Check out these expert-recommended solutions
by Loredana Harsana
Loredana is a passionate writer with a keen interest in PC software and technology. She started off writing about mobile phones back when Samsung Galaxy S II was… read more
Updated on
- Many users have expressed dissatisfaction with Windows 11 Spotlight not working as expected.
- The common reasons to experience issues with Spotlight are corrupt images and system files.
- You will be stuck on the same image if you don’t have an Internet connection.
XINSTALL BY CLICKING THE DOWNLOAD
FILE
Windows Spotlight is a terrific lock screen tool that downloads and installs a new picture for Windows 11 PCs in seconds, but many reported that it’s not working.
Though this feature is usually flawless, the images in Windows Spotlight can sometimes become frozen. And, fixing it is not as complicated as it appears.
However, before we delve into the actual solutions, let’s first understand what causes the error, an important aspect when troubleshooting.
Does Windows 11 have Windows Spotlight?
Yes, Windows Spotlight is a built-in feature in the recent iterations of the OS and is available on Windows 11. The feature automatically downloads and displays images of landscapes, historic locations, and similar kinds on the lock screen.
You can use it to brighten up the lock screen while you take in the breathtaking sights of the world’s most beautiful and distinctive locations.
On top of that, you can mark whether you like a particular image or not. Then, depending on your preferences, Windows Spotlight will show you more or fewer images of that kind.
Why is Windows Spotlight not working in Windows 11?
The fact is that seeing the same picture every time the screen is locked might become monotonous after some time. In addition, depending on how severe the problem with Windows 11 Spotlight is, you may not be able to see any images on the locked screen at all.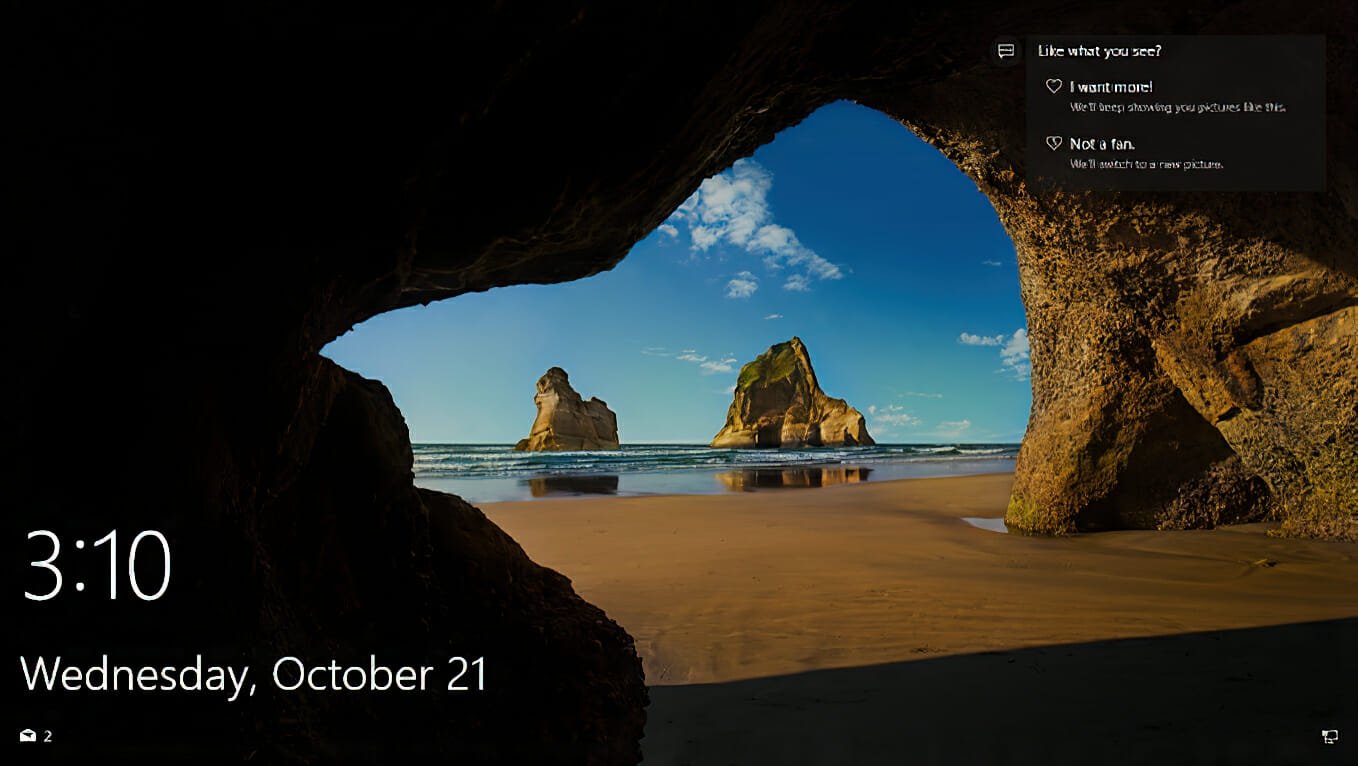
Common reasons for experiencing troubles with Spotlight include a bad Internet connection, faulty image or system files, driver problems, or an outdated Windows update (amongst other things).
The photos displayed on the Windows 11 lock screen or login screen while using the Spotlight function are typically obtained from Bing daily. Therefore, your screen will remain frozen on that exact image unless there is an active Internet connection.
How we test, review and rate?
We have worked for the past 6 months on building a new review system on how we produce content. Using it, we have subsequently redone most of our articles to provide actual hands-on expertise on the guides we made.
For more details you can read how we test, review, and rate at WindowsReport.
Windows Spotlight and other critical processes must be activated to run in the background of the Windows 11 computer for it to function correctly. This includes Microsoft Store, Microsoft Edge, and the Settings apps.
If essential programs are not running, it is possible that Windows Spotlight images will not be working in Windows 11.
Microsoft’s servers must be able to access your location from the regional language settings to provide you with tailored background images.
If the regional language settings on your Windows 11 computer are incorrect, Spotlight will be unable to download the proper background photographs for the lock screen.
How do I fix Windows Spotlight if it’s not working on Windows 11?
1. Check your network connection
The photos displayed on the Windows 11 lock screen or login screen while using the Spotlight function are typically obtained from Bing daily.
Your screen will remain frozen on that exact image without an active Internet connection.
Check to see if Spotlight has begun altering the photos on the lock screen once you are sure the Internet connection is fast and steady.
If the problem continues after this, you should attempt a different solution.
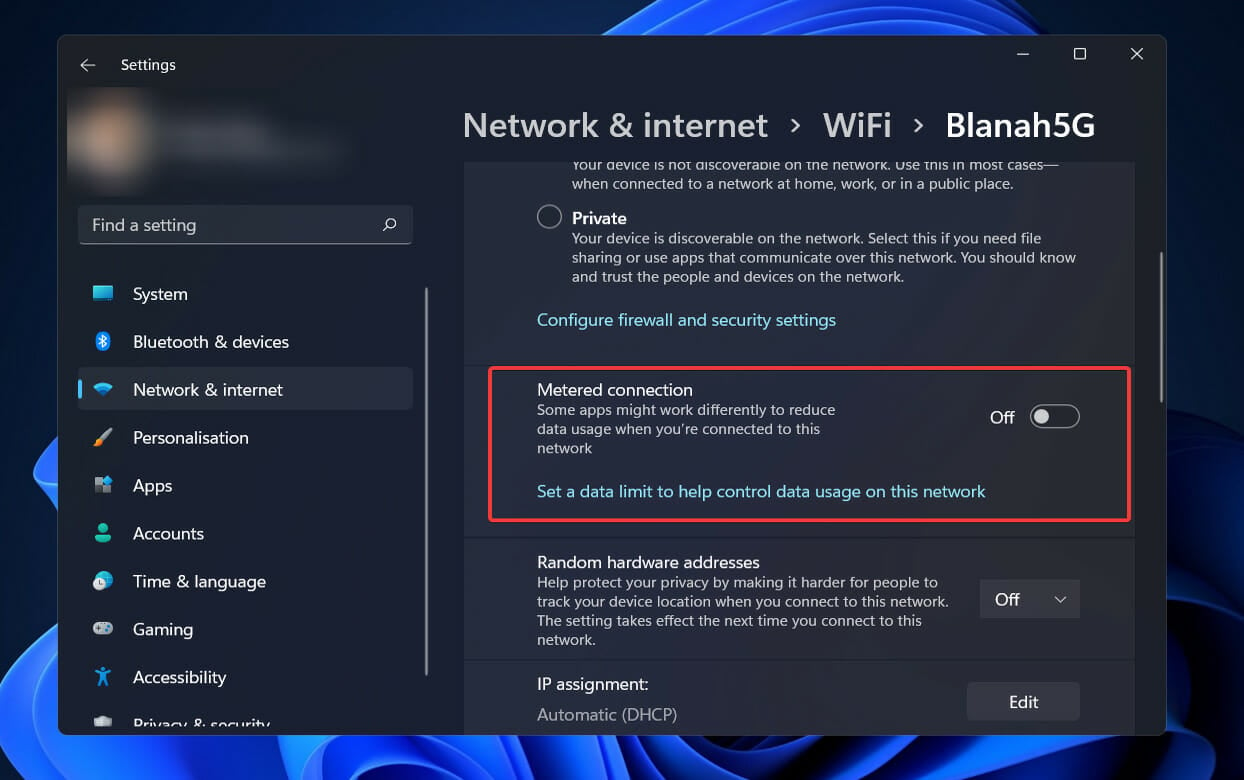
2. Make sure the metered connection is off
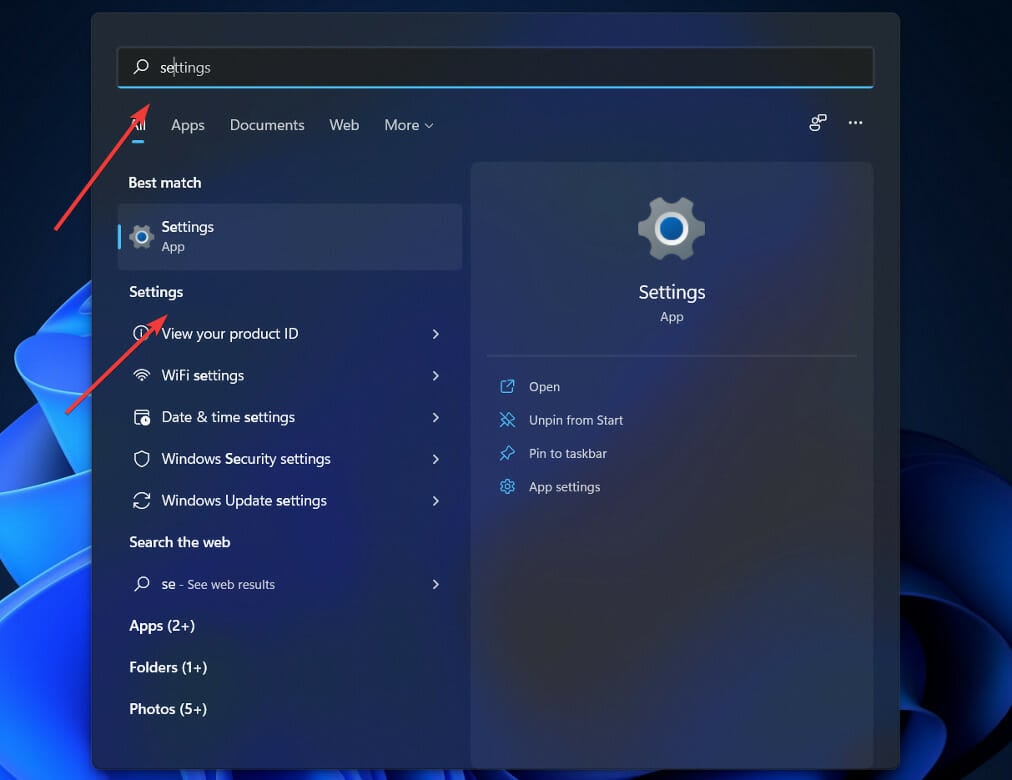
- Click on the Search button, type in Settings, and click on the most relevant result.

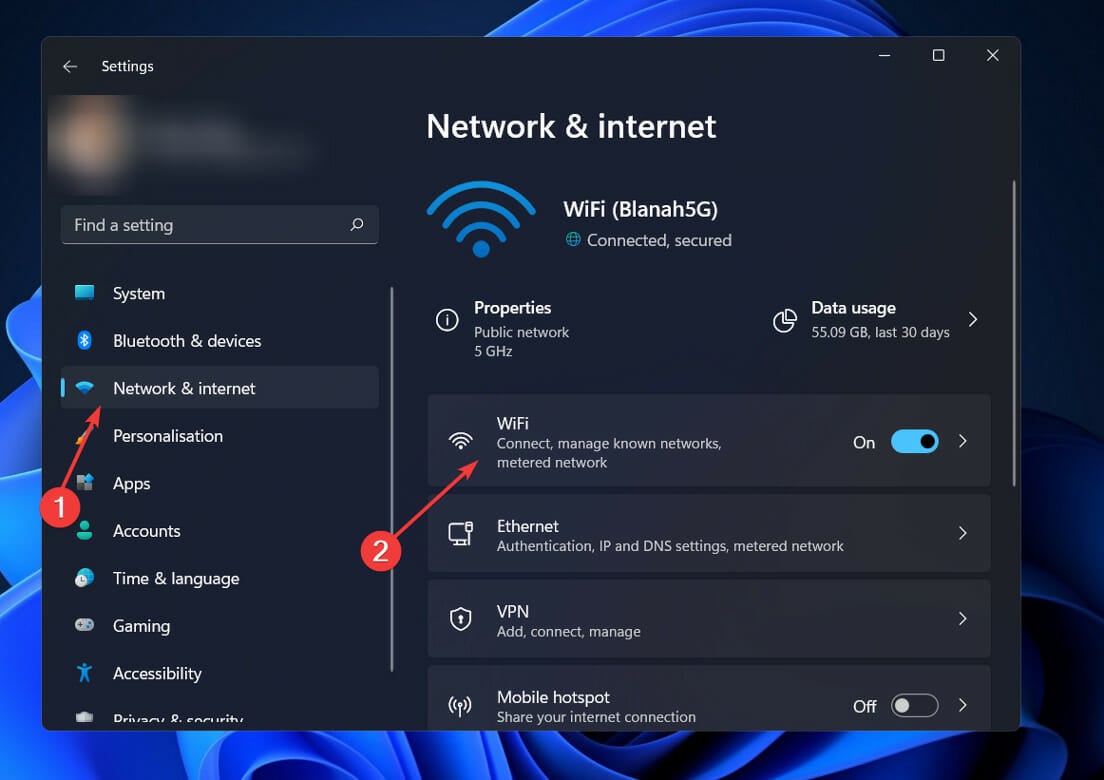
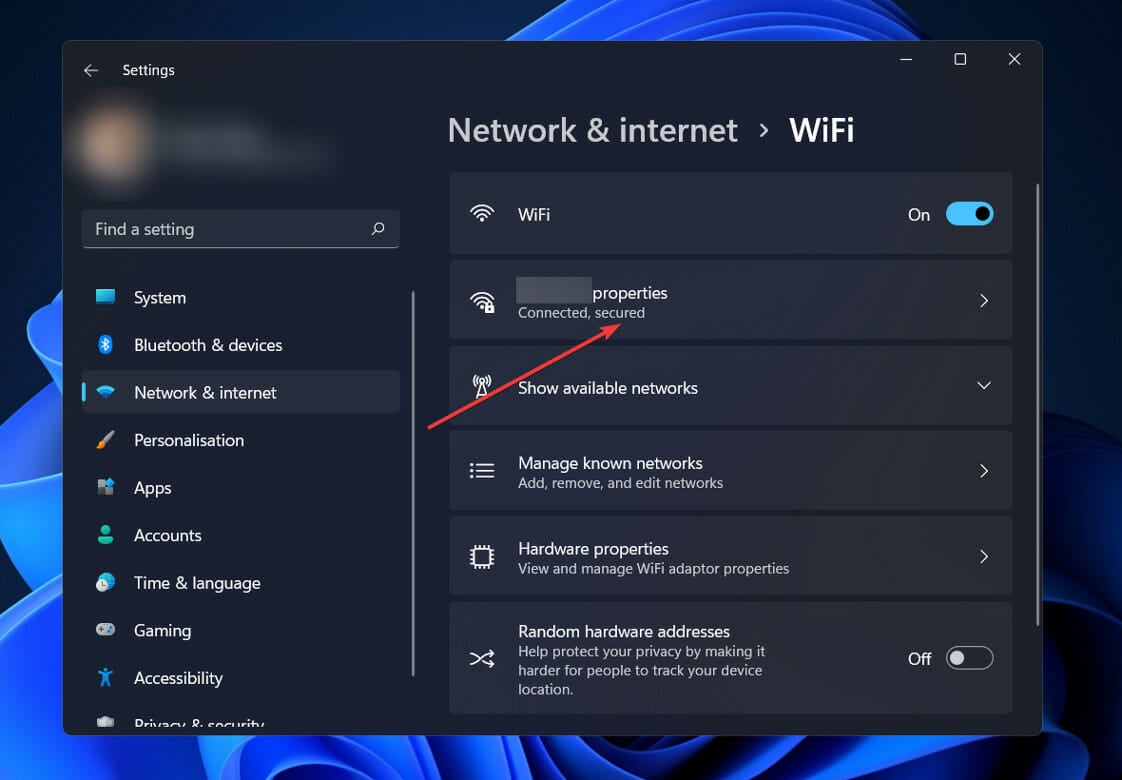
- Now, go to Network & internet, then click on WiFi.

- Now, click on your Network properties.

- Next, turn off the Metered connection.

3. Make sure the date, time, time zone, and region are correct
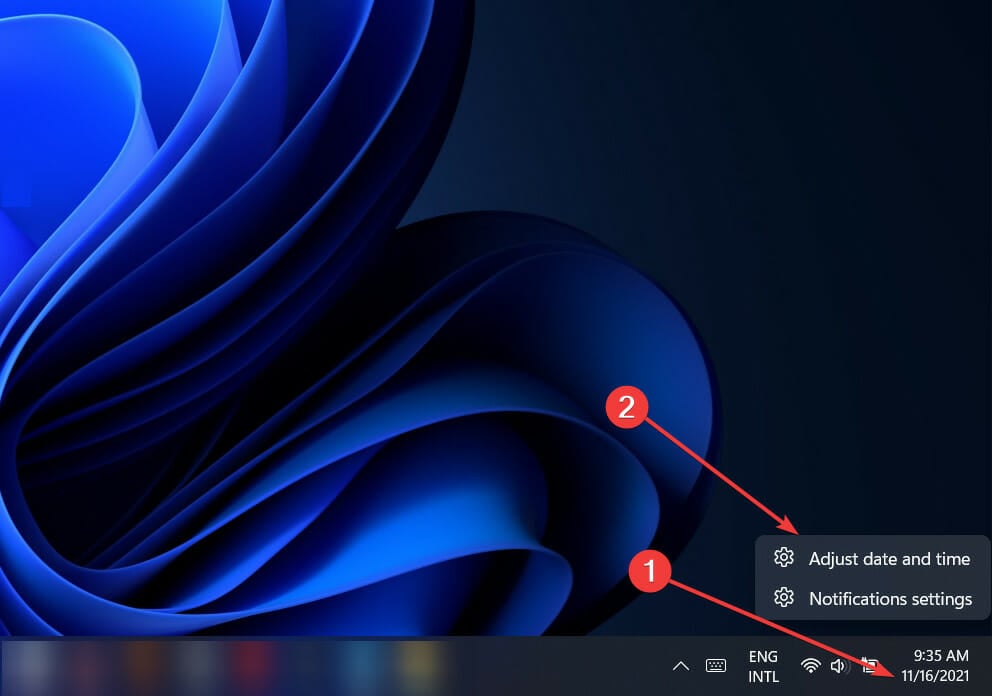
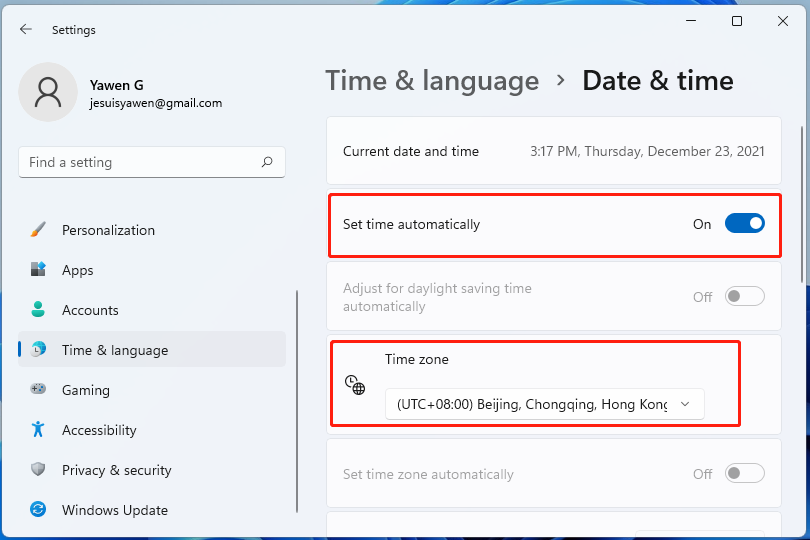
- If your date or time isn’t set correctly, right-click on them in the bottom-right corner, then select Adjust date and time.

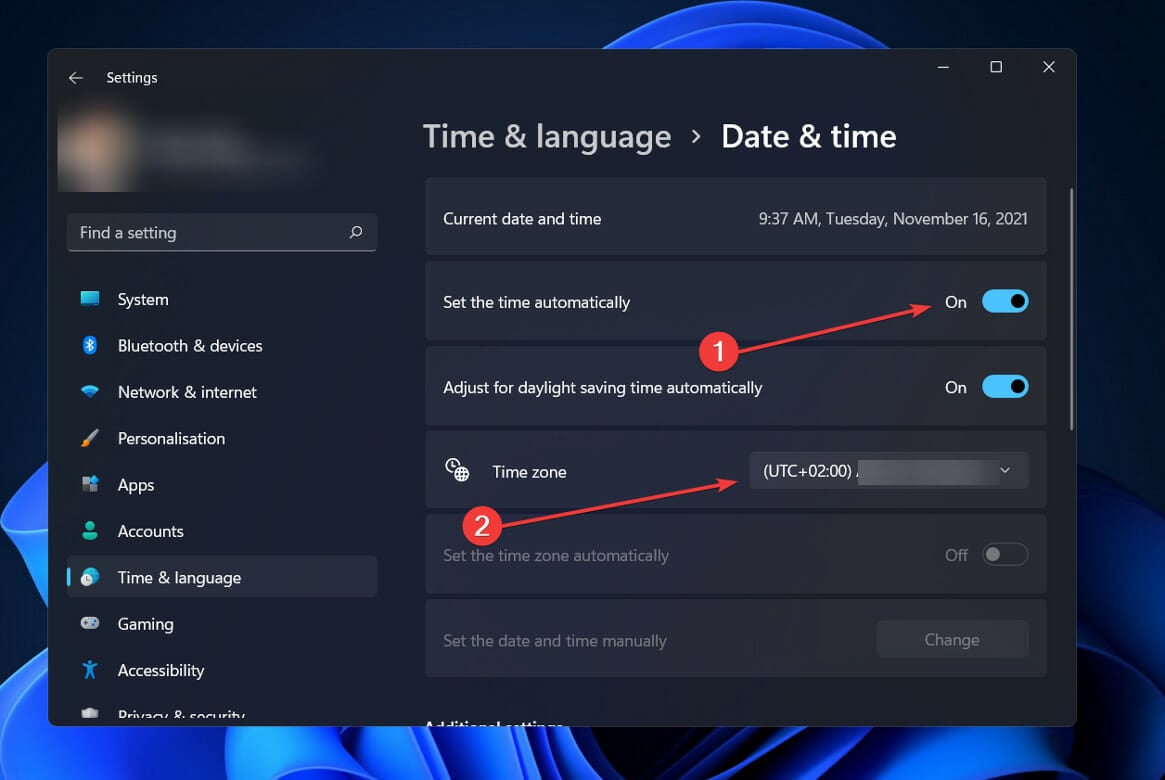
- Make sure the Set the time automatically option is turned on, then select your correct Time zone from the dropdown menu.

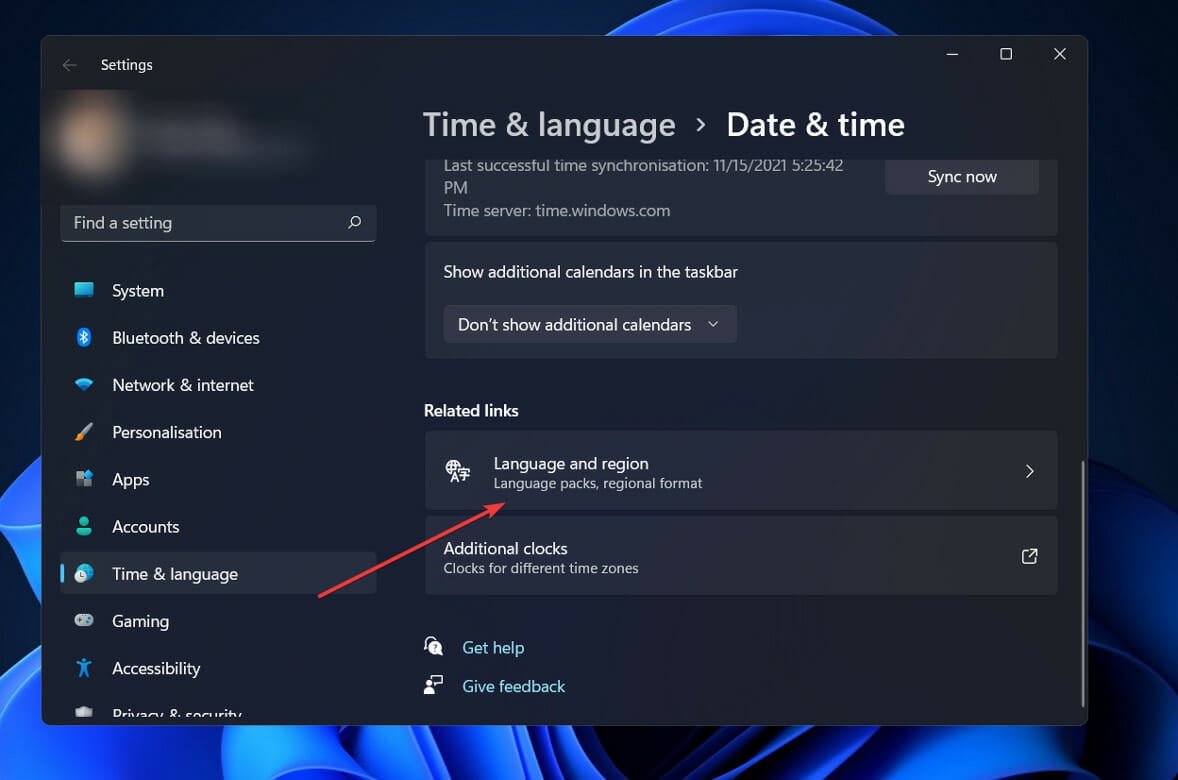
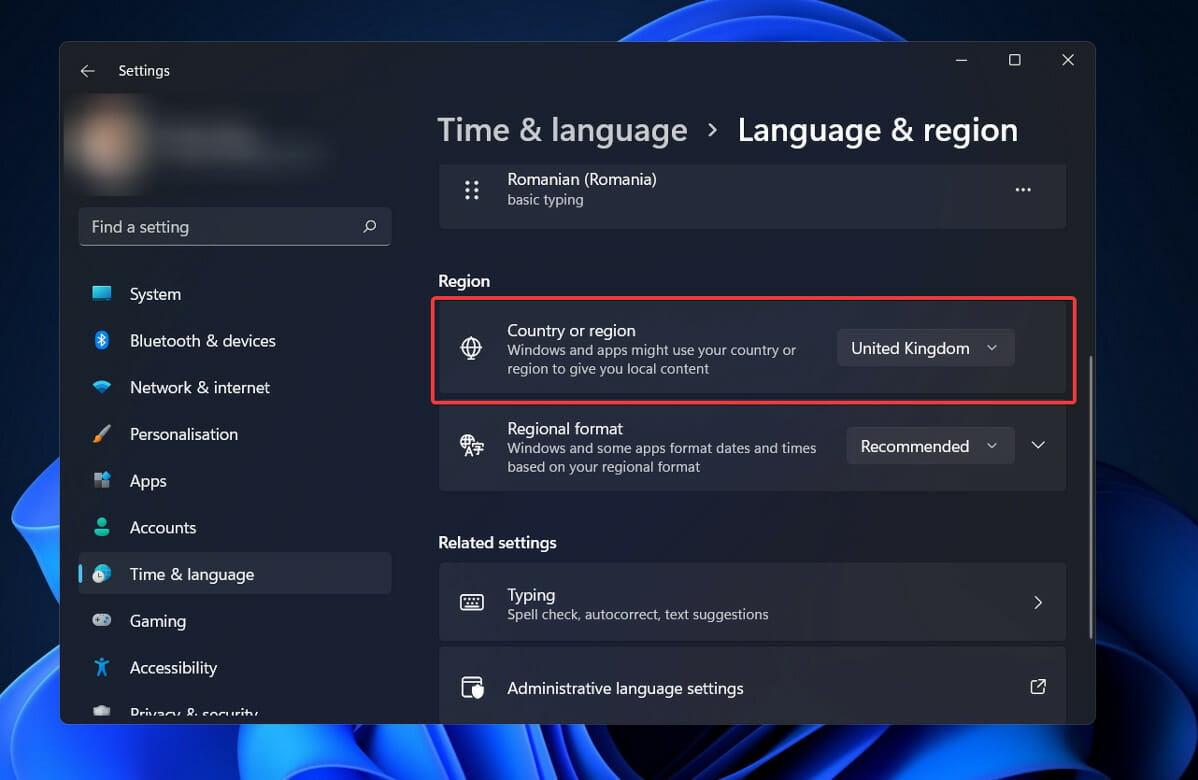
- Next, click on Language & region.

- Under the Region section, check whether the Country or region is set to your current location.

4. Disable and enable Spotlight
- Click on the Search button, type in Settings, and click on the most relevant result.
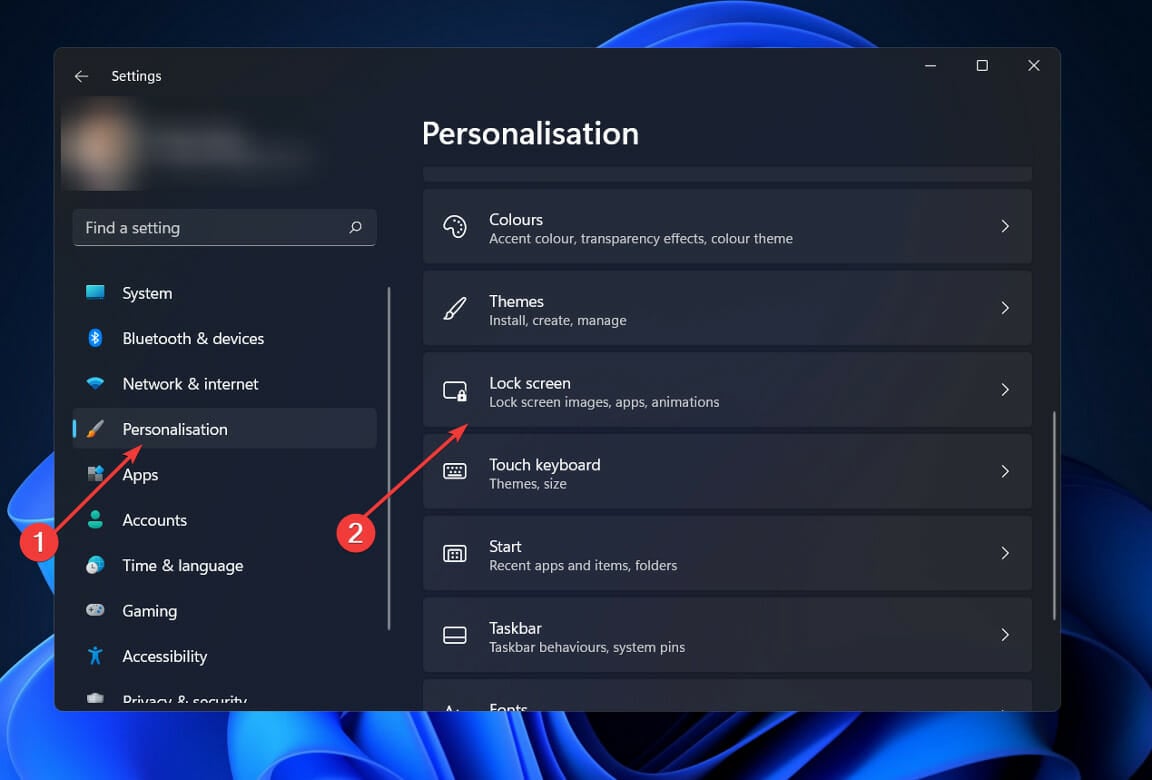
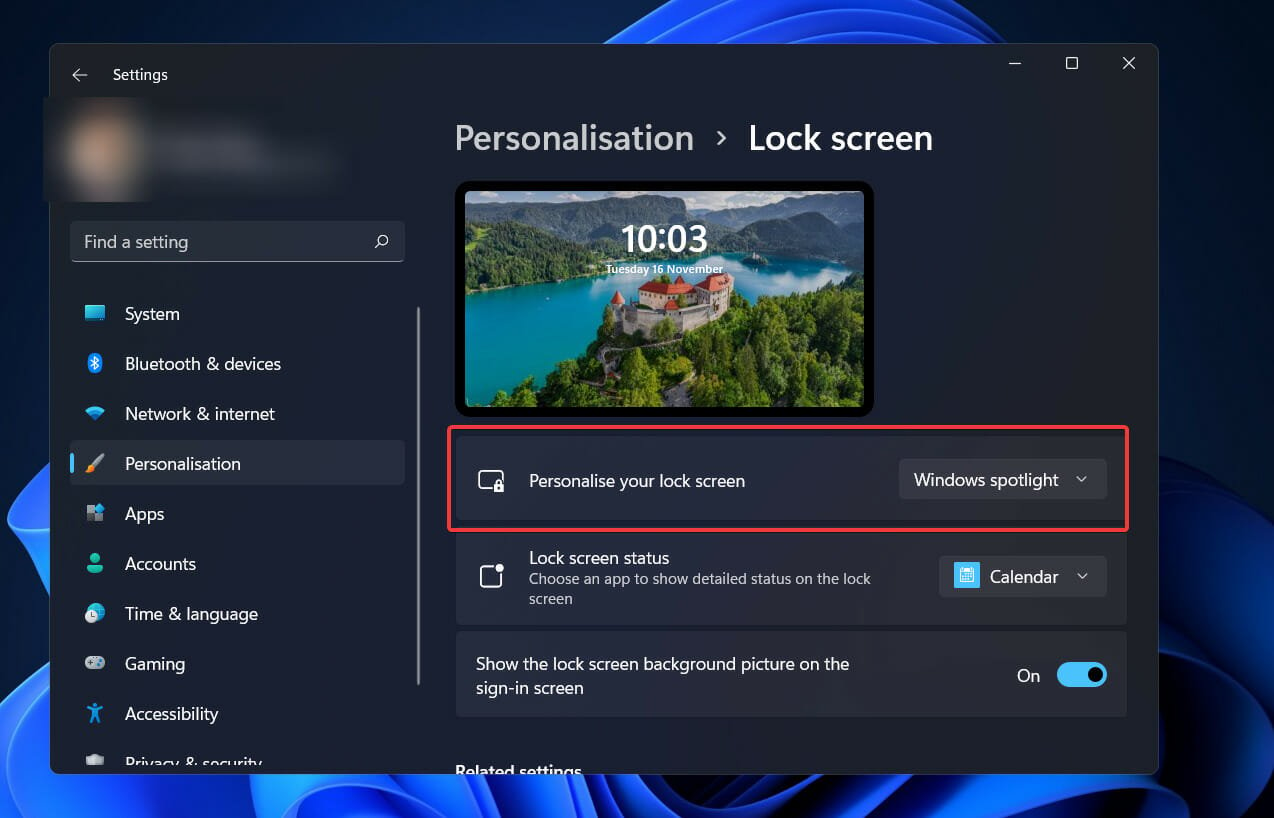
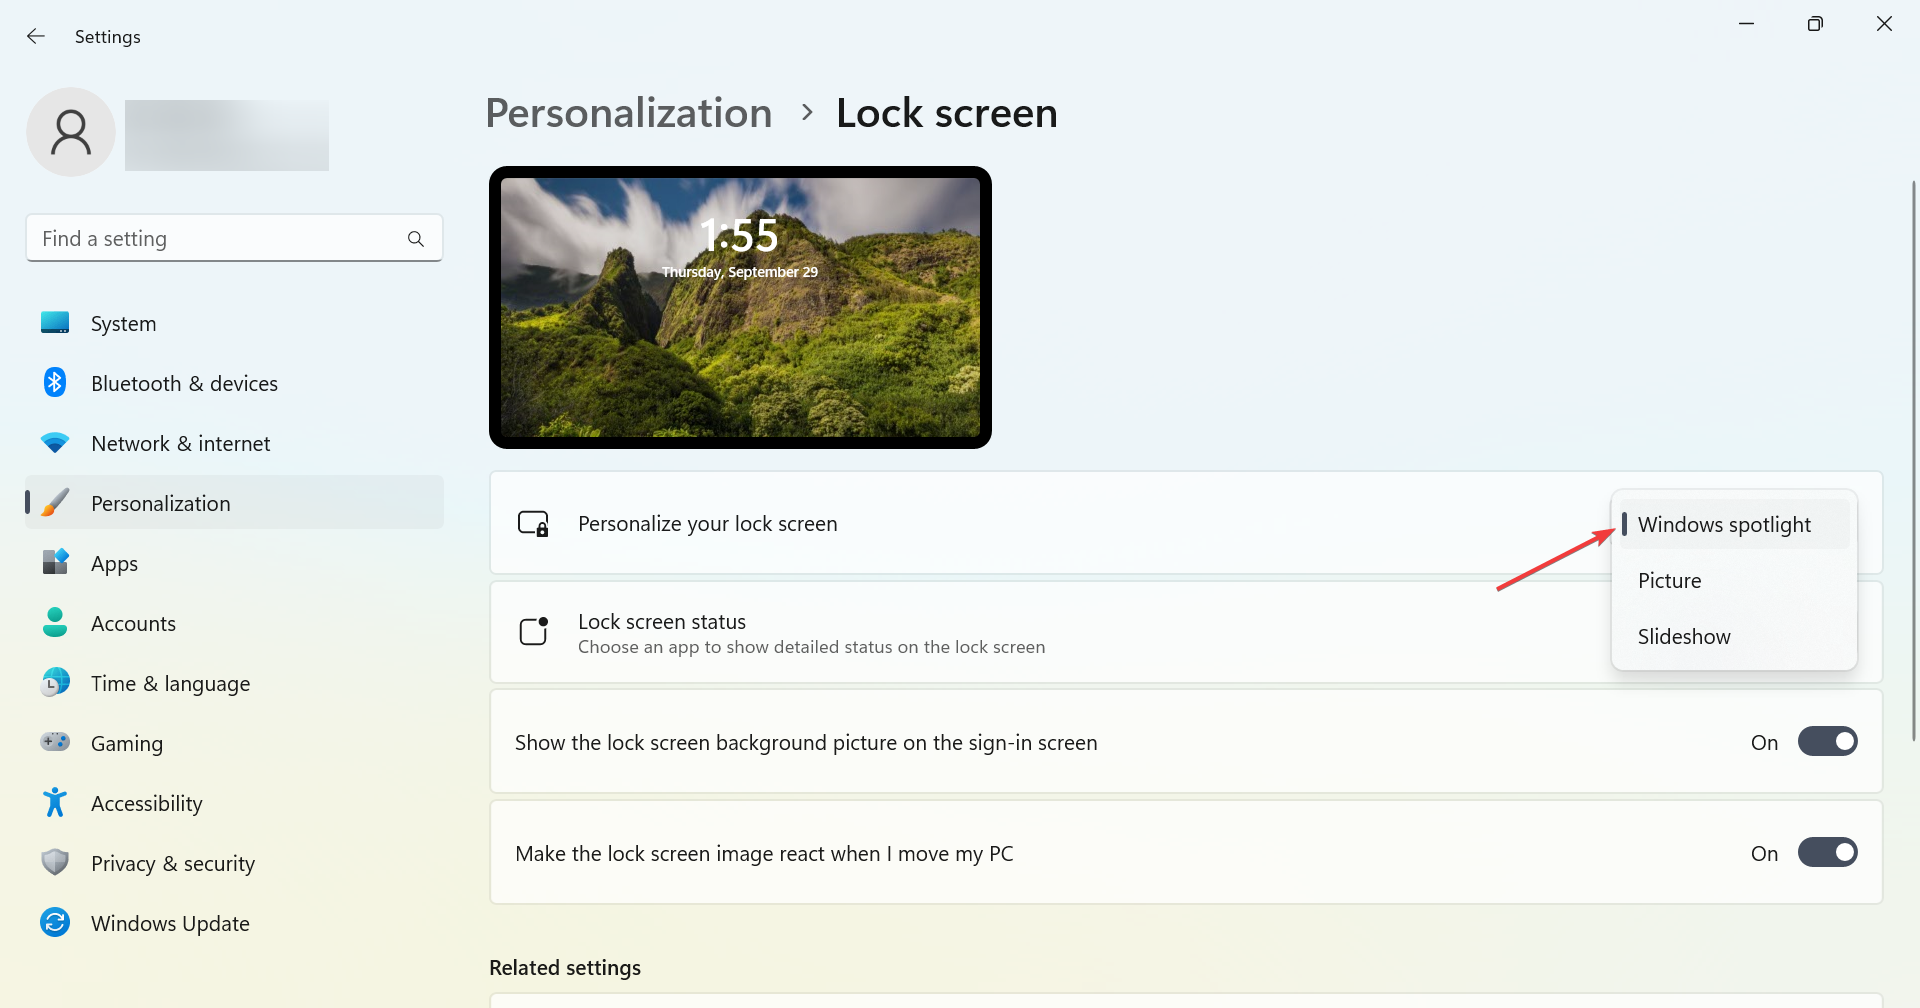
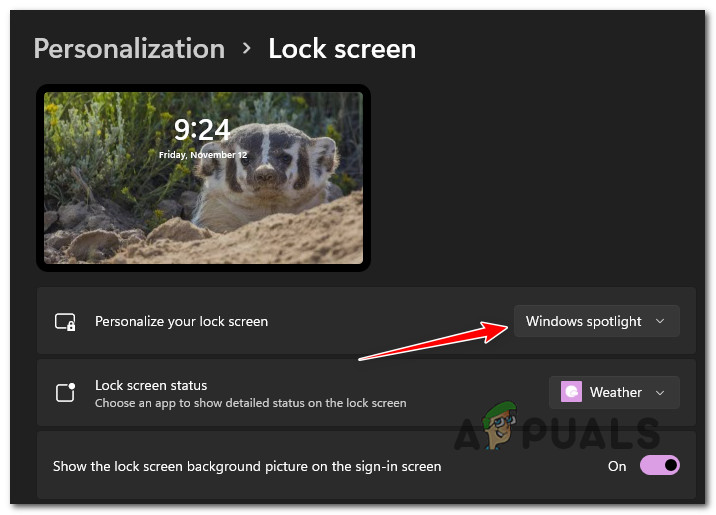
- Select Personalisation from the left panel, and then click on the Lock screen on the right.

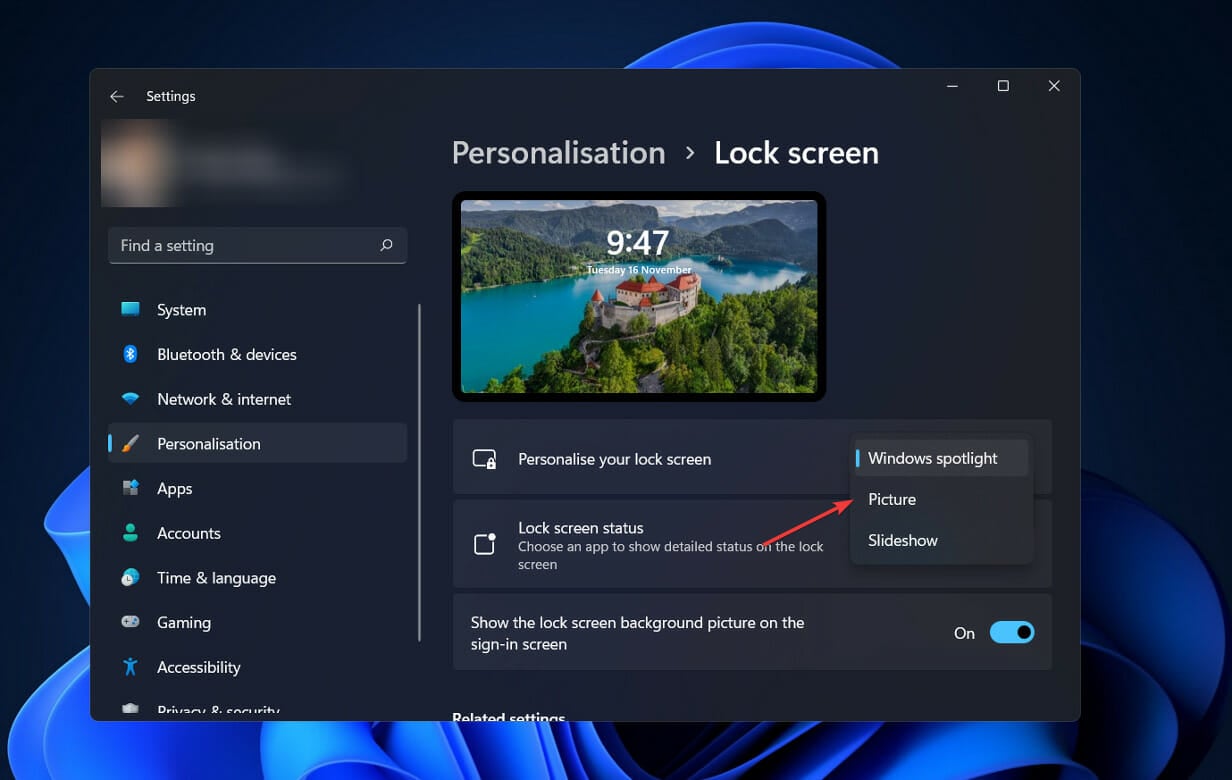
- Next, choose Picture from the Personalize your lock screen menu.

- Once done, again click on the menu, and this time, select Windows spotlight.

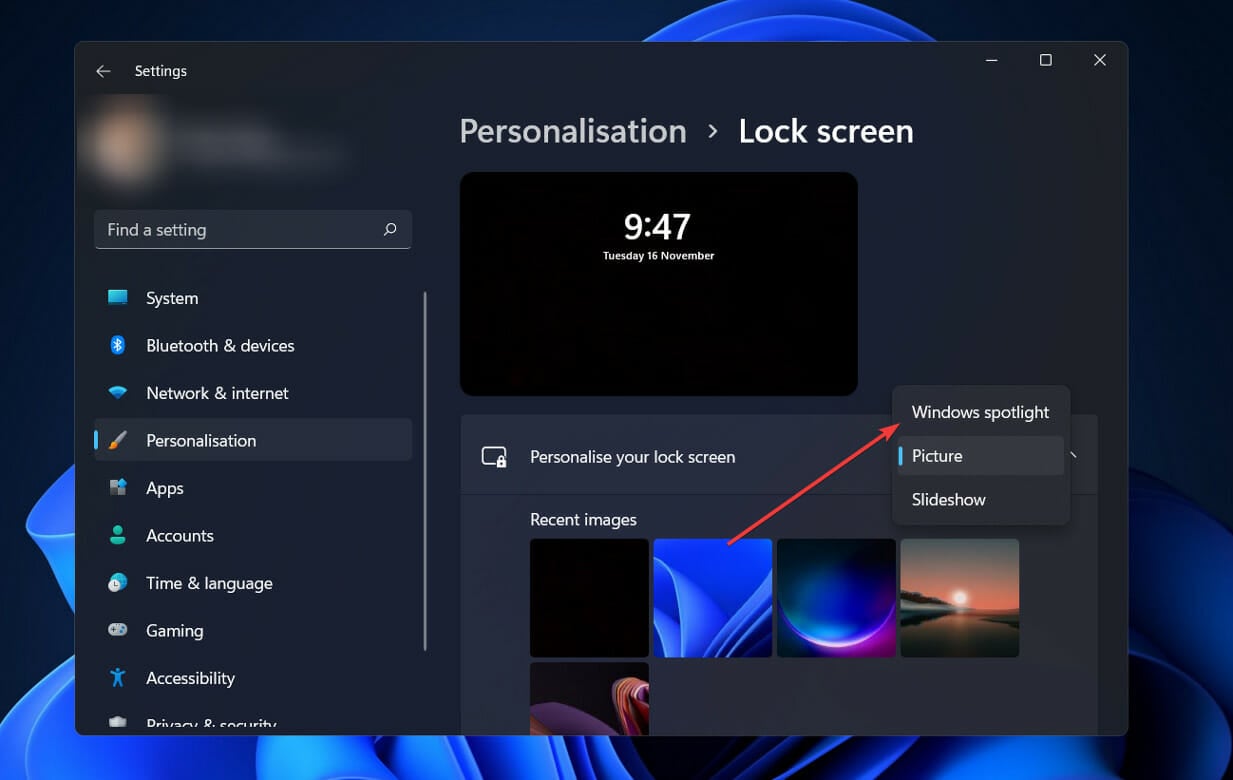
If Windows Spotlight is not working and there’s a blue screen instead, re-enabling the feature should do the trick.
5. Re-register Spotlight using PowerShell
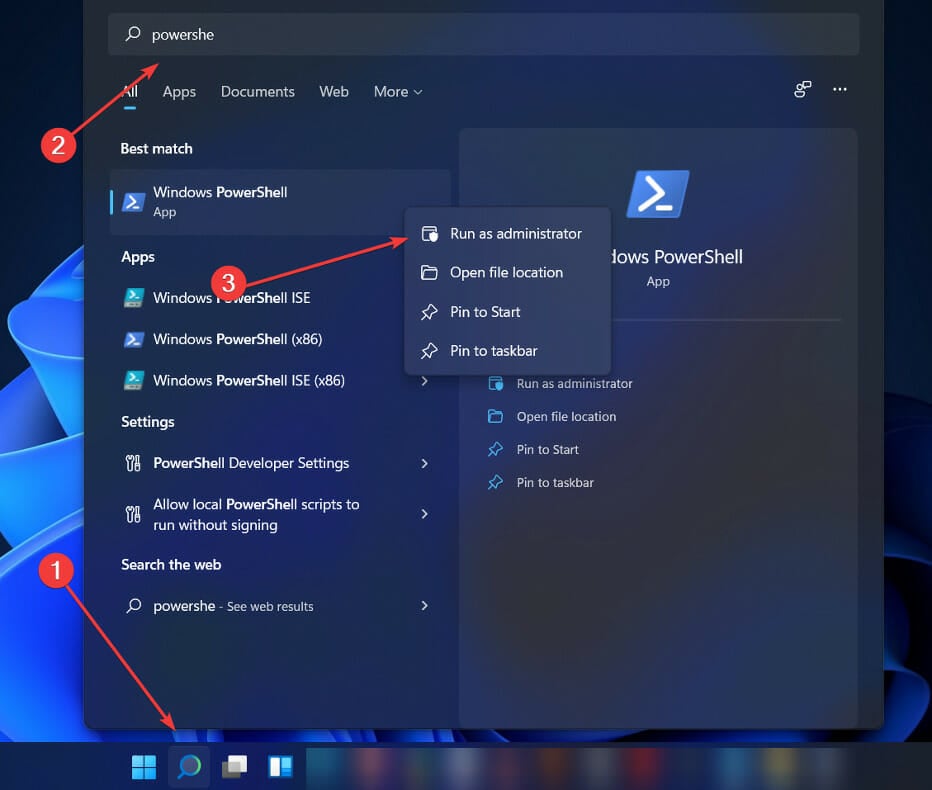
- Click the Search icon, type powershell, right-click on the relevant result, and select Run as administrator.

- Click Yes in the UAC prompt that appears.
- Type or paste in the following command, then press Enter:
Get-AppxPackage -Name Microsoft.Windows.ContentDeliveryManager | Foreach {Add-AppxPackage -DisableDevelopmentMode -Register "$($_.InstallLocation)\AppXManifest.xml" -Verbose}

Once you have finished the steps outlined above, you must restart your computer to complete the process. And it should fix things if Windows 11 lock screen wallpaper is not changing.
How do I turn off Windows Spotlight?
If you want to restrict the use of Windows Spotlight, you can do so in four different ways:
- Manually turn off Windows Spotlight locally
- Turn the feature off using Registry
- Disable Windows Spotlight features using Group Policy
- Deactivate it using Intune

The first two approaches outlined above are labor-intensive and need you to work on a local computer at your leisure. Therefore, it is not recommended to have many PCs in your setup.
To disable Windows Spotlight on business-managed devices, you must use either group policy or Intune (MEM) to accomplish your goal.
Windows Spotlight is activated by default on devices running the Windows 11 operating system. On the other hand, it may be turned off manually on each computer. However, the manual way may be inconvenient if you have many machines.
Using the Mobile Device Management (MDM) policy, enterprise administrators can block users from accessing the Windows Spotlight background when using their handsets.
How do I reset Windows Spotlight on Windows 11?
- Press Windows + I to open Settings, select Personalization from the navigation pane, and click on the Lock screen on the right.

- Now, choose Picture from the Personalize your lock screen menu.
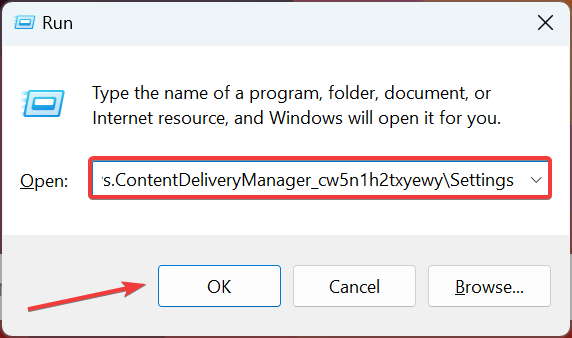
- Next, press Windows + R to open Run, paste the following path in the text field, and click OK:
%LocalAppData%\Packages\Microsoft.Windows.ContentDeliveryManager_cw5n1h2txyewy\Settings
- Rename the roaming.lock file as roaming.dat.back, and the settings.dat file as settings.dat.back.
- Once done, restart the computer.
- Now, head back to the Lock screen setting and select Windows spotlight from the Personalize your lock screen menu.

This will reset the feature and should fix things in case you see a Windows 11 Spotlight black screen.
Our readers reported issues with the lock screen slideshow as well. If you think you might be experiencing the same problem, find out how to fix Windows 11’s lock screen slideshow.
Although we’ve all had some time to familiarize ourselves with Microsoft’s latest operating system, users are discovering new features daily. The Windows 11 3D parallax effects are one feature, so check them out.
User feedback has shown that the live desktop has also proven to be a prevalent feature. Thus, you might be interested in learning how to set a live wallpaper in Windows 11.
That should be the end of it. As you can see, there are some straightforward and more complex solutions. Try them out in the above sequence to find which works best for you.
Leave a comment below to tell us about your experience, including which strategy you applied and which Windows 11 feature you found the most useful.
![]()
Some Windows 11 have suddenly discovered that Windows Spotlight no longer changes the images, and fun facts no longer appear at all on the login screen. Some affected users have reported that they previously had the issue on Windows 10 and thought upgrading to Windows 11 would solve the problem, but it didn’t.
We’ve investigated this issue thoroughly, and we’ve figured out that there are several different resolutions available to you if you’re currently dealing with this issue.
But first, let’s take a look at all the potential causes that might be responsible for causing this Spotlight issue on Windows 11:
- Common Spotlight Inconsistency – Before advancing to more focused troubleshooting guides capable of fixing this Spotlight issue, you should start by running the System Maintenance Troubleshooter to see if your Windows installation is capable of resolving this issue automatically.
- Corrupted Spotlight Cache – One of the most common causes that will end up breaking Spotlight on Windows 11 is a corrupted cache folder. If you find yourself in this scenario, you should first clear both cache folders that Spotlight uses, then register the app once again to prevent any temp file from causing this issue.
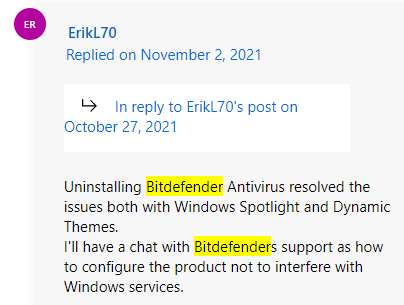
- 3rd-party antivirus interference – While Windows Security is not known to interfere with the functionality of Spotlight, some 3rd party security suites are. For example, BitDefender is often blamed for this issue. Unfortunately, there is no way of fixing this conflict other than uninstalling the problematic security suite.
- The dynamic theme is disabled – Depending on your current Spotlight configuration, you can expect to deal with this issue if you don’t have the active theme installed and enabled on your PC. After allowing the dynamic theme, you should see how Spotlight starts working once again.
- Inconsistent asset folder – The weak spot of Spotlight has always been the asset folder, and this is also true on Windows 11. If you’re into customizing your Spotlight to the brim, you run the risk of breaking the asset folder. To fix it, you need to navigate to the location of the asset folder manually and clear its contents before restarting Spotlight.
- Required Background apps are disabled – Keep in mind that Spotlight has some app dependencies that need to be enabled to allow Spotlight to function correctly. If you haven’t already, take the time to ensure that Microsoft Edge, Microsoft Store, and the Settings app are all enabled as background apps.
- System file corruption – Under certain circumstances, you can expect to see this particular issue due to some kind of system corruption that either affects the Spotlight component directly or some associated dependencies. To resolve this issue, you should take the time to deploy DISM and SFC in quick succession.
Now that you are aware of every potential scenario that might break Spotlight’s functionality start following the methods below to troubleshoot the issue at hand.
Running the System Maintenance Troubleshooter
Before you move on to more specific troubleshooting guides, you should start by checking if your current Windows 11 installation is not capable of fixing the issue automatically.
Windows 11 (as well as Windows 10) comes equipped with the System Maintenance Troubleshooter – this is a utility that allows you to 1-click apply a series of automated fixes related to common issues affecting the desktop, icons, the login screen, and other display-related inconsistencies.
In case you haven’t tried fixing this issue by running the System Maintenance Troubleshooter yet, follow the instructions below to run this tool and apply the recommended fix:
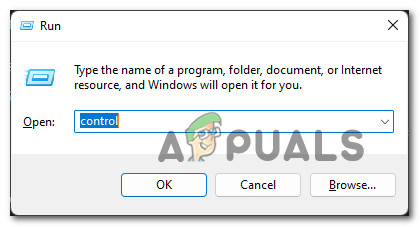
- Press Windows key + R to open up a Run dialog box. Next, type ‘control’ inside the text box and press Enter to open the classic Control Panel interface.

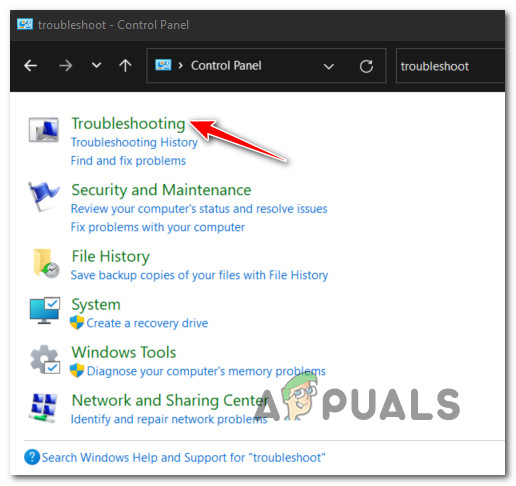
Open up the classic Control Panel menu. - Once you’re inside the classic Control panel menu, use the search function at the top to search for ‘troubleshoot’ and press Enter.
- From the list of results, click on Troubleshooting.

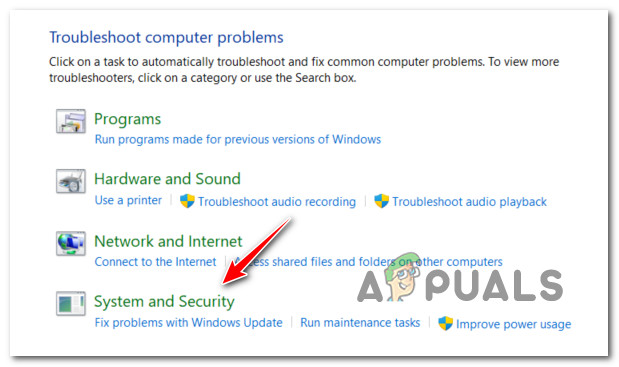
Opening up the Troubleshooting tab - Next, from the dedicated Troubleshooting menu, click on System and Security.

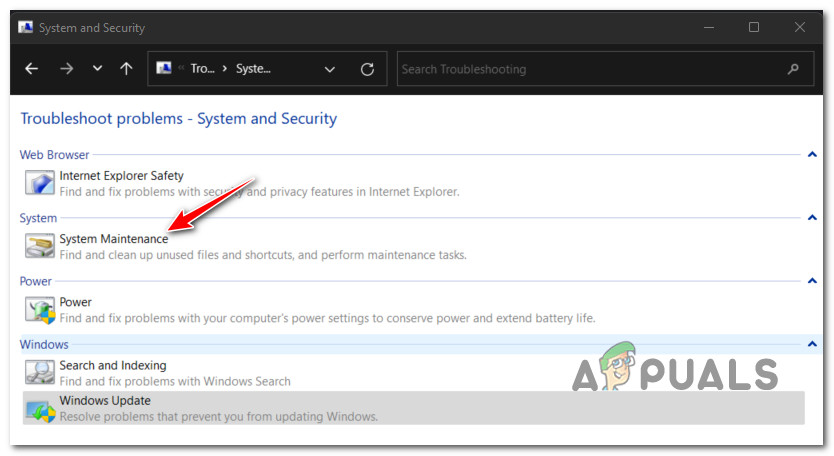
Open up the System and Security tab. - From the dedicated System and Security menu, click on System Maintenance (under System).

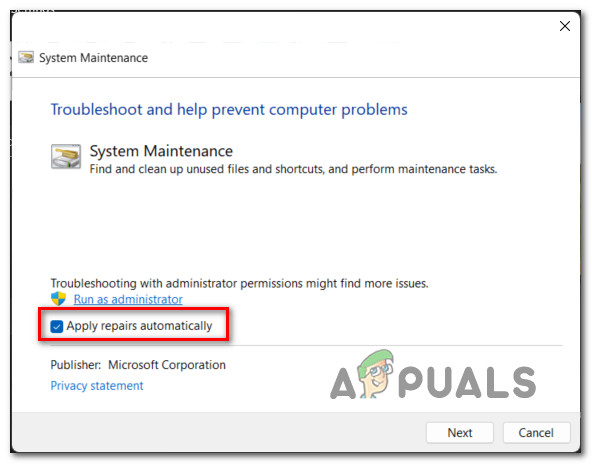
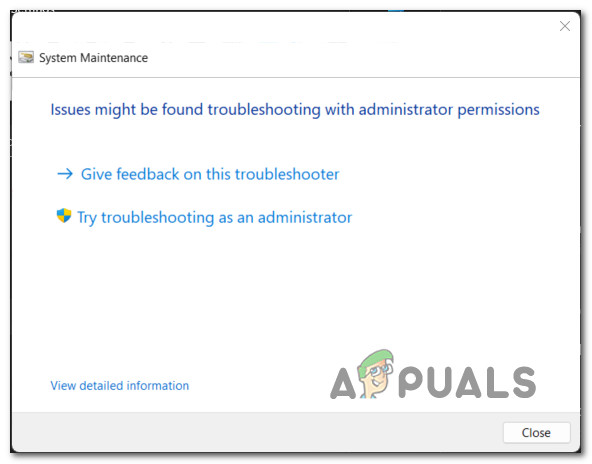
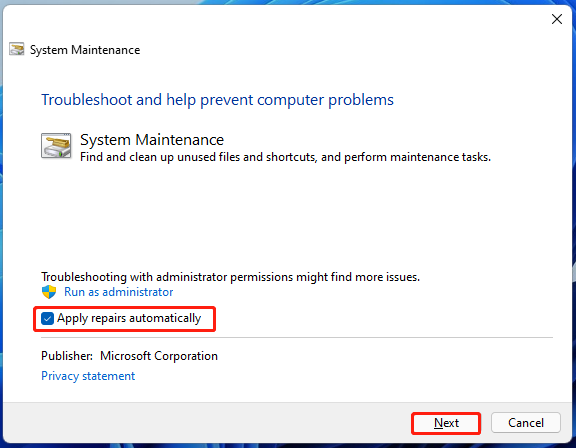
Open up the System Maintenance troubleshooter. - Once you’re at the first screen of the System Maintenance tab, click on the Advanced hyperlink first, then check the box associated with Apply repairs automatically.

Apply the repairs automatically. - Hit Next, then follow the remaining prompts to run the troubleshooter and apply the recommended fix automatically.
Troubleshooting with admin access Note: If you get asked to troubleshoot as an administrator, do so by clicking on Try troubleshooting as an administrator.
- Depending on the fix that gets recommended, you might get asked to perform a series of manual steps.
Once you have successfully run the System Maintenance troubleshooter and applied the recommended fix, reboot your PC and check if Spotlight has started working.
If the same kind of issue is still occurring, move down to the next potential fix below.
Clean the Cache and Reinstall
Suppose the automated fix above was not effective in your case. In that case, the next thing that you should do is troubleshoot against a potential issue brought about by corrupted data stored in one of the two Spotlight cache folders.
Other users dealing with the problem have confirmed that they fixed the issue by deleting both cache folders and registering the main Spotlight app (using a series of elevated CMD and Powershell commands).
Follow the instructions below for specific steps of cleaning the Spotlight cache and reinstalling the main app:
Note: In the name of simplifying things, we will use the new Windows terminal as the platform for inputting the required commands. This action will allow us to run both CMD and Powershell commands without the need to open two separate windows.
- Press Windows key + R to open up a Run dialog box. Next, type ‘wt’ inside the text box and press Ctrl + Shift + Enter to open up a Windows Terminal interface with admin access.
Open up the Windows Terminal interface. - When the User Account window prompts you, click Yes to grant admin access.
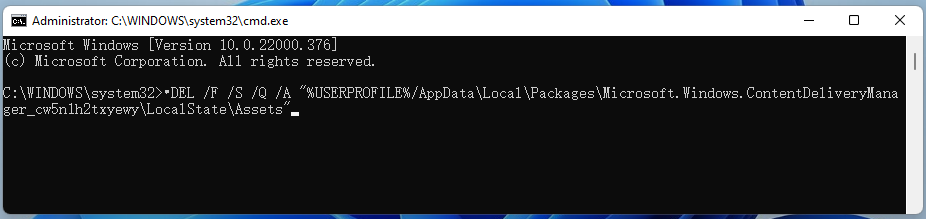
- Once you’re inside the elevated Windows Terminal app, start by running both of these CMD commands in quick succession (press Enter after each command) to clear both of the problematic SpotLight cache folders:
DEL /F /S /Q /A "%USERPROFILE%/AppData\Local\Packages\Microsoft.Windows.ContentDeliveryManager_cw5n1h2txyewy\LocalState\Assets"
DEL /F /S /Q /A "%USERPROFILE%/AppData\Local\Packages\Microsoft.Windows.ContentDeliveryManager_cw5n1h2txyewy\Settings"
- After you run both of these commands, run the following Powershell command from the same Windows Terminal window to register the Spotlight app once again:
Get-AppxPackage -allusers *ContentDeliveryManager* | foreach {Add-AppxPackage "$($_.InstallLocation)\appxmanifest.xml" -DisableDevelopmentMode -register } - Reboot your PC to allow your operating system to re-create the two deleted cache folders and see if Spotlight starts working again.

If you followed the instructions above and are still dealing with the same issue, move down to the next potential fix below.
Uninstall BitDefender (if applicable)
Remember that BitDefender is often singled out for interfering with some critical Windows service dependencies that Spotlight also uses. Several users who we’re also dealing with have confirmed that the Spotlight issue was only fixed after they uninstalled the Bitdefender suite altogether.
Note: Disabling the real-time protection won’t help as other affected users report it.
Update: If you’re using BitDefender and you suspect that it might be interfering with Spotlight, try updating the 3rd-party AV suite to the latest version available before deciding to uninstall it. Some affected users have raised tickets about this Windows 11 issue, so chances are BitDefender will patch it sooner than later.
If this scenario is applicable, follow the instructions below for specific instructions:
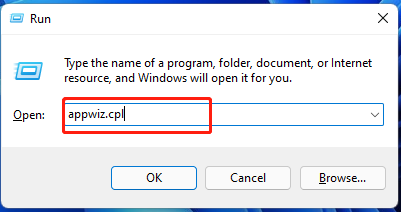
- Press Windows key + R to open up a Run dialog box. Next, type ‘appwiz.cpl’ inside the text box and press Enter to open the Programs and Features menu.
Open up the Programs and Features menu. Note: If the User Account Control prompts you, click Yes to grant admin access.
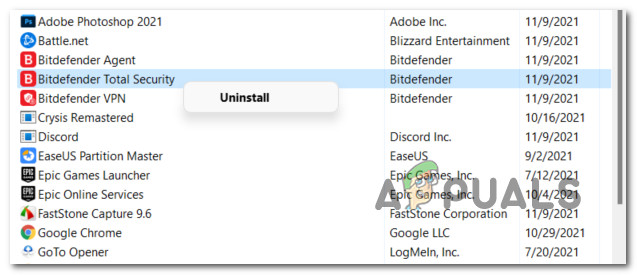
- Once you’re inside the Programs and Features menu, scroll down through the list of applications and locate the BitDefender Total Security listing.
- Right-click on Bitdefender Total Security and choose Uninstall from the context menu.

Uninstall BitDefender - Follow the uninstallation prompts to remove the main BitDefender app from your Windows 11 system.
- Next, proceed to uninstall the remaining supporting AV installations (BitDefender VPN and BitDefender Agent)
- Once the main BitDefender app + all the supporting software is uninstalled, follow this guide to remove any remnant files left behind by your AV.
- Finally, reboot your PC and see if the Spotlight functionality is resumed once the next startup is complete.

If this method was not applicable or didn’t fix the issue, move down to the next potential below.
Clear the Asset folder
Another potential scenario that might leave you stuck with a broken Spotlight component is a corrupted asset folder. This is usually reported when Spotlight is overly customized, or you’ve just upgraded to Windows 11 from an older Windows 11 where Spotlight was configured.
Fortunately, fixing a corrupted asset folder is quite simple. All you need to do is disable Spotlight first, then navigate to the asset folder manually and delete the contents inside (not the folder) before rebooting your PC.
This method has been confirmed to be effective by a lot of affected Windows 11 users.
Follow the instructions below for step by step instructions on clearing the asset folder and fixing the Spotlight functionality on Windows 11:
- First things first, we need to disable Spotlight temporarily. To do this, press Windows key + I to open up the Settings app on Windows 11.
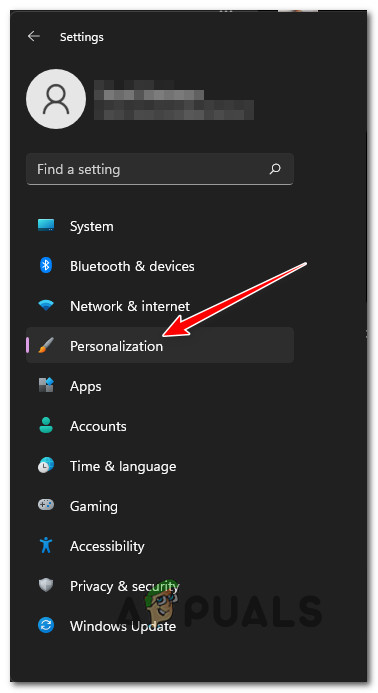
- Next, click on Personalization from the vertical menu on the left.

Accessing the Personalization tab Note: If the vertical menu on the left is not visible by default, click the action icon at the top to make it visible.
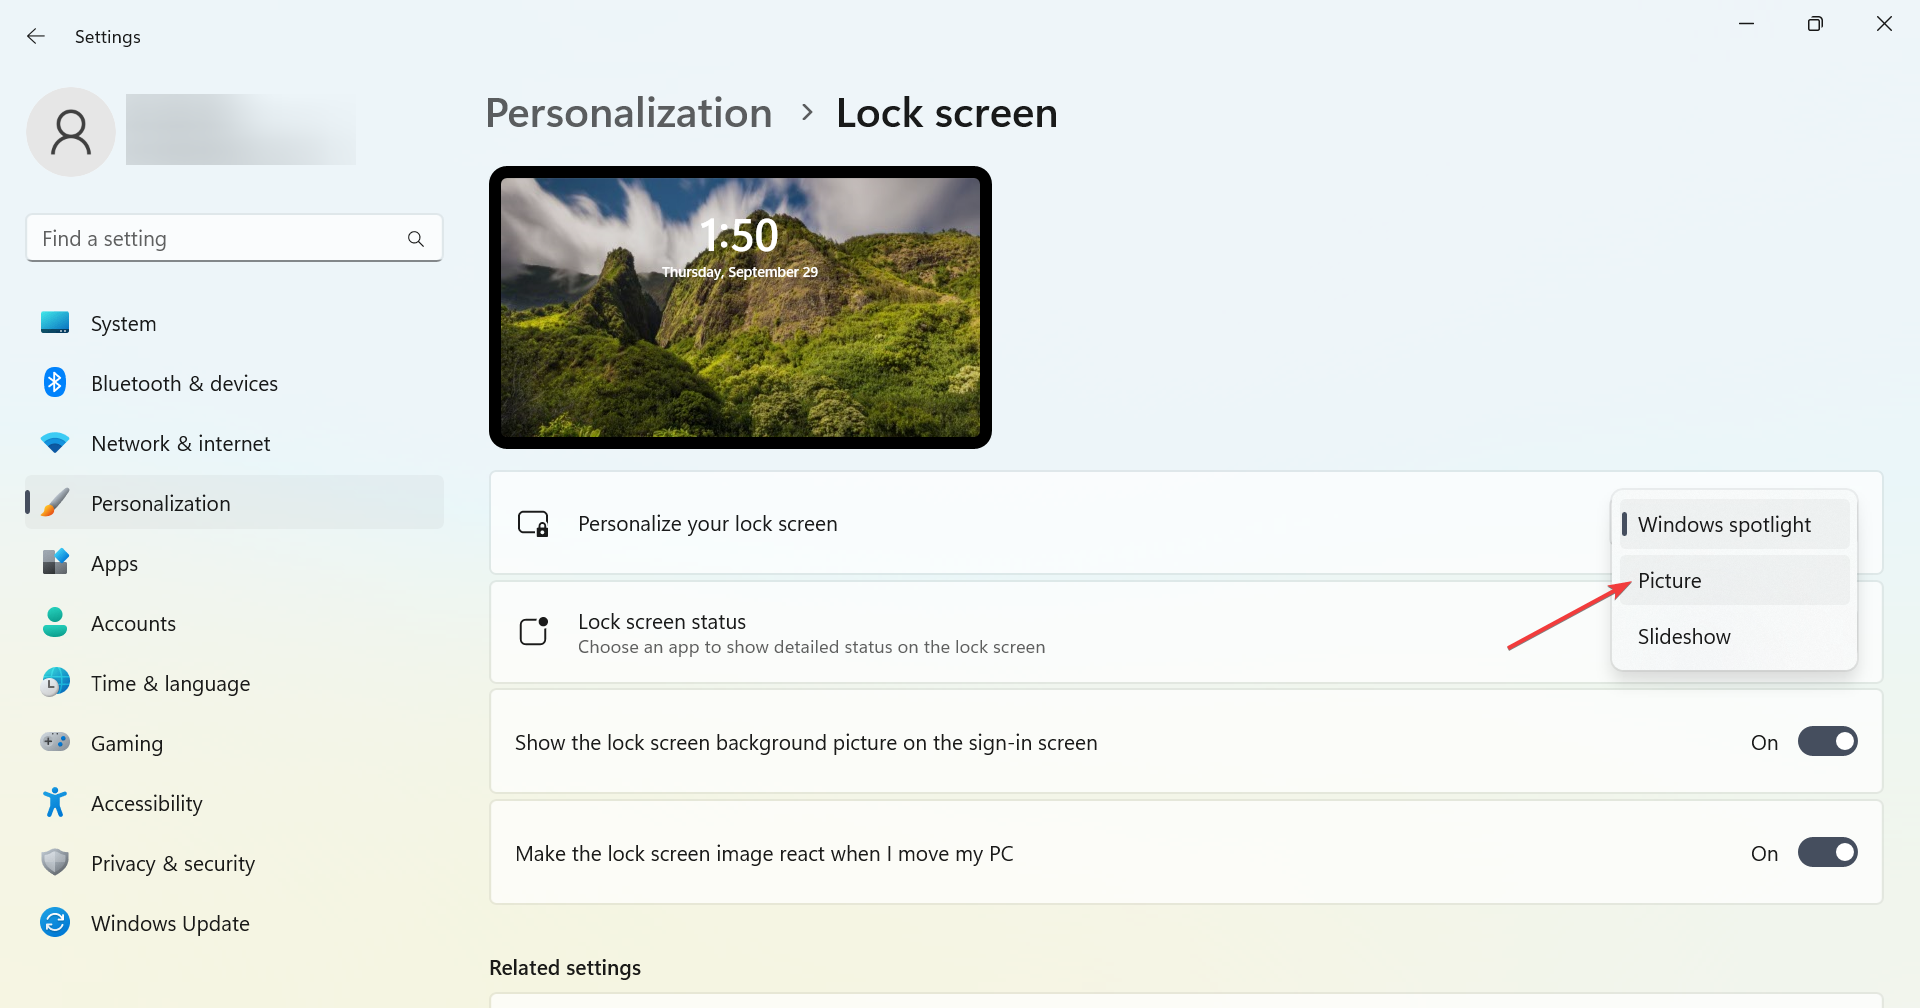
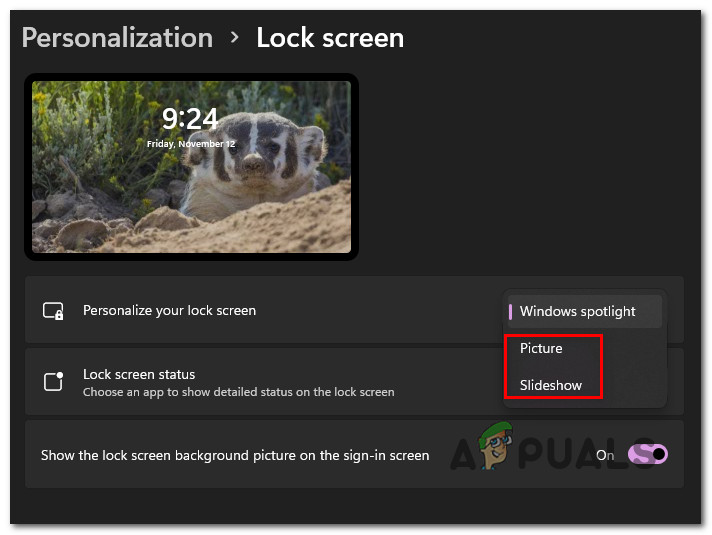
- Once you are inside the Personalization tab, click on Lock Screen from the options at the bottom.
- Inside the Lock Screen tab, change the drop-down menu associated with Personalize your lock screen from Windows Spotlight to either Picture or Slideshow.

Disable Windows Spotlight Note: This will effectively disable the Windows spotlight functionality.
- Once you’ve ensured that Spotlight is disabled, close the Settings screen and open File Explorer.
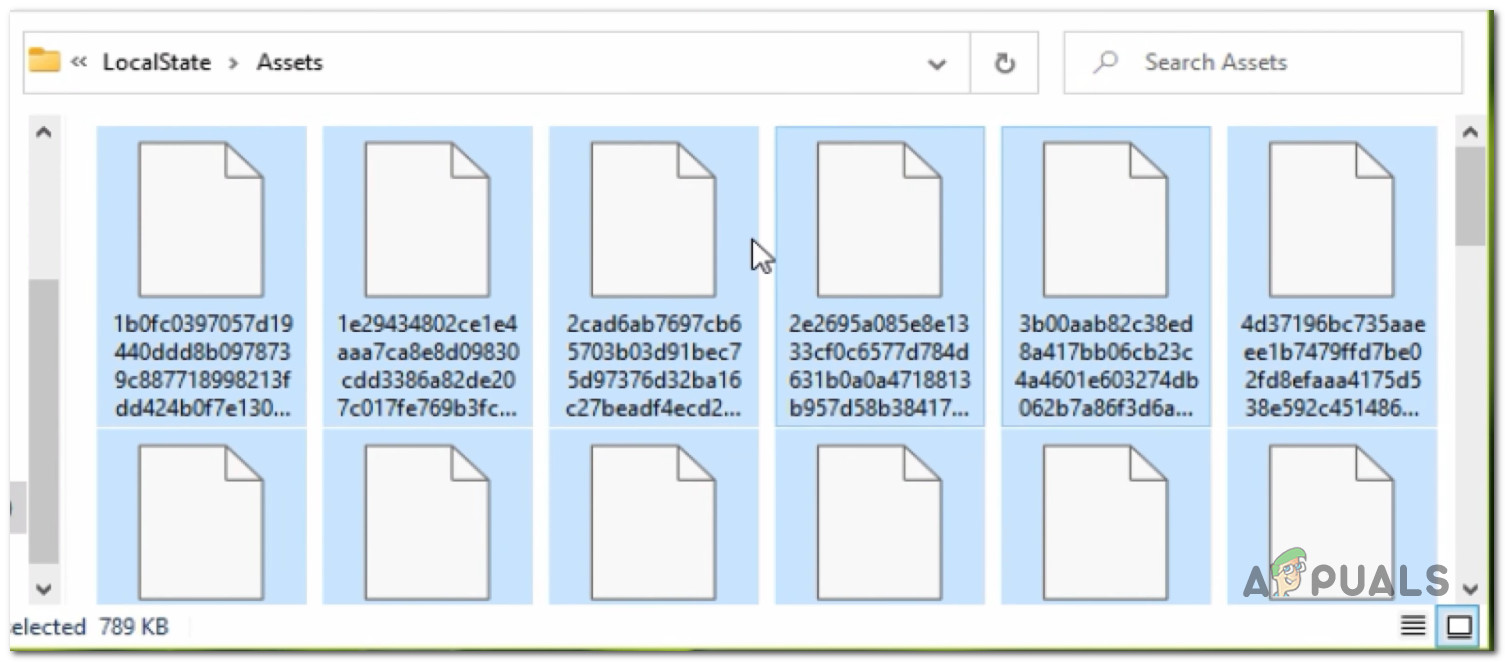
- Using File Explorer, navigate to the following location:
C:\Users\<USERNAME>\AppData\Local\Packages\Microsoft.Windows.ContentDeliveryManager_<Package ID>\LocalState\Assets
Note: If your Windows drive is different than C, replace the letter with the correct one in the path above. Additionally, <USERNAME> is just a placeholder. Replace it with the actual username of your active account.
- Once you arrive inside the correct location, start by clicking on the View tab at the top, then ensure the Hidden Items box is enabled.

Enable ‘Hidden Items’ - After you’ve made sure that the hidden items are visible, click inside the Assets folder, then press Ctrl + A to select everything inside.

Delete the Asset folder - Next, press the Del key or right-click a selected item; once every item is selected, choose Delete from the context menu.
- Once the asset folder has been cleared, return to the Lock screen tab (under Personalization) in the Settings tab and re-enable Spotlight by setting the Personalize your Lock screen drop-down menu to Spotlight.

Enabling the Spotlight functionality back - Reboot your PC to allow the changes to take effect, then check if Spotlight has resumed working the next time your Windows 11 PC boots up.

If the same kind of issue is still occurring, move down to the next potential fix below.
Restart or Reset your router
Although these are two unrelated things, the reason why you might notice that Spotlight stops working might be your router. Temporary data accumulated by your router cache or a bad DNS range can both be viable culprits why Spotlight might stop updating itself.
This is even more likely if you’re dealing with similar network-related issues when using other Windows components like Windows Update.
If this scenario is applicable, you should start with a simple router reset – this operation consists of doing a simple network reboot that will clear the currently cached data (both Internet Protocol and Transmission Control Protocol)
To perform a simple router reboot, look for the power button on your router; it’s typically located on the back.
Once you find it, press it once to cut off the power, then physically disconnect the power cable from the power outlet to give the power capacitors enough time to clear themselves.
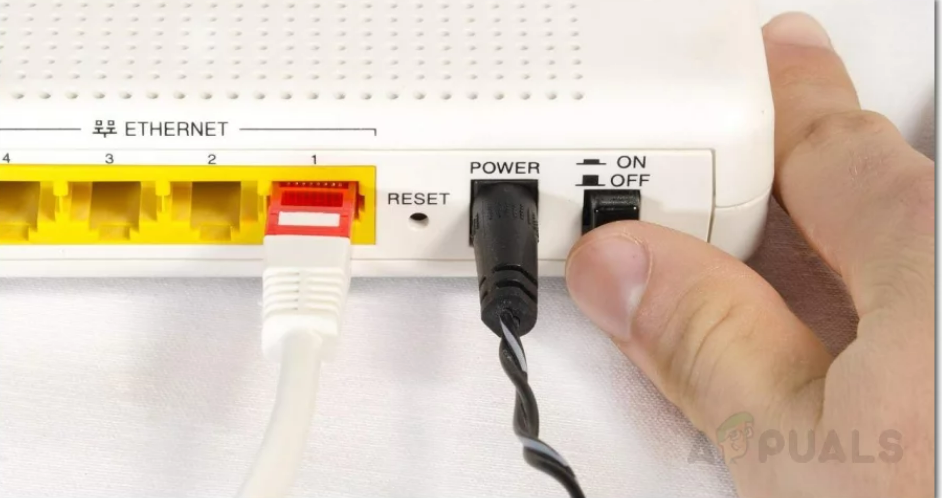
Once the router is reset, reboot your PC and see if the Spotlight component is fixed.
If the same kind of issue is still occurring, there’s still one more thing that you need to do before you exclude your router from the list of potential culprits; resetting your router.
Note: Resetting your router will also reset every network setting back to their factory defaults – this includes any previously forwarded ports, blocked items, and any other custom settings. Also, if you’re using PPPoE, expect the currently saved credentials to be lost at the end of this procedure.
To perform a router reset, press and hold on to the reset button on the back of your router for 10 seconds (or until you notice all the front LEDs flashing at the same time)
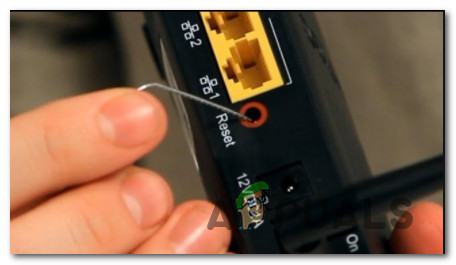
Once you manage to reset your router, re-establish the connection to the Internet and see if Windows Spotlight starts functioning again.
If the same kind of issue is still occurring, move down to the next potential fix below.
Re-register the Windows Spotlight app
Suppose none of the methods above have proven effective in your case. In that case, you should also start thinking of a potential inconsistency brought about by some corruption affecting the main Spotlight app.
For example, it’s a well-known fact that upgrading from Windows 10 to Windows 11 using a generic key might end up breaking the Spotlight functionality.
If you find yourself in this scenario, you should be able to fix the issue by using an elevated Powershell window to re-register the main Windows Spotlight app.
Follow the instructions below for specific instructions on how to do this on Windows 11:
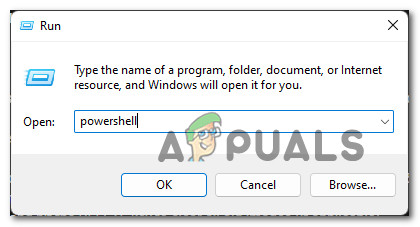
- Press Windows key + R to open up a Run dialog box. Next, type ‘powershell’ inside the text box and press Ctrl + Shift + Enter to open an elevated Powershell window.
Accessing the Powershell window - When you see the User Account Control window, click Yes to grant admin access.
- Once you’re finally inside the elevated Powershell window, type or paste the following command to re-register Windows Spotlight:
Get-AppxPackage -allusers *ContentDeliveryManager* | foreach {Add-AppxPackage "$($_.InstallLocation)\appxmanifest.xml" -DisableDevelopmentMode -register } - Once the command is processed successfully, close the elevated command prompt and reboot your PC.
- Once your Windows 11 PC boots up, pay attention to the login screen to see if the Windows Spotlight functionality has been fixed.
If the same kind of issue is still occurring, move down to the next potential fix below.
Deploy DISM and SFC scans
Suppose you’ve come this far without a tangible result. In that case, you can also assume that you might be dealing with some system file corruption that affects Spotlight directly or some associated dependencies.
Since there are a lot of different components involved, the best course of action is to use one of the two system file corruption built-in tools that Windows 11 features – DISM (Deployment Image Servicing and Deployment) and SFC (System File Checker)
Note: These two tools share some similarities, but our recommendation is to run both of them in quick succession to improve your chances of fixing the issue. SFC is entirely local (uses a locally-stored cache). At the same time, DISM relies on a sub-component of Windows Update to download healthy files that will be used to replace corrupted equivalents.
Follow the instructions below to deploy both SFC and DISM scans on your Windows 11 computer (from the same elevated CMD prompt):
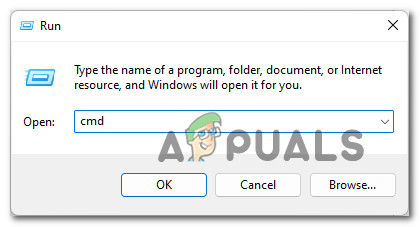
- Press Windows key + R to open up a Run dialog box. Next, type ‘cmd’ inside the Run box and press Ctrl + Shift + Enter to open up an elevated CMD prompt.
Open up an elevated CMD prompt - When the User Account Control prompts you (UAC), click Yes to grant admin access.
- Once you’re inside the elevated Command Prompt window, type the following command and press Enter to initiate an SFC scan:
sfc /scannow
Note: If this utility finds any corrupted Windows files, it will use a locally stored folder to replace any corruption with healthy equivalents.
- Once the SFC scan is complete, reboot your PC and open up another elevated CMD prompt (using step 1) once your Windows 11 computer boots back up.
- Next, once you’re back inside the CMD prompt, run the following command to deploy a DISM scan:
DISM /Online /Cleanup-Image /RestoreHealth
Note: Before you initiate this scan, make sure that you have a reliable Internet connection.
- Once the DISM scan is complete too, reboot your PC one final time and see if the Spotlight component starts working again.
If the same problem is still occurring even after you deployed SFC and DISM scans, move down to the next potential fix below.
Enable Background Apps (Windows 10 Only)
If you didn’t know, Windows Spotlight has specific dependencies that might effectively break the functionality of Spotlight when they’re not configured to function as default apps: Microsoft Edge, Microsoft Store, and the main Settings app.
Several users that we’re also dealing with have confirmed that once they’ve managed to fix the issue by accessing the Background Apps tab of the Settings menu and ensuring that Microsoft Edge, Microsoft Store, and the main Settings app are all permitted to run as background apps.
To do this, follow the instructions below:
Note: This method is only applicable to Windows 10 installations.
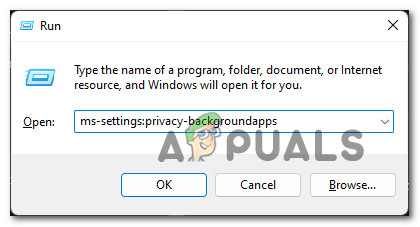
- Press Windows key + R to open up a Run dialog box. Next, type ‘ms-settings:privacy-backgroundapps’ inside the text box that just appeared, then press Enter to open up the Background Apps tab of the Settings menu.
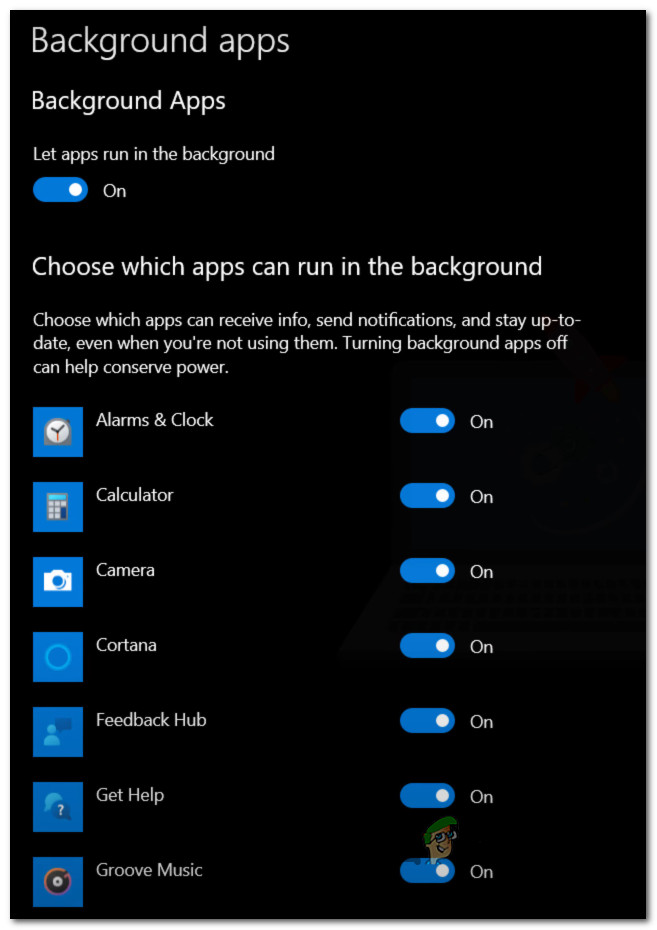
Open up the Background apps tab on Windows 11 - Once you’re inside the Background Apps menu, start by enabling the toggle associated with Background Apps.
- Next, scroll down and ensure that the main Settings app, the Microsoft Store, and the Microsoft Edge toggles are enabled.

Ensure that Spotlight dependencies are permitted to run as background apps - Reboot your PC and see check to see if Spotlight starts running the next time your computer boots up.
Use a dynamic theme
If you’ve burned through every available fix mentioned above, there’s little else you can do (besides repair installing) to fix Windows Spotlight.
However, as other affected users have reported, you should be able to circumvent the issue entirely while getting the very same functionality by installing a Windows Store personalization app called Dynamic Theme.
Think of Dynamic Themes as a type of wrapper that will allow you to feature the same lock screen picture display powered by Bing and Windows Spotlight, but without using the built-in Spotlight component.
It works beautifully, and there isn’t any compromise.
Update: Even if the app is officially a Windows 10 app, we’ve tested it on Windows 11, and it seems to work just fine
![]() Довольно часто функция Windows: интересное (Spotlight), предназначенная для автоматической загрузки и установки различных фоновых изображений для экрана блокировки в Windows 10, у многих пользователей этой операционной системы попросту не работает должным образом.
Довольно часто функция Windows: интересное (Spotlight), предназначенная для автоматической загрузки и установки различных фоновых изображений для экрана блокировки в Windows 10, у многих пользователей этой операционной системы попросту не работает должным образом.
 не работает – решение")
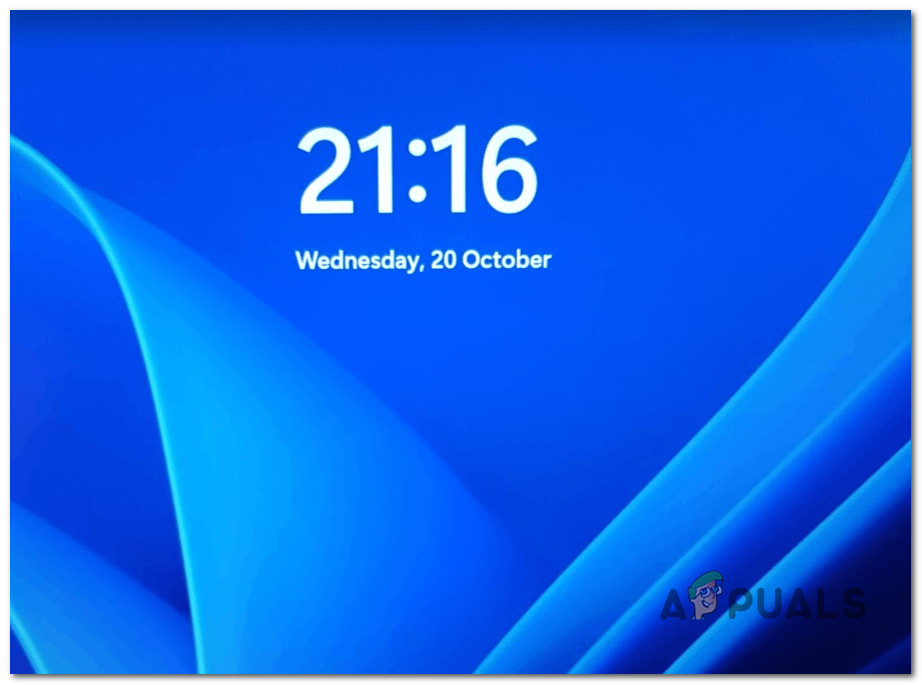
Даже несмотря на то, что соответствующая опция включена в настройках, многие из нас замечают, что на экране блокировки и при входе в Windows 10 всё время демонстрируется одно и тоже изображение, например, горное озеро (как на скриншоте).

Такого быть не должно – картинка должна меняться (примерно раз в сутки).
Если вы столкнулись с такой проблемой (изображение не меняется), то в большинстве случаев работоспособность можно вернуть, выполнив сброс и перерегистрацию данной функции. Как это сделать, читайте далее.
Windows: интересное не работает – решение
Чтобы добиться успешного результата обязательно следуйте (строго и последовательно) всем нижеприведённым указаниям.
И так, для сброса и перерегистрации Windows: интересное (рус. Spotlight) выполните следующее:
Кстати, если вам понравились какие-то картинки из Windows: Spotlight и вам хотелось бы сохранить их у себя в коллекции или, к примеру, использовать в качестве фона рабочего стола, то как это сделать, читайте здесь.
Другие способы
Если приведённый здесь способ вам не помогает (по тем или иным причинам), то можете попробовать решить проблему, удалив вручную файлы в директориях (также предварительно отключив Windows интересное в настройках): C:\Users\Ваше_имя_пользователя\AppData\Local\Packages\Microsoft.Windows.ContentDeliveryManager_cw5n1h2txyewy\LocalState\Assets и C:\Users\Ваше_имя_пользователя\AppData\Local\Packages\Microsoft.Windows.ContentDeliveryManager_cw5n1h2txyewy\Settings → перезагрузить ПК → снова активировать функцию.

Кроме того, проверьте в настройках Windows 10 разрешено ли приложениям работать в фоновом режиме: Параметры → Конфиденциальность → Фоновые приложения → Вкл.
А вдруг и это будет интересно:
- Как вывести букву диска перед его именем в проводнике Windows 10
- Как включить режим «Невидимки» в приложении ВКонтакте для Android
- Почему со временем свободного места на диске C становится всё меньше
- Установка русификатора Foxit PDF Reader
- Чем Viber отличается от Skype
- Способы открыть Панель управления в Windows 11
Дата: 2018-02-05 | Размещено в Статьи
A lot of users complain about Spotlight not working in Windows 11. What causes the issue? How to fix Windows 11 Spotlight not working? Now, let’s start exploring the answers together with MiniTool.
The Spotlight is a Windows 10 feature that can download various pictures from Bing and displays the images on the login/lock screen. Also, it allows users to give feedback if they like the image or not. However, many users reported that they see the same picture each time they lock the login screen especially upgrading to Windows 11.
What causes Windows 11 Spotlight not working? After analyzing extensive user reports and posts, we find the issue can be triggered by many reasons, including poor network connection, Spotlight cache, a metered connection, antivirus interference, inconsistent asset folder, disabled dynamic theme, and even system file corruption. Don’t worry. We provide corresponding solutions to the issue.
Fix 1. Make Sure You Have an Active Internet Connection
Since the pictures displayed on the lock screen are downloaded from Bing daily, you may be stuck on the same picture if you have a poor network connection. To fix the Spotlight not working in Windows 11, make sure that you provide a fast and stable internet connection. If the issue persists after this, move down to the following methods.
Fix 2. Turn off Metered Connection
Some users reported that the Spotlight on Windows 11 not working issue can be caused by a metered connection. This is because it cannot download new images. If this scenario applies to you, you can fix it by turning off Metered connection.
Step 1. Press Win + I keys to open the Settings windows and select Network & Internet.
Step 2. Expand your network connection from the right pane such as Ethernet.
Step 3. Toggle off the switch next to Set as metered connection. After that, reboot your computer to make the change take effect and check if the Windows 11 lock screen Spotlight not working issue gets resolved.

Fix 3. Uninstall Bitdefender If Applicable
According to user reports from the answers.microsoft forum, uninstalling Bitdefender antivirus can help fix Spotlight not working in Windows 11. Here you may have a try.
Step 1. Press Win + R keys to open the Run dialog box, and then type appwiz.cpl in it and hit Enter.
Step 2. In the Programs and Features window, scroll down the list of installed programs to Bitdefender Total Security, and then right-click it and select Uninstall.
Step 3. Follow the on-screen prompts to complete the uninstallation. Then you can repeat the same process to uninstall other Bitdefender-related antivirus programs from your Windows 11 PC.
Fix 4. Re-register Spotlight Using PowerShell
The Spotlight on Windows 11 not working issue can be triggered by a potential inconsistency. To fix it, you can re-register the Spotlight using PowerShell. This method has been proven by many people to be useful. Let’s try.
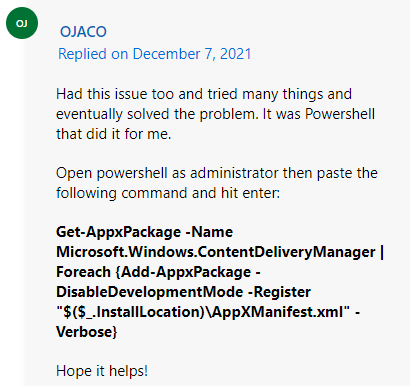
Step 1. Type PowerShell in the Search box, and then right-click the Windows PowerShell app and select Run as administrator.
Step 2. In the elevated PowerShell window, copy and paste the following command in it and hit Enter.
Get-AppxPackage -Name Microsoft.Windows.ContentDeliveryManager | Foreach {Add-AppxPackage -DisableDevelopmentMode -Register “$($_.InstallLocation)AppXManifest.xml” -Verbose}
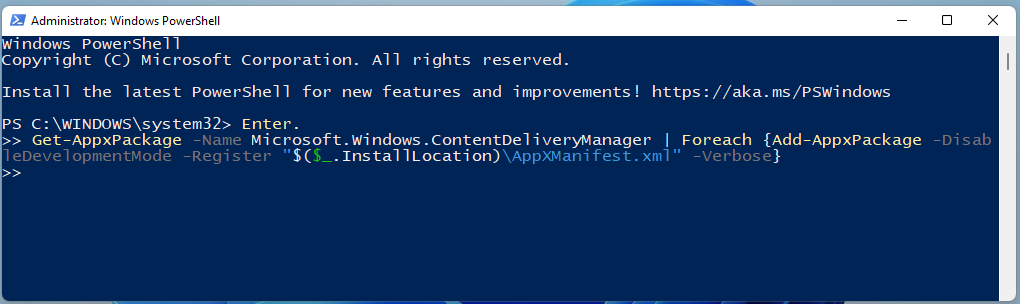
Once finished, close the PowerShell and restart your computer to see if the Spotlight not working on Windows 11 is fixed.
Fix 5. Adjust Your Time and Date
If your time and date are not set properly, you may encounter the Spotlight not working issue. Follow the steps below to change your time and date.
Step 1. Right-click the time and date settings at the bottom right corner and select Adjust date and time.
Step 2. Toggle on the switch next to Set time automatically from the right pane and select your current time and date from the Time Zone section.
Step 3. Go to the Language & region section and check if you set the Country or region correctly.
Fix 6. Re-enable Spotlight in Windows 11
Another simple solution on how to fix Spotlight not working in Windows 11 is to enable and disable Spotlight.
Step 1. Open the Settings app and select Personalization from the left pane, and then select Lock screen from the right pane.
Step 2. Go to the Personalize your lock screen section and click on Picture or Slideshow from the drop-down menu. Then restart your computer.
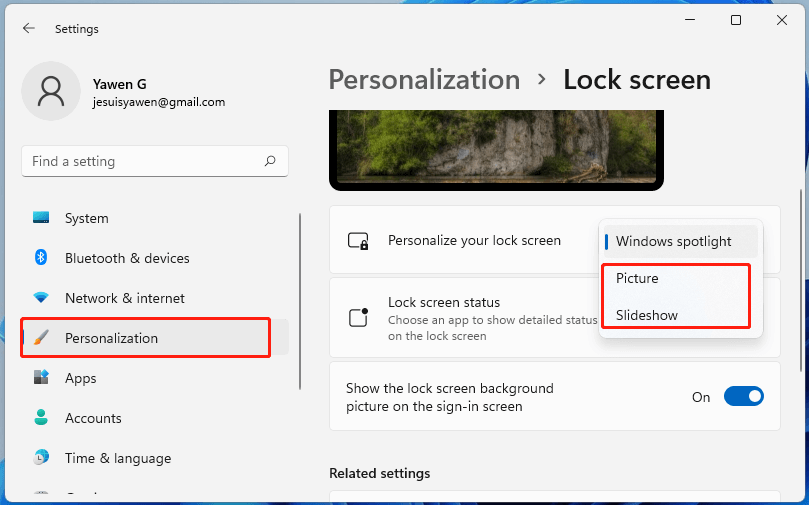
Step 3. Navigate back to the Lock screen section, and then change back to Windows Spotlight from the Personalize your lock screen drop-down menu. After that, press Win + L keys to the lock screen and see if the issue gets solved.
Fix 7. Delete Spotlight Cache
Sometimes, the Spotlight not working on Windows 11 issue can be caused by corrupted Spotlight cache. In this case, you can clean the cache and re-register the Spotlight app.
Step 1. Press Win + R keys to open the Run dialog box, and then type cmd in it and hit Ctrl + Shift + Enter to open the elevated Command Prompt window. Click on Yes in the UAC window.
Step 2. In the pop-up window, type the following commands in order and hit Enter after each one.
- DEL /F /S /Q /A “%USERPROFILE%/AppDataLocalPackagesMicrosoft.Windows.ContentDeliveryManager_cw5n1h2txyewyLocalStateAssets”
- DEL /F /S /Q /A “%USERPROFILE%/AppDataLocalPackagesMicrosoft.Windows.ContentDeliveryManager_cw5n1h2txyewySettings”
Step 3. Open the Windows PowerShell with admin right and run the following command to register the Spotlight app again.
Get-AppxPackage -allusers *ContentDeliveryManager* | foreach {Add-AppxPackage “$($_.InstallLocation)appxmanifest.xml” -DisableDevelopmentMode -register }
Once done, restart your PC and check if the Windows 11 lock screen Spotlight not working issue is gone.
Fix 8. Run System Maintenance Troubleshooter
The system maintenance troubleshooter is a fix utility that can apply a series of automatic fixes related to common issues affecting the lock screen, desktop icon, and other components. It’s worth trying.
Step 1. Open your Control Panel via the search box, and then change the View by type to Large icons and select Troubleshooting.
Step 2. In the Troubleshooting window, click on System and Security.
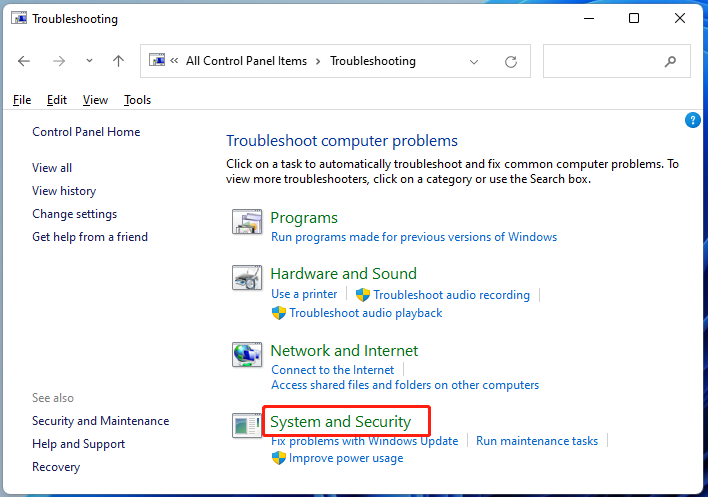
Step 3. Click on System Maintenance.
Step 4. Once you are on the first screen of the System Maintenance tab and click on the Advanced link, and tick the checkbox for Apply repairs automatically, and click on Next. Then this troubleshooter will automatically detect issues and apply the recommended fixes.
Fix 9. Clear Spotlight Assets
Some users reported that the Windows 11 lock screen Spotlight not working issue can be resolved by clearing the assets. Here’s how to do that:
Step 1. To do so, you need to disable the Spotlight feature first by Steps 1 to 2 in Fix 6.
Step 2. Once disabled, press Win + E keys to open the File Explorer, and then go to the following directory.
C:Users<USERNAME>AppDataLocalPackagesMicrosoft.Windows.ContentDeliveryManager_<Package ID>LocalStateAssets
Kindly remind:
You need to replace the Username section with the actual name of your active account. Alternatively, you can try executing the command below in the Run dialog box to open the Assets directory. %USERPROFILE%/AppDataLocalPackagesMicrosoft.Windows.ContentDeliveryManager_cw5n1h2txyewyLocalStateAssets
Step 3. Click on View > Hidden Items from the top menu to make sure all hidden files are visible. Then press Ctrl + A to select everything inside the Assets folder and delete them.
Step 4. Follow step 3 in Fix 6 to re-enable the Windows Spotlight feature.
Now, restart your PC and check if the Windows 11 Spotlight can work properly.
Fix 10. Reset Spotlight Settings
If the Spotlight is still not working, you can try resetting your Windows 11 Spotlight settings. For that:
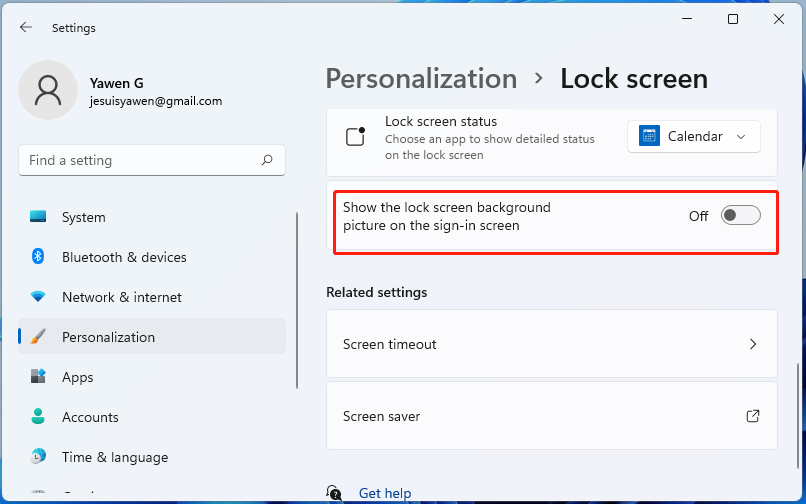
Step 1. Open the Settings app and select Personalization from the left pane, and then select Lock screen from the right pane.
Step 2. Toggle off the switch next to Show lock screen background picture on the sign-in screen and select Picture from the background drop-down menu.
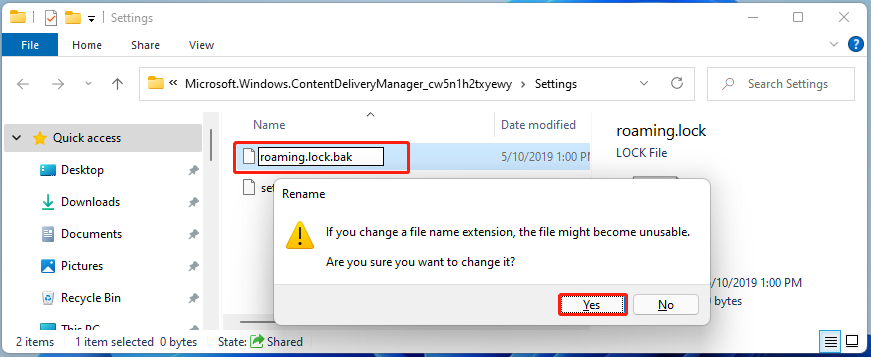
Step 3. Press Win + R keys to open the Run box, and then type %LocalAppData%PackagesMicrosoft.Windows.ContentDeliveryManager_cw5n1h2txyewySettings in it and hit Enter.
Step 4. In the pop-up folder, rename the roaming.lock and settings.dat files to roaming.lock.bak and settings.dat.bak. If you worry about this operation, you can copy and paste the 2 files to another location first.
Step 5. Reboot your computer and navigate back to the Lock screen in the Settings window like in Step 1. Then toggle on the switch for Show lock screen background picture on the sign-in screen.
After that, you can press Win + L keys to lock your screen and see if the issue is fixed.
Fix 11. Run an SFC Scan
If none of the above methods work, then the Windows 11 Spotlight not working issue could be caused by system file corruptions. System File Checker is a Windows system utility that’s often used to scan and repair corrupted system files. You may have a try.
Step 1. Type cmd in the search box on the taskbar, and then right-click the Command Prompt app and select Run as administrator.
Step 2. Type sfc /scannow command in the elevated command prompt. This process may take you much time to scan, please wait patiently.
Once this repairing process completes, restart your PC and see if the problem is gone.
Have you ever wondered how those amazing pictures appear on your Windows 11 lock or login screen? It’s all thanks to the Windows Spotlight feature! It automatically brings you stunning photos from Bing every day, along with fun facts and tips to make your screen more exciting. But there might be times when Spotlight stops working and shows a boring blank screen instead. Don’t worry, in this blog post, we’ll help you fix it and get back to enjoying those beautiful images. Let’s get started!
But before we dive into the solutions, if you are someone who likes to customize your screen, you might be interested in checking out our guide on how to change the screensaver on Windows 11.
Common Reasons Why Windows 11 Spotlight Stops Working
Spotlight feature not working on Windows 11 is a common issue that many users have reported.

There are several reasons why Windows Spotlight may not work as intended on Windows 11.
- Poor Internet connection: Slow or unstable internet can disrupt Spotlight’s functionality.
- Spotlight cache issues: Corrupted or outdated cache files may cause problems.
- Metered network connection: Limited data plans can restrict Spotlight features.
- Antivirus or firewall interference: Security software may block Spotlight.
- Inconsistent asset folder: Corrupted folder can lead to issues.
- Disabled background apps: Some apps need to run in the background for Spotlight.
- Outdated or corrupted drivers: Drivers can affect Spotlight’s performance.
- Corrupted or missing system files: Essential files can cause Spotlight problems.

Wondering how to fix this issue? You’ve come to the right place. In this post, we have listed a bunch of troubleshooting solutions that you can use for resolving this issue.
Let’s get started.
Also read: How To Fix Windows 10 Spotlight Images Not Working?
What is Windows 11’s Lock Screen Spotlight?
Windows 11 brings together a wide array of new features and performance improvements, and the lock screen spotlight is one of them. Each time you restart your device, the lock screen spotlight displays a new background image of a pretty landscape or location. So, you can use the “Windows Lock Screen Spotlight” feature to refresh this image or even choose a custom background as per your preference.

Windows 11 displays these breathtaking locations from different parts of the world on the lockscreen itself and most of these images are fetched from Bing.

Although, if you’re seeing the same image while you restart your device, it may indicate you’ve encountered the “Lock Screen spotlight not working” issue. Here are a few workarounds that you can try for retaining your Windows 11’s lock screen.
Also read: How To Personalize Windows 10 Spotlight Lock Screen
How to Fix Lock Screen Spotlight not Working Issue on Windows 11?
If you’re seeing the same image while you restart your device, it may indicate you’ve encountered the “Lock Screen spotlight not working” issue. Here are a few workarounds that you can try for retaining your Windows 11’s lock screen.
#1 Check Your Internet Connection
The lock screen spotlight may not function on your device if there’s no Internet connection. So, the first thing that you can try is to check whether your PC or laptop is connected to a WiFi network.

Microsoft fetches the background images from Bing and hence if the Internet is not working, your device may get stuck on a monotonous lock screen background.
Connect your device to a stable network connection and then reboot your device to check whether it fixed the issue.
#2 Turn OFF Metered Connection
A metered connection sets a data limit on your connection. Windows 11 also allows you to set up a metered connection on your WiFi or ethernet network as it allows you to effectively manage your data consumption. To make sure that your device hasn’t hit the maximum limit, we will try to temporarily turn off this feature to check whether it helps in resolving the lock screen spotlight not working issue. Here’s what you need to do.
Open Settings> Network and Internet. Tap on “WiFi.

Now select your WiFi network’s name.

In the advanced settings window, turn off the “Metered Connection” feature.

Also read: Everything You Should Know About Spotlight Search
#3 Adjust Date and Time Settings
Incorrect or misconfigured date and time settings can also mess with lock screen preview on Windows 11. To adjust the date and time settings on Windows, follow these quick steps:
On the bottom-right corner of the Taskbar, right-click where the date and time are displayed. Select “Adjust date and time”.
Enable the “Select time automatically” option. Also, make sure you select the precise time zone using the drop-down menu.

And that’s it!
Once you’re done, reboot your device and check whether the issue persists.
Also read: How To Check For Software Updates on Windows PC?
#4 Manually Enable Spotlight via Settings
Open Windows 11’s Settings, select “Personalization”. Tap on “Lock Screen”.

Select the “Personalize your Lock screen” option and then tap on “Windows Spotlight”.

#5 Enable Lock Screen Spotlight via PowerShell
Tap on the search icon placed on the Taskbar, type “PowerShell”, right-click on it, and select “Run as Administrator”.

Copy and paste the following command in the Terminal window and then hit Enter to execute it:

Get-AppxPackage -Name Microsoft.Windows.ContentDeliveryManager | Foreach {Add-AppxPackage -DisableDevelopmentMode -Register "$($_.InstallLocation)\AppXManifest.xml" -Verbose}
After executing this command, exit PowerShell, reboot your Windows 11 PC and see whether it fixed the issue.
#6 Run System File Checker
Windows 11 Spotlight not working may also be caused by corrupted or missing system files. System files are essential files that are required for your operating system and other software to function properly. If your system files are corrupted or missing, they may cause various issues on your PC, including Windows 11 Spotlight not working. To fix this issue, you need to run System File Checker, which is a built-in tool that scans and repairs any corrupted or missing system files on your PC.
Here’s how to run System File Checker:
Press Windows + X keys and select Windows Terminal (Admin) from the menu.

Type DISM.exe /Online /Cleanup-image /Restorehealth and press Enter key. This will use Windows Update to provide the files that are required to fix corruptions. Wait for the process to complete, which may take some time depending on your PC’s condition.

Type sfc /scannow and press Enter key. This will scan all protected system files and replace corrupted files with a cached copy that is located in a compressed folder at %WinDir%\System32\dllcache. Wait for the scan and repair process to complete, which may take some time depending on your PC’s condition.

Restart your PC and check if Windows Spotlight is working.
#7 Disable Your Antivirus or Firewall
Windows 11 Spotlight not working may also be caused by your Antivirus or firewall software. These security software can sometimes block or interfere with Windows Spotlight, preventing it from downloading or displaying the images. If you have an antivirus software installed on your PC, you may need to disable it temporarily or add an exception for Windows Spotlight.

If Windows Spotlight is working, you can re-enable your antivirus or firewall software and add an exception for Windows Spotlight by following the instructions from your software provider.
Frequently Asked Questions About Windows 11 Spotlight:
Q1: Is Windows 11 Spotlight available for Windows 11?
A: Yes, Windows 11 Spotlight is available. It displays stunning Bing photos daily with fun facts and tips on your lock or login screen. You can enable/disable it in Settings > Personalization > Lock screen.
Q2: How do I turn off Windows 11 Spotlight?
A: To turn off Spotlight, go to Settings > Personalization > Lock screen. Under Background, select Picture or Slideshow instead of Windows Spotlight.
Q3: How do I reset Windows 11 Spotlight?
A: To reset Spotlight, switch to Picture or Slideshow under Background in Settings. Then, delete files in %localappdata%\\Packages\\Microsoft.Windows.ContentDeliveryManager_cw5n1h2txyewy\\LocalState\\Assets and rename settings files in %localappdata%\\Packages\\Microsoft.Windows.ContentDeliveryManager_cw5n1h2txyewy\\Settings. Restart your PC and select Windows Spotlight again.
Conclusion
Here were a few solutions that you can give a shot upon for fixing the “Lock Screen spotlight not working” issue on Windows 11. You can use any of the above-mentioned resolutions to retain the lock screen on Windows 11. So, are you a fan of Windows 11’s lock screen spotlight feature?
Was this post helpful? Drop your feedback in the comments section.