Download Windows Speedup Tool to fix errors and make PC run faster
If you see this error message – Windows Sandbox failed to start, Error 0x800706d9, There are no more endpoints available from the endpoint mapper, then this post may be able to help you.

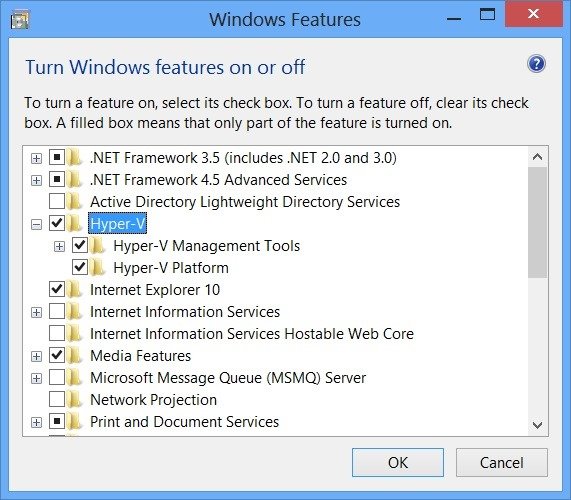
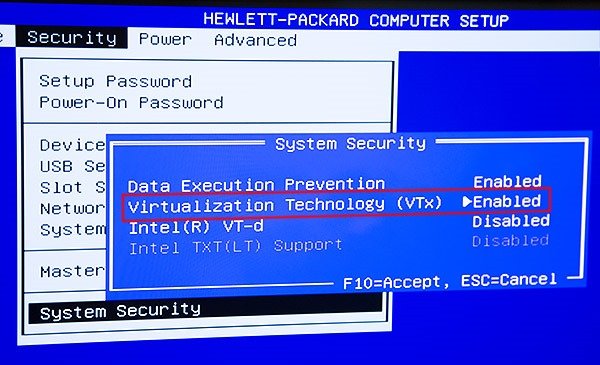
The Sandbox error can happen because of file corruption, services not running, and sometimes it is because of a feature update. Follow the suggested methods to resolve the problem. But before you begin, make sure you have enabled virtualization settings in your computer BIOS or Firmware menu, which can be accessed during the bootup of the computer.
- Check the status of Hyper-V Related Services
- Disable and Enable Hyper-V
- Check for Cumulative Update in Windows
You will need admin permission to follow the steps to resolve the problem.
1] Check the status of Hyper-V Related Services
Open Services Manager and ensure that the following Services are Started. If they are, Restart them; If they are not, then Start them:
- Network Virtualization Service
- Virtual Disk
- Hyper-V Virtual Machine Manager
- Hyper-V Host Compute Service
- Container Manager Services
- Application Guard Container Service
- Remote Procedure Call (RDC)
2] Disable and Enable Hyper-V
Eric O’Malley offered this workaround at Microsoft Answers.
- Turn off Windows Defender Random Folder Protection and Tamper Protection Service
- Turn off Container Manager Service
- Disable Windows Sandbox
Next, please navigate to the folders and Search for VHDX files and delete them but not from the recycle bin. You will have to unhide system files, hidden files, and so on.
C:\ProgramData\Microsoft\Windows\Containters\Sandboxes

C:\ProgramData\Microsoft\Windows\Containters\Zygotes
Having done that, turn on and enable everything that was disabled before deleting the VHDX file.
- Enable Windows Sandbox
- Turn on or Restart Container Manager Service
- Turn on Windows Defender Random Folder Protection and Tamper Protection Service
Check if Windows Sandbox opens as normal. You may have to restart the computer.
READ: Windows Sandbox failed to start Error 0x80070002.
3] Check for Cumulative Updates
It is possible that one of the feature updates has broken this, and the only way out is Microsoft fixing it through a cumulative update. In that case, you will have to keep checking if there is an update that fixes it.
Let us know if anything here or something else helped you fix the problem.
Similar error codes:
- Microsoft Account Error 0x800706d9
- Windows Update Error 0x800706d9.
Ashish holds a Bachelor’s in Computer Engineering and is a veteran Windows and Xbox user. He has work experience as a Database and Microsoft.NET Developer. He has been a Microsoft MVP (2008-2010) and excels in writing tutorials to improve the day-to-day experience with your devices.
Если вы видите это сообщение об ошибке –Не удалось запустить песочницу Windows, ошибка 0x800706d9, конечные точки больше не доступны из диспетчера конечных точектогда этот пост может вам помочь.
Ошибка песочницы может возникнуть из-за повреждения файла, неработающих служб, а иногда и из-за обновления функции. Следуйте предложенным методам, чтобы решить проблему. Но прежде чем начать, убедитесь, что вы включили настройки виртуализации в меню BIOS или прошивки вашего компьютера, доступ к которому можно получить во время запуска компьютера.
- Проверьте состояние служб, связанных с Hyper-V.
- Отключить и включить Hyper-V
- Проверьте наличие накопительных обновлений в Windows
Вам понадобится разрешение администратора, чтобы выполнить действия по решению проблемы.
1] Проверьте состояние служб, связанных с Hyper-V.
Откройте диспетчер служб и убедитесь, что запущены следующие службы. Если да, сбросьте их; Если это не так, запустите их:
- Служба виртуализации сети
- дискотека виртуальная
- Диспетчер виртуальных машин Hyper-V
- Служба хост-вычислений Hyper-V
- Услуги менеджера контейнеров
- Служба контейнера защиты приложений
- Удаленный вызов процедур (RDC)
2] Отключить и включить Hyper-V.
Эрик О’МэллиПредложенныйэто решение в Microsoft Answers.
- Отключите защиту случайных папок и службу защиты от несанкционированного доступа Защитника Windows.
- Отключить службу диспетчера контейнеров
- Отключить песочницу Windows
Далее зайдите в папки и найдите файлы VHDX и удалите их, но не из корзины. Вам придется показать системные файлы, скрытые файлы и т. д.
C:ProgramDataMicrosoftWindowsContaintersSandboxes

C:ProgramDataMicrosoftWindowsContaintersZygotes
Как только это будет сделано, включите и включите все, что было отключено перед удалением файла VHDX.
- Включить песочницу Windows
- Активируйте или перезапустите службу диспетчера контейнеров.
- Включите защиту случайных папок и службу защиты от несанкционированного доступа в Защитнике Windows.
Проверьте, нормально ли открывается Windows Sandbox. Возможно, вам придется перезагрузить компьютер.
ФАЙЛ: Песочница Windows не загружается, не открывается и не работает.
3] Проверьте наличие накопительных обновлений.
Вполне возможно, что одно из обновлений функций могло сломать эту проблему, и единственный выход для Microsoft — исправить это с помощью накопительного обновления. В этом случае вам придется постоянно проверять, есть ли обновление, исправляющее эту проблему.
Сообщите нам, если что-то здесь или что-то еще помогло вам решить проблему.
Похожие коды ошибок:
- Ошибка учетной записи Microsoft 0x800706d9
- Ошибка обновления Windows 0x800706d9.
5 Replies
-
Where are you launching the sandbox from? A physical machine or a VM?
does the sandbox launch or do you just see that error?
1 found this helpful
thumb_up
thumb_down
-

physical machine and it stays on the Sandbox splash screen for about 5 minuets before showing up the error. Ran as admin and normal.
Was this post helpful?
thumb_up
thumb_down
-
Was this post helpful?
thumb_up
thumb_down
-
tfl
This person is a verified professional.
Verify your account
to enable IT peers to see that you are a professional.mace
-
Ah yeah, that seems to be the problem, On ver. 1903 (OS Build 18362.239) Thanks.
Was this post helpful?
thumb_up
thumb_down


На чтение 2 мин Опубликовано
Если ваша песочница Windows не загрузилась, не открывалась и не работала, а система показывала различные коды ошибок, такие как 0x80070057, 0x800706d9, 0x80070002, 0x80070569 и 0xc0370106, тогда это руководство может помочь вам.
Код ошибки 0x80070002 дает два сообщения об ошибке:
- Песочница Windows может не запуститься с кодом ошибки 0x80070002.
- Песочница Windows может не запуститься с «ERROR_FILE_NOT_FOUND (0x80070002)» – особенно на устройствах, на которых язык операционной системы изменяется в процессе обновления при установке Windows 10 версии 1903.

Содержание
- Песочница Windows не загружается, не открывается или не работает
- 1] Проверьте наличие обновлений Windows
- 2] Включить все службы, необходимые для песочницы
- 3] Включить поддержку виртуализации, Hyper-V и SLAT
Песочница Windows не загружается, не открывается или не работает
Существует ограниченное число методов, которые помогут вам исправить проблему с песочницей Windows. Они заключаются в следующем:
- Проверьте наличие обновлений Windows.
- Включите все службы, необходимые для песочницы
- Включить поддержку виртуализации, Hyper-V и SLAT.
1] Проверьте наличие обновлений Windows
Проверьте наличие обновлений для вашего компьютера.
Возможно, Microsoft выпустила исправления или обновления драйверов для вашей системы.
2] Включить все службы, необходимые для песочницы
Откройте диспетчер служб Windows.
Это означает, что вам нужно убедиться, что тип запуска установлен так, как указано ниже.
При желании вы можете запустить или перезапустить эти службы в следующем порядке:
- Network Virtualization Service. . (Тип запуска: ручной).
- Virtual Disk. (Тип запуска: ручной).
- Hyper–V Virtual Machine. (Тип запуска: ручной).
- Hyper-V Host Computer Service. (Тип запуска: ручной).
- Container Manager Services. (Тип запуска: автоматический).
Убедившись, что эти службы запущены, вы можете снова запустить Windows Sandbox.
3] Включить поддержку виртуализации, Hyper-V и SLAT
Поддержка виртуализации, Hyper-V и SLAT – это три основных взаимосвязанных компонента, которые поддерживают работу этой изолированной программной среды Windows.
Убедитесь, что ваш компьютер поддерживает виртуализацию и она включена.
Вам также необходимо включить Hyper-V на вашем компьютере.
Кроме того, убедитесь, что на вашем ЦПУ включена поддержка трансляции адресов SLAT или второго уровня.
Даже если один из компонентов, упомянутых выше, имеет плохую конфигурацию или недоступен, могут возникнуть проблемы с запуском Windows Sandbox, и единственным исправлением будет обновление спецификаций вашего компьютера.
Пожалуйста, не спамьте и никого не оскорбляйте.
Это поле для комментариев, а не спамбокс.
Рекламные ссылки не индексируются!
Did you recently encounter Error Code 0x800706d9 while opening a Store app, launching Sandbox, or updating Windows 10? Well, in this guide, we explore the reasons that lead to this bug in the first place along with some working ways to resolve the issue.
The error 0x800706d9 may occur due to corrupt system files, missing Windows components, fail to start certain services, storage-related issues, etc. In general, we can categorize them into four different types and each one has its own set of solutions. If you do know why you are receiving this error, reach out to the specific section below –
- Update Error 0x800706D9
- Sandbox Error 0x800706D9
- Microsoft Store Error 0x800706D9
- Windows Defender Error 0x800706D9
To solve the Update error 0x800706D9, try the below workarounds –
1] Run System File Checker
The update error 0x800706D9 occurs mainly due to corrupt or missing system files. SFC is a great utility program designed to scan and repair damaged system files. Here’s how to use this tool –
- First of all, open Command Prompt with Admin rights.
- Copy/paste
sfc/ scannowon the elevated console and press the Enter key.
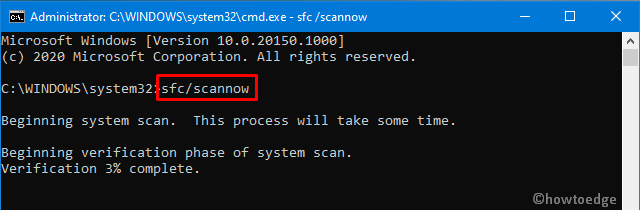
- This usually takes 15-20 minutes to locate and repair corrupt system files. In certain cases, this might even take more time, so wait accordingly.
- Once over, Restart Windows so that changes made come into effect.
2] Manually Install Cumulative Update
If the error persists, one should manually download and install the recent standalone package on the computer. Here’s how to perform this task –
- First of all, visit the Windows 10 Update History page.
- On the left column, select the Windows 10 version that you are having on the computer.
- Scroll down to “In this release“.
- Note down the KB number and reach out to the Microsoft Update Catalog site.
- Paste the KB number noted down earlier and hit Enter. A list of matching results will pop-up.
- Look for the system architecture
- Here, hit the Download button next to the system architecture that you are currently having
- On the subsequent screen, click the top link to download the .msu file.
After the file gets downloaded, browse to the Download folder and double-click the setup to install this.
3] Purge Windows Update Folder
Usually, manually installing the recent cumulative update will resolve any update-related issues on Windows 10. If the 0x800706D9 bug persists even after this, purge the update folder and reinstall the setup file (downloaded above). Here’s how to purge Windows update folder –
- Type “regedit” on the search bar and click the top result.
- When the UAC window prompts, hit Yes.
- On the registry window, navigate to –
HKEY_LOCAL_MACHINE\SOFTWARE\Policies\Microsoft\Windows\WindowsUpdate
Note: If you don’t find the WindowsUpdate folder at the above location, use either system backup or clean install Windows 10, May 2020 Update.
- Head over to the right pane and search for
WUServerandWIStatusServerfolders. - Right-click on each one of them and select “delete“.
- Restart Windows to save the recent changes.
Sign back into Windows 10 and re-follow the method-2.
Fix: Windows Sandbox Error 0x800706d9
The Sandbox error 0x800706D9 may occur due to some corruption inside the system files, certain services not working properly, or installing an incorrect feature update. To correct this, attempt to disable then re-enable Hyper-V services.
Note: Make sure to enable the virtualization settings inside the computer BIOS or Firmware menu before proceeding to the solutions.
Here’s how to fix disable then re-enable Hyper-V related services –
1] Check the status of Hyper-V Related Services
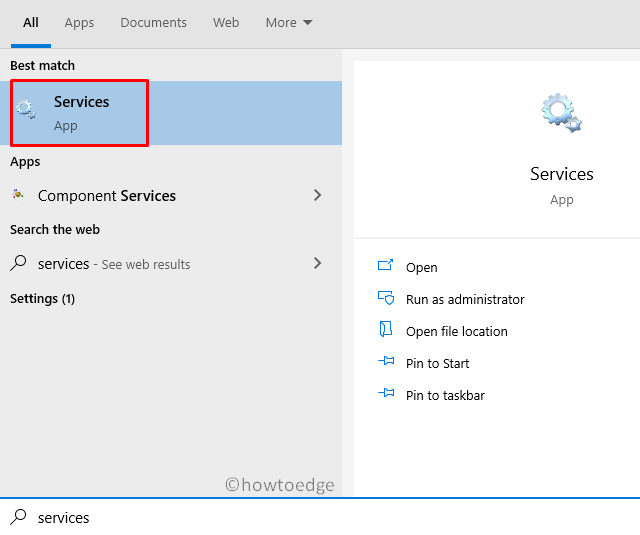
- Press Win+S to invoke the Search UI.
- Type “services” in the text field and click the top result.
- Now, check each one of the services below.
- If you find any one of them as “stopped”, hit “Start” to restart them.
Network Virtualization Service
Virtual Disk
Hyper-V Virtual Machine Manager
Hyper-V Host Compute Service
Container Manager Services
Application Guard Container Service
Remote Procedure Call (RDC)
2] Disable and Enable Hyper-V
First of all, disable the following services –
- Windows Defender Random Folder Protection
- Tamper Protection Service
- Container Manager service
- Windows Sandbox
Next, browse to the below paths –
C:\ProgramData\Microsoft\Windows\Containters\Sandboxes
C:\ProgramData\Microsoft\Windows\Containters\Zygotes
Here, search for VHDX files and delete them. However, make sure not to delete these files from the recycle bin. Now, re-enable the services that you have stopped earlier following the exact reverse order i.e. –
- Windows Sandbox
- Container Manager service
- Tamper Protection Service
- Windows Defender Random Folder Protection
Do Restart Windows to incorporate the above changes. From the next logon, Windows Sandbox will start normally.
Fix: Microsoft Store Error 0x800706D9
This error may also occur while opening Microsoft Store or any of its applications. To solve this, try the following suggestions –
1] Run Store App Troubleshooter
Windows 10 includes a troubleshooter for each one of its services and components. Store App Troubleshooter is one such tool that can locate and repair any bugs related to Windows Store. In case this doesn’t solve the issue, it suggests mending ways to address the issue at hand. Here’s how to use this tool –
- Press Win+I shortcut to start Windows Settings UI.
- Click Update & Security thereafter Troubleshoot on the left overlay.
- Move to the right side and click the “Additional troubleshooter” link.
- Scroll down to Windows Store apps and click to extend its pane.
- Hit Run the troubleshooter.
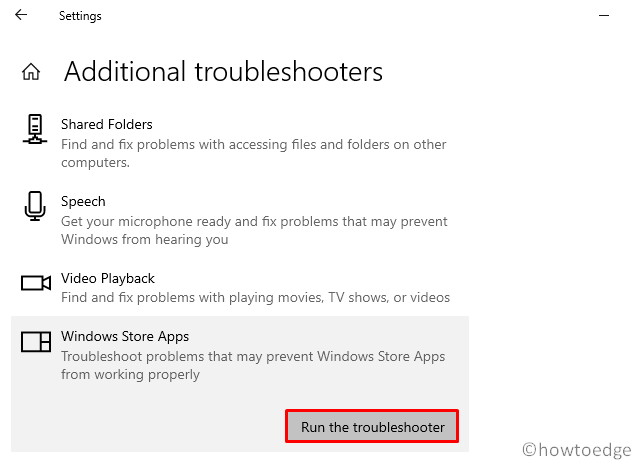
- The tool immediately starts detecting and fixing any errors (if it finds any).
2] Enable Storage Services
At times, the 0x800706D9 error occurs due to Storage services becoming troublesome. Users often disable storage services so as to avoid Windows writing hidden files on USB devices. The 0x6D9 error might occur due to such restrictions on Windows 10. To get rid of this bug, you need to re-enable the services manually following these easy steps –
- Right-click on the Windows icon and choose Run.
- Type “services.msc” without quotes and hit the OK button.
- Locate Storage Service on the succeeding window.
- Double-click the same to launch its Properties window.
- If the Service status displays “stopped”, click the start button.

- Click Apply then OK to confirm these changes.
- Restart Windows so that changes made come into effect from the next logon.
3] Re-register All Store apps
If you are still getting the 0x800706D9 bug, you must re-register each one of the Store apps using PowerShell command. Here are the essential steps to work upon –
- Right-click on the Start button and choose “Windows PowerShell (Admin)“.
- When the UAC window comes into view, tap Yes.
- On the elevated console, copy/paste the below code and hit Enter –
Get-AppXPackage -AllUsers | Foreach {Add-AppxPackage -DisableDevelopmentMode -Register "$($_.InstallLocation)\AppXManifest.xml"}
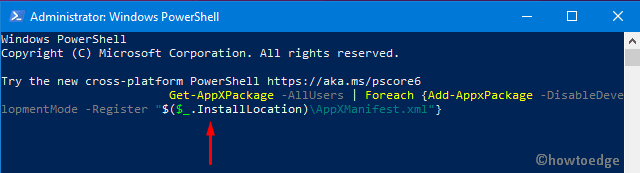
- After this code runs successfully, reboot PC to implement the recent changes.
Fix: Windows Defender Firewall Error 0x800706d9
If you are getting the error code 0x800706d9 while opening Windows Defender, try these solutions –
Tip: Make sure to uninstall or remove any third-party antivirus program as well to avoid this error.
1] Disable Microsoft Defender
- Go and click the “up arrow” available near the notification area and hit the “Shield” icon.
- Doing so will launch the Microsoft Defender application.
- Head over to the right pane and click Virus & threat protection.
- On the succeeding page, tap Manage settings link.
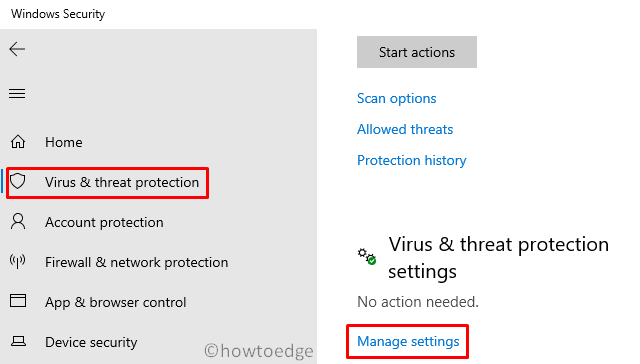
- Next, turn off the Real-time protection toggle switch.
- When a confirmation window appears, hit the Yes button.
You may now check whether the error 0x800706d9 is still appearing or has disappeared.
2] Set Windows Firewall to Automatic
As per certain user’s POV, disabling the Firewall/ICS service directly may fix this issue on Windows 10. However, doing so you might not even launch the Windows Firewall wizard. Here’s how to fix this –
- Make a right-click on the Windows icon and select Run.
- Type “devmgmt.msc” and press Enter to launch the Device Manager.
- This time, right-click on the Windows firewall and set it to Automatic.
That’s it, I hope the above tutorial does help to address the error code 0x800706d9 on Windows 10.