Сообщение об ошибке 0x8024000b не дает возможности обновить Windows версии от XP до 10. Корень неисправности — файл Update Manifest, который обязателен для апдейта, но в текущий момент времени не доступен. Способ исправления ошибки зависит от того, каким образом обновления попадают на ПК.
Методы решения ошибки 0x8024000b
№1: апдейт — с сервера Майкрософт
Зажмите комбинацию клавиш Win+R. В появившемся окне введите следующее: Cmd /c ren %systemroot%\System32\Spupdsvc.exe Spupdsvc.old. Выполните команду нажатием на Ок. После успешно обновляйте ОС.
№2: апдейт — с корпоративного сервера WSUS
Измените название файла Spupdsvc.exe. Скиньте настройки Центра обновлений. Переименуйте директорию SoftwareDistribution, перед этим приостановите службу обновления за счет запуска в командной строке запроса net stop wuauserv. После этого службу обязательно включите — net start wuauserv. Это должно избавить от ошибки 0x8024000b.
by Matthew Adams
Matthew is a freelancer who has produced a variety of articles on various topics related to technology. His main focus is the Windows OS and all the things… read more
Updated on
- Windows Update errors are quite common, but so are the solutions to fixing them.
- For example, we will be showing you how to fix Windows Update error 0x8024000b in this article.
- This error occurs when Windows cannot read a file required for the installation of an update.

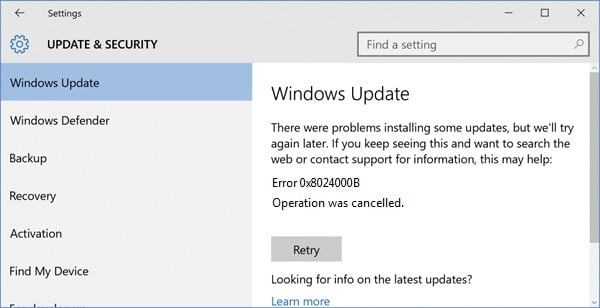
Error 0x8024000b is another in a long line of Windows Update error codes. That error, like the other update issues, stops Windows receiving updates. This error arises when Windows can’t access the manifest update file.
When the error occurs, you’ll see an error 0x8024000b and Operation was cancelled error message within Settings’ Windows Update tab. Read on to find out how to fix it.
How can I fix the error 0x8024000b?
- How can I fix the error 0x8024000b?
- 1. Run the Windows Update troubleshooter
- 2. Clear superseded updates
- 3. Change the Spupdsvc.exe’s file title
- 4. Reset Windows Update components
- 5. Restore Windows to an earlier date
1. Run the Windows Update troubleshooter
Numerous users have confirmed that the Windows Update troubleshooter fixed error 0x8024000b for them.
How we test, review and rate?
We have worked for the past 6 months on building a new review system on how we produce content. Using it, we have subsequently redone most of our articles to provide actual hands-on expertise on the guides we made.
For more details you can read how we test, review, and rate at WindowsReport.
2. Clear superseded updates
Clearing superseded updates on your desktop or laptop is another way to fix error 0x8024000b.
- To do that, open the Cleanup (decline) superseded updates page on Microsoft Technet.
- Click the Cleanup-WSUSserver.ps1 button on that page.

- Open File Explorer by clicking its taskbar button.
- Open the folder you downloaded the script to.
- Right-click the script file and select the Run with Powershell context menu option.
- Then restart Windows after running the script.

3. Change the Spupdsvc.exe’s file title
- Try renaming the Spupdsvc file. To do that, press the Windows key + R key combination, which opens Run.
- Input this command into Run’s text box and press Enter:
- cmd /c ren %systemroot%System32Spupdsvc.exe Spupdsvc.old.

- cmd /c ren %systemroot%System32Spupdsvc.exe Spupdsvc.old.
- Close Run’s window, and restart your desktop and laptop.
- Run the Windows Update once more.

4. Reset Windows Update components
Some users might need to reset Windows Update components to fix error 0x8024000b.
- To do so, open Windows 10’s search utility.
- Type cmd in the search utility’s text box.
- Right-click Command Prompt to open its context menu, and select the Run as administrator option.
- Then input these separate commands into the Command Prompt:
net stop wuauserv
net stop cryptSvc
net stop bits
net stop msiserver
- Enter Ren C:WindowsSoftwareDistribution SoftwareDistribution.old in the Prompt, and press the Return keyboard key.
- Input the Ren C:WindowsSystem32catroot2 Catroot2.old command and press Return to edit the catroot2 folder title.
- Enter the following commands separately, and press Return after each one:
net start wuauserv
net start cryptSvc
net start bits
net start msiserver

5. Restore Windows to an earlier date
- Rolling Windows back to a restore point with System Restore might also be worth a shot.
- Enter rstrui in Run and click OK to open System Restore.
- Press the Next button to proceed to the restore points list.
- Select the Show more restore points option to fully expand the list of restoration points.

- Choose a restore point that will roll back Windows to a time when there wasn’t an update issue.
- You’ll lose some software installed after the selected restore point.
- To see what software gets deleted, click the Check for affected programs button.

- To see what software gets deleted, click the Check for affected programs button.
- Click Next and Finish to roll back the platform.


- Windows 11 23H2: How to Download the Official ISO
- A 64-bit Windows 12 ISO is out, theoretically. Here’s all you need to know
- Dev Build 23550 comes with a huge undocumented improvement
So, try fixing error 0x8024000b with the resolutions above. They are among the most likely fixes for the error, as researched online.
Let us know which of the solutions worked best by leaving us a message in the comments section below.
![]()
Did you receive the 0x8024000b error while trying to update Windows 10 to its latest Build version? Well, this error mainly occurs when Windows can’t read the Update Manifest files which are essential for the update process. As a result, the installation automatically fails on error WU_E_CALL_CANCELLED: Operation was canceled. In short, this implies the operation was either canceled by the user or from the server-side.
Moreover, the same issue might also occur when users aren’t able to filter the results. Here, in this post, we have outlined three working ways in order to address this issue for Windows 10 devices. They are as follows –
- Rename Spupdsc.exe File
- Run a PowerShell Script
- Use Windows Update Troubleshooter
To solve the update error 0x8024000b on Windows 10 PC, attempt these fixes –
1] Rename Spupdsc.exe File
The error 0x8024000b may occur due to the presence of a troublesome file i.e. Spupdsvc.exe. In order to fix this issue, you must rename this file to something spupdsvc.old. Here’s how to proceed –
Note: You may rename this file to anything, however, we suggest keeping the original name intact so as to re-use this whenever required.
- Use WinKey + R to start the Run command.
- Copy/paste the below path inside the dialog box and press Enter –
cmd /c ren %systemroot%\System32\Spupdsvc.exe Spupdsvc.old

- When this code executes successfully, Restart your device.
- Sign back into your computer and check if the update process works without getting into the same trouble or not.
2] Running a PowerShell Script
If the error 0x8024000b doesn’t get solved by the above solution, you may try running a PowerShell script. This script will clean the superseded updates from WSUS. Here are the essential steps to work upon –
- First of all, visit the Microsoft Technet website.
- There you may notice “
Cleanup-WSUSserver.ps1” downloadable link. - Click over this to download the script file.
Note: Now that you have downloaded this file, you must modify the server and port values by opening the script using notepad. To do so, use these simple steps –
- Right-click on the downloaded script and select “Open with…“.
- Select Notepad on the upcoming pop-up window.
- Fill the required fields next to “$server” and “$port” using your WSUS server and port.
Tip: There are certain updates like monthly security patches that you mustn’t decline for any reason. However, if you do want to halt these updates as well, simply remove the “-and $_.ComputersNeedingThisUpdate -eq 0” in between the line – "$superseded = $approvedupdates | ? {$_.Update.IsSuperseded -eq $true -and $_.ComputersNeedingThisUpdate -eq 0}".

- After making the desired changes, press Ctrl + S to save this script, and close Notepad.
- Right-click on the lately modified PowerShell Script and hit “Run as Administrator“.
3] Run Windows Update troubleshooter
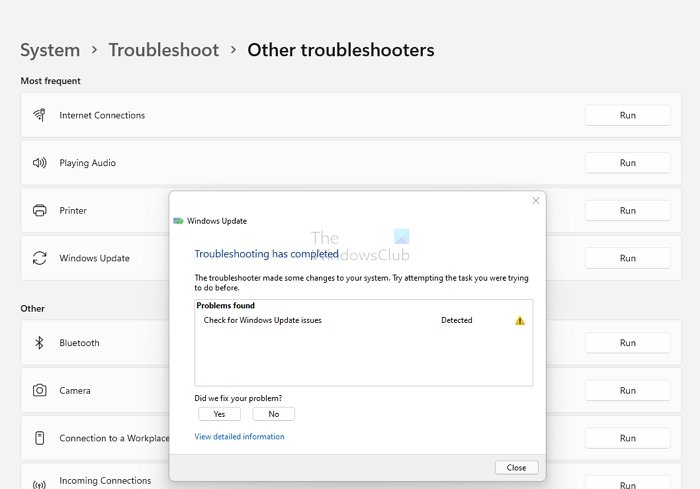
In case the error persists even after cleansing the superseded updates from WSUS, you may use the Windows update troubleshooter. Running this tool will look for possible reasons that may cause this issue and fix them (if this finds any). The procedure to troubleshoot Windows Update is as follows –
- Click the Start Menu and select the gear icon. Doing so will invoke the Windows Settings UI.
- Go to
Update & Security > Troubleshoot. - Jump to the right side and click Additional troubleshooters.
- On the next screen, click
Windows Update > Run the troubleshooter.

- This may take some time in locating and repairing any bugs or errors on the computer.
- When this finishes troubleshooting, close all running tabs and windows, and Reboot the PC.
When Windows 10 reloads, sign back in and check if the update process is occurring smoothly or not. I hope you do find this post worth insightful and helpful in solving your issue.
How do I fix error 0x800f0831?
If you are facing trouble installing Windows 10 updates, you better follow this workaround –
- First of all, visit Microsoft Update Catalog.
- Enter the package ID of the <Missing_Package> in the search bar, and press Enter –
- After the download completes, reinstall the <Failed_Package>.
Alternatively, you may also download and install the pending updates manually as well.
Read Next:
- How to Fix Update Error 0x80070490 in Windows 10
- How to Fix Microsoft Store Error Code 0x000001F7
- Fix Windows 10 Update Error Code 0x800f0984
Download Windows Speedup Tool to fix errors and make PC run faster
Windows Updates are essential for the operating system; however, they can cause errors at times. One such error is Windows Update Error 0x8024000B. The error is caused when Windows cannot read the Update Manifest file required for installing the updates. It means that the operation was canceled by either the user or the service. It could also occur if you are unable to filter the results.

WU_E_CALL_CANCELLED: Operation was canceled.
This message indicates that the OS canceled the operation. You may also encounter this error when we are unable to filter the results.
Try the following solutions sequentially to resolve the problem.
1] Run Cleanup (Decline) Superseded updates PowerShell script

An easy fix to this problem would be to use this Cleanup (Decline) Superseded updates PowerShell WSUS PowerShell script provided on the Microsoft Technet website. Create a system restore point first, then download and run it.
Below is the script by author Mikeaveli007 who uses it to clean up (decline) superseded updates:
Write-Progress -Activity 'Getting WSUS server' -PercentComplete 0
$WSUSserver = Get-WsusServer -Name $server -PortNumber $port
Write-Progress -Activity 'Getting approved updates, this may take a while...' -PercentComplete 10
$approvedupdates = Get-WsusUpdate -UpdateServer $WSUSserver -Approval Approved -Status InstalledOrNotApplicableOrNoStatus
Write-Progress -Activity 'Retrieved updates' -PercentComplete 90
$i = 0
$superseded = $approvedupdates | ? {$_.Update.IsSuperseded -eq $true -and $_.ComputersNeedingThisUpdate -eq 0}
$total = $superseded.count
foreach ($update in $superseded)
{
Write-Progress -Activity 'Declining updates' -Status "$($update.Update.Title)" -PercentComplete (($i/$total) * 100)
$update.Update.Decline()
$i++
}

Write-Host "Total declined updates: $total" -ForegroundColor Yellow
Restart the system once you are done.
2] Rename the Spupdsvc.exe file
If the previous solution didn’t work, you might consider renaming the troublesome Spupdsvc.exe file to Spupdsvc.old. The procedure to do so is as follows:
Press Win + R to open the Run window.Type the following command and press Enter to execute it:
cmd /c ren %systemroot%\System32\Spupdsvc.exe Spupdsvc.old
Restart the system once the command has been executed.
3] Run the Windows Updates Troubleshooter

The Windows Updates Troubleshooter will check the status of services associated with the process and start/restart them if needed. Thus, it could be helpful for this issue. The procedure to do so is as follows:
In Windows 11
Go to Settings (Win + I) > System > Troubleshoot > Other Troubleshooters > Windows Update. Click on the Run button next to it, and let the wizard complete its process. You can choose to restart Windows and then check for updates.
In Windows 10
Go to Start > Settings > Updates and Security > Troubleshoot. Select and run the Windows Updates Troubleshooter from this list and restart the system once done.
How do I fix Windows Update initializing?
Suppose the Windows Update is stuck on this Initializing message. In that case, apart from following the above methods, you can choose to restart the Windows Update Service, run SFC and DISM commands, and clear the SoftwareDistribution and Catroot2 folder.
Should a Windows Update take hours?
Usually no, but a significant update such as a Feature update may take an hour but not more than that. If anything is beyond an hour, it means the update is stuck somewhere, and you need to restart the update process again. It is possible that the update process that takes long doesn’t end with an error code, and all it would do is revert the process. In that case, follow our Windows Update Troubleshooting guide.
What happens if a Windows Update is interrupted?
If you restart while the update is in progress, it can be catastrophic. The action can damage the whole installation and result in BSOD. You may have to install Windows again, and you will not be able to recover files. If you are lucky enough, the system will roll back the process and restore the older version.
We hope something here has helped you.
Anand Khanse is the Admin of TheWindowsClub.com, a 10-year Microsoft MVP (2006-16) & a Windows Insider MVP (2016-2022). Please read the entire post & the comments first, create a System Restore Point before making any changes to your system & be careful about any 3rd-party offers while installing freeware.
Windows 10 — это передовая операционная система, которая является выбором многих компьютерных пользователей по всему миру. Однако, как и любая другая операционная система, Windows 10 также имеет свои проблемы. Одной из общих проблем, с которой сталкиваются пользователи, является ошибка Центра обновления Windows 0x8024000B.
Ошибка 0x8024000B возникает, когда система не может загрузить или установить обновление Windows, которое должно было быть установлено автоматически или вручную. Эта ошибка может быть вызвана различными причинами, такими как неполадки в сети, проблемы с настройками компьютера и другие.
В данной статье мы подробно рассмотрим, как исправить ошибку Центра обновления Windows 0x8024000B в Windows 10. Вы узнаете о нескольких простых методах, которые помогут вам решить эту проблему и обновить ваш компьютер в полном объеме.
Содержание
- Исправление ошибки Центра обновления Windows 0x8024000B в Windows 10
- 1. Проверьте наличие вирусов на компьютере
- 2. Очистите кеш Центра обновления Windows
- 3. Удалите поврежденные обновления
- Причины возникновения ошибки Центра обновления Windows 0x8024000B в Windows 10
- Решение проблемы через настройки обновления
- Ручное решение проблемы с Центром обновления Windows 0x8024000B в Windows 10
- Использование специальных программ для исправления ошибки
- Как избежать возникновения ошибки Центра обновления Windows 0x8024000B в Windows 10 в будущем?
- Вопрос-ответ
- Почему возникает ошибка Центра обновления Windows 0x8024000B?
Исправление ошибки Центра обновления Windows 0x8024000B в Windows 10
Многие пользователи Windows 10 сталкиваются с ошибкой Центра обновления Windows 0x8024000B, которая мешает установке новых обновлений ОС. В данной статье мы рассмотрим несколько способов решения проблемы.
1. Проверьте наличие вирусов на компьютере
Первым шагом необходимо проверить компьютер на вирусы, так как некоторые типы вредоносного ПО могут привести к ошибке 0x8024000B при обновлении Windows 10. Для этого нужно запустить антивирусную программу и провести глубокое сканирование системы.
2. Очистите кеш Центра обновления Windows
Еще одна причина ошибки может быть связана с неполадками в кеше Центра обновления. Для решения этой проблемы необходимо очистить кеш, используя следующие шаги:
- Запустите командную строку от имени администратора.
- Введите команду «net stop wuauserv» и нажмите Enter.
- Перейдите в папку C:\Windows\SoftwareDistribution\Download и удалите все файлы в этой папке.
- Введите команду «net start wuauserv» и нажмите Enter.
3. Удалите поврежденные обновления
Если проблема не устраняется после очистки кеша, необходимо удалить поврежденные обновления. Для этого нужно выполнить следующие действия:
- Откройте «Параметры» > «Обновление и безопасность».
- Перейдите в раздел «Windows Update» и нажмите на «История обновлений».
- Выберите обновления, которые вызывают ошибку 0x8024000B, и нажмите на «Удалить».
- После удаления обновлений перезагрузите компьютер и попробуйте установить их заново.
Надеемся, что эти советы помогут исправить ошибку Центра обновления Windows 0x8024000B в Windows 10 и обновить ОС без проблем.
Причины возникновения ошибки Центра обновления Windows 0x8024000B в Windows 10
Ошибка Центра обновления Windows 0x8024000B может возникать по нескольким причинам, связанных с настройками системы, наличием ошибок в файловой системе или отсутствием необходимых компонентов. Одной из возможных причин является неправильная настройка процесса обновления Windows, что может привести к некорректной работе Центра обновления.
Еще одной возможной причиной ошибки может стать наличие ошибок в файловой системе, связанных с повреждением файлов или неправильной работой утилиты проверки целостности системных файлов. В этом случае рекомендуется выполнить проверку диска и восстановление системных файлов с помощью командной строки.
Также возможна ситуация, когда отсутствуют необходимые компоненты операционной системы для работы Центра обновления Windows. В этом случае мы можем попытаться установить недостающие компоненты вручную или выполнить обновление системы с помощью специальных утилит, таких как Media Creation Tool.
Решение проблемы через настройки обновления
Если у вас возникает ошибка Центра обновления Windows 0x8024000B в Windows 10, прежде чем пробовать другие методы решения, попробуйте проверить настройки обновлений на вашем компьютере. Возможно, проблема заключается в неправильных настройках.
Чтобы проверить настройки обновлений, сделайте следующее:
- Откройте «Настройки» в Windows 10.
- Перейдите в раздел «Обновление и безопасность».
- Нажмите на «Прочитать описания обновлений» и проверьте, есть ли доступные обновления для установки.
- Если доступны новые обновления, нажмите на «Установить» и дождитесь завершения процесса.
Если на вашем компьютере уже установлены все доступные обновления, попробуйте изменить настройки обновлений. Для этого:
- Откройте «Настройки» в Windows 10.
- Перейдите в раздел «Обновление и безопасность».
- Нажмите на «Расширенные параметры».
- В разделе «Выбор способа получения обновлений» выберите «Получение обновлений из центра обновления Microsoft, но дайте мне выбрать, когда загружать и установить их».
- Сохраните изменения и перезапустите компьютер.
Если после изменения настроек обновлений проблема не решится, можно попробовать другие методы решения, описанные в инструкции.
Ручное решение проблемы с Центром обновления Windows 0x8024000B в Windows 10
Если вы столкнулись с ошибкой Центра обновления Windows 0x8024000B в Windows 10, и автоматические методы ее исправления не помогли, то есть несколько ручных действий, которые можно попробовать.
Во-первых, попробуйте очистить кэш центра обновления Windows. Для этого нужно перейти в папку C:\Windows\SoftwareDistribution\Download и удалить все содержимое этой папки. Затем нужно перезапустить службы Центра обновления Windows и проверить наличие обновлений.
Если очистка кэша не помогла, можно попробовать перезапустить службы Центра обновления Windows вручную. Для этого нужно нажать Win+R, ввести services.msc и найти в списке службы Центра обновления Windows (Windows Update). Остановить ее, а затем запустить снова.
Если и это не помогло, можно попытаться обновить драйверы для устройств компьютера. Для этого нужно найти в списке устройство, которое вызывает ошибку (можно увидеть в журнале событий), и обновить его драйвер.
- Важно! Перед проведением ручных действий рекомендуется создать точку восстановления системы, чтобы в случае неудачи можно было вернуть все на место.
Использование специальных программ для исправления ошибки
Если вы попытались исправить ошибку Центра обновления Windows 0x8024000B в Windows 10, но ничего не помогает, можно использовать специальные программы для исправления ошибок. Такие программы проанализируют систему и помогут исправить ошибку.
Одной из таких программ является CCleaner. Она помогает исправить ошибки реестра и удаляет ненужные файлы и записи. Кроме того, CCleaner может улучшить производительность компьютера, что может помочь избавиться от ошибки.
Другая программа — Windows Repair. Она позволяет восстановить настройки Windows, исправить ошибки, восстановить файловую систему, исправить проблемы с реестром и многое другое.
Если же вы не хотите использовать специальные программы, можно попробовать воспользоваться встроенным инструментом DISM, который поможет восстановить поврежденные файлы системы или проверить их целостность. Для этого нужно выполнить несколько команд в командной строке.
Как избежать возникновения ошибки Центра обновления Windows 0x8024000B в Windows 10 в будущем?
Чтобы избежать возникновения ошибки Центра обновления Windows 0x8024000B в Windows 10 в будущем, необходимо обновлять ОС регулярно. Рекомендуется настроить автоматическое обновление ОС, чтобы все новые обновления были установлены вовремя. Не забывайте также проверять наличие обновлений для всех программ и приложений на компьютере.
Для того чтобы избежать возникновения ошибки в будущем, следует использовать только лицензионное ПО. Нелегальное ПО не только может вызвать ошибки при установке обновлений, но и представляет угрозу для безопасности вашего компьютера. Используйте только официальные ресурсы для скачивания программ и драйверов.
Также рекомендуется регулярно проверять состояние жесткого диска и системных файлов на компьютере. Используйте антивирусную программу и антишпионское ПО для проверки вашей системы. Убедитесь, что в системе достаточно свободного места на жестком диске, так как недостаточное место может вызывать множество проблем, включая ошибки обновления.
Кроме того, следует избегать установки известных «левых» программ, которые могут заполнить вашу систему мусором и вызвать проблемы с обновлениями. Если у вас возникла ошибка при установке обновления, попробуйте ее исправить как можно скорее, чтобы не накапливалось большое количество ошибок в системе.
Наконец, не следует забывать о правильной работе с компьютером. Не отключайте компьютер во время обновления, не отключайте компьютер без полного завершения работы и не прерывайте процесс обновления во время работы. Следуйте все инструкциям при установке обновлений и не изменяйте настройки системы, если вы не знаете, что делаете.
Вопрос-ответ
Почему возникает ошибка Центра обновления Windows 0x8024000B?
Ошибка Центра обновления Windows 0x8024000B может возникать по нескольким причинам, включая проблемы с подключением к Интернету, конфликты с антивирусным ПО, поврежденные файлы системы и другие проблемы, связанные с установкой обновлений.