|
|
ОСНОВНОЙ ТЕКСТ СТАТЬИ |
Требования.
Статья применима для Windows 2000/XP
Понадобится установочный диск с дистрибутивомWindows.
Информация
Файл PCI.SYS
необходим для работы устройств компьютера подключенных через слот PCI (как правило этот слот белого цвета). Как сказано в ошибке это проблема возникает из-за удаления или порчи файла, но
есть вероятность возникновения этой проблемы из-за плохого контакта PCI устройств подключенных к компьютеру.
Восстановление файла pci.sys.
Способ №1.
Для начала на всякий случай, переткнем все устройства подключенные к компьютеру. Для этого
открываем системный блок, выдуваем из него пыль (если она имеется) и по очереди, АККУРАТНО, вынимаем и вставляем обратно все устройства, в том числе и планки памяти. Снимать процессор, вентиляторы и другие
охлаждающие устройства не надо.
Перезагружаем компьютер, если проблема осталась, то переходим к удобному Вам способу №2 или №3.
Способ №2.
Этот способ потребует второй — исправный компьютер, например соседа или друга. Главное
чтобы Windows у него был такой же как и на Вашем компьютере. Весь смысл в том, чтобы просто взять исправный файл pci.sys
из рабочей Windows и переписать на Ваш компьютер.
Для этого открываем ваш системный блок, отключаем и снимаем жесткий диск. Идем к исправному компьютеру и
подключаем к нему ваш жесткий диск.
|
|
Не забываем, что Ваш диск должен быть подключен как Slave (ведомый), а исправный диск как Master (главный). Для этого необходимо на Вашем диске поставить перемычку так, как показано на рисунке, который изображен на корпусе вашего диска. В принципе, можно эту перемычку просто убрать, тогда система автоматом должна принять его как ведомый |
Подключив ваш диск, запускаем компьютер. После загрузки Windows, идем в «Мой компьютер», открываем диск на
котором установлена исправная система (как правило это диск «С«) и идем в папку drivers:
C:/WINDOWS/SYSTEM32/drivers/
Находим в этой директории файл pci.sys Копируем это файл (КОПИРУЕМ,
а не ПЕРЕМЕЩАЕМ! иначе сломаете еще один компьютер), и вставляем его на Ваш диск в ту же директорию.
На запрос заменить файл, соглашаемся.
Теперь выключаем компьютер, отключаем Ваш жесткий диск, идем домой и собираем ваш компьютер (не забудьте
установить перемычку на жестком диске в положение Master).
Способ №3.
1. Загрузите компьютер с установочного CD или DVD-диска;
|
|
На диске должна быть точно такая же Windows как и на Вашем компьютере |
2. При появлении сообщения вида «Press any key to boot from CD» нажмите любую
клавишу для загрузки с CD/DVD диска. Например. Кнопку «Ввод (Enter)»;
3. Начните устанавливать Windows;
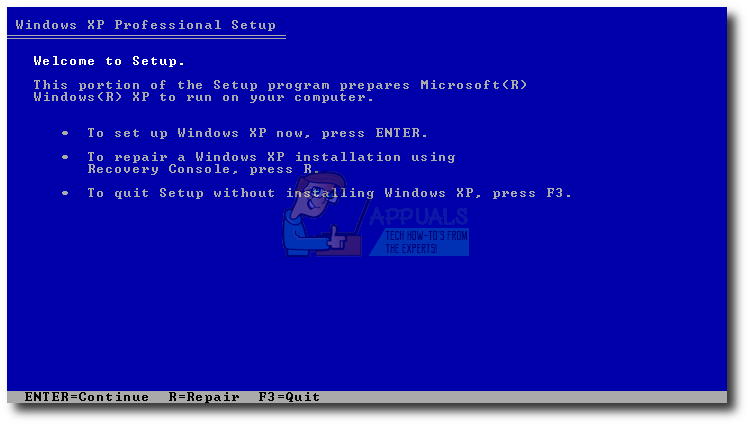
4. Когда появится сообщение «Вас приветствует программа установки«, и предложат выполнить одно из трех действий:
— Чтобы приступит к установке Windows,
нажмите <ВВОД> (<Enter>);
— Чтобы восстановить Windows, с помощью консоли восстановления, нажмите <R>;
— Чтобы выйти из программы, не устанавливая Windows, нажмите <F3>;
Выполните второе действие, нажмите кнопку «R»
для запуска консоли восстановления.
5. Дождитесь сообщения на экране «В какую копию Windows следует выполнить вход«.
6. После строки (Для отмены нажмите <ВВОД>), введите номер операционной системы Windows, которую будем восстанавливать, и нажмите кнопку Ввод (Enter);
|
|
На компьютере может находится две и более ОС Windows, будьте внимательны. Все экземпляры ОС Windows будут отображены на экране |
7. Вам будет предложено ввести пароль локального Администратора, введите его если он есть и нажмите кнопку Ввод (Enter);
8. Должна появится запись C:\WINDOWS> — это командная строка;
|
|
Запись C:\WINDOWS> может отличаться в зависимости от установленной ОС Windows. Например. C:\WINNT или C:\WINDOWS1 |
9. В командной строке введите ren С:\windows\system32\drivers\pci.sys pci.sys.old и нажмите кнопку «Ввод (Enter)»;
|
|
Эта команда переименовывает файл pci.sys в pci.sys.old; Если переименовать не получается, то пропустите этот шаг |
10. Далее введите команду expand D:\i386\pci.sy_ С:\windows\system32\drivers\pci.sys и нажмите кнопку «Ввод (Enter)»;
где, D:\ — это CD/DVD дисковод.
либо так expand I386\pci.sy_ %systemroot%\system32\drivers\
|
|
Эти команда восстанавливает файл pci.sys из архива, который находится на установочном диске |
11. Введите команду exit и нажмите клавишу «Ввод (Enter)», чтобы закрыть консоль восстановления.
12. Перезагрузите компьютер;
|
||
|
||
|
||
|
||
by Loredana Harsana
Loredana is a passionate writer with a keen interest in PC software and technology. She started off writing about mobile phones back when Samsung Galaxy S II was… read more
Updated on
- The missing or corrupted @system32driverspci.sys error can be addressed by changing some of your BIOS settings.
- Alternatively, you can use a third-party software that duplicates or replaces corrupted system files.
- Don’t hesitate to upgrade your operating system as the support for Windows XP or 2000 has ended back in 2014.
If your operating system’s files or applications are corrupted, your OS will be unable to start properly, and your app will be unable to function until the error is corrected. So is the missing or corrupted @system32driverspci.sys file that we will address today.
The full error message reads as Windows could not start because the following file is missing or corrupt system32DRIVERSpci.sys, which indicates that the PCI.sys file is corrupted and must be repaired by the system administrator.
This error message usually appears on computers running the Windows 2000 or Windows XP operating systems. But today we will be using Windows 11 to showcase the solutions. Don’t hesitate to upgrade your OS as well.
What do system files do?
A Windows system file, in technical terms, is any file that has the hidden system attribute enabled. On the practical side, system files are those files that are required by Windows in order for it to function properly.
They are used to store critical computer information that, if not present, can cause a computer system to malfunction and fail altogether.
Hardware drivers, configuration and DLL files, and even the various hive files that make up the Windows Registry are all examples of what is included in this category.
System files are typically found in specific folders that have been designated as a system folder on the computer’s hard drive. These files are hidden from view by default in Windows in order to further prevent any accidental deletions from occurring.
How we test, review and rate?
We have worked for the past 6 months on building a new review system on how we produce content. Using it, we have subsequently redone most of our articles to provide actual hands-on expertise on the guides we made.
For more details you can read how we test, review, and rate at WindowsReport.
How can I fix the missing @system32driverspci.sys error?
1. Reconfigure your BIOS
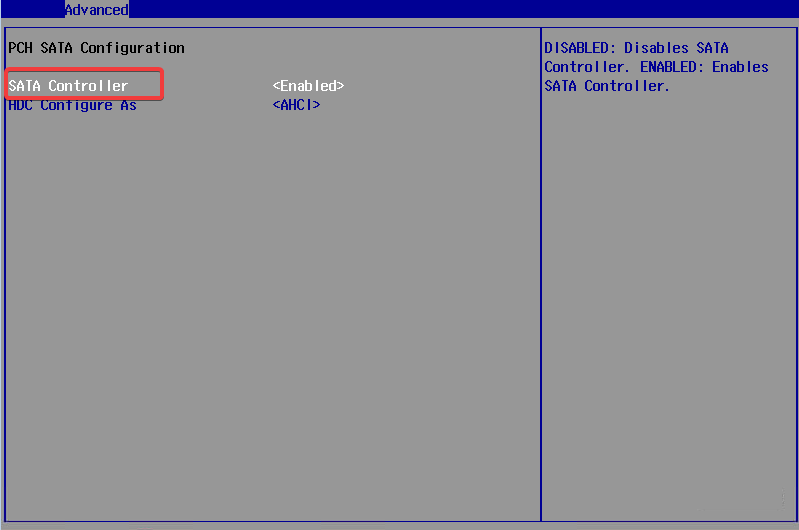
- Restart your computer and press the F2 key in order to enter the BIOS mode. The Basic Input/Output System, is the built-in core processor software that is responsible for booting up your computer and serving as the most important startup program on your computer.
- Go to the SATA configuration section in order to edit it to Combination mode (AHCI, SATA).
- Next, navigate to VGA settings and change the video settings from PEG to PCI.
- Save the changes and continue with the boot-up process. Now the missing or corrupt @system32driverspci.sys error should be gone.
The BIOS, which is typically embedded into your computer as a motherboard chip, serves as a catalyst for the operation of the computer’s various functions.
Note that the procedure for changing the BIOS configuration varies from vendor to vendor, so you should consult the technical documentation for your motherboard for more information.
- Fix: PC automatically goes to BIOS on startup
- We answer: What is BIOS and how to use it?
- Find out how to easily update your BIOS
2. Use a third-party tool
PC problems will inevitably arise, and resolving them is not always as simple as it appears. However, there are specialized tools available, such as Fortect, that can help you resolve these issues.
It is safe to use because it was developed by a legitimate company that works tirelessly to ensure that the software’s databases are kept up to date at all times.
With Fortect installed on your computer, you will never have to worry about issues arising at random times or as a result of a power outage again, as this software will automatically identify and resolve them even before they have a chance to negatively impact your computer’s performance.
The software will diagnose and propose solutions and if you choose to proceed, it will automatically clean or replace the duplicated or corrupted files that caused problems.
⇒ Get Fortect
3. Reinstall your operating system
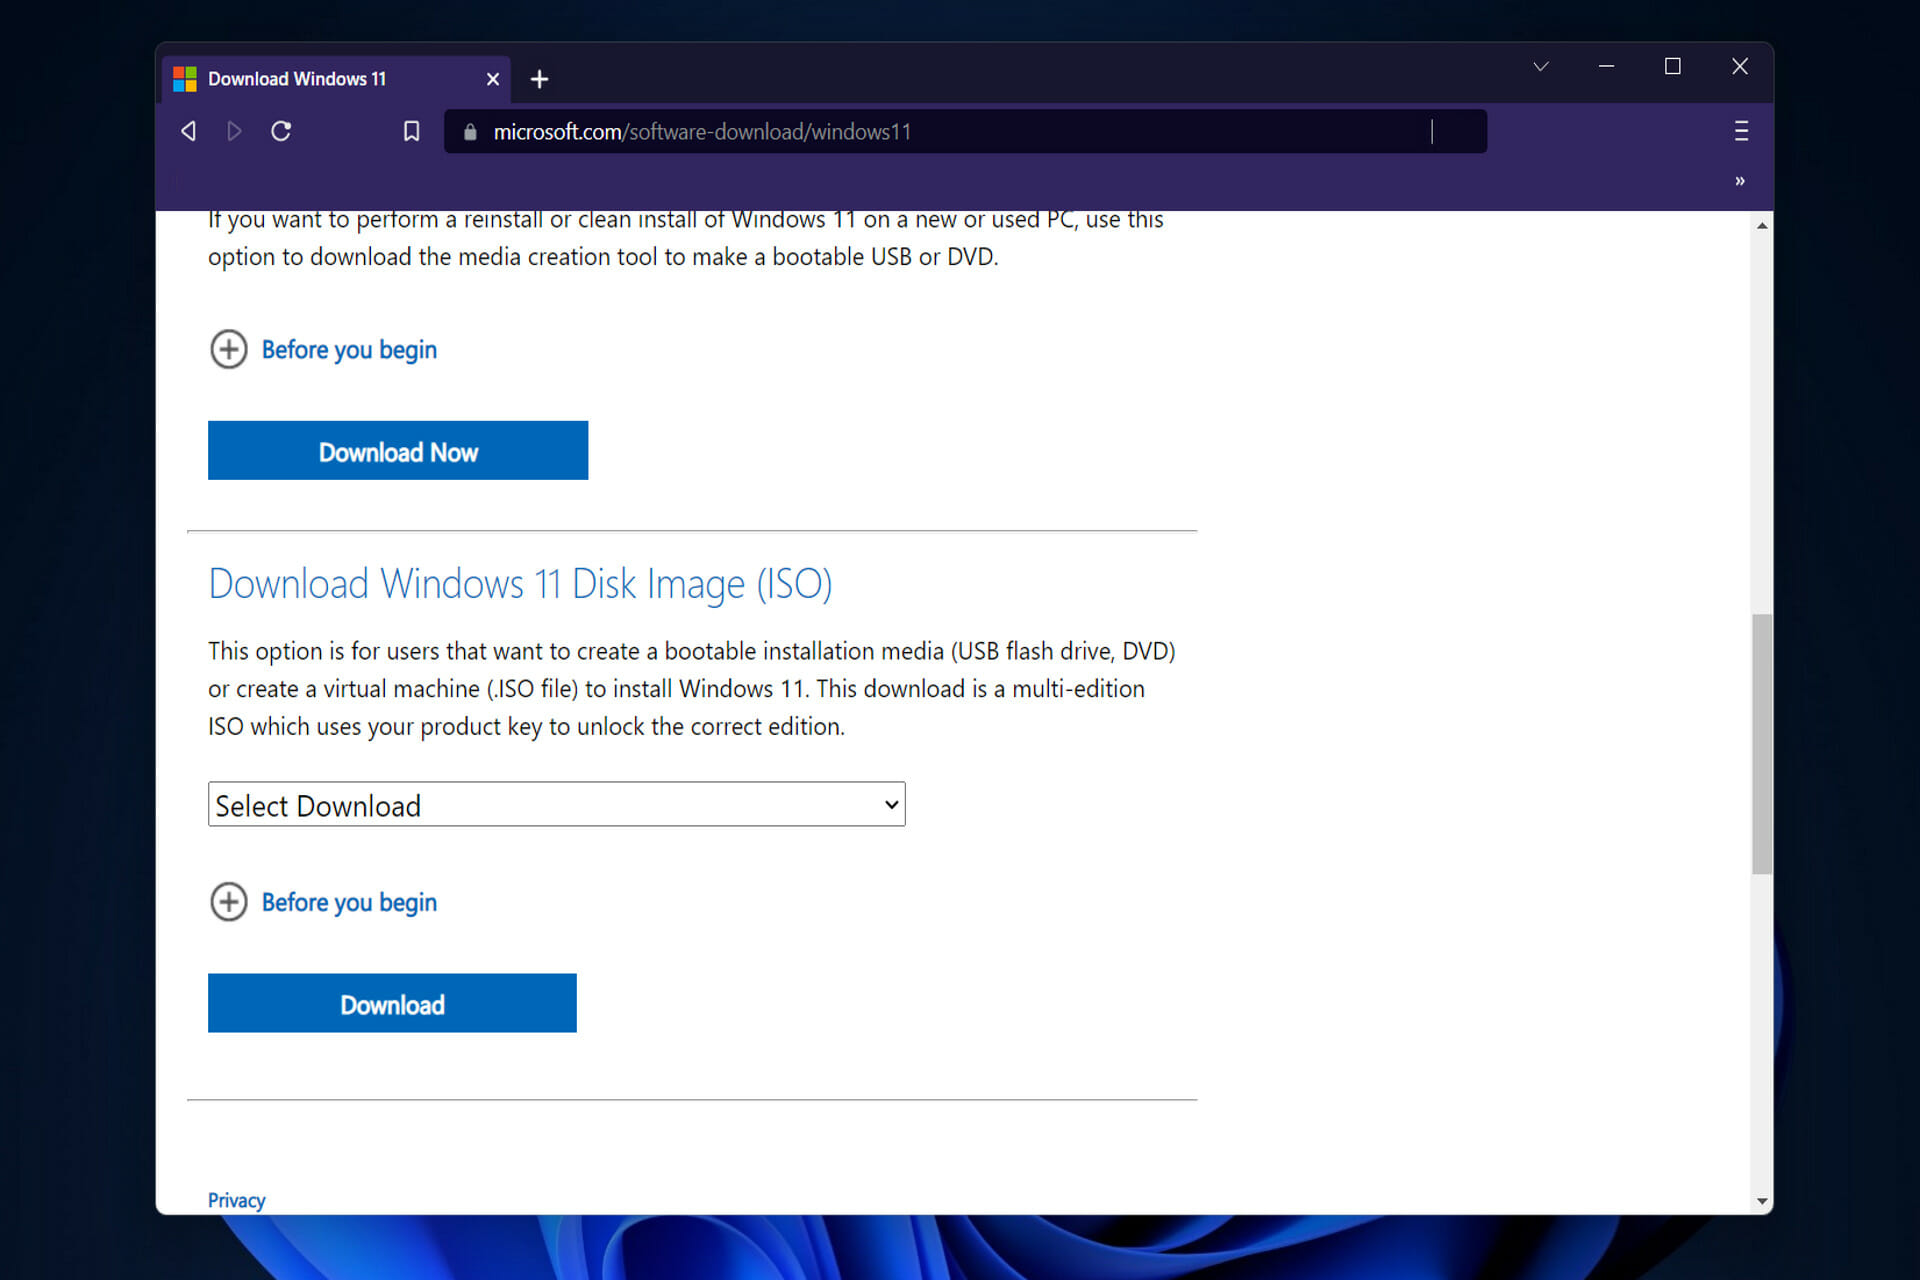
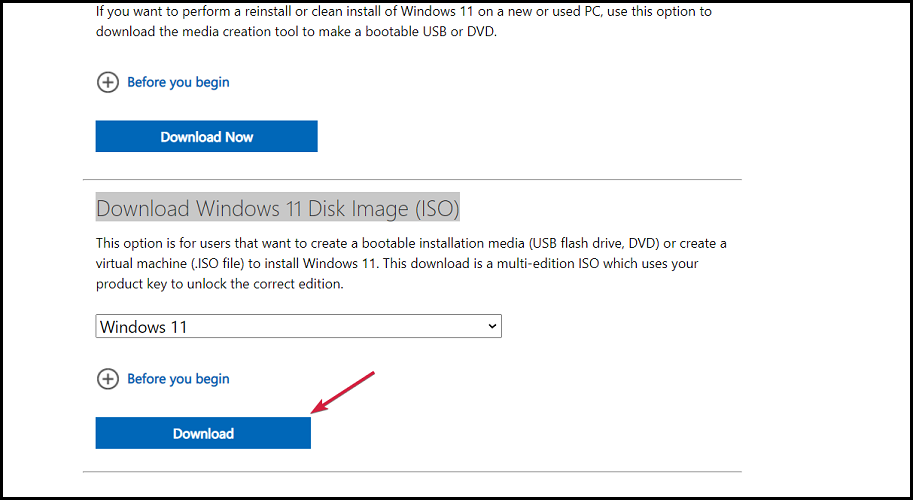
- In order to reinstall your OS, you need to head to Microsoft’s download page and download the ISO file.
- Once you select the language and system, download the file and right-click on it in order to choose Mount.
- Once it is mounted, click on the new drive created then double click on the setup file. You will be asked whether you want to reinstall the OS on this device and whether to keep your files. The @system32driverspci.sys missing error will be deleted along with the previous OS.
When developing the operating system, Microsoft’s primary goal was to provide its users with a better overall experience. This included a redesigned user interface, more collaborations for the App Store, and a unique gaming experience.
To name a few features, the streamlined new design includes pastel-like colors and rounded corners, a redesigned Start menu, and larger touch targets for a better PC tablet interface.
As a result of the support for Android apps through the Amazon Store, as well as a new way to see your interests at a glance thanks to the Widgets feature, upgrading to the new operating system is clearly a compelling proposition.
Because this OS iteration represents the most significant change in years, it’s only natural to want to get started using it as soon as possible. For those of you who are concerned due to a message stating your computer is unable to run Windows 11, rest assured that the problem is easily resolved.
4. Upgrade your RAM
System or application instructions may be unable to be addressed in RAM at times due to a faulty memory module. The most effective solution is to upgrade your RAM.
If you are using multiple RAM modules, you should try unplugging them one at a time to see if there is a problem with any particular one.
In case you intend to purchase another RAM module, you should also determine which generation of RAM memory is currently in use on your motherboard before making your purchase.
According to tradition, we recommend that you review the technical documentation for your motherboard and make an informed decision about which RAM module to purchase for your computer or notebook system.
For more information and potential solutions to the missing @system32driverspci.sys error, check out how to fix corrupted files in Windows 10 / 11.
Was this guide helpful to you? Leave us a comment in the section below and tell us what you think. Thanks for reading!
If system files or applications are corrupted your operating system will not be able to startup properly, and your application will not be able to work until the error is fixed. PCI.sys is a file which can be corrupted or damaged, and your operating system will not be able to work properly. If you turn on your Windows and you see following error: “Windows could not start because the following file is missing or corrupt system32\DRIVERS\pci.sys”, that means pci.sys file is corrupted and should be fixed by you.
What is pci.sys? PCI.SYS is a system file, located on following location C:\Windows\System32\Drivers. By default, Windows is installed on C: partition which is named system partition.
This error occurs on operating system Windows 2000 and Windows XP. So why this problem occurs? There are more reasons including malware infections, faulty hardware component, forced shut down of your computer and other.
We will show you how to solve issues using Windows XP SP3. All methods are compatible with both operating system, Windows 2000 and Windows XP.
Method 1: Repair pci.sys using Recovery Console
When system files are corrupted and your Windows can not boot, the first option is to run Recovery console and repair corrupted files. For this method, you will need bootable CD, DVD or USB with burned Windows 2000 or Windows XP installation. Because we know which system file is corrupted (pci.sys), we will fix only that file.
As you know Microsoft stopped extended and mainstream support for Windows 2000 and Windows XP, and there are a lot of security exploits which can be discovered by hackers. If you are using Windows 2000 or Windows XP, please upgrade your operating system to minimum Windows 7. In case you are using some applications which are only compatible with Windows XP, you do not need to worry because you will be able to run the legacy application on a newest operating system using additional tools. You can install Windows 2000 on Windows 7, Windows 8, Windows 8.1 and Windows 10 using virtualization software. If you are using Windows 7, you can run Windows XP using Virtual PC and Windows XP Mode. If you are using Windows 8, Windows 8.1 and Windows 10, you can run Windows XP using virtualization technology named Hyper-V Client.
- Insert bootable Windows XP CD or DVD disk, or bootable USB flash disk
- Restart your computer
- Boot your computer from the CD or DVD drive or USB flash drive
- Press any key to boot from CD. Setup will inspect your hardware configuration.
- Press R to enter Recovery console
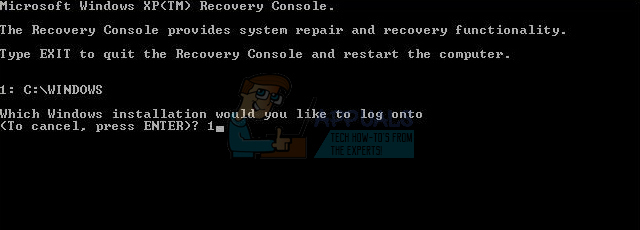
- Select the installation you want to access (by default it is C:\Windows)
- Enter the Administrator Password. In some cases, the Administrator password is set to a blank password. In this case, press ENTER.
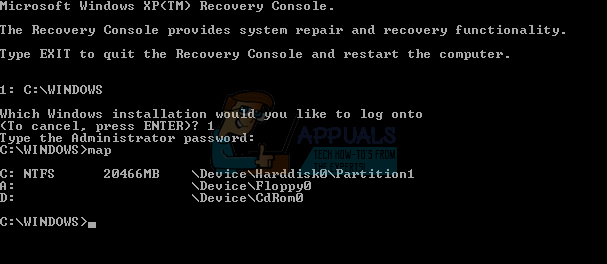
- Type map to see available partition and volumes. As you see, Windows XP is installed on NTFS partition C: and CD-ROM is using letter D:
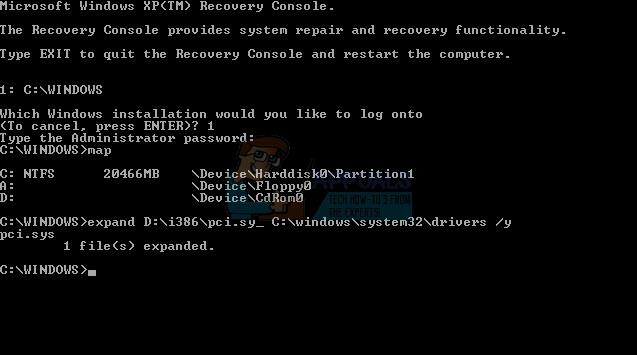
- Type the following at the Command Prompt and press Enter
expand D:\i386\pci.sy_ c:\Windows\system32\drivers /y, where D: is the drive letter of your CD or DVD ROM drive, C: is the drive on which Windows XP is installed, and where Windows is the folder in which Windows XP is installed.
In case you are using Windows 2000, Instead C:\Windows\system32\drivers you need to type C:\winnt\system32\drivers
- Type Exit and press Enter to quit the Recovery console. Windows XP will restart.
- Enjoy your Window XP
Method 2: Change BIOS configuration
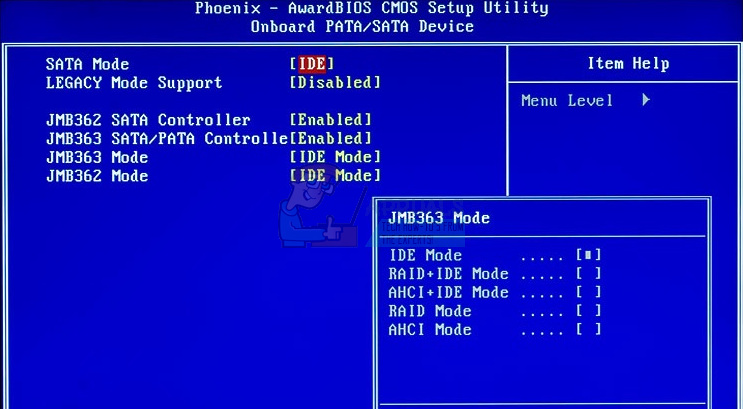
If you upgraded your computer or notebook with new hardware components, and you tried to install your Windows, but you couldn’t because of PCI.sys error, we are recommending you to change current BIOS configuration. The procedure of changing BIOS configuration depends from the vendor, so you need to read the technical documentation of your motherboard. You need to change SATA and VGA configuration.
- Restart or turn on your computer or notebook
- Press F2 or Dell to access BIOS
- Navigate to SATA configuration and change SATA configuration to Combination mode (AHCI, SATA)
- Navigate to VGA settings and change video settings from PEG to PCI
- Save your settings
- Restart your computer
- Install Windows, applications, and drivers
- Change Video display settings back to PEG
- Restart your computer
- Enjoy your Windows
Method 3: Wipe and reinstall operating system
This is the last software method you can try to solve issues. If this method did not help you, next methods will include hardware components. If you do not have or you do not care so much about your data, Windows settings or application configuration, please format your hard disk and reinstall Windows and application. If you have some important data, we are recommending you to boot Linux Live CD on your computer and backup all important data. After that, you can reinstall your Windows.
Please note, that all application, settings, and data will be deleted from system partition.
Method 4: Change RAM module
Sometimes because of faulty RAM, system or application instructions can not be addressed in RAM. The best solution is to change your RAM. How will you do it? If you are using more RAM modules, you should try to unplug one by one and test is there a problem with RAM module. Also, if you are planning to purchase another RAM module, you should check which generation of RAM memory is using your motherboard. As always, we are recommending you to check the technical documentation of your motherboard and based on that you can purchase proper RAM module for your computer or notebook. We guess you are using an old computer with DDR or DDR2 memory. We will show you how to identify which RAM memory do you need. We have motherboard P5Q manufactured by ASUS company. This motherboard is using DDR2 RAM.
- Open Internet browser (Google Chrome, Mozilla Firefox, Internet Explorer or other)
- Open ASUS’s website on this LINK. We will open ASUS Support site because we are using ASUS motherboard
- Navigate to the Memory The motherboard P5Q has four slots and supports max. 16 GB DDR2 RAM.
- Purchase RAM memory
- Install RAM memory
- Enjoy your Windows
Method 5: Change your HDD
Another hardware component which can be faulty is a hard disk (HDD). HDD stores operating system, applications, and our data. Sometimes, files can not be read from hard disk because of bad sectors or some other problem. The best solution for is to buy compatible HDD. As always, we are recommending you to read the technical documentation of your computer or notebook. There are two types of HDD, ATA HDD, and SATA HDD. Be careful when buying HDD, because ATA HDD can not be connected to SATA port, and vice versa. We will show you which HDD is using motherboard ASUS P5Q.
- Open Internet browser (Google Chrome, Mozilla Firefox, Internet Explorer or other)
- Open ASUS website on this LINK. We will open ASUS Support site because we are using ASUS motherboard
- Navigate to Storage The motherboard P5Q has six SATA connectors and supports transfer rate up to 3Gb/s.
- Purchase HDD
- Install RAM memory
- Install We are recommending you to install minimum Windows 7.
- Enjoy your Windows
Jasmin Kahriman
Jasmin is a tech-savvy Systems Engineer with over 15 years of experience in IT infrastructure, holding multiple IT certifications including CNIP, MTA, MCP, MCSA, MCT, Server+, and Network+.


Сегодня возникли проблемы при загрузке Windows. На экране выводилось сообщение:
не удается запустить windows из-за испорченного или отсутствующего файла system32/config/pci.sys
Первым делом подумал что ошибки на диске, поскольку подобные сообщения очень часто при проблемах загрузки файлов реестра Windows:
не удается запустить windows из-за испорченного или отсутствующего файла system32/config/system
не удается запустить windows из-за испорченного или отсутствующего файла system32/config/
Но при попытке загрузки компьютера с помощью консоли восстановления Windows XP с установочного компакт-диска Windows XP появляется одно из следующих сообщений об ошибке:
Не удается загрузить Setupdd.sys. Код ошибки 4.
Подумал, что диск не читается должным образом и решил загрузиться с восстановочного диска Lex. Но и в этом случае на экране та же ошибка Не удается загрузить Setupdd.sys. Код ошибки 4.
Теперь мои подозрения пали на видеокарту, поскольку при загрузке с диска кроме перечисленных проблем еще и символы отображались некорректно. В любом случае ошибка уже на аппаратном уровне, и можно было вооружаться отверткой, чтобы вскрывать корпус компьютера. Но решил для начала просмотреть, что пишут в Интернете.
Поискав через свой телефон, нашел, что проблема может возникать, если в конфигурации компьютера присутствуют поврежденные или несовместимые с Windows XP компоненты. И для решения проблемы требуется отключать все PCI-устройства. Но поскольку таких устройств в системе не обнаружилось, и видеокарта тоже была интегрирована (встроенная) то еще советовали проверить планки памяти. При этом куча отзывов, что во всем виновата битая память. Выключив компьютер, вскрыв корпус — выдернул одну планку памяти (благо, что их оказалось две). Затем включил и сразу же без каких-либо дополнительных манипуляций система загрузилась. Потом решил вернуть планку памяти обратно в слот. Система также загрузилась без проблем. И при последующих загрузках таких проблем больше не возникло. Вот так либо от пыли, либо просто от смещения контактов вызывало сбой при загрузке компьютера.
Вы можете оставить комментарий.

