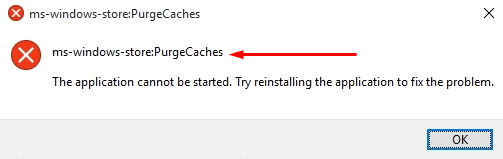
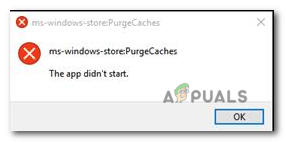
Если вы пытались запустить инструмент WSReset.exe для восстановления Магазина Windows, тогда могли получили сообщение об ошибке со следующим текстом: «ms-windows-store:PurgeCaches. Приложение не запустилось». При запуске упомянутой ранее утилиты Windows использует функцию ms-windows-store:PurgeCaches, чтобы избавиться от локально сохраненного кеша, которые копится в папках Магазина Windows. Причина, по которой это приводит к сбою, обычно заключается в отсутствии определенных разрешений для вашей учетной записи. Ниже мы покажем, что можно сделать, чтобы решить эту проблему, а также расскажем об обходных путях восстановления вашего Магазина Windows.
Скачать средство восстановления Windows
Скачать средство восстановления Windows

Существуют специальные утилиты восстановления для Windows, которые могут решить проблемы, связанные с повреждением реестра, неисправностью файловой системы, нестабильностью драйверов Windows. Мы рекомендуем вам использовать Advanced System Repair Pro для исправления ошибки «ms-windows-store:PurgeCaches» в Windows 11 или Windows 10.
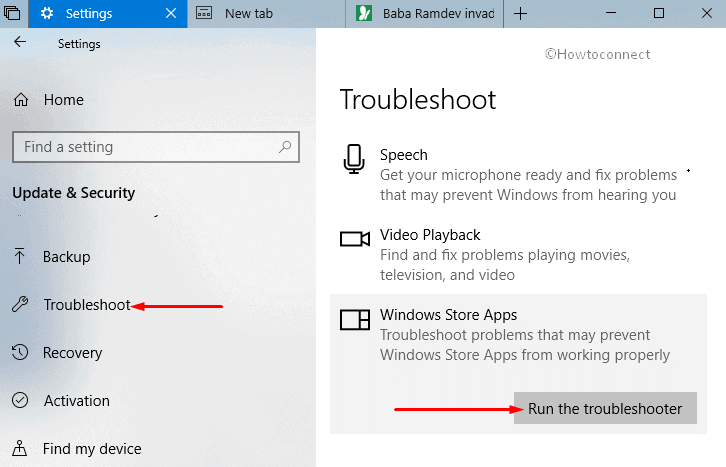
1. Запустите средство устранения неполадок Магазина Windows.
Прежде чем пробовать другие решения, приведенные ниже, рекомендуем сначала воспользоваться средством устранения неполадок Магазина Windows. Встроенные возможности Windows по устранению неполадок часто недооценивают с точки зрения их эффективности, хотя иногда они и правду могут решить проблему. Для этого выполните шаги, перечисленные ниже:
- Тип Параметры устранения неполадок в строку поиска (рядом с Меню Пуск) и откройте их.
- С правой стороны перейдите в Дополнительные средства устранения неполадок и прокрутите список вниз, чтобы выбрать Приложения из Магазина Windows.
- Затем нажмите Запустить средство устранения неполадок и следуйте инструкциям на экране.
- После завершения перезагрузите компьютер и посмотрите, изменилось ли что-нибудь.
2. Включите службу диспетчера лицензий.
Служба диспетчера лицензий — важная деталь поддержки инфраструктуры Магазина Windows. Если она отключена, содержимое, полученное через Магазин Windows, не будет работать должным образом. Обратите внимание, что эта служба присутствует только в Windows 10. Пользователи Windows 11 могут пропустить этот метод и перейти к другим ниже. Служба диспетчера лицензий часто может отключаться, когда пользователи загружают и устанавливают сторонние утилиты оптимизации. К счастью, ее легко восстановить, выполнив следующие простые шаги:
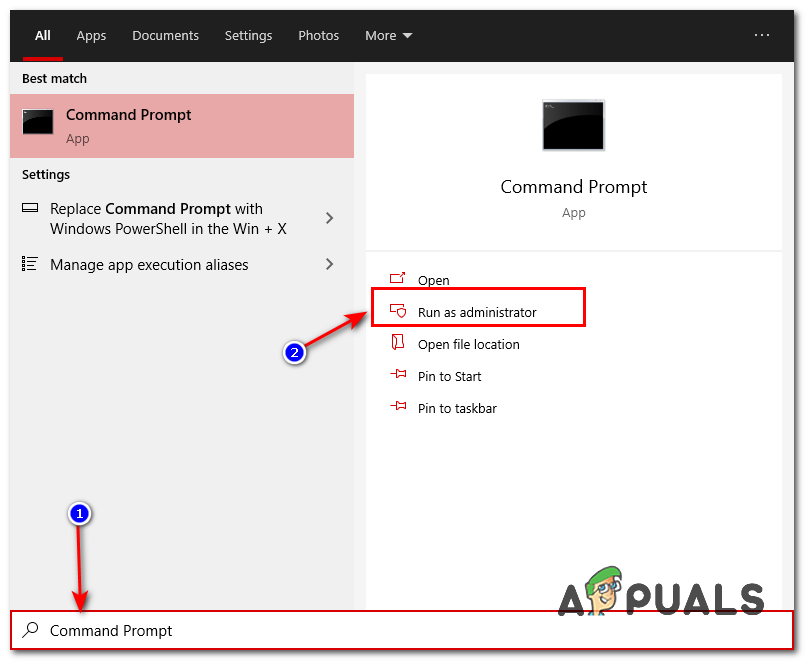
- Открытые Командная строка введя cmd в строку поиска рядом с Меню Пуск кнопку.
- Щелкните правой кнопкой мыши по Командная строка , а затем выбрать Запуск от имени администратора.
- После открытия консоли скопируйте и вставьте эту команду
sc config LicenseManager start= demandи нажмите Enter. - Когда процесс завершится, перезагрузите компьютер.
3. Сбросьте разрешение для Магазина Windows
Некоторые пользователи смогли решить проблему, благодаря простому сбросу основных разрешений для Магазина Windows. Это можно легко сделать с помощью той же командной строки, которую мы уже применяли выше.
- Открытые Командная строка как мы это делали раньше.
- Скопируйте-вставьте эту команду
icacls "C:\Program Files\WindowsApps" /reset /t /c /qи нажмите Enter. - Как только процесс завершится, перезагрузите компьютер.
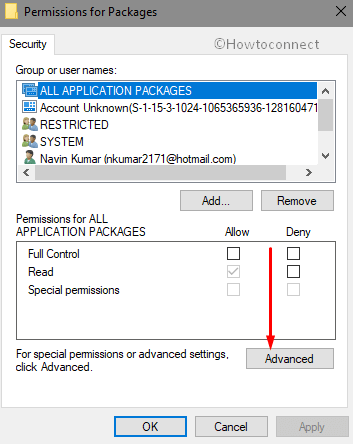
4. Измените разрешения в реестре Windows
Следующие шаги ниже будут сосредоточены на изменении определенных разрешений в реестре Windows. Как уже упоминалось, причина, по которой вы можете столкнуться с ошибкой «ms-windows-store:PurgeCaches», заключается в том, что используемой учетной записи назначено недостаточно разрешений. Поэтому давайте попробуем их предоставить, выполнив следующие действия:
- Нажмите Windows Key + R кнопки вместе, впишите
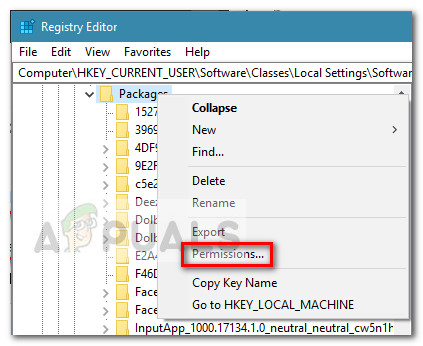
regeditи нажмите Enter . Также подтвердите Контроль учетных записей (UAC) окно, если появится. - На левой панели Редактор реестра, пройдите по этому пути
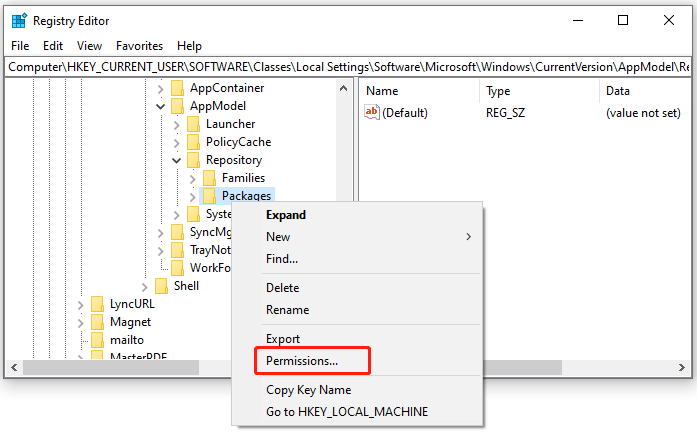
HKEY_CURRENT_USER\Software\Classes\Local Settings\Software\Microsoft\Windows\CurrentVersion\AppModel\Repository\Packages. - Затем щелкните правой кнопкой мыши по Packages и Разрешения….
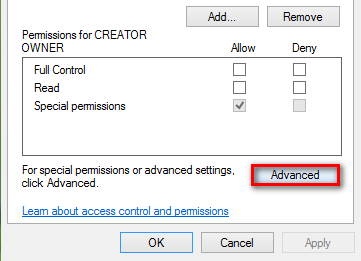
- После этого нажмите на Фильтр , а затем Изменить в верхней части окна.
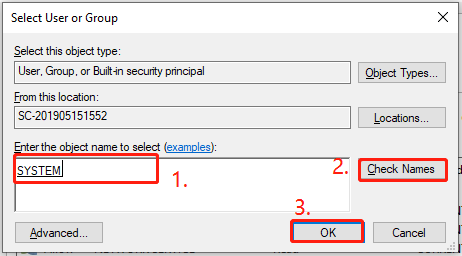
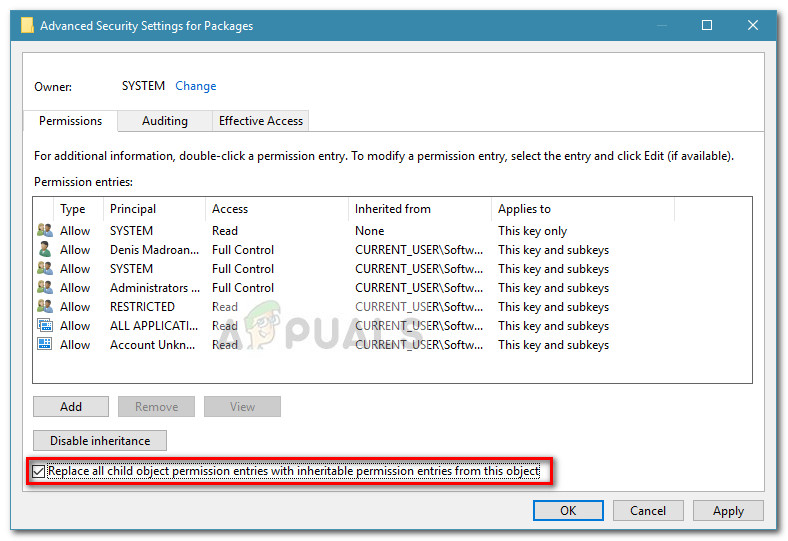
- Важно убедиться, что Владелец выставлен на Система.
- Если надписи Система нет в третьем поле, вы должны написать ее самостоятельно, а затем нажать на Проверить имена.
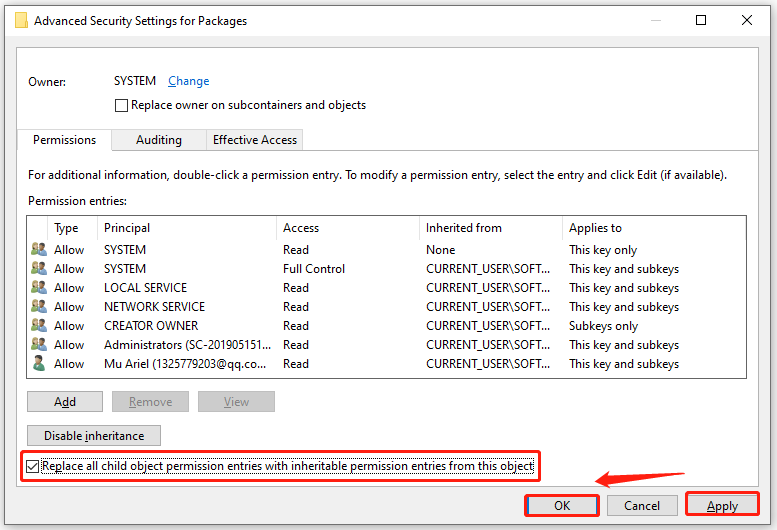
- Когда закончите, нажмите OK для подтверждения и переведите свой взгляд на пункт под названием Заменить все записи разрешений дочернего объекта наследуемыми от этого объекта.
- Выберите его, нажмите Применить , а затем OK , чтобы сохранить назначенные изменения.
Наконец, закройте окно и перезагрузите компьютер, чтобы проверить, решилась ли проблема.
5. Используйте PowerShell для перерегистрации Магазина Windows
В качестве альтернативы использованию инструмента WSReset.exe вы также можете попробовать выполнить тот же сброс с помощью Windows PowerShell. Для этого вам потребуется ввести только одну команду, которую можно найти в следующих шагах:
- Щелкните правой кнопкой мыши по Меню Пуск , а затем выбрать PowerShell (Admin). Нажмите Да в UAC окне, чтобы открыть консоль.
- В консоли PowerShell скопируйте и вставьте эту команду
$manifest = (Get-AppxPackage Microsoft.WindowsStore).InstallLocation + '\AppxManifest.xml' ; Add-AppxPackage -DisableDevelopmentMode -Register $manifestи затем нажмите Enter. - Подождите, пока процесс завершится, и перезагрузите компьютер. Затем, посмотрите изменилось ли что-то.
6. Переустановите встроенные приложения Windows
Этот метод является более продвинутым и также предполагает использование Windows PowerShell. Внимательно следуйте всем инструкциям, выполняя каждый шаг в приведенной последовательности. Обратите внимание, что на этом шаге будут переустановлены все встроенные приложения Windows, такие как Календарь, Почта, Камера, Фото и Магазин Windows. Не беспокойтесь, ваши личные файлы никак не пострадают в процессе.
- Во-первых, важно убедиться, что можете видеть Скрытые элементы. Вы можете сделать это, перейдя в Этот компьютер, затем в Вид сверху, а после выбрать Скрытые элементы.
- Как только это будет сделано, перейдите в
C:\Program Filesи найдите папку с именем WindowsApps. - Щелкните правой кнопкой мыши и выберите Объекты. Перейдите в Безопасность и затем выберите Фильтр.
- Далее нам нужно сменить владельца ключа. Нажмите на Изменить (выделено синим цветом).
- Затем вы должны ввести имя своей учетной записи пользователя в поле с надписью Введите имена выбираемых объектов и завершите, нажав OK.
- Теперь вернитесь к папке Безопасность вкладку в том же окне свойств папки WindowsApps, нажмите Редактировать чтобы изменить разрешения, и выберите личную учетную запись пользователя, которую вы ввели на шагах выше. Вы также должны изменить разрешения на Полный доступ и примените изменения.
- Откройте PowerShell (Admin) так же, как и в предыдущем методе.
- Затем скопируйте и вставьте эту команду
Get-AppXPackage | Foreach {Add-AppxPackage -DisableDevelopmentMode -Register $($_.InstallLocation)\AppXManifest.xml}и нажмите Enter для инициации процесса. - После этого перезагрузите компьютер и посмотрите, изменилось ли что-нибудь в положительную сторону.
Процесс переустановки Windows Apps еще не завершен, это был только предварительный этап, на котором мы настроили саму переустановку. Вот что вам следует делать дальше:
7. Создайте новую учетную запись пользователя.
Иногда создание новой учетной записи также может помочь в устранении проблемы. Новая учетная запись будет работать с нуля без каких-либо изменений, в том числе связанных с разрешениями.
- Щелкните правой кнопкой мыши по значку Меню Пуск и выберите Настройки. Вы также можете сделать это с помощью Windows Key + I сочетания клавиш.
- Перейдите на Учетные записи > Семья и другие пользователи.
- На правой панели прокрутите вниз до Другие пользователи раздела и нажмите Добавить пользователя для этого компьютера.
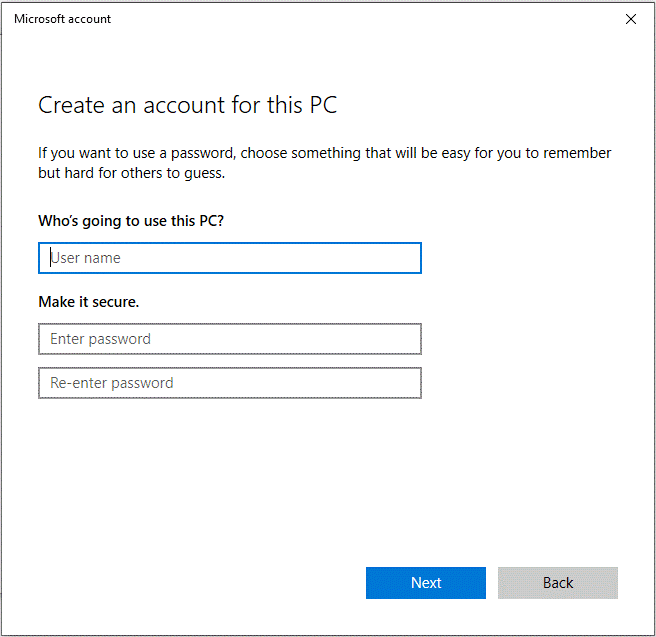
- Теперь выберите У меня нет данных для входа этого человека.
- Выберите Добавить пользователя без учетной записи Майкрософт.
- Затем введите username и password для нового пользователя и нажмите Следующая.
Итоги
Надеемся, больше нет необходимости поиска статей по устранению неполадок на эту тему. Как мы уже говорили, сбой при запуске инструмента WSReset.exe часто является проблемой с правами доступа, которую можно решить, настроив определенные параметры в реестре Windows. Если у вас возникли или возникнут какие-либо другие проблемы, связанные с ошибками или вредоносными программами в будущем, можете спокойно искать их на нашем веб-сайте. Мы публикуем много новых статей каждый день, чтобы помочь нашим посетителям быстро и без суеты избавиться от ошибок и вредоносных программ.
When running the WSReset.exe tool, a lot of users receive the “ms-windows-store:Purgecaches, The application didn’t start” error on Windows 10/11. Don’t worry. This post of MiniTool summarizes several effective troubleshooting fixes.
WSReset.exe is a troubleshooting tool that is used to reset or clear the Windows Store without changing the account settings or deleting installed apps. However, many users reported that they counter the “ms-windows-store Purgecaches” error when using the WSReset.exe too. If you are still trying to fix it, there are 8 reliable troubleshooting methods for you.
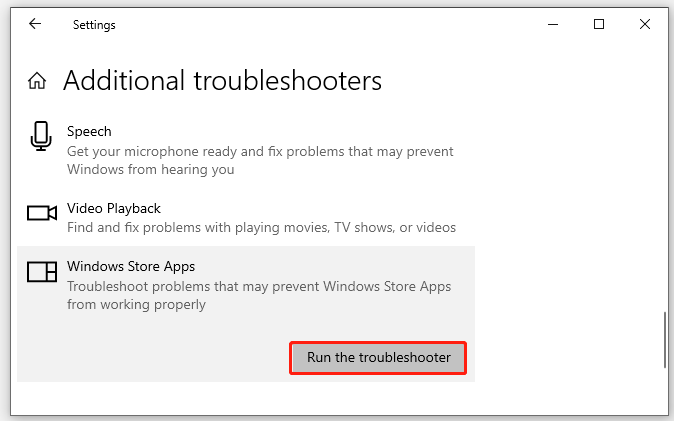
Fix 1. Run Windows Store Apps Troubleshooter
The ms-windows-store:Purgecaches error is often related to the Windows Store Apps. To fix it, you can use the built-in Windows Store Troubleshooter. Here’s how:
Step 1. Press Win + I keys to open Windows Settings.
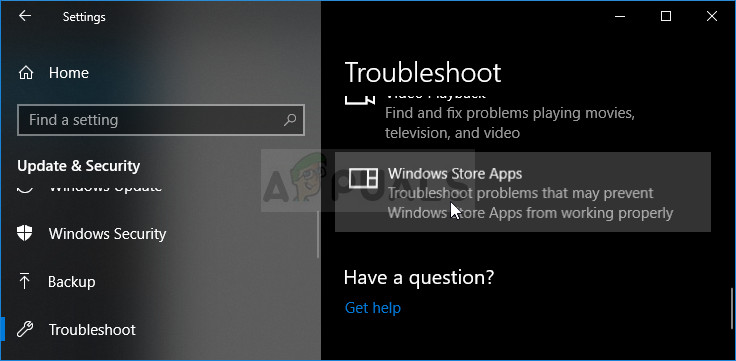
Step 2. Navigate to the Update & Security > Troubleshoot > Additional troubleshooters one by one.
Step 3. Select Windows Store Apps and click on Run the troubleshooter. After that, this tool will detect problems automatically. If any problems are detected, the troubleshooter will try to fix them. In addition, you can repeat this process for your Internet Connections troubleshooter and check if there is an internet issue.
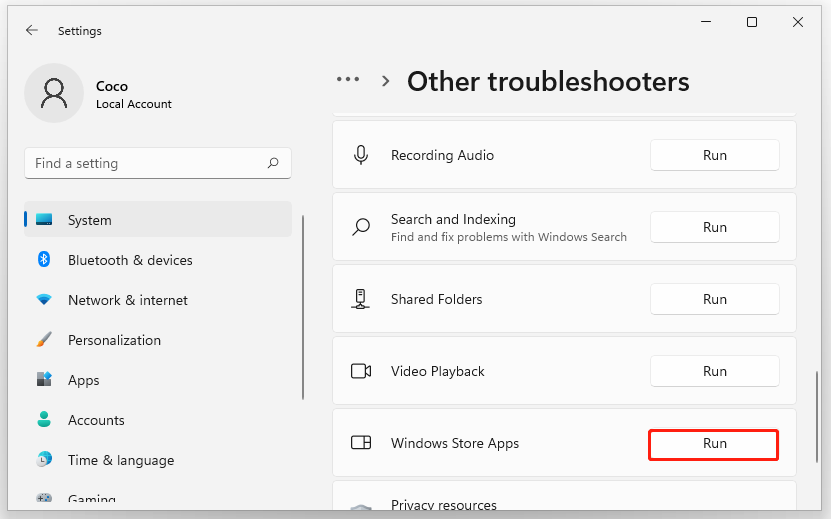
For Windows 11, you can open Settings, and then go to System > Troubleshoot > Other Troubleshooters > Windows Store Apps and click on Run.
Now, you can re-open the WSReset.exe tool and see if the “MS Windows Store Purgecaches the app didn’t start” error is cleared.
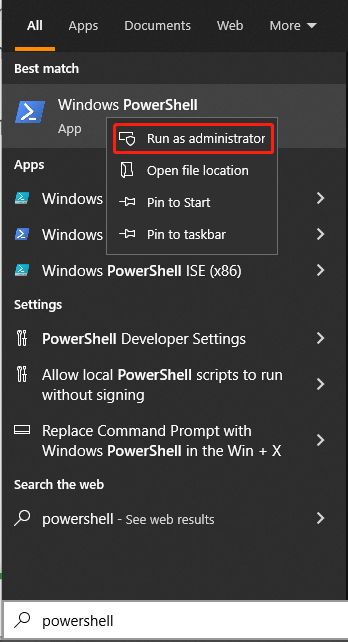
Fix 2. Re-register the Windows Store App
If running the troubleshooter can’t fix the “ms-windows-store:Purgecaches” error, you can try re-registering the Windows Store app via PowerShell. Before you do, make sure that you end all Windows app updates.
Step 1. Type powershell in the Search box, and then right-click Windows PowerShell and select Run as administrator. Then click on Yes in the UAC window to access this app with admin rights.
Step 2. In the elevated PowerShell window, copy and paste the following command and hit Enter.
$manifest = (Get-AppxPackage Microsoft.WindowsStore).InstallLocation + ‘AppxManifest.xml’ ; Add-AppxPackage -DisableDevelopmentMode -Register $manifest
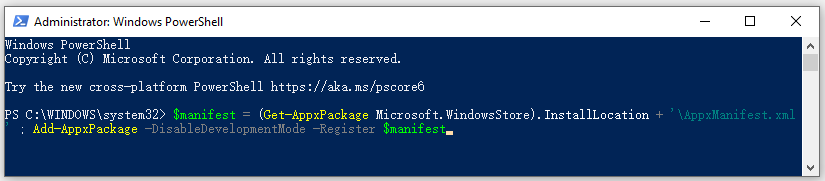
Step 3. Restart your computer and check if the Windows cannot find MS Windows Store Purgecaches error gets fixed.
Fix 3. Enable the License Manager Service
The ms-windows-store Purgecaches error can occur when the License Manager Service is disabled. In this case, you can enable the service via CMD.
Step 1. Type cmd in the Search box, and then right-click Command Prompt and select Run as administrator.
Step 2. In the elevated Command Prompt window, type the following command and hit Enter.
sc config LicenseManager start= demand
Step 3. Restart your computer and see if the error still occurs.
Fix 4. Repair the Packages Permissions via Registry Editor
As mentioned above, the “MS Windows Store Purgecaches the app didn’t start” error mainly occurs when your computer can’t reset the app cache. Here you can try repairing the packages permissions with Registry Editor.
Step 1. Press Win + R keys to open the Run dialog box, and then type regedit in it and hit Enter.

Step 2. In the Registry Editor window, go to the following path via the left navigation bar.
HKEY_CURRENT_USER Software Classes Local Settings Software Microsoft Windows CurrentVersion AppModel Repository Packages
Step 3. Right-click the Packages key from the left pane and select Permissions.
Step 4. Click on Advanced in the pop-up window.

Step 5. In the Advanced Security Settings window, click on the Change link next to Owner. Make sure the Owner option is set as System. If not, you can type System in the box of the Object name, click on Check Name then on OK.
Step 6. Tick the checkbox next to Replace all child object permission entries with inheritable permission entries from this object, and then click on Apply and OK.
Now, close Registry Editor and reboot your computer to check if the ms-windows-store Purgecaches issue is resolved.
Fix 5. Create a New Account
Many users reported that the ms-windows-store:Purgecaches error disappears when using the WSReset tool on a new account. It’s worth having a try.
Step 1. Open the Settings window and select Accounts.
Step 2. Select Other users or Family and other users from the left panel, and then click on Add someone else to this PC and click Sign in without a Microsoft account.
Step 3. In the pop-up window, create a new local account by following the on-screen instructions. Also, you can add a character password to protect your account.
Step 4. Once added, log in to the account by restarting your system. Then you can run the WSReset.exe utility again and see if the app didn’t start Windows 10 error is fixed.
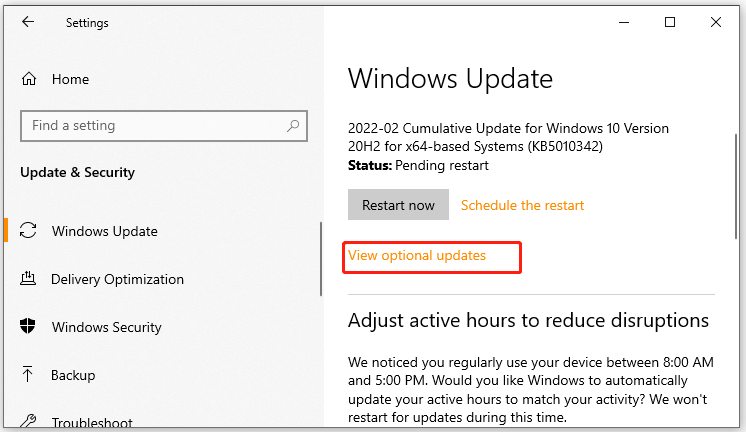
Fix 6. Install the Latest Windows Updates
Sometimes the ms-windows-store Purgecaches error occurs due to some bugs. So, we recommend you install all pending Windows updates and check if the issue is solved.
Step 1. Open the Settings app again and then go to the Update & Security section.
Step 2. Click on Check for updates button to start installing the Windows updates. Or, you can click View optional updates and install all available updates manually. After you install these updates, you can reboot your machine and check if the error gets fixed.
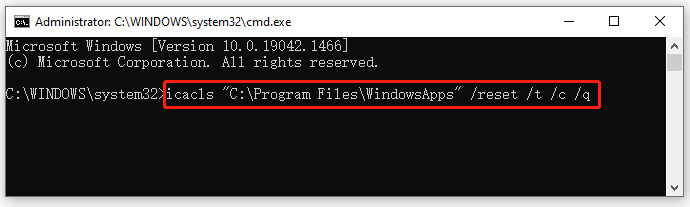
Fix 7. Reset Permissions to the WindowsApps Folder
Some users reported that the Windows cannot find MS Windows Store Purgecaches issue can be resolved by resetting certain permission to the WindowsApps folder. Here’s how:
Step 1. Open an elevated Command Prompt window just like Step 1 in Fix 3.
Step 2. Type the following command and hit Enter to apply it.
icacls “C:Program FilesWindowsApps” /reset /t /c /q
Fix 8. Reinstall Windows Default Apps
If none of the above methods get rid of the error, you may consider reinstalling Windows default apps. To do so, follow the steps below carefully.
Step 1. Press Win + E keys to open File Explorer, and then navigate to the C:ProgramFiles path, right-click the WindowsApps or ModifiableWindowsApps folder, and select Properties.
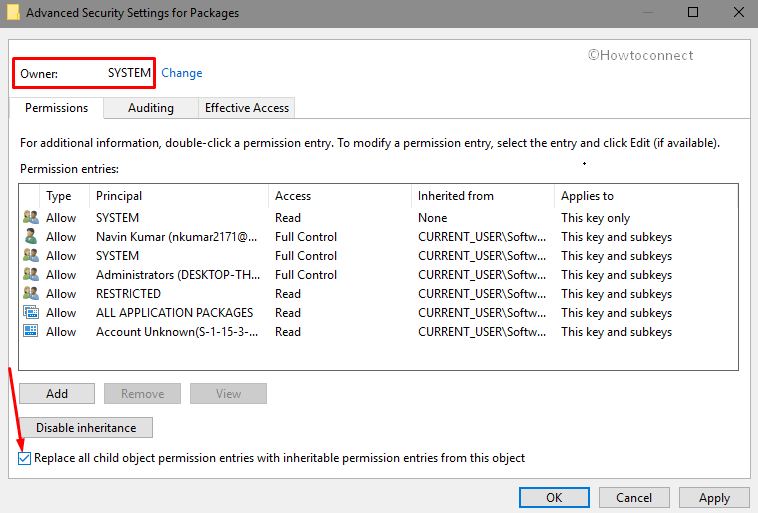
Step 2. Go to the Security tab and click on Advanced.
Step 3. In the Advanced Security Settings window, click on Change next to the Owner section. Then type your user account in the Enter the object name to select area, and click on Check Name and then on OK.
Step 4. Select the checkbox for Replace owner on subcontainers and objects and click on Apply and OK to change the ownership.
Step 5. In the WindowsApps properties windows, go to the Security tab, click on Edit to change permissions and select the user account you set the ownership to, and then change permissions to Full Control. Click on Apply and OK to execute these changes.
Step 6. Open the elevated PowerShell window like Step 1 in Fix 2, and then copy and paste the following command and press Enter to reinstall the Windows Default Apps.
Get-AppXPackage | Foreach {Add-AppxPackage -DisableDevelopmentMode -Register $($_.InstallLocation)AppXManifest.xml}
Once completed, reboot your computer and see if the MS Windows Store Purgecaches the app didn’t start error disappears.
Have you ever faced ms-windows-store:purgeCaches error in reset Microsoft Store application procedure? It’s likely Yes then you are in the right location here as we are telling every possible way to fix this Store issue in Windows 10. When you encounter any Windows 10 store app not working problem the first suggestion for you is to clean it with WSReset.exe. But sometimes this command itself becomes a cause showing ms-windows-store:purgeCaches error.
You find this issue when Microsoft Store is not working and you have tried Wsreset to resolve it. It throws an error message instead of solving the problem. However, you can fix ms-windows-store:purgeCaches in Windows 10 by following some tweaks –
Here is how to Fix ms-windows-store:purgeCaches in Windows 10 –
Solution-1: Registry hack
Step-1: Hit Win+R hotkeys to open Run dialog. When it appears, type regedit in the text field and Press Enter. If you see a UAC prompts up, make a click on Yes.
Step-2: Navigate the following path –
HKEY_CURRENT_USER\Software\Classes\Local Settings\Software\Microsoft\Windows\CurrentVersion\AppModel\Repository\PackagesStep-3: Once you reach the path, do a right click on Packages located in the left pane and Select Permissions…
Step-4: Select Advanced on the Permission window from the bottom right corner.
Step-5: Now check the box beside “Replace all child object permission entries with inheritable permission entries from this object “located on the lower part of the Window.
Note- Before changing, make sure that the Owner is System.
Step-6: In the end, perform a click on Apply and thereafter OK. Finally, Reboot your PC.
Hopefully, it will resolve the issue when the PC gets started.
Solution-2: Run Windows 10 Store troubleshooter
ms-windows-store:purgeCaches error also occurs due to corrupted files. In that case, Windows Store app troubleshoot may help to resolve it.
Read How to Get at Troubleshooters On Windows 10 to Resolve Issues
- Go to the taskbar search box and write down troubleshoot and Press Enter.
- It will open up Troubleshooting Settings page. Now move to the right pane and scroll down and Locate Windows store Apps under Find and fix other problems.
- Now make a click on it and when expanded Select Run the troubleshooter.
The system will automatically resolve the issue once it finds the error.
Solution-3: Use PowerShell command to Reinstall Store
You might face complication while using PowerShell command as it is little tough compared to other solutions. Therefore follow the steps carefully –
- Press Win+X jointly to open WinX menu. Once the result showed up, make a click on Windows PowerShell (admin). Now a UAC will prompt up asking your confirmation, click on Yes to continue.
- Copy the following command and paste it into PowerShell Window and Press Enter –
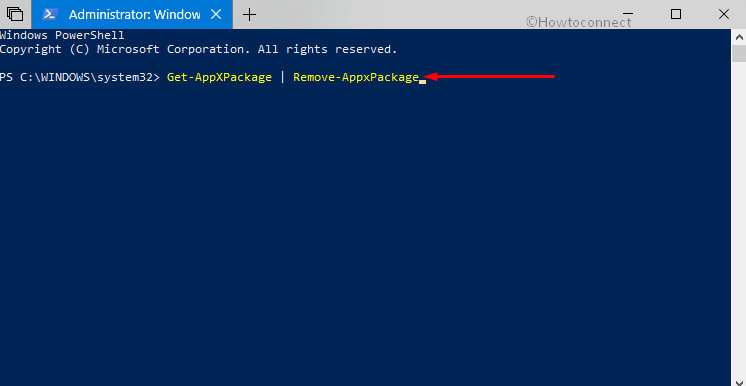
Get-AppXPackage | Remove-AppxPackage
Get-AppxPackage -AllUsers | Remove-AppxPackage
Kindly do not paste both the commands at the same time but do one after another. This method will remove or uninstall Microsoft Store from your computer. Once it is done, Reboot your PC.
- When you PC get restarted, open elevated PowerShell again by following the above step. This time paste this following text after blinking cursor –
Get-AppXPackage | Foreach {Add-AppxPackage -DisableDevelopmentMode -Register “$($_.InstallLocation)AppXManifest.xml”}The PowerShell command will bring back your Microsoft Store again. Finally, Reboot your system to save the changes you made and fix ms-windows-store:purgeCaches in Windows 10.
Solution-4: Try DISM Tool
To fix ms-windows-store:purgeCaches, you can use DISM Command. Here’s how –
- Type cmd in the search box located next to Start button. Once the result came into view, make a right click on “Command Prompt” Desktop app and choose “Run as administrator” from the options.
- Now type the following command one by one after C:\WINDOWS\system32> and press Enter each time –
DISM.exe /Online /Cleanup-image /ScanhealthDISM.exe /Online /Cleanup-image /Restorehealth
- When completed, exit the Command Prompt black Window and Reboot your system.
Run Disk cleanup
Running Disk Cleanup might help you to fix ms-windows-store:purgeCaches issue.
Press Windows logo key type “cleanmgr” and hit Enter.
Select C (the system drive), click OK, on the pop up and let the system to detect the removable items.
Once the Disk Cleanup wizard appears, press “Clean up System files”.
Wait for few minutes for the subsequent window, check all the boxes under Files to delete and then click OK.
That’s it. Hope these ways will help you to resolve ms-windows-store:purgeCaches issue.
Repair any Windows problems such as Blue/Black Screen, DLL, Exe, application, Regisrty error and quickly recover system from issues using Reimage.
ms-windows-store:purgecaches is a setting feature that purges and clears the locally stored cache for Windows Store that builds up over time. The following error code usually appears when there is a problem with the Windows Store to which users usually respond by using the wsreset.exe utility. This is the error message that is most regularly reported by affected users: “ms-windows-store:PurgeCaches, The application didn’t start.”
However, there are other contexts where the error can appear and they are all related to errors related to Windows Store. From what we gathered, this error has increased in frequency after a certain Windows 10 update and might sometimes be caused by the upgrading process to Windows 10.
If you’re currently struggling with the same “ms-windows-store:PurgeCaches, this article will deliver a series of reliable troubleshooting guides. Below you have a collection of methods that other users in a similar situation have used to resolve the issue. To ensure the best results, please follow the methods below in order until you follow a method that enables you to either fix or circumvent the issue. Let’s get to it!
1. Enable the License Manager Service
This issue can also occur if your License Manager Service is disabled. This is caused by a third-party tweaking program or optimization software. It will disable this service and then your Windows Store will stop working and throw this issue. To fix this we have simple steps for you, follow these:-
- Search for Command Prompt and click “Run as administrator”.

Running Command Prompt as an administrator - Once Command Prompt is opened type the following command and press enter:-
sc config LicenseManager start= demand
- Now restart your computer and check to see if the issue persists.
2. Repair permissions via Registry Editor
Since the error is mostly occurring because Windows is unable to reset the app cache, we can circumvent the issue with a registry workaround. Here’s a quick issue on fixing the ms-windows-store:PurgeCaches error by repairing the Packages permissions using Registry Editor:
- Press Windows key + R to open up a Run box. Next, type “regedit“, hit Enter, and choose Yes at the User Account Control (UAC) prompt to open Registry Editor with Administrative privileges.

- Inside Registry Editor, use the left pane to navigate to the following location:
HKEY_CURRENT_USER \ Software \ Classes \ Local Settings \ Software \ Microsoft \ Windows \ CurrentVersion \ AppModel\ Repository \ Packages
- Right-click on the Packages key and choose Permissions.

- Then, in the following window, click on the Advanced button.

- Click on the Change button at the top of the Advanced Security Settings for Packages and make sure that the Owner is set as System. If it’s not set to System, type System in the next box, then click on Check Names and then on OK.

- Once the Owner is set to System, scroll all the way down to the bottom of the screen and check the box associated with Replace all child object permission entries with inheritable permission entries from this object.

- Next, click Apply and then Ok. Finally, close Registry Editor and reboot your machine to see if the issue is resolved at the next startup.


If you’re still encountering the same “ms-windows-store:PurgeCaches error, continue down with Method 2.
3. Use Windows Store Troubleshooter
This solution was suggested by a Microsoft professional and it helped plenty of people, unlike other generic responses users usually receive. This solution is quite helpful as you will first run the inbuilt Windows Apps troubleshooter which will try to identify and solve the error. After that, you will try to run a Powershell command which tries to reregister your Windows Store app. Follow the instructions carefully:
- Search for Settings in the Start menu and click on the first result which pops up. You can also click directly on the gear button at the lower left part of the Start menu.
- Locate the Update & security section at the bottom part of the Settings window and click on it.
- Navigate to the Troubleshoot tab and check under the Find and Fix other problems.
- Windows Store Apps troubleshooter should be right there at the bottom so make sure you click on it and follow the instructions on the screen.
- Additionally, you can repeat the same process for the Internet Connections troubleshooter to check if it is your Internet connection that is causing the problems with Windows Store.
The next part of this solution consists of running this PowerShell command which will reregister the Windows Store. Make sure no Windows app updates are running in the meantime.
- Open PowerShell by right-clicking on the Start menu button and selecting the Windows PowerShell (Admin) option to open the tool with administrator privileges. If you see Command Prompt at that spot, you can also search for it manually.

- Copy and paste the following command and make sure you click Enter afterward.
$manifest = (Get-AppxPackage Microsoft.WindowsStore).InstallLocation + '\AppxManifest.xml' ; Add-AppxPackage -DisableDevelopmentMode -Register $manifest
- Restart your computer and check to see if the Windows Store issue has been resolved.
4. Update Windows
The thing is that many people only started to experience the error after a certain version of Windows has been released. Luckily, folks who had issues with that build were relieved to find out that a new build was soon released which managed to deal with the problem efficiently. The point is that you should install all pending updates on your computer and see if the problem has been resolved.
- Open PowerShell by right-clicking on the Start menu button and selecting the Windows PowerShell (Admin) option to open the tool with administrator privileges. If you see Command Prompt at that spot, you can also search for it manually.

- In the Powershell console, type in “cmd” and wait for Powershell to switch to the cmd-like environment.
- In the “cmd”-like console, type in the command displayed below and make sure you click Enter afterward:
wuauclt.exe /updatenow
- Let this command run for at least an hour and check back to see if any updates were found and/or installed without issues.
Alternative
- Search for Settings in the Start menu and click on the first result which pops up. You can also click directly on the gear button at the lower left part of the Start menu.

- Locate the Update & security section at the bottom part of the Settings window and click on it.
- Stay in the Windows Update tab and click on the Check for updates button under the Update status section to check if there is a new version of Windows available online.

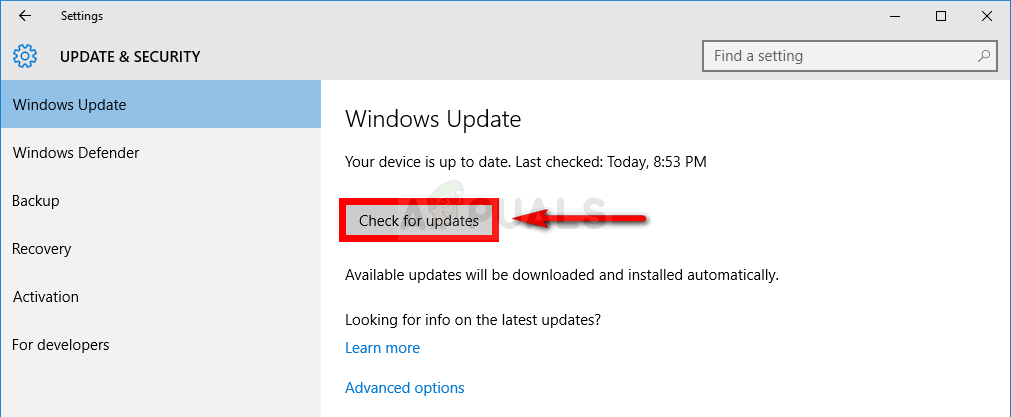
- If there is one, Windows should initiate the download process automatically.
5. Reinstall Windows Default Apps Using PowerShell
This method is somewhat advanced as it involves plenty of details and its implementation can be lengthy. However, if you follow the instructions carefully, you will probably end up with a properly working Windows Store service simply by reinstalling the Windows default apps.
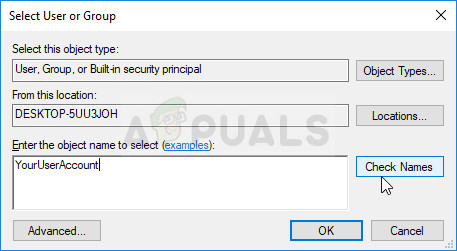
- Right-click the WindowsApps folder located in C:\Program Files, click Properties, and then click the Security tab. Click the Advanced button. The “Advanced Security Settings” window will appear. Here you need to change the Owner of the key.
- Click the Change link next to the “Owner:” label The Select User or Group window will appear.

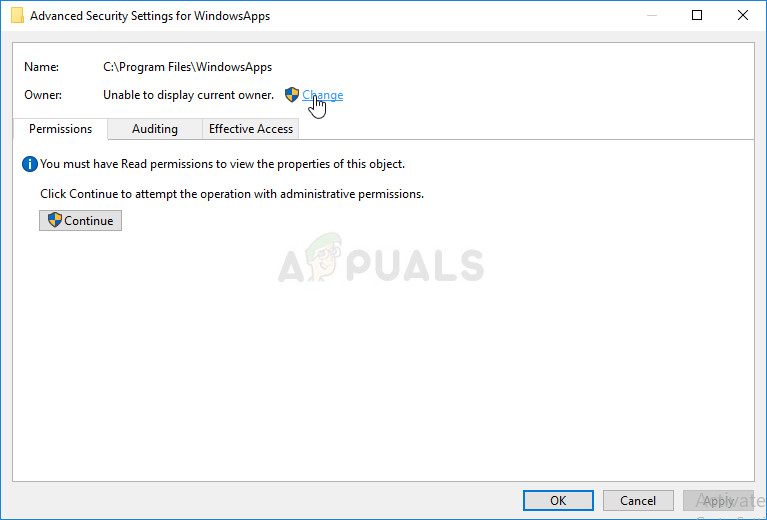
- Select the user account via the Advanced button or just type your user account in the area which says ‘Enter the object name to select’ and click OK. Add your user account.
- Optionally, to change the owner of all subfolders and files inside the folder, select the check box “Replace owner on subcontainers and objects” in the “Advanced Security Settings” window. Click OK to change the ownership.

- In the Security tab of the WindowsApps folder’s Properties window, click on Edit to change permissions and select the personal user account you set the ownership to. Change permissions to Full Control and apply the changes.
Now that you have performed these steps, it’s time to use Powershell to effectively reinstall these apps. This is probably the easier part of this method so consider yourself almost there.
- Open PowerShell by right-clicking on the Start menu button and selecting the Windows PowerShell (Admin) option to open it with admin privileges.
- Copy and paste this command and make sure you click Enter:
Get-AppXPackage | Foreach {Add-AppxPackage -DisableDevelopmentMode -Register $($_.InstallLocation)\AppXManifest.xml}
- Check to see if the problem has been resolved.
6. Use a New Account to Fix Things
This unusual trick has saved several users from losing their minds over this problematic error. It appears that, even though Windows Store and wsreset appear to be not working on your account, they sometimes do work on a new account, and running wsreset fixes Windows Store for both users! This is easy to do so make sure you don’t skip this solution!
- Open Settings either by clicking on the gear icon which is located just above the power button in the Start menu or by searching for it in the search bar next to the Start menu.
- Open the Accounts section in Settings and select the Family and other users option. Choose the Add someone else to this PC option located there, and then click on the Sign in without a Microsoft account option which is usually not recommended but it’s sufficient for your current purposes.

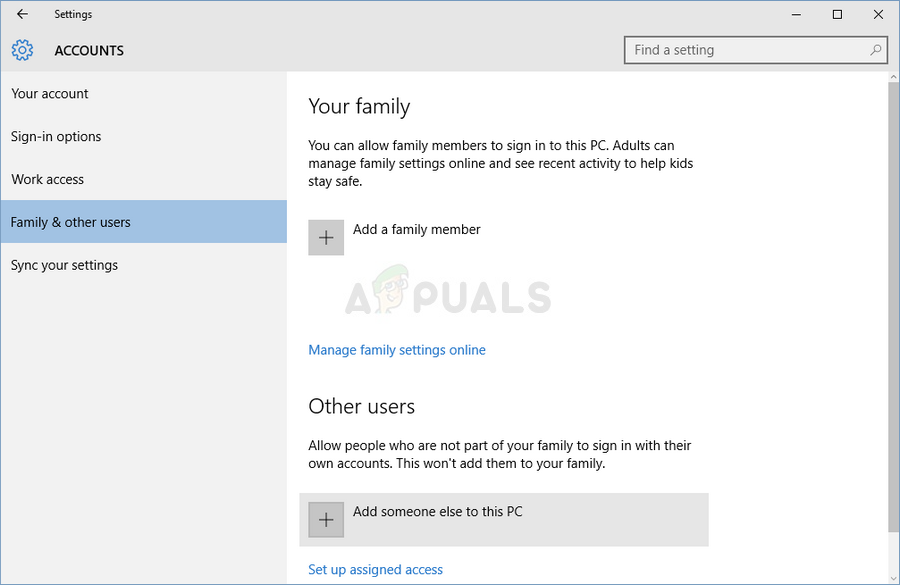
- Create a Local account and proceed with the instructions on-screen. Enter a username for this new account.
- If you want this account to be password-protected, you can add a character password, a password hint, and proceed by clicking Next. You are better off without a password in this scenario.

- Click the Finish button to finish creating a new account. Log in via this account by restarting your computer and try running the “wsreset” command by typing this work in the Start menu button and clicking the first result. Check to see if the problem is solved.
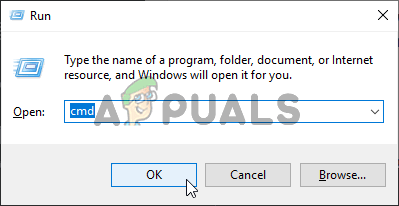
7. Reset Permissions
In some cases, certain permissions might need to be reset to the Windows folders to get rid of this issue. To do that:
- Press “Windows” + “R” to open the Run prompt.
- Type in “cmd” and press “Ctrl” + “Shift”+ “Enter” to provide administrative privileges.

Running the Command Prompt - Type in the following command and press “Enter” to execute it.
icacls "C:\Program Files\WindowsApps" /reset /t /c /q
- Check to see if the issue persists.

Kevin Arrows
Kevin Arrows is a highly experienced and knowledgeable technology specialist with over a decade of industry experience. He holds a Microsoft Certified Technology Specialist (MCTS) certification and has a deep passion for staying up-to-date on the latest tech developments. Kevin has written extensively on a wide range of tech-related topics, showcasing his expertise and knowledge in areas such as software development, cybersecurity, and cloud computing. His contributions to the tech field have been widely recognized and respected by his peers, and he is highly regarded for his ability to explain complex technical concepts in a clear and concise manner.
By Timothy Tibbetts |
If your Windows Store isn’t working and you’re getting the error message ms-windows-store:PurgeCaches, we have a solution. We discovered this error while posting a fix for You’ll Need a New App to Open This Ms-Default-Location, and the fix is the same, so here it is.
Odds are you got here because, at some point, you may have removed the Windows Store and or Store apps with tweaking or privacy apps, Apps & Features, Powershell, or a program uninstaller and forgot about it — until you need one of those apps.
Press the Windows key + S and begin typing in Powershell until you see Windows Powershell. Right click on that and Run as administrator.
1: Type in Get-AppxPackage -allusers Microsoft.WindowsStore | Foreach {Add-AppxPackage -DisableDevelopmentMode -Register «$($_.InstallLocation)AppXManifest.xml»} followed by the enter key.
Hopefully, that fixed your problem, but there’s a good chance you got an error or errors that look something like this:
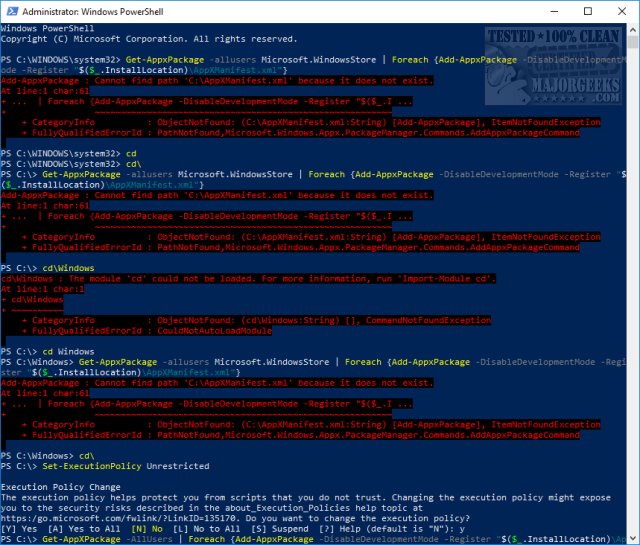
There are numerous possible errors however the most common, recurring words you might see are Can not find path C:\AppXManifest.xml or ObjectNotFound (C:\AppXManifest.xml:String). Because of this, we’re going to use Set-ExecutionPolicy Unrestricted and try it again and, finally, one other possibility.
2: This one worked for us. Press the Windows key + S and begin typing in Powershell until you see Windows Powershell. Right click on that and Run as administrator. Type in Set-ExecutionPolicy Unrestricted followed by enter.
Again, type in Get-AppxPackage -allusers Microsoft.WindowsStore | Foreach {Add-AppxPackage -DisableDevelopmentMode -Register «$($_.InstallLocation)AppXManifest.xml»} followed by the enter key.
3: Press the Windows key + S and begin typing in Powershell until you see Windows Powershell. Right click on that and Run as administrator. Type in Set-ExecutionPolicy Unrestricted followed by enter.
Again, type in Add-AppxPackage -DisableDevelopmentMode -Register $Env:SystemRootWinStoreAppxManifest.XML followed by the enter key.
4: This is worth a try if all else failed. Open PowerShell or Command Prompt as administrator. Type in wsreset.exe. and enter. If the «You’ll Need a New App to Open This Ms-Default-Location» error repeats, there’s one more thing to try.
If that didn’t fix the problem, open PowerShell as admin, and type in icacls «C:\Program Files\WindowsApps» /reset /t /c /q. Once completed, run wsreset.exe again, and press enter.
This was a tough error to fix, and we hope we solved your problem.
comments powered by Disqus