Minecraft doesn’t need any introduction. It is one of the most popular games among PC gamers. Minecraft actually originated the survivor game genre years back. Here you have to fight monsters for your survival, explore, build structures, etc. While this game runs pretty smoothly, you sometimes may face errors while installing or reinstalling it on your PC. Not to worry, you can fix this easily.
If Minecraft is not installing or if the Minecraft installer is not working on Windows 11/10 PC then here are some working suggestions to help you.
- Restart your PC
- Update your OS
- Install the alternative version of Minecraft
- Run Minecraft installer as administrator
- Delete Mod files
- Run Minecraft in compatibility mode
- Run Program Install & Uninstall Troubleshooter
- Ensure that Windows Installer Service.
Minecraft installer not working
1] Restart your PC
Restarting your PC normally fixes all the temporary bugs and errors. Restart your PC and if your installer is not working due to any temporary glitch, it will fix it. Once your PC reboots, try installing Minecraft again and see if that works. If not, try the next fix.
2] Update your OS
Make sure your PC is running the latest version of Windows. Check for the updates on your PC.
- Press Win+I to open the Settings.
- Go to Windows Update and see if there is any update available.
- Download and install it.
- Try running the installer again and see if that helps.
Move on to the next fix if this doesn’t help.
3] Install the alternative version of Minecraft
If the classic version is not working for you and you are unable to install it on your PC, try downloading the alternative version of Minecraft, ‘Minecraft.exe‘. You can download it here. There are various alternatives mentioned, check for the suitable version for your machine and download it. See if you can install it. Move on to the next fix if this doesn’t help.
4] Run Minecraft as an Administrator
- Launch the Start Menu and in the Search bar, type Minecraft Installer.
- Click on Run as Administrator.
- See if that works for you.
5] Remove Mod Files
If you had Minecraft installed on your PC before, this method may help you get rid of this error. The mod files remain on your PC even if you uninstall and delete the game and they won’t let you install it again. You need to remove these mod files from your PC first and then try to install the newer version of Minecraft.
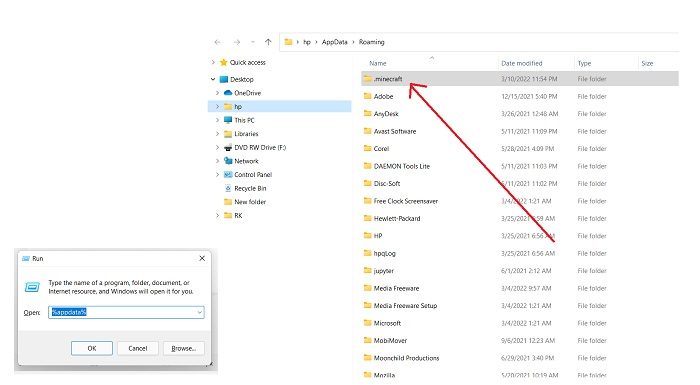
To remove mod files, hold down the Windows key and then press R on your keyboard and type ‘%appdata%’ and then press Enter. You will see a folder named Mods along with the other folders here. Take your cursor there, right-click and Delete it.
Once done, try installing Minecraft again and this should work.
6] Run Minecraft in Compatibility Mode
If none of the above-mentioned fixes are working for you, try running Minecraft in compatibility mode and see if that helps. Locate the file Minecraft.exe on your PC and right-click. Go to Properties and go to the Compatibility tab. Check the box saying, ‘Run this program in compatibility mode for” and from the dropdown menu select your OS. Go to the Settings section again and check the box saying, ‘Disable fullscreen optimizations. Click on ‘Apply’ then ‘OK’ and try running the Minecraft Installer again.
7] Run Program Install & Uninstall Troubleshooter
The first thing we would suggest is to run the Program Install and Uninstall Troubleshooter to repair issues that block program installation or removal because of corrupted registry keys. This program will fix corrupted registry keys on 64-bit operating systems, which control the update data, problems that prevent existing programs from being completely uninstalled or updated, and problems that block you from uninstalling a program through Add or Remove Programs (or Programs and Features) in Control Panel
8] Start the Windows Installer Service
In the Run prompt, type MSIExec, and then press Enter.
If you get the Windows Installer window which tells you everything about MSIExec, then it’s all good.
If you get an error, you might have to start it manually.
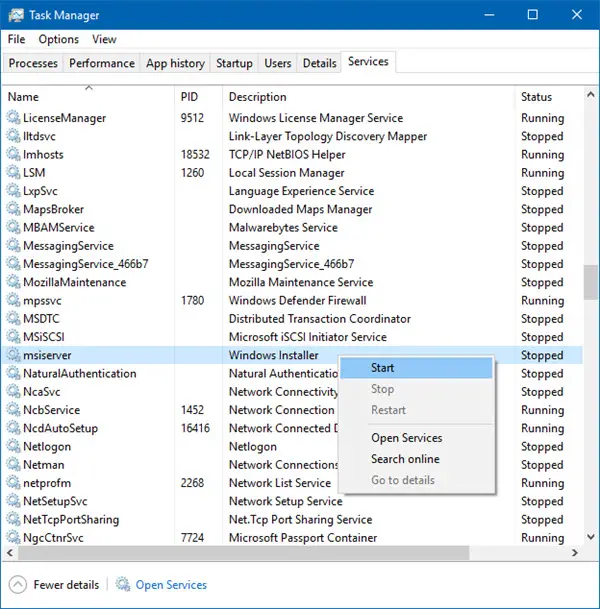
Right-click on the taskbar, and select Task Manager. Switch to Services, and look for msiserver. Start it.
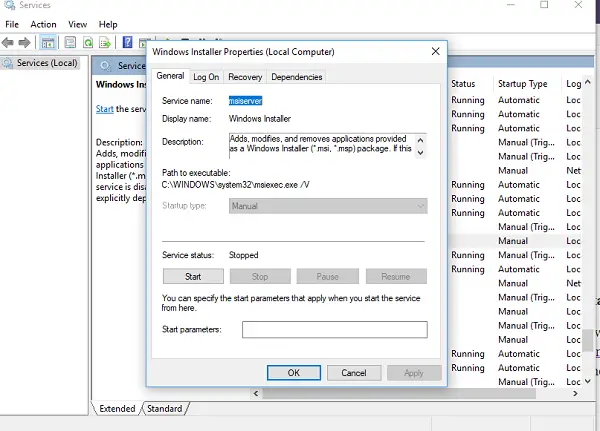
You can also run services.msc to open Windows Services and go to Windows Installer, and restart it.
Read: Minecraft Launcher won’t open on Windows PC
How do I fix the Minecraft Installer error?
We have mentioned 6 fixes for the Minecraft Installer error. Try them and see if that helps. Do let us know if none of the above-mentioned fixes work for you.
Why do I get errors when downloading Minecraft?
The downloading errors mostly come up because of the outdated Minecraft Game launcher. The launcher is regularly updated to fix the bugs. Make you have updated the launcher to avoid these errors.
Related: Minecraft keeps crashing or freezing.
Minecraft является одной из самых популярных видеоигр в мире, в которой игроки могут создавать и исследовать виртуальные миры. Однако иногда пользователи сталкиваются с проблемой, когда Minecraft для Windows не устанавливается на их компьютеры. В этой статье мы рассмотрим несколько возможных решений для этой проблемы.
Проверьте системные требования
Первым шагом, который следует предпринять, это убедиться, что ваш компьютер соответствует системным требованиям для установки игры. Minecraft требует определенные характеристики компьютера, чтобы работать стабильно и без проблем. Убедитесь, что ваш компьютер соответствует следующим минимальным системным требованиям:
- Операционная система: Windows 10
- Процессор: Intel Core i5-4690 или AMD A10-7800 или эквивалентный
- Оперативная память: 8 ГБ
- Видеокарта: NVIDIA GeForce 700 Series или AMD Radeon Rx 200 Series или эквивалентная с поддержкой OpenGL 4.5
- Свободное место на диске: Минимум 4 ГБ
- Интернет-соединение: Для загрузки и обновления игры требуется доступ в Интернет
Если ваш компьютер не соответствует минимальным требованиям, вам может быть необходимо обновить его компоненты, чтобы иметь возможность установить и запустить Minecraft.
Обновите драйверы видеокарты
Проблемы с установкой Minecraft часто связаны с устаревшими или несовместимыми драйверами видеокарты. Рекомендуется обновить драйверы видеокарты до последней версии, чтобы обеспечить правильную установку и работу игры.
Выполните следующие шаги для обновления драйверов видеокарты:
- Нажмите правой кнопкой мыши на рабочем столе и выберите «Параметры NVIDIA Control Panel» или «Параметры AMD Catalyst».
- В окне «Параметры» найдите секцию «Обновить драйверы».
- Перейдите в раздел «Обновить драйверы» и следуйте инструкциям для обновления драйверов видеокарты до последней версии.
После обновления драйверов видеокарты перезагрузите компьютер и попробуйте установить Minecraft снова.
Отключите антивирусное программное обеспечение
Некоторые антивирусные программы могут блокировать установку Minecraft, поскольку их алгоритмы могут ошибочно распознать ее как потенциально вредоносное программное обеспечение. Попробуйте временно отключить антивирусное программное обеспечение на вашем компьютере и повторите попытку установки Minecraft.
Используйте учетную запись с административными правами
Учетная запись, с которой вы пытаетесь установить Minecraft, должна иметь административные права доступа. Убедитесь, что ваша учетная запись имеет полные права доступа или попробуйте выполнить установку с помощью учетной записи администратора.
Контактная поддержка Mojang Studios
Если все вышеперечисленные методы не помогли решить проблему, рекомендуется обратиться в контактную поддержку Mojang Studios. Mojang Studios — разработчик Minecraft — предоставляет поддержку для своих игроков и может помочь вам в установке игры или решении возникающих проблем.
Посетите веб-сайт Mojang Studios и обратитесь к разделу поддержки, чтобы найти контактную информацию для получения помощи в установке Minecraft.
Заключение
Надеемся, что эти рекомендации помогут вам решить проблему с установкой Minecraft для Windows. Учитывайте, что эти методы являются общими и могут не решить все возможные проблемы. В случае неудачи, лучше обратиться к разработчику игры за поддержкой. Minecraft — увлекательная игра, и мы надеемся, что вы сможете наслаждаться ею после успешной установки.
Minecraft is a world-famous and one of the best-selling games in the world; with more than 126 million active users, the game has one of the biggest communities. It is a survival game and can be easily played as a single and multiplayer. But the main issue here is that many users running Windows 10 cannot download the game. To be specific, whenever users go to the Microsoft store and hit the download button, the download button gets white, and after a few seconds, the game doesn’t download. In fact, nothing happens. To fix this, Minecraft windows 10 won’t install the issue; we will give you some solutions.
Causes of Minecraft Windows 10 Won’t Install Issue
Usually, the issues occur after you have redeemed the code, although it is unnecessary. The issue can appear if you are directly purchasing the game. Furthermore, the users who have faced this strange issue claimed that the issue is because of outdated windows or the Microsoft store. If your window runs the build version below 1909, the issue will occur.
- Outdated Windows
- Outdated Microsoft Store
- Older caches and temporary data of the Microsoft Store
Similar Types of Minecraft Windows 10 Won’t Install Issue
- Minecraft windows 10 no applicable devices
- Minecraft windows 10 download
- Minecraft for Windows 10 does not work on this device
- Minecraft windows 10 edition
- Minecraft windows 10 install button greyed out
- Minecraft for windows 10 is not downloading
- Minecraft download
- why can t I run Minecraft on windows 10
- Minecraft won’t launch on windows 10
- Minecraft windows 10 edition download error
Since the issue is all about the pending updates, so fixing the Issue will not be a complex or hard process. Below we have gathered a few solutions to completely eliminate the issue.
1. Update Your Windows
So the first and the most obvious Minecraft Windows 10 Won’t Install method would be updating your windows if you are running the build version below 1909, then the issue will appear. The game requires the latest firmware. For your ease, we have provided you with all the steps to download the latest Windows version.
- STEP 1. Go to the Start Menu; on the left, you will see a Gear icon; click on it
- STEP 2. The setting window will open up, now locate and click on Updates and Security
- STEP 3. On the left, click on the Windows update tab
- STEP 4. Now on the right, click on Check for Updates
- STEP 5. Now download the update
- STEP 6. Restart your system, and the error will be gone
2. Use Update Assistant
When checking for updates, some users show that the system is up to date even though it is not. If you are also facing the same Minecraft Windows 10 Won’t Install, follow the below steps.
- STEP 1. However, in some cases, you will get that your system is up to date, even though it is not
- STEP 2. Open up your browser and go to this link
- STEP 3. Download the update assistant and run the program
- STEP 4. Hopefully, you will be able to get the latest update
- STEP 5. Once updated, restart your system, and your issue will be fixed
3. Reset Microsoft Store
If you are running the latest Windows version and getting the Minecraft Windows 10 Won’t Install error, follow the steps.
- STEP 1. Open the command window with admin permissions
- STEP 2. Now execute the below command
WSReset.exe
- STEP 3. Once you execute the command, you will see a new window will pop up with a message The cache for the Store was cleared. You can now browse the Store for apps.
- STEP 4. Now restart your system and then download the game without errors
Conclusion:
In the above guide, we have tried to cover all the solutions that can fix the Minecraft Windows 10 Won’t Install Issue. We have covered all the possible causes that can trigger the error.
Follow us for more interesting tech stuff guides, and tips like this Minecraft Windows 10 Won’t Install. Thank you!
На чтение 2 мин. Просмотров 1.2k. Опубликовано
Minecraft, вероятно, самая популярная игра в мире, и Microsoft поступила правильно, когда включила эту игру в Windows Store. Но некоторые игроки сообщают, что не могут загрузить игру из-за ошибки 0x803f7003, поэтому вот несколько советов, если вы тоже столкнулись с этой проблемой.

Содержание
- Не можете скачать Minecraft из Магазина Windows? Следить за этим
- Решение 1. Попробуйте обновить загрузку несколько раз
- Решение 2 – Сброс Windows Store
Не можете скачать Minecraft из Магазина Windows? Следить за этим
Решение 1. Попробуйте обновить загрузку несколько раз
Я знаю, что это звучит как глупое решение, на самом деле это совсем не похоже на решение, но некоторые пользователи сообщали, что они могли нормально загружать Minecraft после многократного нажатия кнопки загрузки, поэтому прежде чем делать что-либо еще, Можно отправить несколько минут несколько раз, нажав кнопку загрузки снова и снова.

Если это действительно окажется неправильным «решением», то проблема, вероятно, находится в Магазине Windows, поэтому вы должны что-то с этим сделать.
Решение 2 – Сброс Windows Store
Как я уже сказал, проблема, вероятно, кроется в Магазине Windows, поэтому первое, что вы можете сделать, это сбросить Магазин Windows, а затем снова попытаться загрузить Minecraft. Вот как можно сбросить Windows Store:
- Перейдите в Поиск и введите wsreset.exe
- Нажмите Enter и дайте процессу сбросить ваш Windows Store
Теперь снова войдите в свою учетную запись Microsoft и попробуйте скачать Minecraft. Если проблема не устранена, обратитесь к нашей статье о решении проблем Магазина Windows для получения дополнительных решений.
Если вы все еще не можете загрузить игру из Магазина Windows, вам следует поискать дополнительные решения на форумах Minecraft и Windows, надеюсь, эти ребята нашли другое решение.
Если у вас есть какие-либо другие проблемы, связанные с Windows 10, вы можете найти решение в разделе исправлений Windows 10.
1.Переходим в «мой компьютер», правой кнопкой мыши нажимаем «свойства»,смотрим тип системы! Если у вас 32-bit, то обязательно обновите до 64-bit!
2.Обязательно устанавливаем файл MinecraftW10 <—- скачать там!
3.Обязательно устанавливаем файл из папки Minecraft_W10 —«удалить не нужные файлы» «Unlocker1.9.2.exe».
4. Переди в папку «x64 потом System32 и там будет файл «Windows.ApplicationModel.Store.dll» нажать копировать!
5. переходим дальше в папку «Этот компьютер-Локальный диск С — Windows — System32» жмём верху «ТИП» Выбираем Разжижения приложения ! и ищем файл «Windows.ApplicationModel.Store.dll» жмём правой кнопкой мышки и выбираем волшебную палочку, а там выбираем удалить! Затем переносим файл ApplicationModel.Store.dll из 1 папки x64 потом System32!
6.Дальше переходим Этот компьютер-Локальный диск С — Windows SysWOW64 жмём верху «ТИП» Выбираем Разжижения приложения ! И ищем файл «Windows.ApplicationModel.Store.dll» жмём правой кнопкой мышки и выбираем волшебную палочку, а там выбираем удалить! Затем переносим файл ApplicationModel.Store.dll из 2 папки «SysWOW64» «Windows.ApplicationModel.Store.dll»
7. Дальше переходим в папку «Minecraft все версий» потом запустить «MCLauncher.exe» и установить любую версию!!!1 иили переди сюда ССЫЛКА и том установить Minecraft! А там уже войди в свой Xbox!
8. Обновить свой пк до последней версии!(ОБЯЗАТЕЛЬНО) Переходим в меню Пуск-Параметры- Обновления и Безопасность- Нажать обновить ваш пк.
8. Если вам не помогло, напишите нам сюда


