-
Home
-
Partition Magic
- [Solved] WSL Not Working After Upgrading to Windows 11
By Vega | Follow |
Last Updated
WSL is the Windows Subsystem for Linux and this WSL not working after upgrading to Windows 11 issue appears. If you are troubled by this problem, this article from MiniTool Partition Wizard will talk something about this error, and show some solutions.
Windows Subsystem for Linux (WSL) is part of the Windows operating system functionality that allows you to run Linux file systems, command-line tools, and GUI applications on Windows computers. However, many users reported that WSL does not work or does not start on Windows 11.
Well, how to fix WSL not working in Windows 11? Keep reading.
Fix 1: Enable Windows Subsystem for Linux
When users upgrade their systems to Windows 11, the WSL functionality will be disabled. So, just enable this feature and it will return to normal state.
Step 1: Press the Win + S key and type Turn Windows features on or off and press the Enter button.
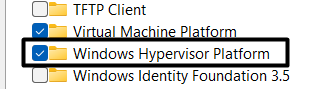
Step 2: Scroll down the screen and select Windows Subsystem for Linux and enable it.
Step 3: Now click on the OK button.

Wait a few seconds for the system files to be installed, and you will be prompted to restart your computer.
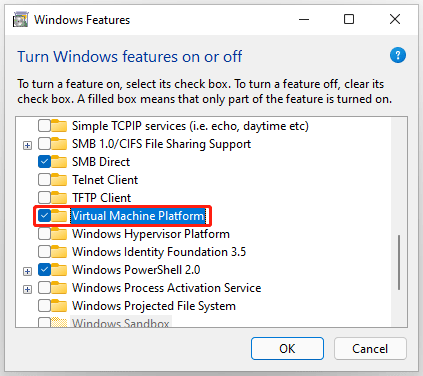
Fix 2: Enable Virtual Machine
Running Windows Subsystem for Linux (WSL) requires installing a virtual machine, which allows you to run multiple operating systems simultaneously using the same hardware. If Windows Subsystem for Linux is enabled, the next thing you need to check is whether the virtual machine is enabled. Proceed as follows:
Step 1: Press the Win + S key and type turn Windows features on or off, then press the Enter button.
Step 2: Scroll down the screen and select Virtual Machine Platform and enable it.
Step 3: Now click on the OK button.
Wait a few seconds, you will be asked to restart your computer and check if the problem is resolved.
Fix 3: Enable Hyper-V
Hyper-V is a feature in the Windows operating system that allows the system to create virtual environments. If this feature is disabled on your system, you will not be able to start or create WSLs. Therefore, you need to enable Hyper-V.
In the Windows Features box, look for Hyper-V and enable it. After enabling the feature, restart your computer and check if it is fixed.
Fix 4: Launch Windows Subsystem for Linux from the Microsoft Store
Sometimes users are unable to start WSL because of a glitch in the installed application. Therefore, you must update WSL from the Microsoft Store, and you can start Windows Subsystem for Linux (WSL) from the Microsoft Store. This way you not only get the latest updates and new features, but also troubleshoot issues.
Step 1: Press the Windows key and type Microsoft Store, then press Enter.
Step 2: Select Library from the lower left corner of the Apps screen.
Step 3: Select the Linux distribution app, such as Ubuntu, and click Launch.
Now, start WSL and check if the WSL not working in Windows 11 problem persists.
Fix 5: Repair Linux Distribution Application
Your Linux distribution application may be dealing with broken bugs, or it may be outdated which prevents you from using it properly. If this is the case, then you have two options to fix the problem: fix it or uninstall it and reinstall it. To repair the application, follow the steps prescribed below:
Step 1: Press the Windows + I key to open Settings. Then select Apps.
Step 2: Click Apps & Features or Installed Apps on the right side of the screen.
Step 3: Scroll down the screen and select the Linux distribution application.
Step 4: Click on the three-dotted line and select Advanced options.
Step 5: Now click on the Repair button there. Then follow the on-screen instructions to complete the process.
Once done, you can launch WSL and check if the WSL not working in Windows 11 issue gets fixed.
About The Author

Position: Columnist
Vega joined MiniTool as an editor after graduation. She enjoys helping people with computer problems, including disk management, data recovery, and more. She is constantly expanding her knowledge in related fields. And she will continue to bring more easy-to-understand professional articles to help people solve various problems on the PC. In her daily life, Vega enjoys hanging out with friends, shopping online and listening to music. She is someone who knows how to enjoy life.
Наконец, после долгих вдумчивых дискуссий между Microsoft и Linux, мы увидели столь необходимую интеграцию Linux в последнюю версию Windows 11. Теперь вы можете запускать команды и инструменты Linux на своем ПК с Windows 11. Большинство пользователей наслаждаются интеграцией WSL, устанавливая свою любимую программу Linux в своей системе.
Но, к сожалению, некоторые пользователи по-прежнему сталкиваются с трудностями при запуске предпочитаемого ими дистрибутива Linux на ПК с Windows. Узнав об этих проблемах, связанных с WSL, мы подробно изучили их, а также нашли некоторые возможные обходные пути, которые могут их исправить. Чтобы помочь вам, мы также упомянули тевозможные обходные путив этом руководстве по устранению неполадок.
Почему подсистема Windows для Linux (WSL) не работает должным образом?
Вот некоторые из наиболее распространенных причин неработоспособности подсистемы Windows для Linux (WSL) в Windows 11. Проверьте их ниже:
- WSL отключен в вашей системе
- Платформа виртуальной машины и функция Hyper V отключены
- Поврежденная установка приложения Linux
- Вредоносное ПО и вирусы
- Неисправное обновление Windows
- Ограничения брандмауэра Windows
Здесь, в этом разделе, мы упомянулиболее 15 обходных путейэто может исправить проблему с неработающей подсистемой Windows для Linux на вашем ПК с Windows 11.
1. Убедитесь, что ваш компьютер поддерживает WSL
При поиске некоторых решений мы обнаружили, что многие пользователи сталкиваются с трудностями при установке WSL 2, которая является последней версией WSL. Когда мы углубились в эту проблему, чтобы узнать больше об этом, мы обнаружили, что WSL 2 может работать только в системах, имеющихПреобразование адресов второго уровня (SLAT)особенность.
Если вы также не можете установить WSL 2 на свой ПК с Windows 11, то это может быть и с вами. Еще одно требование для запуска WSL 2 заключается в том, что ваша система должна работать на процессорах последнего поколения. Если ваша система не соответствует минимальным требованиям, вы не сможете запустить на ней WSL 2.
2.Убедитесь, что WSI работает в основном хранилище
Многие пользователи сообщают, что когда они пытаются установить WSL на своем компьютере с Windows, процесс установки внезапно завершается сбоем, и они видят0x80070003ошибка код на экране. Наиболее распространенной причиной этой ошибки является невозможность запуска подсистемы Windows для Linux на основном диске системы хранения, то есть на диске C:.
Если такая же ошибка возникла в вашем случае при установке WSL, то мы предлагаем вам убедиться, что ему разрешено использовать основной накопитель системы. Вы можете выполнить следующие шаги, чтобы узнать, как проверить то же самое:
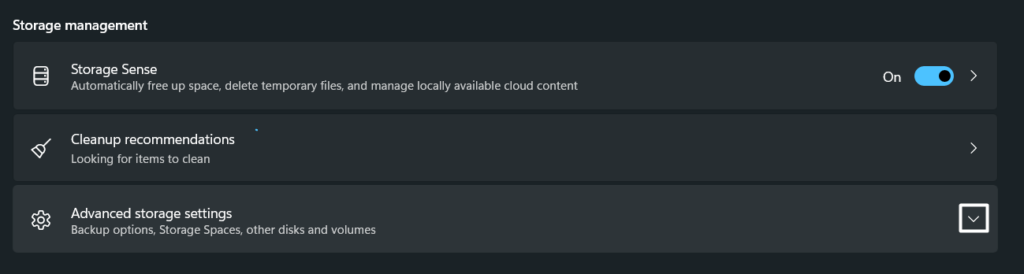
1.ОткройПриложение настроекна вашем ПК с Windows 11 с помощьюОкна + яярлык и перейти кХранилищераздел.
2.Далее развернитеРасширенные настройки хранилищаподразделУправление хранилищемраздел.
3.Теперь развернитеГде сохраняется новый контентподраздел подРасширенные настройки хранилищараздел.

4.вРасширенные настройки хранилищавыберите основной накопитель вашей системы изНовые приложения будут сохраняться в:выпадающее меню и закройте окно.

Убедившись, что WSL разрешено использовать основной накопитель, проверьте, можете ли вы теперь установить WSL на свой ПК с Windows 11.
3.Сканирование на наличие вирусов и вредоносных программ на вашем компьютере
В ходе исследования мы обнаружили, чтовирусы и вредоносное ПОв системе также может помешать правильному функционированию основных компонентов системы, что может привести к этой проблеме. Это может быть то же самое в вашем случае, и, чтобы избежать этого, мы предлагаем просканировать всю систему и убедиться, что в ней нет зараженных файлов.
Вы можете использовать встроенный в Windows инструмент удаления вредоносных программ для поиска зараженных файлов на вашем компьютере и их удаления. Следуйте инструкциям ниже, чтобы узнать, как сделать то же самое:
1.ОткройПриложение настроекна ПК с Windows 11 любым способом и перейдите кКонфиденциальность и безопасностьраздел.

2.После того, как вы переехали вКонфиденциальность и безопасностьраздел, нажмите наБезопасность Windowsа затем нажмите наОткройте Безопасность Windowsвариант.

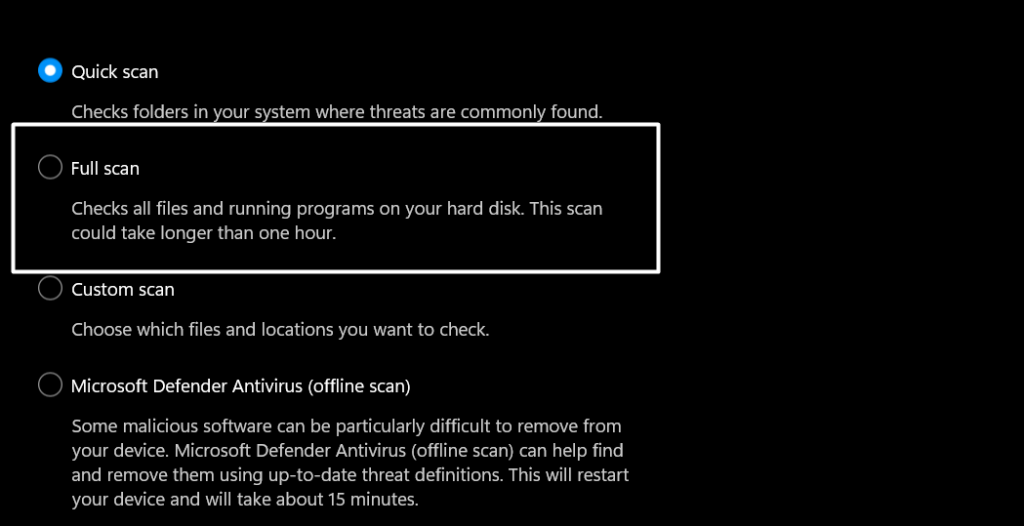
3.вЗащита от вирусов и угрозраздел, нажмите наПараметры сканированияа затем выберите тип сканирования дляПолное сканирование.

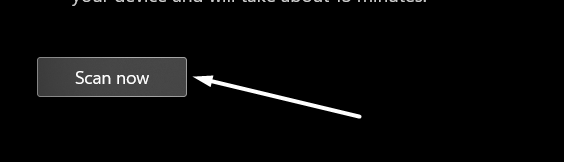
4.В конце нажмите наСканировать сейчас, чтобы начать процесс сканирования, и дождитесь завершения сканирования.

5.После завершения сканирования вредоносных программ вы увидите результаты сканирования на том же экране. Если процесс сканирования обнаружит какие-то вредоносные файлы в системе, вы можете поместить их в карантин или удалить с компьютера.
Сделав то же самое, проверьте статус проблемы.
4. Повторно включите подсистему Windows для Linux (WSL)
Одним из наиболее распространенных, но эффективных решений для преодоления этих проблем, связанных с WSL, являетсяповторно включить WSLна вашем ПК с Windows 11. Это восстановит все компоненты WSL и предотвратит появление тех же проблем. Ниже мы упомянули один из самых простых способов повторного включения WSL на ПК с Windows 11:
1.Во-первых, откройтеПанель управленияна ПК с Windows 11 и перейдите кПрограммыраздел с главного экрана.

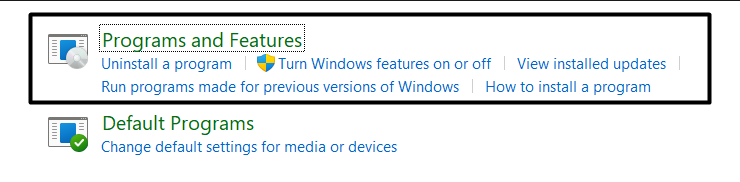
2.вПрограммыраздел, выберитеПрограммы и компонентыраздел и нажмитеВключение или отключение функций Windows.

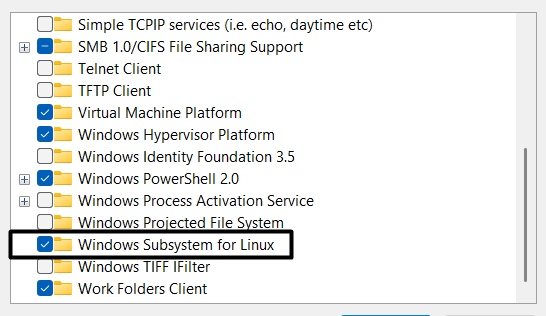
3.Search for theПодсистема Windows для Linuxфлажок вВозможности системы Windowsвсплывающее окно иповторно включите его.

После повторного включения функции подсистемы Windows для Linux проверьте, можете ли вы теперь установить и запустить Linux на своем ПК с Windows 11.
5. Убедитесь, что функция платформы виртуальной машины включена
Согласно Microsoft, функция платформы виртуальных машин должна быть включена на вашем ПК с Windows для бесперебойной работы WSL. Поэтому мы рекомендуем вам убедиться, что эта функция включена на вашем ПК с Windows 11. Вы можете выполнить следующие шаги, чтобы убедиться, что эта функция включена на вашем ПК:
1.Для этого перейдите вПрограммы и компонентыраздел вПанель управлениязапрограммировать и выбратьВключение или отключение функций Windowsс левой боковой панели.
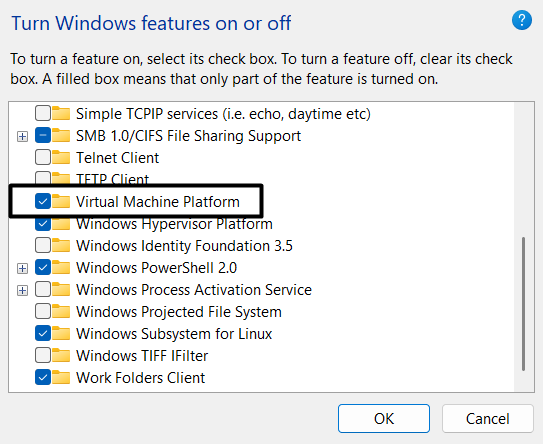
2.Теперь ищитеПлатформа виртуальной машинывариант вВозможности системы Windowsвсплывающее окно и снова включите его, повторно отметив его.

После повторного включения функции Virtual Machine Platform на ПК с Windows перезапустите ее и проверьте, нормально ли работает WSL.
6. Убедитесь, что Hyper-V включен
Hyper V, также известный как Hypervisor, — это функция Windows, которая позволяет создавать и запускать виртуальные машины на ПК с Windows. Чтобы установить и запустить WSL на ПК с Windows 11,Функция Hyper V должна быть включенана вашем ПК.
Возможно, функция Hyper V отключена. на вашем компьютере, поэтому возникает эта проблема. Вы можете проверить то же самое из панели управления, и приведенные ниже шаги демонстрируют то же самое:
1.Сначала откройтеПанель управленияприложение на вашем компьютере с Windows и перейдите кВключение или отключение функций Windowsраздел с левой боковой панели.

2.НайдитеПлатформа гипервизора Windowsособенность вВозможности системы Windowsдиалоговое окно иповторно включите его.

Теперь вы сможете с легкостью запускать и устанавливать различные дистрибутивы Linux на свой компьютер с Windows 11.
7. Включите аппаратную виртуализацию
Проще говоря, аппаратная виртуализация — это компонент Windows, который помогает вам эффективно запускать различные подсистемы, такие как WSL, на вашем ПК. Наряду с платформой гипервизора Windows и функцией платформы виртуальных машин, важно сохранитьФункция аппаратной виртуализации включенабежать различные операционные системы без проблем. Вы должны убедиться, что эта функция включена на вашем ПК с Windows. То же самое можно обеспечить, выполнив следующие шаги:
1.Сначала откройтеДиспетчер задачпрограмму на ПК с Windows 11 и перейдите наПроцессорраздел с главного экрана.
2.Теперь, вПроцессорраздел, убедитесь, чтоВиртуализацияопция включена.
После того, как вы включили функцию аппаратной виртуализации на своем ПК с Windows 11, проверьте, все ли WSL теперь работает нормально.
8. Отключите режим «Использовать устаревшую консоль».
Некоторые пользователи сообщали, что пытались установить WSL на свой ПК с Windows; они получают0x80040306код ошибки в консоли. Если у вас то же самое, то это как-то связано с режимом Legacy Console.
На языке непрофессионала Legacy Console — это инструмент Windows, который помогает вам устанавливать и использовать инструменты командной строки на вашем компьютере с Windows. В некоторых случаях было обнаружено, что устаревший режим консоли конфликтует с компонентами WSL и приводит к этим проблемам.
В таком случае мы предлагаемотключение режима Legacy Consoleвариант на вашем компьютере с Windows 11. Выполните следующие действия, чтобы легко отключить режим Legacy Console на вашем компьютере:
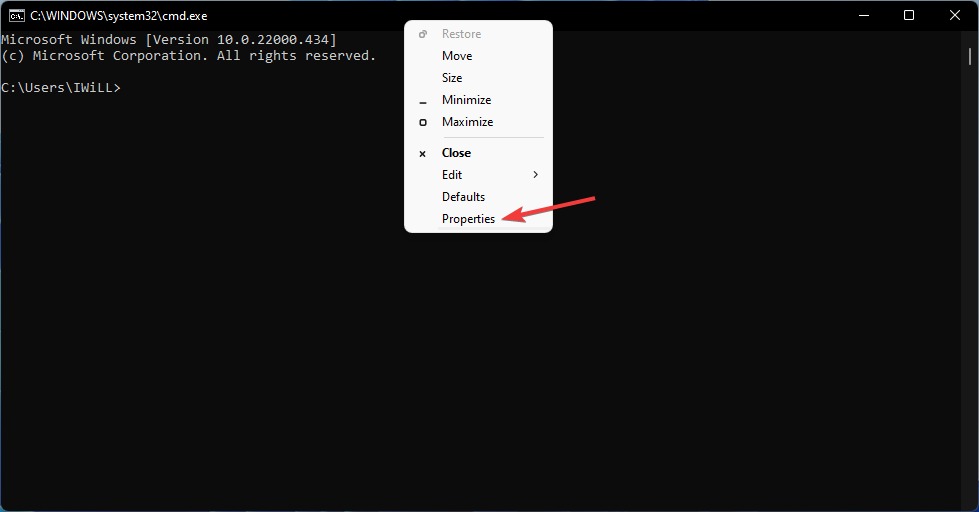
1.ОткройКомандная строкаприложение на ПК с Windows 11, щелкните правой кнопкой мыши строку заголовка и выберитеХарактеристикивариант.

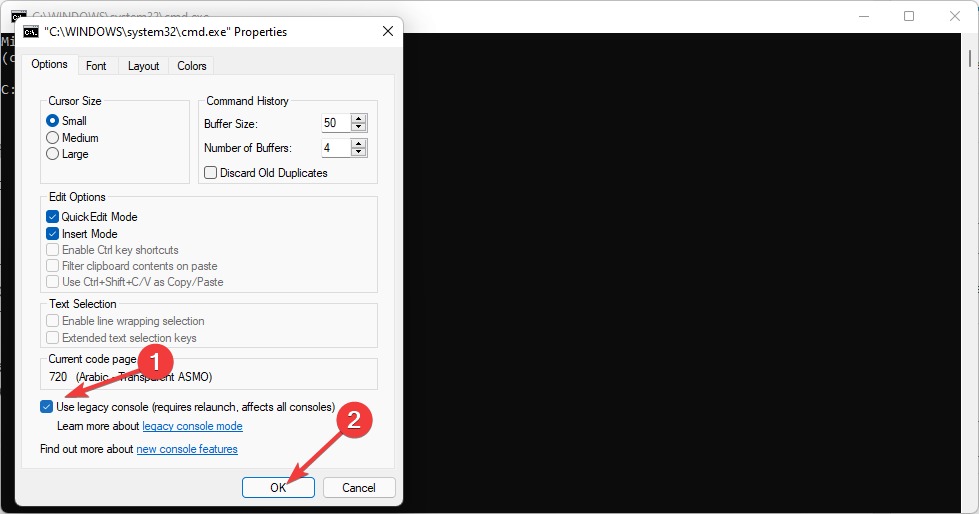
2.ОднаждыХарактеристикираздел открыт,снять галочкувИспользовать устаревшую консольфлажок и нажмите наХОРОШО.

После отключения режима Использовать устаревшую консоль подтвердите, решены ли проблемы с WSL или нет. Надеемся, теперь они исправлены.
9. Отключите функцию шифрования устройства BitLocker.
Шифрование устройства Bitlocker — это функция безопасности Windows, которая защищает операционную систему и ее данные от кражи, потери и других видов потерь. В ходе нашего исследования мы обнаружили, что функция шифрования устройства Bitlocker может накладывать ограничения на WSL и препятствовать его правильной работе.
В таком случае мы предлагаемотключение шифрования устройства Bitlockerособенность на вашем ПК и проверьте, устраняет ли это проблему. Следуйте указанным инструкциям, чтобы узнать, как сделать то же самое, выполнив несколько простых шагов:
1.ОткройСтартовое менюна ПК с Windows 11 найдитеПанель управленияивыберите приложениеизЛучший матчраздел.

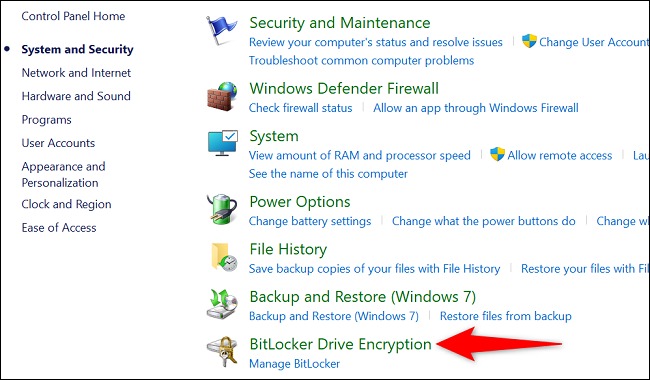
2.Затем отправляйтесь вСистема и безопасностьраздел и выберитеШифрование диска BitLockerвариант из существующих вариантов.

3.В конце выберитеОтключить BitLockerвариант подДиск с операционной системойраздел, чтобы отключить его.

После отключения этой опции проверьте, устранена ли проблема. Если это все еще не исправлено, рассмотрите возможность повторного включения функции шифрования диска BitLocker.
10. Попросите брандмауэр Windows не блокировать WSL
Некоторые пользователи говорили, что когда они подключают свой ПК к VPN и открывают Linux, bash автоматически теряет доступ к сети и перестает работать. В их случае собственный брандмауэр системы препятствовал доступу приложения к Интернету и его правильной работе.
Это может быть то же самое в вашем случае, и вы можете проверить это,отключение встроенного брандмауэра Windows. Итак, выполните следующие шаги, чтобы отключить встроенный брандмауэр Windows Defender:
1.Для этого откройтеПанель управленияприложение на вашем компьютере и перейдите кСистема и безопасностьраздел для доступа к настройкам безопасности компьютера.

2.Затем перейдите кБрандмауэр Защитника Windowsраздел и выберитеВключение или отключение брандмауэра Защитника Windowsвариант.

3.Наконец, установитеНастройки частной сетииНастройки общедоступной сетивозможностьотключить брандмауэр Защитника Windows (не рекомендуется).

3.В качестве альтернативы выполните приведенную ниже команду в повышенномКомандная строкадля отключения встроенного брандмауэра системы.
netsh advfirewall set allprofiles state off11. Перезапустите службу LxssManager.
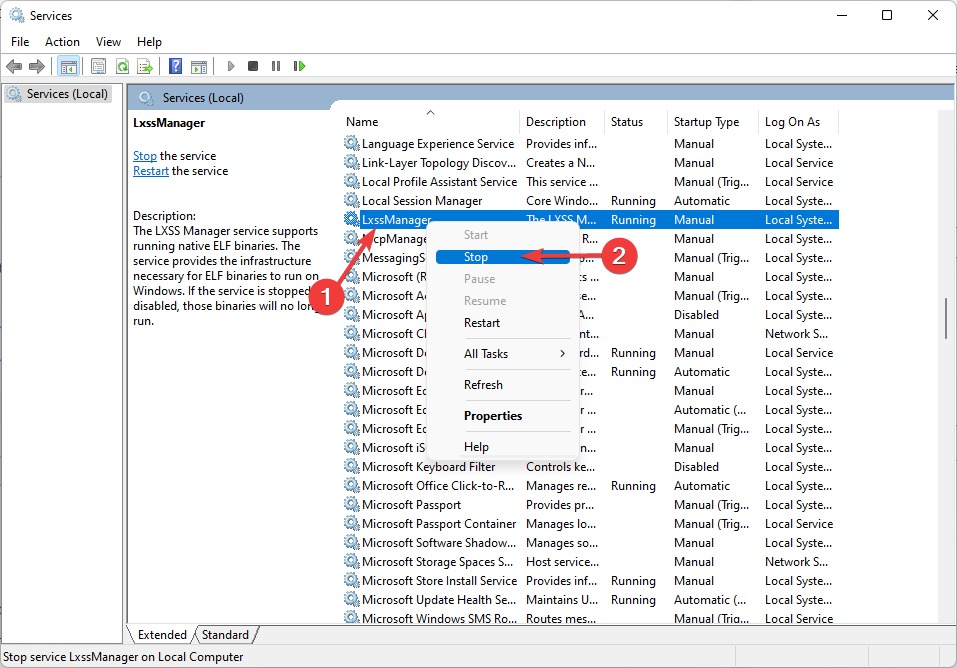
LxssManager — это важная служба Windows, которая позволяет вам легко запускать собственные двоичные файлы ELF в вашей системе. Если эта служба сталкивается с проблемами в работе, это может помешать правильной работе WSL. Возможно, служба LxssManager не работает должным образом, поэтому вы испытываете это неудобство.
К счастью, вы можетеперезапустите LxssManagerсервис, чтобы узнать, поможет ли это. Следуйте указанным инструкциям, чтобы узнать, как восстановить службу LxssManager за несколько простых шагов:
1.Во-первых, откройтеОкно поиска Windows,типУслугив нем, и выберите такой же из результатов поиска.

2.Теперь ищите вLxssManagerслужба вУслугираздел ищелкните правой кнопкой мышина нем, чтобы открыть раскрывающееся меню.
3.В конце выберитеОстанавливатьсяво всплывающем меню и перезапустите WSL, чтобы перезапустить службу и исправить ее.

12. Запустите WSL из Microsoft Store.
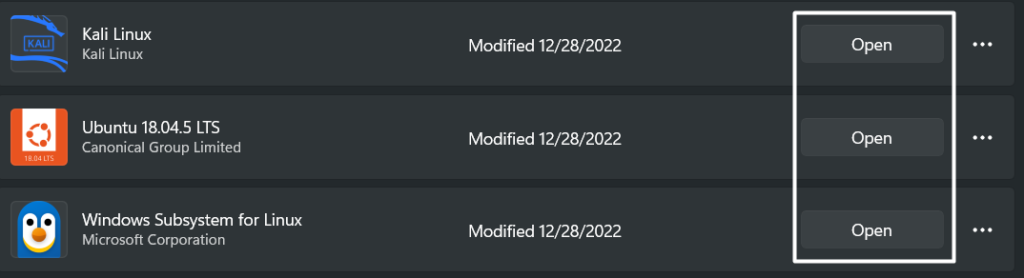
Если вы не можете открыть дистрибутив WSL или Linux на своем ПК с панели задач или окна поиска Windows, мы предлагаем запустить его из Магазина Microsoft. Возможно, произошел сбой в программе распространения, из-за чего программа не открывается. Вы можете выполнить следующие шаги, чтобы открыть WSL из официального магазина Microsoft Store:
1.ОткройМагазин Майкрософтна вашем ПК.
2.Нажмите наБиблиотеказначок в левом нижнем углу экрана.

3.Теперь ищитеПодсистема Windows для приложения LinuxвПрограммыраздел и нажмите наОткрытьрядом с ним.

13. Сбросьте и восстановите приложение дистрибутива Linux
Возможно, приложение дистрибутива Linux было повреждено, поэтому возникают эти проблемы. Лучшее решение для исправления поврежденных данных —восстановить затронутое приложение дистрибутива Linux.
К счастью, ваша система Windows позволяет легко восстанавливать и сбрасывать приложения из системных настроек. Вы можете выполнить следующие шаги, чтобы сбросить и восстановить приложение дистрибутива Linux, не прилагая особых усилий:
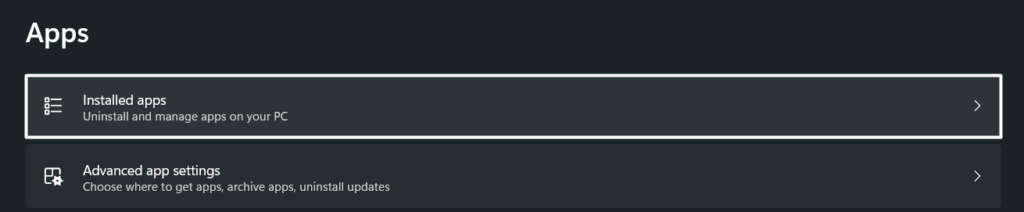
1.ОткройПриложение настроекна ПК с Windows и перейдите вПрограммыраздел в левом навигационном меню.

2.Затем отправляйтесь вУстановленные приложенияраздел и найдитеПриложение для дистрибутива Linuxвы столкнулись с проблемами.

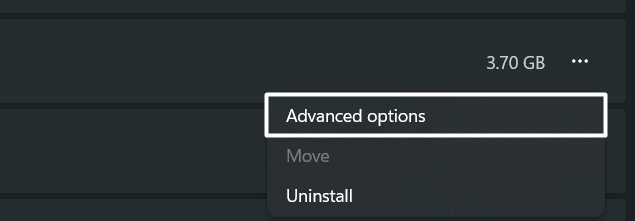
3.Далее нажмите натри точки (…)илиБольше вариантоврядом с приложением и выберитеРасширенные настройкииз выпадающего меню.

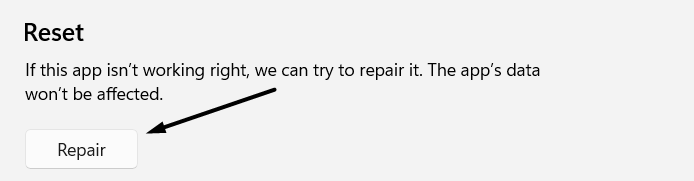
4.вРасширенные настройкираздел, перейдите вПерезагрузитьраздел и нажмите наРемонтчтобы начать восстановление приложения.

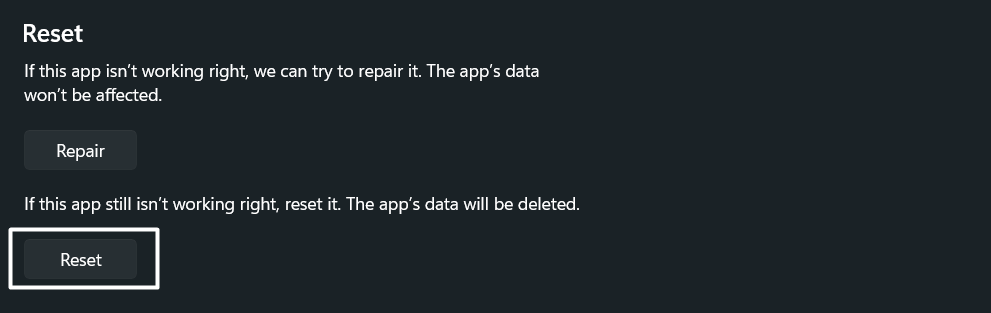
5.Наконец, нажмите наПерезагрузитьвариант вПерезагрузитьраздел, чтобы очистить кеш приложения и данные с компьютера.

Ранее затронутое приложение дистрибутива Linux теперь должно работать нормально.
14. Обновите Linux с помощью терминала Windows
Многие пользователи заявили, что обновление WSL и программы дистрибутива Linux до последней версии устранило для них проблему. Помня об этом, мы также предлагаем вам обновить WSL до последней версии, чтобы увидеть, есть ли какие-то улучшения.
Это обновит все компоненты WSL и его версию ядра до самой последней версии. Вы можете проверить шаги ниже, если вам нужна помощь:
1.Чтобы обновить WSL, откройте папку с повышенными привилегиямиWindows PowerShell и CMDна вашем ПК с Windows и запустите указанную команду в консоли.
wsl --update2.После обновления WSL выполните приведенную ниже команду в дистрибутиве Linux, чтобы обновить пользовательские двоичные файлы дистрибутива Linux.
apt-get update | apt-get upgradeПосле этого проверьте статус проблемы.
15. Переустановите дистрибутив Linux
Если обновление дистрибутива Linux не решает проблему неработающего WSL, вы можете рассмотреть возможность его переустановки. Это полностью удалит программу и ее существующие данные из системы и решит проблему. Итак, вы можете попробоватьпереустановка вашего дистрибутива Linuxна ПК с Windows 11, выполнив указанные шаги:
1.Начать, открыть повышенныйКомандная строка или Windows PowerShellна вашем ПК ибегатьуказанную команду в консоли.
wls --list --all2.Далее выполните указанную команду в консоли. Но заменить<DistributionName>с дистрибутивом Linux, установленным в вашей системе. Например, мы установили Kali Linux в нашей системе Windows, поэтому мы заменим<DistributionName>сКали Линукс.
3.После того, как вы полностью удалили дистрибутив из своей системы, перейдите кМагазин Майкрософти переустановите его.
После переустановки дистрибутива Linux в системе вы сможете без проблем использовать Linux.
16. Удалите неисправные обновления Windows (необязательно)
У некоторых пользователей эти проблемы с WSL начали возникать после обновления ПК до другой версии. Если это то же самое в вашем случае, то мы предлагаемудаление неисправного обновления Windowsиз системы.
Но прежде чем выполнять указанные шаги, вы должны знать, после какого обновления проблема начала появляться. Как только вы обнаружите это, выполните указанный шаг, чтобы удалить неисправное обновление Windows с вашего ПК:
1.Во-первых, перейти кНастройкивашего ПК с Windows и выберитеЦентр обновления Windowsиз левого навигационного меню.

2.Теперь приступайте кИстория обновленийраздел, а затем перейти кУдалить обновленияраздел для просмотра обновлений, которые можно удалить.

3.В конце нажмите наУдалитьрядом с обновлением Windows, которое вы хотите удалить, и снова выберитеУдалитьудалить его из системы.

После этого перезагрузите компьютер и подтвердите, устранена ли проблема.
17. Обновите ПК с Windows 11 до последней версии
Возможно, эти проблемы возникают из-за некоторых ошибок в основных компонентах WSL. Microsoft продолжает выпускать новые обновления, чтобы исправить эти ошибки и сделать Windows более эффективной и стабильной. Вы также можете попытаться найти новые обновления Windows 11 и установить их, чтобы увидеть, решает ли это проблемы: Вот шаги, чтобы сделать то же самое за несколько простых шагов:
1.Начать, ОткройПриложение настроекна ПК с Windows 11 и перейдите кЦентр обновления Windowsиз левой панели навигации.
2.Нажать наПроверить наличие обновленийвариант вЦентр обновления Windowsраздел для поиска новых системных обновлений.

3.Если Windows находит и показывает новые обновления на экране, нажмитеСкачайте и установите всечтобы установить их на свой ПК с Windows.

После того, как вы обновите свой ПК с Windows 11 до последней сборки, перезагрузите его и попробуйте снова установить WSL в системе.
Часто задаваемые вопросы
Будет ли WSL работать в Windows 11?
Да, функция подсистемы Windows для Linux (WSL) работает как в Windows 11, так и в Windows 10. Но ваш ПК с Windows 11 должен соответствовать минимальным требованиям к установке для установки и включения WSL.
Как узнать, установлен ли WSL в Windows 11?
Чтобы проверить, установлена ли подсистема Windows для Linux на вашем ПК с Windows 11, запуститеwsl --install в командной строке с повышенными привилегиями или в программе PowerShell. Если он уже установлен на вашем компьютере, отобразится сообщение о том, что WSL уже установлен в вашей системе Windows 11.
Как включить WSL в Windows 11?
Чтобы включить WSL на ПК с Windows 11, перейдите кПанель управления> Программы> Программы и компоненты> Включение или отключение компонентов Windows.раздел игалочкавПодсистема Windows для Linuxфлажок. Вы также можете загрузить приложение Windows Subsystem for Linux из магазина Microsoft Store на свой компьютер с Windows 11, чтобы включить WSL.
Как исправить ошибку WSL 0x80370102?
Если вы получите0x80370102ошибка при использовании WSL на ПК с Windows 11, то мы рекомендуем убедиться, что на вашем компьютере включена функция платформы виртуальных машин. Вы можете выполнить указанную команду в CMD с повышенными правами или PowerShell, чтобы включить опцию платформы виртуальной машины на вашем ПК с Windows.
dism.exe /online /enable-feature /featurename:VirtualMachinePlatform /all /norestartНаконец, WSL теперь работает правильно
Мы все всегда хотели использовать наш любимый дистрибутив Linux на нашем ПК с Windows, не создавая виртуальную машину. И даже Microsoft попыталась сделать это возможным, и им это тоже удалось. Но, как и у любой другой программы виртуализации, у нее также могут быть некоторые проблемы.
Многие пользователи сталкиваются с проблемами при установке и запуске WSL на своих компьютерах с Windows. Если вы также столкнулись с теми же проблемами с WSL в своей системе, мы надеемся, что упомянутые решения помогли вам решить эту проблему. Кроме того, прежде чем покинуть это руководство, сообщите нам, какие из упомянутых обходных путей сработали для вас.
Finally, after a lot of thoughtful discussion between Microsoft and Linux, we got to see the much-needed Linux integration in the latest Windows 11. You can now run Linux commands and tools natively on your Windows 11 PC. Most users are enjoying the WSL integration by installing their favorite Linux program on their system.
But sadly, some users are still facing difficulties running their preferred Linux distribution on their Windows PC. After getting to know about these WSL-related issues, we researched more about them in detail and also found some possible workarounds that can fix them. To help you out, we’ve also mentioned those possible workarounds in this troubleshooting guide.
Why Is Windows Subsystem for Linux (WSL) Not Working Properly?
Here are some of the most common reasons behind the non-functioning of the Windows Subsystem for Linux (WSL) in Windows 11. Check them below:
- WSL Is Disabled on Your System
- Virtual Machine Platform & Hyper V Feature Is Disabled
- Corrupt Linux App Installation
- Malware & Viruses
- Faulty Windows Update
- Windows Firewall Restrictions
Fix Windows Subsystem for Linux Not Working in Windows 11
Here in this section, we’ve mentioned more than 15 workarounds that can fix the Windows Subsystem for Linux not working issue in your Windows 11 PC.
1. Make Sure Your Computer Can Run WSL
While searching for some solutions, we found that many users are facing difficulties in installing WSL 2, which is the latest version of WSL. When we dug deep into this issue to learn more about this, we found out that WSL 2 can only be run on systems having the Second Level Address Translation (SLAT) feature.
If you’re also unable to install WSL 2 on your Windows 11 PC, then this could be the same with you. Another requirement to run WSL 2 is that your system should be running on the latest generations of CPUs. If your system doesn’t meet the minimum requirements, you can’t run WSL 2 on it.
2. Ensure WSl Is Running on the Main Storage
Many users reported that when they try to install WSL on their Windows machine, the installation process suddenly fails, and they see the 0x80070003 error code on the screen. The most common reason for this error is not allowing the Windows Subsystem for Linux to run on the system’s primary storage drive, which is C: drive.
If the same error appeared in your case while installing WSL, then we suggest you make sure that it’s allowed to use the system’s primary storage drive. You can follow the below-mentioned steps to know how to check the same:
1. Open the Settings app on your Windows 11 PC using the Windows + I shortcut and move to the Storage section.

2. Next, expand the Advanced storage settings subsection of the Storage management section.
3. Now, expand the Where new content is saved subsection under the Advanced storage settings section.

4. In the Advanced storage settings section, select your system’s primary storage drive from the New apps will save to: dropdown menu and close the window.

Once you’ve made sure that WSL is allowed to use the primary storage drive, check if you can now install WSL on your Windows 11 PC.
3. Scan for Viruses & Malware on Your Computer
During the research, we found that the viruses and malware in the system can also prevent system’s essential components from functioning properly, which can lead to this issue. This could be the same in your case and, to avoid this, we suggest scanning the entire system and making sure no infected files are stored in it.
You can use the Windows’ built-in Malware Removal tool to scan for infected files on your PC and remove them. Follow the steps below to know how to do the same:
1. Open the Settings app on your Windows 11 PC using any method you want and proceed to the Privacy & security section.

2. Once you’ve moved to the Privacy & security section, click on Windows Security and then click on the Open Windows Security option.

3. In the Virus & threat protection section, click on Scan options and then select the scan type to Full scan.
4. In the end, click on Scan now to begin the scan process and wait until the scan gets completed.
5. Once the malware scan is completed, you’ll see the scan results on the same screen. If the scanner process finds some harmful files on the system, you can quarantine them or remove them from the computer.
After doing the same, check the issue’s status.
4. Re-enable Windows Subsystem for Linux (WSL)
One of the most common yet effective solutions to overcome these WSL-related issues is to re-enable WSL on your Windows 11 PC. Doing so will reinstate all the WSL components and ensure the same issues don’t appear. We’ve mentioned one of the easiest methods to re-enable WSL on a Windows 11 PC below:
1. First, open Control Panel on your Windows 11 PC and navigate to the Programs section from the home screen.
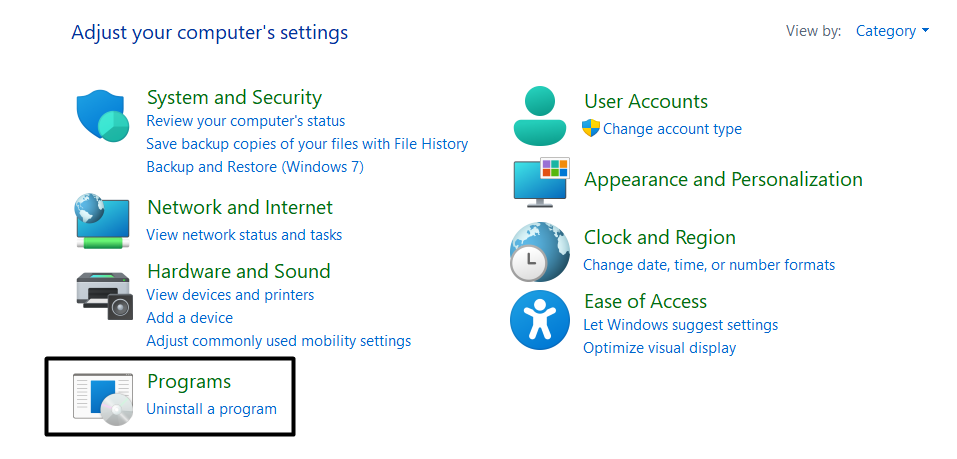
2. In the Programs section, select the Programs and Features section and click Turn Windows features on or off.
3. Search for the Windows Subsystem for Linux checkbox in the Windows Features pop-up and re-enable it.
Once you’ve re-enabled the Windows Subsystem for Linux feature, check if you’re now able to install and run Linux on your Windows 11 PC.
5. Make Sure the Virtual Machine Platform Feature Is Enabled
According to Microsoft, the Virtual Machine Platform feature should be enabled on your Windows PC to run WSL smoothly. Therefore, we suggest you ensure that this feature is enabled on your Windows 11 PC. You can take a look at the steps below to ensure this feature is enabled on your PC:
1. To do so, move to the Programs and Features section in the Control Panel program and select Turn Windows features on or off from the left sidebar.
2. Now, search for the Virtual Machine Platform option in the Windows Features pop-up and re-enable it by re-ticking it.
After re-enabling the Virtual Machine Platform feature on your Windows PC, restart it and check if WSL is working fine or not.
6. Ensure Hyper-V Is Enabled
Hyper V, also known as Hypervisor, is a Windows feature that lets you create and run virtual machines on your Windows PC. To install and run WSL on your Windows 11 PC, the Hyper V feature must be enabled on your PC.
It could be possible that the Hyper V functionality is disabled on your PC, which is why this issue is occurring. You can check the same from Control Panel, and the below-mentioned steps demonstrate the same:
1. First, open the Control Panel app on your Windows computer and navigate to the Turn Windows features on or off section from the left sidebar.

2. Locate the Windows Hypervisor Platform feature in the Windows Features dialog box and re-enable it.
You should now be able to run and install different Linux distributions on your Windows 11 computer with ease.
7. Turn On Hardware Virtualization
In simple terms, Hardware Virtualization is a Windows component that helps you run different subsystems, like WSL, effectively on your PC. Along with the Windows Hyper Hypervisor Platform and Virtual Machine Platform feature, it’s essential to keep the Hardware Virtualization feature enabled to run different operating systems seamlessly. You need to make sure that this functionality is enabled on your Windows PC. The same thing can be ensured by following the below-mentioned steps:
1. First, open the Task Manager program on your Windows 11 PC and head to the CPU section from the home screen.
2. Now, in the CPU section, make sure the Virtualization option is enabled.
Once you’ve turned on the Hardware Virtualization functionality on your Windows 11 PC, check if everything WSL is working fine now.
8. Disable the Use Legacy Console Mode
Some users reported when they try to install WSL on their Windows PC; they get the 0x80040306 error code in the console. If that’s the same with you, then it has something to do with the Legacy Console mode.
In layman’s language, Legacy Console is a Windows tool that helps you install and use command-line tools on your Windows computer. In some cases, it’s found that the Legacy Console mode conflicts with WSL components and leads to these issues.
In that case, we suggest disabling the Legacy Console mode option on your Windows 11 computer. Follow the steps below to easily disable the Legacy Console mode on your computer:
1. Open the Command Prompt app on your Windows 11 PC, right-click on the title bar, and choose the Properties option.
2. Once the Properties section is opened, untick the Use legacy console checkbox and click on OK.
After disabling the Use legacy console mode, confirm if the issues with WSL are resolved or not. We hope they’re fixed now.
9. Disable the BitLocker Device Encryption Feature
Bitlocker Device Encryption is a Windows security feature that protects the operating system and its data from data theft, loss, and other kinds of losses. During our research, we found that the Bitlocker Device Encryption feature can impose limitations on WSL and stop it from functioning properly.
In that case, we suggest disabling the Bitlocker Device Encryption feature on your PC and checking if it fixes the issue. Follow the mentioned instructions to learn how to do the same in a few simple steps:
1. Open the Start Menu on your Windows 11 PC, search for Control Panel and select the app from the Best match section.

2. Then, head to the System and Security section and select the BitLocker Drive Encryption option from the present choices.
3. In the end, select the Turn off BitLocker option under the Operating system drive section to disable it.
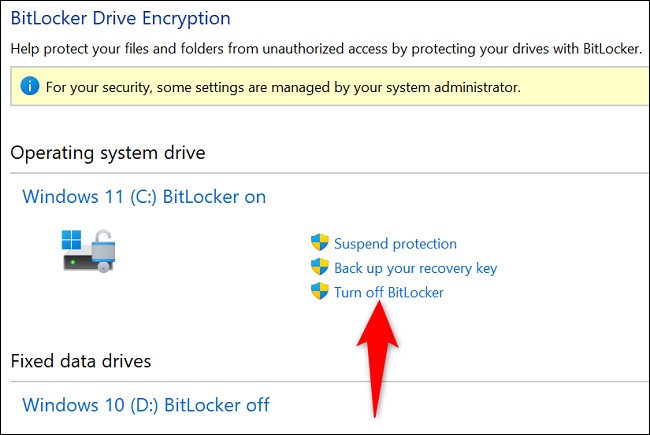
After disabling this option, check if the issue is fixed. If it’s still not fixed, consider re-enabling the BitLocker Drive Encryption feature.
10. Ask Windows Firewall To Not Block WSL
Some users said that when they connect their PC to a VPN and open Linux, the bash automatically loses access to the network and stops working. In their case, the system’s own Firewall was preventing the app from accessing the internet and functioning correctly.
It could be the same in your case, and you can check this by disabling the Windows built-in Firewall. So, follow the below-mentioned steps to disable the Windows built-in Defender Firewall:
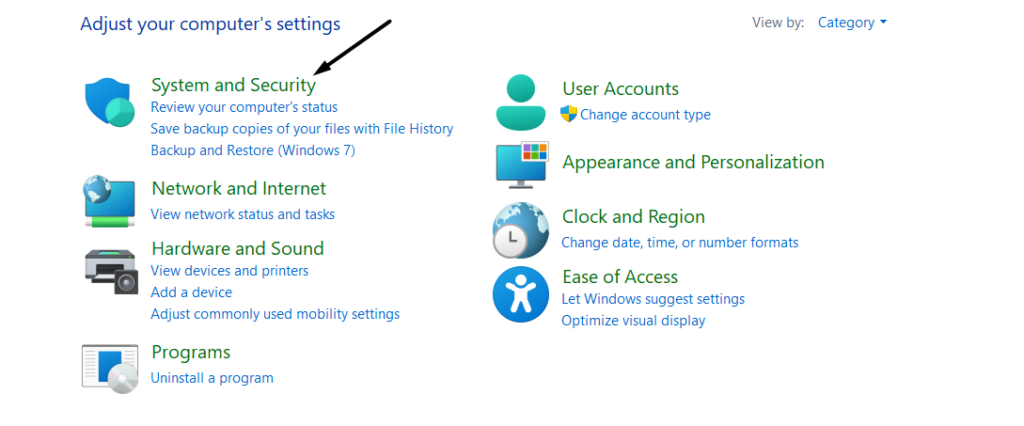
1. To do so, open the Control Panel app on your PC and navigate to the System and Security section to access the computer’s security settings.
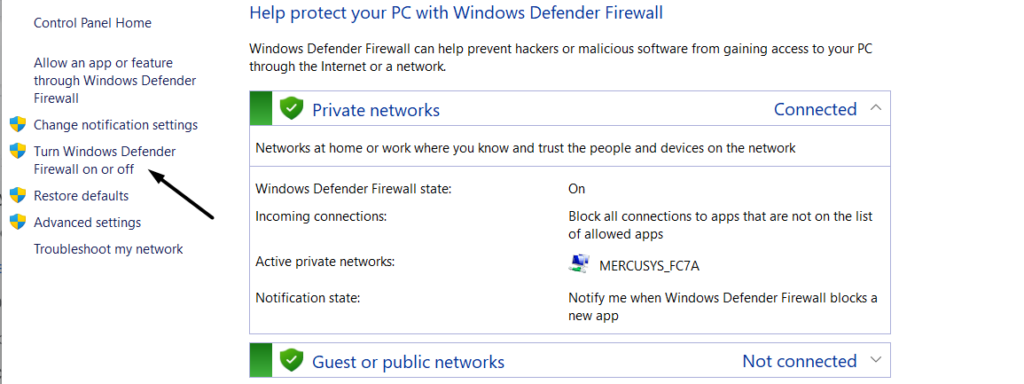
2. Then, move to the Windows Defender Firewall section and choose the Turn Windows Defender Firewall on or off option.
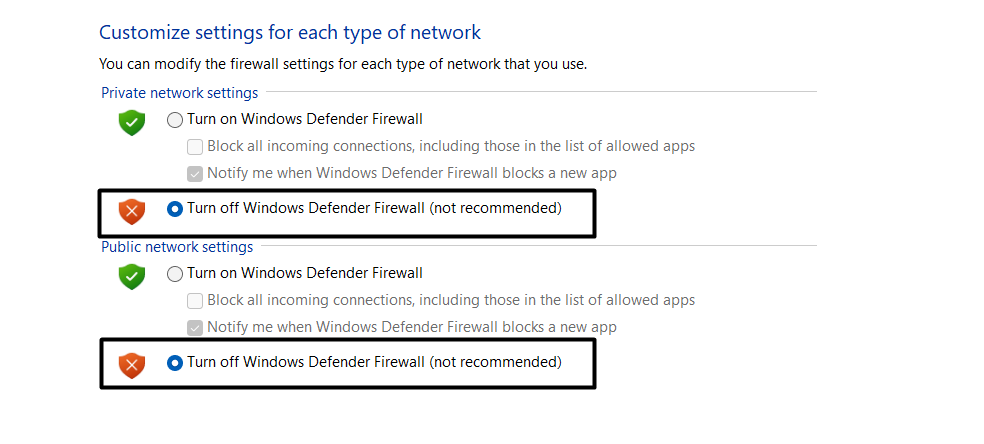
3. At last, set the Private network settings and Public network settings option to turn off Windows Defender Firewall (not recommended).
3. Alternatively, execute the below command in the elevated Command Prompt to disable the system’s integrated Firewall.
netsh advfirewall set allprofiles state off11. Restart the LxssManager Service
LxssManager is an essential Windows service that enables you to run native ELF binaries on your system with ease. If this service faces issues in functioning properly, then it can prevent WSL from working correctly. It could be possible that the LxssManager service isn’t functioning properly, which is why you’re going through this inconvenience.
Fortunately, you can restart the LxssManager service to see if it is of any help. Follow the mentioned instructions to learn how to reinstate the LxssManager service in a few simple steps:
1. Firstly, open the Windows Search Box, type Services in it, and select the same from the search results.

2. Now, look for the LxssManager service in the Services section and right-click on it to open the dropdown menu.
3. In the end, select the Stop option from the pop-up menu and relaunch WSL to restart the service to fix it.
12. Launch WSL from Microsoft Store
If you can’t open WSL or Linux distribution on your PC from the Taskbar or Windows Search Box, then we suggest launching it from the Microsoft Store. It could be possible that there’s a glitch with the distribution program, which is why the program isn’t opening. You can follow the below steps to open WSL from the official Microsoft Store:
1. Open the Microsoft Store on your PC.
2. Click the Library icon at the bottom left corner of the screen.

3. Now, look for the Windows Subsystem for Linux app in the Apps section and click on Open next to it.
13. Reset & Repair the Linux Distribution App
It could be possible that the Linux distribution app has been corrupted, which is why these issues are appearing. The best solution to fix the corrupted data is to repair the affected Linux distribution app.
Fortunately, your Windows system allows you to easily repair and reset apps from the system’s Settings. You can follow the below-mentioned steps to reset and repair your Linux distribution app without putting much effort:
1. Open the Settings app on your Windows PC and move to the Apps section from the left navigation menu.

2. Then, head to the Installed apps section and search for the Linux distribution app you’re facing issues with.
3. Next, click on three dots (…) or More options next to the app and select the Advanced options from the dropdown menu.
4. In the Advanced options section, move to the Reset section and click on Repair to start repairing the app.
5. Lastly, click on the Reset option in the Reset section to clear the app’s cache and data from the computer.
The previously affected Linux distribution app must be working fine now.
14. Update Linux Using Windows Terminal
Many users said updating WSL and the Linux distribution program to the latest version fixed the issue for them. Keeping this in mind, we also suggest you update WSL to the latest version to see if it makes some improvements.
Doing so will update all the WSL components and its kernel version to the most current version. You can check the steps below if you need some assistance:
1. To update WSL, open the elevated Windows PowerShell and CMD on your Windows PC and run the mentioned command in the console.
wsl --update2. Once you’ve updated WSL, execute the below command in the Linux distribution to update the Linux distribution user binaries.
apt-get update | apt-get upgradeOnce done, check the issue’s status.
15. Reinstall Linux distribution
If updating the Linux distribution doesn’t resolve the WSL not working issue, you can then consider reinstalling it. Doing so will completely remove the program and its existing data from the system and resolve the problem. So, you can try reinstalling your Linux distribution on your Windows 11 PC following the mentioned steps:
1. To start, open the elevated Command Prompt or Windows PowerShell on your PC and run the mentioned command in the console.
wls --list --all2. Next, execute the mentioned command in the console. But replace <DistributionName> with the Linux distribution installed on your system. For instance, we’ve installed Kali Linux on our Windows system, so we’ll replace <DistributionName> with Kali Linux.
3. Once you’ve completely removed the distribution from your system, move to Microsoft Store and reinstall it.
After reinstalling the Linux distribution on the system, you should be able to use Linux without any issues now.
16. Uninstall Faulty Windows Updates (Optional)
For some users, these issues with WSL started occurring after updating the PC to another version. If that’s the same in your case, then we suggest removing the malfunctioned Windows update from the system.
But before following the mentioned steps, you should know after which update the issue started appearing. Once you’ve found this out, follow the mentioned step to uninstall the faulty Windows update from your PC:
1. Firstly, move to Settings of your Windows PC and select Windows Update from the left navigation menu.

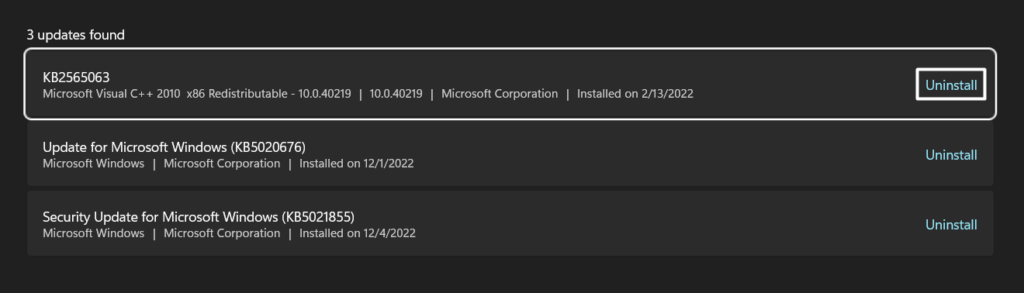
2. Now, proceed to the Update history section and then move to the Uninstall updates section to view the updates that can be uninstalled.

3. In the end, click on Uninstall next to the Windows update you want to uninstall and again select Uninstall to remove it from the system.
Once done, restart the computer, and confirm whether the issue is fixed.
17. Update Your Windows 11 PC To the Latest Version
It could be possible that these issues are appearing because of some bugs in the essential WSL components. Microsoft keeps pushing new updates to fix these bugs and to make Windows more efficient and stable. You can also try to search for new Windows 11 updates and install them to see if it resolves the issues: Here are the steps to do the same in a few simple steps:
1. To start, open the Settings app on your Windows 11 PC and proceed to Windows Update from the left navigation pane.
2. Click on the Check for updates option in the Windows Update section to search for new system updates.

3. If Windows finds and shows some new updates on the screen, click on Download & install all to install them on your Windows PC.

Once you’ve updated your Windows 11 PC to the latest build, restart it and try installing WSL again on the system.
Frequently Asked Questions
Will WSL Work on Windows 11?
Yes, the Windows Subsystem for Linux (WSL) function works on both Windows 11 and Windows 10. But your Windows 11 PC must meet the minimum installation requirements to install and enable the WSL.
How Do I Know if WSL Is Installed on Windows 11?
To check whether Windows Subsystem for Linux is installed on your Windows 11 PC, run the wsl --install command in the elevated Command Prompt or PowerShell program. If it’s already installed on your computer, it’ll display a message explaining WSL is already installed on your Windows 11 system.
How Do I Enable WSL in Windows 11?
To turn on WSL on your Windows 11 PC, move to Control Panel > Programs > Programs & Features > Turn Windows Features on or off section and tick the Windows Subsystem for Linux checkbox. You can also download the Windows Subsystem for Linux app from the Microsoft Store on your Windows 11 computer to enable WSL.
How Do I Fix WSL Error 0x80370102?
If you get the 0x80370102 error while using WSL on your Windows 11 PC, then we suggest making sure that the Virtual Machine Platform feature is enabled on your computer. You can execute the mentioned command in the elevated CMD or PowerShell to enable the Virtual Machine Platform option on your Windows PC.
dism.exe /online /enable-feature /featurename:VirtualMachinePlatform /all /norestartFinally, WSL Is Working Properly Now
We all always wanted to use our favorite Linux distribution on our Windows PC without creating any virtual machine. And even Microsoft tried to make it possible, and they were successful too in doing so. But like every other virtualization program, it may also have some issues.
Many users are experiencing issues in installing and running WSL on their Windows machines. If you were also facing the same issues with WSL on your system, then we hope the mentioned solutions helped you fix the issue. Also, before leaving this guide, let us know which of the mentioned workarounds worked for you.
![]()
Version
Windows 11 Home Build 22621.963
WSL Version
- WSL 2
- WSL 1
Kernel Version
No response
Distro Version
No response
Other Software
No response
Repro Steps
- Install windows 11.
- Open terminal app.
- Run
wsl --install
Expected Behavior
wsl --install on a (almost completely) clean Windows 11 install to install WSL2 and Ubuntu.
Actual Behavior
Produces an error even though Storage Settings for new content are the system drive (C).
Diagnostic Logs
«The deployment operation was blocked due to a per-package-family policy restricting deployments on a non-system volume. Per policy, this app must be installed to the system drive, but that’s not set as the default. In Storage Settings, make the system drive the default location to save new content, then retry the install.»
![]()
The only things modified since OS install are:
- Install one game via Xbox app (to D drive).
- Install discord via windows store (to C drive).
- Change default terminal to «Windows Terminal».
I simply followed the steps in this support article: https://learn.microsoft.com/en-us/windows/wsl/install. I am not used to Windows (I usually use macOS/Linux) and simply followed the steps.
The guide says «This command will enable the features necessary to run WSL and install the Ubuntu distribution of Linux.». However, do I need to enable «developer mode»? This is not mentioned.
![]()
I have investigated further. There appears to be a bug with syncing the settings between windows settings and the xbox app / wsl install. When I run wsl --install I hear the spinning disk spin up. However, the windows settings have the SSD (C drive) selected for new content in all options. The xbox app is set to use the spinning HDD (D drive). Something is inconsistent here.
Toggling the «New apps will save to» setting from C to D and back again fixed this!
However, this also changes the setting in the xbox app. These should probably be separate settings. There is also a clear UI synching bug here. Perhaps the user should also be notified that these are linked somehow as that is not clear.
Windows Storage Settings

Xbox Settings

![]()
Toggling the «New apps will save to» setting from C to D and back again fixed this!
Your workaround worked for me as well, thanks! My Xbox settings were set to another drive to save space on my OS drive.
![]()
Toggling the «New apps will save to» setting from C to D and back again fixed this!
Your workaround worked for me as well, thanks! My Xbox settings were set to another drive to save space on my OS drive.
I confirm !!
![]()
Thanks!
Toggling the «New apps will save to» setting from C to D and back again fixed this!
Your workaround worked for me as well, thanks! My Xbox settings were set to another drive to save space on my OS drive.
Worked for me too, thanks!
![]()
I’m facing the same issue. I just got a new fresh installation of Windows 11 Pro. I just followed the same steps as @John-P did, and WSL is not working for me. Here are some screenshots:
As you can see in the below image, it shows that Ubuntu was installed, but it hangs on Launching Ubuntu...

Docker Desktop also hangs on this looping Starting Docker Engine...


I can’t even run wsl --shutdown as it suggests because the command hangs.
Also, the LxssManager service is permanently stopped, even if I set the startup type as automatic. Every time I reboot/shut down the system, when Windows starts, the service is stopped.

I don’t know what is going on if I am doing something wrong, but I’ve been using macOS/Linux as a DevOps Engineer, and now I give Windows a chance, and I can’t use it.
Windows version I’m running:

FYI, that’s not true for Windows 10. I was using it until today seamlessly. WSL working fine, Docker, and Kubernetes also. If there is any log information I could provide, please guide me and I will provide as much information as possible.
I will try ultimately reinstalling WSL on my current Windows 11 environment and provide more information if I get progress.
![]()
I’m facing the same issue. I just got a new fresh installation of Windows 11 Pro. I just followed the same steps as @John-P did, and WSL is not working for me. Here are some screenshots:
As you can see in the below image, it shows that Ubuntu was installed, but it hangs on
Launching Ubuntu...
Docker Desktop also hangs on this looping
Starting Docker Engine...

I can’t even run
wsl --shutdownas it suggests because the command hangs.Also, the LxssManager service is permanently stopped, even if I set the startup type as automatic. Every time I reboot/shut down the system, when Windows starts, the service is stopped.
I don’t know what is going on if I am doing something wrong, but I’ve been using macOS/Linux as a DevOps Engineer, and now I give Windows a chance, and I can’t use it.
FYI, that’s not true for Windows 10. I was using it until today seamlessly. WSL working fine, Docker, and Kubernetes also. If there is any log information I could provide, please guide me and I will provide as much information as possible.
I will try ultimately reinstalling WSL on my current Windows 11 environment and provide more information if I get progress.
Quick update here @John-P and for anyone looking for a solution. I did some research over the internet and found this workaround that worked for me: #6405 (comment)
Now I am able to install Ubuntu and Debian distros, run Docker Desktop, enable the Kubernetes feature inside of it, etc.
![]()
Same as the original poster; worked with same workaround
Edition Windows 11 Pro
Version 22H2
Installed on 22.09.2023
OS build 22621.2361
Experience Windows Feature Experience Pack 1000.22674.1000.0

Если вы используете Windows 11 Home и столкнулись с проблемами при попытке запустить Ubuntu в подсистеме Windows для Linux 2 (WSL2), вы не одиноки. Эта статья проведет вас через шаги, чтобы решить эту распространенную проблему.
Чтобы исправить ошибку запуска WSL2 Ubuntu в Windows 11 Home, вам необходимо включить Hyper-V, проверить наличие переопределений в настройках безопасности Windows и устранить любые конкретные сообщения об ошибках, с которыми вы сталкиваетесь.
Понимание проблемы
Прежде чем мы углубимся в решение, важно понять проблему. WSL2 — это уровень совместимости для запуска бинарных исполняемых файлов Linux непосредственно в Windows. Это мощный инструмент для разработчиков и системных администраторов, но иногда с ним могут возникать проблемы, особенно при использовании в сочетании с домашними выпусками Windows.
Ошибка запуска обычно возникает при попытке запустить терминал Ubuntu из меню «Пуск» или командной строки. Сообщение об ошибке может быть разным, но часто оно указывает на проблему с базовой технологией виртуализации, используемой WSL2.
Предпосылки
Прежде чем мы начнем, убедитесь, что ваша Windows 11 Home обновлена до последней версии. Это важно, так как Microsoft регулярно выпускает обновления, которые исправляют известные ошибки и повышают стабильность системы.
Шаг 1. Включите Hyper-V
Hyper-V — это технология виртуализации от Microsoft, необходимая для работы WSL2. К сожалению, он не установлен по умолчанию в версиях Windows Home. Вы можете следовать этому руководству, чтобы установить Hyper-V в выпуске Windows 11 Home.
Чтобы включить Hyper-V, откройте PowerShell от имени администратора и выполните следующую команду:
Enable-WindowsOptionalFeature -Online -FeatureName Microsoft-Hyper-V -All
В этой команде Enable-WindowsOptionalFeature — это командлет, который позволяет включать или отключать дополнительные функции в Windows. Параметр -Online указывает, что действие должно быть выполнено в текущей операционной системе. Параметр -FeatureName используется для указания имени функции для включения, в данном случае, Microsoft-Hyper-V. Параметр -All гарантирует, что все связанные функции также включены.
После выполнения команды перезагрузите компьютер, чтобы изменения вступили в силу.
Шаг 2. Проверьте переопределения
В некоторых случаях ошибка запуска может быть вызвана переопределением настроек безопасности Windows. Чтобы проверить это, выполните следующие действия:
- Откройте приложение безопасности Windows.
- Перейдите в «Управление приложениями и браузером».
- Проверьте, включены ли переопределения для «vmvp.exe» и «vmcompute.exe».
Если вы найдете какие-либо переопределения, отключите их. Кроме того, убедитесь, что для «Code Flow Guard» нет переопределений, так как это может вызвать конфликты.
Шаг 3. Проверьте наличие сообщений об ошибках
Если вы по-прежнему сталкиваетесь с сообщением об ошибке при запуске Ubuntu в WSL2, запишите точное сообщение об ошибке. Это поможет в дальнейшем устранении неполадок. Вы также можете найти сообщение об ошибке в Интернете, чтобы найти возможные решения.
Заключение
В этой статье мы рассмотрели шаги по исправлению ошибки запуска WSL2 Ubuntu в Windows 11 Home. Помните, устранение неполадок — это процесс устранения. Если одно решение не работает, попробуйте следующее. Если у вас по-прежнему возникают проблемы, не стесняйтесь обращаться за помощью к онлайн-сообществам, таким как Спросите Ubuntu или Гитхаб.
Помните, что WSL — это официальный канонический выпуск Ubuntu, поэтому вопросы, касающиеся Ubuntu в WSL, находятся в теме Ask Ubuntu, даже если они касаются проблем, связанных с Windows. Удачного устранения неполадок!
Да, вы можете использовать WSL2 в выпуске Windows 11 Home, включив Hyper-V и выполнив действия, описанные в этой статье.
WSL2 — это уровень совместимости для запуска бинарных исполняемых файлов Linux непосредственно в Windows. Это позволяет вам использовать инструменты Linux и запускать приложения Linux на вашем компьютере с Windows.
Ошибка запуска может возникнуть из-за проблем с базовой технологией виртуализации, используемой WSL2. Это можно решить, включив Hyper-V и проверив любые переопределения в настройках безопасности Windows.
Чтобы включить Hyper-V в Windows 11 Home, откройте PowerShell от имени администратора и выполните команду, упомянутую в шаге 1 этой статьи.
Если вы по-прежнему сталкиваетесь с ошибкой запуска, проверьте наличие сообщений об ошибках и найдите возможные решения в Интернете. Вы также можете обратиться за помощью к онлайн-сообществам, таким как Ask Ubuntu или GitHub.