Содержание
- Способ 1: Смена региона на США (только для региона Россия)
- Способ 2: Очистка кешированных обоев экрана блокировки
- Способ 3: Очистка временных файлов
- Способ 4: Удаление системных файлов
- Способ 5: Редактирование локальной групповой политики
- Способ 6: Редактирование реестра
- Способ 7: Повторная регистрация пакетов
- Способ 8: Удаление VPN и прокси-сервера
- Вопросы и ответы
Способ 1: Смена региона на США (только для региона Россия)
С недавнего времени компания Microsoft прекратила поддержку некоторых своих продуктов в России. В связи с этим доступ к определенным серверам тоже запрещен. Пользователи из этой страны заметили, что как раз из-за установленного региона экран блокировки с «Интересным» не меняется, поскольку данные с сервера просто не подгружается. Пока что это можно исправить путем смены региона на США через настройки операционной системы.
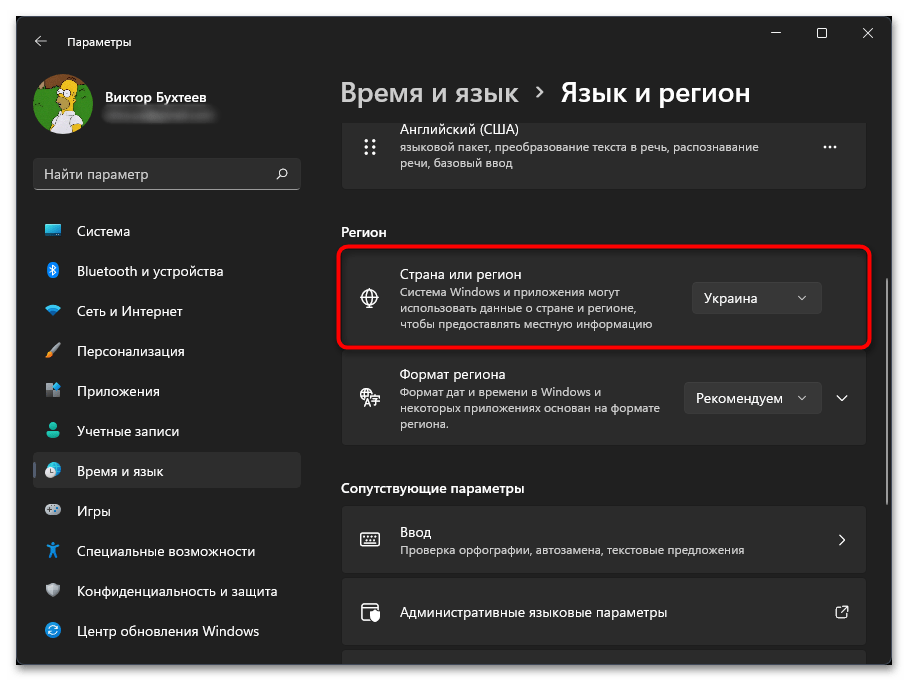
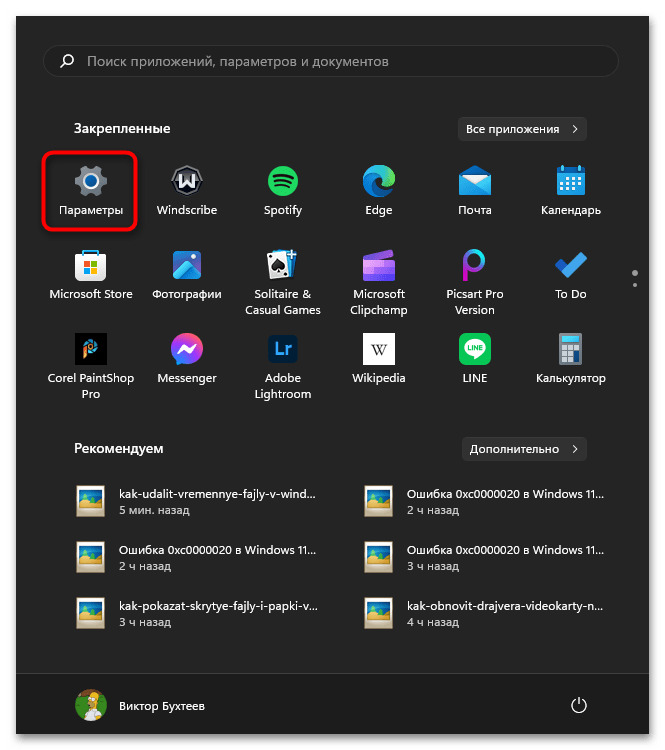
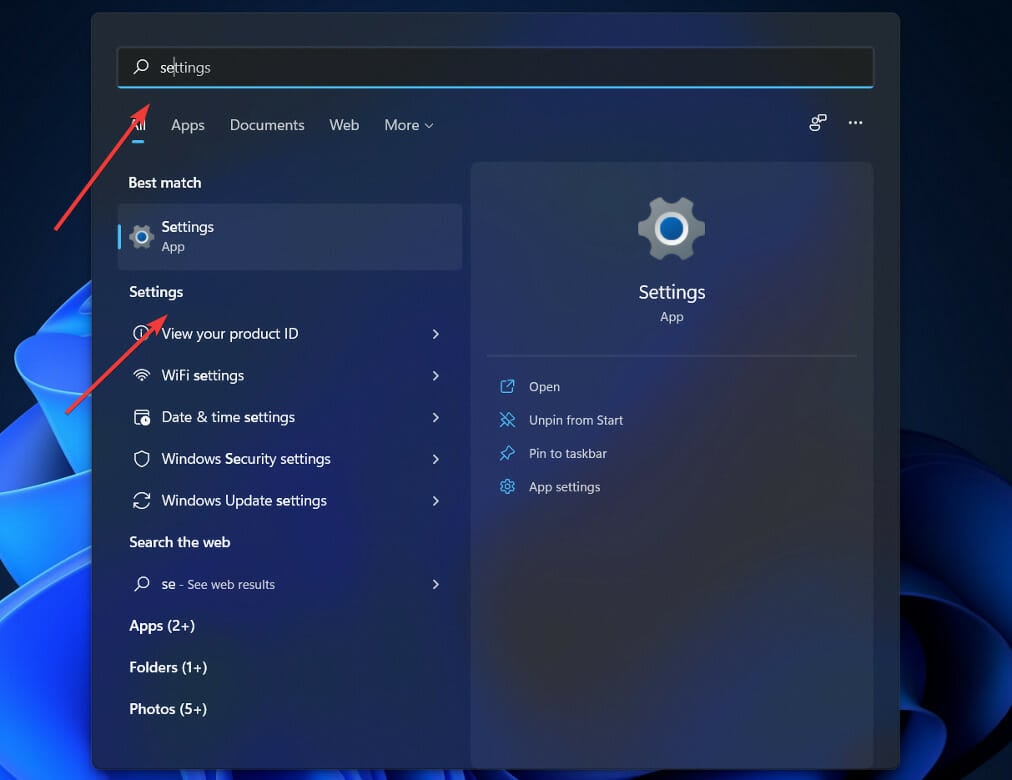
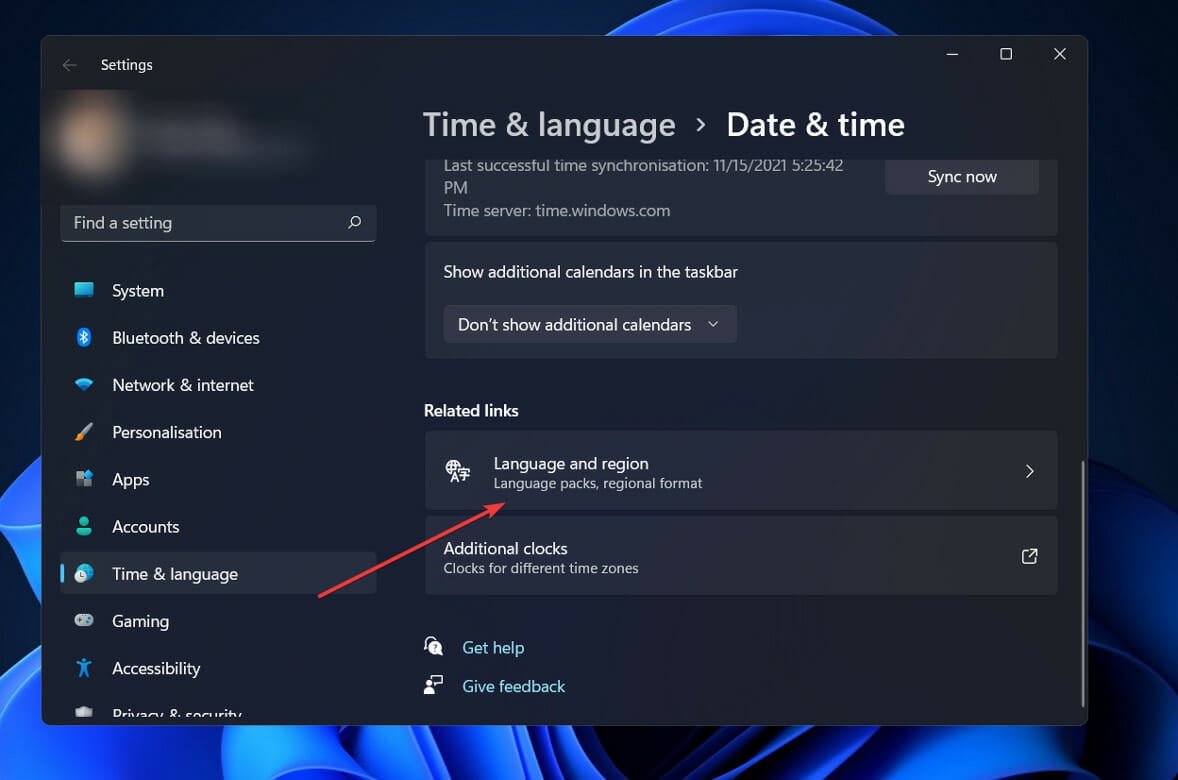
- Понадобится открыть «Пуск» и перейти в «Параметры», кликнув по значку с шестеренкой.
- На панели слева выберите раздел «Время и язык», затем справа щелкните по категории «Язык и регион».
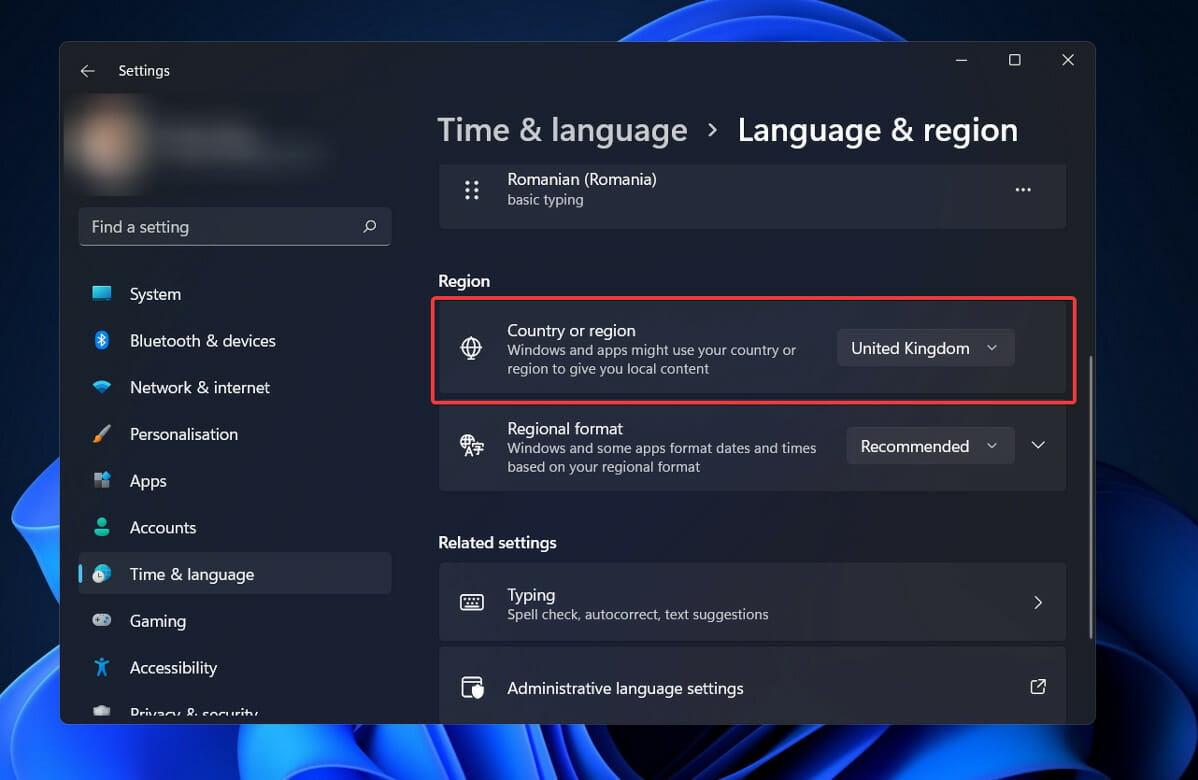
- В блоке «Регион» найдите пункт «Страна или регион» и разверните его.
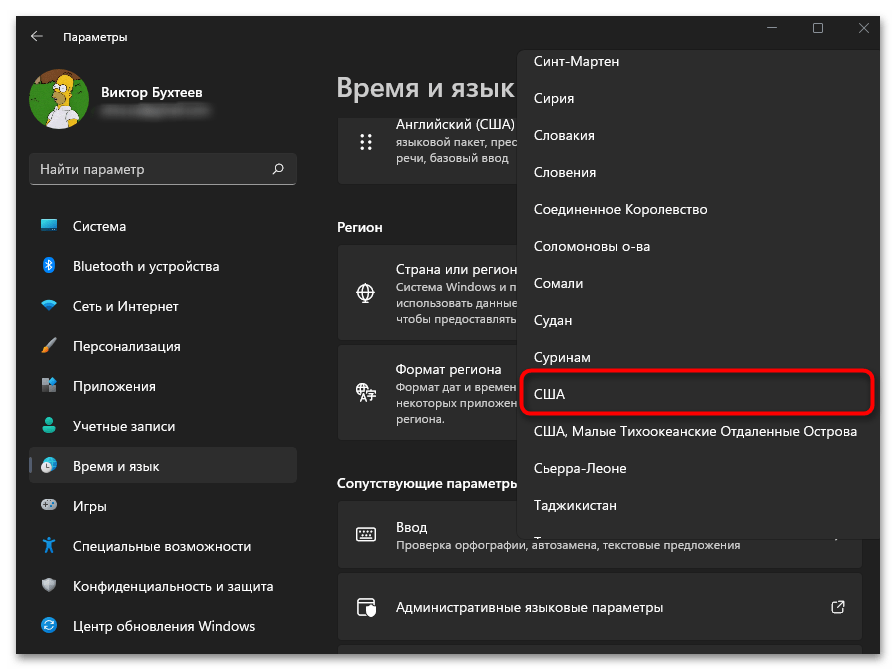
- Отыщите «США» и подтвердите данный выбор.
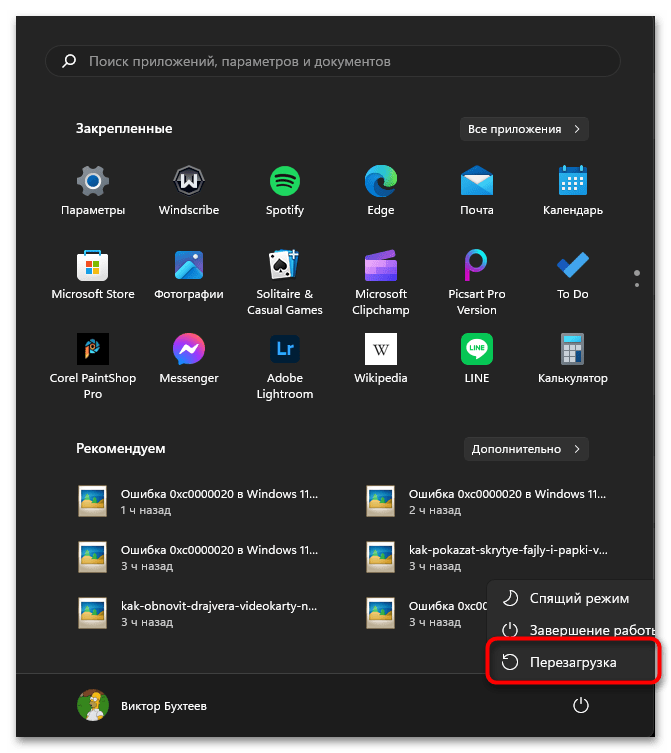
- Теперь остается только перезагрузить компьютер, чтобы изменения вступили в силу. После этого можете приступать к проверке исправления.


Способ 2: Очистка кешированных обоев экрана блокировки
Для обоев на экране блокировки операционная система создает файлы кеша, нужные для быстрой загрузки картинок при входе в операционную систему или выходе из нее на экран блокировки. Это позволяет значительно быстрее показывать вам заставки. Однако иногда в кешированных файлах возникают сбои, что может привести к тому, что заставки у «Интересного» просто не будут меняться и останется только та, которая была на момент возникновения такого сбоя. Решить эту ситуацию можно путем ручной очистки данных файлов, что выглядит следующим образом:
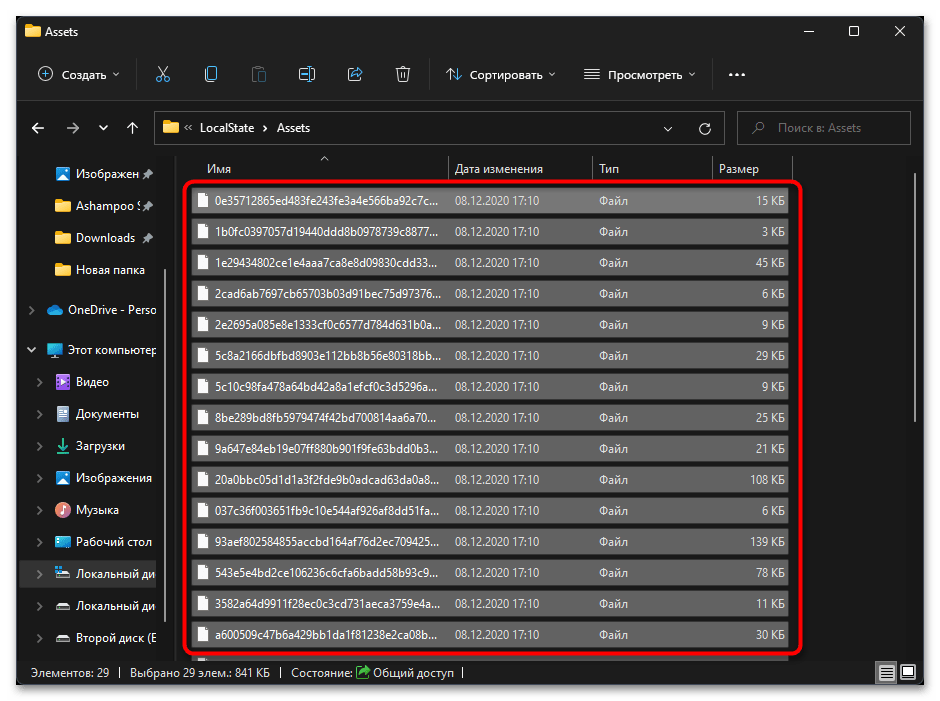
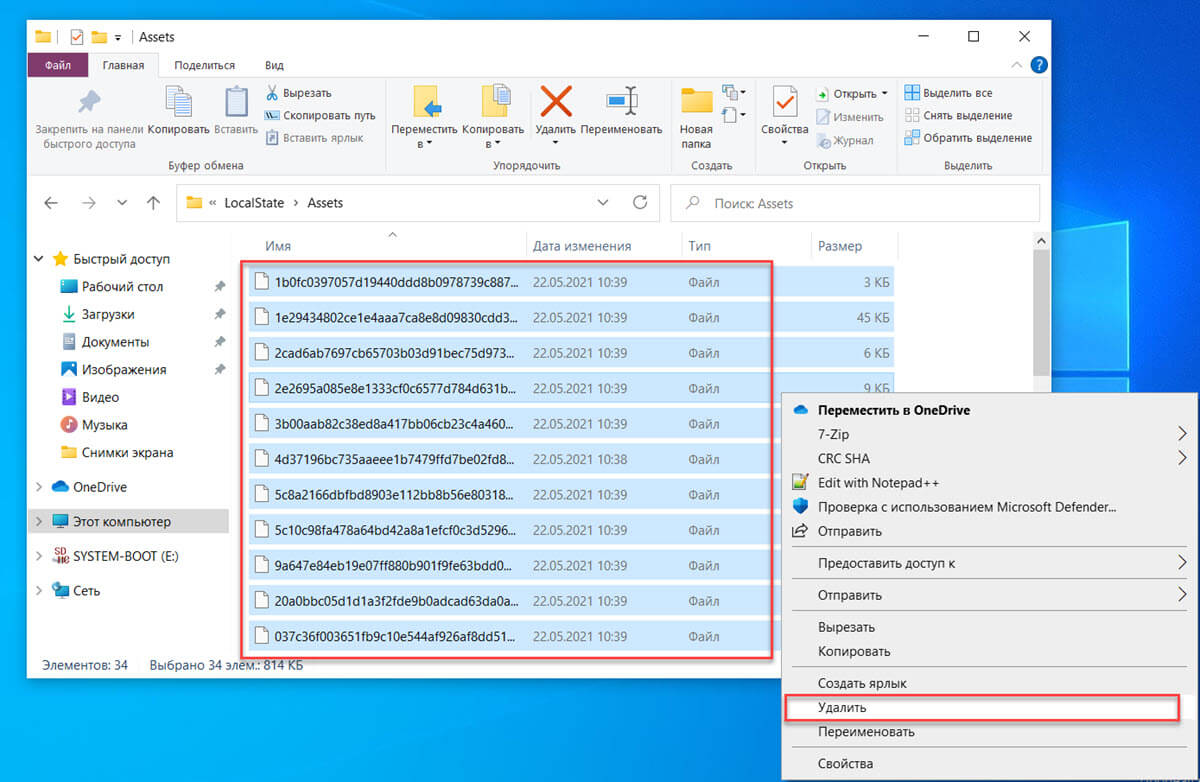
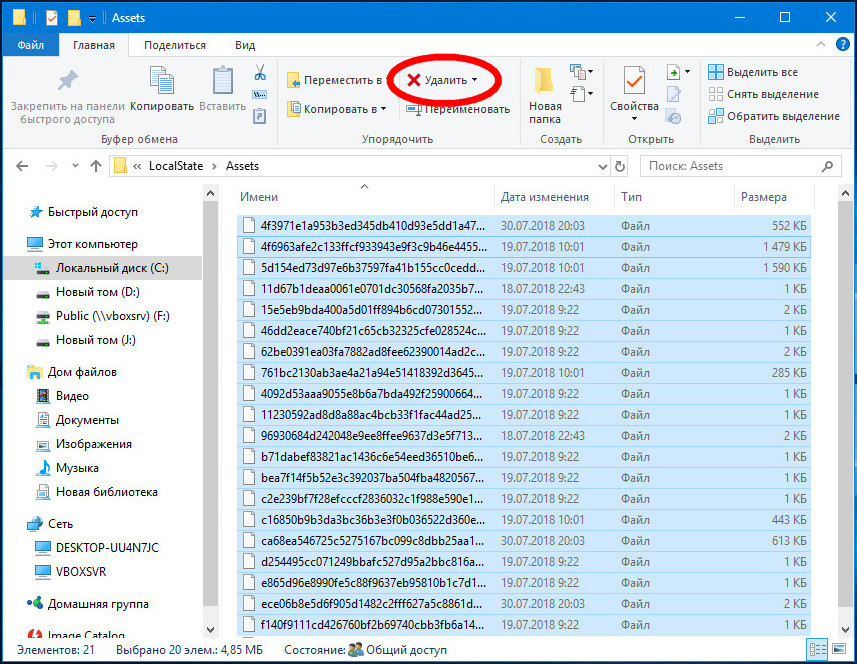
- Откройте «Проводник», в адресную строку вставьте путь
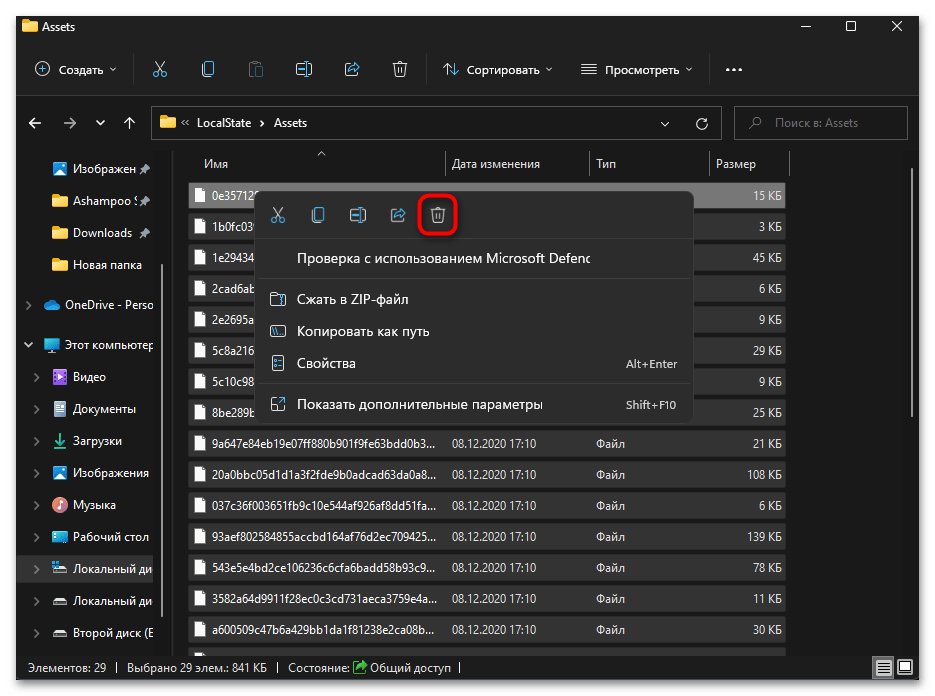
%USERPROFILE%/AppData\Local\Packages\Microsoft.Windows.ContentDeliveryManager_cw5n1h2txyewy\LocalState\Assetsи нажмите Enter, чтобы перейти по нему. - Выделите все находящиеся в конечной директории папки с зажатой левой кнопкой мыши, затем щелкните по любому из них правой.
- Из контекстного меню выберите пункт удаления, подтвердите это действие и дождитесь его завершения. Перезагрузите компьютер и проверьте, меняется ли теперь заставка экрана блокировки с «Интересным».

Способ 3: Очистка временных файлов
Если очистка исключительно файлов кеша не помогла, можно попробовать избавиться ото всех системных временных файлов, которые создаются со временем использования Windows 11 и установленных приложений. Сделать это можно как при помощи системного инструмента, так и через различные сторонние программы. О каждом методе, преимуществах и принципах реализации читайте в другом материале на нашем сайте по ссылке далее.
Подробнее: Удаление временных файлов в Windows 11
Способ 4: Удаление системных файлов
Этот вариант исправления работы смены «Интересного» на экране блокировки подразумевает удаление двух системных файлов, связанных с данным компонентом. Они должны создаться автоматически заново в следующем сеансе после перезапуска компьютера. Это поможет исправить проблемы с ними, если файлы были повреждены или каким-то образом изменены.
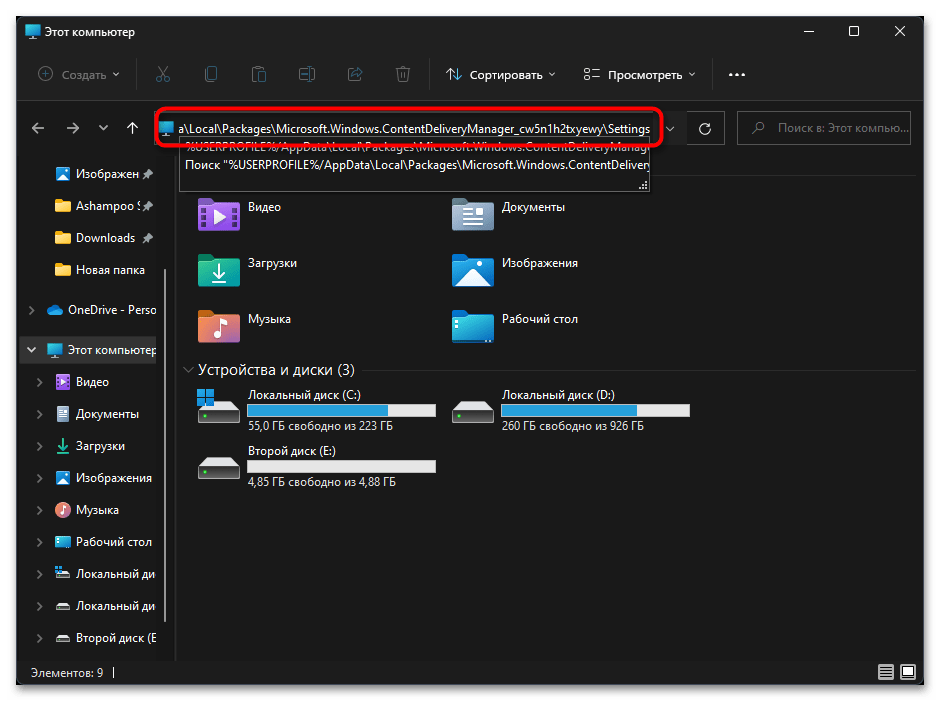
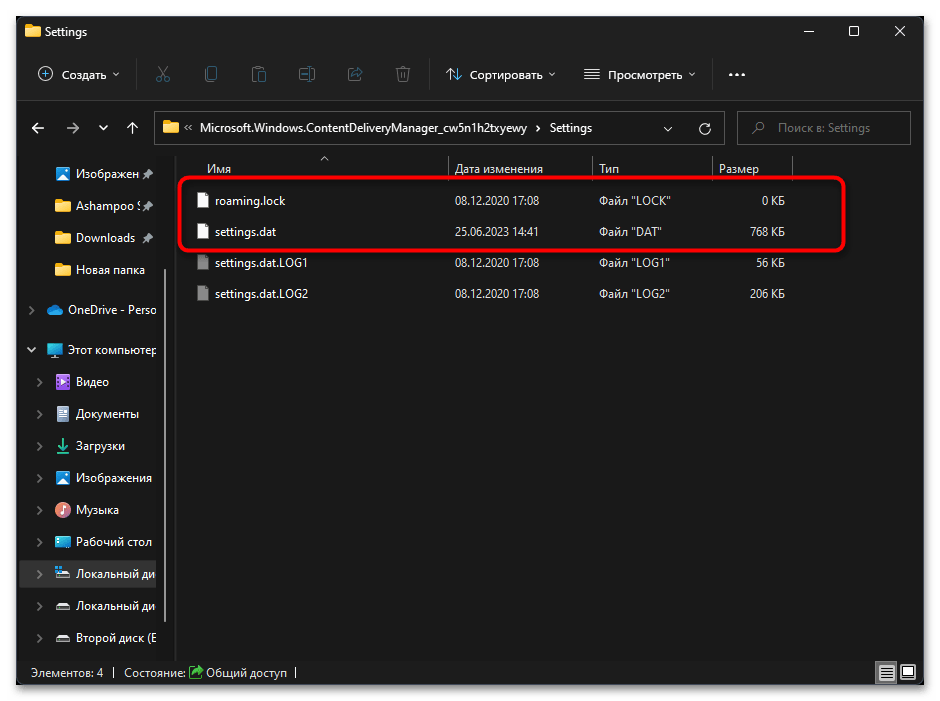
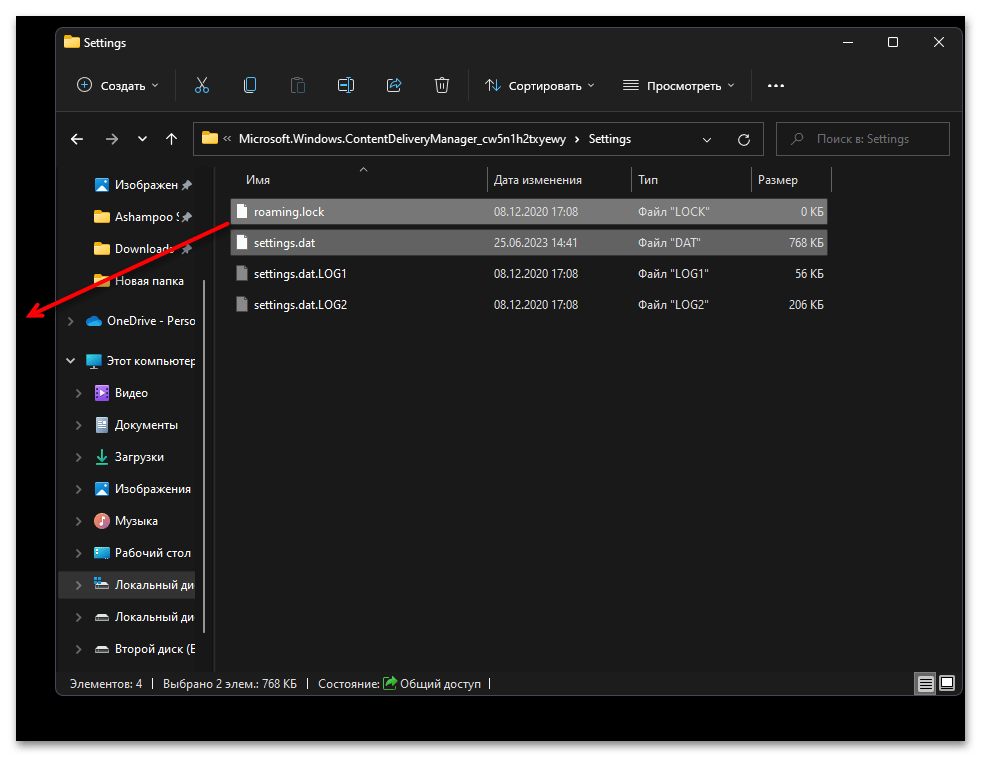
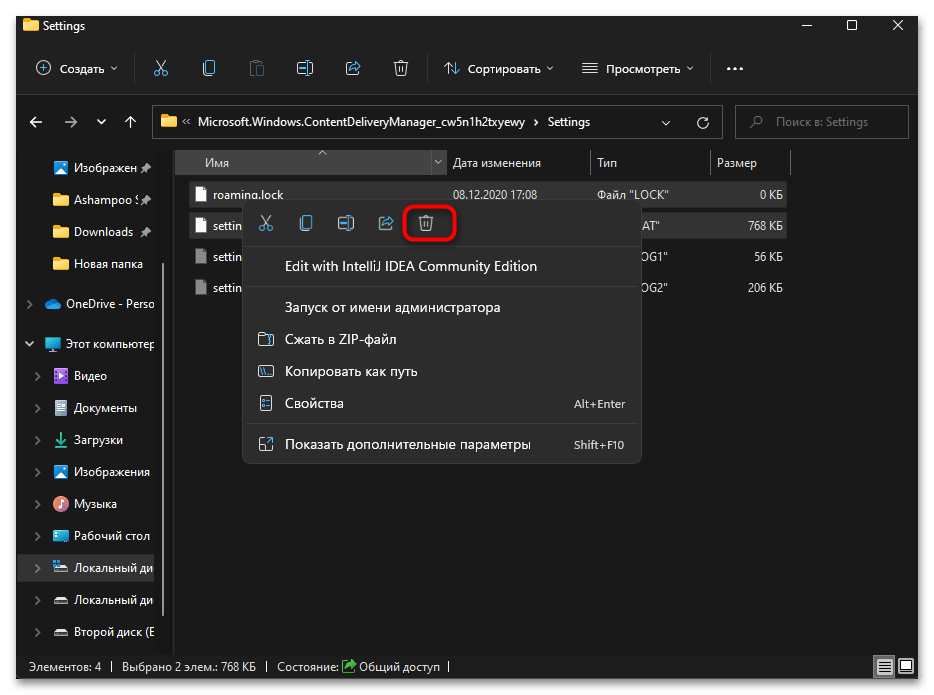
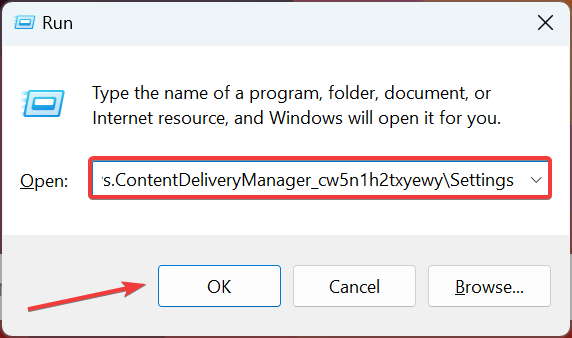
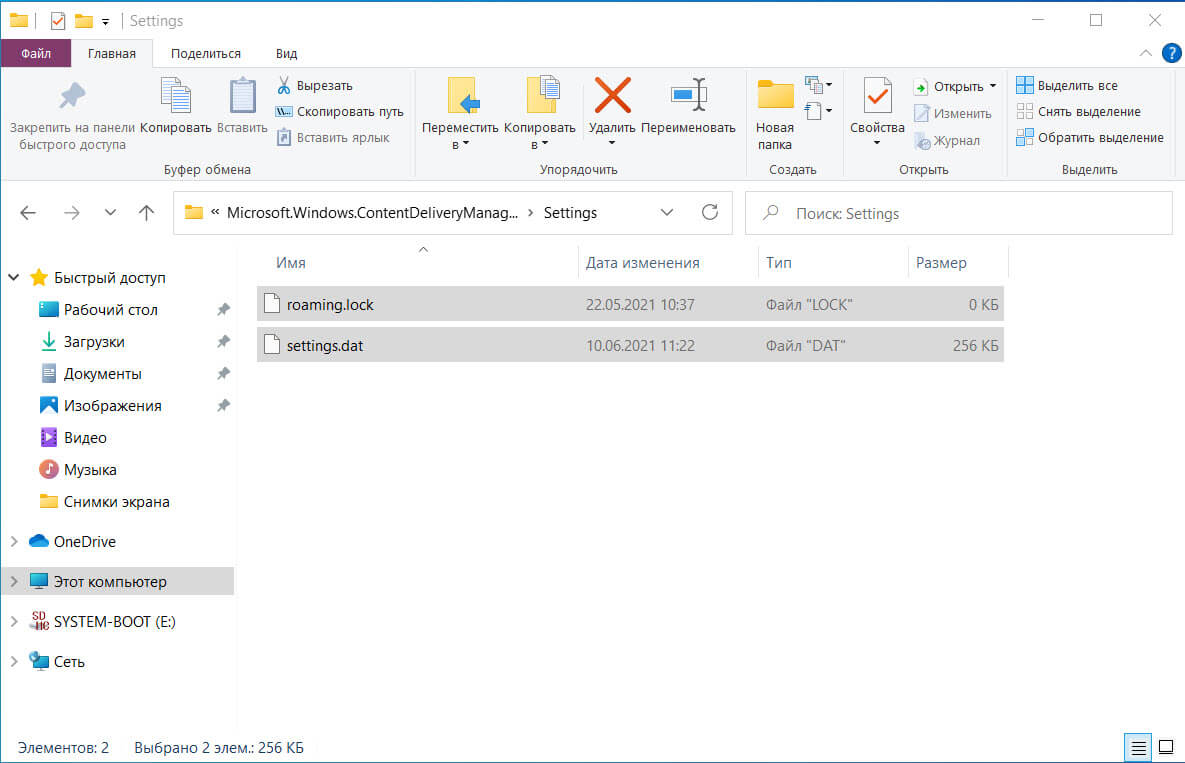
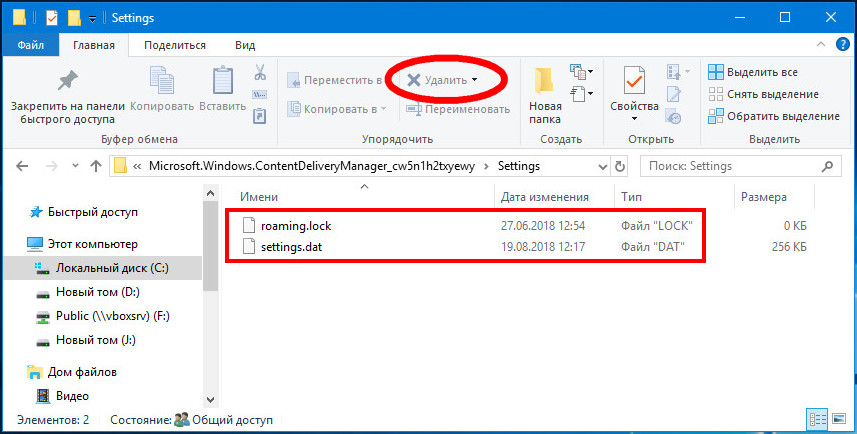
- Снова откройте «Проводник» и на этот раз перейдите по пути
%USERPROFILE%/AppData\Local\Packages\Microsoft.Windows.ContentDeliveryManager_cw5n1h2txyewy\Settings. - В данном каталоге найдите файлы с названиями «roaming.lock», «settings.dat».
- Вам понадобится переместить их на рабочий стол или создать копии с немного измененными названиями в этой же папке, чтобы иметь возможность восстановить их, если вдруг возникнут какие-то проблемы с работоспособностью ОС.
- Как только сделаете это, нажмите по файлам правой кнопкой мыши и удалите их, затем отправьте компьютер на перезагрузку.
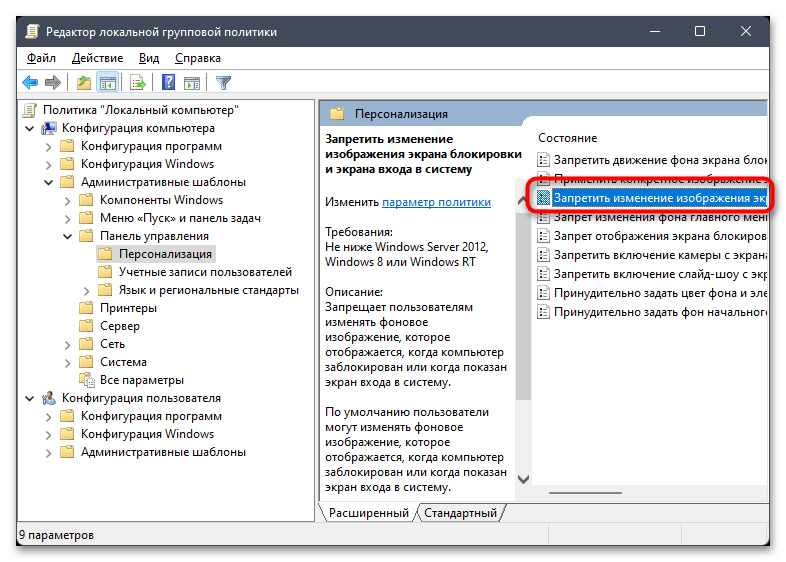
Способ 5: Редактирование локальной групповой политики
Доступ к локальной групповой политике через интерфейс редактора можно получить только в Windows 11 Pro или Enterprise. Если у вас стоит другая версия, нужное приложение будет недоступно и вам придется пропустить этот метод, переходя к редактированию реестра, что является практически альтернативой данному методу. При наличии доступа к нужному редактору понадобится найти и изменить всего один параметр.
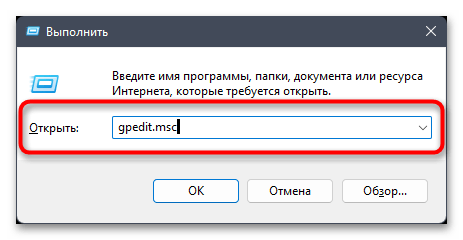
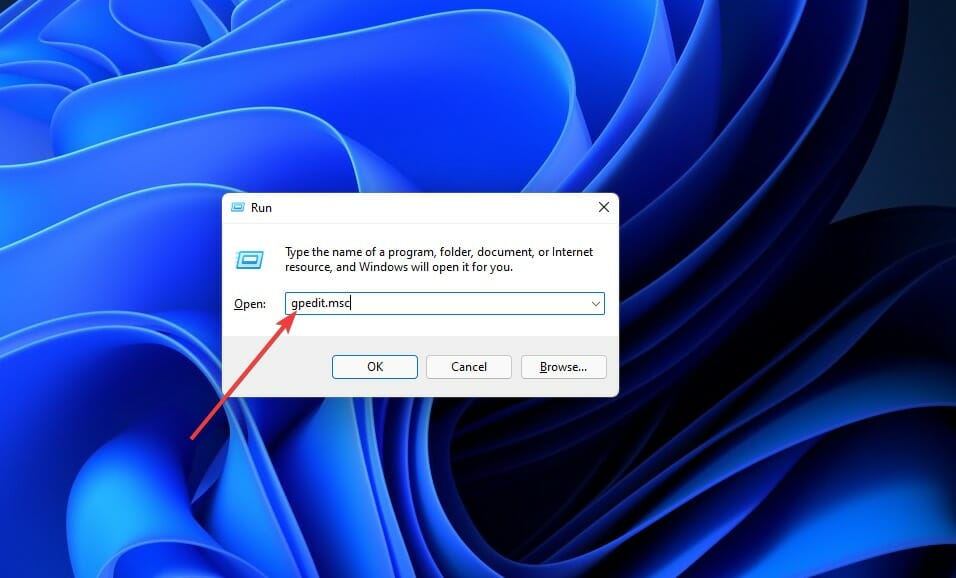
- Откройте утилиту «Выполнить», используя для этого сочетание клавиш Win + R. Введите команду
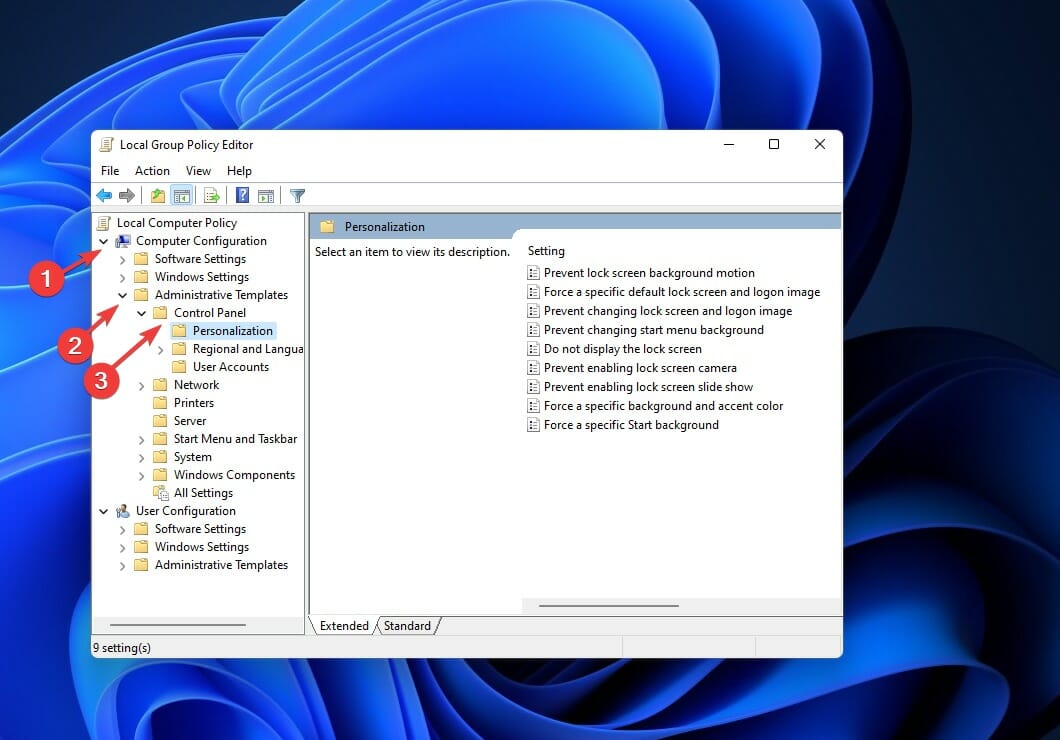
gpedit.mscи нажмите Enter для ее активации. - В окне редактора откройте «Конфигурация компьютера», выберите папку «Административные шаблоны» > «Панель управления» > «Персонализация».
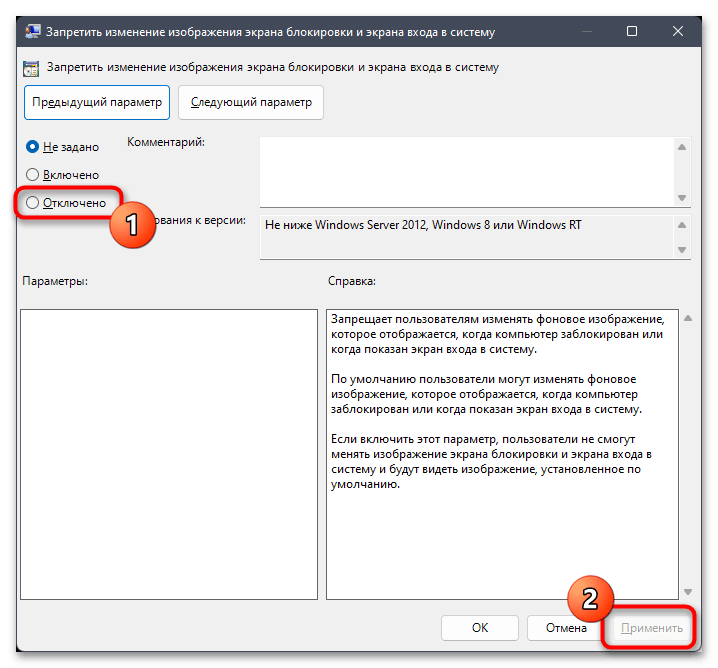
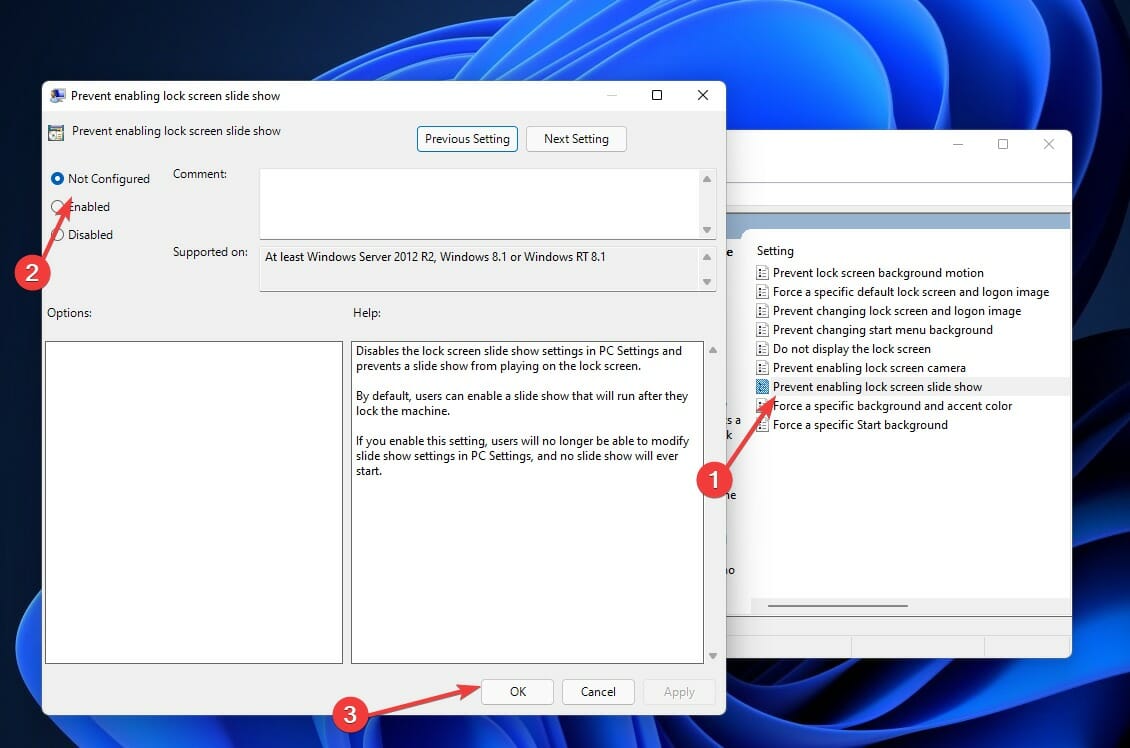
- В списке параметров справа отыщите правило под названием «Запретить изменение изображения экрана блокировки и входа в систему». Дважды щелкните по нему левой кнопкой мыши, чтобы открыть «Свойства».
- Измените значение на «Отключено», примените изменения и перезагрузите компьютер.

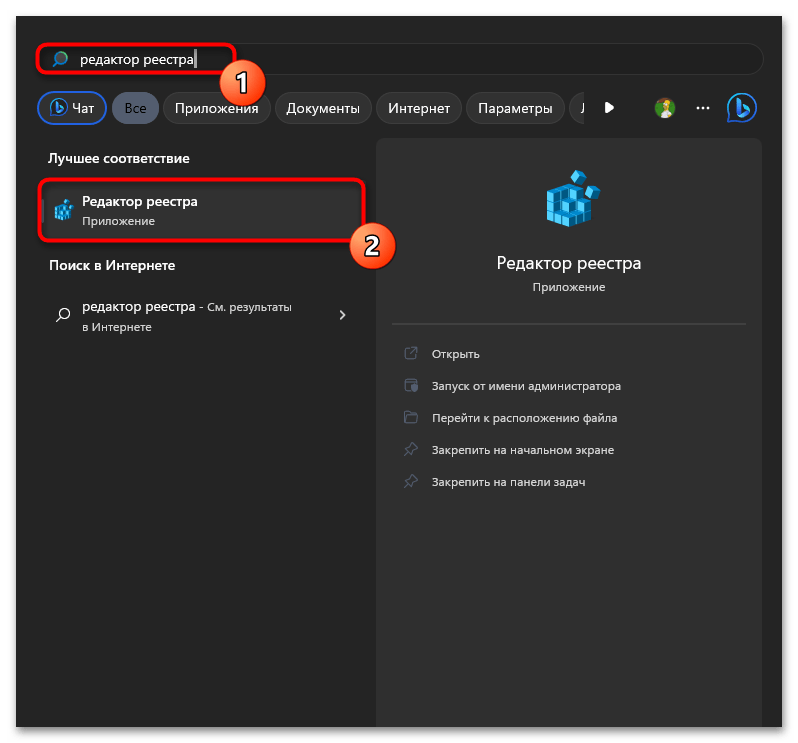
Способ 6: Редактирование реестра
Способ с редактированием реестра может выступать как альтернативой предыдущему, если доступа к локальным групповым политикам нет, так и выступать самостоятельным, когда предыдущие настройки не принесли должного результата. Вам понадобится отыскать параметр, который запрещает изменение экрана блокировки, затем отключить его или вовсе удалить.
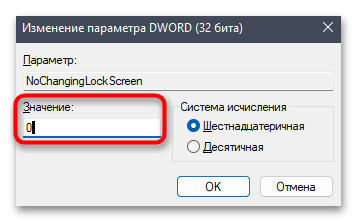
- Для этого через «Пуск» отыщите «Редактор реестра» и запустите данное приложение.
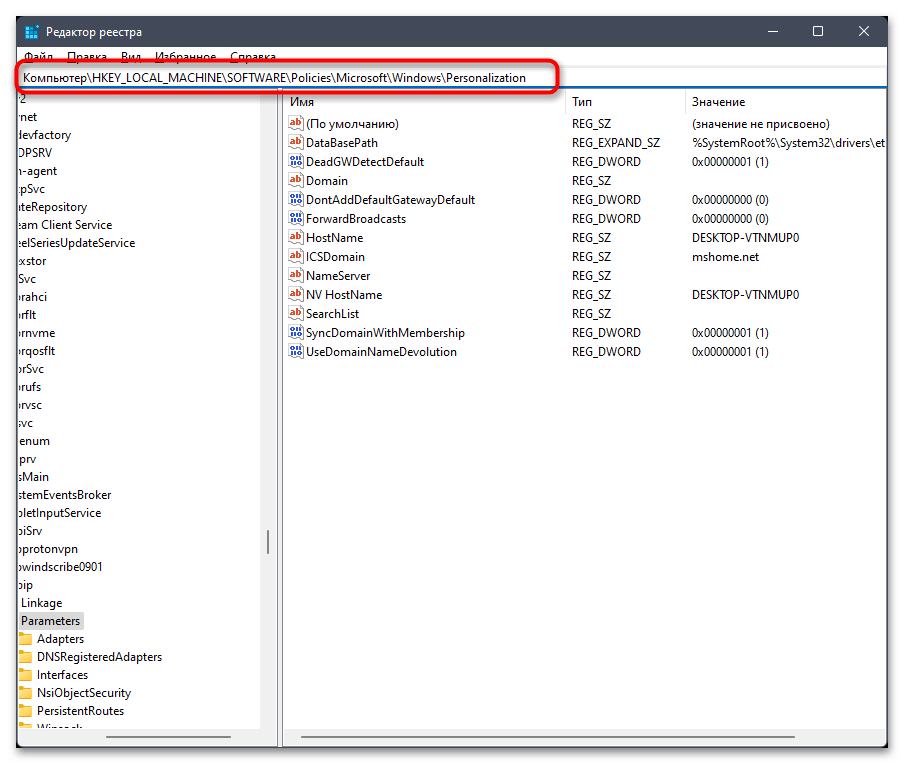
- В адресную строку вставьте путь
Компьютер\HKEY_LOCAL_MACHINE\SOFTWARE\Policies\Microsoft\Windows\Personalizationи перейдите по нему. - Найдите параметр с названием «NoChangingLockScreen». Если он отсутствует, пропустите данный метод и переходите к следующему.
- Можно дважды кликнуть по данному параметру и изменить значение на «0».
- Поддерживается и удаление, что приведет к такому же результату. По завершении не забудьте перезагрузить компьютер.


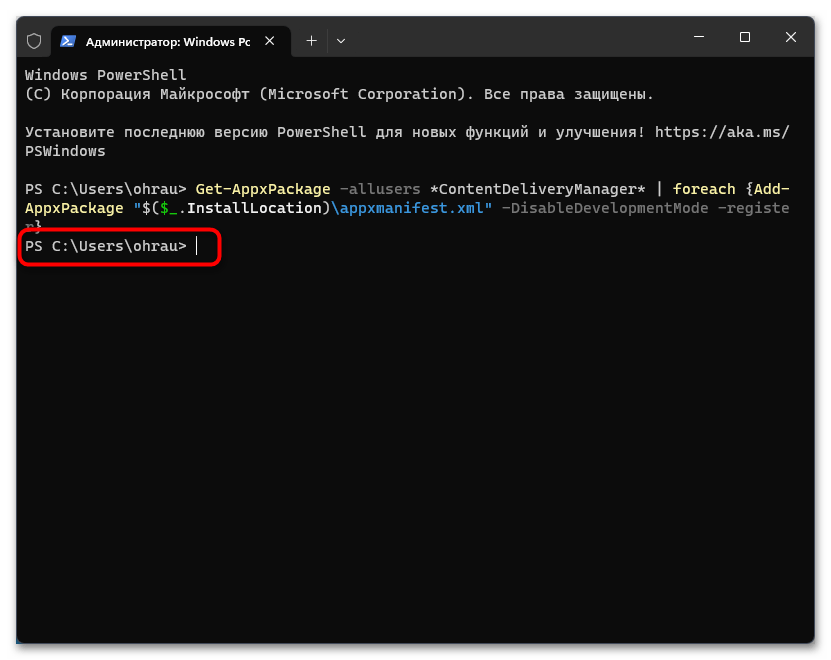
Способ 7: Повторная регистрация пакетов
В Windows 11 есть несколько пакетов со стандартными файлами, которые отвечают как за работу экрана блокировки, так и смену «Интересного» во время его активности. Дальнейшие действия подразумевают повторную регистрацию данных пакетов, что позволит исправить поврежденные файлы или загрузить заново утерянные.
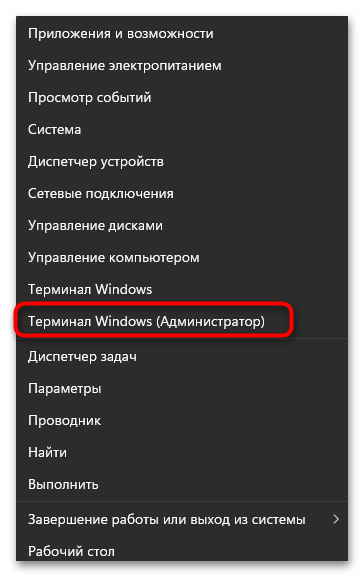
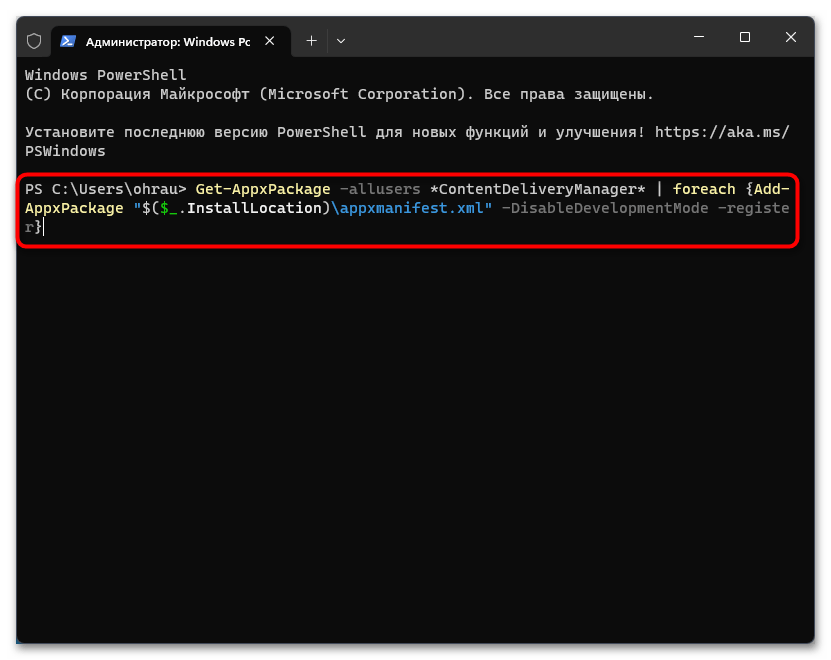
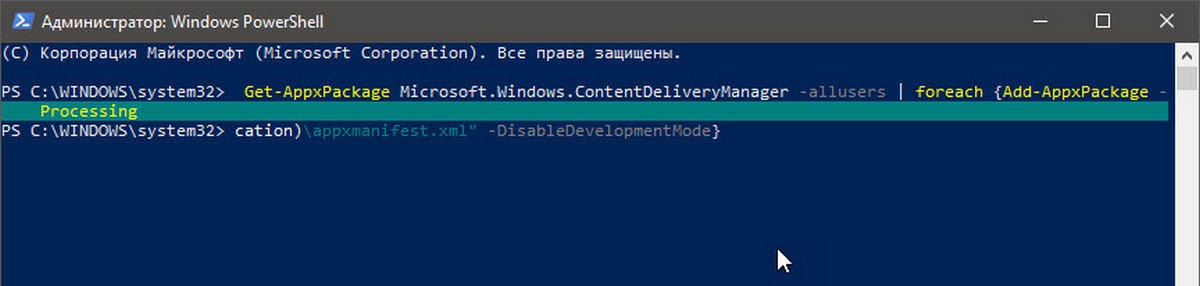
- Щелкните правой кнопкой мыши по «Пуску» и из появившегося контекстного меню выберите пункт «Терминал Windows (Администратор)».
- Вставьте команду
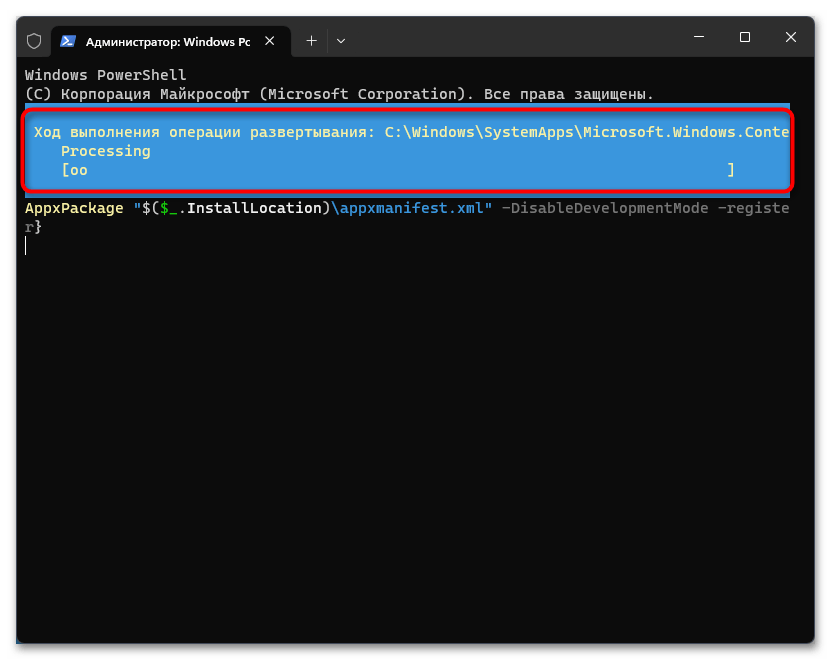
Get-AppxPackage -allusers *ContentDeliveryManager* | foreach {Add-AppxPackage "$($_.InstallLocation)\appxmanifest.xml" -DisableDevelopmentMode -register}и нажмите Enter для ее подтверждения. - Ожидайте окончания развертывания, что займет меньше минуты.
- Если на экране спустя время появилась просто следующая строка для ввода команд, значит, операция закончилась без каких-либо ошибок и можно проверять ее действенность.
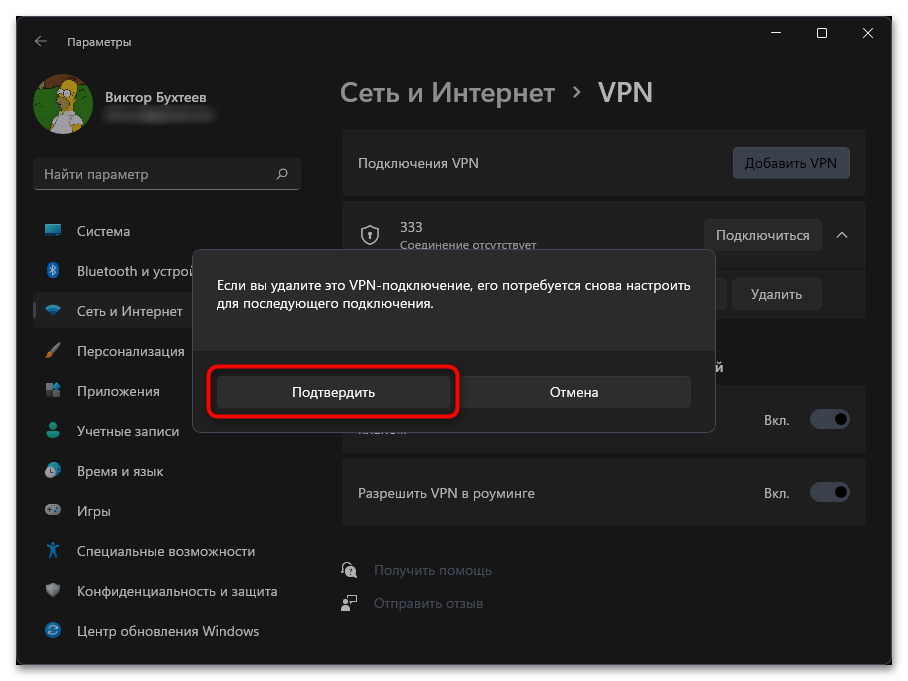
Способ 8: Удаление VPN и прокси-сервера
Последние рекомендации относятся только к тем пользователям, кто ранее задействовал стандартные параметры Windows 11 для создания подключения по VPN или установил прокси-сервер при помощи соответствующих настроек. Эти компоненты могут мешать нормальному доступу к серверам и смене «Интересного» на экране блокировки, поэтому созданные подключения лучше удалить.
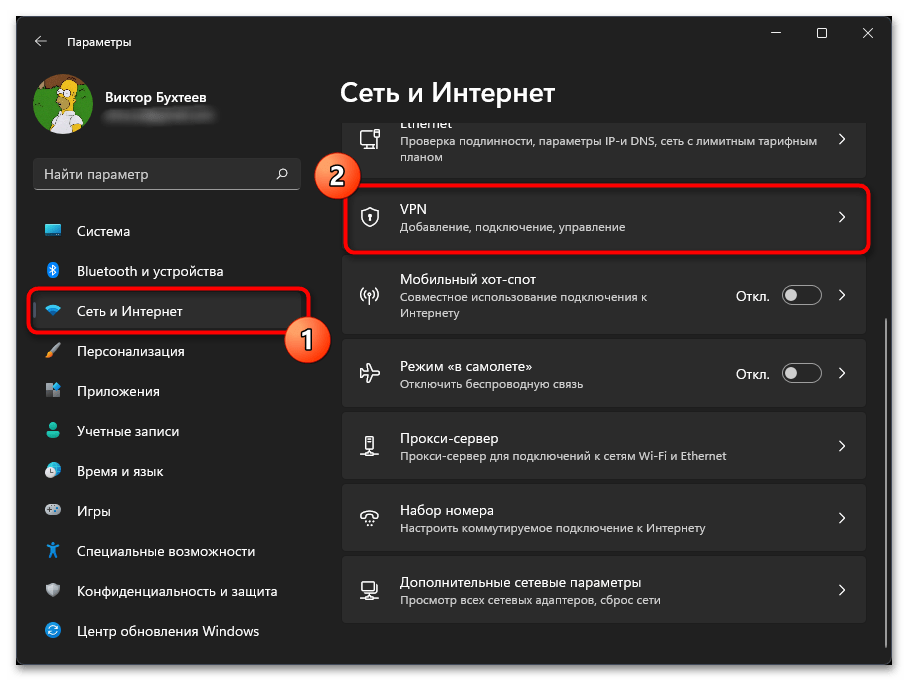
- Откройте «Пуск» и перейдите в «Параметры».
- На панели слева выберите раздел «Сеть и Интернет», затем щелкните по категории «VPN».
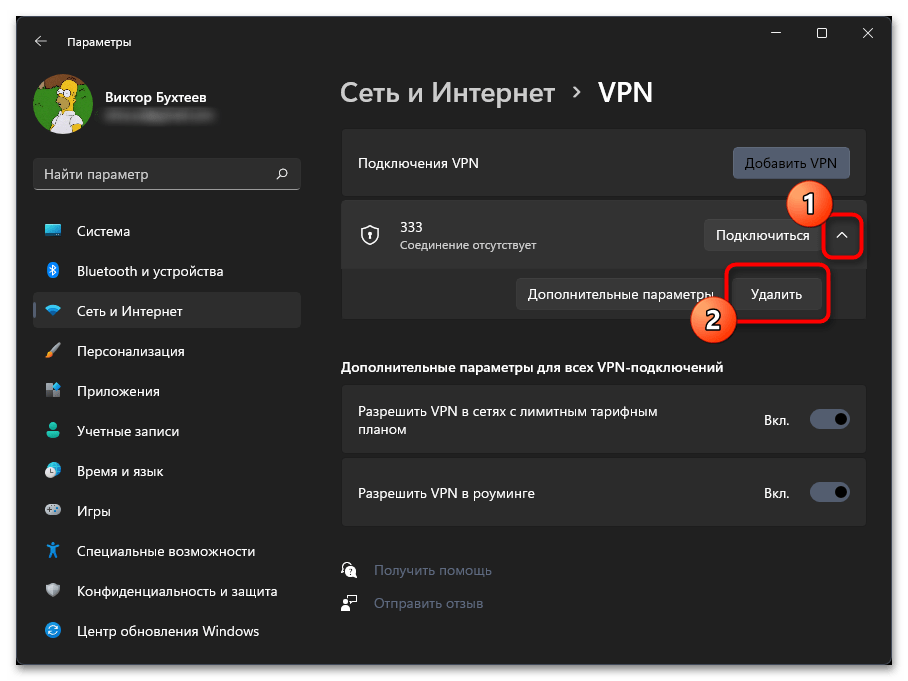
- Разверните созданное подключение и выберите вариант «Удалить».
- В следующем окне подтвердите свое действие.
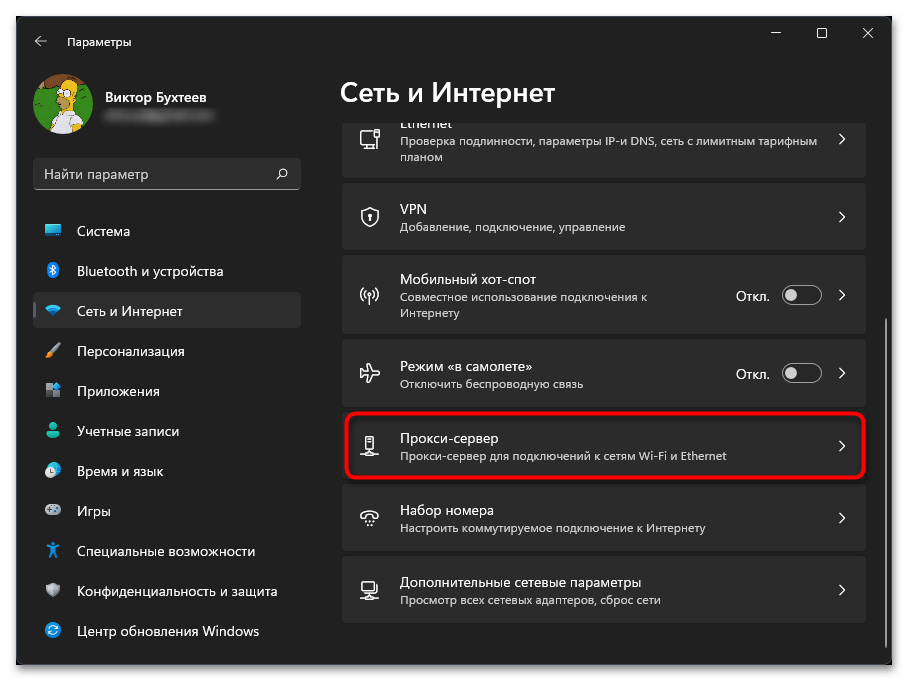
- Для работы с прокси понадобится перейти к категории «Прокси-сервер».
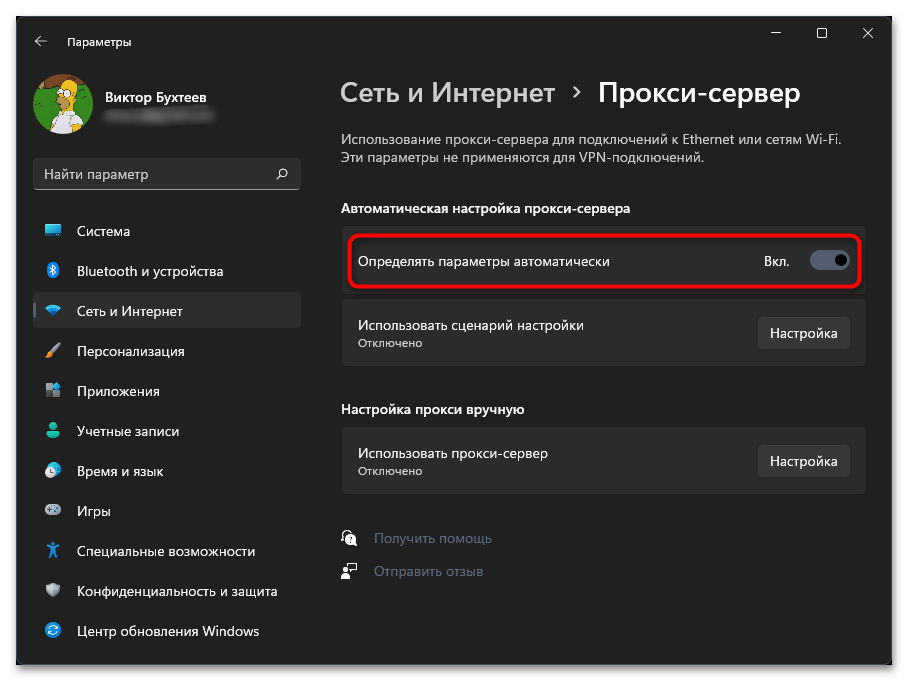
- В ней обязательно активируйте параметр «Определять параметры автоматически».
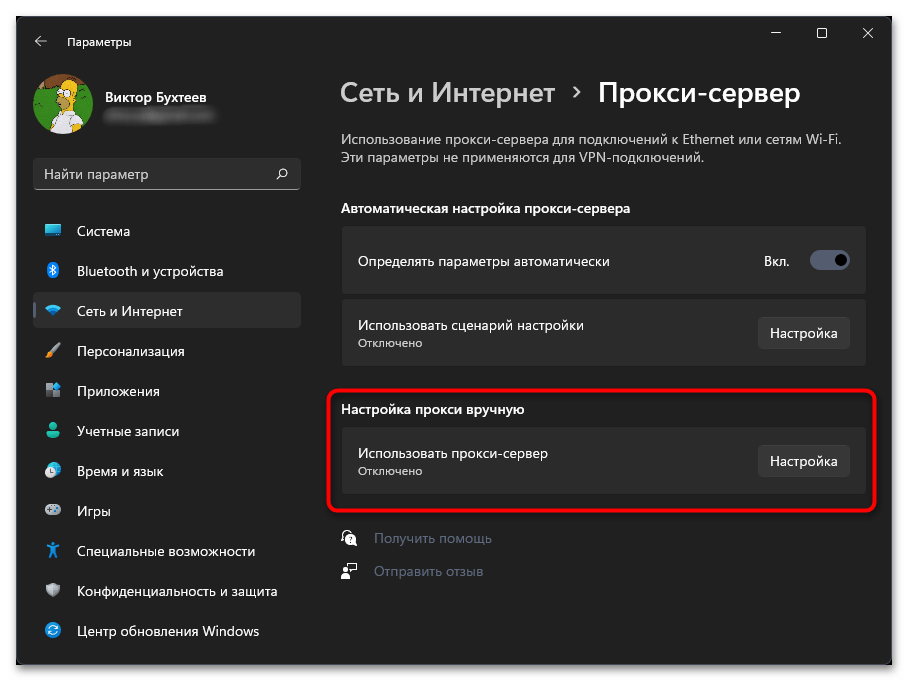
- Существующие подключения в блоке «Настройка прокси вручную» тоже удалите.
Еще статьи по данной теме:
Помогла ли Вам статья?
Check out these expert-recommended solutions
by Loredana Harsana
Loredana is a passionate writer with a keen interest in PC software and technology. She started off writing about mobile phones back when Samsung Galaxy S II was… read more
Updated on
- Many users have expressed dissatisfaction with Windows 11 Spotlight not working as expected.
- The common reasons to experience issues with Spotlight are corrupt images and system files.
- You will be stuck on the same image if you don’t have an Internet connection.
XINSTALL BY CLICKING THE DOWNLOAD
FILE
Windows Spotlight is a terrific lock screen tool that downloads and installs a new picture for Windows 11 PCs in seconds, but many reported that it’s not working.
Though this feature is usually flawless, the images in Windows Spotlight can sometimes become frozen. And, fixing it is not as complicated as it appears.
However, before we delve into the actual solutions, let’s first understand what causes the error, an important aspect when troubleshooting.
Does Windows 11 have Windows Spotlight?
Yes, Windows Spotlight is a built-in feature in the recent iterations of the OS and is available on Windows 11. The feature automatically downloads and displays images of landscapes, historic locations, and similar kinds on the lock screen.
You can use it to brighten up the lock screen while you take in the breathtaking sights of the world’s most beautiful and distinctive locations.
On top of that, you can mark whether you like a particular image or not. Then, depending on your preferences, Windows Spotlight will show you more or fewer images of that kind.
Why is Windows Spotlight not working in Windows 11?
The fact is that seeing the same picture every time the screen is locked might become monotonous after some time. In addition, depending on how severe the problem with Windows 11 Spotlight is, you may not be able to see any images on the locked screen at all.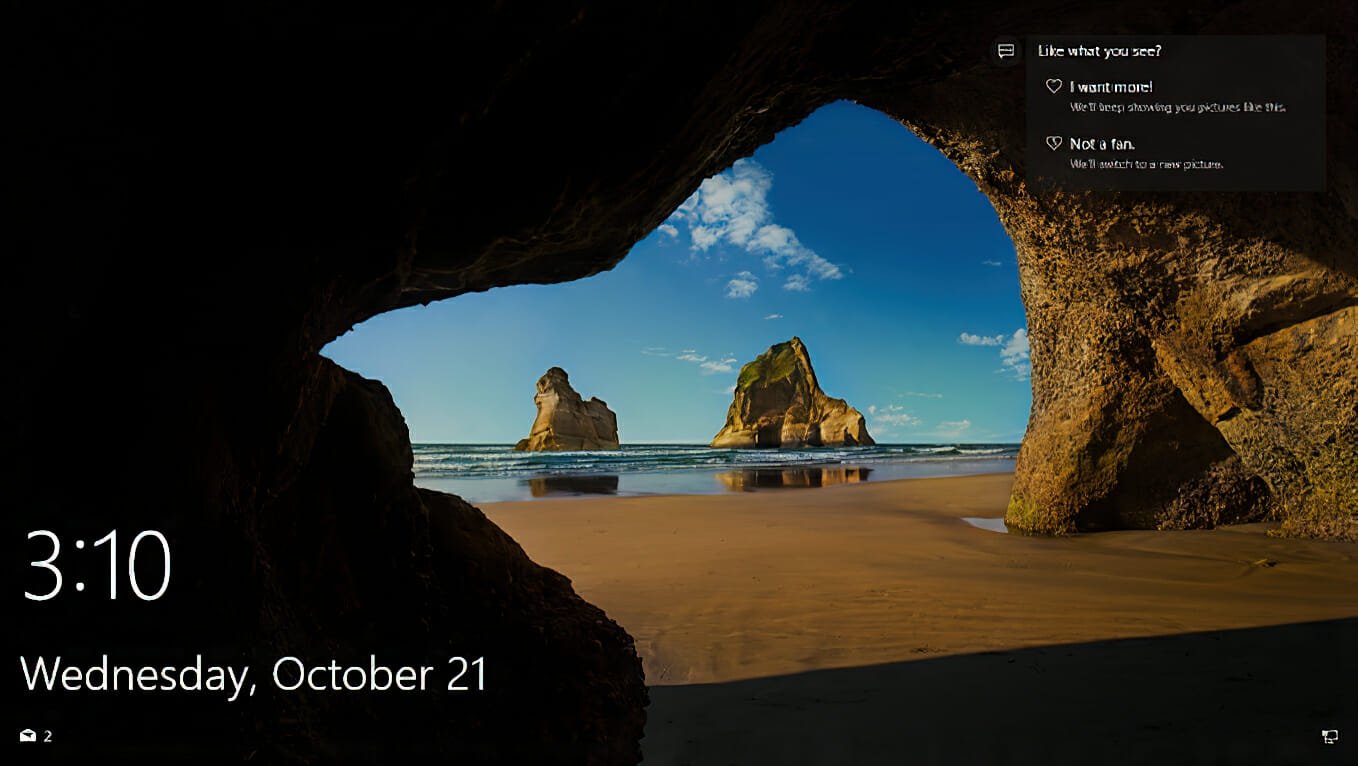
Common reasons for experiencing troubles with Spotlight include a bad Internet connection, faulty image or system files, driver problems, or an outdated Windows update (amongst other things).
The photos displayed on the Windows 11 lock screen or login screen while using the Spotlight function are typically obtained from Bing daily. Therefore, your screen will remain frozen on that exact image unless there is an active Internet connection.
How we test, review and rate?
We have worked for the past 6 months on building a new review system on how we produce content. Using it, we have subsequently redone most of our articles to provide actual hands-on expertise on the guides we made.
For more details you can read how we test, review, and rate at WindowsReport.
Windows Spotlight and other critical processes must be activated to run in the background of the Windows 11 computer for it to function correctly. This includes Microsoft Store, Microsoft Edge, and the Settings apps.
If essential programs are not running, it is possible that Windows Spotlight images will not be working in Windows 11.
Microsoft’s servers must be able to access your location from the regional language settings to provide you with tailored background images.
If the regional language settings on your Windows 11 computer are incorrect, Spotlight will be unable to download the proper background photographs for the lock screen.
How do I fix Windows Spotlight if it’s not working on Windows 11?
1. Check your network connection
The photos displayed on the Windows 11 lock screen or login screen while using the Spotlight function are typically obtained from Bing daily.
Your screen will remain frozen on that exact image without an active Internet connection.
Check to see if Spotlight has begun altering the photos on the lock screen once you are sure the Internet connection is fast and steady.
If the problem continues after this, you should attempt a different solution.
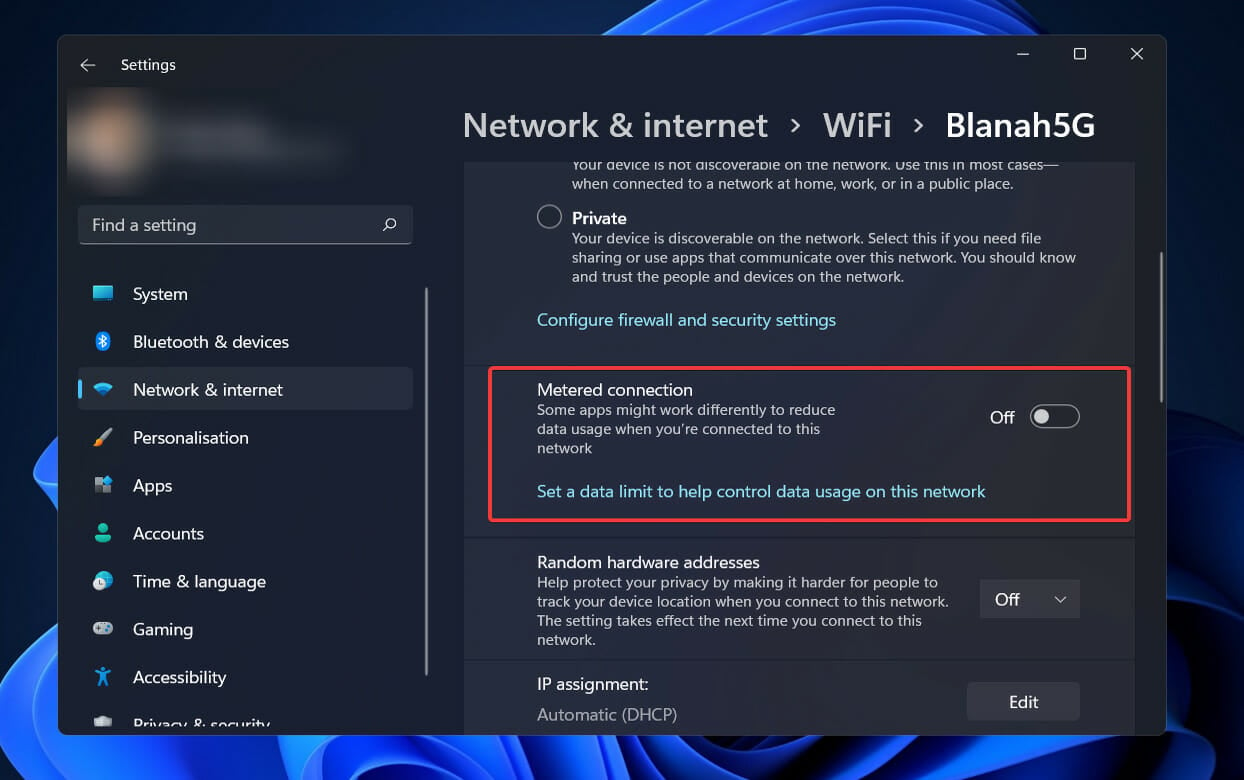
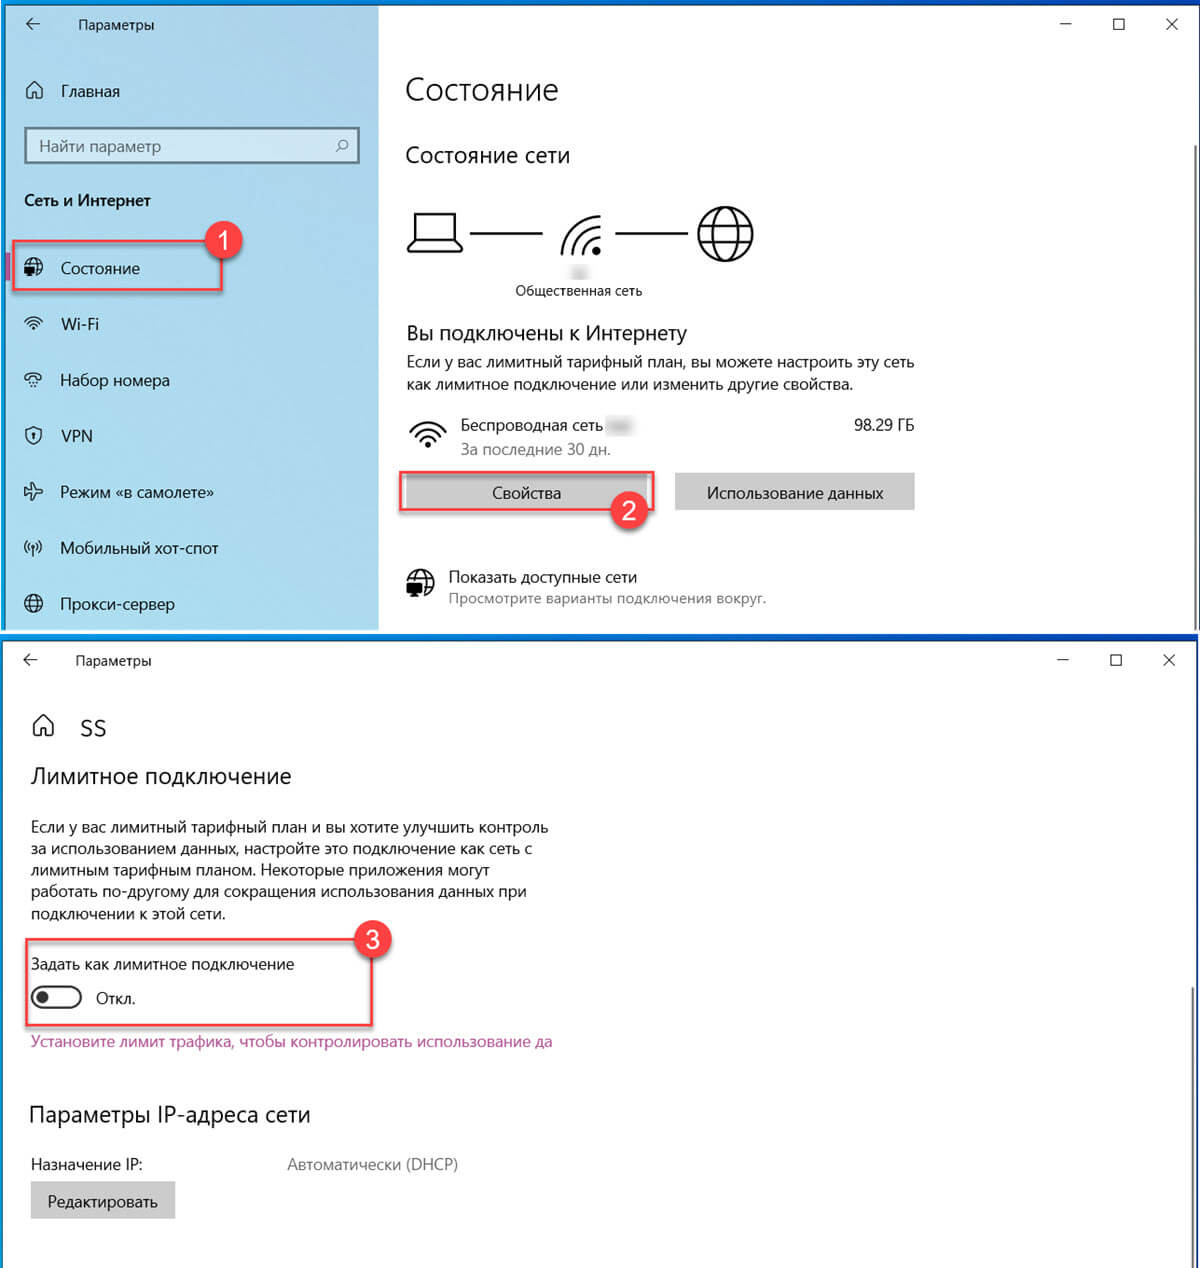
2. Make sure the metered connection is off
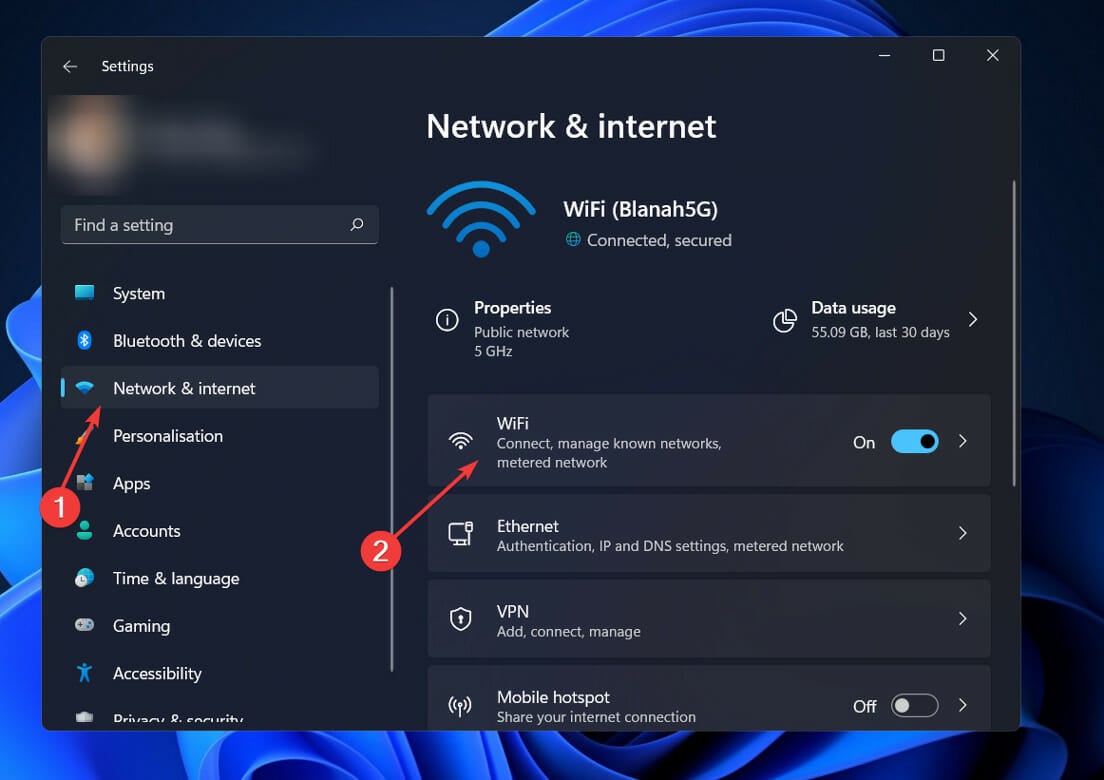
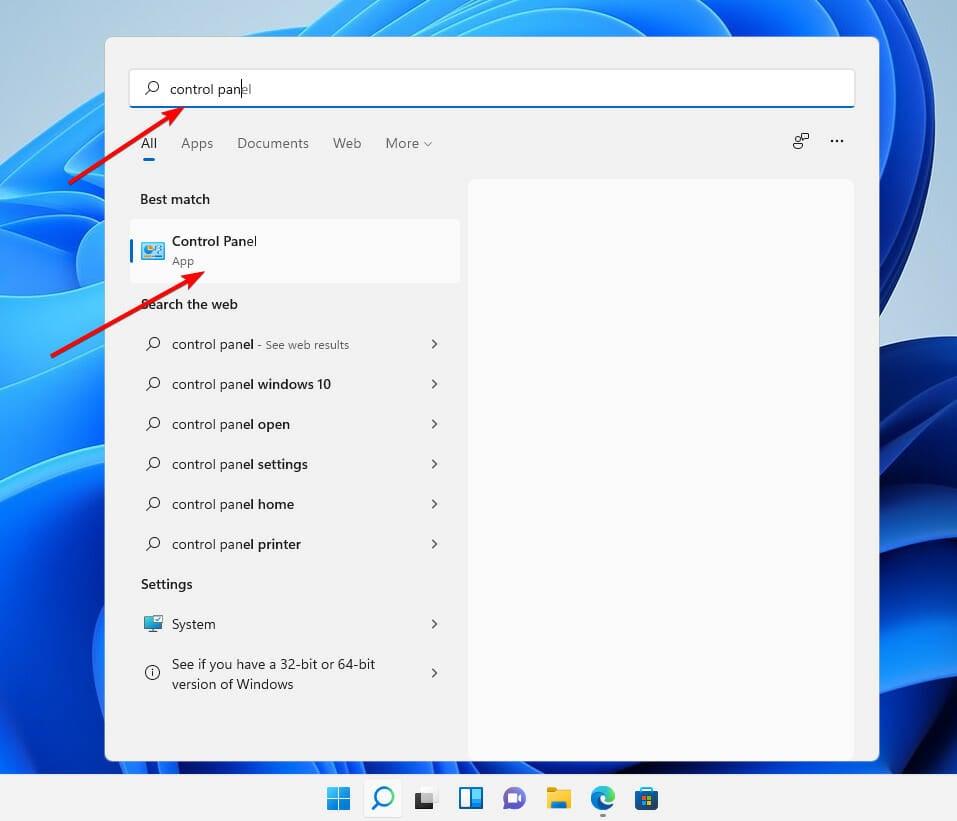
- Click on the Search button, type in Settings, and click on the most relevant result.

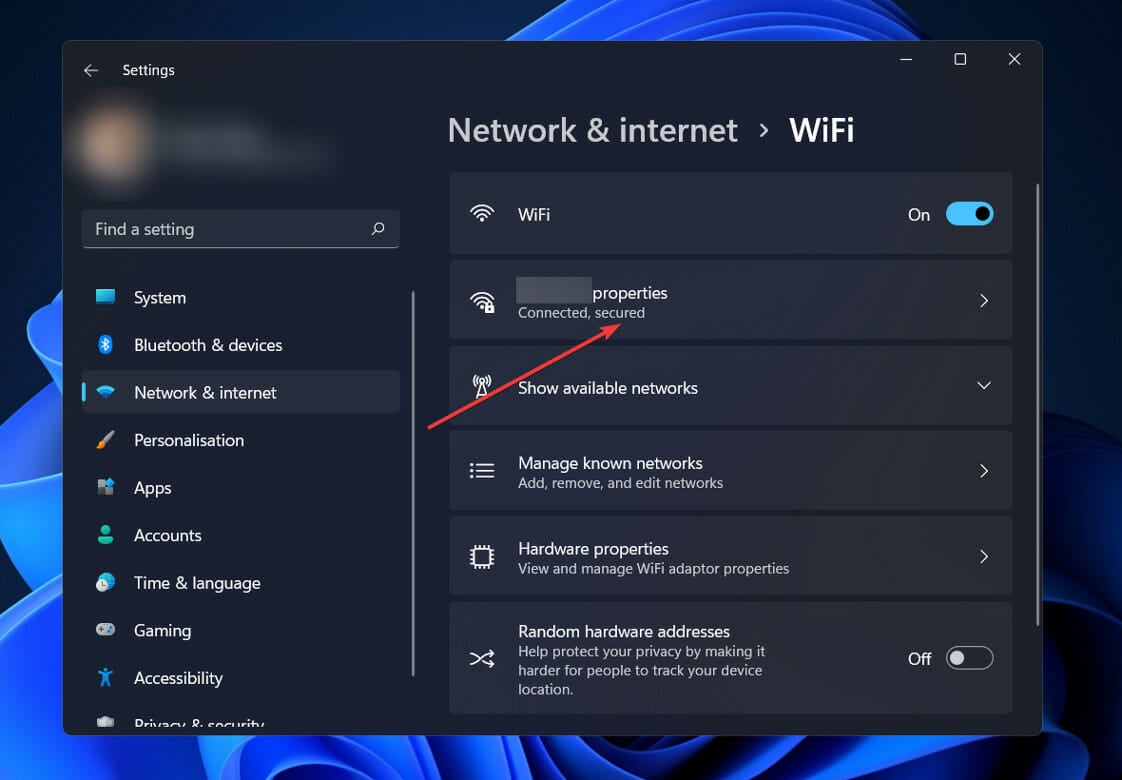
- Now, go to Network & internet, then click on WiFi.

- Now, click on your Network properties.

- Next, turn off the Metered connection.

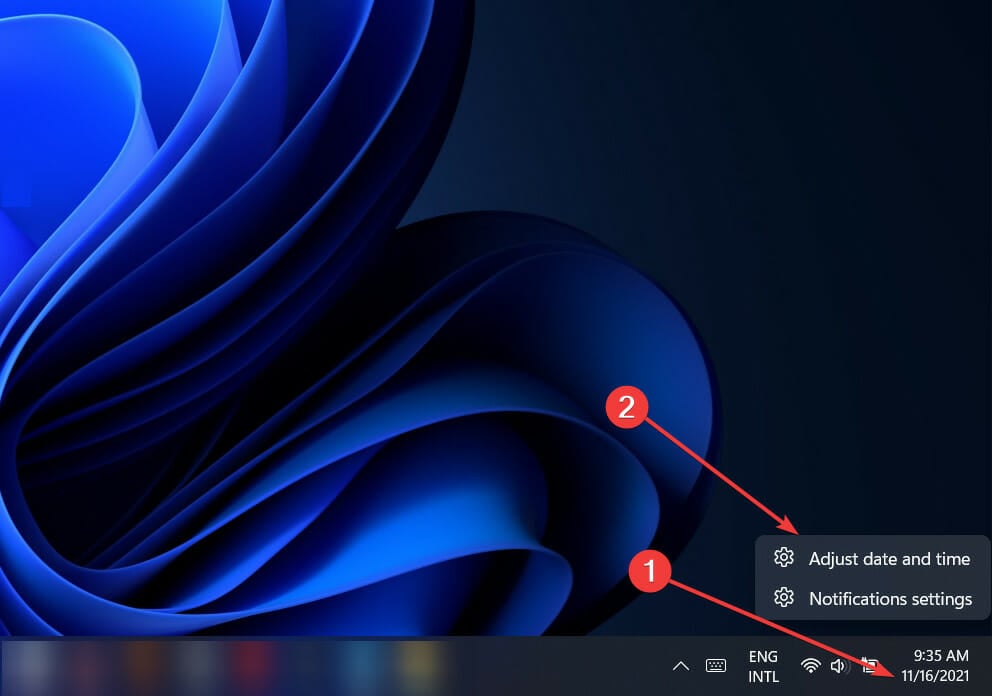
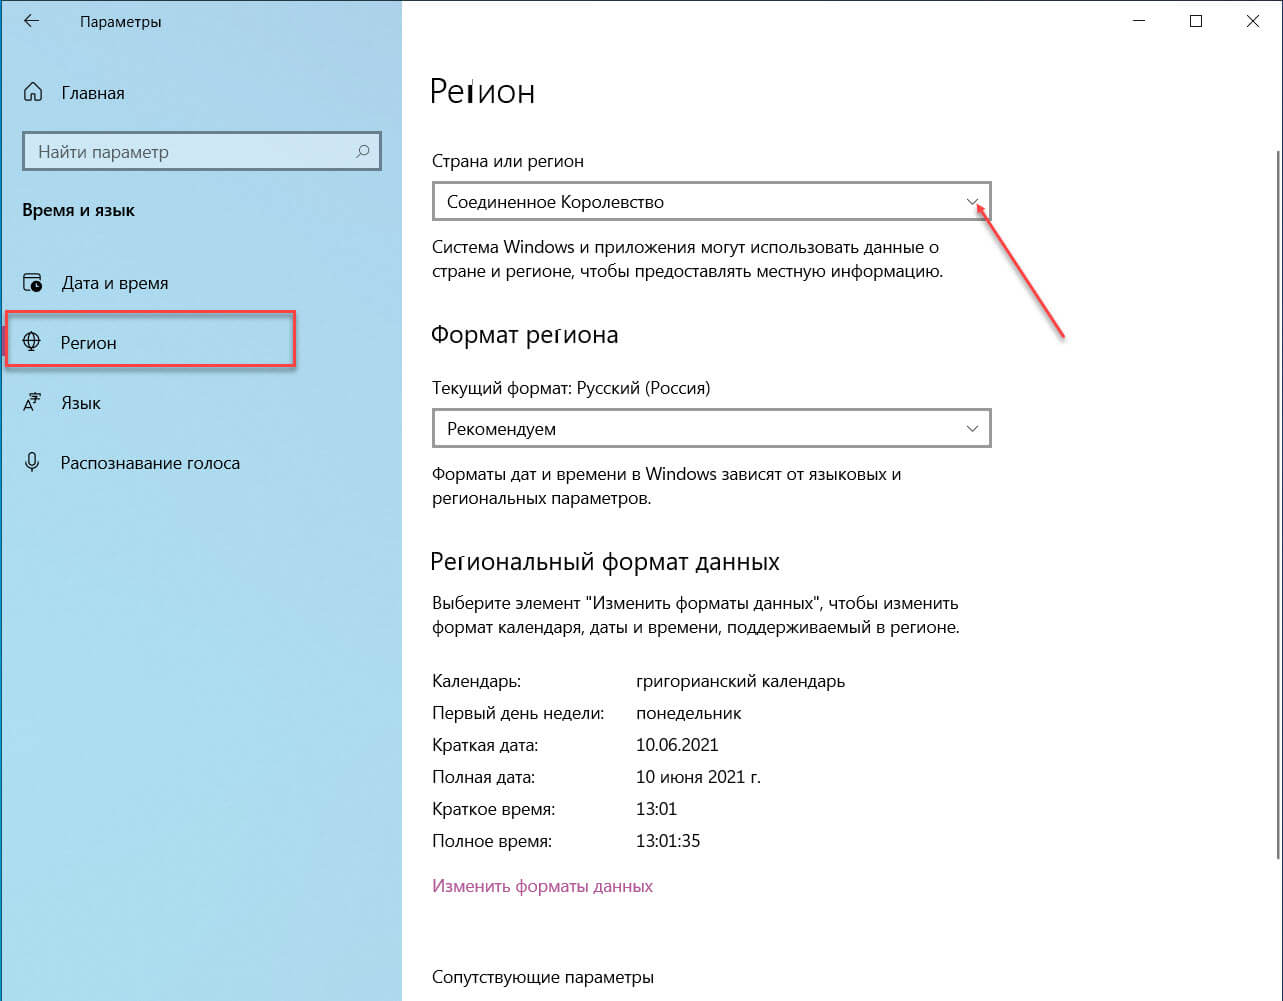
3. Make sure the date, time, time zone, and region are correct
- If your date or time isn’t set correctly, right-click on them in the bottom-right corner, then select Adjust date and time.

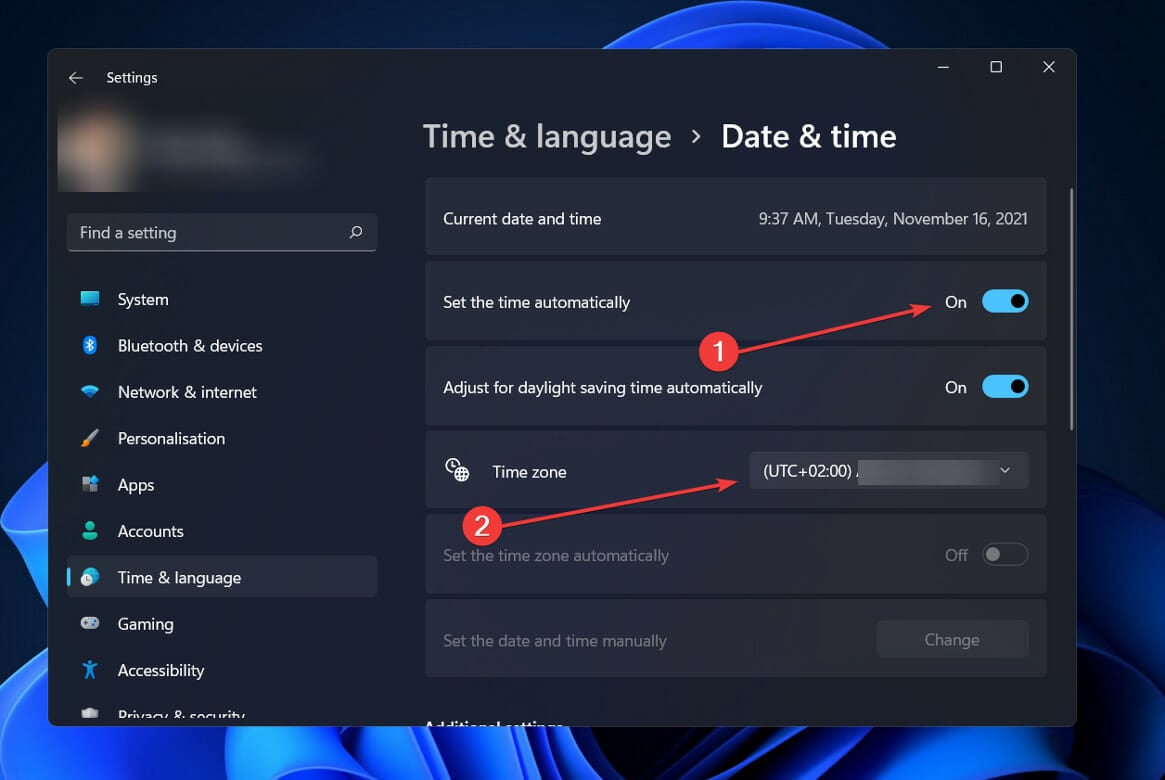
- Make sure the Set the time automatically option is turned on, then select your correct Time zone from the dropdown menu.

- Next, click on Language & region.

- Under the Region section, check whether the Country or region is set to your current location.

4. Disable and enable Spotlight
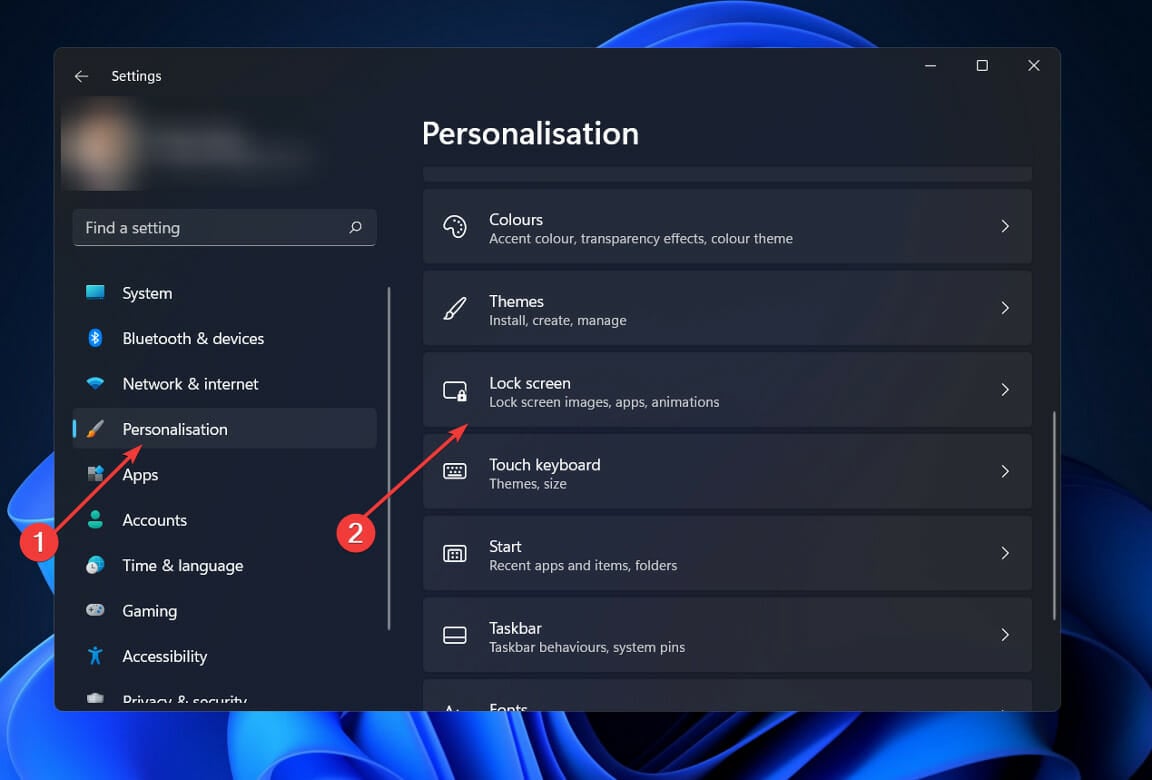
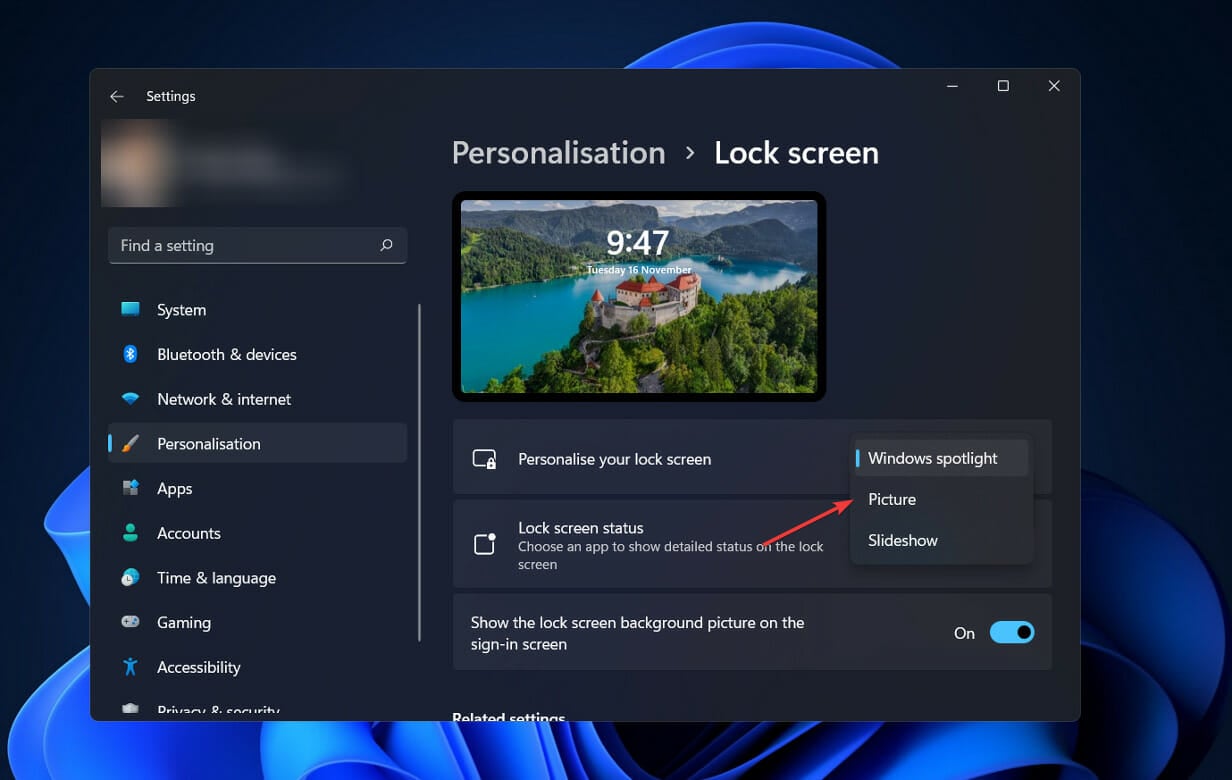
- Click on the Search button, type in Settings, and click on the most relevant result.
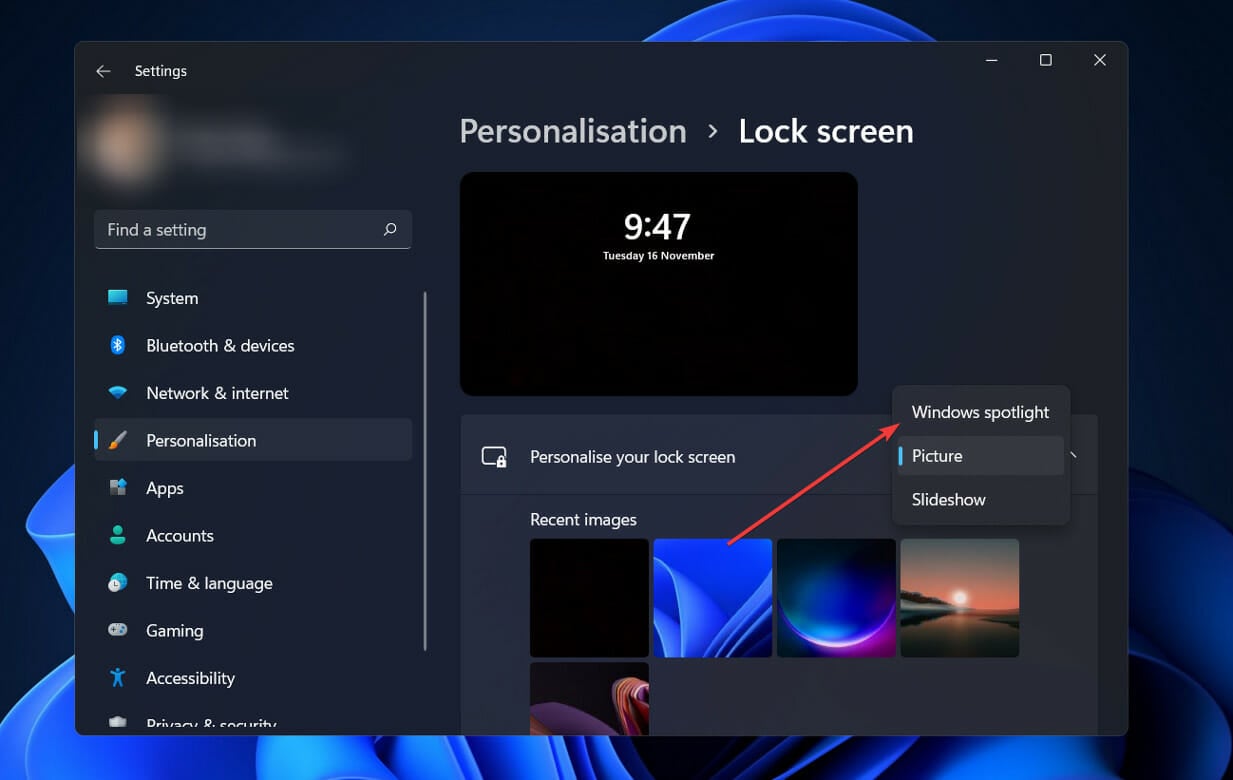
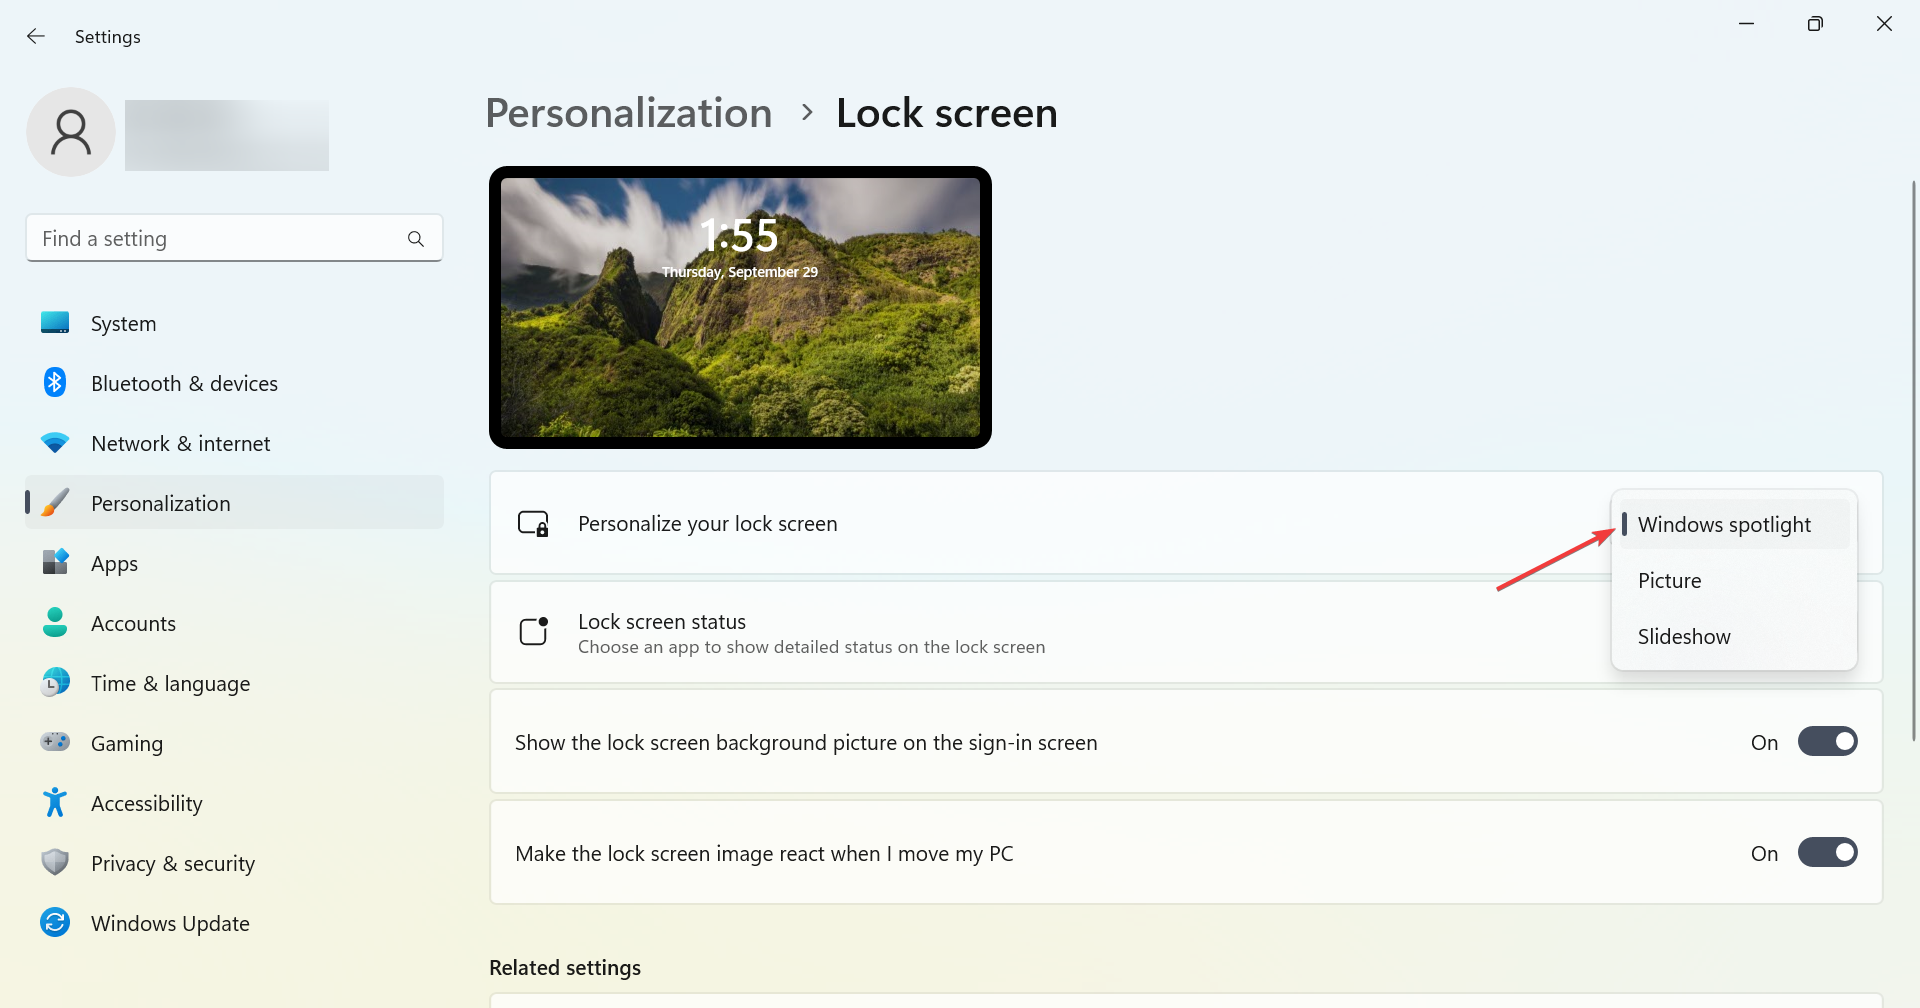
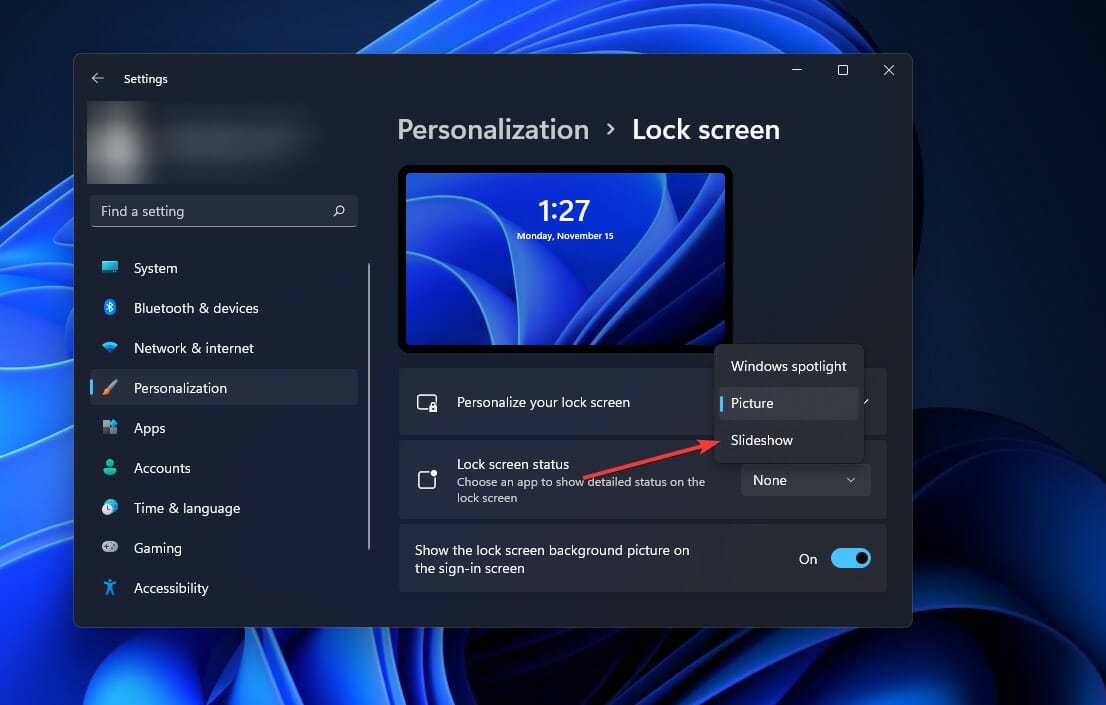
- Select Personalisation from the left panel, and then click on the Lock screen on the right.

- Next, choose Picture from the Personalize your lock screen menu.

- Once done, again click on the menu, and this time, select Windows spotlight.

If Windows Spotlight is not working and there’s a blue screen instead, re-enabling the feature should do the trick.
5. Re-register Spotlight using PowerShell
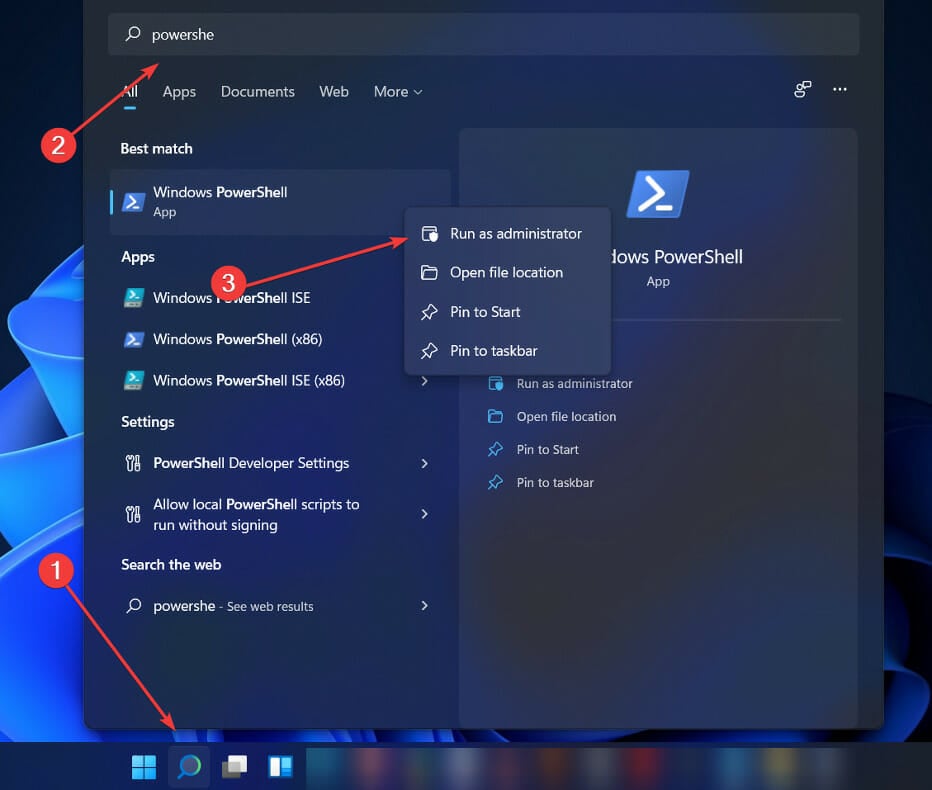
- Click the Search icon, type powershell, right-click on the relevant result, and select Run as administrator.

- Click Yes in the UAC prompt that appears.
- Type or paste in the following command, then press Enter:
Get-AppxPackage -Name Microsoft.Windows.ContentDeliveryManager | Foreach {Add-AppxPackage -DisableDevelopmentMode -Register "$($_.InstallLocation)\AppXManifest.xml" -Verbose}

Once you have finished the steps outlined above, you must restart your computer to complete the process. And it should fix things if Windows 11 lock screen wallpaper is not changing.
How do I turn off Windows Spotlight?
If you want to restrict the use of Windows Spotlight, you can do so in four different ways:
- Manually turn off Windows Spotlight locally
- Turn the feature off using Registry
- Disable Windows Spotlight features using Group Policy
- Deactivate it using Intune

The first two approaches outlined above are labor-intensive and need you to work on a local computer at your leisure. Therefore, it is not recommended to have many PCs in your setup.
To disable Windows Spotlight on business-managed devices, you must use either group policy or Intune (MEM) to accomplish your goal.
Windows Spotlight is activated by default on devices running the Windows 11 operating system. On the other hand, it may be turned off manually on each computer. However, the manual way may be inconvenient if you have many machines.
Using the Mobile Device Management (MDM) policy, enterprise administrators can block users from accessing the Windows Spotlight background when using their handsets.
How do I reset Windows Spotlight on Windows 11?
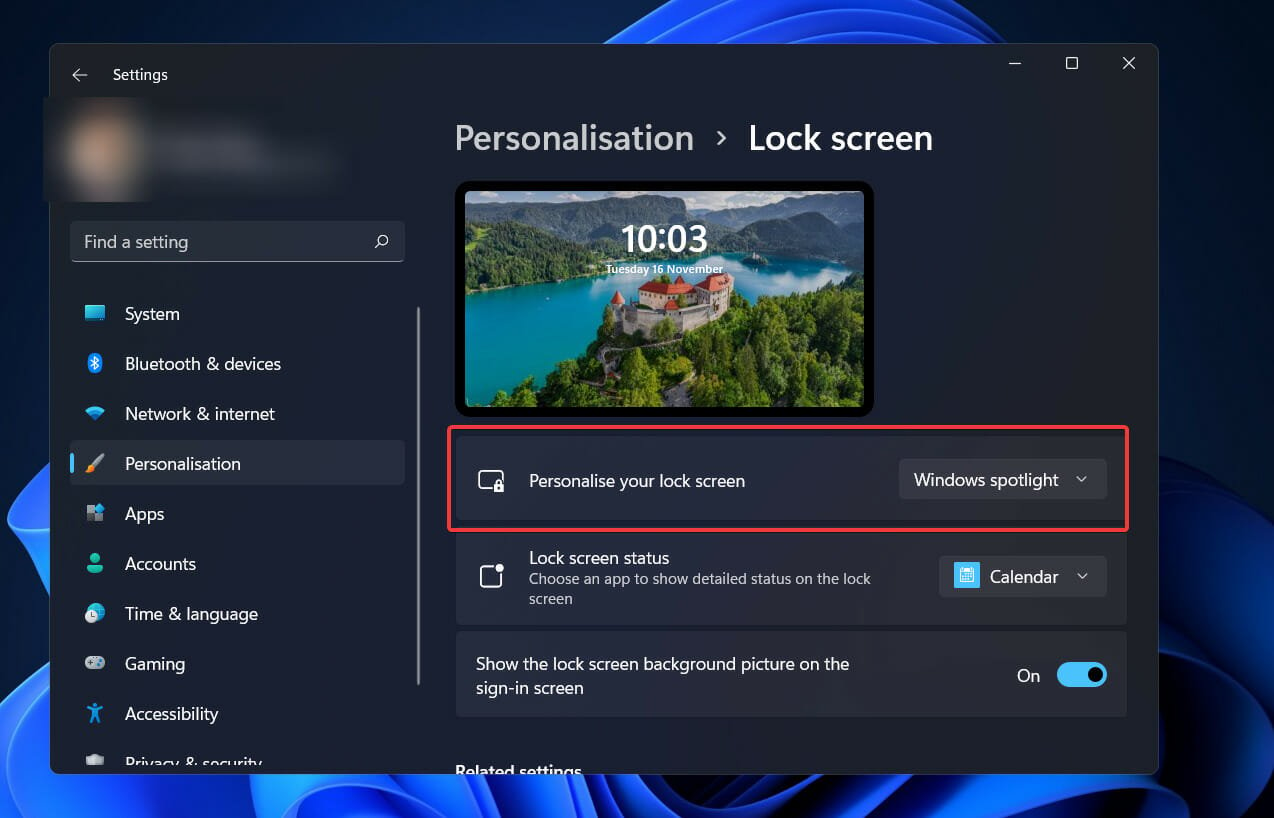
- Press Windows + I to open Settings, select Personalization from the navigation pane, and click on the Lock screen on the right.

- Now, choose Picture from the Personalize your lock screen menu.
- Next, press Windows + R to open Run, paste the following path in the text field, and click OK:
%LocalAppData%\Packages\Microsoft.Windows.ContentDeliveryManager_cw5n1h2txyewy\Settings
- Rename the roaming.lock file as roaming.dat.back, and the settings.dat file as settings.dat.back.
- Once done, restart the computer.
- Now, head back to the Lock screen setting and select Windows spotlight from the Personalize your lock screen menu.

This will reset the feature and should fix things in case you see a Windows 11 Spotlight black screen.
Our readers reported issues with the lock screen slideshow as well. If you think you might be experiencing the same problem, find out how to fix Windows 11’s lock screen slideshow.
Although we’ve all had some time to familiarize ourselves with Microsoft’s latest operating system, users are discovering new features daily. The Windows 11 3D parallax effects are one feature, so check them out.
User feedback has shown that the live desktop has also proven to be a prevalent feature. Thus, you might be interested in learning how to set a live wallpaper in Windows 11.
That should be the end of it. As you can see, there are some straightforward and more complex solutions. Try them out in the above sequence to find which works best for you.
Leave a comment below to tell us about your experience, including which strategy you applied and which Windows 11 feature you found the most useful.
![]()
ну очень холодная погода
Надеюсь факт того, что я не могу смотреть красивые картиночки на экране при запуске винды кому-то помог
Ответить
Развернуть ветку
DEADASS
Да, Майкрософт для России отключила windows интересное и смену фонов на новой вкладке edge
Ответить
Развернуть ветку
deadoptimist
Автор
Точно, по твоему комменту загуглились ответы на форумах. Хах, ну и заморочились они.
Ответить
Развернуть ветку
Илья
Странно, переехал на винде в Турцию — ничего не появилось
Ответить
Развернуть ветку
Дмитрий Шишкин
Устанавливаешь с магазина винды приложение «Динамическая тема» и все в порядке
Ответить
Развернуть ветку
Тони Ховкинс
Всё на месте. Может со сменой региона просто эти фотки включились в настройках а до этого были выключены?
Ответить
Развернуть ветку
deadoptimist
Автор
Не, они были включены, текущую было видно в меню опций и даже в меню Пуск, но не на самом экране блокировки. А теперь включилось.
Ответить
Развернуть ветку
Западный Уорчестершир
Точно же, у меня на днях на ноуте начали меняться фотки. Тоже перевёл регион на США. Но перевёл на пк с вин10, там у меня своя картинка на локскрине. А на ноуте 11, думал может апдейт какой прилетел
Ответить
Развернуть ветку
Giovanni Quintano
Буквально вчера пользовался ноутом друга, ру регион заставка есть, на экране перед вводом пароля 🤷♂️
Ответить
Развернуть ветку
VeRtex
У меня пропадали в начале прошлого года, но в конце года вернулись (Win10). Но у меня ПК постоянно под проксей.
Ответить
Развернуть ветку
deadoptimist
Автор
У меня после чистой переустановки они возвращались, но со временем каждый раз пропадают с концами.
Ответить
Развернуть ветку
deadoptimist
Автор
Тут у меня в ру-регионе картинки отображались, как и в главном меню, а на самом экране нет — там была вот эта дефолтная заставка.
Ответить
Развернуть ветку
Егор Пахотин
У меня в win10 тоже перестали меняться обои на экране блокировки, почти год уже.
Ответить
Развернуть ветку
LudwigXVII
Да тоже самое, пляж какой то завис на интересном и не менялся, в итоге свои обои надоели поставил пока тему из 4 стандартных кругов в слайдшоу
Ответить
Развернуть ветку
bakuvi
Поставил США, ничего не меняется
Ответить
Развернуть ветку
deadoptimist
Автор
Ну, кстати, у меня сегодня тоже опять не было(
Ответить
Развернуть ветку
Канал Канал
У меня Microsoft Edge перестал получать трафик почему-то. Работает только dev версия. У кого также?
Ответить
Развернуть ветку
Сашко Ворожбит
Это фейк! Не будет блокировки Windows 11 в России! Может пришлось разблокировать Windows 11 в России?
Ответить
Развернуть ветку
Chudo Igrok
Смешно смотреть, как пользователи венды ищут обходные пути, чтобы работали какие-то базовые функции… Вместо поставить уже линукс, в который не встроены алюс к тому тонны трекеров слежения. Оболочка KDE Plasma приятна и легка в освоении и хорошо работает из коробки, а при желании — имеет просто целую гору спецэффектов и настроек.
Ответить
Развернуть ветку
leonid Yurasov
Проблема не в операционке, проблема в софте, особенно если есть честно купленный коммерческий софт, да либра до мс оффис пока не дотягивает, как и гимп до фотошопа, только блендер не плох, но он не всем нужен, да и с игрульками чуть сложнее и больше танцев, и со старыми гпу от нвидиа есть нюансы.
В моем случае есть пара местных программ которые не работают через wine, ради них держу виртуалку, но мне проще у меня мак и у меня есть нормальный офис и нормальный аналог фотошопа и полноценная командная строка бонусом.
Ответить
Развернуть ветку
Аккаунт удален
Комментарий недоступен
Ответить
Развернуть ветку
23 комментария
Раскрывать всегда
Have you ever wondered how those amazing pictures appear on your Windows 11 lock or login screen? It’s all thanks to the Windows Spotlight feature! It automatically brings you stunning photos from Bing every day, along with fun facts and tips to make your screen more exciting. But there might be times when Spotlight stops working and shows a boring blank screen instead. Don’t worry, in this blog post, we’ll help you fix it and get back to enjoying those beautiful images. Let’s get started!
But before we dive into the solutions, if you are someone who likes to customize your screen, you might be interested in checking out our guide on how to change the screensaver on Windows 11.
Common Reasons Why Windows 11 Spotlight Stops Working
Spotlight feature not working on Windows 11 is a common issue that many users have reported.

There are several reasons why Windows Spotlight may not work as intended on Windows 11.
- Poor Internet connection: Slow or unstable internet can disrupt Spotlight’s functionality.
- Spotlight cache issues: Corrupted or outdated cache files may cause problems.
- Metered network connection: Limited data plans can restrict Spotlight features.
- Antivirus or firewall interference: Security software may block Spotlight.
- Inconsistent asset folder: Corrupted folder can lead to issues.
- Disabled background apps: Some apps need to run in the background for Spotlight.
- Outdated or corrupted drivers: Drivers can affect Spotlight’s performance.
- Corrupted or missing system files: Essential files can cause Spotlight problems.

Wondering how to fix this issue? You’ve come to the right place. In this post, we have listed a bunch of troubleshooting solutions that you can use for resolving this issue.
Let’s get started.
Also read: How To Fix Windows 10 Spotlight Images Not Working?
What is Windows 11’s Lock Screen Spotlight?
Windows 11 brings together a wide array of new features and performance improvements, and the lock screen spotlight is one of them. Each time you restart your device, the lock screen spotlight displays a new background image of a pretty landscape or location. So, you can use the “Windows Lock Screen Spotlight” feature to refresh this image or even choose a custom background as per your preference.

Windows 11 displays these breathtaking locations from different parts of the world on the lockscreen itself and most of these images are fetched from Bing.

Although, if you’re seeing the same image while you restart your device, it may indicate you’ve encountered the “Lock Screen spotlight not working” issue. Here are a few workarounds that you can try for retaining your Windows 11’s lock screen.
Also read: How To Personalize Windows 10 Spotlight Lock Screen
How to Fix Lock Screen Spotlight not Working Issue on Windows 11?
If you’re seeing the same image while you restart your device, it may indicate you’ve encountered the “Lock Screen spotlight not working” issue. Here are a few workarounds that you can try for retaining your Windows 11’s lock screen.
#1 Check Your Internet Connection
The lock screen spotlight may not function on your device if there’s no Internet connection. So, the first thing that you can try is to check whether your PC or laptop is connected to a WiFi network.

Microsoft fetches the background images from Bing and hence if the Internet is not working, your device may get stuck on a monotonous lock screen background.
Connect your device to a stable network connection and then reboot your device to check whether it fixed the issue.
#2 Turn OFF Metered Connection
A metered connection sets a data limit on your connection. Windows 11 also allows you to set up a metered connection on your WiFi or ethernet network as it allows you to effectively manage your data consumption. To make sure that your device hasn’t hit the maximum limit, we will try to temporarily turn off this feature to check whether it helps in resolving the lock screen spotlight not working issue. Here’s what you need to do.
Open Settings> Network and Internet. Tap on “WiFi.

Now select your WiFi network’s name.

In the advanced settings window, turn off the “Metered Connection” feature.

Also read: Everything You Should Know About Spotlight Search
#3 Adjust Date and Time Settings
Incorrect or misconfigured date and time settings can also mess with lock screen preview on Windows 11. To adjust the date and time settings on Windows, follow these quick steps:
On the bottom-right corner of the Taskbar, right-click where the date and time are displayed. Select “Adjust date and time”.
Enable the “Select time automatically” option. Also, make sure you select the precise time zone using the drop-down menu.

And that’s it!
Once you’re done, reboot your device and check whether the issue persists.
Also read: How To Check For Software Updates on Windows PC?
#4 Manually Enable Spotlight via Settings
Open Windows 11’s Settings, select “Personalization”. Tap on “Lock Screen”.

Select the “Personalize your Lock screen” option and then tap on “Windows Spotlight”.

#5 Enable Lock Screen Spotlight via PowerShell
Tap on the search icon placed on the Taskbar, type “PowerShell”, right-click on it, and select “Run as Administrator”.

Copy and paste the following command in the Terminal window and then hit Enter to execute it:

Get-AppxPackage -Name Microsoft.Windows.ContentDeliveryManager | Foreach {Add-AppxPackage -DisableDevelopmentMode -Register "$($_.InstallLocation)\AppXManifest.xml" -Verbose}
After executing this command, exit PowerShell, reboot your Windows 11 PC and see whether it fixed the issue.
#6 Run System File Checker
Windows 11 Spotlight not working may also be caused by corrupted or missing system files. System files are essential files that are required for your operating system and other software to function properly. If your system files are corrupted or missing, they may cause various issues on your PC, including Windows 11 Spotlight not working. To fix this issue, you need to run System File Checker, which is a built-in tool that scans and repairs any corrupted or missing system files on your PC.
Here’s how to run System File Checker:
Press Windows + X keys and select Windows Terminal (Admin) from the menu.

Type DISM.exe /Online /Cleanup-image /Restorehealth and press Enter key. This will use Windows Update to provide the files that are required to fix corruptions. Wait for the process to complete, which may take some time depending on your PC’s condition.

Type sfc /scannow and press Enter key. This will scan all protected system files and replace corrupted files with a cached copy that is located in a compressed folder at %WinDir%\System32\dllcache. Wait for the scan and repair process to complete, which may take some time depending on your PC’s condition.

Restart your PC and check if Windows Spotlight is working.
#7 Disable Your Antivirus or Firewall
Windows 11 Spotlight not working may also be caused by your Antivirus or firewall software. These security software can sometimes block or interfere with Windows Spotlight, preventing it from downloading or displaying the images. If you have an antivirus software installed on your PC, you may need to disable it temporarily or add an exception for Windows Spotlight.

If Windows Spotlight is working, you can re-enable your antivirus or firewall software and add an exception for Windows Spotlight by following the instructions from your software provider.
Frequently Asked Questions About Windows 11 Spotlight:
Q1: Is Windows 11 Spotlight available for Windows 11?
A: Yes, Windows 11 Spotlight is available. It displays stunning Bing photos daily with fun facts and tips on your lock or login screen. You can enable/disable it in Settings > Personalization > Lock screen.
Q2: How do I turn off Windows 11 Spotlight?
A: To turn off Spotlight, go to Settings > Personalization > Lock screen. Under Background, select Picture or Slideshow instead of Windows Spotlight.
Q3: How do I reset Windows 11 Spotlight?
A: To reset Spotlight, switch to Picture or Slideshow under Background in Settings. Then, delete files in %localappdata%\\Packages\\Microsoft.Windows.ContentDeliveryManager_cw5n1h2txyewy\\LocalState\\Assets and rename settings files in %localappdata%\\Packages\\Microsoft.Windows.ContentDeliveryManager_cw5n1h2txyewy\\Settings. Restart your PC and select Windows Spotlight again.
Conclusion
Here were a few solutions that you can give a shot upon for fixing the “Lock Screen spotlight not working” issue on Windows 11. You can use any of the above-mentioned resolutions to retain the lock screen on Windows 11. So, are you a fan of Windows 11’s lock screen spotlight feature?
Was this post helpful? Drop your feedback in the comments section.
В этом руководстве мы покажем вам различные способы устранения проблемы с неработающим изображением Spotlight/Lock Screen Image на вашем ПК с Windows 11. Windows предоставляет множество параметров настройки экрана блокировки. К ним относятся, например, установка состояния экрана блокировки (календарь/погода/почта) или его персонализация с помощью пользовательского изображения, слайд-шоу или Spotlight. Что касается последнего, Microsoft предоставляет отобранные изображения из разных жанров и вместе с тем дает небольшое описание этого изображения.
Вы можете дополнительно взаимодействовать с этими изображениями, нажав на их описание (и затем введя пароль экрана блокировки). Однако многие пользователи не могут в полной мере использовать эти функции. Множество жалоб выстраивается на форумах Microsoft, где пользователи выразили свою озабоченность что изображение Spotlight/Lock Screen Image не работает на их ПК с Windows 11. Если вы также столкнулись с этой проблемой, то это руководство поможет вам. Следуйте инструкциям.
Обратите внимание, что универсального решения как такового не существует. Вам нужно будет попробовать каждый из перечисленных ниже обходных путей, а затем посмотреть, какой из них сработает в вашу пользу. Итак, имея это в виду, давайте начнем.
ИСПРАВЛЕНИЕ 1. Повторно включите Spotlight
Для начала вам следует подумать об отключении, а затем повторном включении функции Spotlight. Это даст ему новый экземпляр для работы, и это, в свою очередь, также может решить основную проблему. Итак, давайте сразу проверим это.
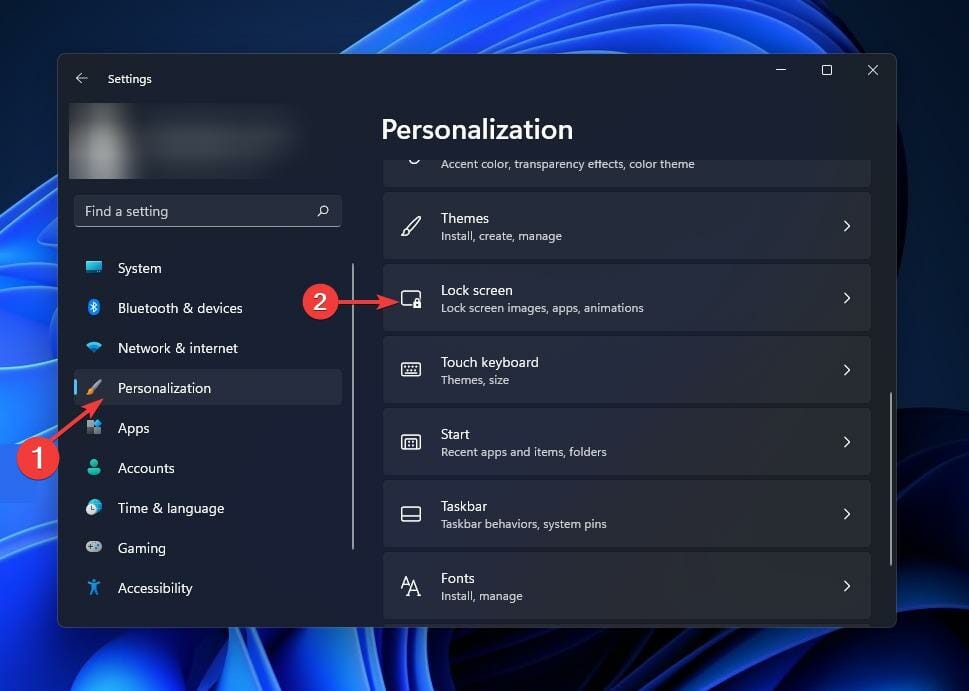
- Для начала используйте сочетания клавиш Windows + I, чтобы открыть меню «Настройки».
- Затем выберите «Персонализация» в левой строке меню и перейдите в раздел «Экран блокировки».
- Теперь щелкните раскрывающееся меню Spotlight и пока выберите «Изображение».
- Затем подождите несколько секунд и снова переключитесь на Spotlight.
- Проверьте, удалось ли исправить проблему с неработающим изображением Spotlight/Lock Screen Image в Windows 11.
ИСПРАВЛЕНИЕ 2. Используйте средство устранения неполадок обслуживания системы
Это приложение для устранения неполадок используется для выполнения задач по обслуживанию системы, таких как очистка неиспользуемых файлов и ярлыков. Кроме того, он также выполняет проверку системных приложений, сканирует основные проблемы, а затем исправляет их соответствующим образом. И в текущем сценарии это определенно может оказаться рукой помощи. Итак, давайте попробуем:
- Начните с открытия панели управления из меню «Пуск»,
- Затем измените вид на крупные значки и выберите «Устранение неполадок».
- После этого нажмите «Система и безопасность».
- Затем нажмите «Обслуживание системы».
- Теперь нажмите кнопку «Пуск», чтобы начать процесс. После завершения сканирования появятся соответствующие исправления.
- Вам просто нужно нажать на исправление, чтобы применить его, а затем перезагрузить компьютер, чтобы оно стало активным.
- Как только ваш компьютер загрузится, проверьте, не устранена ли проблема с неработающим изображением Spotlight / Lock Screen Image в Windows 11 или нет.
ИСПРАВЛЕНИЕ 3. Удаление кэша Spotlight
Если со временем накапливается много временных данных, это может привести к конфликту с правильным функционированием приложения. Поэтому рекомендуется удалить эти кешированные файлы, что можно сделать следующим образом:
- Перейдите в меню «Пуск», найдите командную строку и запустите ее от имени администратора.
- Затем выполните следующие две команды в этом окне CMD (по одной за раз): DEL /F /S /Q /A «%USERPROFILE%/AppDataLocalPackagesMicrosoft.Windows.ContentDeliveryManager_cw5n1h2txyewyLocalStateAssets» DEL /F /S /Q /A «%USERPROFILE%/AppDataLocalPackagesMicrosoft.Windows.ContentDeliveryManager_cw5n1h2txyewySettings»
- Теперь проверьте, устраняет ли это проблему с неработающим изображением Spotlight/Lock Screen Image в Windows 11.
ИСПРАВЛЕНИЕ 4. Используйте команды SFC и DISM
Средство проверки системных файлов и система обслуживания и управления образами развертывания — это два служебных инструмента командной строки, которые сканируют поврежденные файлы Windows, а затем заменяют их рабочим аналогом. Основное различие между ними заключается в том, что в то время как SFC заменяет поврежденные файлы рабочими из кэшированного каталога на вашем ПК, DISM делает это, загружая рабочие файлы с онлайн-серверов Microsoft. И на данный момент мы будем использовать оба этих инструмента для решения основной проблемы. Следуйте вместе.
- Для начала щелкните правой кнопкой мыши меню «Пуск» и выберите Терминал Windows (Администратор).
- Затем щелкните стрелку вниз рядом со значком новой вкладки и выберите «Командная строка» из списка.
- После открытия окна CMD скопируйте и вставьте приведенную ниже команду, чтобы открыть инструмент SFC: sfc /scannow
- После завершения сканирования SFC пришло время использовать инструмент DISM. Поэтому скопируйте и вставьте следующую команду: DISM/Online/Cleanup-Image/RestoreHealth.
После того, как DISM завершит сканирование, рекомендуется перезагрузить компьютер. После загрузки проверьте, устранена ли проблема с неработающим изображением Spotlight/Lock Screen Image в Windows 11.
ИСПРАВЛЕНИЕ 5. Удаление объектов Spotlight
После каждого отображения изображения Spotlight приложение создает временный файл ресурсов. Если какой-либо из этих файлов будет поврежден, это может негативно повлиять на работу изображения на экране блокировки. Единственный выход — удалить все эти файлы ресурсов и позволить ему генерировать их с нуля. Вот как:
- Для начала отключите Spotlight через «Настройки»> «Персонализация»> «Экран блокировки»> «Выбрать изображение».
- Затем откройте проводник с помощью комбинации клавиш Windows + E.
- Теперь скопируйте и вставьте указанное ниже место в адресную строку и нажмите Enter. Обязательно замените ключевое слово USERNAME соответствующим образом. C:Users\AppDataLocalPackagesMicrosoft.Windows.ContentDeliveryManager_LocalStateAssets
- Используйте сочетания клавиш Ctrl + A, чтобы выбрать все файлы в этой папке ресурсов, и нажмите клавишу Delete, чтобы удалить их.
- Как только это будет сделано, перезагрузите компьютер и проверьте, устранена ли проблема с неработающим изображением Spotlight/Lock Screen Image в Windows 11.
ИСПРАВЛЕНИЕ 6. Повторная регистрация приложения Spotlight
Если ни один из вышеупомянутых методов не привел к успеху, вам следует подумать о перерегистрации приложения на вашем ПК. Это похоже на заводской сброс приложения, который вернет все его настройки к заводскому состоянию по умолчанию. Поэтому обратитесь к приведенным ниже инструкциям, чтобы попробовать это:
- Перейдите в меню «Пуск», найдите Powershell и запустите его от имени администратора.
- Затем скопируйте и вставьте указанное ниже место в это окно и нажмите Enter:Get-AppxPackage -allusers *ContentDeliveryManager* | foreach {Add-AppxPackage «$($_.InstallLocation)appxmanifest.xml» -DisableDevelopmentMode -register}
- Теперь перезагрузите компьютер, и когда он загрузится, основная проблема должна быть устранена.
Итак, на этом мы завершаем руководство о том, как исправить проблему с неработающим изображением Spotlight/Lock Screen Image на вашем ПК с Windows 11. Мы перечислили шесть различных методов для одного и того же. Дайте нам знать в комментариях, какой метод принес вам успех. Кроме того, все ваши вопросы приветствуются в разделе комментариев.
«Windows: интересное» — отличная функция, доступная во всех выпусках Windows 10, для автоматической установки нового изображения каждый день в качестве фона экрана блокировки. Функция автоматически загружает изображения из Bing и работает только в том случае, если ваш компьютер подключен к Интернету.
После включения функции Windows Интересное в первый раз она автоматически загружает новые изображения на ежедневной основе и устанавливает его в качестве фона.
Некоторые пользователи сообщают, что Windows Интересное не изменяет текущий фон или показывает черный экран вместо изображения на экране блокировки. Если функция Windows: интересное (Spotlight) не работает на вашем ПК с Windows 10, вы можете заставить ее работать снова, следуя приведенным ниже советам по устранению неполадок.
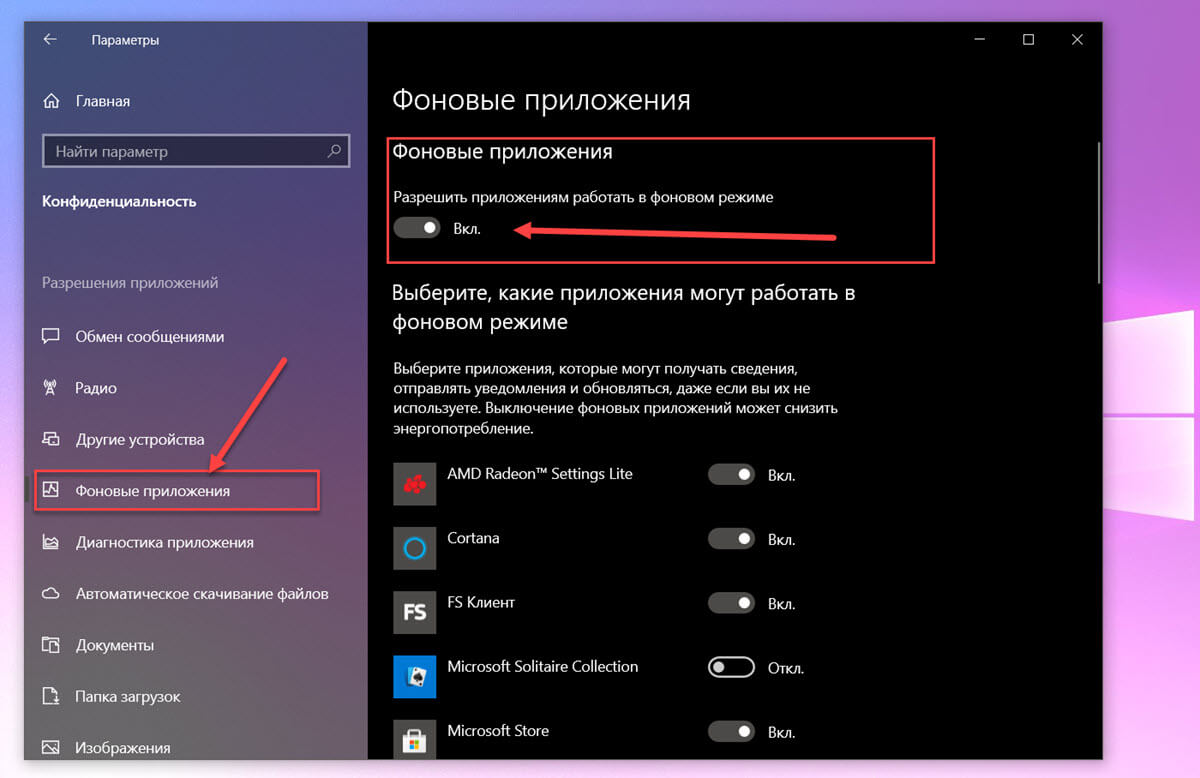
ВАЖНО: Прежде чем выполнить приведенные ниже решения, Проверьте настройку фоновых приложений она должна быть Включена, чтобы проверить — перейдите в «Параметры» → «Конфиденциальность» → «Фоновые приложения»;
Также, мы рекомендуем отключить функцию «Windows: интересное». Вы можете сделать это, перейдя в «Параметры» → «Персонализация» → «Экран Блокировки», а затем выберите в качестве фона «Фото» (это отключит функцию), после того как выполните все способы по восстановлению и перезагрузите ваше устройство, снова включите «Windows: интересное». Через 4, 5 минут (время может отличаться) проверьте смену изображения на экране блокировки с помощью клавиш Win L .
Решение 1 из 4
Шаг 1: Откройте параметры папки, перейдите на вкладку «Вид», установите флажок «Показывать скрытые файлы, папки и диски» и нажмите кнопку «Применить».
Шаг 2: Откройте «Проводник» и перейдите к следующему местоположению:
C:Users%USERPROFILE%AppDataLocalPackagesMicrosoft.Windows.ContentDeliveryManager_cw5n1h2txyewyLocalStateAssets
В приведенном выше пути измените букву «C» на букву диска, где установлена Windows 10.
Шаг 3: В папке «Assets» выберите все файлы, а затем нажмите клавишу «Удалить».
Шаг 4: Затем перейдите к следующей папке:
C:Users%USERPROFILE%AppDataLocalPackagesMicrosoft.Windows.ContentDeliveryManager_cw5n1h2txyewySettings
Шаг 5: В папке «Settings» вы должны найти два файла: roaming.lock и settings.dat. Выберите оба файла и удалите их.
Шаг 6: Перезагрузите компьютер. Функция «Windows: интересное» должна начать работать снова.
Решение 2 из 4
Шаг 1: Откройте Windows PowerShell от имени администратора. Нажмите кнопку «Да», когда появится запрос «Контроля учетных записей».
Шаг 2: В окно PowerShell скопируйте и вставьте следующую команду, а затем нажмите клавишу Enter:
Get-AppxPackage -allusers *ContentDeliveryManager* | foreach {Add-AppxPackage "$($_.InstallLocation)\appxmanifest.xml" -DisableDevelopmentMode -register}
Шаг 3: Перезагрузите компьютер. «Windows: интересное» должен работать, показывая новое изображение на экране блокировки.
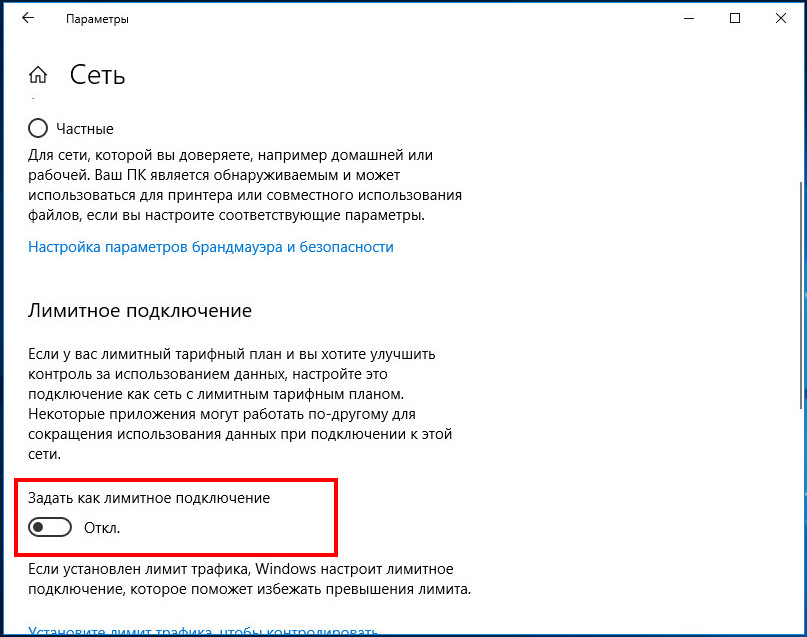
Решение 3 из 4
Отключить лимитное подключение.
Если ваш компьютер подключен к сети с использованием лимита трафика, система не будет загружать новые изображения для экрана блокировки, чтобы избежать превышения лимита.
Если вы установили свою сеть Wi-Fi или Ethernet- в качестве лимитного подключения, отключите его, чтобы функция «Windows: интересное» загружала изображения. Обратитесь к нашей инструкции по включению или отключению Лимитного подключения в Windows 10.
Решение 4 из 4
Если предыдущие способы не помогли, и Вы все еще испытываете трудности с Windows Spotlight, вероятно проблема на стороне Microsoft, в этом случае помогает смена региона.
Шаг 1: Откройте приложение «Параметры» с помощью значка шестеренки в меню «Пуск» или с помощью сочетания клавиш Win I
Шаг 2: В разделе «Персонализация» → «Экран Блокировки», выберите в качестве фона «Фото» (это отключит функцию)
Шаг 3: Перейдите в раздел «Время и язык» → «Регион» и выберите в списке «США», «Мексика» или «Соединённое Королевство».
Шаг 4: Закройте Приложение и перезагрузите компьютер.
Шаг 5: Снова включите «Windows: интересное». Через несколько минут (будьте терпеливы) проверьте изображение на экране блокировки с помощью клавиш Win L .
Надеюсь информация будет полезна!
В Windows 10 есть замечательная функция, автоматически сменяющая фоновые изображения на экране блокировки. Называется она «Windows: интересное» или Spotlight, доступ к ней можно получить через раздел персонализации в приложении «Параметры». Работает функция только тогда, когда компьютер подключен к интернету, ведь изображения она берет из поисковой системы Bing.
Первоначальная реализация Spotlight работала не совсем корректно, многие пользователи жаловались, что функция не загружает картинки. Сейчас разработчики всё наладили, тем не менее, с проблемами в работе Windows Spotlight сталкиваться всё же приходится.

Самая распространенная из них проявляется тем, что каким был фон экрана блокировки, таким он и остается. Реже встречается появление вместо картинки черного фона. В некоторых случаях восстановить работу функции можно просто отключив, а затем повторно включив ее. Если это не помогает, придется прибегнуть к более радикальным мерам, но для начала проверьте не включен ли у вас случайно лимит трафика, при включенном лимите изображения подгружаться не будут.
Если с режимом подключения всё в порядке, выполните эти действия.
Отключив функцию в параметрах, перейдите в Проводнике в папку Assets с контентом Spotlight и удалите из нее всё содержимое.
Затем зайдите в каталог Settings с конфигурационными файлами Spotlight и отправьте в Корзину файлы roaming.lock и settings.dat.
Полные пути к каталогам найдете в текстовом файле здесь — yadi.sk/i/aYp_9mv53aMroK.
Проделав эти нехитрые манипуляции, перезагрузите компьютер.
Функция «Windows: интересное» должна заработать.
Есть и другой способ исправить неполадки с Windows Spotlight — перерегистрировать отвечающее за работу функции приложение.
Запустите от имени администратора консоль PowerShell и выполните в ней вот такую команду:
Get-AppxPackage Microsoft.Windows.ContentDeliveryManager -allusers | foreach {Add-AppxPackage -register “$($_.InstallLocation)appxmanifest.xml” -DisableDevelopmentMode}

Готово.
Перезагрузите компьютер и проверьте работу функции.
Если новый фон не загрузился, не спешите с поиском других способов решения проблемы, возможно, Windows просто еще не успела обратиться в Bing. Работа Spotlight должна наладиться в течение дня.
![]() Загрузка…
Загрузка…
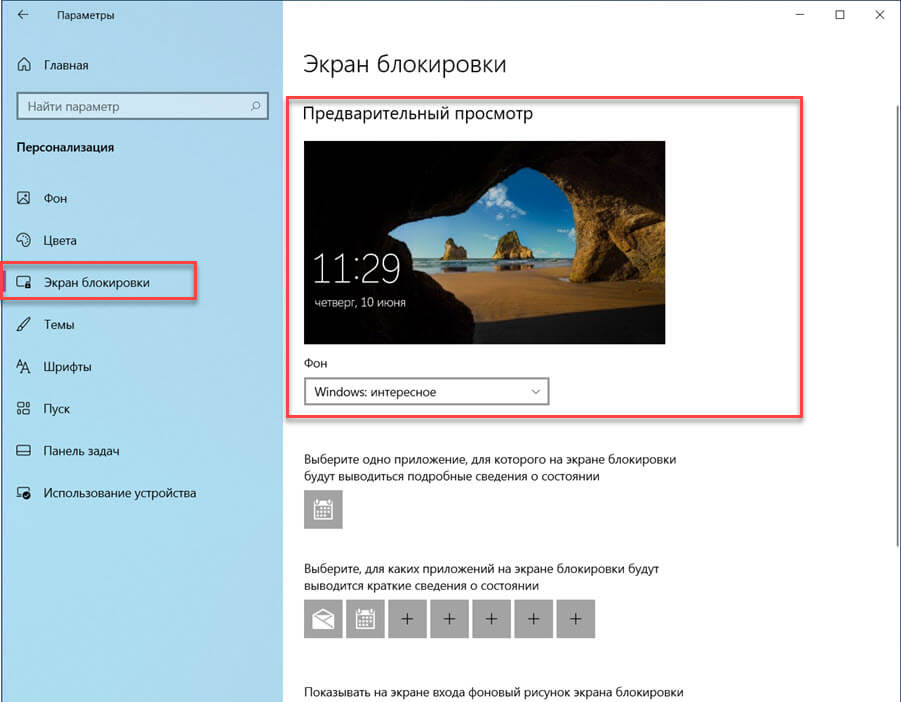
![]() Довольно часто функция Windows: интересное (Spotlight), предназначенная для автоматической загрузки и установки различных фоновых изображений для экрана блокировки в Windows 10, у многих пользователей этой операционной системы попросту не работает должным образом.
Довольно часто функция Windows: интересное (Spotlight), предназначенная для автоматической загрузки и установки различных фоновых изображений для экрана блокировки в Windows 10, у многих пользователей этой операционной системы попросту не работает должным образом.
 не работает – решение")
Даже несмотря на то, что соответствующая опция включена в настройках, многие из нас замечают, что на экране блокировки и при входе в Windows 10 всё время демонстрируется одно и тоже изображение, например, горное озеро (как на скриншоте).

Такого быть не должно – картинка должна меняться (примерно раз в сутки).
Если вы столкнулись с такой проблемой (изображение не меняется), то в большинстве случаев работоспособность можно вернуть, выполнив сброс и перерегистрацию данной функции. Как это сделать, читайте далее.
Windows: интересное не работает – решение
Чтобы добиться успешного результата обязательно следуйте (строго и последовательно) всем нижеприведённым указаниям.
И так, для сброса и перерегистрации Windows: интересное (рус. Spotlight) выполните следующее:
Кстати, если вам понравились какие-то картинки из Windows: Spotlight и вам хотелось бы сохранить их у себя в коллекции или, к примеру, использовать в качестве фона рабочего стола, то как это сделать, читайте здесь.
Другие способы
Если приведённый здесь способ вам не помогает (по тем или иным причинам), то можете попробовать решить проблему, удалив вручную файлы в директориях (также предварительно отключив Windows интересное в настройках): C:UsersВаше_имя_пользователяAppDataLocalPackagesMicrosoft.Windows.ContentDeliveryManager_cw5n1h2txyewyLocalStateAssets и C:UsersВаше_имя_пользователяAppDataLocalPackagesMicrosoft.Windows.ContentDeliveryManager_cw5n1h2txyewySettings → перезагрузить ПК → снова активировать функцию.

Кроме того, проверьте в настройках Windows 10 разрешено ли приложениям работать в фоновом режиме: Параметры → Конфиденциальность → Фоновые приложения → Вкл.
А вдруг и это будет интересно:
- Как сбросить настройки сети в Windows 10
- Windows 11: как установить без TPM 2.0 и Secure Boot
- Как записать загрузочную флешку Windows с помощью Rufus
- Удобное выключение и перезагрузка компьютера под Windows 8
- 3 лучших программы для записи качественного видео с веб-камеры
- Как пользоваться Everything
Дата: 2018-02-05 | Размещено в Статьи
Windows needs to be activated for you to use this feature
by Loredana Harsana
Loredana is a passionate writer with a keen interest in PC software and technology. She started off writing about mobile phones back when Samsung Galaxy S II was… read more
Updated on February 8, 2023
Reviewed by
Vlad Turiceanu

Passionate about technology, Windows, and everything that has a power button, he spent most of his time developing new skills and learning more about the tech world. Coming… read more
- In Windows 11, it is not uncommon for the lock screen slideshow to encounter issues.
- It requires a custom lock screen slideshow setup if the default configuration doesn’t work.
- You can also create a slideshow of images in folders that you want to display.
XINSTALL BY CLICKING THE DOWNLOAD FILE
- Download Restoro PC Repair Tool that comes with Patented Technologies (patent available here).
- Click Start Scan to find Windows 11 issues that could be causing PC problems.
- Click Repair All to fix issues affecting your computer’s security and performance
- Restoro has been downloaded by 0 readers this month.
Due to the large number of processes that must run in the background to make it happen, the lock screen slideshow or Windows Spotlight may stop working for no apparent reason at times.
Windows 11, like Windows 10, allows you to customize the lock screen by displaying a slideshow of personal images. Despite the fact that Windows Spotlight retrieves images from the Bing search engine, the Slideshow feature retrieves images from your local hard disk.
Many factors could be at play when the Windows 11 lock screen slideshow is not working, and we’ve compiled a list of all the alternative options you might want to consider.
How do I fix Windows 11 lock screen slideshow not working issue?
- How do I fix Windows 11 lock screen slideshow not working issue?
- 1. Enable the lock screen slideshow manually
- 2. Check your images
- 3. Re-add folders and images
- 4. Don’t turn off screen after slideshow
- 5. Open Power Options
- 6. Check indexing settings
- 7. Check lock screen blocking in Registry Editor
- 8. Allow lock screen slideshow in GPEDIT
- Why is Windows activation important?
- What does the Windows Spotlight feature do?

NOTE
Make sure that Windows is activated before attempting any other option, as failing to do so would prevent any slideshow from appearing.
1. Enable the lock screen slideshow manually
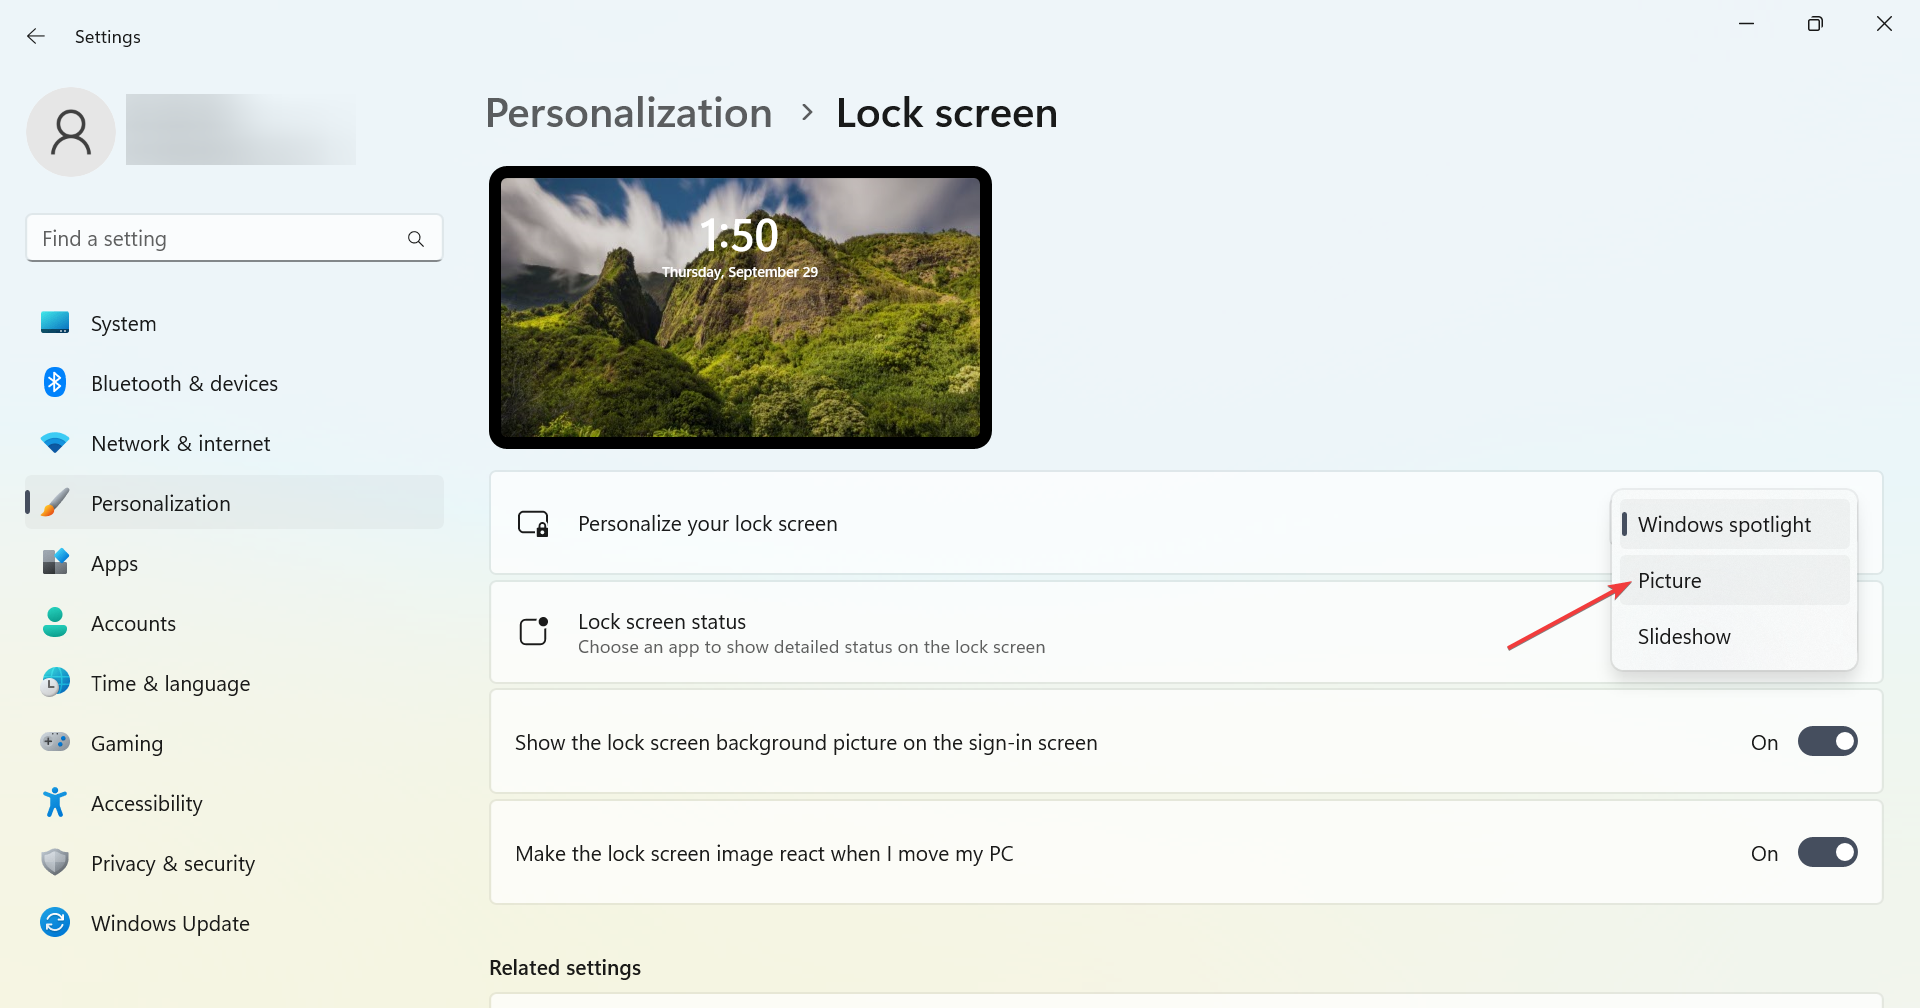
- Press the Windows key + I to open Windows Settings and go to Personalization, then to Lock screen.

- On the right side, you will see a drop-down button named Picture. Expand the list and select the Slideshow option.

Images from the Pictures folder are automatically gathered when the program starts. In other words, you may want to include some images there in order for them to be displayed in the lock screen slideshow.
2. Check your images
By default, Windows 11 include some photographs in the Pictures folder, allowing you to create a slideshow on the lock screen by selecting Show Slideshow on Lock Screen from the Start menu.
Although this is the case, if any of those photographs are accidentally destroyed, you may find yourself in this situation from time to time.
As a point of reference, this Pictures folder is the Library folder that appears when you first boot up your computer or create a new user account in Windows.
3. Re-add folders and images
- Press the Windows key + I to open the Windows Settings panel and go to Personalization, then to Lock Screen.
- Click on the carrot arrow to expand the Personalize your lock screen drop-down menu and remove from the list the folders with pictures, by clicking on the Remove button next to them.

- Next, click on the Browse button and choose the folder with images.


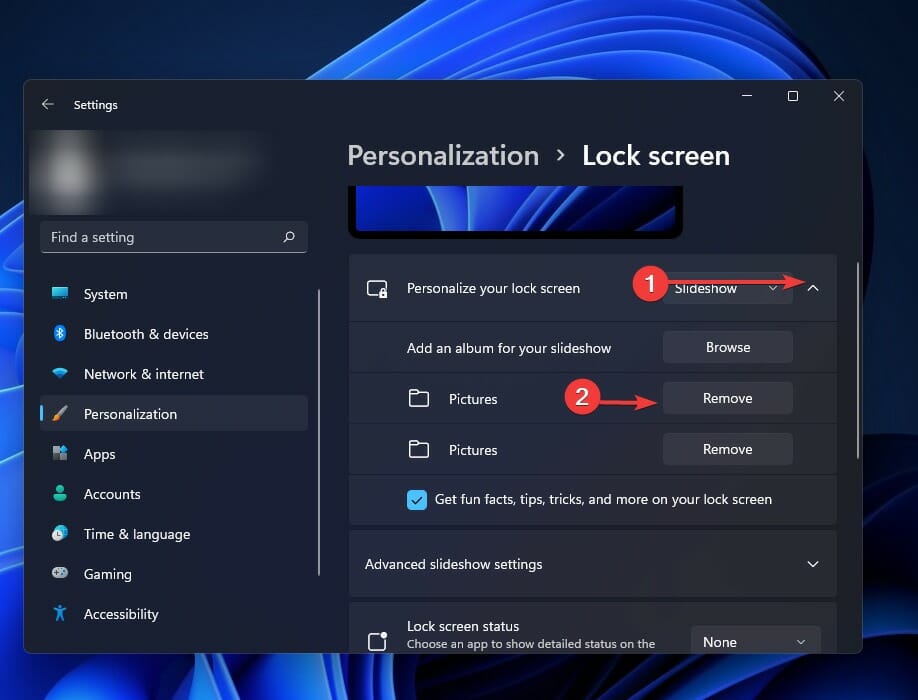
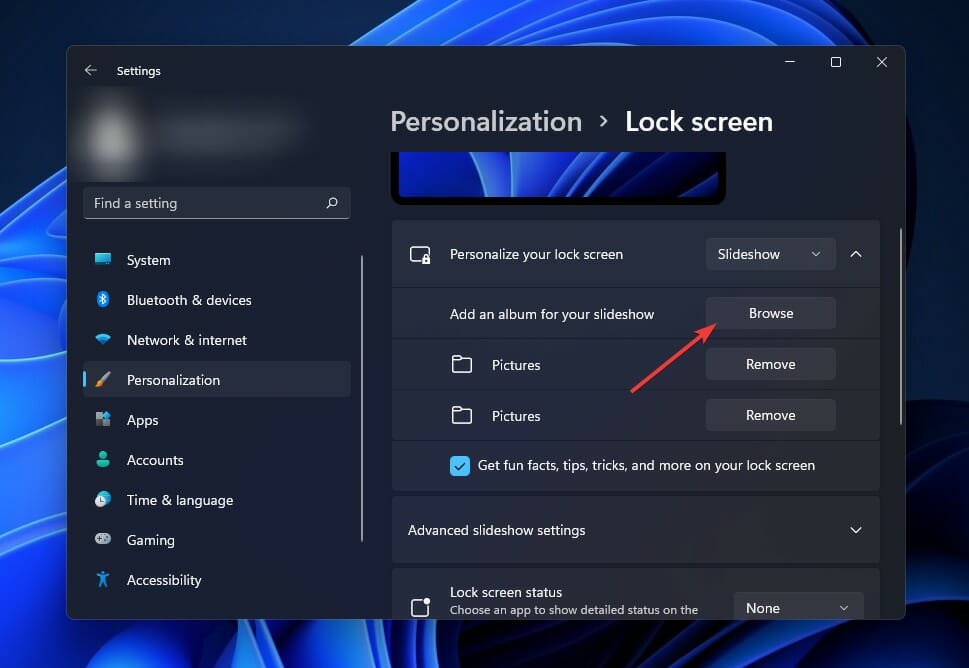
At the end of the process, restart your computer to see if it has resolved your problem.
4. Don’t turn off screen after slideshow
- Press the Windows key + I to open the Windows Settings panel and go to Personalization, then to Lock Screen.
- Click on Advanced slideshow settings to expand it, navigate to Turn off the screen after the slideshow has played for and select the Don’t turn off option.


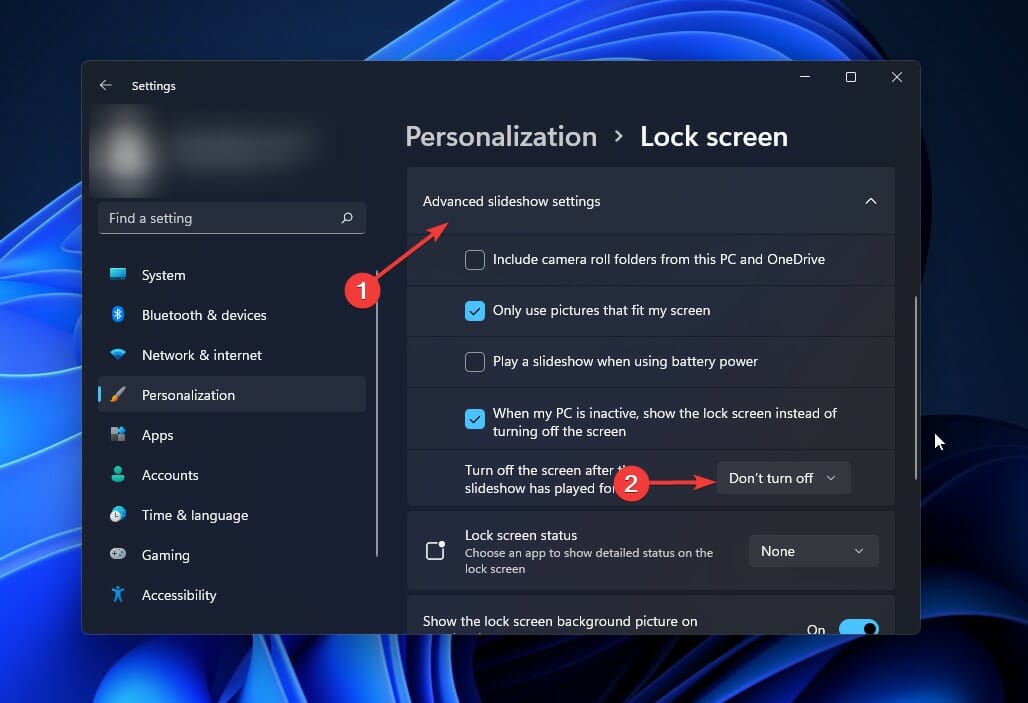
When the slideshow is over, Windows 11 automatically turns off the screen in order to conserve energy. By following the methods outlined above, you can avoid the need to conserve energy.
5. Open Power Options
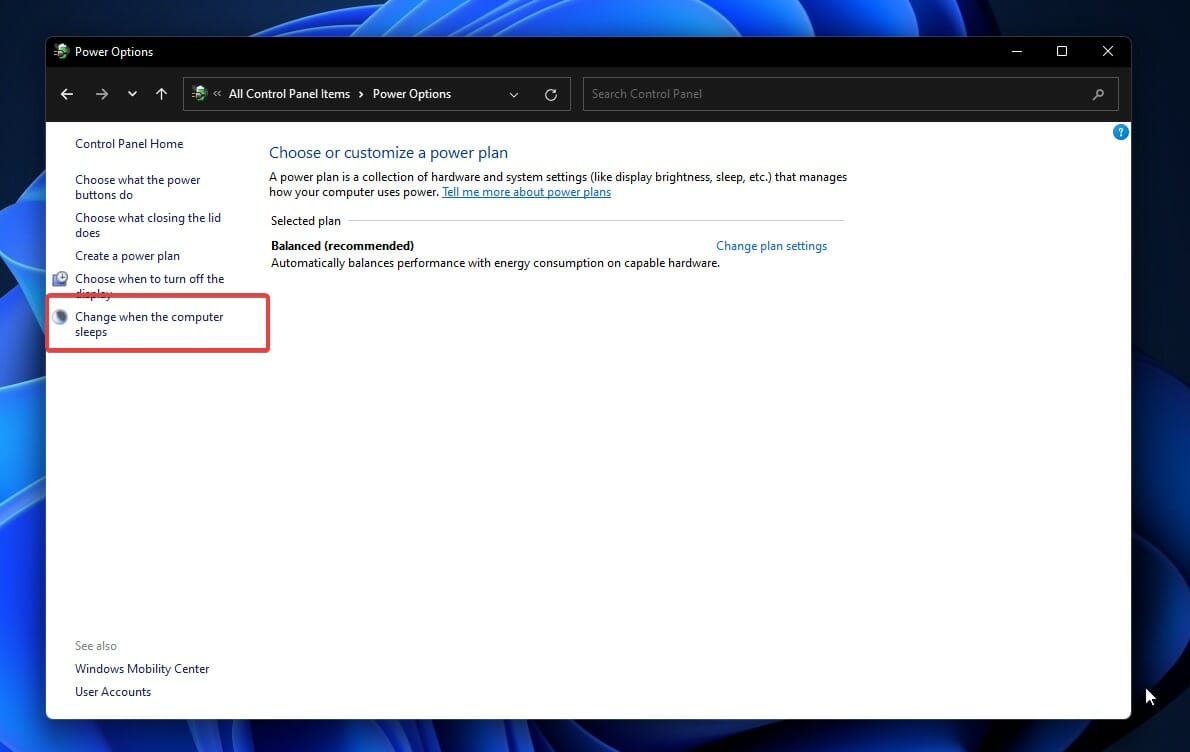
- Press the Windows key + S and search for Control Panel. Click on the most relevant result.

- Go to Power options and click on the Change when the computer sleeps option.

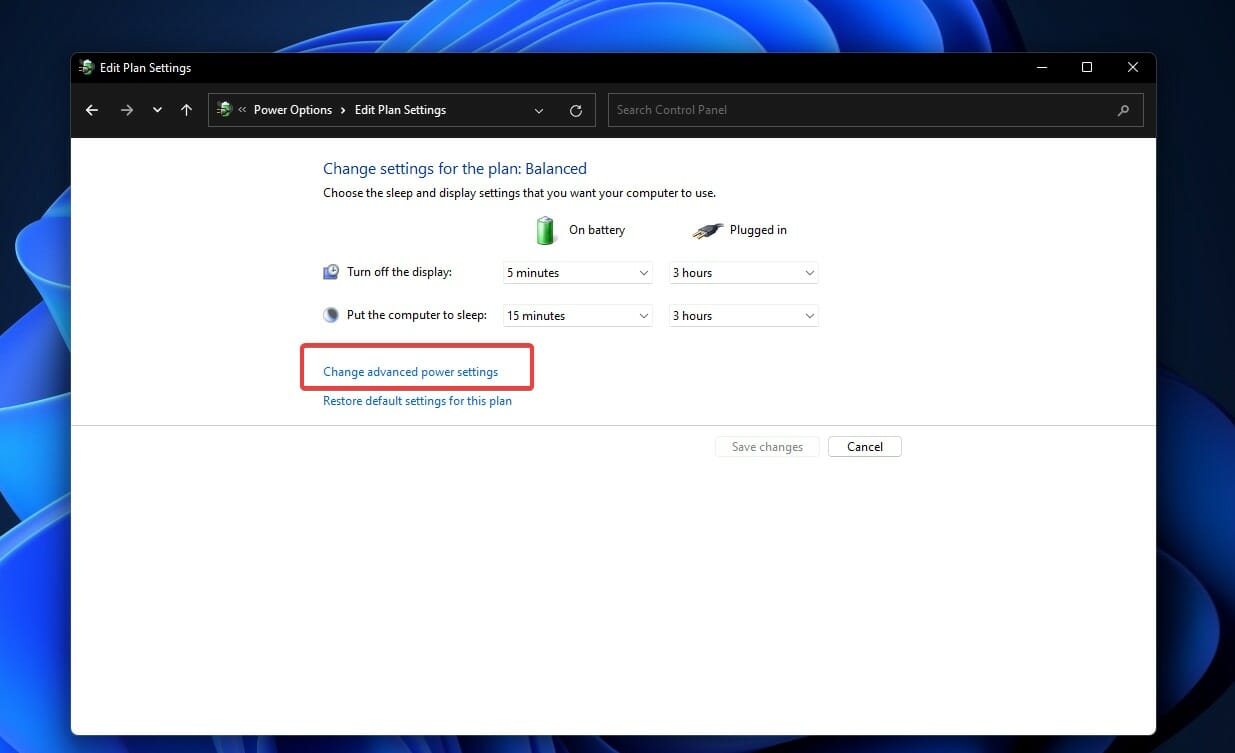
- Select Change advanced power settings.

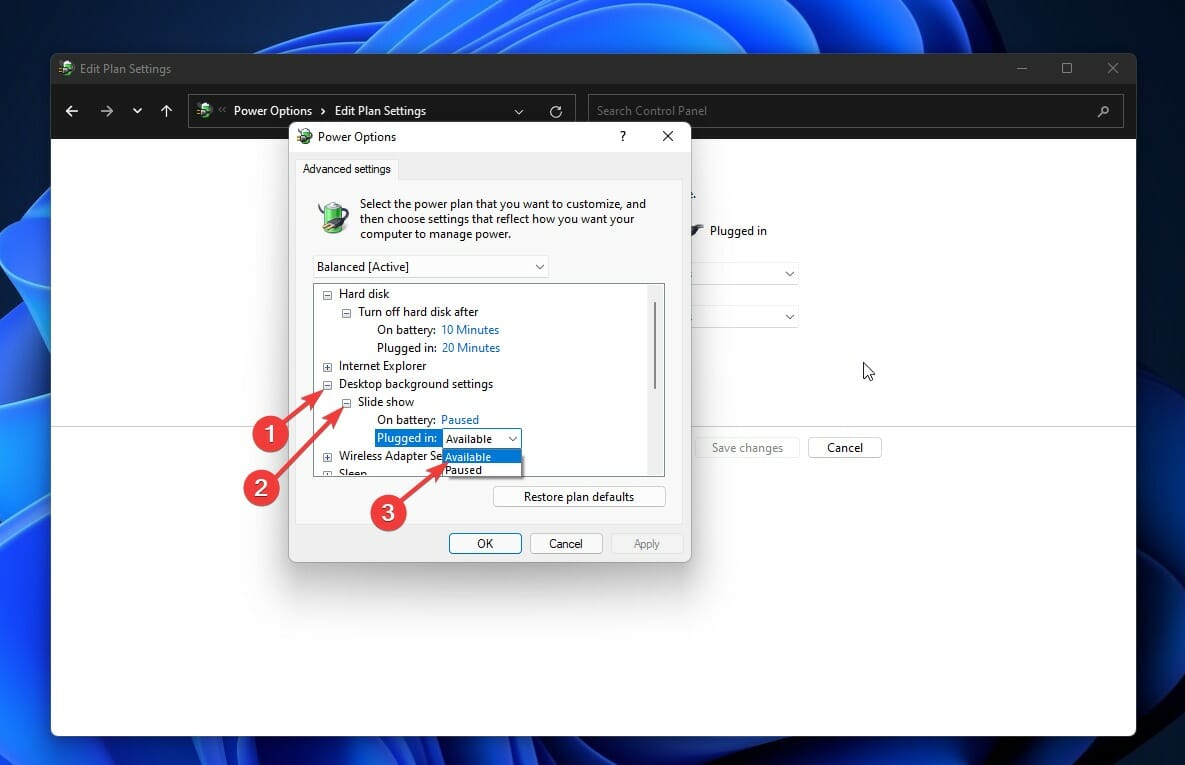
- Expand the Desktop background settings then Slide slow, expand the list, and select the Available option.

Some PC issues are hard to tackle, especially when it comes to corrupted repositories or missing Windows files. If you are having troubles fixing an error, your system may be partially broken.
We recommend installing Restoro, a tool that will scan your machine and identify what the fault is.
Click here to download and start repairing.
When using a laptop, it is possible to enable or disable the slideshow depending on your power plan in order to conserve battery life. That being said, it can be causing the problem at hand with Windows 11.
6. Check indexing settings
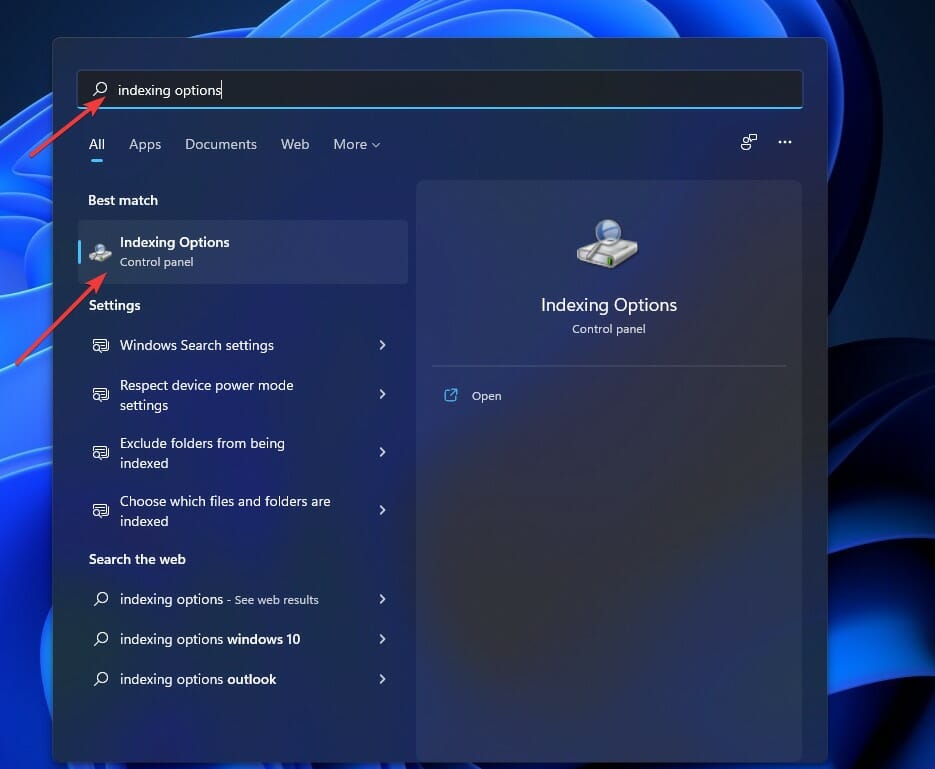
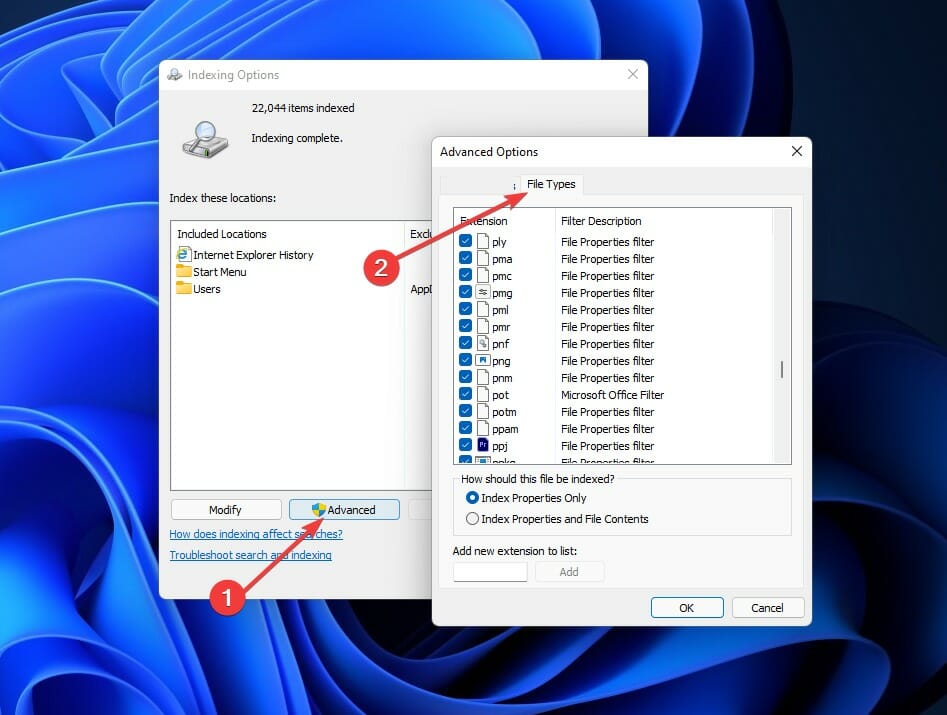
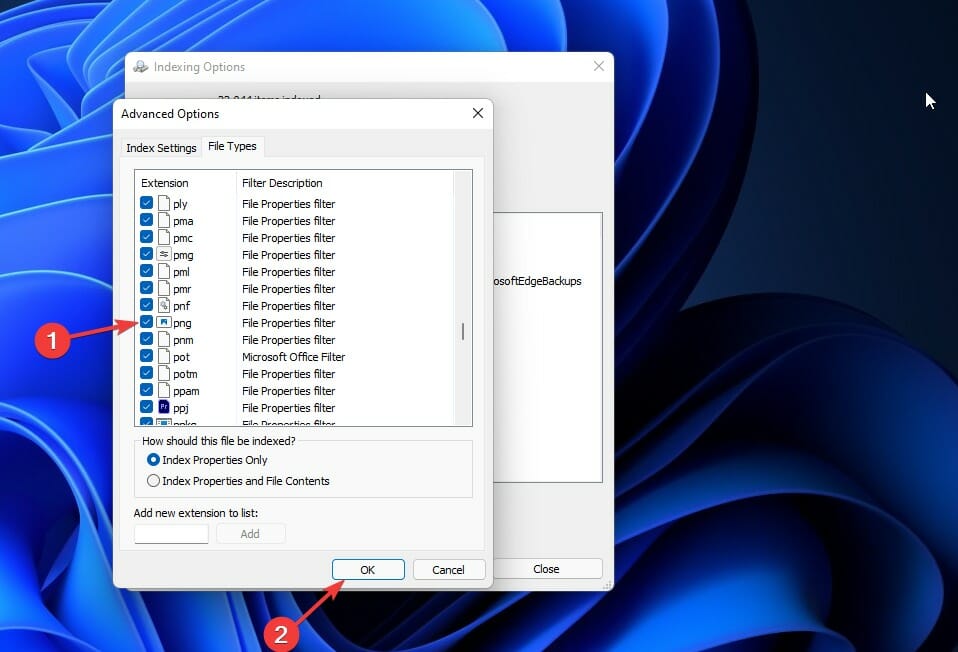
- Press the Windows key + S and search for indexing options. Click on the most relevant result to open it.

- Press the Advanced button and switch to the File Types tab.

- Look up the PNG and JPG options and make sure that both of them are ticked. If not, check the boxes next to them and click the OK button to save the changes made.

Windows may fail to index a specific path or folder or kind of file as a result of malware, virus, and other malicious software.
Alternatively, if the photos you’ve chosen are PNG or JPG and Windows 11 isn’t indexing those file formats, you may experience problems.
7. Check lock screen blocking in Registry Editor
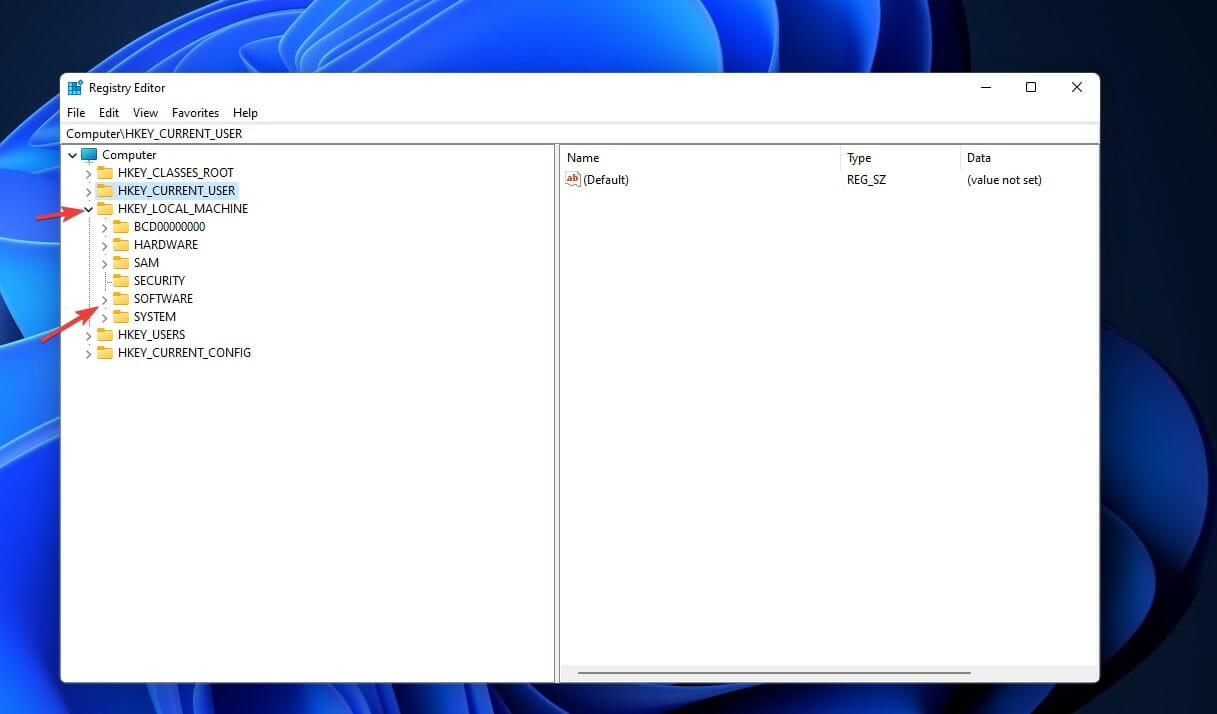
- Press the Windows key + R , then type regedit and press Enter.

- Navigate to HKEY_LOCAL_MACHINE, then to Software and Policies. Go to Microsoft, then to Windows followed by Personalization.

- You may find a REG_DWORD named NoLockScreenSlideshow. If so, right-click on it and select the Delete option.

8. Allow lock screen slideshow in GPEDIT
- Press the Windows key + R , then type gpedit.msc and press the Enter button.

- Navigate to Computer Configuration, then to Administrative Templates. Go to Control Panel followed by Personalization.

- Double click on the Prevent enabling lock screen slide show setting and select either Not Configured or Disabled option, followed by the OK bottom.

If you have this option selected, you will be unable to change the lock screen slideshow on Windows 11. As a result, it is necessary to double-check the settings to ensure that they are correct.
Confirm the removal, then restart your computer to make the changes take effect. Check to see if the slideshow is now functioning properly.
Why is Windows activation important?
Activation helps verify that your copy of Windows is genuine and hasn’t been used on more devices than the Microsoft Software License Terms allow.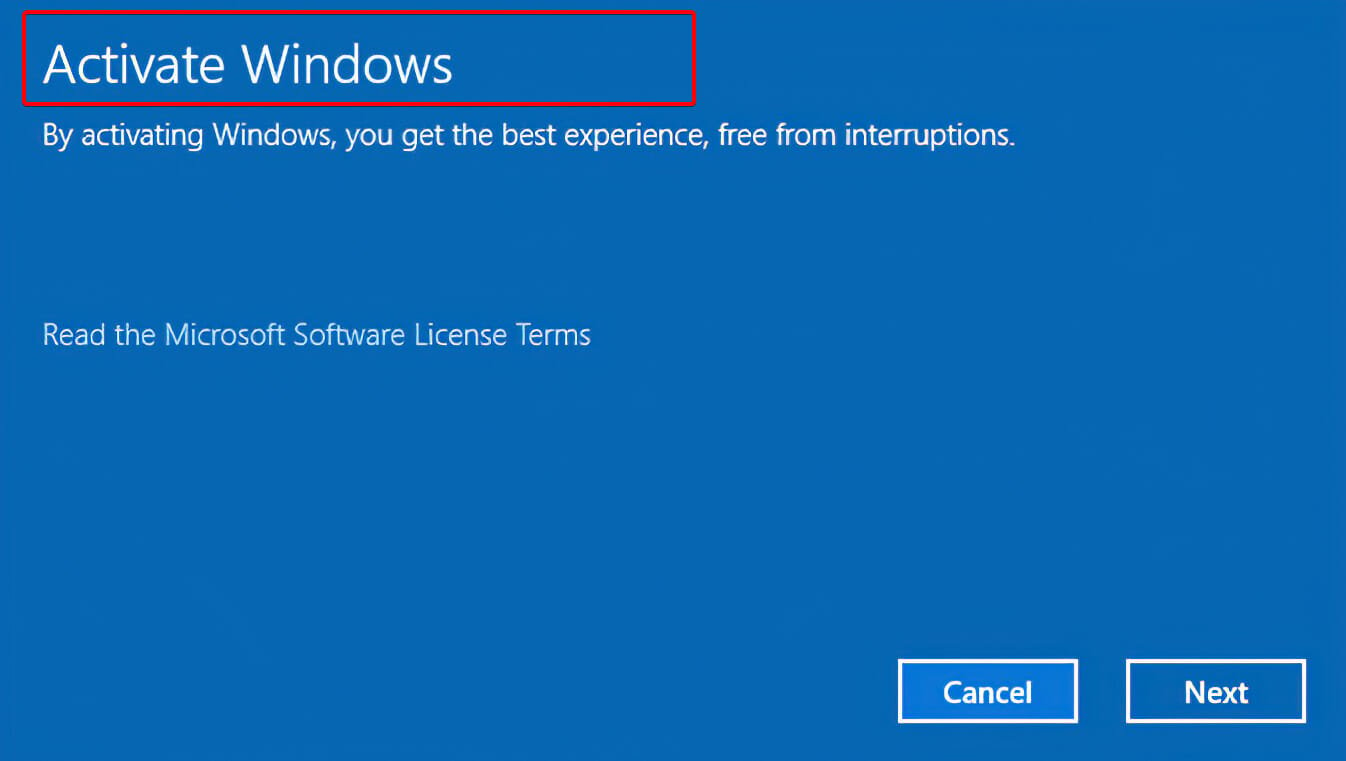
The activation process is distinct from the installation one, which requires a product code to proceed. It also differs from post-installation registration in another way.
A licensed copy of Windows and a specific computer system are linked together through the process of Windows activation.
In principle, creating such a link should prevent the same copy of Windows from being installed on more than one computer, as was previously allowed with older versions of the operating system.
So, what exactly happens if you don’t activate your Windows 11 operating system? It’s true that nothing bad happens. There will be virtually minimal disruption in system functionality. The only thing that will be unavailable in this situation is personalization such as the slideshow one.
What does the Windows Spotlight feature do?
Using the Microsoft Bing site as an example, Windows Spotlight will display your photographs and allow you to vote on which image should be used as the lock screen background on your computer’s Windows 11 operating system.
This enables Windows Spotlight to customize the appearance of the lock screen based on the preferences of each individual user.
The Windows Spotlight service may also learn from the apps and services that you use, and over time, it can provide recommendations about which apps you should try out or which features of the Windows 11 operating system you should take advantage of.
The images typically depict identifiable, well-known locations such as famous historical or natural landmarks and rarely show any human beings. Location information is occasionally provided, while photo credits are typically not.
If you were paying attention to the Windows slideshow and enjoyed it, you might be interested in learning how to set a live wallpaper in Windows 11. The live aspect of the desktop has proven to be extremely popular among users.
Using the themes and skins that Microsoft Windows 11 provides, you can further tailor your desktop experience even more. Check out the top ten greatest Windows 11 themes and skins to download, all of them are available for free download.
Alternatively, if you miss how the previous user interface looked like, you can make Windows 11 look like Windows 10 again.
Let us know in the comments section below which approach worked best for you, as well as which feature of Windows 11 you enjoy the most.
![]()
Newsletter
Windows needs to be activated for you to use this feature
by Loredana Harsana
Loredana is a passionate writer with a keen interest in PC software and technology. She started off writing about mobile phones back when Samsung Galaxy S II was… read more
Updated on February 8, 2023
Reviewed by
Vlad Turiceanu
Passionate about technology, Windows, and everything that has a power button, he spent most of his time developing new skills and learning more about the tech world. Coming… read more
- In Windows 11, it is not uncommon for the lock screen slideshow to encounter issues.
- It requires a custom lock screen slideshow setup if the default configuration doesn’t work.
- You can also create a slideshow of images in folders that you want to display.
XINSTALL BY CLICKING THE DOWNLOAD FILE
- Download Restoro PC Repair Tool that comes with Patented Technologies (patent available here).
- Click Start Scan to find Windows 11 issues that could be causing PC problems.
- Click Repair All to fix issues affecting your computer’s security and performance
- Restoro has been downloaded by 0 readers this month.
Due to the large number of processes that must run in the background to make it happen, the lock screen slideshow or Windows Spotlight may stop working for no apparent reason at times.
Windows 11, like Windows 10, allows you to customize the lock screen by displaying a slideshow of personal images. Despite the fact that Windows Spotlight retrieves images from the Bing search engine, the Slideshow feature retrieves images from your local hard disk.
Many factors could be at play when the Windows 11 lock screen slideshow is not working, and we’ve compiled a list of all the alternative options you might want to consider.
How do I fix Windows 11 lock screen slideshow not working issue?
- How do I fix Windows 11 lock screen slideshow not working issue?
- 1. Enable the lock screen slideshow manually
- 2. Check your images
- 3. Re-add folders and images
- 4. Don’t turn off screen after slideshow
- 5. Open Power Options
- 6. Check indexing settings
- 7. Check lock screen blocking in Registry Editor
- 8. Allow lock screen slideshow in GPEDIT
- Why is Windows activation important?
- What does the Windows Spotlight feature do?
NOTE
Make sure that Windows is activated before attempting any other option, as failing to do so would prevent any slideshow from appearing.
1. Enable the lock screen slideshow manually
- Press the Windows key + I to open Windows Settings and go to Personalization, then to Lock screen.
- On the right side, you will see a drop-down button named Picture. Expand the list and select the Slideshow option.
Images from the Pictures folder are automatically gathered when the program starts. In other words, you may want to include some images there in order for them to be displayed in the lock screen slideshow.
2. Check your images
By default, Windows 11 include some photographs in the Pictures folder, allowing you to create a slideshow on the lock screen by selecting Show Slideshow on Lock Screen from the Start menu.
Although this is the case, if any of those photographs are accidentally destroyed, you may find yourself in this situation from time to time.
As a point of reference, this Pictures folder is the Library folder that appears when you first boot up your computer or create a new user account in Windows.
3. Re-add folders and images
- Press the Windows key + I to open the Windows Settings panel and go to Personalization, then to Lock Screen.
- Click on the carrot arrow to expand the Personalize your lock screen drop-down menu and remove from the list the folders with pictures, by clicking on the Remove button next to them.
- Next, click on the Browse button and choose the folder with images.
At the end of the process, restart your computer to see if it has resolved your problem.
4. Don’t turn off screen after slideshow
- Press the Windows key + I to open the Windows Settings panel and go to Personalization, then to Lock Screen.
- Click on Advanced slideshow settings to expand it, navigate to Turn off the screen after the slideshow has played for and select the Don’t turn off option.
When the slideshow is over, Windows 11 automatically turns off the screen in order to conserve energy. By following the methods outlined above, you can avoid the need to conserve energy.
5. Open Power Options
- Press the Windows key + S and search for Control Panel. Click on the most relevant result.
- Go to Power options and click on the Change when the computer sleeps option.
- Select Change advanced power settings.
- Expand the Desktop background settings then Slide slow, expand the list, and select the Available option.
Some PC issues are hard to tackle, especially when it comes to corrupted repositories or missing Windows files. If you are having troubles fixing an error, your system may be partially broken.
We recommend installing Restoro, a tool that will scan your machine and identify what the fault is.
Click here to download and start repairing.
When using a laptop, it is possible to enable or disable the slideshow depending on your power plan in order to conserve battery life. That being said, it can be causing the problem at hand with Windows 11.
6. Check indexing settings
- Press the Windows key + S and search for indexing options. Click on the most relevant result to open it.
- Press the Advanced button and switch to the File Types tab.
- Look up the PNG and JPG options and make sure that both of them are ticked. If not, check the boxes next to them and click the OK button to save the changes made.
Windows may fail to index a specific path or folder or kind of file as a result of malware, virus, and other malicious software.
Alternatively, if the photos you’ve chosen are PNG or JPG and Windows 11 isn’t indexing those file formats, you may experience problems.
7. Check lock screen blocking in Registry Editor
- Press the Windows key + R , then type regedit and press Enter.
- Navigate to HKEY_LOCAL_MACHINE, then to Software and Policies. Go to Microsoft, then to Windows followed by Personalization.
- You may find a REG_DWORD named NoLockScreenSlideshow. If so, right-click on it and select the Delete option.
8. Allow lock screen slideshow in GPEDIT
- Press the Windows key + R , then type gpedit.msc and press the Enter button.
- Navigate to Computer Configuration, then to Administrative Templates. Go to Control Panel followed by Personalization.
- Double click on the Prevent enabling lock screen slide show setting and select either Not Configured or Disabled option, followed by the OK bottom.
If you have this option selected, you will be unable to change the lock screen slideshow on Windows 11. As a result, it is necessary to double-check the settings to ensure that they are correct.
Confirm the removal, then restart your computer to make the changes take effect. Check to see if the slideshow is now functioning properly.
Why is Windows activation important?
Activation helps verify that your copy of Windows is genuine and hasn’t been used on more devices than the Microsoft Software License Terms allow.
The activation process is distinct from the installation one, which requires a product code to proceed. It also differs from post-installation registration in another way.
A licensed copy of Windows and a specific computer system are linked together through the process of Windows activation.
In principle, creating such a link should prevent the same copy of Windows from being installed on more than one computer, as was previously allowed with older versions of the operating system.
So, what exactly happens if you don’t activate your Windows 11 operating system? It’s true that nothing bad happens. There will be virtually minimal disruption in system functionality. The only thing that will be unavailable in this situation is personalization such as the slideshow one.
What does the Windows Spotlight feature do?
Using the Microsoft Bing site as an example, Windows Spotlight will display your photographs and allow you to vote on which image should be used as the lock screen background on your computer’s Windows 11 operating system.
This enables Windows Spotlight to customize the appearance of the lock screen based on the preferences of each individual user.
The Windows Spotlight service may also learn from the apps and services that you use, and over time, it can provide recommendations about which apps you should try out or which features of the Windows 11 operating system you should take advantage of.
The images typically depict identifiable, well-known locations such as famous historical or natural landmarks and rarely show any human beings. Location information is occasionally provided, while photo credits are typically not.
If you were paying attention to the Windows slideshow and enjoyed it, you might be interested in learning how to set a live wallpaper in Windows 11. The live aspect of the desktop has proven to be extremely popular among users.
Using the themes and skins that Microsoft Windows 11 provides, you can further tailor your desktop experience even more. Check out the top ten greatest Windows 11 themes and skins to download, all of them are available for free download.
Alternatively, if you miss how the previous user interface looked like, you can make Windows 11 look like Windows 10 again.
Let us know in the comments section below which approach worked best for you, as well as which feature of Windows 11 you enjoy the most.
![]()
Newsletter
Программка «Windows интересное» (она же — Windows Spotlight) просто подгружает красивые картинки из Bing на экран блокировки Windows 10. «Фича» простая, но весьма симпатичная, потому нравится многим
… пока работает. Однако нормально работает она не всегда. Бывает, что какая-то картинка надолго подвисает, а бывает, что «интересное» вообще перестает функционировать.
А с учетом того, что в настройках системы отдельной кнопочки, которая позволила бы перезапустить эту программку, не предусмотрено, то как её в таких случаях чинить, не совсем понятно.
Не пропустите: КАК ОТКЛЮЧИТЬ ПОИСК BING В ПОСЛЕДНИХ WINDOWS 10 (С V.2004 И В СЛЕДУЮЩИХ)
Но, не беда, сейчас мы об этом расскажем. Итак, что делать, когда Windows интересное «заклинивает» на одной картинке и/или перестает работать.
Значит:
сначала совсем отключаем Windows интересное
Для этого:
- кликаем Параметры -> Персонализация -> Экран блокировки (слева);
- в меню «Фон» (в правой части окна) выбираем опцию «Фото» или «Слайд-шоу«.
Программа «Windows интeресное» отключилась и теперь можно убрать старые изображения из памяти, восстановить настройки и запустить её заново. Поэтому по порядку:
#1 — чистим кэш «Windows интересное»
- жмем «Пуск«, в строке поиска системы пишем выполнить и кликаем «Выполнить» в результатах поиска выше;
- в строке «Открыть» вводим путь и затем жмем OK:
%USERPROFILE%/AppDataLocalPackagesMicrosoft.Windows.ContentDeliveryManager_cw5n1h2txyewyLocalStateAssets
- в открывшемся окне выделяем все файлы (Ctrl + A) и удаляем (кнопку Delete на клавиатуре) все файлы.
#2 — восстанавливаем параметры «Windows интересное»
- в окне «Выполнить» вводим следующий путь и жмем ОК:
%USERPROFILE%/AppDataLocalPackagesMicrosoft.Windows.ContentDeliveryManager_cw5n1h2txyewySettings
- в открывшейся папке правой кнопкой мыши жмем по очереди по файлам settings.dat и roaming.lock, в меню выбираем «Переименовать» и прописываем для них новые названия settings.dat.bak и roaming.lock.bak, соответственно;
- перезагружаем компьютер.
Не пропустите: КАК БЫСТРО ВКЛЮЧИТЬ ПРИЛОЖЕНИЕ, ЗАБЛОКИРОВАННОЕ АНТИВИРУСНОЙ ЗАЩИТОЙ WINDOWS 10
#3 — включаем «Windows интересное» по-новой
- кликаем Параметры -> Персонализация -> Экран блокировки (слева);
- в меню «Фон» (в правой части окна) выбираем опцию «Windows: интересное«.
После этого программка заработает исправно и снова начнет показывать вам приятные картинки. Если кому на будущее интересно, то аналогичное мероприятие по восстановлению работы «Windows: интересное» несколько быстрее можно провести и с помощью команд PowerShell системы.
Расскажем на всякий случай, как это делается:

- сначала полностью отключаем «интересное» (это вы уже умеете);
- кликаем «Пуск«, в поиске пишем PowerShell, затем в выдаче жмем правой клавишей мыши по строке Windows PowerShell и в меню кликаем «Запуск от имени Администратора«;
- в окне PowerShell прописываем следующую команду (и после жмем Enter):
Get-AppxPackage -allusers *ContentDeliveryManager* | foreach {Add-AppxPackage «$($_.InstallLocation)appxmanifest.xml» -DisableDevelopmentMode -register }
- перезагружаем комп;
- включаем «интeресное» заново (Параметры -> Персонализация -> Экран блокировки (слева) -> меню «Фон» (справа) -> опцию «Windows: интерeсное»).