 Среди замеченных проблем после обновления до Windows 11 или чистой установки — невозможность открыть Терминал Windows 11, например, через контекстное меню кнопки «Пуск». Вторая возможная ситуация — при попытке открыть параметры терминала появляется запрос об открытии файла .json, но не окна настроек.
В этой простой инструкции о том, что делать, если не открывается терминал Windows 11 и при проблемах с открытием его настроек.
Решение проблем с Терминалом Windows 11
Для того, чтобы решить проблемы с запуском или открытием параметров терминала Windows 11, рекомендую использовать следующие шаги:
- Зайдите в Параметры (можно нажать клавиши Win+I на клавиатуре) — Приложения — Приложения и возможности.
- В списке приложений найдите «Windows Terminal» (Не исключено, что в будущих обновлениях может называться «Терминал Windows»). При отсутствии такого пункта перейдите к шагу 6.
- Нажмите по трем точкам справа от имени приложения и откройте «Дополнительные параметры».

- В разделе «Сбросить» попробуйте использовать кнопки «Исправить» и «Сброс», проверяя после каждого действия, восстановилась ли правильная работа терминала.

- Если это не помогло, удалите Windows Terminal, используя кнопку внизу окна.
- Зайдите в магазин приложений Microsoft Store и используйте поиск в магазине для поиска приложения Windows Terminal. Найдите приложение и установите его.


Обычно, на 4-м или после 6-го шага все проблемы с открытием Терминала Windows 11 и его параметров бывают решены.
Если этого не произошло, опишите в комментариях вашу ситуацию: что именно не работает в Терминале (не запускается, не получается что-то сделать), какие действия уже были выполнены и насколько успешно. Возможно, мне удастся предложить способ исправления.
Во всех версиях Windows разработчики так и не смогли полностью перейти на GUI – многие специфические задачи выполняются через командную строку. Начиная с «семёрки», появилась возможность эти задачи автоматизировать благодаря оболочке PowerShell, в «десятке» эта оболочка заменила классическую командную строку в меню «Пуск». В Windows 11 пошли ещё дальше – интегрировали CMD, PowerShell и WSL в единой консоли с графическим интерфейсом и настраиваемыми параметрами, при этом каждое из приложений может работать в отдельном окне.

Разумеется, открытие WT было добавлено посредством вызова меню «Пуск». Но от многих пользователей начали поступать жалобы, что с открытием консоли именно этим способом возникли проблемы: например, Терминал при запуске просто подвисал, или отсутствовал при нажатии «Пуск». Между тем существует немало альтернативных способов запуска нового приложения, о которых вы сегодня и узнаете.
Запуск Терминала с правами администратора через меню «Пуск»
Классический способ предполагает два варианта открытия консоли: с обычными правами и привилегиями администратора. Если последняя опция в контекстном меню отсутствует, можно попробовать выполнить следующую инструкцию:
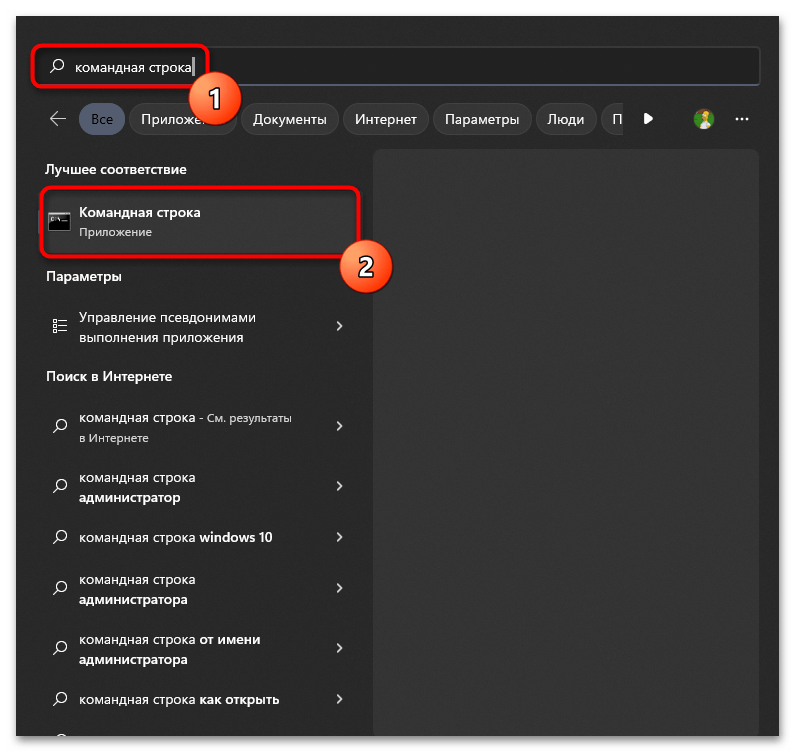
Использование поиска Windows 11
Если в меню кнопки «Пуск» Терминал отсутствует или Терминал банально не открывается, вы можете запустить консоль, используя процедуру поиска в Windows 11:
Отметим, что при развёртывании «Пуск» также появится поле поиска, более привычное для пользователей предыдущих версий ОС Windows, его можно использовать точно таким же способом, результаты поиска будут идентичными.
Как открыть Терминал Windows 11 через панель задач
Самый простой и очевидный способ открытия WT – поместить его иконку на панель задач. Если вы не будете использовать программу часто, то особого смысла в этом нет, поскольку пиктограмма будет занимать место на панели, которая, как известно, не резиновая. Но тем, кто привык выполнять задачи с применением командной строки или PowerShell, и тем более запускать приложения, изначально разработанные для работы в среде Linux, отдельная кнопка в панели задач лишней точно не будет.
Открыть консоль с правами администратора будет проще простого – кликнув по иконке ПКМ и выбрав в появившемся списке соответствующий пункт.

Добавить WT в панель задач можно следующим образом:
- запускаем консоль любым удобным способом;
- кликаем по значку терминальной программы ПКМ;
- выбираем «Закрепить на панели задач».
Если в «Пуск» строка с WT отсутствует, её можно туда вернуть. Для этого открываем список доступных приложений Windows 11, ищем там Windows Terminal, кликаем по строке ПКМ и выбираем пункт «Закрепить на начальном экране». Если нажать кнопку «Дополнительно», то получите в свое распоряжение альтернативный способ закрепления значка приложения на панели задач.

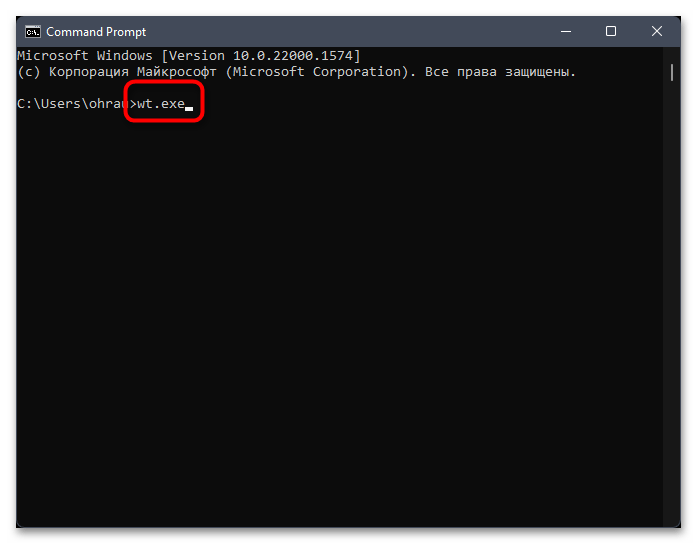
Использование консоли «Выполнить» для запуска Терминала с привилегированными правами
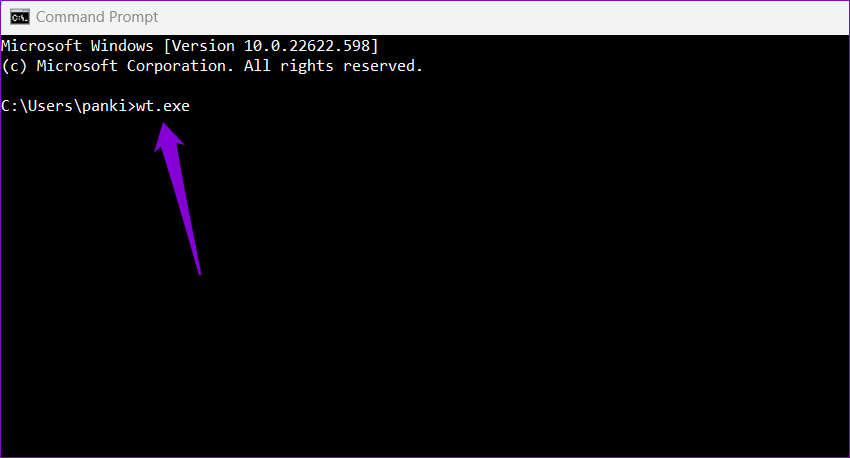
Стандартная комбинация Win+R, используемая для запуска консоли «Выполнить», тоже вполне может быть задействована для открытия консоли, если через меню или панель задач запуск Терминала Windows 11 не работает. Для этого в текстовом поле набираем команду wt.exe, подтверждаем нажатием Enter.

Если выполняемая текущая задача требует запуска Терминала или любой его компоненты с привилегированными правами, вместо Enter используем комбинацию Ctrl+Shift+Enter, в результате чего появится запрос UAC. Подтверждаем, в результате чего новое терминальное приложение запустится с правами администратора.
Запуск Терминала через Диспетчер задач
Этот метод открытия Терминала в Windows 11 нельзя назвать самым быстрым и удобным, но есть пользователи, которые привыкли иметь дело с Диспетчером задач и используют его, даже есть более простые методы решения текущих проблем.

Интерфейс Диспетчера в новой версии ОС отличается от привычного, но способ запуска остался прежним – комбинация Ctrl+Shift+Esc.
Жмем по кнопке «Файл», выбираем опцию «Запустить новую задачу», в поле «Отрыть» диалогового окна набираем текст wt и ставим галочку напротив нижнего параметра, если требуется открыть Терминал с правами администратора. Жмём ОК и наслаждаемся работой в консоли.

Использование комбинации Win+X
Есть достаточно обширная категория пользователей, привыкших пользоваться этим сочетанием клавиш для запуска таких востребованных системных приложений, как Диспетчер задач, Управление дисковой подсистемой или Диспетчер устройств. В этом списке в Windows 11 будет присутствовать и WT.

Итак, последовательность действий:
- жмём Win+X, или, что равноценно, кликаем ПКМ по кнопке меню «Пуск»;
- обладателям ноутбуков с сенсорным экраном или ПК с таким монитором достаточно нажать и немного придержать кнопку «Пуск»;
- выбираем в списке обычный WT или терминал с правами администратора.
Запуск Терминала через Проводник
Возможность запуска программы из любой папки или с рабочего стола – вещь, безусловно, очень удобная. Но для его добавления в каскадное меню Проводника необходимо немного «попотеть», и без стороннего софта здесь не обойтись.

Итак, чтобы добавить WT в контекстное меню Проводника, скачиваем с официального сайта утилиту Winaero Tweaker, устанавливаем её и запускаем. В левой панели находим в списке приложений Windows Terminal, однократно кликаем по ней. Справа появится окно настройки параметров для этого приложения – ставим галочку напротив опции «Add Windows Terminal…». Здесь же можно выбрать и используемые профили, которые также будут отображаться в меню Проводника.
Теперь переходим в Проводник, кликаем ПКМ по любому каталогу, выбираем строку «Показать дополнительные параметры», а в новом списке – значок щита и надписью Windows Terminal. Если вызвать и для этой строки контекстное меню, то появится возможность запуска WT с конкретным профилем (например, только командной строки или PowerShell).

Другие варианты
Если все предложенные способы не срабатывают и завершаются ошибкой, высока вероятность, что файл wt.exe просто отсутствует в системной папке или повреждён (например, в результате деятельности зловредного ПО).
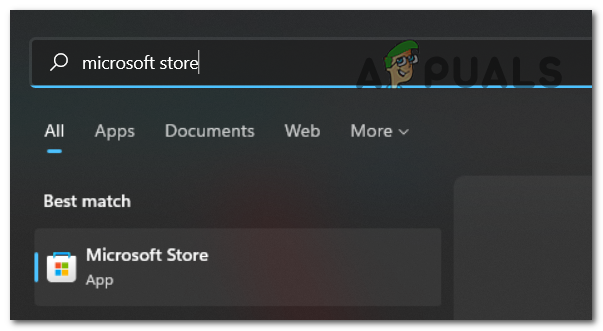
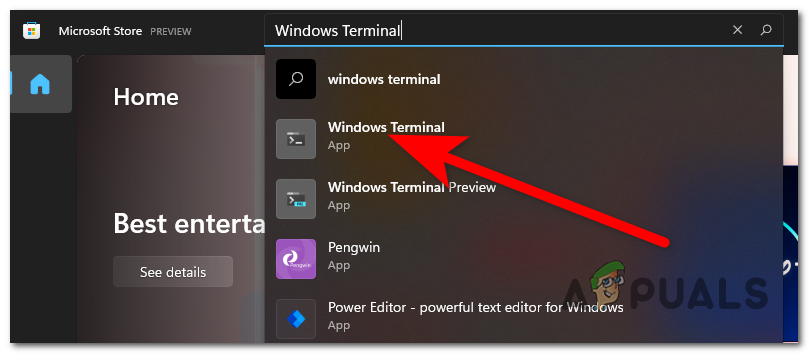
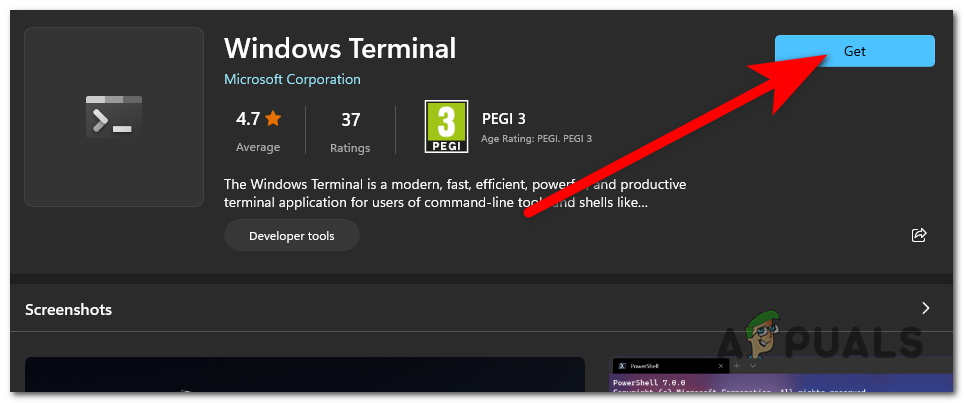
Для проверки нужно зайти в Microsoft Store (ярлык магазина должен присутствовать в меню кнопки «Пуск»). Набираем в поисковой строке слово Terminal, появится результат в виде окна приложения консоли. Причём, если в Windows 11 приложение уже имеется (просто вы не можете его запустить), будет присутствовать кнопка Open. А если приложение действительно удалено – кнопка Install, её и жмём для повторной инсталляции консоли.

Кстати, тем, что часто использует компоненты Windows Terminal, можно посоветовать поместить запуск консоли в автозагрузку. Для этого приложение нужно открыть любым из доступных способов, в верхней статусной строке кликнуть по стрелочке, направленной вниз, и в открывшемся меню выбрать опцию Settings. Откроется окно настроек Терминала, где переходим во вкладку Startup, а в правом блоке активируем переключатель опции Launch on machine startup, переместив его в положение On. Сохраняем изменения, нажав кнопку Save.
На этом всё! Надеемся, что этот материал помог вам в решении проблемы с работой Терминала Windows 11.
Содержание
- Способ 1: Альтернативный запуск через «Командную строку»
- Способ 2: Проверка псевдонима выполнения приложения
- Способ 3: Исправление / сброс «Терминала»
- Способ 4: Проверка системных и необязательных обновлений
- Способ 5: Ручное обновление PowerShell
- Способ 6: Переустановка «Терминала»
- Способ 7: Проверка целостности системных файлов
- Вопросы и ответы

Способ 1: Альтернативный запуск через «Командную строку»
Иногда для решения проблемы с работой «Терминала» в Windows 11 достаточно просто выбрать альтернативный метод его запуска. Лучше всего для этого подойдет «Командная строка», поскольку вы можете путем обхода псевдонимов и ярлыков инициировать открытие исполняемого файла, которым и является «Терминал». Давайте разберемся с тем, как осуществляется реализация данного метода.
- Откройте «Пуск», отыщите через поиск «Командную строку» и запустите данное приложение.
- В нем введите команду
wt.exe, затем нажмите Enter для ее активации. - Если через секунду на экране появилось новое окно «Терминала Windows», значит, этот метод сработал успешно. Вы можете использовать его или позже снова попробовать стандартные варианты открытия консоли.
Способ 2: Проверка псевдонима выполнения приложения
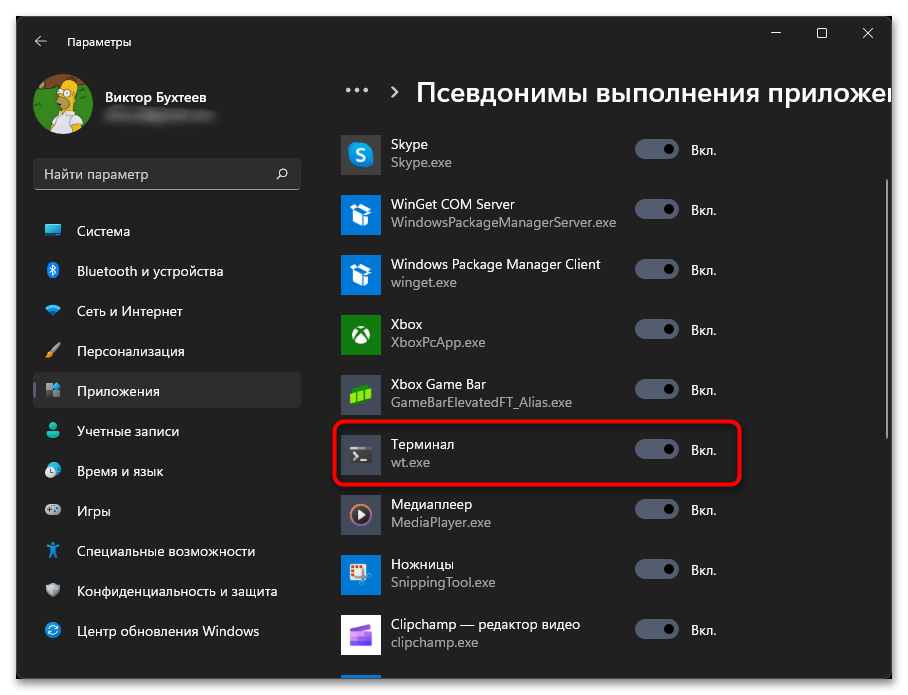
У всех стандартных приложений Windows 11 есть свои псевдонимы — имена, ссылающиеся на исполняемые файла формата EXE. Они отображаются при поиске через «Пуск», также могут быть расположены в контекстном меню или представлены в качестве ярлыков. Если псевдоним «Терминала» отключен, с его запуском могут возникнуть проблемы, поэтому и требуется проверить данную настройку.
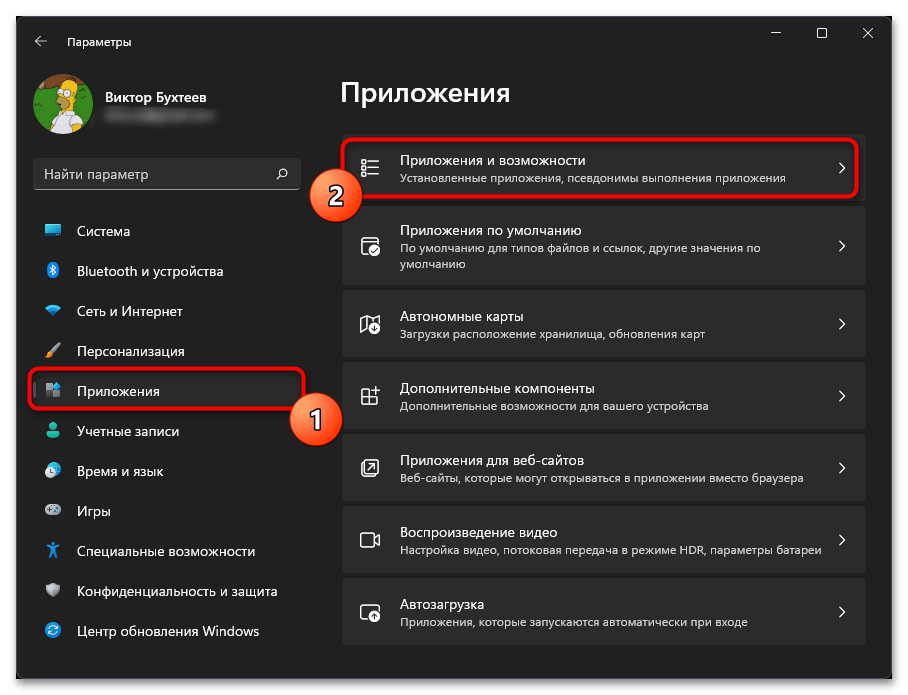
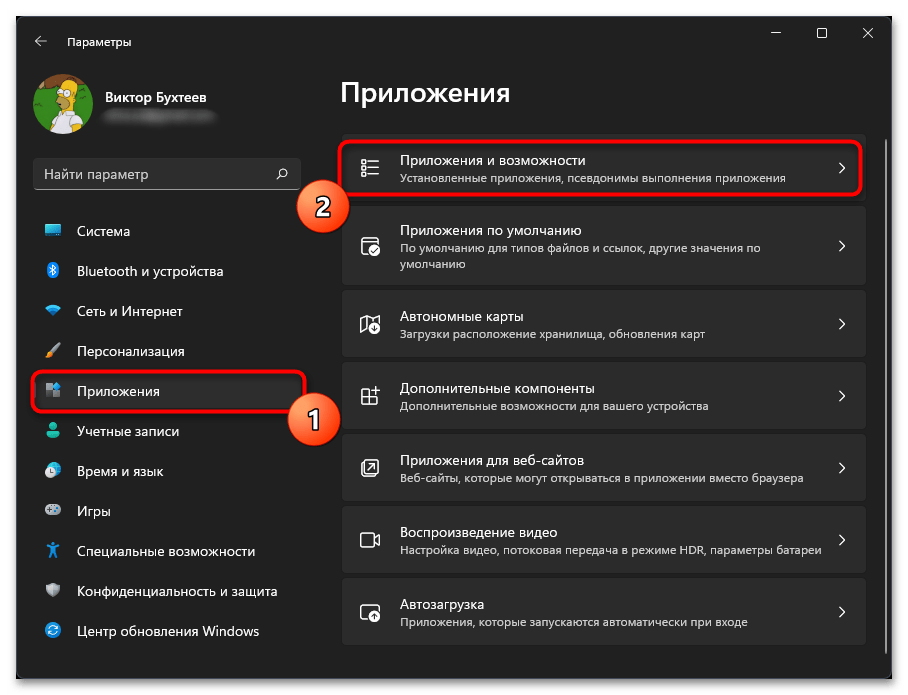
- Откройте «Пуск» и нажмите по значку с шестеренкой, чтобы перейти в «Параметры».
- На панели слева выберите раздел «Приложения», затем щелкните левой кнопкой мыши по категории «Приложения и возможности».
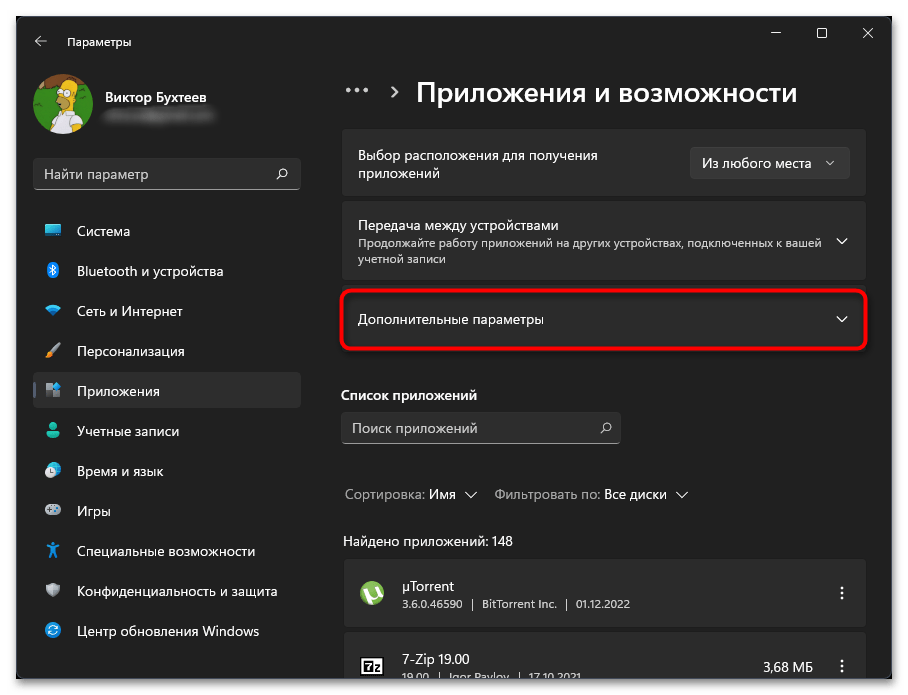
- Разверните список «Дополнительные параметры».
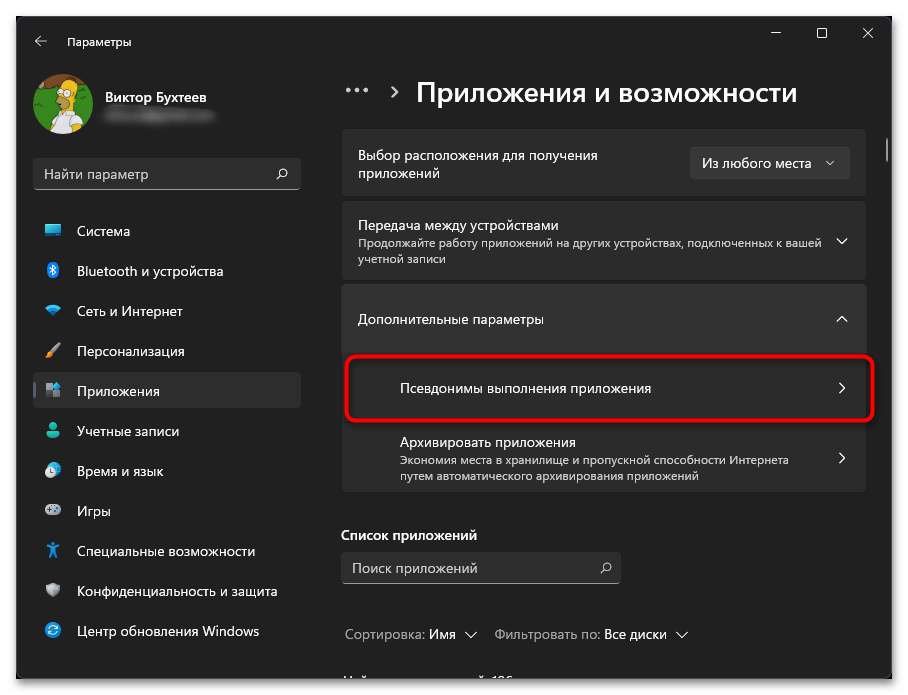
- В нем кликните левой кнопкой мыши по пункту «Псевдонимы выполнения приложения», чтобы перейти к соответствующему списку.
- Отыщите «Терминал» и убедитесь в том, что возле него ползунок находится в состоянии «Вкл.». Если это не так, измените его положение, затем перезагрузите Виндовс и проверьте работу «Терминала».
Способ 3: Исправление / сброс «Терминала»
Существует вероятность, что «Терминал» не запускается по причине появления сбоев в его файлах. Иногда это решается путем простого исправления при помощи стандартной функции, но в некоторых случаях может понадобиться и сброс с очисткой данных. Все это осуществляется через одно и то же меню, поэтому не займет у вас много времени.
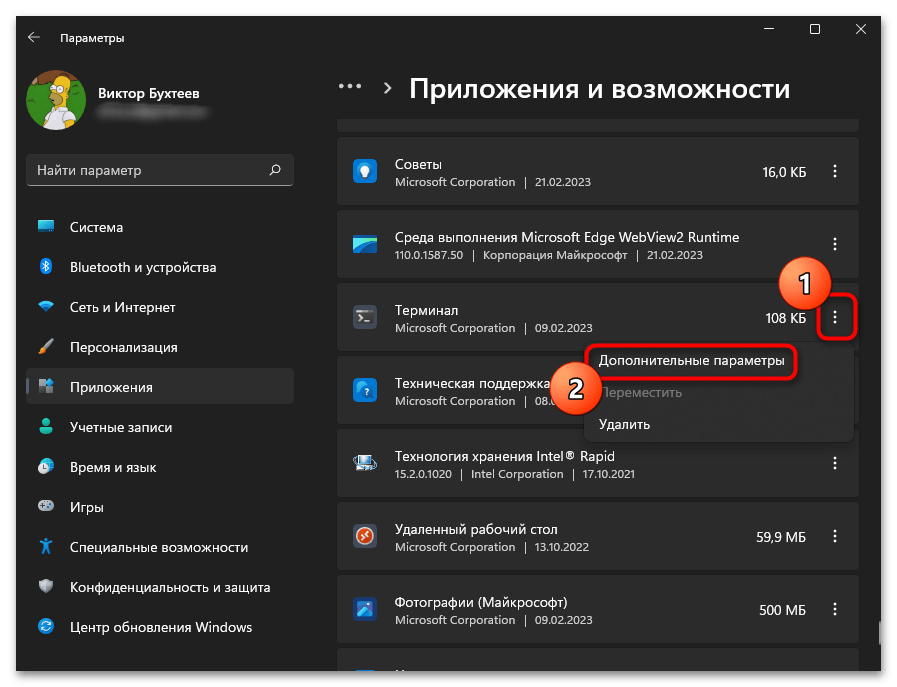
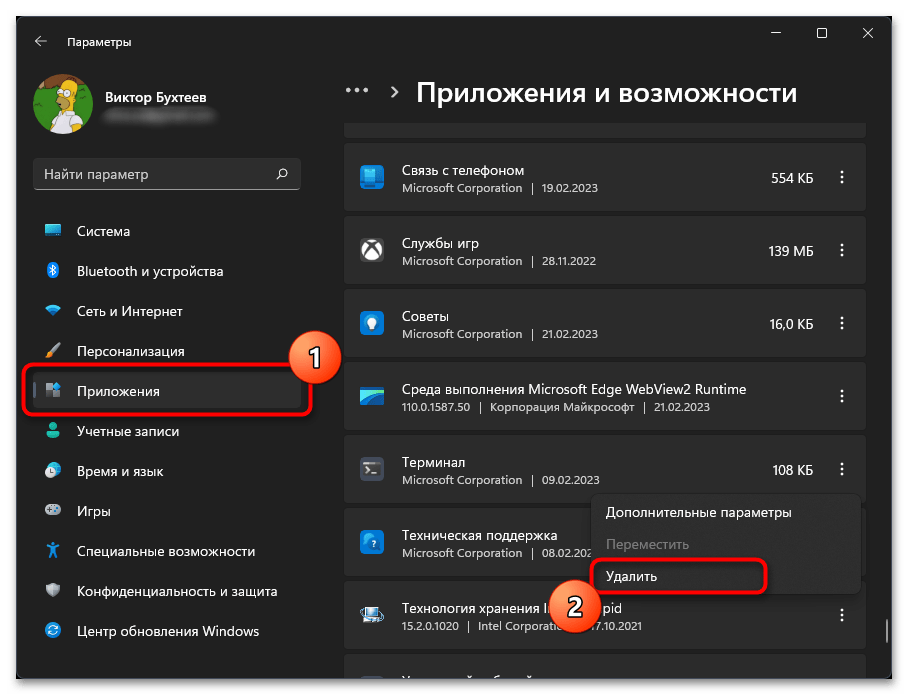
- В «Параметрах» снова выберите раздел «Приложения» и нажмите по «Приложения и возможности».
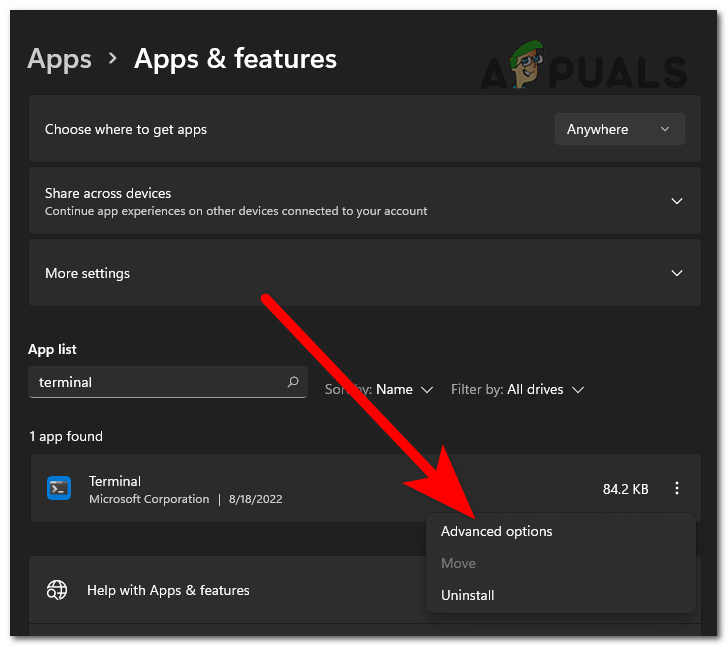
- Пролистайте список приложений, расположенных по алфавиту, чтобы найти «Терминал». Справа щелкните по кнопке с тремя точками и выберите пункт «Дополнительные параметры».
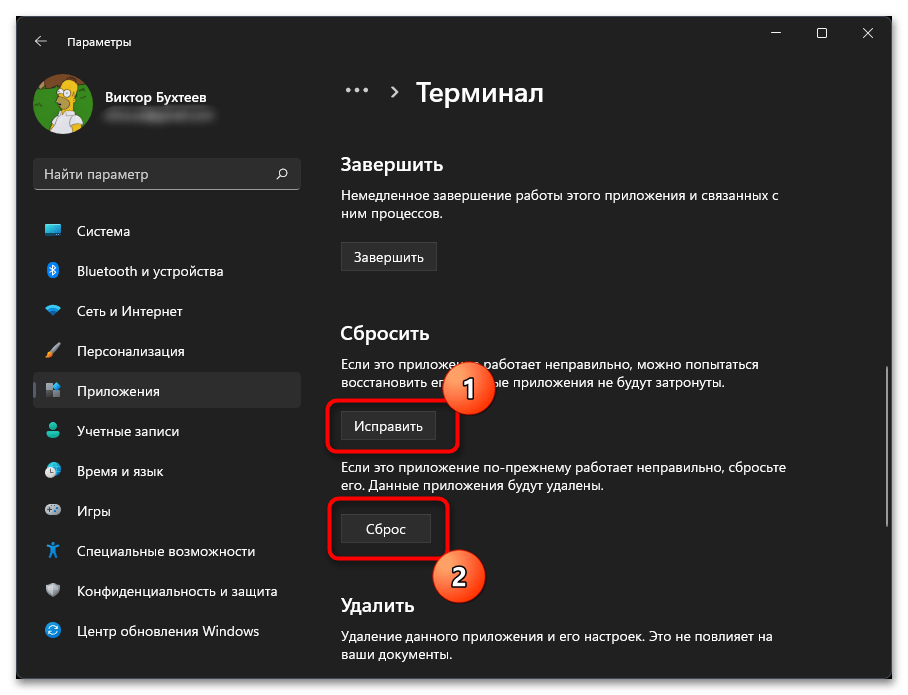
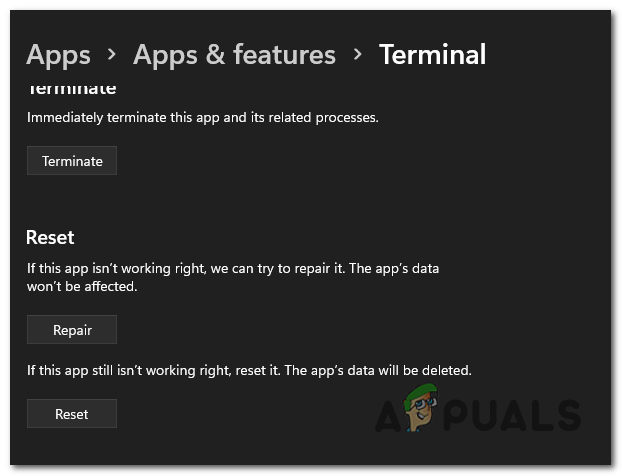
- Найдите кнопку «Исправить», нажмите ее и подтвердите исправление. Проверьте работу консоли и, если это понадобится, вернитесь и дополнительно выполните сброс.
Способ 4: Проверка системных и необязательных обновлений
Компонент «Терминал» является основной частью Windows 11, предустановлен в ней по умолчанию и может обновляться в автоматическом режиме. Если у вас возникли трудности с его работой, мы бы рекомендовали проверить системные и необязательные обновления, поскольку эта ситуация может быть решена как раз инсталляцией апдейтов с исправлениями.
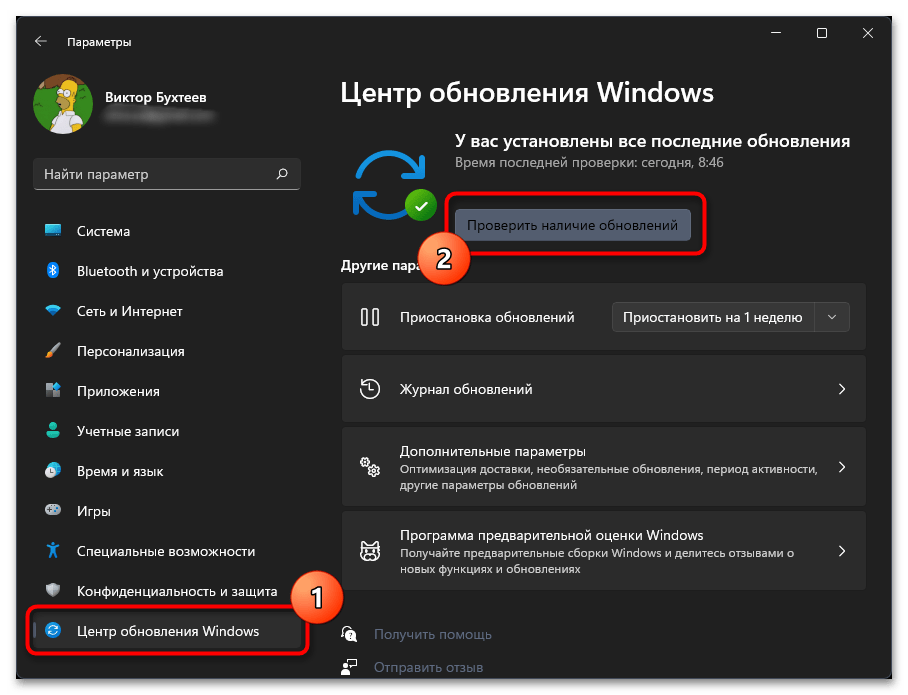
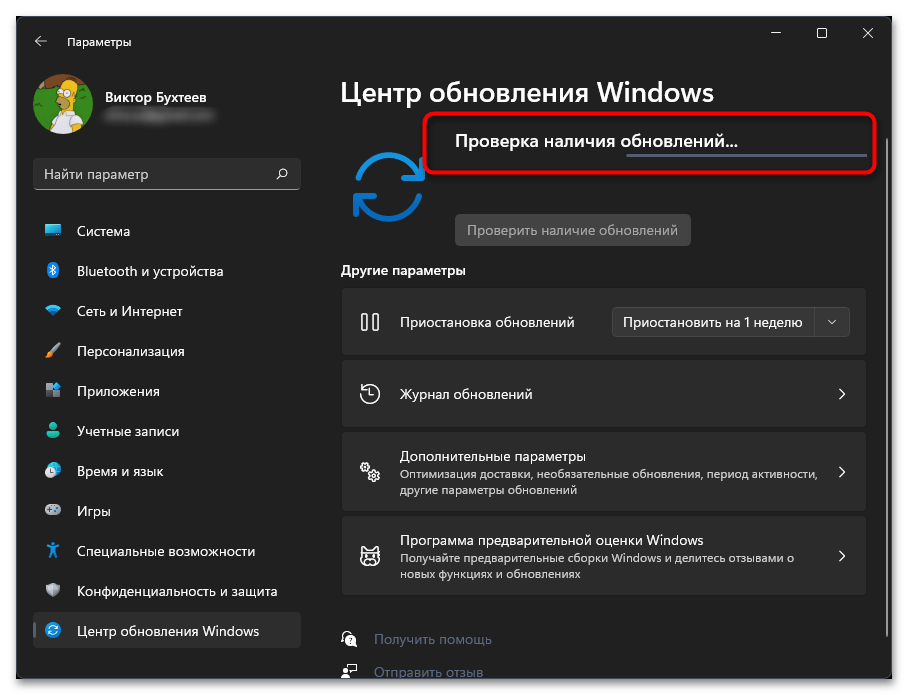
- В «Параметрах» выберите «Центр обновления Windows» и нажмите кнопку «Проверить наличие обновлений».
- Ожидайте окончания поиска и произведите установку найденных апдейтов.
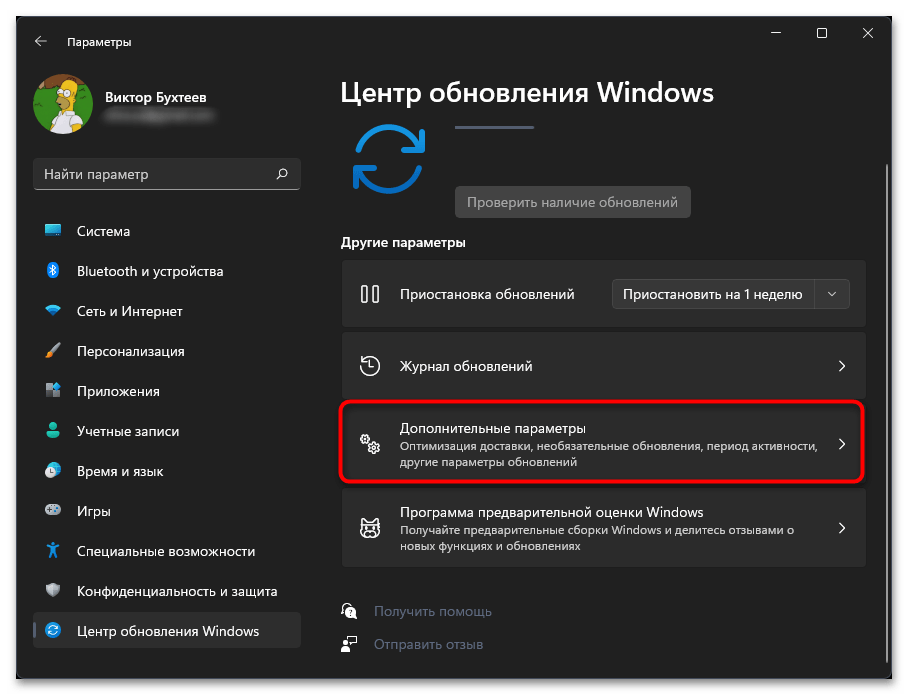
- Дополнительно проверьте необязательные обновления. Переход к ним осуществляется путем клика по пункту «Дополнительные параметры».
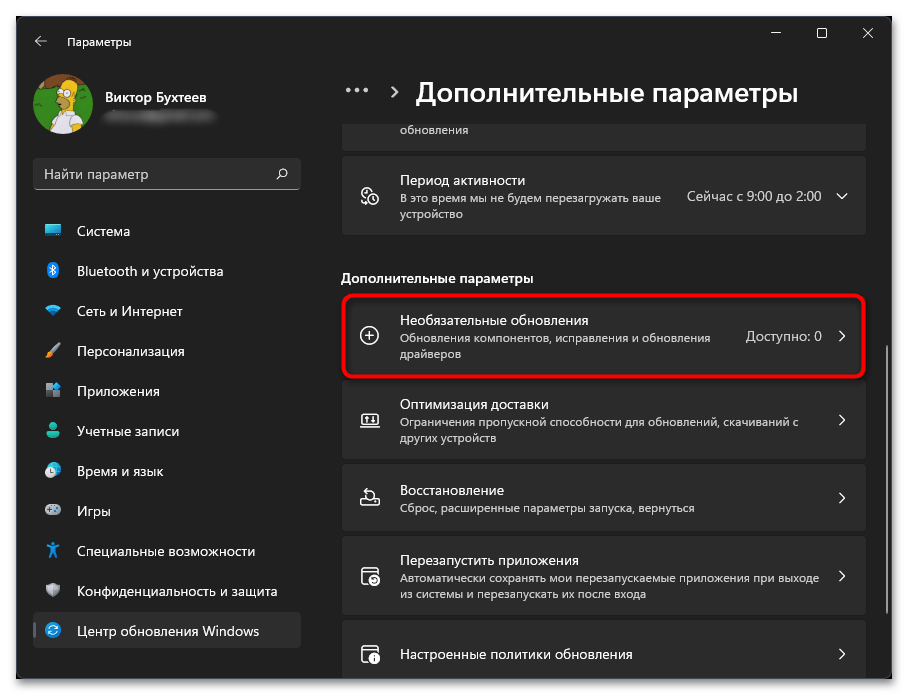
- Раскройте список необязательных обновлений, проверьте, есть ли среди них те, которые могут быть связаны с «Терминалом». Выделите их галочками, установите и отправьте ПК на перезагрузку, чтобы все изменения вступили в силу.
Способ 5: Ручное обновление PowerShell
«Терминал» в Windows 11 тесно связан с PowerShell, по сути является только оболочкой для данного приложения. Поэтому иногда решением возникшей неполадки будет ручное обновление второго приложения, что осуществляется тремя разными методами. Один из них не подойдет, поскольку требует доступа к текущей версии консоли, а вот скачивание с Microsoft Store или ручная загрузка исполняемого файла может помочь вам исправить ошибку с запуском.
Подробнее: Обновление PowerShell в Windows 11
Способ 6: Переустановка «Терминала»
Одним из радикальных методов решения проблемы с запуском «Терминала» является его переустановка. Выполняется довольно просто, поскольку сначала понадобится удалить приложение из операционной системы, а затем его повторно инсталлировать. Никаких ограничений в этом плане нет, и можно будет обойтись исключительно стандартными средствами Windows 11.
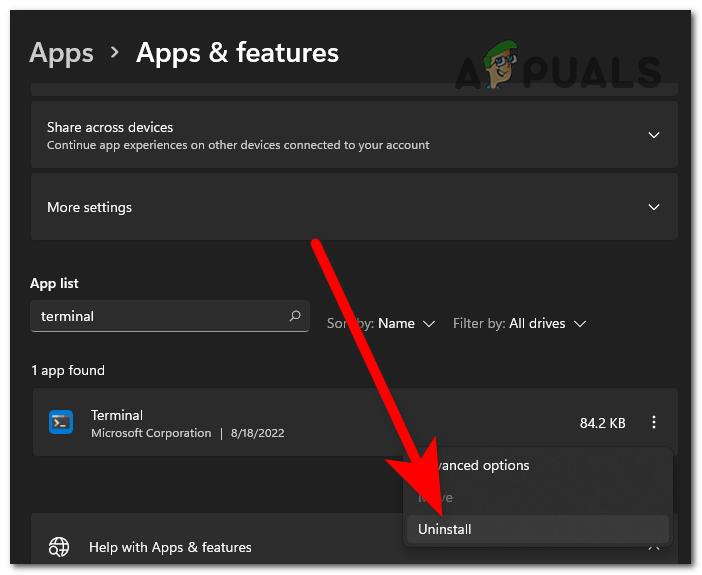
- В списке приложений найдите «Терминал», вызовите меню управления им и выберите пункт «Удалить». После этого подтвердите удаление приложения из системы.
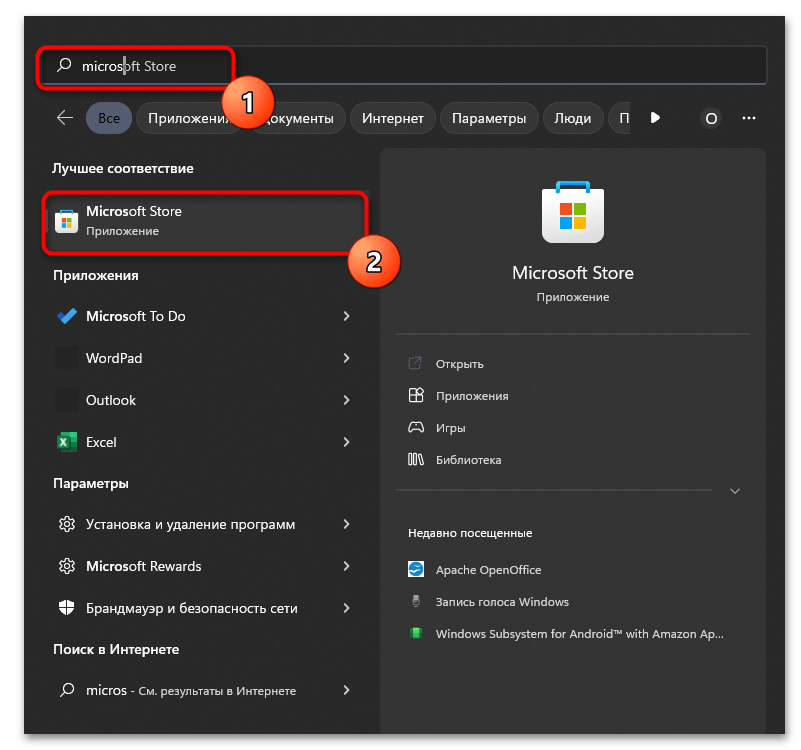
- Теперь понадобится перейти в «Пуск», отыскать «Microsoft Store» и запустить стандартный магазин.
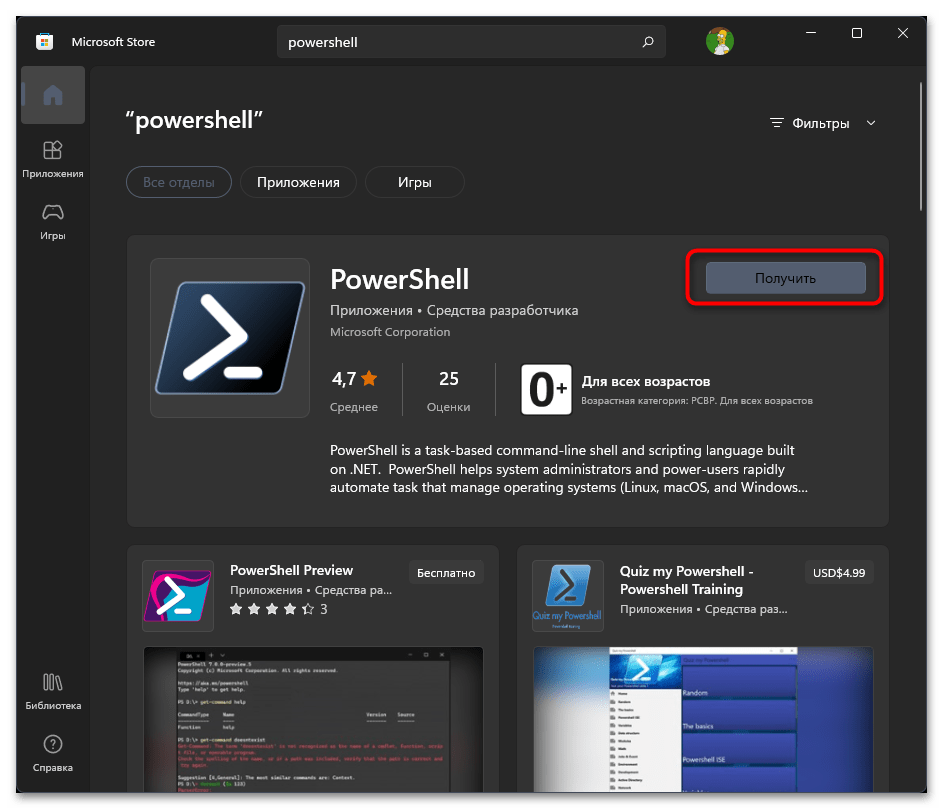
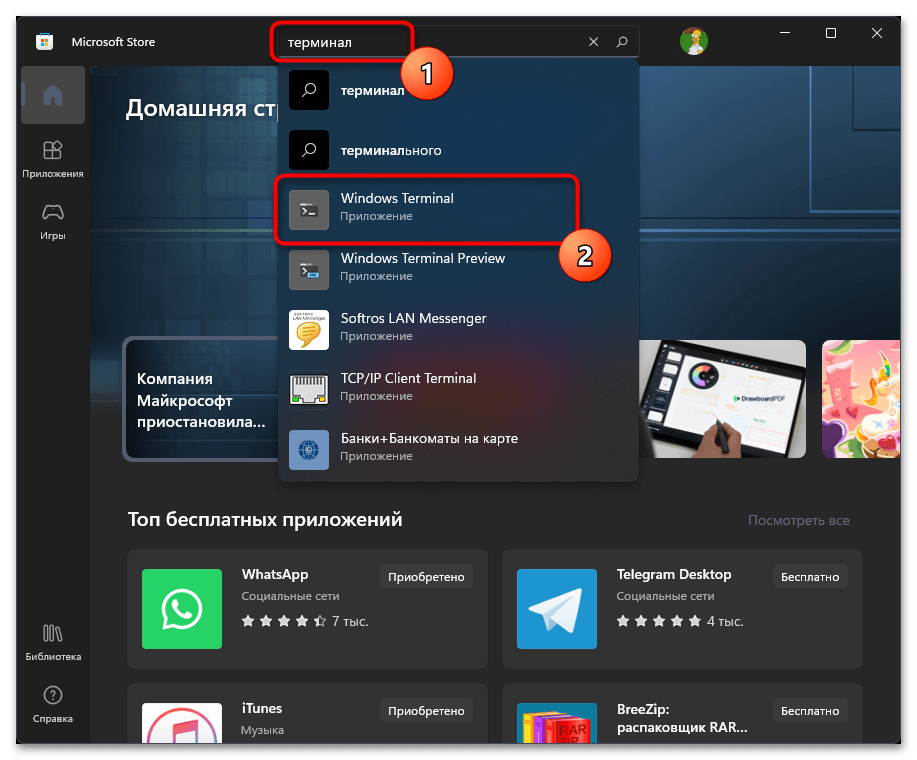
- Отыщите через поиск «Терминал» и откройте страницу приложения.
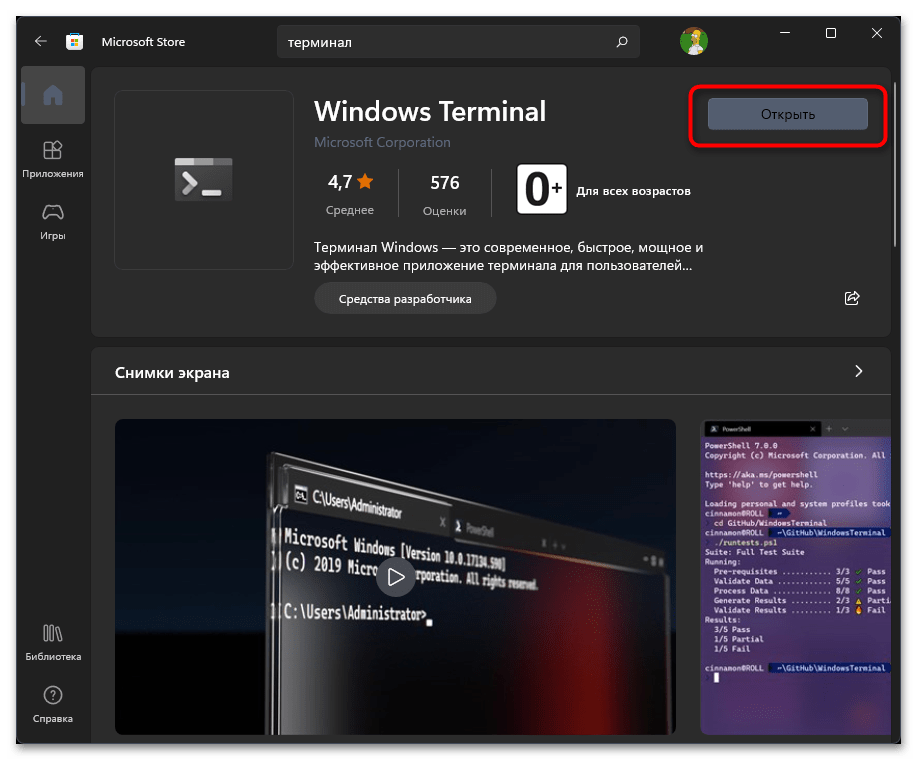
- Вместо кнопки «Открыть» у вас должна быть «Получить», если вы удалили консоль. Нажмите ее для загрузки, ожидайте конца инсталляции и запустите «Терминал» для теста.
Способ 7: Проверка целостности системных файлов
Если ничего из предложенного не помогло наладить работу консоли, можно предположить, что проблема связана с нарушением целостности системных файлов. Обычно их восстановление осуществляется не так сложно, как кажется на первый взгляд. Для этого понадобится использовать стандартные утилиты, а о применении каждой из них написано в отдельной инструкции на нашем сайте по следующей ссылке.
Подробнее: Использование и восстановление проверки целостности системных файлов в Windows
Еще статьи по данной теме:
Помогла ли Вам статья?
Microsoft’s Windows Terminal is a command-line tool that comes pre-installed on Windows 11. It gives a single-window experience for the Command Prompt, PowerShell, Azure Cloud Shell, and SubSystem for Linux. You might sometimes see the ‘Windows cannot find wt.exe’ error message, and the window fails to open at all.

You may wonder what must’ve gone wrong, but luckily there are ways to tackle this problem. Below are some troubleshooting tips you can try if the Windows Terminal app is not opening on Windows 11. So, without further ado, let’s check them out.
1. Use Alternative Methods to Launch Windows Terminal
On Windows, there are several ways to launch the Terminal app. So, give these alternate methods a try if you can’t the Terminal app from the Start menu or the Power User menu.
Press the Windows key + R to open the Run dialog, type wt.exe in the Open field, and press Enter. If you want to launch Windows Terminal with admin rights, press Ctrl + Shift + Enter keys together and select Yes when a User Account Control (UAC) prompt appears on the screen.

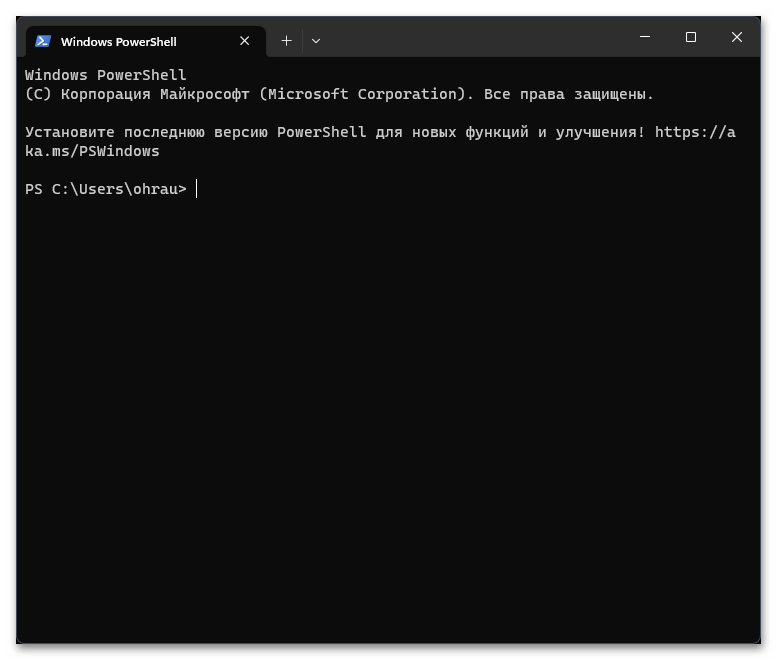
Alternatively, you can launch the Windows Terminal using Command Prompt or Windows PowerShell.
Step 1: Click the search icon on the Taskbar, type Command Prompt or Windows PowerShell, and press Enter.

Step 2: In the console, type wt.exe and press Enter.
2. Ensure Windows Terminal Is Not Disabled
If you cannot launch Windows Terminal even with the alternative methods, make sure the app is not disabled on your PC.
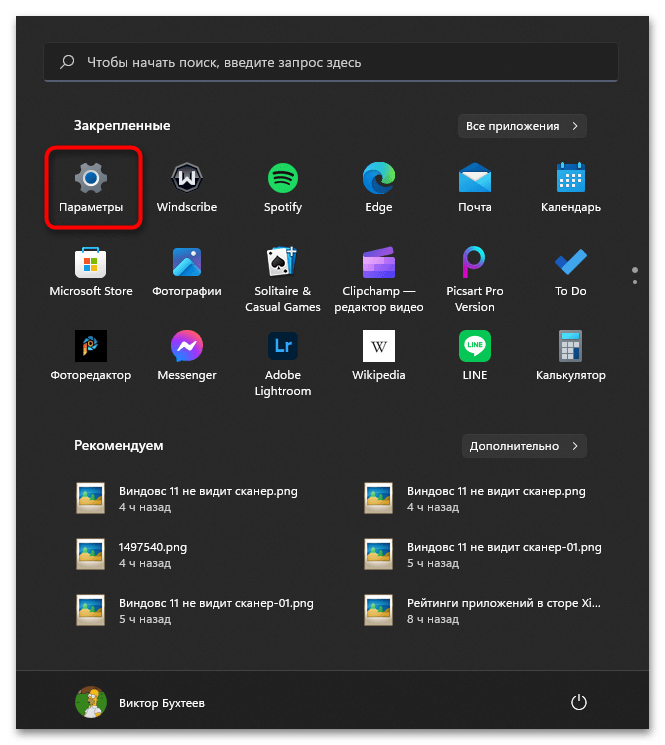
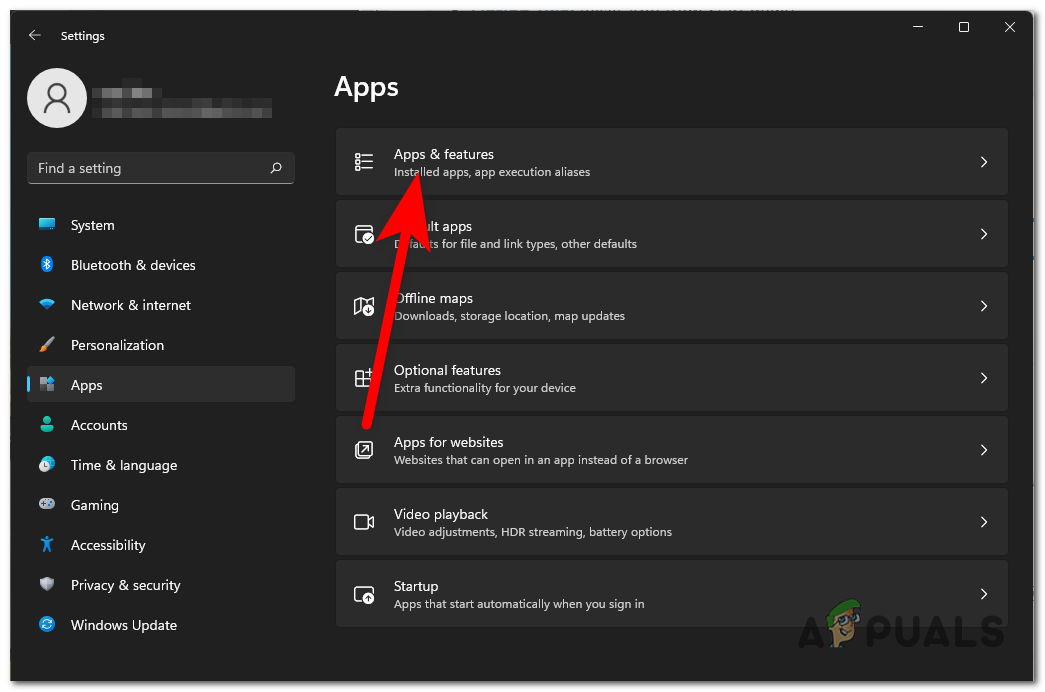
Step 1: Open the Start menu and click the gear-shaped icon to launch the Settings app.
Step 2: Switch to the Apps tab and click on Advanced app settings.
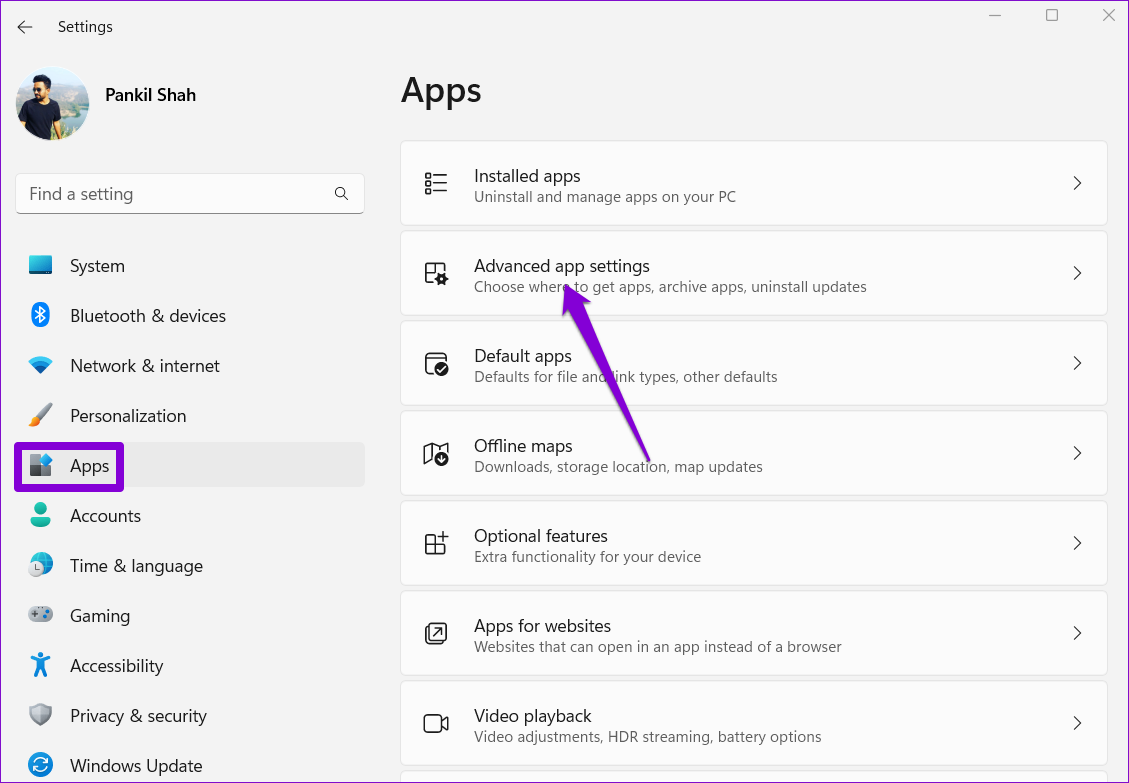
Step 3: Click on App execution aliases.

Step 4: Locate and enable the switch next to the Terminal app. If it is already on, turn it off and back on.

After this, see if you can open Windows Terminal.
3. Repair or Reset the Windows Terminal App
Windows 11 lets you repair your apps in several different ways. So, if the issue remains, you can repair the Windows Terminal app by following the steps below.
Step 1: Press the Windows key + X to open the Power User menu and select Installed apps from the list.

Step 2: Scroll down or use the search bar to locate the Terminal app. Click the three-dot menu icon next to it and select Advanced options.

Step 3: Scroll down to the Reset section and click the Repair button.

Windows will attempt to repair any issues with the app. After that, try to open Windows Terminal. You can try resetting the app from the same menu if the problem persists.
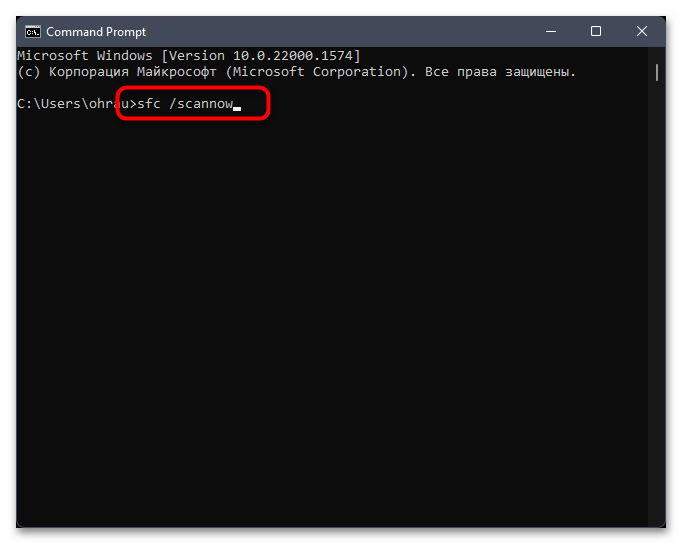
4. Perform the SFC and DISM scans
Another reason apps may fail to launch on Windows is corrupted or missing system files. If that’s the case, running an SFC (or System File Checker) scan can help you detect and repair such damaged system files. Here’s what you need to do.
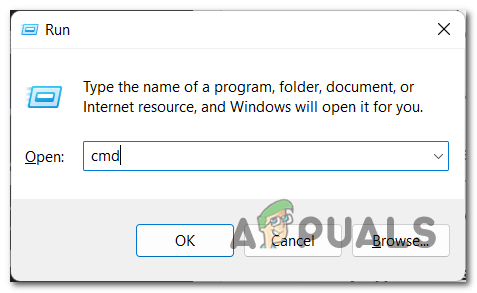
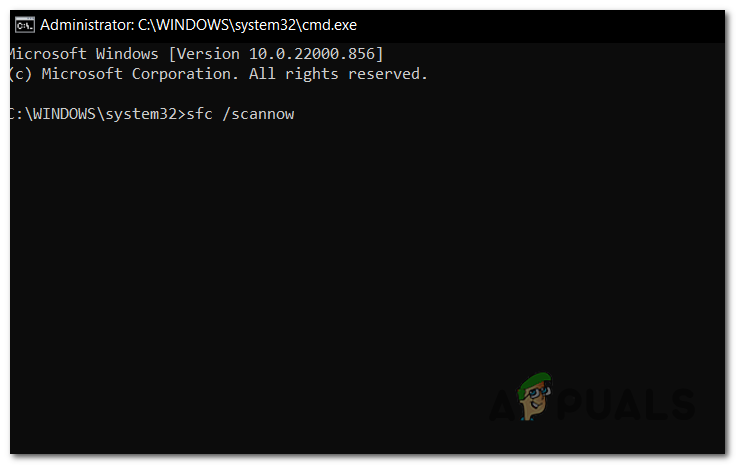
Step 1: Press the Windows key + S to open the search menu. Type cmd in the box and select Run as administrator.

Step 2: Select Yes when the User Account Control (UAC) prompt appears.
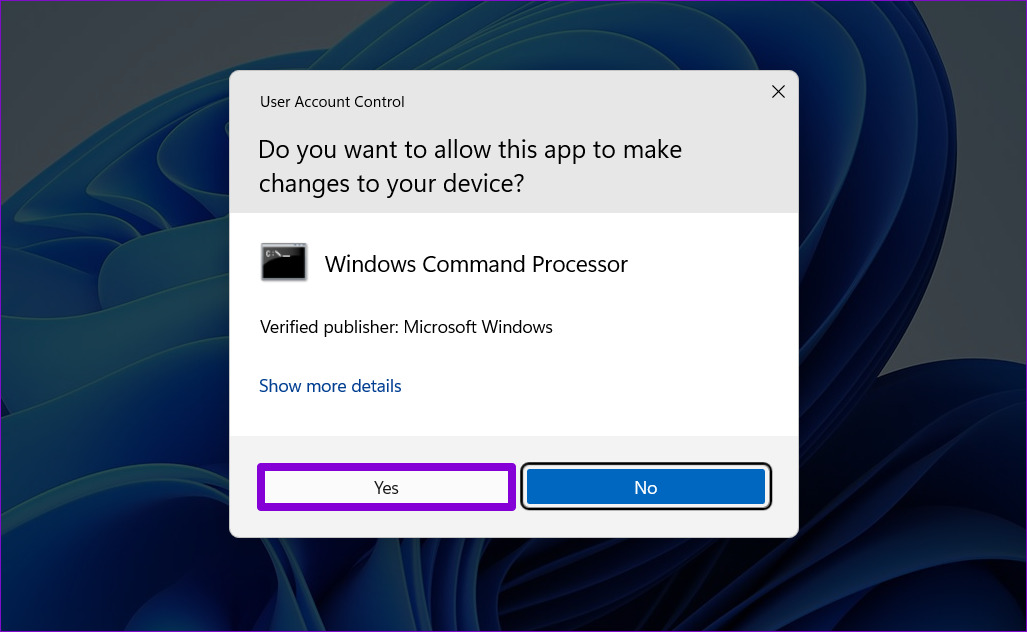
Step 3: Type the following command in the console and press Enter.
SFC /scannow
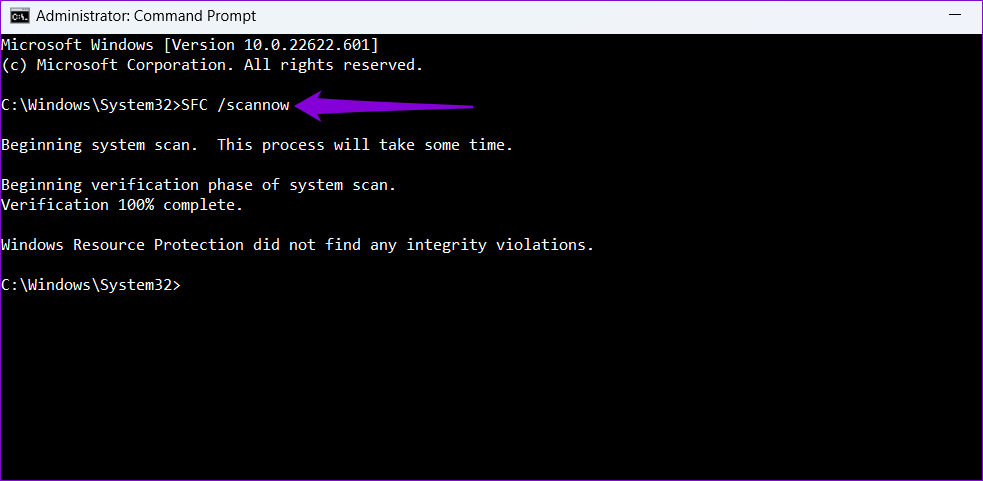
This process may take some time. After the scan is complete, a message will appear indicating whether or not it found any problems. You’ll also get instructions to fix errors if there is a problem.
Next, run the DISM (Deployment Image Servicing and Management) scan. DISM can repair system images and files like an SFC scan on your Windows computer.
Launch the command prompt with administrative privileges, run the following commands individually, and press Enter after each command:
DISM /Online /Cleanup-Image /CheckHealth
DISM /Online /Cleanup-Image /ScanHealth
DISM /Online /Cleanup-Image /RestoreHealth

DISM will connect to Windows Update and download and replace damaged files, if necessary. Wait for the scan to complete, and then restart your PC. Following this, you should be able to open Windows Terminal.
5. Reinstall Windows Terminal
If none of the above solutions work, you may have to go for the nuclear option of uninstalling and reinstalling Windows Terminal. Thankfully, it’s quite easy to do so.
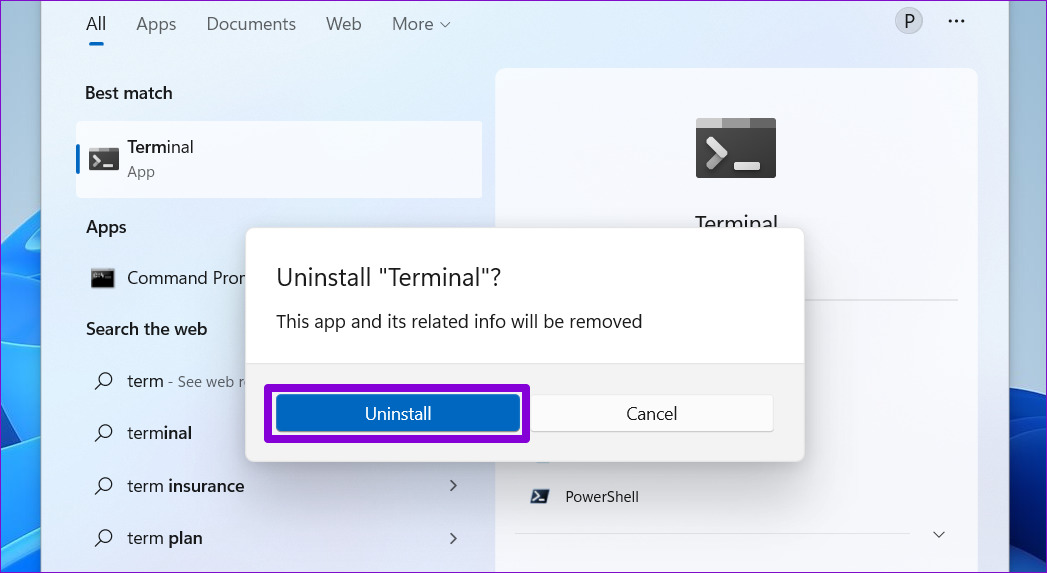
Step 1: Open the Start menu and search for the Terminal app. Right-click on the first result and select Uninstall.

Step 2: Select Uninstall to confirm.
Step 3: Open Microsoft Store on your PC and search for Windows Terminal. Click the Install button to Install the app.

Command and Control
Windows Terminal is easily the best command line tool available on Windows 11, thanks to its browser-like tab experience and several of customization options. Hopefully, the above solutions have been helpful, and you can access the Windows Terminal app as before.
Many users have been reporting that they are encountering the ‘Windows Terminal not working‘ error on Windows 11. Since the appearance of Windows 11, people have constantly been saying that they cannot use the Windows Terminal because the app won’t start regardless of how they try to open it. The Windows Terminal simply doesn’t start, while nothing happens. This issue has been typically encountered on Windows 11.
After many people have discussed online of this issue, we have decided to do an in-depth investigation to see what can cause it.
The principal cause for this issue could be some system errors that have appeared as well as corrupted files that are harming your computer. The reason for this appearing is not known, it could happen after some computer issues that weren’t caused by you and that happened randomly.
The computer is being affected by this because it prevents it from functioning correctly and, at times, even causes it to behave in similar ways. In this case, you can repair and reset the Windows Terminal, reinstall it, and perform an SFC and DISM scan.
The causes for the ‘Windows Terminal not working‘ error on Windows 11, here is a list that contains all the possible methods that users have used in order to fix this issue:
1. Repair and reset Windows Terminal from the Windows Settings
The first thing you should try to do in this situation is to repair the Windows Terminal from the Settings of your computer. After repairing, they are saying that you should also reset the app to try to open it. This method has turned out to be efficient for many users that have tried it.
This method will repair the harmed files of the Windows Terminal that are causing it to not start. Besides that, resetting it will replace the corrupted files with healthy equivalents.
To do this method, go to the Windows Settings and access the Apps & features section. There you will be able to see the Windows Terminal through the list of apps. Access the Advanced Options of it, where you will be able to repair and reset the app.
In case you don’t know how to do this, here are the steps you need to follow:
- The first step you need to do is to open the Windows Settings. There are many ways that you could do to open it, one of which is to press the Windows key + R to open a Run dialog box in which you need to type ‘ms-settings:‘. After that, press Enter to open Settings.

Using a Run dialog box to open the Windows Settings - Once you are inside the Windows Settings, look on the left side of the window and search for the Apps section. When you see it, make sure to access it.
- Now you need to search for the Apps & features button, then click on it.

Accessing the Apps & features section inside the Windows Settings - After you are inside Apps & features and you are able to see the list of apps, search for the Terminal app manually or use the search option.
- When you find it, click on the three dots associated with it and then click on Advanced options.

Accessing the Advanced options of the Windows Terminal - Now all that is left to do is to scroll down to find the Repair and Reset buttons.
- After that, click on the Repair button first and wait until it’s complete. Then click on the Reset button to complete the process.

Repairing then resetting the Windows Terminal - Once you’ve done that, try to open the Windows Terminal to see if the problem was fixed.

In case the error still appears after doing this, check the next method below.
2. Uninstall and reinstall it from the Microsoft Store
The second thing you can do is to uninstall the Windows Terminal, then reinstall it from the Microsoft Store. This method is recommended by many users that have managed to make the Windows Terminal work by uninstalling the app that was used by default. Then they reinstalled it directly from the Microsoft Store.
All you have to do is to access the Windows Settings of your computer and go to the Apps & features section. There you will be able to uninstall the Windows Terminal. After that, you need to go to the Microsoft Store and make sure to reinstall it.
Here are the steps you need to follow in case you don’t know how to do this:
- You need to start by opening the Windows Settings. Open a Run dialog box by pressing the Windows key + R and type inside the search bar ‘ms-settings:‘, then press Enter to open the Settings right away.
Using a Run dialog box to open the Windows Settings - Once you are inside the Windows Settings, locate the Apps section on the left side of the screen. When you find it, make sure to access it.
- Now you need to click on the Apps & features to get to the list where all the apps are.
Inside the Windows Settings accessing the Apps & features section - Now that you are able to see all the apps that are installed on your computer, locate the Terminal application using the search option or manually.
- Once you find it, click on the three dots associated with it and click on Uninstall.

Uninstalling the Windows Terminal - After the app has been fully uninstalled, you can close the Windows Settings.
- Now you need to open the Microsoft Store. There are many ways to do this, one of them is to use the taskbar search option. When you find it, click on it.

Opening the Microsoft Store using the taskbar search option - After the Microsoft Store appears on your screen, click on the search bar located on the upper side of the screen and search for Windows Terminal.
- Once you have found it, click on it to open the page.

Accessing the Windows Terminal page inside the Microsoft Store - When you are inside the Windows Terminal page, click on the Get button located in the top left corner to install the app.

Installing the Windows Terminal - Once the process will be complete, the app will be installed. Test it to see if it works now.


In case you are still unable to use the Windows Terminal, go to the next method.
3. Reset Windows Terminal using Command Prompt
Another method that you can try in order to fix the Windows Terminal not working issue on Windows 11 is to use the Command Prompt to reset it. This is another way that you can use to reset the Windows Terminal, but the difference is that this time you will use the Command Prompt and not the Settings.
All you have to do is to open the Command Prompt and insert a command that will automatically reset the Windows Terminal. But you have to make sure that you open the Command Prompt with administrator privileges because you won’t be able to complete the method otherwise.
Here is a guide that contains all the step-by-step instructions on how to do this:
- Firstly you have to open the Command Prompt with admin privileges. Press the Windows key + R to open a Run dialog box and type inside the search bar ‘cmd‘, then you need to press CTRL + Shift + Enter to open it with administrator privileges.
Opening the Command Prompt using a Run dialog box - After you’ve done that, you will be prompted by the User Account Control (UAC) to confirm that you want to give the Command Prompt permission to do changes to your computer. Click on Yes to confirm and move forward.
- Once you have done that, the Command Prompt should appear on your screen. All you have to do is to copy the following command and paste it inside the CMD:
del /f /s /q /a "%LocalAppData%\Packages\Microsoft.WindowsTerminal_8wekyb3d8bbwe\LocalState\settings.json"
- After the command has been pasted inside the Command Prompt, press Enter to reset the Windows Terminal.
- Now you can close the Command Prompt and try to open the Windows Terminal to see if you still encounter the same problem.

In case the Windows Terminal still does not work on your Windows 11 computer, go to the next possible fix below.
4. Perform an SFC and DISM scan
Additionally, corrupted files and system faults that are impacting your Windows 11 could be the source of this error. Unknown factors, such as basic bugs that can occur occasionally to anyone, could be the cause of these issues.
If this case is applicable, start by using the two tools included in Windows 11 if this applies to you: System File Checker (SFC) and Deployment Image Servicing and Management (DISM). All of your system files will be scanned by these programs, and if any are corrupted, they will be replaced with their healthy counterparts. It will take a while, but you must be patient in order for the process to be finished.
All you need to do is launch the Command Prompt with administrator rights, then type a few commands to check for and fix system issues and damaged files. After that, your issue ought to be resolved.
Here is a guide that will demonstrate how to do an SFC scan and a DISM scan in case you are unfamiliar with doing so:
- The Command Prompt needs to be opened with administrator rights as the initial step. There are various ways to open it, one of which is to hit Windows key + R to bring up the Run dialog box, where you must input “cmd,” after which you must simultaneously press CTRL + Shift + Enter to launch it as an administrator.
Opening the Command Prompt using a Run dialog box - The User Account Control (UAC) will ask you to confirm that you want to give the Command Prompt administrator rights. Select Yes to proceed.
- You must copy and paste the following command to launch the System File Checker once you are in the Command Prompt:
sfc /scannow

Starting the System File Checker scan inside the Command Prompt - Wait until the scan is finished; it could take up to a few minutes.
- After starting this procedure, the CMD window must definitely not be closed, even if the utility appears to have stopped working. Please wait for the process to finish before interfering, as doing so could result in logical issues with your HDD or SSD.
- Once the SFC scan has been completed successfully, restart your computer and wait until it boots up again.
- Repeat step 1’s instructions to launch the Command Prompt with administrator rights after the computer is turned back on.
- You should now copy and paste the commands that follow in the sequence that you are seeing them. To apply each one, paste it one at a time and hit Enter:
DISM /Online /Cleanup-Image /CheckHealth

DISM /Online /Cleanup-Image /ScanHealth

DISM /Online /Cleanup-Image /RestoreHealth
- It will take a few minutes for this scan as well, so keep the Command Prompt open and don’t disturb the procedure.
- The only thing left to do is to see if the Windows Terminal program is still not functioning after you have entered each of these instructions and the scan is complete.
If the issue persists and the Windows Terminal won’t launch, try the next and final approach listed below.
5. Run an in-place upgrade
Repair installing Windows 11 is the very last option you have when you run into problems with the Windows Terminal not functioning properly. This is the final method that will be discussed in this post because it is the one that requires the most effort and the longest amount of time. Nevertheless, despite this, many customers who have been through this have found that this strategy is effective for solving their problems.
In the event that you choose to perform a repair installation of Windows 11, this process will essentially reset your personal computer and will reinstall Windows in an accurate manner without corrupted files or problems in the system. When you do this, you will be prompted with the choice to either keep or erase your data. We strongly suggest that you back up the vital information to a safe location and then reset all of your computer’s settings to ensure that you delete all of the corrupt files.
In the event that you aren’t entirely sure how to repair and install Windows 11, here is an article that will walk you through all of the steps involved in this process and provide you with all of the information that you require. In addition to that, you will be able to see clearly just what it is that you have to do and how you can get it done.
The only thing left to do now that you have finished this step and the process has been concluded is to test the Windows Terminal program to check whether it is still not working at all.