by Vladimir Popescu
Being an artist his entire life while also playing handball at a professional level, Vladimir has also developed a passion for all things computer-related. With an innate fascination… read more
Updated on
- Users of different brands of scanners are experiencing Windows 11 not detecting the device issues.
- Because of this problem, the scanner fails to communicate with the Windows 11 PC, thereby not allowing the user to scan their documents or images.
- Applying the solutions mentioned in this guide will help you possibly fix this problem. For example, try to reinstall scanner drivers.

XINSTALL BY CLICKING THE DOWNLOAD
FILE
Have you connected your scanner to your Windows 11 PC only to find out that your PC is not being detected by it?
If you are facing Windows 11 scanner not detected problem, then you aren’t alone. There are multiple users who have reported this issue with Microsoft’s latest operating system, Windows 11.
Be it HP, Canon, EPSON, or any other scanner, Windows 11 throws up compatibility issues when you connect a scanner to it.
Scanners are devices that have helped users that help you scan documents or anything and bring them to their PC. You can scan your drawing and load it on your PC to view it digitally. The same is the case with documents.
Corporates and workplaces make use of scanners and fax machines in high volumes. Imagine the chaos if the scanner stopped working in Windows 11 in a corporate or workplace.
Notably, the Windows 11 scanner not detected problem isn’t anything new. This issue has been consistent with older Windows OS versions as well.
If you are looking for solutions to fix the Windows 11 scanner not detected issue, then you have landed in the right place.
In this guide, we will give you a curated list of solutions that will help you fix the Windows 11 scanner not detected error. Let us check them out.
Why is my Windows 11 PC showing scanner not detected errors?
Device driver compatibility issues aren’t something new for Windows operating systems. When hardware fails to communicate with the PC, your PC will show an error message.
If the scanner is connected via USB or a serial port and it is still not detected by the PC, then the reason behind this could be outdated drivers, corrupt system files, or the presence of a bug in the installed version of Windows.
The Windows 11 scanner not detected error can take various forms. It affects scanners from not only one brand, but all major brands, including Epson, Canon, HP, Image Access, Panasonic, etc.
Here are the possible reasons behind Windows 11 scanner not detected error:
How we test, review and rate?
We have worked for the past 6 months on building a new review system on how we produce content. Using it, we have subsequently redone most of our articles to provide actual hands-on expertise on the guides we made.
For more details you can read how we test, review, and rate at WindowsReport.
- The Windows 11 system files are corrupt
- Damaged USB port
- Presence of bug in the version of Windows installed
- Due to virus or malware
- A third-party app is conflicting with the scanner driver
- Outdated scanner drivers
- Registry issues
Well, these are only a few reasons why you are experiencing a scanner not detecting an error on your Windows 11 PC.
There are multiple versions of this error, but the below-listed solutions will definitely help you cure and resolve this issue. Let us take a look at the solutions, one by one.
How can I fix Windows 11’s scanner not detected issue?
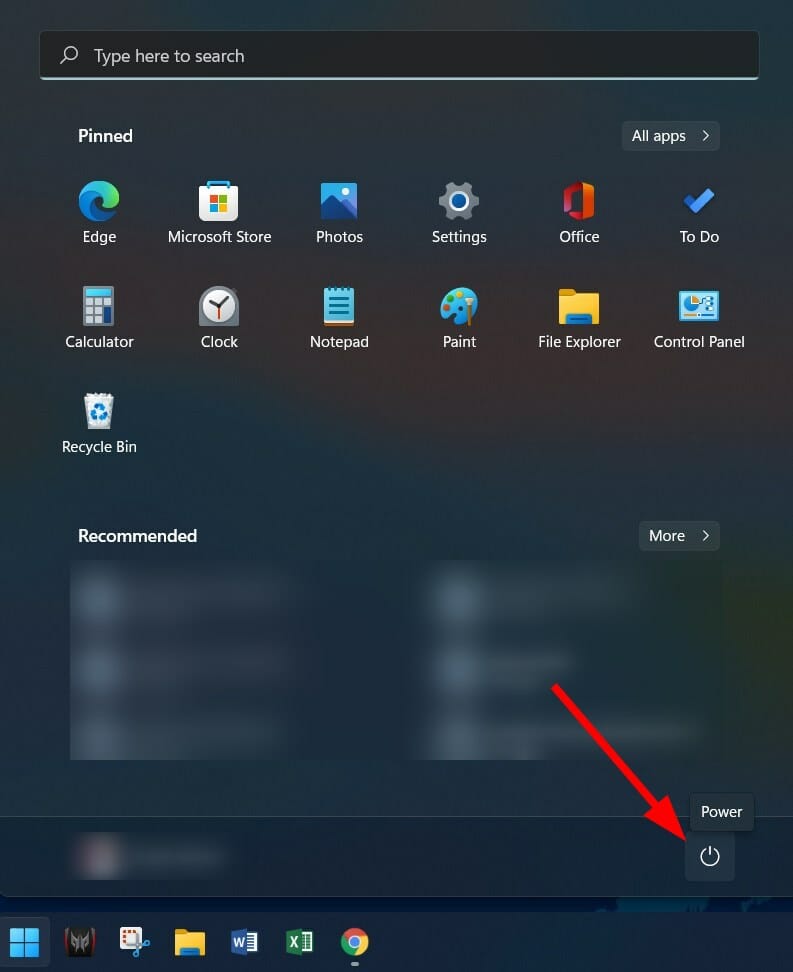
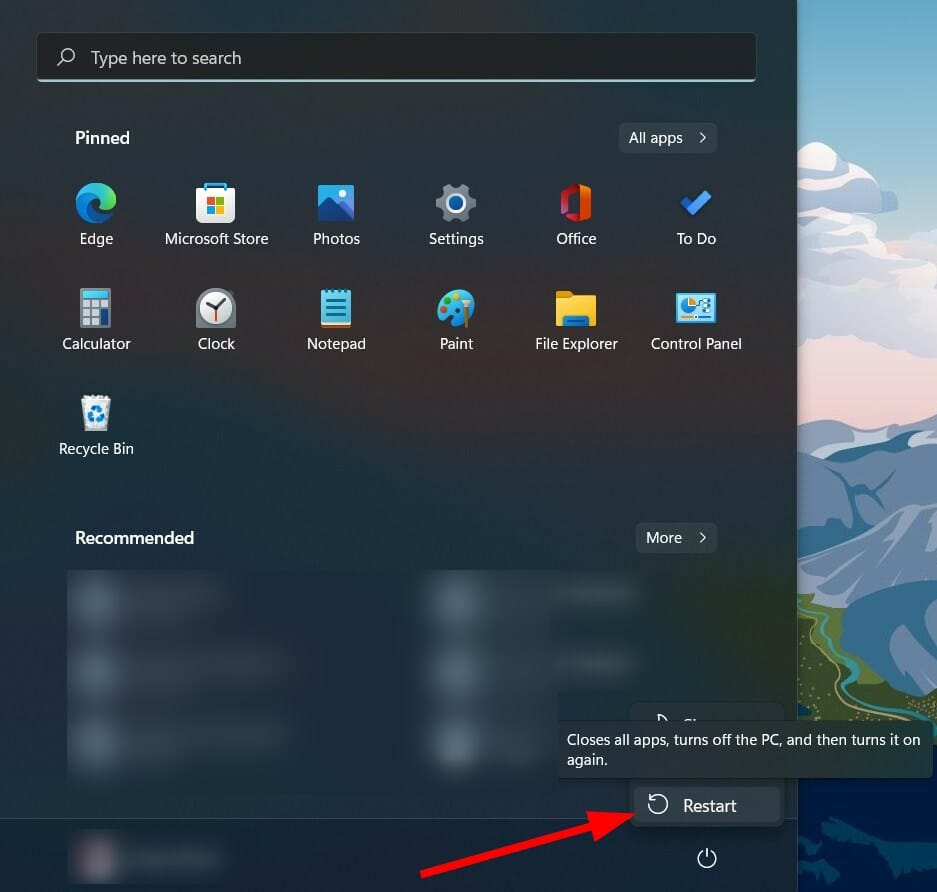
1. Restart your PC
- Open the Start menu.
- Click on the Power button.

- Select Restart.

When you restart your PC, all the unnecessary files or processes are put to sleep, and when the system boots up again, important system files are re-loaded.
There is a chance that some important scanner-related files did not load during the previous installation. Try restarting your PC, connecting your scanner back again, and checking if this fixes the issue or not.
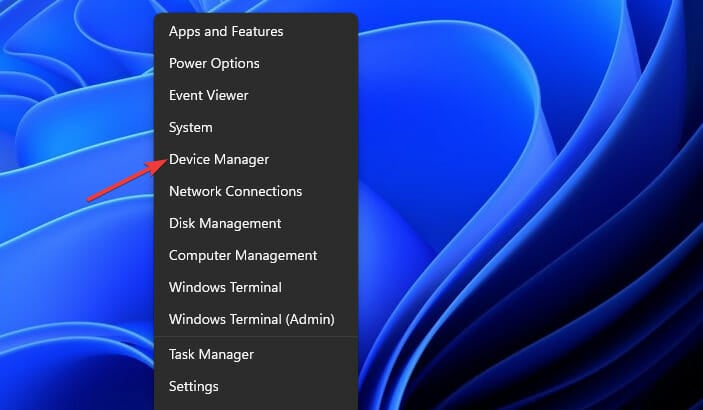
2. Reinstall scanner drivers
- Right click on the Start menu icon.
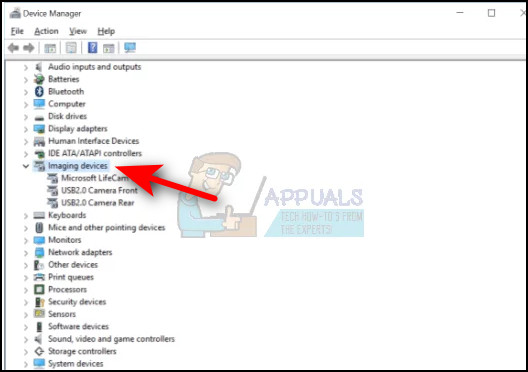
- Select Device Manager.

- Expand the Imaging devices section.
- Right-click on the problematic scanner and select Uninstall.
- Reboot your PC.
- Visit the official website of your scanner’s manufacturer’s website.
- Download the appropriate scanner driver.
- Install it and see if this fixes the issue or not.
During your previous installation, the scanner software might have failed to load some important communication files. That may be the reason you are experiencing the Windows 11 scanner not detected issue.
A simple solution to this would be to uninstall the current scanner driver installed on your PC, and reinstall it. This time, make sure not to interrupt the installation process.
Now, instead of making efforts to visit the scanner manufacturer’s website and download the update, you can make use of a highly-recommended software called Outbyte Driver Updater.
Outbyte Driver Updater is a one-stop solution for all your driver-related needs. With just a simple click, it will scan for all outdated drivers, show you the result, and prompt you to install all the updates, all from within the software itself.
It can help you fix errors related to faulty or broken driver files, update old device drivers, locate missing drivers, and much more.
3. Repair corrupt system files
- Open Start menu.
- Search for Command Prompt.
- Select Run as administrator.

- Type the below command and press Enter:
sfc /scanow
- You PC will start scanning and possibly fix the issue as well.
- Reboot your PC.
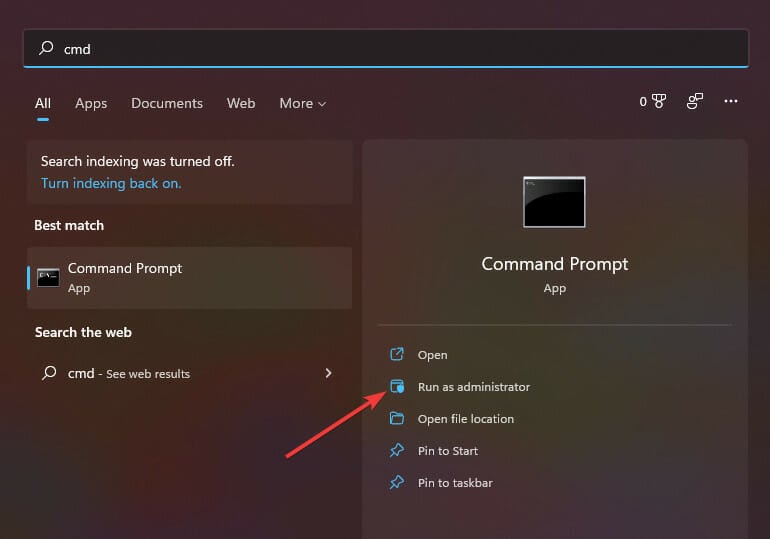
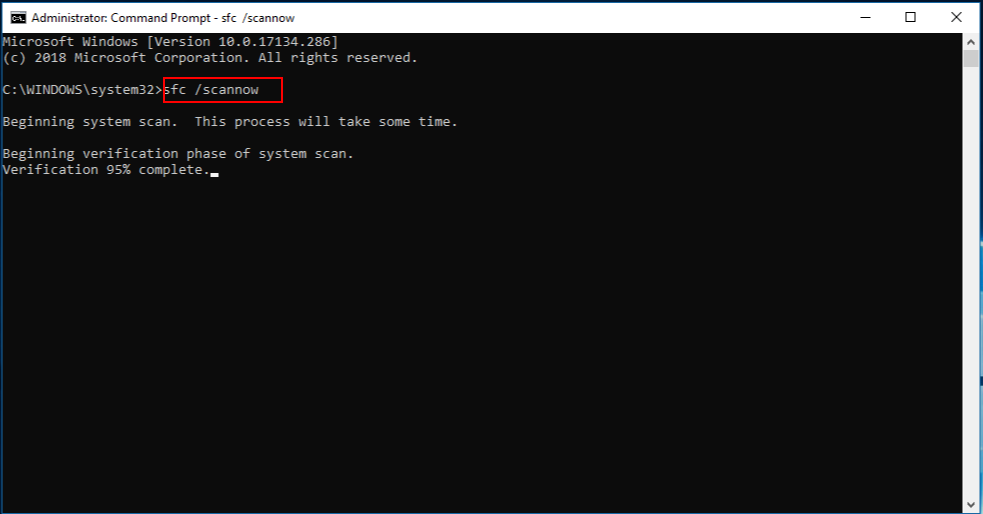
The SFC Scan is a very powerful in-built Windows troubleshooting tool that scans all of your system files and replaces all the corrupted ones.
All you need to do is execute a command in the CMD, and everything else will be done automatically. You can try using the SFC Scan tool and see if this fixes the Windows 11 scanner not detected error.
Otherwise, you can use trusted third-party repair software. It can help you fix multiple errors on your PC. If you think the Windows 11 scanner not detected error is caused by corrupt system files, then this tool can come in handy.
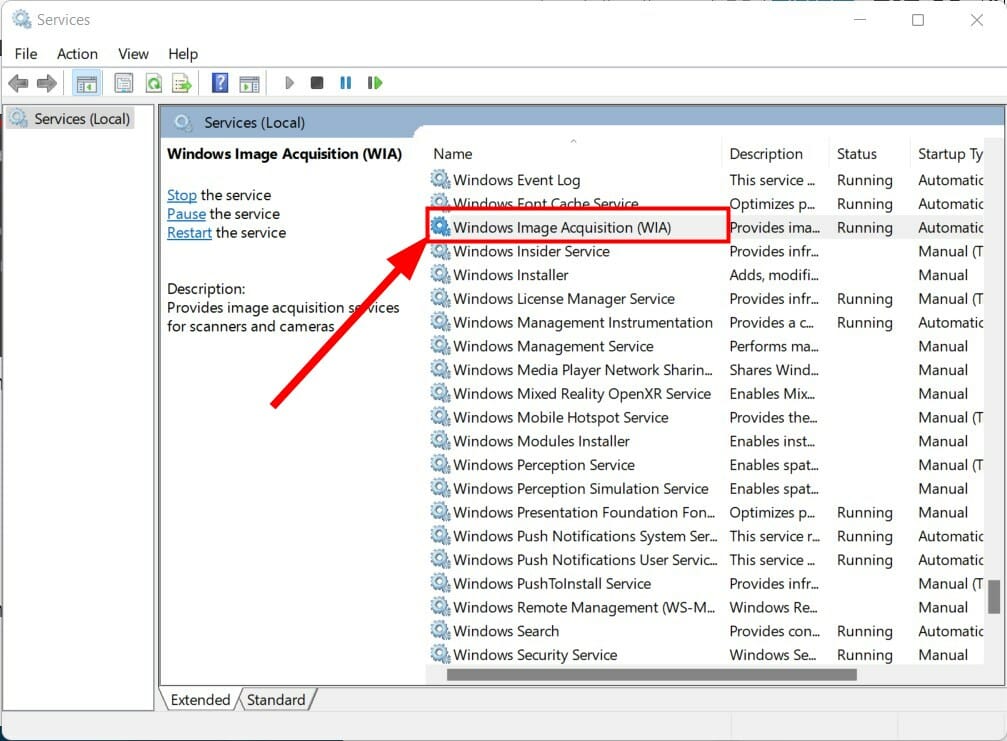
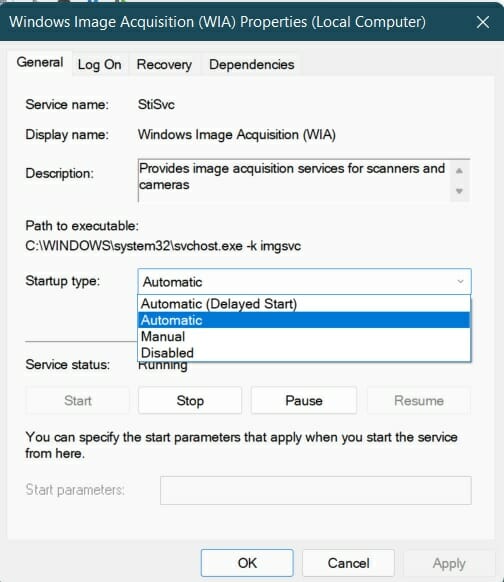
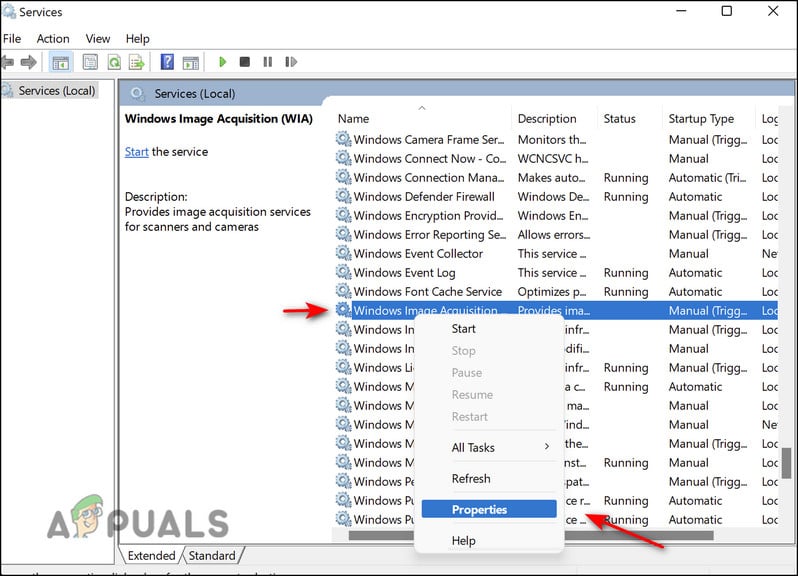
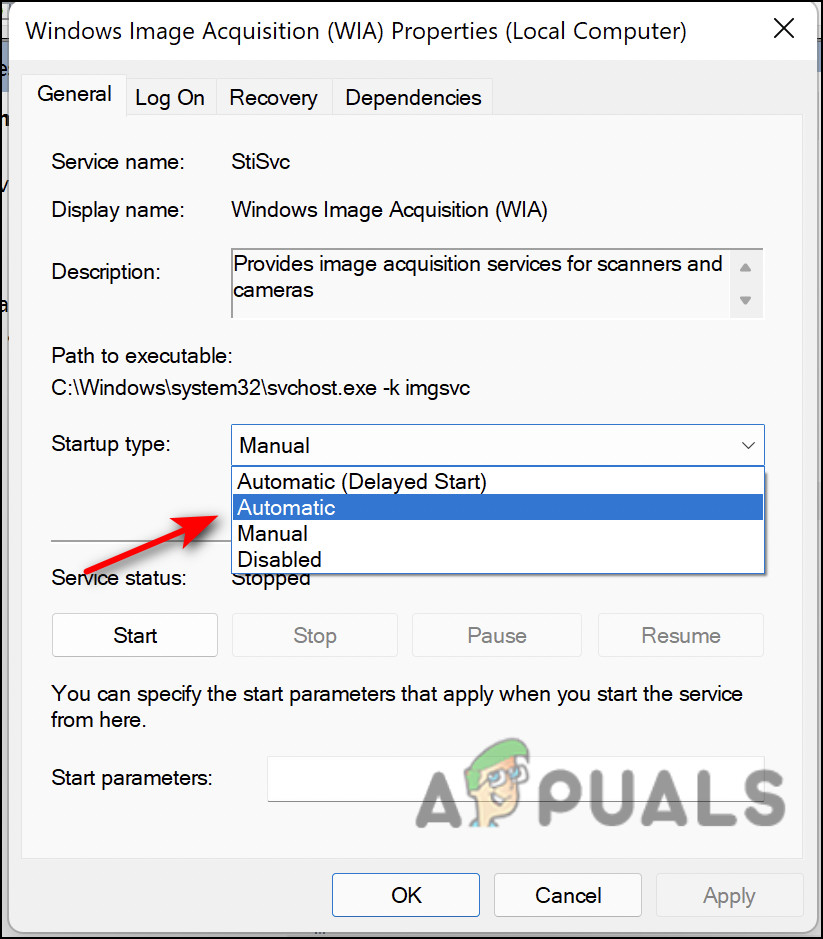
4. Set scanner services to open automatically
- Open the Start menu.
- Search for services and open it.

- Locate Windows Image Acquisition (WIA) on the right-side and double-click on it.

- Under Startup type, select Automatic.

- Click Start.
- Select Apply and OK.

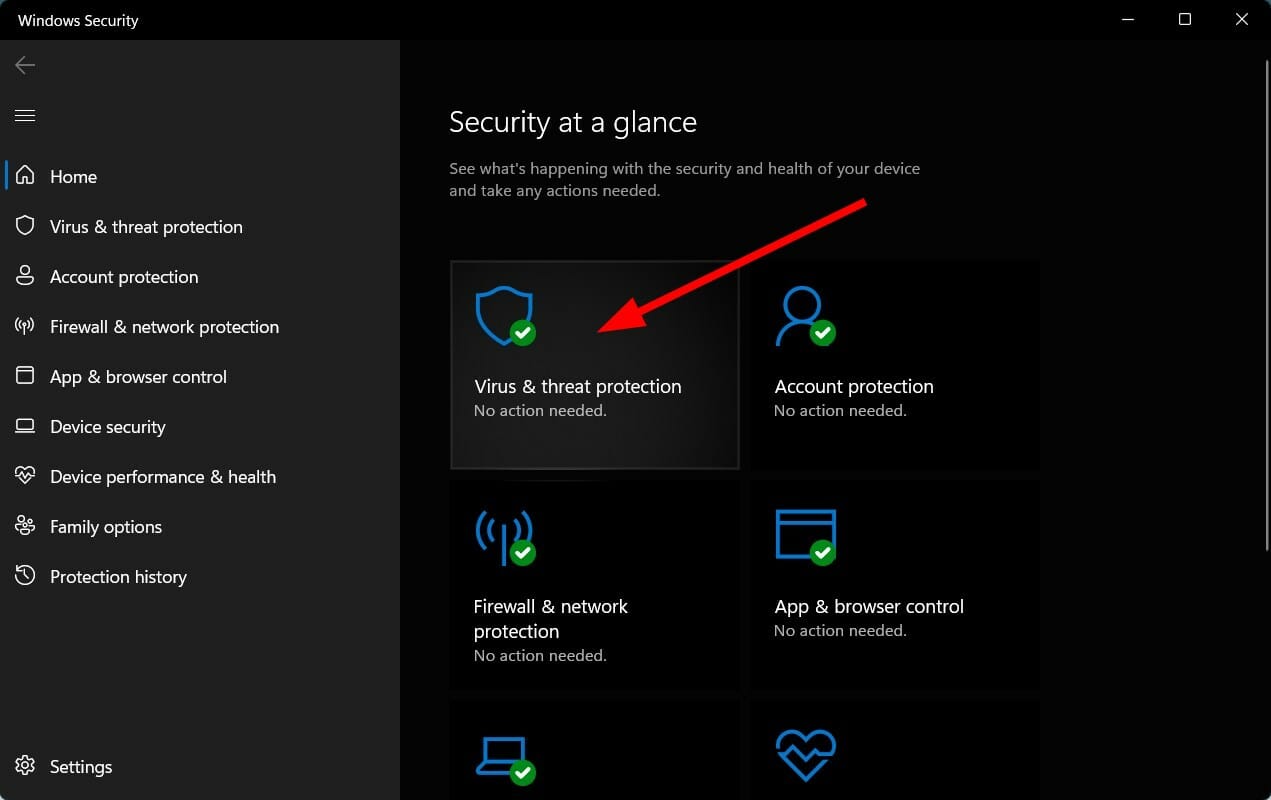
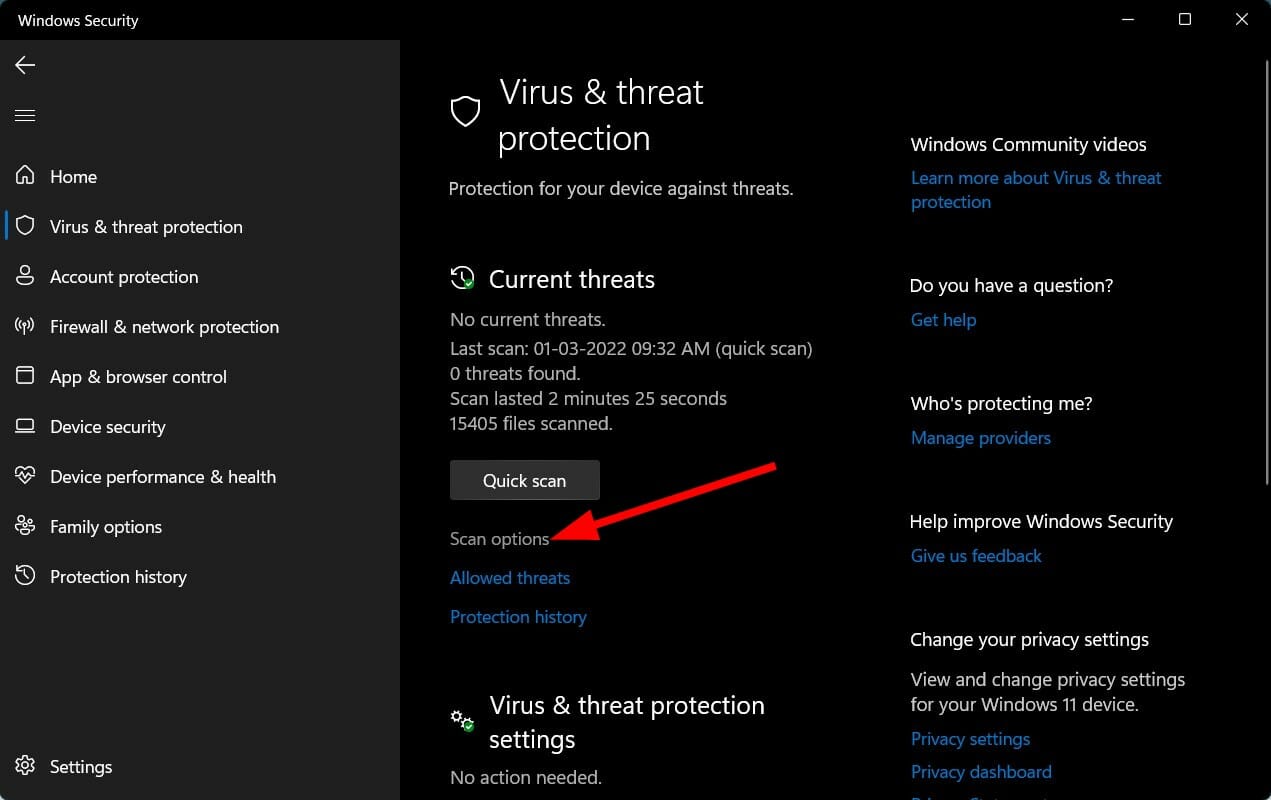
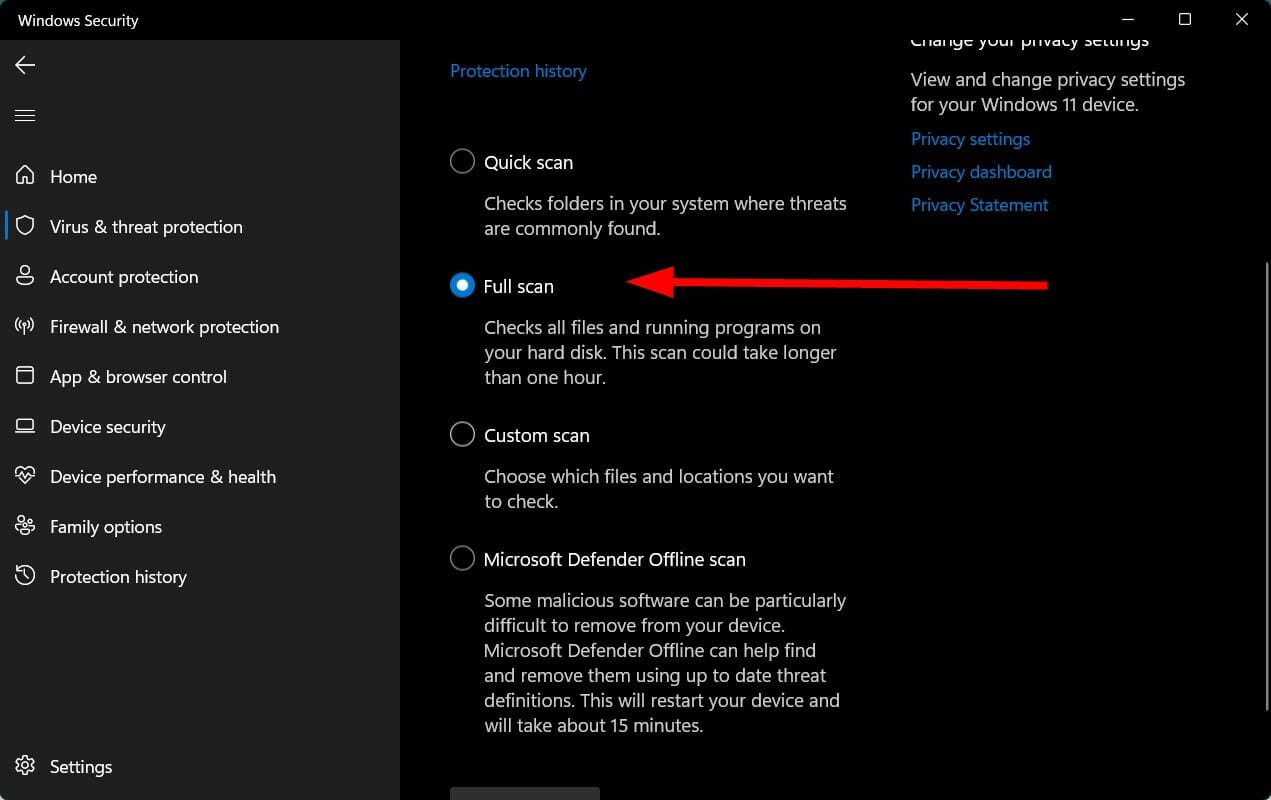
5. Scan your PC for virus
- Click on the upward arrow located in the bottom-right taskbar.

- Select Windows Security.

- Click on Virus & threat protection.

- Choose Quick Scan and let Windows Security scan your PC for virus and malware.
- You can also select the Scan options button.
- Under Scan Options, you can also choose Full scan to deeply scan your PC for virus or malware.
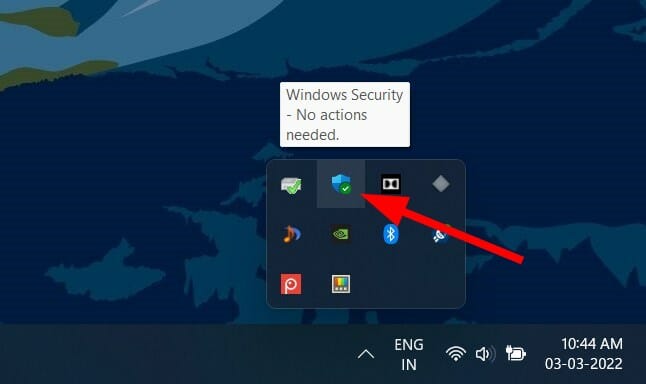
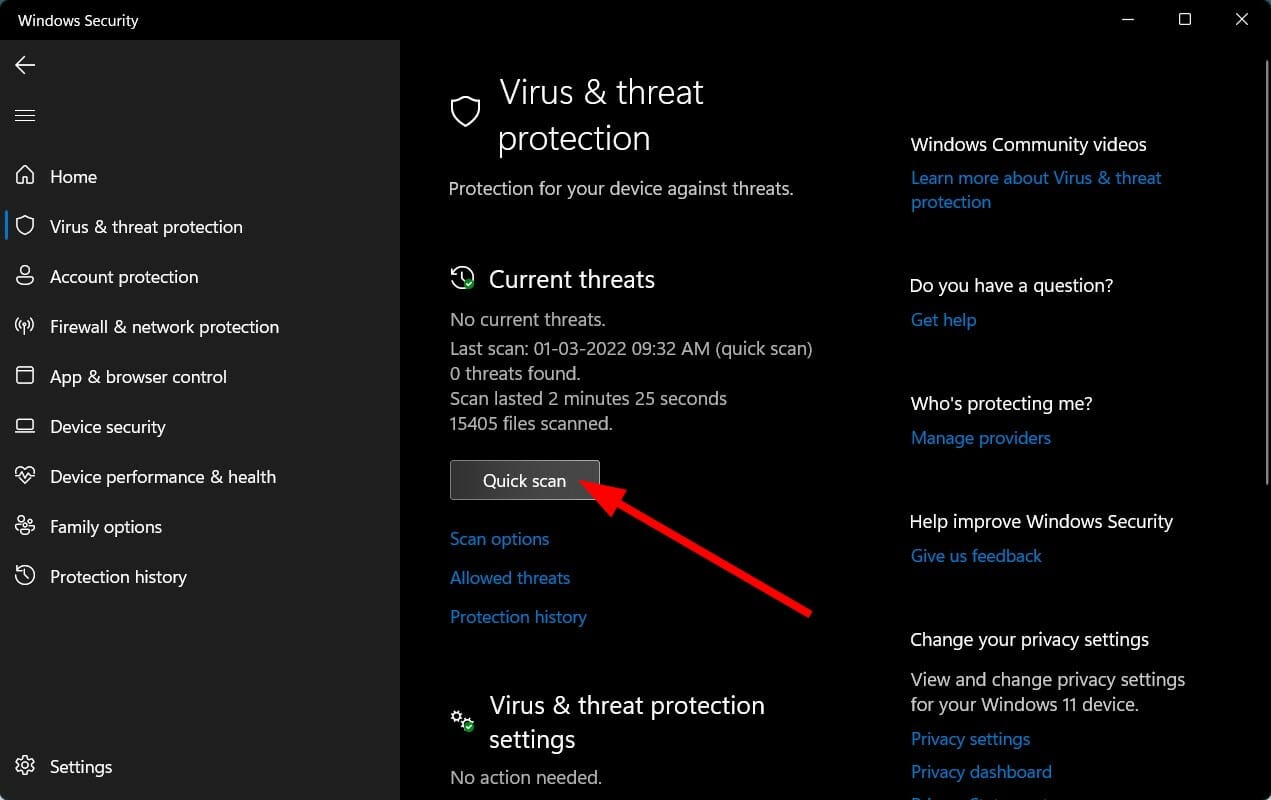
We made use of Windows Security Defender to show the steps to scan your PC for viruses, as we don’t have any third-party antivirus applications installed on our Windows 11 PC.
But the above steps would give you an idea that you need to perform a scan to check for any viruses or malware present on your PC.
The presence of a virus or malware not only causes several issues, such as the Windows 11 scanner not detected issue, but it will also affect the smooth functioning of your PC.
Viruses and malware are of different types. So, they can trigger different problems, and it would be a safe bet to check your PC for viruses.
6. Check for Windows updates
- Press Win + I buttons to open Windows Settings.
- Select Windows Update from the left-pane.
- Click on Check for updates button.

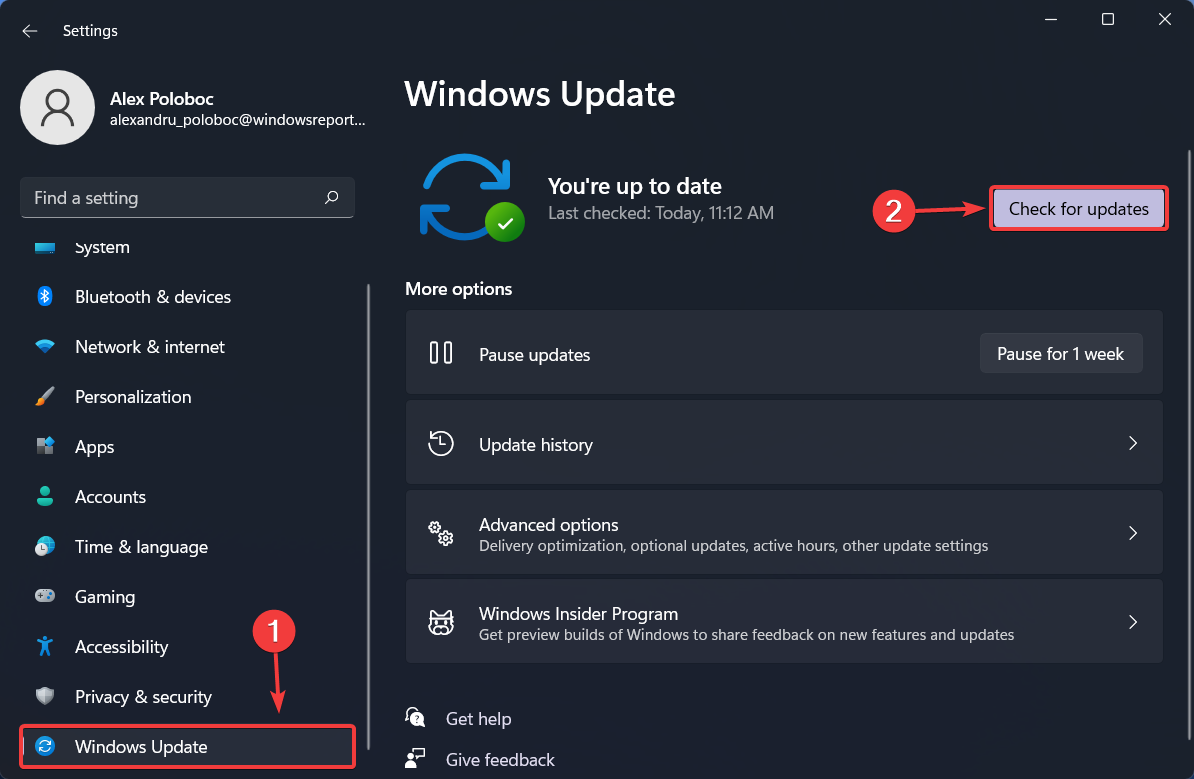
There are chances that due to a bug present in the previous version of the Windows update, the scanner isn’t able to communicate properly with your PC.
It is recommended that you keep your PC up-to-date as Microsoft rolls out new updates that not only bring new features but bug fixes for such errors as well.
7. Check for faulty cables
Scanner not detected error is caused by more than just faulty drivers or system files. It is also caused if the wire connecting your scanner to the PC is damaged.
We advise you to check if the scanner cable is free from damage. You can check if the cable is working or not by connecting it to a different PC and see if this works on it or not.
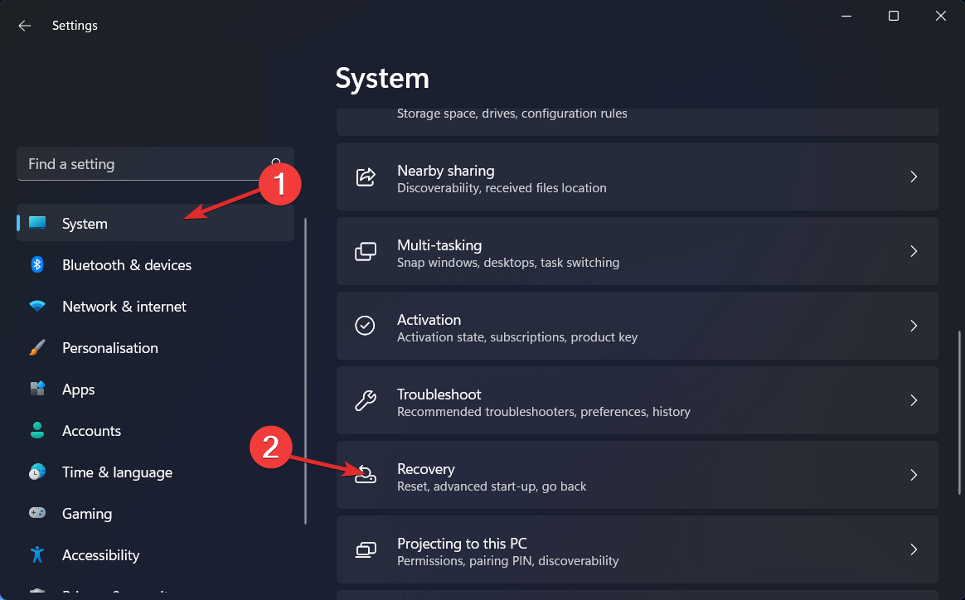
8. Reset Windows 11
- Press Win + I buttons to open Windows Settings.
- Click on Recovery from the right-side.

- Under Recovery options, press the Reset PC button.

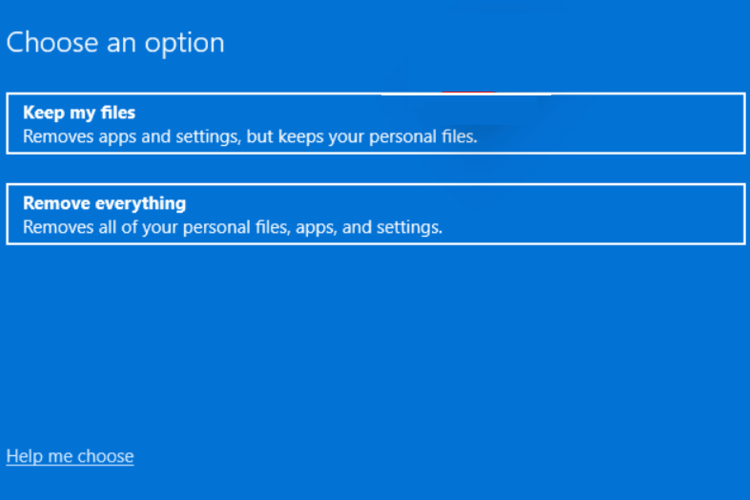
- Select the type of factory reset your want to perform.

- Choose the option how you would like to reinstall Windows.
- Click Next.
- Hit the Reset button.
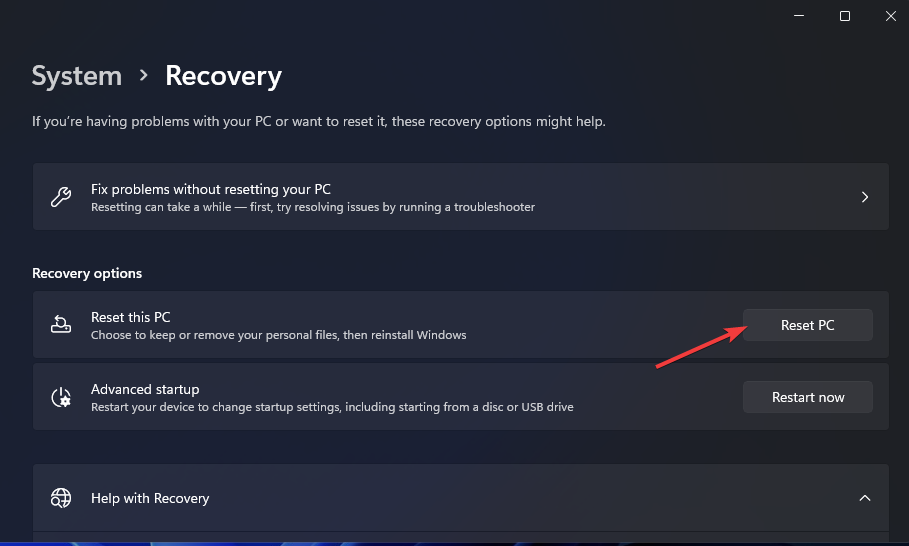
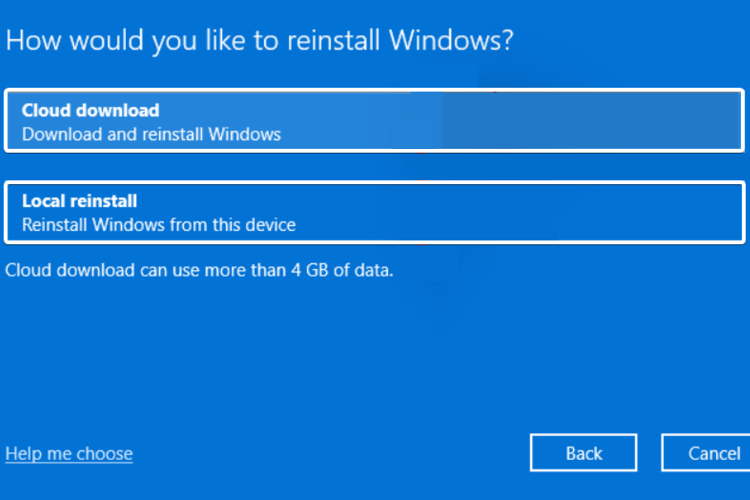
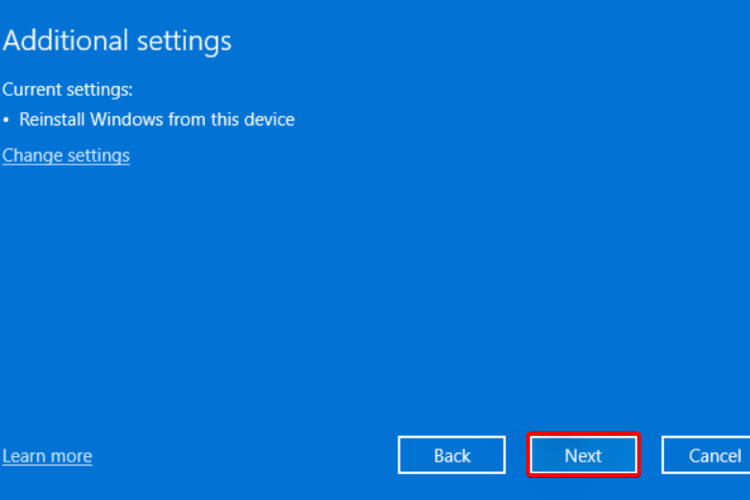
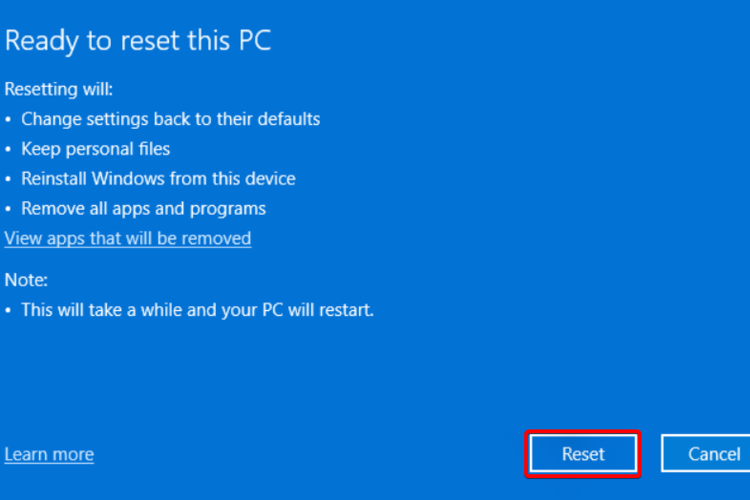
You should reset your PC only if the above solutions did not help you fix the Windows 11 scanner not detected issue. This is one of the different ways via which you can reset your PC.
Do note that your PC may reboot multiple times during the reset process. But that is normal and nothing to worry about as it is a part of the reset procedure.
What else can I do to fix the Windows 11 scanner not detected error?
Well, there are few chances that the above-mentioned solutions won’t help you fix the Windows 11 scanner not detected issue.
However, if you are having a tough time fixing this problem, there are a few other solutions that you can apply and hopefully fix the problem at hand.
➡ Run scanner in compatibility mode
If your scanner isn’t working on any of the Windows 11 PCs, then we would recommend running it in compatibility mode.
Simply right-click on your scanner icon and select Properties. Switch to the Compatibility tab and select the option Run this program in compatibility mode. Finally, hit the OK button to activate.
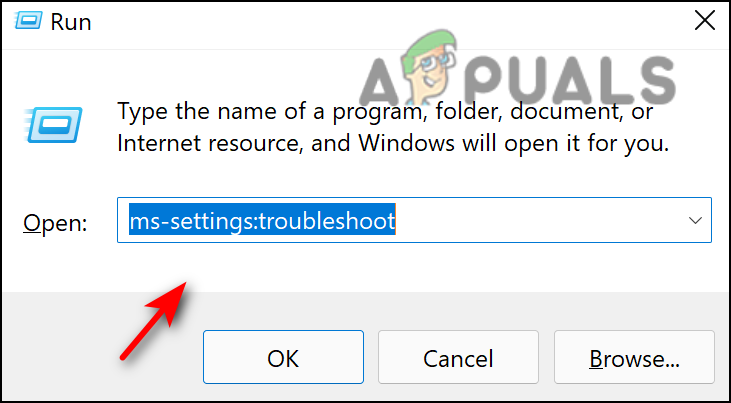
➡ Run the troubleshooter
You can also make use of the Windows Troubleshooter tool to fix issues related to your hardware. Simply navigate to the troubleshooter page and press the Run button next to Printer.
The troubleshooter will identify the reasons that are triggering the issue and also prompt you to do what is necessary to fix it.
Let us know in the comments below which one of the above solutions helped you fix the Windows 11 scanner not detected issue.
Feel free to share any other solution that you applied and resolved the problem so that others experiencing the issue can try that as well.
![]()
Обсуждение товара
с windows 11 работает ?
с windows 11 работает ? а то у меня xerox не работает с 11, что только не делал. с 10 было нормально.
Сканирует только через программу
Здравствуйте, pantum 6500w не сканирует, когда кладу документ нажимаю сканирование-одна страница-сканирование на ПК, нажимаю пуск и далее ничего не происходит,если же захожу через программу для сканирования с компьютера,то все в порядке. Скажите пожа…
Сканирование нескольких страниц в pdf
При сетевом подключении принтера, в убогорой родной программе для сканирования — нет выбора сканрования нескольких страниц в один файл. На самом МФУ на кнопках можно вроде это сделать, но работает только при USB подключении, а у меня по wi-fi.
модификация устройства(принтера)
На плате присутствует контакты для ethernet. Если припоять ethernet, будет ли работать без модификации ПО? Возможно ли расширение функционала т.к. На задней панели, много чего ещё есть.
В последнее время многие пользователи сообщают, что их сканер не работает в Windows 11. В зависимости от конкретной проблемы, некоторые пользователи вообще не могут взаимодействовать со сканером, в то время как другие получают сообщение об ошибке “Can’t communicate with scanner”. Почти каждый тип сканера столкнулся с этой проблемой, как Epson, Canon, HP, Image Access, Panasonic – просто чтобы назвать несколько.

В этой статье мы расскажем вам о соответствующих методах устранения неполадок, которые помогли нескольким пользователям решить проблему в кратчайшие сроки. Давайте приступим!
Переустановите сканер
Одна из основных причин проблем со сканером заключается в том, что он устарел. Решение этой проблемы простое, поскольку все, что вам нужно сделать, это обновить сканер.
Это можно сделать, удалив сканер, а затем загрузив его последнюю версию с сайта производителя сканера.
Здесь приведено пошаговое руководство, как это сделать:
- Введите Диспетчер устройств в области поиска на панели задач и нажмите кнопку Откройте.

Откройте диспетчер устройств - Внутри окна Диспетчер устройств разверните опцию Создание изображений или Другие устройства.

развернуть Устройства визуализации - Найдите Сканеры выберите этот параметр и щелкните его правой кнопкой мыши.
- Выберите Деинсталлировать устройство из контекстного меню и дождитесь завершения процесса.

Деинсталлировать устройство - После этого перезагрузите компьютер.
- После перезагрузки перейдите на сайт производителя сканера и установите последнюю версию. Проверьте, работает ли сканер.


Настройте режим совместимости
Несколько пользователей смогли устранить проблему, изменив режим совместимости сканера. Если вы еще не знаете, режим совместимости Windows’ позволяет старым программам запускаться без проблем. Можно заставить старые программы работать на более новой операционной системе, используя режим совместимости.
Вот как можно настроить режим совместимости сканера, чтобы устранить проблему:
- Щелкните правой кнопкой мыши на значке сканера и выберите пункт Свойства из контекстного меню.
- Перейдите к Вкладка «Совместимость и установите флажок Запустите эту программу в режиме совместимости для коробки. Выберите любую более старую версию Windows из выпадающего меню.
- Нажмите Применить чтобы сохранить изменения.

Настройка запуска исполняемого файла в режиме совместимости с Windows 7 - После этого перезагрузите компьютер и проверьте, решена ли проблема.

В операционной системе Windows (или любой другой) существуют определенные службы Windows, которые должны быть включены для успешного выполнения соответствующих операций.
Аналогично, для правильной работы сканера в Windows должна быть включена служба под названием Windows Image Acquisition (Сбор изображений Windows). Выполните указанные ниже действия, чтобы включить эту службу на вашем компьютере:
- Нажмите Windows + R клавиши одновременно на вашем компьютере, чтобы открыть окно Запустить диалоговое окно на вашем компьютере.
- В текстовом поле диалогового окна введите службы.msc и нажмите Введите.

Доступ к экрану служб - Как только вы окажетесь в окне Службы, найдите и щелкните правой кнопкой мыши на Windows Image Acquisition (WIA) служба.
- Выберите Свойства из контекстного меню, отображаемого на экране.

Запустите программу Windows Image Acquisition - В окне Свойства установите параметр Тип запуска на Автоматически.

Переключите тип запуска на Автоматический - Затем убедитесь, что статус службы запущен. Если это не так, нажмите на кнопку Кнопка «Пуск.
- Выполните те же действия для служб DCOM Server Process Launcher, Shell Hardware Detection, Remote Procedure Call и RPC Endpoint Mapper.
- Наконец, закройте окно Службы и проверьте, решило ли это проблему.


Запустите Устранение неполадок оборудования и устройств
Кроме того, вы можете запустить средство устранения неполадок оборудования и устройств, которое может автоматически применять автоматические исправления в случаях, подобных этому. Эти исправления должны устранить проблемы с поврежденными файлами и плохими драйверами.
Вот что вам нужно сделать:
- Нажмите клавиша Windows + R чтобы открыть Запустить диалоговое окно.
- Внутри текстового поля введите ‘ms-settings:troubleshoot‘ и нажмите Введите открыть средство устранения неполадок оборудования и устройств.

Введите ms-settings-troubleshoot - Оказавшись на вкладке Устранение неполадок, выберите Другие средства устранения неполадок в правой панели.

Нажмите другие способы устранения неполадок - Выберите Запустите кнопку устранения неполадок связанные с вашим сканером.
- Подождите, пока средство устранения неполадок завершит сканирование. В случае выявления жизнеспособной стратегии ремонта вам будет представлено окно с возможностью автоматического применения этой стратегии. Нажать на Применить это исправление.

Применение рекомендуемого исправления - Затем перезагрузите компьютер и запустите сканер, чтобы убедиться, что проблема решена.


Запустите команды SFC и DISM
Как мы обсуждали ранее, ошибки повреждения или ошибки в системе часто ответственны за такие ошибки, как у нас здесь.
В Windows для устранения ошибок можно воспользоваться несколькими встроенными инструментами, которые практически не требуют участия пользователя. Есть две программы, которые выполняют эту задачу: Deployment Image Servicing and Management (DISM) и System File Checker (SFC).
Вы можете использовать каждую утилиту для сканирования операционной системы на наличие ошибок и их автоматического устранения. DISM в значительной степени полагается на Windows Update для замены неисправных данных, в то время как SFC использует локально кэшированный архив. Для завершения работы SFC потребуется более пяти минут. Сканирование DISM требует загрузки внешних файлов, поэтому его выполнение занимает больше времени. Попробуйте запустить обе команды SFC и Команды DISM, и проверьте, решит ли это проблему. Если ошибка сохраняется, перейдите к указанному ниже методу.
Удалить последнее обновление
Бывают случаи, когда проблемы, подобные рассматриваемой, возникают из-за недавно установленных обновлений, которые повреждены и содержат ошибки. Если сканер перестал работать после недавней установки обновления Windows, возможно, вам поможет удаление обновления.
Вот что вам нужно сделать:
- Введите Панель управления в строке поиска и нажмите Введите.

Запустить панель управления - В окне Панель управления нажмите на Удалить программу в разделе Программы.

- Выберите Просмотр установленных обновлений с левой панели.
- Нажмите на Установлено на для сортировки обновлений по дате, а затем щелкните правой кнопкой мыши на недавно установленном обновлении.

Отсортировать по дате - Выберите Удалить и дождитесь завершения процесса.
- После этого перезагрузите компьютер и проверьте, решена ли проблема.


В последнее время довольно много пользователей сообщили о том, что их сканер не работает в Windows 11. В зависимости от конкретной проблемы некоторые пользователи вообще не могут взаимодействовать со сканером, в то время как другие получают сообщение «Невозможно связаться с сообщение об ошибке сканера. С этой проблемой сталкивался почти каждый тип сканера, например Epson, Canon, HP, Image Access, Panasonic – и это лишь некоторые из них.
В этой статье мы познакомим вас с соответствующими методами устранения неполадок, которые помогли нескольким пользователям решить проблему в кратчайшие сроки. Давайте начнем!
Переустановите сканер
Одна из основных причин, по которой у вас возникают проблемы со сканером, заключается в том, что он устарел. Решение этой проблемы простое: все, что вам нужно сделать, это обновить сканер.
Сделать это можно, удалив сканер, а затем загрузив его последнюю версию с сайта производителя сканера.
Вот пошаговое руководство, как это сделать:
- ТипДиспетчер устройствв области поиска панели задач и нажмитеОткрыть.
- В окне диспетчера устройств разверните параметрВизуализацияилиДругие устройства.
- НайдитеСканерыпод этой опцией и щелкните по ней правой кнопкой мыши.
- ВыбиратьУдалить устройствоиз контекстного меню и дождитесь завершения процесса.
- После этого перезагрузите компьютер.
- После перезагрузки перейдите на веб-сайт производителя сканера и установите последнюю версию. Проверьте, заработает ли ваш сканер.


Настройте режим совместимости
Нескольким пользователям удалось решить проблему, изменив режим совместимости сканера. Если вы еще не знаете, режим совместимости Windows позволяет без проблем запускать старые программы. Можно заставить старые программы работать в новой операционной системе, используя режим совместимости.
Вот как вы можете настроить режим совместимости вашего сканера, чтобы устранить проблему:
- Щелкните правой кнопкой мыши значок сканера и выберитеХарактеристикииз контекстного меню.
- Отправляйтесь вВкладка «Совместимость»и отметьте галочкойЗапустите эту программув режиме совместимости с коробкой. Выберите любую старую версию Windows из раскрывающегося меню.
- УдарятьПрименятьчтобы сохранить изменения.
- После этого перезагрузите компьютер и проверьте, решена ли проблема.

В операционной системе Windows (или любой другой) существуют определенные службы Windows, которые необходимо включить, чтобы вы могли успешно выполнять соответствующие операции.
Аналогично, для правильной работы сканера в Windows должна быть включена служба Windows Image Acquisition. Выполните шаги, указанные ниже, чтобы включить службу на вашем компьютере:
- НажиматьWindows+клавиши Rодновременно на вашем компьютере, чтобы открытьБегатьдиалоговое окно на вашем компьютере.
- В текстовом поле диалогового окна введитеServices.mscи ударилEnter.
- Как только вы окажетесь в окне «Службы», найдите и щелкните правой кнопкой мышиПолучение изображений Windows (WIA)услуга.
- ВыбиратьХарактеристикииз контекстного меню, отображаемого на экране.
- В окне Свойства установитеТип запускакАвтоматический.
- Затем убедитесь, что статус службы работает. Если это не так, нажмите на кнопкуКнопка Пуск.
- Выполните те же действия для служб запуска процессов сервера DCOM, обнаружения оборудования оболочки, удаленного вызова процедур и службы сопоставления конечных точек RPC.
- Наконец, закройте окно «Службы» и проверьте, решило ли это проблему.


Запустите средство устранения неполадок оборудования и устройств.
Кроме того, вы можете запустить средство устранения неполадок оборудования и устройств, которое может автоматически применять автоматические исправления в подобных случаях. Эти исправления должны устранить проблемы с поврежденными файлами и плохими драйверами.
Вот что вам нужно сделать:
- НажиматьКлюч Windows+роткрытьБегатьдиалоговое окно.
- В текстовом поле введите ‘мс-настройки: устранение неполадок‘ и нажмитеEnterчтобы открыть средство устранения неполадок оборудования и устройств.
- На вкладке «Устранение неполадок» выберитеДругие средства устранения неполадоквариант на правой панели.
- ВыберитеКнопка «Запустить средство устранения неполадок»связанный с вашим сканером.
- Подождите, пока средство устранения неполадок завершит сканирование. В случае определения жизнеспособной стратегии ремонта вам будет предложено окно с возможностью автоматического ее применения. Нажмите наПрименить это исправление.
- Затем перезагрузите компьютер и запустите сканер, чтобы проверить, решена ли проблема.


Запустите команды SFC и DISM
Как мы обсуждали ранее, ошибки, связанные с повреждением или ошибками в системе, часто являются причиной таких ошибок, как здесь.
В Windows вы можете получить доступ к нескольким встроенным инструментам для устранения ошибок, которые практически не требуют участия пользователя. Для этого есть две программы: обслуживание образов развертывания и управление ими (DISM) и проверка системных файлов (SFC).
Вы можете использовать каждую утилиту для сканирования вашей операционной системы на наличие ошибок и автоматического их исправления. DISM в значительной степени полагается на Центр обновления Windows для замены ошибочных данных, в то время как SFC использует локально кэшированный архив. Для завершения SFC требуется более пяти минут. Сканирования DISM требуют загрузки внешних файлов, поэтому их выполнение занимает больше времени. Попробуйте запустить команды SFC и DISM и проверьте, решит ли это проблему. Если ошибка не устранена, перейдите к методу, указанному ниже.
Удалить последнее обновление
Бывают случаи, когда проблемы, подобные описанной, возникают из-за недавно установленных обновлений, которые повреждены и содержат ошибки. Если ваш сканер перестал работать после того, как вы недавно установили обновление Windows, удаление обновления может помочь вам.
Вот что вам нужно сделать:
- ТипПанель управленияв строке поиска и нажмитеEnter.
- В окне Панели управления нажмите наУдалить программув разделе «Программы».
- ВыбиратьПросмотр установленных обновленийс левой панели.
- Нажмите наУстановленочтобы отсортировать обновления по дате, а затем щелкните правой кнопкой мыши недавно установленное обновление.
- ВыбиратьУдалитьи дождитесь завершения процесса.
- После этого перезагрузите компьютер и проверьте, решена ли проблема.


Читать дальше
- VMware Workstation Pro не работает в Windows? Попробуйте эти исправления
- Проигрыватель Windows Media не открывается? Попробуйте эти исправления
- Windows 11 не выходит из спящего режима? Попробуйте эти исправления
- Приложение Windows Mail не отправляет электронные письма? Попробуйте эти исправления!
Recently, there have been reports by quite a few users that their scanner won’t run on Windows 11. Depending on the specific problem, some users are unable to interact at all with the scanner, while others receive a “Can’t communicate with scanner” error message. Almost every type of scanner has faced this issue like Epson, Canon, HP, Image Access, Panasonic – just to name a few.
In this article, we will walk you through the relevant troubleshooting methods that have helped several users fix the issue in no time. Let’s get started!
Reinstall the Scanner
One of the main reasons you are having trouble with your scanner is that it is outdated. The solution to this is simple, as all that you need to do is update the scanner.
You can do this by uninstalling the scanner, and then downloading its latest version from the manufacturer’s website of the scanner.
Here is a step-by-step guide on how to do this:
- Type Device Manager in the search area of the taskbar and hit Open.
Open device manager - Inside the Device Manager window, expand the option Imaging or Other devices.
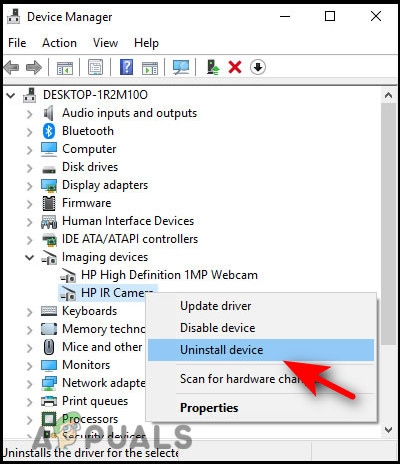
expand imaging devices - Locate Scanners under this option and right-click on it.
- Select Uninstall device from the context menu and wait for the process to complete.
Uninstall device - Once done, restart your PC.
- Upon reboot, head over to the manufacturing website of the scanner and install the latest version. Check if doing so gets your scanner up and running.
Adjust the Compatibility Mode
Several users were able to fix the issue by altering the compatibility mode of the scanner. If you don’t know already, Windows’ compatibility mode allows older programs to run without any problems. It is possible to make older programs run on a newer operating system by using a compatibility mode.
Here is how you can adjust the compatibility mode of your scanner to fix the issue at hand:
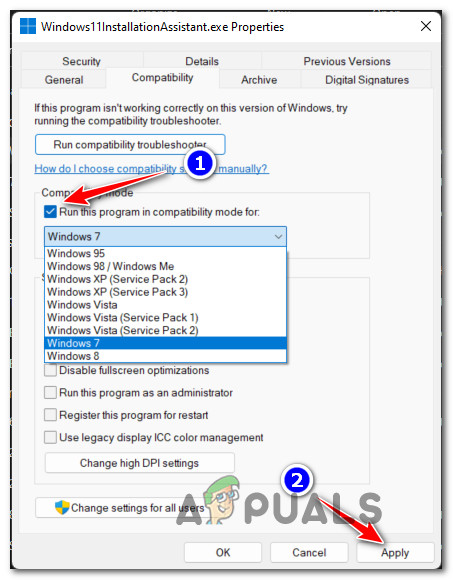
- Right-click on your scanner’s icon and select Properties from the context menu.
- Head over to the Compatibility tab and checkmark the Run this program in compatibility mode for box. Choose any older version of Windows from the dropdown menu.
- Hit Apply to save the changes.
Configuring the executable to launch in Compatibility mode with Windows 7 - Once done, restart your PC and check if the issue is resolved.
Check Windows Services
In Windows operating system (or any other), there are certain Windows services that should be enabled for you to perform relevant operations successfully.
Similarly, for you to run your scanner properly, a service named Windows Image Acquisition should be enabled on Windows. Follow the steps mentioned below to enable the service on your PC:
- Press Windows + R keys simultaneously on your PC to open a Run dialog box on your PC.
- In the text field of the dialog box, type services.msc and hit Enter.
Accessing the Services Screen - Once you are inside the Services window, locate and right-click on Windows Image Acquisition (WIA) service.
- Select Properties from the context menu displayed on your screen.
Run Windows Image Acquisition - In the Properties window, set the Startup type to Automatic.
Switch the startup type to Automatic - Then, ensure that the Service status is running. If it is not, click on the Start button.
- Perform the same steps for DCOM Server Process Launcher, Shell Hardware Detection, Remote Procedure Call, and RPC Endpoint Mapper services.
- Finally, close the Services window and check if doing so resolved the issue.
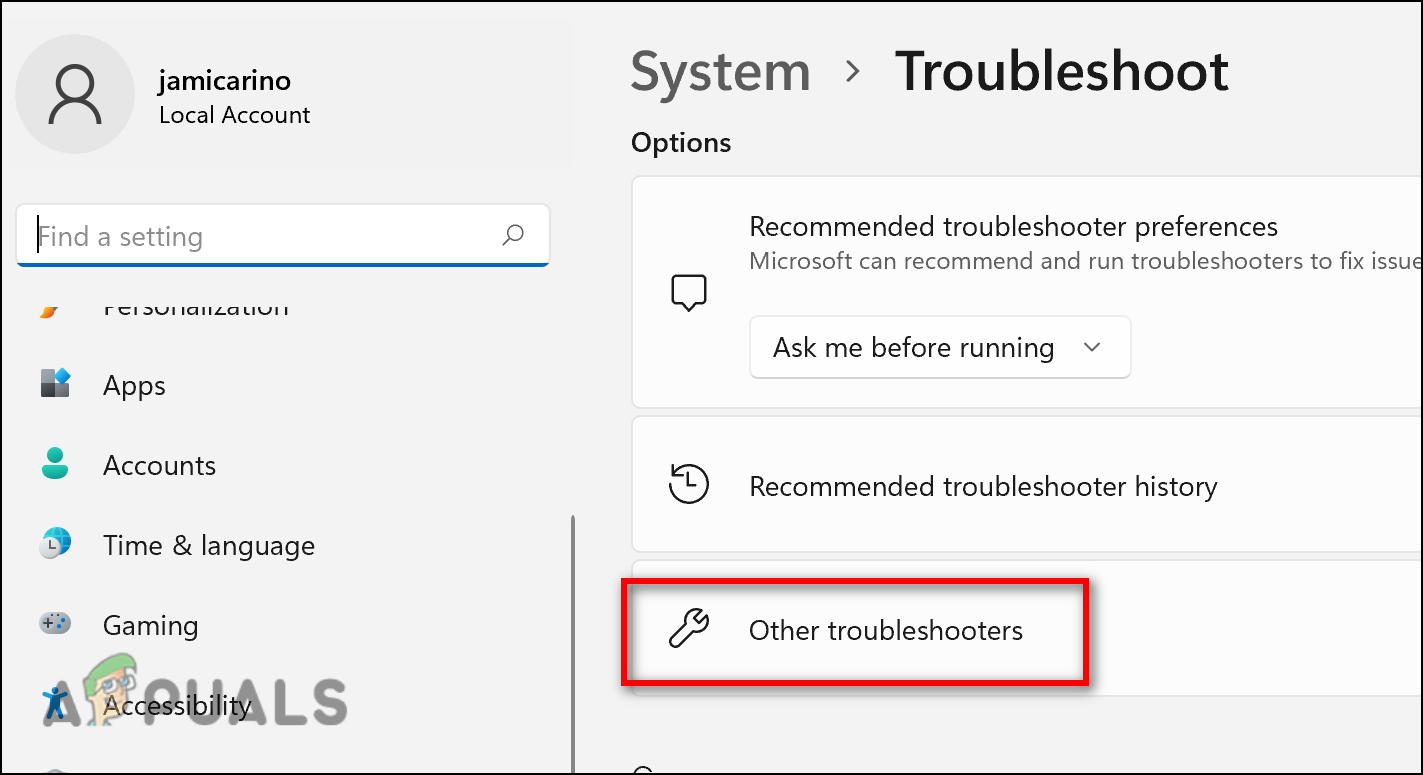
Run Hardware and Device Troubleshooter
Alternatively, you can run the Hardware and Device Troubleshooter, which can automatically apply automated fixes in cases like this one. These fixes should fix problems with corrupted files and bad drivers.
Here is what you need to do:
- Press Windows key + R to open up a Run dialog box.
- Inside the text box, type ‘ms-settings:troubleshoot’ and press Enter to open up the Hardware and Device Troubleshooter.
Type ms-settings-troubleshoot - Once you’re inside the Troubleshooting tab, select Other troubleshooters option in the right pane.
Click other troubleshooters - Select the Run the troubleshooter button associated with your scanner.
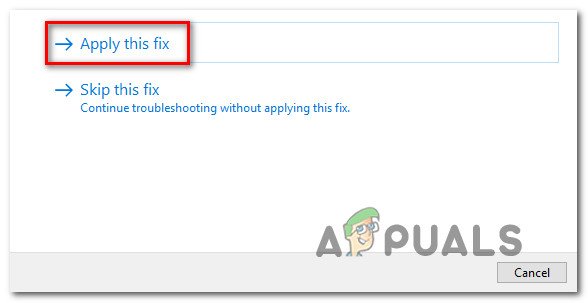
- Wait for the troubleshooter to complete its scan. In the event a viable repair strategy is identified, you will be presented with a window with the option to automatically apply it. Click on Apply this fix.
Applying the recommended fix - Then, restart your computer and run the scanner to see if the issue is resolved.
Run SFC and DISM Commands
As we discussed previously, corruption errors or bugs in the system are often responsible for such errors as we have here.
In Windows, you can access several built-in tools to troubleshoot errors, which require little or no user involvement. There are two programs that accomplish this: Deployment Image Servicing and Management (DISM) and System File Checker (SFC).
You can use each utility to scan your operating system for errors and fix them automatically. DISM relies heavily on Windows Update to replace the faulty data, while SFC uses a locally cached archive. It takes over five minutes for SFC to finish. DISM scans require that external files be downloaded, so they take longer to complete. Try running both SFC and DISM commands, and check if that resolves the issue. If the error persists, move to the method mentioned below.
Uninstall Recent Update
There are times when issues like the one at hand are caused due to recently installed updates that are corrupt and buggy. If your scanner stopped running after you installed a Windows update recently, uninstalling the update might do the trick for you.
Here is what you need to do:
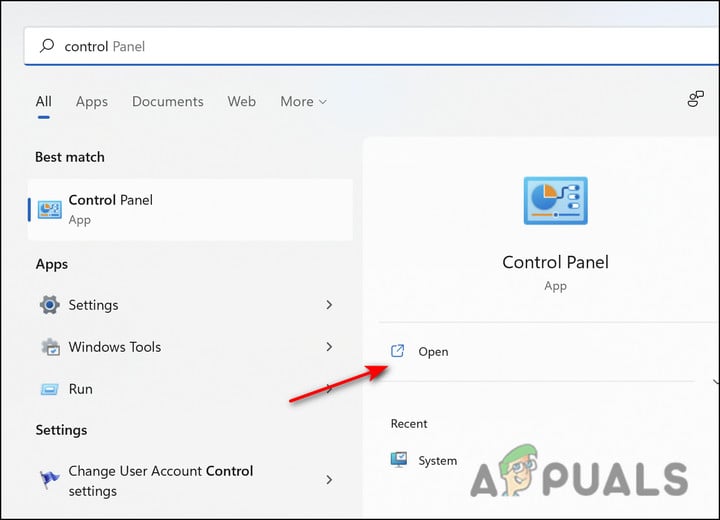
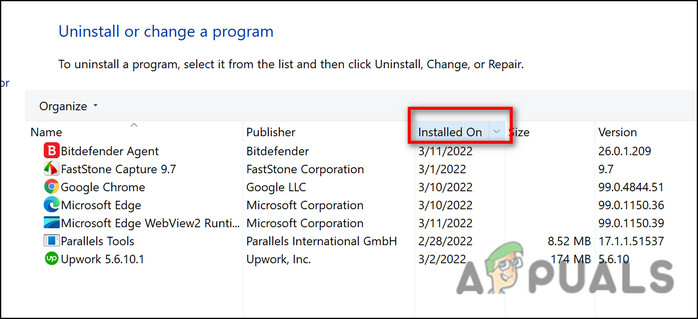
- Type Control Panel in the search bar and hit Enter.
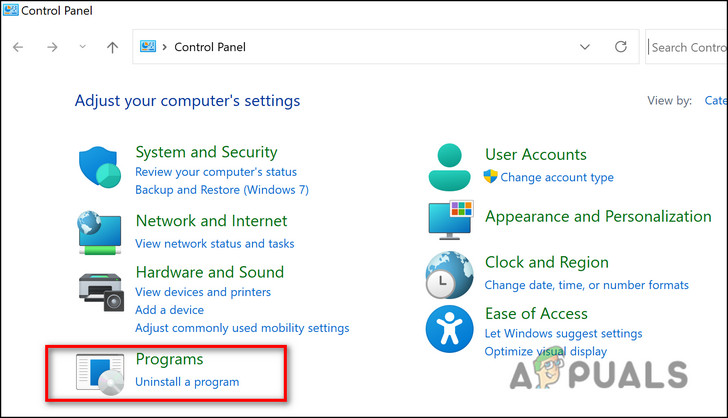
Run control panel - In the Control Panel window, click on Uninstall a program under Programs.
- Select View Installed updates from the left panel.
- Click on Installed On to sort the updates by date, and then right-click on the recently installed update.
Sort by date - Select Uninstall and wait for the process to complete.
- Once done, restart your PC and check if the issue is resolved.

Zainab Falak
Zainab Falak is a highly educated professional with a background in actuarial science and a strong passion for technology. Her expertise lies in the field of data analytics and she is a proficient programmer in languages such as Python and R. At Appuals, Zainab shares her extensive knowledge of Windows 8, 10, and 11, covering a broad range of topics related to these operating systems. Zainab’s ability to effectively communicate technical concepts in a clear and concise manner has earned her recognition and respect in the tech community. She is committed to staying up-to-date with the latest developments in the field and providing readers with insightful and informative content.