If the Nvidia screen recorder is not working, you should take a closer look at your display drivers
by Vlad Turiceanu
Passionate about technology, Windows, and everything that has a power button, he spent most of his time developing new skills and learning more about the tech world. Coming… read more
Updated on
- ShadowPlay technology allows you to record your gameplay and share it with your friends.
- Nevertheless, you might occasionally face instances when the function fails, such as GeForce Experience not recording.
- A mismatch between your specs and the app’s requirements might be the why GeForce experience won’t record.
- Display settings — including drivers — are also worth a second look.
XINSTALL BY CLICKING THE DOWNLOAD
FILE
Gaming much? Then we can skip the introductions as we are pretty confident you’re already well acquainted with NVIDIA and its pros and cons.
GeForce experience not recording issues are not uncommon and chances are, you already battle with this anomaly. Something might have gone wrong with NVidia Geforce or other culprits may be to blame. So, why won’t GeForce Experience record? We’re about to find out.
Acknowledging gamers’ needs, NVIDIA – an important player (if not THE player) in the graphical processing unit manufacturers’ market – raised the bar by adding GeForce Experience into the game.
This app provides an easy and easily customizable interface packed with useful features that are meant to enhance your gaming experience.
Why is my GeForce Experience not recording?
As cool a feature as it may seem (and it really is), there are instances when ShadowPlay can behave quite erratically and users reported issues like:
GeForce Experience not recording sound, instant replay not working, GeForce Experience not recording mic or GeForce Experience not recording game audio among others.
Even more problems are about to be uncovered, as follows:
- GeForce or ShadowPlay not recording
- GeForce experience recording not starting
- Nvidia screen recorder not working
- GeForce experience not recording audio
- GeForce experience not recording game chat
- Also, GeForce experience not recording instant replay
- GeForce experience not recording mic
- A particular case – GeForce experience only recording 10 seconds
- GeForce experience not recording desktop
- GeForce experience not recording Discord
From incompatible specs to faulty drivers and conflictual software settings that cannot help but interfere with each other, there can be many culprits responsible for the GeForce Experience recording not working problem.
This is where we come into play. Without further ado, let’s dive into some serious, but really easy GeForce troubleshooting steps.
How do I get GeForce Experience to record if it won’t?
- Why is my GeForce Experience not recording?
- How do I get GeForce Experience to record if it won’t?
- 1. Check system requirements
- 2. Check supported games
- 3. Get the latest graphic and display drivers
- 4. Uninstall or quit third-party audio software
- 5. Adjust the default directory
- 6. Switch on Windows Aero
- 7. Uninstall and reinstall the display drivers
1. Check system requirements
The GeForce Experience app requires a minim-up setup, thus you need to check your system’s specifications in order to make sure that the two are compatible.
Fortunately, the app is intuitive enough to allow you to check your specs without leaving the software. Simply access the General section within.
How we test, review and rate?
We have worked for the past 6 months on building a new review system on how we produce content. Using it, we have subsequently redone most of our articles to provide actual hands-on expertise on the guides we made.
For more details you can read how we test, review, and rate at WindowsReport.
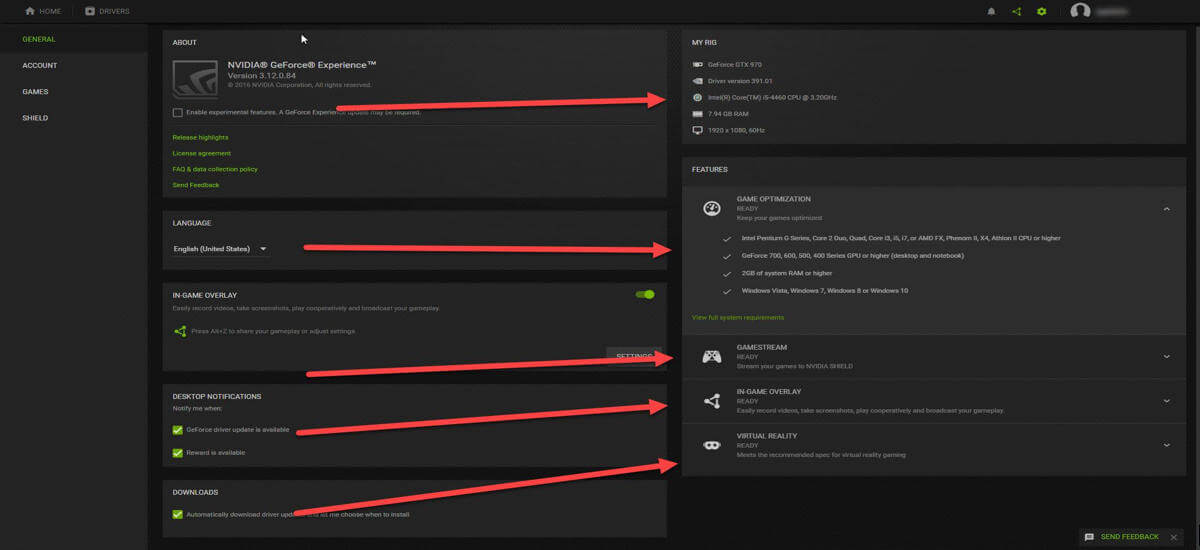
According to the manufacturer, the general system requirements that you will have to comply with are:
- OS (Windows 7, 8, 8.1, 10)
- RAM (2GB system memory minimum)
- Disk Space (20MB minimum)
- CPU (Intel Pentium G Series, Quad-Core i3, i5, i7, or higher, AMD FX, or higher)
Note: When it comes to GPU, there are a few series that are not entirely compatible with the ShadowPlay technology, such as GeForce 700, 600, and 600M. The same goes for GeForce 300 and 300M, GeForce 200 and 200M, GeForce 9/9M, and 8/8M.
Since the technology is based on a dedicated NVENC video encoding accelerator you will need a GeForce GTX 650 or higher GPU.
2. Check supported games

GeForce Experience in-game overlay supports all DirectX 9, 10, and 11-based games. In desktop mode, OpenGL games running in a window are also supported.
You can check out a full list of games that are compatible with the video-recording feature integrated into the GeForce Experience here.
3. Get the latest graphic and display drivers
1. Open the app and go to the Preferences screen.
2. Next, select the Check for Updates button to install the drivers.
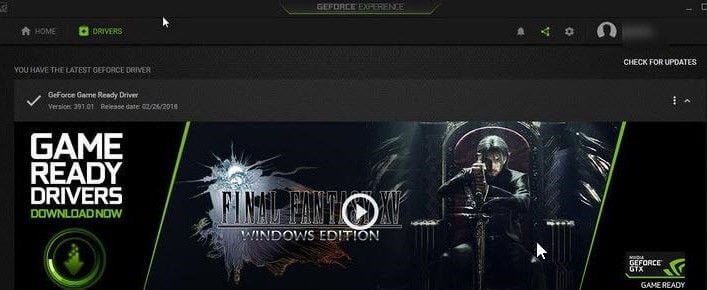
3. You can also use this option to verify that you are running the latest version of GeForce Experience.
4. Alternatively, you can through the Device Manager on your PC or even use a dedicated program such as Outbyte Driver Updater to make sure your drivers are always up to date and in pristine condition.
If you are encountering recording issues, you might face a case of corrupted or obsolete drivers.
One important feature incorporated into the GeForce Experience is the Game Ready driver update. In fact, the app automatically notifies you when new drivers are available.
Even though it is a useful feature, it’s not exempt from errors. If for some reason the GeForce Game Ready driver installation can’t continue, we got your back.
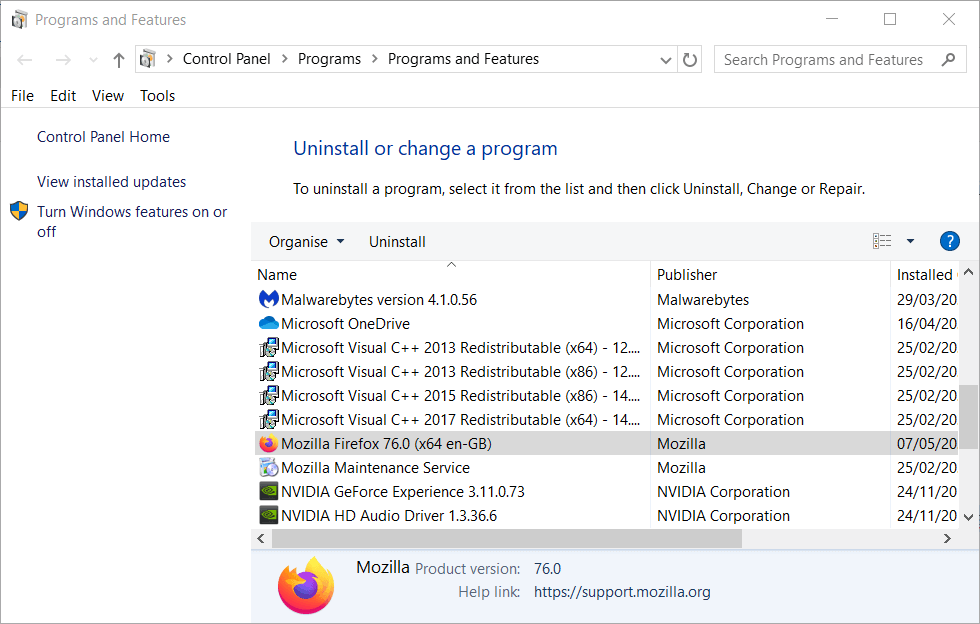
4. Uninstall or quit third-party audio software
If you are using additional audio enhancement software, it is possible that this is actually interfering with your GeForce Experience recording capacities.
Make sure you uninstall this software from the Control Panel -> Programs -> Programs and Features -> Uninstall a program.
If you happen to encounter issues while launching the Control Panel, here’s a step-by-step guide to help you have it fixed and get on with your uninstalling.
You can also choose to use a dedicated removal tool. One performant program for this job is the IObit Uninstaller which also removes leftover files, folders, and registry entries.
Furthermore, if there are any other streaming or recording apps and/or games running in the background, make sure you close all of them.
Finally, reboot the PC and try again.
5. Adjust the default directory
This issue can be triggered by insufficient disk space in the default directory or by a corrupted recording path.
One simple way to fix this is by changing the recording path to a different HDD than the one you used for installing the game(s).
You can also, create a new directory – just make sure you are logged in with your admin account in order to avoid permissions issues.
- 5 Ways to Fix GeForce Experience Not Detecting Games
- Nvidia Control Panel is not Opening: How to Manually Force it
- FIX: NVIDIA GeForce Experience not working
- Fix NVIDIA Installer Cannot Continue & Resume GeForce installation
- FIX: GeForce Experience preparing to install error
6. Switch on Windows Aero
If you are running on Windows 7, switching the Aero effect on is another potential fix for recording issues.
To enable any of the Aero themes, simply access the Control Panel -> Appearance and Personalization -> Personalization or right-click the desktop and select Personalize. Then click Window Color, and select the Enable transparency option.

7. Uninstall and reinstall the display drivers
If all other methods fail, you can simply install the display driver altogether and reinstall the latest version from the official website.
Make sure you use a specialized tool to completely uninstall the graphic driver and go for a fresh install by downloading the latest Nvidia and GeForce Experience driver from the official website.
There you go, these tested solutions should have your ShadowPlay option flawlessly recording again in no time so that you can share your gameplay highlights with your friends.
If you are aware of additional methods for fixing NVIDIA recording issues, feel free to share them in the comments section below.
Of course, this depends on several other factors such as CPU consumption and screen resolution.
![]()
Пользователи с таким энтузиазмом описывают достоинства этой утилиты, «однофамилицы» «кладбищенского романса» панк-группы Joy Division – Shadowplay, что не поставить её невозможно, тем более что она бесплатная. Вот только одна проблема – утилита входит в пакет видеокарт от Nvidia и доступна только обладателям этих видеокарт.

Можно сказать и по-другому, если вы приобрели видеокарту от Nvidia, и в пакете программного обеспечения для неё есть Shadowplay, то она должна работать с этой видеокартой.
Технические особенности
Отсюда первый вывод — «где искать». Если Shadowplay не запускается, не включается, не работает – у вас должна быть видеокарта Nvidia, причём версии не ниже 600-ой. Вот список, на которых эта программа записи видео прямо с монитора – Shadowplay будет работать наверняка:
- GeForce Titan;
- Серия GTX 600;
- Серия GTX 700;
- GTX 600M – тут уже надо проверять, работает не на всех;
- GTX700M;
- GTX 800М;
- Все более современные.
Если у вас стоит видеокарта другого производителя или не из приведённого списка, работа программы не гарантируется – пусть Shadowplay и стоит, но она поставлена отдельно от пакета имеющейся видеокарты и не записывает.

Видеокарта Nvidia
Кроме того, есть требования и к характеристикам самого компьютера. Они для успешного запуска программы, собственно, должны соответствовать возможностям самой видеокарты:
- процессор должен иметь частоту не ниже 2,8 ГГц;
- оперативная память должна иметь объем не меньше 6 Гб.
Итак, если Shadowplay не работает по неизвестной вам причине, проверьте свои технические возможности.
Дополнительные нюансы
Есть и ещё некоторые важные нюансы, от которых зависит работоспособность программы.
Она позволяет передавать производимую запись видео сразу в сеть, нет необходимости возиться с Web-камерой, но для этого должен быть в работе Twitch-канал, если его нет, то само собой нет и трансляции.

Главная панель
Программа очень бережно относится к имеющимся на ПК ресурсам, но кое-чего, конечно, требует. В частности, она производит свои настройки и настройки игр под параметры компьютера в фоновом режиме. Если у вас фон перегружен другими утилитами, то и настройки могут не пройти. Поэтому необходимо внимательно следить за тем, что у вас ещё работает на ПК «без вашего ведома». Для обеспечения работы Shadowplay, возможно, понадобится эти программы отключить. Обращаем внимание, некоторые действия Shadowplay производит сразу после загрузки системы, поэтому сначала удаляем всё лишнее в фоне, а затем перезагружаем ПК, чтобы Shadowplay сделала свою работу.
Ещё один нюанс связан с форматом, в котором программа представляет своё видео. Это хорошо известный и обеспечивающий прекрасное качество – MP4. Проблема только в том, что с этим форматом могут не работать простые (и бесплатные, что немаловажно) программы редактирования видео. Вот получится ситуация – «висит груша, нельзя скушать». Другими словами, файл видео получен, но работать с ним не получается. Вывод, в общем-то, простой — придётся использовать конвертер для перевода mp4-видео в другой формат. Но конвертер должен быть надёжный, не теряющий качество видео в другом формате.

Параметры качества
И последнее. Программа довольно проста в настройках, но у неё есть особенность работы со звуком – его может не быть. Самое простое решение этой проблемы – сначала выключить функцию настройки программы «Внутриигровое наложение», а затем эту функцию активизировать вновь.
Заключение
Есть, конечно, и другой способ, заставить работать Shadowplay – просто переставить программу. Лучше всего сначала удалить, а затем поставить заново. Но это уже в самом крайнем случае, когда проверены аппаратные характеристики, проверен Интернет, на диске достаточно места для записи видео.
Подобные утилиты «от производителя», как правило, не имеют проблем в использовании, если ваша система удовлетворяет всем требованиям по характеристикам аппаратуры.
Если вы хотите быть на пике собственного потокового видео и использовать Shadowplay, лучше приобретите видеокарту от Nvidia 600 и выше. Это гарантированное решение всех проблем.
На чтение 3 мин Просмотров 4.7к. Опубликовано
3
Если у вас установлен GeForce Experience, и вы обнаружите, что не можете записать геймплей с NVIDIA Shadowplay , вы не одиноки. Многие пользователи также сообщают об этой проблеме. Мы разделяем вас с ощущением того, что вы не знаете, что делать, когда что-то неожиданно идет не так. Но больше не беспокойтесь, это можно исправить.
Вот 4 исправления, которые вы можете попробовать. Возможно, вам не придется пробовать их все; просто двигайтесь вниз, пока не найдете тот, который вам подходит.
- Перезапустите службу NVIDIA Streamer
- Переустановите драйвер NVIDIA
- Обновить GeForce Experience
- Включить захват рабочего стола
Содержание
- 1: перезапустите службу NVIDIA Streamer
- 2: Переустановите драйвер NVIDIA
- 3. Обновите GeForce Experience
- 4: Включить захват рабочего стола
1: перезапустите службу NVIDIA Streamer
В некоторых случаях виновником является служба NVIDA Streamer, особенно когда она выключена. Вы можете перезапустить эту службу:
1) На клавиатуре нажмите клавишу с логотипом Windows  и R одновременно. Введите services.msc и нажмите Enter .

2) Щелкните правой кнопкой мыши NVIDIA Streamer Service и нажмите Перезагрузить .

3) Посмотрите, может ли ваш Shadowplay сейчас записывать.
2: Переустановите драйвер NVIDIA
В некоторых случаях GeForce Experience устанавливает на ваш компьютер программы, которые не являются графическим драйвером. Поэтому вам следует заново переустановить драйвер дисплея NVIDIA.
Вы можете перейти на сайт поддержки NVIDIA, чтобы найти и загрузить последнюю доступную версию драйвера дисплея. Или вы можете обновить драйвер видеокарты через диспетчер устройств или Центр обновления Windows.
Если у вас нет времени, терпения или компьютерных навыков для обновления драйверов вручную, вы можете сделать это автоматически с помощью Driver Easy .
Driver Easy автоматически распознает вашу систему и найдет для нее правильные драйверы. Вам не нужно точно знать, на какой системе работает ваш компьютер, вам не нужно рисковать загрузкой и установкой неправильного драйвера, и вам не нужно беспокоиться об ошибке при установке.
Вы можете автоматически обновлять драйверы с помощью БЕСПЛАТНОЙ или Pro версии Driver Easy. Но с версией Pro требуется всего 2 клика (и вы получаете полную поддержку и 30-дневную гарантию возврата денег):
1) Загрузите и установите драйвер Легкий.
2) Запустите Driver Easy и нажмите кнопку Сканировать сейчас . Затем Driver Easy просканирует ваш компьютер и обнаружит все проблемные драйверы.

3) Нажмите кнопку Обновить рядом с отмеченным устройством NVIDIA, чтобы автоматически загрузить и установить правильную версию его драйвера (вы можете сделать это с помощью БЕСПЛАТНАЯ версия).
Или нажмите Обновить все , чтобы автоматически загрузить и установить правильную версию всех драйверов, которые отсутствуют или устарели в вашей системе ( для этого требуется версия Pro – вам будет предложено выполнить обновление, когда вы нажмете «Обновить все»).

4) Перезагрузите компьютер, чтобы изменения вступили в силу. Посмотрите, хорошо ли работает Shadowplay.
3. Обновите GeForce Experience
Бета-версия GeForce Experience может получить неисправный драйвер или другие неисправные приложения NVIDIA. Если вы не обновили его до последней версии, сделайте это сейчас:
1) На клавиатуре одновременно нажмите клавишу с логотипом Windows и R . Введите appwiz.cpl и нажмите Enter .

2) Щелкните правой кнопкой мыши NVIDIA GeForce Experience и выберите Удалить . Следуйте инструкциям на экране, чтобы удалить его.

3) Перейдите в службу поддержки NVIDIA, чтобы загрузить последнюю версию. из GeForce Experience и установите в соответствии с инструкциями.
4) Посмотрите, решена ли проблема с записью Shadowplay.
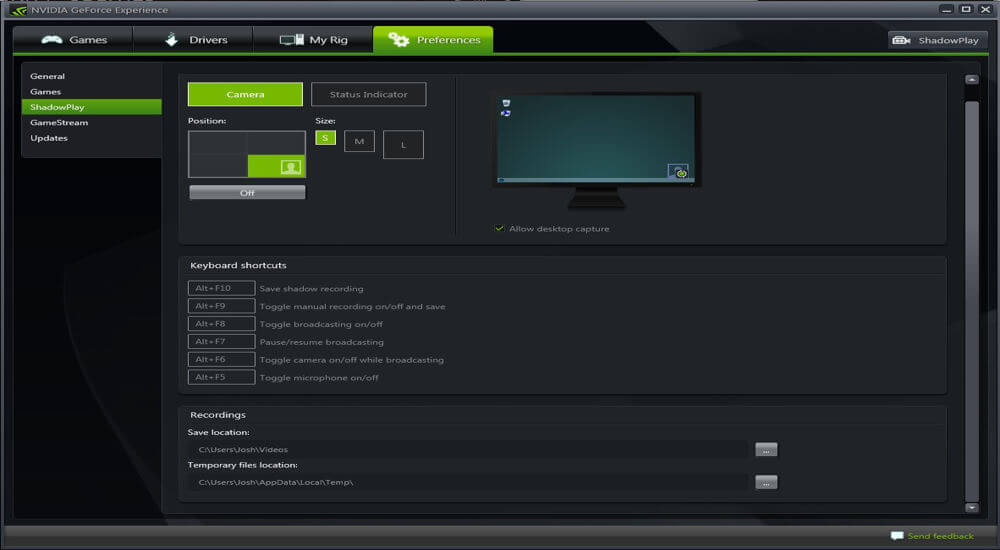
4: Включить захват рабочего стола
Если захват рабочего стола отключен, Shadowplay не обнаружит, если вы играете в игру в полноэкранном режиме. Вы можете включить эту функцию, чтобы запись снова заработала:
1) Откройте Shadowplay. Нажмите Предпочтение .
2) Убедитесь, что установлен флажок Разрешить захват рабочего стола .

3) Посмотрите, может ли ваш Shadowplay сейчас записывать.
Содержание
- Способ 1: Проверка включения экспериментальных функций
- Способ 2: Разрешение записи рабочего стола
- Способ 3: Выход из учетной записи Twitch
- Способ 4: Перезапуск службы NVIDIA
- Способ 5: Установка обновлений Media Feature Pack
- Способ 6: Обновление драйвера для GeForce Experience
- Способ 7: Переустановка драйверов NVIDIA
- Вопросы и ответы
Способ 1: Проверка включения экспериментальных функций
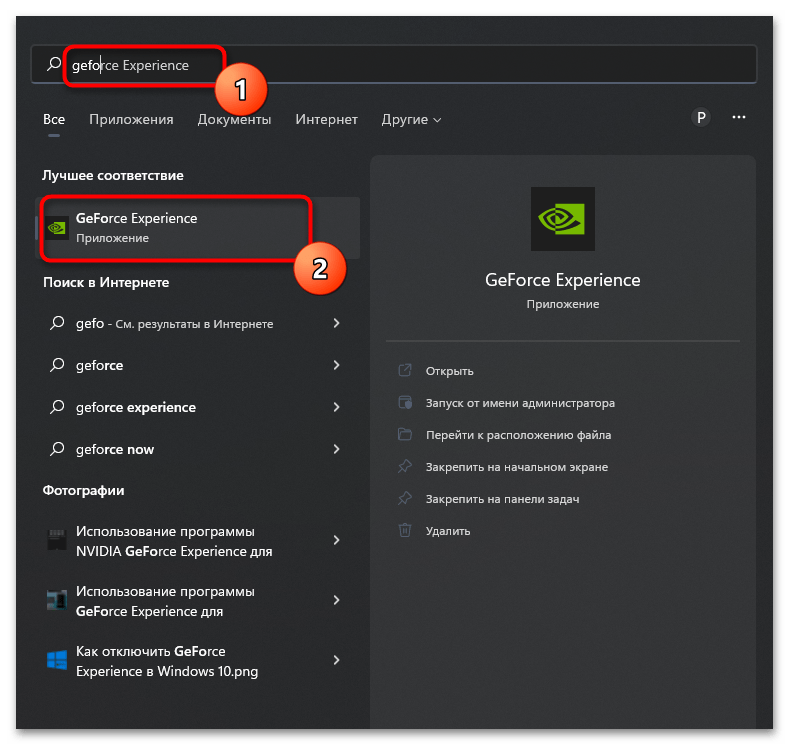
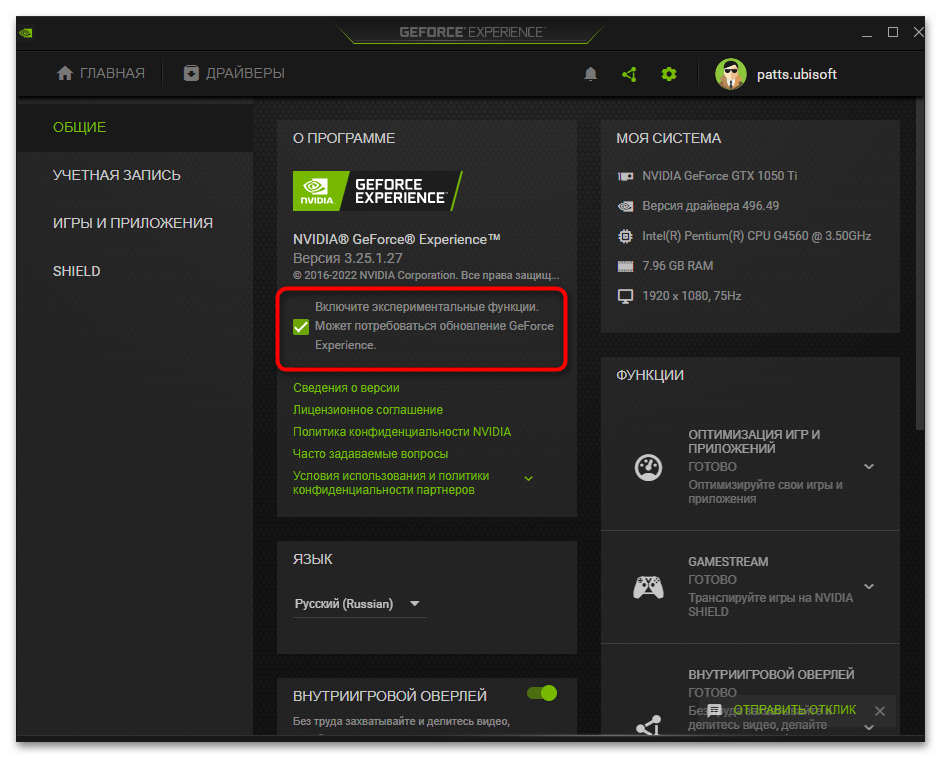
Наличие проблем с работой ShadowPlay свидетельствует о том, что у вас на ноутбуке уже установлена распространенная программа для управления играми и драйверами с названием GeForce Experience, поскольку без нее у вас и вовсе не удастся получить доступ к прямым трансляциям или записи экрана через фирменную технологию от NVIDIA. Поэтому начнем с самого простого метода решения проблемы, который подразумевает включение экспериментальных функций. Чаще всего этот параметр уже включен, но если вдруг оказалось, что он деактивирован, скорее всего, причина как раз будет в этом.
- Откройте меню «Пуск» и через поиск отыщите GeForce Experience, после чего запустите данное приложение.
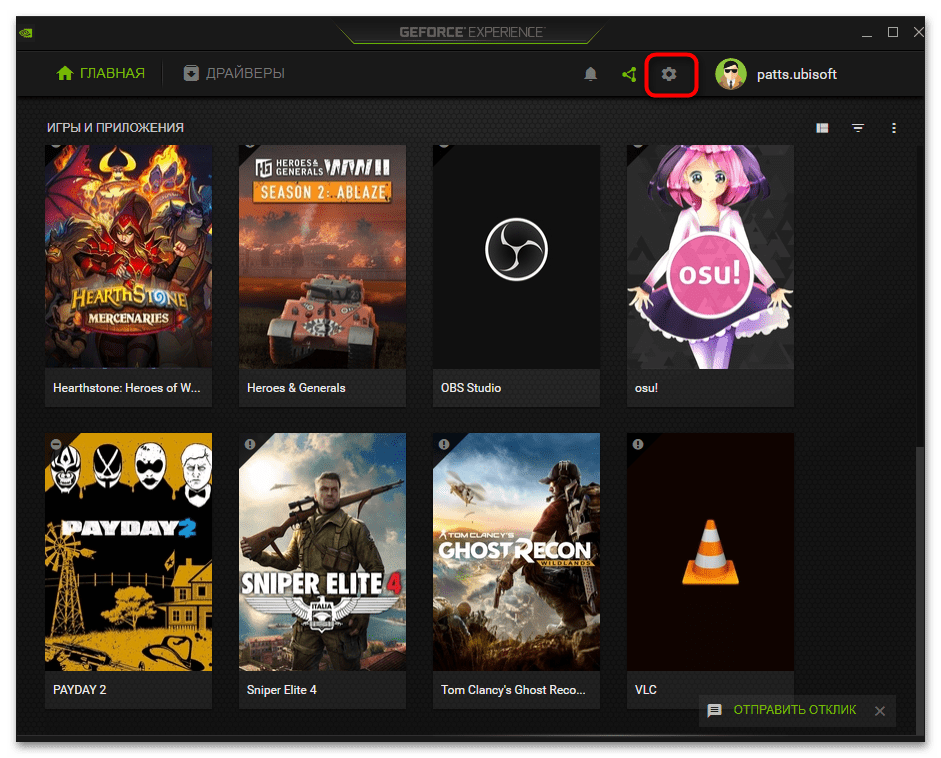
- Авторизуйтесь, если еще не сделали этого ранее, иначе кнопка с настройками не будет доступна, затем нажмите по значку с шестеренкой в правом верхнем углу.
- Вы сразу окажетесь в разделе с общими параметрами, где и нужно поставить галочку возле пункта «Включить экспериментальные функции».
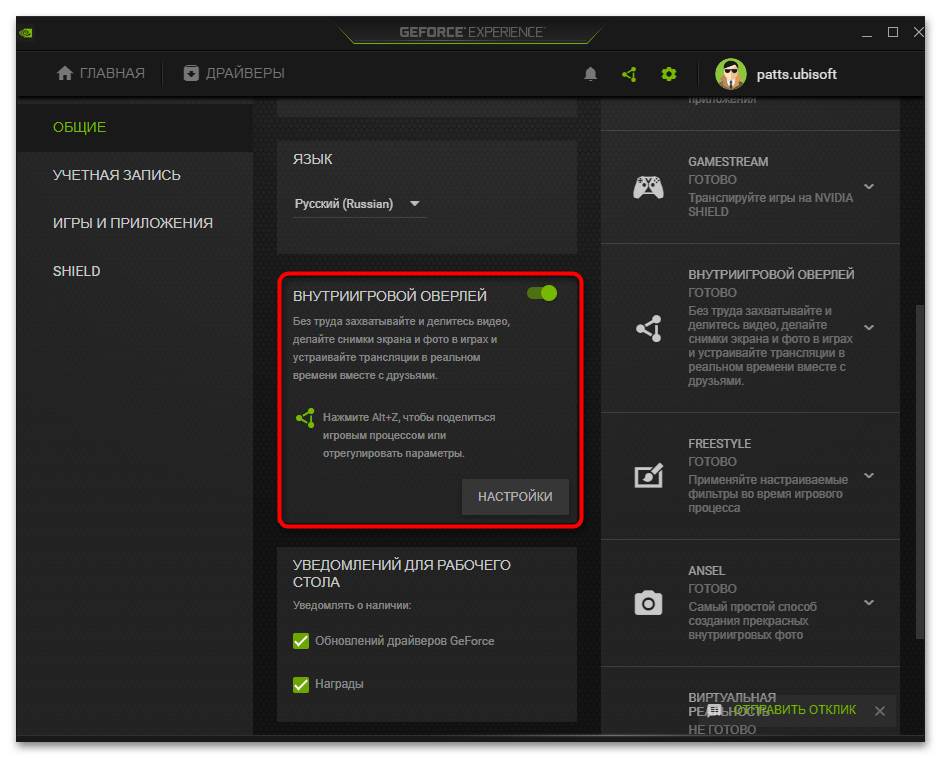
- Дополнительно обратите внимание и на переключатель «Внутриигровой оверлей», поскольку он нам еще понадобится для реализации последующих способов, если этот вдруг не поможет. Поэтому активируйте переключатель, если внутриигровой оверлей сейчас отключен.
Теперь попробуйте снова вызвать ShadowPlay, запустив игру или любую программу, которую хотите записать. Если функция снова недоступна, тогда переходите к дальнейшей проработке каждого следующего метода до тех пор, пока не найдете среди них решение, касающееся именно вашей ситуации.
Способ 2: Разрешение записи рабочего стола
Если для ShadowPlay стоит ограничение конфиденциальности, запрещающее возможность захвата рабочего стола, проблема с простым включением записи может возникнуть даже при работе с другими окнами, например, если при попытке активировать захват текущее окно не активно. Поэтому всегда рекомендуется разрешать средству от NVIDIA доступ к записи рабочего стола, чтобы избежать возникновения ошибок, связанных как раз с этим разрешением.
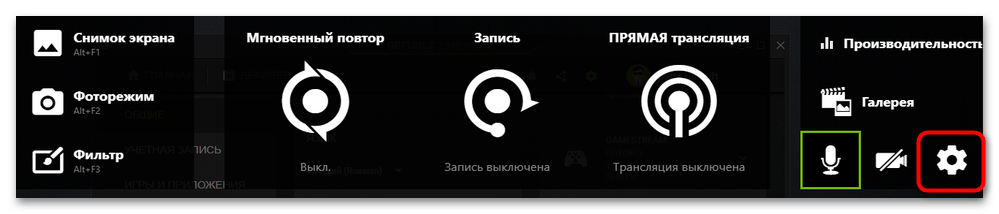
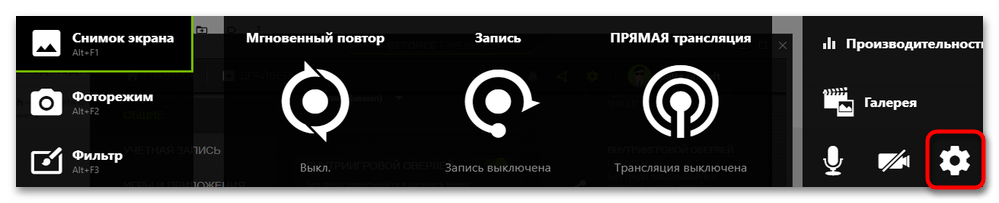
- Мы будем использовать самый простой переход к настройкам ShadowPlay, что осуществляется через оверлей. Для его вызова используйте стандартную комбинацию клавиш Alt + Z. Дождитесь появления окна с элементами управления и в нем нажмите по значку с изображением шестеренки для открытия параметров.
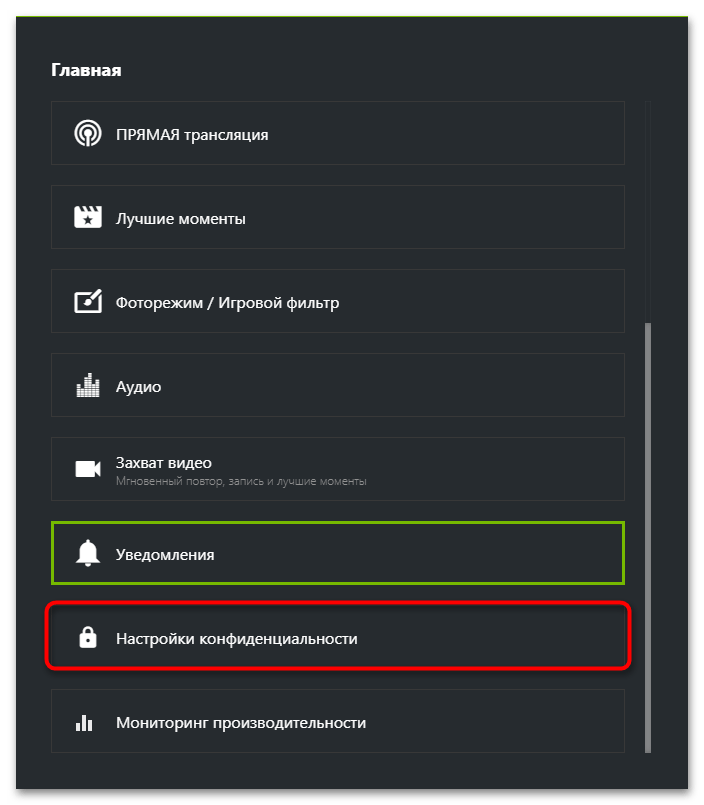
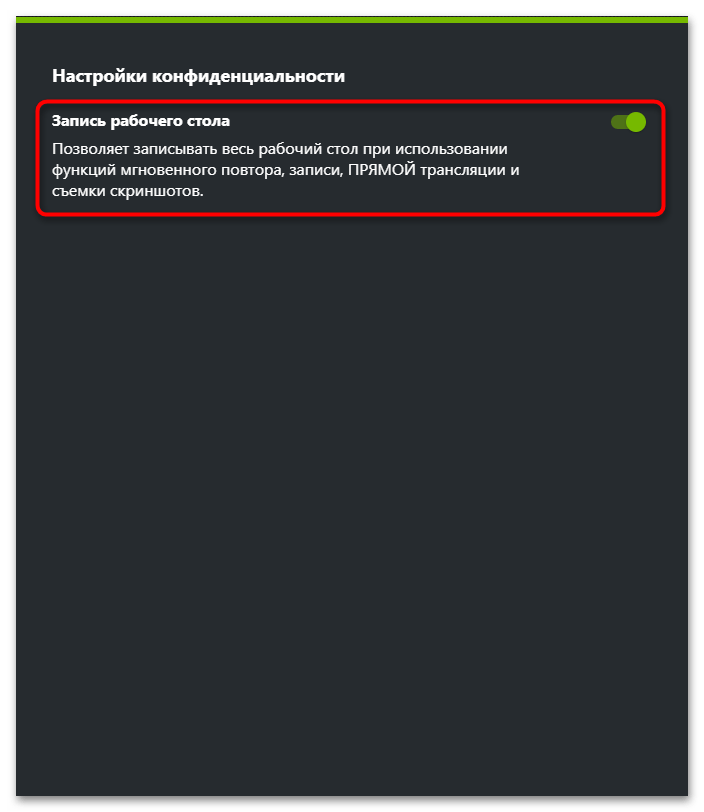
- В новом окне опуститесь по списку с настройками и найдите пункт «Настройки конфиденциальности», после чего кликните по нему левой кнопкой мыши.
- Пока что в данном окне вы найдете только одну настройку, которая как раз и связана с записью рабочего стола. Активируйте единственный переключатель, предоставив тем самым ShadowPlay необходимое разрешение. После этого выйдите из данного меню и попробуйте активировать запись повторно.

Способ 3: Выход из учетной записи Twitch
Мы не можем точно объяснить причину, по которой привязанная к NVIDIA GeForce Experience учетная запись Twitch влияет на разрешение записи экрана, но предполагаем, что это может быть связано со внутренними настройками конфиденциальности и сохранении видео на канале. Если у вас есть авторизация через Twitch, рекомендуем выйти из аккаунта и повторить попытку использовать ShadowPlay. Пользователи, которые и так не входили в свой аккаунт Твича через Experience, могут смело пропускать этот метод.
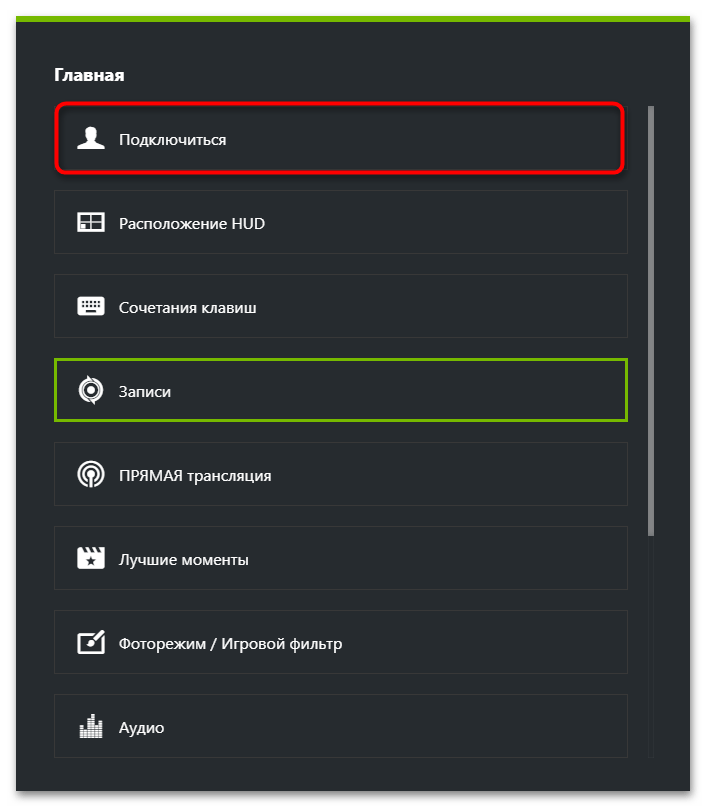
- Вызовите меню с кнопками взаимодействия точно так же, как это было показано в способе выше, после чего перейдите в настройки.
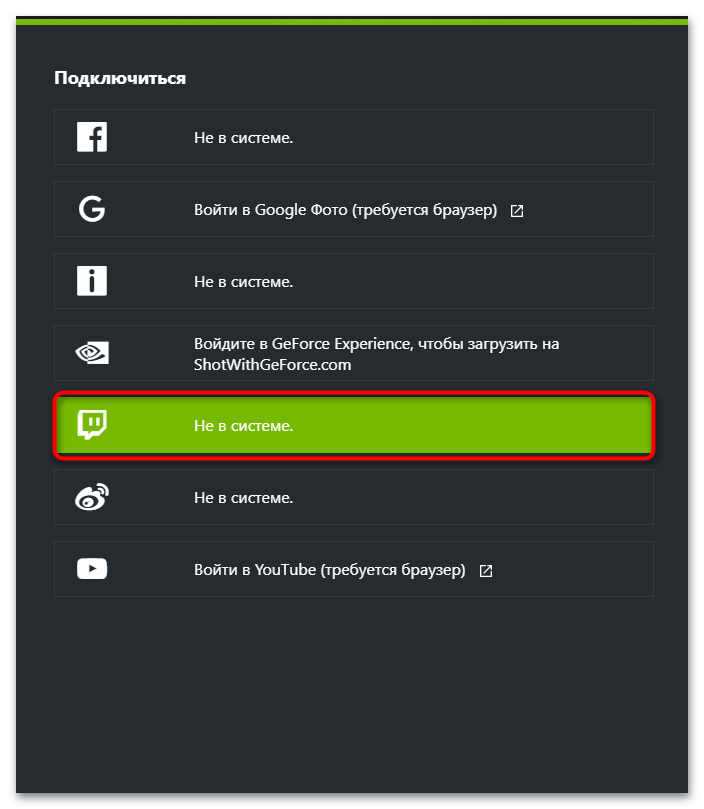
- Найдите пункт «Подключиться» и щелкните по нему левой кнопкой мыши.
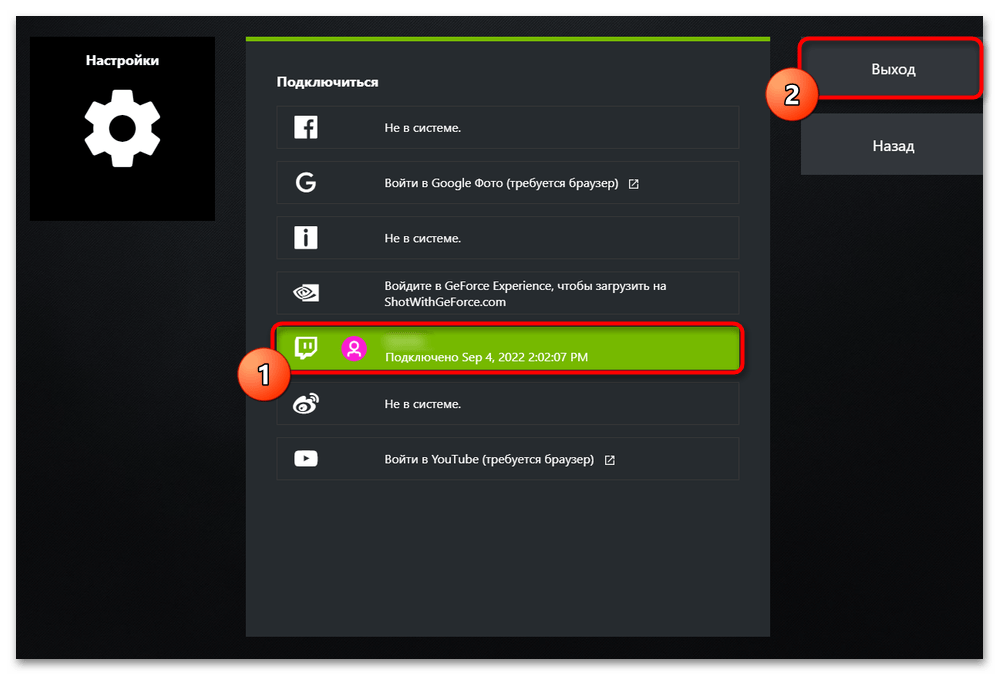
- Среди своих аккаунтов найдите Twitch по значку, выделите пункт ЛКМ и нажмите на «Выход», расположенный в правом верхнем углу.
- Дождитесь появления статуса «Не в системе.», затем закройте настройки и проверьте функционирование ShadowPlay, запустив запись любым удобным для вас методом.
Способ 4: Перезапуск службы NVIDIA
Существует вероятность, что ответственная за внутриигровой оверлей и действия, связанные с ним, служба NVIDIA просто некорректно функционирует и не может прийти в нормальное состояние даже после перезапуска Windows (если вы пробовали это делать после того, как обнаружили рассматриваемую проблему). В таком случае ее необходимо перезапустить вручную.
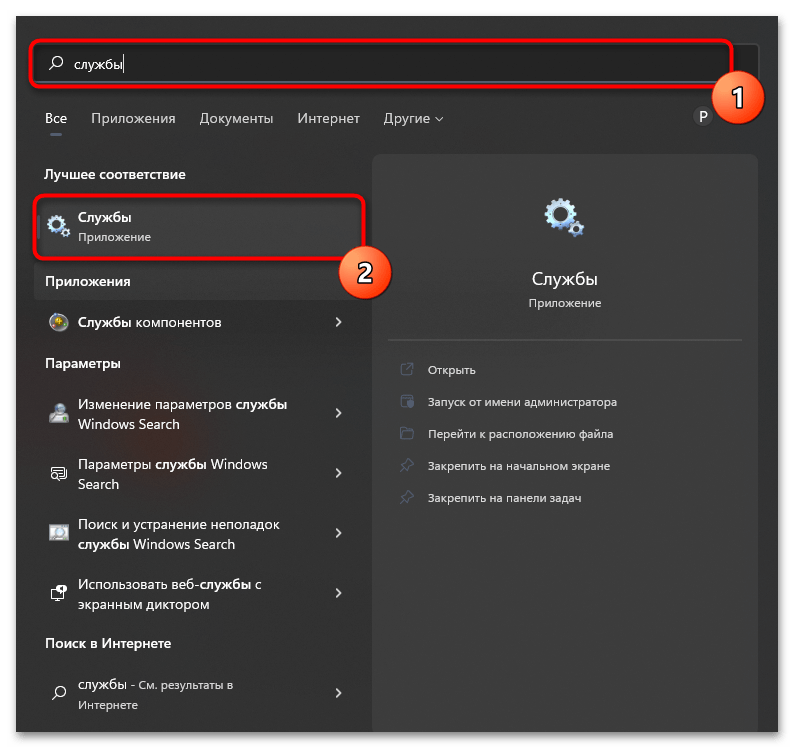
- Откройте меню «Пуск», активируйте строку поиска и отыщите через нее приложение «Службы», после чего запустите его.
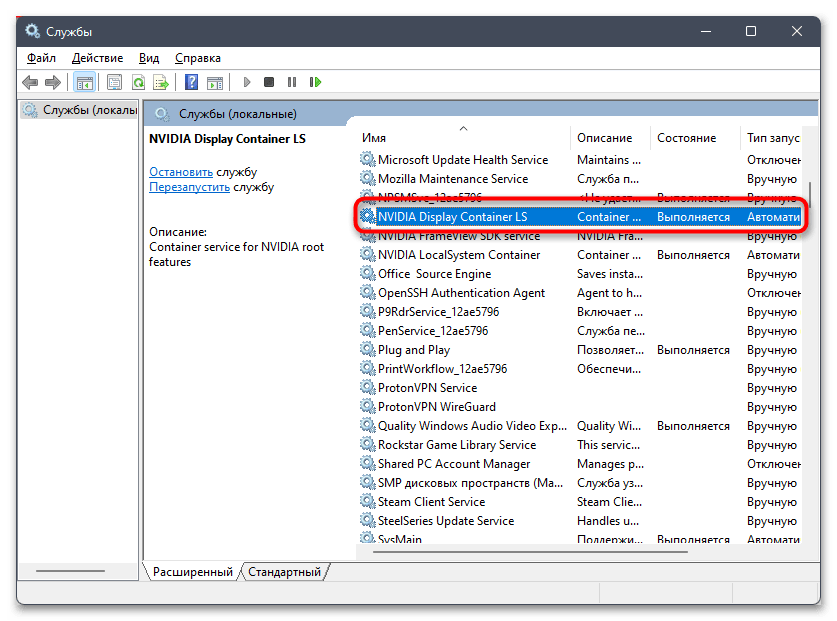
- Пролистайте список и отыщите строку с названием «NVIDIA Display Container LS», затем щелкните по данной службе правой кнопкой мыши.
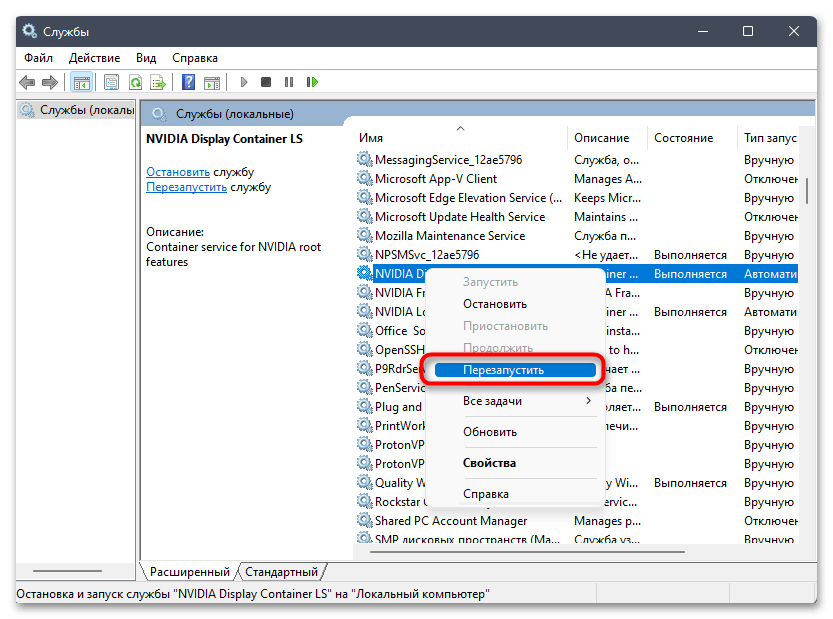
- Из появившегося контекстного меню выберите пункт «Перезапустить» и ожидайте окончания перезапуска службы. На этом выполнение данного метода считается завершенным.
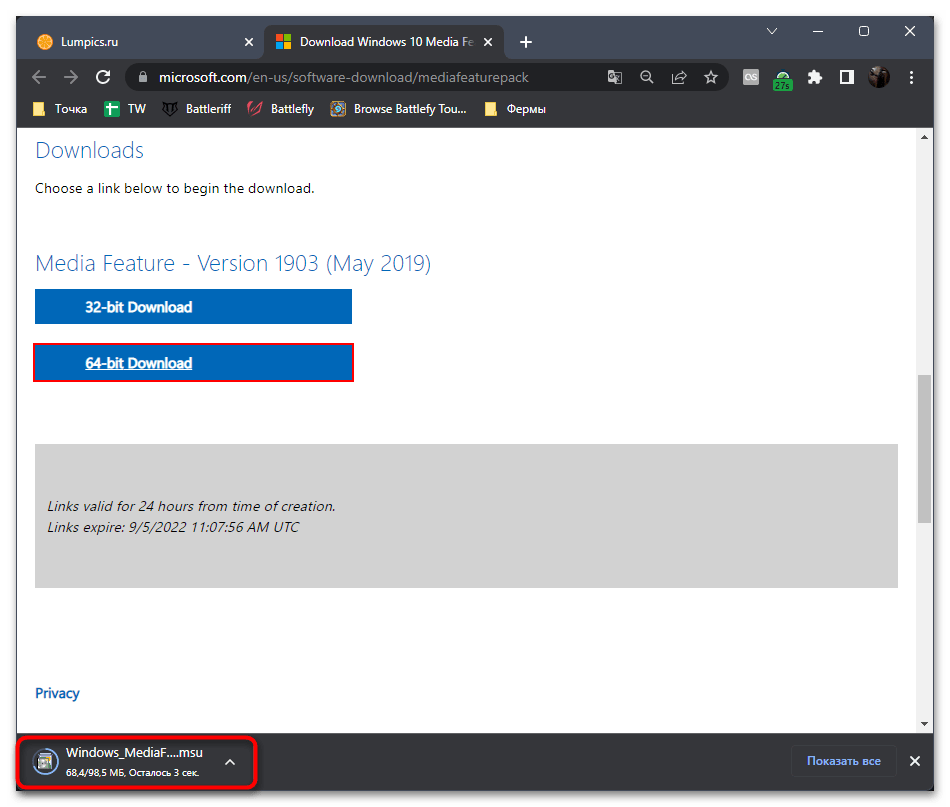
Способ 5: Установка обновлений Media Feature Pack
Media Feature Pack — официальный пакет видео- и аудиокодеков для Windows от компании Microsoft. Обычно устанавливается вместе с основными обновлениями, однако может быть пропущен, из-за чего на ноутбуке возникают проблемы с воспроизведением видео или захватом экрана. Как раз вторую функцию и выполняет ShadowPlay, поэтому отсутствие нужных кодеков может стать проблемой, из-за которой инструмент и не хочет запускаться.
Скачать Media Feature Pack с официального сайта
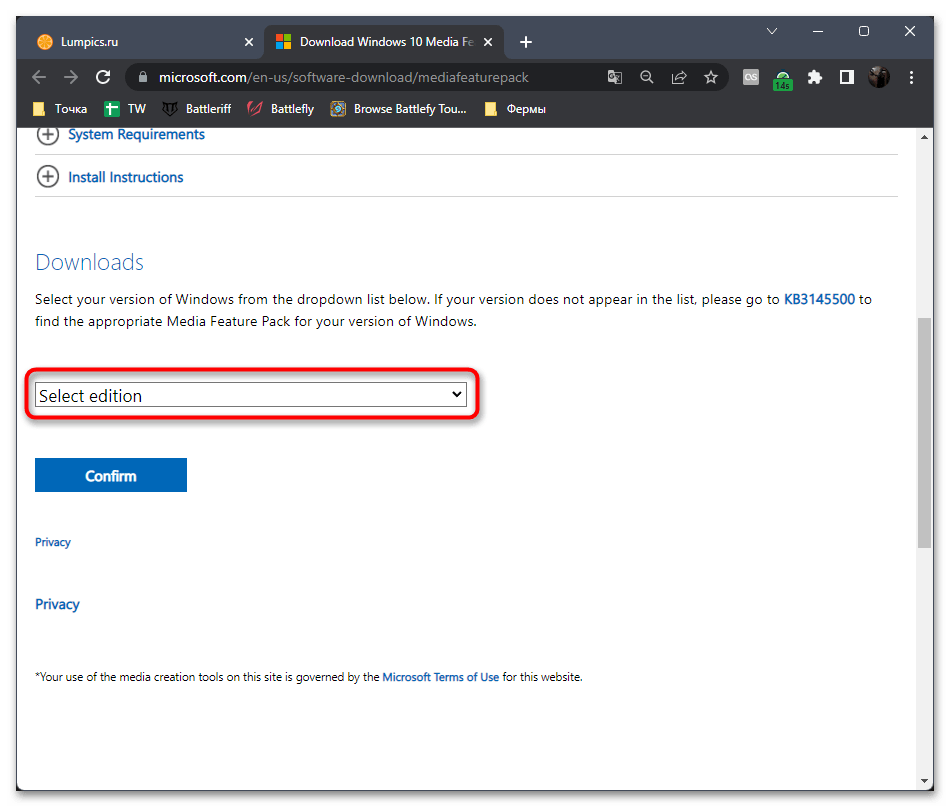
- Вам понадобится щелкнуть по ссылке выше, чтобы открыть официальную страницу с файлами кодека. На ней разверните меню выбора версий.
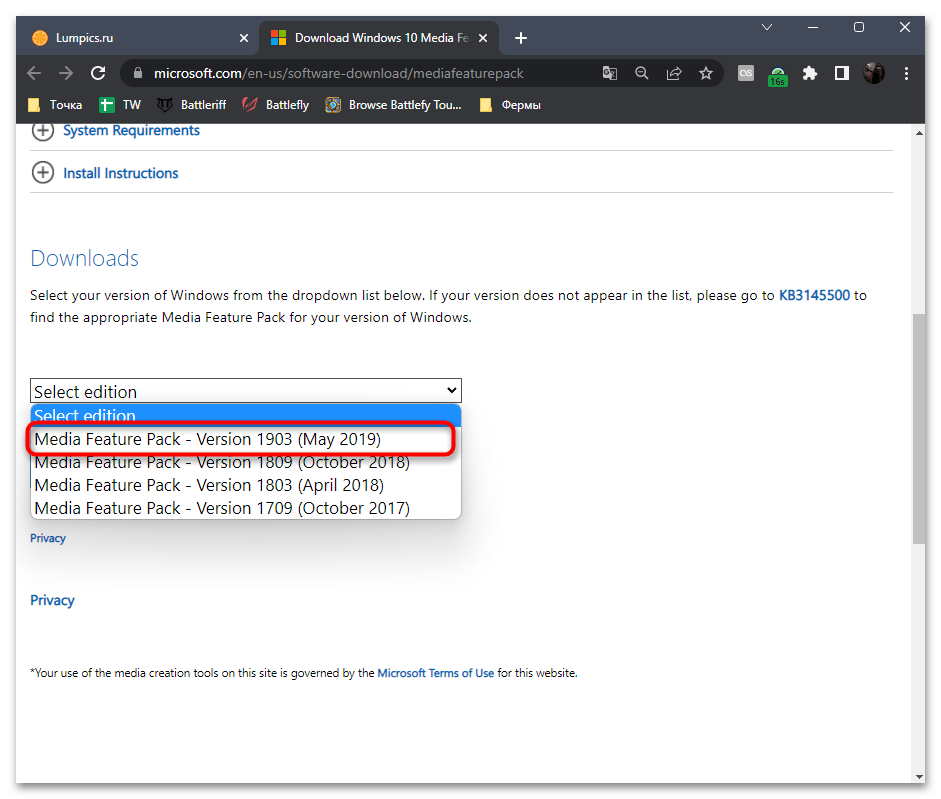
- Среди них найдите ту, что с самой свежей датой, и выберите ее, нажав по строчке левой кнопкой мыши.
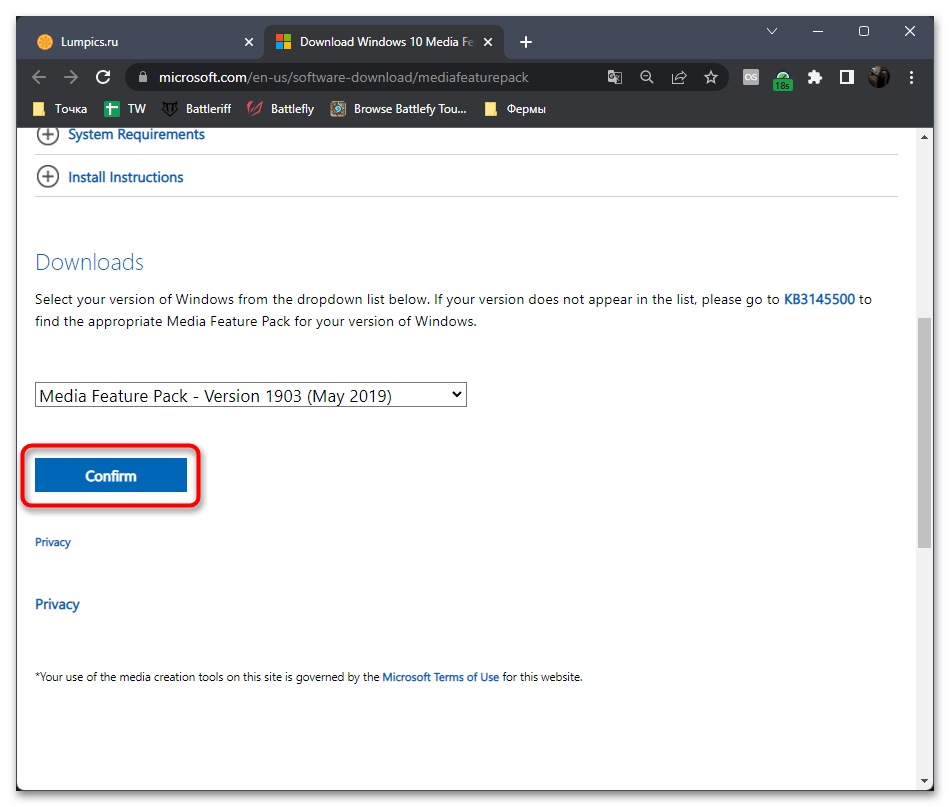
- Теперь перейдите к следующему шагу, кликнув по «Confirm».
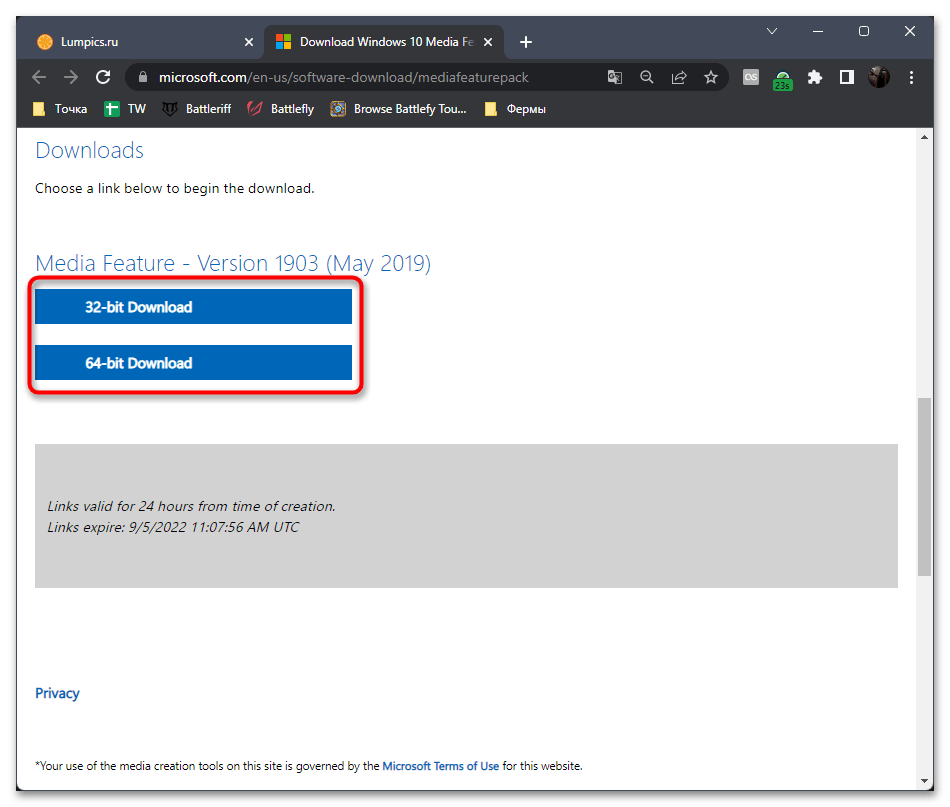
- На экране отобразятся две кнопки с выбором разрядности Windows. Соответственно, воспользуйтесь той, что соответствует установленной на вашем ноутбуке.
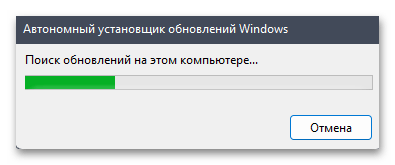
- Начнется процесс скачивания исполняемого файла. Дождитесь его завершения и произведите запуск.
- Вы будете уведомлены о том, что начался поиск обновлений на компьютере. Если увидите, что статус сменился на установку, не прерывайте этот процесс, ждите его окончания и отправьте ноутбук на перезагрузку, кликнув по появившейся в этом же окне кнопке. Только после этого переходите к повторной попытке использования захвата экрана от NVIDIA.
Способ 6: Обновление драйвера для GeForce Experience
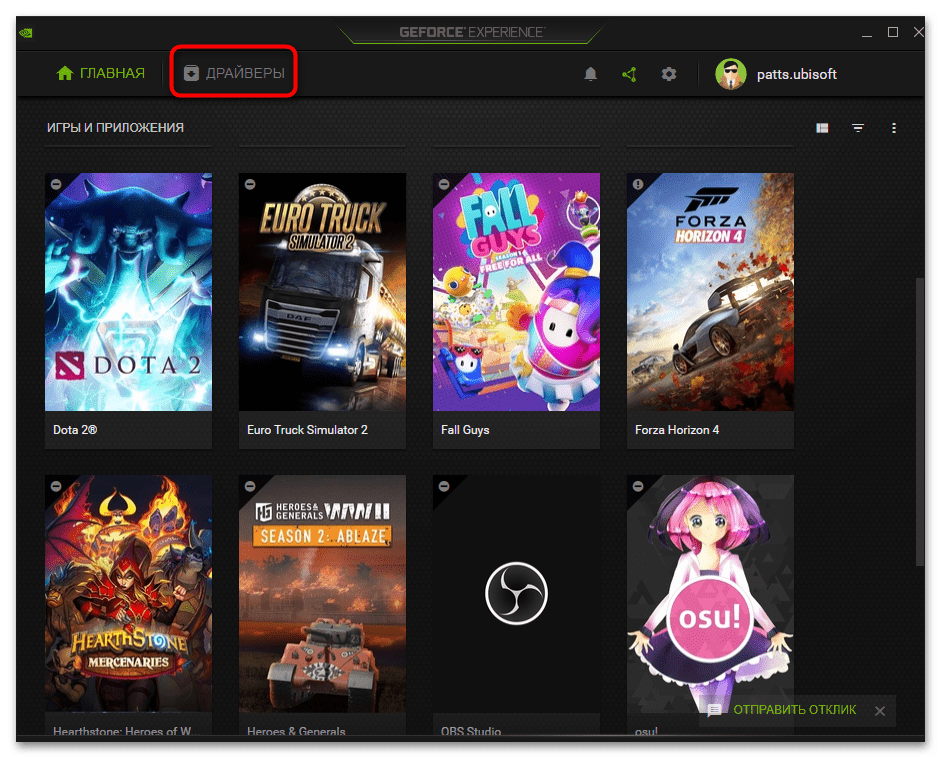
Иногда причиной отказа работы некоторых встроенных функций программного обеспечения становится его устаревшая версия. В таком случае понадобится установить обновления. Проще всего это сделать непосредственно через GeForce Experience, поскольку софт самостоятельно ищет новые версии всех связанных драйверов и предлагает автоматически установить их, без необходимости искать файлы в интернете.
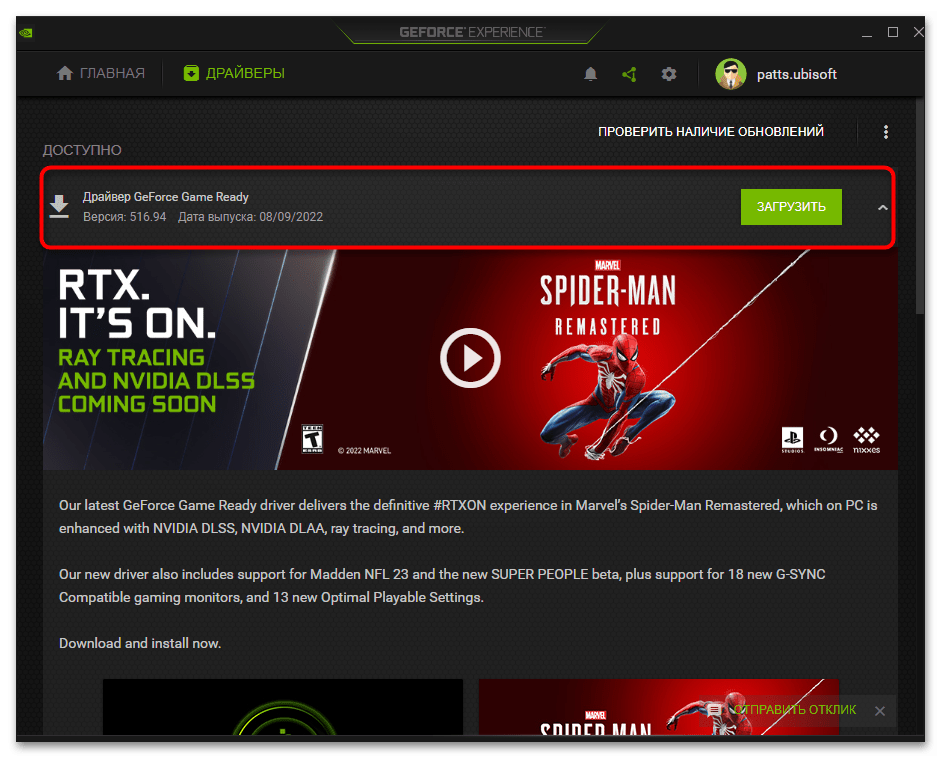
- Запустите программу и перейдите на вкладку «Драйверы».
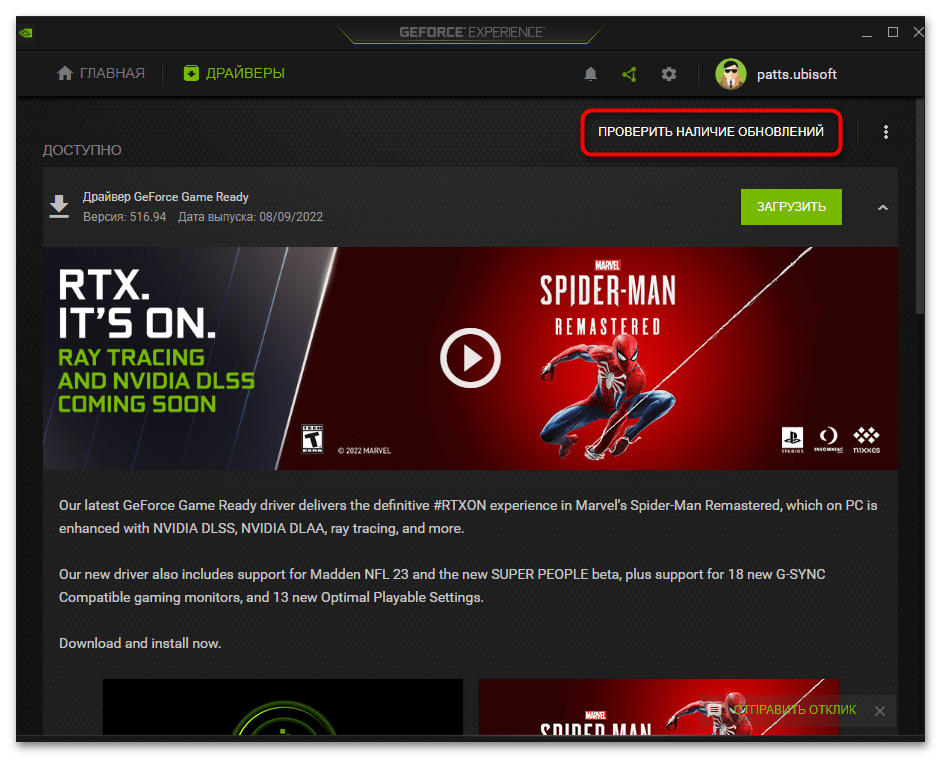
- Если обновления еще не найдены автоматически, нажмите для этого кнопку «Проверить наличие обновлений».
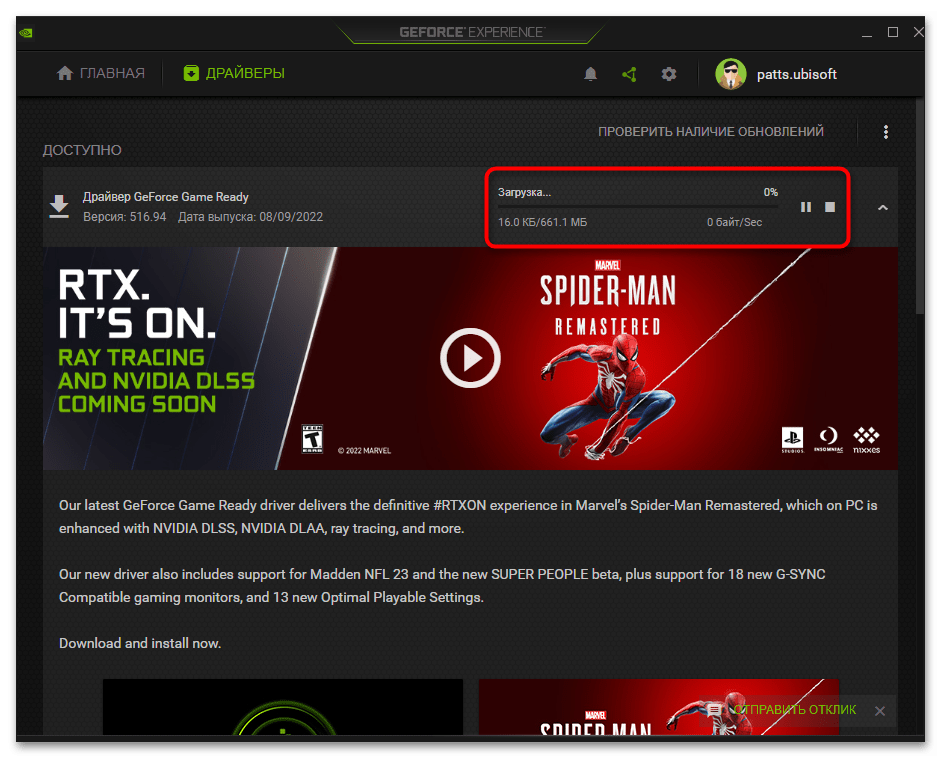
- По завершении этого процесса ознакомьтесь с результатами и нажмите «Загрузить», чтобы установить найденные обновления. При этом GeForce Experience может найти как свежую версию этой же программы, так и драйверы для вашей видеокарты, поэтому желательно установить все нововведения, чтобы исключить возможность появления связанных ошибок.
- Ожидайте окончания этого процесса, следя за загрузкой и установкой в этом же окне. В конце может потребоваться перезагрузка ноутбука, но такое уведомление появляется далеко не всегда.
Способ 7: Переустановка драйверов NVIDIA
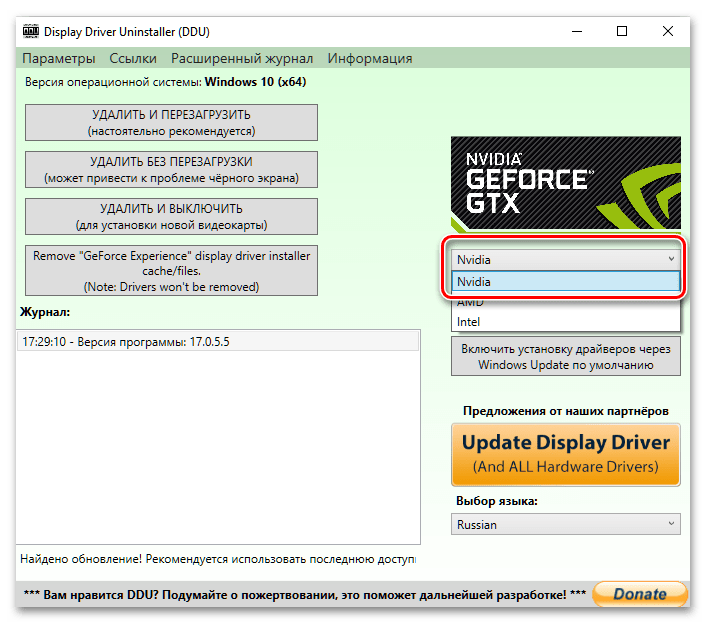
Это заключительный способ, прибегать к которому стоит только в том случае, если ни одна из рекомендаций выше не помогла достичь нужного результата. Мы бы рекомендовали использовать метод переустановки с использованием Display Driver Uninstaller, однако, помимо него, доступны и другие варианты. Ознакомиться со всеми ними и получить соответствующие инструкции вы можете в другом материале на нашем сайте, перейдя по следующей ссылке.
Подробнее: Переустановка драйверов видеокарт NVIDIA
Shadowplay is an Nvidia feature that people can use to record their gameplay using Geforce GPUs. It is primarily a very useful software that can be utilized very easily. However, recently, we have noticed some complaints from users that are complaining about Shadowplay not working. After coming to know of this, we decided to investigate the matter and drafted the following solutions to get rid of this issue.

Make sure to follow the steps written below carefully in order to avoid any further exaggeration of this issue. Also, make sure to glance over the reasons due to which it is triggered in the first place to develop a more informed understanding of this issue.
What Causes the Shadowplay Not Working Issue?
After investigating users’ claims about the Shadowplay not working issue, we came to the conclusion that the following are some of the most primary reasons due to which Shadowplay stops working.
- Glitched Service: It is possible that some Nvidia services might have been glitched due to which you are unable to get Shadowplay working properly. A simple fix to this is listed below where you can restart the services and they should start working normally.
- Disabled Nvidia Telemetry Service: If you have at any point disabled the Nvidia Telemetry Service, you will run into the Shadowplay not working issue because this service needs to be enabled in order for the Shadowplay feature to work properly.
- Missing Media Feature Pack on Windows 10: If your Windows installation is missing the Windows Media Feature Pack, you will run into the Shadowplay not working issue on your computer. A simple workaround to this should be to just download and install it on your computer.
- Experimental Features: In some cases, you might not have experimental features enabled on your computer due to which Geforce Experience is unable to properly deploy Shadowplay on your PC.
- Disabled Desktop Capture: Desktop Capture feature sometimes needs to be enabled in order for Shadowplay to record your screen. If the feature has been disabled, you will run into the Shadowplay not working error on your computer.
- Nvidia Driver Issue: If your Nvidia Driver has been installed incorrectly or if it has been glitched, Shadowplay will not be able to properly capture your screen. Therefore, it is recommended that you perform a clean installation of the Nvidia driver to fix the Shadowplay not working issue.
- Geforce Experience Installation: In certain situations, it is possible that the Geforce installation on your computer has been corrupted due to which you are unable to run Shadowplay properly. Therefore, completely reinstalling Geforce Experience should be the go-to fix in your case.
Now that you have read through the reasons due to which this error occurs, we can finally move on towards deploying fixes.
Before You Start:
We think that it is important that you get some basic troubleshooting out of the way before moving on to the more complex solutions.
- Make sure to completely restart your PC, all your applications and software.
- Right-click on Geforce Experience and select the “Run as Administrator” button and check if doing so enables you to be able to run the game.
- Make sure that you reinstall the software completely.
- Make sure that the Share Settings are enabled inside the Geforce Experience software.
- Make sure that you try to disable Nahimar, Razer Kraken, and Xonar software in the background.
- Make sure that you have enough space available in your recording folder as well as your root drive, if not, make sure to clear out at least 4 GB from each of them.
- Try turning off Twitch.
- Try to run the games in fullscreen mode.
Fixing the Shadowplay not Working Issue:
Solution 1: Adjusting System for Best Performance
- Press “Windows’ + “R” to open the Run prompt.
- Type in “control panel” and press “Enter” to launch the control panel.

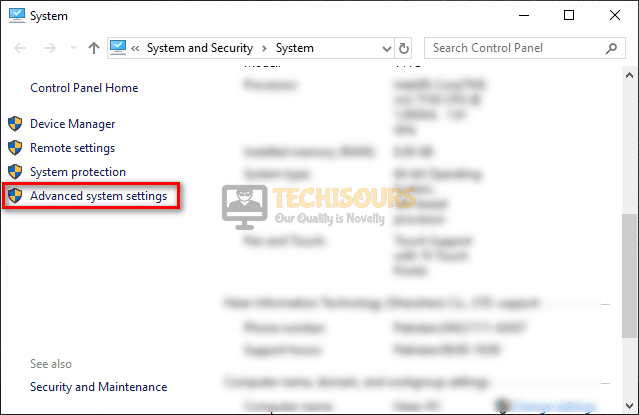
Open Control panel - Click on the “System and Security” option and then click on the “System” heading.
- Inside this setting, click on the “Advanced System Settings” button and then click on the “Advanced” tab.

Advanced system settings - Under “Performance”, click on the “Settings” option and check the “Adjust for best performance” button.
- Select the “Apply” option and close out this window.
- Check to see if doing so has fixed the Shadowplay not working issue.

Solution 2: Toggling Administrator Tag
- Navigate to the following location.
C:\Program Files\NVIDIA Corporation\NVIDIA GeForce Experience
- Inside this folder, you should be able to see the “Nvidia Share.exe” application.
- Right-click on it and select the “Properties” button.
- Once inside the properties, click on the “Compatibility” tab and then if the “Run this program as an administrator” box is unchecked, make sure to check it and if it is checked, make sure to uncheck it.

Opening Compatibility Tab - After toggling this setting, click on the “Apply” button and then select the “OK” button.
- Check to see if making this change fixes the Shadowplay not working error on your computer.

Solution 3: Installing Missing Packages
- Navigate to this download link and click on the “Download” button to download the Windows Media feature pack.
- Select the edition according to your Operating system version and click on “Confirm”.

Confirming Media pack Download - Install the downloaded executable and all of its tag-along software.
- After doing so, navigate to this download link to download Microsoft Visual C++ 2013.
- After downloading, run the executable, and install the software.
- Check to see if installing both of these helps in getting Shadowplay working again.

Solution 4: Perform a Clean install of Geforce Experience
- Press “Windows’ + “R” to open the Run prompt.
- Type in “Appwiz.cpl” to open the application wizard.

Typing in “Appwiz.cpl” and pressing “Enter” - Inside the application wizard, scroll down and right-click on the “Geforce Experience” software.
- Select the “Uninstall/Change” option and then follow through with the setup by following the on-screen instructions to completely remove this software from your computer.

Uninstall NVIDIA GeForce Experience - After removing the software, navigate to the following folder on your computer.
C:\Program Files\NVIDIA Corporation\
- In this folder, if you see an “Nvidia Geforce Experience” folder, click on it and press “Shift’ + “Delete” to remove it from your computer.
- Download the Geforce Experience software again and install it on your computer.
- Check to see if completing this whole reinstallation fixes the issue.
- If this doesn’t fix the issue, make sure to also remove any other recording software because that might be what is causing this conflict.


Solution 5: Turning Desktop Capture ON
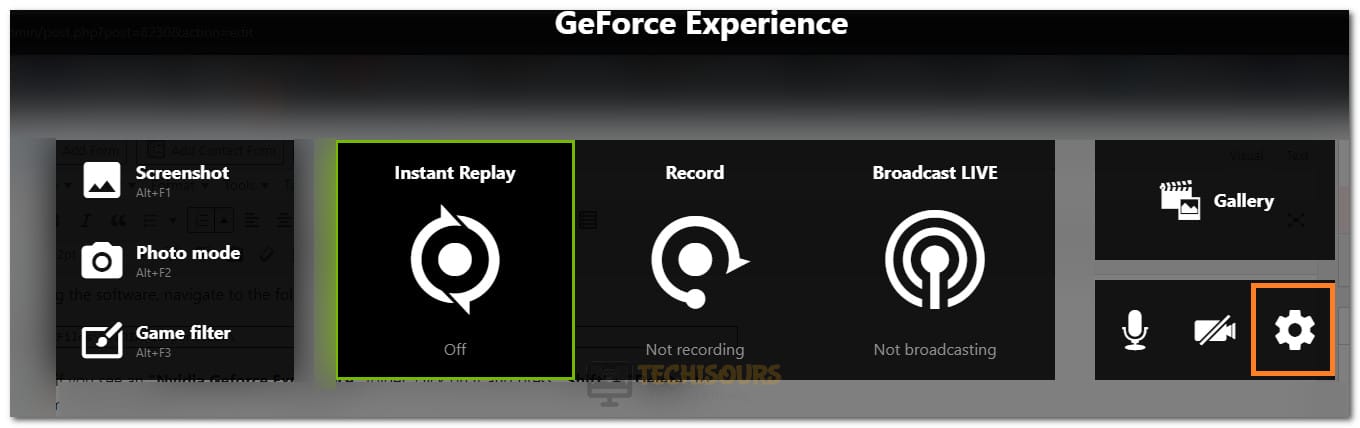
- Launch Geforce Experience and click on the In-game overlay option in the top right corner.
- After clicking on this, select the “Settings” knob and then scroll down and select the “Privacy” option.

Opening Settings - Make sure to turn on the Desktop Capture toggle.
- Check to see if by doing this, you are able to fix the Shadowplay not working issue.
Solution 6: Create Single Track
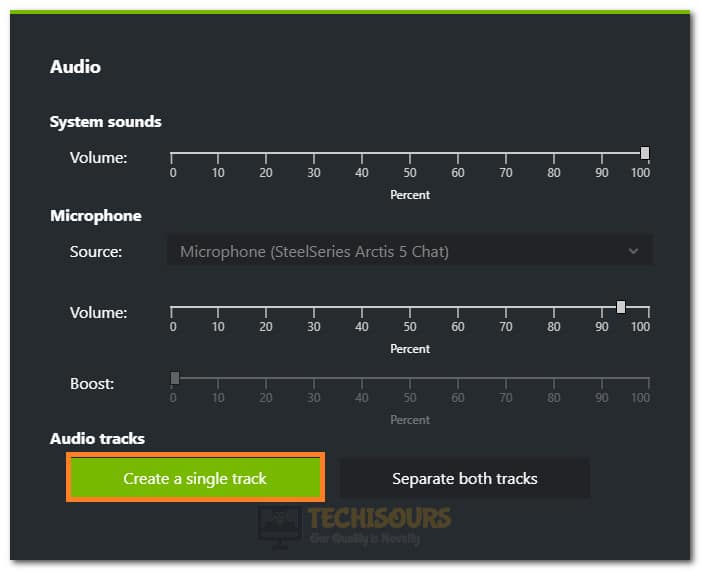
- With Geforce Experience and Shadowplay running in the background, press “Alt+Z” on your keyboard to open up Shadowplay.
- Click on the “Settings” cog and then scroll down and select the “Audio” option.
- Make sure that in this setting, the “Create Single Track” option is selected instead of the Separate both tracks option.

Selecting Create Single Track Option - Check to see if by doing this, shadowplay starts working normally again.
Solution 7: Checking App Volumes
- Right-click on the “Speaker” icon in your left corner of the system tray.
- Click on the “Open Sound Settings” option and then select the “App Volume and Device Preferences” option.

Clicking on the App Volume and Device Preferences - Make sure that under the “App Volume” heading, both the master volume and the Nvidia Container volume is turned all the way up.
- Check to see if by completing this step, the Shadowplay not working error is fixed.

Solution 8: Enabling Nvidia Device
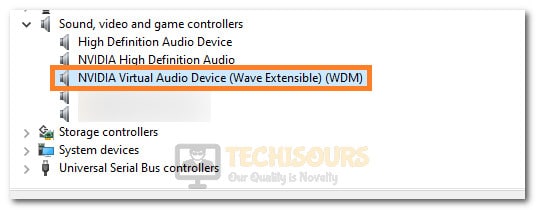
- Press “Windows’ + “R” to open the Run prompt.
- Type in “devmgmt.msc” and press “Enter” to launch into the device manager.

Typing devmgmt.msc in the Run prompt - After doing so, expand the “Sound, Video and Game Controllers” tab and right-click on the “Nvidia Virtual Device (Wave Extensible) (WDM)” option.

Enabling Nvidia Device - Click on the “Enable Device” option if it has been disabled to enable it back up again.
- After enabling this device, check to see if Shadowplay starts working normally again.

Solution 9: Selecting Default Playback Device
- Right-click on the “Speaker” icon on the lower left of your system tray and select the “Sounds” option.
- Click on the “Playback” tab and make sure that you have selected the main playback device on your computer as the default one.

Select “Sound” - If that is not the case, make sure to click on your playback device in the list and then select the “Set Default” option.
- Check to see if by doing so, you are able to fix this issue.

Solution 10: Disable Aero Theme on Windows 7
- Press “Windows’ + “R” to open the Run prompt.
- Type in ” Control Panel” and press “Enter” to launch it on your computer.

Typing in Control Panel - Inside the control panel, click on the “appearance and Personalization” option.
- Inside this, click on the “Change Theme” option, and then from the list of themes, select a “Basic” theme instead of the Aero themes list.
- Click on “Apply” to save your changes and head back over to the desktop.
- Check to see if by disabling the Aero theme, Shadowplay not working issue has been resolved.

Solution 11: Disabling Blur behind Setting
- Press “Windows’ + “R” to open the Run prompt.
- Type in “regedit” and press “enter” to launch the registry editor.
Typing “regedit” - Inside the registry editor, navigate to the following address.
Computer\HKEY_CURRENT_USER\SOFTWARE\Microsoft\Windows\CurrentVersion\Themes
- On the right side, double click on the “Enable Blur Behind” entry if you have one and set its value to “1”.
- Save your changes and check to see if by doing so, you are able to fix the Shadowplay not working issue.
- If the setting isn’t available, right-click anywhere and click on the “New> Dword 32-bit Value” option.
- Once you have created this new value, name it “EnableBlurBehind” and press “Enter”.
- Set its value to “1′ Similarly and exit out of the registry.

Set value of the DWORD - Check to see if the issue has been fixed by doing so.


Solution 12: Restart Nvidia Services
- Press “Windows’ + “R” to open the Run prompt.
- Type in “services.msc” and press “Enter” to launch the service management window.

Typing in “services.msc” - Inside this window, right-click on the “Nvidia Display Container LS” and select the “Restart” option.
- Similarly, find all Nvidia related services in the list and restart them and if any one of them has been stopped, right-click on them and select the “Start” button.
- Some prominent services should be “Nvidia Streaming Service” and other container services.
- Check to see if by doing so, the Shadowplay not working error is resolved.

Solution 13: Deploying Experimental Features
- Launch Geforce Experience and click on the “Settings” cog on the top right side.
- Inside settings, check the “Enable Experimental Features” option.

Enabling Experimental Features on Nvidia Geforce Experience - Closeout of Geforce Experience after doing so and navigate to the following folders.
C:\Program Files\NVIDIA Corporation\NVIDIA GeForce Experience
- Inside this folder, delete the “Share.Json” and the “Geforce Experience.json” files.
- Relaunch Geforce Experience and close out of it again.
- Reinstall Geforce Experience and restart the computer.
- Check to see if you are now able to use the Shadowplay feature properly.

Solution 14: Fix Nvidia Shadowplay for a Specific Game
For some users, the Nvidia Shadowplay feature wasn’t working for a specific game such as Valorant. In order to fix this, follow the steps below.
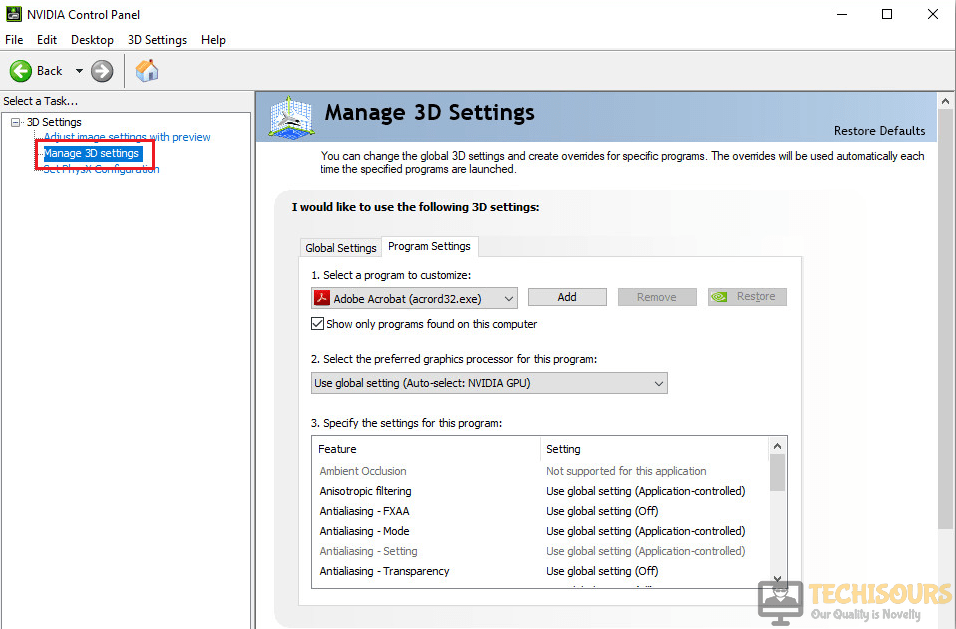
- Right-click anywhere on your desktop and click on the “Nvidia Control Panel” option.
- Once the control panel is launched, click on the “Manage 3D settings” button.

Manage 3D Settings - Click on the “Program Settings” tab and make sure to add the game for which Shadowplay isn’t working.
- Check to see if by doing so you are able to fix the Shadowplay not working issue.
- If you are still getting the Shadowplay not working issue with Valorant, navigate to the following location and right-click on the mentioned file.
C:\Riot Games\VALORANT\live\ShooterGame\Binaries\Win64\VALORANT-Win64-Shipping.exe
- Click on “Properties” and then select the “Compatibility” tab.
- In the compatibility settings, make sure to check the “Disable Fullscreen Optimizations” option.
- Check to see if doing so fixes the issue.
Solution 15: Perform Clean Driver Install
- As a last resort, you can try and perform a fresh install of your GPU drivers and check if you are able to fix the Shadowplay not working error by doing so
- For that, download the Display Driver Uninstaller software from this website.
- After the software has been downloaded, follow the onscreen instructions to uninstall the Nvidia Driver completely and all of its associated software as well.
- After uninstalling, you will automatically be shifted to the Microsoft Basic Visual Adapter.
- Navigate to the Nvidia website and download the drivers for your Graphics Card by specifying its model.
- Download and install these drivers on your computer and Geforce Experience along with it.
- Check to see if by doing so, the Shadowplay not working error is fixed.
Hopefully, the shadowplay issue must be resolved by now but if you need further assistance, contact here.

Alan is a hardcore tech enthusiast that lives and breathes tech. When he is not indulged in playing the latest video games, he helps users with technical problems that they might run into. Alan is a Computer Science Graduate with a Masters in Data Science.