Инструмент обрезки был давним важным дополнением к Windows, которому удалось выжить во многих версиях, которые поначалу не были очень хорошо приняты публикой. Если вы тот, кто делает много снимков экрана, то вы, вероятно, знакомы с Windows + Shift + S Сочетание клавиш.
К сожалению, в последнее время инструмент для обрезки не работает для многих пользователей, особенно для тех, кто недавно обновился до Windows 11 с Windows 10, поскольку они получают эту длинную ошибку: «Это приложение не открывается. Проблема с Windows заключается в том, что функция Screen Snipping не открывается. Обновление вашего компьютера может помочь исправить это.
Если вы находитесь в одной лодке, то вот несколько исправлений, которые должны помочь вам снова запустить Snipping Tool в вашей системе.
Проблема с ножницей: как исправить
Вот как можно исправить Snipping Tool на ПК с Windows 11. Вы можете использовать первые два исправления, найденные сообществом, или последний метод, предложенный Microsoft. Давайте начнем.
Исправление №1: используйте старую версию приложения
Если вы недавно обновились с Windows 10, вы можете использовать старую версию Snipping Tool, которая будет доступна в вашем драйвере загрузки. Windows хранит вашу предыдущую установку в течение первых 10 дней с даты вашего обновления. Вы можете использовать это в своих интересах, чтобы использовать старую версию Snipping Tool на своем ПК.
Чтобы начать, перейдите по следующему пути.
C:/Windows.old/Windows/System32/
Найдите SnippingTool.exe в текущей папке и скопируйте его в буфер обмена.
Теперь перейдите по следующему пути.
C:/Windows/System32/
Вставьте файл, который вы скопировали в буфер обмена ранее.
Попробуйте использовать Windows + Shift + S сочетание клавиш сейчас и нажмите + Создать. Инструмент Snipping Tool теперь должен работать должным образом, и вы больше не должны получать сообщение «Это приложение не открывается. Проблема с Windows заключается в том, что функция Screen Snipping не открывается. Обновление вашего компьютера может помочь исправить это. ошибка.
Исправление №2: переустановите Snipping Tool.
Если вышеуказанное исправление не помогло вам, вы можете попробовать переустановить Snipping Tool. Следуйте приведенному ниже руководству, чтобы начать работу.
Нажмите Windows + S на клавиатуре найдите PowerShell и нажмите «Запуск от имени администратора».
Теперь введите следующую команду и нажмите Enter на клавиатуре.
get-appxpackage *Microsoft.ScreenSketch* | remove-appxpackage
Инструмент Snipping Tool будет удален с вашего ПК. Мы рекомендуем вам перезагрузить компьютер на этом этапе. После перезапуска снова запустите PowerShell от имени администратора и выполните следующую команду.
Get-AppXPackage *Microsoft.ScreenSketch* -AllUsers | Foreach {Add-AppxPackage -DisableDevelopmentMode -Register "$($_.InstallLocation)AppXManifest.xml"}
После установки приложения вы можете закрыть PowerShell и использовать Snipping Tool по назначению. Теперь приложение должно работать на вашем ПК должным образом.
Исправление № 3: Последнее средство: обновите компьютер
Удивительно, но это официальное исправление, выпущенное Microsoft, чтобы снова запустить Snipping Tool в вашей системе. Следуйте приведенному ниже руководству, чтобы обновить свой компьютер.
Нажмите Windows + iи щелкните «Центр обновления Windows».
Щелкните «Дополнительные параметры».
Теперь нажмите «Восстановление».
Нажмите “Сбросить ПК”.
Выберите «Сохранить мои файлы» и следуйте инструкциям на экране, чтобы обновить свой компьютер.
Мы надеемся, что это руководство помогло вам снова запустить Snipping Tool на вашем компьютере. Если у вас возникнут какие-либо проблемы или возникнут вопросы, не стесняйтесь оставлять их в разделе комментариев ниже.
Многие функции из предыдущей версии Windows перекочевали и в одиннадцатую версию, куда входит и приложение «Ножницы» для создания скриншотов. Некоторые пользователи сталкиваются с проблемами в его работе и не могут сделать снимок экрана.
Я постараюсь разобраться в этой проблеме, представив вашему вниманию все известные методы ее решения.
Перед просмотром следующих рекомендаций убедитесь в том, что скриншоты действительно не создаются. Обычно они сохраняются в папке C:\Users\\Pictures\Screenshots (Снимки экрана). Перейдите в папку и убедитесь в отсутствии изображений в ней.
Способ 1: Использование другой комбинации клавиш
В первую очередь хочется обратить внимание на ситуацию, когда скриншоты не сохраняются исключительно при использовании горячих клавиш для их создания, куда входит PrtSc (Print Screen). Скорее всего, под упомянутую клавишу записано какое-то функциональное действие. Если после нажатия на нее ничего не происходит, рекомендую попробовать комбинацию Fn + PrtSc или Win + PrtSc.
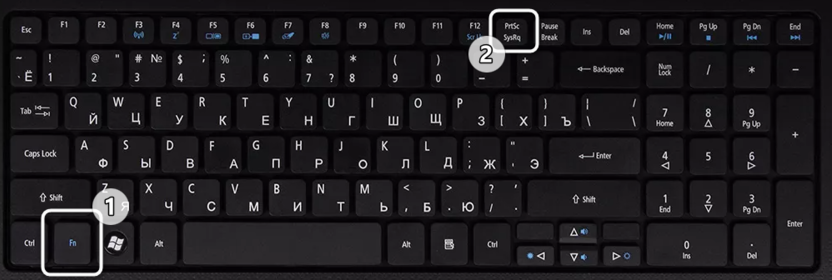
Еще есть сочетание Alt + PrtSc, которое должно создать снимок исключительно активного окна, игнорируя все остальное содержимое. Попробуйте разные варианты и убедитесь в том, что один из них сработал. Если это не так, переходите к следующим методам.
Комьюнити теперь в Телеграм
Подпишитесь и будьте в курсе последних IT-новостей
Подписаться
Способ 2: Проверка установленного времени
Неправильное время, установленное в операционной системе, может сказываться на работе различных системных приложений, в том числе и «Ножниц». Конечно, случается такое редко, но все же стоит проверить текущее время и сравнить его с тем, которое выдаст Гугл или Яндекс при соответствующем запросе.
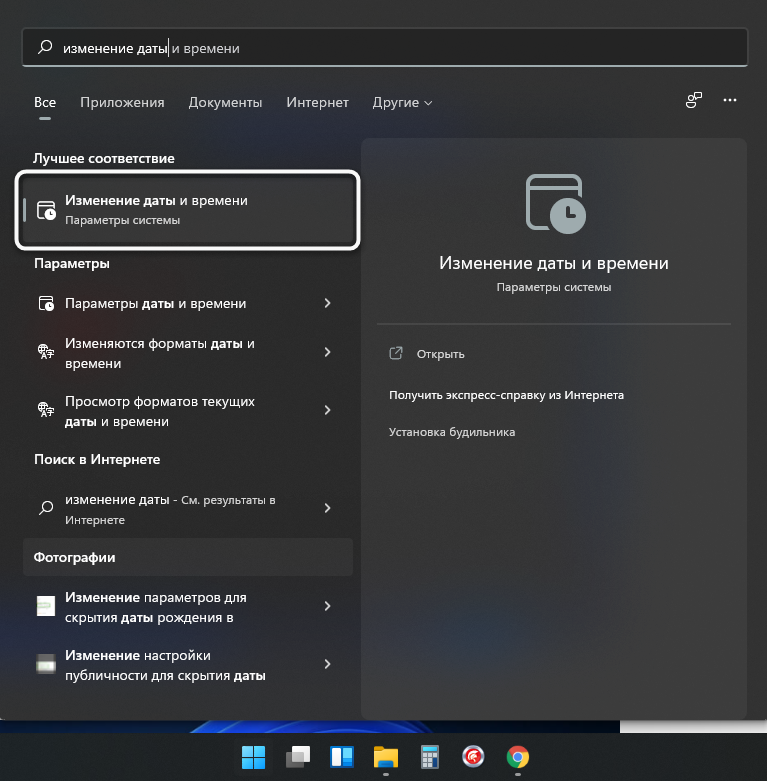
Если что, вы всегда можете открыть параметр «Изменение даты и времени» через «Пуск», чтобы включить автоматическую синхронизацию или установить правильное значение самостоятельно. Внесенные изменения провоцируют сброс в настройках «Ножниц», что и позволит нормализовать работу приложения, если ошибки действительно возникали из-за времени.
Способ 3: Перезапуск приложения
Может показаться, что это предложение звучит банально, но я веду речь именно о перезапуске. Для этого понадобится завершить процесс, что проще всего сделать через «Диспетчер задач».
-
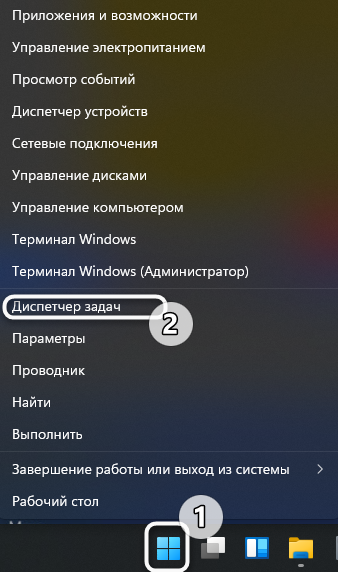
В Windows 11 для открытия «Диспетчера задач» все еще можно использовать горячие клавиши, а также есть другой вариант: нажмите ПКМ по «Пуск» и выберите «Диспетчер задач» из появившегося списка.

-
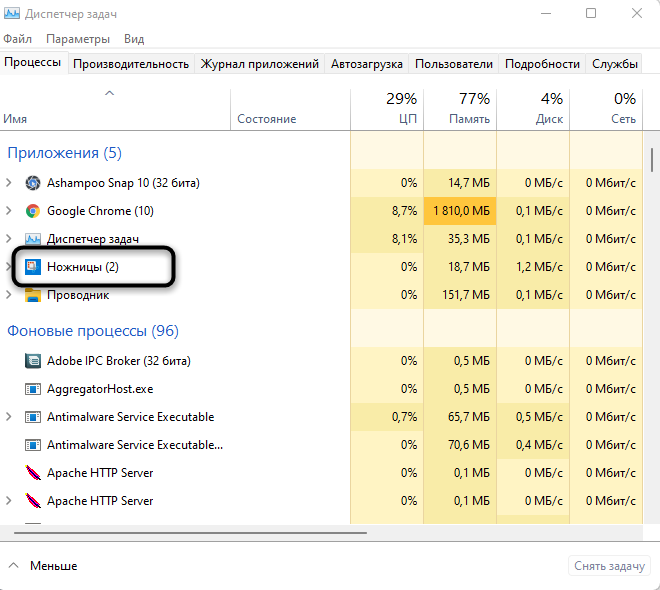
Найдите задачу «Ножницы» и снимите ее, выбрав соответствующий пункт в контекстном меню.
-
Отыщите «Ножницы» через «Проводник» и запустите его. Проверьте, создаются ли скриншоты теперь.

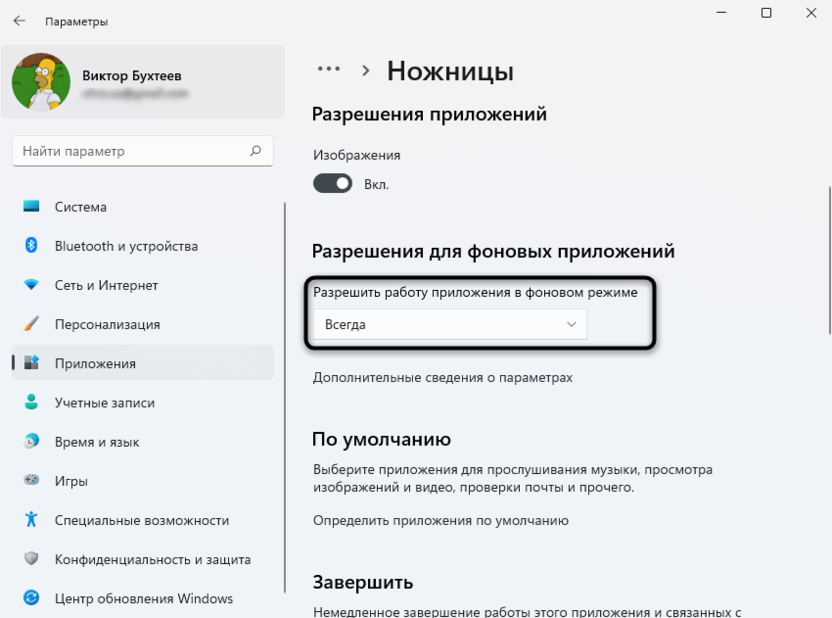
Способ 4: Настройка фоновой работы приложения
Иногда «Ножницы» не отвечают на запросы пользователя по причине некорректного функционирования в фоновом режиме. Вам необходимо сделать так, чтобы приложение всегда было активным, выполнив следующую настройку:
-
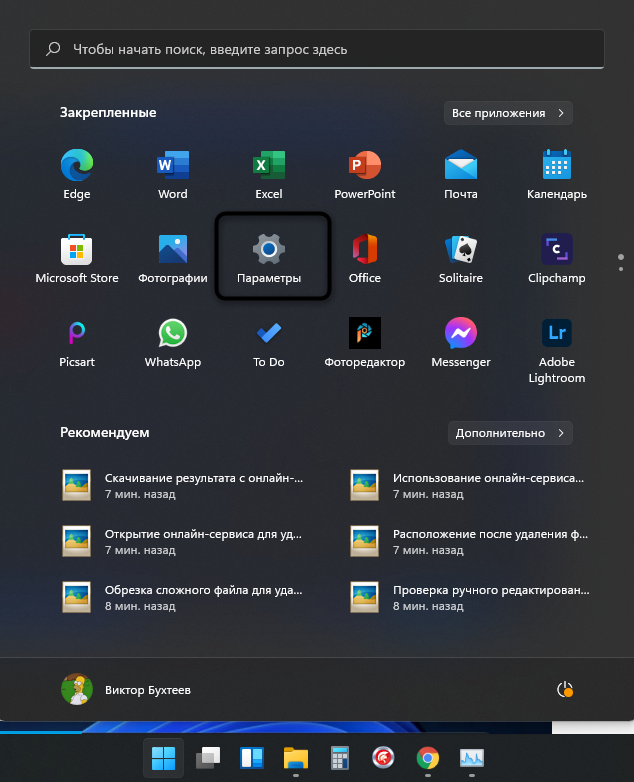
Откройте «Пуск» и нажмите по значку «Параметры».
-
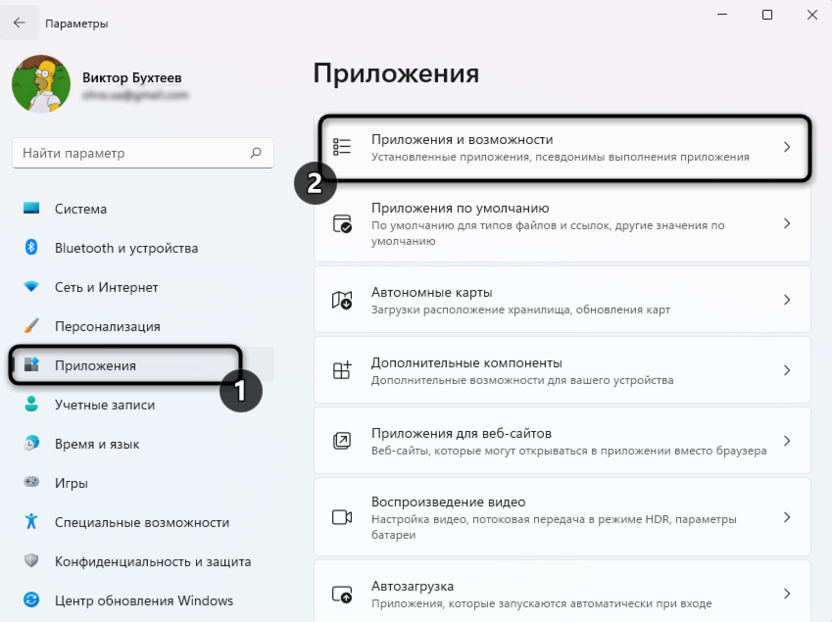
На панели слева выберите пункт «Приложения» и щелкните по первой строке «Приложения и возможности».
-
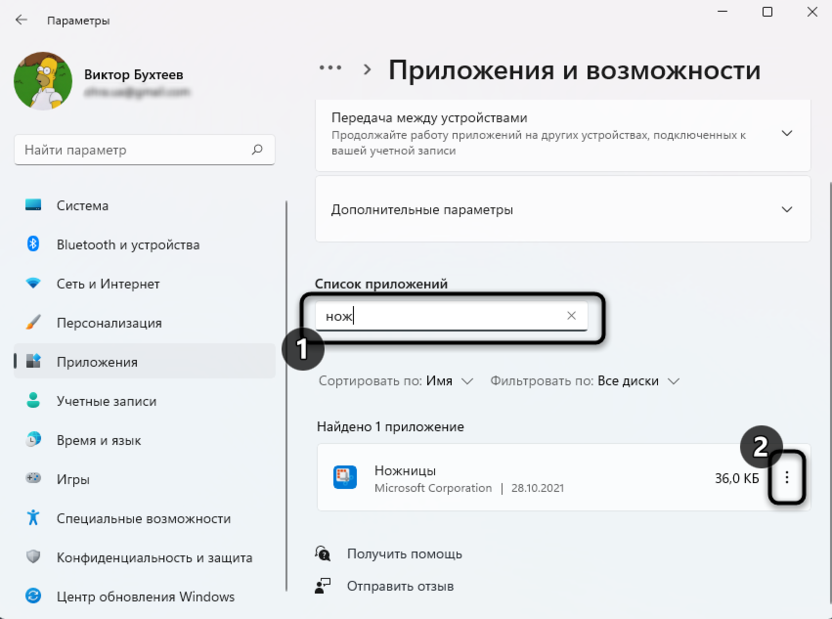
Обязательно используйте поиск для нахождения «Ножниц» и нажмите по трем точкам в поле справа.
-
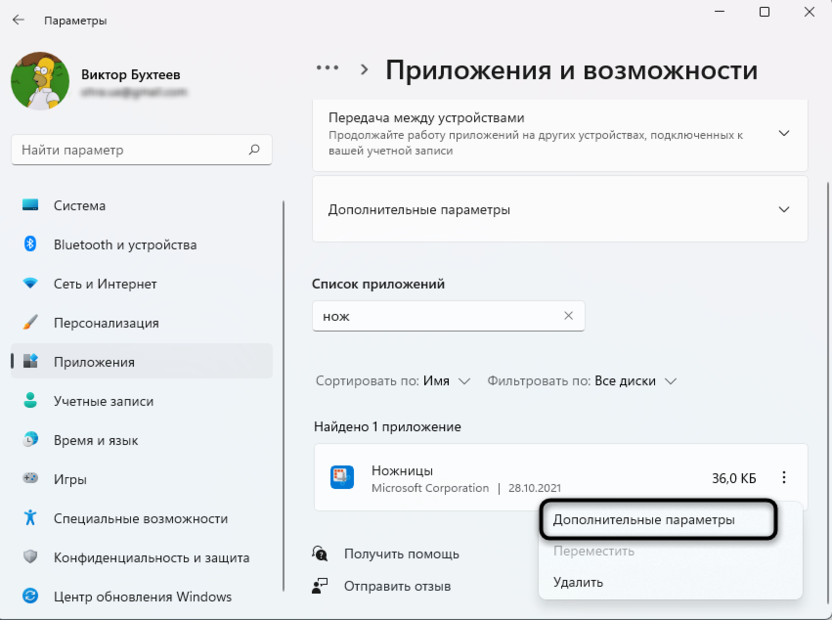
Из появившегося списка выберите «Дополнительные параметры».
-
Разрешите работу приложения в фоновом режиме, указав вариант «Всегда». После этого можете перезапустить ПК и попробовать сделать снимок экрана.
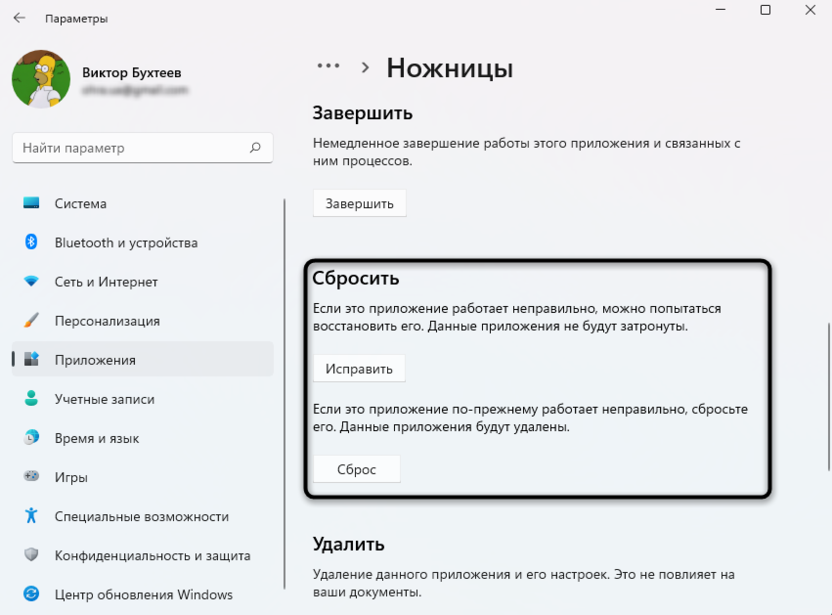
Способ 5: Исправление и сброс приложения
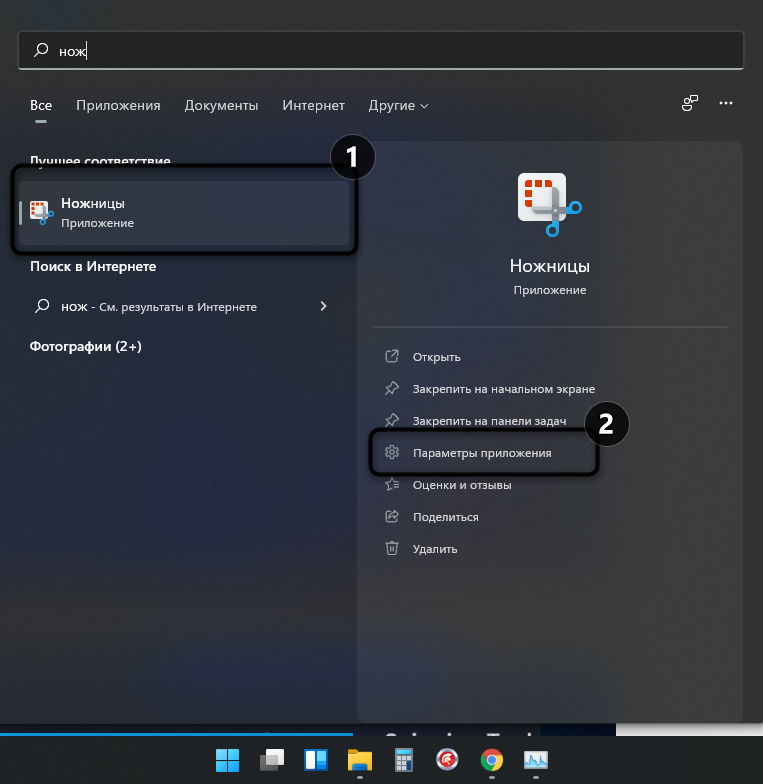
В Windows 11 есть интересные опции для приложений, позволяющие сбрасывать их или исправлять в автоматическом режиме. Возможно, это поможет решить вашу проблему, если она кроется в некорректном функционировании «Ножницы». Для этого откройте тот же раздел с параметрами так, как это было показано выше, или отыщите «Ножницы» через «Пуск» и в меню справа выберите «Параметры приложения».
Сначала нажмите кнопку «Исправить», а если это не поможет, используйте «Сброс». После выполнения таких манипуляций программа возвращается к стандартным настройкам, а все данные удаляются – это позволяет восстановить ее работоспособность.
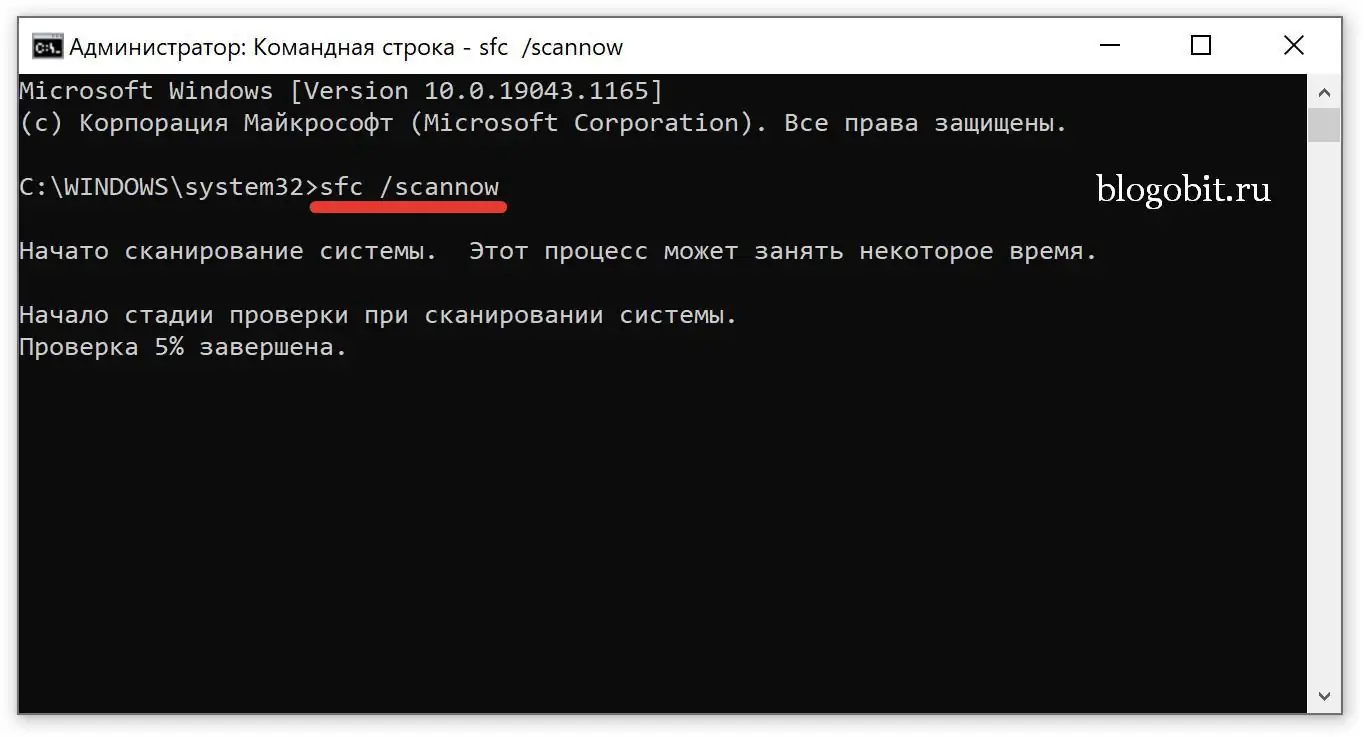
Скорее всего, хотя бы один из перечисленных выше вариантов окажется полезным. Если нет, откройте «Командую строку» и запустите сканирование целостности системных файлов с помощью sfc /scannow. Это займет некоторое время; в случае нахождения ошибок вы будете уведомлены об их исправлении.
Вы можете использовать инструмент «Ножницы» на компьютере или мобильном устройстве с операционной системой Windows 10/11, который используется для того, чтобы сделать снимок определенной части экрана и сохранить его в файл. Возможности, которые есть у данного инструмента, зависят от того, какую версию Windows вы используете.
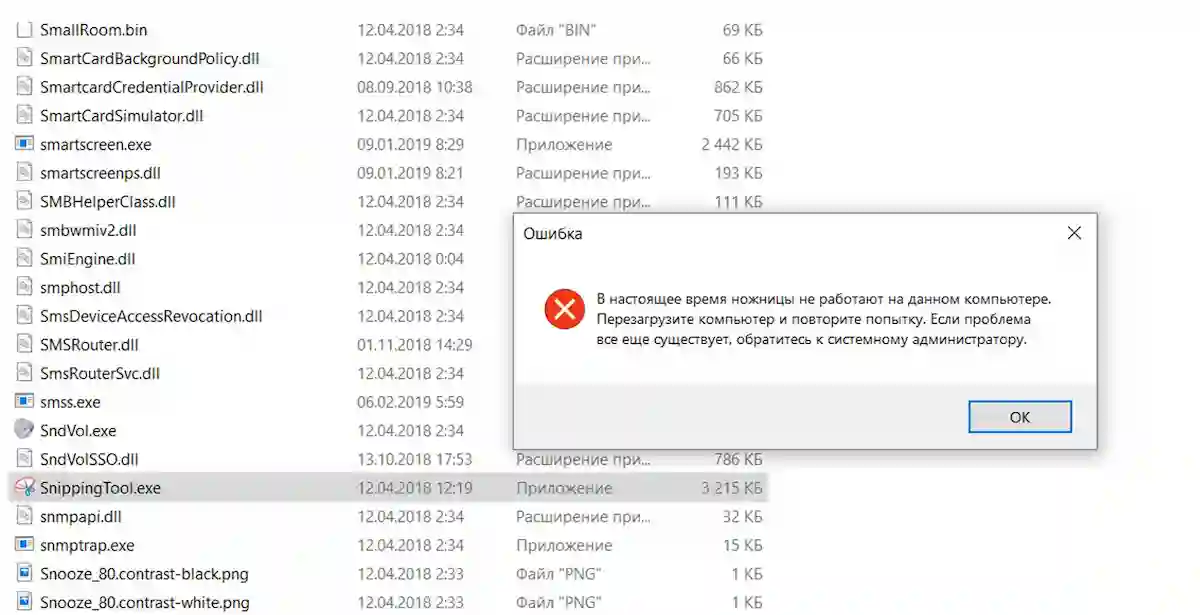
При возникновении проблем с приложением «Ножницы», обычно появляется сообщение об ошибке, в котором говорится:
В настоящее время ножницы не работают на данном компьютере. Перезагрузите компьютер и повторите попытку. Если проблема все ещё существует, обратитесь к системному администратору.
Инструмент «Ножницы» — очень полезное приложение, которое может послужить любому пользователя Windows, особенно тем, кто часто работает с компьютером. Ниже мы приведем несколько решений, как исправить ошибки данного приложения.
Содержание
- Перезапустите инструмент «Ножницы»
- Запустите SFC сканирование
- Найдите конфликтующее программное обеспечение
Чтобы решить проблему с приложением, если оно не отвечает на нажатия или после запуска не появляется на экране, то вы можете принудительно закрыть его и снова открыть.
- Нажмите клавиши Ctrl + Shift + Esc, чтобы открыть диспетчер задач.
- В появившемся окне перейдите на вкладку Процессы.
- Затем найдите приложение Snipping Tool, нажмите на него правой кнопкой мыши и выберите Снять задачу.
- После выполнения вышеуказанных шагов откройте инструмент Snipping Tool сочетанием клавиш WinKey + Shift + S и посмотрите, работает ли он.
Запустите SFC сканирование
Приложение «Ножницы» может не работать должным образом, если некоторые системные файлы этого инструмента повреждены или отсутствуют. Поэтому, если первый способ вам не помог, то вы можете попробовать запустить утилиту проверки системных файлов, чтобы убедиться, что неисправные системные файлы востановлены. Чтобы запустить SFC, выполните следующие действия:
- Откройте командную строку от имени администратора.
- В окне командной строки введите команду, указанную ниже:
sfc /scannow
- Теперь нажмите клавишу Enter, чтобы запустить команду. Процесс проверки системы может занять некоторое время, поэтому терпеливо дождитесь завершения процесса. По окончанию проверки будет сообщено о том, сколько и какие файлы были исправлены.
Найдите конфликтующее программное обеспечение
Если ни один из перечисленных выше методов не работает, последнее, что вам следует попробовать, это проверить, есть ли на вашем компьютере какое-либо программное обеспечение, которое может конфликтовать с приложением «Ножницы».
- Встроке поиска рядом с кнопкой «Пуск», введите «Конфигурация системы» и нажмите Enter.
- На следующей странице перейдите на вкладку Службы.
- Установите флажок Не отображать службы Майкрософт.
- Выберите службы, которые, по вашему мнению, вызывают проблему.
- Нажмите «Применить», а затем кнопку «ОК».
Внимание! В данном способе вы поочередно отключаете службы приложений и методом перебора пробуете определить конфликтующую программу, если после отключения определенной службы приложение «Ножницы» запустилось, значит причина в этой службе.
Is your Snipping Tool not working in Windows 11? Microsoft replaced its classic screenshot grabber by merging its features with Snip & Sketch. The newer Windows 11 app looks like a simple change from Windows 10, but users have reported bugs such as “the app can’t open” error and a lack of response while grabbing screen caps. The following is a list of possible fixes to make Snipping Tool work on your device.
Tip: Are you dealing with a BSoD? It could be because of a «Bad System Config Info» Error in Windows. Read on to learn how to fix it.
Content
- 1. Check for Windows 11 Out-of-Band (OOB) Updates
- 2. Disable Automatic Time Temporarily and Reset Its Manual Value
- 3. Run the Windows 11 Snipping Tool Directly from «Windows.old» Folder
- 4. Keep «Automatically Copy Changes» Enabled in Snipping Tool Settings
- 5. Turn Background App Permissions On to Take Pictures
- 6. Set Keyboard Print Screen Key to Launch Snipping Tool
- 7. Uninstall and Reinstall Snipping Tool
- 8. Repair and Reset Snipping Tool App
- 9. Use Local Group Policy Editor in Windows 11 to Enable Snipping Tool
- 10. Registry Hack to Enable Snipping Tool
- 11. Perform a Clean Windows 11 Installation
- 12. Do a Cloud «Reset» of the Windows 11 Operating System
- Frequently Asked Questions
How to Fix the Windows 11 Snipping Tool Not Working
The Snipping Tool not working can be traced to faulty Windows 11 security updates, expired digital certificates, or a missing folder/registry value. Each solution covered below will fix a unique error source.
1. Check for Windows 11 Out-of-Band (OOB) Updates
The universal solution to the Snipping Tool not working issue in Windows 11 is to finish an “Out-of-band (OOB)” update: a non-security Microsoft patch introduced past scheduled release dates. One of them is KB5008295, but you should opt for the latest OOB patches whenever they’re announced.
- From the Start menu search, look for “Windows Update Settings” and check for the latest updates, even if it shows “You’re up to date.»

- Wait for the latest updates to install on your Windows 11 PC, which will cover any patches pertaining to the problem.
- Restart your device and check whether you can work with the Snipping Tool.
Tip: Snip & Sketch isn’t the only missing feature. The classic Volume Mixer is also gone from Windows 11. Find out how to get it back.
2. Disable Automatic Time Temporarily and Reset Its Manual Value
If your Snipping Tool app is breaking in Windows 11 and unable to grab screenshots, then you may have a wrong date/time issue related to the app’s digital certificates.
You need to temporarily change your date and time from automatic to manual and go back to automatic once the error is gone.
- Go to «Settings -> Time & Language -> Date & Time.»
- Turn off the toggle switch for «Set time automatically.»

- Select «Change» from the «Set the date and time manually» option.
- Regardless of the current date, change the date manually to October 30, 2021. Leave the time section as is.

- Check whether the Snipping Tool is working. If it is doing fine, switch back to automatic timing in «Set time automatically.» The correct date will show on your computer.
3. Run the Windows 11 Snipping Tool Directly from «Windows.old» Folder
For those who upgraded to Windows 11 from Windows 10, you might have an older version of the Snipping Tool left behind in the «Windows.old» folder. This is also known as the «classic» Snipping Tool.
Launching the latest Windows 11 Snipping Tool application may cause it to crash, but you can continue to use the classic Snipping Tool application to grab screenshots in Windows 11.
- On your C drive, you should be able to see the «Windows.old» folder. If you don’t find it there, proceed to the other solutions.

- Search for an application file called «Snipping» in the Windows 11 file and folder search menu.
- Open the application file from its original location. You will be directed to the folder where the older Snipping Tool is located.

- Pin the Snipping Tool application file to the Start menu or save the entire folder to your Windows 11 taskbar.
With a new Windows update, the old folder issues should be resolved entirely.
4. Keep «Automatically Copy Changes» Enabled in Snipping Tool Settings
The clipboard automatically saves changes when you’re copy-pasting anything on your computer. If you can open the Snipping Tool program, but it is not copy-pasting any images, enable its «Automatically Copy Changes» function.
- Open and launch the Snipping Tool.
- Click the three-dot option to enable the «See more» option, where you can open «Settings.»

- Make sure the «Automatically copy changes» toggle is turned on. While the other toggles in the menu can be turned off to suit your needs, the «Auto copy to clipboard» option should always be kept on.

As these screen snips are saved to the Clipboard by default, taking a fresh screenshot would cancel out the old one. You’ll have to toggle on another option labeled «Multiple windows» to save multiple screenshots.
5. Turn Background App Permissions On to Take Pictures
Does your Snipping Tool app have the access permissions to take pictures as a background app? In some cases, it has to be provided manually, otherwise the image won’t be captured by the Snipping Tool object memory.
- On your Windows 11 device, go to «Settings -> Apps -> Installed Apps —> Snipping Tool -> Advanced Settings.» This will take you to the «Apps & features» section of the Snipping Tool.
- Ensure the app permissions for the pictures are turned on. Further, enable background app permissions as «Power optimized» or «Always.»

Good to know: Do you want to use Windows 11 without a Microsoft account? You can!
6. Set Keyboard Print Screen Key to Launch Snipping Tool
For those struggling with faulty update issues in the Windows 11 Snipping Tool, a nice workaround is to set the PrtScr key on your keyboard to serve as the default launch button for Snipping Tool.
- Open and launch Snipping Tool. Select the three-dot menu to open Settings.
- In the Settings menu, select «Print Screen key shortcut» and «Change in Windows settings.»

- You will see a «Did you mean to switch apps?» notification when Snipping Tool is trying to open Settings. Click «Yes» to proceed.

- Turn the «Use the Print Screen button to open screen snipping» toggle on. You can select various screenshot grabbing options, such as Freeform Snip, Rectangular Snip, and Full Screen Snipping, directly from the PrtScn button on your keyboard.

The PrtScr key has many related functions that work with other Windows tools, such as PowerShell, Command Prompt, and Microsoft Office. To use them, you will have to temporarily disable the PrtScr key shortcut.
7. Uninstall and Reinstall Snipping Tool
Is your Snipping Tool aborting on launch? Due to a faulty update or other reasons, it may be improperly installed. The flawed installation can cause the program to abort and should be replaced with a new version.
- To uninstall the Snipping Tool program in Windows 11, select «Add or remove programs» from the Start menu search or in the Control Panel.
- Scroll down to the Snipping Tool app, and from its three-dot menu, select «Uninstall» to proceed with the removal.

- After uninstalling the Snipping Tool in Windows 11, you can reinstall it from Microsoft Store.

Are you facing issues with Microsoft Store? We have a handy guide on the steps you can take to make Microsoft Store work properly.
8. Repair and Reset Snipping Tool App
Close on the heels of uninstalling Snipping Tool in Windows 11, you can periodically repair and reset the app. This will fix any newly found issues in the app’s processes as shown below.
- Go to «Settings -> Apps -> Snipping Tool -> Advanced options.» It will open the «Apps & features» menu.
- Navigate to the «Reset» menu and click «Repair.» Wait a few seconds for it to be repaired.

- If there are no outstanding issues, you should notice a checkmark next to the Repair button as shown below.

- Repeat the same procedure for the Reset button. Once the issues have been resolved, you should not face any more issues with the app.
9. Use Local Group Policy Editor in Windows 11 to Enable Snipping Tool
Occasionally, you may find the Snipping Tool not working despite no errors with the update. There may be some deep policy settings on your device that have disabled the Snipping Tool without you noticing.
Windows 11 advanced administrator settings have a Local Group Policy Editor that helps undo any policies you don’t want on your device.
- Go to the «Run» menu using Win + R. Type «gpedit.msc» to launch the «Local Group Policy Editor.»

- Scroll down to «Tablet PC -> Accessories» and click on the setting option «Do not allow Snipping Tool to run» to evaluate its status.

- If the dialog box that follows shows that «Do not allow Snipping Tool to run» has been «Enabled,» you need to change it to «Disabled.»
10. Registry Hack to Enable Snipping Tool
Apart from the Local Group Policy Editor, you can also use a minor registry tweak to kickstart the Snipping Tool on your Windows 11 device. This is helpful when you just don’t see the Snipping Tool application tool and folder in your File Explorer.
- Go to the «Run» menu using Win + R. Type «regedit» to launch the «Registry Editor» on your screen.

- Go down the following path in your Registry Editor:
Computer\HKEY_LOCAL_MACHINE\SOFTWARE\Policies\Microsoft
Right-click on Microsoft to select a new key and name it «TabletPC.»

- Select the newly created «TabletPC» key and right-click to add a new DWORD (32-bit) value. Call it «DisableSnippingTool.»

- Right-click to edit the above DWORD (32-bit) value string and set it as «0.» The default value is «1,» which would disable the Snipping Tool.
Note: try this method only if the Snipping Tool is not visible on your system.
11. Perform a Clean Windows 11 Installation
The Snipping Tool may run into unanticipated issues if the operating system is riddled with corrupt files. It is easy to deal with the problems caused by installed apps by going for a clean installation of Windows 11.
- Before going for a clean installation, make a backup of your files first, as they’ll be lost in the process.
- Download «Create Windows 11 Installation Media» at this link.
- Launch the installer. Follow the on-screen instructions until you reach an option that lets you choose the media to be used. Select the «USB flash drive» option that will let you install a USB setup for booting.

- Once the USB installer is ready, insert it in a USB port on your Windows device.
- Restart your PC or laptop and enter boot keys that will vary based on your device manufacturer. Generally, they are F2, F10 or F12, or Esc.
- Follow the on-screen instructions to activate the latest Windows 11 OS on your device. This should be bug-free, as any old patchy updates are gone.
You may find this detailed tutorial useful, as it covers all the possible ways to install Windows 11 on your device.
12. Do a Cloud «Reset» of the Windows 11 Operating System
If the original copy of your Windows 11 system is genuine and valid, it is easier to fix any issues with a simple Cloud Reset. It works similarly to a clean installation but is much easier to perform, as you don’t require a USB drive.
- Go to «Settings -> System -> Recovery -> Recovery options.»
- Select «Reset PC» in the menu options for «Reset this PC.»

- Follow the instructions and choose an option to «Remove everything» rather than «Keep my files.» This will guarantee a fresh system devoid of errors.
- Select «Cloud download» to reinstall Windows. This will hook your system to the latest Windows 11 version on the cloud.

- In the next few steps, you can begin the Reset procedure. Once it starts, you cannot stop its progress.
- Leave your device plugged in and connected to the Internet. After the cloud download is finished, a new Windows version is automatically installed.
Learn how to check your hard disk health in Windows 11.
Frequently Asked Questions
Why does my computer freeze when I use Snipping Tool?
If your PC freezes when using Snipping Tool, it indicates the possibility of corrupt graphics drivers. To fix the problem, start Command Prompt in Administrator mode and run sfc/Scannow followed by DISM.exe.
Once the outdated drivers have been identified through a system scan, you can open them from Device Management (devmgmt.msc in Run menu.) Update and reinstall the drivers as directed on your Command Prompt screen.
Why does my Windows Snipping/Snip & Sketch Tool not cover the whole screen?
If the Windows 11 Snipping or Windows 10 Snip & Sketch tools fail to cover the whole monitor screen, it means the display is not set to its correct resolution. Go to «Settings -> System -> Display -> Scale & Layout» and set the scale to its recommended value on your device.
How do I fix a black screen encountered while using Snipping Tool in Windows 11?
If you’re encountered black screens while saving screenshots with Snipping Tool, it means there are some problems with your graphic drivers. Open «Device Manager» using the Run command menu devmgmt.msc and select any graphics drivers related to «Display adapters» and «Integrated monitors.» Right-click them to update the missing drivers. They’ll sometimes be marked with an exclamation point.
What are the alternatives to Snipping Tool in Windows 11?
How do I capture a scrolling screenshot in Windows 11?
To capture a scrolling screenshot in Windows 11/10, follow the steps covered in this tutorial, which works for Windows, Mac, Linux, and browser-based settings.
Image credit: Pixabay. All screenshots by Sayak Boral.

Sayak Boral is a technology writer with over eleven years of experience working in different industries including semiconductors, IoT, enterprise IT, telecommunications OSS/BSS, and network security. He has been writing for MakeTechEasier on a wide range of technical topics including Windows, Android, Internet, Hardware Guides, Browsers, Software Tools, and Product Reviews.
Subscribe to our newsletter!
Our latest tutorials delivered straight to your inbox
The Snipping tool is an excellent screenshotting tool, but sometimes it has issues starting up on WIndows 11.

The Snipping Tool holds the crown for the best screenshot tool for Windows OS, and for good reason. It’s efficient, the lightest of all existing alternatives, takes up very little disc space, and doesn’t clog your RAM.
However, the Snipping Tool isn’t perfect as it comes with its fair share of flaws and issues that cause major inconvenience. It may begin to malfunction or occasionally crash or freeze, leaving users in a state of frustration.
Here, we have compiled some ways to fix the «Snipping tool not working» error on Windows 11 and resolve it for good.
It is inevitable that once in a while, a bug might cause your programs or system files to malfunction. However, with Windows 11, it is now easier than ever to fix programs.
You can simply troubleshoot and repair an application without any additional third-party software with these few steps:
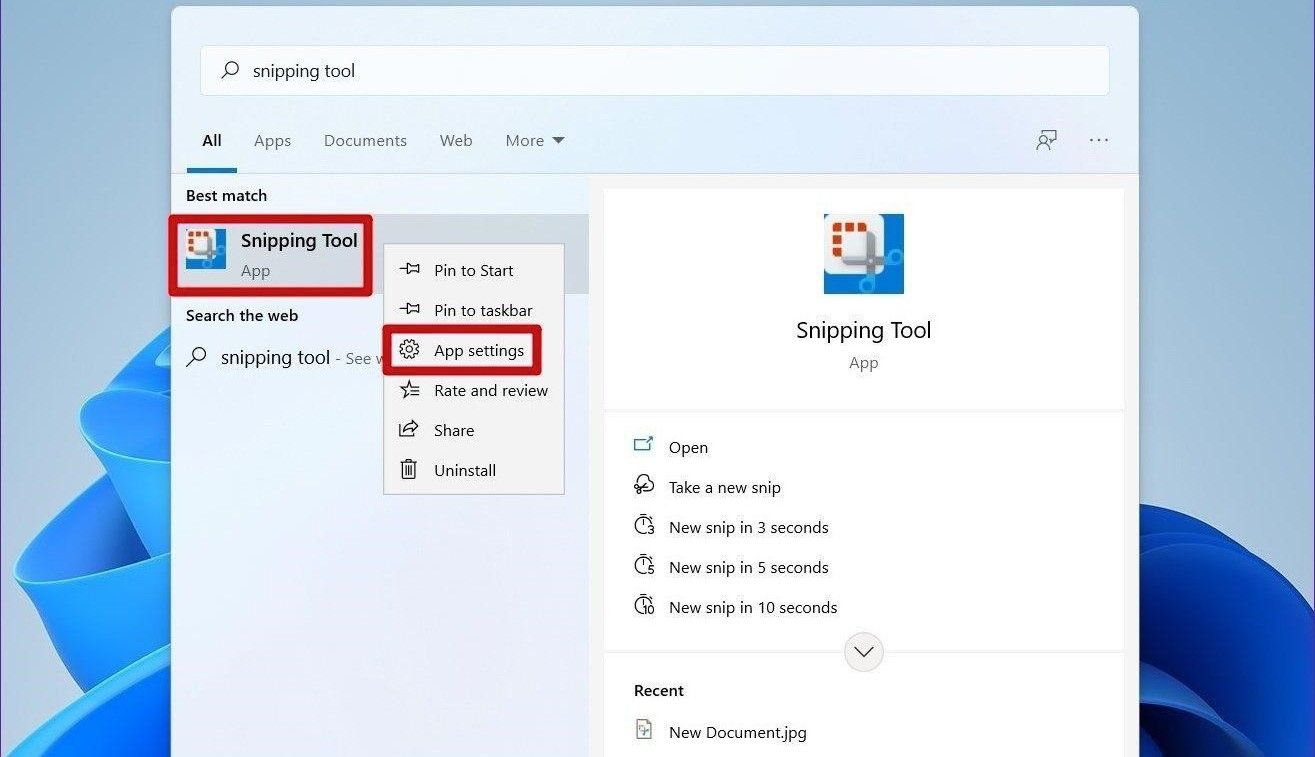
- Open Windows Search by clicking on the search icon on the taskbar.
- Type Snipping Tool.
- Right-click on the Snipping Tool app and select App settings.
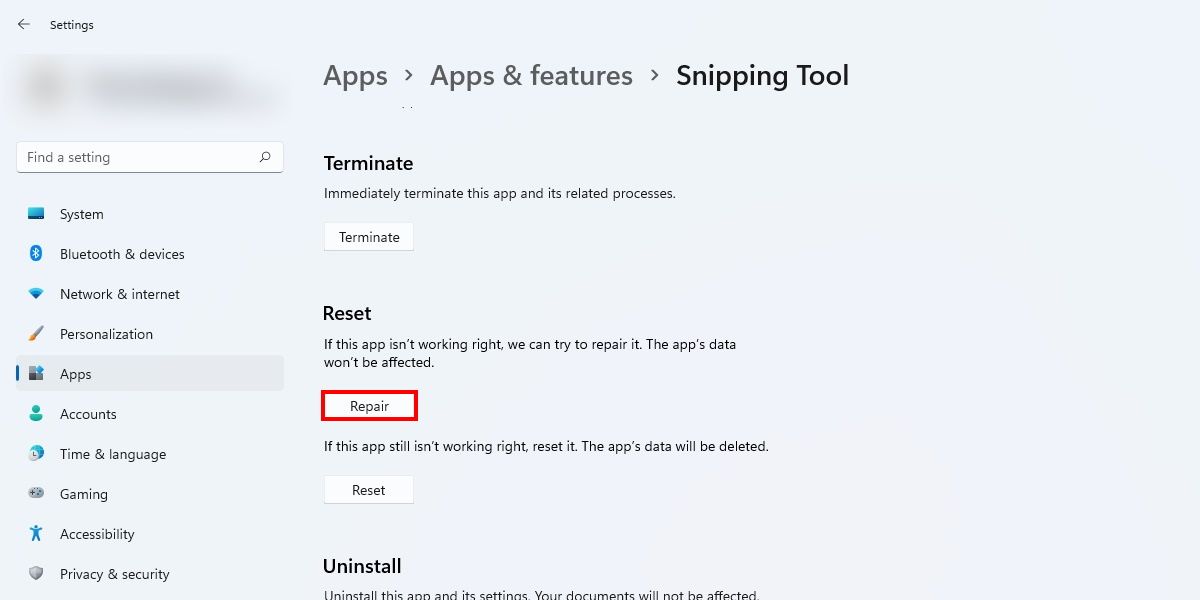
- Scroll down to Reset and click on the Repair option. The system will attempt to repair the software.
- If repairing the app does not solve the issue, try resetting the app by clicking on Reset. However, keep in mind that by doing so, you’re going to lose all your app data.
2. Turn Off Focus Assist
Focus Assist is a fantastic Windows feature that filters all unwanted notifications to help you get more done. However, this can cause problems with some helpful apps, such as the Snipping Tool, by preventing them from launching.
You can disable Focus Assist from blocking Snipping Tool by:
- Head to Settings > Systems > Focus assist.

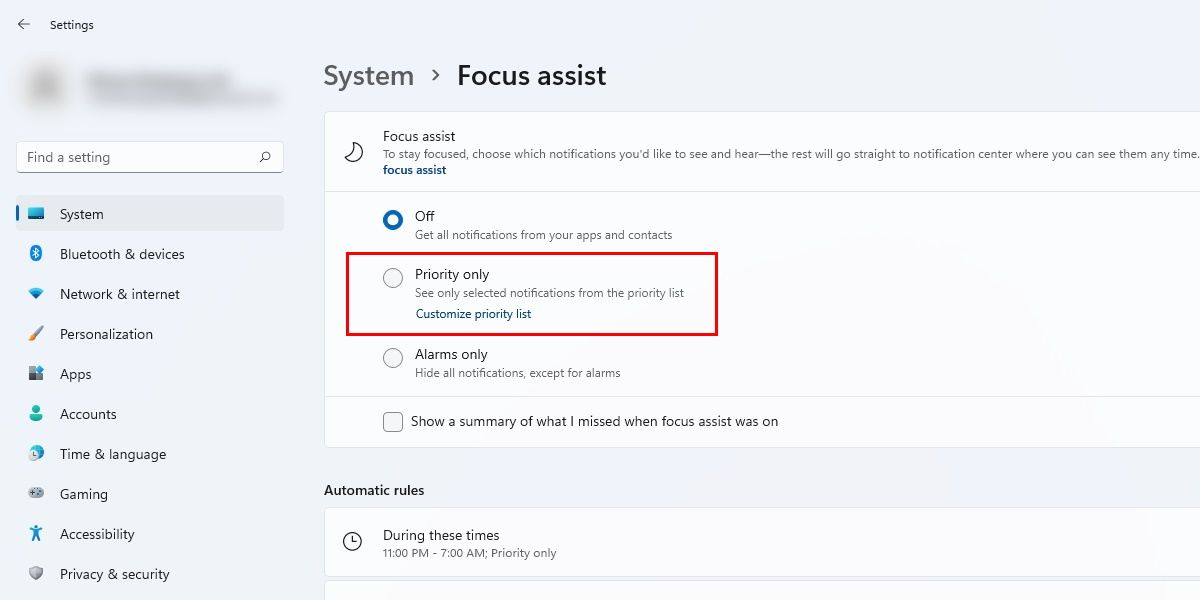
- In Focus Assist, select the Priority only option and click on the Customize priority list.
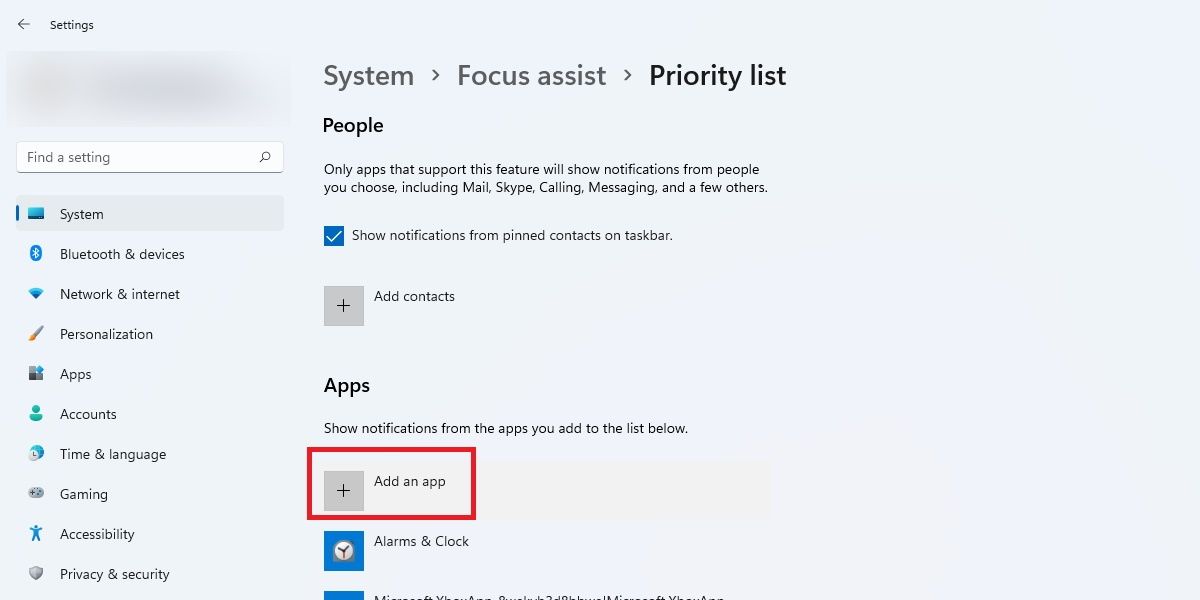
- Here, under the Apps section, click on Add an app. Find the Snipping Tool from the list of apps and close the window.
- Try opening Snipping Tool and check if it works now.
The Snipping Tool has been replaced by the new Snip & Sketch tool by Microsoft, and as a result, the former’s stopped working on many PCs. The most straightforward solution is to use some other method for taking screenshots or upgrade to the more advanced Snip & Sketch tool manually. To do this:
- Find the Microsoft Store pinned on your Windows 11 taskbar and open it.
- Search Snip & Sketch.
- Click on the Get button which will prompt app installation.
- Once the app is installed, you can start using Snip & Sketch by selecting Open.
You can also check out our in-depth guide on how to fully acquaint yourself with Snip & Sketch.
4. Perform a Clean Boot
Another reason for the Snipping Tool to not work is interference from other apps or third-party programs, especially your antivirus software. Performing a clean boot can help you with this issue and get the screenshot tool working in no time.
To perform a clean boot, you have to disable all the third-party services and programs. For this:
- Press Win + R to launch the Run dialog box.
- Type msconfig in search.
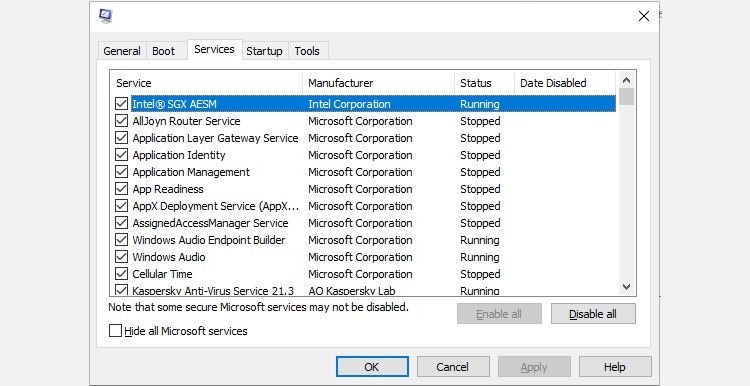
- In the System Configuration dialog box, go to the Services panel.
- Check the Hide all Microsoft services box and then click on Disable all button.

After you have disabled all these third-party services:
- Head over to the Startup tab and click on Open Task Manager
- Right-click on all third-party programs, one by one, and Disable them.
- Click Ok on the System Configuration box.
- Restart your computer.
5. Disable Automatic Time
Some users identified the jump to Windows 11 as the leading cause of Snipping Tool troubles. They pinned down this error on the latest Windows version, however, later, more testing revealed that the app would work perfectly fine on devices if Microsoft Store was not set to auto-update programs, hinting that the issue is due to expired certificates.
To fix the issue and continue grabbing screenshots, you can try these steps:
- Open Settings app.
- Navigate to Time & Language > Date & time.

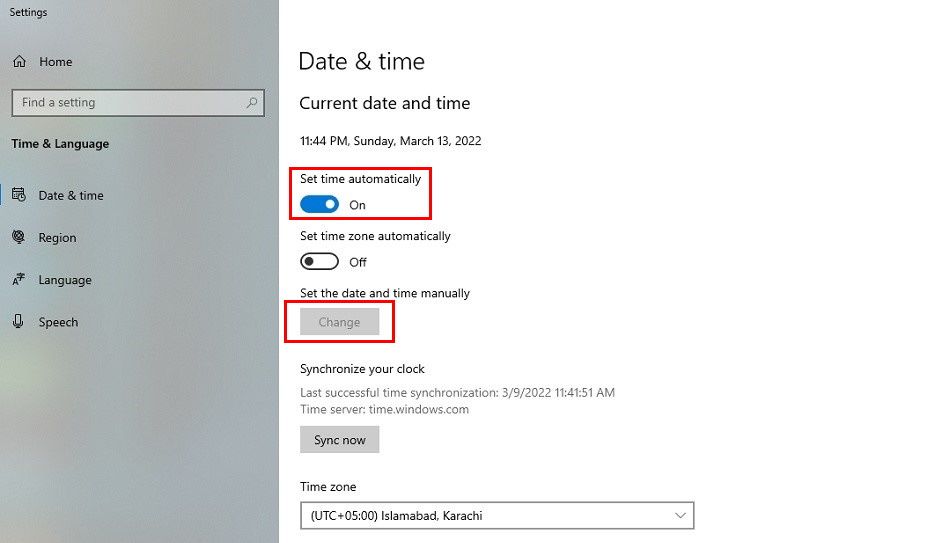
- Toggle the Set time automatically option to off.
- Now, press Change which will allow you to reset the value manually. You can select any random date before October 30, 2021, however, you don’t need to change the time.
- Hopefully, this would have straightened any issues you were facing with Snipping Tool. Turn the Set time automatically to On if your app is working smoothly once again.
If none of the above methods work, and you wish to use solely the Snipping Tool in Windows 11 without reverting to Windows 10, follow the steps below to utilize the Classic Windows 10 Snipping Tool.
- Open Settings > File Explorer.
- Head to the System drive partition (C:\).
- Next, open the Windows.old folder followed by the system32 folder.
- Here, you’ll find SnippingTool.exe. Double-click on this file to launch and use the classic Snipping Tool even in Windows 11.
7. Use Regedit
The Snipping Tool is installed and enabled by default on the Windows 11 operating system, but the Software Restriction Policy prevents some users from using it, or in some cases, restricts them from being able to view the app in the File Explorer.
If you are also facing similar issues and completely confused about what to do next, here’s how what you can do as a last resort:
- Launch the Run dialog box by pressing Win + R on your keyboard.
- Type Regedit in the search box and press enter.
- This will prompt open a User Account Control window asking you permission to continue and make changes to your device. Select Yes and the Registry Editor will be displayed.
- Scroll down the Registry Editor until you spot HKEY_LOCAL_MACHINE & follow the path SOFTWARE > Policies > Microsoft.

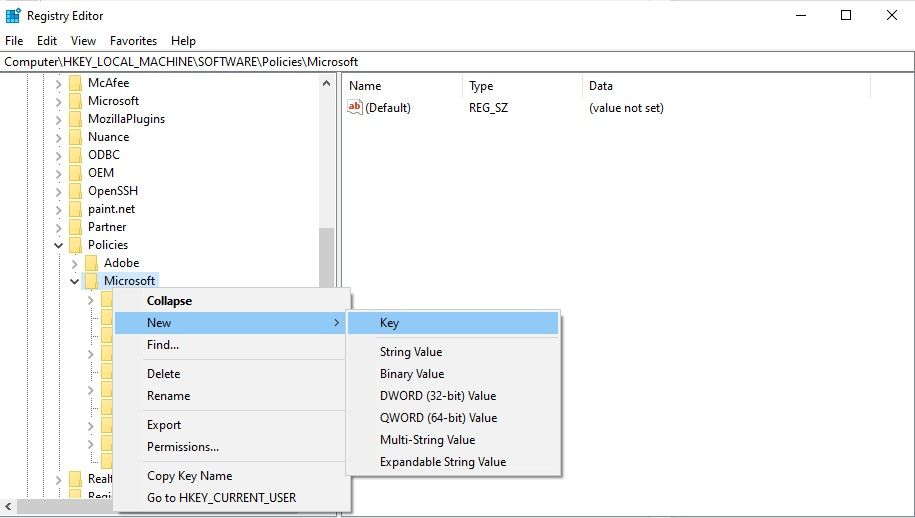
- Locate the TabletPC key. If it doesn’t exist, right-click on Microsoft, select New > Key, and name it TabletPC.
- Right-click on this newly created key TabletPC > New > DWORD (32-bit) Value and rename it to DisableSnippingTool.
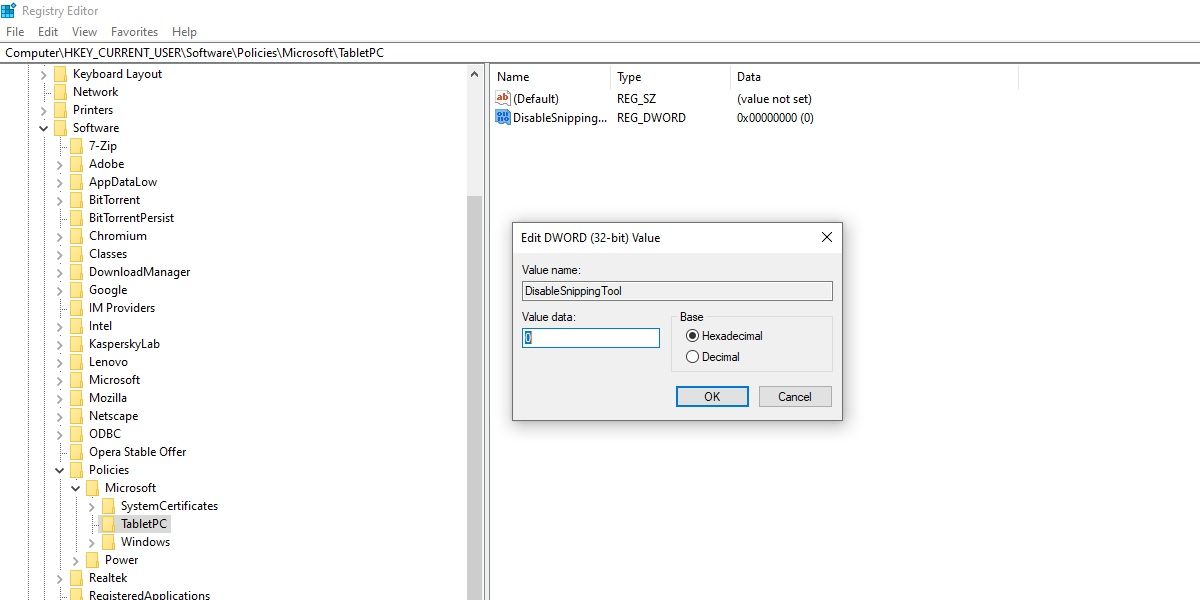
- Double-click on DisableSnippingTool and make sure the Value data is set to 0 with Hexadecimal option also selected.
- Close the Registry Editor, and try searching and opening the Snipping Tool. These steps will have reset and kick-started the app, allowing you to successfully take screenshots on your Windows 11.
Capturing Screenshots on Windows, Quicker
There’s no doubt that Windows’ Snipping tool is quite a handy app to take screenshots on your laptops & PC; however, it is not the only way. Now, you can capture your screen more flexibly (and quickly) with different Windows hotkeys that you probably didn’t even know were at your disposal. Check out these screen-capturing shortcuts and make the most of your Windows experience.