- Remove From My Forums
-
Вопрос
-
Добрый день.
После обновления 1903 перестало работать PPtP подключение.
Ошибок не выдает.
Просто крутиться подключение и все. Потом отскакивает в исходное состояние. (готов снова подключаться)
-
Изменено
27 мая 2019 г. 5:32
-
Изменено
Ответы
-
Попробуйте так:
Пуск — Параметры — Сеть и Интернет — VPN — (выбрать pptp ваше подключение) — Дополнительные параметры
Тут принудительно вбить логин и пароль.
После этих манипуляций (почему-то?) начинает подключаться, авторизируется и нормально соединяется. Только что попробовал на двух машинах с 1903.
По результатам отпишитесь.
- Remove From My Forums
-
Question
-
Добрый день.
После обновления 1903 перестало работать PPtP подключение.
Ошибок не выдает.
Просто крутиться подключение и все. Потом отскакивает в исходное состояние. (готов снова подключаться)
-
Edited by
Monday, May 27, 2019 5:32 AM
-
Edited by
Answers
-
Попробуйте так:
Пуск — Параметры — Сеть и Интернет — VPN — (выбрать pptp ваше подключение) — Дополнительные параметры
Тут принудительно вбить логин и пароль.
После этих манипуляций (почему-то?) начинает подключаться, авторизируется и нормально соединяется. Только что попробовал на двух машинах с 1903.
По результатам отпишитесь.

Here we can see, “How to: Fix Windows 10 PPTP VPN is Not Connecting”
- One of the oldest VPN protocols is PPTP (Point-to-Point Tunneling Protocol).
- PPTP, however, despite its long history, can be less reliable than other protocols.
- On Windows 10, for example, you might notice that your PPTP VPN is refusing to connect.
- When your PPTP VPN fails to connect, follow the steps in the guide below.
Are you seeking for a solution to the problem of your Windows 10 PPTP VPN not connecting? Then, you’ve come to the correct place.
The Point-to-Point Tunneling Protocol (PPTP) stands for Point-to-Point Tunneling Protocol. On the other hand, PPTP VPN is one of the most widely used LAN protocols. It is compatible with Windows OS and uses 128-bit encryption.
Meanwhile, some Windows 10 customers have reported that their PPTP VPN connection is not working. This issue is also widespread on computer networks, such as LANs and WANs.
We’ve compiled a list of solutions for you, so take a look at them below. Furthermore, any of our solutions can resolve the VPN connection issue.
Fix: PPTP VPN won’t connect on Windows 10
1. Check your internet connection
To begin, examine your internet connection. You’ll be able to tell if you have an active internet connection if you do this. For example, your broadband data plan may have run out, causing the issue. As a result, you can experiment with different types of internet connections to discover if they function.
Alternatively, you can restart your internet connection or reset your router before connecting to a VPN on your Windows 10 PC.
Meanwhile, if the error persists after attempting this remedy, move on to the next option.
2. Use a different VPN service
Some VPNs no longer use PPTP since it is less secure than the latest connection protocols such as SSTP, IKEv2, L2TP, OpenVPN, etc.
Several VPN service providers still use PPTP connection protocols. As a result, you might want to give them a shot to get over the ‘Windows 10 PPTP VPN not connecting issue.
Private Internet Access, a VPN service owned, developed, and supported by Kape Technologies, the same company that launched CyberGhost, is a solid example.
WireGuard®, PPTP, OpenVPN, and L2TP/IPSec technologies, as well as SOCKS5 Proxy and the possibility to pick from several VPN gateways, are all available in PIA.
3. Alter the time and place
The incorrect date and time could possibly be the source of the Windows 10 PPTP VPN not connecting issue. A VPN connection problem may also arise if your VPN server location date and time differ from your Windows 10 date and time.
Here’s how to set time on your computer automatically:
- First, press the Windows key, then Settings, then Time and Language.
- Then, to ensure it’s switched on, toggle the option Set Time Automatically on.
- Restart your computer after closing the window.
- Launch your web browser after your PC has booted up, and then try to launch the webpage again.
Continue to the next solution if the Windows 10 PPTP VPN, not the connecting problem, persists.
4. Clean out your computer’s registry
Windows 10 PPTP VPN not connecting can also be caused by invalid Windows registry keys, missing DLLs, and even obsolete program remains. As a result, you’ll have to wipe up your Windows registry.
On the other hand, SFC Scan is a built-in Windows utility that checks all system files for errors and patches them. Here’s how to conduct an SFC scan on any version of Windows:
Start by typing cmd into the search box, then right-clicking Command Prompt and selecting Run as Administrator.
Now type sfc /scannow at the command prompt.
Wait for the scanning to finish before restarting your computer. On restarting, all corrupted files will be replaced.
5. Install the network drivers again
The network drivers may be obsolete, corrupted, or even inactive at times. As a result, you may want to consider reinstalling network drivers on your Windows 10 computer. To reinstall network drivers, follow these steps:
- Go to Start > Type Device Manager into the search box and press the Enter key.
- Network Adapters should be located.
- Remove any network drivers that are currently installed.
- Scan for hardware changes by selecting Action > Scan for hardware changes.
- Wait for the procedure to finish. (The drivers will be reinstalled as a result of this.)
- After that, connect to the VPN.
Additionally, you can use automated tools to update your network drivers automatically.
If the Windows 10 PPTP VPN not connecting prompt persists, try reinstalling your VPN client software as described in the next option.
6. Reinstall your VPN software
To reinstall the VPN client on your Windows 10 PC, follow these steps:
- To access the Control Panel, go to Start > Control Panel.
- Under the Programs menu, select Uninstall an application.
- Select Uninstall from the list of apps to remove your VPN.
- After a successful uninstall, you’ll receive a notification, so click Close to leave the Setup Wizard.
- Go to Start > Run if the VPN is still shown as available after removing it.
- Type ncpa.cpl and hit Enter to launch the Network Connections window.
- Right-click on the WAN Miniport designated your VPN under Network Connections.
- Choose Delete.
- Press Enter after typing Network Connections in the Start menu. Delete a VPN connection by right-clicking it and selecting Delete.
- Choose a VPN service.
- Delete your VPN if it appears to be available.
After you’ve completed the uninstall, you’ll be able to install the VPN client on your Windows 10 PC. Meanwhile, we recommend downloading and installing the most recent VPN client on your computer.
7. Make sure you have the most recent Windows updates installed
Some VPN client software requires the most recent version of the Windows.NET Framework and several other Windows components. For example, the Windows 10 PPTP VPN not connecting error might occur if some of these components are missing.
Furthermore, the most recent Windows updates enhance your PC’s security, performance, and functionality. As a result, we recommend downloading and installing the most recent Windows updates.
This is how you do it:
- To get started, go to Start, type “update” in the search box, and then click on Windows Update.
- Check for updates in the Windows Update window and install any that are available.
8. Disable security programs for the time being
On Windows 10, several antivirus applications can prevent VPN software from working. As a result, you must arrange your antivirus protection to exclude your VPN.
This is how you can accomplish it in Windows Defender:
- But, first, start the Windows Defender Security Center application.
- Go to the Virus and Threat Protection settings now.
- Exclusions can be chosen.
- Add or remove exclusions by selecting Add or remove exclusions.
- Select Add your VPN client software and an exclusion.
Furthermore, the Windows Firewall can restrict PPTP VPN connections; as a result, you must allow your VPN under Windows Firewall Advanced settings.
This is how you do it:
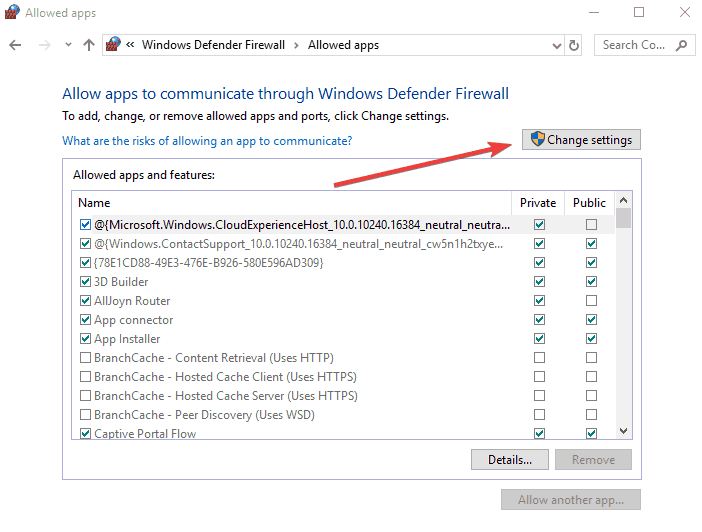
- Go to Start > Type Allow a program to run via Windows Firewall, and then press Enter.
- Select Change Settings from the drop-down menu.
- Now, select Allow another program from the drop-down menu.
- Select the VPN program you wish to install or click Browse to find it, and then click OK.
- Check to see if your VPN is working.
9. Enable the PPTP rule
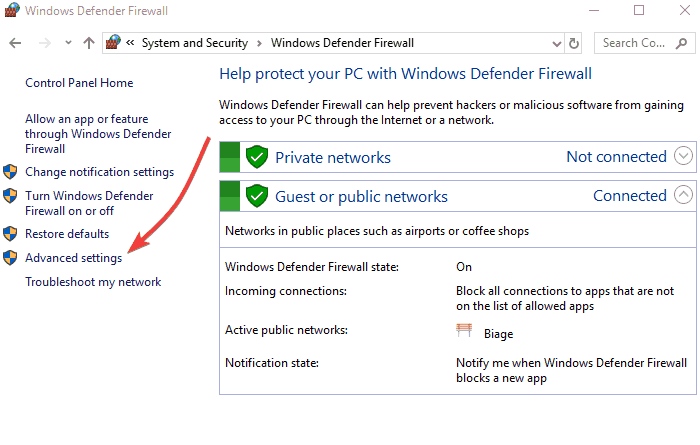
- On Windows 10, use these steps to enable the PPTP rule:
- To access the Control Panel, go to Start > Control Panel.
- Go to Windows Firewall > Advanced Settings > Search for Routing and Remote Access in the Inbound and Outbound Rules sections.
- Right-click Routing and Remote Access (PPTP-In) and select Enable Rule for Inbound Rules.
- Right-click Routing and Remote Access (PPTP-Out) and select Enable Rule for Outbound Rules.
10. Create a PPTP VPN connection manually
You can also ask your VPN service provider for PPTP account setup instructions and then follow them. Alternatively, you can manually configure PPTP VPN on your Windows 10 machine.
However, you will require a VPN account and a working internet connection.
To set up a PPTP VPN manually, follow these steps:
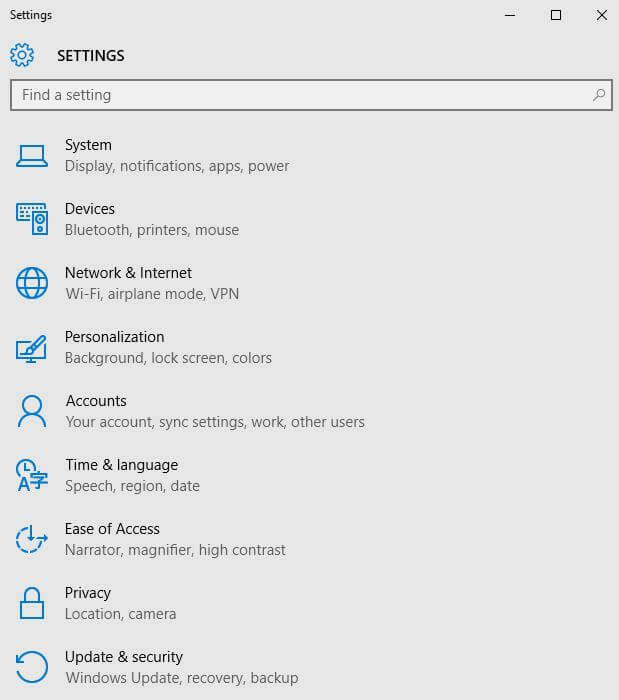
- Select Start > Settings from the context menu by right-clicking the Start button. Next, select Network and Internet > VPN from the drop-down menu.
- After that, select Add a VPN connection from the dropdown menu.
- After that, select Windows (built-in) and then the Connection name field.
- Give the VPN connection a name.
- Enter the server’s address in the Server name or address area.
- Select the PPTP connection protocol from the dropdown menu below VPN type.
- Now, select a sign-in method from the dropdown menu below Type of sign-in info and click Save.
- To connect, go to the VPN you just created and select Connect.
Conclusion
I hope you found this guide useful. If you’ve got any questions or comments, don’t hesitate to use the shape below.
User Questions:
1. Can’t get PPTP to work?
Use another VPN client software or application to connect to the PPTP VPN. This is to see if the problem is related to the VPN client service you previously installed. Connect to the PPTP VPN using a different network, such as a mobile phone’s 4G network.
2. Why isn’t my VPN on Windows 10 working?
To begin, make sure your Windows 11/10 system is up to date. Some upgrades address known VPN difficulties, resulting in immediate assistance. Second, update the network drivers or try some older drivers to see if it fixes the problem. Finally, the problem could be as simple as DNS caching.
3. What are the ports that Pptp uses?
TCP port 1723 and IP protocol 47 Generic Routing Encapsulation are used by the Point-to-Point Tunneling Protocol (PPTP) (GRE).
4. Windows 10 1903 VPN not working for us : r/sysadmin – Reddit
Windows 10 1903 VPN not working for us from sysadmin
5. Windows 10 PPTP VPN gets stuck on “Verifying your sign-in
Windows 10 PPTP VPN gets stuck on «Verifying your sign-in info» from selfhosted
Conflicting firewall or missing updates can cause issues
by Ivan Jenic
Passionate about all elements related to Windows and combined with his innate curiosity, Ivan has delved deep into understanding this operating system, with a specialization in drivers and… read more
Updated on
- PPTP (Point-to-Point Tunneling Protocol) is one of the oldest known VPN protocols.
- However, despite it being around for a while, PPTP can be less reliable than other protocols.
- For instance, you may notice that your PPTP VPN may refuse to connect on Windows 10.
- The guide below will teach you what to do when your PPTP VPN just won’t connect.

Are you looking for the right solution for your Windows 10 PPTP VPN not connecting problem? You are in the right spot.
PPTP stands for Point-to-Point Tunneling Protocol. PPTP VPN on the other hand is one of the oldest protocols used on LAN networks. It utilizes 128-bit encryption and it is compatible with Windows OS.
Meanwhile, some Windows 10 users reported the PPTP VPN not connecting problem. Also, this problem is common on computer networks, such as LAN or even WAN.
We have enlisted some solutions for you, so ensure you go through them below. Moreover, any of our compiled solutions can fix the VPN connection problem.
Fix: Windows 10 PPTP VPN won’t connect
1. Check your internet connection
Firstly, to check your internet connection. This will enable you to determine if you have an active internet connection. For instance, your broadband data subscription might be exhausted resulting in a problem. Hence, you can try other modes of internet connection to see if it works.
Alternatively, you can reset your router or restart your internet connection, and then connect to VPN on your Windows 10 machine.
Meanwhile, if you still get the error after trying out this fix, you may proceed to the next solution.
How we test, review and rate?
We have worked for the past 6 months on building a new review system on how we produce content. Using it, we have subsequently redone most of our articles to provide actual hands-on expertise on the guides we made.
For more details you can read how we test, review, and rate at WindowsReport.
2. Use an alternative VPN solution
Some VPNs don’t utilize PPTP any longer; this is because PPTP is less secure compared to the latest connection protocols such as SSTP, IKEv2, L2TP, OpenVPN, and many more.
However, some VPN service providers still utilize PPTP connection protocols. Therefore, you may want to try them out so as to bypass the ‘Windows 10 PPTP VPN not connecting’ problem.
One very good example is Private Internet Access, a VPN service owned and continuously developed and supported by Kape Technologies, the same company that created CyberGhost.
PIA features WireGuard®, PPTP, OpenVPN, and L2TP/IPSec technologies, along with SOCKS5 Proxy, and the ability to choose from Different VPN gateways.
Private Internet Access
Get this VPN that features WireGuard®, PPTP, OpenVPN, and L2TP/IPSec technologies.
3. Change time and location
Windows 10 PPTP VPN , not connecting problem might also be caused by incorrect date and time. Also, if your VPN server location ‘date and time’ is different from your Windows 10 date and time, the VPN connection problem might occur.
Here’s how to set time automatically:
- Press Windows key > Select Settings > Select Time and Language

- Toggle the option Set Time Automatically to ensure it is turned on.
- Close the window and restart your PC.
- After booting up your PC, launch the web browser, and then attempt to launch the website again.
If the Windows 10 PPTP VPN not connecting error prompt persists, proceed to the next solution.
4. Repair your PC Registry
Invalid Windows registry keys, missing DLLs, and even obsolete software leftovers can also cause Windows 10 PPTP VPN not connecting. Hence, you need clean up your Windows registry.
SFC Scan , on the other hand, is a Windows built-in tool that verifies all system files and fixes files with issues. Here’s how to run an SFC scan on all Windows’ versions:
5. Reinstall network drivers
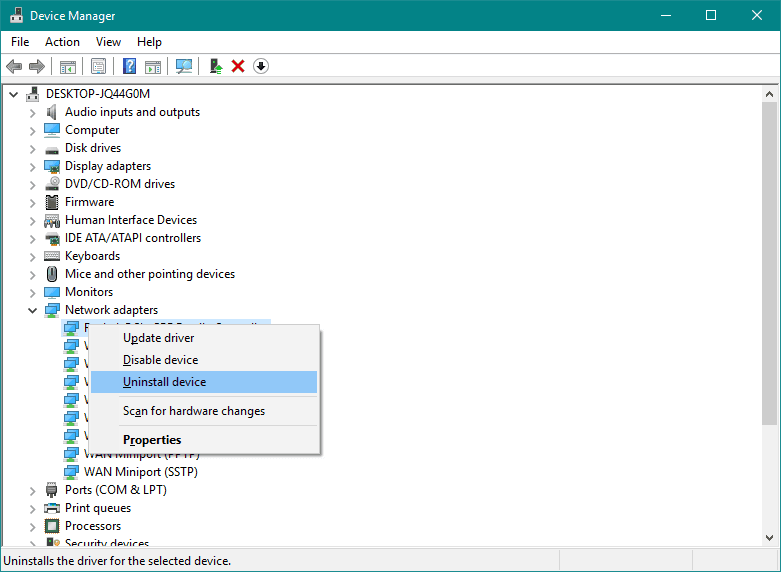
Sometimes, the network drivers might be outdated, corrupted, or even inactive. Hence, you may consider reinstalling the network drivers on your Windows 10 PC. Here’s how to reinstall network drivers:
- Go to Start > Type Device Manager, and then hit Enter key.
- Locate Network Adapters
- Uninstall available network drivers.

- Click Action > Scan for hardware changes
- Wait for the process to be completed. (This will reinstall the drivers)
- Connect to the VPN afterward
In addition, you can also update your network drivers automatically by using automated software.
⇒ Get Outbyte Driver Updater
If you are still getting Windows 10 PPTP VPN not connecting prompt, then you might want to reinstall your VPN client software in the next solution below.
6. Reinstall your VPN
Here’s how to reinstall VPN client on your Windows 10 PC:
- Go to Start > Control Panel
- Select Uninstall a program under Programs menu

- Find your VPN from the list of programs and select Uninstall
- In the Setup Wizard, click you’ll get a notification after a successful uninstall, so click Close to exit the wizard.
- If the VPN is still listed as available after uninstalling it, go to Start > Run
- Type ncpa.cpl and press Enter to open the Network Connections window
- Under Network Connections, right-click on the WAN Miniport labeled your VPN
- Select Delete
- Go to Start > Type Network Connections, and press Enter. Right-click a VPN connection and use the Delete option.
- Select VPN.
- If you see your VPN as available, delete it.

After the complete uninstall, you can then install the VPN client on your Windows 10 PC afterward. Meanwhile, we do recommend that you install the latest VPN client version on your PC.
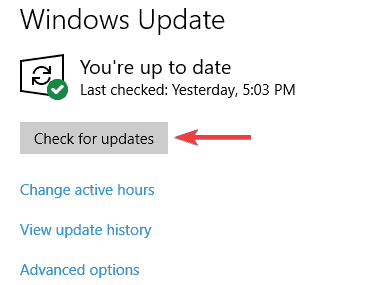
7. Install the latest Windows Updates
Some VPN client software requires the latest Windows .NET Framework and several Windows components. Failure to have some of these components can result in the Windows 10 PPTP VPN not connecting error issue.
Moreover, the latest Windows updates improve your PC’s security, performance, and operations. Hence, we recommend that you install the latest Windows updates.
Here’s how to do this:
- Go to Start>type “update” in the search box and then click on Windows Update to proceed.

- In the Windows Update window, check for updates and install the available updates.
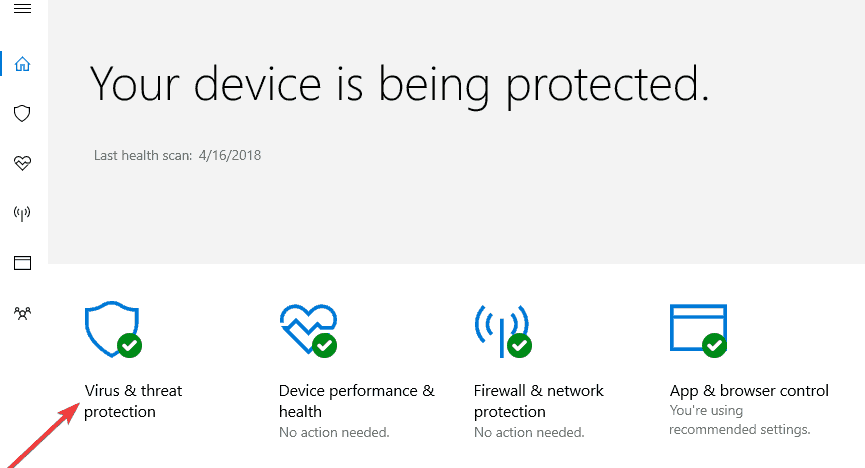
8. Temporarily disable security programs
Some antivirus programs can block VPN software on Windows 10. Hence, you need to exclude your VPN from your antivirus protection settings.
Here’s how to do this in Windows Defender:
- Launch Windows Defender Security Center
- Now, go to Virus & Threat protection settings

- Select Exclusions
- Select Add or remove exclusions
- Select Add an exclusion and add your VPN client software
In addition, Windows Firewall as well can also prevent PPTP VPN from connecting; therefore, you need to enable your VPN in Windows Firewall Advanced settings.
Here’s how to do this:
- Go to Start > Type Allow a program through Windows firewall and then hit Enter key
- Click on Change Settings options

- Now, click on Allow another program
- Select the VPN software you want to add, or click Browse to find the VPN software, and then click OK.
- Check if you can connect to your VPN.
9. Enable rule for PPTP
Here’s how to enable rule for PPTP on Windows 10:
- Go to Start > Control Panel
- Now, go to Windows Firewall > Select Advanced Settings

- Search for the Routing and Remote Access under Inbound Rules and Outbound Rules.
- For Inbound Rules: right-click Routing and Remote Access (PPTP-In), select Enable Rule.
- For Outbound Rules: right-click Routing and Remote Access (PPTP-Out), select Enable Rule.
10. Manually setup PPTP VPN connection
You can also request for PPTP account setup instructions from your VPN service provider and follow the instructions. Alternatively, you can setup PPTP VPN manually on your Windows 10 computer.
However, you need a VPN account and a working internet connection.
Follow these steps to manually set up PPTP VPN:
- Right-click Start > Settings> Click Network and internet > Click VPN.
- Now, Click Add a VPN connection and then click the dropdown menu.
- Check Windows (built-in), and then click the Connection name field.
- Type a name for the VPN connection.
- Click the Server name or address field and enter the server’s address.
- Click the dropdown menu below VPN type and select the PPTP connection protocol.
- Now, click the dropdown menu below Type of sign-in info, tick a sign-in method, and click on Save.
- To connect, click on the VPN you just set up., and click Connect
Also, your VPN service provider will provide you with VPN client software as well. You can install the VPN client software, and then follow the prompts to set up PPTP VPN on your Windows 10 machine.
Have you tried any other solution? Let us know by commenting below or you can ask questions if any. We would gladly respond.
![]()
-
ВАЖНО!
Перед началом поиска проблем убедитесь, что все галочки на страницах «Гостевой доступ», «Белый список», «Маршрут по умолчанию» в вашем персональном разделе системы сняты! Это поможет локализовать и исправить ошибку быстрее.

Помните, что настройки туннелей в системе VPNKI применяются при переподключении туннеля. Поэтому при изменении информации в личном кабинете системы всегда переподключайте все туннели в вашем аккаунте.
Шаг 1. Подключение
1.0.1. Если соединения нет, то первым делом проверьте, что ваш внешний IP адрес не заблокирован в нашей системе. Узнать свой белый IP адрес можно, например, задав в поиске Яндекса фразу «IP address». Запомните адрес, а потом посмотрите на перечень заблокированных IP адресов в нашей системе. Этот список можно найти на странице «Инструменты» — «Заблокированные IP адреса».
1.0.2. Проверьте, что в настройках VPN соединения Windows вы используете механизм аутентификации CHAP для соединения без шифрования и механизм MS-CHAPv2 для соединения с шифрованием.
1.1. Наиболее частой причиной невозможности установления соединения является нежелание вашего провайдера пропустить трафик протокола GRE. Этот протокол используется в соединении PPTP.
По состоянию на начало 2017 года, провайдеры, ограничивающие вас в соединениях, это, например, Yota и МГТС. Но эта ситуация не одинакова во всех частях их сетей.
В случае наличия проблемы с GRE соединение не устанавливается и таймаут на его установление истекает.
О том, как эта проблема выглядит в логах системы VPNKI читайте здесь. Раздел про PPTP и GRE.
Вылечить это можно только путем использования другого VPN протокола. Например L2TP, L2TP c шифрованием IPsec, OpenVPN, SSTP и WireGuard.
Если нет возможности изменить протокол, то можно поменять и провайдера. Хотя бы на время тестирования.
1.2. Следующая по частоте причина — ошибка в имени пользователя, пароле или адресе службы msk.vpnki.ru . Тут совет один — проверьте все еще раз. Если не уверены в пароле, то поставьте на период тестирования пароль 12345. Когда все заработает, то измените на нормальный.
1.3. Следующая причина — ваше соединение НЕ будет принято, если пользователь с таким именем уже подключен. В этом случае вы получите ошибку авторизации.
Если вы некорректно оборвали первое соединение (например, отвалился канал к провайдеру) и вы начали устранавливать его еще раз, то в этом случае наша система может вас не подключить. До того момента, пока не исчетет таймаут неактивности первой сессии.
В некоторых случаях этот таймаут может доходить до 5 минут. Такую ситуацию вы сможете обнаружить в логе «События авторизации» нашей системы.
1.4. Если вы все сделали верно, но соединение не устанавливается, то обратитесь к нам в форум.
Сформулируйте ситуацию, сообщите время/дату неуспешного подключения, тип используемого протокола, а также имя туннеля, чье соединение не установилось.
Результат этого шага — Соединение установлено.
Шаг 2. Подключение установлено, как мне проверить что я на верном пути?
2.1. После установления соединения ваше устройство автоматически получит адрес из сети 172.16.0.0/16.
После этого вы должны успешно пинговать адрес сервера VPNKI путем выполнения команды ping 172.16.0.1 на своем устройстве.
Если пинг не проходит, то убедитесь что новый интерфейс на вашей системе создался. Выполните команду ipconfig и убедитесь, что интерфейс pppX с адресом 172.16.x.x создался.
Затем проверьте настройки межсетевого экрана на предмет пропускания трафика протокола icmp для нового интерфейса pppX. Но на 90% там все нормально.
2.2. Пинг адреса 172.16.0.1 проходит, но не сразу.
Это нормальная ситуация. В течение 10-12 секунд после установления соединения система VPNKI ожидает запрос от вашего устройства на получение данных по протоколу DHCP. Такая длительность обусловлена подключением клиентов по низкоскоростным каналам и поэтому мы вынуждены ждать.
Если запрос DHCP не приходит, то маршрутизация вашего трафика начнется через 12 секунд. Если запрос DHCP получен и обработан, то трафик пойдет без задержек.
Результат этого шага — команда ping 172.16.0.1 выполняется успешно.
Шаг 3. Подключение установлено, пинг адреса 172.16.0.1 успешен, что дальше?
Дальнейшие действия связаны с наличием маршрутной информации. Дело в том, что после подключения, адрес сервера VPNKI — 172.16.0.1 является адресом, напрямую подключенным к вашему устройству по каналу точка-точка. По этой причине ваше устройство «знает» об этом адресе и успешно пингует его.
Однако, на этом этапе, ваше устройство не обладает информацией о других адресах вашей сети VPNKI. Первым шагом будет являться «обучение» вашего устройства новому маршруту к сети VPNKI 172.16.0.0/16 .
Именно в этой логической сети находятся все ваши прочие туннели.
Для достижения цели обучения вашего устройства используются два метода:
- получение этого маршрута на ваше устройства от сервера по протоколу DHCP.
- прописывание статического маршрута в ручном режиме в командной строке Windows.
Если вы настраивали все по инструкции на сайте (с использованием протокола DHCP), то после установления соединения ваше устройство получит информацию о маршруте к сети 172.16.0.0/16
Эта сеть должна быть доступна через адрес сервера VPNKI — 172.16.0.1 .
Проверить это можно выполнив команду route print. В ее длинном выводе вы должны обнаружить следующую строку:
Сетевой адрес Маска Адрес шлюза Интерфейс
172.16.0.0 255.255.0.0 172.16.0.1 172.16.x.x — выданный вам адрес
Если по какой-то причине данная строка не появилась то это означает, что протокол DHCP не отработал и маршрутная информация о сети 172.16.0.0/16 не получена.
В такой ситуации вы сможете выполнить пинг сервера 172.16.0.1, но не сможете выполнить пинг адреса другого туннеля в сети VPNKI. В этом случае имеет смысл разобраться в причине или добавить статический маршрут в ручном режиме.
В качестве обходного маневра вы можете прописать маршрут к сети 172.16.0.0/16 выполнив команду (с правами администратора!)route add 172.16.0.0 mask 255.255.0.0 172.16.0.1
После этого вы должны успешно выполнить пинг своего «другого устройства», подключенного к сети VPNKI по его адресу 172.16.x.x. Выполните команду ping 172.16.x.x .
Однако обращаем внимание:
— второе устройство также должно содержать в своей таблице маршрутов путь к сети 172.16.0.0/16. Только в этом случае ваше устройство в другом туннеле будет знать куда отправять ответы на пинг.
— на втором вашем устройстве межсетевой экран не должен блокировать ответы на пакеты icmp. Проверить принципиальную возможность ответов устройства на пакеты утилиты ping вы можете с нашей страницы «Инструменты», указав адрес устройства. Если вы уверены, что устройство настроено правильно, но пинги с этой страницы не проходят, то смотрите настройки своего устройства относящиеся к протоколу icmp.
Результат этого шага — наличие маршрута к сети 172.16.0.0/16 в таблице маршрутов Windows устройства. И успешный пинг вашего второго устройства по адресу 172.16.x.x.
Шаг 4. Пинг моего другого устройства по адресу 172.16.x.x успешен, а как выполнить пинг другого устройства по его внутреннему адресу 192.168.x.x?
Дальше начинается действие, ради которого все и затевалось — получение одним устройством c ОС Windows доступа к внутренней сети, расположенной за устройством (маршрутизатором) в вашем другом туннеле. Эти действия связаны с наличием маршрутной информации о сети «за» маршуртизатором и почти аналогичны предыдущему шагу, но с некоторыми отличиями. Теперь нам необходимо не только обучить ваш Windows «знанию» о сети 172.16.0.0/16 . Это было выполнено на предыдущем шаге. Теперт надо дать ему информацию о сети, расположенной «за» маршрутизатором вашего второго туннеля.
Прежде чем приступить к этому шагу вы должны убедиться в том, что сеть «за» вашим маршрутизатором НЕ пересекается с сетью, в которую подключена ваша Windows машина. То есть, если ваш Windows находится в сети 192.168.0.0/24 (например дом) и такая же сеть 192.168.0.0/24 расположена за вторым устройством (например дача), то такая конфигурация будет некорректной и из нее есть два выхода:
— перенастроить одну из сетей на другую схему адресации, например 192.168.1.0/24
— осуществить трансляцию портов на вашем втором устройстве в адрес, полученный от сети vpnki 172.16.x.x . Эту конфигурацию мы не будем рассматривать в рамках настоящего документа.
Итак, если вы имеете разные сети, то теперь нам необходимо сообщить вашему Windows устройству о наличии сети, например 192.168.1.0/24, расположенной за ваш вторым туннелем. Для этого вам необходимо на вашей персональной странице настроек VPNKI, для второго вашего туннеля (например дача) отметить галочкой то, что вы настраиваете маршуртизатор и за ним расположена сеть 192.168.1.0/24. Примененная на этой странице настройка добавит эту сеть в протокол DHCP и передаст в ваше Windows устройство при следующем подключении.
Проверить это вы сможете выполнив команду route print. В ее длинном выводе вы должны обнаружить следующую строку:
Сетевой адрес Маска Адрес шлюза Интерфейс
192.168.1.0 255.255.255.0 on-link 172.16.x.x — выданный вам адрес
Если по какой-то причине данная строка не появилась это означает, что протокол DHCP не отработал и маршрутная информация не получена. В этом случае имеет смысл разобраться в причине или добавить статический маршрут в ручном режиме.
В качестве обходного маневра вы можете прописать маршрут к сети 192.168.1.0/24 выполнив команду (с правами администратора!)route add 192.168.1.0 mask 255.255.255.0 172.16.0.1
После этого вы должны успешно выполнить пинг своего «другого устройства», подключенного к сети vpnki по его внутреннему адресу (например 192.168.1.1), выполнив команду ping 192.168.1.1
Однако обращаем внимание:
— на то, что второе устройство (маршрутизатор) должно содержать в своей таблце маршрутов путь к сети 172.16.0.0/16 для отправки ответов на ваш пинг.
— на втором вашем устройстве (маршрутизаторе) межсетевой экране не должен блокировать ответы на пакеты icmp .
Результат этого шага — наличие маршрута к сети 192.168.1.0/24 в таблице маршрутов Windows устройства и успешный пинг вашего второго устройства по внутреннему адресу 192.168.1.x.
PS: В целях борьбы с зависшими сессиями мы принудительно отключаем пользовательские туннели с протоколами PPTP, L2TP, L2TP/IPsec, IKEv2/IPsec, SSTP через 24 часа после установления соединения. При правильной настройке соединения должны автоматически переустановиться.
ДОПОЛНИТЕЛЬНО ПО ТЕМЕ:
- Ознакомьтесь с настройками и работой нашей услуги «Публикация URL». Она поможет вам организовать удаленный доступ по протоколам http и https к своим ресурсам.
- Озанакомьтесь с работой и настройками нашей услуги «Проброс TCP порта». Она поможет вам опубликовать в сети Интернет TCP порт вашего устройства.
- Ознакомьтесь с настройками и приниципами работы услуги «Доступ через HTTP и SOCKS5 прокси». Она даст вам возможность удаленного доступа через прокси.