 По умолчанию, в Windows 10 клавиша F8 не работает для входа в безопасный режим (но есть множество других способов запустить безопасный режим Windows 10). Однако, если вам удобен привычный метод запуска безопасного режима, вы можете вернуть старую функциональность.
В этой инструкции о том, как сделать так, чтобы при нажатии клавиши F8 при запуске компьютера появлялось «старое» меню выбора режимов загрузки с возможностью входа в безопасный режим, некоторые нюансы, которые следует учесть и видео инструкция.
Вход в безопасный режим с помощью клавиши F8 в Windows 10
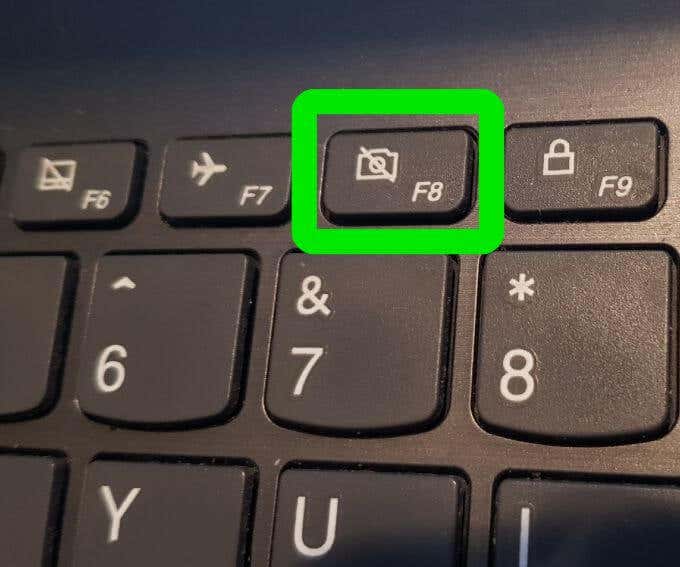
Для того, чтобы включить вход в безопасный режим по клавише F8 (на некоторых ноутбуках нужно будет нажимать Fn+F8), выполните следующие простые действия:
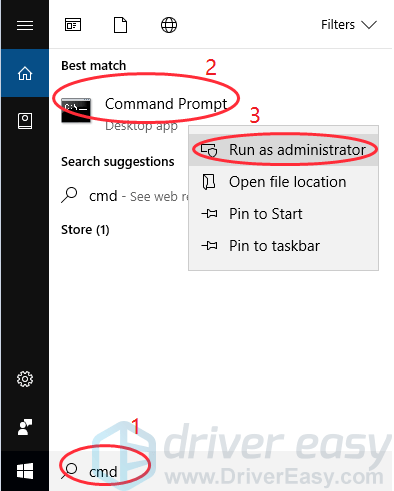
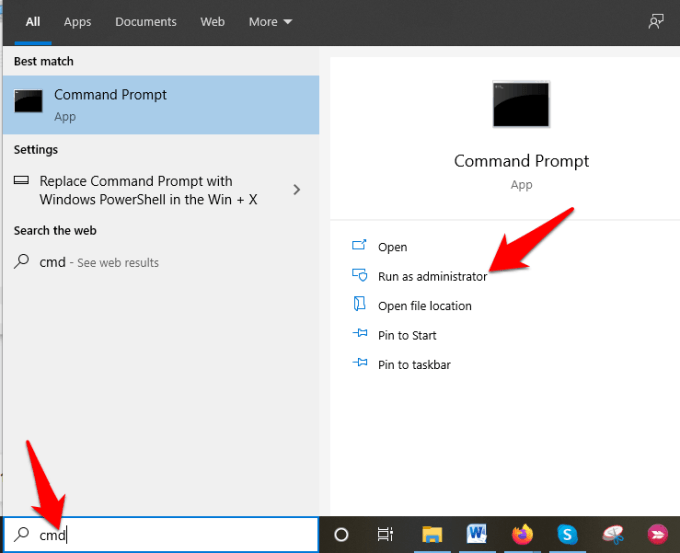
- Запустите командную строку от имени администратора. Самый простой способ сделать это — использовать поиск в панели задач: начните набирать «Командная строка», а затем либо выберите нужный пункт в контекстном меню найденного результата, либо используйте пункт в правой панели результатов поиска (только в последних версиях Windows 10).

- Если Windows 10 не запускается, но появляется экран с пунктом «дополнительные параметры», то в них вы также можете запустить командную строку.
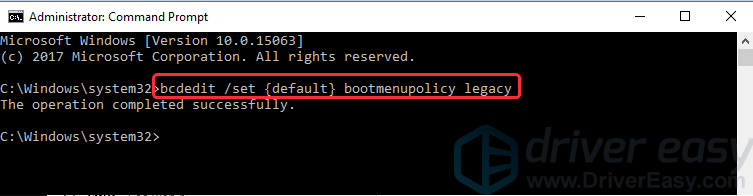
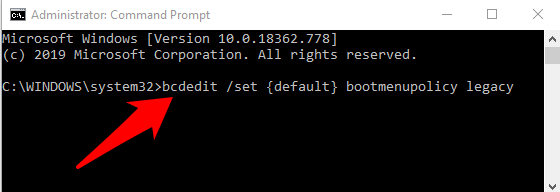
- В командной строке введите команду
bcdedit /set {default} bootmenupolicy legacyи нажмите Enter.

- Если операция была завершена успешно, значит всё готово: можно перезагружать компьютер и многократно нажимать F8 (или Fn+F8) — иначе можно не успеть. В результате вы увидите знакомое вам меню, как на скриншоте ниже.


Всё очень просто, но есть важная особенность использования этого меню в Windows 10 по сравнению с 7-кой. Нюанс заключается в том, что по умолчанию в Windows 10 включена функция быстрый запуск.
Это приводит к тому, что, когда вы выключаете компьютер или ноутбук с помощью пункта «Завершение работы», он не совсем выключается, а переходит в своего рода гибернацию, а в дальнейшем — включается не «с самого начала». В результате, при использовании этого пункта, клавиша F8, включенная описанным способом, не сработает для входа в безопасный режим. Решение — использовать перезагрузку вместо завершения работы или отключить быстрый запуск Windows 10.
В дальнейшем, если вы захотите отменить сделанные по инструкции изменения, запустите командную строку от имени администратора и используйте команду
bcdedit /set {default} bootmenupolicy standard
В результате всё вернется в исходное состояние.
Видео инструкция
Надеюсь, инструкция оказалась полезной для кого-то из читателей.
Как известно, при загрузке Windows 10 не работает клавиша F8, отключена возможность выбора дополнительного меню загрузки (безопасный режим, отключение автоматической перезагрузки и др.), как это было сделано в предыдущих версия системах.
Вместо этого Windos 10 запускает возможность выбора дополнительных параметров загрузки, только после трех аварийных отключений системы или ручным(однократным) запуском в msconfig.
Для включения альтернативного меню при загрузке Windows 10, запустите командную строку с правами администратора:
ПУСК — Служебные Windows — правой клавишей мыши по Командная строка — Дополнительно — Запуск от имени администратора.
Введите команду:
bcdedit /set {default} bootmenupolicy legacy

Нажмите Enter и перезагрузите компьютер.
Теперь, если при запуске системы нажать клавишу F8 отобразится расширенное меню загрузки.
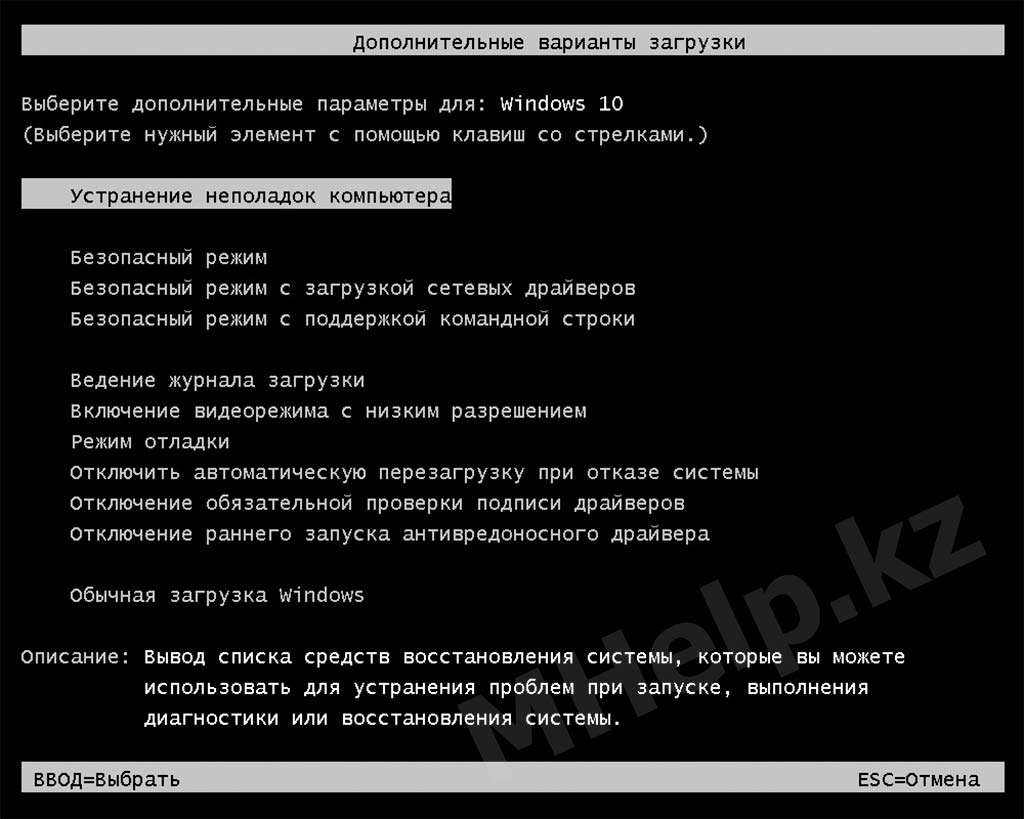
В котором можно выбрать безопасный режим или например отключить автоматическую перезагрузку при отказе системы, для получения кода BSOD ошибки.
Проверенно на Windows 10 x64 версия 1809 (сборка 17763). Включен режим UEFI и Safe Boot.
[nx_box title=»Поделиться этой статьей» style=»glass» box_color=»#ED303C»]Если данная статья вам помогла и вы хотели бы в ответ помочь проекту Mhelp.kz, поделитесь этой статьей с другими:
[/nx_box]
As a Windows 10 user, you may have noticed that: Windows 10 Safe Mode F8 key no longer works. You probably can’t help but wonder: does Windows 10 remove this feature? The answer is NO. You can still enter the Safe Mode by pressing the F8 key. You may need to manually re-enable this feature with only a few simple steps.
This article introduces how to fix Windows 10 Safe Mode F8 not working issue, and also provides alternative methods for you to start Safe Mode. So you can try whichever way you prefer.
- How to Fix Windows 10 F8 key to start Safe Mode
- Alternative methods to start Safe Mode
Fix Windows 10 F8 key to start Safe Mode
There is a workaround to re-enable Windows 10 F8 key to start Safe Mode easily. You can skip to How to fix it directly if you already know the reason why the F8 key doesn’t work in Windows 10.
Why doesn’t Windows 10 F8 key work?
In Windows 7, you can easily enter the Safe Mode by pressing the F8 key before Windows starts loading, but this has changed in Windows 8 and Windows 10. The reason is that Microsoft has reduced the time period for the F8 key to almost zero interval (less than 200 milliseconds). As a result, people almost can’t press the F8 key within such a short period of time, and there is little chance to detect the F8 key to invoke the boot menu and then start Safe Mode.
If you are lucky enough, you can keep pressing the F8 key during the boot, then you can sometimes get into the screen of Safe Mode boot options. But in most of the time, you might try in vain. However, the good news is that you can still get your F8 key work again, if you can access to your Windows normally. You just need to manually re-enable this feature.
How to fix it?
Note: You can try this method to get your F8 key work again only when your Windows can boot normally. If you can’t start Windows normally, you may start Safe Mode when your Windows can’t start normally.
As known, F8 no longer works in starting Safe Mode. But you can re-activate it with the Boot Configuration Data (BCD) Edit command. BCD Edit is a built-in tool to control how the operating system is started. With that, you can re-enable F8 boot menu easily. Follow these steps:
1) Type cmd in the search box, and right click Command Prompt to select Run as administrator, then click Yes to confirm.
2) Copy the command below and paste it in the Command Prompt, and press Enter.
bcdedit /set {default} bootmenupolicy legacy
3) After the operation completed successfully, restart your PC.
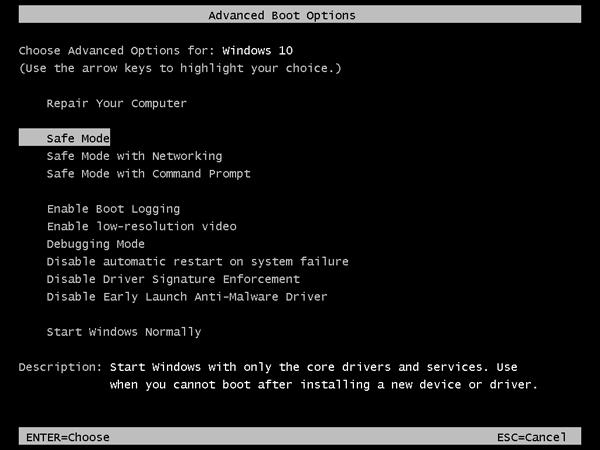
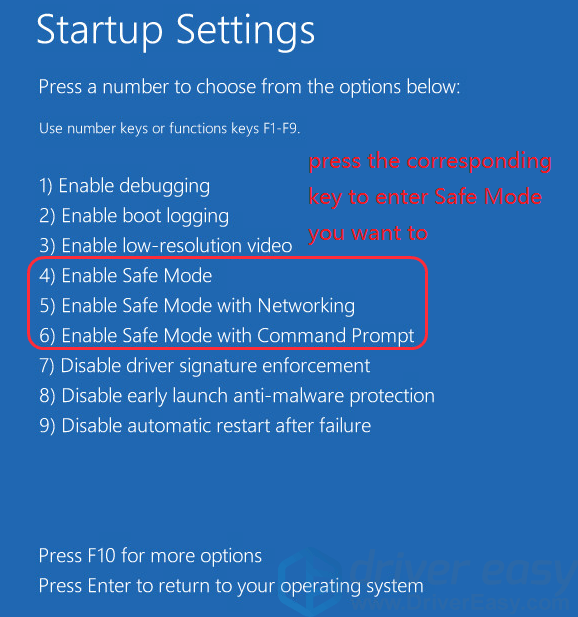
4) Before the Windows logo appears, press F8 to access Advanced Boot Options as the screenshot below. Select the Safe Mode you want to boot into, and press Enter.
Safe Mode: Safe Mode with a minimal set of drivers and services.
Safe Mode with Networking: Safe Mode with the network drivers and services needed to access the Internet.
Safe Mode with Command Prompt: Safe Mode with a Command Prompt window instead of the usual Windows interface. This option is intended for IT pros and system admins.
Then your Windows will start into Safe Mode.
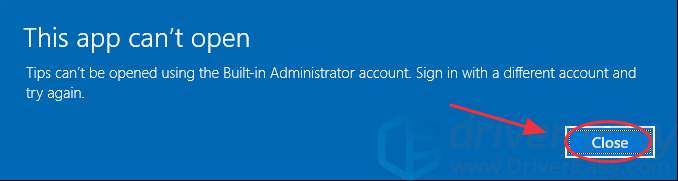
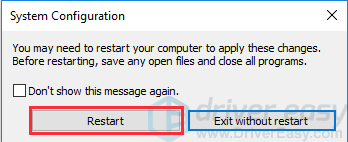
Note: After entering Safe Mode, you may see this message on your screen. This is normal because many applications doesn’t run in Safe Mode. Just click Close to close the window.
Alternative methods to start Safe Mode
In addition to F8 boot menu options, Windows 10 also provides other effective methods for you to enter Safe Mode. You can also try the methods below.
Method 1: Start Safe Mode from the Start menu
If you can start and run your Windows properly, you can try entering Safe Mode from the Start menu on your screen. This is a worth-considering method as well:
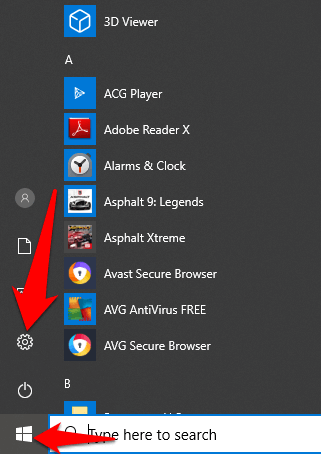
1) Click the Start button at the bottom left, and then click the Settings button.
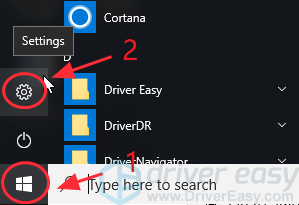
2) Click Update & security.

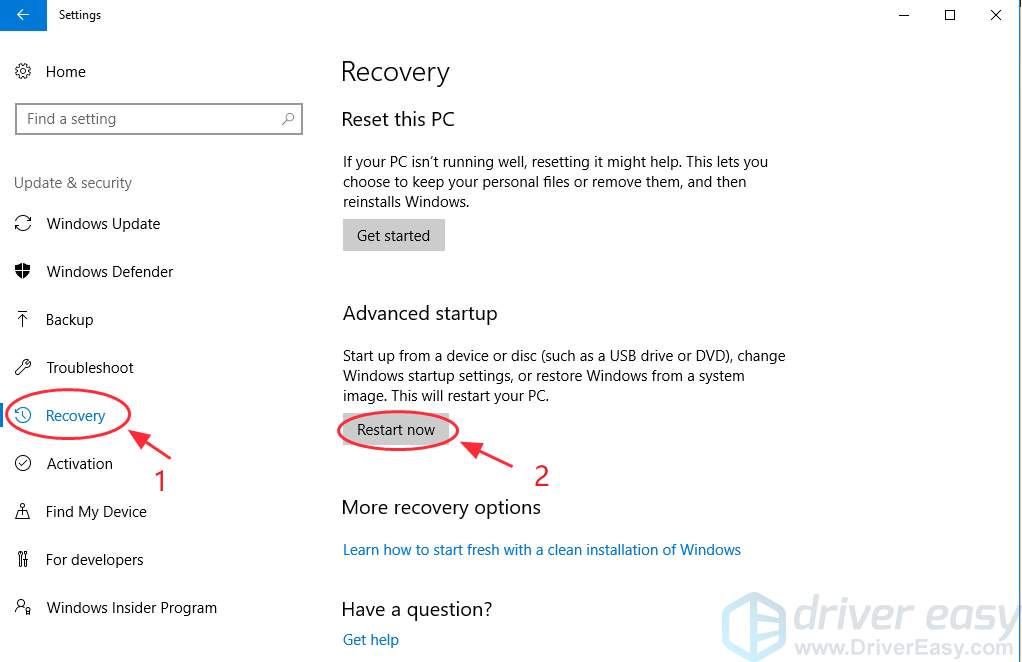
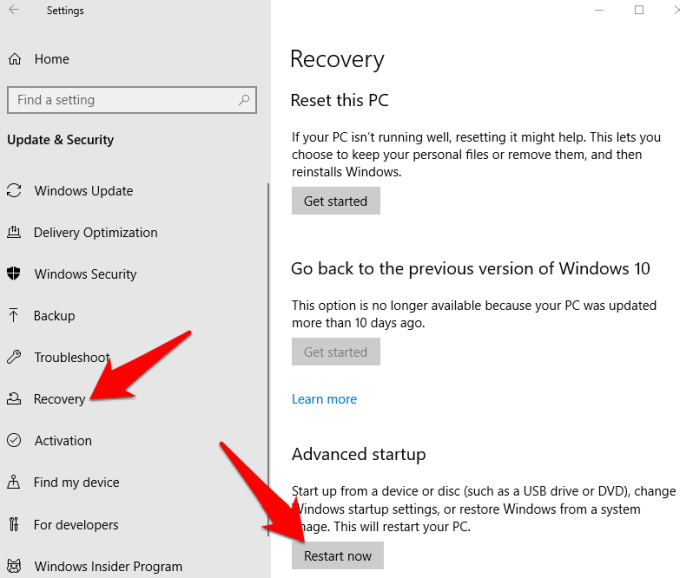
3) Click Recovery on the left pane, then click Restart now.
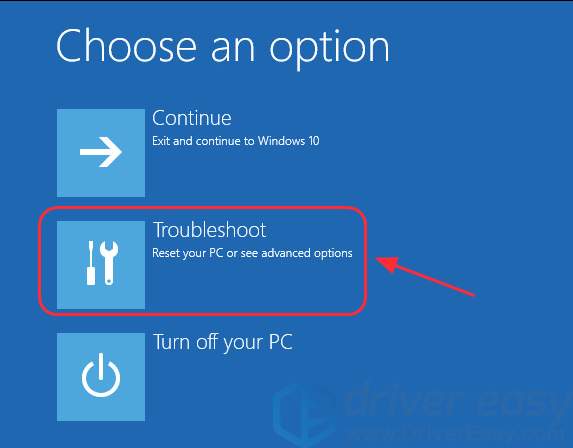
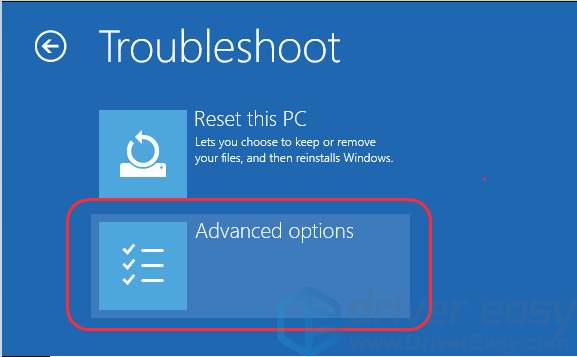
4) Your Windows will automatically restart. Then the Advanced troubleshooting tools screen will appear, and click Troubleshoot.
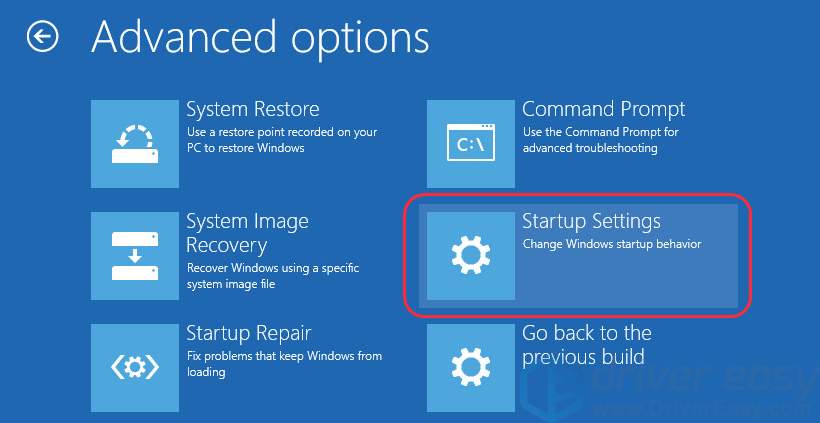
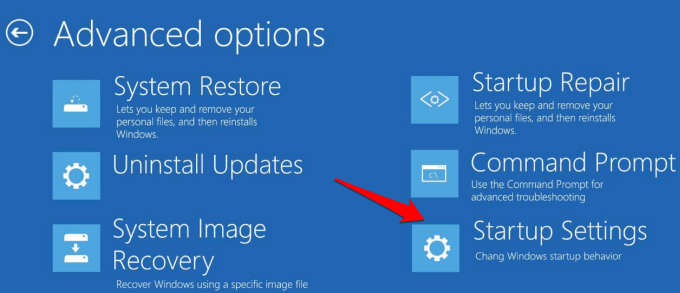
5) Click Advanced options.
6) Click Startup Settings.
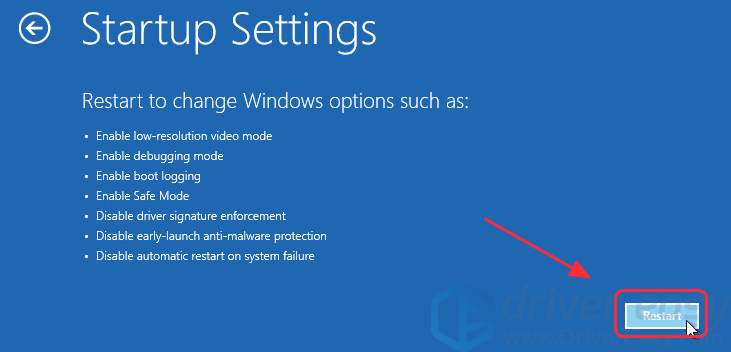
7) Click Restart. Then your computer will automatically restart and a screen appears to show different startup options.
 On your keyboard, click the 4 number key or F4 key to enter Safe Mode. (You can also press the corresponding key to enter Safe Mode with networking/Command Prompt. That depends on your needs.)
Tips: You have another choice to start Safe Mode from the Start menu:
1) Click the Start button at the bottom left corner, and right click the power button.
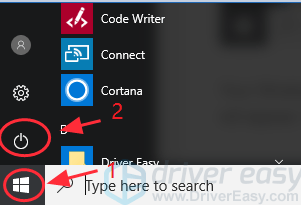
2) Hold down the Shift key on your keyboard when you click Restart.
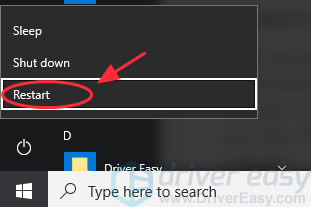
Your Windows will automatically restart. Then the Advanced troubleshooting tools will appear. Repeat the steps from step 4) above to continue.
Method 2: Start Safe Mode by System Configuration
When you are troubleshooting your system, you may need to boot into Safe Mode several times. Repeating all the steps above to enter Safe Mode would be a huge nuisance. In that case, you can start Safe Mode by System Configuration to save your time. This will help boot into Safe Mode every time you restart your computer.
System Configuration is also referred to MSConfig. It’s a system utility to troubleshoot the Windows startup process. It can disable or re-enable the programs and device drivers that run during boot process. Then you will be able to determine the cause of your problem.
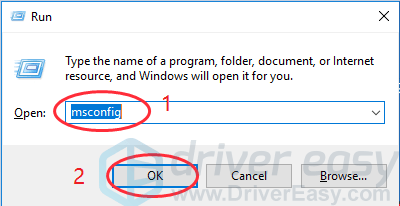
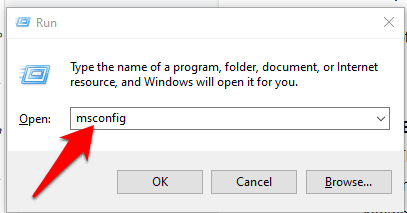
1) On your keyboard, press the Windows logo key  + R at the same time to invoke the Run box.
2) Type msconfig in the Run box and click OK.
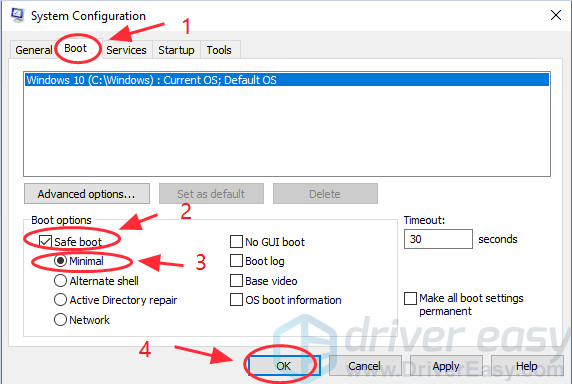
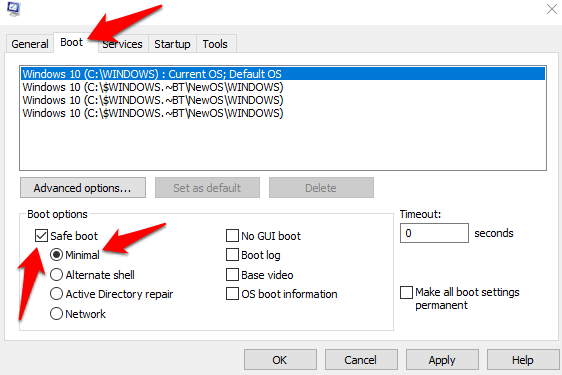
3) Click Boot. In Boot options, check the box next to Safe boot and select Minimal, and click OK. Or you can select other Safe Mode options according to your demand.
Minimal: normal Safe Mode.
Alternate shell: Safe Mode using only the Command Prompt.
Active Directory repair: Used only for repairing an Active Directory server.
Network: Safe Mode with networking support.
4) Click Restart to apply the changes. Then your Windows will restart into Safe Mode.
How to exit Safe Mode from System Configuration
Windows will start Safe Mode with System Configuration every time you boot your computer. So if you don’t want Safe Mode, you can exit Safe Mode by following these steps:
1) On your keyboard, press the Windows logo key + R at the same time to invoke the Run box.
2) Type msconfig in the Run box and click OK.
3) Click Boot. In Boot options, uncheck the box next to Safe boot, and click OK.

4) Click Restart to apply the changes and restart your computer in normal mode.
Method 3: Start safe mode when your Windows can’t start normally
As mentioned above, Safe Mode runs with a minimum set of drivers and programs. Generally speaking, if your Windows can’t boot normally, there won’t be a problem to enter Safe Mode as well. Therefore, you can reboot your computer twice in a row to access to the Automatic Repair screen where you can initiate Safe Mode. Follow the instructions below.
Note: Before getting started, make sure your computer is off.
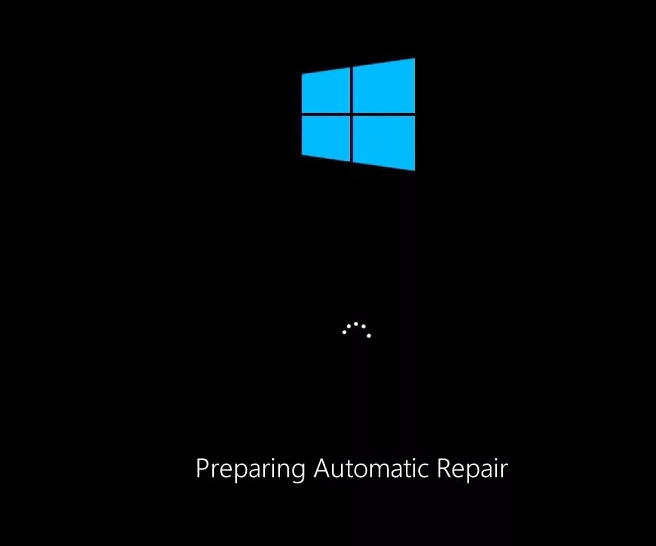
1) Press the power button to turn on your computer, then hold the power button to shut it down (about 5 seconds). Repeat this more than twice until you see the Preparing the Automatic Repair screen.
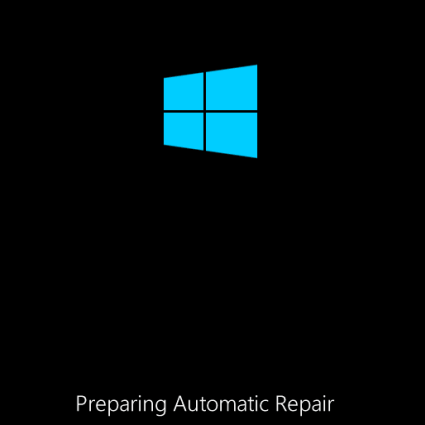
Note: this step helps to activate the Preparing Automatic Repair screen. If your Windows doesn’t restart normally, this screen pops up and Windows tries to fix the problem by itself. So if you see this screen at the first time when you power on the computer, just skip to the next step.
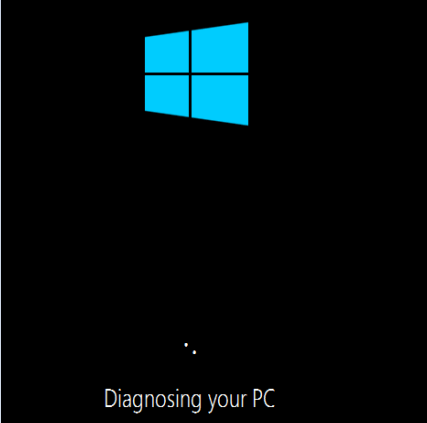
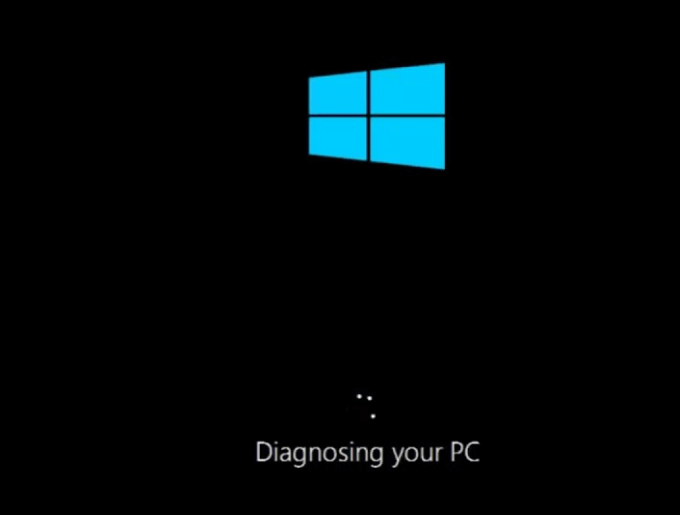
2) Then the Diagnosing your PC screen will appear.
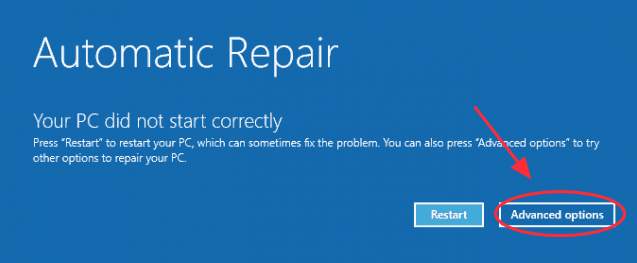
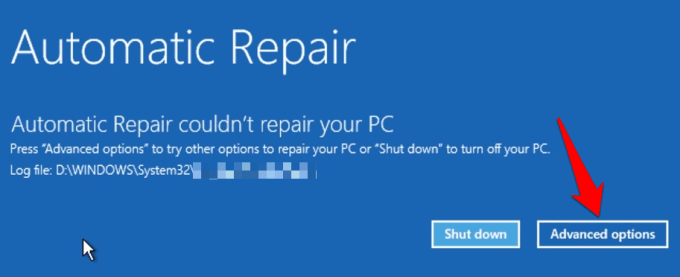
3) The Startup Repair screen appears, and click Advanced options.
4) You will enter the Advanced troubleshooting tools screen, then click Troubleshoot.
Then repeat the instructions from steps 5) to in Method 2 above to finish the settings, and your Windows will boot into Safe Mode.
These are the easy methods to enter Safe Mode. Hope it helps solve your issue. Feel free to comment below if you have any questions, and we will see what more we can further help.
После обновления операционной системы до Windows 10 пользователи столкнулись с тем, что многие операции в новой системе выполняются по-другому. Один из примеров – запуск системы в безопасном режиме. Раньше для этого нужно было просто нажать на клавишу F8 сразу после прохождения процедуры POST, но в Windows 10 данный способ не работает. Вместо него в безопасный режим нужно входить с помощью команды msconfig, установочного диска или нового меню «Параметры». Но, если вы слишком привыкли к старому способу загрузки в безопасном режиме, то вы можете переключиться на использование старого загрузочного меню, которое выглядит и работает точно также как раньше.
В данной инструкции мы расскажем о том, как настроить систему так, чтобы при использовании клавиши F8 при загрузке компьютера появлялось старое меню, с помощью которого можно быстро загрузиться в безопасном режиме.
Вход в безопасный режим Windows 10 через F8
Итак, если вы хотите переключиться на использование старого загрузочного меню, то вам нужно внести некоторые изменения в настройки Windows 10. Для этого вам понадобиться командная строка с правами администратора. Ее можно запустить несколькими способами, самый простой вариант, это воспользоваться поиском в меню «Пуск». Откройте меню «Пуск», введите команду «cmd», кликните правой кнопкой мышки по найденной программе и запустите ее от имени администратора.

После того как командная строка запущена, вам нужно просто выполнить следующую команду:
bcdedit /set {default} bootmenupolicy legacy
В командной строке это выглядит примерно так:

Если появилось сообщение о том, что операция выполнена успешно, значит можно перезагружать компьютер и проверять, можно ли запустить безопасный режим Windows 10 при помощи клавиши F8 (или Fn-F8 на некоторых ноутбуках). Если все сработало, то вы увидите вот такое загрузочное меню:

Если вы решите отключить старое меню и вернуться к стандартному способу загрузки Windows 10 в безопасном режиме, то для этого нужно будет выполнить следующую команду:
bcdedit /set {default} bootmenupolicy standard

Как и в предыдущем случае, после выполнения данной команды должно появиться сообщение «Операция успешно завершена».
Клавиша F8 все равно не работает
Если вы активировали старое загрузочное меню, но клавиша F8 все равно не срабатывает, то скорее всего причина в функции «Быстрый запуск». Данная функция ускоряет загрузку Windows 10 за счет использования гибернации и если она включена, то вы не сможете открыть загрузочное меню при помощи клавиши F8.
Решить эту проблему можно двумя способами. Первый вариант – просто отключить быстрый запуск (инструкция по ссылке), но в этом случае Windows 10 будет включаться намного медленней. Второй вариант – перед использованием клавиши F8 перезагрузить компьютер (Пуск – Выключение – Перезагрузка). При использовании перезагрузки быстрый запуск не срабатывает, а значит вы можете открыть загрузочное меню Windows 10 при помощи клавиши F8.
Посмотрите также:
- Как записать загрузочный диск
- Как сделать загрузочную флешку через UltraISO
- Как загрузиться с флешки
- Как записать образ на флешку через UltraISO
- Как создать загрузочную флешку Windows 10
Автор
Александр Степушин
Создатель сайта comp-security.net, автор более 2000 статей о ремонте компьютеров, работе с программами, настройке операционных систем.
Остались вопросы?
Задайте вопрос в комментариях под статьей или на странице
«Задать вопрос»
и вы обязательно получите ответ.
If you’ve upgraded to Windows 10 from older versions like Windows XP, Vista and Windows 7, you may have noticed that the F8 function key you pressed during startup to enter Safe Mode no longer works.
The F8 key is still available on your keyboard, but it works with other key combinations to perform certain functions, especially when your touchpad or mouse isn’t working and you need to use keyboard shortcuts instead.

In this guide, we’re going to show you what to do when you find F8 not working in Windows 10, but first, let’s look at why this happens.
Safe Mode is a native Windows feature in all versions of the operating system, which is used to troubleshoot various problems such as driver installation issues, problems booting into Windows, and malware or virus-related issues among others.
The F8 boot menu was removed in order to improve system boot time. This is because Windows 10 boots much faster than previous versions, so you won’t have enough time to press the F8 key and enter Safe Mode during startup. Plus, it can’t recognize the key press during the boot process, which prevents access to the boot options screen from where you can select the Safe Mode option.
Instead, Microsoft provided a new Advanced Boot Options menu feature that lets you access troubleshooting options such as Safe Mode and others.
You can still access the Safe Mode feature by pressing the F8 key, but you have to re-enable it manually using a few simple steps, and there are other methods that can also get you into Safe Mode, but they’re not as straightforward.
Fix F8 Not Working In Windows 10
1. Manually Re-enable F8 Key
- Type CMD in the search bar and click Run as Administrator.
- Type this command in the Command Prompt: bcdedit /set {default} bootmenupolicy legacy and press Enter..
Note: BCD or Boot Configuration Data Edit command is a native tool in Windows that controls how the operating system starts. It also helps you easily re-activate the F8 boot menu.
- Restart your PC, and press the F8 key repeatedly on the keyboard while it starts up and you’ll see the Advanced Boot Options menu, from where you can select Safe Mode, Safe Mode with Networking, or Safe Mode with Command Prompt.
To disable the F8 key again, open the elevated Command Prompt and type this command: bcdedit /set {default} bootmenupolicy standard
2. Enter Safe Mode From Start Menu
- Click Start and select Settings.
- Next, click Update & Security in the Settings menu.
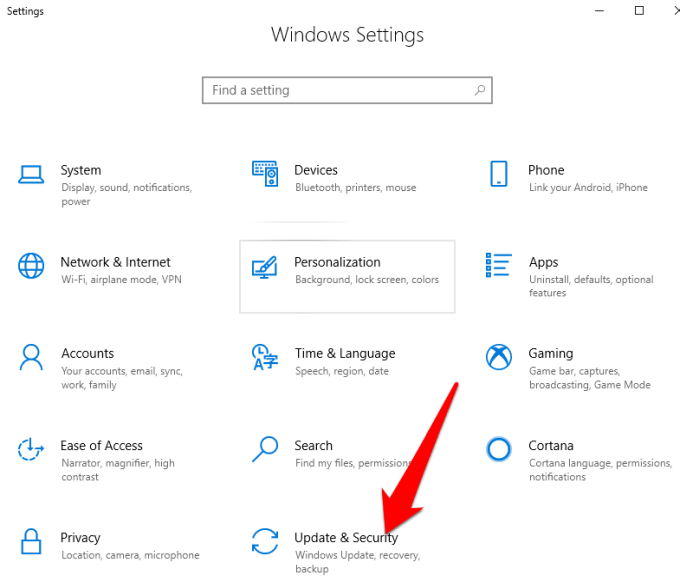
- On the left pane, click Recovery and then click Restart now.
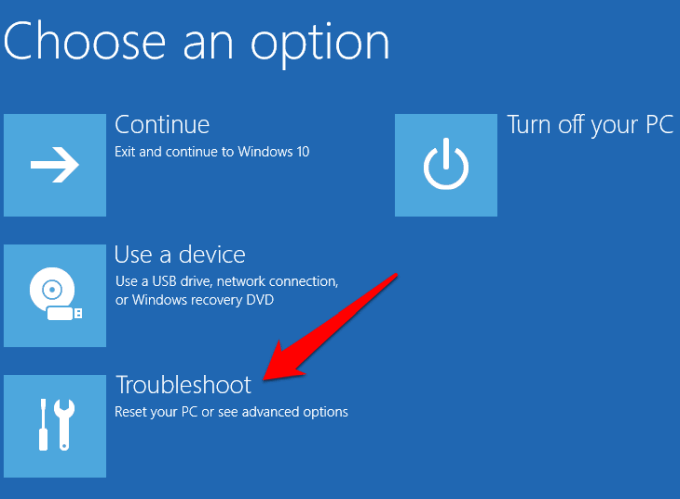
- Windows will restart automatically and display the Choose an Option screen. Click Troubleshoot.

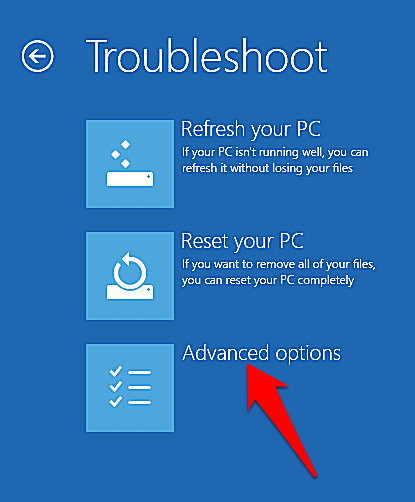
- Click Advanced Options.

- Next, click Startup Settings.
- A screen will appear showing different startup options.

- On your keyboard, press the F4 key or number 4 key to enter Safe Mode, or the corresponding key to enter Safe Mode with Networking or with Command Prompt depending on what you want to do.
Note: You can also click Start, right-click the Power button, and hold down the Shift key when you click Restart. This automatically restarts Windows and brings up the Choose an Option screen, after which you can continue with the steps to access Safe Mode.
3. Start Safe Mode By System Configuration
System Configuration also known as msconfig, is a system utility used when troubleshooting the Windows startup process. It can disable or re-enable device drivers and programs that run during the boot process to figure out why the problem you’re experiencing occurred. It saves time compared to other methods that require you to repeat several steps just to enter Safe Mode.
- Press the Windows logo key+R to open the Run dialog box and type msconfig. Then press Enter or click OK.
- Click Boot and mark the checkbox next to Safe Boot. Select Minimal and click OK. There are other options available such as Alternate Shell (Safe Mode with Command Prompt), Active Directory Repair, and Network (Safe Mode with Networking support), so you can pick the one you need.
- Click Apply > OK for the changes to take effect and Windows will restart in Safe Mode.
To exit Safe Mode from System Configuration, open the Boot options window again, uncheck the box next to Safe Boot, and click OK. Click Restart to apply the changes, and restart your computer normally.
4. Enter Safe Mode When Windows Can’t Boot Normally
Safe Mode loads with a minimum set of programs and drivers. If Windows can’t start normally, you won’t have a problem entering Safe Mode, because you can restart the PC twice and go to the Automatic Repair screen from where you can enter Safe Mode.
- Make sure your PC is off and then press and hold down the Power button until the computer goes off. Repeat this about two or three times (to trigger the boot recovery mechanism) until the Preparing Automatic Repair screen appears.
- If you see the Preparing Automatic Repair screen when you power on the computer the first time, skip to the next step, and the Diagnosing Your PC screen will appear. This will be followed by the Attempting repairs message.
- Windows will show the Automatic Repair couldn’t repair your PC message and give you the Shut down and Advanced options in the Startup Repair screen. Click Advanced options.
- Click Troubleshoot in the Choose an option screen.
- Next, click Advanced Options.
- Click Startup Settings.

- Your PC will restart and show different startup options on the next screen.
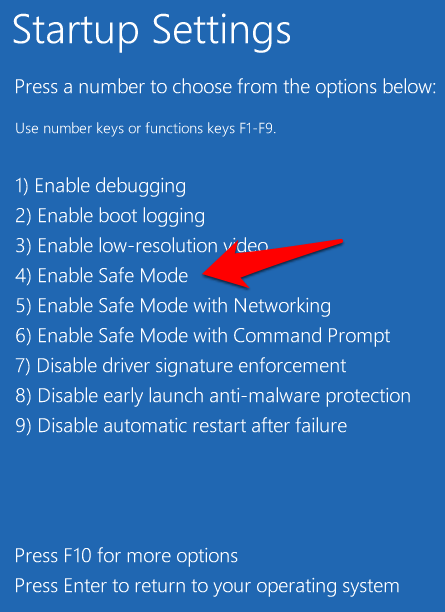
- Press the F4 key or number 4 key on your keyboard to enter Safe Mode. You can also press the corresponding key to enter Safe Mode with Command Prompt or with Networking depending on what you want to do.
Note: If you have a Windows 10 bootable USB drive or setup disc, you can use that to start your PC in Safe Mode if Windows can’t load. Boot the PC using the bootable drive or setup disc, select Repair your computer and you’ll get to the Choose an option screen from where you can take the steps above to enter Safe Mode.
5. Start In Safe Mode When You Can’t Login to Desktop
This is another method you can use if you find Windows 10 Safe Mode not working. If you can access your login screen (welcome or sign-in screen) but can’t access or login to Desktop, use these steps to restart your computer in Safe Mode.
- Click on Power at the bottom right side of the Windows 10 Login screen.
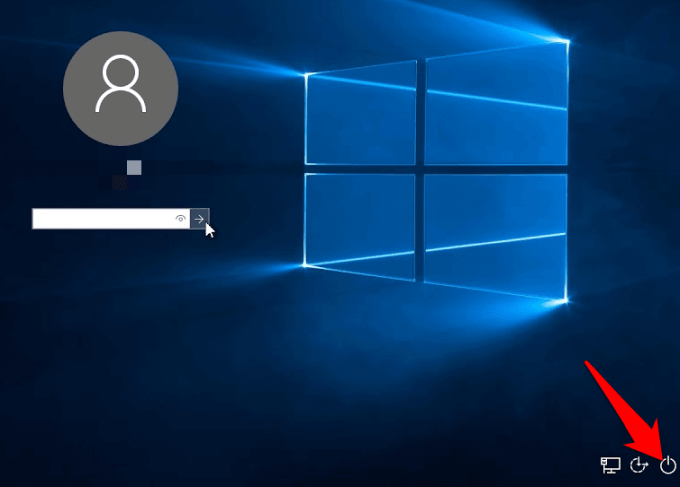
- Press and hold down the Shift key on your keyboard and select Restart. You’ll see the Please Wait screen appear briefly, and the Choose an Option screen. Click Troubleshoot.

- Click Advanced Options.
- In the Advanced Options screen, click Startup Settings.
- In the Startup Settings screen, press the key(s) corresponding to the Safe Mode option you want to use.

More Ways To Boot To Safe Mode
We hope you found this guide useful in helping you boot into Safe Mode when you find F8 not working in Windows 10. If you know of other methods you can use to access Safe Mode, you’re welcome to share them with us.