If you’re a PC gamer, then there’s a good chance you’ve heard of G-Sync. It’s a proprietary adaptive sync technology designed by NVIDIA, and arguably, it’s the best in the business despite stiff competition from AMD’s FreeSync. G-Sync is all about eliminating screen tearing in video games, but to take advantage of this, you’ll need a G-Sync supported computer monitor. Additionally, since G-Sync is hardware based, gamers will have little reasons to activate the software-based V-Sync.
Over the years, NVIDIA has come under attack due to the proprietary nature of G-Sync since free alternatives are available. Whatever the case may be, this adaptive sync technology is still arguably the best, but it does come with a few problems.
Is your computer powered by Windows 11/10? If that’s the case, then maybe you’re one of the many folks who has come across issues with G-Sync. We understand that some gamers are unable to locate the service in the NVIDIA control panel.
For others, it’s not showing up, while for some, the service is completely broken. The question is, then, what should be done to set things back to normalcy. We can say for certain that there are several ways to fix your G-Sync problems, so continue with us.
Install the newest G-Sync driver
It’s always important to keep your drivers updated because many problems can be fixed with a simple update. Just visit the Nvidia G-Sync website here, download the latest driver, install it, then select the option that says Custom Install.
After doing that, choose Clean install then follow onscreen options to move forward and complete the installation.
What if I have the latest driver installed already?
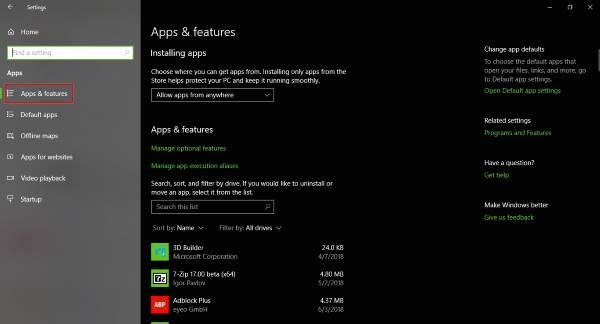
OK, so if you already have the latest driver installed and G-Sync is acting up, then it could be that the newest driver is at fault. The best option, then, is to revert to the older driver by pressing the Windows Key + I, then navigate to Apps & features.
From there, you can search for the required driver/program and remove it, no problem.
Now, when you’re done, visit the Nvidia website and download the previous driver version, then complete your task by installing it. After that, restart your Windows 10 computer and check carefully if G-Sync is up and running again.
Activate V-Sync
Some users claim one of the few ways to fix G-Sync when it’s not working, is to actually turn-on V-Sync. Doing this doesn’t make a lot of sense, but we’re suspecting it might be due to a bug on Nvidia’s part.
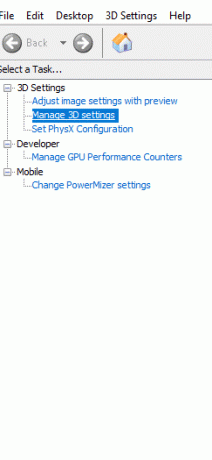
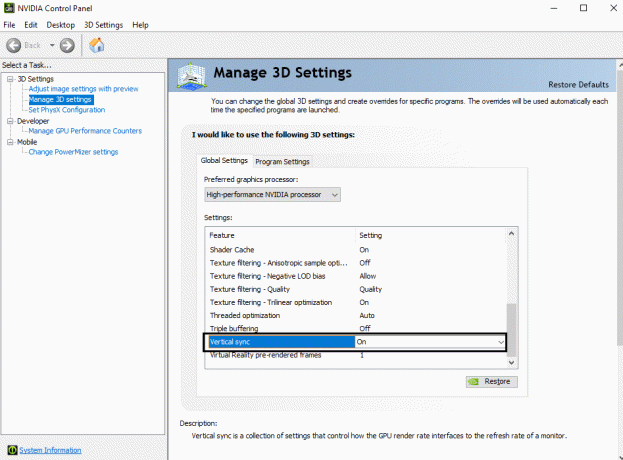
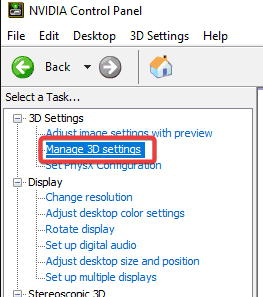
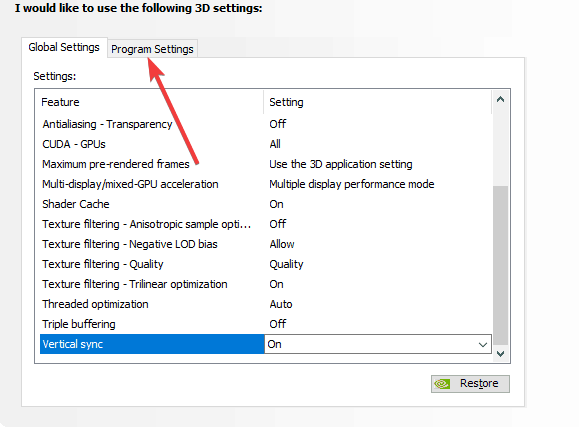
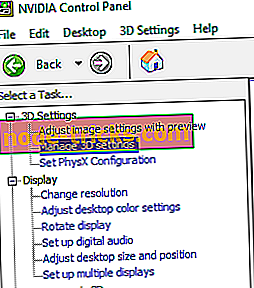
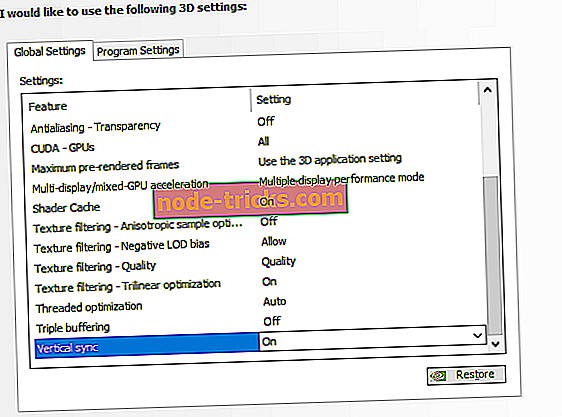
To activate V-Sync, then, simply launch the Nvidia Control Panel, then navigate to Manage 3D settings. After that, go to Global Settings and click on the Vertical sync option, then set this option to On, and finally, click Apply.
Restart your Windows 11/10 computer, and from there, things should be working as intended.
Is G-Sync configured properly?
It’s very important for Windows 10 gamers to check from time to time if G-Sync is working as it should.
To do this, just turn on your G-Sync-supported computer monitor and turn off your system. Make sure the monitor is off while the PC off for this is important. Now, check if your monitor is in G-Sync mode.
Restart your computer and navigate to the Nvidia Control Panel. Here you’ll need to turn off then turn on G-Sync again, and finally, restart your computer.
If nothing works, then the last best option is to contact Nvidia support in hopes to get some help from the actual experts.
Mar. 08, 2023 / Updated by
Renata to
Windows 11

Before solving the not working problem, users should know what is G-Sync.
G-SYNC is a display screen adaptive synchronization technology developed by NVIDIA to solve the problem of screen tearing in games:
G-Sync technology dynamically adjusts the refresh rate of the monitor to keep consistent with the refresh time of the game screen, avoiding screen tearing/low FPS while maintaining a high frame rate screen experience. Compared with V-Sync, G-Sync technology does not waste any game frames at all, and the system delay is also greatly reduced.
The most important advantage of G-SYNC: when G-SYNC is started, the refresh rate of the computer monitor will be the same as the frame number of the game, and it will change dynamically. The FPS of the game depends on the refresh rate of the display.
Note: The principle of the display is to quickly play countless static pictures, and through the visual residue of the human eye, the eyes will mistakenly think that the pictures are dynamic.
The refresh rate is the frequency at which the display displays images. The unit is Hz. A 60Hz display refreshes 60 images per second, and a 144Hz display refreshes 144 images per second. The higher the refresh rate, the smoother the image looks.
To fix G-Sync not working problem, users can try the below solutions:
Solution1. Update Graphics Driver
Solution2. Enable V-Sync
Solution3. Check G-Sync Settings
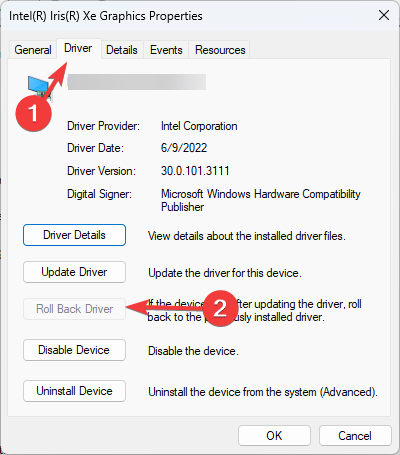
Solution4. Rollback Nvidia Driver
Solution5. Update Windows
Solution1. Update Graphics Driver
An outdated graphics driver is not compatible with the newly launching G-Sync.
Graphics card driver problems will cause the Windows system obviously freezing when running, but it will not crash; When playing games, it runs unsmoothly or even unable to enter games.
In this case, users can update the graphics driver.
Download Driver Talent for free updating and installing.
Only for one click, it can scan/find what problems with the computer drivers.
rrr

In other way to update drivers:
1. WIN+X together,
2. Open Device Manager
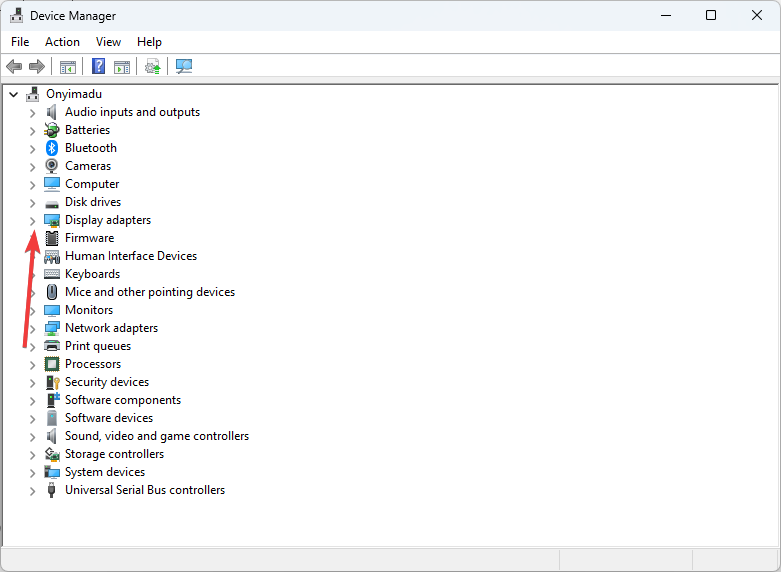
3. Choose display adaptor
4. Choose the graphics card driver
5. Right click the graphics card driver and uninstall it/update it
Note: Updating the graphics card driver can correct the BUG in the old version, and can further tap the functions of the graphics card hardware, so that some hardware functions can be fully utilized.
Solution2. Enable V-Sync
G-Sync is linked with V-Sync and sometimes it offers game stuttering, lag, screen tearing, etc. If your G-Sync can’t work properly on Windows 11/10, you should enable V-Sync.
1. Open NVIDIA Control Panel
2. Choose NVIDIA Control Panel from the list.
3. Click on Manage the NVIDIA Control Panel window and click on Manage 3D settings.
4. Choose to Global setting in the Manage 3D settings window
5. Check out whether the vertical sync is enabled or disabled.
6. Scroll down to the Vertical sync drop-down box and choose turn On.
7. Make sure to click on Apply to save the settings.
8. Restart the computer to enable V-Sync.
Solution3. Check G-Sync Settings
The G-Sync settings issue can also lead to unable running G-Sync or the screen tearing on G-Syn.
If G-Sync is unable to running or it made the screen tearing, it mostly result for G-Sync settings issue.
1. Check G-Sync not working issue.
2. Check whether the G-Sync monitor is good and working properly.
3. Restart the system and sign in
4. Head over to the NVIDIA Control Panel
5. On the 3D Settings
6. Choose Manage 3D settings
7. Keep in mind that the G-Sync option turned on or off to check for the issue.
Solution4. Rollback Nvidia Driver
The latest NVIDIA drivers might cause G-Sync to not work or tear. NVIDIA graphics cards are G-Sync supporters, users can try rolling it back to an older version in Device Manager and see if it turns G-Sync back to normal.
You can rollback the driver to a former version, following these steps and try to rollback the driver:
1. Press WIN+X at the same time, and Enter into Device Manager
2. Choose the Display Adaptor
3. Right click the graphics card device
4. Choose properties
5. On the Driver Tab, select Rollback Driver, and press OK
6. Follow the pop-up instructions
If the rollback driver still failed to fix the issue, users can use Driver Talent to choose another driver version.
In the below method, users can rollback Nvidia Driver:
On Driver Talent’s scan results page, users can click the reverted triangle of the driver—which will expand a list of different driver versions.

Solution5. Update Windows
If none of the previous methods work, you can check to see if your computer has not been updated for too long. Outdated software may cause some problems with newly released video games.
Through Windows updates, computer can resolve corrupted files and bugs. In this way, the G-Sync not working issue may be fixed
1. Press Windows + I together
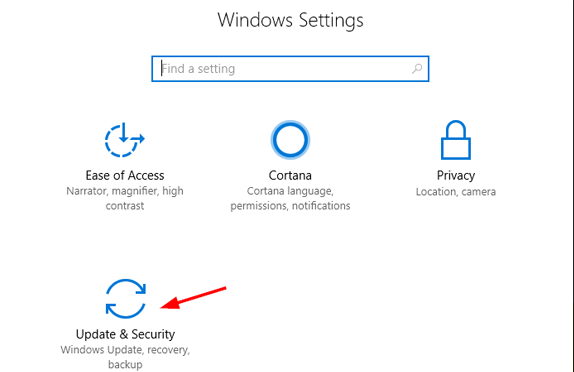
2. On the Windows Settings, click on Update & Security
3. Choose Windows Update section
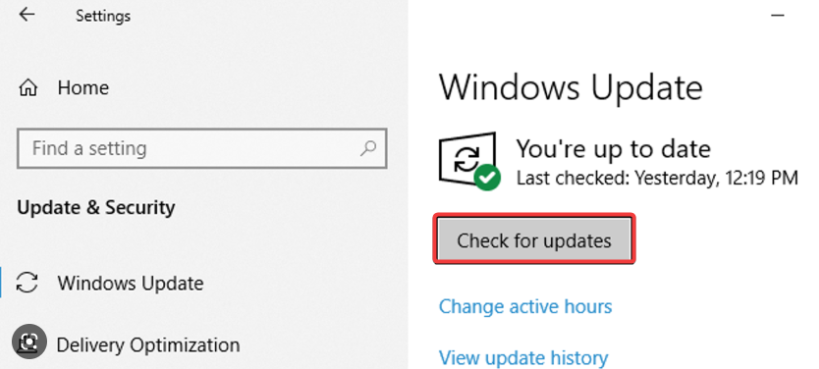
4. Click Check for Updates
5. Download and Install to start updating the software
6. Wait for seconds and restart the computer to make changes effected
Recommended Download

|
ExplorerMax |

|
Driver Talent for Network Card | |
| Smart and advanced file explorer tool for Windows platforms | Download & Install Network Drivers without Internet Connection | |||
|
30-day Free Trial |
Free Download |
In gaming, screen tearing has always been one of the biggest issues. It happens when a game produces more frames than your monitor can handle. For example, if your game runs more than 180 frames per second on a 144Hz refresh rate monitor, you will likely see screen tearing – a state of the display where you will see a distorted image for a split second.
To solve this issue, VSync was introduced. VSync, when enabled, will force synchronize your game’s frame rate with your monitor refresh rate, thus, eliminating the screen tearing issue. However, multiple new problems arise when VSync is in used. Users will very likely experience input lag/delay and screen stuttering when VSync is enabled. It was difficult to balance the good and bad of using VSync.
As a result, G-Sync was then introduced by NVIDIA to solve both the screen tearing and input lag issues. It is a new variable refresh rate technology that is able to synchronize game’s frame rate with monitor refresh rate while making sure the frames can appear instantly to minimize input lag and screen stuttering.
FreeSync is AMD’s version of G-Sync. They are both essentially the same – to allow your monitor to stay in sync with your game’s render rate to increase smoothness and reduce latency. G-Sync works only with NVIDIA graphics cards, while FreeSync is compatible only with AMD graphics card.
You will also need to have a G-Sync or FreeSync supported monitor in order to use the technology. For instance, if your monitor is not certified as G-Sync compatible, you will not be able to turn on G-Sync on your computer.
How to Enable NVIDIA G-Sync in Windows 11
To turn on NVIDIA G-Sync technology in Windows 11, follow the steps below.
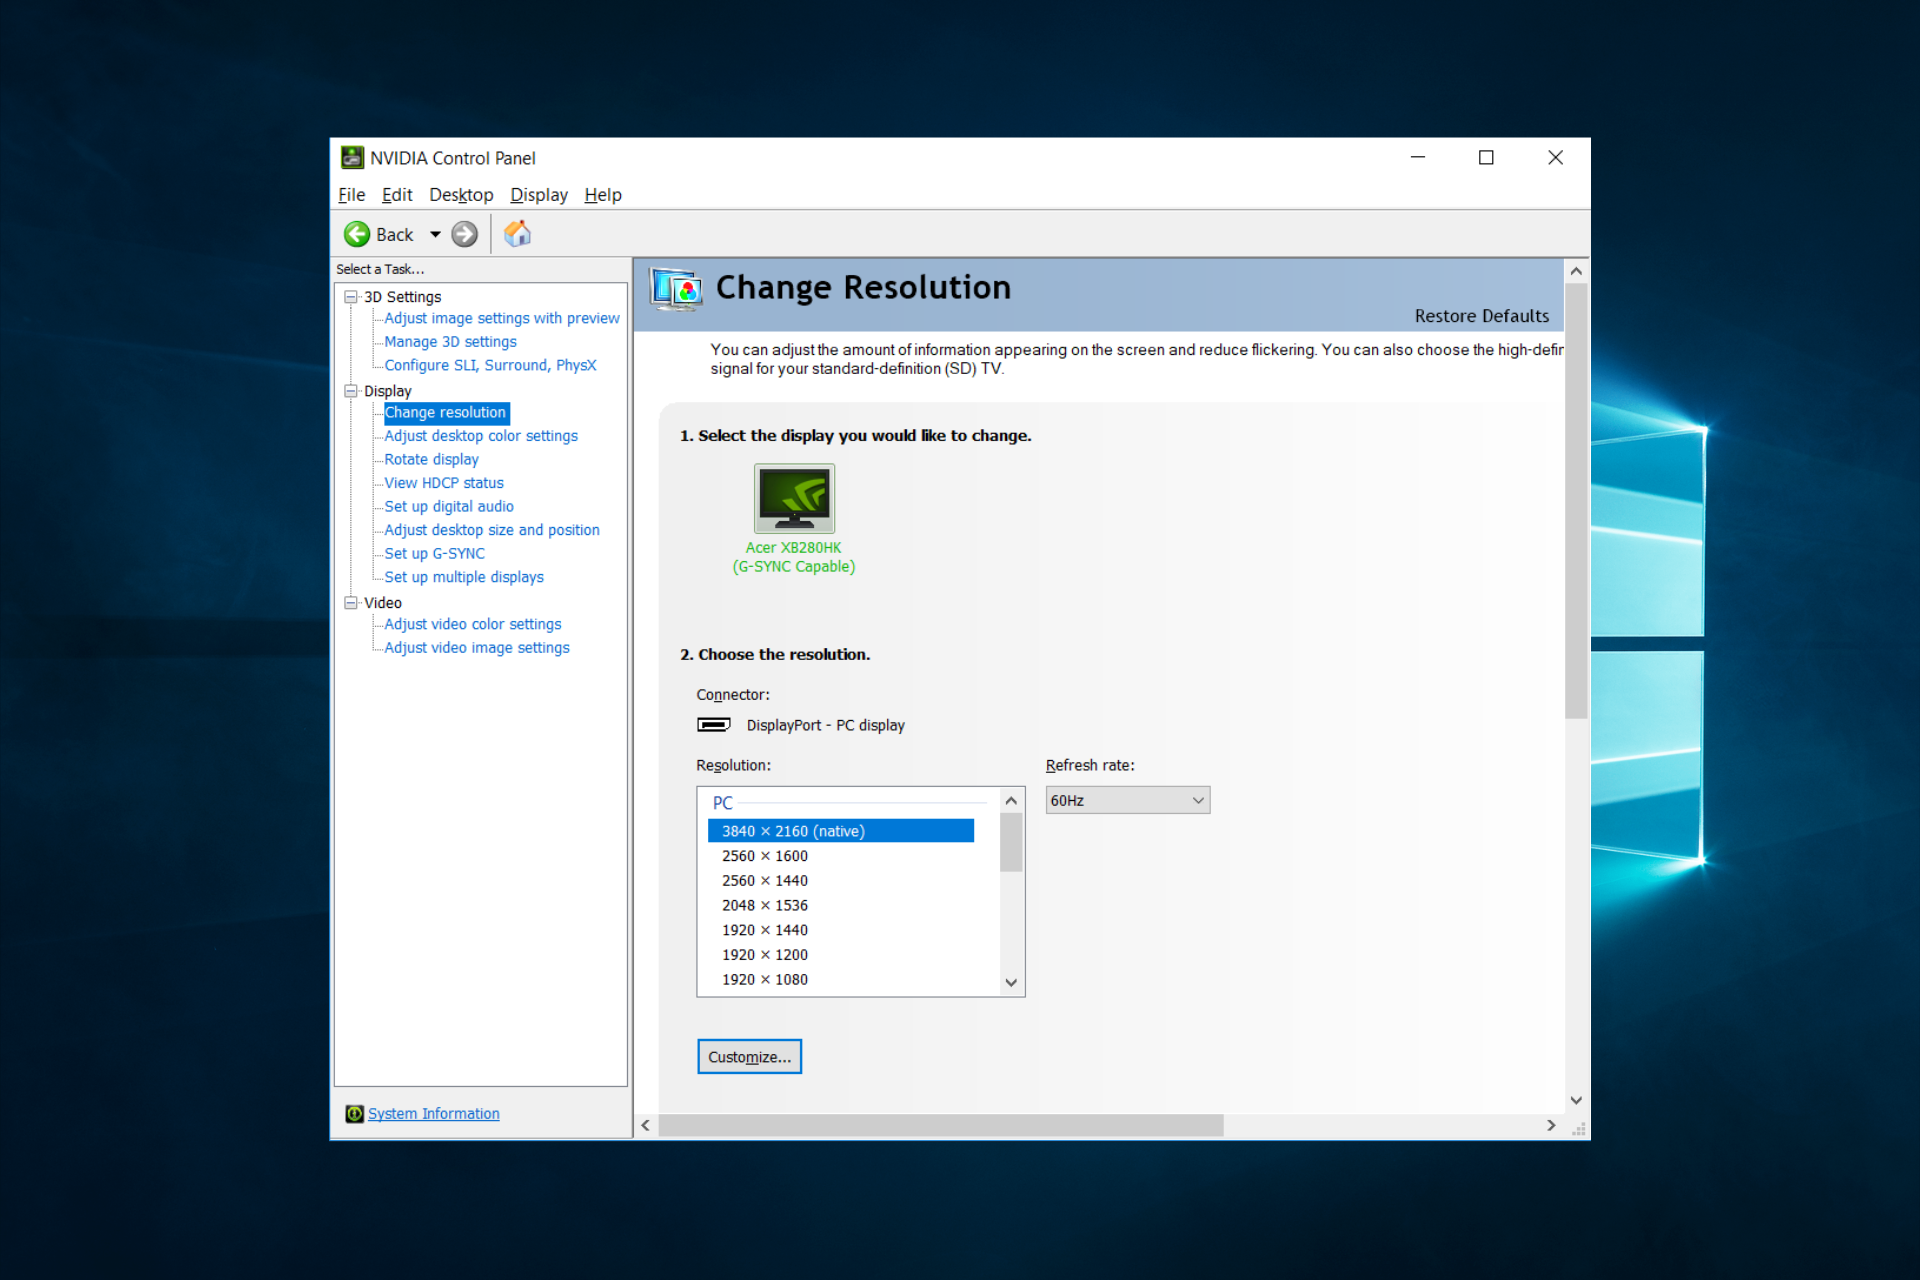
1. First, search for and open “NVIDIA Control Panel” via Start.
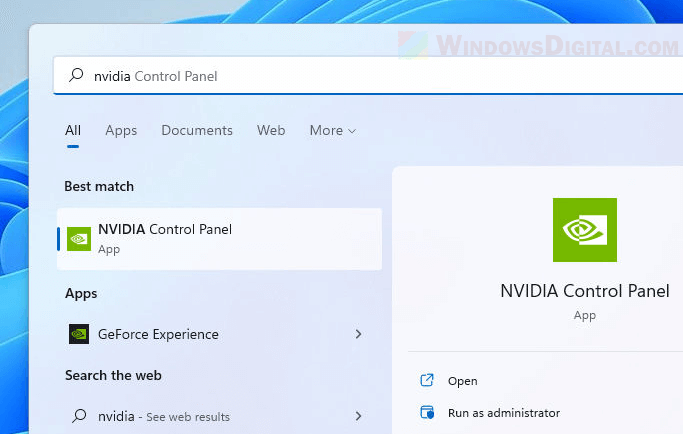
2. In the NVIDIA Control Panel window, expand Display and select Set up G-SYNC on the left pane.
3. Then, select the checkbox that says “Enable G-SYNC, G-SYNC Compatible” and select whether you want to “enable for full screen mode” only, or “enable for windowed and full screen mode“.

4. Click Apply to save the changes.
The “select the display you would like to change” section will tell you which of your monitors are G-SYNC Capable. If the “Set up G-SYNC” option is not showing up or not available in NVIDIA Control Panel, it could indicate that either no G-SYNC capable monitor is detected or your graphics card does not support G-Sync technology.
How to Enable AMD FreeSync in Windows 11
To turn on AMD FreeSync in Windows 11, follow the steps below.
1. Right-click anywhere on your desktop and select Show more options > AMD Radeon Software.

2. In the AMD Radeon Software window, select Gaming > Games. Then, click Global Display.
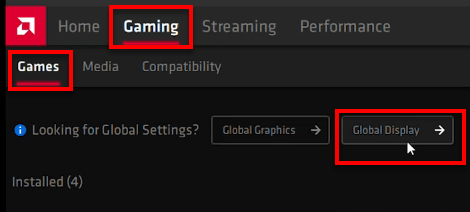
3. Under Display Options, click the toggle button next to Radeon FreeSync option to enable it.
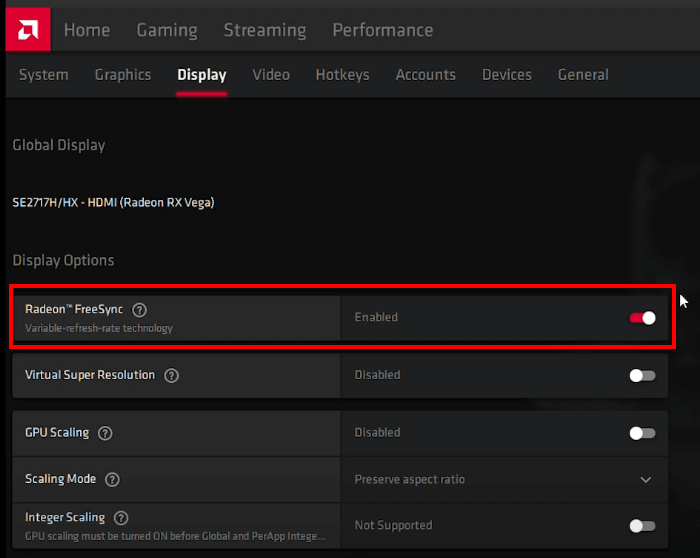
If the Radeon FreeSync option is grayed out or not available, it may indicate that either no FreeSync compatible monitor is detected or your AMD graphics card does not support FreeSync.
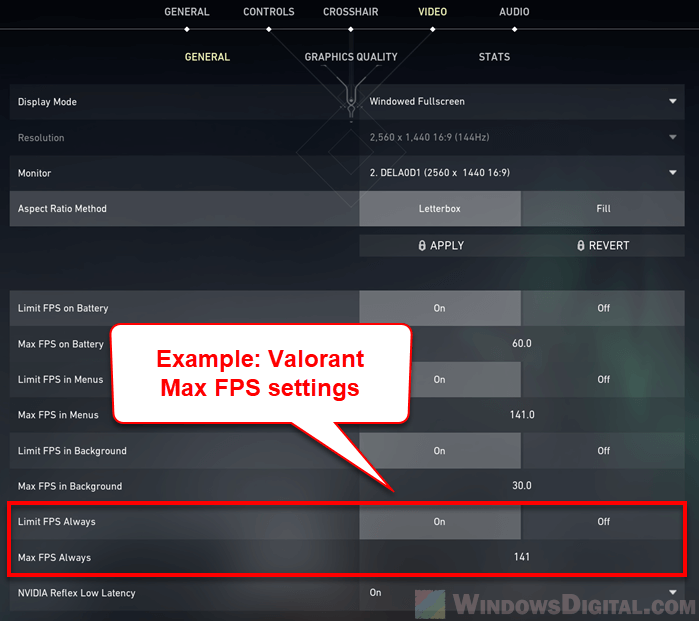
Tip: Limit Max FPS to -3 of monitor’s refresh rate for optimal result
Even with G-Sync or FreeSync enabled, it does not guarantee complete elimination of screen tearing issue for all games. FPS in some games can still go over your monitor refresh rate and may cause screen tearing as well as input lag issues even with G-Sync or FreeSync enabled.
To fix this, you can try to limit the game’s max refresh rate to -3 of your monitor’s refresh rate. For example, if your monitor supports 144Hz refresh rate, limit your game’s max frame rate to 141. This is to make sure your game’s FPS will never go beyond your monitor’s refresh rate.
If there is a video settings in-game or a config file that allows you to set the max frame rate of the game, set it to -3 of your monitor’s refresh rate for optimal experience.
If there is no in-game settings that allows you to change the max FPS, you can change it via NVIDIA Control Panel’s “Max Frame Rate” settings for G-Sync users, or AMD Radeon Software’s Radeon Chill Settings for FreeSync users. See below on how to do so.
NVIDIA Max Frame Rate
For NVIDIA graphics card users, to configure max frame rate via NVIDIA Control Panel, follow the steps below.
First, search for “NVIDIA Control Panel” via Start and select the first result. In NVIDIA Control Panel window, select Manage 3D settings from the left pane. On the right pane, click Program Settings tab. Under “Select a program to customize“, click the drop-down menu and select the game you want to configure.
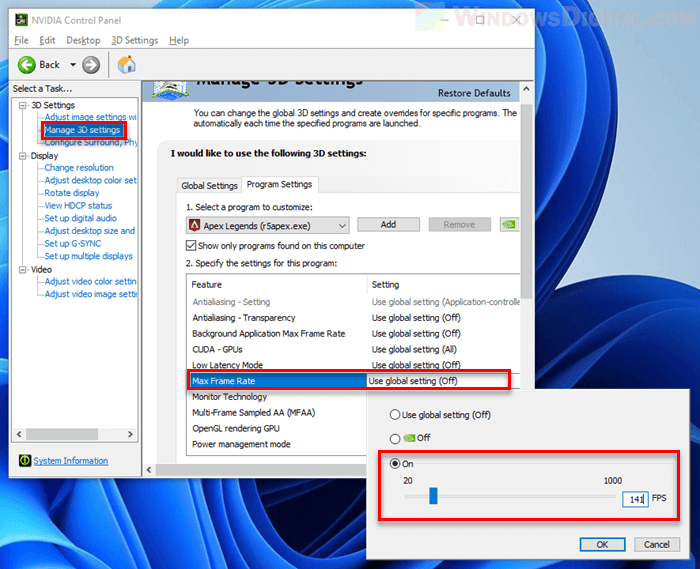
In the “Specify the settings for this program” section, look for an option called “Max Frame Rate“. Click it and select On. Then, use the slider (or manually enter) to set the max FPS for this particular game. For optimal results, set the max frame rate to -3 of your monitor’s refresh rate.
AMD Radeon Chill
For AMD Radeon users, there is a setting called Radeon Chill in the AMD Radeon Software. This setting allows you to set the minimum and maximum frame rate globally or only for a particular game to save power. You can use this feature to limit the frame rate of any game you want.
To configure the Radeon Chill settings, first open AMD Radeon Settings by right-clicking anywhere on your Windows 11 desktop and select Show more options > AMD Radeon Software.
In AMD Radeon Software window, navigate to Gaming > Games. Then, select the game you want to configure. After selecting the game, look for an option called “Radeon Chill“. Click the toggle button to enable it and you will then be able to set the Min FPS and Max FPS.
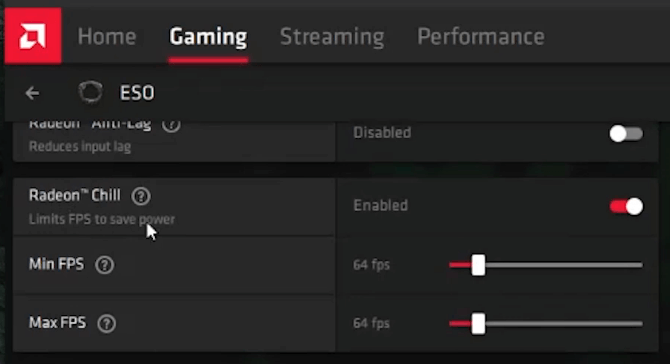
For optimal results, you should set your max frame rate to -3 of your monitor’s refresh rate. You should also make sure the min and max frame rate in the Radeon Chill settings have the same value to ensure smoother experience.
Соревновательный киберспорт сейчас больше, чем когда-либо прежде. И NVIDIA занимает достойное место в качестве производителя лучших графических процессоров для любого ПК. Они хотят, чтобы их пользователи получали максимум удовольствия от онлайн-игр, и поэтому ввели функцию G-Sync, чтобы сделать это реальностью. G-Sync позволяет игрокам достичь максимальной производительности при сохранении наилучшего качества изображения.
Но в последнее время многие пользователи Windows сообщают, что у них проблемы с G-Sync на своих ПК с Windows 11. Они вообще не могут заставить его работать. Если вы один из таких пользователей, эта статья вам поможет. Здесь мы включили исправления, которые решат вашу проблему G-sync в Windows 11. Итак, без лишних слов, давайте перейдем к делу.

Содержание страницы
-
Что делать, если G-Sync не работает в Windows 11?
- Убедитесь, что ваш G-Sync настроен правильно:
- Измените настройки V-Sync:
- Обновить драйвер:
- Откат к предыдущей версии драйвера:
- Сбросить Windows:
- Заменить RAM:
NVIDIA G-Sync была представлена для решения проблемы разрывов экрана, возникающих при воспроизведении требовательных игр. Поэтому отсутствие работы этой функции — серьезная проблема для людей, которые увлекаются соревновательными играми. Поэтому, если вы не знаете, что делать, если G-Sync не работает на вашем ПК, выполните действия для решений, упомянутых ниже.
Прежде чем мы перейдем к решениям, вы должны знать, что для работы G-Sync вам нужны мониторы, поддерживающие эту функцию. Если у вас нет монитора со встроенной этой функцией, решения, упомянутые ниже, не будут работать.
Убедитесь, что ваш G-Sync настроен правильно:
- Перезагрузите компьютер и включите подключенный монитор с помощью функции G-Sync. Если у вас несколько мониторов, не включайте мониторы, на которых нет этой функции. Вы можете включить их позже.
- Просмотрите различные режимы и настройки на своем мониторе и убедитесь, что G-Sync включен.
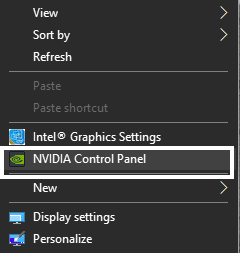
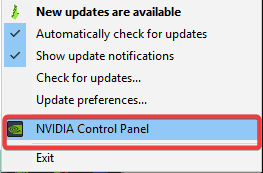
- Щелкните правой кнопкой мыши на рабочем столе и выберите «Панель управления Nvidia».
- Выключите и включите параметр G-Sync на вкладке «Настройка G-Sync».
- Нажмите «Управление настройками 3D», а также выключите и включите G-синхронизацию.
Теперь запустите игру, в которой у вас не работала G-sync на вашем ПК с Windows 10. В меню настроек игры отключите такие настройки, как фиксированное обновление, V-Sync, ограничение частоты кадров и другие подобные параметры.
Если G-Sync по-прежнему не работает на вашем ПК, попробуйте следующее решение.
Измените настройки V-Sync:
Некоторые пользователи могут решить проблему G-Sync, включив вертикальную синхронизацию на панели управления Nvidia.
- Щелкните правой кнопкой мыши на рабочем столе и выберите «Панель управления Nvidia».
- Нажмите «Управление настройками 3D» на левой панели.
- Щелкните вкладку «Глобальные настройки» на правой панели.
- Просмотрите список настроек и установите для параметра «Вертикальная синхронизация» значение «Вкл.». Нажмите «Применить», чтобы сохранить изменения.
- Теперь щелкните вкладку «Настройки программы» на правой панели.
- Выберите файл программы для игры, которая у вас есть на вашем ПК.
- Установите графический процессор Nvidia в качестве предпочтительного графического процессора для этой нижестоящей программы.
- Прокрутите настройки этой программы и установите для параметра «Вертикальная синхронизация» значение «Вкл.». Нажмите «Применить», чтобы сохранить изменения.
Теперь закройте панель управления Nvidia и запустите игру, в которой у вас возникли проблемы. Если G-Sync по-прежнему не работает на вашем ПК, попробуйте следующее решение.
Обновить драйвер:
Если на вашем ПК установлена старая версия графических драйверов, а у вас установлена последняя версия Windows, вам также придется обновить графический драйвер. Есть три способа обновить драйвер видеокарты. Вы можете сделать это вручную, автоматически или с помощью стороннего приложения.
Чтобы выполнить обновление автоматически,
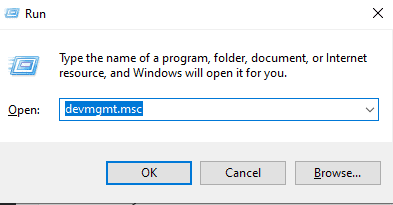
- Нажмите клавишу Windows + R, чтобы открыть диалоговое окно «Выполнить».
- Введите «devmgmt.msc» в диалоговом окне и нажмите «ОК». Откроется окно диспетчера устройств.
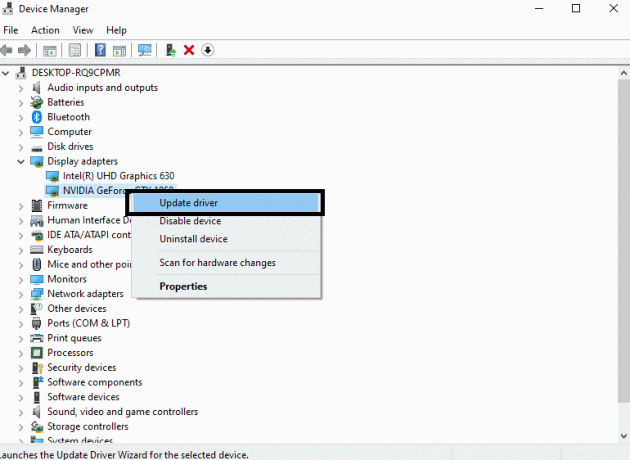
- Дважды щелкните адаптер дисплея, чтобы развернуть его. Щелкните правой кнопкой мыши графический процессор NVIDIA и выберите параметр «Обновить драйвер».
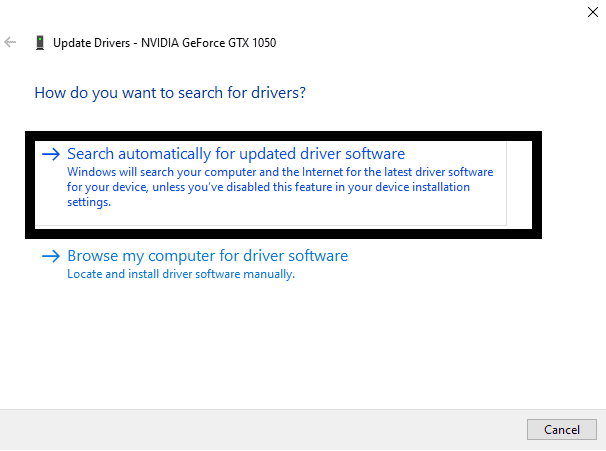
- Щелкните «Автоматический поиск обновленного программного обеспечения драйвера», а затем следуйте инструкциям на экране, чтобы компьютер с Windows загрузил последнюю версию драйвера из Интернета и установил ее на свой компьютер.
Чтобы выполнить обновление вручную,
- Нажмите на это ссылка, чтобы открыть страницу загрузки драйвера Nvidia.
- Установите список опций в соответствии с конфигурацией вашего ПК. Щелкните «Поиск».
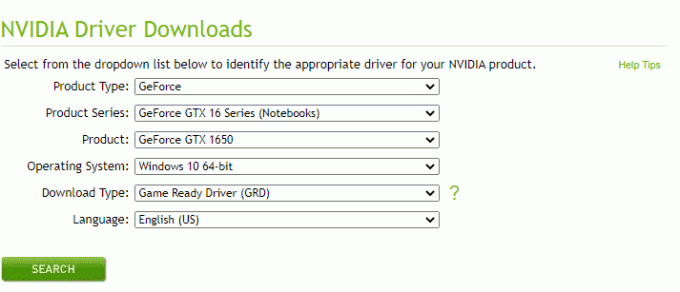
- Варианты загрузки последних версий драйверов будут отображаться на веб-странице. Загрузите последнюю версию, а затем установите ее на свой компьютер.
Вы также можете выполнить обновление с помощью сторонней служебной программы. Некоторые такие приложения могут сканировать и устанавливать отсутствующие драйверы на ваш компьютер. Используйте одну из этих программ, чтобы установить на свой компьютер последние версии драйверов графики.
По завершении установки последних графических драйверов перезагрузите компьютер.
Если функция G-Sync по-прежнему не работает на вашем ПК с Windows 11, попробуйте следующее решение, упомянутое ниже.
Откат к предыдущей версии драйвера:
Некоторые пользователи начали сталкиваться с проблемами с G-Sync после обновления драйверов Nvidia Graphics до последней версии. Это означает, что новая версия графического драйвера несовместима с версией Windows на вашем ПК. Вам необходимо откатить вашу версию графического драйвера до предыдущей версии. Это решение могло бы снова заставить G-Sync работать, если бы он работал до обновления.
- Нажмите клавишу Windows + R, чтобы открыть диалоговое окно «Выполнить».
- Введите «appwiz.cpl» в диалоговом окне и нажмите «ОК».
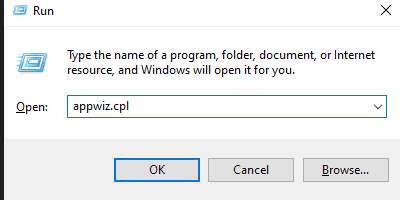
- Найдите здесь в списке «Графический драйвер Nvidia». Как только вы его увидите, нажмите на него, а затем нажмите кнопку «Удалить» вверху.

- Следуйте инструкциям на экране, чтобы удалить эту версию графического драйвера.
- После завершения удаления перезагрузите компьютер.
- Теперь вам нужно установить старую версию графического драйвера. Для этого вам нужно посетить страницу загрузки Nvidia. Нажмите на это ссылка, чтобы открыть страницу загрузки драйвера Nvidia.
- Установите список опций в соответствии с конфигурацией вашего ПК. Щелкните «Поиск».
- Варианты загрузки последних версий драйверов будут отображаться на веб-странице. Загрузите старую версию и затем установите ее на свой компьютер.
Теперь перезагрузите компьютер и попробуйте запустить программу, в которой вы хотите, чтобы функция G-Sync работала. Если G-Sync по-прежнему не работает на вашем ПК, перейдите к следующему решению.
Сбросить Windows:
Сброс Windows работает для некоторых пользователей, если что-то не так в настройках Windows, что мешает правильной работе функции G-Sync. Сброс Windows восстановит все до значений по умолчанию.
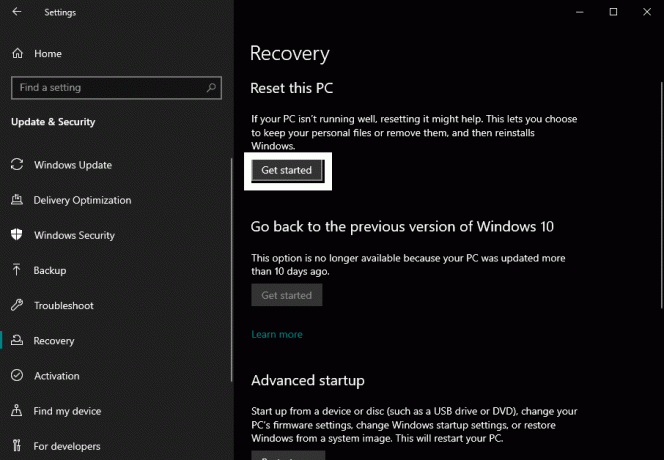
- Нажмите Windows Key + I, чтобы открыть страницу настроек Windows.
- Нажмите «Обновление и безопасность».

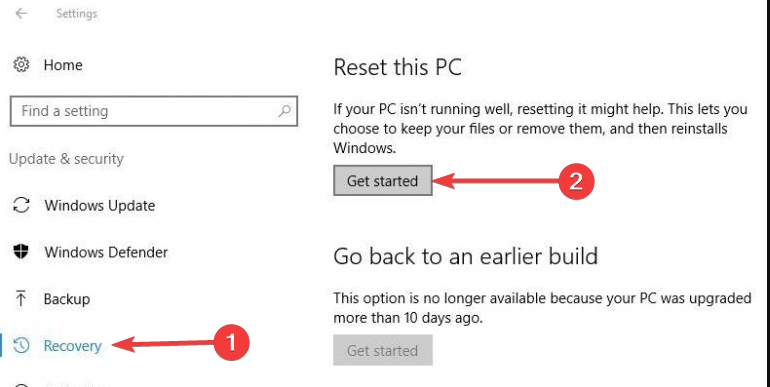
- Щелкните вкладку «Восстановление» на левой панели.
- На правой панели вы увидите опцию «Сбросить этот компьютер». Нажмите кнопку «Начать работу» под ним.
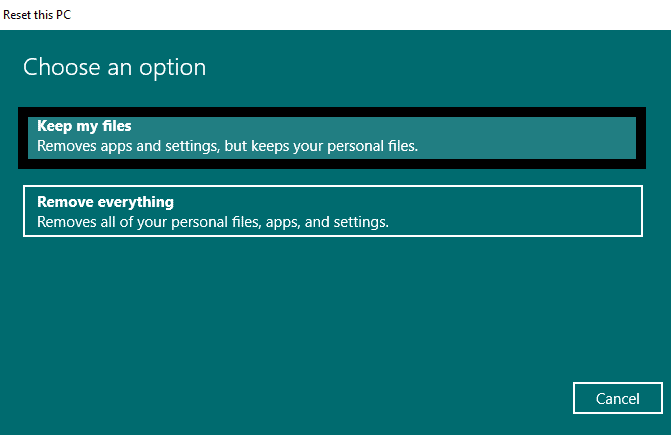
- Выберите «Сохранить мои файлы» и следуйте инструкциям на экране, чтобы завершить сброс Windows.
Если функция G-Sync по-прежнему не работает на вашем ПК с Windows 11, попробуйте последнее решение, упомянутое ниже.
Заменить RAM:
В некоторых редких случаях неисправное оборудование также может привести к тому, что функция G-Sync не будет работать на вашем ПК. По этой причине для решения проблемы будет достаточно замены оперативной памяти. В зависимости от вашей материнской платы и конфигурации системы купите новый модуль RAM и установите его на свой компьютер.
Если вы не знаете, как это сделать, отнесите его в ближайший сервисный центр. Скажите им, что вы хотите обновить и изменить ОЗУ, заплатите им за ОЗУ и установку, и они сделают это за вас.
Надеюсь, одно из этих решений помогло решить проблему с G-Sync, которая не работает на вашем ПК с Windows. яЕсли у вас есть какие-либо вопросы или вопросы по этой статье, оставьте комментарий ниже, и мы свяжемся с вами. Также не забудьте ознакомиться с другими нашими статьями о советы и хитрости iPhone,Советы и хитрости для Android, Советы и хитрости для ПКи многое другое для получения дополнительной полезной информации.
Enabling Vertical sync on Nvidia can fix the problem
by Milan Stanojevic
Milan has been enthusiastic about technology ever since his childhood days, and this led him to take interest in all PC-related technologies. He’s a PC enthusiast and he… read more
Published on November 22, 2022
Reviewed by
Alex Serban

After moving away from the corporate work-style, Alex has found rewards in a lifestyle of constant analysis, team coordination and pestering his colleagues. Holding an MCSA Windows Server… read more
- Many hardcore gamers claimed that G-Sync isn’t working on Windows 10, and it prevents them from staying competitive.
- Suppose G-Sync is performing incorrectly on your PC. In that case, you can change the V-Sync settings or use a reliable automated tool that installs the latest drivers to ensure maximum performance.
XINSTALL BY CLICKING THE DOWNLOAD FILE
This software will repair common computer errors, protect you from file loss, malware, hardware failure and optimize your PC for maximum performance. Fix PC issues and remove viruses now in 3 easy steps:
- Download Restoro PC Repair Tool that comes with Patented Technologies (patent available here).
- Click Start Scan to find Windows issues that could be causing PC problems.
- Click Repair All to fix issues affecting your computer’s security and performance
- Restoro has been downloaded by 0 readers this month.
Gamers, let us discuss the problem of G-sync not working. We will also discuss some common causes and the best possible solutions.
PC gaming has become a recreational activity where players compete against each other to achieve the best performance and results.
If you’re a gamer and want to achieve maximum performance and the best image quality, then you are most likely using the Nvidia G-Sync technology.
Although this technology can prevent screen tearing during gameplay sessions, many users reported that G-Sync isn’t working in Windows 10, so let’s see if we can fix that problem.
Note: To get the best out of the tech, you should use G-sync-compatible monitors.
Why is G-Sync not working?
From the experience of users who have had issues with G-Sync not working, we have come up with the most common causes. These include:
- Problems with settings – In some cases, it could be a minor setting configuration that has hindered it from not working.
- Outdated drivers – When drivers are obsolete or inadequate, they also could trigger problems with G-sync.
- Hardware issues – The most common of these are RAM issues. You may need to change your RAM to get it working correctly.
While this is not an exhaustive list, it makes up most of the common culprits. So now, let us discuss solutions.
How can I fix G-Sync if it’s not working?
- Change V-Sync settings
- Install the latest drivers
- Check out the older driver
- Reset Windows 10
- Install the latest OS updates
1. Change V-Sync settings
- Right-click the desktop and select Nvidia Control Panel.

- Go to Manage 3D settings in the left panel.

- Navigate to the Global Settings tab, locate the Vertical sync option, set this option to On, and click Apply to save changes.

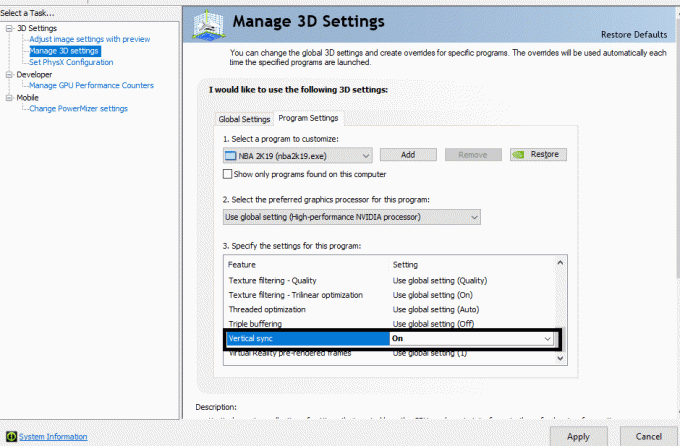
- You can also turn on Vertical sync for applications experiencing screen tearing from the Program Settings tab.
- After making these changes, restart your PC.

You can change the V-Sync settings if G-Sync isn’t working correctly on your Windows 10 PC. However, according to users, you need to turn on V-Sync to fix this problem.
As you can see, you can quickly fix this problem by turning on V-Sync in Nvidia Control Panel.
Some PC issues are hard to tackle, especially when it comes to corrupted repositories or missing Windows files. If you are having troubles fixing an error, your system may be partially broken.
We recommend installing Restoro, a tool that will scan your machine and identify what the fault is.
Click here to download and start repairing.
You need to disable V-Sync in your game and keep it enabled only in the Nvidia Control Panel.
2. Install the latest drivers
Many users reported solving the G-Sync problem after manually downloading and installing the latest Nvidia drivers.
If you don’t want the hassle of updating drivers manually, we suggest doing it automatically using trusted software.
To make sure that everything goes smoothly and avoid any kind of GPU driver errors, be sure to use a complete driver update assistant that will solve your problems with just a couple of clicks, and we strongly recommend DriverFix. Follow these easy steps to safely update your drivers:
- Download and install DriverFix.
- Launch the software.
- Wait for DriverFix to detect all your faulty drivers.
- The application will now show you all the drivers that have issues, and you just need to select the ones you’d liked fixed.
- Wait for the app to download and install the newest drivers.
- Restart your PC for the changes to take effect.

DriverFix
Keep you GPU on the peaks of their performance without worrying about its drivers.
Disclaimer: this program needs to be upgraded from the free version in order to perform some specific actions.
3. Check out the older driver
- Press Windows + X and select Device Manager to open it.

- In the Device Manager window, scroll down and expand Display adapters.

- Right-click on the Nvidia driver, select Properties, click on the Driver tab and click the Roll Back Driver button.

- Follow the instructions to complete the process.

Although this solution works for some users, we have to mention that it’s not perfect, as some users have experienced crashes with your Nvidia driver.
Users reported that they couldn’t watch videos on a second monitor after installing older drivers, so if you need to use two or more monitors, you might want to skip this solution.
- PCSX2 Runtime Error: 4 Solutions to Get It Working Again
- 6 Best VoIP Software For Gaming [2023 Guide]
4. Reset Windows 10
- Press Windows + I to open Settings, then click on the Update & Security option.

- Go to the Recovery tab, and click on the Get started button in the Reset this PC section.

- Select Keep my files and follow the on-screen instructions to reset your PC.


A few users reported fixing problems with G-Sync not working on Windows 10 by performing a Windows 10 reset.
Resetting Windows 10 will delete all installed applications and files from your primary partition, so you might want to use this solution as a last resort.
5. Install the latest OS updates
- Open the Settings app using Windows + I, then click Update & Security.
- Click on Check for updates and install any updates found.

Problems with G-Sync can cause screen tearing and lead to reduced performance. If you’re a gamer with G-Sync problems, we strongly suggest you try out some of our solutions.
These solutions will come in handy for cases of G-Sync not working in fullscreen, with two monitors on HDMI or a FreeSync monitor.
If you have other suggestions or questions, don’t hesitate to leave them in the comments below.
![]()
Newsletter
Enabling Vertical sync on Nvidia can fix the problem
by Milan Stanojevic
Milan has been enthusiastic about technology ever since his childhood days, and this led him to take interest in all PC-related technologies. He’s a PC enthusiast and he… read more
Published on November 22, 2022
Reviewed by
Alex Serban
After moving away from the corporate work-style, Alex has found rewards in a lifestyle of constant analysis, team coordination and pestering his colleagues. Holding an MCSA Windows Server… read more
- Many hardcore gamers claimed that G-Sync isn’t working on Windows 10, and it prevents them from staying competitive.
- Suppose G-Sync is performing incorrectly on your PC. In that case, you can change the V-Sync settings or use a reliable automated tool that installs the latest drivers to ensure maximum performance.
XINSTALL BY CLICKING THE DOWNLOAD FILE
This software will repair common computer errors, protect you from file loss, malware, hardware failure and optimize your PC for maximum performance. Fix PC issues and remove viruses now in 3 easy steps:
- Download Restoro PC Repair Tool that comes with Patented Technologies (patent available here).
- Click Start Scan to find Windows issues that could be causing PC problems.
- Click Repair All to fix issues affecting your computer’s security and performance
- Restoro has been downloaded by 0 readers this month.
Gamers, let us discuss the problem of G-sync not working. We will also discuss some common causes and the best possible solutions.
PC gaming has become a recreational activity where players compete against each other to achieve the best performance and results.
If you’re a gamer and want to achieve maximum performance and the best image quality, then you are most likely using the Nvidia G-Sync technology.
Although this technology can prevent screen tearing during gameplay sessions, many users reported that G-Sync isn’t working in Windows 10, so let’s see if we can fix that problem.
Note: To get the best out of the tech, you should use G-sync-compatible monitors.
Why is G-Sync not working?
From the experience of users who have had issues with G-Sync not working, we have come up with the most common causes. These include:
- Problems with settings – In some cases, it could be a minor setting configuration that has hindered it from not working.
- Outdated drivers – When drivers are obsolete or inadequate, they also could trigger problems with G-sync.
- Hardware issues – The most common of these are RAM issues. You may need to change your RAM to get it working correctly.
While this is not an exhaustive list, it makes up most of the common culprits. So now, let us discuss solutions.
How can I fix G-Sync if it’s not working?
- Change V-Sync settings
- Install the latest drivers
- Check out the older driver
- Reset Windows 10
- Install the latest OS updates
1. Change V-Sync settings
- Right-click the desktop and select Nvidia Control Panel.
- Go to Manage 3D settings in the left panel.
- Navigate to the Global Settings tab, locate the Vertical sync option, set this option to On, and click Apply to save changes.
- You can also turn on Vertical sync for applications experiencing screen tearing from the Program Settings tab.
- After making these changes, restart your PC.
You can change the V-Sync settings if G-Sync isn’t working correctly on your Windows 10 PC. However, according to users, you need to turn on V-Sync to fix this problem.
As you can see, you can quickly fix this problem by turning on V-Sync in Nvidia Control Panel.
Some PC issues are hard to tackle, especially when it comes to corrupted repositories or missing Windows files. If you are having troubles fixing an error, your system may be partially broken.
We recommend installing Restoro, a tool that will scan your machine and identify what the fault is.
Click here to download and start repairing.
You need to disable V-Sync in your game and keep it enabled only in the Nvidia Control Panel.
2. Install the latest drivers
Many users reported solving the G-Sync problem after manually downloading and installing the latest Nvidia drivers.
If you don’t want the hassle of updating drivers manually, we suggest doing it automatically using trusted software.
To make sure that everything goes smoothly and avoid any kind of GPU driver errors, be sure to use a complete driver update assistant that will solve your problems with just a couple of clicks, and we strongly recommend DriverFix. Follow these easy steps to safely update your drivers:
- Download and install DriverFix.
- Launch the software.
- Wait for DriverFix to detect all your faulty drivers.
- The application will now show you all the drivers that have issues, and you just need to select the ones you’d liked fixed.
- Wait for the app to download and install the newest drivers.
- Restart your PC for the changes to take effect.
DriverFix
Keep you GPU on the peaks of their performance without worrying about its drivers.
Disclaimer: this program needs to be upgraded from the free version in order to perform some specific actions.
3. Check out the older driver
- Press Windows + X and select Device Manager to open it.
- In the Device Manager window, scroll down and expand Display adapters.
- Right-click on the Nvidia driver, select Properties, click on the Driver tab and click the Roll Back Driver button.
- Follow the instructions to complete the process.
Although this solution works for some users, we have to mention that it’s not perfect, as some users have experienced crashes with your Nvidia driver.
Users reported that they couldn’t watch videos on a second monitor after installing older drivers, so if you need to use two or more monitors, you might want to skip this solution.
- PCSX2 Runtime Error: 4 Solutions to Get It Working Again
- 6 Best VoIP Software For Gaming [2023 Guide]
4. Reset Windows 10
- Press Windows + I to open Settings, then click on the Update & Security option.
- Go to the Recovery tab, and click on the Get started button in the Reset this PC section.
- Select Keep my files and follow the on-screen instructions to reset your PC.
A few users reported fixing problems with G-Sync not working on Windows 10 by performing a Windows 10 reset.
Resetting Windows 10 will delete all installed applications and files from your primary partition, so you might want to use this solution as a last resort.
5. Install the latest OS updates
- Open the Settings app using Windows + I, then click Update & Security.
- Click on Check for updates and install any updates found.
Problems with G-Sync can cause screen tearing and lead to reduced performance. If you’re a gamer with G-Sync problems, we strongly suggest you try out some of our solutions.
These solutions will come in handy for cases of G-Sync not working in fullscreen, with two monitors on HDMI or a FreeSync monitor.
If you have other suggestions or questions, don’t hesitate to leave them in the comments below.
![]()
Newsletter
Dmitry Chesnokov
20.07.2022
Автор
Включил всё, кроме v sync. Если включить индикацию g sync, то индикация горит что включен, но разрывы не исчезают
Ответить
Развернуть ветку
abstract nonsense
20.07.2022
Фпс больше частоты обновления экрана значит, лочь в драйвере/игре фпс на (частота экрана)-2
Ответить
Развернуть ветку
Dmitry Chesnokov
20.07.2022
Автор
Не помогает
Разрывы остаются
Помогает только принудительное включение v sync в той же панели nvidia, но смысл тогда от g sync.
Ответить
Развернуть ветку
ABSVRD
20.07.2022
gsync по умолчанию работают только с полноэкранным эксклюзивным режимом. Если это игра с псевдо фулскрином, например если использует directx 12, то gsync не будет пахать, пока ты в панеле управления не выставишь чтобы он работал со всеми режимами. Но у этого есть минус он будет вмешиваться ВО ВСЕ ПРОГРАММЫ. Чтобы назначить его только на определнынй софт, надо скачать Nvidia profile inspector, найти там игру в списке или добавить ее и выставить значение как я показал на скрине. К тому же есть gsync (чип) и gsync compatible У них разный порог срабатывания и если ты превышаешь этот порог (фпс), то gsync не будет пахать
Ответить
Развернуть ветку
Kir Kir
20.07.2022
Чтобы он точно пахал, надо скачать Nvidia profile inspector
а в панели управления нвидиа не судьба включить работу в полноэкранном и оконном режиме?
Ответить
Развернуть ветку
ABSVRD
20.07.2022
прочитай хорошенько, я отредактировал до того как ты мне ответил
Ответить
Развернуть ветку
KSODIKA
20.07.2022
Ну собственно, как я и сказал выше, g sync не применяется при превышении фпс над герцовкой монитора, это не его зона ответственности ) автор именно об этом спрашивает, его напрягает тиринг
Ответить
Развернуть ветку
ABSVRD
20.07.2022
Он не спрашивает именно об этом. Он в общем спросил о разрывах кадра. Тиринг может быть не только из-за превышения кадров, но и из-за другой проблемы которую я описал
Ответить
Развернуть ветку
KSODIKA
20.07.2022
Может ты и прав
Я просто инспектора не устанавливал, разрывов (дерганий) в пределах герцовки у меня нет, игры запускаю в фуллскрине. По идее этого должно быть достаточно, странно, что автор столкнулся с разрывами в пределах герцовки. Либо он всё-таки имел в виду именно тиринг по превышению, из поста не очевидно
Ответить
Развернуть ветку
Dmitry Chesnokov
20.07.2022
Автор
Включил уже g sync и в оконных приложениях, ограничил 142 фпс, и все та же фигня. Честно уже даже не знаю на что думать, дрова обновлены.
Ответить
Развернуть ветку
Kir Kir
20.07.2022
Помогает только принудительное включение v sync в той же панели nvidia, но смысл тогда от g sync.
«with G-SYNC enabled, the “Vertical sync” option in the control panel no longer acts as V-SYNC, and actually dictates whether, one, the G-SYNC module compensates for frametime variances output by the system (which prevents tearing at all times. G-SYNC + V-SYNC “Off” disables this behavior; see G-SYNC 101: Range), and two, whether G-SYNC falls back on fixed refresh rate V-SYNC behavior; if V-SYNC is “On,” G-SYNC will revert to V-SYNC behavior above its range, if V-SYNC is “Off,” G-SYNC will disable above its range, and tearing will begin display wide.»
Ответить
Развернуть ветку
KSODIKA
20.07.2022
G sync не ограничивает частоту кадров, эта функция была, но ее выпилили несколько лет назад, тк многие жаловались, что она даёт сильный инпут лаг, сильнее чем всинк.
Смысл gsync в том, чтобы в пределах максимальной частоты монитора подстраивать эту частоту под фпс. Условно, если у тебя монитор 144 гц, а фпс игры скачет от 70 до 140, то вот в пределах этого фпс gsync будет подстраивать герцовку монитора. Таким образом картинка не дёргается. Если же у тебя фпс улетает за пределы герцовки монитора (160 фпс), gsync не применяется. Если не хочешь тиринга, либо включай всинк, либо ограничивай фпс другими средствами (иногда это эффективней чем всинк), либо ставь графику выше, чтобы видеокарта уходила в 100% до превышения фпс над герцовкой, либо ограничивай фпс на уровне движка игры (в некоторых играх такая опция есть, например в КС го, ставишь максимальное число кадров с отключенным всинк, это даёт меньше инпут лага, но не все разработчики это делают)
Ответить
Развернуть ветку
Аккаунт удален
20.07.2022
Комментарий недоступен
Ответить
Развернуть ветку
Dmitry Chesnokov
20.07.2022
Автор
Не думаю что в этом проблема, при тестировании g sync маятником все хорошо, но именно в играх разрывы есть, при чем если включить отображение g sync, то показывает что включен
Ответить
Развернуть ветку
Аккаунт удален
20.07.2022
Комментарий недоступен
Ответить
Развернуть ветку
Dmitry Chesnokov
20.07.2022
Автор
V sync отключен
Герцовка монитора меняется, но кадры все равно рвутся.
Настройка включена на полноэкранный и оконный режимы.
Оконный без рамок попробую сегодня вечером
Ответить
Развернуть ветку
Lord Kite
20.07.2022
нужно вкл. параметр vsync либо в игре, либо в настройках видеокарты в панели управления nvidia.
Ответить
Развернуть ветку
Lord Kite
20.07.2022
я тоже поначалу думал, что если вкл. g-sync, то vsync нужно выкл. оказалось наоборот. у меня с vrr дисплеем, по крайней мере именно так.
Ответить
Развернуть ветку
Иванов Иван
20.07.2022
А я его даже не включаю и разрывов нету. Все идеально работает без v-sync.
Ответить
Развернуть ветку
kepov
20.07.2022
Я так понял это ME:LE, тоже самое при 144 гц и g-sync, монитор только 27GL650+1063.
В игре выставил ограничение в 120 кадров, намного лучше стало.
Ответить
Развернуть ветку
kepov
20.07.2022
Но помогло не до конца, иногда бывают разрывы.
Тоже удивлялся, с другими играми подобного нет.
Ответить
Развернуть ветку
Dmitry Chesnokov
20.07.2022
Автор
У меня ещё с gears 5 такое было
Теперь вот думаю ещё что нибудь скачать и посмотреть, может вообще нигде не работает
Ответить
Развернуть ветку
кум кумич
20.07.2022
Точно такая же херня в апексе. Фпс без ограничений — разрывы. Ставишь ограничение 144 — разрывы. Ставишь ограничение — 140 — разрывов нет. Хз с чем связано, но в других играх без проблем.
Ответить
Развернуть ветку
KSODIKA
20.07.2022
В апексе отдельная песня, там с этим проблемы
Ответить
Развернуть ветку
FLAX Official
24.09.2022
я не знаю, что там за песня с апексом. Года 4 играл на 1070 не знал, что такое тиринг, но играл всегда с G-sync + Fast Sync + Режим низкой задержки — «ультра». Сейчас купил себе 3070ti и выключил все это, чтобы насладиться игрой в 200+ фпс, но сталкнулся с тирингом (дрожит экран в разных облостьях монитора при движении). 3-4 недели решал этот вопрос и пришел к выводу, что это не возможно решить…я вернулся на G-sync + Режим низкой задержки «Ультра» и залочил фпс на 141 и картинка стала плавно без ипутлага
Ответить
Развернуть ветку
Морячок
20.07.2022
У меня кстати когда был FreeSync монитор то G-SYNC очень паршиво работал, в каких то играх не было разрывов, в каких то были…
Когда взял монитор с G-SYNC все стало на свои места и разрывов уже не было нигде (на той же системе)
Ответить
Развернуть ветку
Zedd
20.07.2022
Включить gaync в панели нвидиа, поставить галочку совместимости.
Выключить вертикалку в игре
В панели управления нвидиа в 3д приложениях игре выставить вертикальную синхронизацию в положение вкл ( парадоксально, но это активирует gsync )
Ответить
Развернуть ветку
Dmitry Chesnokov
20.07.2022
Автор
То есть если я включу v sync в панели управления нвидия, то работает все равно g sync, не v sync?
Ответить
Развернуть ветку
Если вы геймер, вы хотите испытать максимальную производительность без заиканий. Для достижения максимальной производительности и наилучшего качества изображения многие пользователи стремятся использовать технологию Nvidia G-Sync. Хотя эта технология может предотвратить разрыв экрана во время сеансов игры, многие пользователи сообщили, что G-Sync не работает в Windows 10, поэтому давайте посмотрим, сможем ли мы решить эту проблему.
Вот еще несколько похожих проблем, с которыми вы можете столкнуться на пути:
- G-Sync не появляется
- нет опции G-Sync в панели управления Nvidia
- G-Sync исчезает в панели управления Nvidia
- G-Sync сломан
Оглавление:
- Изменить настройки V-Sync
- Установите последние версии драйверов
- Установите более старый драйвер
- Проверьте, правильно ли настроен ваш G-Sync
- Сбросить Windows 10
- Попробуйте заменить вашу оперативную память
Исправлено — G-Sync не работает в Windows 10
Решение 1 — Изменить настройки V-Sync
Если G-Sync не работает должным образом на вашем ПК с Windows 10, вы можете исправить эту проблему, изменив настройки V-Sync. По словам пользователей, вам нужно включить V-Sync, чтобы решить эту проблему. Для этого выполните следующие простые шаги:
- Откройте панель управления Nvidia . Это можно сделать, щелкнув правой кнопкой мыши значок Nvidia в правом нижнем углу и выбрав в меню панель управления Nvidia .

- Когда откроется Панель управления Nvidia, перейдите в Управление настройками 3D на левой панели.
- Теперь вам нужно перейти на вкладку « Глобальные настройки » и найти пункт « Вертикальная синхронизация» в меню. Установите вертикальную синхронизацию на Вкл . Нажмите Применить, чтобы сохранить изменения. При желании вы можете включить вертикальную синхронизацию только для приложений, которые испытывают разрыв экрана на вкладке « Настройки программы ».
- После внесения этих изменений перезагрузите компьютер.

Как видите, вы легко можете решить эту проблему, включив V-Sync в Панели управления Nvidia. Следует отметить, что вам нужно отключить V-Sync в своей игре и оставить включенным только в Панели управления Nvidia.
Решение 2 — Установите последние версии драйверов
Обновление драйверов важно, если вы хотите обеспечить максимальную производительность. Новые драйверы также исправляют некоторые проблемы совместимости и ошибки, поэтому мы рекомендуем установить последние версии драйверов для вашей видеокарты. Пользователи сообщили, что они исправили проблему с G-Sync после загрузки и установки последних драйверов Nvidia. По их словам, вам просто нужно скачать последние версии драйверов и выбрать вариант выборочной установки . После этого выберите опцию « Чистая установка» и следуйте инструкциям на экране для завершения настройки.
Обновление драйверов вручную
Если вы не хотите, чтобы обновление драйверов выполнялось вручную, мы настоятельно рекомендуем сделать это автоматически с помощью инструмента обновления драйверов Tweakbit. Этот инструмент одобрен Microsoft и Norton Antivirus. После нескольких испытаний наша команда пришла к выводу, что это лучшее автоматизированное решение. Ниже вы можете найти краткое руководство, как это сделать:
-
- Загрузите и установите программу обновления драйверов TweakBit .
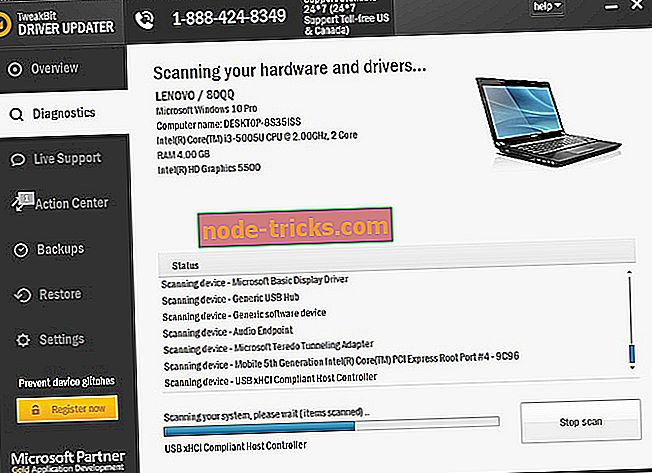
- После установки программа начнет сканирование вашего компьютера на наличие устаревших драйверов автоматически. Driver Updater проверит установленные вами версии драйверов по своей облачной базе данных последних версий и порекомендует правильные обновления. Все, что вам нужно сделать, это дождаться завершения сканирования.
- По завершении сканирования вы получите отчет обо всех проблемных драйверах, найденных на вашем ПК. Просмотрите список и посмотрите, хотите ли вы обновить каждый драйвер по отдельности или все сразу. Чтобы обновить один драйвер за раз, нажмите ссылку «Обновить драйвер» рядом с именем драйвера. Или просто нажмите кнопку «Обновить все» внизу, чтобы автоматически установить все рекомендуемые обновления.
- Загрузите и установите программу обновления драйверов TweakBit .
 По завершении сканирования вы получите отчет обо всех проблемных драйверах, найденных на вашем ПК. Просмотрите список и посмотрите, хотите ли вы обновить каждый драйвер по отдельности или все сразу. Чтобы обновить один драйвер за раз, нажмите ссылку «Обновить драйвер» рядом с именем драйвера. Или просто нажмите кнопку «Обновить все» внизу, чтобы автоматически установить все рекомендуемые обновления.
Примечание. Некоторые драйверы необходимо устанавливать в несколько этапов, поэтому вам придется нажимать кнопку «Обновить» несколько раз, пока не будут установлены все его компоненты.
Решение 3 — Установите более старый драйвер
Обычно последние версии драйверов содержат новые функции и исправления ошибок, но иногда последние версии драйверов могут вызывать определенные проблемы. Пользователи сообщили, что у них возникла эта проблема с G-Sync после установки последних драйверов Nvidia. По их словам, они удалили последние версии драйверов и установили старую версию на свой ПК. Удалить драйверы видеокарты довольно просто, и вы можете сделать это с помощью специального инструмента, который называется Display Driver Uninstaller. Инструмент прост в использовании и полностью удалит все файлы, связанные с драйвером вашей видеокарты.
После удаления драйвера вам необходимо зайти на сайт Nvidia, скачать и установить более старую версию драйвера. Хотя это решение работает для некоторых пользователей, мы должны отметить, что оно не идеально. Пользователи сообщили, что они не могут смотреть видео на втором мониторе после установки старых драйверов, поэтому, если вам нужно использовать два или более мониторов, вы можете пропустить это решение.
Решение 4 — Проверьте, правильно ли настроена ваша G-Sync
По словам пользователей, чтобы использовать G-Sync в Windows 10, необходимо правильно его настроить. Чтобы убедиться, что G-Sync работает правильно, выполните следующие простые шаги:
- Перезагрузите компьютер с включенным единственным монитором G-Sync. Если у вас несколько мониторов, включите другие мониторы позже.
- Включите и выключите монитор G-Sync и проверьте, находится ли он в режиме G-Sync.
- Включите и выключите опцию G-Sync на вкладке « Настройка G-Sync » панели управления Nvidia . Обязательно включите и выключите G-Sync в разделе « Управление 3D-настройками ».
- Убедитесь, что в игре не включены фиксированное обновление, V-Sync, ограничение частоты кадров и подобные параметры. Если вы это сделаете, обязательно отключите их.
После внесения этих изменений проверьте, работает ли G-Sync на вашем ПК. Мало кто сообщил, что G-Sync не работает, если вы используете два монитора и запускаете игру в оконном режиме, так что имейте это в виду.
Решение 5 — Сброс Windows 10
Немногие пользователи сообщили, что они исправили проблемы с G-Sync в Windows 10, выполнив сброс Windows 10. Сброс Windows 10 удалит все установленные приложения и файлы из вашего основного раздела, поэтому вы можете использовать это решение в качестве последнего средства. Если вы решили выполнить этот процесс, мы объяснили, как сбросить настройки Windows 10 до заводских настроек в наших предыдущих статьях, поэтому обязательно ознакомьтесь с нашими подробными инструкциями.
Решение 6. Попробуйте заменить оперативную память
По мнению некоторых пользователей, им удалось решить эту проблему путем замены оперативной памяти. У них были некоторые проблемы с G-Sync и SLI, и, по их словам, их оперативная память была виновником. Если у вас возникла такая же проблема, попробуйте проверить вашу RAM или заменить один или несколько модулей памяти и проверить, решает ли это проблему.
Проблемы с G-Sync могут привести к разрыву экрана и снижению производительности. Если вы геймер и у вас проблемы с G-Sync, мы настоятельно рекомендуем вам попробовать некоторые из наших решений.
 Доброго времени суток!
Думаю, что многие любители игр сталкивались с «прыжками» FPS (это частота кадров): в спокойных сценах показатель высокий, а в динамичных падает… Разумеется, такие чередования и «прыжки» могут вызывать искажения картинки: разрывы (👇), наложение одной части изображения на другую, задержки и пр. (прим.: происходит это из-за того, что частота кадров монитора не совпадает с частотой, выдаваемой видеокартой…).
Для исправления подобной «проблемы» — монитор и видеокарту необходимо синхронизировать (именно для этого и используются технологии FreeSync от AMD, и G-Sync от NVIDIA).
В сегодняшней заметке приведу несколько рекомендаций, как можно «подружить» G-Sync с монитором FreeSync (у производителей AOC, Philips и пр. с мониторами FreeSync от 2020г. уже есть такая совместимость). Тем не менее, отмечу, что в силу особенностей разных моделей устройств — сделать это удается не всегда… (но попытка не пытка? 😉)
*
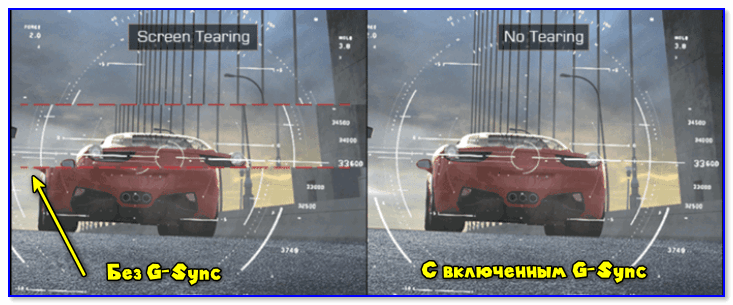
Пример работы G-Sync // без него изображение «рвется» на полосы
*
Почему не работает G-Sync и как его включить
👉 ШАГ 1
- для начала необходимо обновить драйвера NVIDIA на видеокарту до последней версии (не ниже 418.91!). Спец. утилиты в помощь;
- далее обратить внимание на интерфейс подключения монитора — необходим DisplayPort (1.2а!). Прим.: через HDMI работать данная фишка не будет*;
- видеокарта должна быть NVIDIA серии 10xx или 20xx (ОС Windows 10);
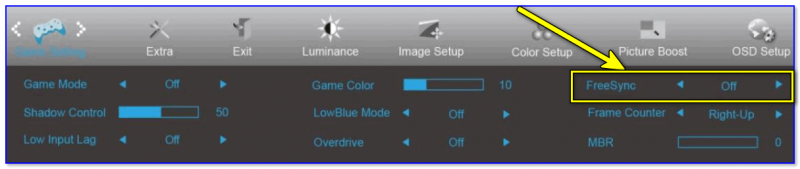
- в настройках монитора необходимо включить FreeSync (т.е. перевести этот параметр в режим «ON» / «включено»).

Настройки монитора AOC / в качестве примера
В большинстве случаев после заданиях подобных параметров — G-Sync включится автоматически (при усл. совместимости монитора и дефолтных настроек драйверов). У NVIDIA и AMD на сайтах, кстати, есть свои списки «проверенных» и совместимых мониторов…
*
👉 ШАГ 2
Если G-Sync не «включился» — необходимо вручную изменить ряд параметров в настройках видеокарты.
Для этого нажимаем правой кнопкой мыши в любом свободном месте рабочего стола — в появившемся меню выбираем пункт «Панель управления NVIDIA».
👉 В помощь!
Как открыть настройки видеокарты: AMD, nVidia, Intel (не могу найти панель управления графикой)
Как войти в панель управления NVIDIA // GeForce
Далее необходимо найти и открыть меню «Настройка G-Sync» (на англ. «Set up G-SYNC»). В этой вкладке включите G-Sync!
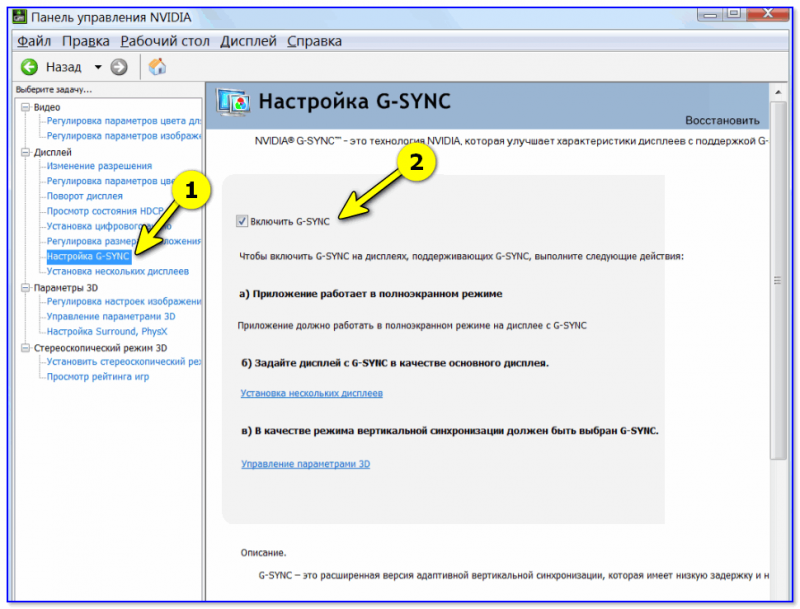
Включить G-Sync (панель управления NVIDIA)
После необходимо перейти во вкладку «Управление параметрами 3D», и в «Глобальных параметрах» в строке «Вертикальный синхроимпульс» выставить «G-Sync». См. пример ниже.
Примечание: вместо кладки «Вертикальный синхроимпульс» у вас может быть другая вкладка «Технология монитора» — при наличии оной в ней также нужно выставить «G-Sync».
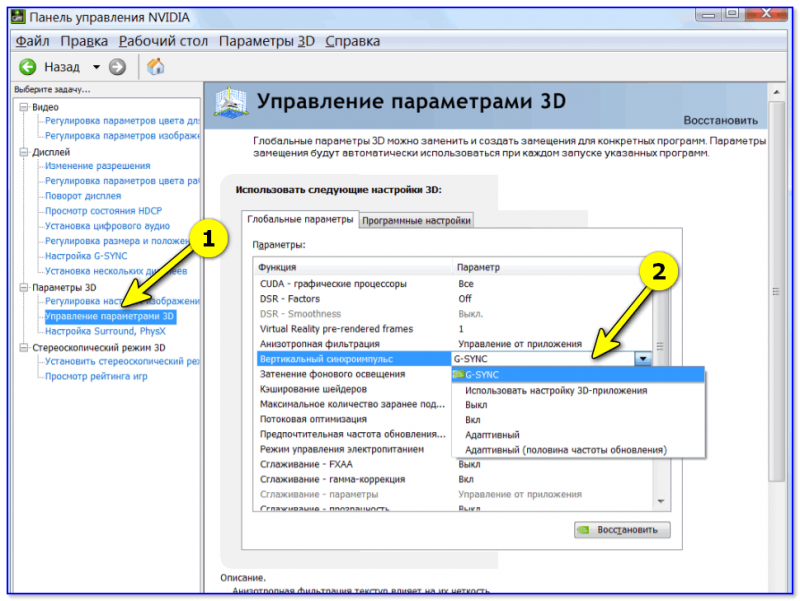
Управление параметрами 3D — вертикальный синхроимпульс
Собственно, после подобных «манипуляций» G-Sync должен начать работать — а качество картинки станет на порядок лучше (больше никаких разрывов 👌).
*
👉 Близко к теме!
Вертикальная синхронизация (VSync) в играх: что это и зачем нужно, как ее включить / отключить.

*
Дополнения по теме — будут кстати!
Удачной игры!
😉


Полезный софт:
-
- Видео-Монтаж

Отличное ПО для создания своих первых видеороликов (все действия идут по шагам!).
Видео сделает даже новичок!
-
- Ускоритель компьютера

Программа для очистки Windows от «мусора» (удаляет временные файлы, ускоряет систему, оптимизирует реестр).
В этом руководстве мы рассмотрим, как включить NVIDIA G-Sync в Windows. Если у вас есть монитор с g-синхронизацией и, конечно же, видеокарта NVIDIA, то вы сможете включить GSYNC. Это действительно помогает изменить ситуацию в Windows и в играх, поэтому мы настоятельно рекомендуем сделать это, если у вас есть такая возможность.
NVIDIA G-Sync — это опция в панели управления NVIDIA, которая помогает отображать наилучшее изображение с низкой задержкой. Она также помогает уменьшить разрывы экрана или полностью устранить их во время игр.
G-Sync будет синхронизироваться с вашей игрой, поэтому нет необходимости включать V-Sync, когда вы ее используете. Как видите, наличие G-Sync действительно может принести пользу, если вы любитель компьютерных игр!
Содержание
- Требования NVIDIA G-SYNC
- Лучшие мониторы NVIDIA G-Sync
- Как включить G-sync на ПК с Windows
- YouTube video: Включить NVIDIA G-Sync в Windows
Требования NVIDIA G-SYNC
Вам нужен монитор, поддерживающий эту функцию, и существуют системные требования для использования G-sync в Windows, которые мы перечислили ниже.
Если у вас нет возможности включить G-sync и у вас нет нижеперечисленных требований, это будет причиной:
- OS: Windows 10/11
- Графика: GeForce 10 серии или выше
- Драйвер: R417.71 или выше
- Монитор: G-Sync совместимый монитор, подключенный через DisplayPort v1.2
Лучшие мониторы NVIDIA G-Sync
NVIDIA G-Sync — это отличный способ устранить разрывы экрана при игре на вашем ПК и, по сути, просто сделать игры более плавными. А еще лучший способ улучшить это — приобрести новый монитор с этой функцией, например, один из представленных ниже:
Партнерские ссылки могут приносить нам комиссионные, если вы перейдете по ссылке или совершите покупку.
Как включить G-sync на ПК с Windows
Ниже описаны шаги для включения NVIDIA G-Sync в Windows 10 или Windows 11.
1. Щелкните правой кнопкой мыши на рабочем столе и выберите Панель управления NVIDIA
2. Разверните опцию Дисплей > выберите Настроить G-SYNC
3. Поставьте галочку в поле » Enable G-SYNC, G-SYNC Compatible «
4. Теперь выберите один из следующих вариантов:
- Enable for full screen mode
- Enable for windowed and full screen mode
5. Выберите монитор, на котором вы хотите включить G-Sync
6. Теперь отметьте Включить настройки для выбранной модели дисплея
7. Теперь G-синхронизация будет включена для выбранного вами дисплея
Мы надеемся, что приведенное выше руководство помогло настроить G-Sync на вашем компьютере с Windows, и теперь вы можете наслаждаться играми без разрывов экрана.
Если вам понравилось это руководство и вы нашли его полезным, мы уверены, что вам понравятся и другие наши руководства по играм.
Посмотрите наше видео на YouTube » Enable Nvidia G-Sync In Windows «, если вы застряли.
YouTube video: Включить NVIDIA G-Sync в Windows
Посмотрите наши последние руководства:
- Enable AMD FreeSync In Windows
- Saints Row GPU Driver Has Crashed Error
- Enable NVIDIA G-Sync In Windows
- FIFA 23 Release Date PS/Xbox/PC
- Clear AMD Graphics Card Cache
So I have a completely new setup, all drivers are updated, windows is fully updated, however I can’t get the option to enable g-sync to showup. I’ve gone through the 3D settings and forced vertical sync, restarted the computer and monitor and sadly it still isn’t available. I’m not sure if this is something strictly a issue right now with windows 11 users or not. As for details it is a DDR5 setup if that has any relevance.
I apologize if this is a easy fix, I’m still pretty green with this stuff considering that I’ve been using a Mac / OSX for years, but despite searching the internet for solutions, the only thing I’ve seen suggested is turning on vertical sync in the 3d settings, updating drivers, etc.
Monitor is a BenQ XL2740. I can take screenshots of anything needed to be seen when I get home.
Is the monitor connected through displayport to the GPU and are you using an nvidia GPU? (which model?)
Is the monitor connected through displayport to the GPU and are you using an nvidia GPU? (which model?)
ArieIs the monitor connected through displayport to the GPU and are you using an nvidia GPU? (which model?)
Yea it’s through displayport, and it’s a RTX 3070ti. I am using a 2.0 HDMI
[quote=Arie]Is the monitor connected through displayport to the GPU and are you using an nvidia GPU? (which model?)[/quote]
Yea it’s through displayport, and it’s a RTX 3070ti. I am using a 2.0 HDMI
Brock
ArieIs the monitor connected through displayport to the GPU and are you using an nvidia GPU? (which model?)
Yea it’s through displayport, and it’s a RTX 3070ti. I am using a 2.0 HDMI
It’s either connected with a displayport cable or an HDMI cable, which one is it?
[quote=Brock][quote=Arie]Is the monitor connected through displayport to the GPU and are you using an nvidia GPU? (which model?)[/quote]
Yea it’s through displayport, and it’s a RTX 3070ti. I am using a 2.0 HDMI[/quote]
It’s either connected with a displayport cable or an HDMI cable, which one is it?
My bad it’s the HDMI, can you only do g-synch with a display port cable?
My bad it’s the HDMI, can you only do g-synch with a display port cable?
Depends on the monitor, most older ones only support it through displayport, so I’d try the displayport cable first for your model.
Depends on the monitor, most older ones only support it through displayport, so I’d try the displayport cable first for your model.
BrockI’ve gone through the 3D settings and forced vertical sync,
you might consider undoing this
[quote=Brock]I’ve gone through the 3D settings and forced vertical sync,[/quote]
you might consider undoing this
Alright I’ll use one and hopefully that will resolve this. Thanks for the help Arie.
Alright I’ll use one and hopefully that will resolve this. Thanks for the help Arie.
turbochad69
BrockI’ve gone through the 3D settings and forced vertical sync,
you might consider undoing this
it’s actually recommended to have vsync and triple buff on when using gsync
there’ll be a setting for latency to set to «ultra» where nvidia tries to mitigate the input lag introduced by this
it’s actually not bad at all
i would have recommended you give ULMB or dyac (since yours is a benq) a try to see if you like it, but for some reason you have a benq monitor that doesn’t have either
[quote=turbochad69][quote=Brock]I’ve gone through the 3D settings and forced vertical sync,[/quote]
you might consider undoing this[/quote]
it’s actually recommended to have vsync and triple buff on when using gsync
there’ll be a setting for latency to set to «ultra» where nvidia tries to mitigate the input lag introduced by this
it’s actually not bad at all
i would have recommended you give ULMB or dyac (since yours is a benq) a try to see if you like it, but for some reason you have a benq monitor that doesn’t have either
Brimstone
turbochad69
BrockI’ve gone through the 3D settings and forced vertical sync,
you might consider undoing this
it’s actually recommended to have vsync and triple buff on when using gsync
there’ll be a setting for latency to set to «ultra» where nvidia tries to mitigate the input lag introduced by this
it’s actually not bad at all
i would have recommended you give ULMB or dyac (since yours is a benq) a try to see if you like it, but for some reason you have a benq monitor that doesn’t have either
I will tryout the triple buff / vsync combination when the cable shows up in the mail tomorrow. Any reason not to use vertical synch since I’m a getting the impression that people don’t with this sorta thing?
[quote=Brimstone][quote=turbochad69][quote=Brock]I’ve gone through the 3D settings and forced vertical sync,[/quote]
you might consider undoing this[/quote]
it’s actually recommended to have vsync and triple buff on when using gsync
there’ll be a setting for latency to set to «ultra» where nvidia tries to mitigate the input lag introduced by this
it’s actually not bad at all
i would have recommended you give ULMB or dyac (since yours is a benq) a try to see if you like it, but for some reason you have a benq monitor that doesn’t have either[/quote]
I will tryout the triple buff / vsync combination when the cable shows up in the mail tomorrow. Any reason not to use vertical synch since I’m a getting the impression that people don’t with this sorta thing?
vsync alone typically adds a lot of input lag for what most of us perceive as little benefit.
like i said nvidia has the ultra latency feature to try and combat it, but even then it’s still definitely noticeable for a lot of people but ymmv
vsync alone typically adds a lot of input lag for what most of us perceive as little benefit.
like i said nvidia has the ultra latency feature to try and combat it, but even then it’s still definitely noticeable for a lot of people but ymmv
even with a display port cable (vsync on and off) its still not showing up as a option. I really wonder if this has anything to do with windows 11 or not.
even with a display port cable (vsync on and off) its still not showing up as a option. I really wonder if this has anything to do with windows 11 or not.
Make sure you have FreeSync enabled on your monitors OSD
Make sure you have FreeSync enabled on your monitors OSD
^ gsync compatible just means it’s a variation of freesync. Had a similar issue that I didn’t realize was one until I was kicking around trying to get the game to look hella smooth and the option just popped up in the Nvidia menu.
And IMO smooth picture > FPS/input delay (unless it’s DISTURBINGLY NOTICABLE). I use rocketjumping as a ghetto benchmark for if new settings have too much delay for my taste. Only felt it once when I accidentally locked to 60.
Edit:also recommend trying out one or two other dp cables if you have them on hand.
BuildBruh^ gsync compatible just means it’s a variation of freesync. Had a similar issue that I didn’t realize was one until I was kicking around trying to get the game to look hella smooth and the option just popped up in the Nvidia menu.
And IMO smooth picture > FPS/input delay (unless it’s DISTURBINGLY NOTICABLE). I use rocketjumping as a ghetto benchmark for if new settings have too much delay for my taste. Only felt it once when I accidentally locked to 60.
Edit:also recommend trying out one or two other dp cables if you have them on hand.
I got two different cables, didn’t change anything.
[quote=BuildBruh]^ gsync compatible just means it’s a variation of freesync. Had a similar issue that I didn’t realize was one until I was kicking around trying to get the game to look hella smooth and the option just popped up in the Nvidia menu.
And IMO smooth picture > FPS/input delay (unless it’s DISTURBINGLY NOTICABLE). I use rocketjumping as a ghetto benchmark for if new settings have too much delay for my taste. Only felt it once when I accidentally locked to 60.
Edit:also recommend trying out one or two other dp cables if you have them on hand.[/quote]
I got two different cables, didn’t change anything.
Please
sign in through STEAM
to post a comment.