Explore tested solutions to solve Realtek HD Audio Driver errors
by Vlad Turiceanu
Passionate about technology, Windows, and everything that has a power button, he spent most of his time developing new skills and learning more about the tech world. Coming… read more
Updated on
- The Realtek HD Audio Driver can stop working properly if it isn’t updated regularly.
- After updating the driver, make sure to restart the Audio service.
- Another solution is to reinstall the Realtek driver altogether.
XINSTALL BY CLICKING THE DOWNLOAD
FILE
The Realtek HD Audio Driver is one of the most common pieces of software for changing and tweaking audio settings on your PC. However, there are some difficulties that might cause Windows 11’s Realtek audio driver to stop functioning properly.
A variety of factors might contribute to Realtek HD Audio Driver issues. The majority of the challenges may be addressed by taking the steps outlined in this guide. Keep up with us!
Is Realtek audio driver compatible with Windows 11?
Realtek HD Audio Driver is the most user-friendly audio driver software that enhances sound quality and provides Dolby or Surround sound support via a sound card.
This driver is completely compatible with Windows 11, and this is not the cause of different issues with the driver. Here are the most common causes:
- Outdated drivers – Driver updates go hand in hand with OS ones. Thus, if your OS will update but your drivers won’t, it might cause miscommunications across your device. In this case, it is advised to update your Realtek audio driver.
- Enhancement audio settings – There are multiple audio enhancement software and settings that may cause issues with the driver. Thus, we will show you below how to disable them.
- Corrupted drivers – Corrupted drivers are another reason which causes your OS to unsuccessfully communicate with your driver. By reinstalling the driver or installing another one, you will be able to fix this issue.
- Wrong port connections – Make sure that you connect the audio cable to the right port and not the one for an audio input, which is usually pink.
How do I fix my Realtek audio driver in Windows 11?
- Is Realtek audio driver compatible with Windows 11?
- How do I fix my Realtek audio driver in Windows 11?
- 1. Check the audio output
- 2. Restart the Audio service
- 3. Update the driver
- 4. Reinstall the Realtek driver or use your manufacturer’s
- 5. Disable Audio Enhancements
- 6. Run the Audio Troubleshooter
- 7. Run System Restore
- 8. Update Windows
- What to do if there’s no sound at all?
Before moving on to more complex troubleshooting solutions, make sure to do the following:
How we test, review and rate?
We have worked for the past 6 months on building a new review system on how we produce content. Using it, we have subsequently redone most of our articles to provide actual hands-on expertise on the guides we made.
For more details you can read how we test, review, and rate at WindowsReport.
- Check the audio output, unplug and reconnect the device, then connect it to another system to test its functionality.
- Remove any third-party antivirus software and opt for a better one that’s optimized for Windows 11 and won’t interfere with your audio.
1. Check the audio output
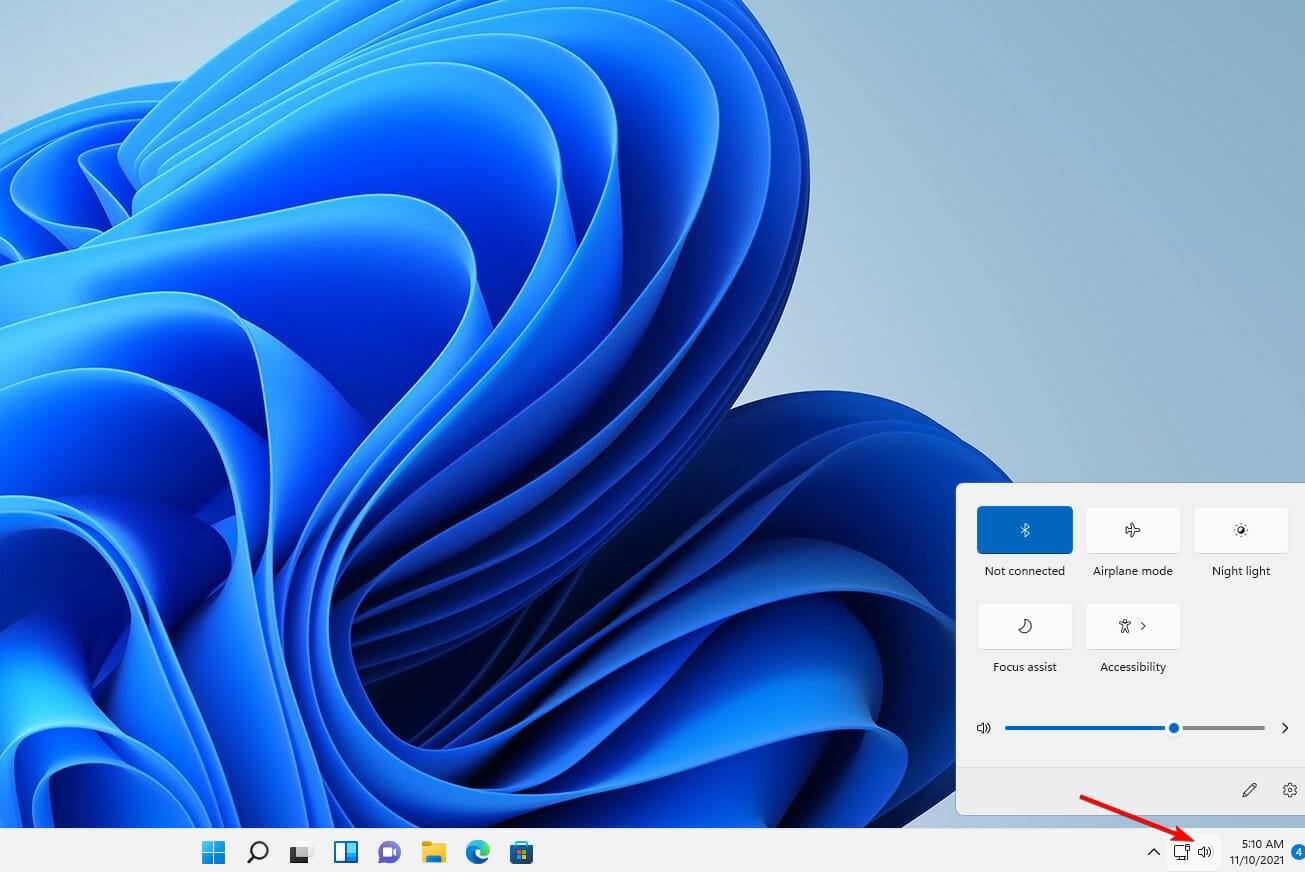
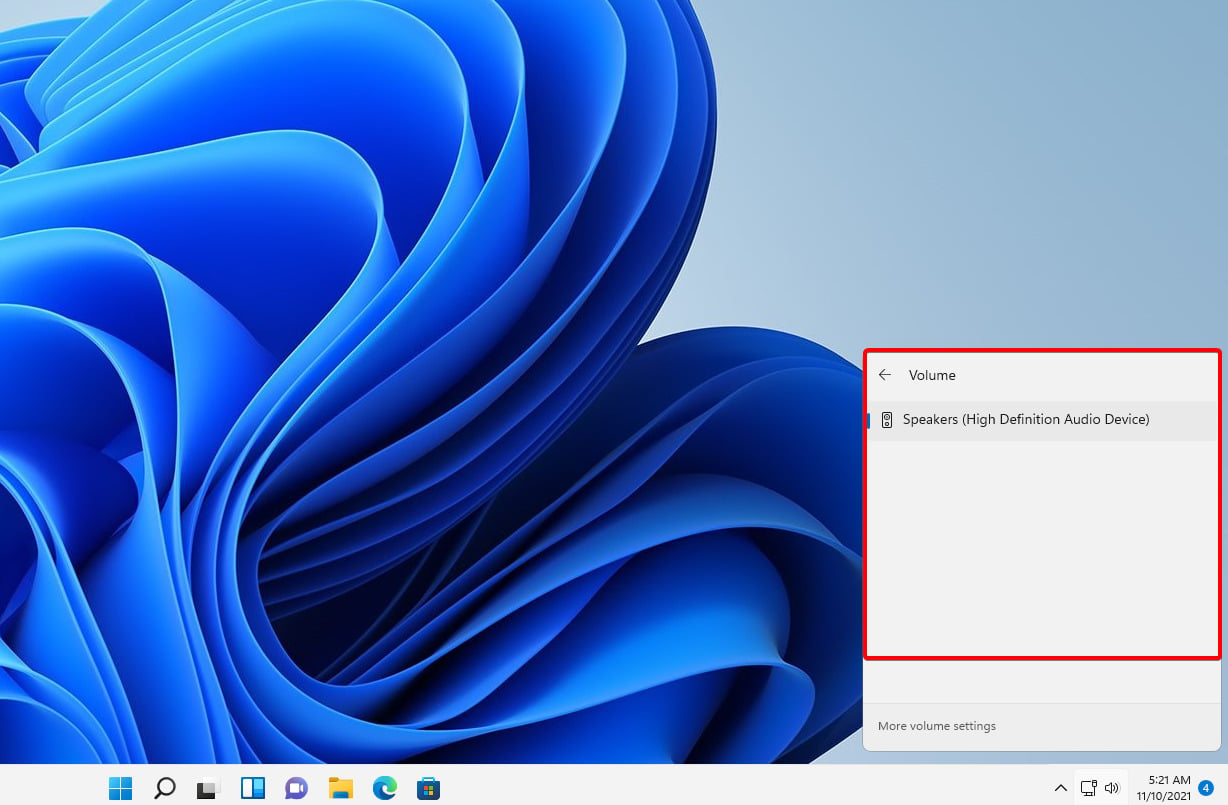
- Click on the Volume icon in the Taskbar. Alternatively, you can press Windows + A to launch it.

- In the Quick Menu, click on the carrot arrow icon next to the volume level.
- It will prompt you with a list of audio devices connected to the system. Select the desired device.

If selecting the desired device did not resolve the audio issue, it is possible that other system faults, for which we have provided alternative solutions, were the source of the problem.
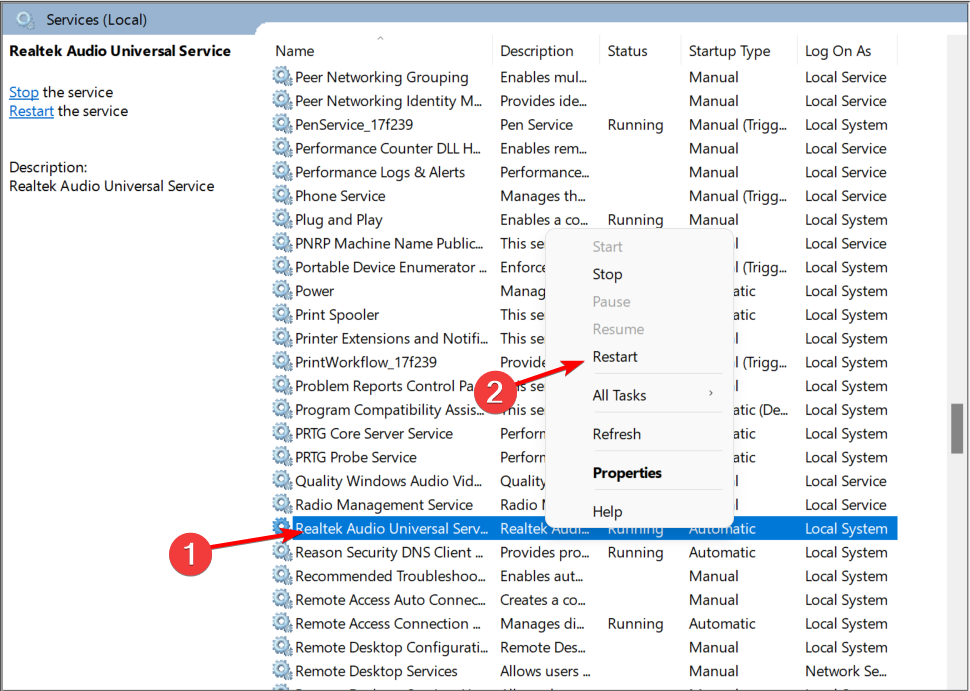
2. Restart the Audio service
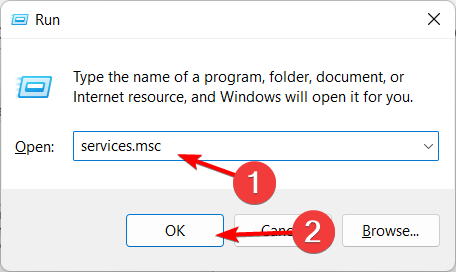
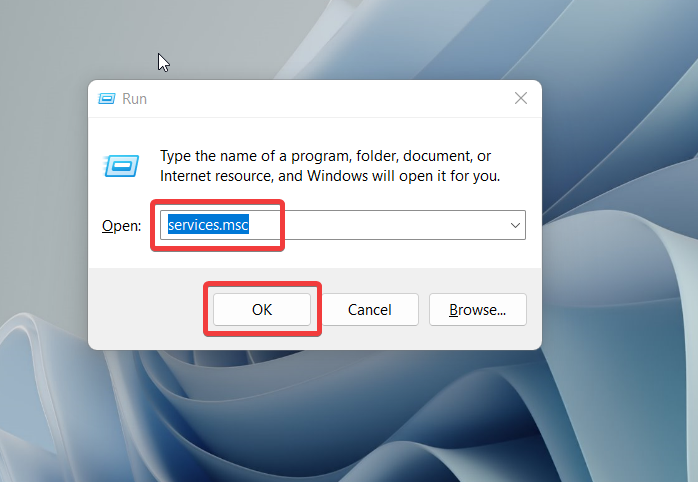
- Press the Windows key + R, which opens Run. Then enter services.msc in the open box, and click the OK button.

- Find the Realtek audio service, right-click it and select Restart.

3. Update the driver
If it isn’t constantly updated, the Realtek HD Audio Driver may stop functioning correctly. Follow these easy steps to correctly update the driver and fix the issue!
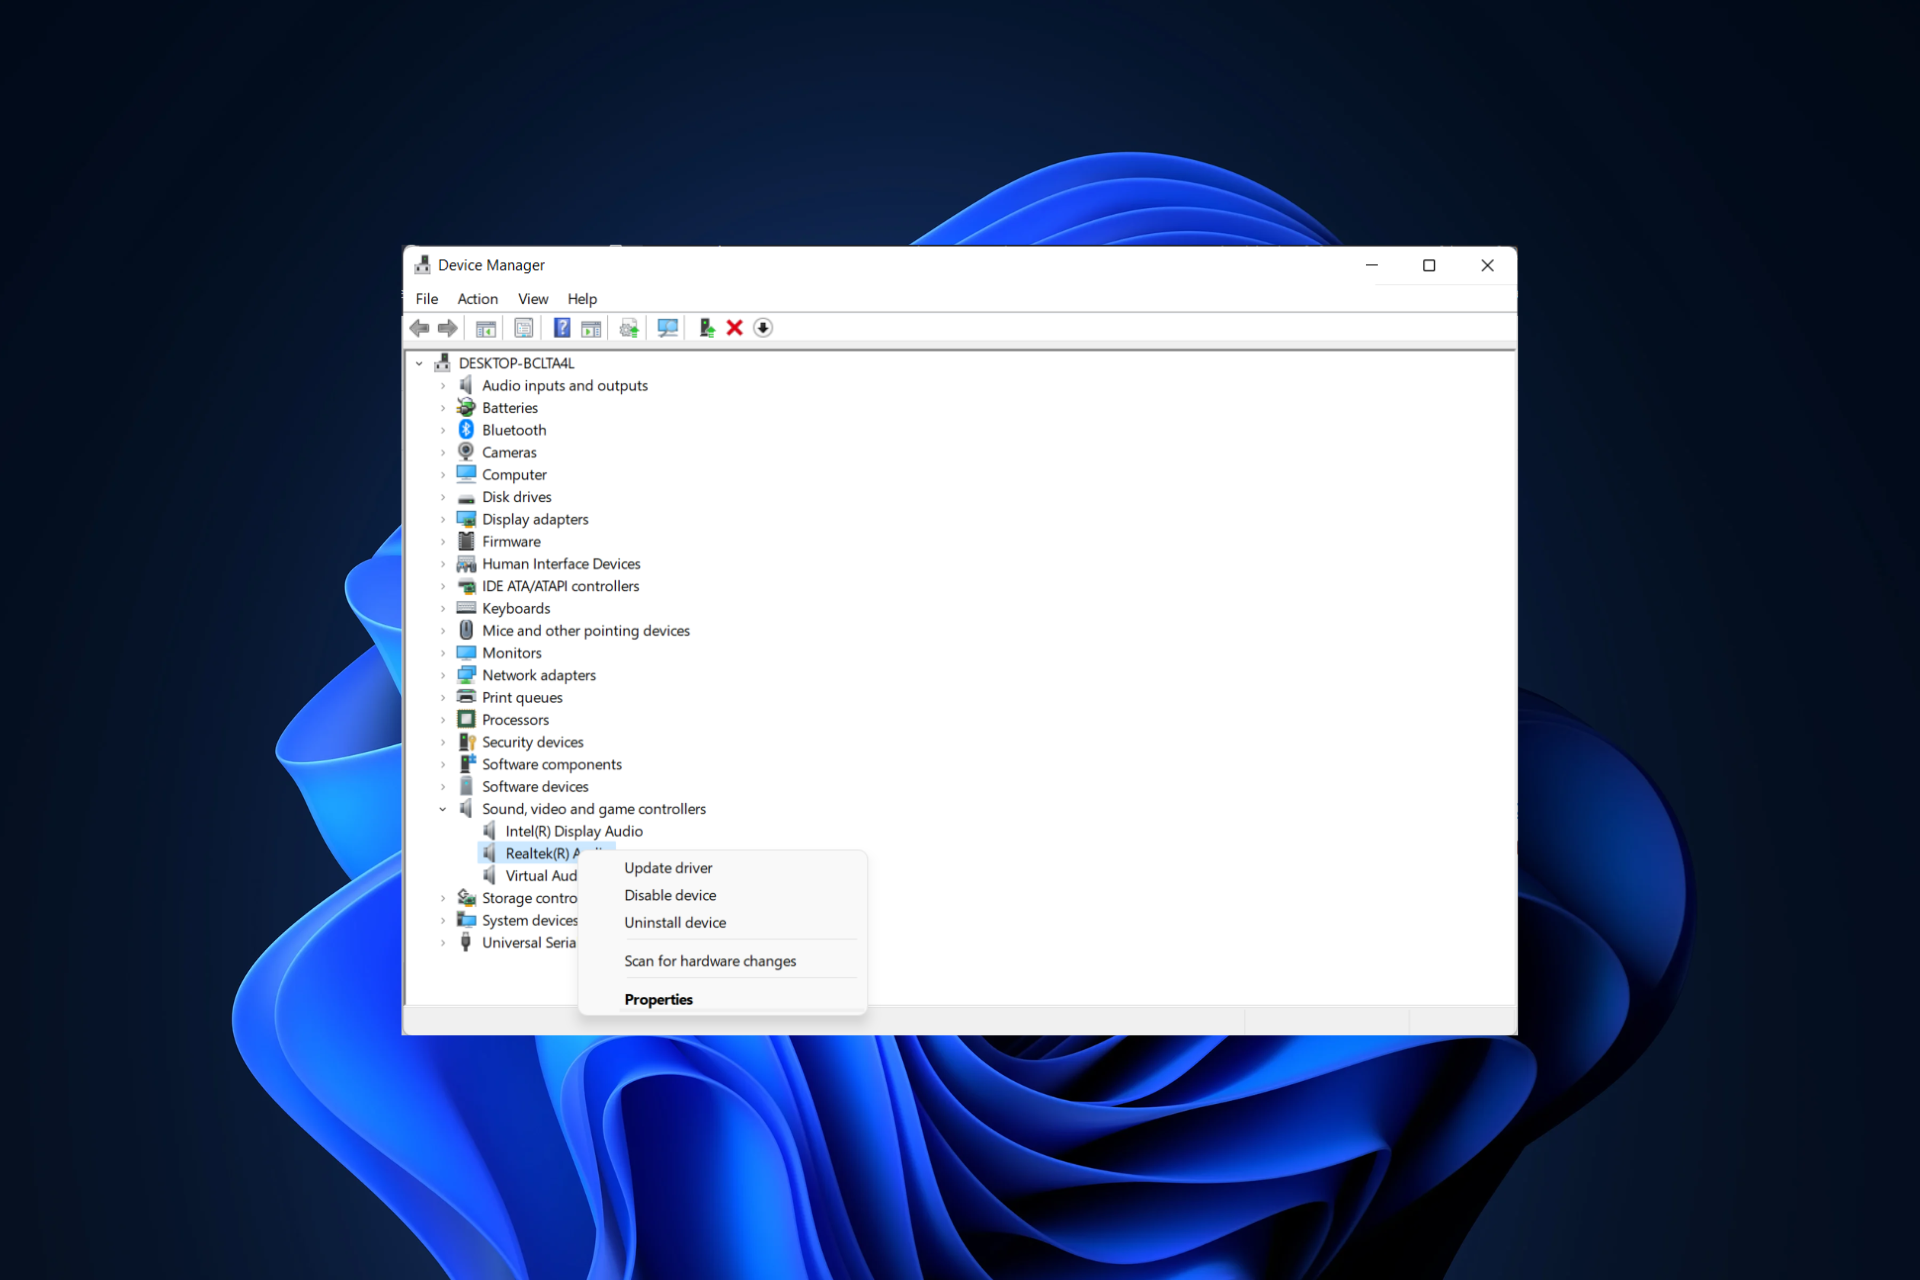
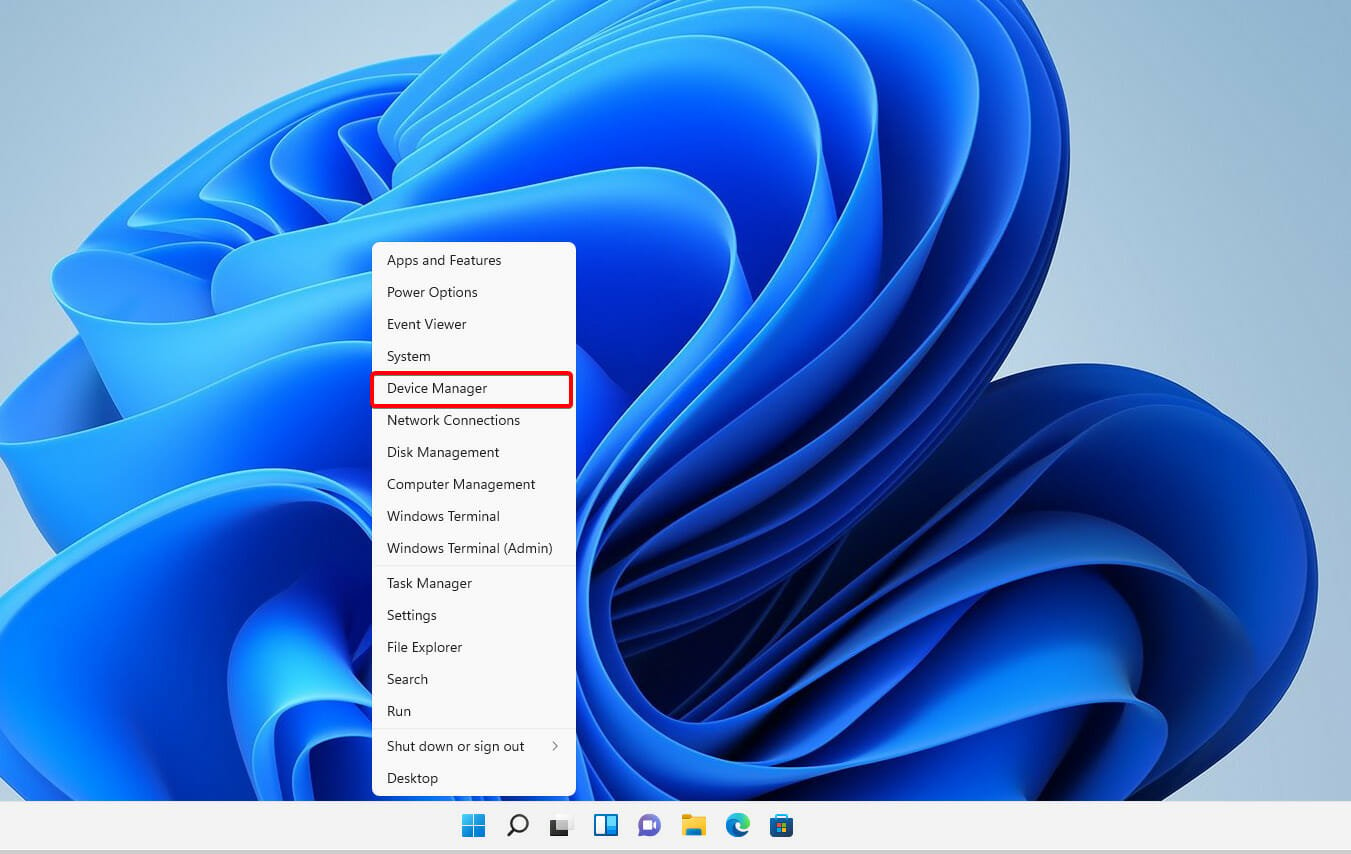
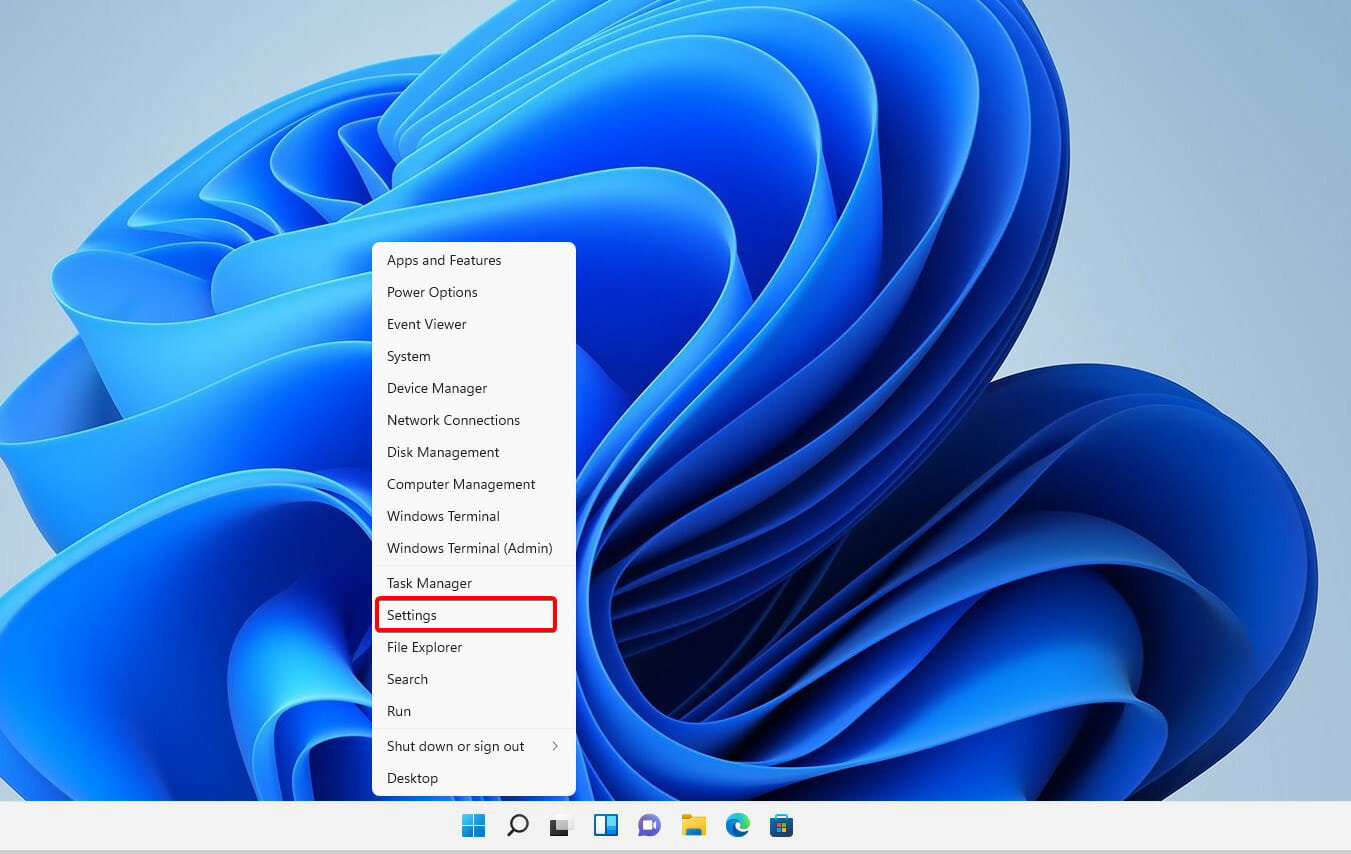
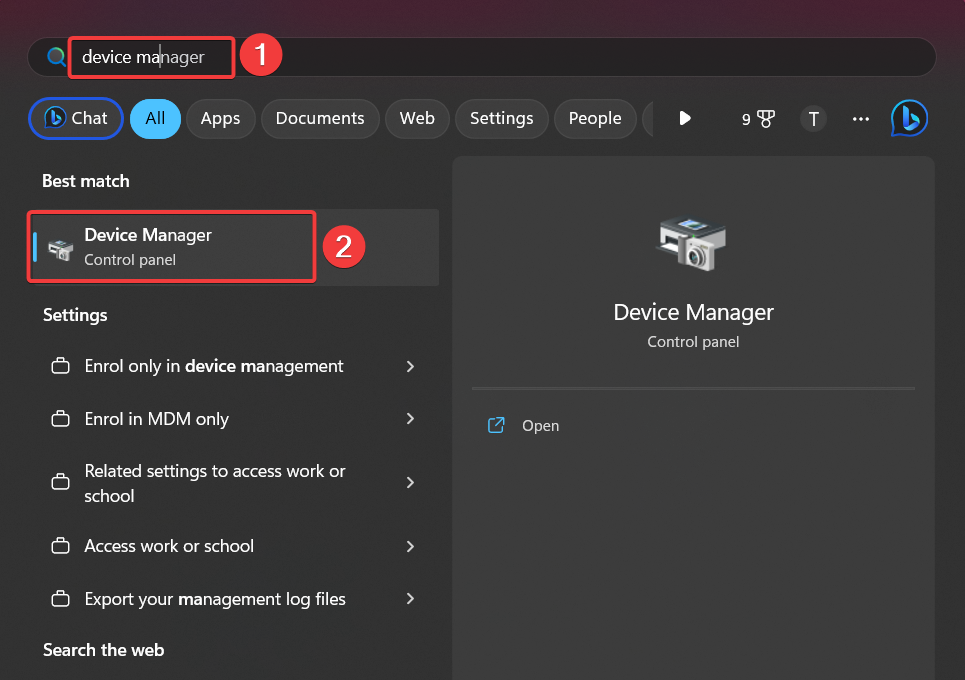
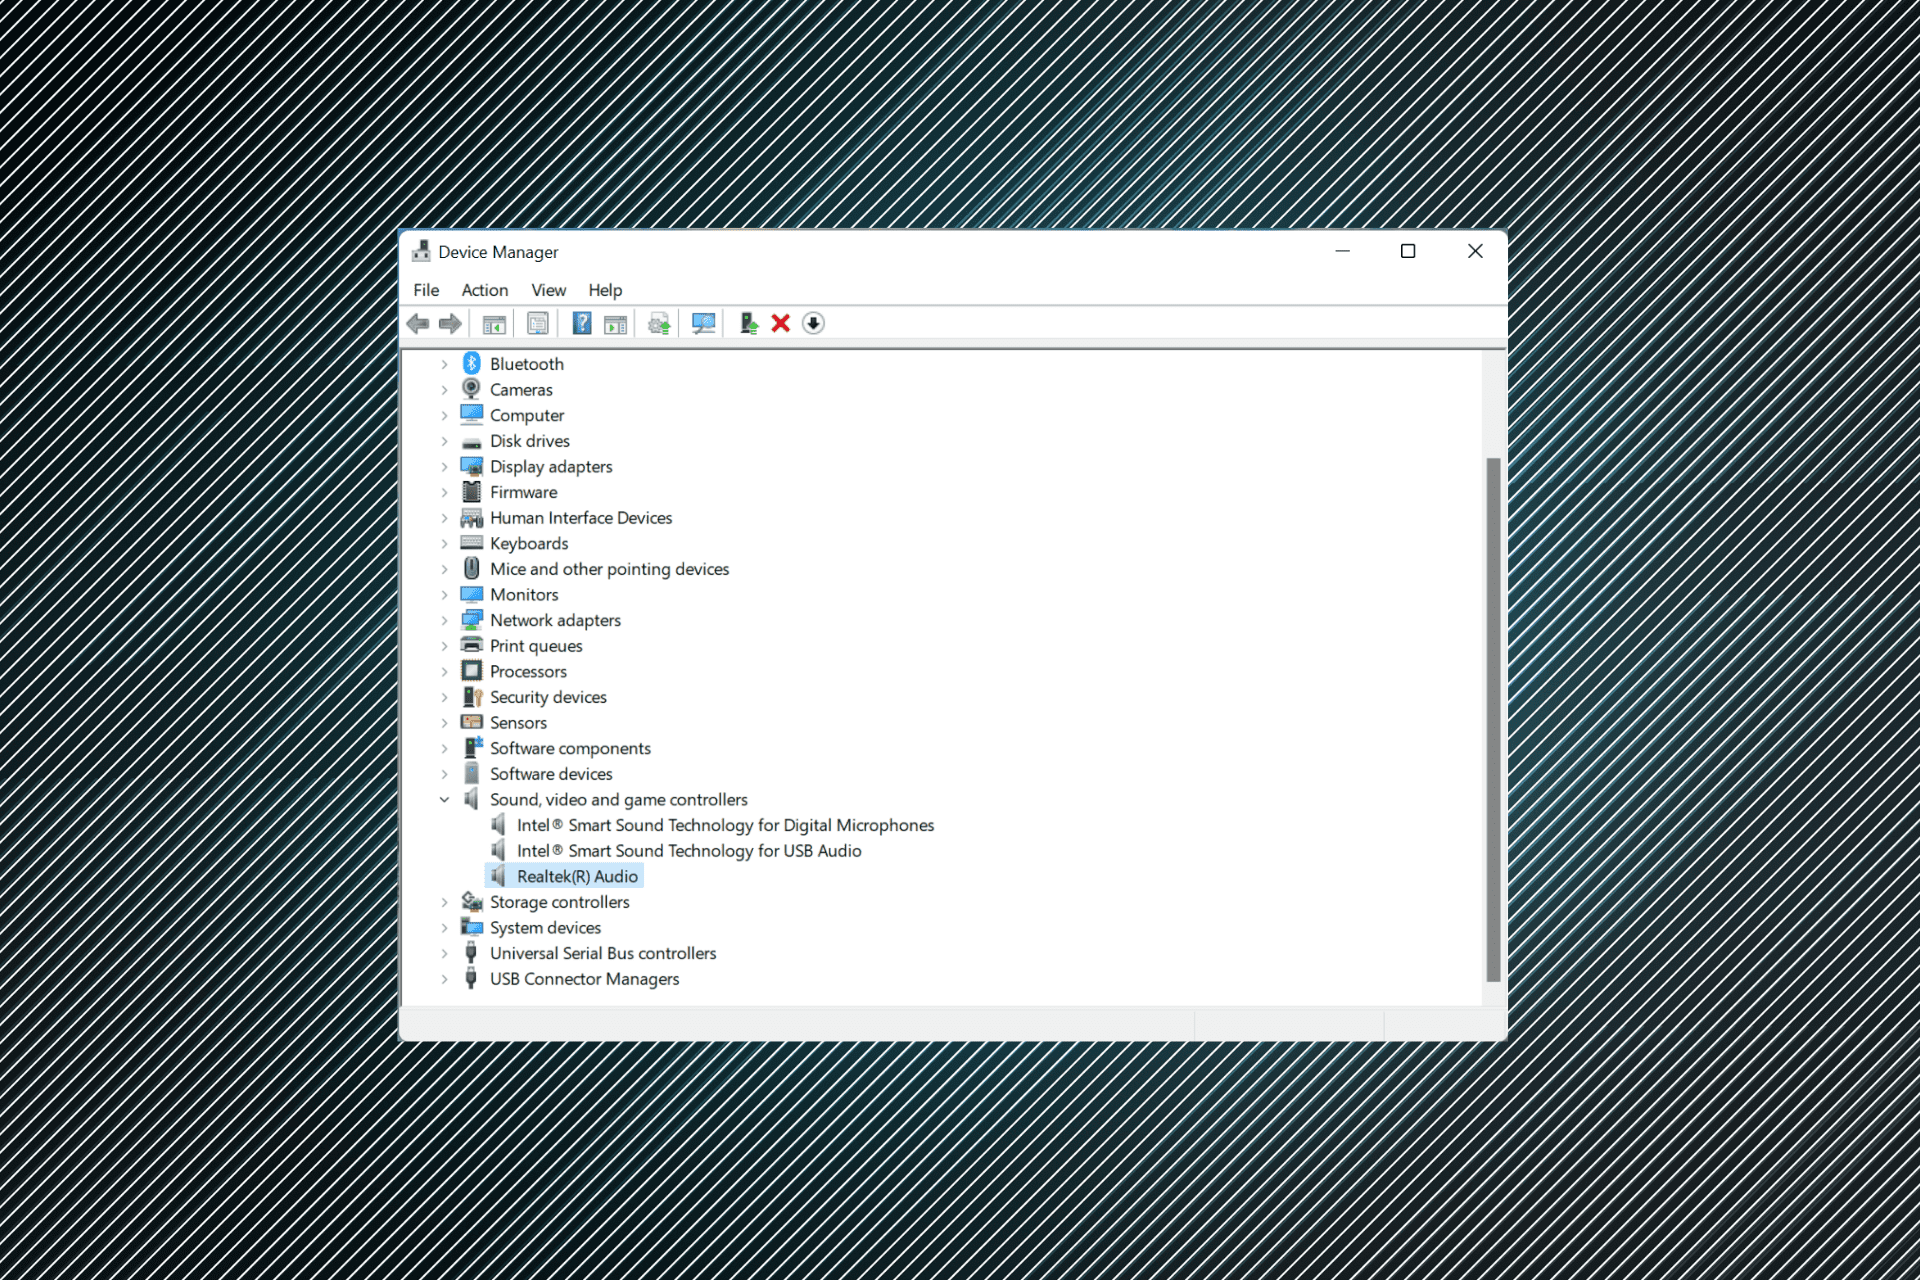
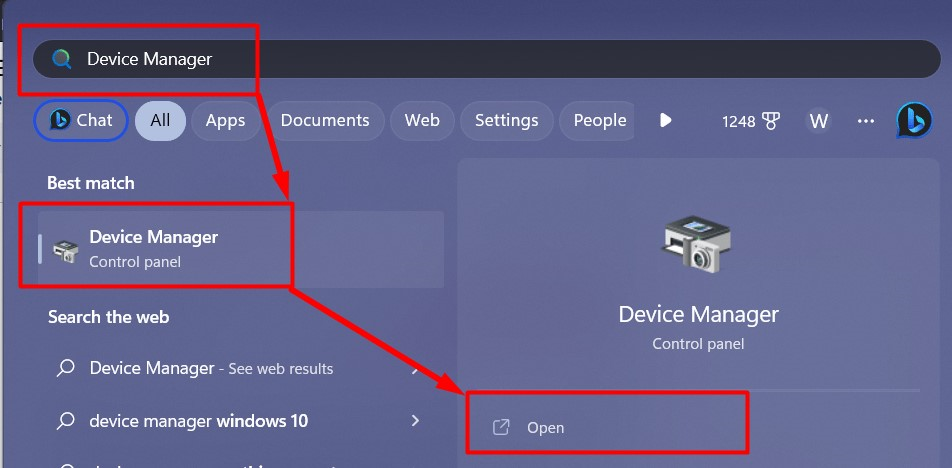
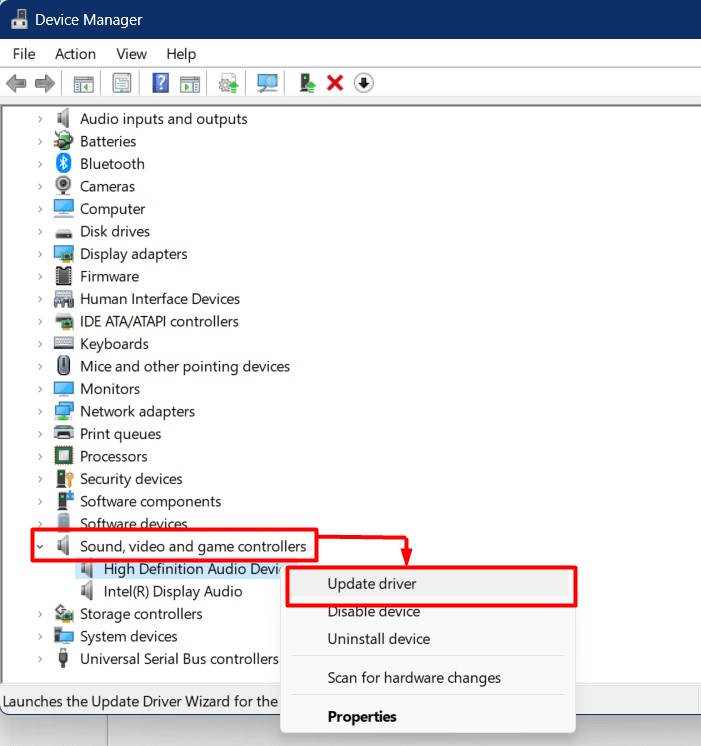
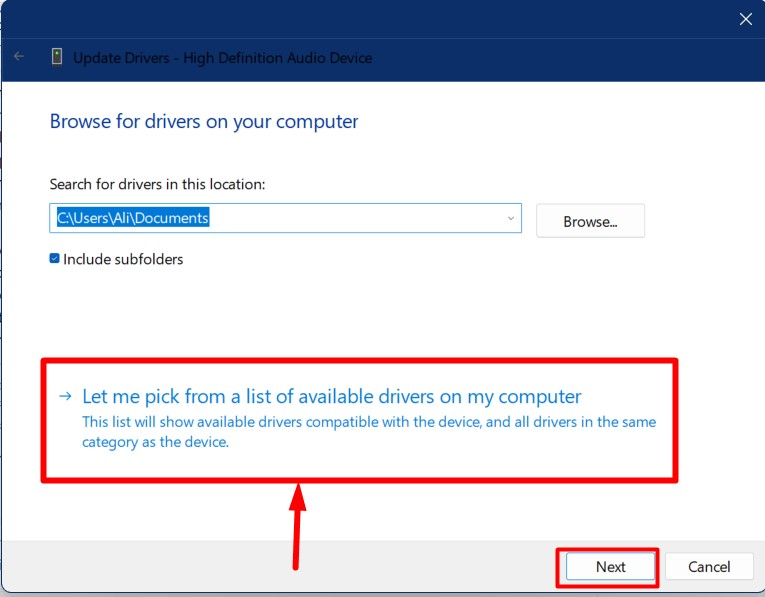
1. Right-click on the Start icon in the Taskbar or press Windows + X to launch the Quick Access menu then select Device Manager.
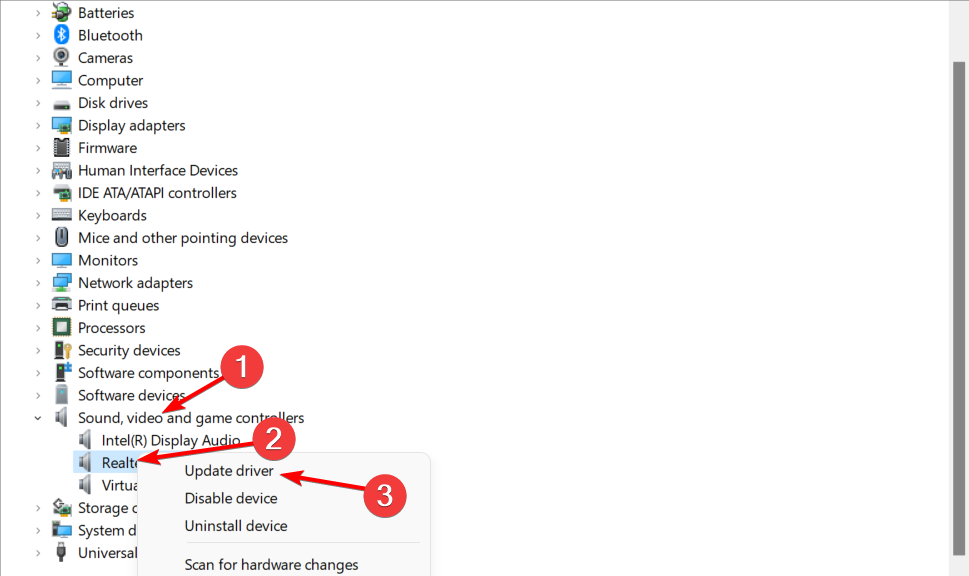
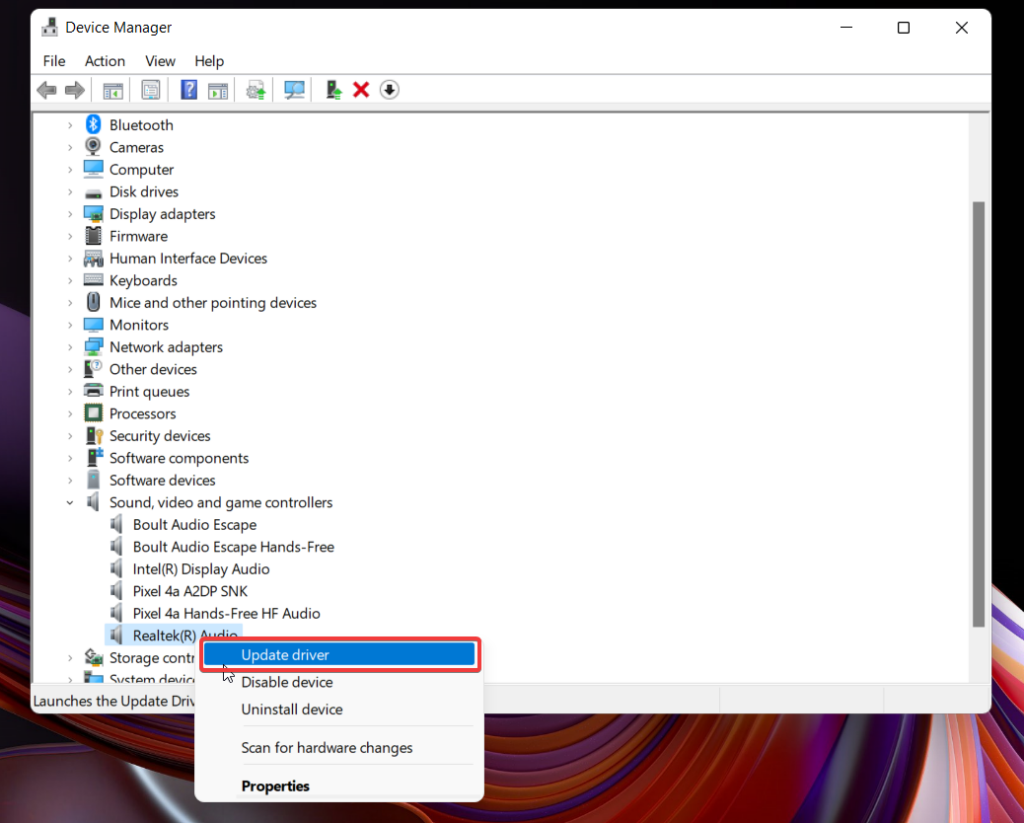
2. Locate and double-click the Sound, video, and game controllers option. Right-click on the Realtek Audio device and select Update driver from the context menu.
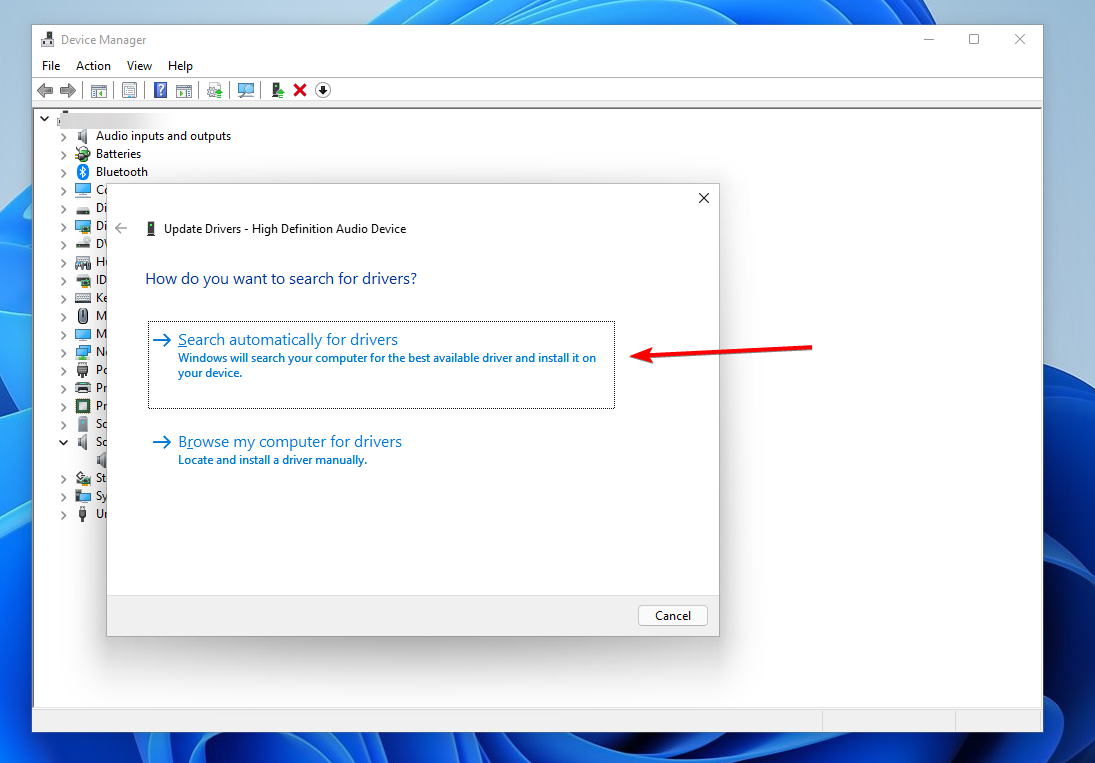
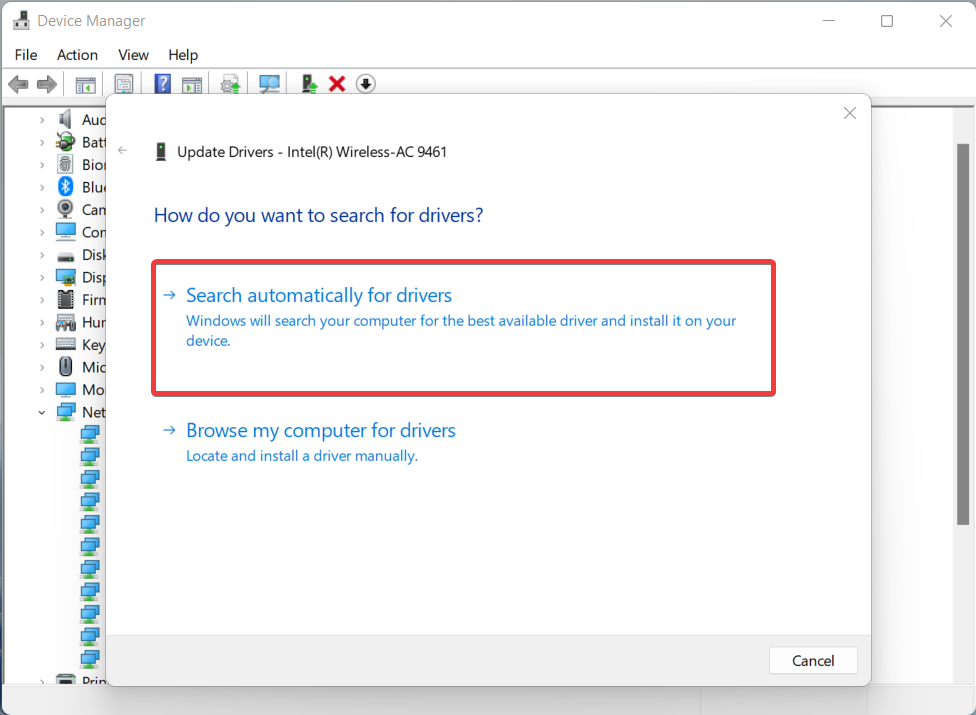
3. Select the Search automatically for drivers option as Windows will find the best drivers on your system. Reboot your PC afterward.
We strongly advocate using a specialist program such as Outbyte Driver Updater to do automatic scans for out-of-date drivers.

Outbyte Driver Updater
Safely update the Realtek driver as well as all other outdated drivers on your system.
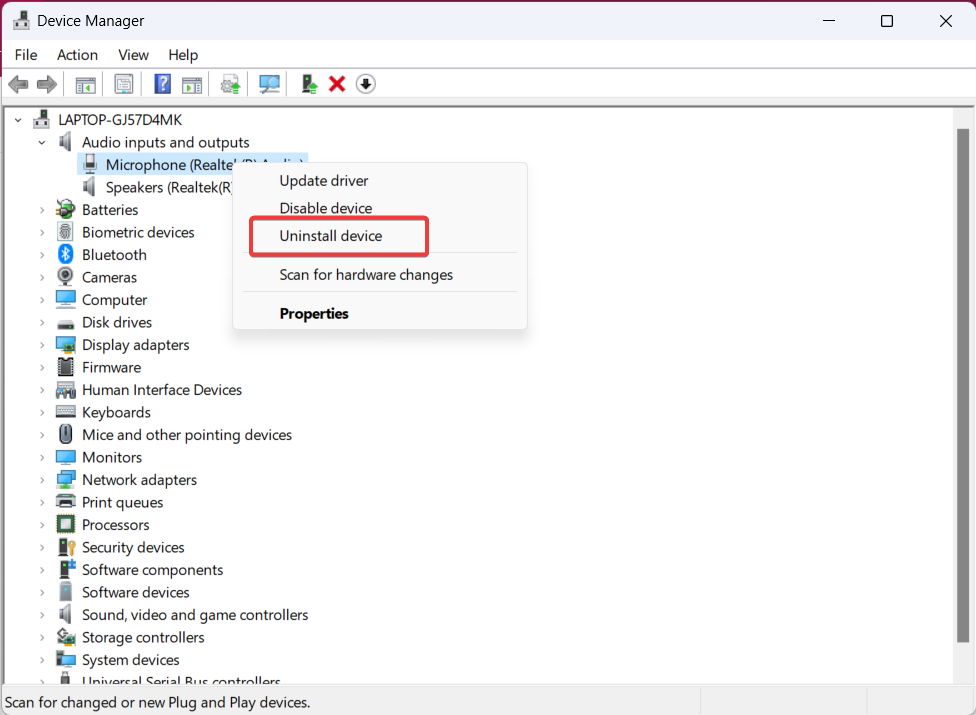
4. Reinstall the Realtek driver or use your manufacturer’s
- Right-click on the Start icon in the Taskbar or press Windows + X to launch the Quick Access menu. Select Device Manager from the list of options displayed.

- Locate and double-click on the Sound, video, and game controllers option. Right-click on the Realtek Audio device and select Uninstall device from the context menu.

- You can now either reboot your PC to automatically reinstall the Realtek driver, or head to your manufacturer’s website and search for an audio driver and download it. For example, here is Lenovo’s support page where you can find all drivers.


After you have completed the procedures outlined above, restart your computer. Windows will automatically update the driver to the most recent version available. It will also remove any corrupted driver files that may have been present.
- Realtek HD Audio Manager is missing [Solved]
- Fix: No speaker or headphones are plugged in [Full Guide]
- Headphones not detected in Windows 10 or 11 [Easy Fix]
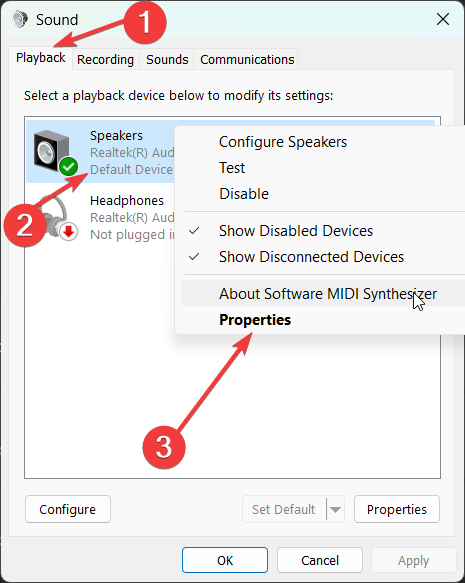
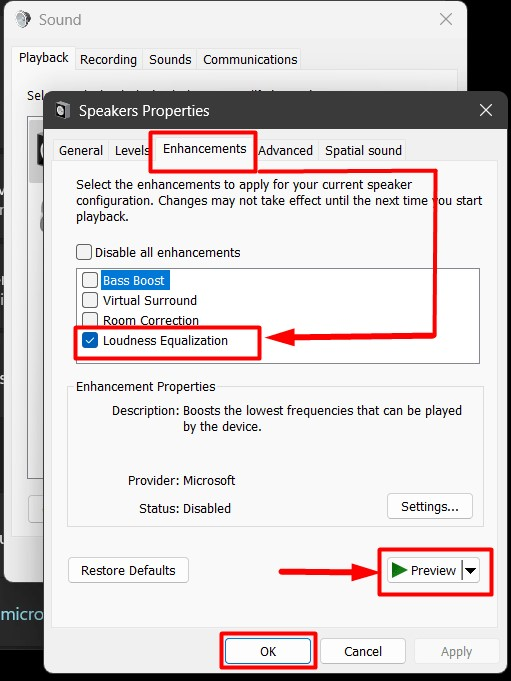
5. Disable Audio Enhancements
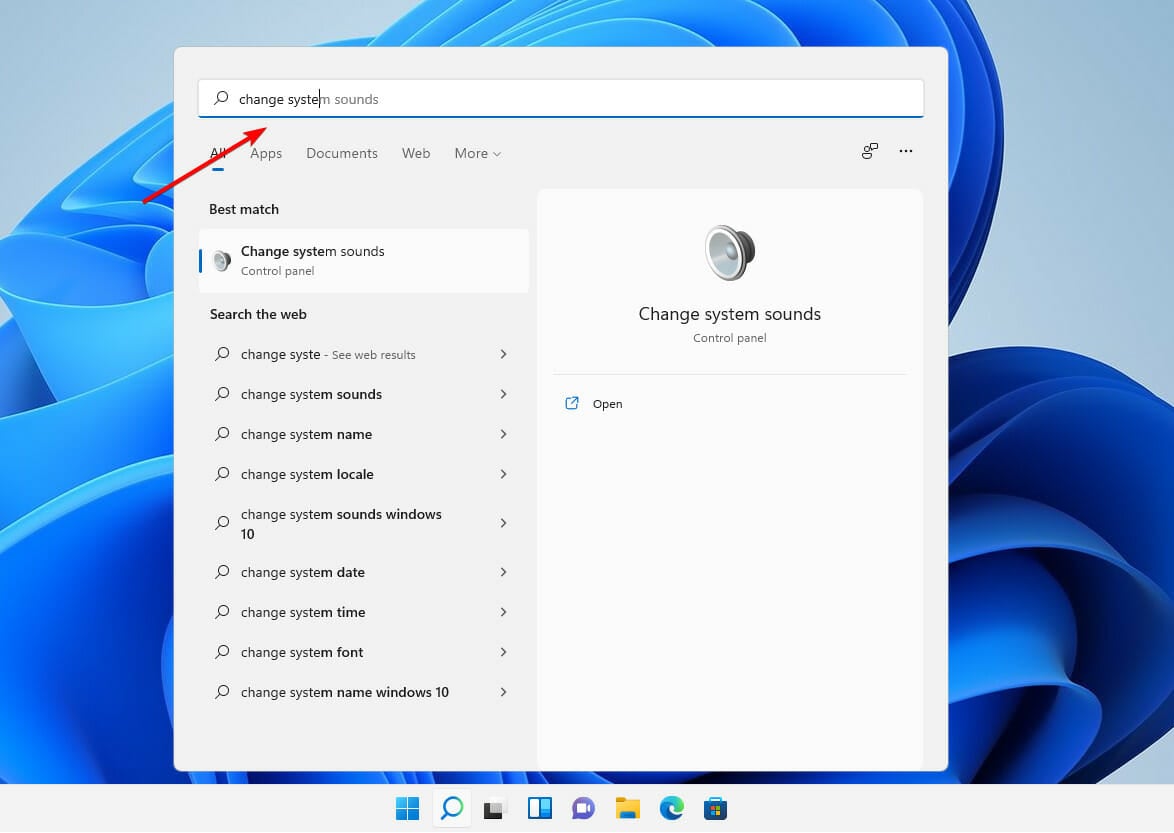
- Press on the Windows key + S, and search for Change system sounds.

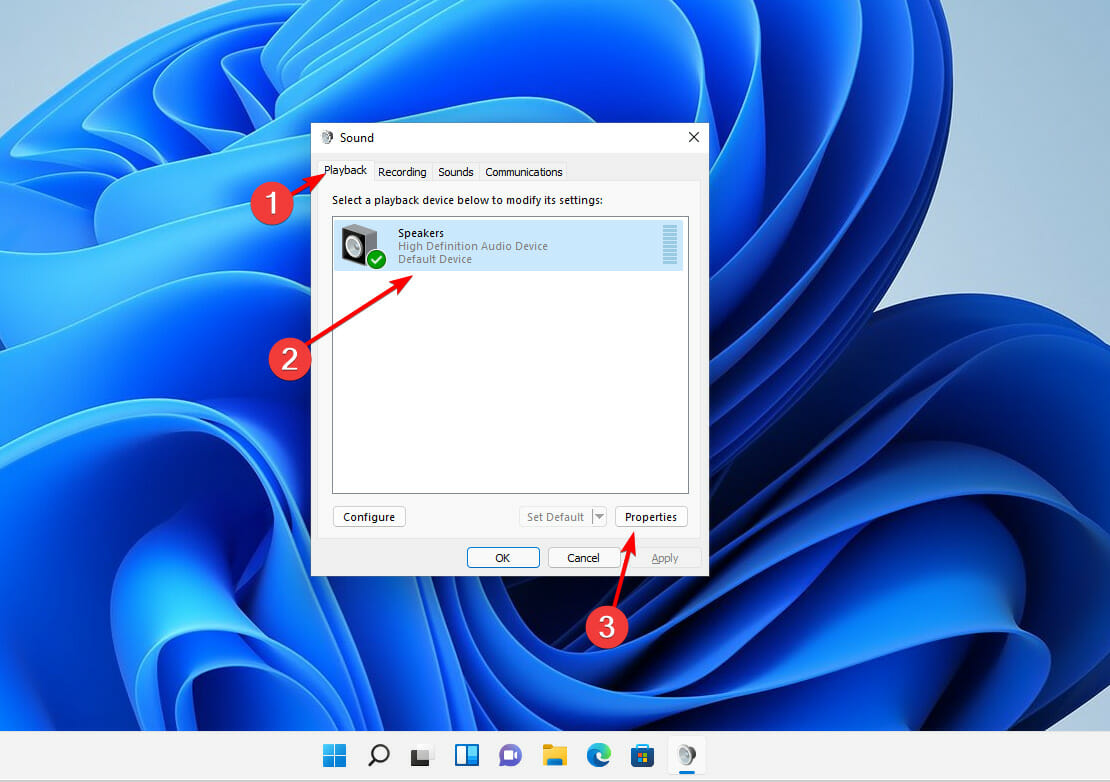
- Inside the Sound panel, navigate to the Playback tab, then select the speaker you are having trouble with, and click on Properties at the bottom.

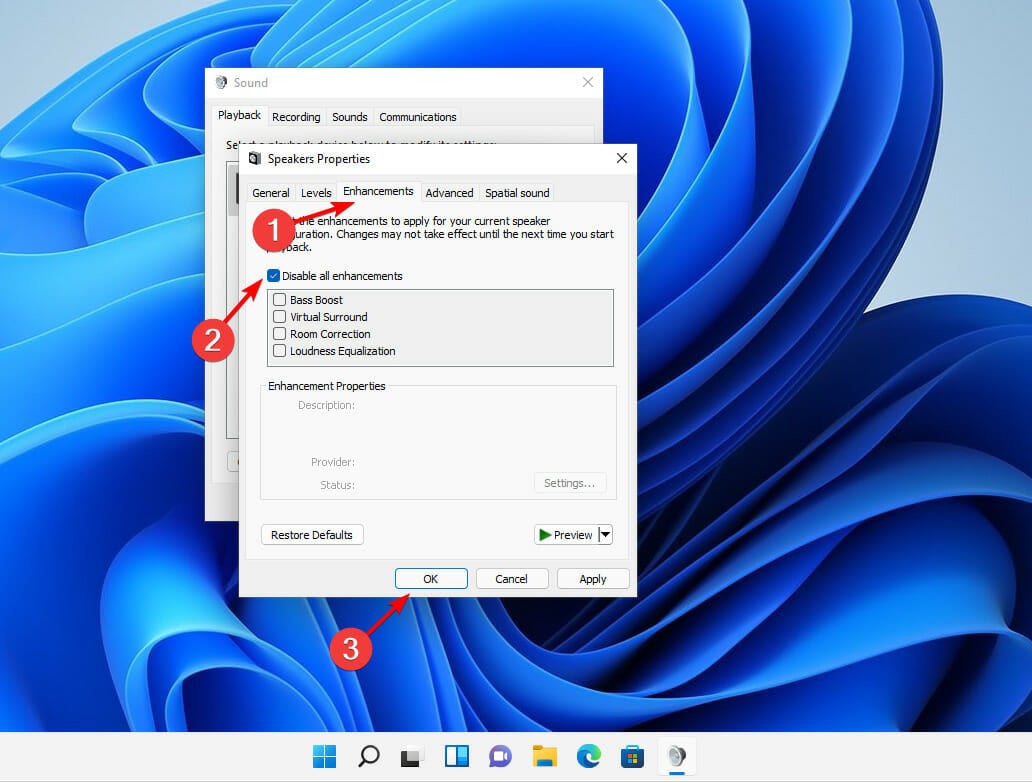
- Click on the Enhancements tab, then tick the checkbox for Disable all enhancements, and click the OK at the bottom to save the changes and close the window.

6. Run the Audio Troubleshooter
- Right-click on the Start icon in the Taskbar or press Windows + X to launch the Quick Access menu. From the list of options, select Settings.
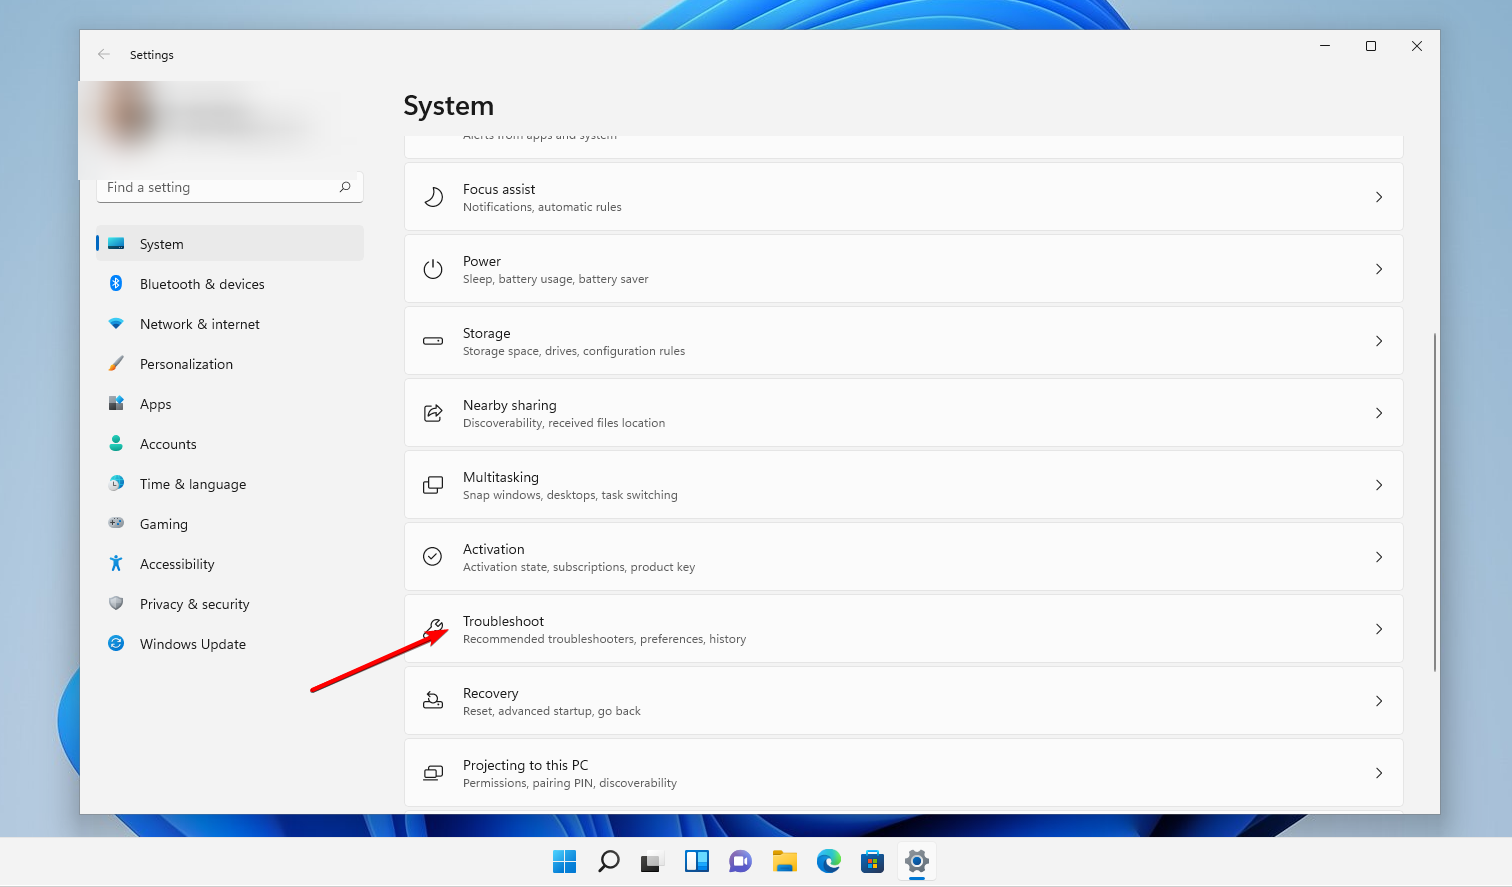
- The System tab will be open by default. Scroll down on the right side of the window and select Troubleshoot from the list of options.

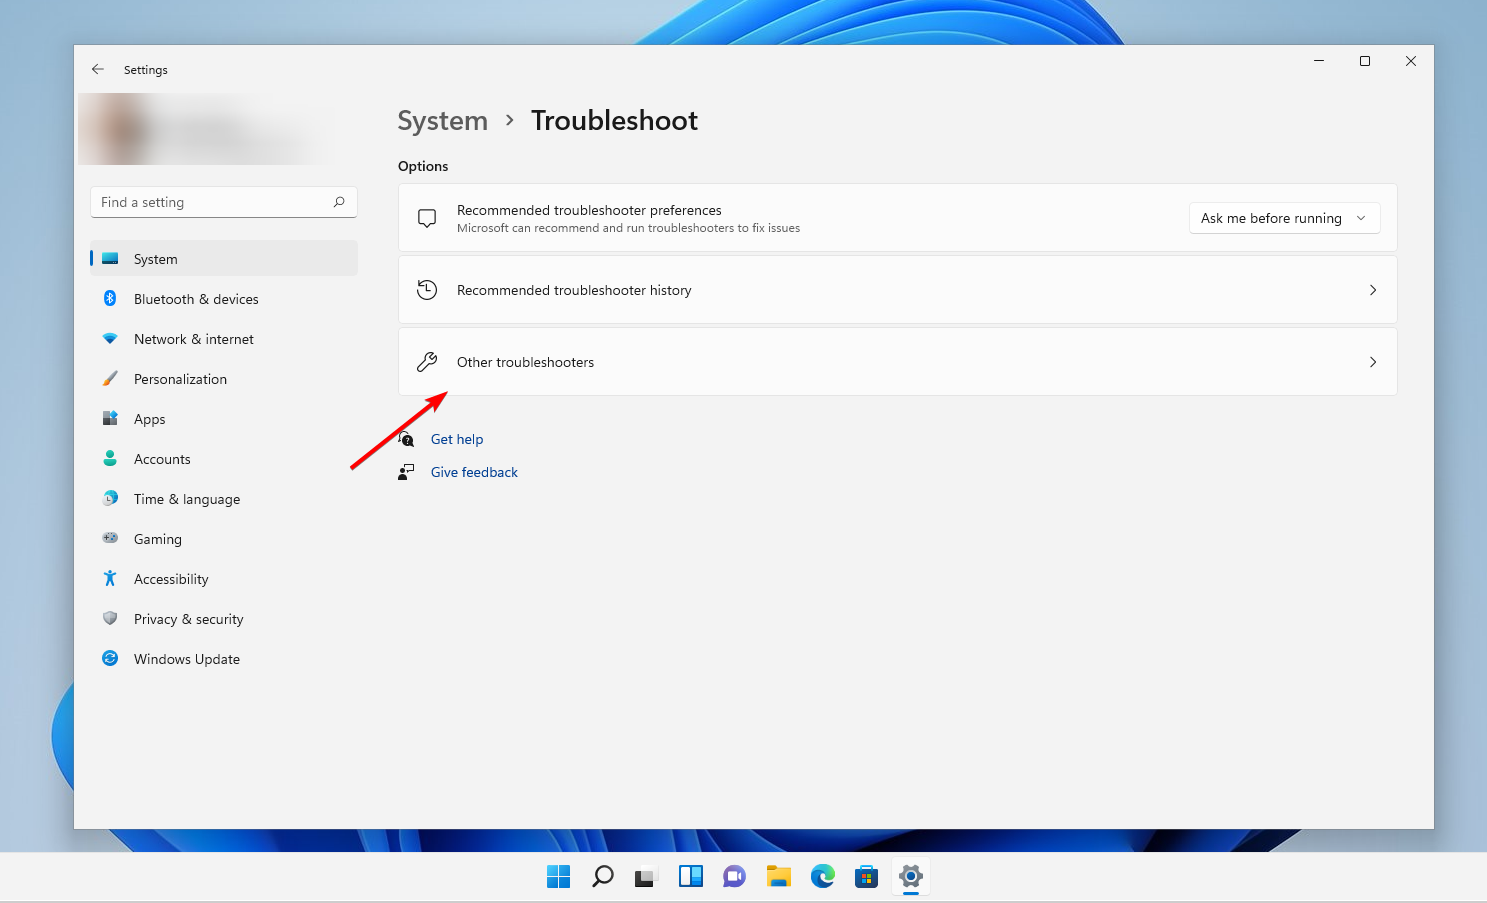
- Tap on Other troubleshooters.

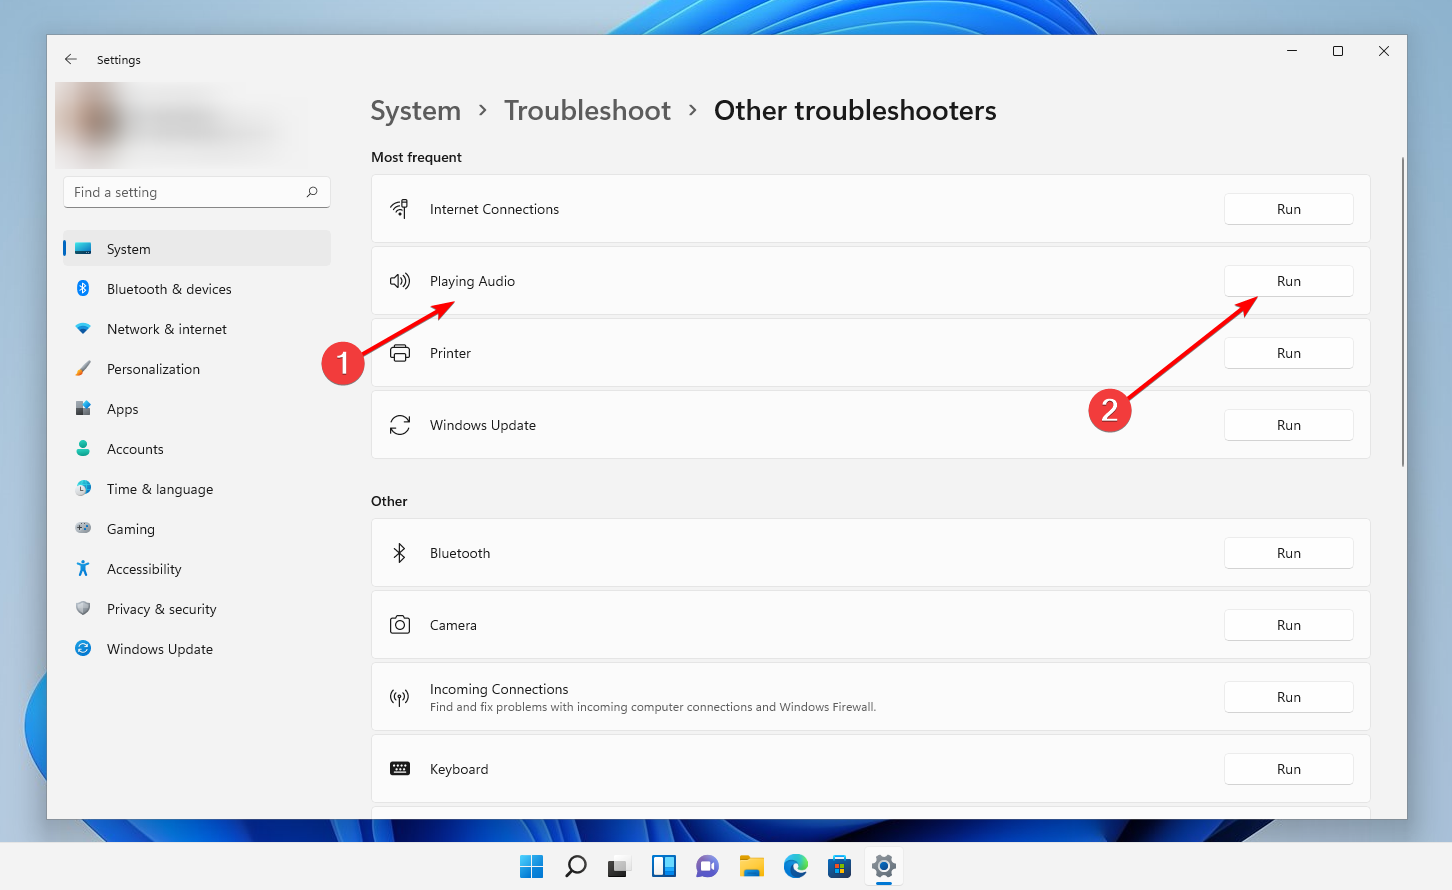
- Locate the Playing Audio troubleshooter and click on Run next to it.

- Select the audio output device you are having issues with and click on Next at the bottom.
Windows will now identify any issues with the device or configured settings and fix them. Instructions will be displayed once the errors are found, so make sure to follow them carefully.
7. Run System Restore

NOTE
System Restore will not delete any files on the system, however, recently installed applications, changes in settings, and driver updates may be removed.
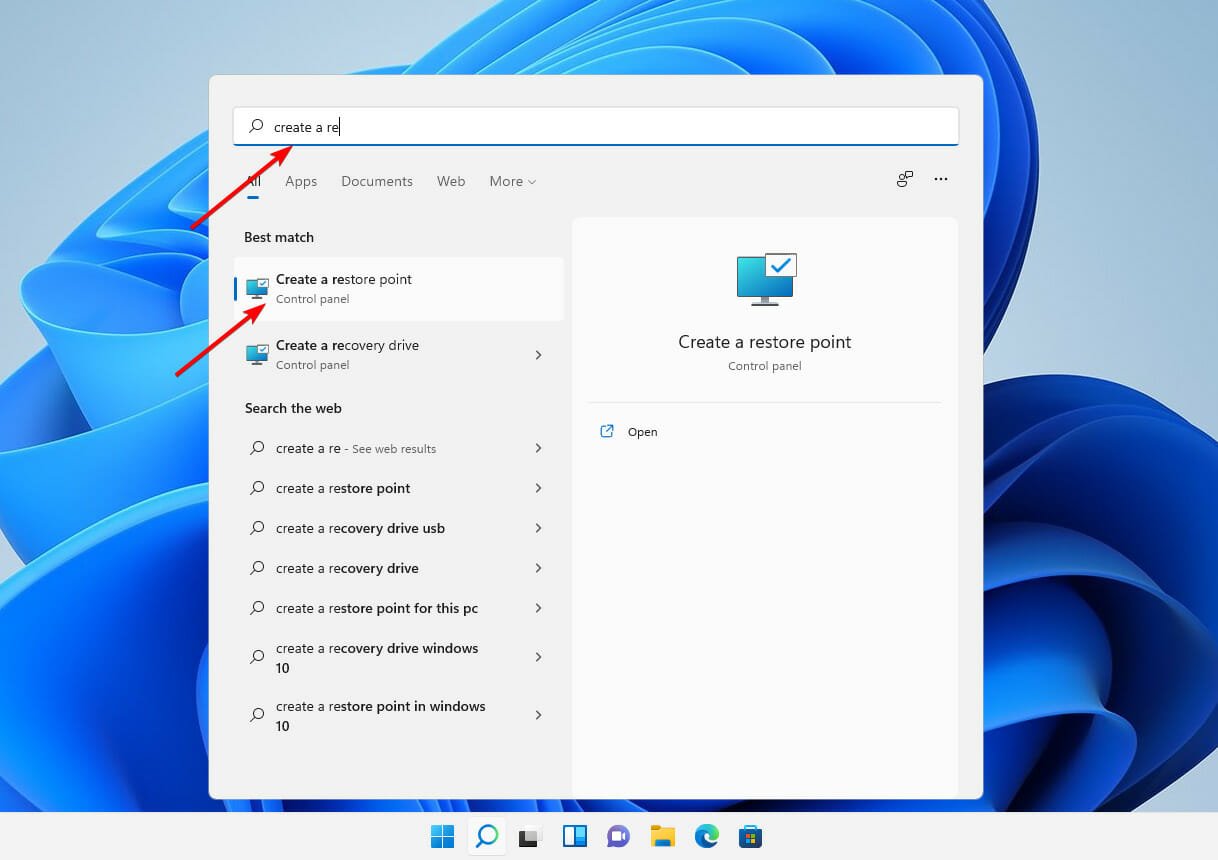
- Press on the Windows key + S, search for Create a restore point, and click on the relevant search result.

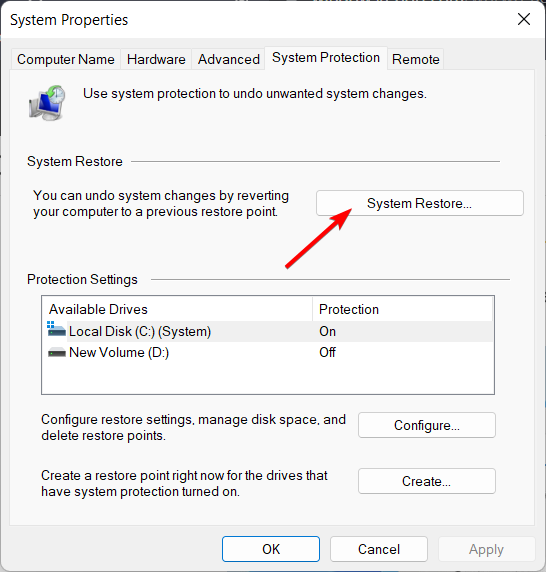
- The System Protection tab will automatically open. Click on System Restore under it.

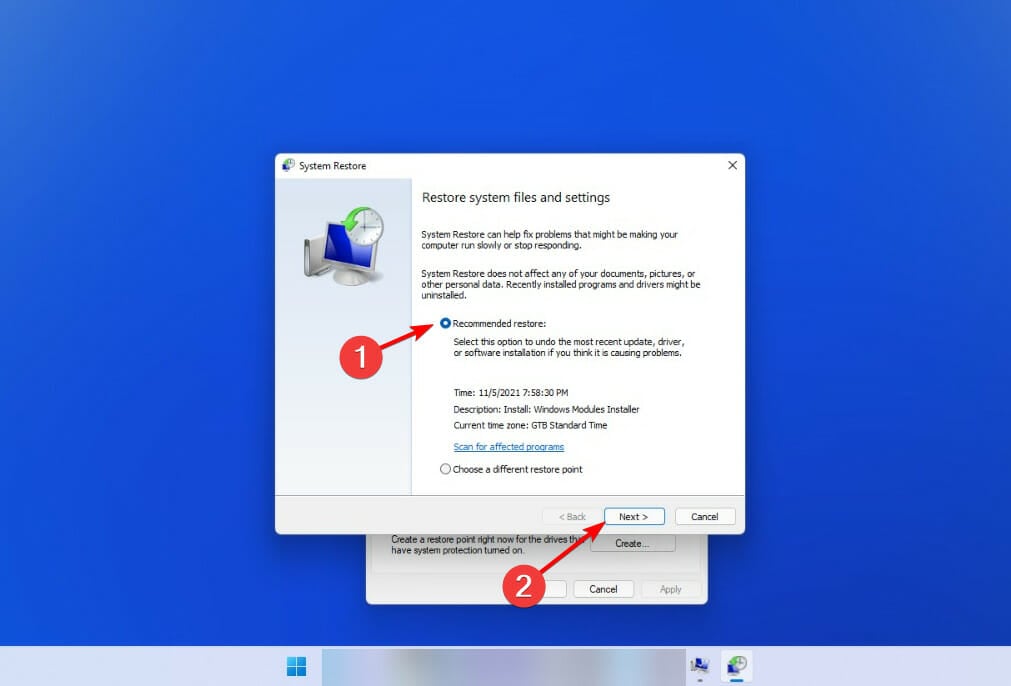
- The Recommended restore point will be selected by default, but you can select another one by clicking on the Choose a different restore point option. After this, click on Next at the bottom.

- If everything looks fine, click on Finish at the bottom.
After your system has been successfully restored, the Realtek audio problem will be immediately repaired by the operating system. In case you don’t have a restore point created, check our guide on how to create a restore point in Windows 11.
8. Update Windows
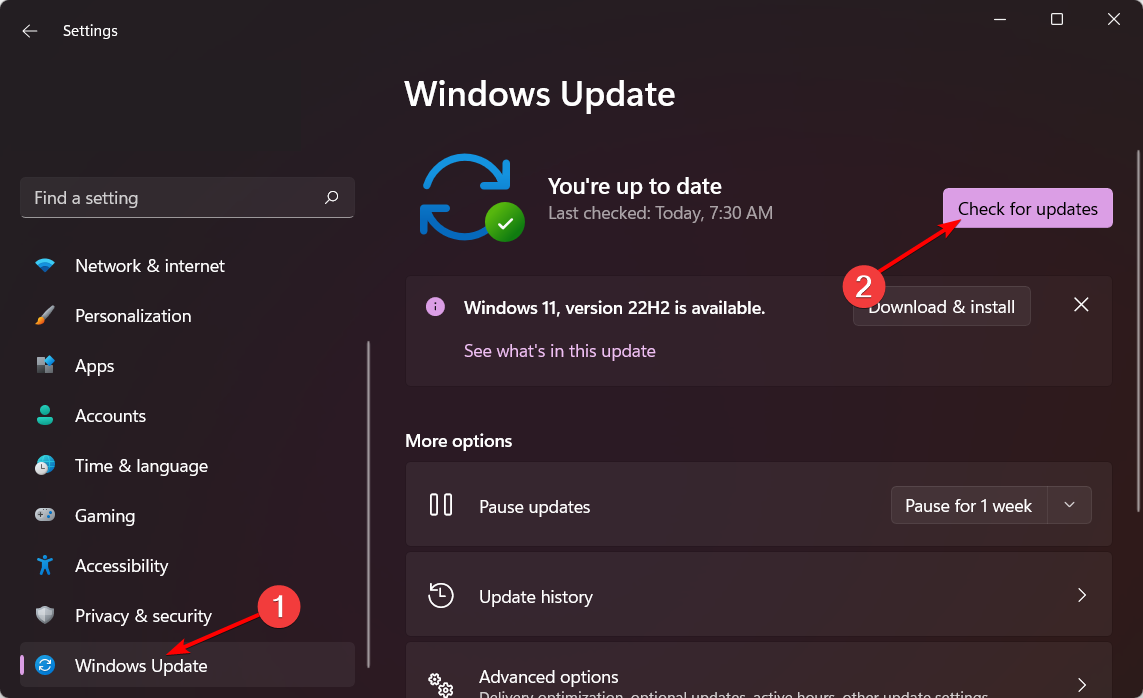
- Press Windows + I to open the Settings app. Click the Windows Update section then click Check for updates on the right.

- Reboot your PC afterward. The Realtek audio driver not working in Windows 11 issue will be fixed.
What to do if there’s no sound at all?
If you notice your sound has been missing altogether after installing Windows 11, you might want to check in with Microsoft’s help center.
The help service will offer you more actions to take in order to solve the sound issues at hand. To talk with its support team, click the Get support link on the Contact Microsoft Support page. Thereafter, click the Contact Support button after entering a description.
We hope that these methods were helpful in resolving your Realtek HD Audio Driver issues. Let us know what you think in the comment section below, and which solution worked best for you!
![]()
Equalizer APO is a system-wide graphical equalizer for Windows users which has been popular in almost all Windows iterations. Offering an array of incredible features, it become a significant resource for Windows users in their pursuit of a rich audio experience. However, some customers have reported that Equalizer APO does not perform as planned when they switched to Windows 11.
The tool does not improve the sound quality, fails to launch, or even crashes abruptly. In case you are also experiencing roadblocks in utilizing the features of this exceptional tool, don’t worry! You can easily resolve the issues with Equalizer APO on Windows 11 to restore the control of your audio and utilize the full capacity of your sound system.
Implement the various troubleshooting techniques in an attempt to fix the Equalizer APO not working in Windows 11 issue.
1. Install the Equalizer APO as SFX/EFX
To optimize the settings of Equalizer APO for your audio device on Windows 11, you can make adjustments to the APO (Audio Processing Object) setting. By default, Equalizer APO uses LFX/GFX, but for Windows 11, it is recommended to switch to SFX/EFX.
SFX/EFX serves as a signaling mechanism between Equalizer APO and your audio device, instructing it on how to apply the audio modifications. Selecting the correct APO is crucial because if the wrong one is chosen, your device won’t recognize the audio changes made through Equalizer APO. Here are the steps to select SFX/EFX APO:
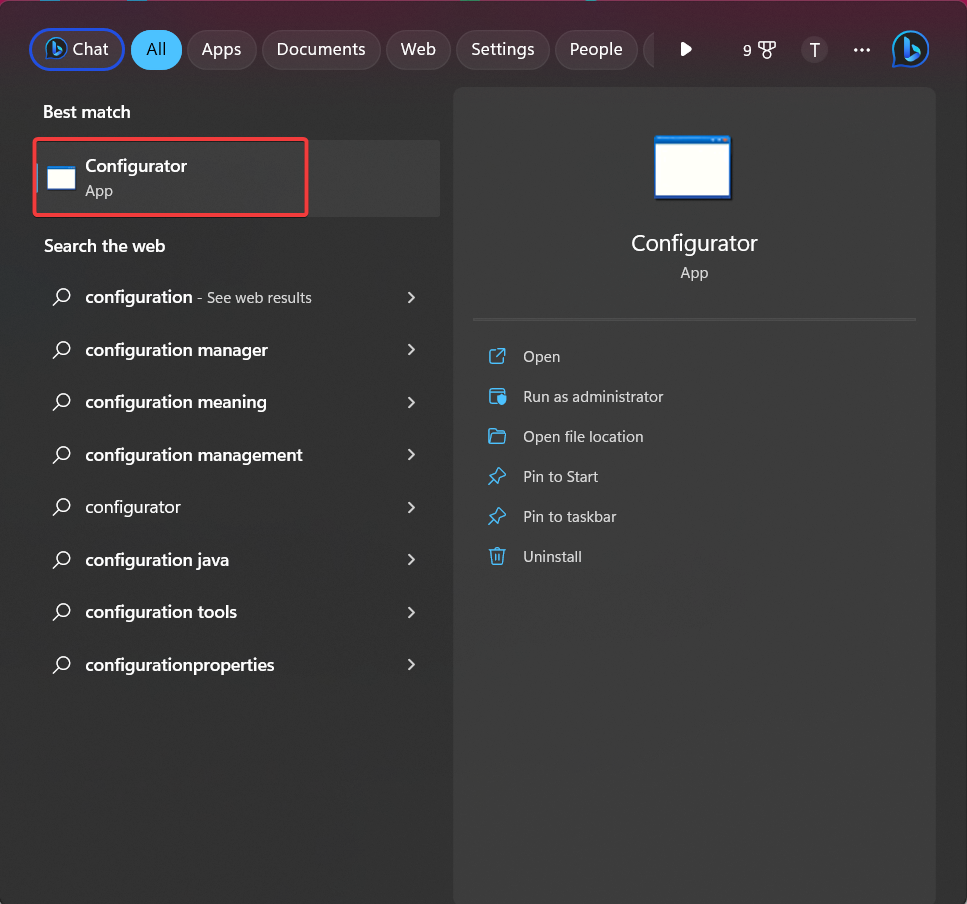
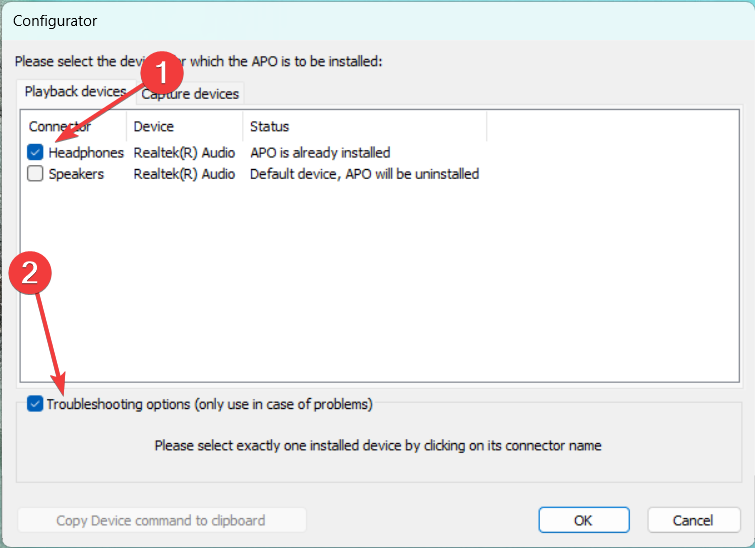
1. Click the Start button, type Configurator, and select the corresponding app.
2. Alternatively, navigate to C:\Program Files\EqualizerAPO and open Configurator.exe.
3. Once the Configurator is open, locate and select your audio device and checkmark the box next to Troubleshooting Options.
4. Click on the drop-down menu that currently displays Install as LFX/GFX and select Install as SFX/EFX (experimental) from that menu.
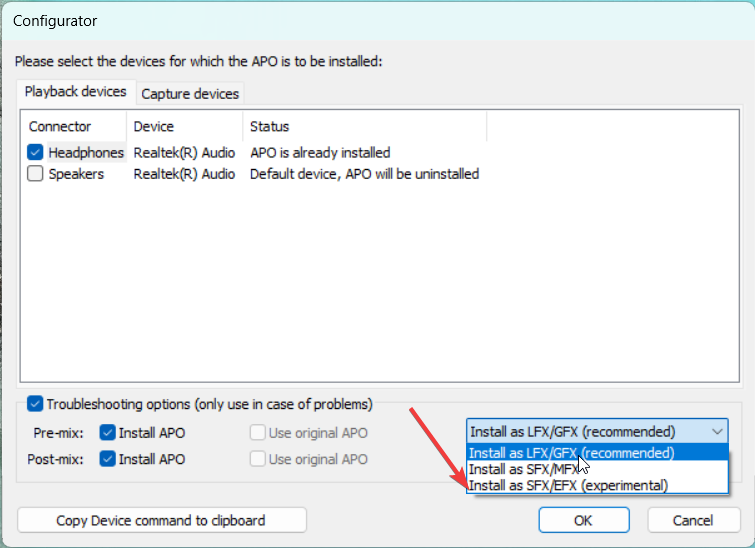
5. Click OK. Restart your computer to apply the changes.
After your system reboots, verify if the audio configurations are now effective.
2. Check Antivirus Settings
If you are unable to open the Equalizer APO Configuration Editor (Editor.exe) or Configurator (Configurator.exe), there is a possibility that the antivirus has blocked the .exe considering it to be a threat. To resolve this issue, you can exclude Equalizer APO from Windows Defender by following these steps:
1. Press the Windows key, type Windows Security in the search bar, and choose the relevant search result.

2. Go to Windows Security and choose Virus & threat protection.
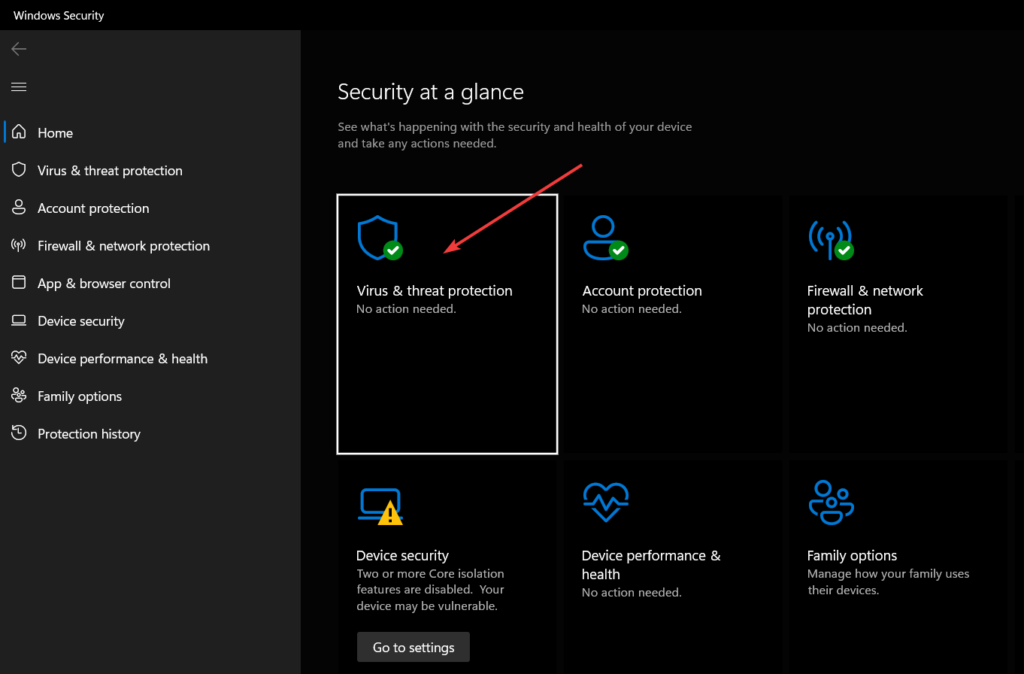
3. Choose the Manage Settings option located under Virus & threat protection settings.
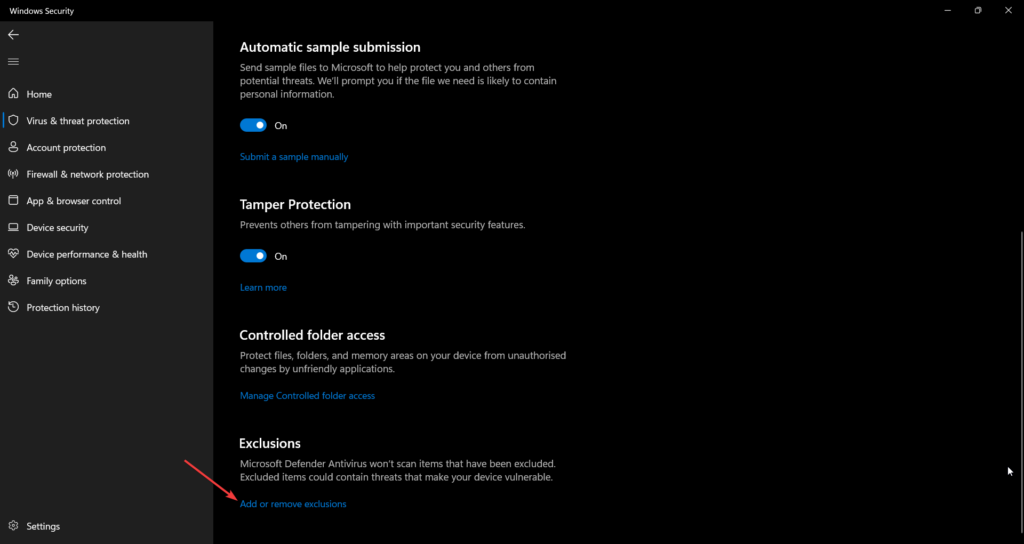
4. Scroll down and select Add or remove exclusions located under the Exclusions section.
5. Click Add an exclusion and select Folder.
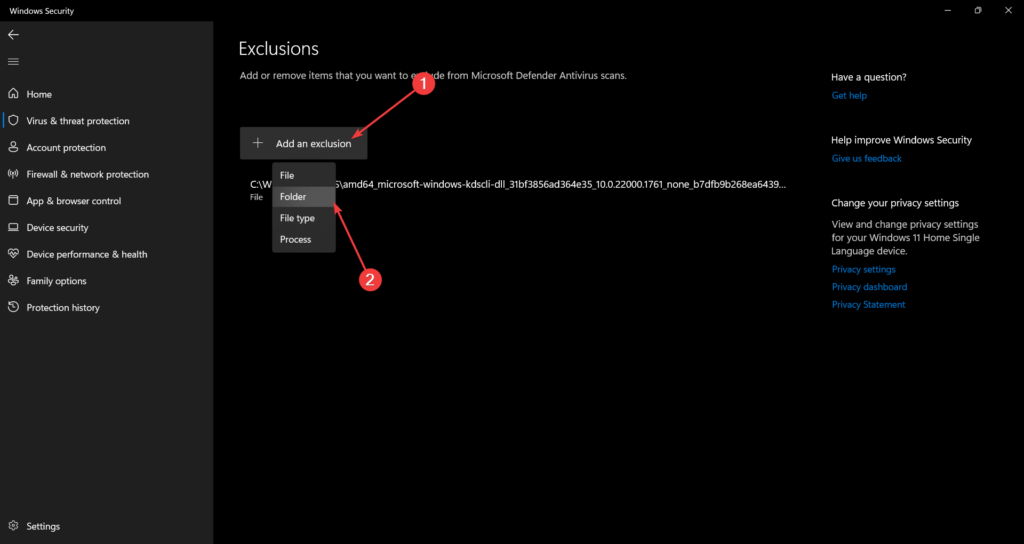
6. Locate and choose the Equalizer APO installation folder.
Please note that the process of excluding a program or folder from antivirus software can vary depending on the specific security program you are using.
3. Enable Sound System Enhancements
To ensure that Equalizer APO can successfully apply audio enhancements features to your audio device, you must ensure the enhancements feature is enabled in the Windows system settings. Follow the steps below to verify it:
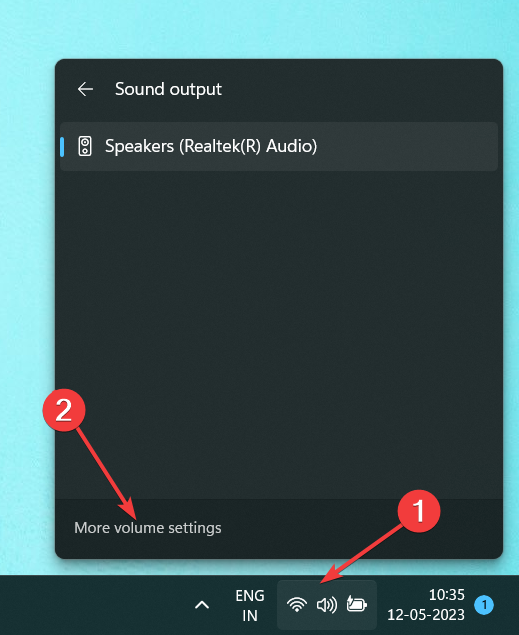
1. Expand the audio icon on the Action tray and select More volume settings.
2. In the Playback tab of the Windows sound settings, right-click your audio device and select Properties from the context menu.
3. Navigate to the Advanced tab of the Properties window. Here, you need to make sure that the Enable audio enhancements checkbox is selected.
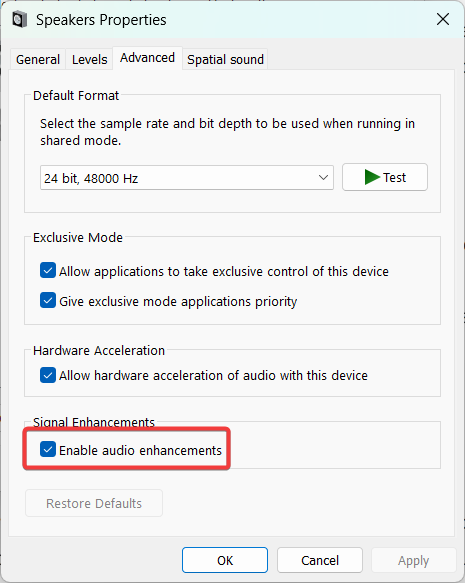
4. After making the changes, click the Apply button followed by OK.
In some cases, users may need help finding the Enhancements tab in their audio device’s properties. This could be due to their sound card not supporting enhancements or a software bug. You need to update Windows and your audio drivers to the most recent versions.
4. Start the Audio Services
Equalizer APO will not function if the Windows Services related to the system audio are paused or have encountered a problem. You should try enabling the audio service from the Windows Services window to eliminate it. Here are the steps:
1. Open the Run dialog box, by using the Windows key + R shortcut, type services.msc, and press the Enter key.
2. Locate the Windows Audio service in the Services window and double-click it to access the Properties window.
3. In the General tab of the properties window, select Automatic in the drop-down menu next to Startup type.
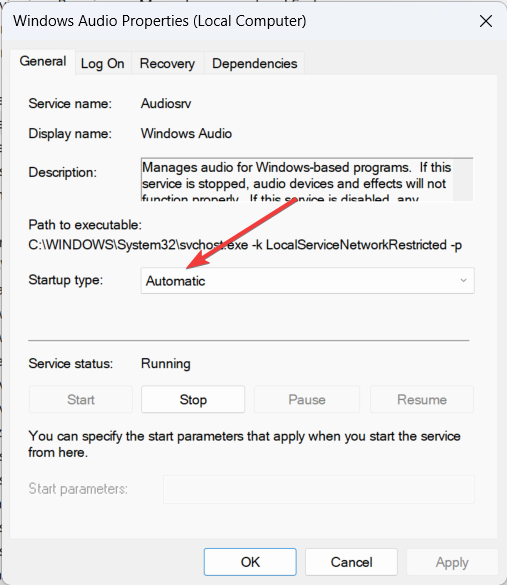
4. Press OK to save the settings. Your PC should be restarted to ensure the modifications take effect.
5. Disable Hardware Acceleration of Audio
Hardware acceleration for audio devices can sometimes interfere with Equalizer APO’s ability to detect and apply sound changes. You can try turning off hardware acceleration for your sound card by doing the following to see if this is the case. Here is the step-by-step process for the same.
1. Expand the audio icon on the Action tray and select More Volume Settings.
2. Switch to the Playback tab, right-click your sound device, and select Properties.

3. Navigate to the Advanced tab and uncheck the Allow hardware acceleration of audio with this device option.
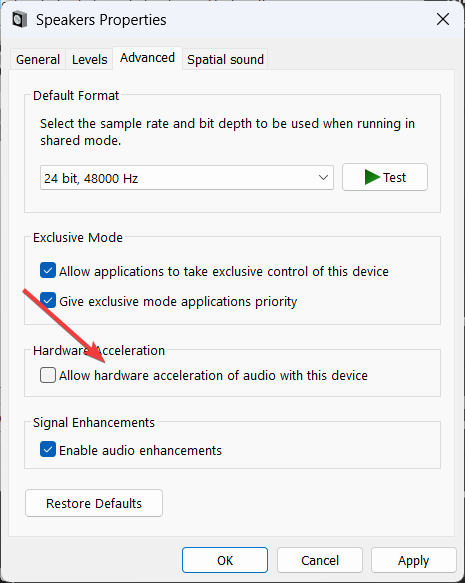
4. Save the changes and restart your laptop or PC.
After the restart, test if Equalizer APO can detect and apply the desired sound changes effectively.
6. Update Your Realtek Audio Drivers
Outdated drivers that haven’t been updated since the initial Windows installation can encounter compatibility issues, and they may become corrupted over time. If you are experiencing issues with Equalizer APO on Windows 11 for Realtek or any other audio device, updating the audio driver might successfully resolve the problem. Here’s how you can update the audio driver:
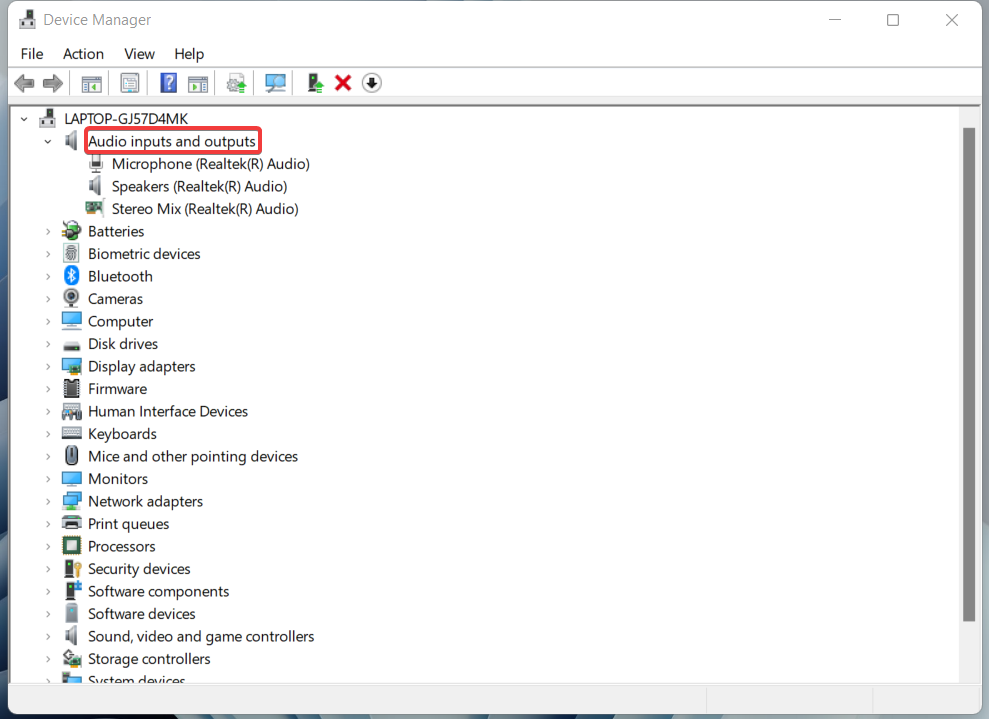
1. Click the Start button, type Device Manager, and select it from the results list.
2. In the Device Manager window, double-click the Audio inputs and outputs category.

3. Right-click on your audio device and select the Update driver.
4. The driver update wizard will open up. Choose Search automatically for the drivers option here.
The system will look for available updates. If an update is discovered, it will be installed as the most up-to-date driver for your audio device. If there is no available update, a notice will appear indicating that the best drivers for your device are already installed.
7. Reset All Global Preferences
If Equalizer APO is not working or fails to launch in Windows 11 due to misconfigured settings, you can try resetting the program to resolve the issue. Resetting Equalizer APO will remove all saved configurations and audio settings.
It is recommended to back up your configuration files before proceeding to avoid messing up your system. Here’s how you can reset Equalizer APO on Windows 11 PC.
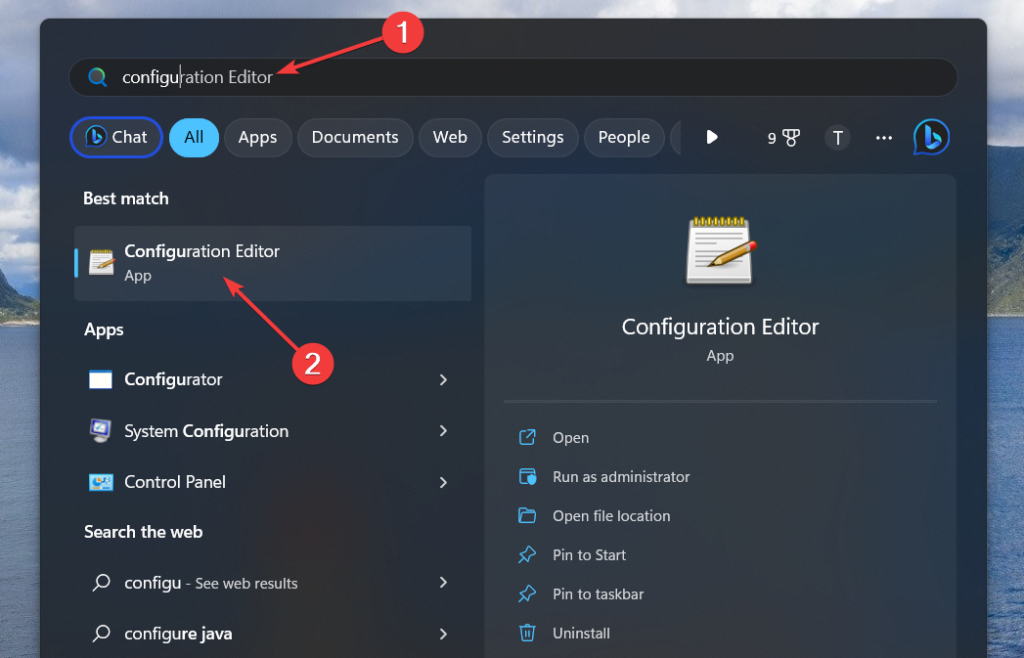
1. Launch the Start menu, search for Configuration Editor, and select the relevant search result.
2. In the Configuration Editor, press the Settings option in the menu bar and choose Reset all global preferences option.
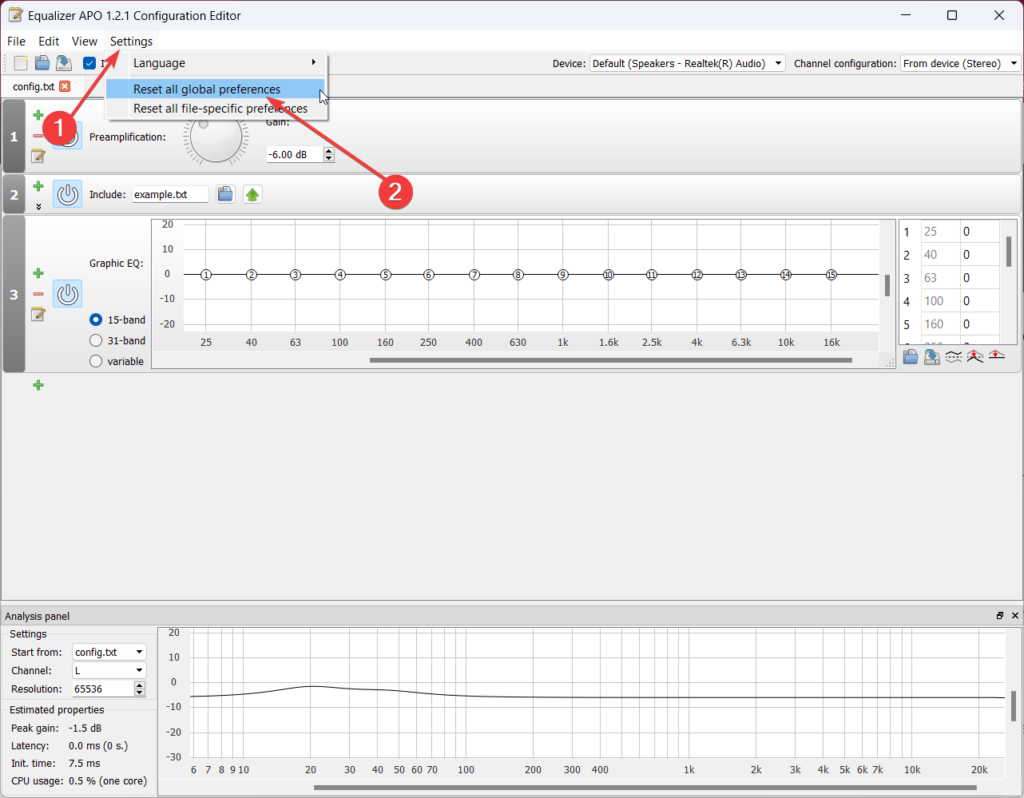
3. Confirm the action by clicking Yes and restart your computer to apply the changes.
8. Change Advanced Playback Properties
To address the Equalizer APO on Windows 11 PC, it is recommended to adjust the advanced playback settings of your audio device in the Windows sound settings. If you are not sure how to do it, follow the steps below:
1. Once again, expand the Action tray on the bottom right, click the Audio icon, and select More Volume Settings.

2. Navigate to the Playback tab in the Sound window, right-click your preferred audio device, and select Properties.

3. Next, switch to the Advanced tab, and under the Exclusive Mode section, uncheck the two checkboxes related to the exclusive control of the device. In case, they were already unchecked, checkmark them.
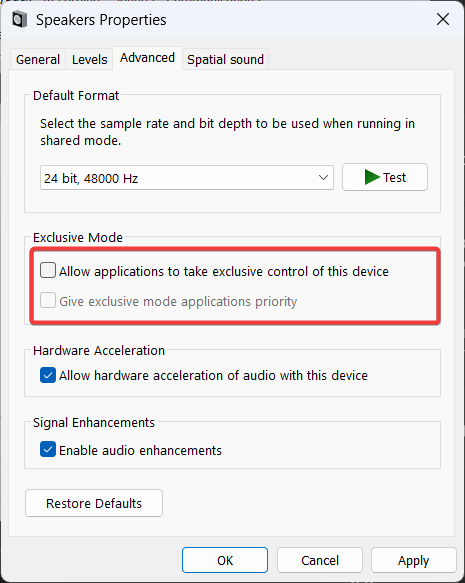
4. Click Apply and save the changes on the audio device properties window.
5. Next, click Apply and OK again on the Sound window to apply system-wide settings.
9. Reinstall Your Audio Devices on Windows
If updating the audio driver could not fix the problem with Equalizer APO on Windows 11, you should try to reinstall the audio devices on your Windows PC and see if it does the trick. Here’s a step-by-step to implement the solution.
1. Click the Start button, put device manager into the search field, and select the appropriate search result.

2. Locate and double-click on Audio Inputs and Outputs in the Device Manager window.
3. Right-click on the audio device and choose the Uninstall device option.
4. There might be a confirmation request. Press Uninstall button to uninstall the app from Windows 11.
5. After this, click on the computer symbol with a magnifying glass on the menu bar of the Device Manager.
This will start a check for hardware modifications. Windows will automatically detect the audio device and reinstall it. You should see the audio device reappear in the list.
10. Allow Equalizer APO Through Firewall
Firewalls are designed to block unauthorized or unknown programs from accessing the internet, ensuring the security of your PC. While Equalizer APO typically doesn’t require internet access for its main operation of configuring your computer’s audio, it’s still worth checking if the Firewall is blocking it.
Here’s how you can allow Equalizer APO through Windows Firewall:
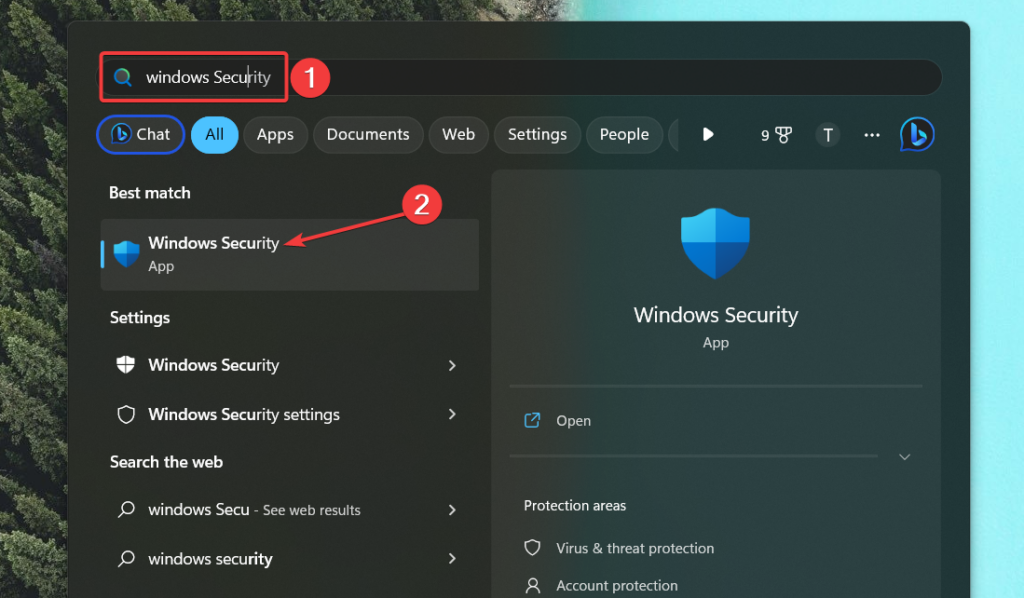
1. Press the Windows key and search for Windows Security in the start menu.
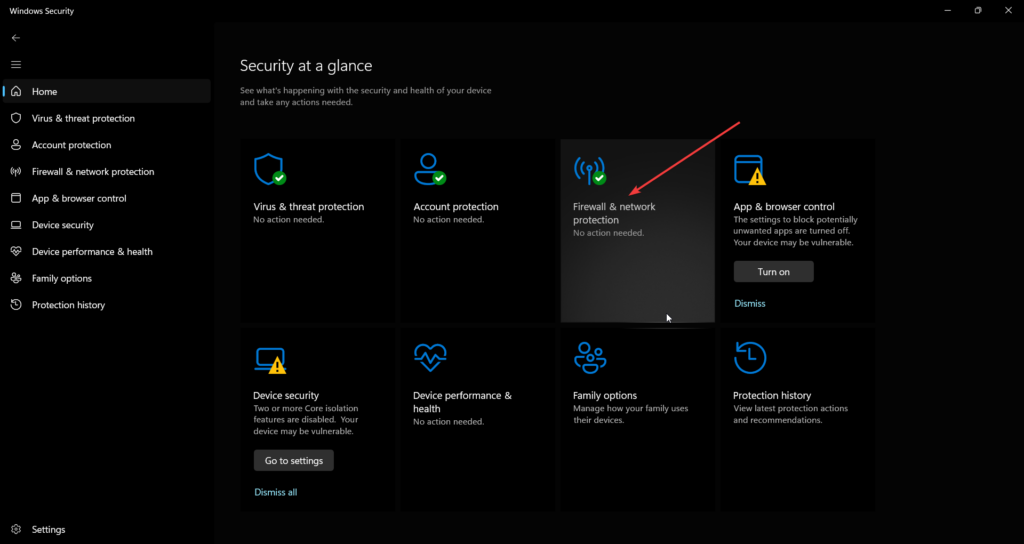
2. In Windows Security, select Firewall & network protection.
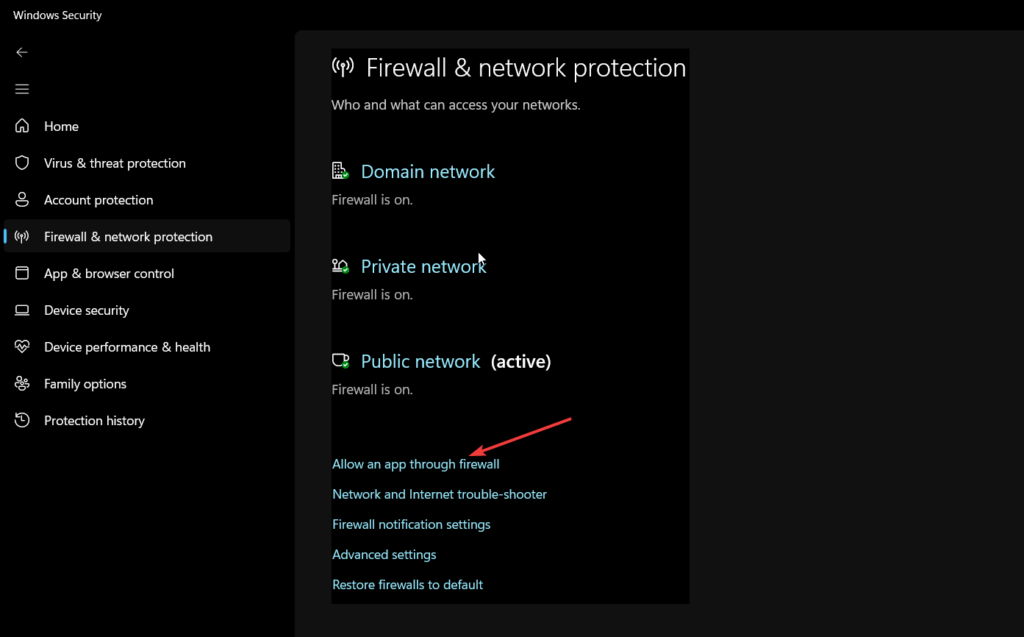
3. Choose Allow and App through Firewall option.
4. Click Change Settings and choose then Choose another app.
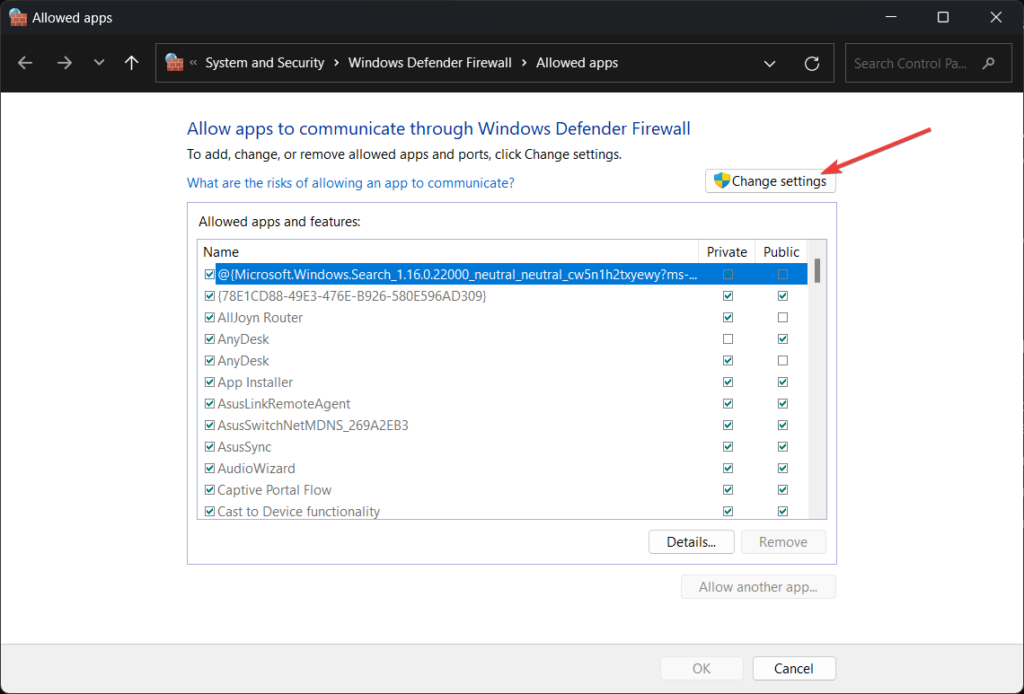
5. A small box appears where you can browse for a file. Navigate to the C:\Program Files\EqualizerAPO directory and select the Editor.exe file of Equalizer APO.
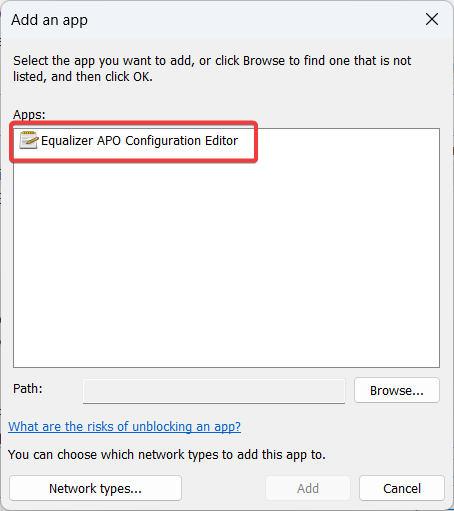
6. Ensure that it is check-marked and click OK.
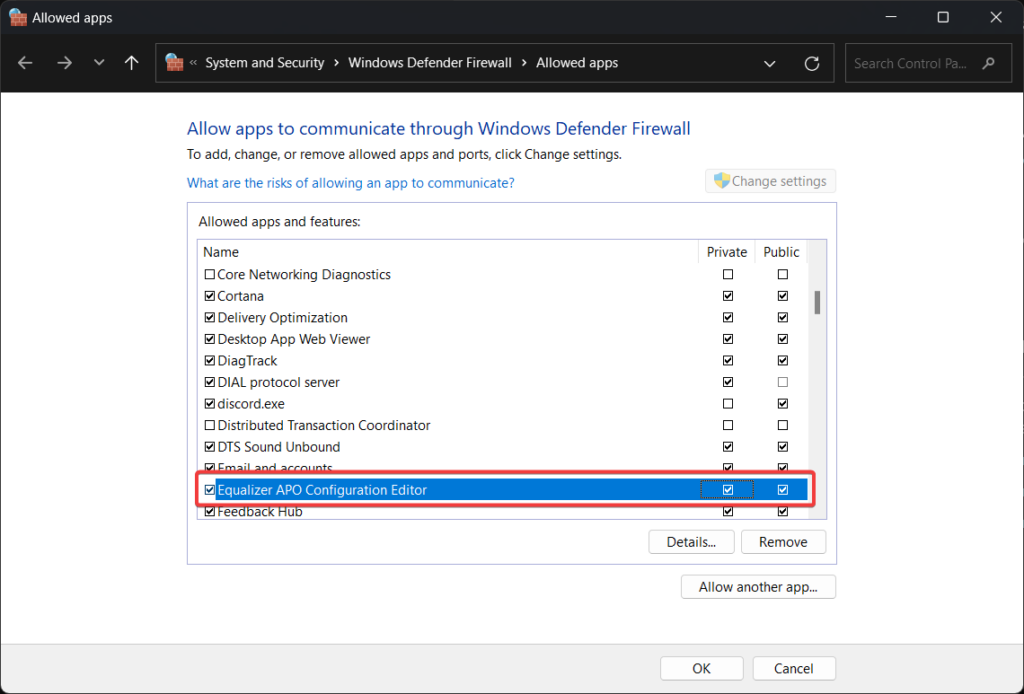
Repeat the same steps for the Configurator.exe file in the Equalizer APO folder.
11. Uninstall Equalizer APO and Reinstall it
If none of the methods listed here could resolve the issue at hand, it’s best to uninstall the Equalizer APO from Windows 11. After the app is successfully uninstalled, reinstall the app once again. This is the step-by-step process to perform this action.
1. Go to the Settings app using the Windows + I shortcut.
2. Choose Apps from the left panel menu in the Settings window followed by Installed apps from right section.

3. Locate Equalizer APO in the list of installed programs, click the ellipsis icon, and choose Uninstall.
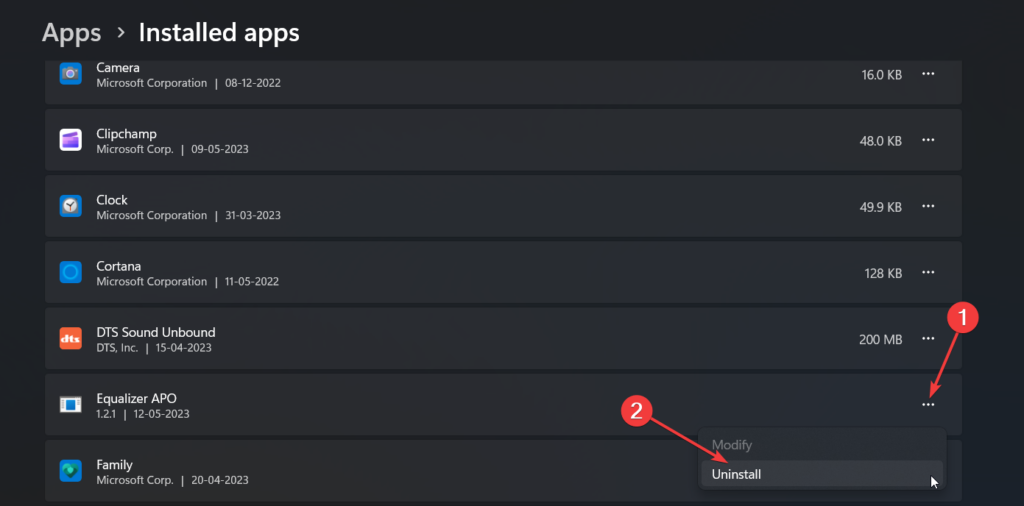
4. Now, visit the official Equalizer APO website or the trusted source from where you originally downloaded the program.
5. Download the latest version of Equalizer APO, compatible with Windows 11.
6. Once the download is finished, locate the downloaded installer file (typically in the Downloads folder) and double-click on it to begin the installation.
7. Restart your computer after reinstalling Equalizer APO to ensure the changes take effect.
After the installation, you may run Equalizer APO and configure it to your liking.
Conclusion
If you’ve followed all of these methods we’re sure that the issues with Equalizer APO on your computer will have been resolved successfully. As you can see, fixing Equalizer APO on Windows 11 involves some patience and troubleshooting, but with the appropriate techniques, you can do it.
by Loredana Harsana
Loredana is a passionate writer with a keen interest in PC software and technology. She started off writing about mobile phones back when Samsung Galaxy S II was… read more
Published on October 26, 2022
- Downloading the Realtek audio driver on your Windows 11 system helps boost the audio quality and enhances connectivity, along with various other benefits.
- Learn how to download the driver for HP, Dell, Lenovo, and ASUS devices.
- Also, find out how to fix issues with the Realtek audio driver in Windows 11.
Realtek audio drivers are a useful piece of software that helps enhance the sound output and improve the system’s connectivity with external audio devices. Owing to these benefits, you may want to download the Realtek audio driver in Windows 11.
But many are clueless as to how to get Realtek audio driver installed on their computer. And with Windows 11 still in the early stages, this is expected.
If you too had been trying to download and install the Realtek audio driver in Windows 11, read the following sections to find out how you can do that.
How does installing the Realtek audio driver help in Windows 11?
Drivers, as we know, are critical for the effective functioning of every piece of hardware connected to the PC. Be it keyboard, mouse, printer, or the graphics and sound card.
First, the Realtek audio driver is one of the most user-friendly options available out there. Apart from that, it delivers high-quality audio not just with the built-in speakers and microphones but also if you connect external ones.
And the best part, you are unlikely to encounter issues with the connectivity. On the contrary, the driver would actually help improve it. Also, with each driver update, you are likely to see better performance and patches for previously known bugs.
So, let’s now see how you can download the Realtek audio driver in Windows 11.
How can I install the Realtek audio driver in Windows 11?
To make things easier, we will take up individual manufacturers in the following sections, and you can directly head to the one that you are using.
Also, we will be manually searching for the driver. But, several manufacturers offer a tool to automatically detect the device and list out the available drivers for it and you can use it, if available.
1. Realtek audio driver for HP in Windows 11
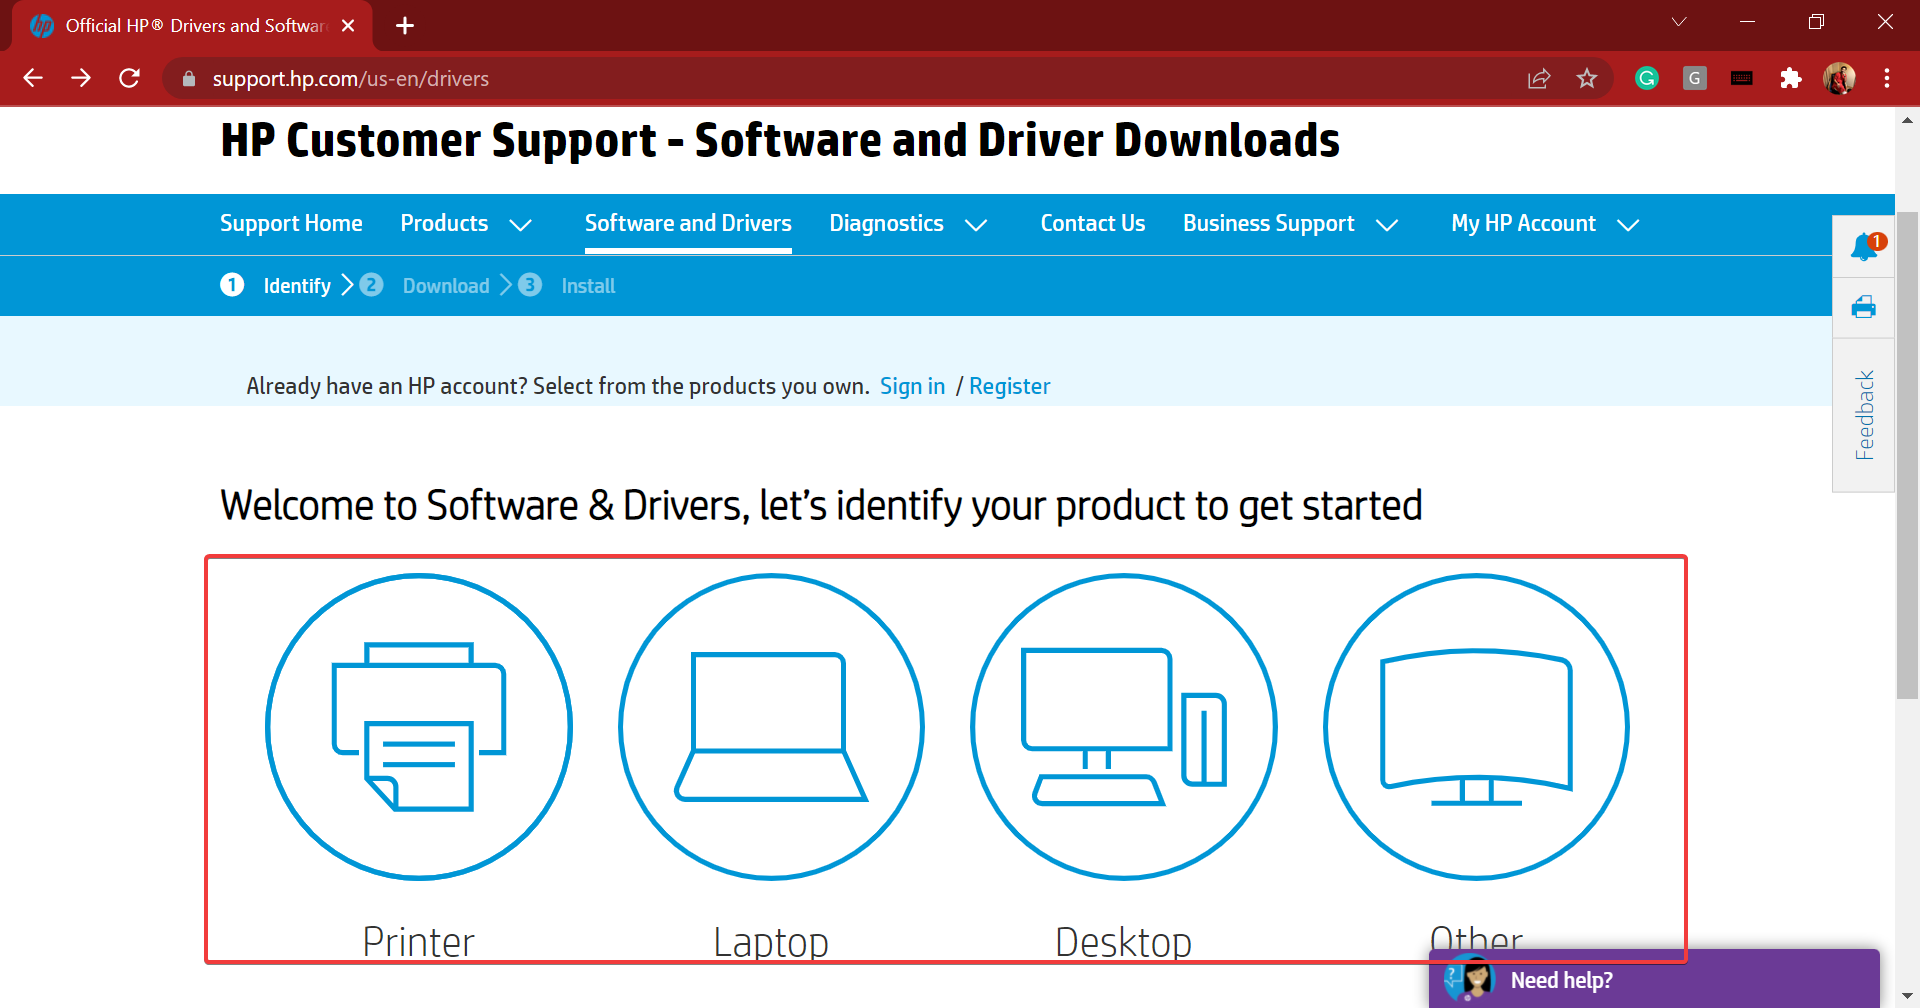
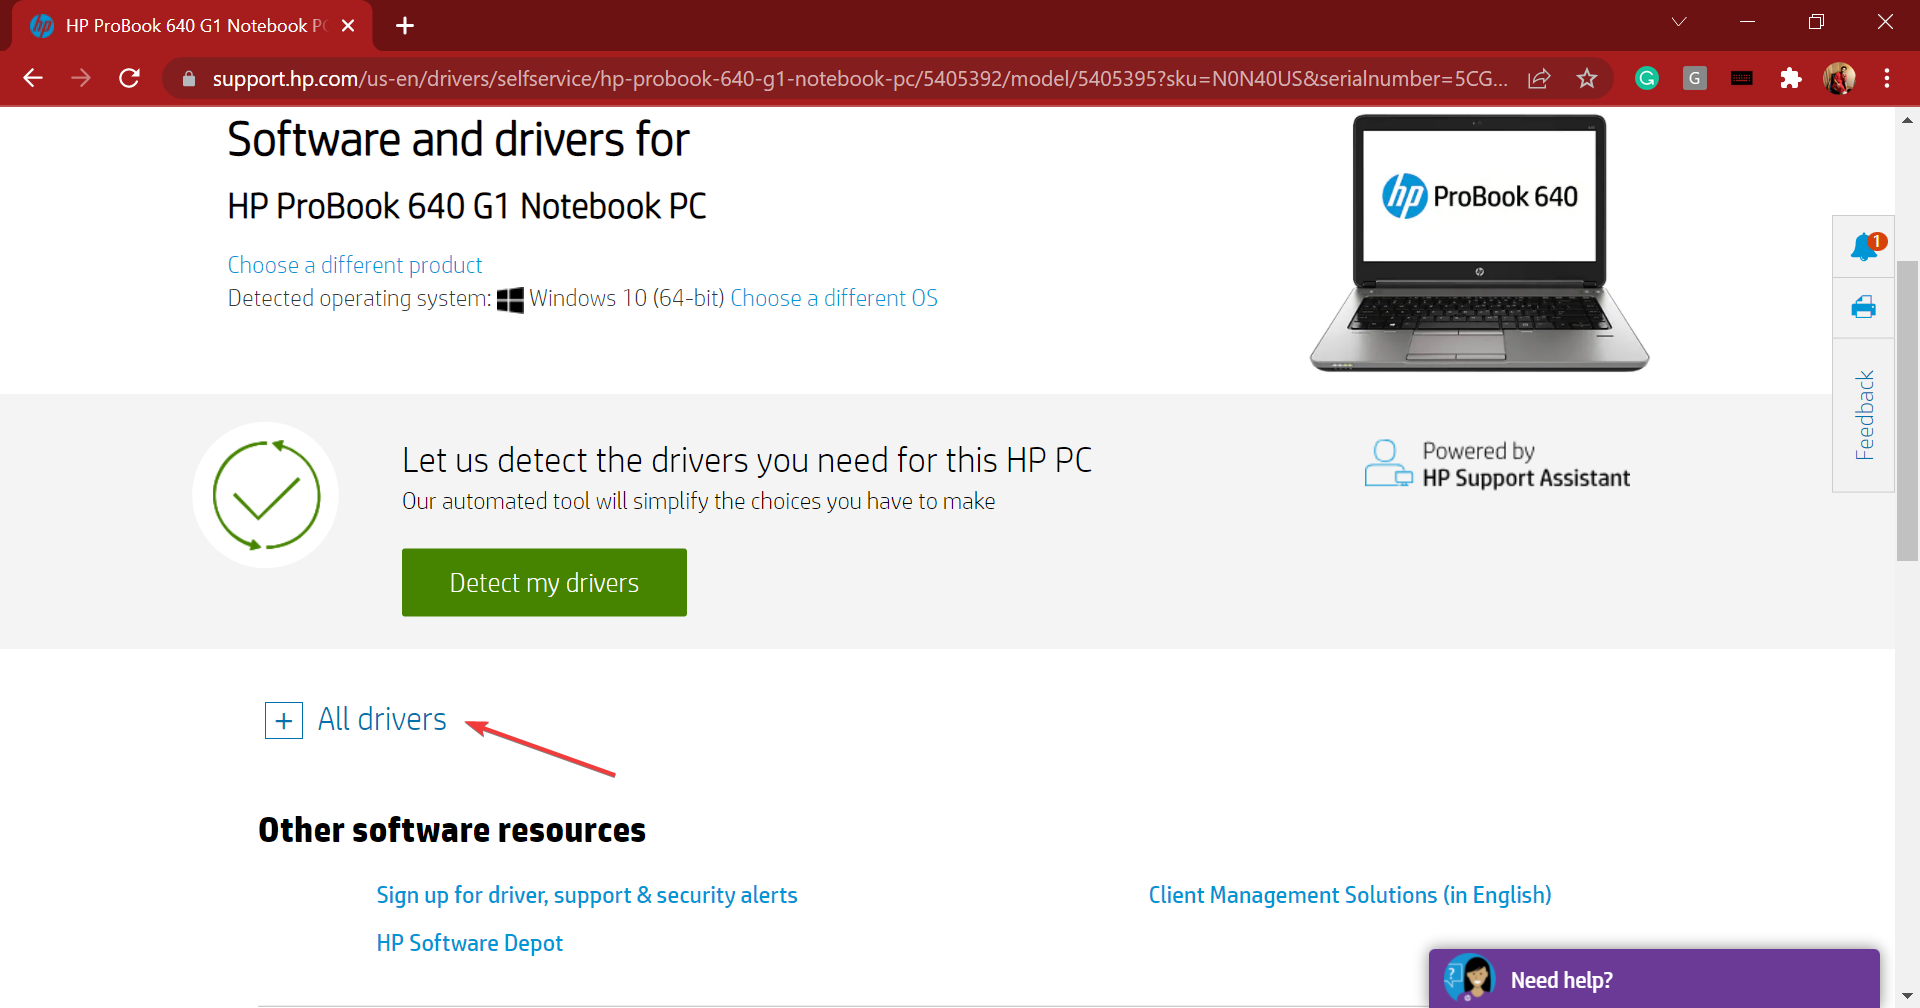
- Go to the driver section of HP’s official website, and select your device from the option listed here.

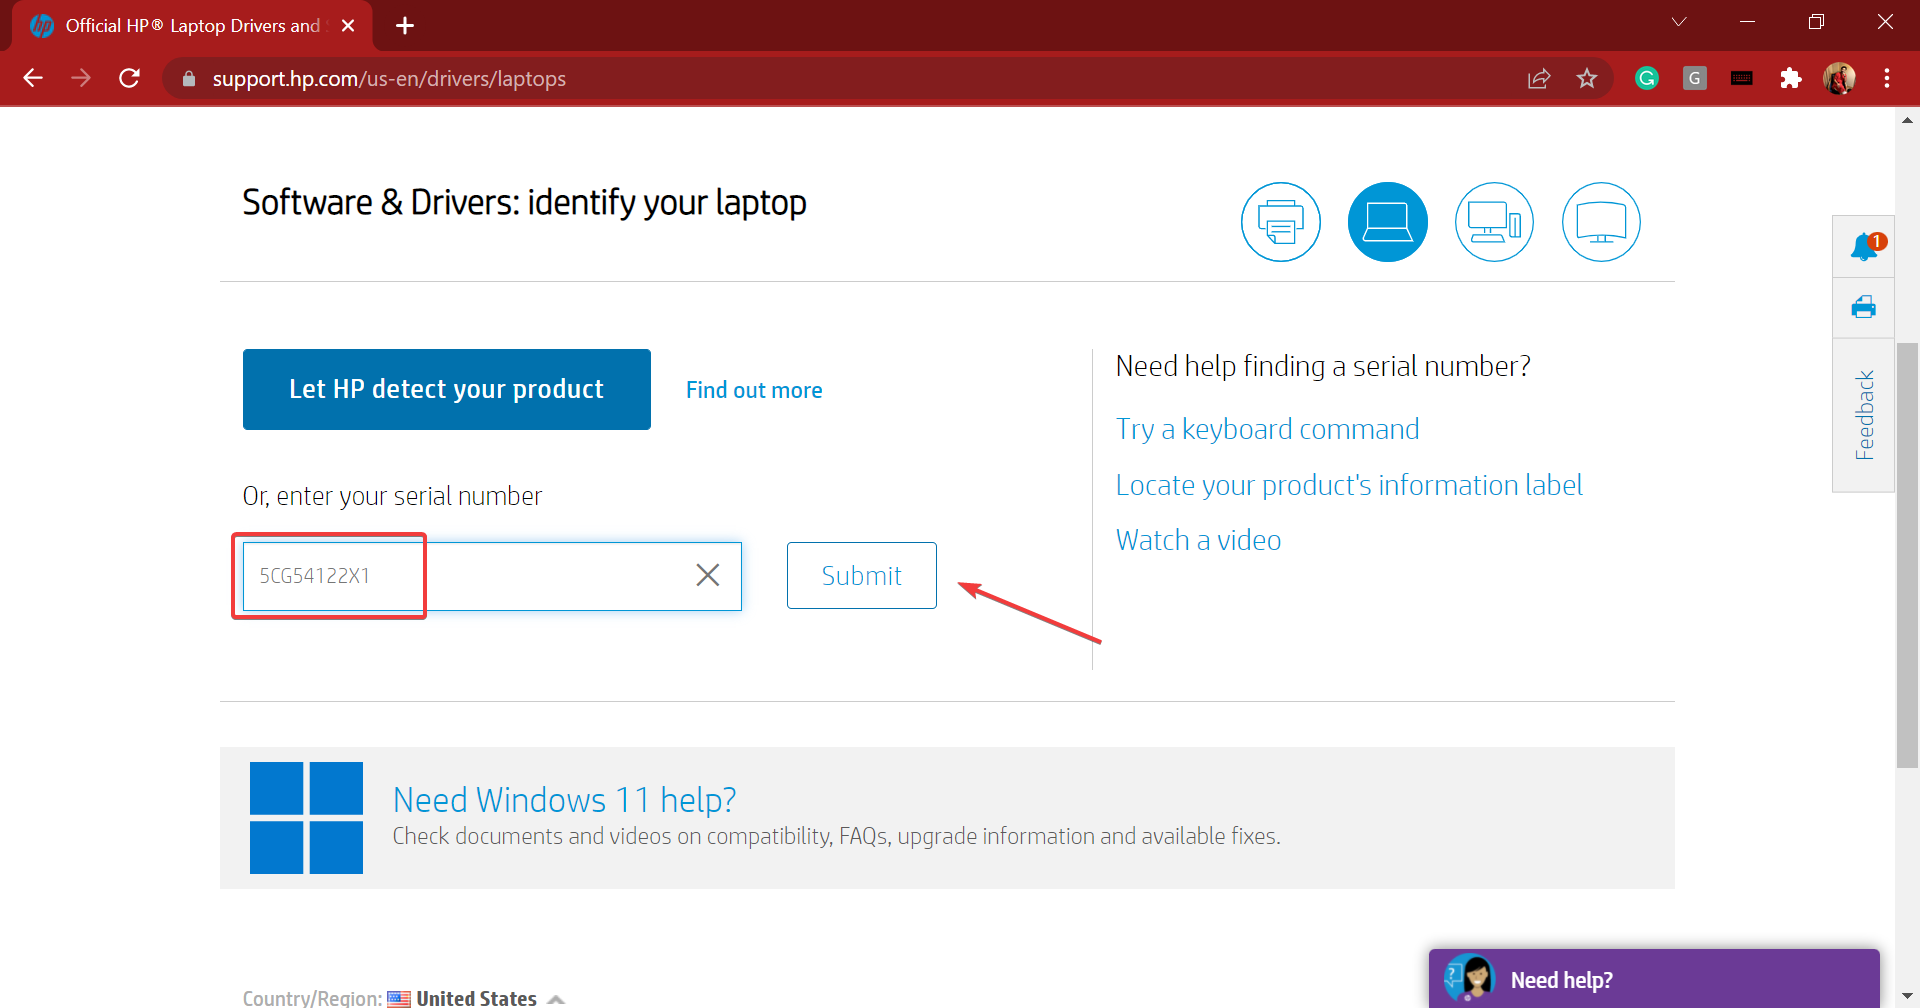
- Now, enter the product name or serial number in the provided text field, and click on the Submit button.
- Click on the All drivers entry to check out the various available ones. Also, make sure that the latest iteration is selected as the operating system. In case it isn’t, click on Choose a different OS and select Windows 11.
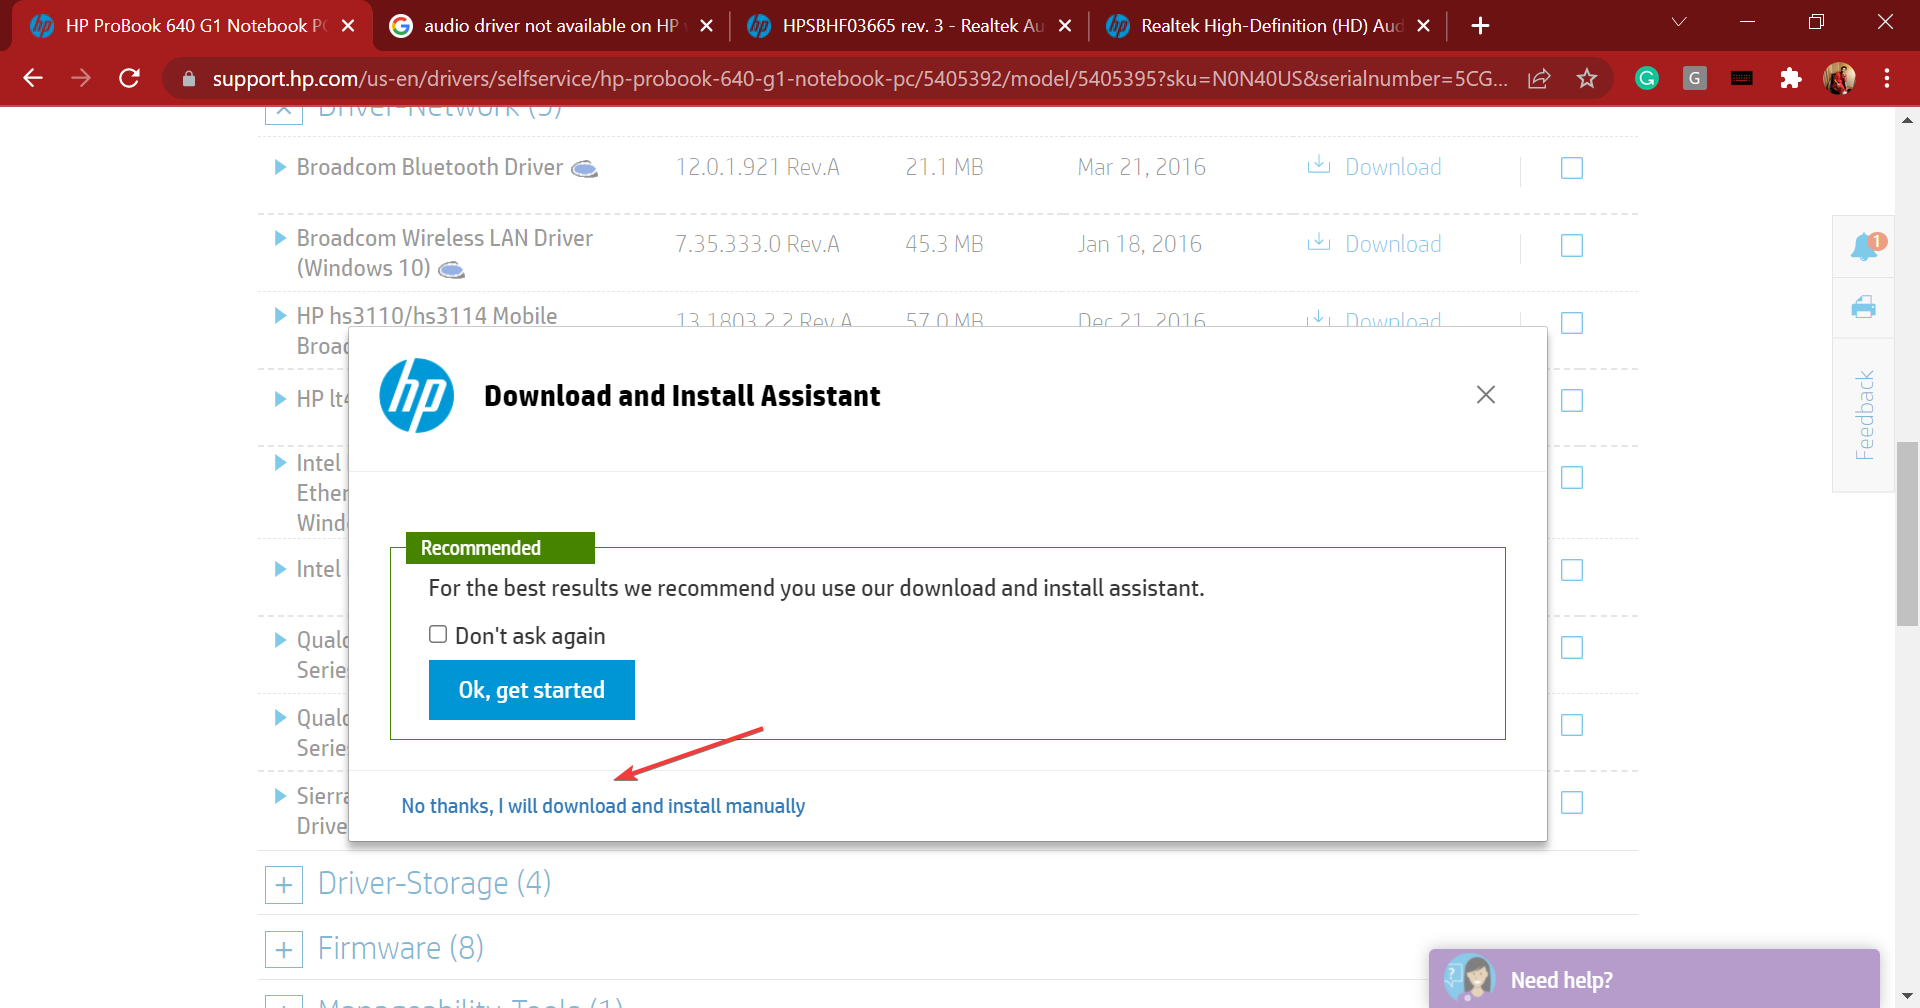
- Now, locate the Realtek audio driver, and click on the Download option next to it.
- You can now download the install assistant or click on No thanks, I will download and install manually. We choose the latter.
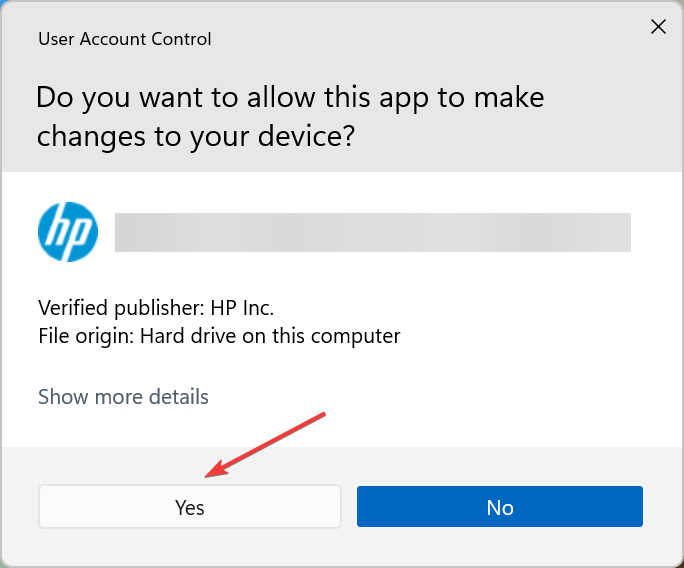
- Once the setup is downloaded, click on it to launch the installer.
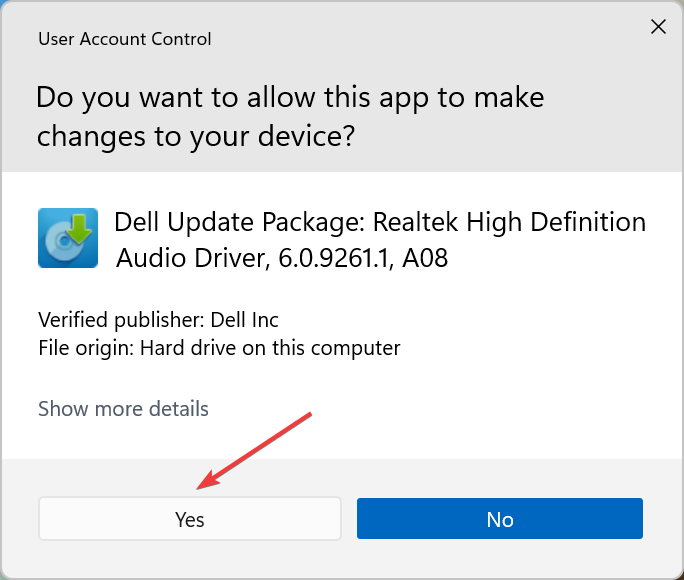
- Click Yes on the UAC (User Account Control) prompt that pops up.

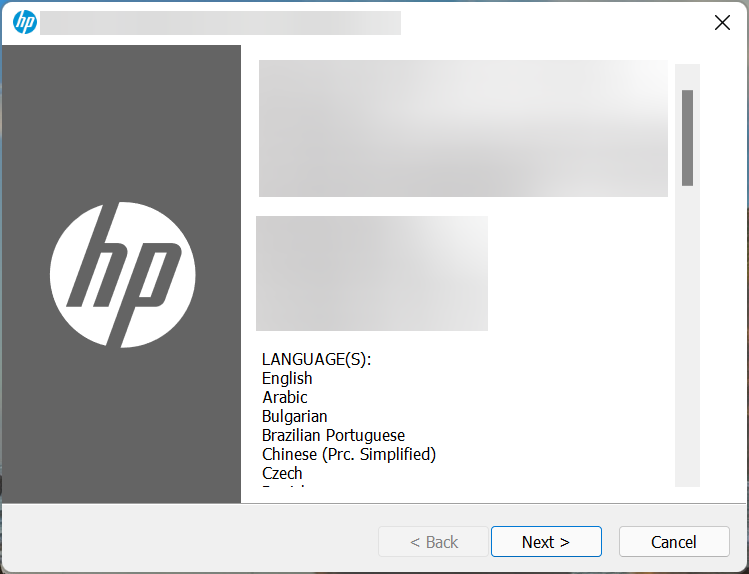
- Now, follow the on-screen instructions to complete the installation process, and restart the computer once it’s done for the changes to fully come into effect.


Once done with the steps listed here, you would have the Realtek audio driver downloaded and running in Windows 11.
Also, if you don’t want to go through the trouble of manually searching for the driver, use a reliable third-party app. We recommend using DriverFix, a dedicated tool that will automatically download and update the relevant drivers on your system.
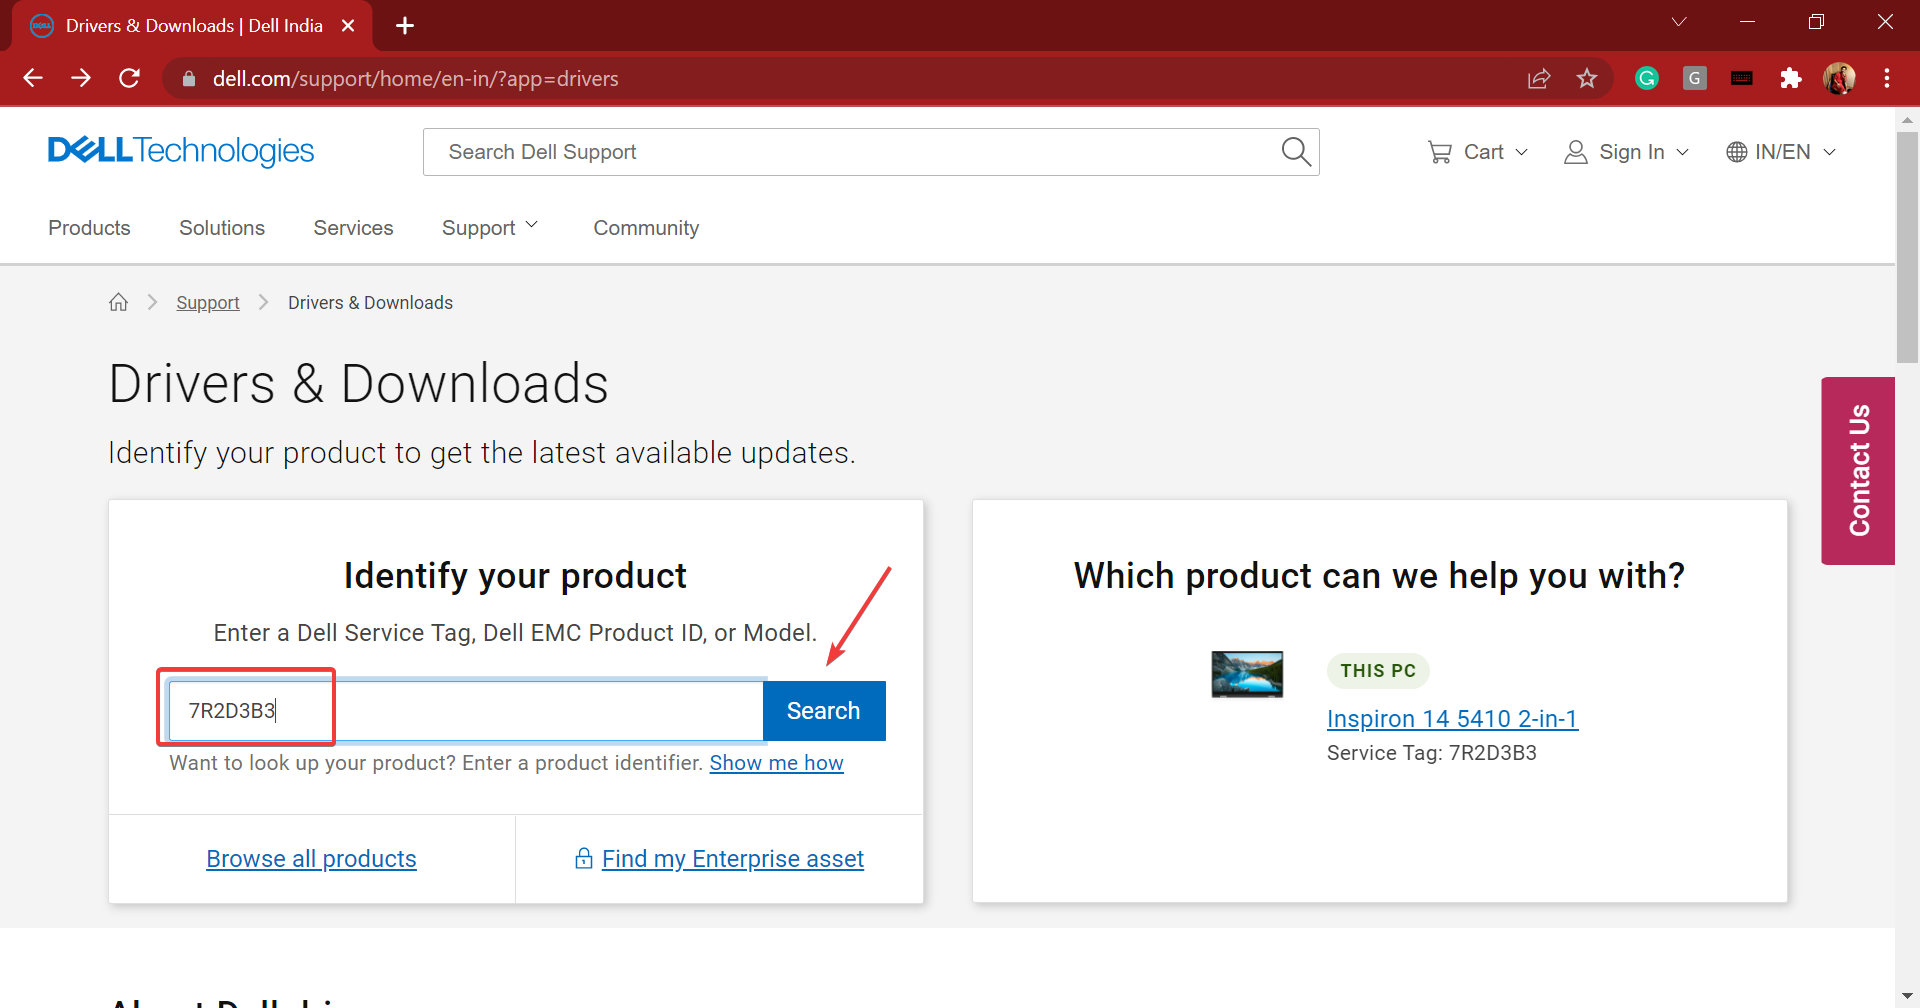
2. Realtek audio driver for Dell in Windows 11
- Go to the driver dowloads section on Dell’s website, enter a product identifier in the designated text field, and click on Search.
- Now, click on the Find drivers option to manually search for the Realtek audio driver.
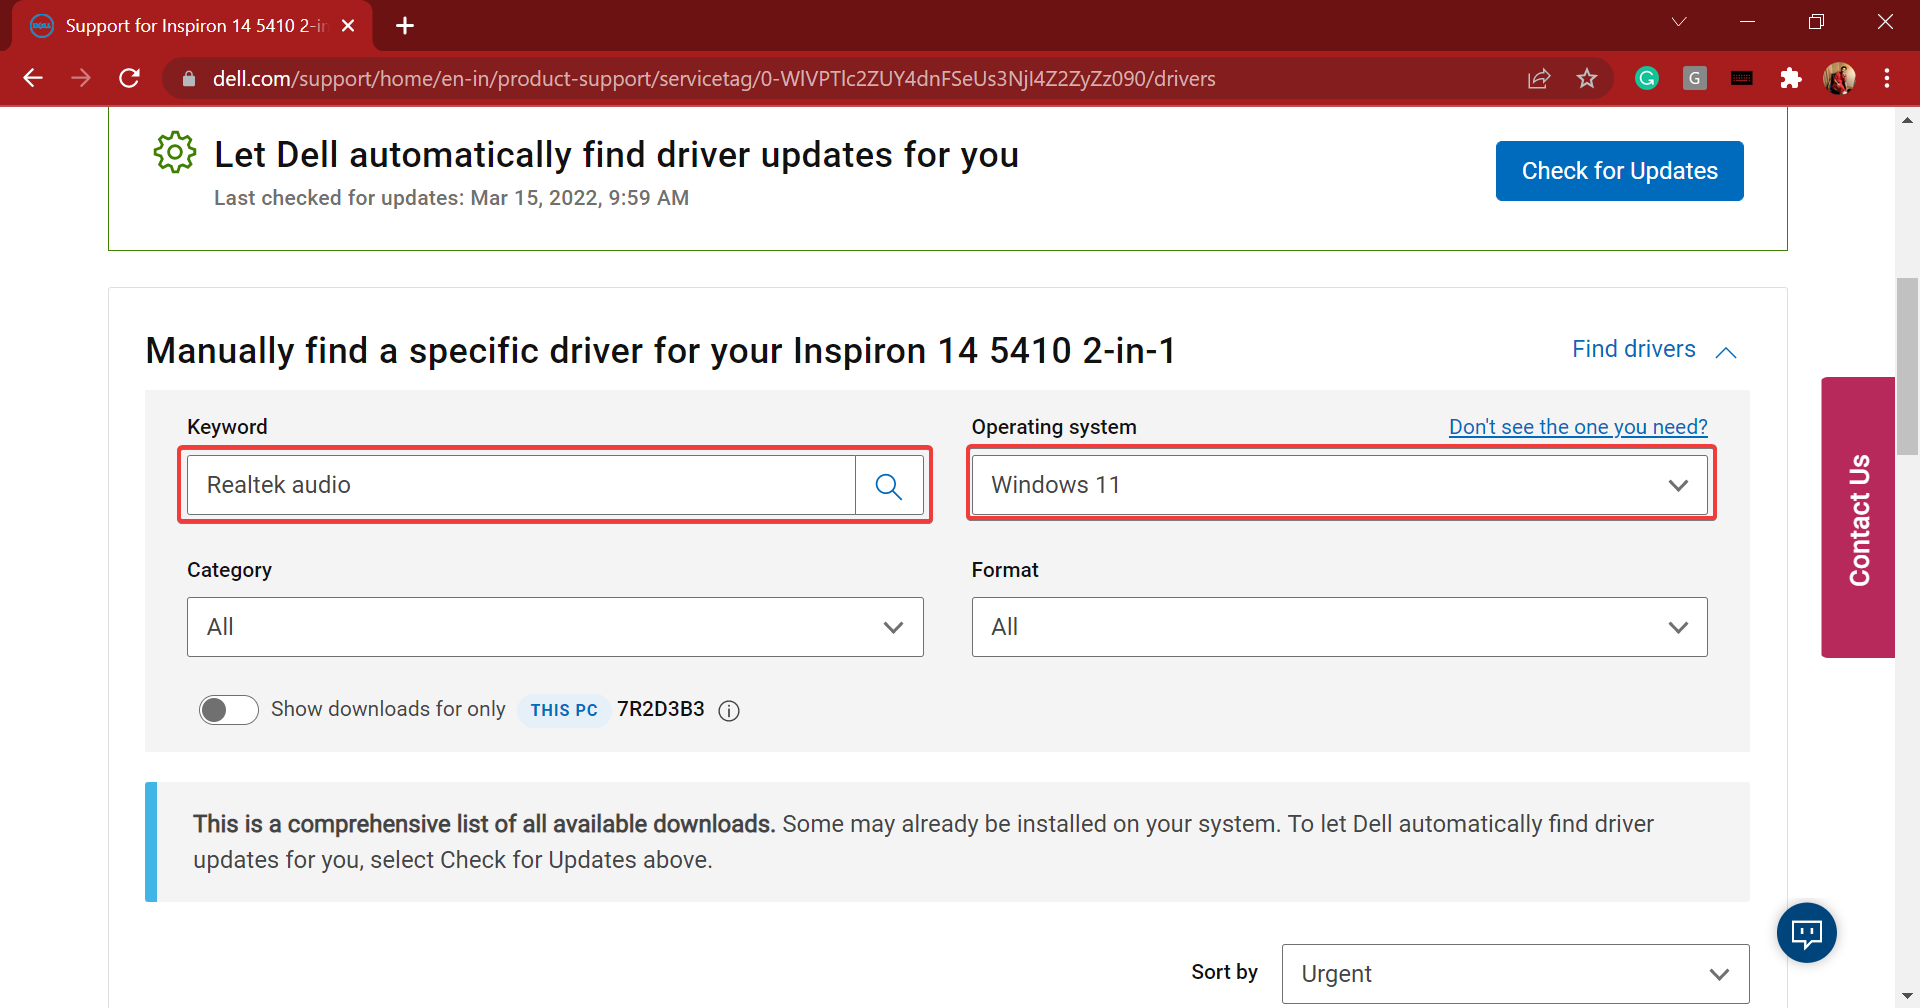
- Enter Realtek audio in the Keyword text field and choose Windows 11 from the Operating system dropdown menu.
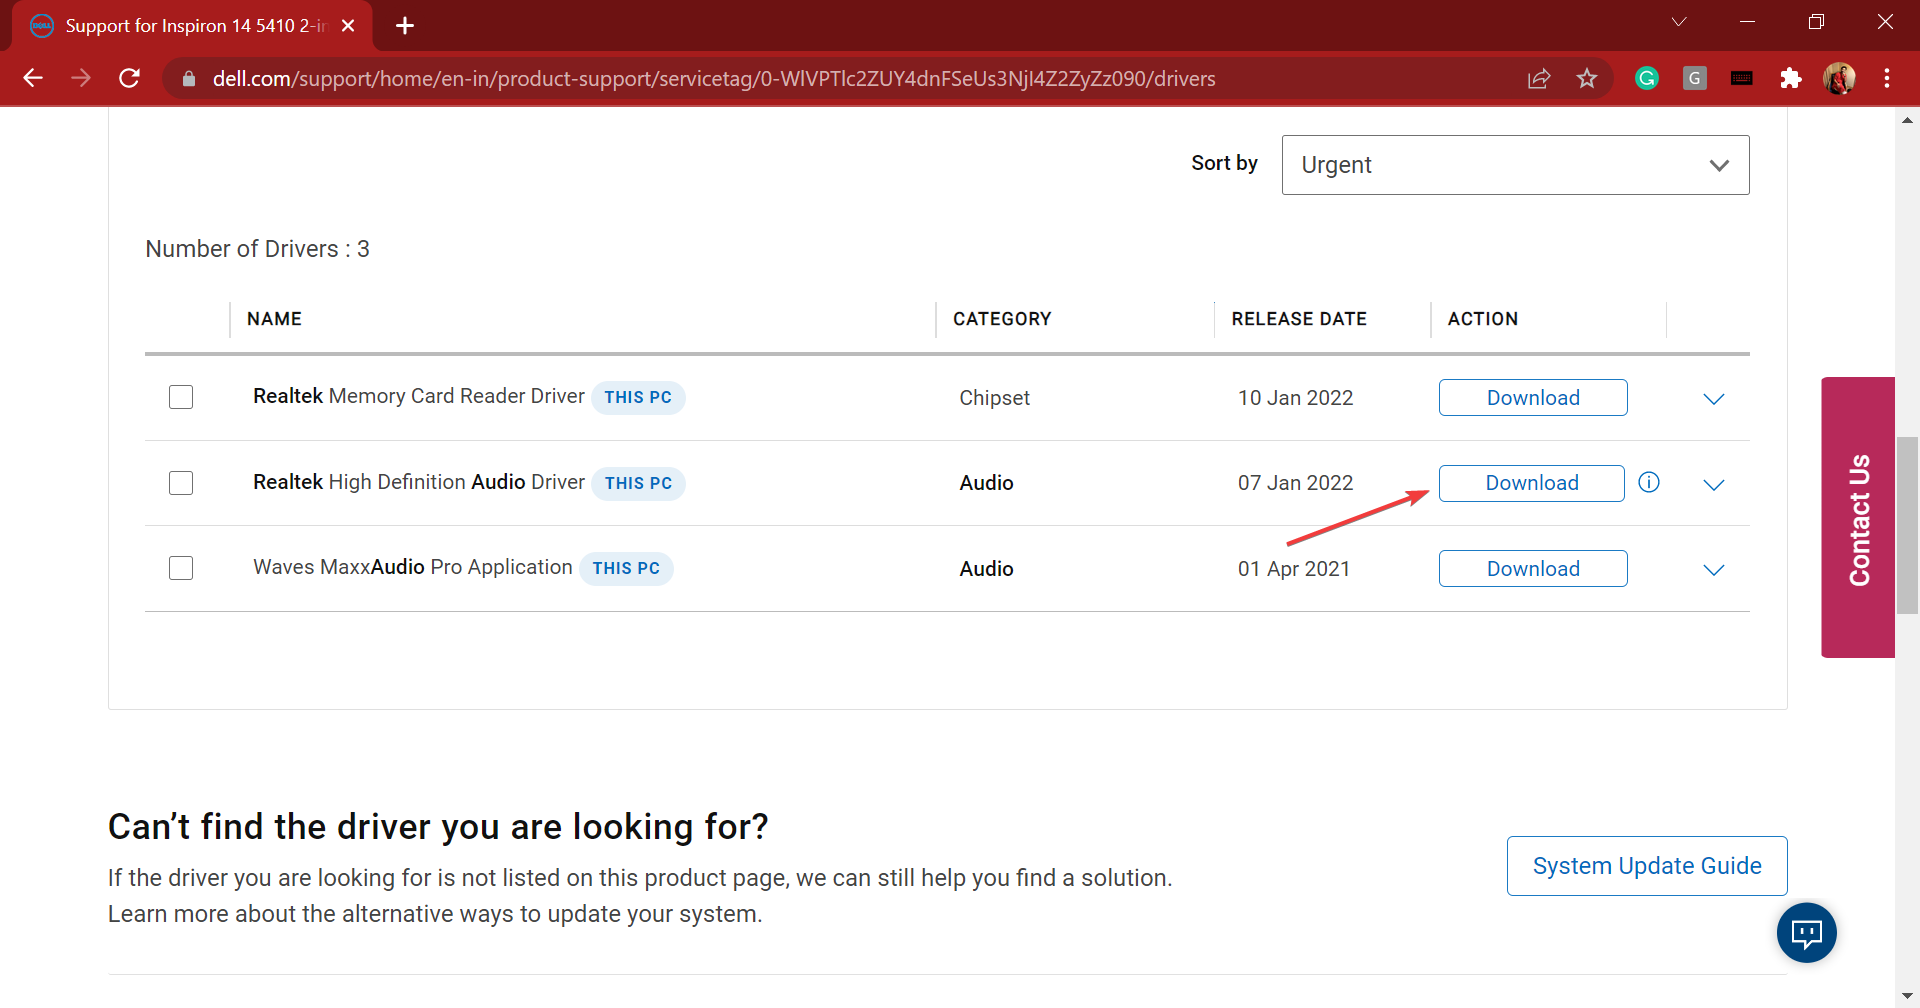
- Now, scroll down and click on the Download button next to Realtek audio driver.
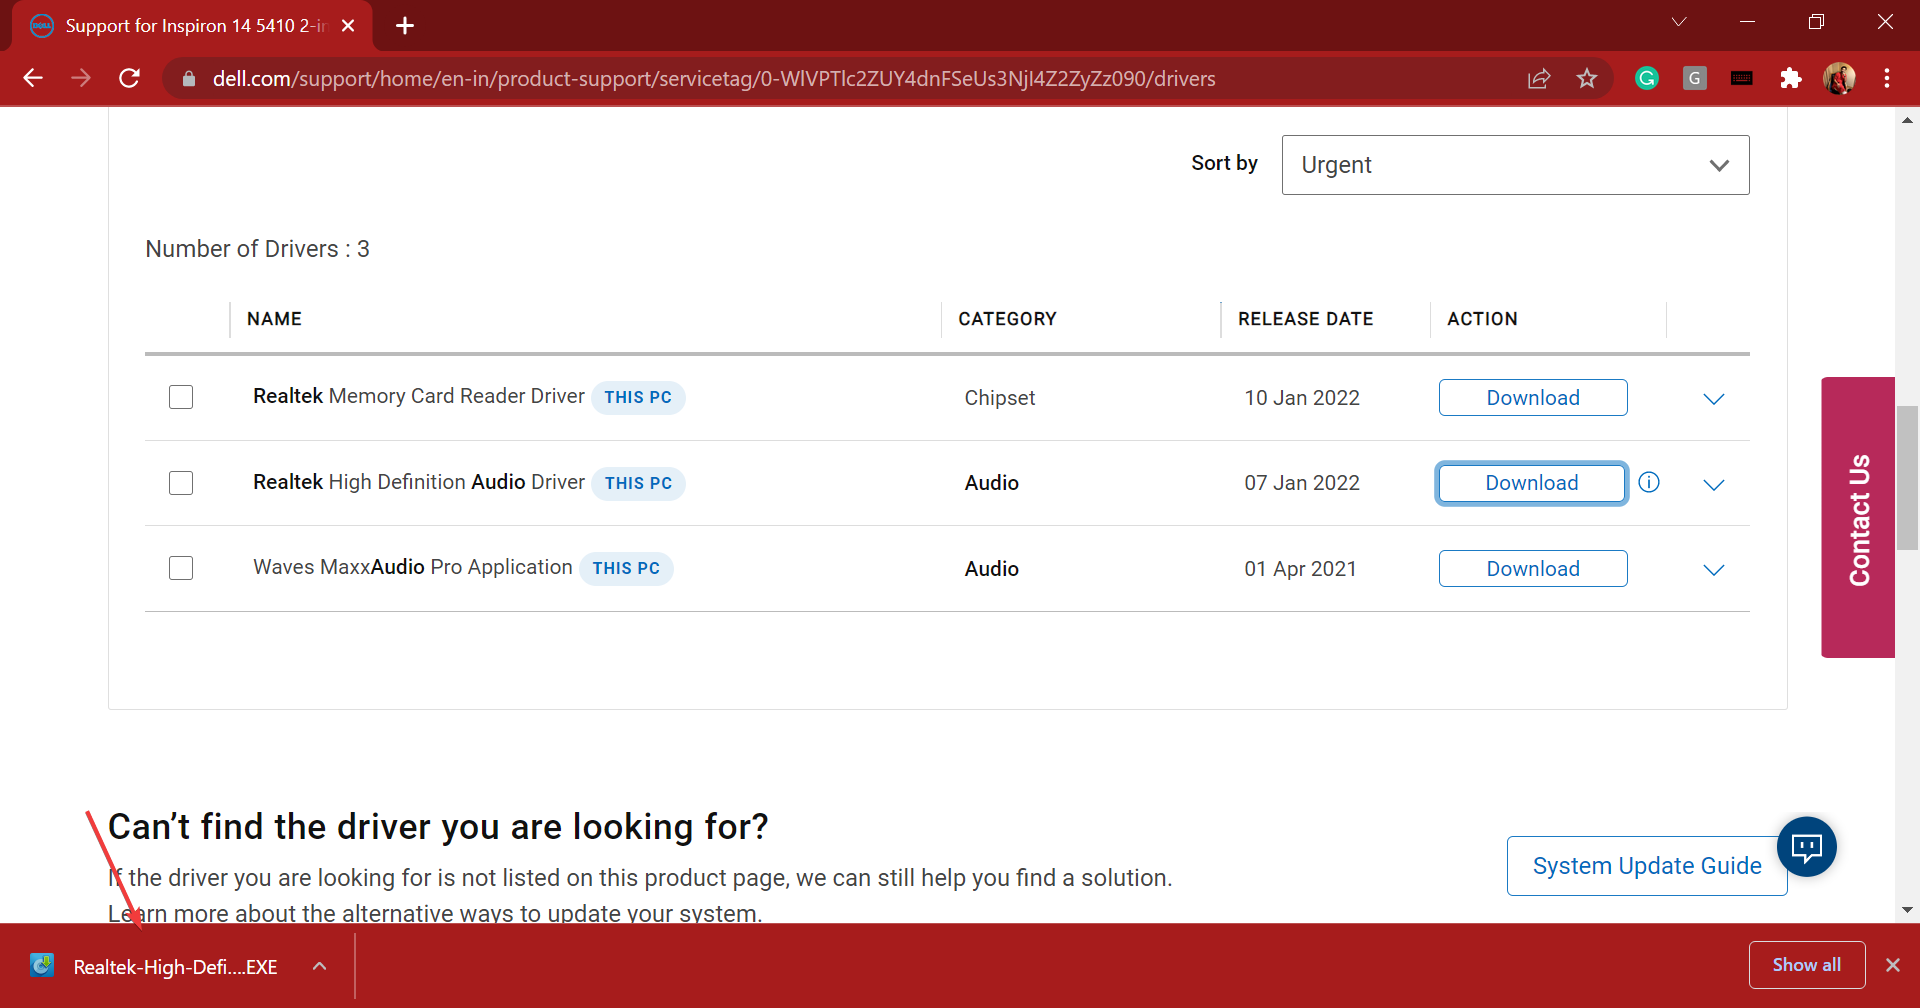
- Once the setup is downloaded, click on it to launch the installer.
- Click Yes on the UAC (User Account Control) prompt that pops up.

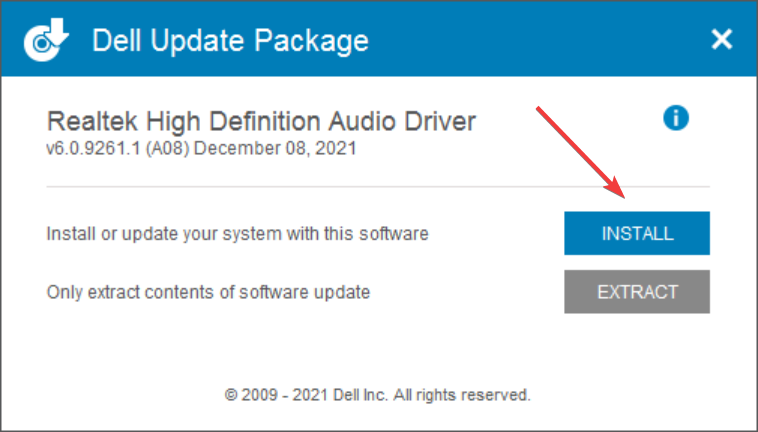
- Next, click Install and follow the on-screen instructions to complete the process.


Once you have downloaded and installed the Realtek audio driver in Windows 11, restart the computer for the changes to come into effect, and you are good to go.
- How to reinstall the audio driver in Windows 11
- How to download ASUS Realtek HD Audio Manager in Windows 11
- FIX: No sound output devices found in Windows 11
- Fix: Windows 11’s audio crackling & sound distortion
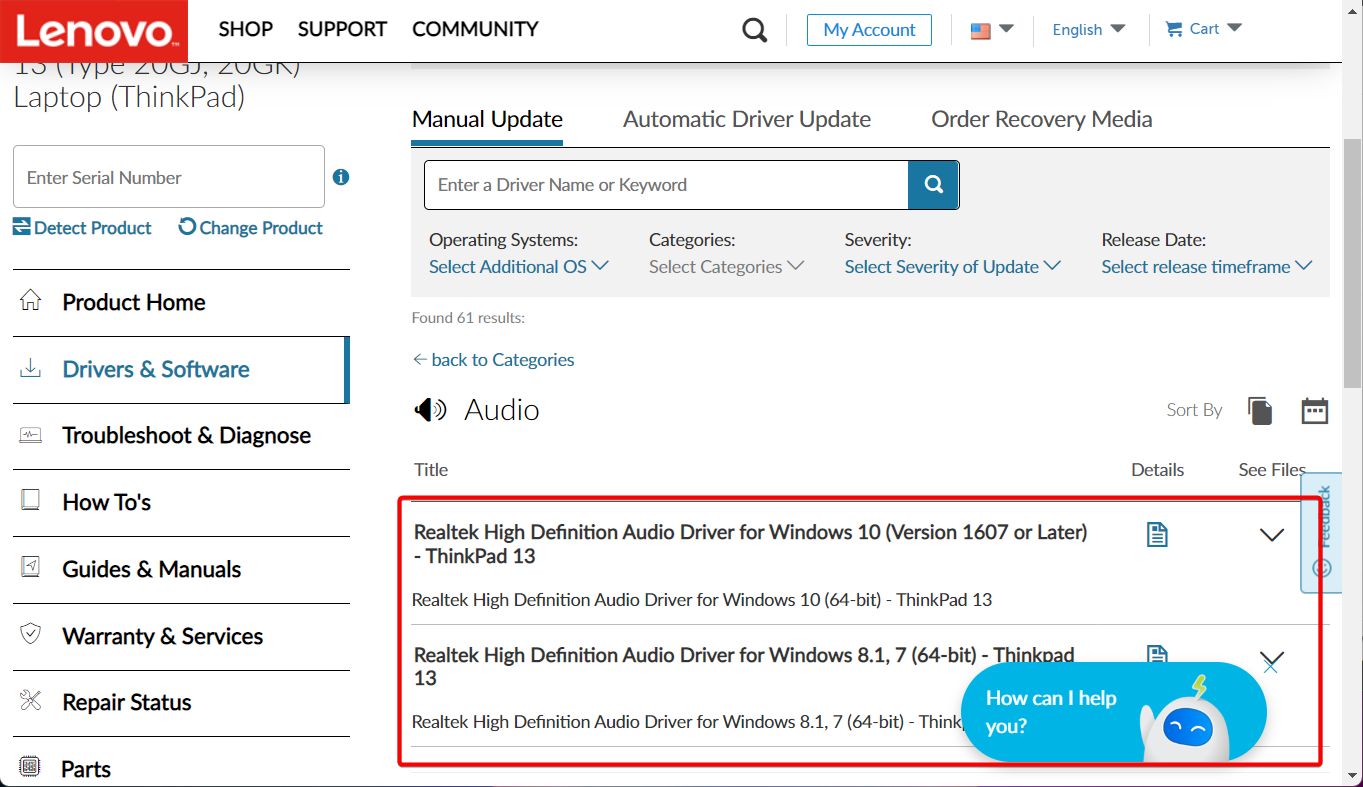
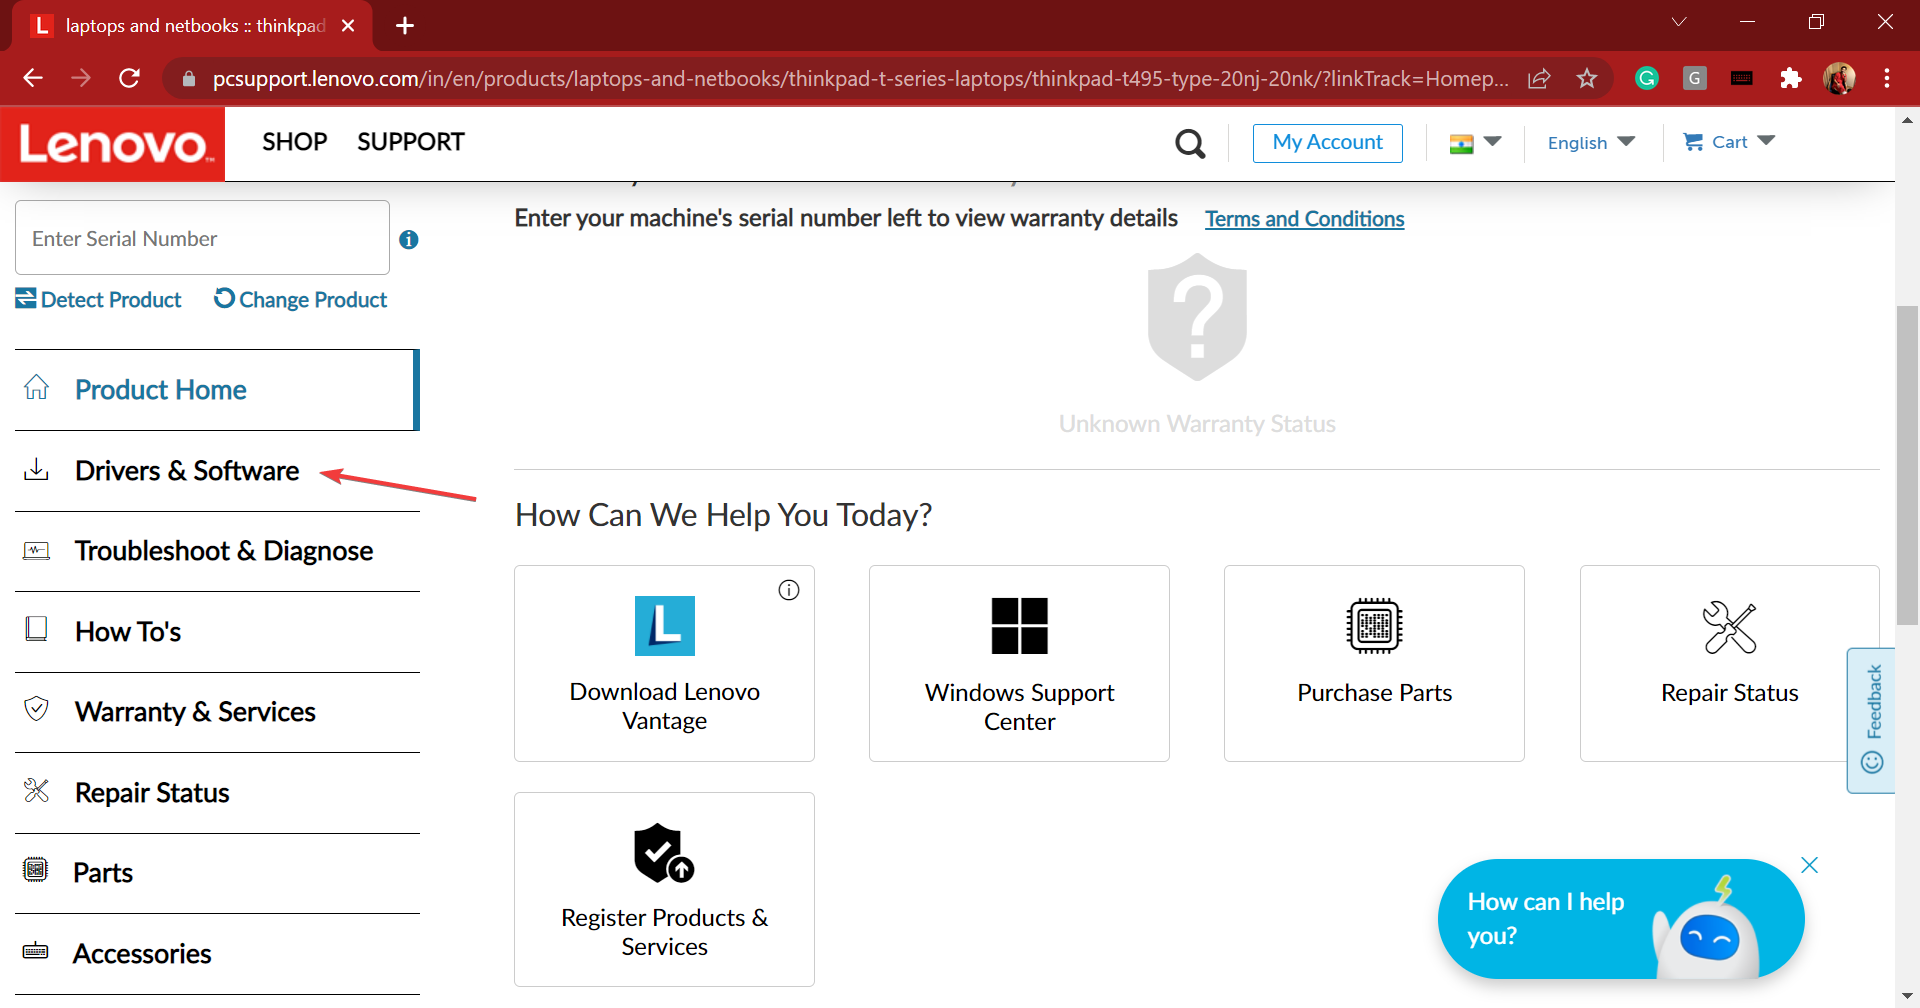
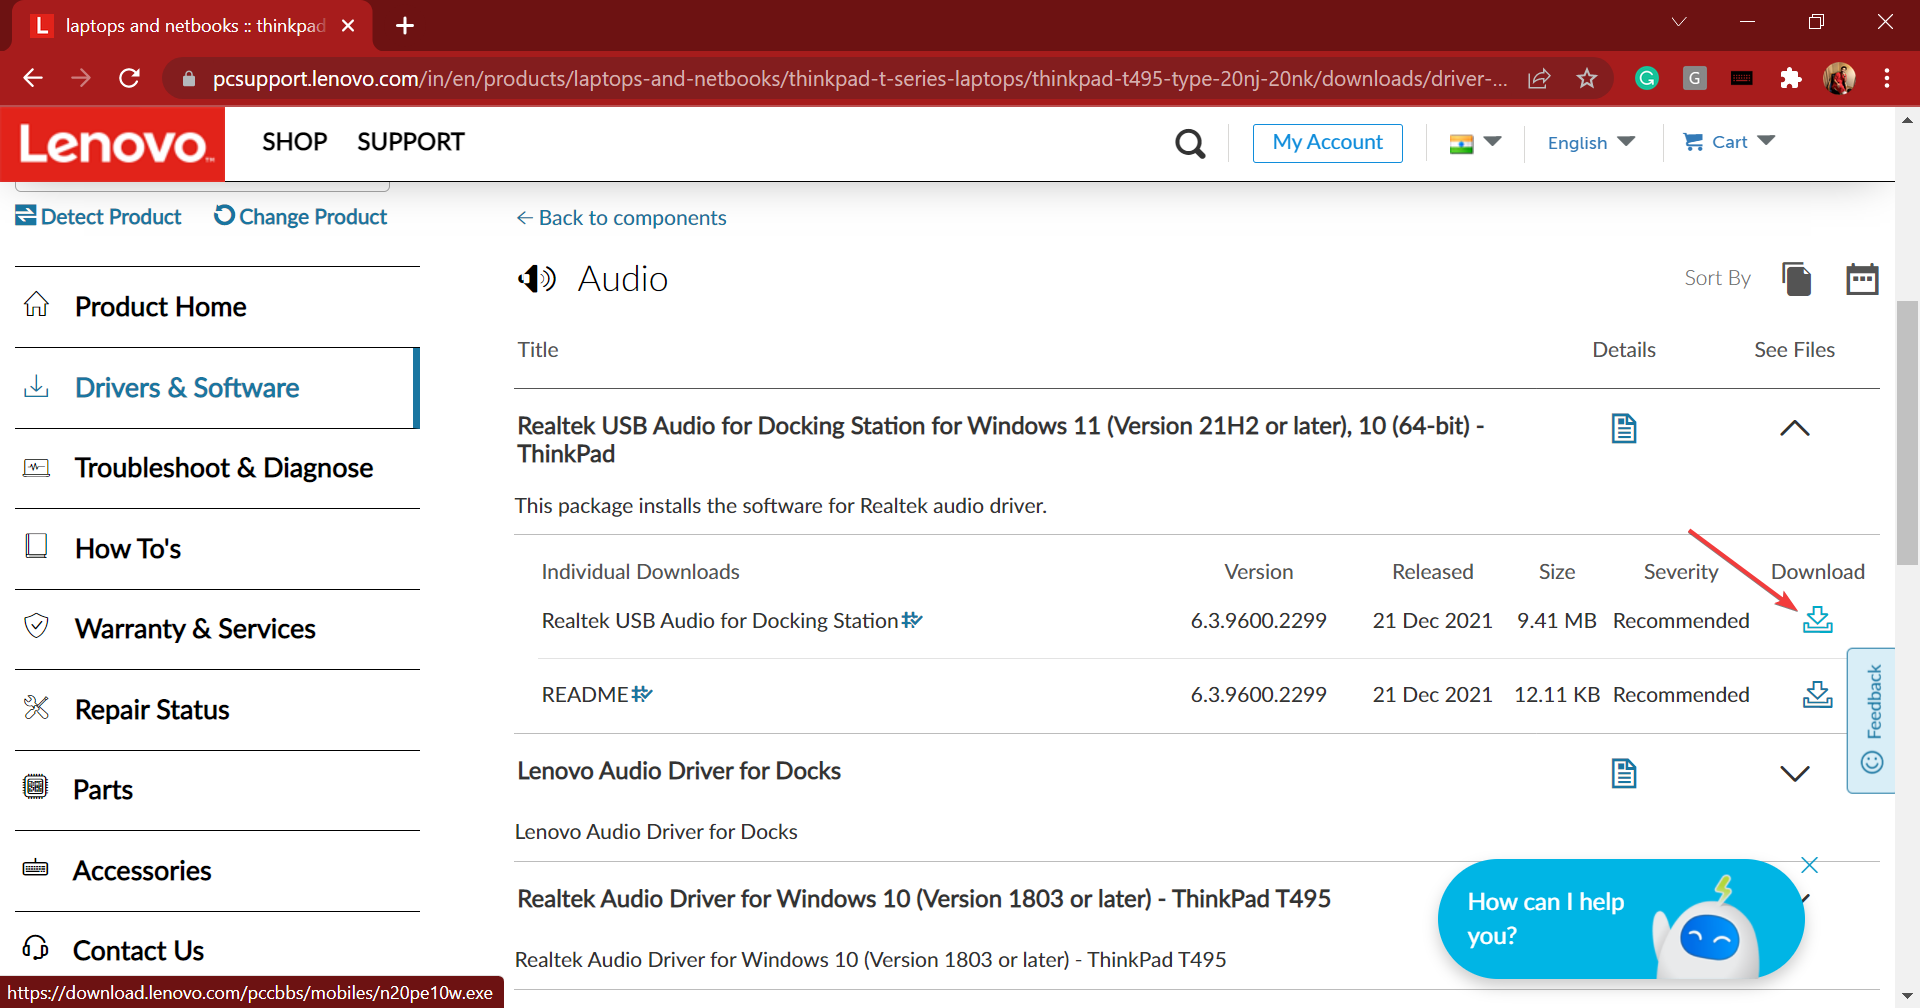
3. Realtek audio driver for Lenovo
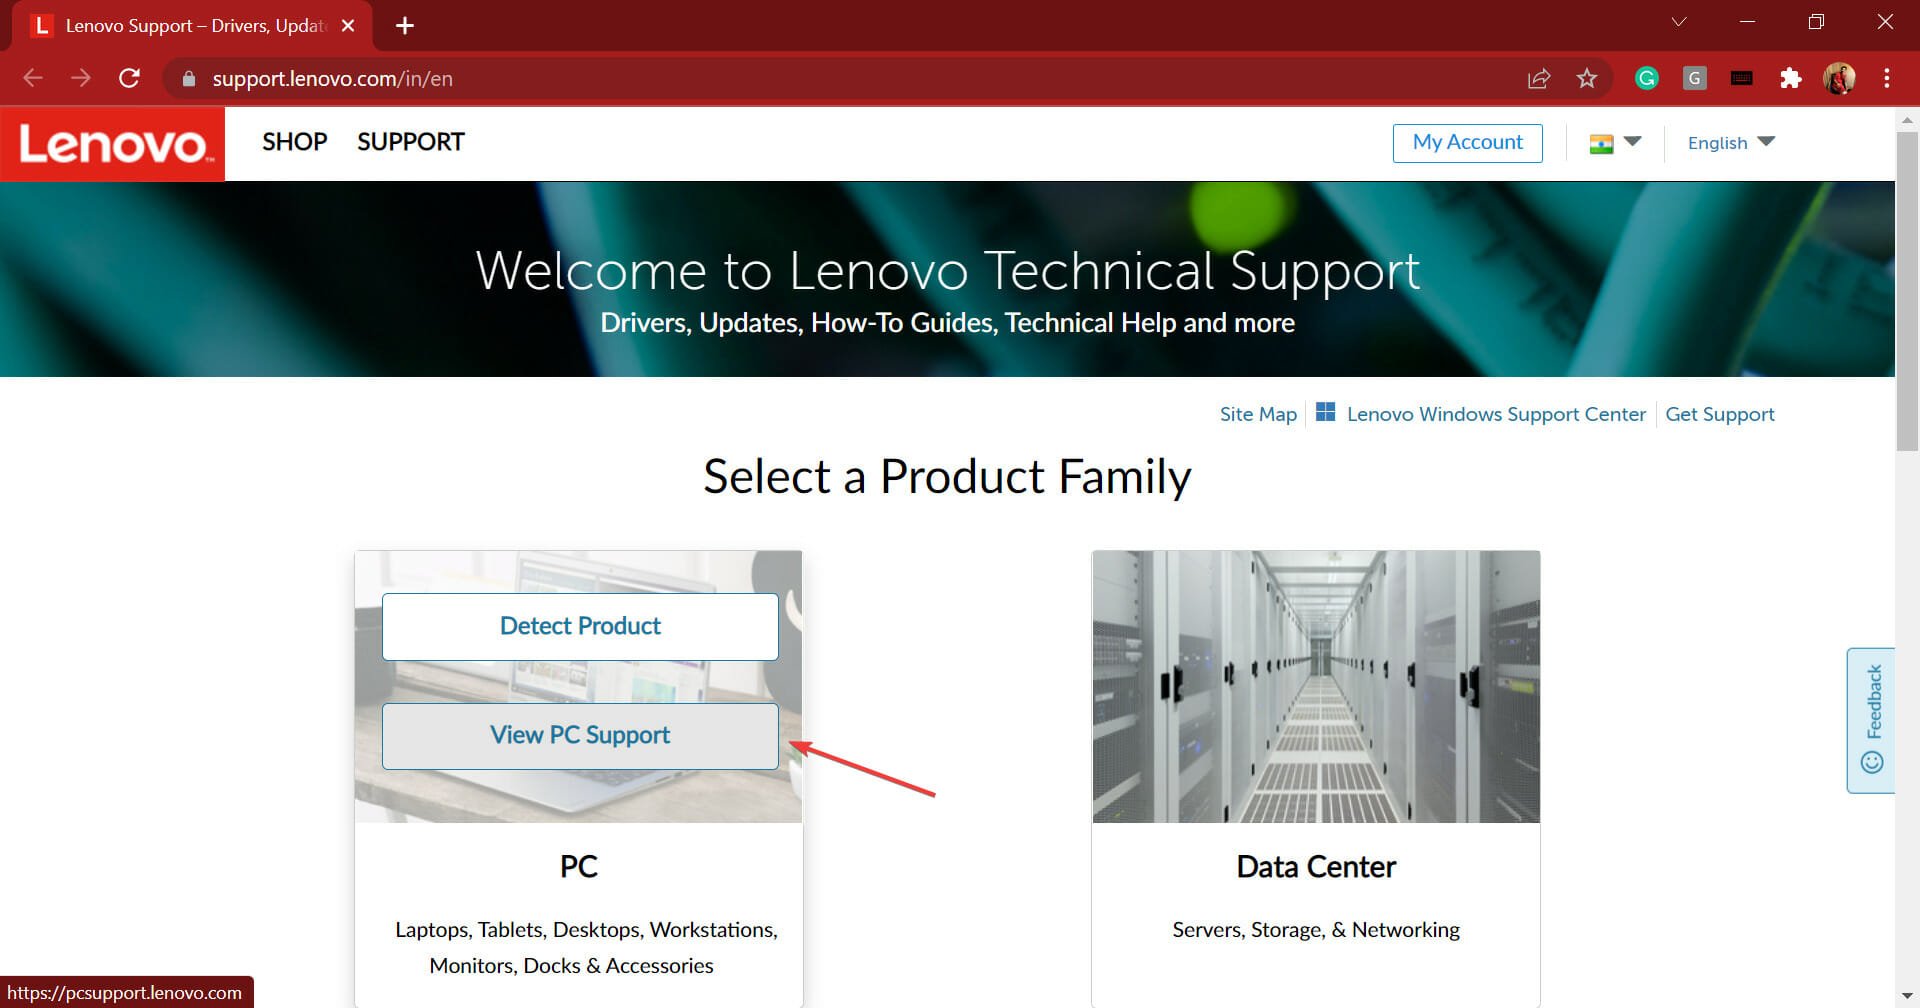
- Go to the technical support page for Lenovo, hover the cursor over PC from the options listed here, and select View PC Support.
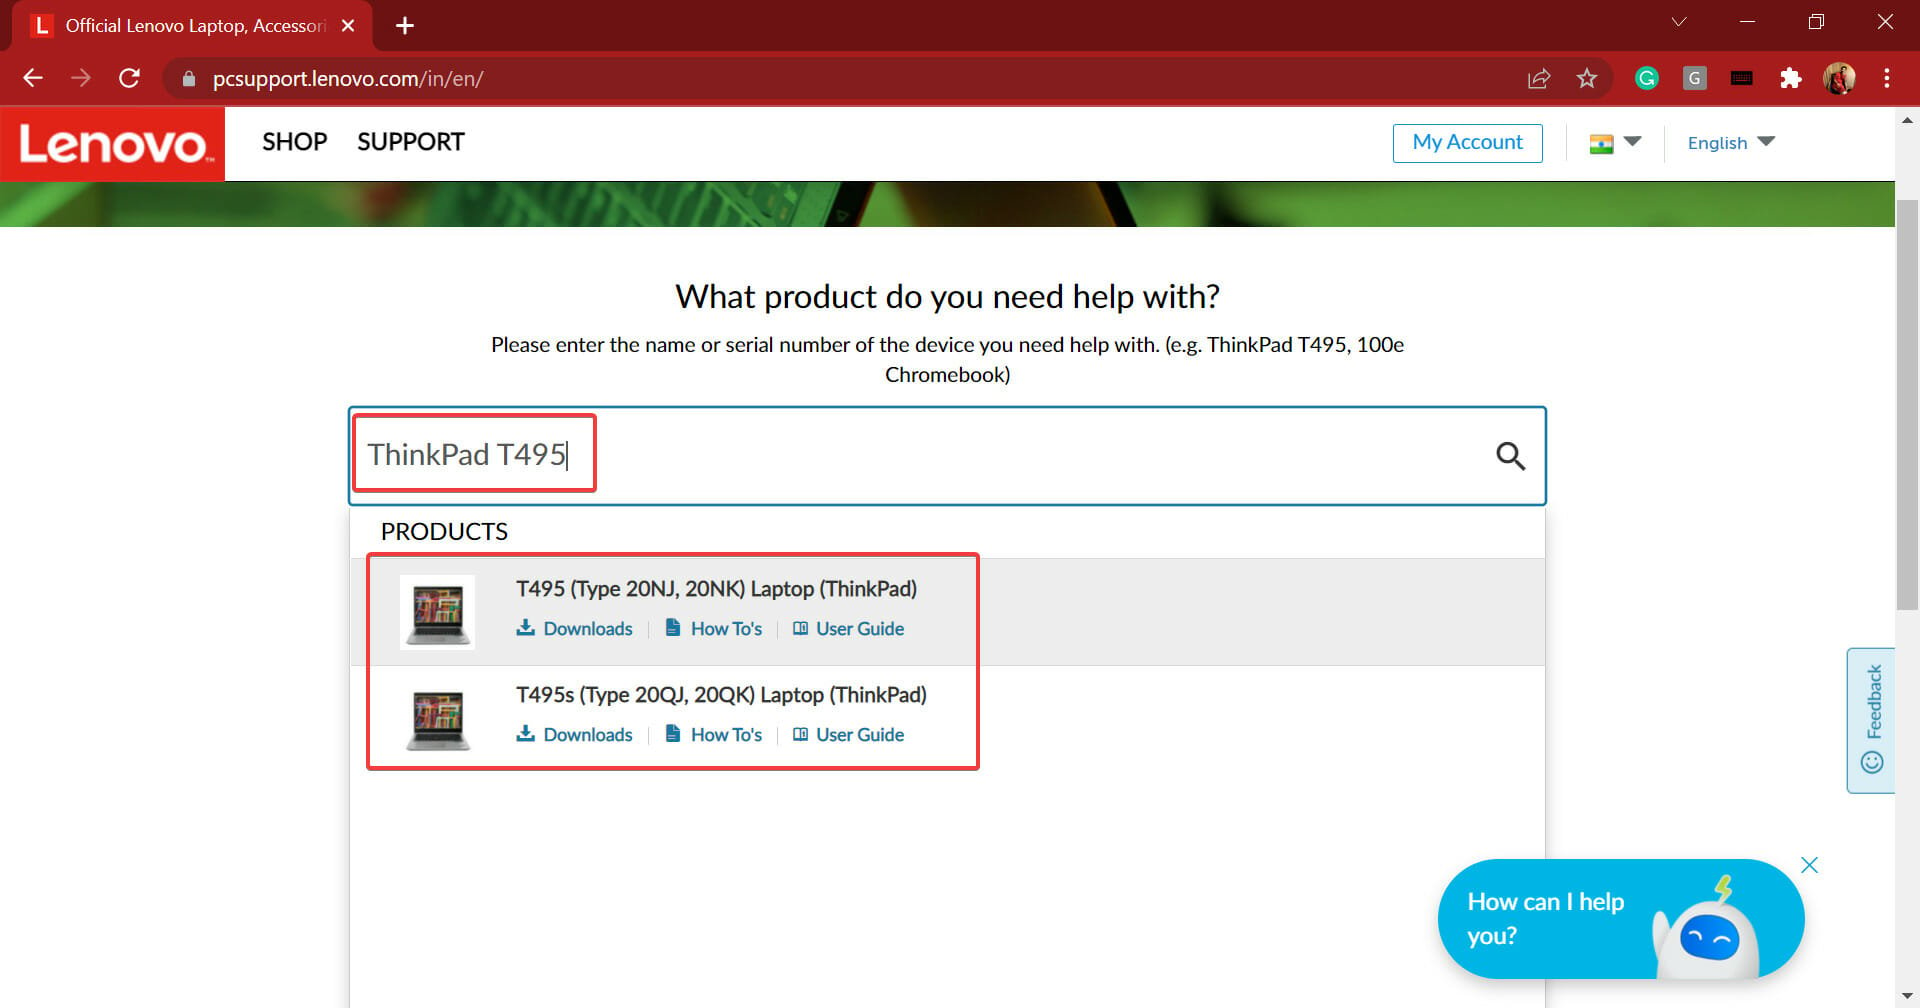
- Now, enter the device name in the designated text field and select the relevant option once it appears in the search results.
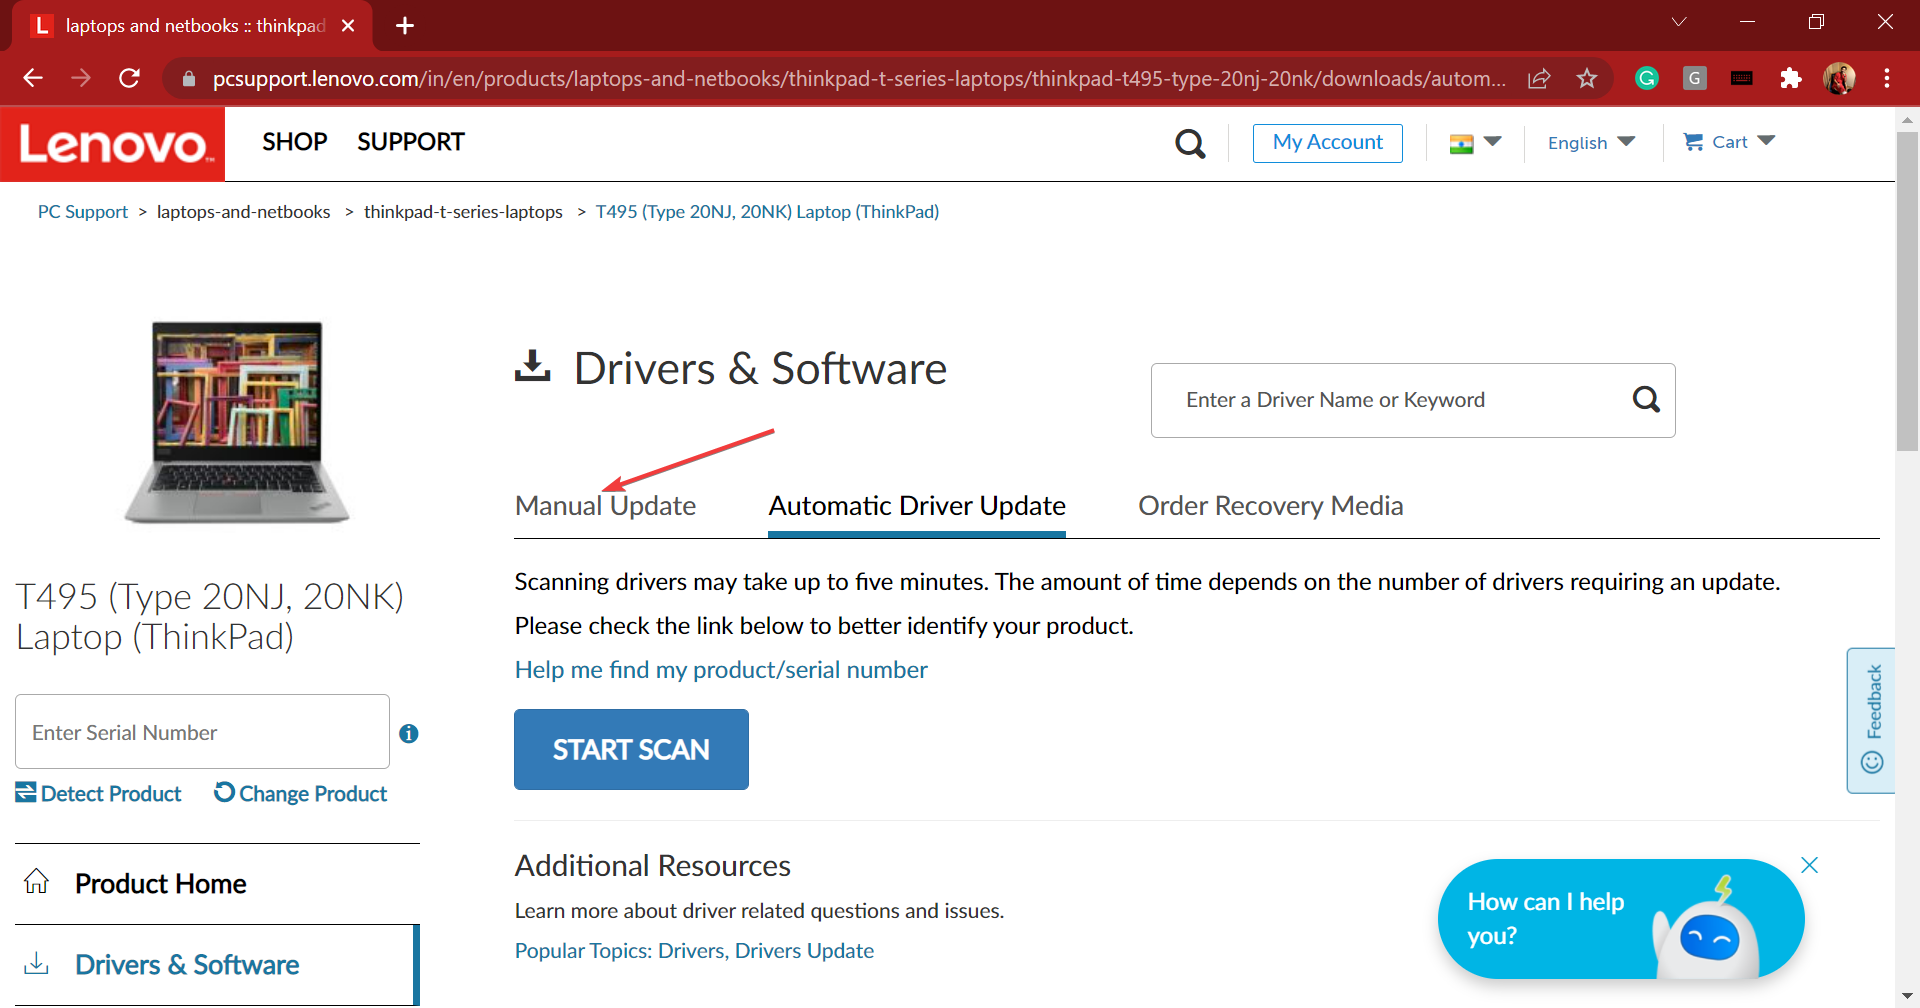
- Select Drivers & Software from the navigation pane on the left.
- Now, select the Manual update tab.
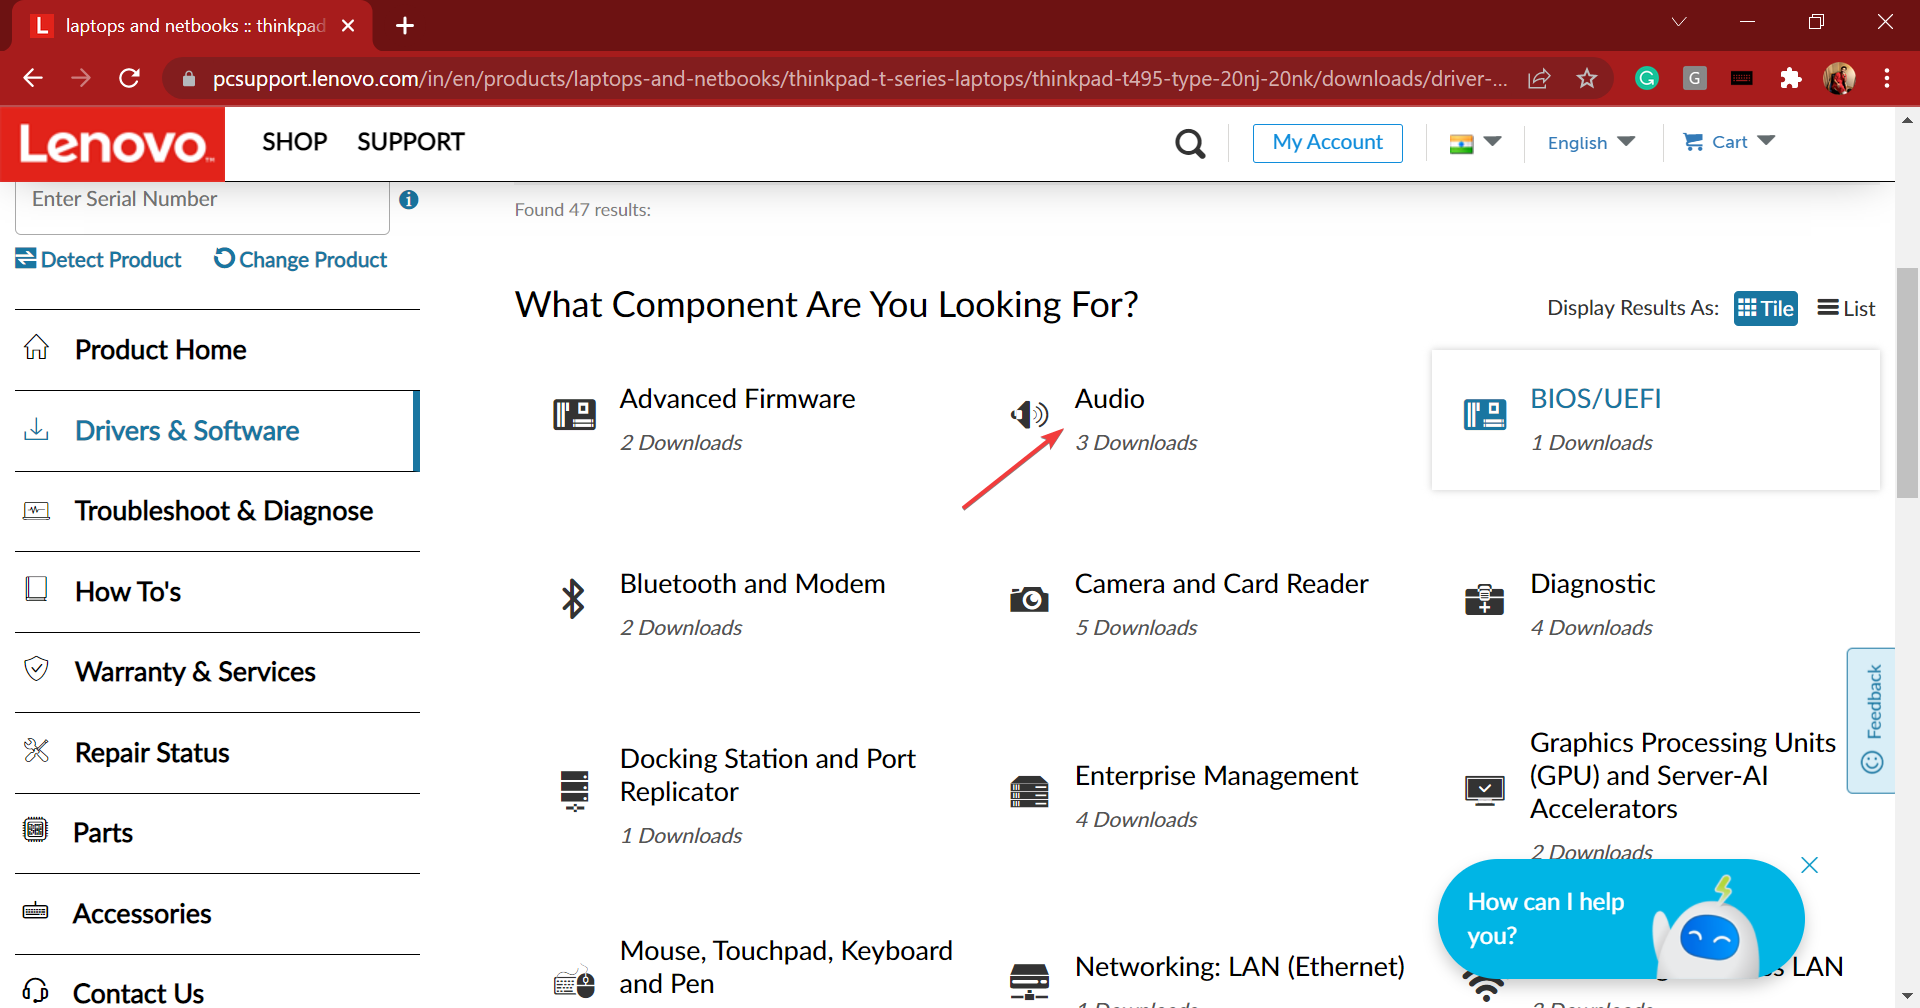
- Click on the Audio entry from the various components listed here.
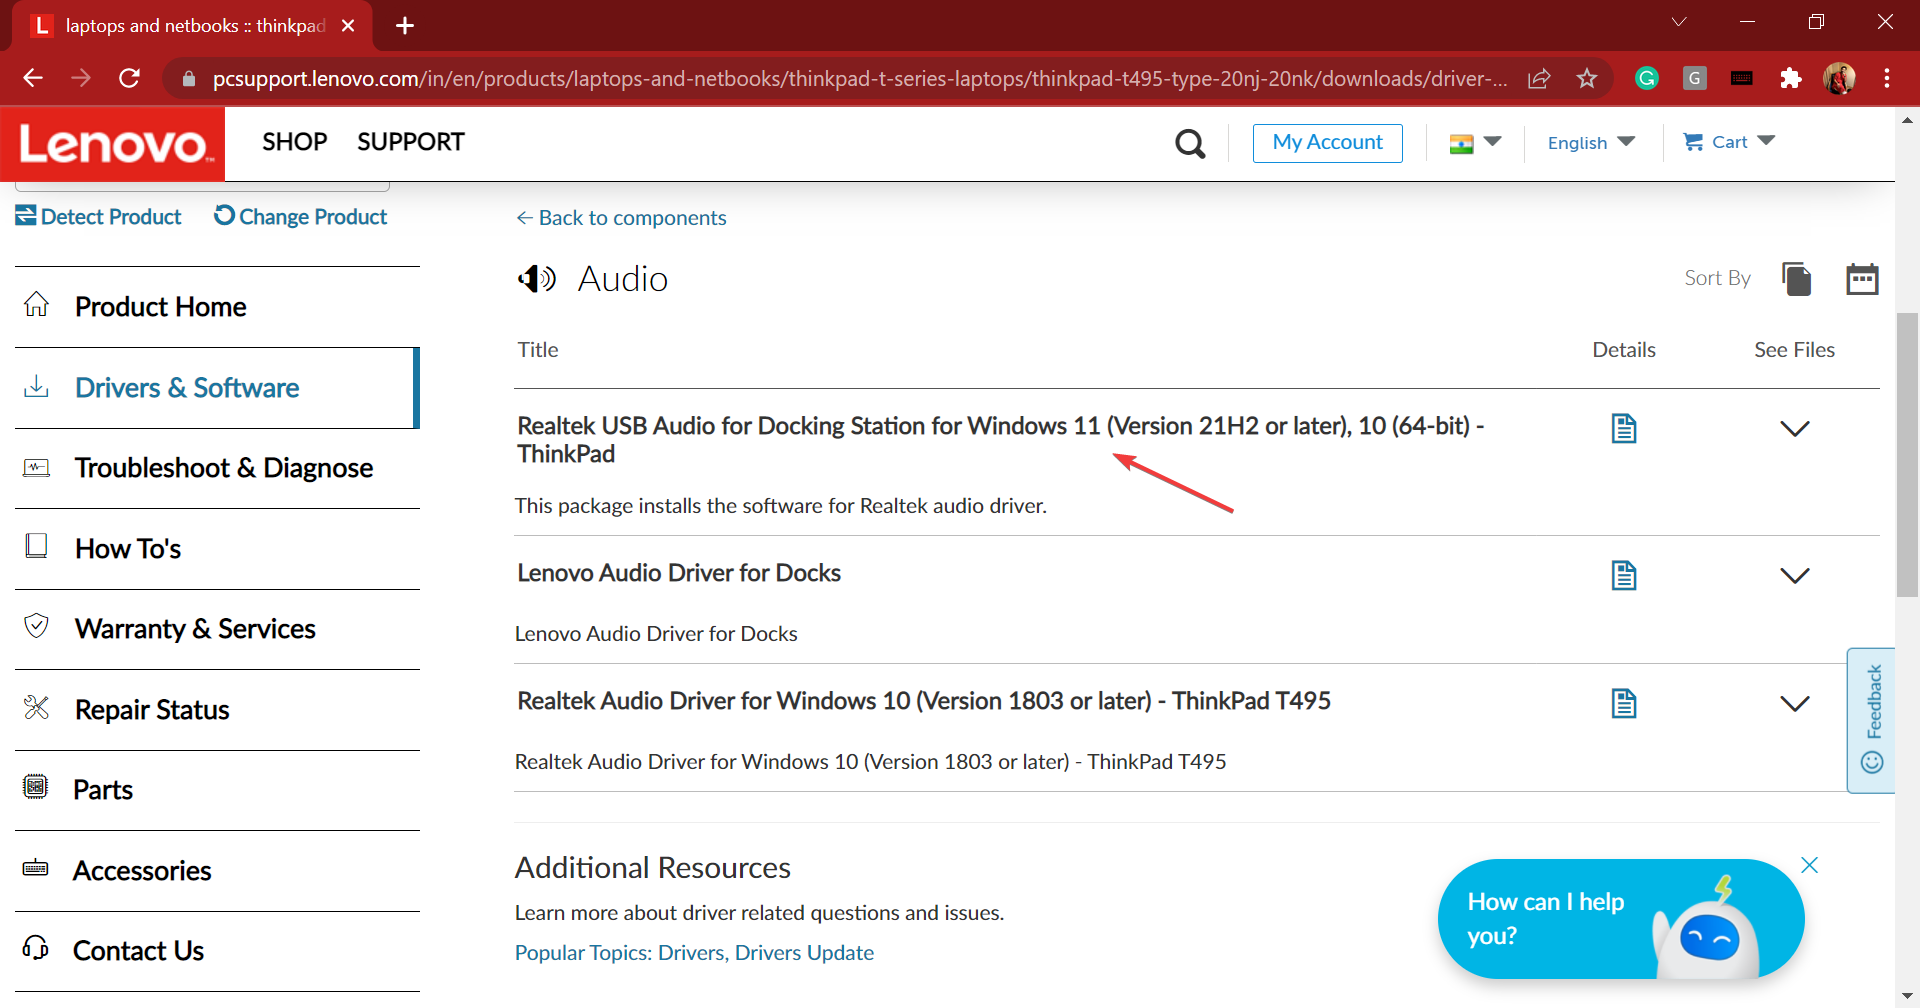
- Next, click on Realtek audio driver for Windows 11.
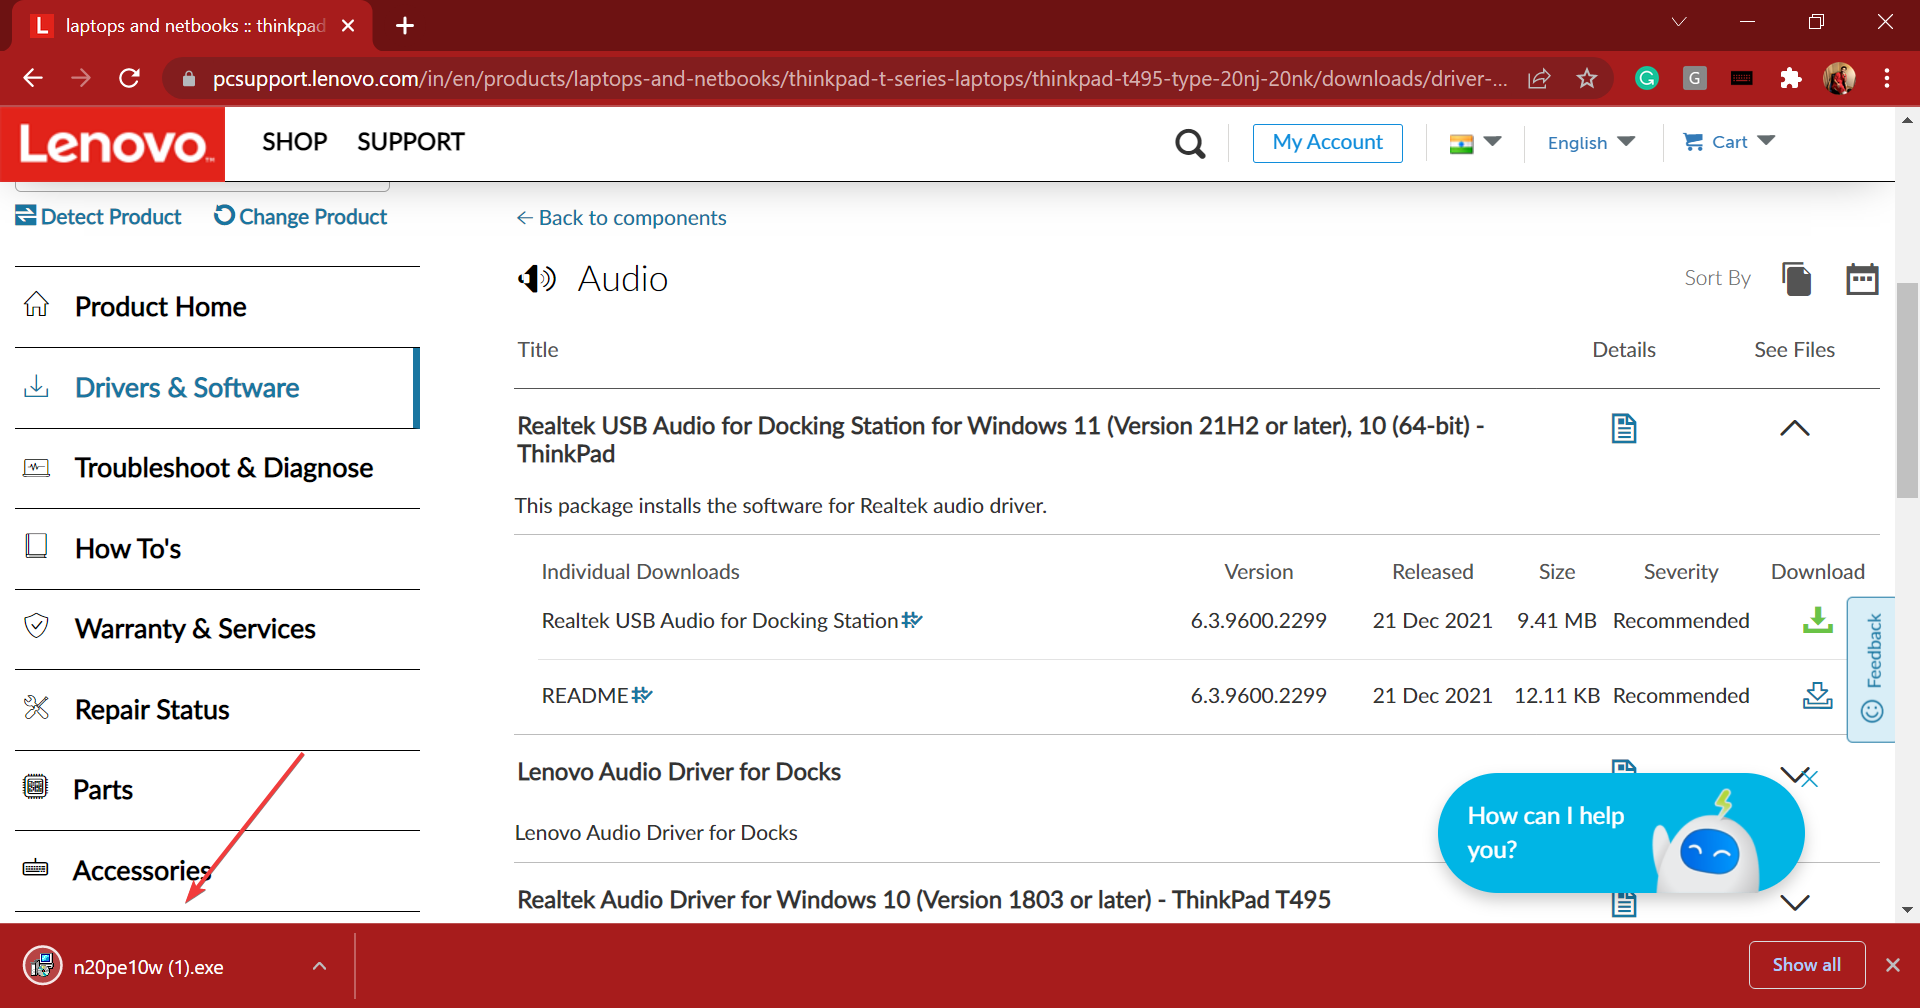
- Click on the Download icon next to the Realtek audio driver.
- Once the setup is downloaded, click on it to launch the installer.
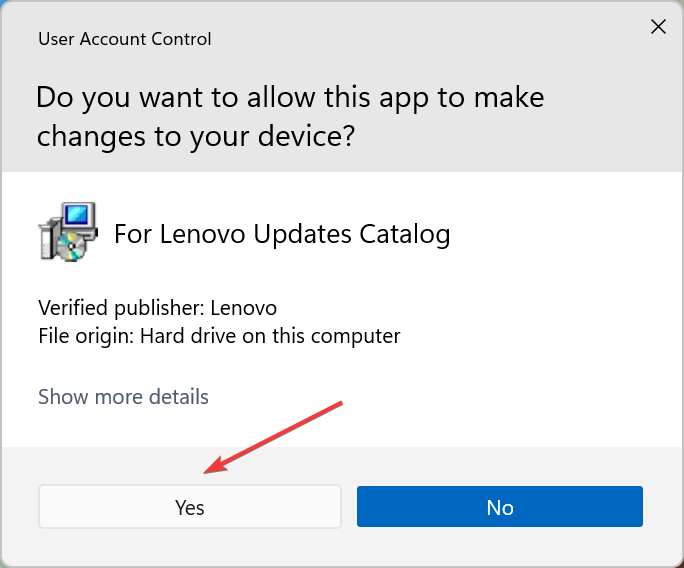
- Click Yes in the UAC (User Account Control) prompt that pops up.
- Now, follow the on-screen instructions to complete the installation process.

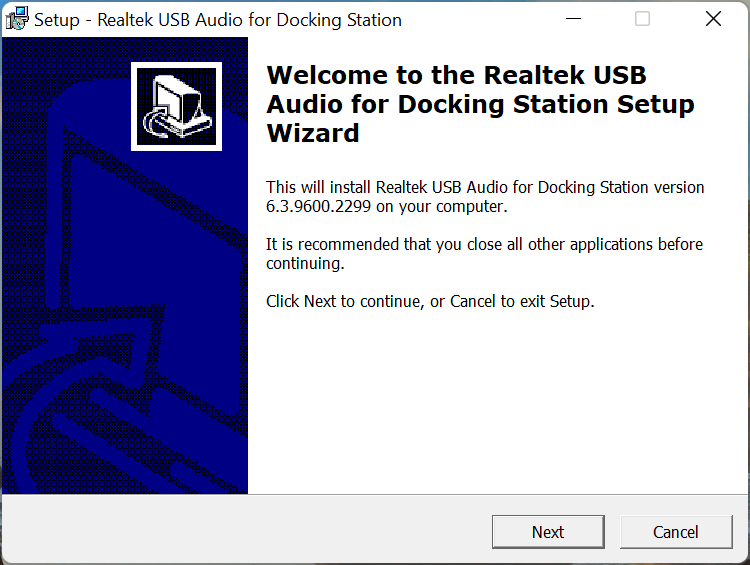
Once done with the download and installation of Realtek audio driver in Windows 11 on Lenovo device, restart the computer for the changes to come into effect.
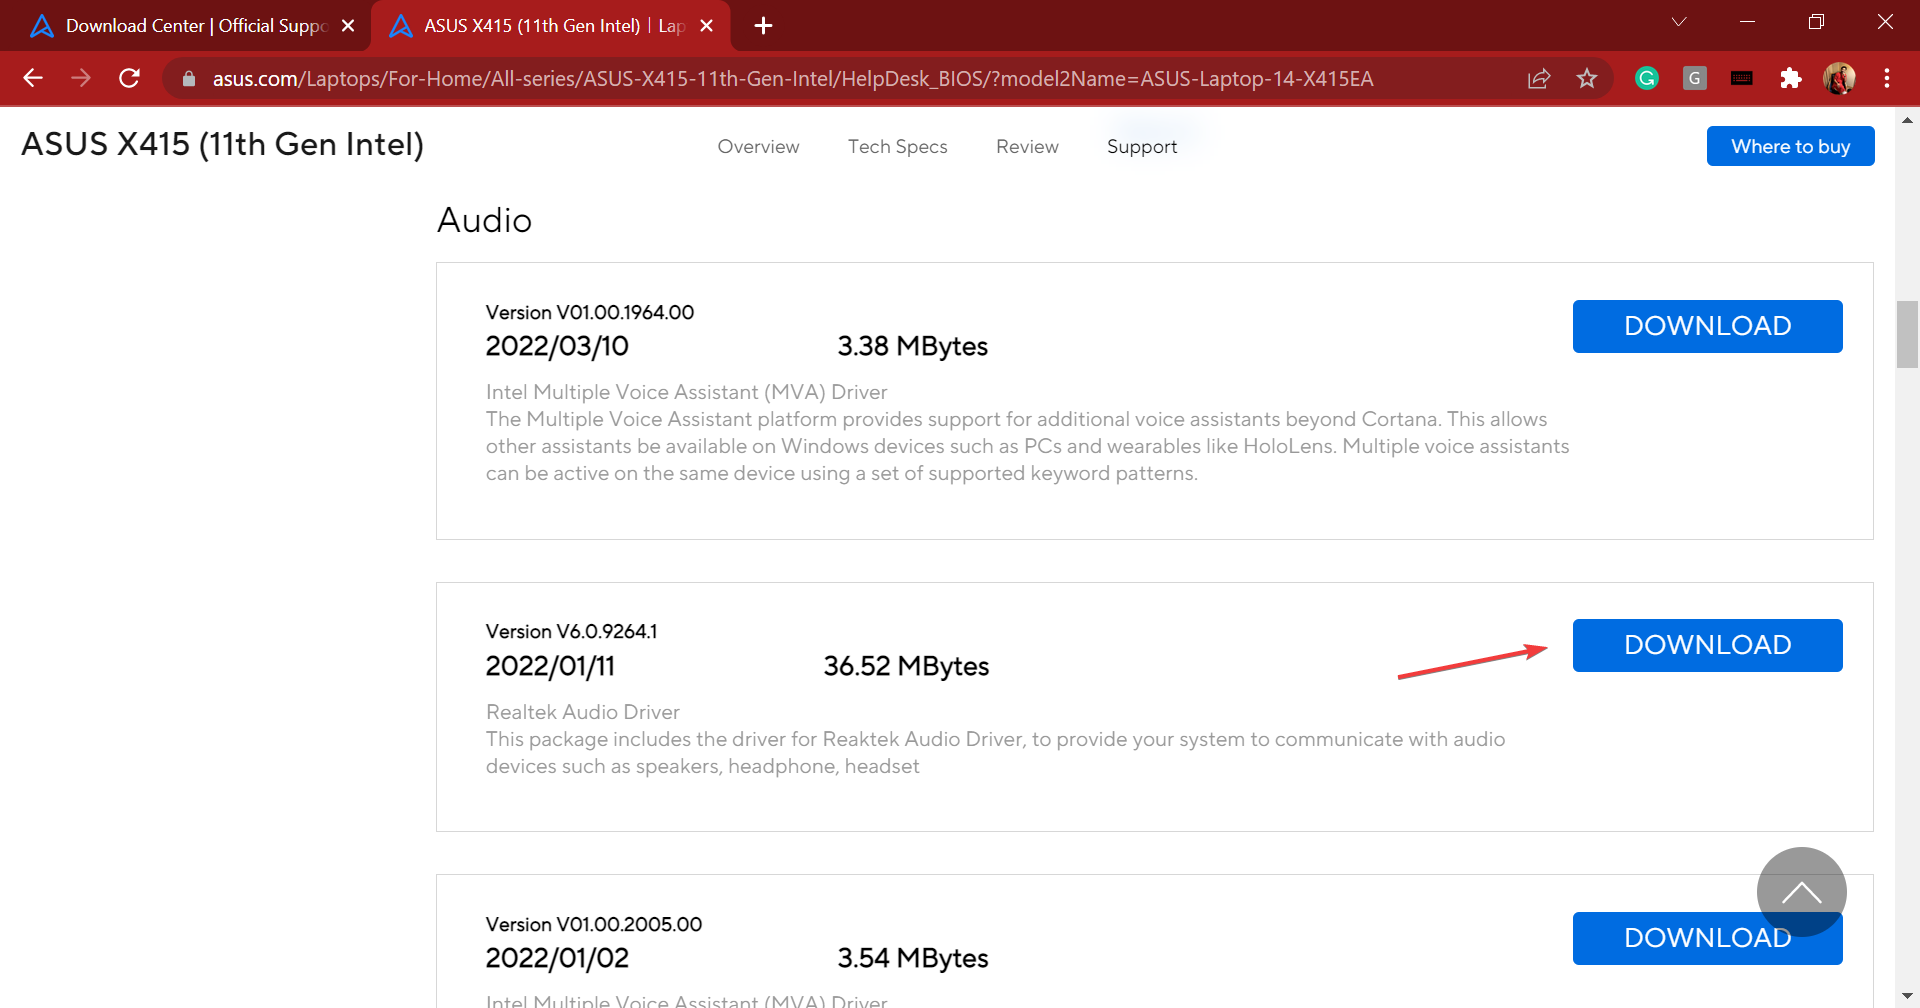
4. Realtek audio driver for Asus
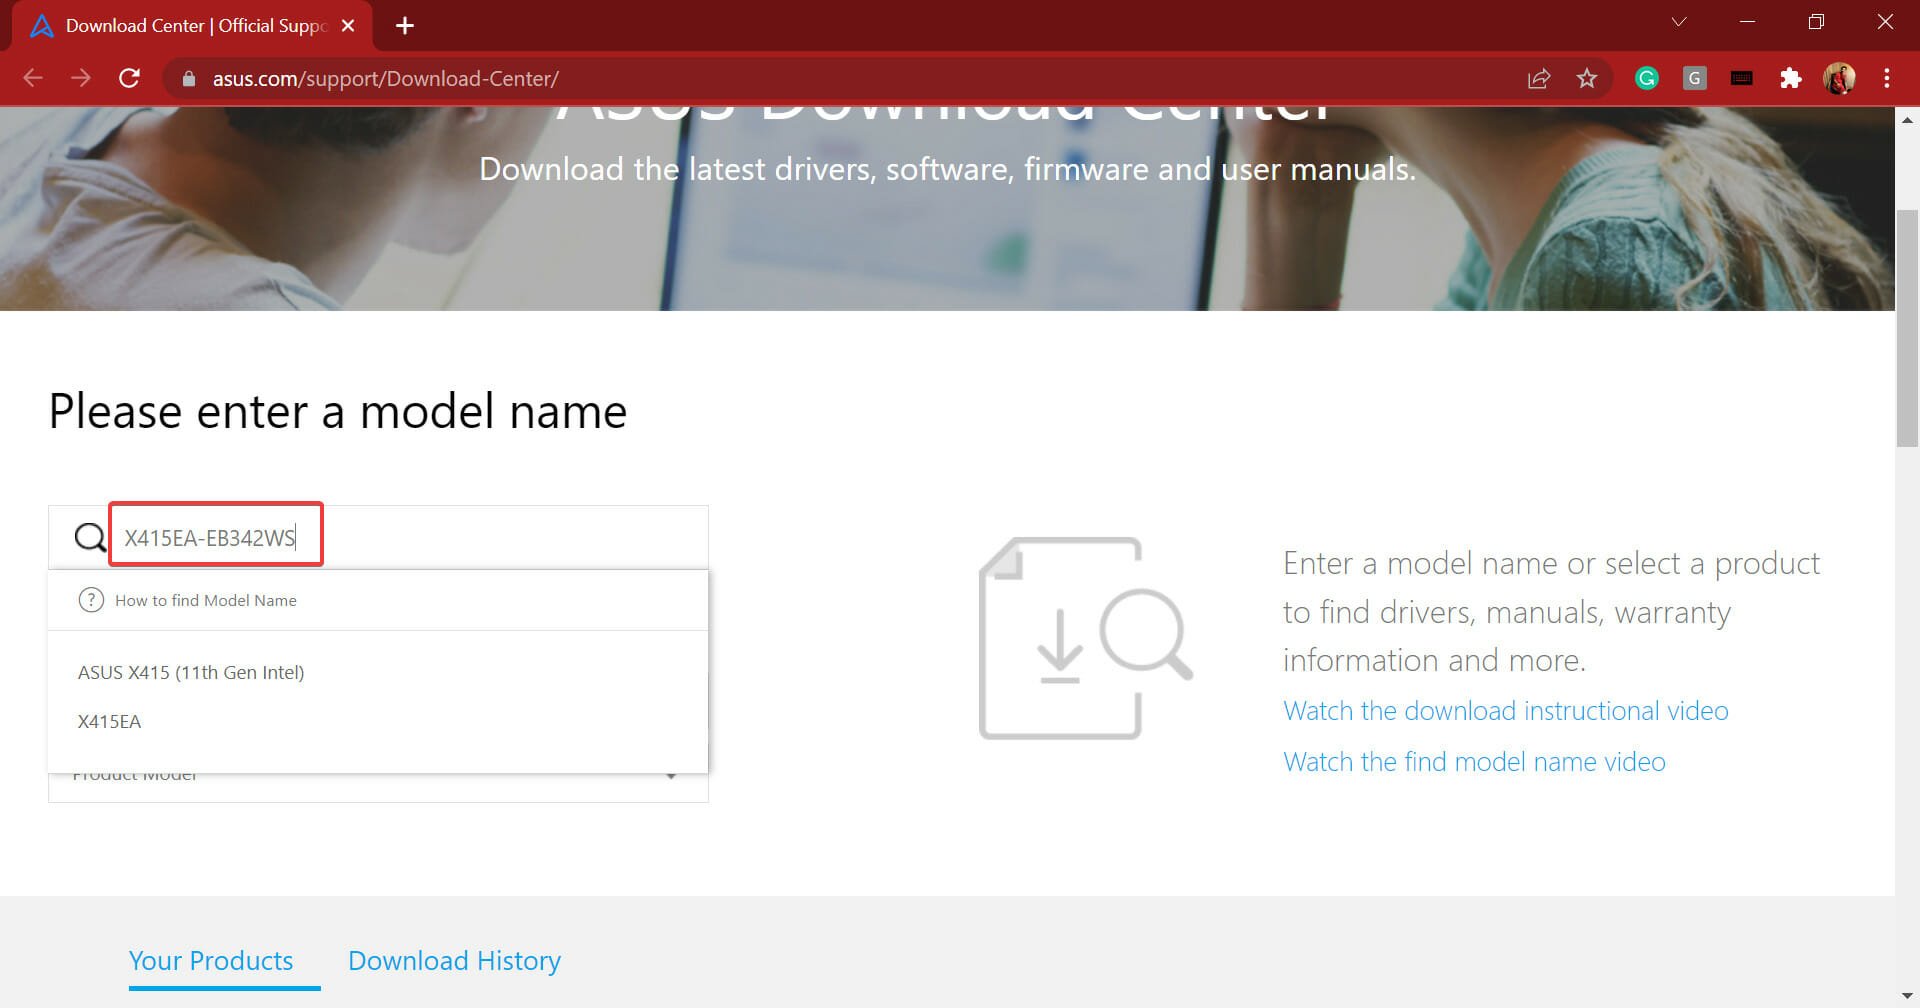
- Go to Asus support, and either enter the model name and select the relevant option from the search results, or you can manually find your product.
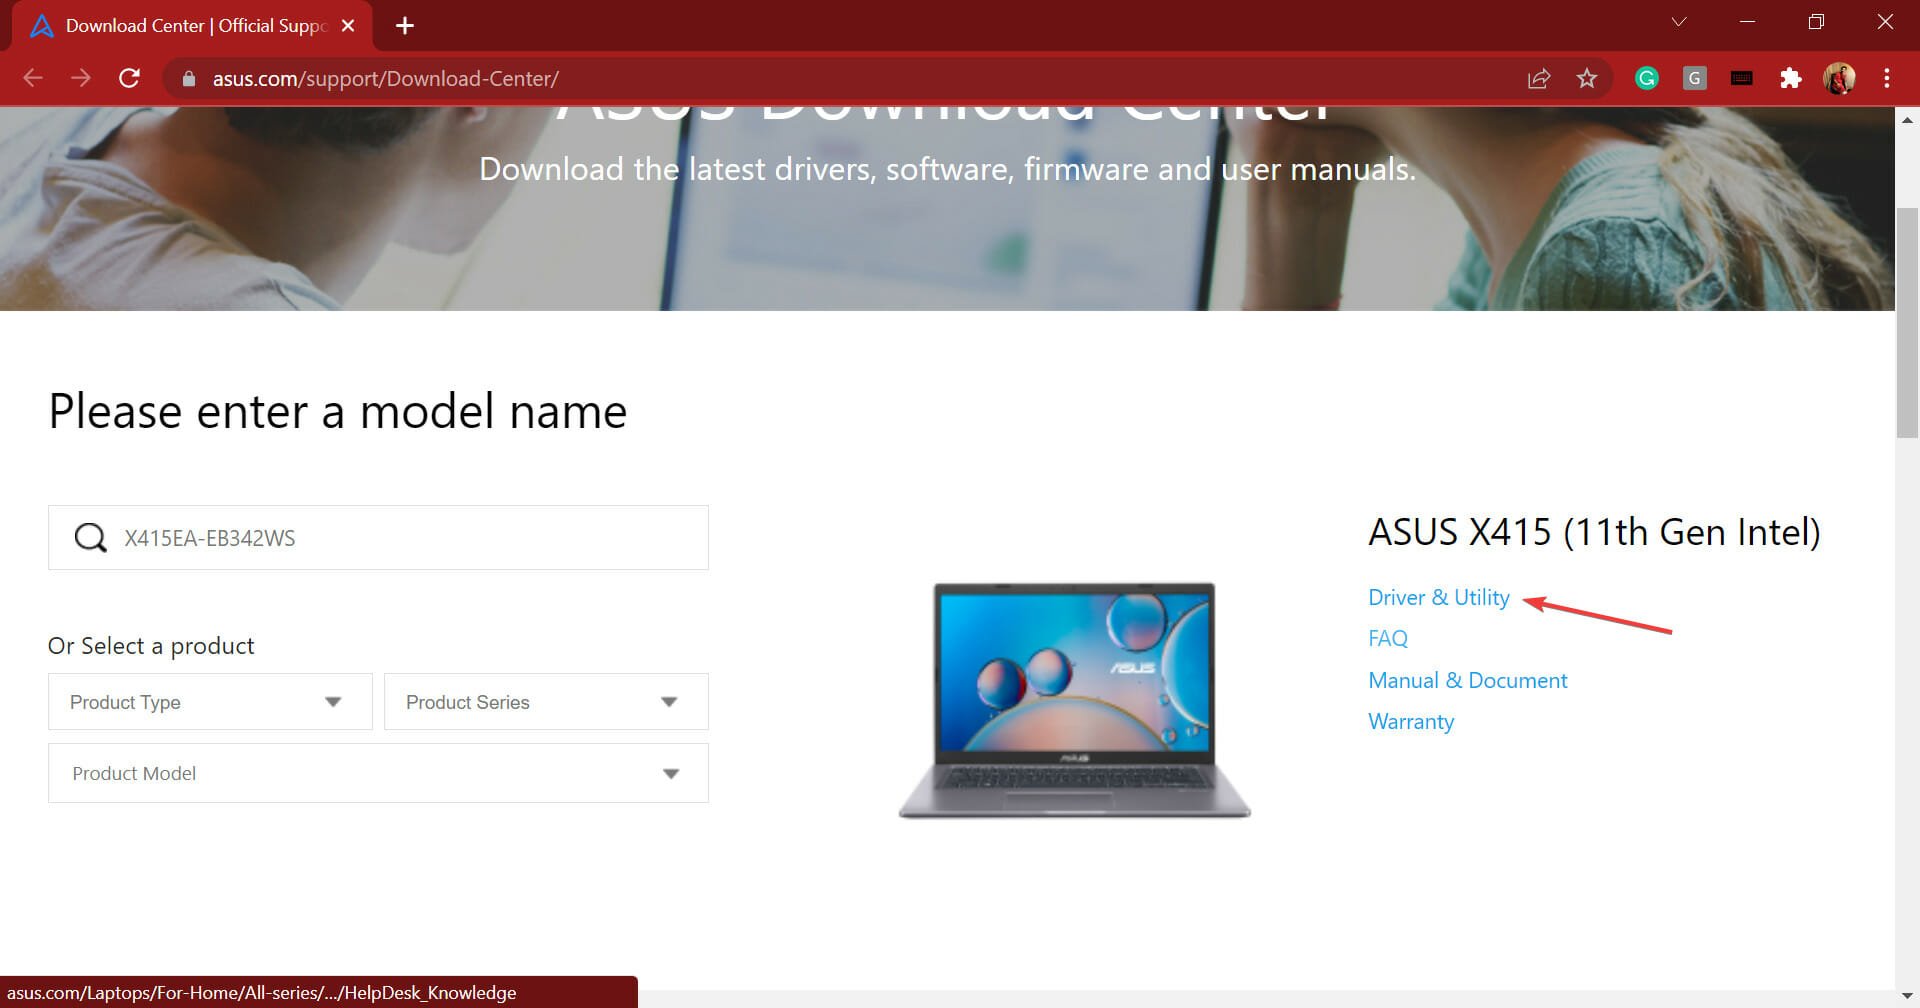
- Click on the Driver & Utility option on the right.
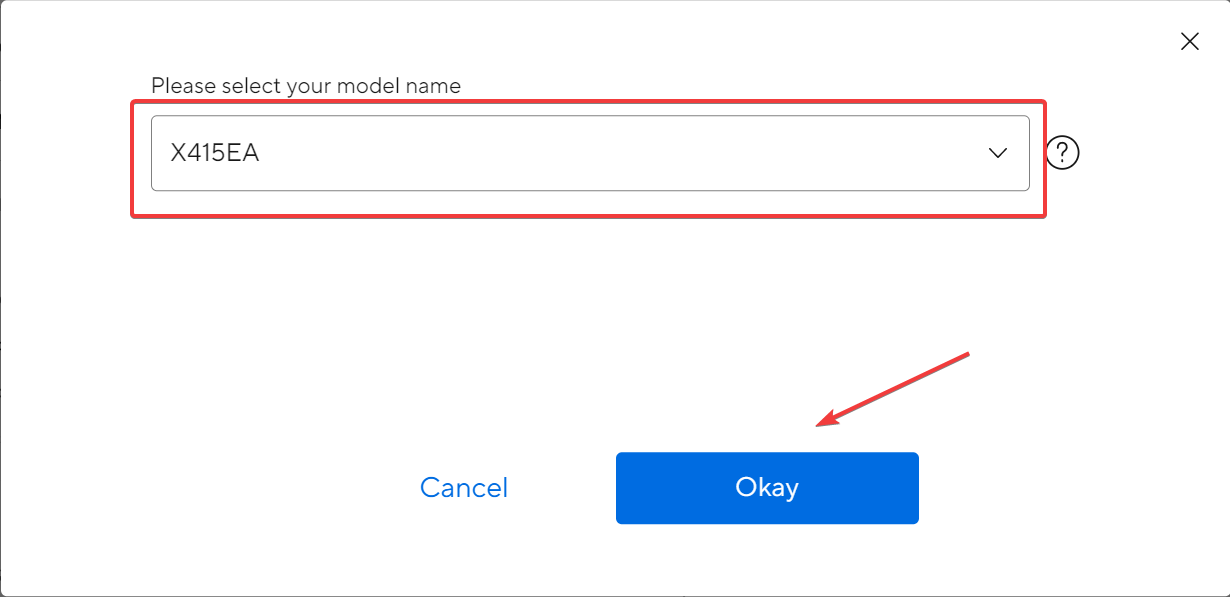
- Now, select your model name from the dropdown menu and click on Okay, if prompted.

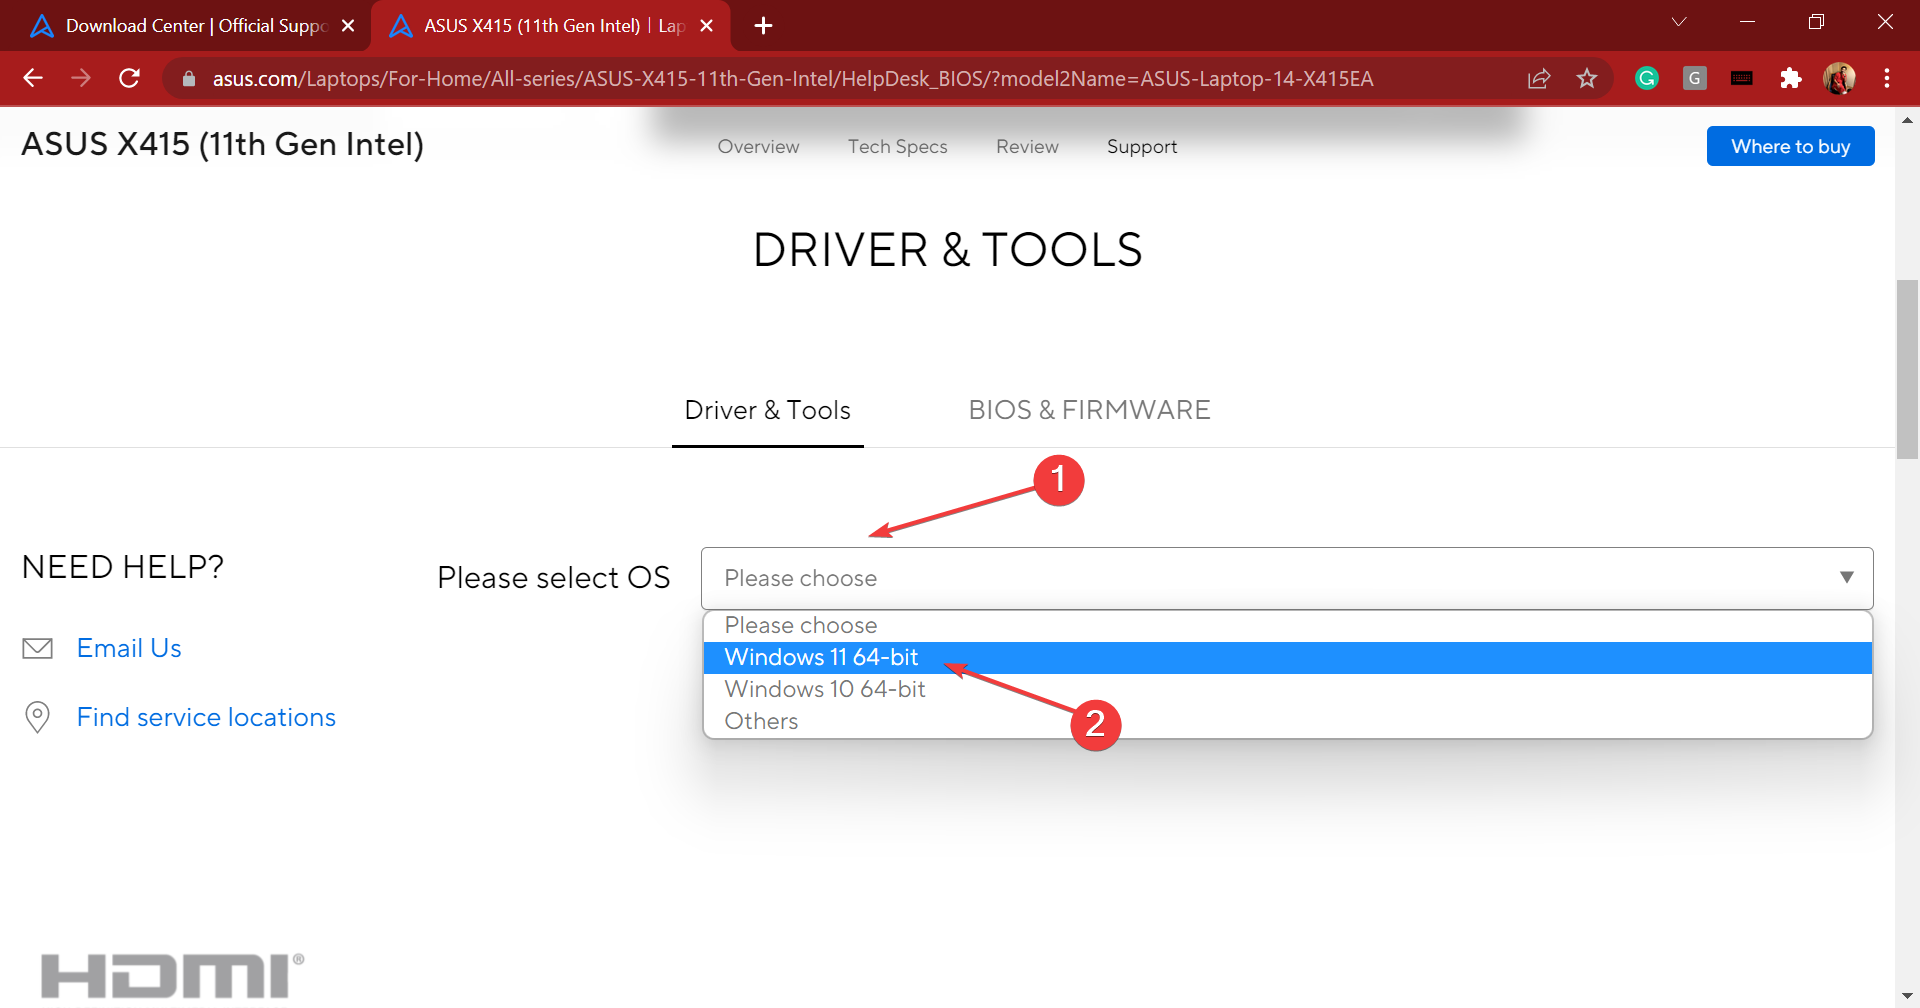
- Scroll down, click on the Please select OS dropdown menu, and select Windows 11 from the list of options.
- Again scroll down, and click on Show all under the Audio section.
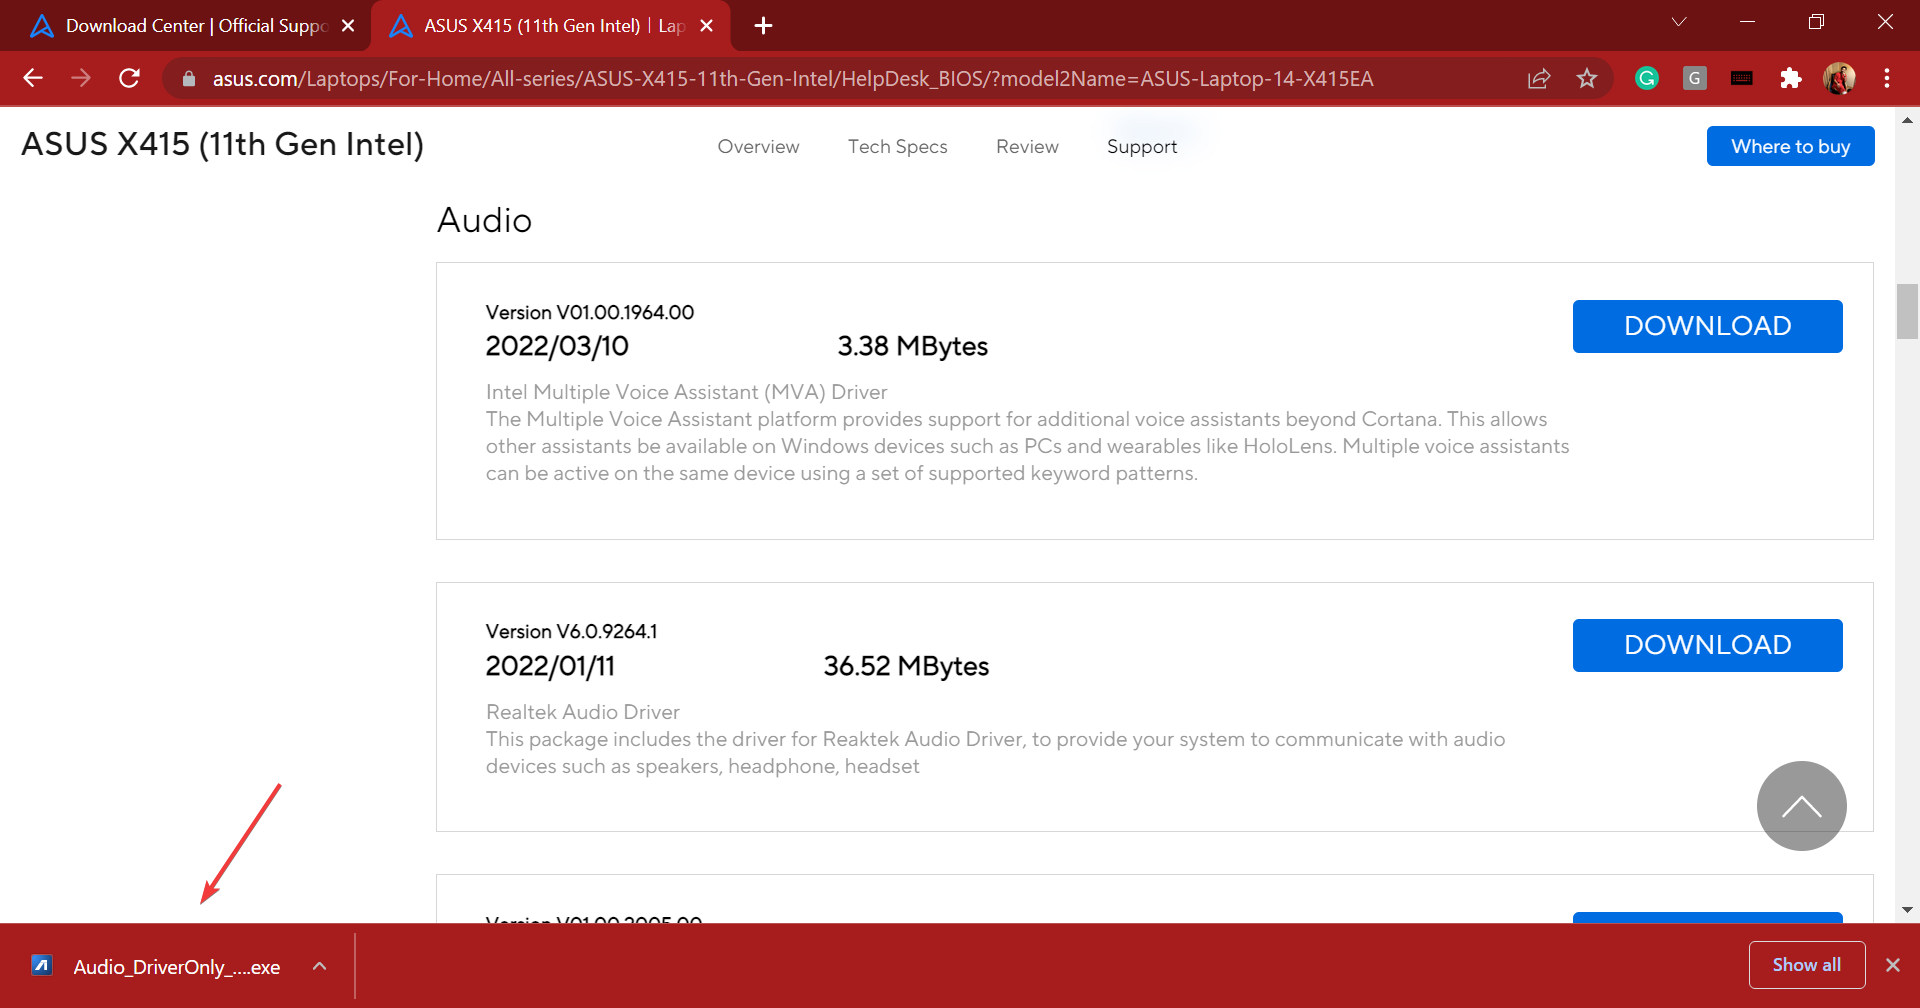
- Click on the Download button next to the Realtek audio driver entry.
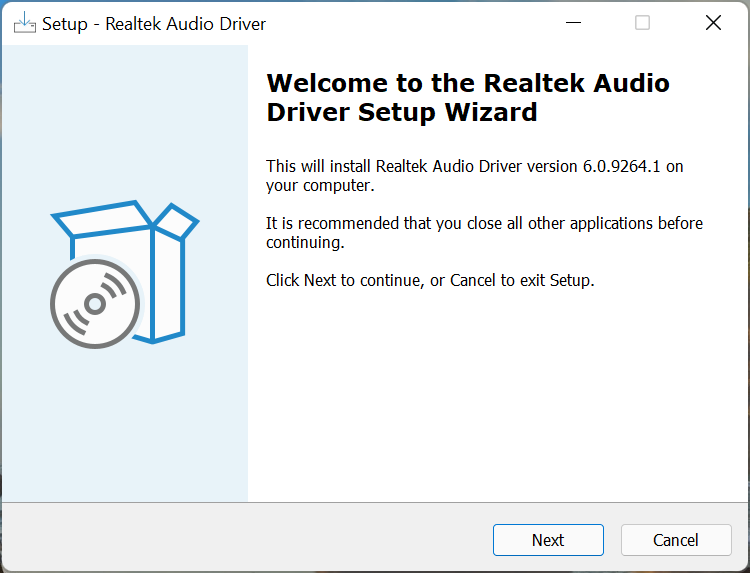
- Once you have the setup downloaded, click on it to launch the installer.
- Next, click Yes in the UAC (User Account Control) prompt that pops up.
- After the installer is launched, follow the on-screen instructions to complete the installation process.

- Once done, restart the computer for the changes to come into effect.


That’s it! You have now downloaded and installed Realtek audio driver in Windows 11 on the Asus device. In case you want to be sure, just head to the Device Manager and verify the same.
How can I fix issues with the Realtek audio driver in Windows 11?
Downloading the Realtek audio driver in Windows 11 was relatively simpler, the real task is troubleshooting issues with it. Though the chances of you encountering an error are bleak, you must always be prepared for such a situation to effectively handle it.
If you want to fix issues with the Realtek audio driver in Windows 11, first verify if the connections are in order. Also, check if there’s a newer version available and if you find one, update the driver. In case the driver is corrupt, reinstalling it should do the job.
Besides check for misconfigured sound settings and disable audio enhancements. If nothing else works, you can always perform a system restore in Windows 11, and get your PC back to a healthy state.
You now know how to manually download Realtek audio driver in Windows 11, and fix issues with it. So from now onwards, the audio quality on your system would always be up to the mark, with no major glitches.
Also, you must have noticed that all the manufacturers listed here have a tool on their website to automatically list out the various available drivers or their updates.
So try using it for a quicker experience, but if that doesn’t help, you can always follow the manual approach. Besides, find out what to do if there’s no sound in Windows 11.
Tell us your experience with the Realtek audio driver and if you noticed any improvement with the audio quality in the comments section below.
![]()
Newsletter
by Loredana Harsana
Loredana is a passionate writer with a keen interest in PC software and technology. She started off writing about mobile phones back when Samsung Galaxy S II was… read more
Published on October 26, 2022
- Downloading the Realtek audio driver on your Windows 11 system helps boost the audio quality and enhances connectivity, along with various other benefits.
- Learn how to download the driver for HP, Dell, Lenovo, and ASUS devices.
- Also, find out how to fix issues with the Realtek audio driver in Windows 11.
Realtek audio drivers are a useful piece of software that helps enhance the sound output and improve the system’s connectivity with external audio devices. Owing to these benefits, you may want to download the Realtek audio driver in Windows 11.
But many are clueless as to how to get Realtek audio driver installed on their computer. And with Windows 11 still in the early stages, this is expected.
If you too had been trying to download and install the Realtek audio driver in Windows 11, read the following sections to find out how you can do that.
How does installing the Realtek audio driver help in Windows 11?
Drivers, as we know, are critical for the effective functioning of every piece of hardware connected to the PC. Be it keyboard, mouse, printer, or the graphics and sound card.
First, the Realtek audio driver is one of the most user-friendly options available out there. Apart from that, it delivers high-quality audio not just with the built-in speakers and microphones but also if you connect external ones.
And the best part, you are unlikely to encounter issues with the connectivity. On the contrary, the driver would actually help improve it. Also, with each driver update, you are likely to see better performance and patches for previously known bugs.
So, let’s now see how you can download the Realtek audio driver in Windows 11.
How can I install the Realtek audio driver in Windows 11?
To make things easier, we will take up individual manufacturers in the following sections, and you can directly head to the one that you are using.
Also, we will be manually searching for the driver. But, several manufacturers offer a tool to automatically detect the device and list out the available drivers for it and you can use it, if available.
1. Realtek audio driver for HP in Windows 11
- Go to the driver section of HP’s official website, and select your device from the option listed here.
- Now, enter the product name or serial number in the provided text field, and click on the Submit button.
- Click on the All drivers entry to check out the various available ones. Also, make sure that the latest iteration is selected as the operating system. In case it isn’t, click on Choose a different OS and select Windows 11.
- Now, locate the Realtek audio driver, and click on the Download option next to it.
- You can now download the install assistant or click on No thanks, I will download and install manually. We choose the latter.
- Once the setup is downloaded, click on it to launch the installer.
- Click Yes on the UAC (User Account Control) prompt that pops up.
- Now, follow the on-screen instructions to complete the installation process, and restart the computer once it’s done for the changes to fully come into effect.
Once done with the steps listed here, you would have the Realtek audio driver downloaded and running in Windows 11.
Also, if you don’t want to go through the trouble of manually searching for the driver, use a reliable third-party app. We recommend using DriverFix, a dedicated tool that will automatically download and update the relevant drivers on your system.
2. Realtek audio driver for Dell in Windows 11
- Go to the driver dowloads section on Dell’s website, enter a product identifier in the designated text field, and click on Search.
- Now, click on the Find drivers option to manually search for the Realtek audio driver.
- Enter Realtek audio in the Keyword text field and choose Windows 11 from the Operating system dropdown menu.
- Now, scroll down and click on the Download button next to Realtek audio driver.
- Once the setup is downloaded, click on it to launch the installer.
- Click Yes on the UAC (User Account Control) prompt that pops up.
- Next, click Install and follow the on-screen instructions to complete the process.
Once you have downloaded and installed the Realtek audio driver in Windows 11, restart the computer for the changes to come into effect, and you are good to go.
- How to reinstall the audio driver in Windows 11
- How to download ASUS Realtek HD Audio Manager in Windows 11
- FIX: No sound output devices found in Windows 11
- Fix: Windows 11’s audio crackling & sound distortion
3. Realtek audio driver for Lenovo
- Go to the technical support page for Lenovo, hover the cursor over PC from the options listed here, and select View PC Support.
- Now, enter the device name in the designated text field and select the relevant option once it appears in the search results.
- Select Drivers & Software from the navigation pane on the left.
- Now, select the Manual update tab.
- Click on the Audio entry from the various components listed here.
- Next, click on Realtek audio driver for Windows 11.
- Click on the Download icon next to the Realtek audio driver.
- Once the setup is downloaded, click on it to launch the installer.
- Click Yes in the UAC (User Account Control) prompt that pops up.
- Now, follow the on-screen instructions to complete the installation process.
Once done with the download and installation of Realtek audio driver in Windows 11 on Lenovo device, restart the computer for the changes to come into effect.
4. Realtek audio driver for Asus
- Go to Asus support, and either enter the model name and select the relevant option from the search results, or you can manually find your product.
- Click on the Driver & Utility option on the right.
- Now, select your model name from the dropdown menu and click on Okay, if prompted.
- Scroll down, click on the Please select OS dropdown menu, and select Windows 11 from the list of options.
- Again scroll down, and click on Show all under the Audio section.
- Click on the Download button next to the Realtek audio driver entry.
- Once you have the setup downloaded, click on it to launch the installer.
- Next, click Yes in the UAC (User Account Control) prompt that pops up.
- After the installer is launched, follow the on-screen instructions to complete the installation process.
- Once done, restart the computer for the changes to come into effect.
That’s it! You have now downloaded and installed Realtek audio driver in Windows 11 on the Asus device. In case you want to be sure, just head to the Device Manager and verify the same.
How can I fix issues with the Realtek audio driver in Windows 11?
Downloading the Realtek audio driver in Windows 11 was relatively simpler, the real task is troubleshooting issues with it. Though the chances of you encountering an error are bleak, you must always be prepared for such a situation to effectively handle it.
If you want to fix issues with the Realtek audio driver in Windows 11, first verify if the connections are in order. Also, check if there’s a newer version available and if you find one, update the driver. In case the driver is corrupt, reinstalling it should do the job.
Besides check for misconfigured sound settings and disable audio enhancements. If nothing else works, you can always perform a system restore in Windows 11, and get your PC back to a healthy state.
You now know how to manually download Realtek audio driver in Windows 11, and fix issues with it. So from now onwards, the audio quality on your system would always be up to the mark, with no major glitches.
Also, you must have noticed that all the manufacturers listed here have a tool on their website to automatically list out the various available drivers or their updates.
So try using it for a quicker experience, but if that doesn’t help, you can always follow the manual approach. Besides, find out what to do if there’s no sound in Windows 11.
Tell us your experience with the Realtek audio driver and if you noticed any improvement with the audio quality in the comments section below.
![]()
Newsletter
Содержание
- Способ 1: Приложение «Параметры»
- Способ 2: Поиск в меню «Пуск»
- Способ 3: «Панель управления»
- Способ 4: Исполняемый файл диспетчера звука
- Вопросы и ответы

Обратим ваше внимание на то, что стандартный эквалайзер поддерживается практически во всех версиях драйверов для встроенных звуковых карт. Если при помощи способов ниже вам не удалось отыскать соответствующую функцию, возможно, понадобится обновить звуковой драйвер. Это можно сделать вручную, используя инструкции из приведенной ниже статьи.
Подробнее: Установка драйверов стандартными средствами Windows
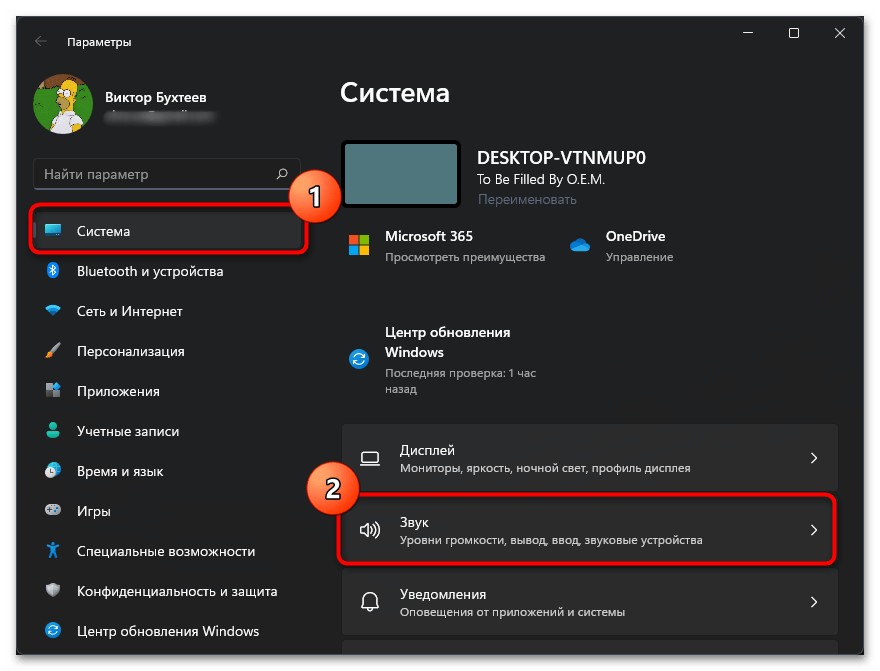
Способ 1: Приложение «Параметры»
Пользователи часто обращаются к приложению «Параметры» в Windows 11 для доступа к различным системным настройкам. В нем есть кнопка, позволяющая перейти к отдельному окну для управления звуковыми устройствами, через которое вы и сможете включить эквалайзер для его дальнейшей настройки. Полностью реализация этого метода выглядит следующим образом:
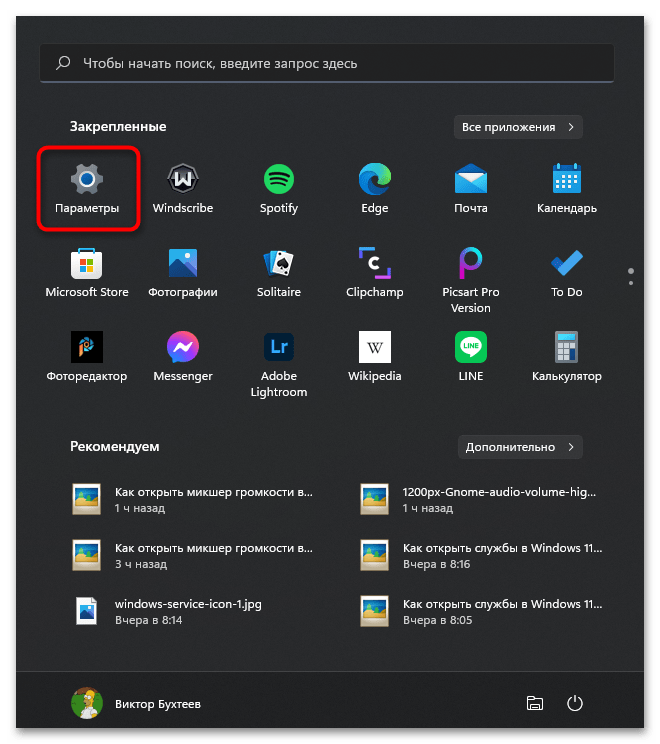
- Откройте меню «Пуск», посмотрите на список закрепленных значков и найдите в нем «Параметры».
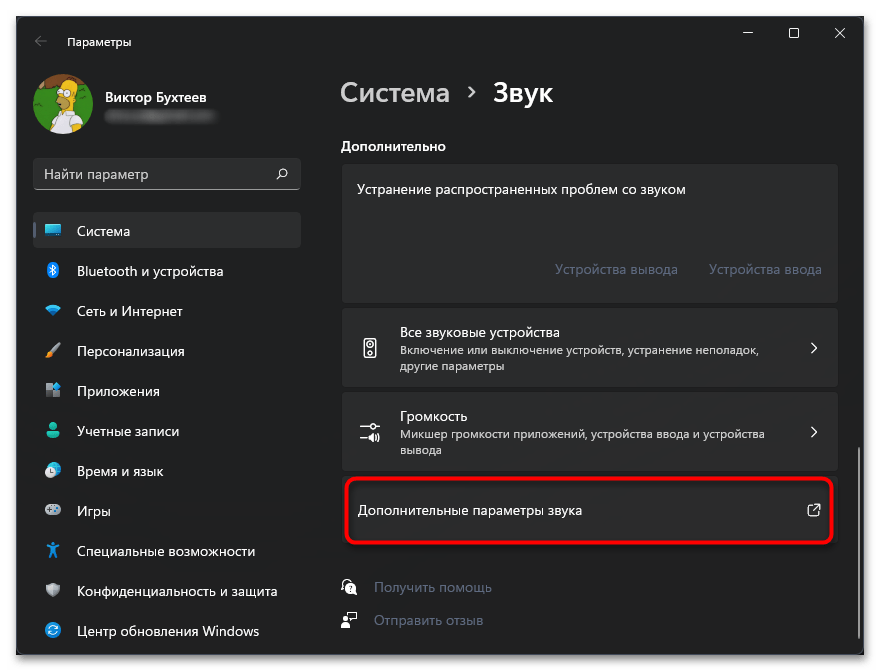
- После перехода к новому окну выберите раздел «Система» и в области справа отыщите категорию «Звук».
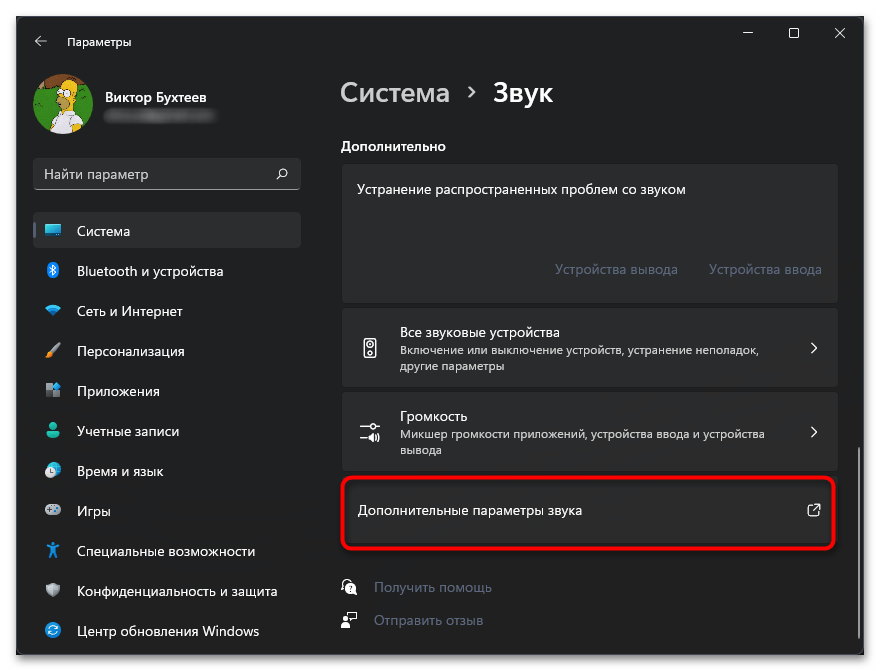
- Как только откроете ее, можете опуститься, чтобы отыскать кнопку «Дополнительные параметры звука».
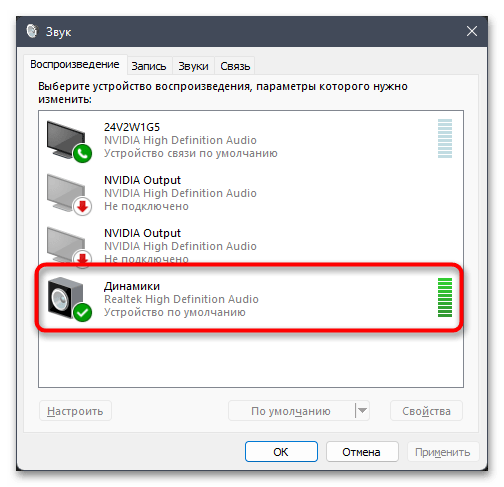
- Она отвечает за переход к окну «Звук», в котором в первую очередь следует отыскать используемое устройство воспроизведения. Возле него будет стоять зеленая галочка, поэтому вам понадобится только дважды кликнуть левой кнопкой мыши по этому оборудованию.
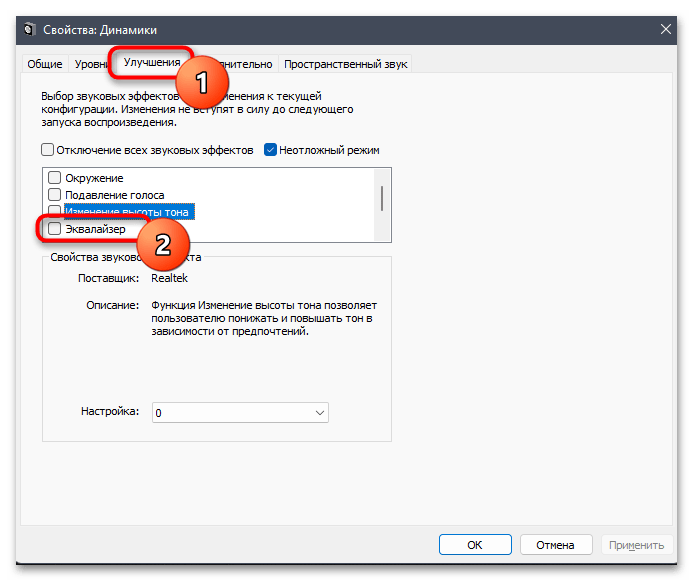
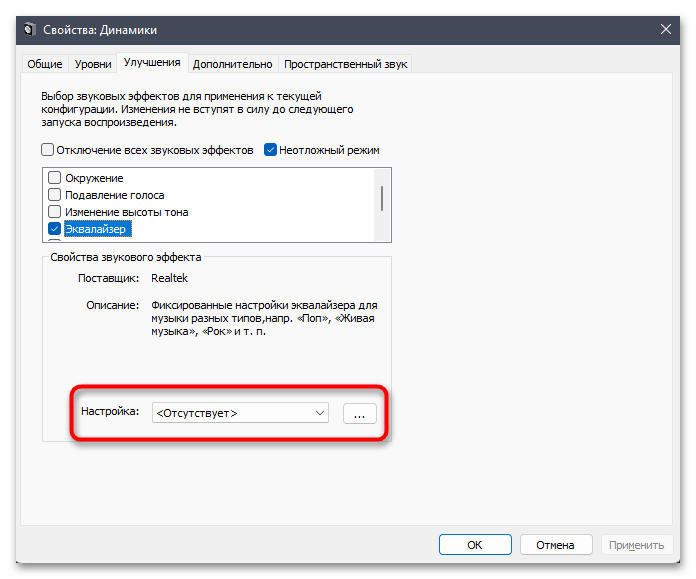
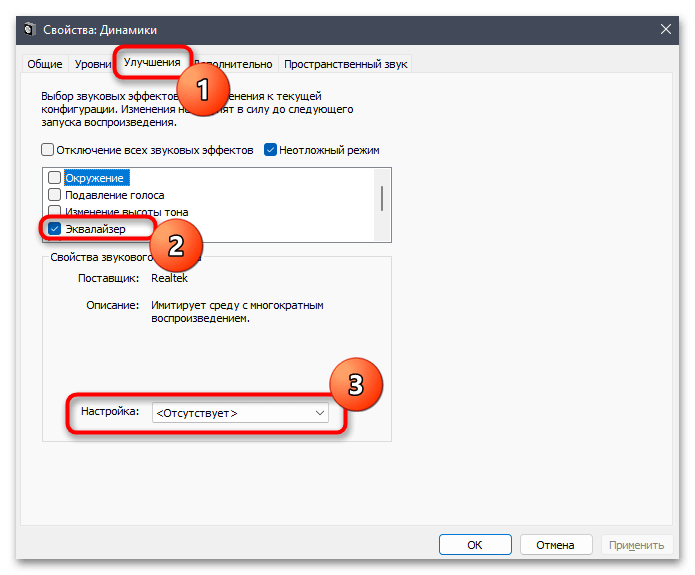
- В окне со свойствами устройства воспроизведения перейдите на вкладку «Улучшения» и активируйте галочку возле пункта «Эквалайзер».
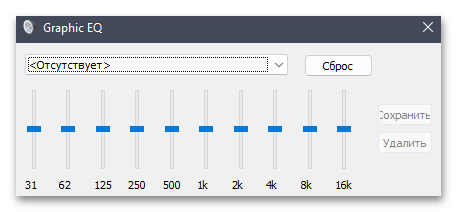
- Теперь вы можете выбрать одну из стандартных настроек эквалайзера или нажать по кнопке с тремя точками для открытия ползунков настройки частот.
- Регулируйте их или прямо здесь меняйте профили, чтобы подобрать оптимальный вариант эквалайзера. Кстати, изменения вступают в силу сразу же, поэтому вы можете параллельно прослушивать музыку, добиваясь нужного результата. Перед выходом не забудьте сохранить новый профиль.
Способ 2: Поиск в меню «Пуск»
Отдельно затронем метод, который по принципу реализации похож на предыдущий, но позволяет открыть эквалайзер буквально на пару шагов быстрее. Для этого понадобится использовать поиск в меню «Пуск», тем самым сразу переходя к необходимой категории настроек в приложении «Параметры».
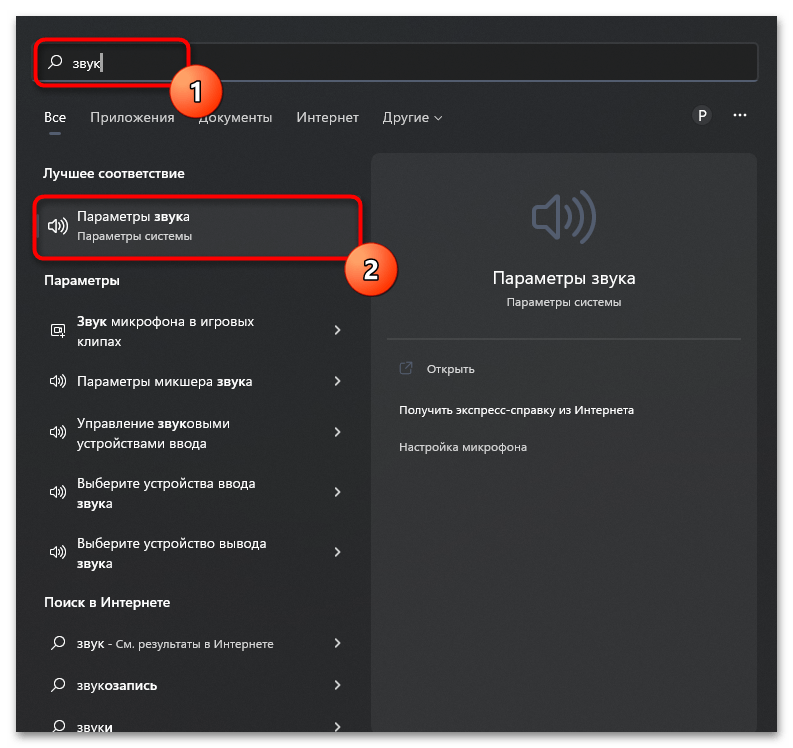
- Откройте меню «Пуск» и в строке поиска введите «Параметры звука». Перейдите по появившемуся соответствию.
- В новом окне нажмите по плитке «Дополнительные параметры звука».
- Вы будете перемещены в то же самое окно, о котором шла речь в способе выше, сможете выбрать устройство воспроизведения и активировать для него эквалайзер с дальнейшей установкой своих настроек.

Способ 3: «Панель управления»
Открыть то же самое меню с настройками можно и через «Панель управления», если этот, более старый, метод вам кажется удобнее. Результат все равно будет один и тот же, незначительно поменяется только алгоритм выполняемых действий. Однако можно получить доступ и к дополнительным настройкам звукового драйвера, о чем тоже будет сказано далее.
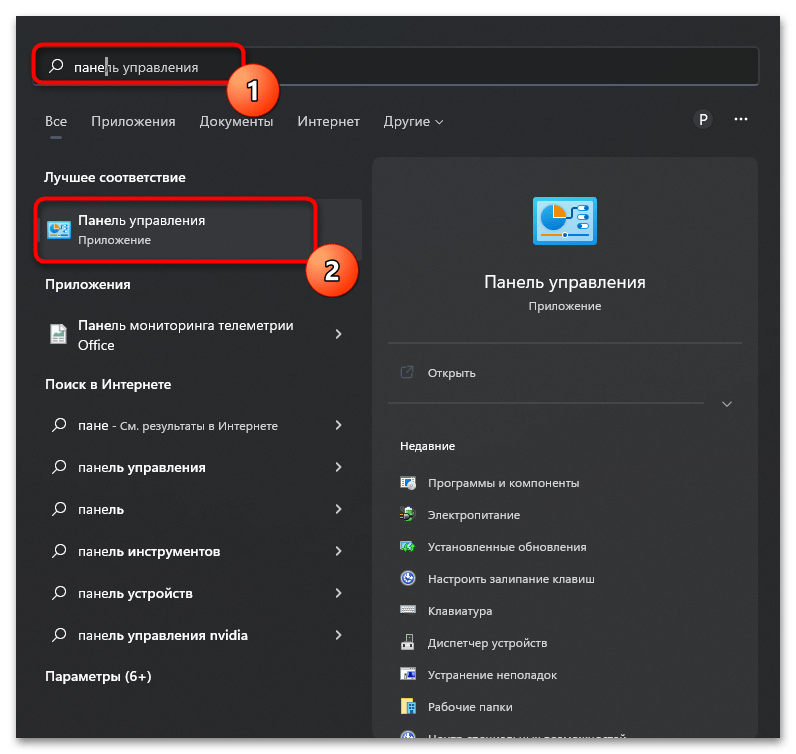
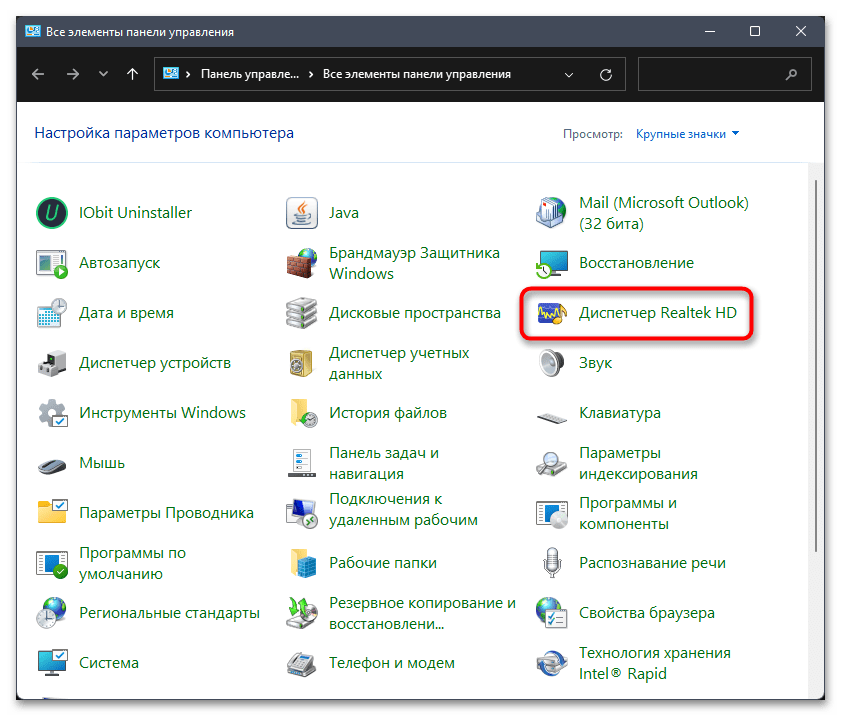
- Перейдите в меню «Пуск» и через поиск отыщите «Панель управления».
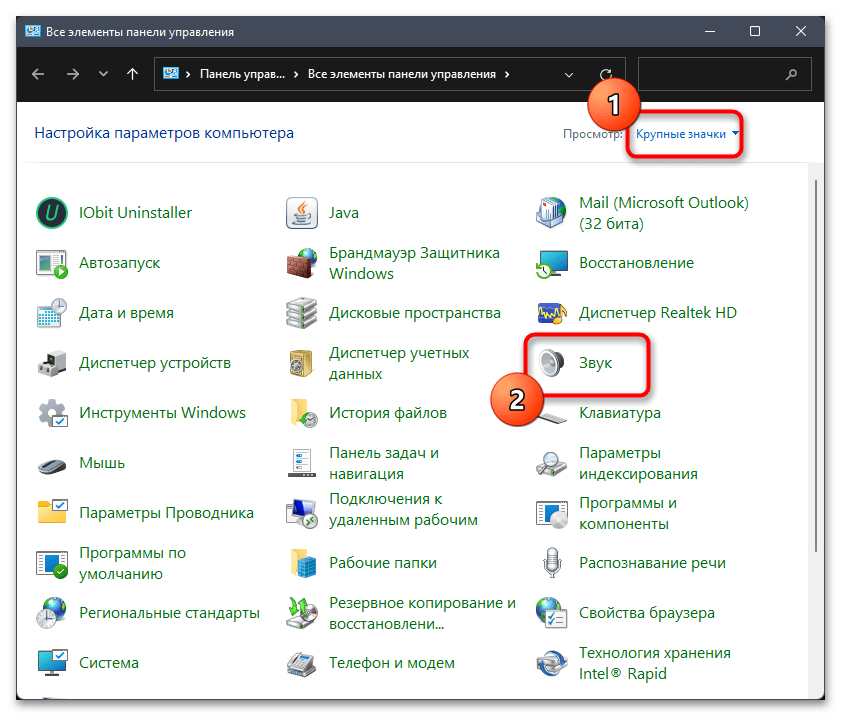
- После перехода к соответствующему приложению установите тип просмотра в состояние «Крупные значки» и щелкните по названию пункта «Звук».
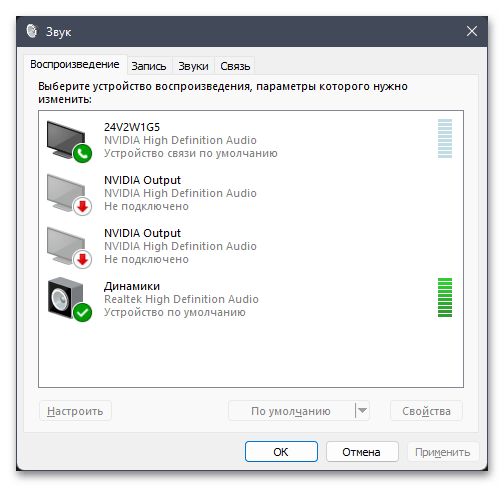
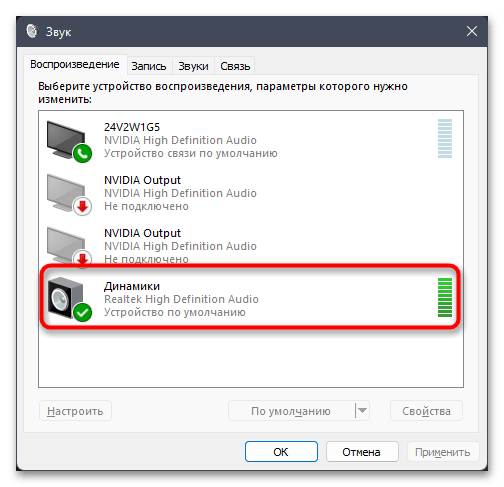
- Далее выберите устройство воспроизведения, для которого хотите активировать эквалайзер, дважды щелкнув по нему левой кнопкой мыши.
- Перейдите на вкладку «Улучшения», поставьте галочку возле пункта «Эквалайзер» и приступайте к настройке. Вы можете как выбрать один из заготовленных профилей, так и создать его самостоятельно, регулируя частотные ползунки.
- Часто после установки звукового драйвера в «Панели управления» появляется дополнительный значок, позволяющий перейти к его настройкам. В большинстве случаев он называется «Диспетчер Realtek HD», поскольку самый популярный производитель встроенных звуковых карт — Realtek. Если у вас ноутбук или подключена внешняя звуковая карта, при поиске таких приложений отталкивайтесь от характеристик устройства.
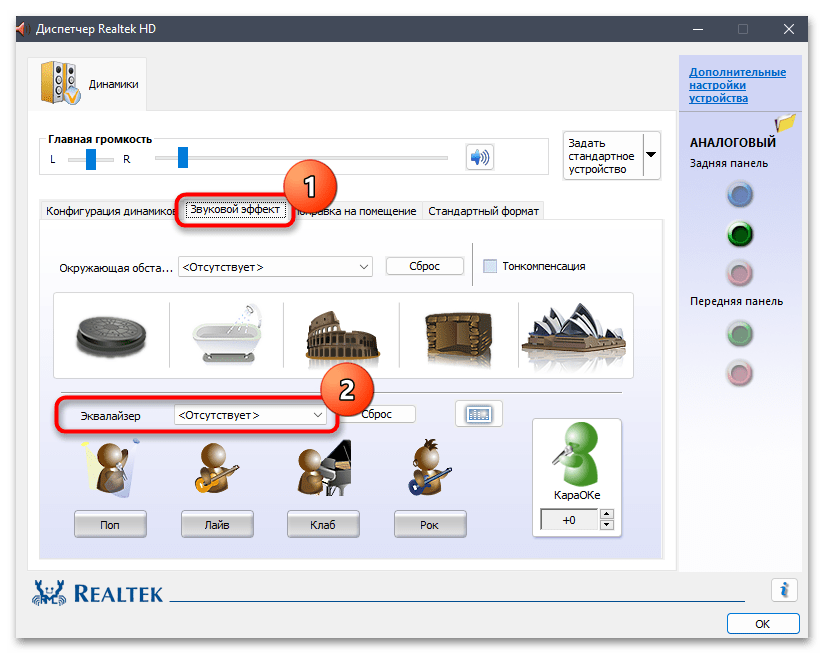
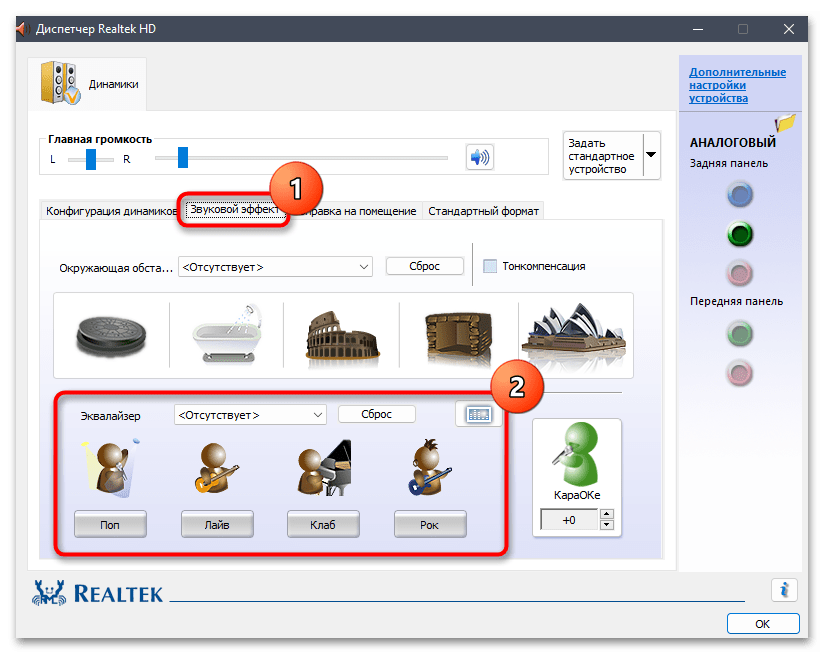
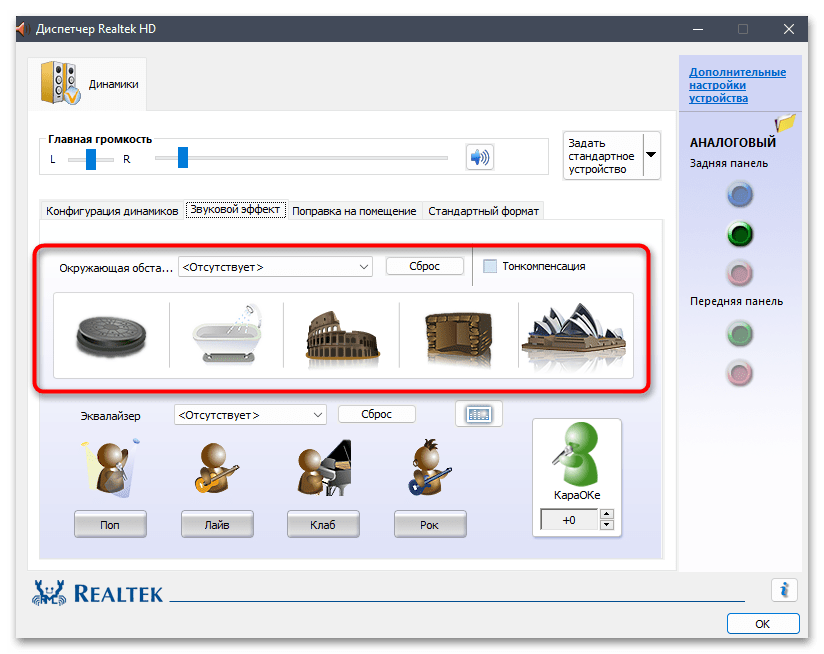
- В диспетчере звука понадобится выбрать вкладку «Звуковой эффект» и активировать эквалайзер.
- Вместо выбора профиля можно нажать по соответствующей кнопке справа, чтобы отобразить ползунки регулирования. После изменения не забудьте задать название для своего профиля и сохранить его.
Способ 4: Исполняемый файл диспетчера звука
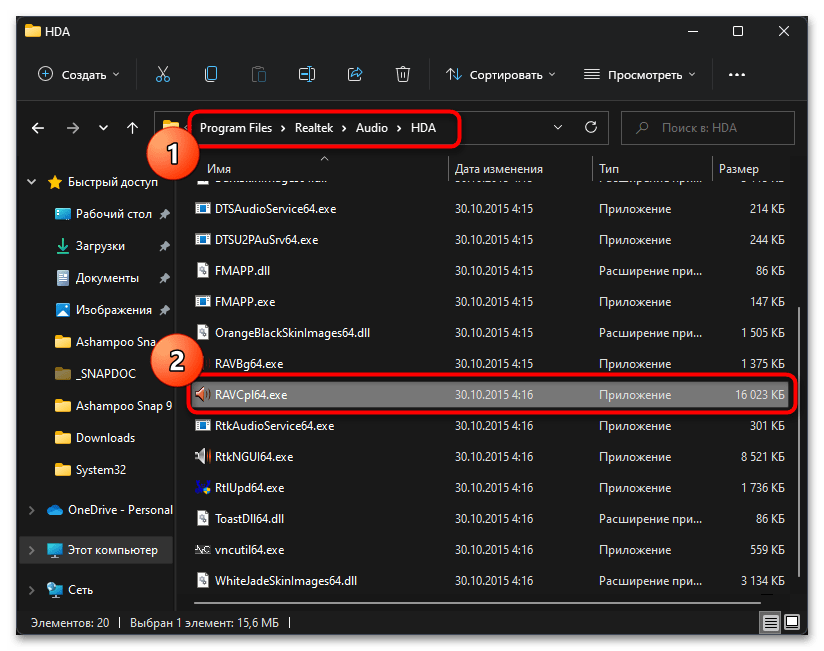
В конце предыдущего метода мы говорили о запуске диспетчера звука от производителя звуковой карты, который устанавливается в Windows 11 вместе с драйверами. Если его значок в «Панели управления» отсутствует, можно отыскать исполняемый файл для запуска вручную, что осуществляется следующим образом:
- Откройте «Проводник» и перейдите по пути
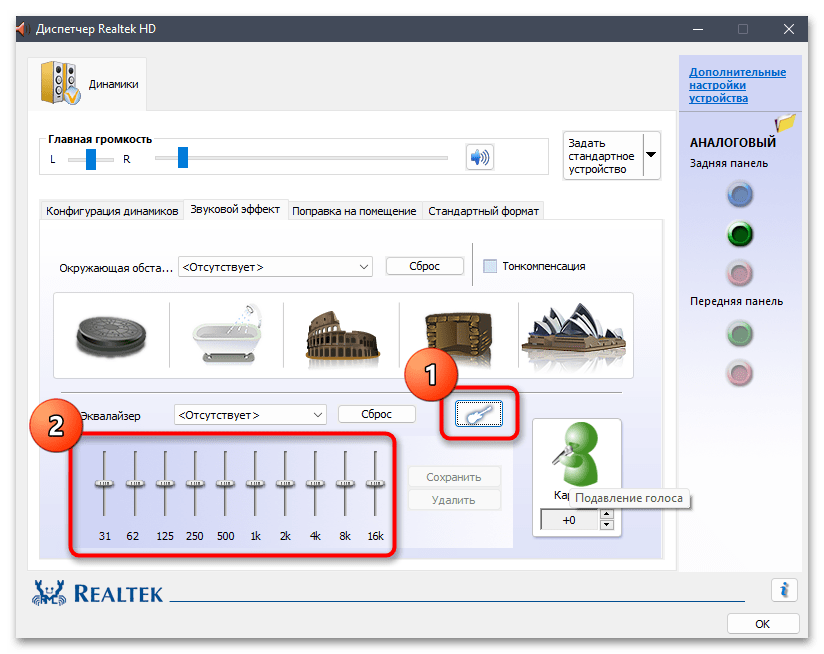
C:Program FilesRealtekAudioHDA. Папка с драйвером аудио может отличаться от текущей, если в вашем компьютере или ноутбуке встроена другая звуковая карта, однако мы остановимся на самом популярном варианте. В каталоге найдите исполняемый файл для запуска диспетчера, который в данном случае называется «RAVCpl64.exe». - В новом окне перейдите на вкладку «Звуковой эффект» и выберите одну из заготовок. Можно и развернуть все ползунки эквалайзера для ручной настройки звука.
- Обратите внимание и на дополнительные функции, предлагаемые разными драйверами. Часто можно включить улучшения для конкретных задач или активировать окружающую обстановку, если это будет необходимо.
Читайте также: Что делать, если не запускается Realtek HD в Windows
Еще статьи по данной теме:
Помогла ли Вам статья?
Аудиодрайвер Realtek HD — это широко используемый аудиодрайвер в Windows. Некоторые пользователи сообщают, что аудиоменеджер Realtek HD не работает или не отображается в Windows 11/10. Если вы столкнулись с этой проблемой, то этот пост вам поможет.

Аудиодрайвер Realtek HD помогает нам воспроизводить звук на нашем ПК с Windows. Представьте, что вы проигрываете аудиоклип и ничего не слышите. Динамики работают нормально, звук воспроизводится нормально. Мы пытаемся исправить это, увеличивая или уменьшая громкость и устраняя неполадки аудиодрайвера Realtek. Что делать, если вы не можете найти аудиодрайвер Realtek HD в диспетчере устройств? Как это исправить? Давайте посмотрим, как решить проблему.
Realtek HD Audio Manager не отображается в диспетчере устройств
Если Realtek HD Audio Manager не работает, не отображается или отсутствует в диспетчере устройств в Windows 11 или Windows 10, вы можете решить проблему, используя следующие методы.
- Обновите аудиодрайвер Realtek HD
- Показать скрытые устройства
- Добавить устаревшее оборудование
- Переустановите драйверы
- Сбросить BIOS по умолчанию
Давайте подробно рассмотрим каждый метод.
1]Обновите аудиодрайвер Realtek HD.
Если Realtek HD Audio Manager не работает на вашем компьютере, это может быть связано с устаревшими драйверами или отсутствием файлов. Первое, что вы должны попробовать, это обновить аудиодрайверы Realtek HD в диспетчере устройств. Также проверьте наличие обновлений Windows в приложении «Настройки», с помощью которого мы можем обновлять драйверы автоматически.
2]Показать скрытые устройства
Если вы не видите Realtek HD Audio Manager, есть вероятность, что Realtek HD Audio Manager или связанные с ним устройства скрыты по ошибке. Вы должны выбрать опцию отображения скрытых устройств в диспетчере устройств. Скрытые устройства будут видны, и вы можете найти в них Realtek HD Audio Manager.
3]Добавить устаревшее оборудование
Если Realtek HD Audio Manager отсутствует в диспетчере устройств, вы можете исправить это, используя функцию добавления устаревшего оборудования. Откройте Диспетчер устройств на своем ПК и выберите Звуковые, видео и игровые контроллеры. Затем нажмите «Действие» в строке меню и выберите «Добавить устаревшее оборудование».
Затем следуйте инструкциям на экране и выберите «Поиск и автоматическая установка оборудования» (рекомендуется), затем следуйте инструкциям и установите устройство вручную.
Это может решить проблему с Realtek HD Audio Manager.
4]Переустановите драйверы
Если проблема все еще не устранена, вам необходимо удалить аудиодрайвер Realtek HD и переустановить его вручную, чтобы решить проблему. Это решит проблему, и вы сможете легко воспроизводить звук с помощью аудиоустройств Realtek HD.
5]Сбросить BIOS по умолчанию
Иногда изменения, которые вы вносите или вносите в настройки BIOS, могут повлиять на устройства, которые вы используете на своем ПК. Единственный способ исправить проблемы, возникающие в этом экземпляре, — это сбросить BIOS до значений по умолчанию. После этого вы сможете без проблем использовать Realtek HD Audio Manager.
Почему мой Realtek не отображается в диспетчере устройств?
Может быть множество причин, по которым устройства Realtek не отображаются в диспетчере устройств. Возможно, устройства скрыты, драйверы устарели или повреждены, или некоторые настройки в BIOS повлияли на это. Вы можете легко решить проблему, используя описанные выше методы.
Диспетчер звука Realtek HD: «В этом пакете драйверов не поддерживался драйвер»
Когда вы видите значок «В этом пакете драйверов не поддерживался ни один драйвер”При попытке использовать аудиоменеджер Realtek HD, вам необходимо обновить драйверы или переустановить их, если необходимо установить правильные драйверы для вашего ПК.
.
Skip to content
- ТВикинариум
- Форум
- Поддержка
- PRO
- Войти
ФорумXpucT2022-08-18T02:06:35+03:00
Вы должны войти, чтобы создавать сообщения и темы.
Пропал эквалайзер [Решено]

Цитата: Andrei Webnotes от 31.05.2022, 04:51
Добрый день.
Пересел на новое устройство, обновил винду и обнаружил, что теперь нет эквалайзера.
Возможно, кто-то знает как его вернуть?
Пытался гуглить, ничего не нашел.
Вроде как надо дрова другие ставить.
Буду благодарен если кто поможет.
Windows 10 21H2 (19044.1706)
Скрин 1
Скрин 2
Добрый день.
Пересел на новое устройство, обновил винду и обнаружил, что теперь нет эквалайзера.
Возможно, кто-то знает как его вернуть?
Пытался гуглить, ничего не нашел.
Вроде как надо дрова другие ставить.
Буду благодарен если кто поможет.
Windows 10 21H2 (19044.1706)
Скрин 1
Скрин 2
Голосуйте — палец вниз.0Голосуйте — палец вверх.0

Цитата: Mikhail от 31.05.2022, 05:42
Добрый🖐.
Обновите драйвера с удалением старых(и выключите интернет), через безопасный режим с помощью DDU(Display Driver Uninstaller), поставьте новые с сайта производителя мат.платы или скачайте на стороне realtek звуковой драйвер, например, после включите интернет.
Добрый🖐.
Обновите драйвера с удалением старых(и выключите интернет), через безопасный режим с помощью DDU(Display Driver Uninstaller), поставьте новые с сайта производителя мат.платы или скачайте на стороне realtek звуковой драйвер, например, после включите интернет.
Голосуйте — палец вниз.0Голосуйте — палец вверх.1
«Любой дурак может знать. Дело в том, чтобы понять.» — Альберт Эйнштейн
Цитата: Andrei Webnotes от 31.05.2022, 22:39
Здравствуйте, @satirov
Сделал всё как вы написали.
По началу эквалайзер так и не появился.
Но после перезагрузки появился.
Также появилась папка C:Program FilesRealtek и в автозагрузке появилось приложение C:Program FilesRealtekAudioHDARtkNGUI64.exe
Единожды настроив эквалайзер под свои предпочтения (не люблю сильные басы и когда речь не слышно) — отключил RtkNGUI64.exe с автозагрузки.
После перезагрузки все настройки сохраняются, а RtkNGUI64.exe уже автоматически не загружается.
И если надо еще раз подкрутить эквалайзер, то я просто запускаю руками RtkNGUI64.exe и меняю что нужно.
Вопрос решён.
Спасибо!
Голосуйте — палец вниз.0Голосуйте — палец вверх.0
Улучшения звука в ОС Windows прошли долгий путь с 1800-х по 2000-е годы. В ходе этого курса используются несколько новых функций, таких как «Dolby» или «DTS». Среди них одним из наиболее перспективных является «Эквалайзер громкости», что делает более тихий звук более громким. Его можно активировать из «Звук» настройки. Однако некоторые пользователи не нашли эти настройки в своей системе.
В этом руководстве исправляется опция «Эквалификация громкости», отсутствующая в настройках звука, используя следующий контент:
- Что такое эквалайзер громкости?
- Где найти настройки эквалайзера громкости в Windows 11/10?
- Исправлено: невозможно найти эквалайзер громкости в Windows 11/10.
Что такое эквалайзер громкости?
«Эквалайзер громкости» трансформирует наше восприятие звука, управляя динамическим диапазоном. Наши уши воспринимают изменения громкости, и за счет уменьшения значительных изменений в громких и тихих звуках звук кажется более последовательным и чистым. Это может сделать прослушивание более приятным, поскольку звуки идеально сбалансированы с точки зрения громких и тихих звуков. Он работает путем анализа динамического диапазона аудиосигнала и его настройки для достижения более равномерного вывода звука.
Где найти настройки эквалайзера громкости в Windows 11/10?
«Эквалайзер громкостиНастройки в Windows 11/10 находятся в разделе «Звук» настройки. Чтобы найти эти настройки, выполните следующие действия.
Шаг 1. Откройте настройки звука.
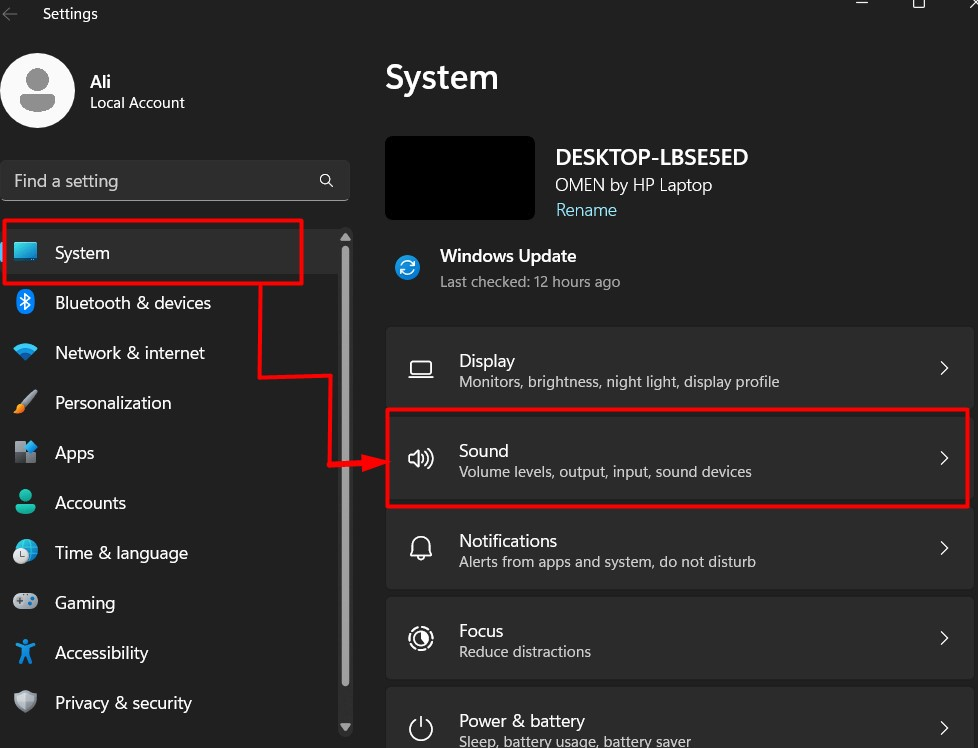
Настройки «Звук» настраиваются во всех свойствах звука Windows. Чтобы открыть его, нажмите кнопку «Окна + ЯКлавиши «», чтобы запустить «Настройки» Windows, выберите «Система» на левой панели и нажмите «Звук» на правой панели:
Из «ЗвукНастройки, выберите «Дополнительные настройки звука”:

Шаг 2. Найдите настройки эквалайзера громкости
В «Дополнительные настройки звука», выберите устройство вывода, например «Оратор» или «Наушники» и нажмите кнопку «ХарактеристикиКнопка », как показано ниже:

В следующем окне выберите «Улучшения» и установите/снимите флажок напротив «Эквалайзер громкости», чтобы включить/отключить его. Здесь вы можете «Предварительный просмотр» аудио перед его включением:
Кликнув «Настройки», вы можете настроить «Время выпуска» для «Эквалайзер громкостис «Короткого» на «Длинный»:

Вышеуказанные настройки могут быть не видны некоторым пользователям, поэтому, чтобы это исправить, следуйте этому руководству до конца.
Исправлено: невозможно найти эквалайзер громкости в Windows 11/10.
Для некоторых пользователей «Эквалайзер громкости» не найден в настройках «Звук». Это связано с установленными драйверами, которые можно исправить, выполнив следующие действия:
Шаг 1. Откройте диспетчер устройств.
«Диспетчер устройств» управляет драйверами всех периферийных устройств/устройств, подключенных к системе. То же самое и с «Эквалайзер громкости”. Чтобы открыть его, нажмите клавишу «Windows» и войдите в «Диспетчер устройств»:
Шаг 2. Обновите/перенастройте аудиодрайвер, чтобы добавить выравнивание громкости в настройках.
В «Диспетчере устройств» найдите «Звук, видео…контроллеры», как показано ниже, щелкните его правой кнопкой мыши и выберите «Обновить драйвер» из меню:
В следующем окне активируйте выделенную опцию:
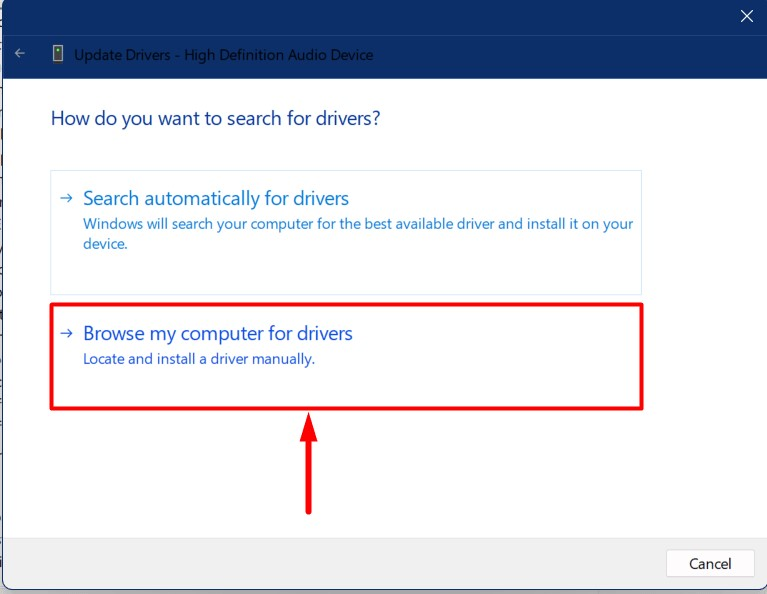
Теперь нажмите кнопку «Позвольте мне выбрать… на моем компьютере», как подчеркнуто:
В окне «Далее» убедитесь, что «Показать совместимое оборудованиеустановлен флажок и выберите «Аудиоустройства высокой четкости», и вызвать «Следующий» кнопка:
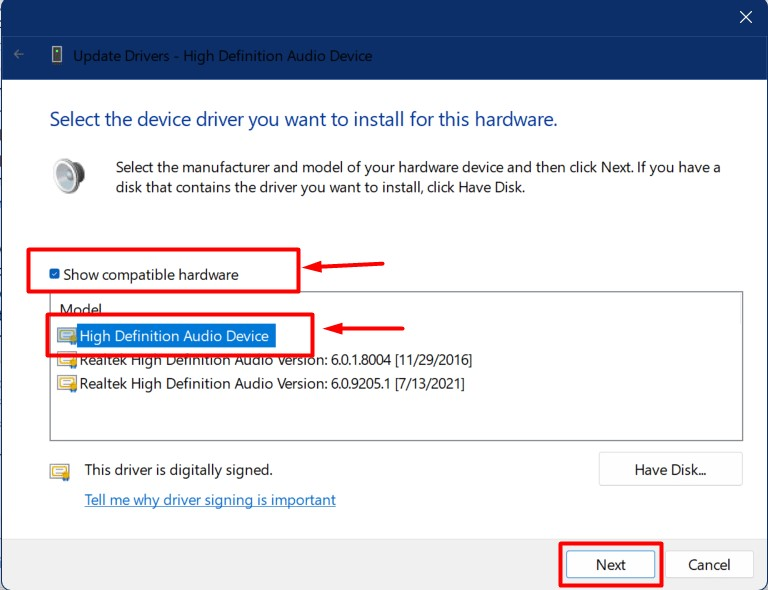
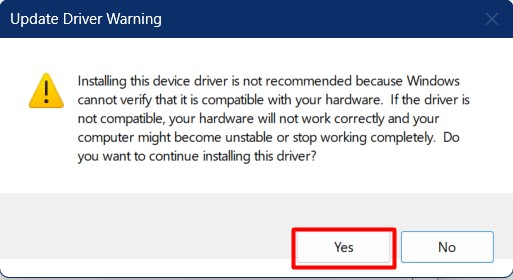
Подтвердите установку, нажав кнопку «Да”:
После завершения процесса установки перезагрузите систему и «Эквалайзер громкостиТеперь опция будет видна в разделе «Звукнастройки в разделе «Улучшениявкладка:

Это все, что касается устранения проблемы с отсутствием опции «Выравнивание громкости» в Windows.
Заключение
«Эквалайзер громкостиНастройки отсутствуют из-за проблем совместимости драйверов. Чтобы это исправить, перейдите к «Диспетчер устройств», щелкните правой кнопкой мыши «Звуковые, видео и игровые контроллеры» драйвер и вызвать «Обновить драйвер» вариант. Оттуда найдите драйверы на вашем компьютере и выберите «Аудиоустройства высокой четкости», и триггер «Следующий», чтобы установить его. «Эквалификация громкости» теперь будет видна и настраиваема. В этом руководстве решена проблема отсутствия эквалайзера громкости в Windows 11/10.
 Среди частых вопросов пользователей последних версий Windows — загрузка и установка приложения Realtek Audio Console (или Realtek Audio Control), а также решение проблем с его работой, если оно было установлено.
В этой инструкции подробно о способах скачать и установить Realtek Audio Console, а также о причинах, по которым при установке приложения могут возникнуть проблемы.
Информация про Realtek Audio Console и необходимые условия для работы приложения
Прежде чем устанавливать Realtek Audio Console необходимо учесть важный нюанс: это приложение предназначено для звуковых карт Realtek, работающих с новыми драйверами DCH или UAD (Universal Audio Driver). Определить версию текущего драйвера в Windows 11 и Windows 10 легко:
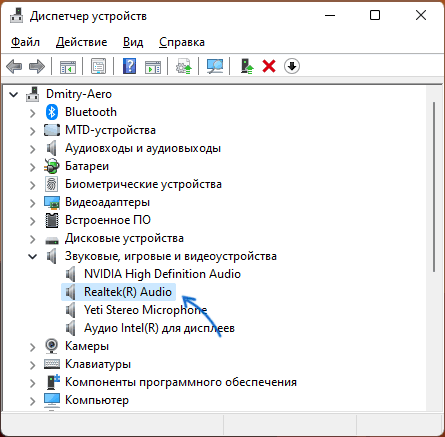
- Нажмите правой кнопкой мыши по кнопке пуск и выберите пункт «Диспетчер устройств» в контекстном меню.
- Посмотрите название вашей звуковой карты в разделе «Звуковые, игровые и видеоустройства».
- Если вы видите Realtek(R) Audio — это говорит о том, что у вас установлен драйвер DCH/UAD и Realtek Audio Console может использоваться.

- Если указано: Realtek High Definition Audio — это говорит о том, что установлен старый драйвер и для управления должно использоваться приложение Realtek HD Audio Manager.
В случае, если у вас используется традиционный (старый) вариант драйвера, вы можете попробовать обновить драйвер прямо в диспетчере устройств: нажмите правой кнопкой мыши по Realtek High Definition Audio, выберите пункт «Обновить драйвер», затем — «Найти драйверы на этом компьютере» — «Выбрать драйвер из списка доступных драйверов на компьютере» и посмотрите, есть ли в списке совместимых устройств Realtek(R) Audio. При наличии — выберите и установите его.
И дополнительный нюанс: в случае если на компьютере установлен новый драйвер Realtek, как правило, установка Realtek Audio Console выполняется автоматически, и вы увидите его в списке установленных приложений. Если же этого не произошло, есть следующие варианты скачать и установить приложение.
Как скачать Realtek Audio Console из магазина Microsoft Store
Если выполнять поиск по приложениям в Microsoft Store, приложение, которое в магазине имеет название Realtek Audio Control, вы не найдёте. Однако можно воспользоваться прямой ссылкой:
- Перейдите по ссылке на приложение Realtek Audio Control в Microsoft Store
- Нажмите кнопку «Получить» (если будет предложено открыть в приложении магазина, согласитесь) и установите приложение.

- После установки оно появится в списке приложений под именем Realtek Audio Console.
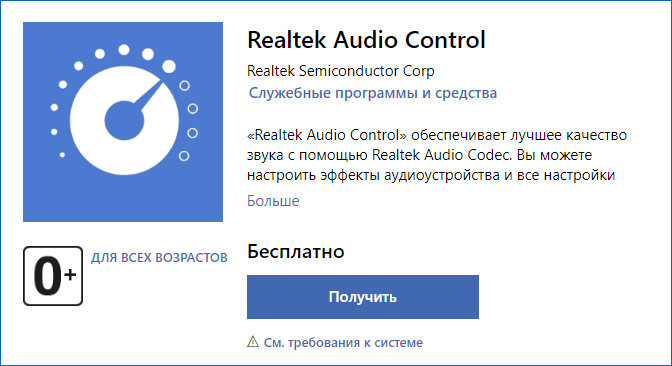
Напомню, что приложение будет работать лишь при наличии соответствующих драйверов Realtek.
Установка Realtek Audio Console вместе с драйверами звуковой карты
Если после установки или переустановки Windows 11 или Windows 10 вы не устанавливали драйверы вручную, при этом имеете не самый старый компьютер или ноутбук, загрузка и установка драйвера звука с официального сайта производителя может решить проблему:
- Найдите официальную страницу поддержки вашей материнской платы (если это ПК) или ноутбука.
- В разделе загрузок найдите драйвер Audio и скачайте его.

- После установки проверьте, появилось ли приложение Realtek Audio Console.
- В некоторых случаях оно появляется не сразу, а загружается из Интернета.
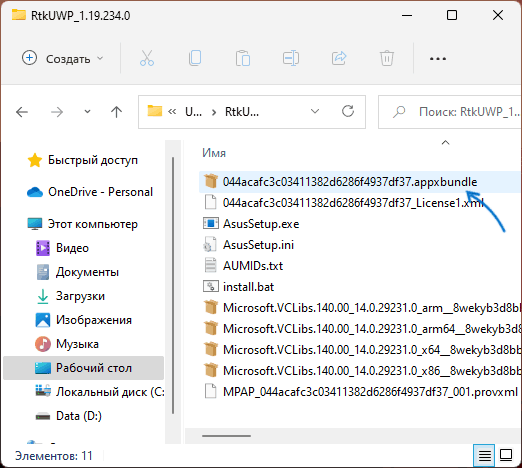
- В некоторых драйверах файлы приложения можно найти внутри архива. К примеру, если открыть архив с драйверами Audio некоторых материнских плат Asus (на примере — B560M), то в нём можно найти папку UWP, распаковать её и запустить файл appxbundle оттуда для установки Realtek Audio Console.


Неофициальный источник Realtek Audio Console и драйверов UAD (DCH)
На GitHub доступен проект, где выкладываются неофициальные сборки драйверов Realtek Universal Audio Driver и приложения Realtek Audio Console. Если другие методы установки для вас не работают, можно попробовать этот вариант:
- Зайдите на страницу https://github.com/pal1000/Realtek-UAD-generic/releases
- Ссылка на установщик Realtek Audio Console находится в разделе Realtek Audio Control app, после распаковки потребуется запустить файл setup.cmd из папки с распакованным архивом.

- Ниже, в разделе Assets вы найдете архив с последней сборкой драйвера Realtek, необходимого для работы приложения. Учитывайте, что он может не работать для достаточно старых звуковых карт Realtek.

В случае, если Realtek Audio Console не запускается, хотя все условия для его работы выполняются, причинами могут быть:
- Отключенные элементы Realtek в автозагрузке.
- Отключенные службы Realtek в списке служб.
- Наличие и работа дополнительных приложений и служб улучшения звука от производителя.
Надеюсь, инструкция поможет или решить проблему и установить Realtek Audio Console или разобраться, почему это не удавалось сделать.