На чтение 8 мин. Просмотров 9.6k. Опубликовано
Если ваша установка Windows 10 повреждена, вы обычно можете восстановить ее с помощью команды sfc/scannow, но если проверка sfc не может решить проблему, вы всегда можете использовать DISM.
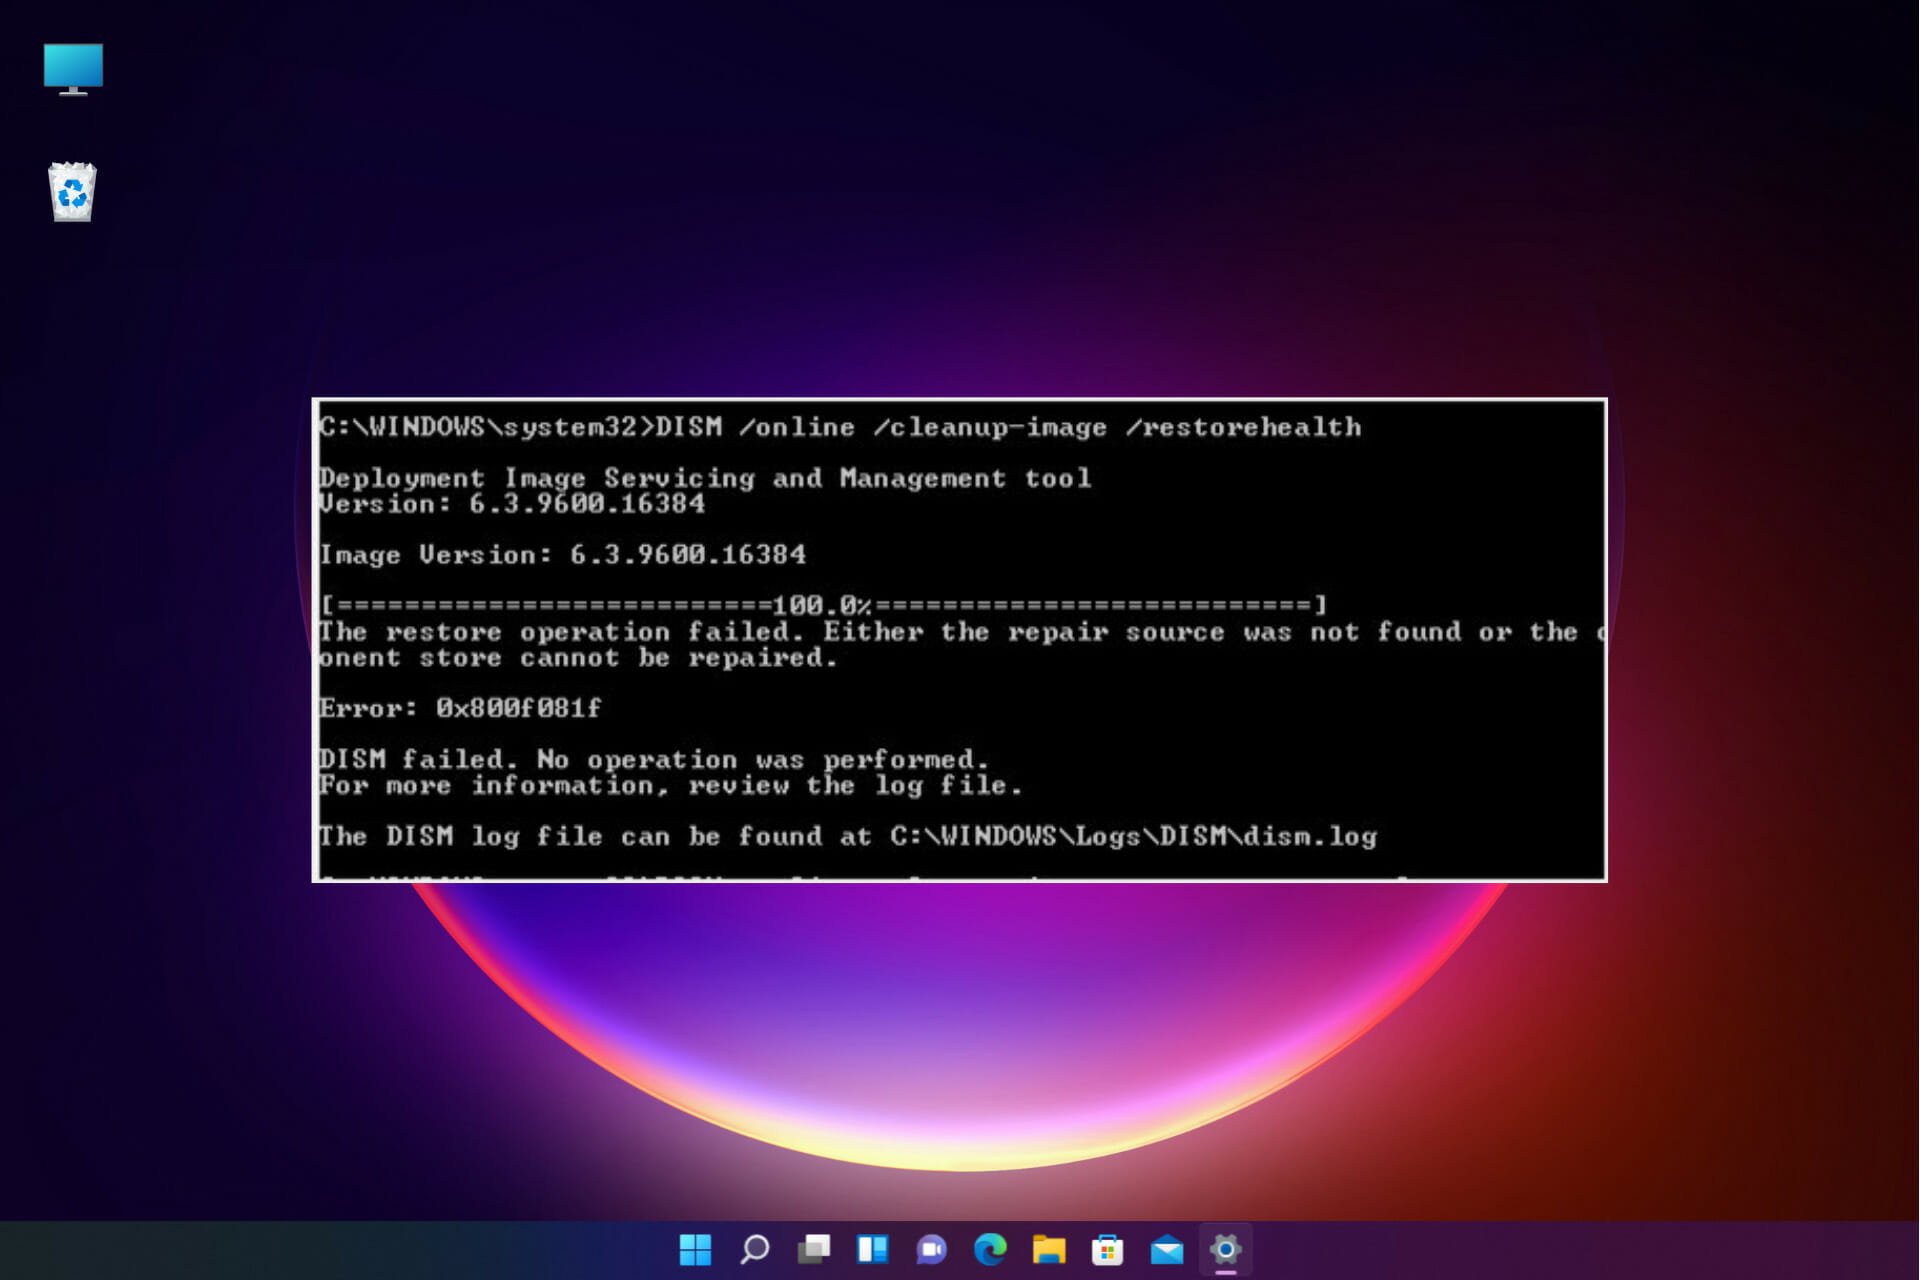
Иногда процесс DISM может потерпеть неудачу, и сегодня мы собираемся показать вам, что делать в случае, если это произойдет.
Содержание
- Не удалось выполнить DISM, что делать?
- Решение 1. Проверьте свой антивирус
- Решение 2. Введите правильное местоположение файла Install.wim.
- Решение 3 – Скопируйте Install.wim с вашего жесткого диска
- Решение 4 – Очистить компоненты образа системы
- Решение 5. Запустите средство устранения неполадок Центра обновления Windows
- Решение 6 – Сброс служб Windows Update
- Решение 7 – Отключить прокси
- Решение 8. Убедитесь, что ваш .wim не установлен только для чтения
- Решение 9 – Выполнить обновление на месте
Не удалось выполнить DISM, что делать?
Сканирование DISM может исправить многие проблемы на вашем ПК, но многие пользователи сообщили, что сканирование DISM не было завершено или не запущено. Говоря о проблемах DISM, вот некоторые связанные проблемы, о которых сообщают пользователи:
- Не удалось выполнить DISM, не было выполнено ни одной операции . Это довольно распространенная проблема с DISM. Тем не менее, вы можете решить проблему, выполнив команду DISM с помощью ISO-файла Windows 10.
- DISM не удалось загрузить провайдера, выгрузить автономный реестр, очистить файловые буферы, установить каталог Windows, смонтировать образ . Это некоторые распространенные проблемы, с которыми вы можете столкнуться при сканировании DISM. Тем не менее, вы сможете исправить большинство из них, используя наши решения.
- Сбой DISM 0x8000ffff, 0x800f0954, 0x800f081f . Если вы получаете любую из этих ошибок, попробуйте скопировать файл install.wim из Windows 10 ISO и использовать его для сканирования DISM.
- Сбой DISM при обработке команды cleanup-image, add-package . Это некоторые распространенные проблемы с DISM, но их можно решить с помощью одного из наших решений.
- Ошибка DISM при попытке скопировать загрузочные файлы . Это еще одна распространенная проблема с DISM, но ее можно исправить, очистив компоненты образа системы.
- Dism.exe не удалось проверить командную строку, чтобы загрузить менеджер wim . Если у вас возникла какая-либо из этих проблем, перезапустите компоненты обновления Windows и проверьте, помогает ли это.
Прочитайте наше удобное руководство и научитесь использовать DISM как настоящий техник!
Решение 1. Проверьте свой антивирус

В некоторых редких случаях эта проблема может быть вызвана вашим антивирусом. Ваш антивирус может повлиять на вашу систему и вызвать эту проблему.
Если в вашей системе произошел сбой DISM, вы можете решить эту проблему, просто отключив определенные антивирусные функции или вообще отключив антивирус.
Если это не поможет, попробуйте удалить антивирус. После удаления антивируса повторите сканирование DISM еще раз.
Если удаление антивируса решит вашу проблему, вам следует подумать о переходе на другое антивирусное программное обеспечение.
На рынке есть много отличных антивирусных приложений, но если вы ищете антивирус, который не будет мешать вашей системе, мы рекомендуем вам попробовать Bitdefender .
Решение 2. Введите правильное местоположение файла Install.wim.
Если DISM выдает сообщение «Не удается найти исходные файлы», вам необходимо смонтировать ISO-файл Windows 10 и указать расположение файла Install.wim.
Чтобы указать расположение файла, просто введите команду DISM/Online/Cleanup-Image/RestoreHealth /source:WIM:X:SourcesInstall.wim:1/LimitAccess в командной строке.
Помните, что вам нужно заменить X буквой, соответствующей диску, на котором смонтирован ISO-файл Windows 10.
Epic Guide alert! Все, что вам нужно знать об открытии файлов WIM в Windows 10.
Решение 3 – Скопируйте Install.wim с вашего жесткого диска
Немногие пользователи предположили, что вы можете решить эту проблему, скопировав Install.wim в корневой каталог вашего жесткого диска.
Чтобы получить файл Install.wim, просто скачайте Windows 10 ISO, смонтируйте его и найдите файл Install.wim.
После копирования файла Install.wim обязательно введите правильное местоположение файла Install.wim перед запуском сканирования DISM.
Также имейте в виду, что команда DISM чувствительна к регистру, и пользователи сообщили, что ввод install.wim вместо Install.wim привел к сбою DISM, поэтому обязательно введите правильное имя файла перед началом сканирования DISM.
Немногие пользователи также сообщили, что DISM не поддерживает пробелы в расположении источника, поэтому убедитесь, что в папке с данными нет пробелов в имени.
Решение 4 – Очистить компоненты образа системы
Если у вас есть проблемы с DISM, вы можете решить эти проблемы, очистив компоненты образа системы. Это довольно простой процесс, и вы можете сделать это, выполнив следующие действия:
- Откройте Командную строку от имени администратора.
-
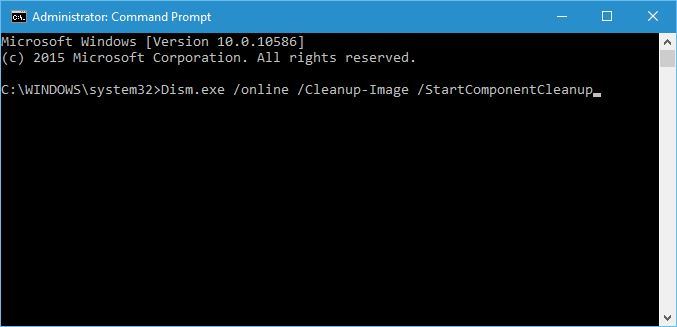
Когда откроется Командная строка , введите Dism.exe/online/Cleanup-Image/StartComponentCleanup и нажмите Enter.

- Дождитесь окончания процесса

Кроме того, вы также можете запустить следующие команды:
- DISM/Online/Cleanup-Image/StartComponentCleanup
- DISM/Online/Cleanup-Image/AnalyzeComponentStore
После выполнения этих команд попробуйте снова выполнить сканирование DISM. Несколько пользователей сообщили, что выполнение следующих команд устранило проблему:
- Dism.exe/online/Cleanup-Image/StartComponentCleanup
- Dism.exe/online/Cleanup-Image/StartComponentCleanup/ResetBase
Работа в командной строке будет походить на прогулку по парку после ознакомления с этим руководством!
Решение 5. Запустите средство устранения неполадок Центра обновления Windows
По словам пользователей, иногда проблемы DISM могут возникать из-за проблем Центра обновления Windows.
Если DISM не удалось завершить или запустить в вашей системе, вы можете решить проблему, запустив средство устранения неполадок Центра обновления Windows.
Это довольно просто, и вы можете сделать это, выполнив следующие действия:
- Нажмите Ключ Windows + I , чтобы открыть приложение Настройки .
-
Перейдите в раздел Система и безопасность .
-
Выберите Устранение неполадок в меню слева. На правой панели выберите Центр обновления Windows и нажмите Запустить средство устранения неполадок .
- Следуйте инструкциям на экране для устранения неполадок.


После устранения неполадки попробуйте снова запустить сканирование DISM, и оно должно быть в состоянии завершить.
Ищете лучший инструмент для устранения неполадок? Вот лучшие варианты.
Решение 6 – Сброс служб Windows Update
Как уже упоминалось, проблемы с DISM могут быть вызваны Центром обновления Windows, и, если DISM не удалось завершить на вашем компьютере, проблема может быть в услугах Центра обновления Windows.
Тем не менее, вы можете решить эту проблему, просто сбросив службы Центра обновления Windows.
Это относительно просто сделать, и вы можете сделать это, выполнив следующие действия:
- Откройте Командную строку в качестве администратора.
- При запуске Командная строка выполните следующие команды:
- net stop wuauserv
- cd% systemroot% SoftwareDistribution
- ren Download Download.old
- net start wuauserv
- чистые стоповые биты
- чистые стартовые биты
- net stop cryptsvc
- cd% systemroot% system32
- ren catroot2 catroot2old
- net start cryptsvc
После выполнения этих команд компоненты Центра обновления Windows должны быть перезапущены, и проблема будет решена.
Решение 7 – Отключить прокси
Если DISM не удалось завершить или запустить на вашем компьютере, возможно, проблема в прокси-сервере.
Многие пользователи используют прокси для защиты своей конфиденциальности в Интернете, но иногда ваш прокси может мешать работе вашей системы и приводить к этим и другим проблемам.
Чтобы решить эту проблему, рекомендуется отключить прокси-сервер и проверить, помогает ли это. Для этого вам просто нужно выполнить следующие простые шаги:
-
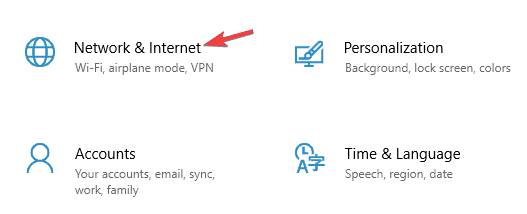
Откройте приложение Настройки и перейдите в раздел Сеть и Интернет .
-
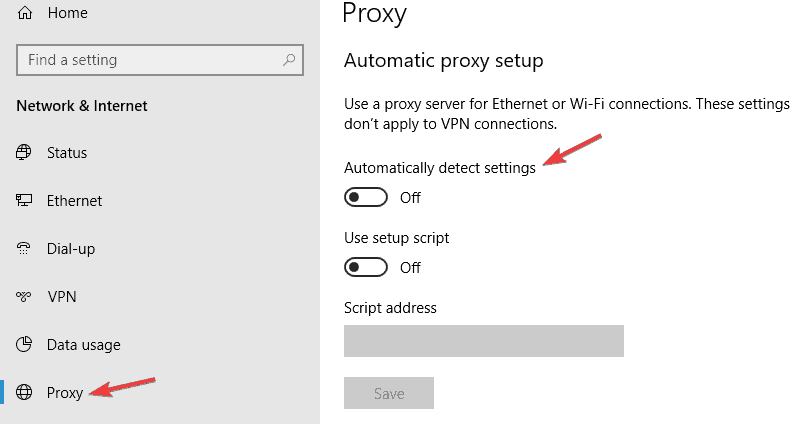
Выберите Прокси-сервер в меню слева. На правой панели отключите все настройки.


После отключения прокси-сервера проверьте, решена ли проблема. Хотя прокси-сервер является отличным способом защиты вашей конфиденциальности в Интернете, многие пользователи предпочитают использовать VPN вместо прокси.
Если вы хотите защитить свою конфиденциальность в Интернете и ищете хороший VPN, мы настоятельно рекомендуем вам использовать CyberGhost VPN .
Прокси не выключится в Windows 10? Не паникуйте! Вот наши лучшие решения!
Решение 8. Убедитесь, что ваш .wim не установлен только для чтения
Многие пользователи копируют файл install.wim из установочного ISO-образа Windows 10, чтобы запустить сканирование DISM в автономном режиме.
Тем не менее, несколько пользователей сообщили, что DISM не удалось, потому что файл install.wim был задан как файл только для чтения.
Если это произойдет, ваш компьютер не сможет что-либо записать в файл install.wim, и сканирование DISM не будет завершено. Однако это можно исправить, изменив свойства файла install.wim.
Для этого выполните следующие действия:
-
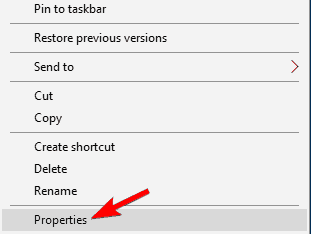
Найдите файл install.wim на жестком диске, щелкните его правой кнопкой мыши и выберите Свойства .
-
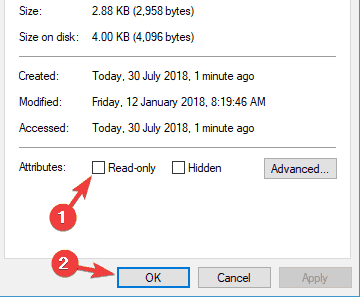
Когда откроется окно Свойства , снимите флажок Только для чтения . Теперь нажмите Применить и ОК , чтобы сохранить изменения.


После внесения этих изменений попробуйте снова запустить сканирование DISM.
Решение 9 – Выполнить обновление на месте
Если сканирование DISM не удалось завершить на вашем компьютере, вашим последним решением может быть обновление на месте. Этот процесс переустановит Windows 10 и заставит его обновиться до последней версии.
В отличие от переустановки, этот процесс сохранит все ваши файлы и установленные приложения, поэтому вы сможете продолжить с того места, где остановились. Чтобы выполнить обновление на месте, выполните следующие действия.
- Загрузите и запустите Инструмент создания мультимедиа .
- Теперь выберите вариант Обновить этот компьютер .
- Программа установки подготовит необходимые файлы, поэтому вам придется подождать.
- Выберите Загрузить и установить обновления (рекомендуется) и нажмите Далее .
- Подождите, пока обновления будут загружены.
- Следуйте инструкциям на экране. На экране Готов к установке нажмите кнопку Изменить то, что сохранить .
- Выберите Сохранить личные файлы и приложения и нажмите Далее .
- Следуйте инструкциям на экране для завершения процесса обновления на месте.
После завершения процесса обновления у вас будет новая установка Windows 10, и ваши проблемы должны быть решены.
Сканирование DISM может использоваться для исправления поврежденной установки Windows 10, но даже сканирование DISM иногда может завершиться неудачей, и если это произойдет, обязательно попробуйте некоторые из наших решений.
Примечание редактора . Этот пост был первоначально опубликован в августе 2016 года и с тех пор был полностью переработан и обновлен для обеспечения свежести, точности и полноты.
Get back to fixing corrupt files on your PC with the built-in tool
by Milan Stanojevic
Milan has been enthusiastic about technology ever since his childhood days, and this led him to take interest in all PC-related technologies. He’s a PC enthusiast and he… read more
Updated on
- DISM.exe (Deployment Image Servicing and Management) is a useful command-line tool for Windows images and Windows Recovery Environment.
- The DISM failed issue might be caused by interference from your antivirus software.
- A quick fix for DISM not working is to clean up system image components or disable your proxy.
XINSTALL BY CLICKING THE DOWNLOAD
FILE
The DISM command comes in very handy when it comes to repairing your Windows PC. For example, if your Windows 10 installation is corrupt, you can usually fix it using the built-in SFC /scannow command, followed by DISM.
However, the DISM can fail. In this case, you cannot use it to repair your PC, and the problems will not be fixed.
If DISM failed on your device, we will show you how to fix the tool in this guide and return to keeping your PC in top shape.
What causes the DISM failed issue?
There are various reasons for the DISM command not working on your Windows PC. Below are some of the variations of the DISM error and the causes:
- DISM failed no operation was performed – This is a relatively common problem with DISM. However, you might be able to fix the problem by performing the DISM can using the Windows ISO file. The full error message reads: DISM failed. no operation was performed. for more information, review the log file.
- DISM failed to load the provider, unload offline registry, flush file buffers, set the windows directory, and mount the image – These are some common problems you can encounter with DISM scan. However, you should be able to fix most of them using our solutions.
- DISM failed 0x8000ffff, 0x800f0954, 0x800f081f, 0x800f0827 – If you’re getting any of these errors, try copying the install.wim file from Windows 10 ISO and use it to perform a DISM scan.
- DISM failed while processing command cleanup-image, add-package – These are some common problems with DISM, but they can be solved using one of our solutions.
- DISM failure when attempting to copy boot files – This is another common problem with DISM, but you might be able to fix it by cleaning up system image components.
- Dism.exe failed validating command line to load wim manager – If you’re having any of these problems, restart Windows update components and check if that helps.
- DISM failed error 0x800f0905 – This is the case when users try running the DISM tool on encountering the 0x800f0905 update error.
- DISM failed no operation was performed Windows 11 – The DISM tool often fails with this error message in the latest iteration of Windows as well. The solution from above should do the trick.
- Dism /online /cleanup-image /restorehealth not working – While the other commands work, this one is not working for some users.
How can I fix the DISM not working issue?
- What causes the DISM failed issue?
- How can I fix the DISM not working issue?
- 1. Check your antivirus
- 2. Enter the correct location of Install.wim file
- 3. Copy the Install.wim file
- 4. Clean up system image components
- 5. Run the Windows Update troubleshooter
- 6. Reset Windows Update services
- 7. Disable proxy
- 8. Make sure that your .wim isn’t set to read-only
- 9. Perform an in-place upgrade
- How do you know if DISM is working?
- What can I do if DISM failed on Windows 11?
- Does DISM delete files?
1. Check your antivirus
In some rare instances, the DISM command not working issue can be caused by your antivirus. Your antivirus can interfere with your system and cause this problem.
If DISM failed on your system, you might be able to fix the problem simply by disabling certain antivirus features or the app. You also try to remove the antivirus software if disabling it does not solve the problem.
Should this fix the problem, you might need to consider one of the best modern antivirus software in ESET NOD 32.
This software uses cutting-edge technology to keep your PC secure without causing errors. What’s more, it provides both offline and online security and ensures your privacy. So, let it take care of your security while you worry about other things.
2. Enter the correct location of Install.wim file
If DISM is giving you the Can’t find source files message, you need to mount Windows 10 ISO file and specify the location of the Install.wim file.
To specify the location of the file, type the following command in Command Prompt and press Enter to run it: DISM /Online /Cleanup-Image /RestoreHealth /source:WIM:X:SourcesInstall.wim:1 /LimitAccess
Remember that you need to replace X with the letter that matches the drive where Windows 10 ISO file is mounted.
3. Copy the Install.wim file
Few users suggested that you can fix this problem by copying the Install.wim to the root directory of your hard drive.
To get Install.wim file, download Windows 10 ISO, mount it, and locate Install.wim file.
After copying the Install.wim file, be sure to enter the correct location of the Install.wim file before running the DISM scan.
How we test, review and rate?
We have worked for the past 6 months on building a new review system on how we produce content. Using it, we have subsequently redone most of our articles to provide actual hands-on expertise on the guides we made.
For more details you can read how we test, review, and rate at WindowsReport.
Also, remember that the DISM command is case sensitive, and users reported entering install.wim instead of Install.wim caused the DISM to fail. Therefore, enter the correct file name before starting the DISM scan.
Few users also reported that DISM doesn’t support spaces in the source location. So, be sure that the containing folder doesn’t have any spaces in its name.
4. Clean up system image components
1. Open Command Prompt as administrator.
2. Type the command below and press Enter. Dism.exe /online /Cleanup-Image /StartComponentCleanup
3. Wait for the process to finish.
4. Try to perform the DISM scan again after running these commands.
5. In addition, if DISM still isn’t working, you can also run the following commands:
DISM /Online /Cleanup-Image /StartComponentCleanup
DISM /Online /Cleanup-Image /AnalyzeComponentStore
Dism.exe /online /Cleanup-Image /StartComponentCleanup
Dism.exe /online /Cleanup-Image /StartComponentCleanup /ResetBase
If you’re facing DISM error 193, 740, 14098, 3017, and similar variations, you might be able to fix those problems by cleaning up the system image components.
This is simple, provided you follow the steps above. All you need is to run Command Prompt as an administrator and run a few commands with privileges.
There are many repair tools for Windows that can be used to fix broken or corrupted files. Check out our dedicated article to find out which are the best.
5. Run the Windows Update troubleshooter
- Press the Windows key + I to open the Settings app.
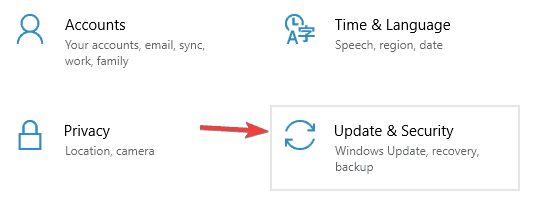
- Select the Update & Security option.

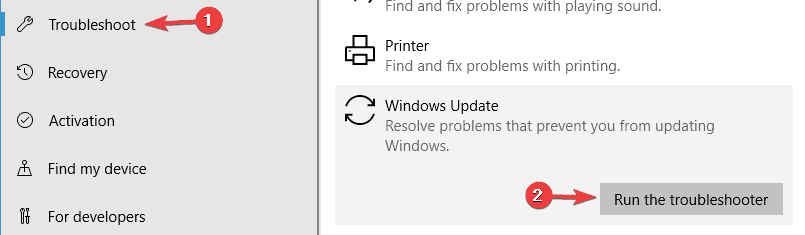
- Choose Troubleshoot from the menu on the left.
- Select Windows Update and click Run the troubleshooter.

- Follow the instructions on the screen to complete the troubleshooter.
According to users, sometimes DISM problems can occur due to Windows Update issues.
If DISM failed to complete or run on your system, you might be able to fix the problem by running the Windows Update troubleshooter.
Once the troubleshooter is finished, try to rerun the DISM scan, and it should be able to complete.
6. Reset Windows Update services
- Open Command Prompt as an administrator.
- When Command Prompt starts, run the following commands:
net stop wuauservcd %systemroot%SoftwareDistributionren Download Download.oldnet start wuauservnet stop bitsnet start bitsnet stop cryptsvccd %systemroot%system32ren catroot2 catroot2oldnet start cryptsvc
If DISM failed to complete, showing a DISM does not support servicing on Windows PC, the problem might be Windows Update services.
However, you can fix the problem simply by resetting Windows Update services. After these commands are executed, Windows Update components should restart, and the issue will be resolved.
7. Disable proxy
- Open the Settings app.
- Choose the Network & Internet option.

- Select Proxy from the menu on the left. In the right pane, disable all settings.

If DISM failed to complete or run on your PC, the problem might be your proxy. Many users use proxy to protect their privacy online, but sometimes your proxy can interfere with your system and lead to this and other issues.
After disabling your proxy, check if the problem is resolved. Although a proxy is a great way to protect your privacy online, many users prefer using a VPN over a proxy.
If you want to protect your privacy online and you’re looking for a good VPN, we strongly suggest you consider PIA.
- How to quickly fix DISM error 50 on Windows 10/11
- Sfc /scannow stops on Windows 10/11 [BEST SOLUTIONS]
- DISM source files could not be found? Try these 3 solutions
- Full Fix: Elevated permissions are required to run DISM
- Fix: Error 0X800f081f on Windows Update 10
8. Make sure that your .wim isn’t set to read-only
- Locate install.wim file on your hard drive, right-click it, and choose Properties.

- When the Properties window opens, make sure to uncheck the Read-only option. Now click Apply and OK to save changes.

Many users copy the install.wim file from Windows 10 installation ISO to run the DISM scan offline.
However, several users reported that DISM is not working because of the install.wim file was set as a read-only file.
If that happens, your PC won’t be able to write anything to the install.wim file and the DISM scan won’t complete. So, changing the properties of install.wim file should solve the issue in this case.
After making these changes, try to rerun the DISM scan.
9. Perform an in-place upgrade
- Download and run Media Creation Tool.
- Now select the Upgrade this PC now option.
- The setup will prepare the necessary files, so you’ll need to wait.
- Select Download and install updates (recommended) and click Next.
- Wait while the updates are downloaded.
- Follow the instructions on the screen. On the Ready to install screen, click the Change what to keep option.
- Select Keep personal files and apps and click Next.
- Follow the instructions on the screen to complete the in-place upgrade process.
If the DISM scan failed to complete on your PC, your final solution might be an in-place upgrade. This process will reinstall Windows 10 and force it to upgrade to the latest version.
Unlike reinstallation, this process will keep all your files and installed applications, so you can continue where you left off.
How do you know if DISM is working?
DISM does not take much time to scan your PC for errors. It is usually around 10 to 30 minutes but can sometimes take hours.
Users sometimes report that it hangs at around the 20% progress mark. But that does not mean it is not working, as this is normal. So far, it is showing progress, but the command is still working.
What can I do if DISM failed on Windows 11?
If you’ve upgraded to the new OS, you know by now that it’s not so different from Windows 10 apart from some new features and improved design.
And yes, DISM can fail on Windows 11 as often as on the older OSes, so you have to be prepared for this.
Luckily, all the solutions we listed above will work seamlessly on the new OS, and it will be even more accessible.
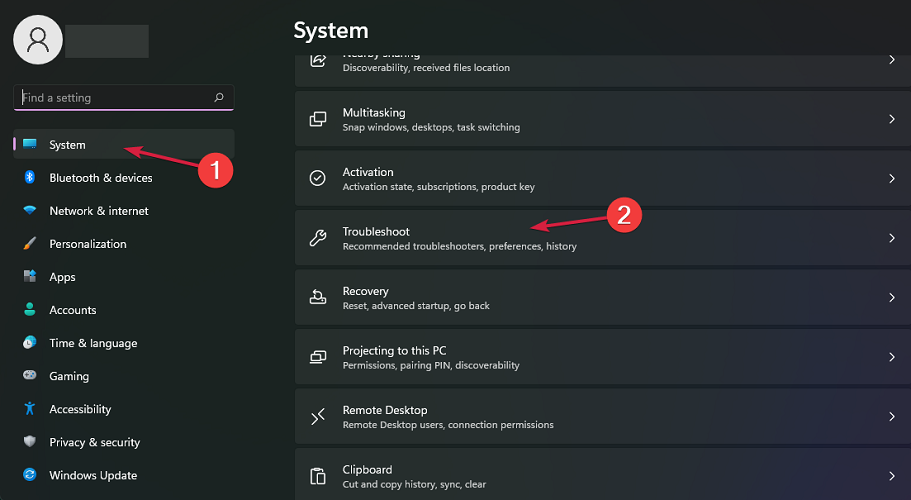
As you can see from our screenshot above, in Windows 11, the Troubleshoot option is right in the System settings, will be fewer clicks to access.
Does DISM delete files?
DISM works basically to repair broken and corrupt files on a PC. It keeps a log of the errors found on your PC, and the fixes applied.
It does not delete your files, app, or data. So you don’t have anything to worry about. DISM cannot harm your computer.
The DISM failed on Windows 10 or Windows 11 error can deprive you of an essential built-in tool to repair your PC for free. But with the fixes in this guide, you should be able to get it working again.
Are you facing other errors like the DISM error 2 on Windows 10? Then, check our guide to solve the problem quickly.
Feel free to let us know if you were able to get DISM working again on Windows in the comments below.
![]()
Sometimes, Windows users may see an error message “DISM Failed” while running this tool. In this post, You will get to know how to fix this problem.
The full form of DISM is Deployment Image Servicing and Management. It is a tool that comes as built-in software in every Windows. It allows administrators to prepare windows images before deploying to the users. The DISM tool is available through the command-line or PowerShell. Sometimes, Users may see various DISM failure messages in command prompt or PowerShell while running this tool.
The most common error messages are –
- DISM failed no operation was performed
- DISM failed 0x8000ffff, 0x800f0954, 0x800f081f: The Source File Couldn’t be Found
- Error Code 87, 112, 11, 50, 2, 3, 87,1726, 1393, 1910, etc.
- DISM failed while processing command cleanup-image, add-package
- DISM failed to load the provider, to unload offline registry, to flush file buffers, to set the windows directory, mount the image
- DISM failure when attempting to copy boot files
- Dism.exe failed validating command line, to load wim manager
We run the DISM command to repair corrupted system files. So, It is a very important command to troubleshoot Windows PC problems. There may be multiple DISM error messages appear when DISM failed. But, Solutions are very common.

To fix these DISM problems, you can follow these methods. Some methods are applicable for specific DISM errors.
1. Disable/Uninstall Antivirus Temporarily
Third-party antivirus programs that you use on your PC is often responsible for various issues. In some cases, These programs can interfere in any critical operation. Then, You may get various error messages. So, When DISM failed error appears on your PC, you should disable any antivirus or security programs. If possible, Uninstall them temporarily. Then, Run the DISM command again. It may fix your problem.
2. Troubleshoot DISM Error by Specifying/Tweaking Install.wim
It is the most common problem users encounter when they run DISM command. If it gives you any messages like “Can’t Find Source File” or anything similar, following these steps will surely fix this error. Also, It may work for any other DISM related problems too.
a: Specify the correct location of Install.wim file
When DISM says it can’t find the source file, you will have to specify the correct location of install.wim file. In this case, You will need a bootable Windows 10 disk/flash drive or at least the Windows 10 ISO file. Then, Follow the instructions bellow.
- At first, Insert the bootable windows media in your PC. If you have ISO file, right click on it and choose Mount. It will create an additional drive containing Windows installation files that you can find in this PC. Just, Remember the drive letter.
- Then, In the command prompt (with admin rights), type the following command and hit enter.
DISM /Online /Cleanup-Image /RestoreHealth /source:WIM:X:\Sources\Install.wim:1 /LimitAccess
Note: Replace X: with the drive letter of your Windows bootable disk.
Wait for a few minutes to complete the operation. I hope it will fix DISM errors 0x8000ffff, 0x800f0954, 0x800f081f: The Source File Couldn’t be Found.
b: Copy Install.wim
If solution 1 fails, it is the way to go. In fact, It also can fix other DISM failed errors. You will just need to copy the install.wim file from Windows bootable media to the local disk C. To do it, Follow these things.
- At first, Insert the installation disk into your PC or moun the ISO file like before. You will find this file in the sources folder.
- Then, Locate and copy install.wim file and paste it in local disk C.
- Now, Run the DISM command. Make sure to replace the source file location. For example, Use “DISM /Online /Cleanup-Image /RestoreHealth /source:WIM:C:\Install.wim:1 /LimitAccess” in case, you have copied the file to local disk C.
Hopefully, This time, You will not get any DISM errors.
c. Uncheck Read-Only
Sometimes, User may encounter problems with DISM command just because the install.wim is set to read-only mode. In this case, They must change it to fix the problem. To do it –
- Right-click on the install.wim file and go to properties,
- Then, Uncheck the read-only and save the settings.
- After that, Run the DISM command by specifying the source again.
I hope, This time you will not get any error anymore.
The above three steps will work for almost every DISM failed problems. If you still face problems, you can follow the next methods.
3. Refresh DISM Tool & Clean up System Image Components
Refreshing the DISM tool and also cleaning up the image components can help you to get rid of various problems. Especially, It works great to get rid of DISM error codes like 87, 112, 11, 50, 2, 3, 87, 0x8000ffff, 0x800f0954, 0x800f081f, etc. By the way, Here are the instructions you will have to follow to reset DISM and clean up the components.
- At first, Run the following commands. These will refresh this tool and also clean the system image components.
dism.exe /image:C: /cleanup-image /revertpendingactions
dism /online /Cleanup-Image /StartComponentCleanup
- Now, Wait for a few minutes until it finishes the process.
- Restart your computer and try to run DISM command again. I hope, This time, You won’t get any error.
- If the problem still bugs you, you also can try the following command.
Dism.exe /online /Cleanup-Image /StartComponentCleanup /ResetBase
Hopefully, This method will fix DISM fails error on your computer. If not, you can try some other additional solutions.
4. Troubleshoot Windows Update
It is another method to get rid of DISM failed errors. At least, It worked for a few numbers of users. So, At first, You can run the windows update troubleshooter to see if it helps. Then, You also can reset the update components manually.
- At first, Press Windows + I key on the keyboard to open the settings.
- Then, Go to Update & Security > Troubleshoot.
- Now, Find the “Windows Update” and click on it.
- Then, Click on “Run the troubleshooter” and follow onscreen instructions.
- If it doesn’t work, you will have to refresh the update components. If you don’t know how to do it, Read: How to Reset Update Components
5. Check the Internet Connection
Unlike SFC, The DISM operation requires an internet connection. So, Connectivity problem can lead your PC to show you various DISM errors. In this case, Proxy may be the major culprit. To disable proxy, you can follow these steps.
- At first, Go to Settings > Network & Internet > Proxy.
- Then, Disable it by unchecking all relevant settings.
You also should make sure that you have a stable internet connection.
Generally, We use DISM command to troubleshoot various problems on Windows. When it itself becomes corrupted and shows you an error, it becomes a major issue. I hope, This article will help you to fix DISM failed errors on your PC.
 Используя DISM в командной строке для проверки хранилища компонентов Windows или других целей, некоторые пользователи могут столкнуться с ошибкой 87: «Неизвестный параметр» или «Параметр не распознан в этом контексте».
В этой инструкции подробно о причинах ошибки 87 в командной строке при использовании DISM в Windows 11, Windows 10 и 7 и о возможных способах её исправления.
Проверьте правильность ввода команды DISM и набор известных параметров
Самая распространенная причина ошибки 87, особенно если речь идёт не о старых ОС, а о Windows 11 и Windows 10 — синтаксические ошибки при вводе команды, либо особенности списка поддерживаемых параметров.

Чаще всего это бывают следующие варианты ошибок:
- Отсутствие пробелов перед знаком «/» в указанных параметрах команды DISM.
- Неправильный порядок указания параметров (например, если изменить порядок параметров checkhealth и cleanup-image, вы получите указанную ошибку).
- Также русскоязычные пользователи, случается, путают латинские буквы C и S, U и Y.
- В некоторых случаях при вводе команд пользователь не учитывает, что список поддерживаемых параметров DISM отличается, в зависимости от того, запущена ли командная строка в работающей системе или в среде восстановления (или с загрузочной флешки). Более подробно на эту тему в инструкции, где рассмотрена именно такая ситуация: Неизвестный параметр Cleanup-Image при использовании DISM — причины и варианты решения.
Даже если вы копируете команду с какого-то сайта, следует учитывать, что ошибки могут быть и там — опечатки, копирование кода с ошибками, никто от этого не застрахован.
Версия DISM
Версии DISM и набор поддерживаемых команд отличаются. Не все команды, которые работают в DISM из Windows 11/10 будут работать в Windows 7 и 8.1. К примеру, если в современной ОС с DISM 10-й версии использовать команду
DISM /online /cleanup-image /checkhealth
она будет исправно работать.
Если ту же команду ввести в Windows 7, с DISM версии 6.1, результатом будет ошибка 87:

Возможные варианты решения:
- Не использовать неподдерживаемые команды, если они не критичны для получения нужного результата.
- Установить последнюю версию DISM, это можно сделать даже в старой версии системы, что будет рассмотрено далее.
Установка последней версии DISM в Windows старых версий
При необходимости использовать последнюю версию DISM в предыдущей версии Windows, вы можете скачать и установить Windows ADK (Комплект средств для развертывания и оценки Windows) нужной версии (например, мы можем установить ADK для Windows 10 в Windows 7) и выбрать пункт «средства развертывания» при установке:

Установщики последних версий Windows ADK доступны на официальной странице https://learn.microsoft.com/en-us/windows-hardware/get-started/adk-install при этом следует учитывать:
- Для установки последних версий требуется наличие .NET Framework 5 на компьютере.
- Это онлайн-установщики и загрузка необходимых компонентов из РФ без VPN не работает.
- Новая версия DISM не заменяет имеющуюся, а устанавливается отдельно, по умолчанию — в папке C:\Program Files (x86)\Windows Kits\10\Assessment and Deployment Kit\Deployment Tools\amd64\DISM и потребуется запускать её из этого расположения, либо добавлять в переменные среды.
Если ошибка сохраняется, можно учесть следующие нюансы и попробовать некоторые дополнительные варианты действий:
- Для работы некоторых параметров DISM, например, /spsuperseded требуется, чтобы служба «Установщик модулей Windows» была включена. Включить службу можно в Win+R — services.msc. Находим «Установщик модулей Windows» в списке, дважды нажимаем по службе и устанавливаем тип запуска «Вручную» — значение по умолчанию для этой службы.
- Выполнить проверку целостности системных файлов с помощью команды sfc /scannow
- Если ранее ошибка не возникала, попробовать использовать точки восстановления системы.
- Если есть обновления Windows — попробуйте установить их, однажды в очередном обновлении Windows 10 ошибка 87 была вызвана проблемами в самом обновлении и уже в следующем она была исправлена.
Если проблема сохраняется, опишите в комментариях, при каких обстоятельствах она возникает, а также укажите версию Windows, DISM (отображается после запуска команды), какую именно команду вы пробуете ввести — я постараюсь помочь.
Many error codes, such as 0x800f0954, 0x800f0950, 0x8024402c, etc., indicate the same problem – DISM failed on your computer. How desperate it is to see such an error message! But the good news is that there are several effective ways for you to troubleshoot the DISM errors.
If you search the internet, you’ll find numerous people care about this topic – DISM failed. This is a common error that can appear on any version of Windows system. So, what does this DISM error mean? How it will affect you? Can you fix it when DISM is not working? All these issues will be covered in this MiniTool post.
What Is DISM
DISM is the acronym for Deployment Image Servicing and Management; it is actually a command-line tool built into every Windows system. DISM is mainly used for mounting and servicing the Windows images (including the ones used for Windows Recovery Environment, Windows PE, and Windows Setup) before deployment. To put it simply, DISM is a basic Windows utility designed for network administrators to finish tasks like system image preparation, modification, and repair, when necessary.
What Does DISM Do
DISM can be used to fix some common problems. DISM command can be used to check and fix Windows system files and Windows images and corruption of the Windows image Component Store. Here gives some functions that DISM can make.
- Mount and get information about the Windows image (.wim) files or virtual hard disk (.vhd/.vhdx) files.
- Capture, split, or manage .wim files.
- Install, uninstall, configure, and update things like drivers, Windows features, packages, and international settings (in a .wim file or .vhd/.vhdx).
- Service a running operating system with the subsets of the DISM commands.
- Take the place of deployment tools, such as ImageX, PEimg, and Package Manager.
For more functions of DISM, please read this article: Repair Windows 10 Image with DISM and Other Useful Tips for DISM.
DISM Not Working & Failure
People are complaining on the internet that the DISM won’t run. When you try to repair the Windows image on Windows 10 by running “DISM /Online /Cleanup-Image /RestoreHealth” in the Command Prompt window, you may find the DISM not work. The DISM error 1910 “The object exporter specified was not found” could appear on your screen.
Some users said both the sfc /scannow and Dism /Online /Cleanup-image /RestoreHealth commands failed and they received 0x80240021 Failure DISM. See what you can do if DISM /Online /Cleanup-image /Restorehealth is stuck.
You can read the content below to find more methods to troubleshoot the issue.
How to Fix When DISM Failed
Some common error messages of DISM error:
- DISM failed no operation was performed: in the cases mentioned above, both users said their DISM failed and no operation was performed. You’re indeed able to fix this by using Windows 10 ISO file.
- DISM failed 0x8000ffff, 0x800f0954, 0x800f0950, 0x800f0907, 0x800f081f (The source files could not be found. Use the “Source” option to specify the location of the files that are required to restore the feature.): if you see error codes like this, you should use the install.wim file to start a DISM scan (after copying it from your Windows 10 ISO).
- DISM failure when attempting to copy boot files: some users said they have solved this error by cleaning up the system image components. You should try.
- DISM.exe failed validating command line, to load wim manager: if you are in the face of such problems, you should try to fix it by restarting the Windows update components, as many people said this method is helpful.
- Error Codes 2, 3, 11, 50, 87, 112, 1393, 1726, 1910, and so on.
- DISM failed while processing the command cleanup-image, add-package.
- DISM failed to load the provider, unload offline registry, flush file buffers, set the windows directory, mount the image.
- More waiting for you to discover…
# 1. Disable or Uninstall Antivirus or Security Programs
The antivirus software you have installed on your computer may cause a lot of problems such as compatibility issues, file loss, and the DISM error. The antivirus software of the security program is able to interfere with your system and intervene in any critical operation.
Therefore, if the DISM failed, I advise you to disable all the antivirus/security programs or uninstall them temporarily, and then repeat the DISM scan to see whether it works.
If this has helped to solve the DISM not working problem, you’d better consider changing the antivirus software or disabling the security features.
# 2. Disable Proxy on Your PC
Many users use proxy to protect their privacy from the public, but sometimes the proxy may interfere with system operation or lead to other problems. When you get the DISM error message, you can disable the proxy and then relaunch DISM to see if it works well.
Step 1: Press Win + I to open Settings.
Step 2: Choose Network & Internet.
Step 3: Shift to the Proxy option in the left pane.
Step 4: Turn off all the options in the right panel.
# 3. Run the Windows Update Troubleshooter
DISM errors can be caused by Windows Update in some cases. You can try this method when meet this problem.
Step 1: Press Win + I on the keyboard to open Settings.
Step 2: Choose Update & Security.
Step 3: Shift to the Troubleshoot option in the left pane.
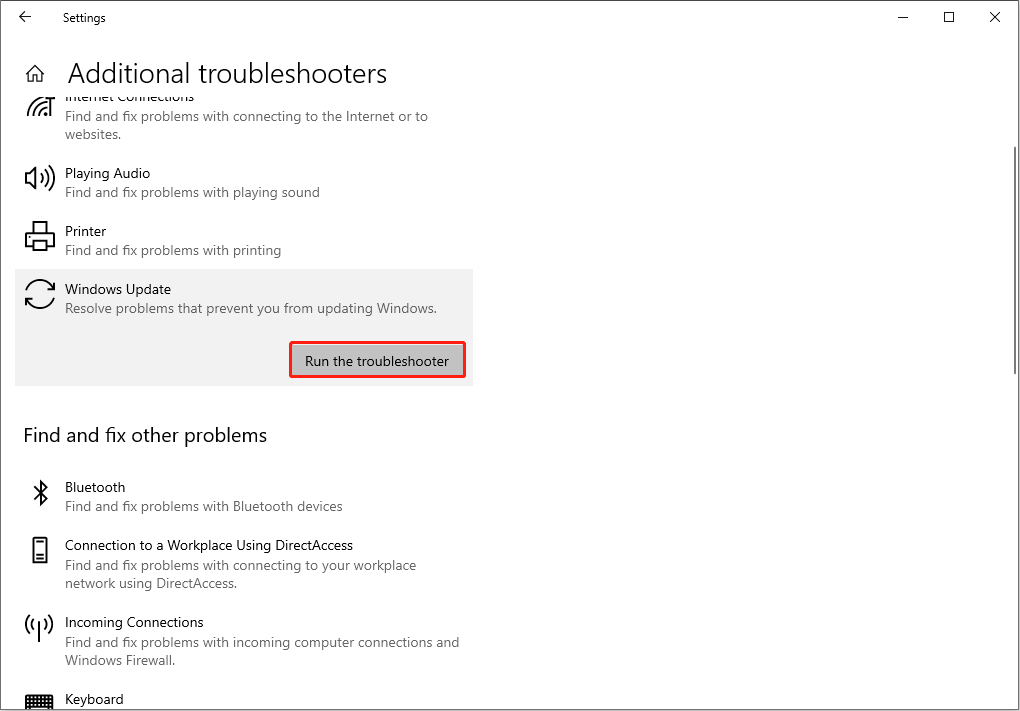
Step 4: Click Additional troubleshooters and then select Windows Update.
Step 5: Click on the Run the troubleshooter button.
Step 6: Follow the on-screen instructions to complete the rest process.
# 4. Run DISM Command in Clean Boot
This method works for cases where the DISM failed due to service conflict.
Step 1: Press Win + I to open Settings.
Step 2: Scroll down to the bottom and select Update & Security.
Step 3: Shift to the Recovery option in the left pane.
Step 4: Look for the Advanced startup section in the right pane. Then, click Restart now under it.

Step 5: Select Troubleshoot in the Choose an option window.
Step 6: Choose Advanced options, and then click Command Prompt.
Step 7: Choose your account to continue.
Step 8: Run the DISM command (for instance, DISM /Online /Cleanup-Image /CheckHealth) and see if it works or not.

# 5. Specify/Tweak Install.wim File
If you get an error message like “Can’t find the source files”, the most possible cause is the install.wim file’s wrong location or setting. You can follow the next steps to fix this issue.
Warning:
The DISM command is case-sensitive; you must confirm that your spell every word correctly before executing the command.
Case 1: Correct location of install.wim file:
1: Get the bootable disk or at least a Windows 10 ISO file. If you’re using an ISO file, please use it to create a bootable drive and remember its drive letter.
2: Press Win+ R and type cmd.
3: Press Shift + Ctrl + Enter to run as administrator.
4: Type this command into the Command Prompt window:
DISM /Online /Cleanup-Image /RestoreHealth /source:WIM:X:\Sources\Install.wim:1 /LimitAccess (* Please replace X with the drive letter).
5: Hit Enter on the keyboard and wait for the command to complete.
Case 2: Copy install.wim (from the bootable disk to local disk C:):
1: Insert the bootable disk into your computer or mount the ISO file.
2: Locate the install.wim file and then copy it to a local disk.
3: Paste the file to the local disk C: (here take drive C: as an example).
4: Run Command Prompt as administrator and type DISM /Online /Cleanup-Image /RestoreHealth /source:WIM:C:\Install.wim:1 /LimitAccess (C refers to the location where you paste the file).
5: Then, press Enter and wait for the command to finish.
Case 3: Uncheck Install.wim Read-Only
Some cases prove that the DISM error is caused by the Read-Only setting. You can change it with the following steps.
1: Right-click on the install.wim file and choose Properties on the context menu.
2: Switch to the General tab and uncheck the Read-Only option.
3: Click on the Apply button and OK button to confirm.
4: Now, run the DISM command by specifying the source again.
# 6. Clean up System Image Components
Step 1: Press Win + R and type cmd in the search bar.
Step 2: Click Shift + Ctrl + Enter simultaneously to run Command Prompt as administrator.
Step 3: Copy the command: Dism.exe /online /Cleanup-Image /StartComponentCleanup in the Command Prompt.
Step 3: Press Enter on the keyboard and wait for the command to finish.
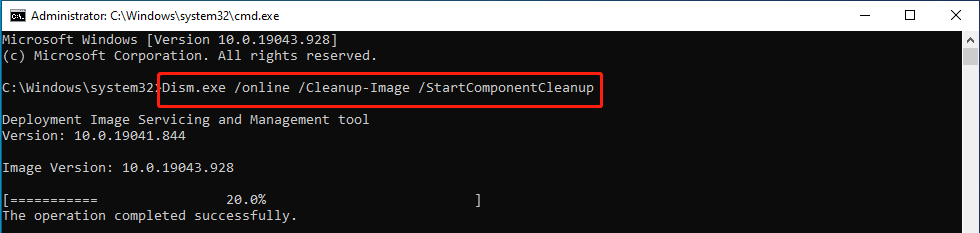
Step 4: Restart your computer and try to perform the DISM scan again.
If this command failed, you can take your chances with the following commands:
- DISM /Online /Cleanup-Image /StartComponentCleanup
- DISM /Online /Cleanup-Image /AnalyzeComponentStore
- DISM.exe /online /Cleanup-Image /StartComponentCleanup /ResetBase
# 7. Reset Windows Update Service
DISM error, like no operation was performed error, is related to Windows Update Service. When it begins to update but the service doesn’t support and disturbs the normal operation of the system, a DISM error occurs. Therefore, you can try to reset Windows Update Service to fix the issue.
Step 1: Type Command Prompt in the search bar from the Start menu.
Step 2: Select Run as administrator at the right panel.
Step 3: Type net stop wuauserv and hit Enter.
Step 4: Wait for the command to complete.
Step 5: Repeat steps 3 and step 4 to run these commands in order:
- cd %systemroot%SoftwareDistribution
- ren Download Download.old
- net start wuauserv
- net stop bits
- net start bits
- net stop cryptsvc
- cd %systemroot%system32
- ren catroot2 catroot2old
- net start cryptsvc.
Step 6: Restart your computer.
Recover Lost/Deleted Data on Windows
Although DISM errors are seldom caused by hardware issues, we can’t rule them out completely. Thus, it is necessary to check your data and recover them if necessary. MiniTool Power Data Recovery, the best free data recovery software for Windows, should be mentioned.
MiniTool Power Data Recovery is devoted to providing a safe and green data recovery environment. There is no damage to your data during the restoration process. Besides, it supports you retrieve data from different data storage devices such as external hard drives, USB flash drives, memory cards, and so on.
To improve data recovery efficiency, it provides more specific scan selections like desktop, recycle bin, and selected folder. Why not try the free edition to recover your data first?
Tips:
The free version of MiniTool Power Data Recovery allows you to recover up to 1 GB of data. If you need a larger data recovery capacity, please get an advanced edition through this page.
Step 1: Download MiniTool Power Data Recovery on your computer.
MiniTool Power Data Recovery FreeClick to Download100%Clean & Safe
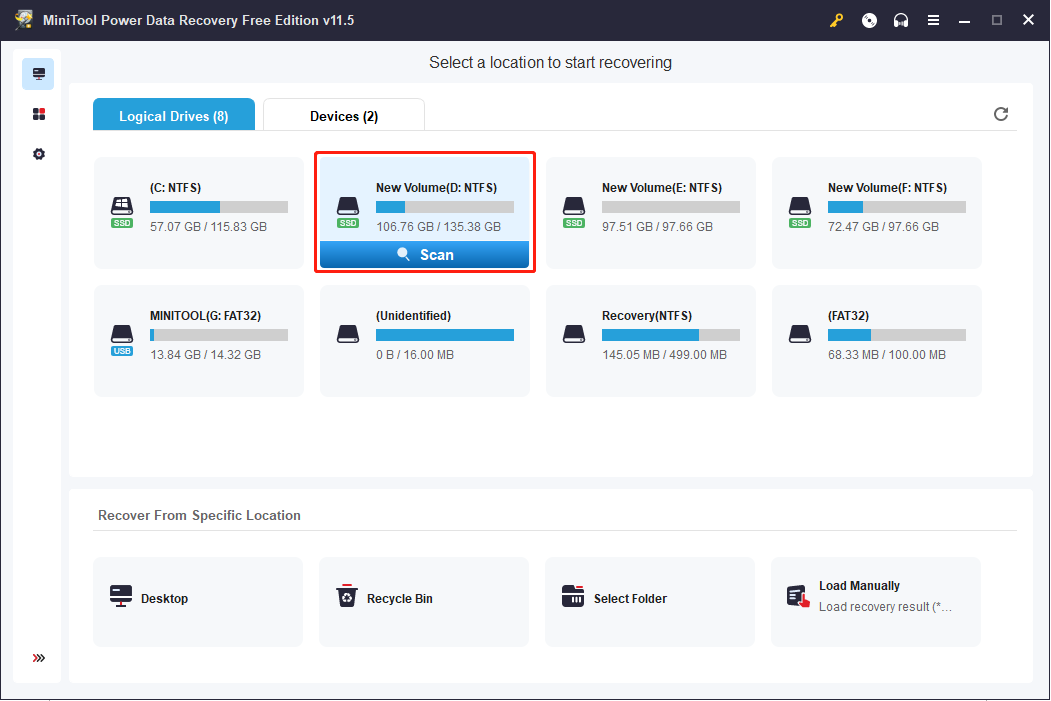
Step 2: Run the software and select a partition to scan. If you check the drive at one time, you can switch to the Devices tab to scan the entire disk.
Step 3: After the scan process is completed, browse the result page to find your desired files.
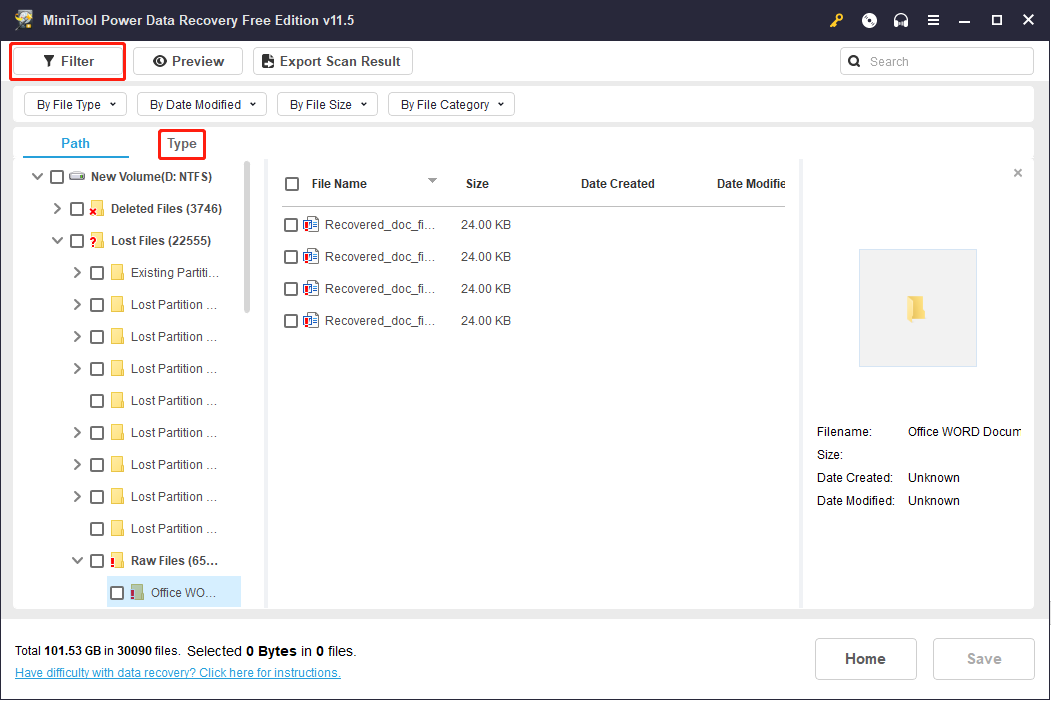
Tips:
If there are numerous data that you can’t locate wanted files quickly, you can choose Filter or Type function to reduce the distraction choices by setting different conditions, for instance, the type, size, created time, etc. The Search function works a lot when you remember the file’s names. Additionally, before saving the files, you can preview them to avoid restoring the wrong data.
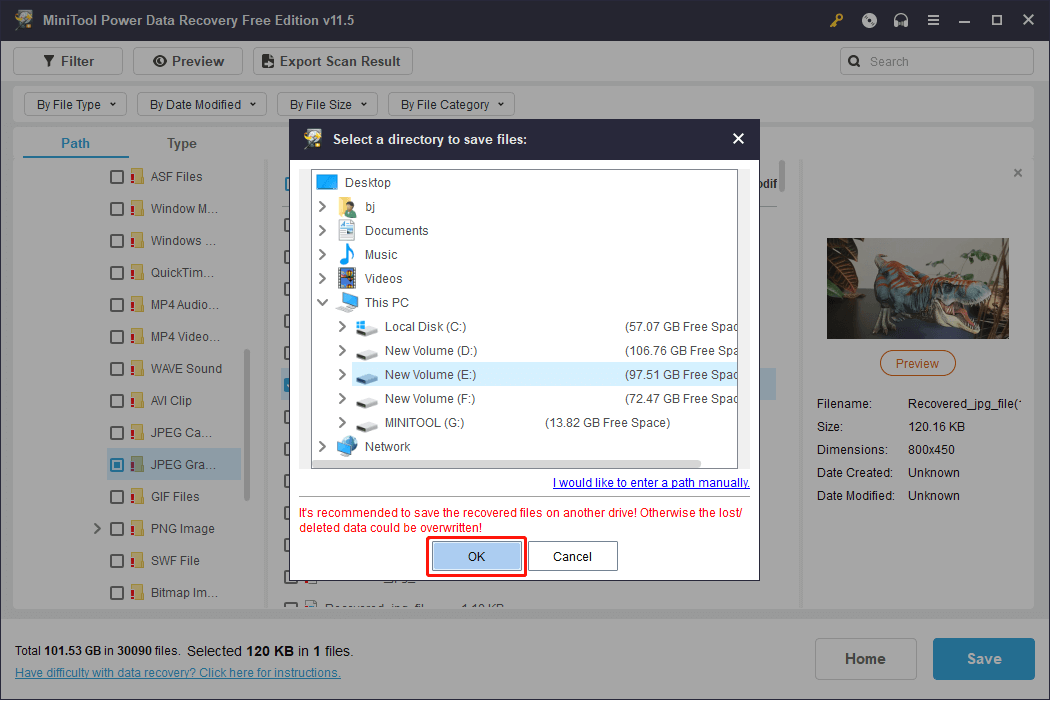
Step 4: Click the Save button and choose a storage path for the data.
Step 5: Click OK to confirm.
Final Words
DISM is a useful tool for repairing Windows images. When you find the DISM failed on your computer, don’t worry. You can try the methods mentioned in this post one by one to work out your problem. If finding your data lost or mistakenly deleted, please don’t hesitate to try MiniTool’s professional data recovery software.
MiniTool Power Data Recovery FreeClick to Download100%Clean & Safe
Please leave us a message via [email protected] if you are still in trouble or want to solve other disk and system problems.