Решение Cisco VPN работает довольно хорошо в Windows 10, если мы посмотрим на отчеты. Наиболее заметные проблемы появляются только после серьезных обновлений, которые могут сломать приложение. Они не распространены, но, с другой стороны, они делают клиент VPN полностью непригодным для использования. По крайней мере, так было в случае с Fall Creators Update и April Update.
Тем не менее, нет необходимости беспокоиться. Мы нашли некоторые подходящие шаги и зачислили их ниже, поэтому обязательно ознакомьтесь с ними.
- Ремонт установки
- Разрешить VPN свободно общаться через брандмауэр
- Настроить реестр
- Выполните чистую переустановку
1: Ремонт установки
Начнем с ремонта установки. Многие сторонние приложения, как правило, ломаются после выполнения крупного обновления. Вот почему всегда рекомендуется переустанавливать их после установки обновления.
Еще лучше, если вы хотите избежать одной из многочисленных ошибок обновления / обновления, удаление является жизнеспособным выбором. Однако, если вы не удалили Cisco VPN до обновления, вместо переустановки, вы должны сначала попробовать восстановить текущую установку.
Если вы не знаете, как восстановить Cisco VPN, выполните действия, описанные ниже:
- В панели поиска Windows введите Control и откройте панель управления.

- Нажмите « Удалить программу » в левом нижнем углу.
- Нажмите на клиента Cisco System VPN и выберите Восстановить.
- Следуйте инструкциям, пока установка не будет восстановлена.


2. Разрешить VPN свободно общаться через брандмауэр
Обновления системы могут довольно часто изменять системные настройки и предпочтения на значения по умолчанию. Этот проступок, конечно, может повлиять и на настройки Защитника Windows. В таком случае есть вероятность, что многие сторонние приложения, которым требуется бесплатный трафик через брандмауэр, не будут работать. Включая клиент Cisco VPN.
- Читайте также: FIX: не удалось инициализировать подсистему подключения в Cisco AnyConnect ошибка в Windows
Вот почему мы рекомендуем вам проверить настройки и убедиться, что приложение действительно разрешено в настройках брандмауэра Windows. Вот что вам нужно сделать:
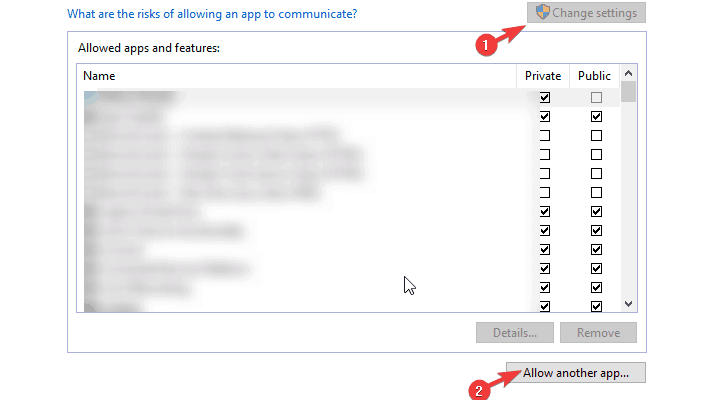
- На панели поиска Windows введите Разрешить приложение и откройте « Разрешить приложение через брандмауэр Windows ».
- Нажмите Изменить настройки.
- Убедитесь, что Cisco VPN находится в списке и ему разрешено обмениваться данными через брандмауэр Windows. Если это не так, нажмите « Разрешить другое приложение » и добавьте его.
- Установите флажки как для частной, так и для публичной сети.
- Подтвердите изменения и откройте Cisco VPN.

3: настроить реестр
Как и многие другие решения для интеграции VPN, Cisco VPN поставляется со специальным связанным виртуальным сетевым адаптером. Отказ этого устройства является еще одним распространенным явлением, и он сопровождается кодом ошибки 442. Первое, что вы можете сделать, если эта ошибка возникает, это проверить драйвер виртуального адаптера в диспетчере устройств.
- Читайте также: CCleaner совместим с Windows 8.1, 10
Вот где это можно найти:
- Щелкните правой кнопкой мыши кнопку «Пуск» и откройте диспетчер устройств.
- Разверните Сетевые адаптеры.
- Щелкните правой кнопкой мыши на виртуальном адаптере и обновите его.
- Перезагрузите компьютер.

Теперь, если это не решит проблему, вы можете попробовать настройку реестра, которая, кажется, полностью ее устраняет. Это требует административного разрешения для внесения изменений в Реестр. Кроме того, мы настоятельно рекомендуем действовать осторожно, поскольку неуместное вмешательство в реестр может привести к системному отказу.
Выполните следующие действия, чтобы настроить реестр и восстановить Cisco VPN:
- Введите regedit в строке поиска Windows и откройте редактор реестра.
- Скопируйте и вставьте следующий путь в адресную строку: HKEY_LOCAL_MACHINESYSTEMCurrentControlSetServicesCVirtA
- Щелкните правой кнопкой мыши запись реестра DisplayName и выберите «Изменить».
- В разделе «Значения данных» убедитесь, что единственным текстом, который стоит, является Cisco Systems VPN Adapter. Для 64-битной версии текст представляет собой Cisco Systems VPN Adapter для 64-битной Windows.
- Сохраните изменения и попробуйте снова запустить Cisco VPN.

4: выполнить чистую переустановку
Наконец, если ни одно из предыдущих решений не позволило использовать Cisco VPN, единственное оставшееся решение, которое мы можем предложить, — это выполнить чистую переустановку. В идеале это потребует установки с чистого листа, при которой вы удалите все оставшиеся связанные файлы с вашего ПК до повторной установки Cisco VPN.
- ЧИТАЙТЕ ТАКЖЕ: Интернет-трафик утроится к 2020 году, согласно оценкам Cisco
Выполните следующие действия, чтобы выполнить чистую переустановку и исправить Cisco VPN в Windows 10:
- Перейдите в Панель управления и откройте Удаление программы.
- Удалите клиент Cisco Systems VPN.
- Запустите Ashampoo Uninstaller (или любой другой сторонний очиститель).
- Перейдите в системный раздел и удалите все, что связано с Cisco, из папки «Программы».
- Загрузите клиент Cisco VPN здесь.
- Установите клиент и попробуйте запустить его.
Если это не помогло, попробуйте связаться со службой поддержки, поскольку они, скорее всего, помогут вам наилучшим образом.
Вот и все. Если у вас есть какие-либо альтернативные решения, которыми вы хотите поделиться с нами, не стесняйтесь сделать это в разделе комментариев ниже.
The Cisco VPN may have problems that appear only after the major updates, so follow our guide to make sure you fix the issues with the VPN on Windows 10.
- Восстановить установку
- Разрешить VPN свободно общаться через брандмауэр
- Настроить реестр
- Выполните чистую переустановку
1: Ремонт установки
Начнем с ремонта установки. Многие сторонние приложения, как правило, ломаются после выполнения крупного обновления. Вот почему всегда рекомендуется переустанавливать их после установки обновления.
Еще лучше, если вы хотите избежать одной из многочисленных ошибок обновления / обновления, удаление является жизнеспособным выбором. Однако, если вы не удалили Cisco VPN до обновления, вместо переустановки, вы должны сначала попробовать восстановить текущую установку.
Если вы не знаете, как восстановить Cisco VPN, выполните действия, описанные ниже:
- В панели поиска Windows введите Control и откройте панель управления .
- Нажмите « Удалить программу » в левом нижнем углу.
- Нажмите на клиента Cisco System VPN и выберите Восстановить .
- Следуйте инструкциям, пока установка не будет восстановлена.


2. Разрешить VPN свободно общаться через брандмауэр.
Обновления системы могут довольно часто изменять системные настройки и предпочтения на значения по умолчанию. Этот проступок, конечно, может повлиять и на настройки Защитника Windows. В таком случае есть вероятность, что многие сторонние приложения, которым требуется бесплатный трафик через брандмауэр, не будут работать. Включая клиент Cisco VPN.
Вот почему мы рекомендуем вам проверить настройки и убедиться, что приложение действительно разрешено в настройках брандмауэра Windows. Вот что вам нужно сделать:
- На панели поиска Windows введите Разрешить приложение и откройте « Разрешить приложение через брандмауэр Windows ».
- Нажмите Изменить настройки.
- Убедитесь, что Cisco VPN находится в списке, и ему разрешено обмениваться данными через брандмауэр Windows. Если это не так, нажмите « Разрешить другое приложение » и добавьте его.
- Установите флажки как для частной, так и для публичной сети.
- Подтвердите изменения и откройте Cisco VPN.

3: настроить реестр
Как и многие другие решения для интеграции VPN, Cisco VPN поставляется со специальным связанным виртуальным сетевым адаптером. Сбой этого устройства является еще одним распространенным явлением, и он сопровождается кодом ошибки 442. Первое, что вы можете сделать, если эта ошибка возникает, это проверить драйвер виртуального адаптера в диспетчере устройств.
Вот где это можно найти:
- Щелкните правой кнопкой мыши кнопку «Пуск» и откройте диспетчер устройств .
- Разверните Сетевые адаптеры .
- Щелкните правой кнопкой мыши на виртуальном адаптере и обновите его.
- Перезагрузите компьютер.

Теперь, если это не решит проблему, вы можете попробовать настройку реестра, которая, кажется, полностью ее устраняет. Это требует административного разрешения для внесения изменений в Реестр. Кроме того, мы настоятельно рекомендуем действовать осторожно, поскольку неуместное вмешательство в реестр может привести к системному отказу.
Выполните следующие действия, чтобы настроить реестр и восстановить Cisco VPN:
- Введите regedit в строке поиска Windows и откройте редактор реестра .
- Скопируйте и вставьте следующий путь в адресную строку: HKEY_LOCAL_MACHINESYSTEMCurrentControlSetServicesCVirtA
- Щелкните правой кнопкой мыши запись реестра DisplayName и выберите «Изменить».
- В разделе «Значения данных» убедитесь, что единственным текстом, который стоит, является Cisco Systems VPN Adapter . Для 64-битной версии текст представляет собой Cisco Systems VPN Adapter для 64-битной Windows.
- Сохраните изменения и попробуйте снова запустить Cisco VPN.

4: выполнить чистую переустановку
Наконец, если ни одно из предыдущих решений не позволило Cisco VPN работать, единственное оставшееся решение, которое мы можем предложить, – это выполнить чистую переустановку. В идеале это потребует установки с чистого листа, при которой вы удалите все оставшиеся связанные файлы с вашего ПК до повторной установки Cisco VPN.
Выполните следующие действия, чтобы выполнить чистую переустановку и исправить Cisco VPN в Windows 10:
- Перейдите в Панель управления и откройте Удаление программы.
- Удалите клиент Cisco Systems VPN.
- Запустите Ashampoo Uninstaller (или любой другой сторонний очиститель).
- Перейдите в системный раздел и удалите все, что связано с Cisco, из папки «Программы».
- Загрузите клиент Cisco VPN здесь.
- Установите клиент и попробуйте запустить его.
Если это не помогло, попробуйте связаться со службой поддержки, поскольку они, скорее всего, помогут вам наилучшим образом.
Вот и все. Если у вас есть какие-либо альтернативные решения, которыми вы хотите поделиться с нами, не стесняйтесь сделать это в разделе комментариев ниже.
Ошибки OpenVPN
Если вы не знаете как узнать ошибку, возникшую в ходе подключения, нажмите на следующую ссылку:
- Как узнать какая OpenVPN ошибка возникла?
Ниже представлен список возможных ошибок и методы их устранения. Нажмите на ошибку, чтобы узнать как ее устранить. Названия ошибок соответствуют записям в окне лога.
- Не могу выбрать “Connect” при нажатии на иконку в системном трее?
- Connect to IP:Port failed, will try again in 5 seconds; No Route to Host
- Cannot load certificate file client.crt
- All TAP-Win32 adapters on this system are currently in use
- ERROR: Windows route add command failed: returned error code 1?
- Initialization Sequence Completed With Errors
How to fix Cisco VPN issues on Windows 10
- Use a more reliable VPN
- Repair the installation
- Allow VPN to freely communicate through Firewall
- Tweak the Registry
- Perform a clean reinstallation
1. Use a more reliable VPN
 If your current VPN faces frequent issues after updates, then maybe it’s time you replaced it altogether before going through any of the troubleshooting steps.
That being said, you should use a reliable VPN, compatible with Windows that never breaks after updates, a VPN service like Private Internet Access.
This VPN service developed by Kape Technologies is constantly being updated with new features, and this includes compatibility improvements after many Windows 10 updates.
So far, PIA supports Windows 7, 8.1, and 10 (32 or 64 bit), and it is usually updated after every major Windows 10 updates, or at least that is what we should believe judging by their changelog.

Private Internet Access
If you can’t use Cisco AnyConnect, then PIA is the VPN for you, now at a discounted price for a limited time only!
2. Repair the installation
Let’s start by repairing the installation. Lots of third-party applications tend to break after a major update is administered. That’s why is always recommended to reinstall them after the update is installed.
Even better, if you want to avoid one of the numerous update/upgrade errors, uninstalling is a viable choice.
However, if you’ve not uninstalled Cisco VPN prior to an update, instead of reinstallation, you should try out repairing the present installation first.
If you’re not sure how to repair the Cisco VPN, follow the steps we provided below:
- In the Windows Search bar, type Control and open Control Panel.
- Click Uninstall a program in the bottom left corner.
- Click on the Cisco System VPN client and choose Repair.
- Follow the instructions until the installation is repaired.


3. Allow VPN to freely communicate through Firewall
System updates can, quite frequently, change the system settings and preferences to default values. This misdeed, of course, can affect Windows Defender settings as well.
If that’s the case, chances are that lots of third-party :enhancement-c9e9e92a” class=”textannotation”>apps that require free traffic through the Firewall won’t work. Including the Cisco VPN client.
That’s why we encourage you to check the settings and confirm that the app is indeed allowed in Windows Firewall settings. Here’s what you need to do:
- In the Windows Search bar, type Allow an app and open Allow an app through Windows Firewall.
- Click Change settings.
- Make sure that Cisco VPN is on the list and it’s allowed to communicate through Windows Firewall.
- If that’s not the case, click Allow another app and add it.
- If that’s not the case, click Allow another app and add it.
- Check both Private and Publicrong> network boxes.
- Confirm changes and open the Cisco VPN.
4. Tweak the Registry
Like many other integrating VPN solutions, Cisco VPN comes with the specific associated Virtual Network Adapter. The failure of this device is another common occurrence and it’s accompanied by the error code 442.
The first thing you can do if this error occurs is checking the Virtual Adapter driver in the Device Manager.
This is where to find it:
- Right-click on the Start button and open Device Manager.
- Expand Network adapters.
- Right-click on Virtual Adapter and update it.
- Restart your PC.

Now, if that fails to resolve the issue, you can try a Registry tweak which seems to address it fully. This requires administrative permission, in order to make changes to Registry.
Furthermore, we strongly suggest treading carefully since untaught meddling with Registry can result in a system failure.
Follow these steps to tweak Registry and repair Cisco VPN:
- Type regedit in the Windows Search bar and open Registry Editor.
- Copy-paste the following path in the address bar:
- HKEY_LOCAL_MACHINE/SYSTEM/Current/Control/SetServices/CVirtA
- HKEY_LOCAL_MACHINE/SYSTEM/Current/Control/SetServices/CVirtA
- Right-click on the DisplayName registry entry and choose Modify.
- Under the Value Data section, make sure that the only body of text which stands is the Cisco Systems VPN Adapter.
- For the 64bit version, the text is the Cisco Systems VPN Adapter for 64-bit Windows.
- Save changes and try running Cisco VPN again.

5. Perform a clean reinstallation
Finally, if none of the previous solutions got Cisco VPN to work, the only remaining solution we can suggest is performing a clean reinstallation.
Ideally, this will require a clean slate install where you’ll clear all remaining associated files from your PC prior to installing Cisco VPN again.
Follow these steps to perform a clean reinstallation and fix Cisco VPN on Windows 10:
- Navigate to Control Panel and open Uninstall a program.
- Uninstall the Cisco Systems VPN client.
- Run Ashampoo Uninstaller (or any other 3rd-party cleaner).
- Navigate to the system partition and delete everything Cisco-related from the Programs folder.
- Download the Cisco VPN client, here.
- Install the client and try running it.
If Cisco VPN is still not working on Windows 10, try contacting the support as they would more likely assist you in the best manner.
That’s it. If you have any alternative solutions you care to share with us, feel free to do so in the comments section below.
Как узнать какая OpenVPN ошибка возникла?
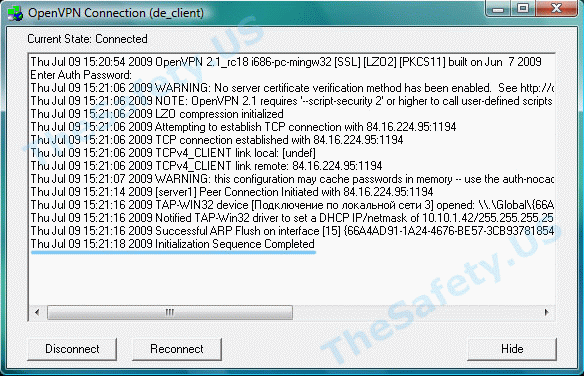
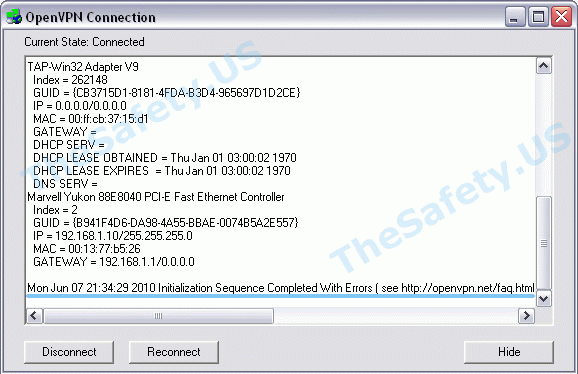
Программа OpenVPN имеет лог подключения. При подключении к OpenVPN серверу программа записывает данные подключения. Эта информация никуда не передается и остается на вашем компьютере, чтобы вы могли понять из-за чего возникла ошибка впн. Чтобы вызвать окно лога, нажмите дважды левой кнопкой мыши на иконку OpenVPN в системном трее.

Когда соединение прошло успешно, и вы подключены к VPN серверу, то окно лога должно выглядеть так:
наверх
Не могу выбрать “Connect” при нажатии на иконку в системном трее
В списке есть только “Proxy Settings”, “About” и “Exit”, но нет пункта “Connect”.

Это означает, что вы не скачали и/или не скопировали конфигурационный файл “client.ovpn” в “C:/Program Files/OpenVPN/config”. Откройте еще раз Инструкцию по настройке OpenVPN соединения для вашей ОС и проверьте все шаги установки и настройки.
наверх
All TAP-Win32 adapters on this system are currently in use
Эта впн ошибка связана с некорректной работой Windows и программы OpenVPN. Также эта OpenVPN ошибка может возникнуть вследствие отключения Интернета без отключения сначала OpenVPN соединения. Всегда отключайте сначала OpenVPN соединение и только затем Интернет.
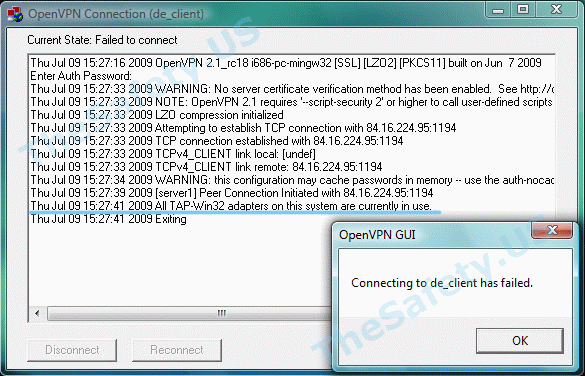
Для устранения ошибки, зайдите в “Пуск -> Сетевые подключения”. Найдите “Подключение по локальной сети. TAP-Win32 Adapter” и правой кнопкой мышки щелкните на ярлыке. Выберите “Отключить”.

Затем, таким же образом, “Включите” данное подключение. После выполнения данных действий проблемы с VPN подключением должны исчезнуть.

наверх
ERROR: Windows route add command failed: returned error code 1
Данная ошибка связана с ограничением прав в Windows Vista, Seven.
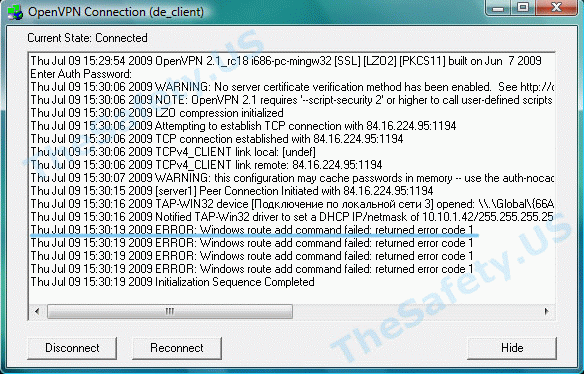
Для устранения ошибки, необходимо выйти из OpenVPN GUI. Правой кнопкой мышки нажать на иконку OpenVPN GUI на рабочем столе и выбрать пункт меню “Свойства”

На вкладке “Совместимость” поставьте галочку “Выполнять эту программу от имени администратора”.
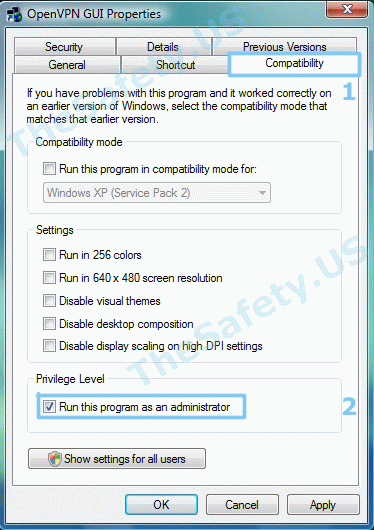
Теперь запустите OpenVPN GUI еще раз и подключитесь к VPN серверу.
наверх
Initialization Sequence Completed With Errors
Данная ошибка связана с неправильной работой службы DHCP из-за антивирусов или фаерволов.
Ошибка наблюдалась постоянно у фаервола Outpost Firewall версии 2009 и ранее, наблюдается также у антивируса Касперского. Ниже представлено решение для антивируса Касперского. Сам алгоритм ничем не отличается от решения проблемы для других антивирусов и фаерволов.
Для устранения ошибки, необходимо зайти в “Пуск -> Панель Управления -> Сетевые подключения” и зайти в “Свойства” виртуального адаптера “TAP-Win 32 Adapter”. На вкладке “Общие” в списке отключить Kaspersky Anti-Virus NDIS Filter и затем нажать “ОК”.
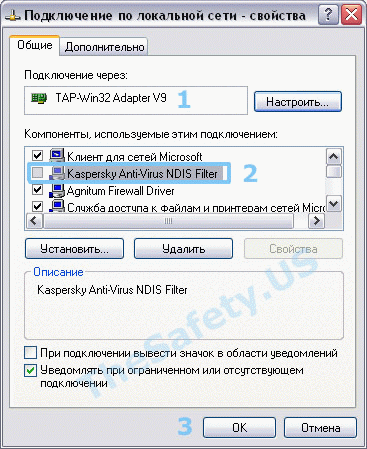
Теперь подключитесь к VPN и подключение должно пройти успешно.
наверх
by Milan Stanojevic
Milan has been enthusiastic about technology ever since his childhood days, and this led him to take interest in all PC-related technologies. He’s a PC enthusiast and he… read more
Updated on
- Unable to install Cisco Anyconnect or the classic Cisco VPN Client?
- You may be surprised to learn that its development has ceased in 2011.
- However, there are still ways you can get hold of the installation files.
- We have the solution you need — simply follow the steps below.

While it is a good virtual private network software, many users reported that Cisco Anyconnect won’t install on their PC at all or that Cisco Anyconnect installation failed on Windows 10. This issue can occur because of the fact that the Cisco VPN service was last updated in the year 2011.
Even though the latest version of this software is not natively compatible with the Windows 10 operating system, in this article we will explore a way to make it run on your Windows 10 PC without any issues.
Please make sure to follow all the steps presented in this article in the order that they are written for the best results.
Cisco VPN Client was officially abandoned as a project in 2011, and you might find yourself unable to install Cisco Anyconnect.
To avoid any potential problems, try downloading and installing the Cisco VPN client from a third-party source.
How we test, review and rate?
We have worked for the past 6 months on building a new review system on how we produce content. Using it, we have subsequently redone most of our articles to provide actual hands-on expertise on the guides we made.
For more details you can read how we test, review, and rate at WindowsReport.
What can I do if Cisco VPN won’t install on Windows?
How to install Cisco on your Windows 10 PC
Note: If you recently upgraded from Windows 7 or Vista to Windows 10, then it is recommended that you uninstall SonicWALL Global VPN Client and Cisco VPN Client by searching for them in Control Panel >Add or remove program window.
If you are using a clean install of Windows 10, then you are ready to start setting up the Cisco VPN.
- Click here to download the 32bit version of the Cisco VPN Client, and here for the 64-bit version.

- Run the .exe file you downloaded, select Browse and choose a specific location on your hard-drive for the files to be extracted (in this example image, we created a folder on the Desktop called Cisco VPN to which we extracted the files from the .exe).

- Navigate to the location in which you unzipped the folder, and search for the vpnclient_setup.msi file.

- Double click on the installer, and select Next.

- You are now done. The installation process will start normally and you will be able to follow the on-screen instructions


Install Private Internet Access

While the Cisco VPN Client was a great solution back in the days, it is safe to declare that it is not quite cutting-edge technology nowadays.
In fact, CISCO Systems has completely shut down support for this product since 2014 and no updates were released for this product since 2012, thus it is no wonder that error messages like there is a problem with this windows installer package appear.
Running obsolete software can cause more damage than you might think, which is why we recommend a modern VPN client like Private Internet Access.
Switching to a world-leading VPN client like Kape Technologies owned PIA can significantly improve your online experience by streamlining your connection, reducing loading times, and enhancing your download speeds.
With an impressive network of global gateways, you will never have to worry about your connection to worldwide servers not being successful. Plus, your traffic data will be routed through secure VPN tunnels and protected by the best-in-class encryption technology.
Private Internet Access
Cisco Anyconnect won’t install? Go for a more modern, more friendly, more performant VPN like PIA!
In this article we explored the best way to install Cisco VPN on your Windows 10 PC. We are sure that the solution provided here will help you bypass any installation issues with this software.
Please feel free to let us know if this method worked for you by using the comment section found below.
![]()
What is ‘Cisco AnyConnect VPN connected but no internet access’ issue in Windows 10?
In this post, we are going to discuss on How to fix Cisco AnyConnect VPN connected but no network access, Cisco AnyConnect VPN connected but no internet access, Cisco AnyConnect VPN connection failed issue in Windows 10/8/7. You will be guided with easy steps/methods to resolve the issue. Let’s starts the discussion.
‘Cisco AnyConnect VPN: Cisco AnyConnect VPN is one of best VPN (Virtual Private Network) services from Cisco. It is secure mobility client a web-based VPN that doesn’t need any user side additional configuration it is also called IP Tunneling. It is secure method to access the servers on a remote location. Cisco AnyConnect VPN supports both IPsec and SSL options.
However, several Windows users reported that they faced Cisco AnyConnect VPN connected but no internet access, Cisco AnyConnect VPN connection failed, Cisco AnyConnect VPN connected but no network access issue on their Windows 10/8/7 computer when they tried to connect Cisco AnyConnect VPN. This issue indicates you are unable to connect Cisco AnyConnect VPN in your Windows computer.
Users explained that they were successful in Cisco AnyConnect VPN connection in Windows computer but it is still causing No Internet/Network issue, or sometimes they faced Cisco AnyConnect VPN connection failed issue when they attempt to connect Cisco AnyConnect VPN in Windows PC. There could be several reasons behind the issue including the interference of third-party antivirus/firewall program or Windows Firewall, issue with Cisco AnyConnect VPN Client app itself, issue with your network and its network settings, and other Windows issues. Let’s go for the solution.
How to fix Cisco AnyConnect VPN connected but no network access in Windows 10/8/7?
Method 1: Fix Cisco AnyConnect VPN connected but no internet access issue with ‘PC Repair Tool’
‘PC Repair Tool’ is easy & quick way to find and fix BSOD errors, DLL errors, EXE errors, problems with programs/applications, malware or viruses issues, system files or registry issues, and other system issues with just few clicks.
⇓ Get PC Repair Tool
Method 2: Repair Cisco AnyConnect VPN Client installation

One possible way to fix the issue is to repair Cisco AnyConnect VPN Client installation in order to repair corruption in Cisco AnyConnect VPN Client installation.
Step 1: Open ‘Control Panel’ in Windows PC via Windows Search Box and go to ‘Uninstall a Program > Programs & Features’
Step 2: Find and right-click on ‘Cisco AnyConnect VPN’, and select ‘Change/Repair’ and follow on-screen instructions to finish repair process and once finished, restart your computer and check if the issue is resolved.
Method 3: Allow Cisco AnyConnect VPN through Windows Firewall

This issue can be occurred if Cisco AnyConnect VPN is blocked by Windows Firewall in computer. You can allow Cisco AnyConnect VPN through Windows Firewall in order to fix.
Step 1: Open ‘Control Panel’ in Windows PC using above method and go to ‘System & Security > Windows Defender Firewall > Allow an app through Windows Defender Firewall’
Step 2: Click ‘Change Settings’, click ‘Allow another app’ and add ‘Cisco AnyConnect VPN Installation’ folder
Step 3: Now, tick the ‘Private’ and ‘Public’ checkboxes next to Cisco AnyConnect VPN and then hit ‘Ok/Save’ to save the changes. Once done, check if the issue is resolved.
Method 4: Fix Cisco AnyConnect VPN connection failed issue using Registry Editor

Step 1: Open ‘Registry Editor’ app in Windows PC via Windows Search Box and navigate to following path
HKEY_LOCAL_MACHINE/SYSTEM/Current/Control/SetServices/CVirtA
Step 2: Now, right-click ‘DisplayName’ registry entry and select ‘Modify’, Under the Value Data section, make sure that the only body of text which stands is the Cisco Systems VPN Adapter. For the 64bit version, the text is the Cisco Systems VPN Adapter for 64-bit Windows.
Step 3: Click ‘Ok’ to save the changes and retry running Cisco AnyConnect VPN and check if the issue is resolved.
Method 5: Update Virtual Network Adapter driver

Updating Virtual Network Adapter driver in Windows PC can resolve the issue.
Step 1: Open ‘Device Manager’ in Windows PC via Windows Search Box and expand ‘Network Adapters’ category
Step 2: Right-click on your Virtual Adapter driver and select ‘Update Driver’ and follow on-screen instructions to finish update process. Once updated, restart your computer and check if the issue is resolved.
Download or reinstall Virtual Network Adapter Driver Update in Windows PC [Automatically]
You can also try to update all Windows drivers including Virtual Network Adapter Driver using Automatic Driver Update Tool. You can get this tool through button/link below.
⇓ Get Automatic Driver Update Tool
Method 6: Install all pending Windows update
You can also try to fix the issue by install all available or pending Windows update in computer.
Step 1: Open ‘Settings’ App in Windows PC via Windows Search Box and go to ‘Update & Security > Windows Update’ and click ‘Check for updates’ button
Step 2: Download and install all available updates and pending updates in computer and once updated, restart your computer and check if the issue is resolved.
Method 7: Run Cisco AnyConnect VPN in Compatibility Mode
This issue can be occurred if Cisco AnyConnect VPN app is not running in Compatibility mode in computer. You can set Cisco AnyConnect VPN app to run in compatibility mode in order to fix.
Step 1: Open ‘File Explorer’ and navigate to following path
C:\Program Files (x86)\Cisco\Cisco AnyConnect Secure Mobility Client
Step 2: Find and right-click on ‘vpnui.exe’ and select ‘Properties’. Click ‘Compatibility’ tab, tick ‘Run this program in compatibility mode for’ checkbox and select ‘Windows 8’ or prior one from dropdown
Step 3: Hit ‘Apply > Ok’ button to save the changes and retry running Cisco AnyConnect VPN and check if the issue is resolved.
Method 8: Uninstall and reinstall Cisco AnyConnect VPN
If the issue is still persist, then you can try to fix the issue by uninstalling Cisco AnyConnect VPN and then reinstall it.
Step 1: Open ‘Control Panel’ in Windows PC and go to ‘Uninstall a Programs > Programs & Features’
Step 2: Find and right-click on ‘Cisco AnyConnect VPN’, and select ‘Uninstall’ to uninstall it and once finished, restart your computer
Step 3: After restart, download and install latest version of Cisco AnyConnect VPN app in Windows PC from Cisco official site. Once installed, try running Cisco AnyConnect VPN and check if the issue is resolved.
Conclusion
I am sure this post helped you on How to fix Cisco AnyConnect VPN connected but no network access, Cisco AnyConnect VPN connected but no internet access, Cisco AnyConnect VPN connection failed issue in Windows 10/8/7 with several easy steps/methods. You can read & follow our instructions to do so. That’s all. For any suggestions or queries, please write on comment box below.
If you are experiencing ‘Cisco AnyConnect Connection attempt failed’ error while running Cisco AnyConnect VPN application on Windows 10 computer, then you are in right place for the solution. Here, you will be guided with easy methods/steps to resolve the issue. Let’s go for the solution.
‘Cisco AnyConnect VPN’: Cisco AnyConnect is VPN (Virtual Private Network) software provides reliable and easy-to-deploy encrypted network connectivity from devices by delivering persistent corporate access for users on the go. It enables business-critical application connectivity. It features wide range of authentication options, access to internal IPv4/IPv6 network resources, and many more.
However, several users reported that they faced ‘Cisco AnyConnect Connection attempt failed’ when running the Cisco AnyConnect VPN software on their Windows 10 device in the hope of establishing a VPN connection. This error indicates that your Cisco AnyConnect VPN software is unable to establish VPN connection for some reasons. The error prevents you from establishing Cisco AnyConnect Connection in your device. Let’s take a look at error message.
“Connection attempted failed. Please try again”
The possible reason behind this issue can be an incompatibility with Windows 10 affecting SSL/TL API that inhibits the Cisco AnyConnect VPN software communicating with outside the server. In such case, you can try to fix the issue running Cisco AnyConnect VPN Software in compatibility mode with your Windows 10 computer.
This issue can also be occurred due to missing Hotfix for TSL Protocol Renegotiation. You can try to fix the issue by installing every pending update that can fix any issue with Cisco AnyConnect VPN Client. Sometimes, this error is occurred after Windows update KB 3034682. Users reported the error started occurring after this windows update. In such case, you can uninstall the problematic windows update in order to fix the issue.
Hyper-V conflict in your Windows 10 can cause this error while running Cisco AnyConnect software for VPN connection. Another possible reason behind the issue can be Connection Sharing Option is enabled, internet explorer is configured to work offline and other reasons. However, it is possible to fix the issue. Let’s go for the solution.
How to fix ‘Cisco AnyConnect Connection attempt failed’ error in Windows 10?
Method 1: Fix Windows PC problems with ‘PC Repair Tool’
You can fix your Windows PC problems with ‘PC Repair Tool’ in order to fix this error. This software offers you to find and fix BSOD errors, DLL errors, EXE errors, problems with programs, malware or viruses issue, and other system issues with just few clicks.
Method 2: Install every pending Windows update
As mentioned, this error is occurred due to pending windows update. You can install every pending updates in order to fix the issue.

Step 1: Press ‘Windows + I’ keys on keyboard to open ‘Settings’ App in Windows 10
Step 2: Go to ‘Update &Security > Windows Update’ and click on ‘Check for updates’ button
Step 3: This will show you all available Windows updates. Download and install every pending updates and wait to finish the process. Once done, restart your computer and check if the issue is resolved.
Method 3: Run Cisco AnyConnect VPN Software in Compatibility Mode in Windows 10
It might possible you are running Cisco AnyConnect in incompatibility mode means the software is not compatible with your Windows 10 computer. You can fix the issue by running the application in compatibility Mode.
Step 1: Open ‘File Explorer’ and navigate to ‘C:\Program Files (x86)\Cisco\Cisco AnyConnect Secure Mobility Client’ path
Step 2: Once you have inside the correct location, locate and right-click on ‘vpnui.exe’ file, and select ‘Properties’ option
Step 3: In the ‘Properties’ window, click on ‘Compatibility’ tab, check the ‘Run this program in compatibility mode’ checkbox and choose your Windows OS version like Windows 10 from ‘Select the Windows Version’ dropdown
Step 4: Finally, click on ‘Apply’ and ‘Ok’ to see the changes and check if the error is resolved.
Method 4: Uninstall problematic Windows update
As mentioned, this issue can be occurred due to problematic windows update installed in your computer like ‘KB 3034682’. In such case, you can uninstall this Windows update in order to fix the issue.
Step 1: Open ‘Settings’ App and go to ‘Update & Security > Windows Update’
Step 2: Click on ‘View Update History’ in right pane, and click on ‘Uninstall Updates’
Step 3: Find and select the problematic Windows update like ‘KB 3034682’, right-click on it and select ‘Uninstall’. Follow on-screen instructions to finish uninstall process and after that, restart your computer
Step 4: Now, open your browser and visit ‘Download Page of Microsoft Show or Hide Troubleshooter Package’ and download the troubleshooter
Step 5: Once downloaded, open the ‘.diagcab’ file and click on ‘Advanced’ button and check ‘Apply Repairs Automatically’
Step 6: Click on ‘Next’ and wait to finish scan for updates and then click on ‘Hide Updates’
Step 7: Check the box associated with update that you want to hide and then hit ‘Next’ to advance hide the selected update from Windows update
Step 8: Once done, reboot your computer to see the changes and check if the problem is resolved.
Method 5: Disable Hyper-V in Windows 10
This issue can also be occurred to Hyper-V service conflict with Cisco AnyConnect software in your computer. Hyper-V service is enabled by default in your Windows 10. You can disable this service in order to fix Cisco AnyConnect Connection attempt failed error in Windows 10.
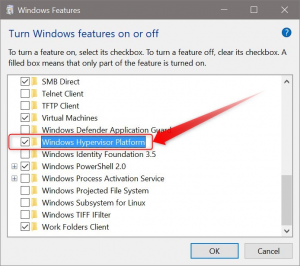
Step 1: Press ‘Windows + X’ keys on keyboard and select ‘Control Panel’
Step 2: In ‘Control Panel’ window, go to ‘Uninstall a Program > Programs & Features’
Step 3: Click on ‘Turn Windows Feature ON or OFF’ in left pane. In the opened window, find and deselect Hyper-V associated checkbox and hit ‘Ok’ button to save the changes
Step 4: After that, reboot your computer and check if the issue is resolved.
Method 6: Disable Network Connection Sharing in Windows 10
Another possible way to fix the issue is to disable Network Connection Sharing in Windows 10. Let’s try.
Step 1: Press ‘Windows + R’ keys on keyboard, type ‘ncpa.cpl’ in the opened ‘Run’ dialog box and hit ‘Ok’ button to open ‘Network Connections’ tab
Step 2: In the opened window, look through the list of network adapters and detect the one created specifically for hosting hotspot networks like ‘Microsoft Hosted Network Virtual Adapter’
Step 3: Right-click on it and select ‘Properties’. In ‘Properties’ window, click on ‘Sharing’ tab and deselect ‘Allow other network users to connect through this computer’s Internet Connection’ checkbox
Step 4: Finally, click on ‘Ok’ button to save the changes and restart your computer. Please check if the problem is resolved.
Method 7: Disable ‘Internet Explorer’s ability to work offline’ via ‘Registry Editor’
As mentioned, enabled Internet Explorer’s ability to work offline can cause ‘Cisco AnyConnect Connection attempt failed’ error. You can fix the issue by disabling offline mode.
Step 1: Press ‘Windows + R’ keys on keyboard, type ‘regedit’ in the opened ‘Run’ dialog box and hit ‘OK’ button to open ‘Registry Editor’ window
Step 2: In the opened window, navigate to ‘HKEY_CURRENT_USER\Software\Microsoft\Windows\CurrentVersion\Internet Settings’ path’
Step 3: Locate and Double-click on ‘GlobalUserOffline’ DWORD key, set its ‘Base’ to ‘Hexadecimal’, and value to ‘0’, and then hit ‘Ok’ button to save the changes
Step 4: After that, reboot your computer and check if the issue is resolved.
Conclusion
I am sure this article helped you on How to fix ‘Cisco AnyConnect Connection attempt failed’ error in Windows 10 with several easy steps/methods. You can read & follow our instructions to do so. That’s all. For any suggestions or queries, please write on comment box below.