If Bluestacks 5 is stuck on starting, you need to perform a Bluestacks repair 🔧
by Milan Stanojevic
Milan has been enthusiastic about technology ever since his childhood days, and this led him to take interest in all PC-related technologies. He’s a PC enthusiast and he… read more
Updated on
- If you cannot start Bluestacks, then try running it in compatibility mode, close background apps, and pause your antivirus.
- Is Bluestacks5 stuck on the loading screen? You cannot wait for an invite loading to conclude, so act promptly.
- Repair Bluestacks by reinstalling the software if necessary and make sure virtualization is enabled on your device.
XINSTALL BY CLICKING THE DOWNLOAD
FILE
BlueStacks is a fast Android emulator for PC, allowing users to enjoy thousands of apps on their computers. Whilst the platform is fairly solid, sometimes users cannot start Bluestacks.
For instance, the BlueStacks engine won’t start on certain systems.
If you have encountered errors with starting BlueStacks on your Windows PC, then the fixes below will help you get it up and running in no time. But first, let’s see what triggers the issues, to begin with.
Why BlueStacks cannot start?
This issue can occur if BlueStacks failed to install properly on your PC. A damaged installation can’t run properly, so you might have to reinstall the software.
In case the installation is damaged, BlueStacks won’t open on your PC, so it’s recommended to repair the Bluestacks installation.
If there’s a driver problem, you might even get Blue Screen of Death errors in BlueStacks, but there are ways to fix that.
Speaking of problems, here are some similar issues that users reported:
- Bluestacks stuck on initializing screen Windows 10 – This problem can appear on almost any OS, see BlueStacks not starting Windows 10, cannot start BlueStacks Windows 11, Mac
- Cannot start bluestacks unable to initialize graphics
- Bluestacks stuck on starting engine – BlueStacks stuck on starting, also BlueStacks infinite loading, or loading forever. To fix the problem, simply end those processes and check if that helps.
- Bluestacks 5 stuck on loading screen/ welcome screen – cannot start Bluestacks 5, cannot start Bluestacks X – To fix the problem, make sure that your antivirus isn’t interfering with Bluestacks.
- Cannot start BlueStacks error code 1, needs minor repair
- Bluestacks stuck on just a sec –To fix it, disable all startup applications and run Bluestacks again.
- Cannot start BlueStacks Hyper-V
How to fix Cannot start BlueStacks please send a problem report?
- Why BlueStacks cannot start?
- How to fix Cannot start BlueStacks please send a problem report?
- 1. Close any additional applications
- 2. Install the latest version of Bluestacks
- 3. Use a different software
- 4. Change the security properties
- 5. Run Bluestacks in Compatibility mode
- 6. End all Bluestack processes
- 7. Try an older version of Bluestacks
- 8. Check your antivirus
- 9. Install the latest updates
- 10. Make sure virtualization is enabled on your device
Before we dig in, here are a few quick prerequisites for you to verify:
- Ensure that your PC fulfills the minimum system requirements
- Change Graphics Mode to DirectX
- Consider upgrading to an SSD and adding more memory
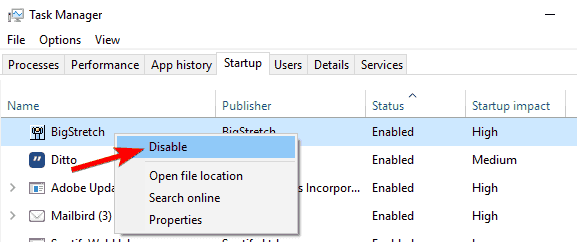
1. Close any additional applications
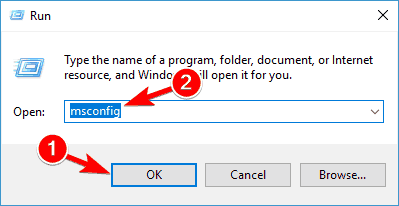
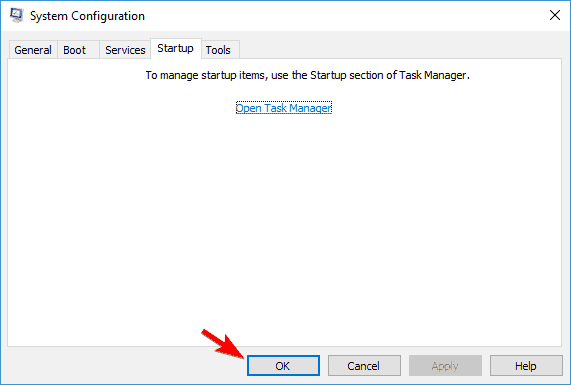
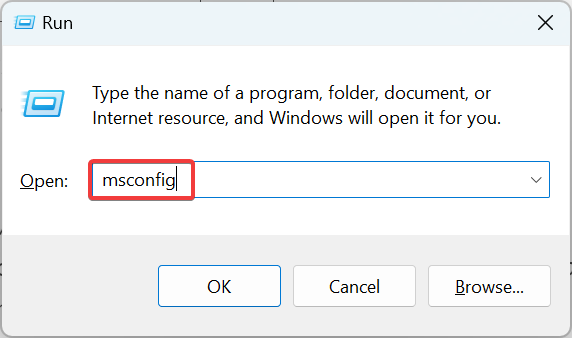
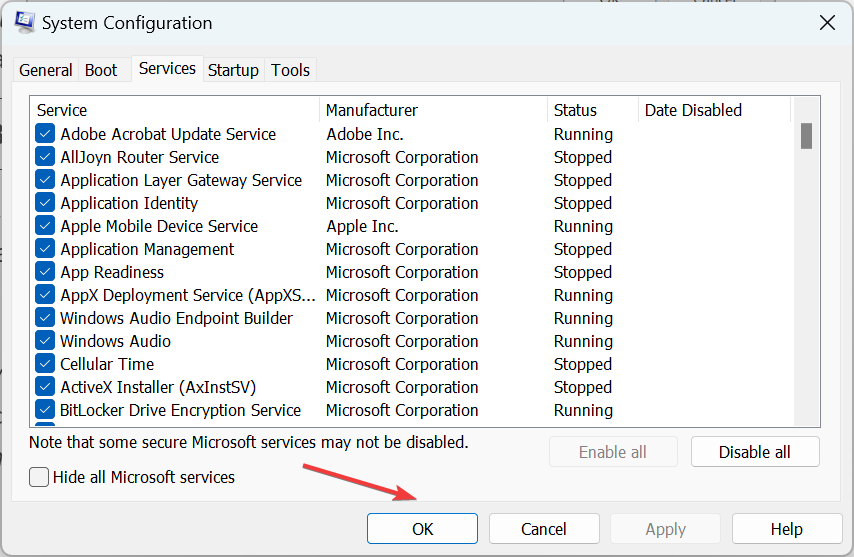
- Press Windows Key + R and enter msconfig. Now press Enter or click OK.

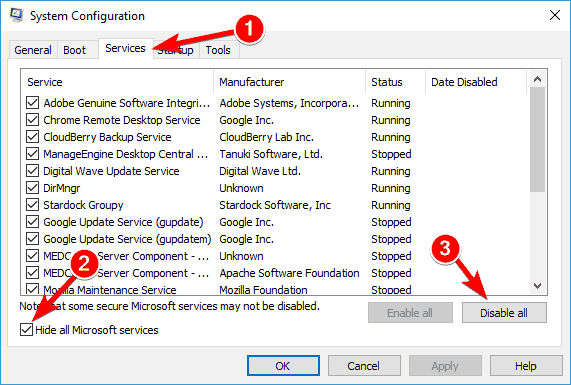
- The System Configuration window will now open.
- Navigate to the Services tab and check Hide all Microsoft services. Now click Disable all button.

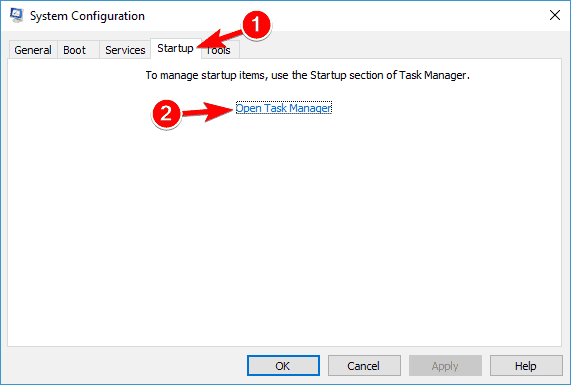
- Proceed to the Startup tab and click Open Task Manager.
- A list of startup applications will now appear in Task Manager.
- Right-click the first entry on the list and choose Disable from the menu. Repeat this step for all startup applications on the list.

- Close Task Manager. Now go back to the System Configuration window.
- Click Apply and OK to save changes. Restart your PC to apply the changes.
Third-party applications can sometimes interfere with Bluestacks and cause Bluestacks to get stuck on initializing.
Since many of these applications start automatically with Windows, it’s advised that you perform a Clean boot and disable all startup applications and services.
Once your PC restarts, check if the problem with Bluestacks still appears. If not, it means that one of the startup applications was causing it.
How we test, review and rate?
We have worked for the past 6 months on building a new review system on how we produce content. Using it, we have subsequently redone most of our articles to provide actual hands-on expertise on the guides we made.
For more details you can read how we test, review, and rate at WindowsReport.
To find the cause, you need to enable startup applications and services until you find the problematic application. Once you find it, remove it from your PC and check if that helps.
2. Install the latest version of Bluestacks
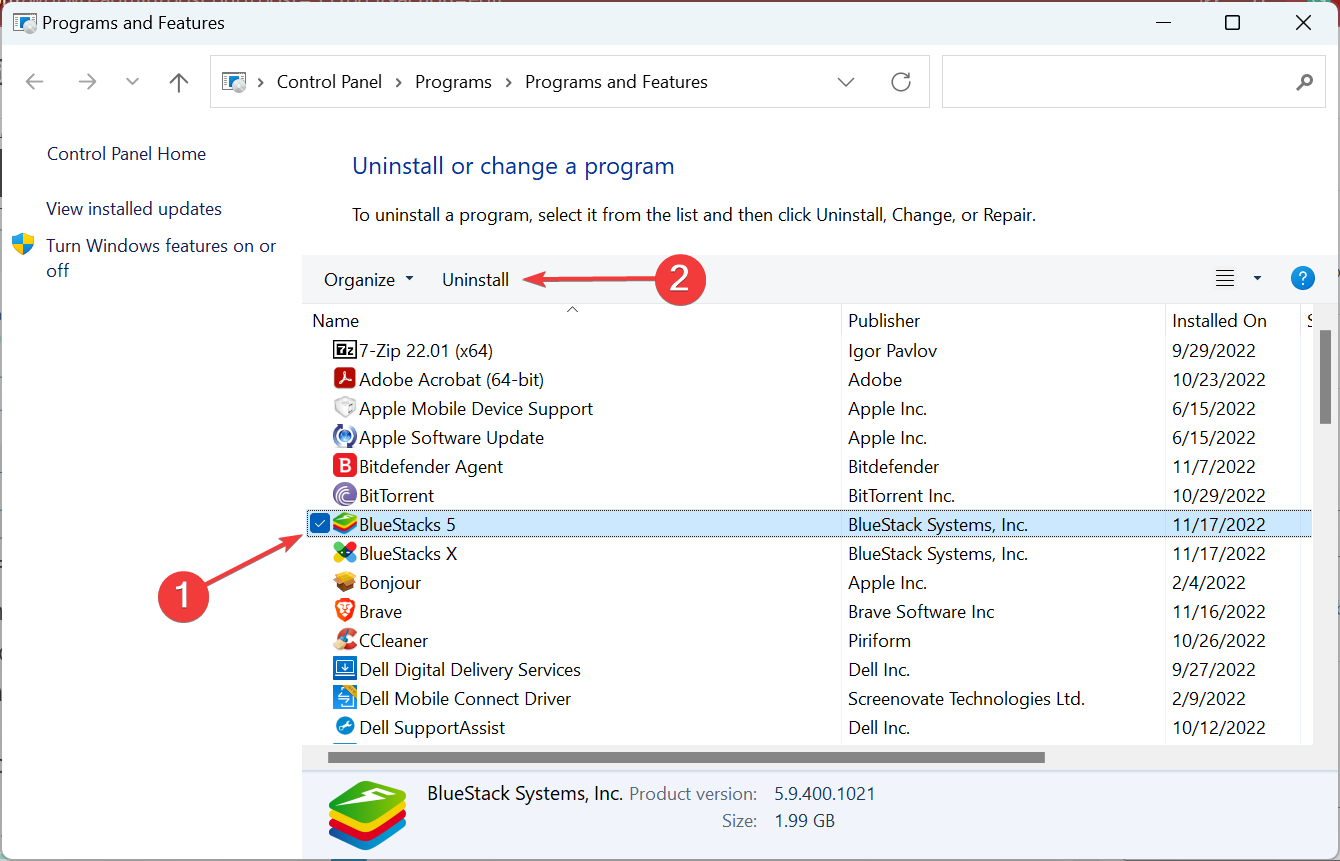
- Uninstall Bluestacks. You can do that by going to Settings app > System > Apps & features. Locate Bluestacks and click the Uninstall button.
- Locate and remove the following folders:
C:\Program\Files(x86)\BlueStacksorC:\Program\Files\BlueStacksC:\Program\Data\BlueStacksC:\Program\Data\BlueStacks\Setup
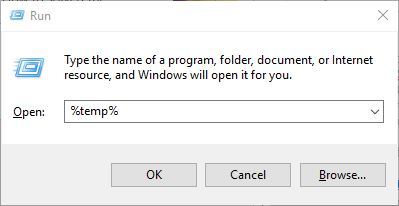
- Press Windows Key + R, enter %temp% and press Enter or click OK.
- Delete all BST files and folders. You can search for BST files using the search bar at the top right corner.
- Download the removal tool and use it to remove Bluestacks.
Sometimes older and outdated versions of Bluestacks engine won’t start, and to fix this problem, we advise you to reinstall the Bluestacks application.
In addition to downloading the latest version, be sure that you have the necessary .NET framework installed. You can download all the necessary components from Microsoft’s download page.
Note that you’ll need to completely remove all files, folders, and registry keys associated with Bluestacks.
If this process seems a bit complicated, you can also remove Bluestacks using an uninstaller tool.
By using a professional uninstaller tool you’ll ensure that the software is completely removed from your system along with all of its files and registry entries.
Once you remove it using this kind of tool, download BlueStacks and check if the issue is resolved.
3. Use a different software
Although BlueStacks is a great Android emulator, it’s not the only one on the market, and there are many others that can do the same job, and one of them is LDPlayer.
This software delivers great performance, so you’ll experience maximum framerate when playing games. Custom keyboard and mouse controls are supported, allowing you to play Android games the same way as PC games.
Lastly, the software supports multiple instances, synchronization, and macros, allowing you to automate tedious tasks with ease.
⇒ Get LDPlayer
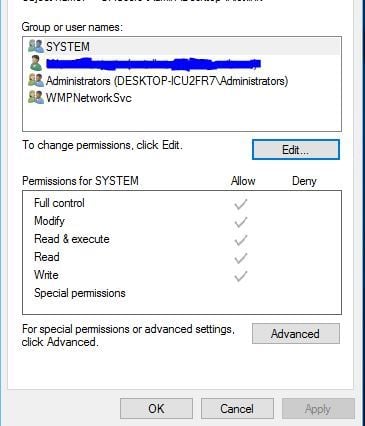
4. Change the security properties
Users reported that Bluestacks initialization problems can occur due to your security settings.
Sometimes you might not have the necessary privileges to run this application, but you can fix that problem by following these steps:
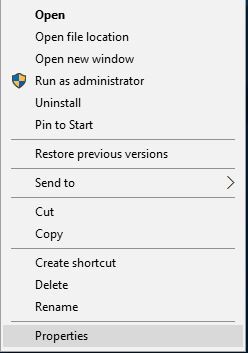
- Go to the Bluestacks installation directory. By default, it should be
C:\Program Files\BlueStacks - Locate HD-StartLauncher, right-click it, and choose Properties.

- Go to the Security tab and click Edit.

- In the Group or user names section, select your user name, and under the Permissions section, check Full control in Allow column.

- After you’re done, click Apply and OK to save changes.
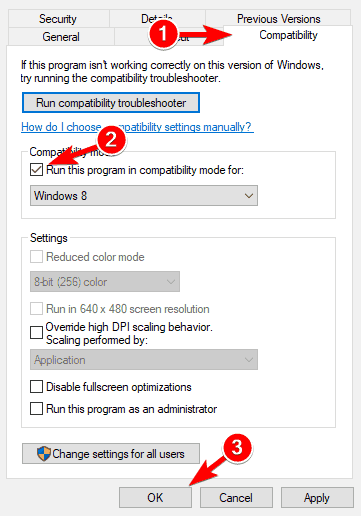
5. Run Bluestacks in Compatibility mode
A few users reported that you can fix problems with Bluestacks not starting by running it in Compatibility mode. To do that, follow these steps:
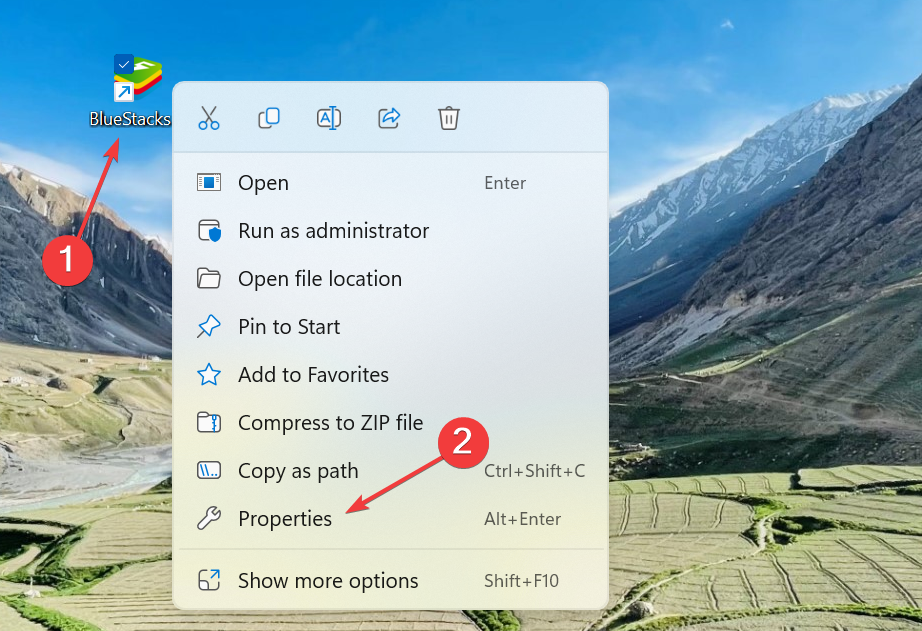
- Right-click the Bluestacks shortcut and choose Properties from the menu.
- Go to the Compatibility tab, check Run this program in compatibility mode for, and select a previous version of Windows from the dropdown menu.

- After you’re done, click Apply and OK to save changes.
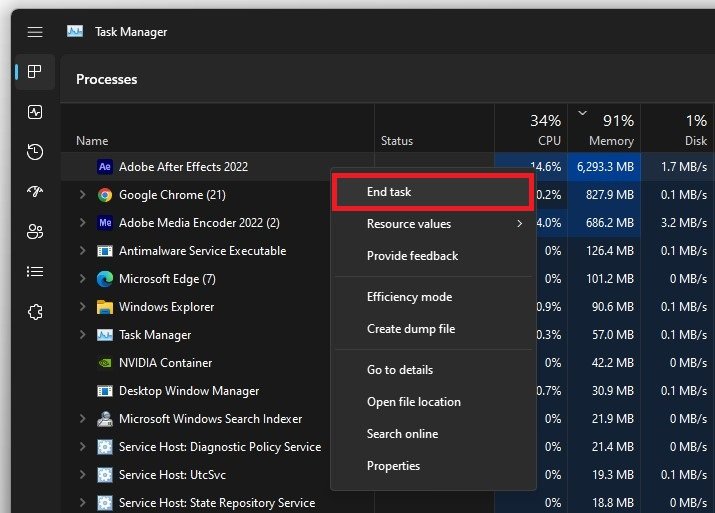
6. End all Bluestack processes
If Bluestacks gets stuck on initializing on your PC, you might be able to fix the problem by disabling all running Bluestacks processes. This is quite simple to do, and you can do it by following these steps:
- Turn on Airplane mode. If you don’t have a laptop, you can just disable your Internet connection.
- Press Ctrl + Shift + Esc to open Task Manager.
- Locate all Bluestacks processes and terminate them.
- You can do that by right-clicking the Bluestacks process and choosing End Task from the menu.

- Once you disabled all Bluestacks processes, close Task Manager.
- Navigate to the Bluestacks installation directory and run HD-Quit, HD-QuitMultiInstance, and HD-Restart.
- After doing that, try to run Bluestacks again.
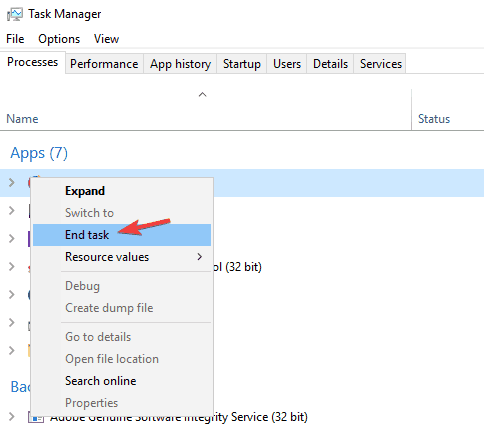
Bluestacks should now start. Disable Airplane Mode or enable your Internet connection and you’re good to go.
- FIX: Bluestacks failed to connect to server on Windows 10/11
- Here’s how to fix Bluestacks black screen on your PC
- Is Windows 11 Faster Than Windows 10?
- How to Change the Icon Size on Windows 10
- Are Windows 11 Product Keys Backward Compatible?
- Fix: This Alias Cannot be Added to Your Account Error on Windows 11
7. Try an older version of Bluestacks
According to users, sometimes Bluestacks won’t start due to issues in the latest version. To fix this problem, users are suggesting switching back to the older version and check if that helps.
To do that, first, you need to completely delete your current installation of Bluestacks. After doing that, install the older version and check if that helps.
8. Check your antivirus
Your antivirus software can cause Bluestacks not to start. However, you can fix this problem simply by disabling certain features in your antivirus.
If that doesn’t work, be sure to add Bluestacks to the list of exceptions in both your antivirus and firewall. If the issue is still there, you need to disable your antivirus altogether.
In the worst-case scenario, your only option might be to completely remove your antivirus.
If uninstalling the antivirus solves the problem, you might want to consider switching to a different antivirus solution.
There are many antivirus applications on the market, and some of them offer great protection without interfering with your system.
9. Install the latest updates
- Press Windows Key + I to open the Settings app.
- When the Settings app opens, go to Update & Security section.

- Now click Check for updates button.


Another cause for problems with Bluestacks can be missing updates.
There may be certain incompatibility issues between Bluestacks and your version of Windows. To ensure that everything is running smoothly, we strongly encourage you to keep your OS up to date.
For the most part, Windows installs the missing updates automatically, but sometimes certain glitches can occur causing you to skip updates.
If any updates are available, they will be downloaded automatically in the background. Once the updates are installed, check if the problem with Bluestacks is resolved.
10. Make sure virtualization is enabled on your device
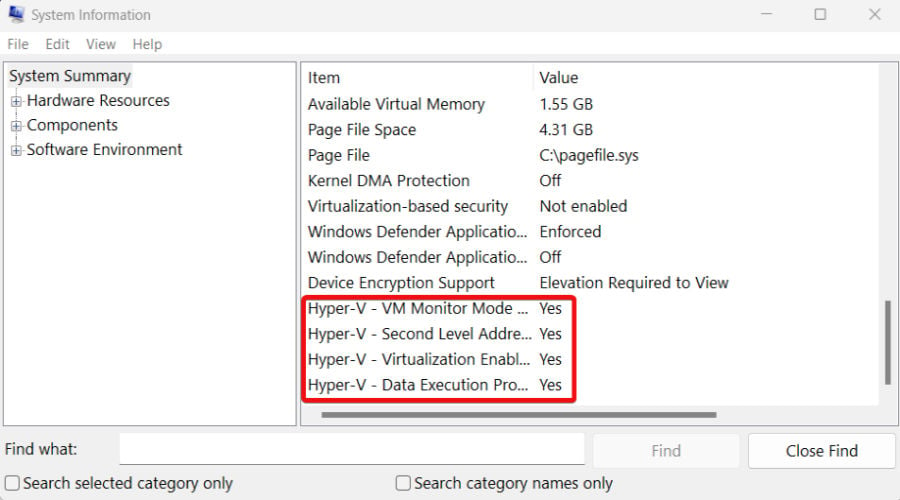
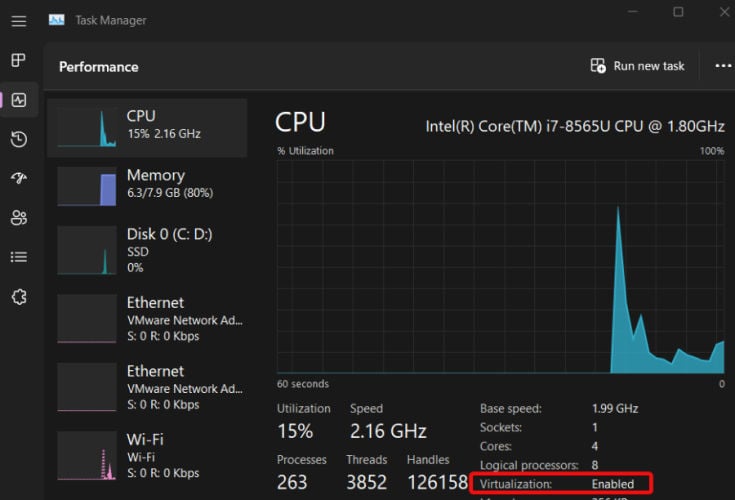
If you cannot start Bluestacks, you may need to take a closer look at your Hyper-V settings (or similar). So, first of all, you need to make sure that your CPU supports virtualization, and then enable it on your PC.
- To do so, you can type Run in the search zone and open the Run menu.
- Next, type in msinfo32. The System Information window should open.
- Under System Summary, your Hyper-V mentions should have the value Yes.

- Alternatively, you can use the shortcut Ctrl + Shift + Esc to open the Task Manager.
- Go to the Performance tab and look for CPU.
- The Virtualization field should say Enabled.

If that’s not the case, but you’re certain that your CPU supports this feature, you’ll need to enable virtualization in BIOS.
Bluestacks is one quite useful tool, and if Bluestacks is stuck on initializing on your Windows 10 PC, be sure to try some of our solutions.
![]()
Check expert-recommended fixes for a quick resolution
by Madalina Dinita
Madalina has been a Windows fan ever since she got her hands on her first Windows XP computer. She is interested in all things technology, especially emerging technologies… read more
Updated on
- BlueStacks is a popular android emulator used by many worldwide, but many reported that it’s not opening.
- The problem usually arises due to corrupt system or app files, an outdated driver, or misconfigured settings.
- To fix things, update BlueStacks, disable specific settings, or run the app in compatibility mode, amongst other solutions.
BlueStacks is a popular Android emulator allowing users to run Android apps on the computer. But, many who used BlueStacks reported that it’s not opening.
The error is encountered by users who downloaded the app for the first time or have been using it for a while. In addition, for some users, BlueStacks was not starting in Windows 10 after the computer powered off abruptly. So, let’s find out the solutions to it.
Why is BlueStacks not opening?
Here are some of the reasons BlueStacks is not opening or working:
- Issues with the app files – If you started encountering the problem after an abrupt shutdown, chances are that the app files are corrupt, and it’s responsible for the issue.
- Corrupt system files – Corrupt system files are a likely reason behind BlueStacks 5 being stuck on the loading screen, and the underlying cause should be evident in most cases.
- Virtualization is disabled – BlueStacks requires virtualization support to run apps, in the absence of which, it wouldn’t run effectively and may throw errors.
- Third-party conflicts – In some cases, an antivirus or security software may conflict with the functioning of BlueStacks and trigger errors.
How can I fix BlueStacks if it won’t open?
Before we head to the slightly tricky solutions, here are a few simple ones to try:
- Restart the computer
- Install the available updates for Windows
If the two updates don’t work, head to the ones listed next.
How we test, review and rate?
We have worked for the past 6 months on building a new review system on how we produce content. Using it, we have subsequently redone most of our articles to provide actual hands-on expertise on the guides we made.
For more details you can read how we test, review, and rate at WindowsReport.
1. Update BlueStacks
- Launch BlueStacks, and click on the Settings icon.

- Head to the About tab, and click on Check for updates.

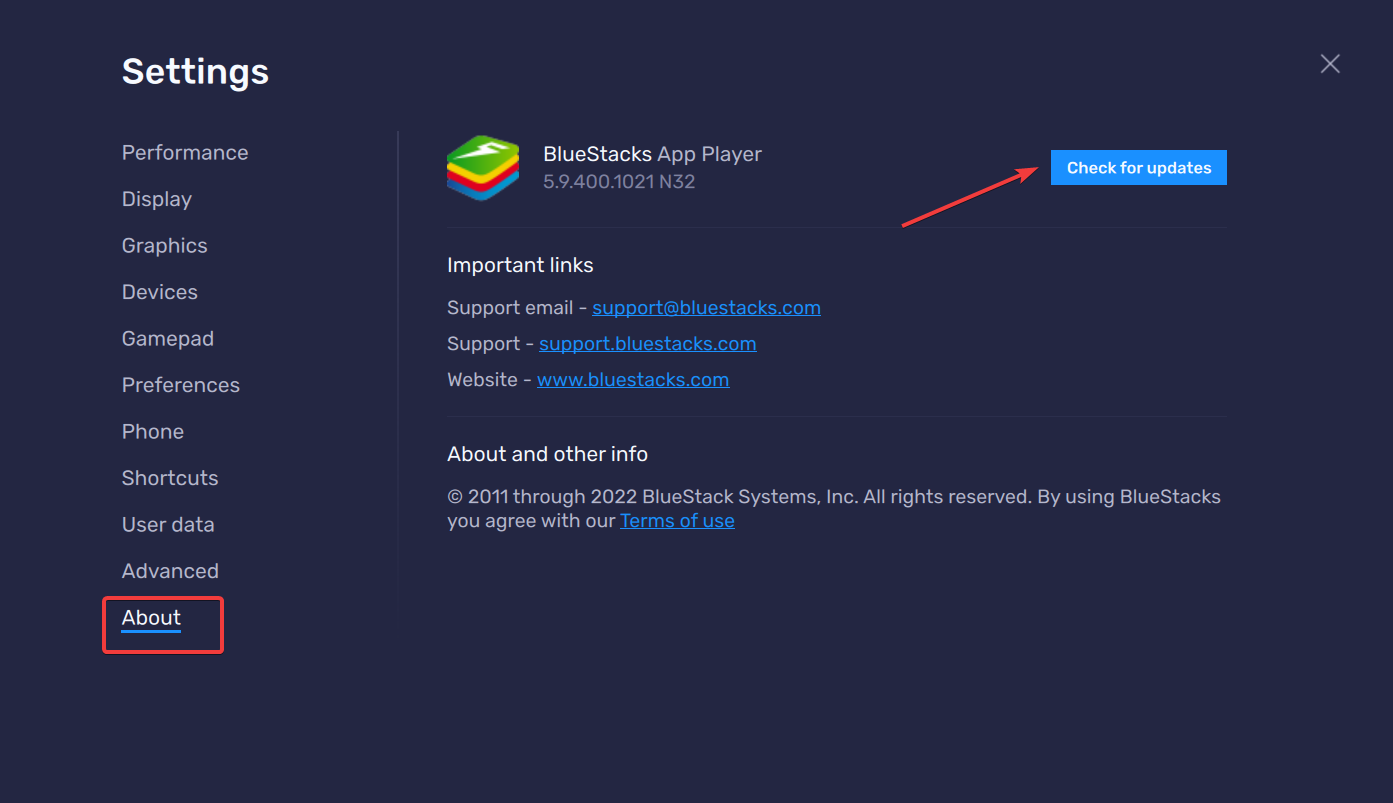
BlueStacks, in response to a query, reported that updating the app would fix things when it’s not opening. So, make sure you do that.
- Here’s how to fix Bluestacks Blue Screen of Death errors
- Cash App Error 400: How to Quickly Fix It
- Fix: The Term is Not Recognized as The Name of a Cmdlet
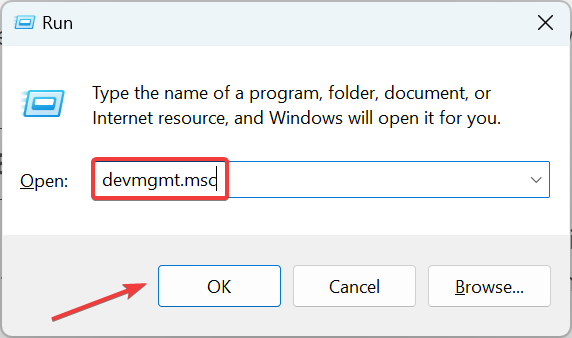
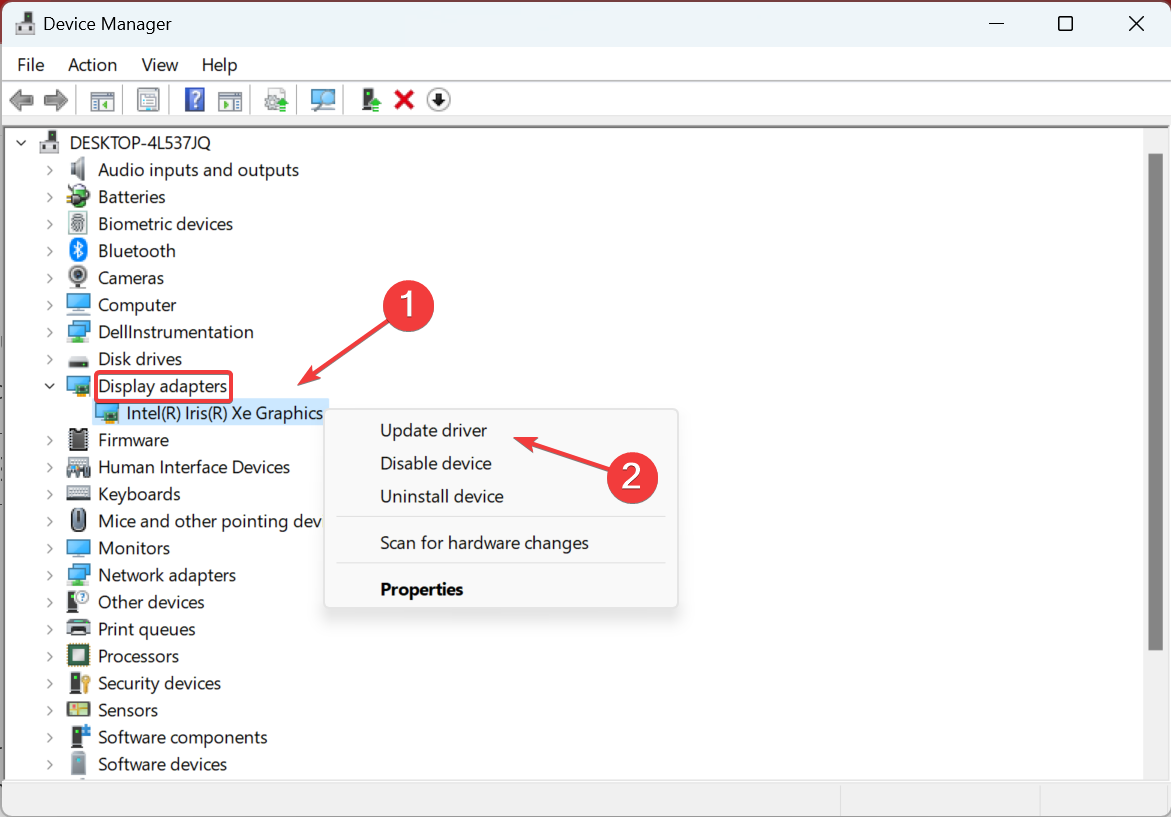
2. Update the graphics driver
- Press Windows + R to open the Run command, type devmgmt.msc, and click OK.

- Expand the Display adapters entry, right-click on the graphics adapter in use, and select Update driver.

- Select Search automatically for users.

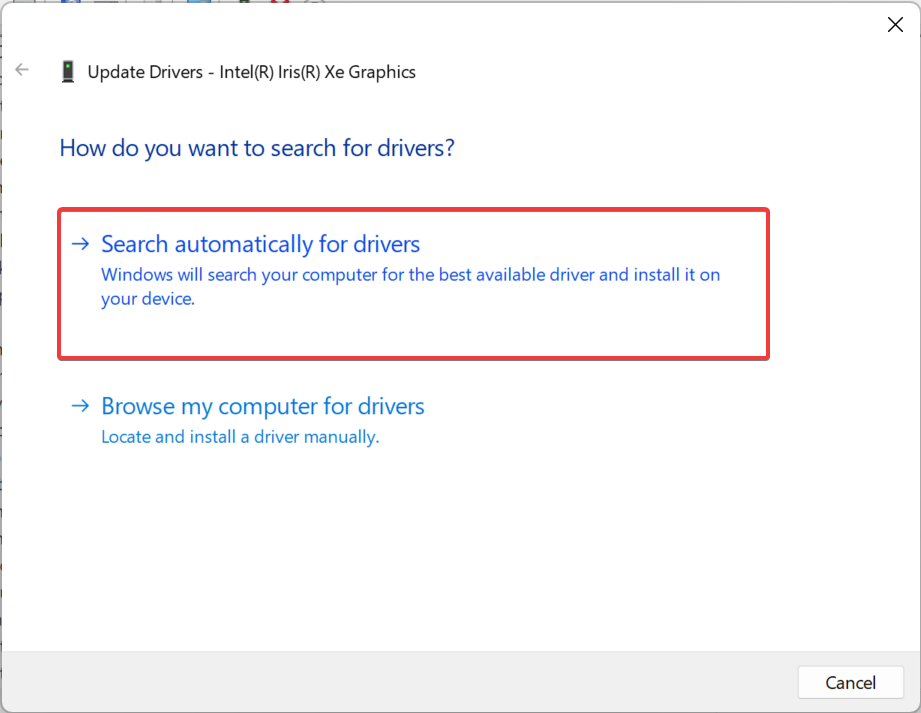
Running an outdated version of the graphics driver is also known to affect the app’s functionality, and in some cases, BlueStacks X was not working. In case it still doesn’t work, you can also try manually updating the driver.
If manually updating the driver seems too complicated, we recommend using a specialized tool, Outbyte Driver Updater, which excels in speed and safety for finding and installing the right driver updates.

Outbyte Driver Updater
Update your graphics driver along with all other outdated drivers in no time.
3. Disable optional Windows features
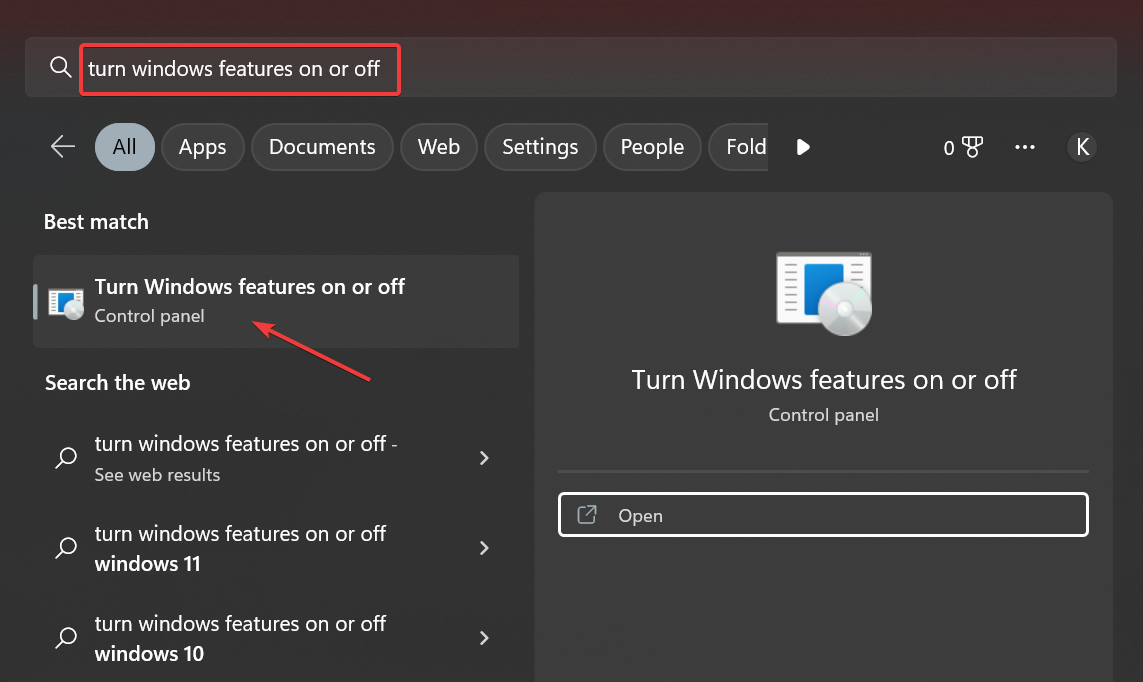
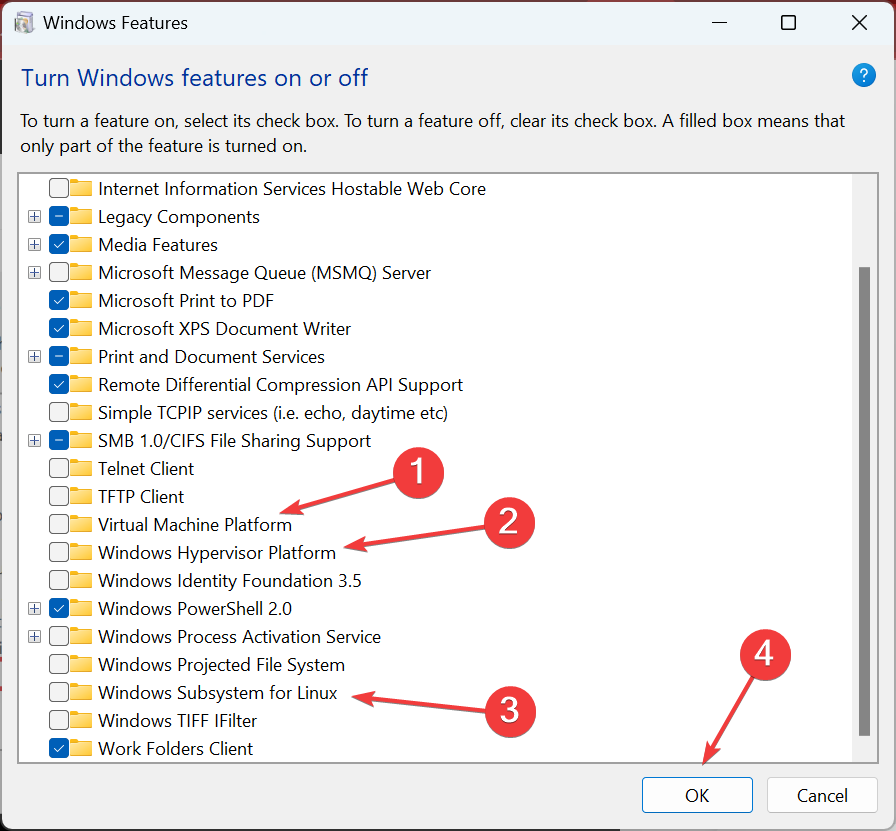
- Press Windows + S to open the Search menu; type Turn Windows features on or off, and click on the relevant search result.

- Now, uncheck the following entries, and click OK to save the changes:
- Virtual Machine Platform
- Windows Hypervisor Platform
- Windows Subsystem for Linux

- Click on Restart now for the changes to come into effect.
4. Try an alternative android emulator
Before going into more detail with our solutions for fixing the Bluestacks not loading, we recommend you try another android emulator.
There are plenty of great emulators out there, some are better than others but that’s just a forever going debate. The best emulator is the one that is right for you.
Trying a different android emulator can prove to be a great choice since you can compare the ones you used and see if it’s worth going through all of the steps below.
With a great emulator, there won’t be any significant lag to incompatibility issues with your system. All Google Play Store will be available to you with no exceptions.
If you want to try a great reviewed android emulator, we recommend LDPlayer, for its features that are gamer-oriented. They offer custom controls, meaning that you can play with a keyboard and mouse, open several instances simultaneously, enroll in Gacha games faster, and many more.
5. Make sure the relevant services are running
- Press Windows + R to open Run, type msconfig, and hit Enter.
- Navigate to the Services tab, make sure the following two services are running, and click on OK to save the changes:
- BlueStacks Android Service
- BlueStacks Log Rotator Service

- Now, press Ctrl + Shift + Esc to open the Task Manager, head to the Startup tab, select BlueStacks and click Enable.

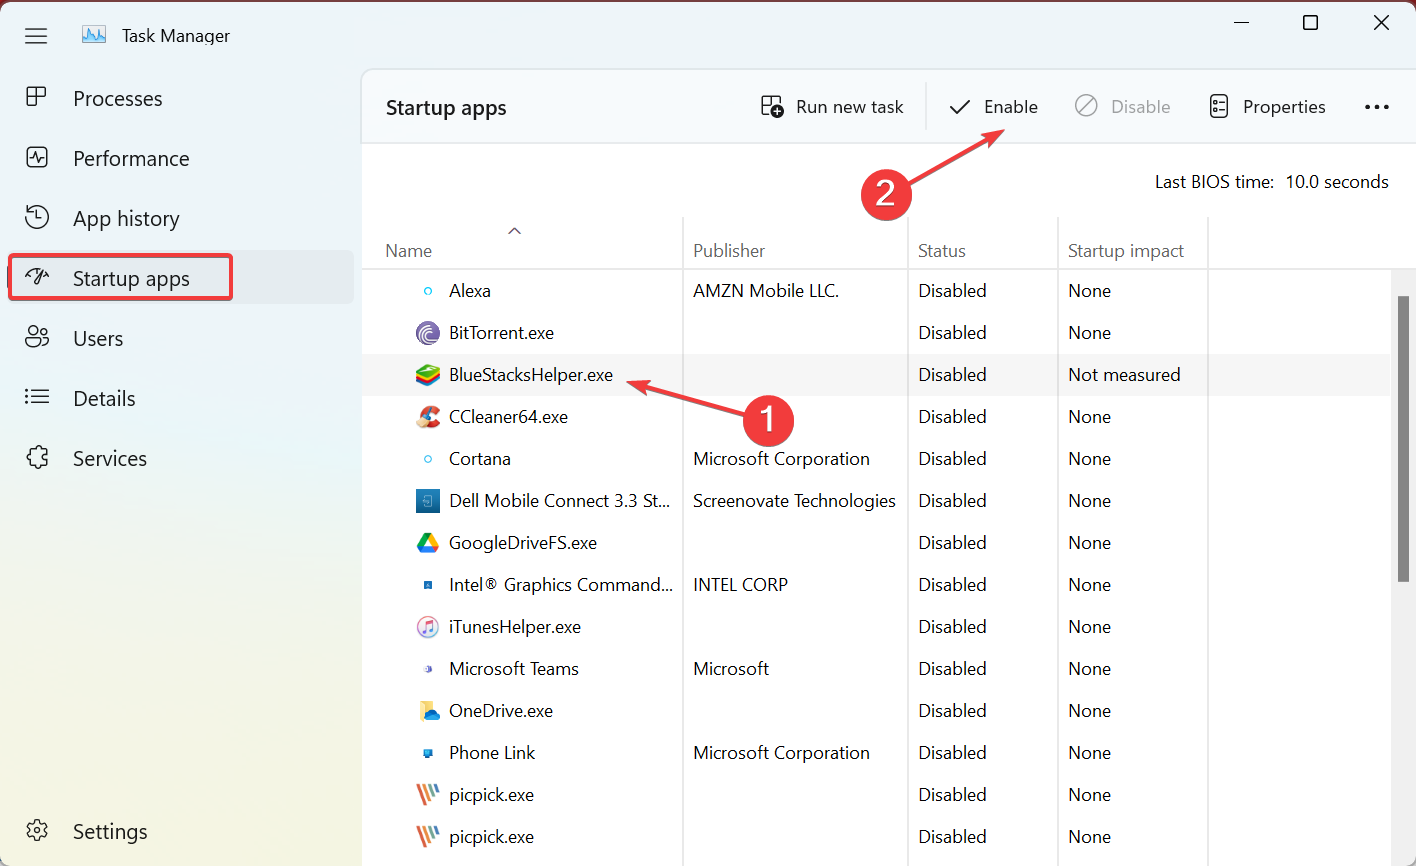
In case see Starting BlueStacks, please wait for an extended period, and make sure the related services are running. And once done, the BlueStacks should work if it was not opening earlier.
6. Run BlueStacks in compatibility mode
- Locate the BlueStacks launcher, right-click on it, and select Properties.

- Navigate to the Compatibility tab, tick the checkbox for Run this program in compatibility mode, select a previous iteration from the dropdown menu, and click OK to save the changes.

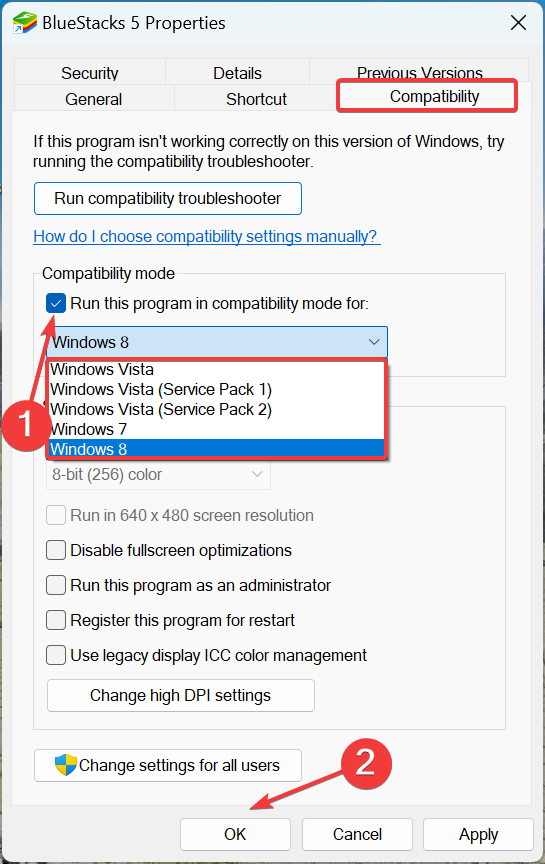
Once done, relaunch the app, and verify whether the problem is fixed. If not, try another iteration of Windows from the dropdown menu.
7. Reinstall BlueStacks

NOTE
When removing the app, make sure to uninstall every BlueStacks entry that’s listed in the Programs and Features window.
- Press Windows + R to open Run, type appwiz.cpl in the text field, and hit Enter.
- Locate BlueStacks from the list of apps, select it, and click on Uninstall.

- Now, follow the on-screen instructions to complete the process.

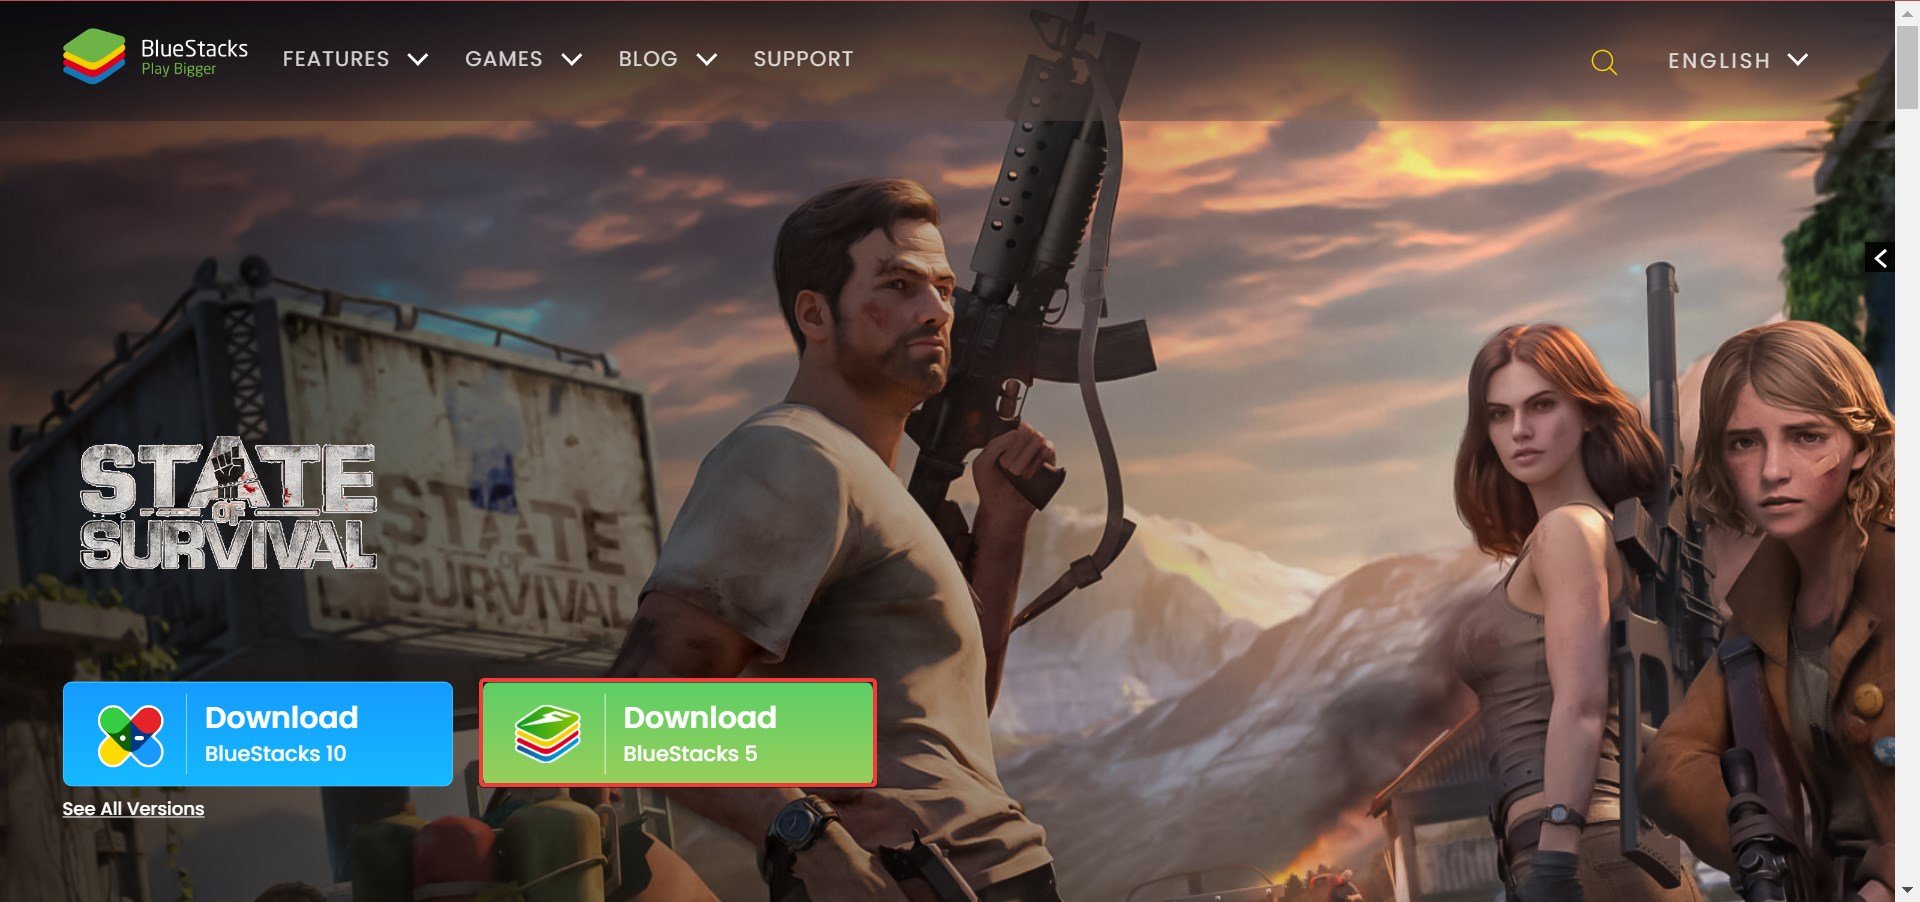
- Once done, head to BlueStack’s official website and download the app.

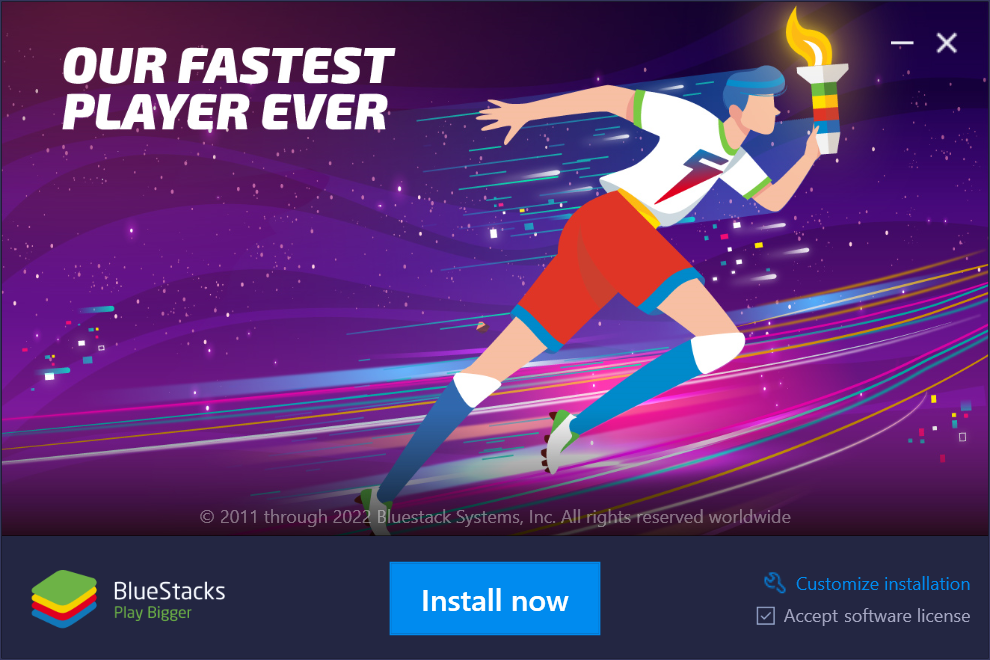
- Launch the setup and follow the instructions to complete the installation.


That’s it! If BlueStacks was not opening until now, things should be up and running, and the emulator would work perfectly.
Also, find out how to speed up games on BlueStacks and get the best performance.
If you have any other queries or know of a solution not listed here, drop them in the comments section below.
![]()
Methods and Steps to Fix BlueStacks not Working on Windows 10 – Are you encountering troubles along launching BlueStacks on the newest Windows OS? Many users face lots of similar problems after they upgraded their computers to the latest edition. They complain about BlueStacks Windows 10 crash, gray screen, not loading like problems.
If you are confronting the same issues then you are on the right page since here is the guide to settle all issues belonging to this application on Windows 10.
When you find this error the first thing you should ensure that you have downloaded the application from its authoritative website. And the second is once Uninstall and reinstall so that you can avoid extra hassle. Despite this, you experience the issues then follow the fix Step by step carefully.
Step 1 –
Ensure Accurate System Requirement
Before starting any fix confirm that you fulfill Requirements of System. Your computer must be equipped with
1. At least 2 GB of RAM,
2. Not lower than 4 Gigabyte volume in Hard Disk,
3. Fully updated Graphics Card,
4. Running with Administrator Privilege.
Step 2 –
Update Graphics Card
Graphics card plays a great role in running run this emulator so here we are writing the way to update it.
Right click on the NVIDIA icon residing in the system tray and choose the option Check for updates on the menu.
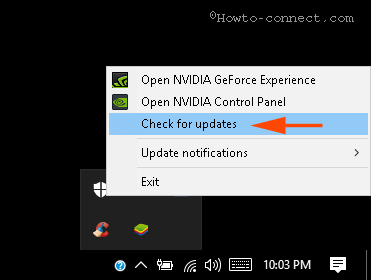
Wait until the card is perfectly updated and restart the system after it is finished.
Step 3 –
Start in Compatibility mode
If BlueStacks Windows 10 not loading issue occurs then the finest solution is running it in Compatibility mode.
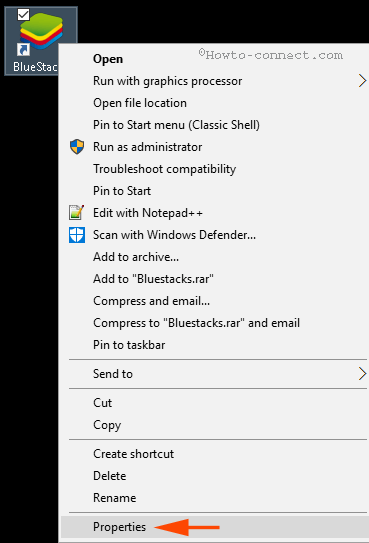
Right click on the Shortcut of the app and select Properties from the list of options.
Now switch to Compatibility tab afterward click Run compatibility troubleshooter.
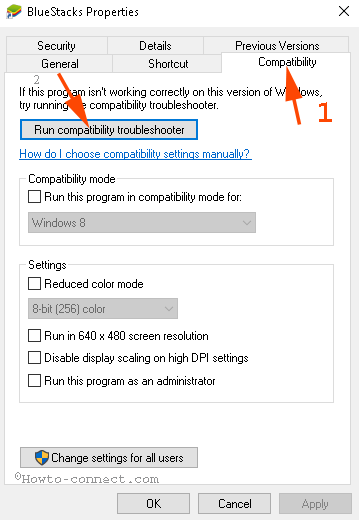
Pick Try recommended settings within two choices.
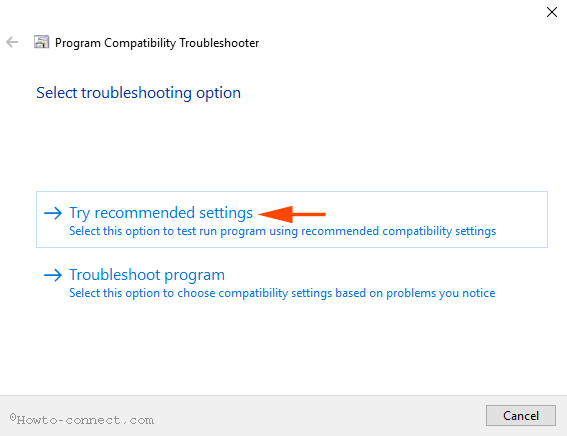
Click Test the program… and check whether you have solved BlueStacks not Working on Windows 10.
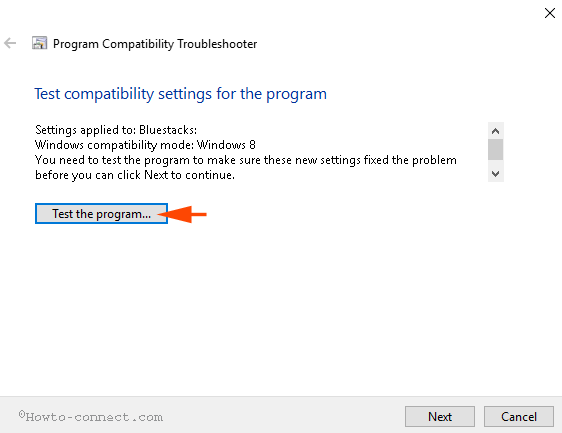
If not then click Next and select Try Using different settings to launch the emulator.
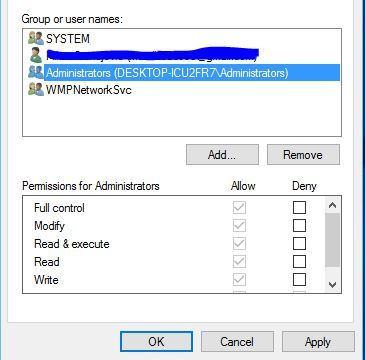
Step 4 – Make sure if you have proper Permission to run BlueStacks
Several times lack of correct security settings prevents this application from running on Windows 10. So check it.
Again right-click on this emulator shortcut and choose Properties option.
Switch to the Security tab and click Edit.
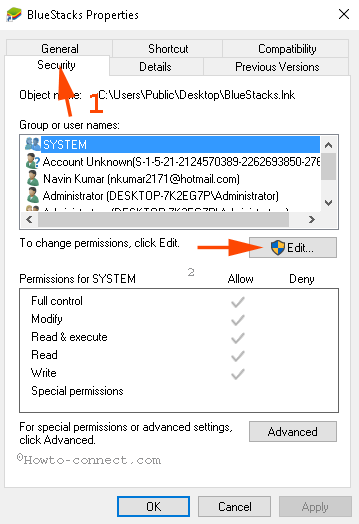
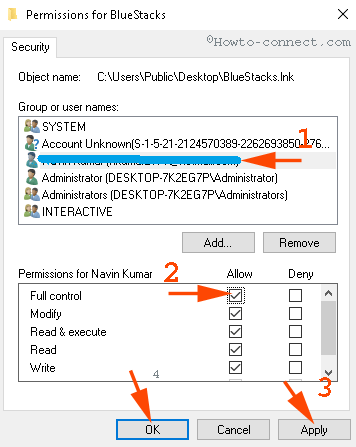
Select your username in Group or user names block and tick Full control box in Allow column in the lower section. At last, click Apply and then OK.
Close and Start the application freshly and see whether it is loading.
Step 5 – Uninstall and Reinstall BlueStacks
If these steps stay imperfect to Fix BlueStacks not Working on Windows 10 then uninstall and reinstall it.
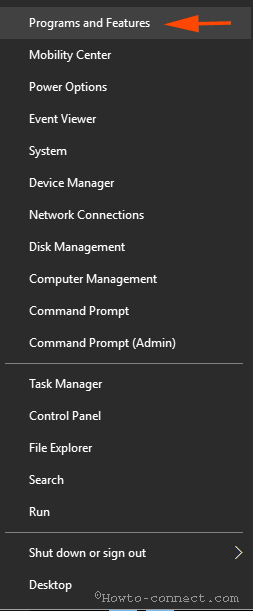
To uninstall BlueStacks, click Win+X altogether and select Programs and Features on the list of options.
Right click on BlueStacks App Player and choose Uninstall on an extra small pop up.
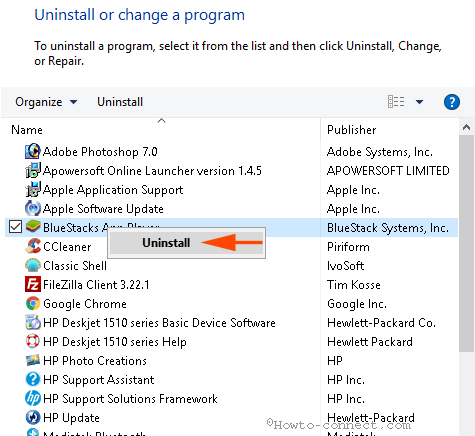
An Uninstaller Dialog box appears questioning Are you sure you want to uninstall BlueStacks App Player, select Yes.
One more dialog box opens after a short time and asks Do you want to keep all your apps and data? select No.
Instantly the Applications are removed from your computer.
To completely remove Bluestacks from Windows 10 you need to put some more effort.
1. Navigate to C => Program Data and delete BlueStacks Setup.
2. In a similar way, go to C:\Program Files (x86)\BlueStacks, C:\Program Files\BlueStacks, C:\ProgramData\BlueStacks and Delete items if present.
3. Type BST in File Explorer search box (Local Disk C in the Quick access navigation pane) and press Enter.
4. Open run dialog box, type %temp%, and click Enter. Select all the items in the Window and Delete.
5. Run Ccleaner to wipe out registry clutter caused by the Application.
6. Click this link to download the cleaner and run both Batch files under it one by one.
Finally, Install the latest version of BlueStacks from the official website.
Conclusion
So these are the procedures and steps for How to fix BlueStacks not Working on Windows 10. One thing worth remembrance is that always grabs the application from the official website to avoid unnecessary issues. Still, you face any problem do inform through commenting.
Repair any Windows problems such as Blue/Black Screen, DLL, Exe, application, Regisrty error and quickly recover system from issues using Reimage.
BlueStacks is one of the best Android emulators for Windows out there, but even it has its problems at times.

BlueStacks is one of the most popular Android emulators available for Windows. Because of its easy-to-navigate user interface and best performance, it is loved by millions of gamers around the globe.
Even though it is continuously updated, it occasionally encounters problems. In some cases, it fails to play certain games, starts lagging, or shuts down automatically, while other times, it just raises its hand to run. If BlueStacks isn’t working on your computer, we will cover nine fixes to help you get it working again.
Does Your Computer Meet the Minimum System Requirements?
Before we jump into the fixes, it’s worth double-checking that your PC meets the system requirements. You can check them out by visiting the Bluestacks official website, which explains its minimum and recommended requirements.
You’ll need to upgrade your computer if it doesn’t meet these requirements. Nevertheless, if it’s more powerful than what is required, implement the following fixes:
1. Check BlueStacks Is Up and Running
The first step is to ensure that BlueStacks backend isn’t facing downtime. For that, go to the updownradar’s official website and check the app’s status and any errors reported there.
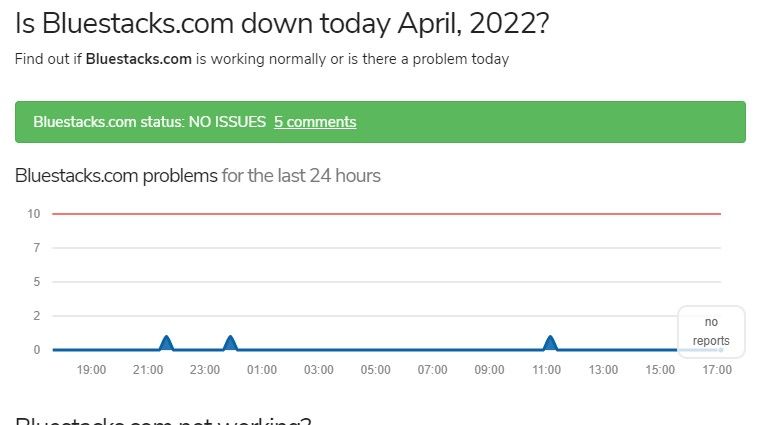
If an issue lies in BlueStacks backend, wait and relax until the problem goes away on its own. However, if everything seems to be working there, the issue may be with your computer that needs to be looked into.
2. Turn Off Your Antivirus
Depending on how you set up your antivirus, BlueStacks may be interpreted as a threat to your system, preventing the app from running. So, temporarily turn it off to avoid the antivirus halting its execution.
Additionally, you can temporarily disable Windows Defender Firewall to ensure it’s not interfering with the app’s execution. If Firewall is to blame, add BlueStacks to the exclusion list as per Microsoft support’s instructions.
3. Give Your Device and BlueStacks a Fresh Start
If neither of the first two fixes resolves the issue, try restarting BlueStacks and see if it works. If that doesn’t work, you can give your computer a fresh start to ensure a temporary glitch isn’t causing the problem.
If restarting your computer and app does not resolve the issue, it’s time to ensure BlueStacks has enough memory to do its job.
4. Close Resource Hungry Processes Running in Parallel
Every process you run on your computer strains your system memory. When many resource-hungry programs consume memory simultaneously, there might not be enough resources for other computer programs to function effectively.
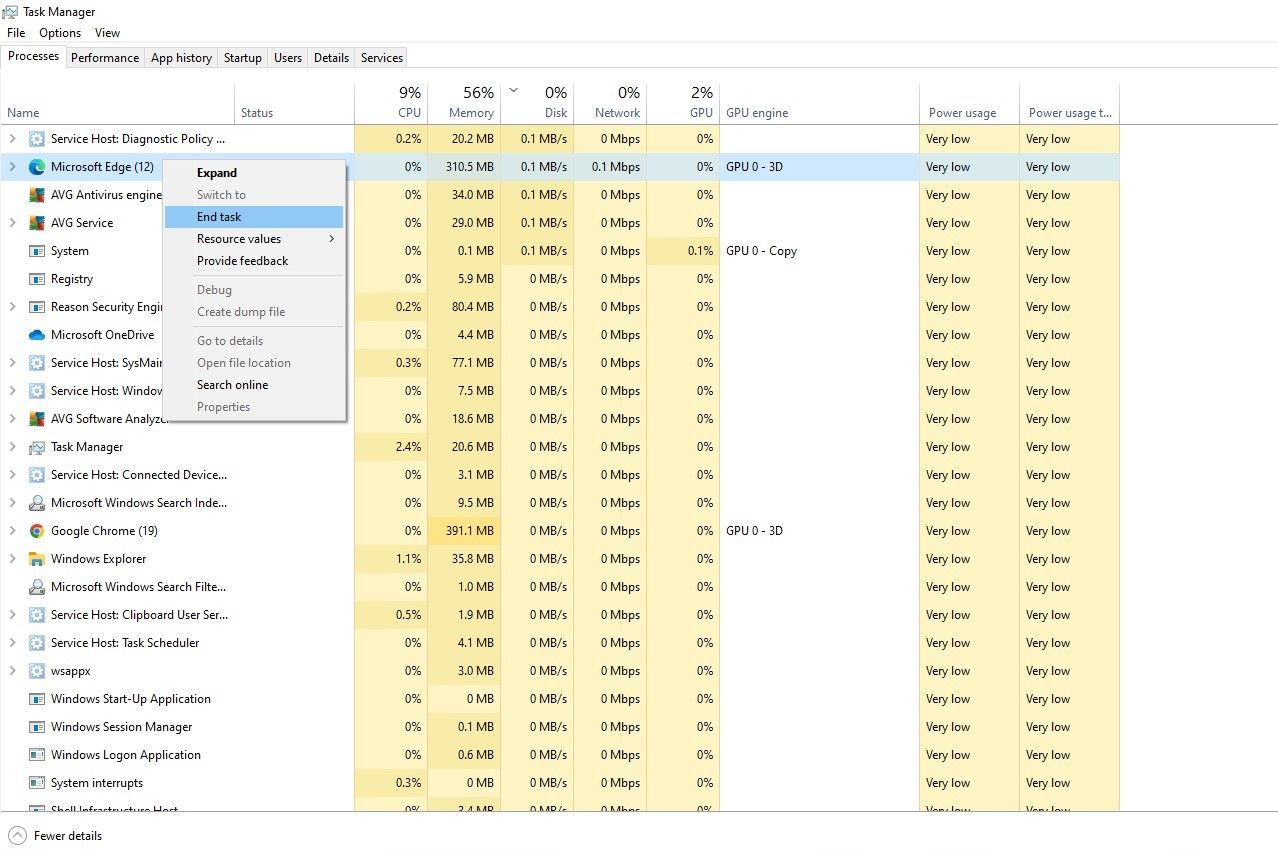
You’re more likely to encounter this problem if your computer isn’t powerful enough. Hence, it’s imperative to rule it out first. To do so, click on the Windows Start icon and open Task Manager.
On the Processes tab, check the Memory percentage. If it is 100% or close, filter out all processes that contribute the most to memory usage. Shut down all of those processes, and you’re good to go.
You can close any process by right-clicking it and choosing End task.
Besides monitoring memory usage, keep an eye out for disk and CPU usage, and troubleshoot high disk and CPU usage to ensure enough resources are available for BlueStacks to function properly.
When freeing up memory doesn’t help, you should update your graphics driver.
5. Update Your Graphics Driver
An outdated graphics driver can also halt the app’s execution. Thus, make sure to update your graphics driver before continuing. We’ve previously covered updating graphics drivers properly if you don’t know how to do it.
6. Enable Virtualization
BlueStacks recommend enabling CPU virtualization for the program to run efficiently. Depending on what type of CPU you have, you will need to enable virtualization differently.
Check out this comprehensive guide by BlueStacks support to learn more about how to enable virtualization for Intel and AMD CPUs.
7. Run an SFC Scan
If enabling virtualization doesn’t make any difference, run an SFC scan to ensure no broken or corrupt Windows files are causing the issue.
You can run an SFC scan by following these steps:
- Type «cmd» in the Windows search bar.
- Right-click on the Command Prompt app and click on Run as administrator.
- Type «SFC /scannow» and hit Enter.
Wait for the scan to finish. After that, follow the onscreen instructions to manually repair the damaged files unless the operating system automatically does it.
8. Upgrade or Downgrade Windows OS
A dated operating system can also cause compatibility issues with apps. Thus, if BlueStacks is updated to the latest version, Windows must also be fully updated.
To check for updates, follow these steps:
- Open the Windows Settings app.
- Go to Update & Security.
- Navigate to Windows Update in the left sidebar.
- Click on Check for updates in the right-hand pane.
Windows will automatically look for the most recent update and install it on your computer. However, if BlueStacks has started malfunctioning after updating your computer to a recent version, you may want to revert the update.
If you need some help, here’s how to revert a Windows update to an earlier version.
9. Uninstall and Reinstall BlueStacks
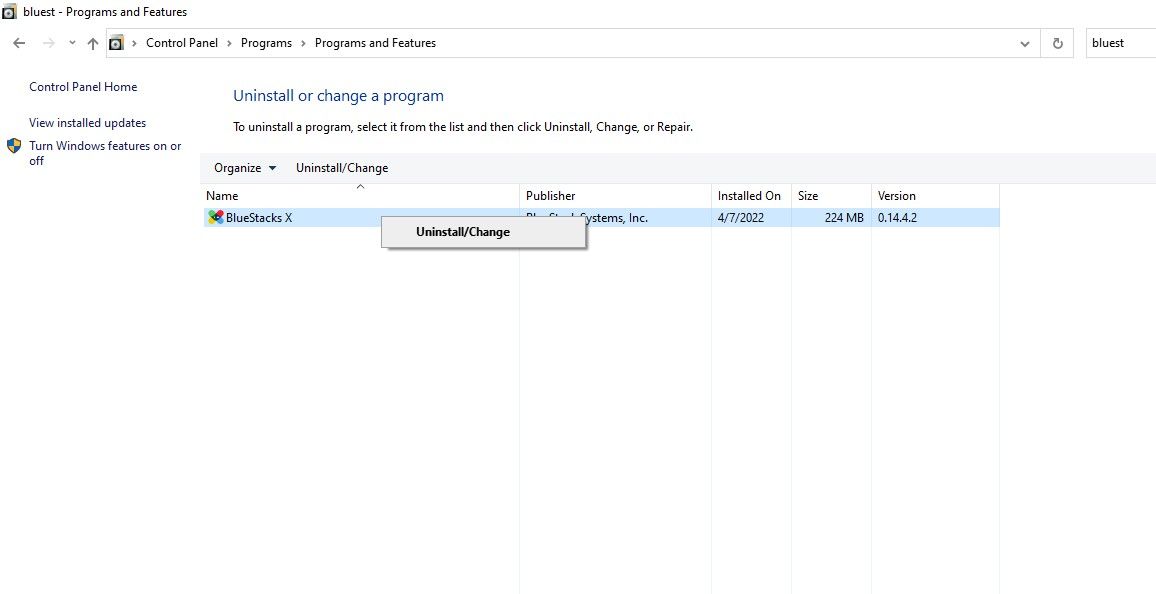
If implementing all the fixes in the list does not resolve the problem, you should reinstall BlueStacks as a last resort. Uninstall BlueStacks existing installation before you do that. To do that, follow these steps:
- Go to the Windows Control Panel.
- Navigate to Programs > Programs and Features.
- Right-click on the BlueStacks program and hit Uninstall.

Delete BlueStacks from your computer, go to BlueStacks’ official website, grab a fresh copy of the program, and install it.
Hopefully, with a fresh installation, you can resolve the issue you’re experiencing and any hidden issues within the program files.
Is BlueStacks Still Not Working? Go for an Alternative
The fixes in the list should help BlueStacks get back on track and allow you to run your favorite apps again. If these fixes do not resolve the issue, you may want to consider resetting your computer once.
However, if that does not work, it’s best to switch to the BlueStacks alternative temporarily. Andy, NoxPlayer, and Phoenix OS are some of the best alternatives to BlueStacks.

Are you tired of waiting for BlueStacks 5 to launch or load on your Windows device, only to be faced with an error message? Don’t worry, you’re not alone. Many users have reported encountering this issue, but the good news is that it’s fixable. In this article, we’ll take a deep dive into the causes of BlueStacks 5 not launching or loading and provide you with easy-to-follow solutions to get your favorite games and apps running smoothly on your Windows device.
BlueStacks Minimum System Requirements
In case your PC is running the minimum system requirements for Bluestacks, then you should make sure that all instances of the applications are closed and not running in the background. You can find the minimum system requirements listed in my extensive tutorial linked below

End BlueStacks and Other Tasks
Open up your Task Manager. Here, sort this list of processes by their memory usage and end all processes with the Bluestacks icon. You can also prevent any applications from running that could show an overlay or change your emulator files, such as CCleaner, Steam, Discord, or Adobe applications.
End resource intensive tasks
Allow BlueStacks Through Firewall
Sometimes, your antivirus or firewall could block parts of the software while it’s launching and cause the startup issues you are experiencing. In your start menu search, type Firewall to open up your Firewall & Network Protection system settings window. Here, select Allow an app through firewall.

Allow an app through firewall
On this window, click on Change settings, which will allow you to search and locate the BlueStacks and BlueStacksWeb services. Make sure that both of these apps are checked.

Allow BlueStacks through Windows Defender Firewall
In case you’re unable to find these apps, then you will have to click on Allow another app and proceed to locate your BlueStacks files in your File Explorer, under: Program Files > BlueStacks > HD-Player.

This PC > Program Files > BlueStacks > HD-Player
Update Graphics Driver
If the problem persists, the issue is related to outdated drivers on your PC, an unreliable network connection, or corrupted BlueStacks files. To update your graphics driver, I suggest using the GeForce Experience application for NVIDIA GPU users, and AMD users can use the AMD Radeon Software.
In this example, I will use the GeForce Experience application. In the Drivers tab, select Download the latest graphics driver, which will install automatically. You should update your GPU driver every few months to get the most out of your hardware.

GeForce Experience > Drivers
Windows Update
When this is done, open up your Windows settings. Here, in the Windows Update tab, proceed to download the latest update and then restart your Windows PC in order to install the update. After restarting your PC, you can try to launch the Bluestacks player again to see if this fixes your issue.

Windows Settings > Windows Update
Delete Temporary Files
In case the problem persists, then make sure to delete your temporary files. Search for “storage” in your start menu search to open up your Storage Settings. After a second or two, you can preview your current storage utilization.
Click on Temporary Files, and here make sure that your temporary files are selected and proceed to remove these files. Your temporary files are files saved by programs on your PC that should be deleted from time to time and can cause startup issues for some apps if not deleted.

System Settings > Storage > Temporary Files
Test Network Connection
Lastly, make sure that you’re using a reliable network connection. You can use a speed testing site or application such as Speedtest.net. Here, preview your average upload and download speed to ensure that this problem is not related to your network connection.

Test Internet upload and download speed
Reinstall BlueStacks
As a last resort, you will have to reinstall the BlueStacks emulator on your system. To do so, open up your Windows settings. Here, under Apps, click on Installed Apps. Filter your search by All Drives and look up BlueStacks. Click on the burger menu icon for BlueStacks and click on Uninstall. The uninstaller will take a few seconds to remove all of the BlueStacks files.

Uninstall BlueStacks
Lastly, on Bluestacks, you can redownload the installer for your Windows PC to re-download the BlueStacks files.

-
There could be several reasons for this issue, including outdated drivers, low system specifications, corrupted files, or conflicting software.
-
Try clearing the cache and data for BlueStacks, updating your drivers, and checking for any conflicting software. If the issue persists, try reinstalling BlueStacks.
-
Yes, low system specifications can cause performance issues, including BlueStacks 5 not launching or loading. Make sure your device meets the minimum system requirements for BlueStacks 5.