The solutions you are looking for are in the guide below
by Ivan Jenic
Passionate about all elements related to Windows and combined with his innate curiosity, Ivan has delved deep into understanding this operating system, with a specialization in drivers and… read more
Updated on
- If the Windows 10 taskbar is frozen, you can perform a System restore to bypass the problem.
- You can also use dedicated, third-party software to get your taskbar to work again.
Windows 10 isn’t without flaws, and one of the more annoying issues is the unresponsive taskbar so that’s what we’re going to address now.
With an unresponsive taskbar, you aren’t able to access your notifications, Start menu, or Cortana, so you can see why this is such a problem.
In fact, a lot of users reported Windows 10 that the Start menu and taskbar not working, so we are going to take a closer look at this problem.
So, if your taskbar is not working on Windows 10 after an update, you definitely came to the right place to get it fixed.
What causes the Windows taskbar to freeze?
There are many reasons why Windows 11 Taskbar is not working, but the most common one is the corruption of the user profile, so recreating it might be the best course of action.
On the other hand, if the Start Menu isn’t working, it’s possible that you encountered a system bug, so it’s a good idea to update your system.
This isn’t the only component that can experience issues, and many reported that the Search bar is not working in Windows 11, but that can be easily fixed with the solutions from this guide.
Fortunately, we have several solutions available to you.
The taskbar is a key component of your system, however, sometimes your Taskbar might become unresponsive. Speaking of the unresponsive Taskbar, here are some similar issues that users reported:
- Windows 10 Start Menu and Taskbar not working – Sometimes both your Start Menu and Taskbar won’t work. Your antivirus might cause this, so be sure to install the latest updates and check if that helps.
- Windows 10 Start Menu not working – This is a similar problem that can occur alongside an unresponsive Taskbar. If your Start Menu is not working, be sure to check one of our related articles for a detailed explanation on how to fix this problem.
- Windows 10 Taskbar frozen, not working – This is a relatively common problem with your Taskbar. To fix this problem, be sure to download and install the latest updates and check if that helps.
- Windows 10 Taskbar unresponsive after sleep, update – This problem can appear after a recent update. If you suspect that an update is a problem, remove it or perform a System Restore.
- Taskbar unresponsive at startup – In some cases, Taskbar won’t work as soon as you turn on your PC. To fix this issue, you might have to create a new user account and check if that solves the problem.
- Taskbar not working Windows 10 after update – You may have to roll back the update in this instance.
How do I fix the unresponsive taskbar in Windows 10?
- What causes the Windows taskbar to freeze?
- How do I fix the unresponsive taskbar in Windows 10?
- 1. Perform a System Restore or use a dedicated software
- 2. Uninstall your Nvidia graphics driver
- 3. Check your antivirus
- 4. Disable the iGPU MultiMonitor in BIOS
- 5. Use PowerShell
- 6. Check for missing updates
- 7. Create a new account
- 8. Remove the problematic applications
- 9. Restart File Explorer
- How do I restart the taskbar service?
- How can I fix unresponsive Taskbar on Windows 11?
1. Perform a System Restore or use a dedicated software
You can repair the Windows 10 unresponsive taskbar using this useful resolution with the System Restore service. See the guided steps to perform it safely.
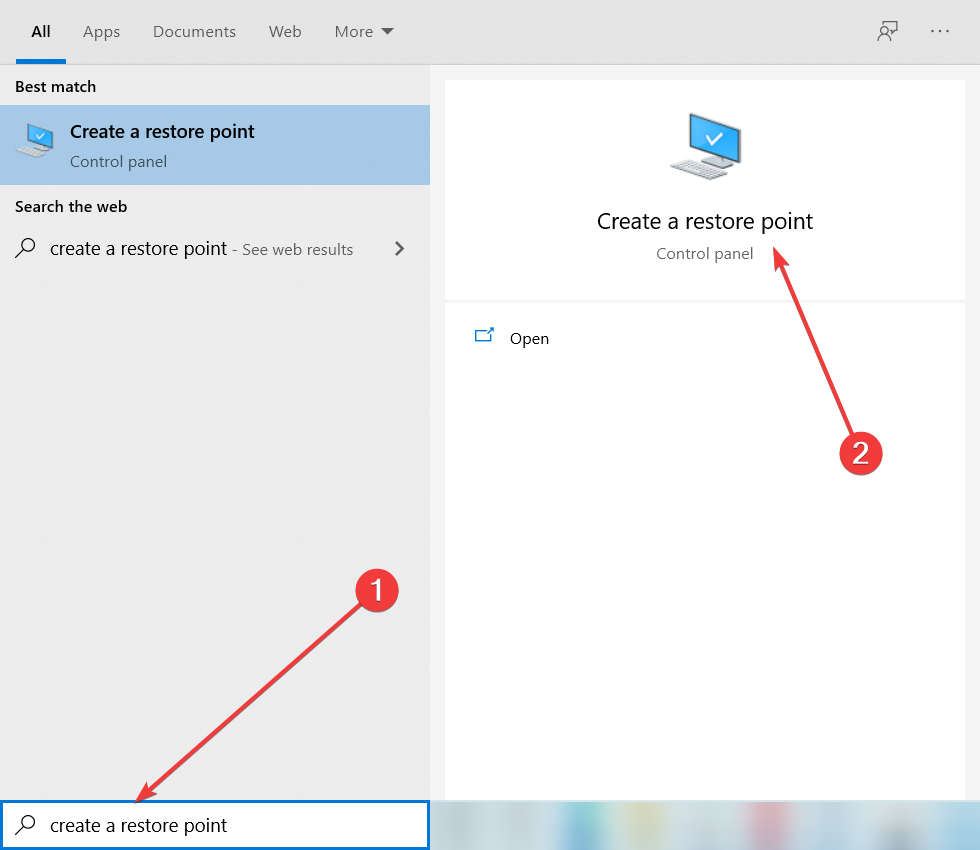
1. Press Windows Key + S and enter create a restore point. Choose to Create a restore point from the menu.
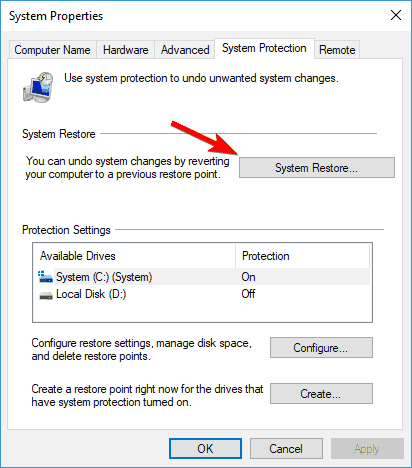
2. System Properties window will now appear. Select System Restore from the menu.
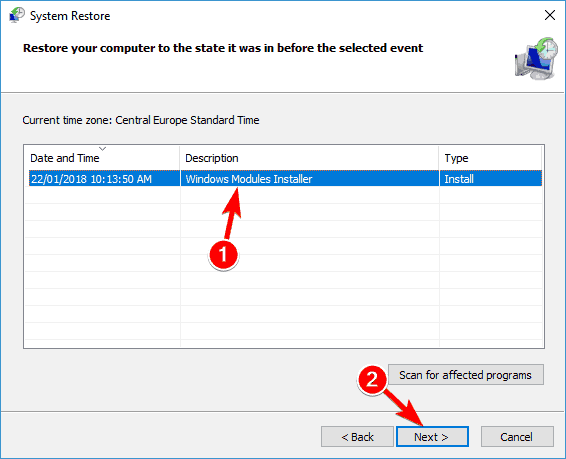
3. When System Restore window opens, click Next.

4. If available, check Show more restore points checkbox. Select the desired restore point and click Next.
5. Follow the instructions on the screen to restore your PC.
How we test, review and rate?
We have worked for the past 6 months on building a new review system on how we produce content. Using it, we have subsequently redone most of our articles to provide actual hands-on expertise on the guides we made.
For more details you can read how we test, review, and rate at WindowsReport.
After the restoration process is completed, check if your Taskbar is working again.
If other solutions can fix the problem with the unresponsive Taskbar, you might want to try performing a System Restore.
1.2 Use dedicated software to fix the problem
What can you do if you don’t have any restore points created? Unfortunately, you will have to solve this problem in some other way. We recommend a dedicated, third-party software that can solve this problem automatically.
The awesome tool recommended below not only finds and fixes problems with your system, but it will also optimize your PC in all aspects.
2. Uninstall your Nvidia graphics driver
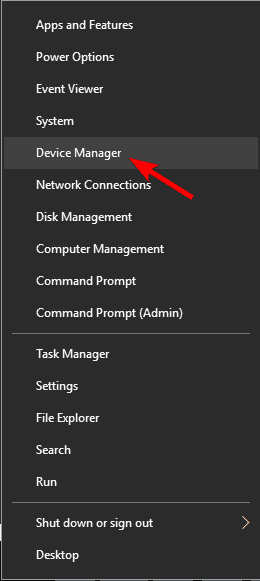
- Press Windows Key + X to open Win + X menu.
- Choose Device Manager from the list. If this method doesn’t work, you can use any other method to start Device Manager.

- When it opens, locate your graphics card driver, right-click it, and choose Uninstall Device from the menu.
- Check Delete the driver software for this device and click Uninstall.
Some users report that uninstalling their current Nvidia graphics driver and replacing it with an older Nvidia driver could solve the problem. To do that, simply follow the steps above.
After doing that, go to your graphics card’s manufacturer’s website and download the driver that is a couple of months old. Once the download and install the older driver, check if the issue is still there.
3. Check your antivirus
Sometimes you might experience issues with unresponsive Taskbar due to your antivirus software.
Using an antivirus is important, but third-party antivirus tools can sometimes interfere with your system and cause this and many other errors to occur.
To fix the problem, you need to disable certain antivirus features and check if that helps. If that doesn’t solve the problem with the unresponsive Taskbar, your next step would be to completely disable your antivirus.
In case that doesn’t help, your only solution is to remove your antivirus software. Several users reported that Norton antivirus caused this issue on their PC, but after removing it, the problem was resolved.
Keep in mind that other antivirus tools can also cause this problem, so you might have to remove them as well.
If removing the antivirus solves the problem, your next step would be to switch to a different antivirus.
There are many great antivirus tools on the market, but if you want a tool that offers maximum protection without any interference with your system, we suggest that you try out the solution below.
⇒ Get ESET NOR32
4. Disable the iGPU MultiMonitor in BIOS
Users report that disabling the iGPU MultiMonitor option in BIOS helped fix this issue. To access BIOS you’ll have to press Del or F2 (or some other key depending on your motherboard) while booting.
We have to mention that not every BIOS has the iGPU MultiMonitor option. Also, the location of the iGPU MultiMonitor option might be different for different versions of BIOS, so there’s no unique way to disable it.
You’ll have to try and find it in your BIOS on your own. Most likely you will find it in the graphics section so it won’t be that difficult to locate.
- How to Show System Tray Icons on All my Windows 11 Monitors
- Fix: Docked in the Taskbar Option Greyed out on Windows 11
- Fix: Taskbar Thumbnail Preview Disappears too Quickly on Windows 11
5. Use PowerShell
5.1 Enable Firewall
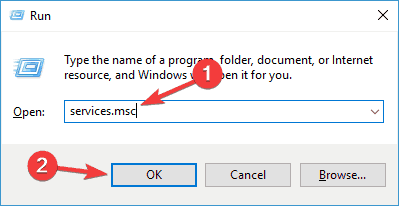
- Press Windows Key + R, type Services.msc and press Enter to open the Services window.

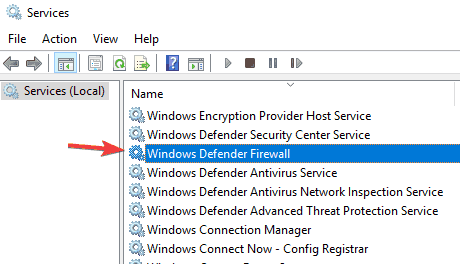
- Find Windows Firewall from the list of services and double-click it to open its properties.

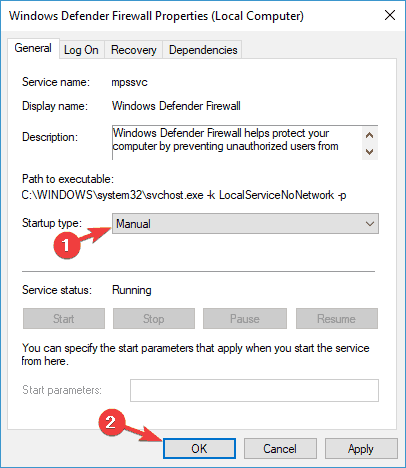
- Find the Startup Type option, set it to Manual and click Apply.

- Now in the Services window in the top left to find a Start this service button to start Windows Firewall.
In order for this solution to work, you’ll need to have your Windows Firewall enabled. If your Windows Firewall isn’t enabled perform the steps above to enable it.
After you’ve enabled Windows Firewall you can proceed to the next steps.
- Find the following path:
C:WindowsSystem32WindowsPowerShellv1.0powershell.exe - Right-click powershell.exe and choose Run as Administrator.
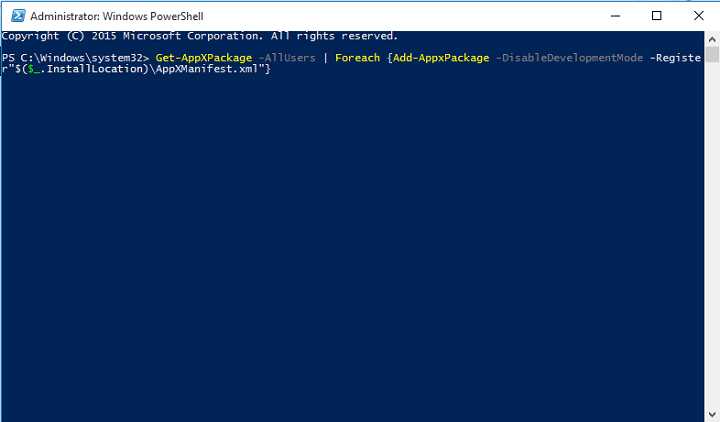
- Copy this line into PowerShell and press Enter to execute it:
Get-AppXPackage -AllUsers | Foreach {Add-AppxPackage -DisableDevelopmentMode -Register"$($_.InstallLocation)AppXManifest.xml"}
- Check to see if the problem is resolved. After you’ve enabled Windows Firewall you can proceed to next steps.
6. Check for missing updates
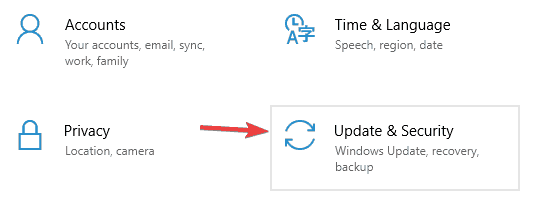
- Press Windows Key + I to open the Settings app.
- Navigate to Update & Security section.

- In the right pane click Check for updates button.

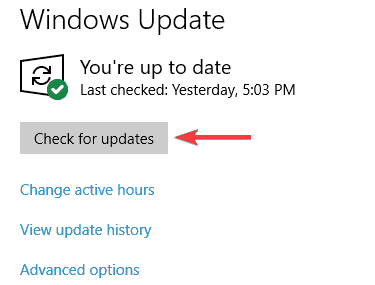
If you’re having problems with the unresponsive Taskbar, the issue might be related to the missing updates. Sometimes there might be a glitch in your system and installing the updates might fix that.
Windows 10 installs the missing updates automatically, but you can always check for updates manually.
- 5 proven solutions to fix Windows 11 widgets not working
- Is the Windows 11 Taskbar empty? Here’s how to fix it
- Windows 10 Start Button not working [Fixed]
- Full Fix: Taskbar not working in Windows 10
If any updates are available, Windows will download them automatically in the background. Once the updates are downloaded, they will be automatically installed as soon as you restart your PC.
After your system is up to date, check if the problem is still there. Yes, it might be as easy as installing the latest Windows 10 updates.
7. Create a new account
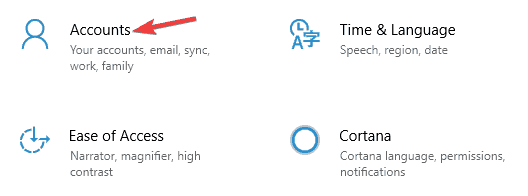
- Press Windows Key + I to open the Settings app.
- When Settings app opens, go to the Accounts section.

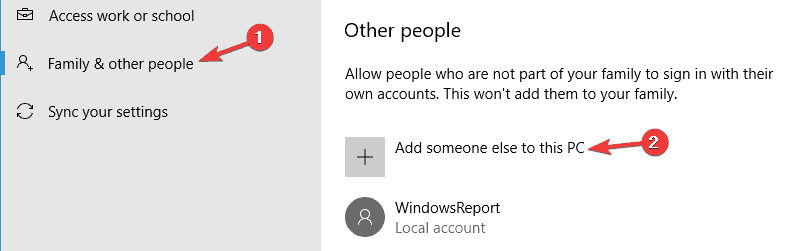
- From the menu on the left choose Family & other people. In the right pane choose to Add someone else to this PC.

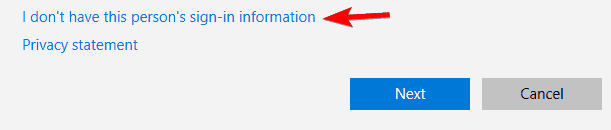
- Select I don’t have this person’s sign-in information.

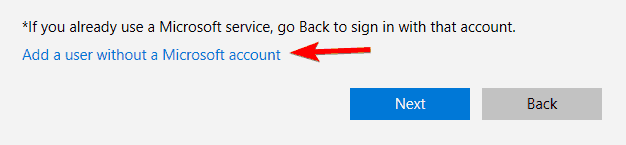
- Now choose to Add a user without a Microsoft account.

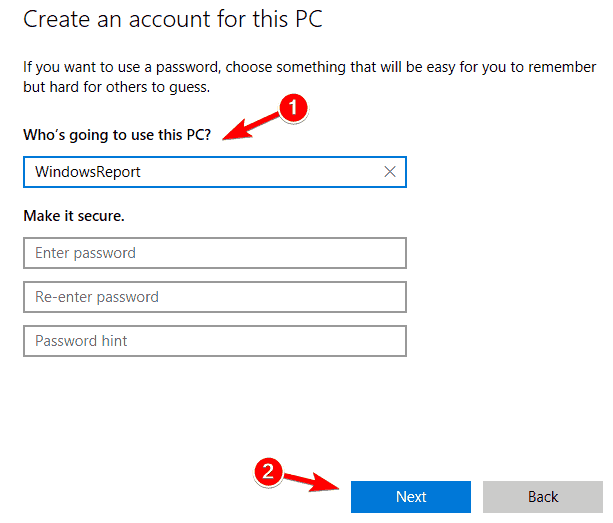
- Enter the desired username and click Next.

According to users, sometimes the problem with an unresponsive Taskbar can be caused by a corrupted user account. To fix this problem, it’s advised that you create a new account and check if that helps.
Once you create a new user account, switch to the new account and check if the problem is still there.
If the issue doesn’t appear on the new account, you might have to move all your personal files to it and start using it instead of your old account.
8. Remove the problematic applications
Sometimes third-party issues can cause problems with Taskbar to appear. According to users, applications such as QuickTime or Quickbooks can cause this problem to appear.
If you’re having problems with the unresponsive Taskbar, the best way to deal with this issue is to remove the problematic applications.
There are several ways to do that, but the best method is to use uninstaller software. By using an uninstaller software such as IOBit Uninstaller, you’ll remove the problematic application, as well as its files and registry entries.
This will ensure that the application is completely removed and prevent the problem from appearing in the future.
9. Restart File Explorer
- Press Ctrl + Shift + Esc to open Task Manager.
- Locate File Explorer process, right-click it and choose Restart from the menu.

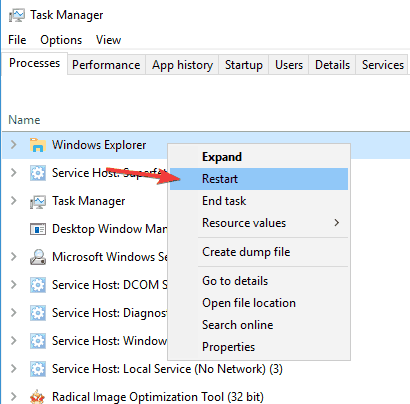
According to users, one way to deal with an unresponsive Taskbar is to restart File Explorer. Your Taskbar and Start Menu are related to File Explorer, and by restarting its process, you’ll also restart your Taskbar.
Once File Explorer restarts, check if the problem is still there. Keep in mind that this might not be a permanent solution, so if the problem reappears, you’ll need to restart Windows Explorer again.
How do I restart the taskbar service?
Don’t worry, this is a really simple process that is not going to take up a whole lot of your time, so don’t even worry about that.
You will see the steps described right below, so go through them carefully and you will have your issues resolved in absolutely no time.
How can I fix unresponsive Taskbar on Windows 11?
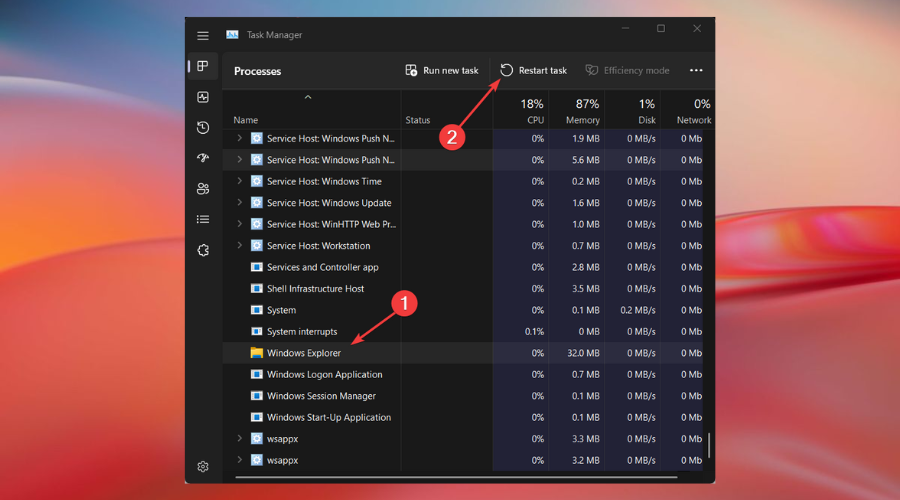
- Press Ctrl + Alt + Del select Task manager.

- Scroll down to Windows Explorer, select it and press Restart.

This issue with the Windows taskbar not working can be an annoying problem, but we hope that some of these solutions were helpful to you.
After reading this article, you will be a lot more prepared to deal with your taskbar not working on windows 10 HP.
Many users reported their Windows 10 taskbar being unresponsive after updates, so this is not an isolated issue.
An unresponsive taskbar on your Windows 11 device can be pretty annoying, so just follow this guide and put all that in the past.
You can also use these steps if your Windows 10 taskbar has a loading cursor, or your Windows taskbar has frozen on startup.
Remember to keep your Windows 10 up to date with the latest updates because if none of these solutions were helpful, maybe the latest update might fix this issue.
![]()
Если «Панель задач» на вашем компьютере перестала реагировать на нажатия, и вы не можете ни открыть меню «Пуск», ни запустить приложения с помощью кнопок на панели, ни отобразить контекстное меню, эта статья поможет вам решить данную проблему в операционной системе Windows 10.
Проверяем и восстанавливаем системные файлы
Причиной такого сбоя может быть повреждение системных файлов Windows. Для их проверки и восстановления воспользуемся утилитой «Windows PowerShell», запустив ее от имени администратора.
-
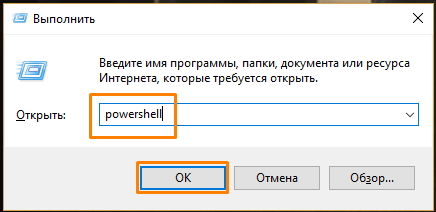
- Откроем приложение «PowerShell» с помощью окна «Выполнить», которое можно вызвать комбинацией клавиш «Windows» + «R». В поле ввода введем команду powershell и, чтобы запустить оболочку с привилегиями администратора, нажмем кнопку «ОК», удерживая при этом клавиши «Ctrl» + «Shift».

Запускаем «Windows PowerShell» от имени администратора из окна «Выполнить»
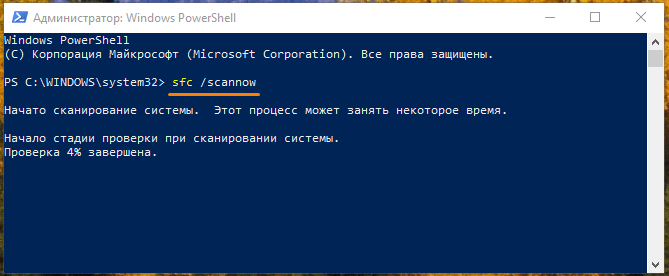
- Запустим программу «System File Checker» (SFC), которая проверит системные файлы ОС и восстановит их в случае необходимости. Вводим в командную строку: sfc /scannow и подтверждаем команду клавишей «Enter». Процесс займет какое-то время, нужно дождаться его окончания.

Запускаем сканирование системных файлов программой «System File Checker»
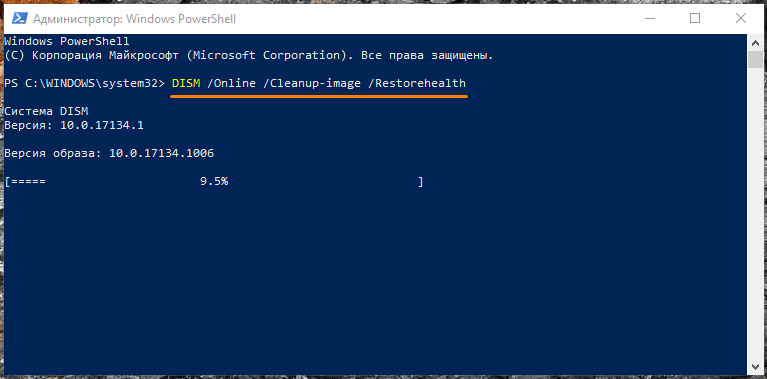
- Затем запустим другой инструмент восстановления системных файлов «Deployment Image and Service» (DISM). Для этого введем в командную строку команду: dism /Online /Cleanup-image /Restorehealth. После нажатия клавиши «Enter» будет начато сканирование, нам также следует дождаться его завершения.

Запускаем проверку системных файлов программой «Deployment Image and Service»
- Откроем приложение «PowerShell» с помощью окна «Выполнить», которое можно вызвать комбинацией клавиш «Windows» + «R». В поле ввода введем команду powershell и, чтобы запустить оболочку с привилегиями администратора, нажмем кнопку «ОК», удерживая при этом клавиши «Ctrl» + «Shift».
Если ошибки не были найдены или системные файлы восстановить не удалось, выполним дальнейшие инструкции.
Перерегистрируем «Панель задач»
Перерегистрация «Панели задач» сбросит все ее настройки и должна помочь восстановить ее работоспособность. Снова воспользуемся утилитой «Windows PowerShell», запущенной с правами администратора (см. пункт 1 предыдущего раздела статьи).
Выделяем и копируем с помощью клавиш «Ctrl» + «C» следующую команду: Get-AppXPackage | Foreach {Add-AppxPackage -DisableDevelopmentMode -Register «$($_.InstallLocation)\AppXManifest.xml»} и вставляем ее, нажав «Ctrl» + «V», в командную строку оболочки «PowerShell». Не забываем нажать «Enter» для подтверждения. После применения команды компьютер следует перезагрузить.
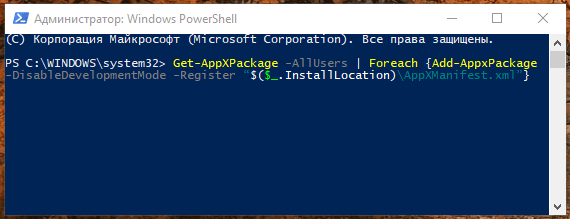
Копируем и вставляем команду в командную строку
Если панель задач перестала нормально работать после чистки реестра одной из сторонних утилит, таких, например, как «CCleaner» или «RegOrganizer», велика вероятность, что вместе с мусором из реестра были удалены важные данные, необходимые для функционирования «Панели задач». Придется восстановить поврежденную ветку реестра вручную.
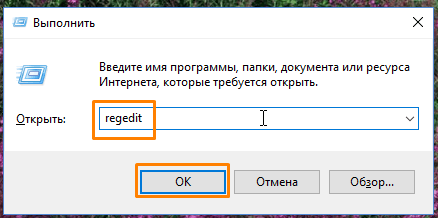
- Нажимаем уже знакомые нам горячие клавиши «Windows» + «R» и в окне «Выполнить» вводим regedit, после чего кликаем кнопку «ОК».

Запускаем «Редактор реестра» из окна «Выполнить»
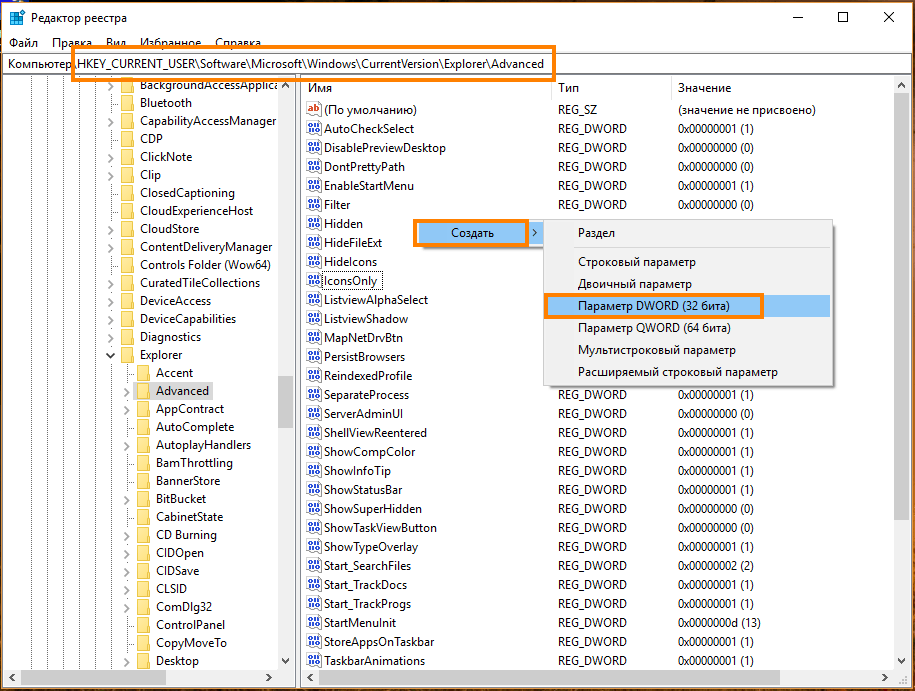
- Откроется окно редактора реестра Windows. Используя левую часть окна, перейдем к разделу реестра HKEY_CURRENT_USER\Software\Microsoft\Windows\CurrentVersion\Explorer\Advanced. Далее кликаем правой кнопкой мыши в свободном месте правой части окна и выбираем команду «Создать», а затем «Параметр DWORD (32 бита)».

Создаем «Параметр DWORD (32 бита)»
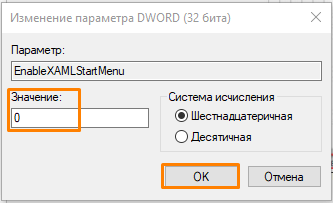
- Вводим имя нового параметра: EnableXAMLStartMenu и нажимаем «Enter».
- Чтобы задать значение параметра, дважды кликаем по нему, в появившемся окне в поле «Значение» указываем 0 и нажимаем «ОК».

Задаем значение 0
- Закрываем окно редактора реестра и перезагружаем ПК.
Перезапускаем «Проводник»
Сбой в «Проводнике» Windows также может привести к неработоспособности «Панели задач». Для решения этой проблемы перезапустим «Проводник» с помощью окна «Выполнить».
Вызовем окно «Выполнить» горячими клавишами «Windows» + «R», скопируем в поле ввода «Открыть» следующий текст: REG ADD «HKCU\Software\Microsoft\Windows\CurrentVersion\Explorer\Advanced» /V EnableXamlStartMenu /T REG_DWORD /D 0 /F» и нажмем кнопку «ОК», а затем перезагрузим компьютер.
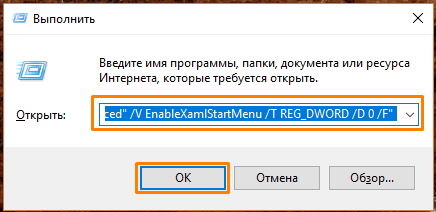
Перезапускаем «Проводник»
В заключение добавим, что при возникновении любых сбоев в Windows 10 вы можете сделать откат системы с помощью встроенного приложения «Восстановление системы», в том случае, если на компьютере были созданы точки восстановления в период до возникновения решаемой вами проблемы.
Post Views: 2 419
Автор: Амиль | Дата публикации: 5.10.2016 | В разделе: Windows инструкции
Одна из основных проблем последней версии ОС Windows – не работающая панель задач. Она зачастую перестаёт реагировать на действия пользователя после очередного автоматического обновления. И сегодня мы расскажем Вам, как вернуть её в строй!
Мы подготовили два простейших способа, требующих буквально нескольких минут Вашего драгоценного времени.
Что делать, если панель задач в Windows 10 перестала работать
Самый простой способ – просканировать систему посредством встроенной в неё утилиты. Она называется SFC. Именно с её помощью решаются проблемы, которые приходят к нам с автоматическим обновлением операционной системы. Если панель задач в Виндовс 10 действительно не работает, то для восстановления её полной работоспособности Вам придётся проделать следующие действия:
- Запускаем командую строку от имени Администратора. Сделать это проще простого – нужно лишь кликнуть правой кнопкой мыши по «Пуску» и в контекстном меню выбрать соответствующий пункт. Если не получается, то нажать комбинацию клавиш (кнопка пуск на клаиватуре) win + R и ввести команду «cmd» без кавычек.

- Открылось окно командной строки. Сюда необходимо ввести команду «sfc /scannow» (без кавычек, конечно же);
- После в строке появится уведомление о том, что сканирование началось. Информация будет постоянно меняться в зависимости от стадии сканирования. Оно может занять определённое время – примерно с полчаса;
- В автоматическом режиме будут найдены и устранены неполадки в Реестре. После завершения процесса сканирования нужно обязательно перезагрузить компьютер и проверить работоспособность панели задач.


Если она по-прежнему не функционирует, отчаиваться не стоит – мы приготовили ещё один способ, который наверняка поможет справиться с данной проблемой. Результат не заставит себя ждать!
Перезапускаем панель задач при помощи PowerShell
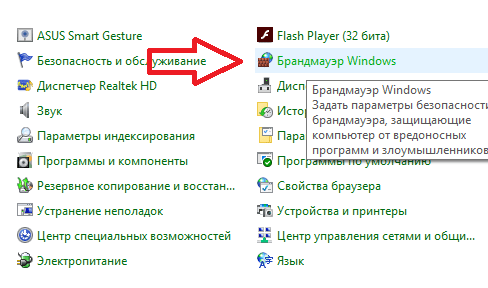
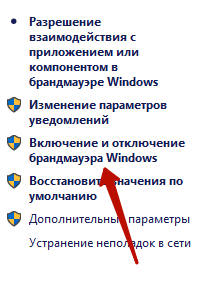
Если способ выше оказался неэффективным в Вашем случае, то стоит воспользоваться практически стопроцентным вариантом восстановления работоспособности панели задач. Но для начала следует отключить брандмауэр, встроенный в ОС, иначе ничего не получится. Сделать это можно следующим образом:
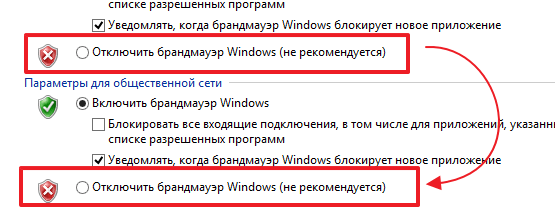
Совет: если Вы используете антивирус со встроенным брандмауэром (а/в Касперского, Nod32, Dr. Web и другие), отключение не потребуется.
Для включения данной утилиты можно воспользоваться несколькими способами, но мы решили остановиться на командной строке. Запускаем её от имени Администратора, вводим команду «PowerShell» (без кавычек). Готово, теперь в командной строке включился соответствующий режим. Дальше действуем следующим образом:
- Вводим команду со скриншота;
- Нажимаем на кнопку «Enter» и ждём завершения процесса восстановления панели задач;
- Перезагружаем компьютер.

Готово! Теперь панель задач вновь должна начать корректно работать. Если при очередном обновлении проблема вернётся, Вы знаете, что нужно будет делать – поэтому сохраняйте статью в закладки. Даже если Вы сразу перешли ко второму способу, проскочив первый, рекомендуем воспользоваться и им, чтобы почистить Реестр – компьютер станет работать немножко быстрее.
Другие инструкции: