by Loredana Harsana
Loredana is a passionate writer with a keen interest in PC software and technology. She started off writing about mobile phones back when Samsung Galaxy S II was… read more
Updated on
- One of the best features of later versions of Windows is the ability to mount ISO files without the use of a third-party tool.
- However, various users have encountered problems when attempting to mount ISO files on a Windows 11 PC.
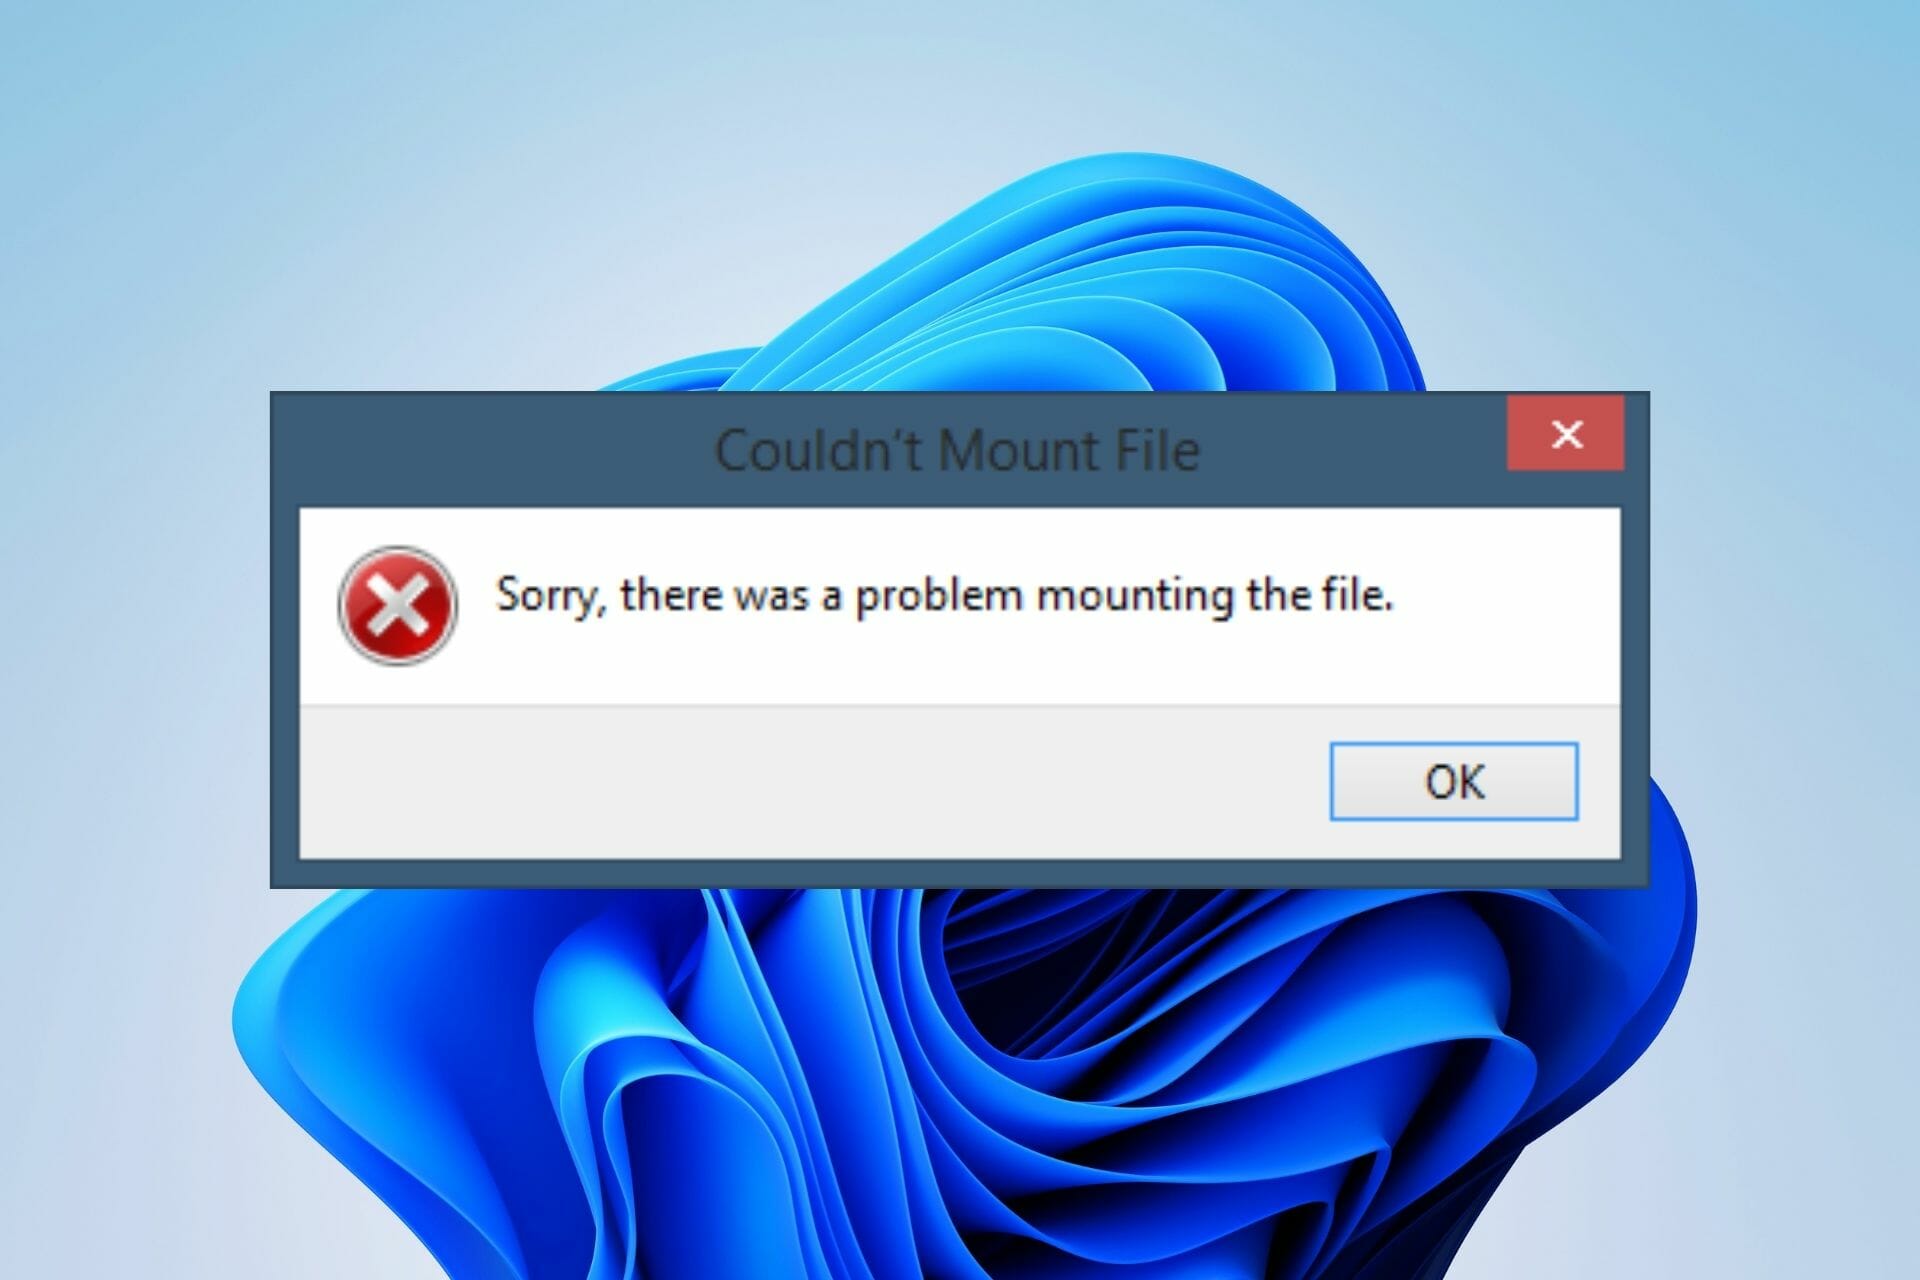
- If you are looking for a quick fix for the error message Sorry, there was a problem mounting the file, these easy guide will help you.
XINSTALL BY CLICKING THE DOWNLOAD
FILE
Windows 11 includes mounting ISO disk images as well as VHD virtual HDD image files.
When attempting to mount a file on Windows Server 11, several users report getting the Sorry, there was a problem mounting the file message. The problem has only been reported with the built-in ISO file mount in Windows.
If you’re one of those who have experienced such difficulties and want to learn how to fix ISO issues on Windows 11, you’re in the right place.
You can view or extract the contents of an ISO image without using third-party software, and this article will show you how to do so on Windows 11.
How we test, review and rate?
We have worked for the past 6 months on building a new review system on how we produce content. Using it, we have subsequently redone most of our articles to provide actual hands-on expertise on the guides we made.
For more details you can read how we test, review, and rate at WindowsReport.
How do I fix the ISO file mount error on Windows 11?
1. Open the ISO file with Windows Explorer
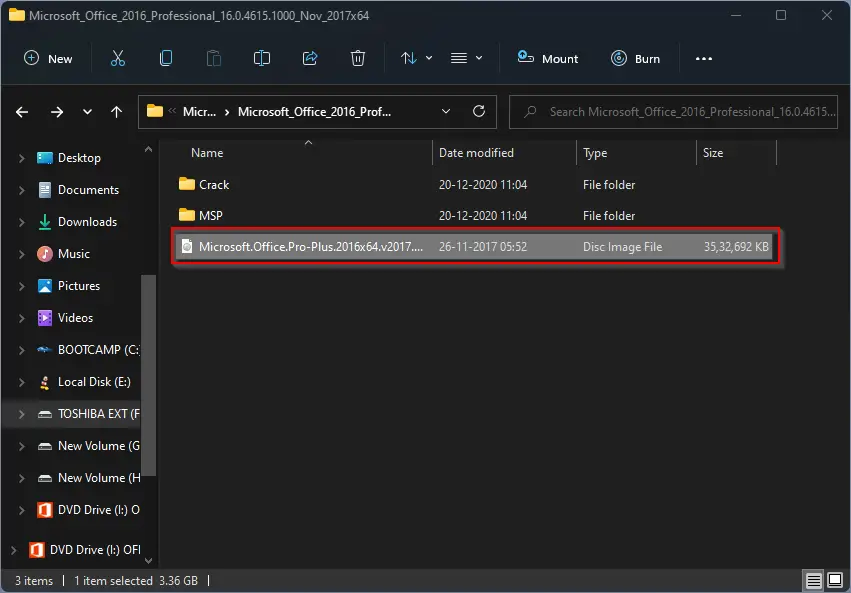
- Locate the ISO file through File Explorer.
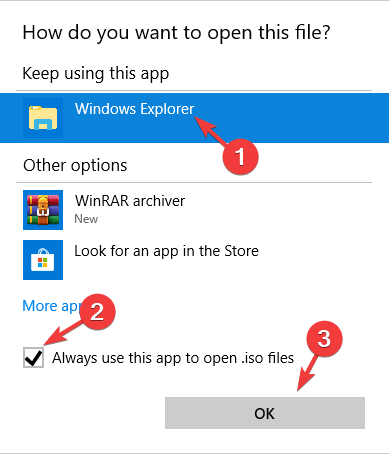
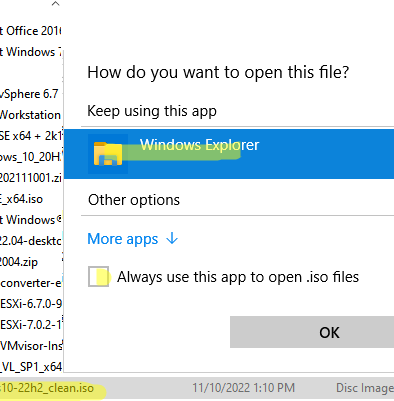
- Right-click the file and choose Open with and Chose another app from the menu.

- Select Windows Explorer from the list. Check Always use this app to open .iso files and click OK.
- How to recover deleted files in Windows 11
- Windows 11’s File Explorer search not working? Try these fixes
- Windows 11 version 22H2 has been officially declared Feature Complete
2. Use a third-party repair tool
Another method we tested to restore corrupted ISO files was to use a third-party repair software that’s both reliable and practical.
The recommended solution is to use the Fortect professional Windows repair software, which does a deep scan of your Windows system, identifying and automatically repairing system files and components that are causing Sorry, there was an error mounting the file error message.
It has a database of over 25,000,000 files and can repair corrupted, malfunctioning, or missing Windows software files.
⇒ Get Fortect
3. Unmount all drives
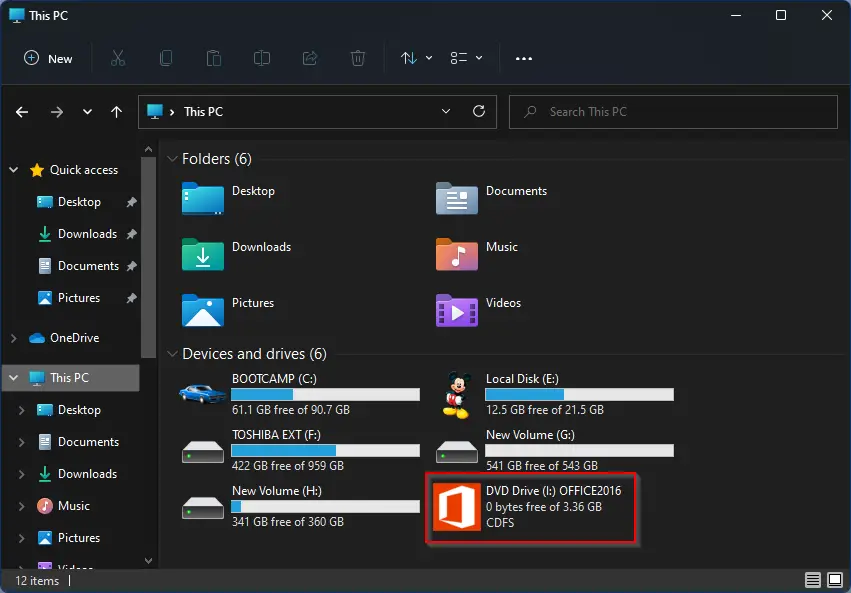
- Type in Search bar This PC and click on it.
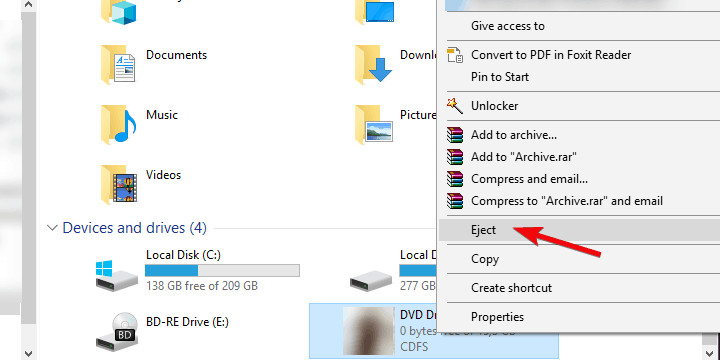
- Expand Devices and Drives.
- Right-click on individual virtual drives and click Eject.

- Restart your computer and retry to mount the desired ISO file in any open slot.
That virtual drive appears in File Explorer with its drive letter and functions exactly like a DVD. You can, for example, copy files from the virtual DVD to any other disk drive.
Copy the VHD file from one location to another, rather than cut and paste, and you’ll be able to mount it. This is also a workaround to fix Sorry, there’s was a problem mounting the file error message.
Last but not least, there’s always the alternative of using third-party software to automate the process of mounting an ISO file on your Windows 11 PC if doing it manually overwhelms you.
To have an extra layer of security, we recommend using a compatible antivirus solution for Windows 11 PC, so you can be on the safe side when mounting ISO files.
If you encountered other issues and errors while mounting ISO files in Windows 10, in the article we covered more troubleshooting steps to help you resolve them.
Furthermore, having the most recent security upgrades should keep you safe from mounting a damaged ISO file, avoiding any issues. Leave us a comment and tell us if this easy fix resolved your issue.
![]()
Если вы, возможно, пытались получить исходный код чего-либо, первоначально опубликованного на компакт-диске, то вы могли столкнуться с ISO-образами. ISO-образы — это виртуализированные образы дисков, которые вы можете монтировать и отключать на виртуальных дисках для аналогичного опыта. Но как смонтировать ISO в Windows 11? Нужны ли вам дополнительные сторонние инструменты? Давай выясним!
Монтировать ISO всегда выгоднее, чем извлекать его содержимое. Это не только очень быстро, но и помогает экономить диск, предоставляя быстрый доступ к его файлам и помогая сэкономить время, затрачиваемое на извлечение образов ISO.
Монтирование ISO (или любого другого файла образа, если на то пошло) также имеет то преимущество, что вы получаете доступ к операционным системам и другим загрузочным дискам, которые вы можете заранее протестировать, чтобы убедиться, что они работают должным образом.
Связанный: Как запускать старые игры в Windows 11
Как смонтировать ISO в Windows 11
Вы можете легко смонтировать ISO в Windows 11, используя следующие методы. Следуйте любому из разделов ниже в зависимости от ваших текущих предпочтений.
Способ 1: Двойной щелчок
Проводник Windows теперь полностью поддерживает образы ISO. Это означает, что вы можете просто дважды щелкнуть образ ISO, чтобы смонтировать его на виртуальный диск на вашем ПК.
После подключения вы можете найти то же самое в разделе «Этот компьютер» вашей системы в проводнике.
Связанный: Как сделать запись экрана в Windows 11 со звуком
Вы также можете смонтировать ISO-образ в Windows 11, используя контекстное меню, вызываемое правой кнопкой мыши.
Найдите соответствующий ISO в локальном хранилище и щелкните его правой кнопкой мыши.
Щелкните и выберите Подключить.
После подключения вы сможете найти виртуальный диск в разделе «Устройства и диски» на вашем ПК.
Способ 3: Использование панели инструментов
Проводник Windows 11 претерпел серьезные изменения с момента своего появления. Теперь вы можете найти часто используемые параметры в меню ленты вверху. Вы можете использовать то же самое для монтирования ISO-образа в вашей системе Windows 11. Следуйте инструкциям ниже, чтобы помочь вам в этом процессе.
Откройте проводник и перейдите к нужному файлу ISO. Нажмите и выберите то же самое.
Нажмите «Подключить» вверху в меню «Лента».
Выбранный ISO теперь должен быть смонтирован на виртуальном диске в вашей системе. Вы найдете то же самое в разделе «Этот компьютер» вашего проводника.
Способ 4: использование PowerShell
Вы также можете использовать PowerShell для монтирования дисков в Windows 11 в зависимости от ваших текущих потребностей и требований. Следуйте инструкциям ниже, чтобы помочь вам в этом процессе.
Откройте проводник и перейдите к нужному файлу ISO. Щелкните правой кнопкой мыши на найденном.
Щелкните Копировать как путь.
Нажмите Windows + R на клавиатуре, чтобы запустить «Выполнить».
Теперь введите следующее и нажмите Ctrl + Shift + Enter на клавиатуре.
пауэршелл
Используйте следующую команду для монтирования вашего ISO. Просто замените PATH на путь к ISO-образу, который мы скопировали ранее.
Mount-DiskImage -ImagePath “ПУТЬ”
Примечание. Путь будет автоматически вставлен с кавычками при использовании функции «Копировать как путь». Однако, если этого не произойдет, убедитесь, что вы добавили кавычки в свой путь.
Нажмите Enter, когда закончите.
Вот и все! Выбранный ISO теперь будет подключен к виртуальному диску в вашей системе.
Способ 5: Использование сторонних инструментов
Существует множество сторонних инструментов, которые позволяют вам манипулировать образами ISO. Эти инструменты также поставляются в комплекте с возможностью легко монтировать ваши ISO-образы в Windows 11. Вы можете использовать то же самое в своих интересах и монтировать свои ISO. Следуйте любому из разделов ниже в зависимости от ваших предпочтений.
Вариант 1: Использование WinCDEmu
WinCDEmu — это инструмент с открытым исходным кодом, который позволяет монтировать ISO-образы в Windows 11. Следуйте приведенному ниже руководству, чтобы помочь вам в этом процессе.
Щелкните ссылку выше, а затем нажмите «Загрузить», чтобы загрузить WinCDEmu на свой компьютер. После загрузки дважды щелкните и запустите его.
Установите флажок «Настроить параметры установки».
При необходимости выберите каталог установки WinCDEmu на вашем ПК.
Кроме того, установите флажок Требовать права администратора (UAC) для подключения образов, если вы хотите защититься от неавторизованных пользователей, монтирующих ISO-образы в вашей системе.
После этого нажмите «Установить».
После завершения установки нажмите OK.
Теперь перейдите к соответствующему ISO в проводнике и Shift + щелкните его правой кнопкой мыши.
Щелкните Выбрать букву диска и монтировать.
Используйте раскрывающееся меню вверху и выберите нужную букву для вашего виртуального диска.
Используйте следующее раскрывающееся меню, чтобы выбрать тип вашего диска, если применимо. Это будет тип эмулируемого диска в Windows 11.
Установите следующие флажки в зависимости от ваших предпочтений.
-
Отключить автозапуск на это время: диск не будет использовать функцию автозапуска, если вы установите флажок для этой опции.
-
Сохранить диск после перезагрузки: виртуальный диск с установленным ISO-образом сохранится после перезагрузки.
Нажмите OK, когда закончите.
Вот и все! Выбранный ISO-образ теперь должен быть смонтирован на виртуальном диске на вашем ПК.
Вариант 2: Использование PowerISO
PowerISO — еще одна давняя утилита, которая может помочь вам монтировать файлы ISO в вашей системе. Используйте руководство ниже, чтобы помочь вам в этом процессе.
Щелкните ссылку выше и выберите одну из ссылок для загрузки в зависимости от вашего процессора. Загрузка должна автоматически начаться в вашем браузере. Просто сохраните его в локальном хранилище. Дважды щелкните и запустите то же самое, как только закончите.
Щелкните Я согласен.
Нажмите «Обзор» и при необходимости выберите пользовательский каталог установки PowerISO.
Нажмите «Установить», когда закончите.
Нажмите “Далее.
Выберите дополнительные ассоциации файлов слева, если вы хотите открывать дополнительные типы файлов с помощью PowerISO. ISO будет выбран по умолчанию вверху.
Используйте раскрывающееся меню, чтобы выбрать количество виртуальных дисков, которые вы хотите добавить на свой ПК.
Кроме того, установите флажки для следующих параметров в зависимости от ваших предпочтений.
-
Автозапуск при загрузке: PowerISO будет запускаться в фоновом режиме каждый раз при включении компьютера.
-
Автоматическое монтирование при загрузке: этот параметр будет автоматически монтировать последние смонтированные ISO-образы на ваши виртуальные диски каждый раз, когда ваш компьютер включается.
-
Интегрируйте PowerISO в Shell: это добавит параметры PowerISO в ваш проводник, включая контекстное меню, вызываемое правой кнопкой мыши.
-
Автоматически проверять наличие обновлений: этот параметр позволит PowerISO автоматически проверять наличие новых версий и ожидающих обновлений в фоновом режиме.
Нажмите «Закрыть», когда закончите.
Перезагрузите систему в этот момент. Это необходимый шаг для установки виртуальных дисков PowerISO в вашей системе по мере необходимости.
После этого перейдите к соответствующему файлу ISO в проводнике и Shift + щелкните его правой кнопкой мыши.
Наведите курсор на PowerISO в контекстном меню.
Выберите Подключить образ к диску [N:] , где N — это буква диска, назначенная вашему виртуальному диску.
Выбранный ISO теперь будет подключен к вашему виртуальному диску PowerISO. Вы можете получить к нему доступ в разделе «Этот компьютер» Проводника Windows 11.
Как размонтировать ISO
Размонтировать ISO в Windows 11 довольно просто благодаря встроенным параметрам. Просто щелкните правой кнопкой мыши на своем виртуальном диске и нажмите «Извлечь». Это будет работать для всех вышеперечисленных нативных методов, которые не используют сторонний инструмент.
Если вместо этого вы использовали сторонний инструмент для монтирования вашего ISO, вам нужно будет использовать его специальный раздел в контекстном меню, чтобы отключить его из вашей системы. Параметр будет называться «Извлечь» или «Отключить» в зависимости от используемого вами инструмента.
Мы надеемся, что этот пост помог вам легко смонтировать ISO-образы в Windows 11. Если у вас есть еще вопросы, не стесняйтесь задавать их в комментариях ниже.
СВЯЗАННЫЕ С
В некоторых случаях при попытке смонтировать файл с ISO образом в Windows может появится ошибка:
Не удалось подключить файл
К сожалению при подключении файла возникла проблема.
Couldn't Mount File
 Sorry, there was a problem mounting the file
В этой статье, мы рассмотрим как исправить проблему с монтированием ISO образа в виртуальный CD/DVD привод в Windows.
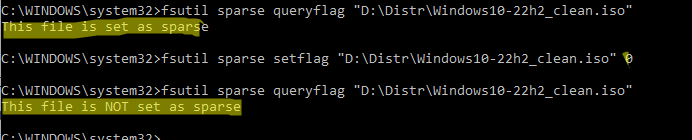
Совет 1. Проверьте атрибуты ISO файла
Если Windows не может смонтировать ISO, проверьте не задан ли для файла атрибут SPARSE. Откройте командную строку с правами администратора и выполните:
fsutil sparse queryflag "D:\Distr\Windows10-22h2_clean.iso"
Если команда вернула This file is set as sparse, нужно снять этот атрибут:
fsutil sparse setflag "D:\Distr\Windows10-22h2_clean.iso" 0
Еще раз проверьте состояние атрибута с помощью
fsutil sparse queryflag
. Команда вернет This file is NOT set as sparse.
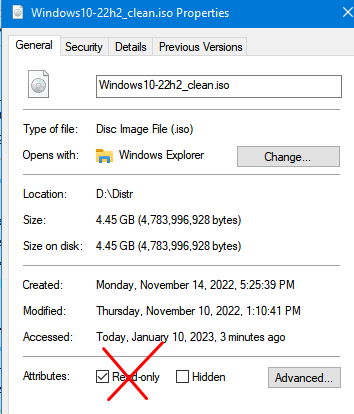
Если при попытке изменить атрибут файла появится ошибка Error: Access is denied, нужно в свойствах файла отключить атрибут Только чтение

Можно отключить атрибут ReadOnly в свойствах ISO файла или с помощью команды:
attrib -r "D:\Distr\Windows10-22h2_clean.iso"
Если файл с ISO образом был недавно скачан из интернета, нужно разблокировать файл. Откройте свойства файла, На вкладке Общие (General) нажмите кнопку или установите чекбокс Разблокировать (Unblock). У полученного из интернета файла рядом с кнопкой будет указано такое предупреждение:
Осторожно: Этот файл получен с другого компьютера и, возможно, был заблокирован с целью защиты компьютера.
This file came from another computer and might be blocked to help protect this computer)
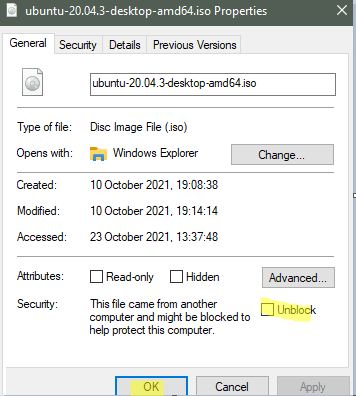
Теперь попробуйте смонтировать ваш ISO образ из проводника Windows или с помощью PoweShell.
В некоторых случаях может помочь самое простое решение – просто скопируйте ISO файл в другой каталог и смонтируйте образ. Если ISO файл хранится в сетевой папке, доступной по UNC пути, попробуйте скопировать его на локальный компьютер.
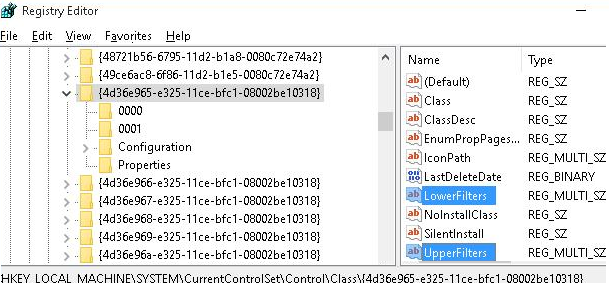
Совет 2. Сбросьте настройки CD/DVD приводов в реестре
В некоторых случаях причиной проблем с монтированием ISO файлов в Windows может быть некорректные настройки для CD/DVD приводов (как физических, так и виртуальных). Вы можете сбросить настройки CD устройств через реестр :
- Запустите regedit.exe
- Перейдите в раздел HKEY_LOCAL_MACHINE\SYSTEM\CurrentControlSet\Control\Class\{4D36E965-E325-11CE-BFC1-08002BE10318}
- Удалите параметры
UpperFilters
и
LowerFilters

Совет. Если в данной ветке будет присутствовать параметр UpperFilters.bak, трогать его не нужно.
- Перезагрузите компьютер. Windows сбросит настройки CD/DVD привода на стандартные.
Совет 3. Не монтируются ISO файлы из проводника Windows
Если ISO файл корректно монтируется с помощью PowerShell команды
Mount-DiskImage
, но не монтируется их проводника Windows, нужно попробовать сбросить ассоциации для файлов с расширением ISO.
- Щелкните по ISO файлу правой кнопкой и выберите Open with
- В окне выберите Windows Explorer и включите опцию Always use this app to open .iso files
It is possible to mount ISO files on a virtual CD/DVD drive starting in Windows 8. If you still use Windows 7, you’ll need a third-party tool to mount an ISO disk image file. This ISO mounting feature is also available on Windows 10, as well as on Windows 11. If the Mount option is missing on Windows 10, you can enable it by following the link.
An ISO image is a file format for storing a physical disk’s contents (CD, DVD, or Blu-ray). Most software companies distribute their applications and tools using this file format instead of shipping physical media, which is time-consuming and costly. For example, Microsoft uses this format to distribute previews of 11 to testers and many other products.
Windows 11 features native support for mounting and mounting ISO files without requiring additional software, even though there are a number of free image-related applications available.
We’ll show you how to mount and unmount ISO files on Windows 11 PC in this gearupwindows article.
How to Mount and Unmount an ISO File on Windows 11 using File Explorer?
On a Windows 11 PC, you can mount ISO files in two ways:-
Mount ISO Image with a Double-click
To quickly mount an ISO file on Windows 11, open File Explorer by pressing the Windows + E keys and then browse to the folder with the ISO image. Finally, double-click the .iso file to mount it.
After executing the above steps, the ISO file will open like any other folder, allowing you to access and extract the contents as necessary. It will also be visible in File Explorer, just like a CD/DVD drive.
To mount an ISO image from the File Explorer context menu, open File Explorer by pressing the Windows + E keys simultaneously or any other method. Now, browse the folder that stores the ISO image. Now, right-click the .iso file and select the Mount option.

After performing the above steps, you can access the image file’s contents by opening the virtual drive from File Explorer.
Unmount image on Windows 11
Once you have done with the mounted image and are no longer required, you can quickly unmount it by right-clicking the virtual drive under This PC and selecting the Eject option. Do the following:-
Step 1. Double-click on This PC icon on the desktop and right-click on the virtual CD drive.
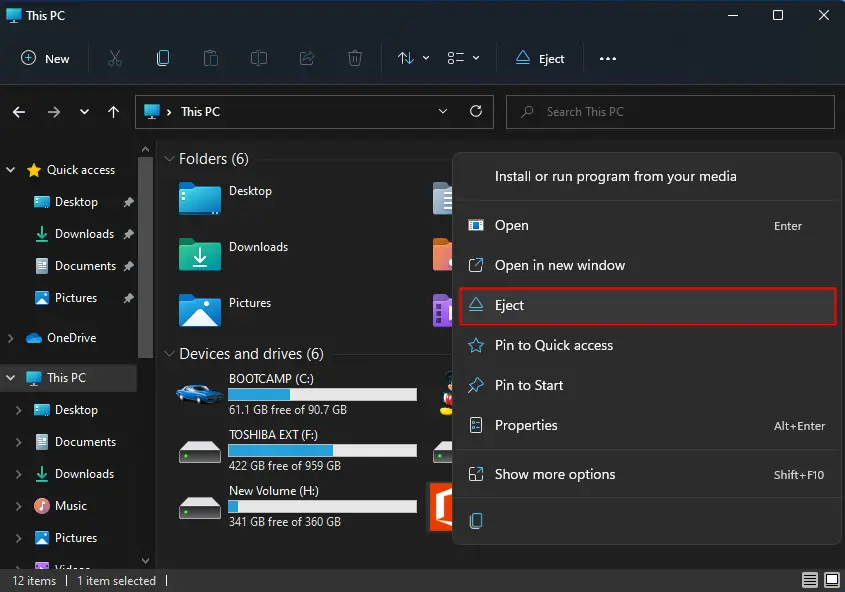
Step 2. Click on the Eject from the context menu.
Once you perform the above steps, the ISO file will be unmounted. If you want to reaccess its content, you need to mount it again.
Conclusion
In conclusion, mounting ISO files on Windows 11 is a straightforward process that can be done in a couple of ways. Windows 11 natively supports the ability to mount and unmount ISO files without needing any third-party tools. This feature is also available in Windows 10. With the help of this article, you can quickly mount and unmount ISO files on your Windows 11 PC using File Explorer. You can now access the contents of the mounted ISO file and extract any necessary files. If you no longer need the mounted ISO file, you can unmount it easily by right-clicking on the virtual drive and selecting the Eject option. Overall, mounting ISO files is a useful feature that can save time and money, and Windows 11 makes it even easier to use.
If you might have tried to source something originally published on a CD, then you might have come across ISOs. ISOs are virtualized disk images that you can mount and dismount on virtual drives for a similar experience. But how do you mount an ISO on Windows 11? Do you need any additional third-party tools? Let’s find out!
Mounting an ISO is always more beneficial than extracting its contents. Not only it’s super fast, it also helps you save disk too while giving quick access to its files and helps save the time spent extracting ISO images.
Mounting an ISO (or any other image file, for that matter) also has the advantage of getting access to Operating Systems and other boot drives that you can test beforehand to ensure they’re working as intended.
Related: How to Run Old Games on Windows 11
How to mount an ISO in Windows 11
You can easily mount an ISO in Windows 11 using the following methods. Follow either of the sections below depending on your current preferences.
Method 1: Using double click
Windows File Explorer has now full support for ISO images. This means that you can simply double-click an ISO image to mount the same to a virtual disk on your PC.

Once mounted, you can find the same in the This PC section of your system in the file explorer.

Related: How to Screen Record on Windows 11 With Audio
You can also choose to mount an ISO on Windows 11 using the right-click context menu.
Locate the concerned ISO on your local storage and right-click the same.

Click and select Mount.

Once mounted, you will be able to find the virtual disk in the Devices and drives section of your PC.
Method 3: Using the toolbar
The Windows 11 File Explorer has received a major overhaul since its introduction. You can now find frequently used options in the Ribbon menu at the top. You can use the same to mount an ISO image on your Windows 11 system. Follow the steps below to help you along with the process.
Open the File Explorer and navigate to your desired ISO file. Click and select the same.

Click Mount at the top in the Ribbon menu.

The selected ISO should now be mounted to a virtual drive on your system. You will find the same in the This PC section of your file explorer.
Method 4: Using PowerShell
You can also use PowerShell to mount drives on Windows 11 depending on your current needs and requirements. Follow the steps below to help you along with the process.
Open the File Explorer and navigate to the desired ISO file. Right-click on the same once found.

Click Copy as Path.

Press Windows + R on your keyboard to launch Run.

Now type in the following and press Ctrl + Shift + Enter on your keyboard.
powershell

Use the following command to mount your ISO. Simply replace PATH with the path to the ISO we copied earlier.
Mount-DiskImage -ImagePath "PATH"

Note: The path will be pasted with quotes automatically when using Copy as Path. However, if that does not happen, ensure that you add quotes to your Path.
Press Enter once you’re done.

And that’s it! The selected ISO will now be mounted to a virtual drive on your system.
Method 5: Using third-party tools
There are tons of third-party tools out there that allow you to manipulate ISO images. These tools also come bundled with the ability to mount your ISOs in Windows 11 easily. You can use the same to your advantage and mount your ISOs. Follow either of the sections below depending on your preference.
Option 1: Using WinCDEmu
WinCDEmu is an open-source tool that can allow you to mount ISO images on Windows 11. Follow the guide below to help you along with the process.
- WinCDEmu | Download Link
Click the link above and then click Download to download WinCDEmu to your PC. Once downloaded, double click and launch the same.

Check the box for Customize installation options.

Choose an installation directory for WinCDEmu as needed on your PC.

Additionally, check the box for Require administrator rights (UAC) to mount images if you wish to safeguard against unauthorized users mounting ISOs on your system.

Once done, click Install.

Once installation completes, click OK.

Now navigate to the concerned ISO in the File Explorer and Shift + Right-click on the same.

Click Select drive letter & mount.

Use the drop-down menu at the top and choose the desired letter for your virtual drive.

Use the next drop-down menu to select your disk type if applicable. This will be the emulated disk type on Windows 11.

Check the following boxes depending on your preferences.
- Disable autorun for this time: The disk won’t use its autorun functionality if you check the box for this option.
- Keep drive after restart: The virtual drive with your mounted ISO will persist after a restart.

Click OK once you’re done.

And that’s it! The selected ISO image should now be mounted to a virtual drive on your PC.
Option 2: Using PowerISO
PowerISO is another long-standing utility that can help you mount ISO files on your system. Use the guide below to help you along with the process.
- PowerISO | Download Link
Click the link above and choose one of the download links depending on your CPU. The download should automatically initiate in your browser. Simply save it to your local storage. Double click and launch the same once done.

Click I Agree.

Click Browse and choose a custom installation directory for PowerISO if needed.

Click Install once you’re done.

Click Next.

Select the additional file associations on the left if you wish to open additional file types with PowerISO. ISO will be selected by default at the top.

Use the drop-down menu to choose the number of virtual drives you wish to add to your PC.

Additionally, check the boxes for the following options depending on your preferences.
- Autostart on boot up: This will launch PowerISO in the background each time your PC turns on.
- Automount on boot up: This option will automatically mount the last mounted ISOs to your virtual drives each time your PC turns on.
- Integrate PowerISO into Shell: This will add PowerISO options to your File Explorer including the right-click context menu.
- Check for updates automatically: This option will allow PowerISO to check for new versions and pending updates in the background automatically.

Click Close once you’re done.

Restart your system at this point. This is a necessary step to install PowerISO virtual drives on your system as needed.
Once done, navigate to the concerned ISO file in the File Explorer and Shift + Right-click on the same.
Hover over PowerISO in the context menu.

Select Mount image to drive [N:] <No Media> where N is the drive letter you assigned to your virtual drive.
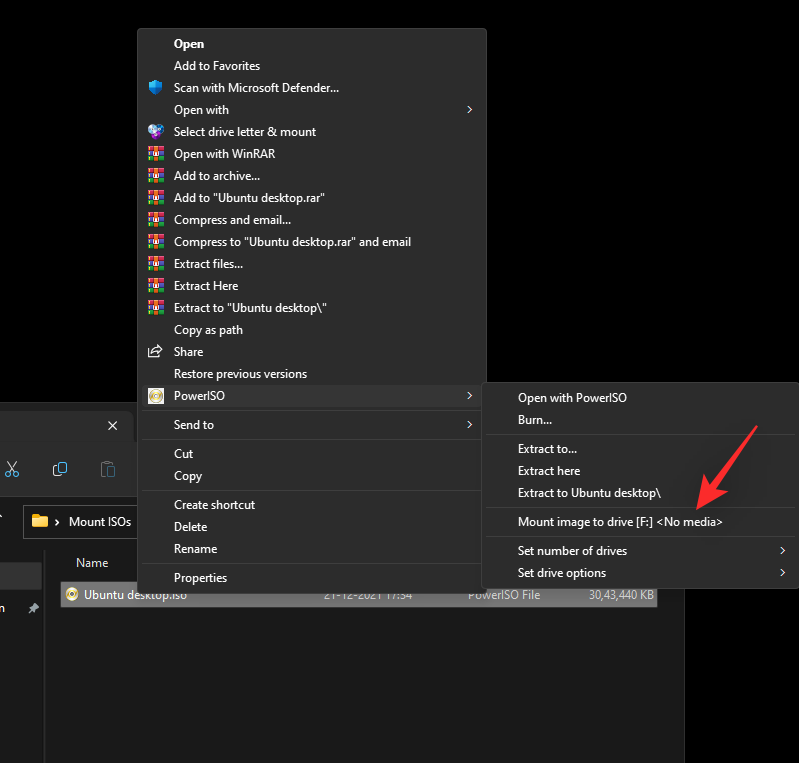
The selected ISO will now be mounted to your PowerISO virtual drive. You can access the same in the This PC section of Windows 11 File Explorer.
How to unmount an ISO
Unmounting an ISO is quite simple in Windows 11 thanks to its in-built options. Simply right-click on your virtual drive and click Eject. This will work for all the native methods above that do not use a third-party tool.

If you used a third-party tool to mount your ISO instead, then you will need to use its dedicated section in the context menu to unmount the same from your system. The option will be named Eject or Unmount depending on the tool you used.
We hope this post helped you easily mount ISOs in Windows 11. If you have any more questions, feel free to drop them in the comments below.
RELATED
- How to Remove the “System requirements not met” Watermark on Windows 11
- How to Disable Speech to Text on Windows 11 in 2022
- How to Search Messages in the Phone Link App on Windows 11
- Switch Out of S Mode Not Working? How to Fix
- 6 Ways to Shutdown Windows 11 Without Updating [Works 100%]
- 4 Easy Ways to Customize and Change Icons in Windows 11