На чтение 7 мин. Просмотров 12.9k. Опубликовано
Иногда, чтобы решить определенную проблему или заблокировать определенный веб-сайт на вашем компьютере с Windows 10, вы должны отредактировать файл hosts.
Редактирование файла hosts – это довольно сложная процедура, и количество пользователей сообщило «Доступ запрещен» при попытке редактировать файл hosts в Windows 10.
Файл Hosts находится в вашем установочном каталоге Windows 10 и защищен от несанкционированного доступа, но если вам нужно отредактировать файл hosts, вы можете избежать сообщения «Доступ запрещен» , следуя одному из наших решений.
Вот еще несколько примеров этой проблемы:
- Не удается отредактировать файл hosts в Windows 10 . Если вы не можете редактировать файл hosts в Windows 10, возможно, вам не нужны соответствующие разрешения. Мы рассмотрим эту проблему здесь
- Файл хостов, используемый другим процессом . Это еще одна распространенная проблема, которая не позволяет пользователям редактировать файл хоста.
- У вас нет разрешения на сохранение файла hosts в Windows 10 . Это тот же случай, что и в первом сообщении об ошибке.
Как отредактировать файл hosts в Windows 10 и избежать сообщения «Доступ запрещен»?
Содержание .
- Запустите Блокнот как администратор
- Скопируйте файл hosts в другое место
- Убедитесь, что хосты не установлены только для чтения
- Изменить настройки безопасности для хостов
- Используйте скрытую учетную запись администратора
Исправлено: ошибка «Отказано в доступе» в Windows 10
Решение 1. Запустите «Блокнот» от имени администратора .
Если вы используете Блокнот в качестве текстового редактора, вам необходимо запустить его как администратор, прежде чем вы сможете редактировать файл hosts. Чтобы запустить Блокнот от имени администратора и отредактировать файл hosts, выполните следующие действия:
-
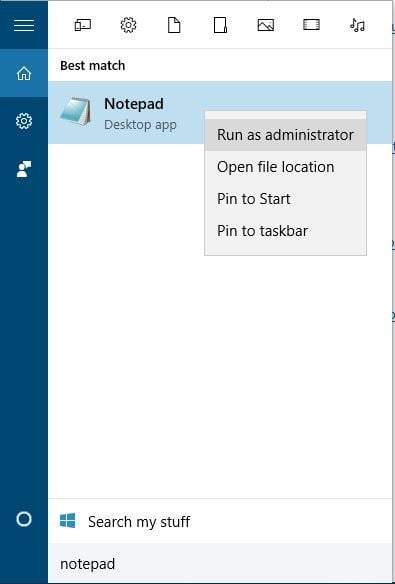
Нажмите Windows Key + S и введите Блокнот . Нажмите правой кнопкой мыши Блокнот в списке результатов и выберите Запуск от имени администратора .

- Когда откроется Блокнот , выберите Файл> Открыть .
-
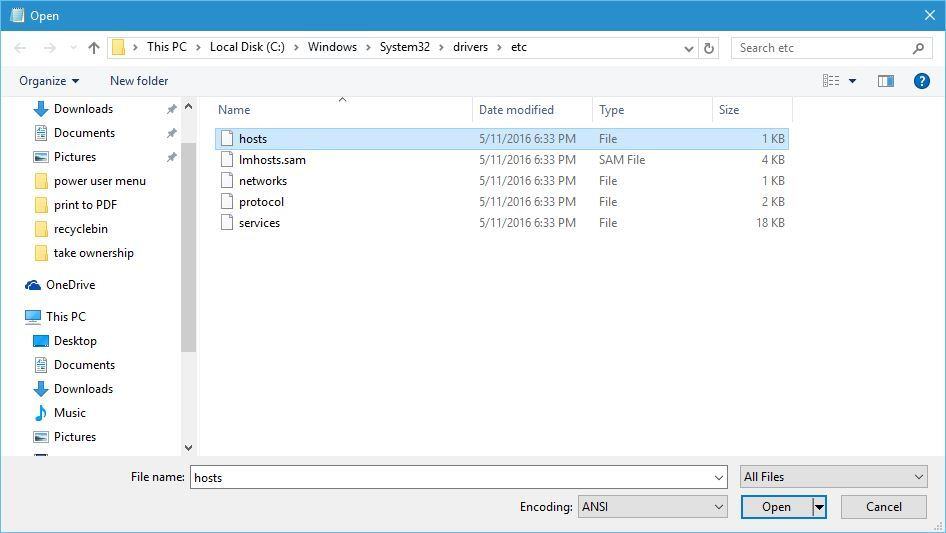
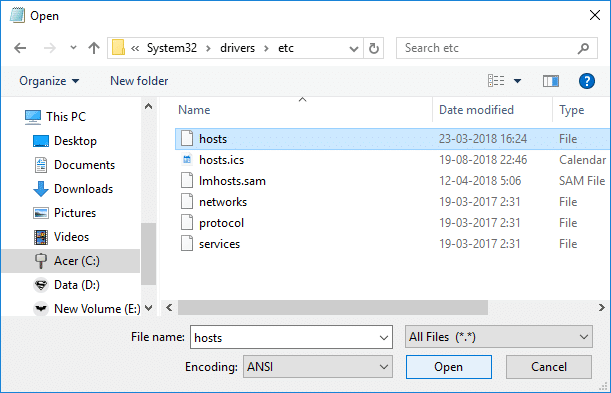
Перейдите в папку C: \ Windows \ System32 \ drivers \ etc и замените Текстовые документы (* .txt) на Все файлы . Выберите хосты и нажмите Открыть .
- Внесите необходимые изменения и сохраните их.


Мы должны упомянуть, что это решение должно работать с любым другим текстовым редактором, поэтому, если вы не используете Блокнот, просто запустите нужный текстовый редактор от имени администратора, и вы сможете без проблем редактировать файл hosts.
Ищете альтернативные варианты блокнота? Вот 6 лучших текстовых редакторов, доступных прямо сейчас.
Кроме того, вы можете запустить командную строку как администратор и использовать ее для запуска Блокнота и редактирования файла hosts. Для этого выполните следующие инструкции:
-
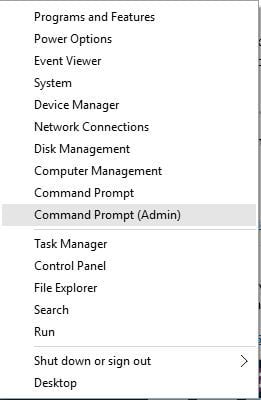
Нажмите Windows Key + X и выберите в меню Командная строка (Администратор) .
-
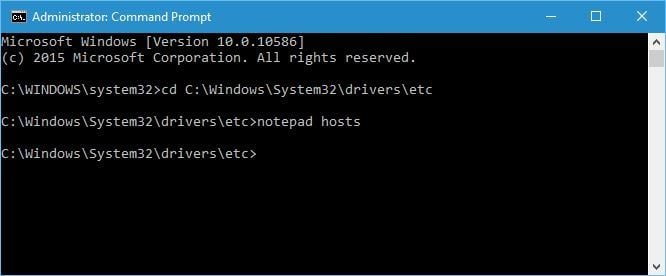
Когда откроется командная строка, введите следующие строки и нажмите Enter после каждой строки:
- cd C: \ Windows \ System32 \ drivers \ etc
-
хозяева блокнота
- Блокнот теперь откроет файл hosts, и вы сможете внести необходимые изменения.


Если у вас возникли проблемы с доступом к командной строке от имени администратора, вам лучше ознакомиться с этим руководством.
Решение 2. Скопируйте файл hosts в другое место .
По словам пользователей, вы можете избежать сообщения «Доступ запрещен» при редактировании файла hosts, просто переместив файл в другое место, отредактировав его и вернув его в исходное местоположение. Для этого выполните следующие действия:
- Перейдите в C: \ Windows \ System32 \ drivers \ etc и найдите файл hosts.
- Скопируйте его на свой Рабочий стол или в любую другую папку, к которой у вас есть доступ.
- Откройте файл hosts на рабочем столе с помощью блокнота или любого другого текстового редактора.
- Внесите необходимые изменения и переместите файл hosts обратно в каталог C: \ Windows \ System32 \ drivers \ etc .
Отредактируйте файл хостов, следуя этому пошаговому руководству.
Решение 3. Убедитесь, что хосты не настроены только на чтение .
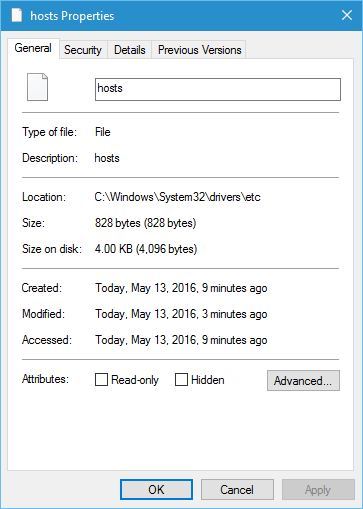
По умолчанию для файла hosts установлено только для чтения, что означает, что вы можете открыть его, но не можете вносить в него какие-либо изменения. Чтобы устранить эту проблему, необходимо отключить режим «Только чтение» для файла hosts, выполнив следующие действия:
- Перейдите в C: \ Windows \ System32 \ drivers \ etc .
- Найдите файл hosts, щелкните его правой кнопкой мыши и выберите в меню Свойства .
-
Перейдите в раздел Атрибуты и убедитесь, что параметр Только для чтения не отмечен .
- Нажмите Применить и ОК , чтобы сохранить изменения.

Теперь вы сможете внести необходимые изменения в файл hosts. После того, как вы закончите, было бы неплохо снова установить хост-файл в режим только для чтения.
Иногда все ваши документы доступны только для чтения, включая ваш файл hosts. Если вы хотите изменить их правильно, вы можете найти больше информации об этом в этом кратком руководстве.
Решение 4. Изменить настройки безопасности для хостов
Иногда для доступа к определенным файлам и папкам вам нужны соответствующие привилегии, и то же самое относится и к файлу hosts.
Если вы получаете «Доступ запрещен» при попытке изменить файл hosts, вы можете не иметь полного контроля над файлом, но вы можете легко изменить его, выполнив следующие действия:
- Перейдите в C: \ Windows \ System32 \ drivers \ etc .
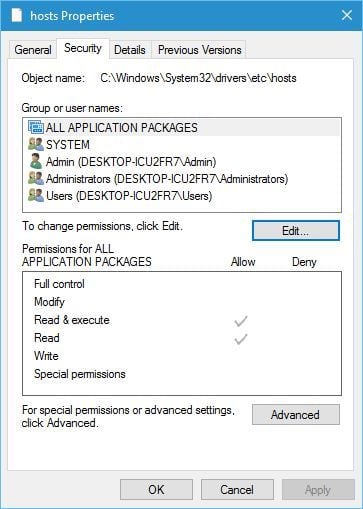
- Найдите файл hosts, щелкните его правой кнопкой мыши и выберите Свойства .
-
Перейдите на вкладку Безопасность и нажмите кнопку Изменить .
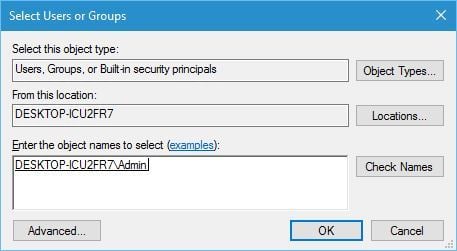
- Вы должны увидеть список пользователей и групп на вашем компьютере, которые имеют доступ к файлу hosts. Если в списке есть ваше имя пользователя или группа, щелкните его и убедитесь, что для него установлены разрешения Полный доступ . Если вашего имени пользователя нет в списке, нажмите кнопку Добавить .
-
Введите имя пользователя или имя группы в поле Введите имена объектов для выбора и нажмите Проверить имена и ОК .
- Новый пользователь или группа будут добавлены в список. Теперь вам нужно выбрать вновь добавленную группу или пользователя и установить флажок Полный контроль ниже.
- Нажмите Применить и ОК , чтобы сохранить изменения.


Epic Guide alert! больше нет проблем с Проводником. Исправьте их все с помощью этого обширного руководства!
Решение 5. Использование скрытой учетной записи администратора
Большинство системных файлов защищены, поэтому вам нужно иметь учетную запись администратора, чтобы вносить в них изменения. Поскольку hosts является одним из системных файлов, для его редактирования требуется учетная запись администратора.
Если вы не используете учетную запись администратора, вы можете включить скрытую учетную запись администратора и использовать ее для внесения изменений в файл hosts. Чтобы включить скрытую учетную запись администратора, выполните следующие действия:
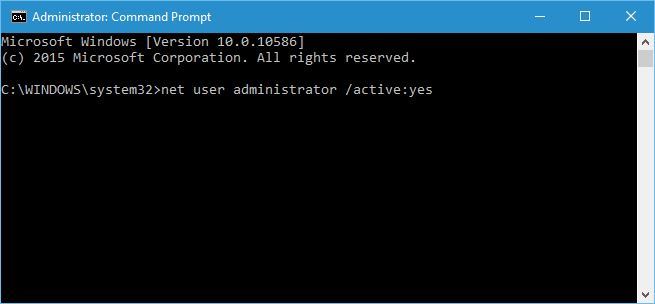
- Нажмите Ключ Windows + X и выберите Командная строка (Администратор) .
-
Когда откроется командная строка, введите администратор сетевого пользователя/активный: да и нажмите Enter . Это активирует скрытую учетную запись администратора.
- После активации учетной записи администратора вы можете переключиться на нее и попробовать изменить файл hosts.

Узнайте все, что нужно знать об учетной записи администратора и о том, как ее можно включить/отключить прямо здесь!
После внесения изменений в файл hosts вы можете вернуться к исходной учетной записи, снова запустить командную строку от имени администратора и ввести сетевой пользователь администратор/активный: нет , чтобы отключить скрытую учетную запись администратора.
Файл Hosts – это системный файл, поэтому он защищен, и обычно вам не рекомендуется его редактировать, но если вы решите это сделать, всегда полезно знать, как сбросить файл хостов по умолчанию в Windows 10 на случай, если что-то пойдет не так.
Если вам нужно отредактировать файл hosts, но вы получаете сообщение «Доступ запрещен» , не стесняйтесь попробовать некоторые из наших решений. Если у вас есть еще вопросы, не стесняйтесь оставлять их в разделе комментариев ниже.
Убрал UAC до ноля.
Варианты, которые перепробовал:
1. Открыть блокнот от имени администратора -> открыть HOSTS -> отредакттировать -> сохраняю с заменой и:
Отсутствуют разрешения на открытие этого файла . Обратитесь к владельцу файла или администратору сети.
2. Перемещаю HOSTS на рабочий стол, редактирую и обратно в папку не копируется с заменой:
пишет Вам неоходимо разрешение на выполнение этой операции
3. Нажать правой кнопкой мыши по файлы HOSTS -> свойства -> безопасность -> изменить
Тоже не срабатывает, так как нет возможности проставить галочки.
Что делать?
-
Вопрос задан
-
3136 просмотров
вообще без всяких заморочек — любой текстовый редактор с адмискими правами (только что перепроверил — запустил Far с админским уровнем — нет проблем)
другой вопрос — если у вас жесткая залочка файла hosts — ищите вирусы ;))
ps для примера, если у вас «игровая/пиратская сборка» — все. говорить не о чем. у вас вирусы
Пригласить эксперта
Включите назад UAC и не выключайте его — так безопаснее.
Скопируйте hosts куда нибудь на рабочий стол, отредактируйте, сохраните и сохранённый закиньте назад в его папку.
Спросит подтверждение перезаписи и подтверждение прав администратора.
…
PROFIT!
Открыть текстовый редактор от имени администратора вполне достаточно.
Значит надо получить права став владельцем файла — в безопасном режиме(если это еще работает).
загрузиться с LiveCD/DVD/flash USB и проверить на вирусы
-
Показать ещё
Загружается…
09 окт. 2023, в 19:26
1500 руб./в час
09 окт. 2023, в 18:18
1000 руб./за проект
09 окт. 2023, в 18:11
15000 руб./за проект
Минуточку внимания
В этой статье мы расскажем, где находится файл hosts Windows 10, для чего его используют и как изменить файл hosts в Windows 10.
Сайт состоит из файлов, которые хранятся на физическом сервере. Чтобы найти сайт, нужно связаться с сервером и запросить эти файлы. Для связи с сервером мы вводим доменное имя в поисковую строку. Домены созданы для удобного запоминания человеком, но для устройств (компьютеров, серверов, смартфонов) буквенное обозначение адреса непонятно. Для техники были созданы IP-адреса. Они состоят из цифр, например 123.123.123.123.
Чтобы связать буквенное и цифровое обозначение сайтов, был создан файл hosts, в котором были указаны домены и соответствующие им IP. Этот файл нужно было загружать на своё устройство вручную. Пока сайтов было мало, этот метод работал, но, как только сайты стали создаваться в больших количествах, постоянно обновлять hosts стало неудобно. Для решения этой проблемы создали DNS-систему. Пользователю не нужно было устанавливать огромный файл с данными на устройство. Вся база данных сайтов хранится на сервере, к которому браузер обращается самостоятельно.
Несмотря на то что hosts был заменён, его настройки остались приоритетными для браузера, поэтому его можно использовать для блокировки нежелательных сайтов и подключения к сайтам до внесения его данных в DNS-систему.
Как редактировать файл hosts в Windows 10
Обратите внимание! Редактирование файла возможно только от имени администратора. Файл hosts для Windows 10 выглядит как обычный файл, но без расширения.
-
1.
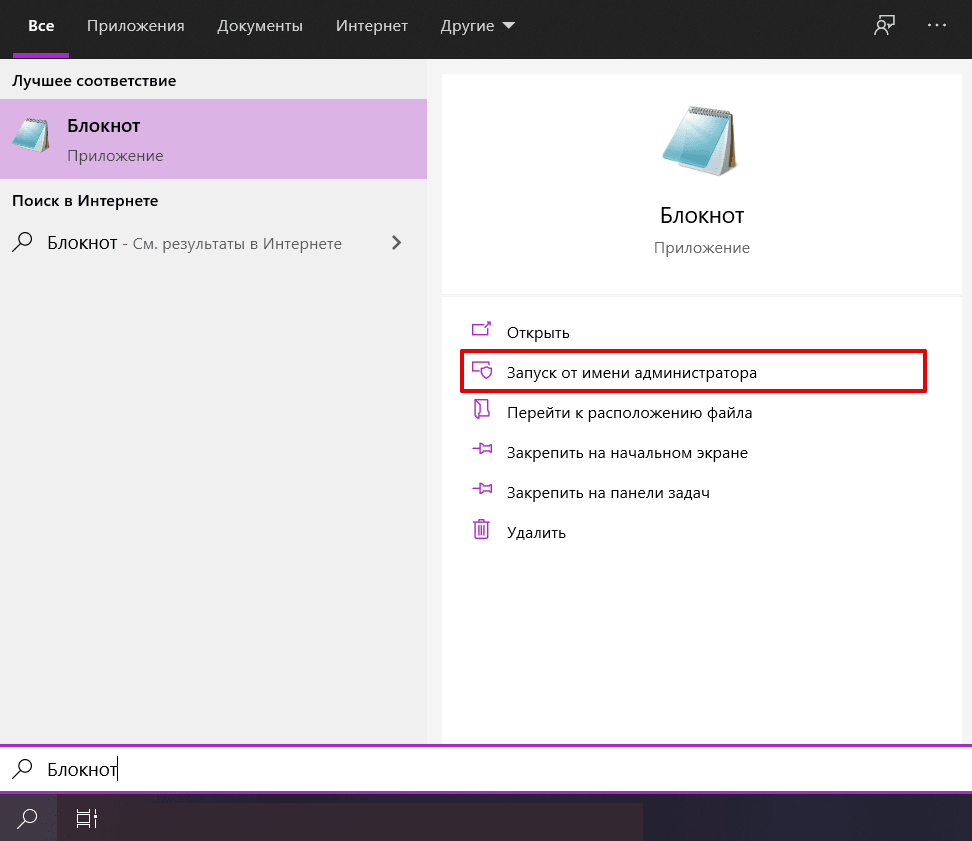
Запустите Блокнот или любой другой редактор от имени администратора. Для этого в поисковой строке ПК введите слово Блокнот. В найденных приложениях выберите Блокнот. Выберите Запуск от имени администратора:
-
2.
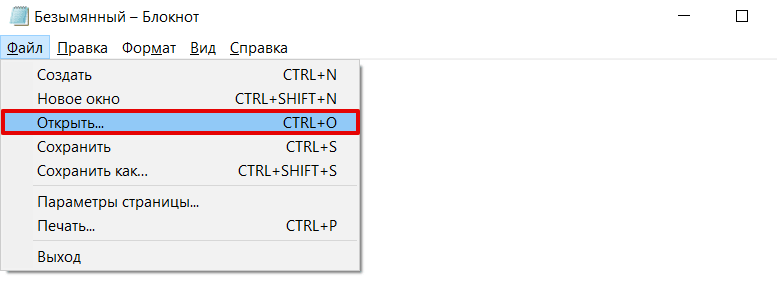
Во вкладке «Файл» нажмите Открыть:
-
3.
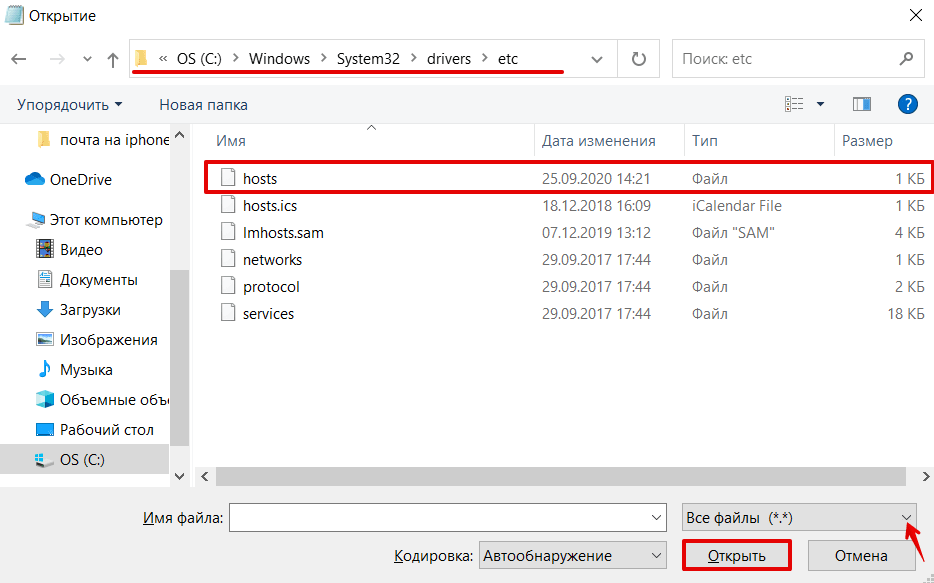
Измените тип файла на Все файлы.
-
4.
Найдите файл hosts. Где находится hosts в windows 10? Обычно его можно найти по пути: OS(C:) ➝ Windows ➝ System 32 ➝ drivers ➝ etc. Нажмите Открыть:
-
5.
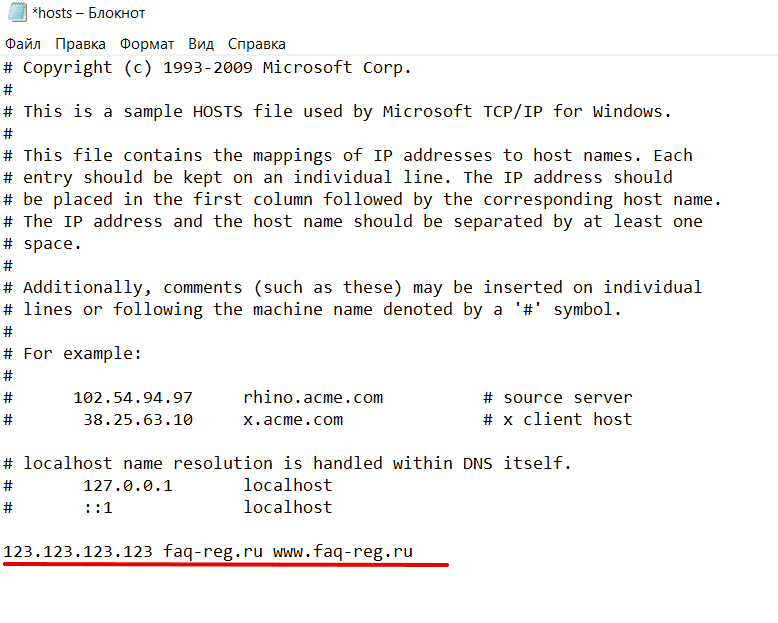
Добавьте в конце файла нужную запись. Например, мы добавим запись:
123.123.123.123 faq-reg.ru www.faq-reg.ruГде:
- 123.123.123.123 — IP-адрес вашего сервера или хостинга,
- faq-reg.ru — имя вашего домена.
Обратите внимание! Если Windows 10 не даёт изменить файл hosts, значит, вы открыли файл не от имени администратора.
-
6.
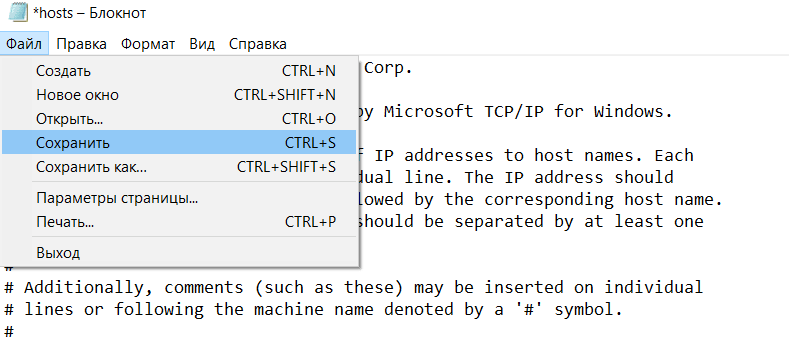
Сохраните изменения в файле. Для этого перейдите во вкладку «Файл» и нажмите Сохранить:
Как сохранить hosts в Windows 10
Как блокировать нежелательный сайт на Windows 10
Блокировкой сайта может быть полезна работодателям и родителям. Например, вы не хотите, чтобы ваш ребёнок пользовался сайтами с готовым домашними заданиями. Запретите ПК заходить на них. Для этого:
-
1.
Войдите в файл hosts.
-
2.
На новой строке добавьте запись вида
Где:
- 127.0.0.1 ― адрес, который возвращает любой запрос обратно на устройство. Таким образом, браузер не может получить файлы сайта с сервера.
- имя домена ― домен сайта, доступ к которому вы хотите ограничить.
При блокировке сайта рекомендуем использовать сразу два варианта адреса — с www и без. Например:
127.0.0.1 vk.com

127.0.0.1 www.vk.com
Готово, теперь браузер перестанет отображать сайт.
Не обязательно вручную вносить изменения в файл. Для блокировки сайтов можно использовать программы, например Hosts File Editor. С её помощью можно легко управлять hosts-файлом.
Как увидеть сайт до публикации в DNS-системе
При создании сайта обязательно нужно прописать DNS-серверы. Только после этого пользователи смогут найти ваш сайт в интернете. Система будет вносить ваши данные в базу в течение 24 часов. Если вам нужно увидеть сайт в браузере раньше, запишите IP-адрес и доменное имя в файл hosts. Браузер возьмёт информацию из него и будет неважно, есть ли сайт в DNS-системе.
Как создать новый файл hosts в Windows 10
Если файл hosts в Windows 10 отсутствует или нужно вернуть его к базовым настройкам, скачивать файл hosts Windows 10 не нужно. Если по какой-либо причине вам нужно восстановить файл hosts или создать новый с базовыми настройками:
-
1.
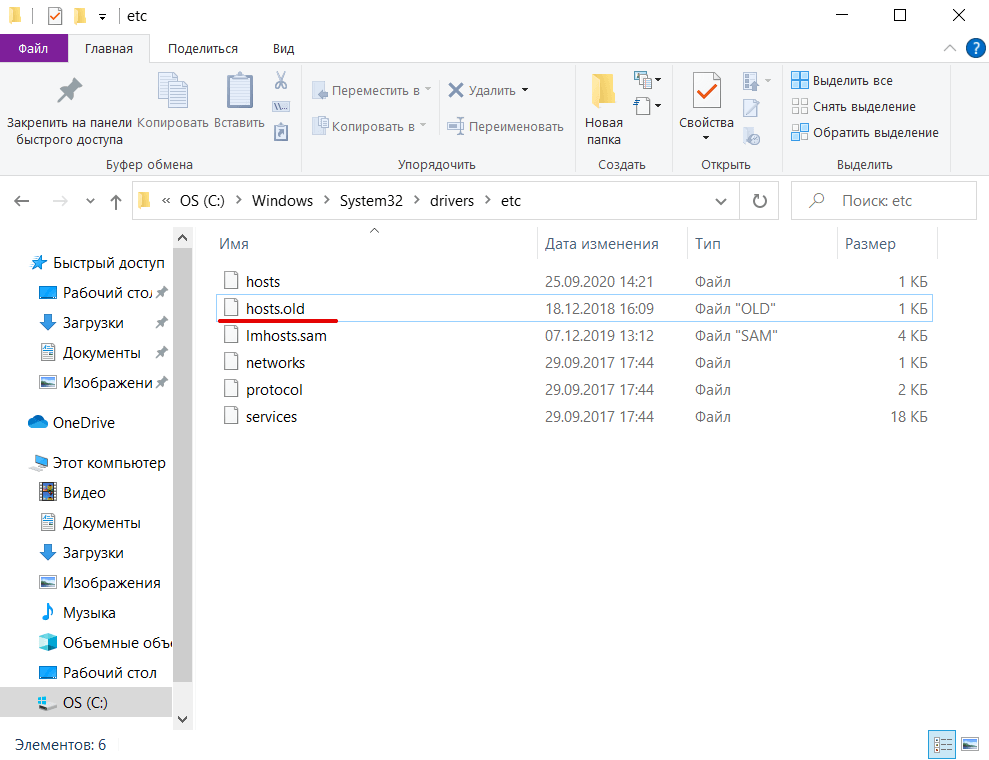
Зайдите в папку etc, где лежит файл hosts (OS(C:) ➝ Windows ➝ System 32 ➝ drivers ➝ etc).
-
2.
Если у вас остался старый файл, переименуйте старый файл hosts (например, в hosts.old), чтобы его настройки не учитывались браузером:
-
3.
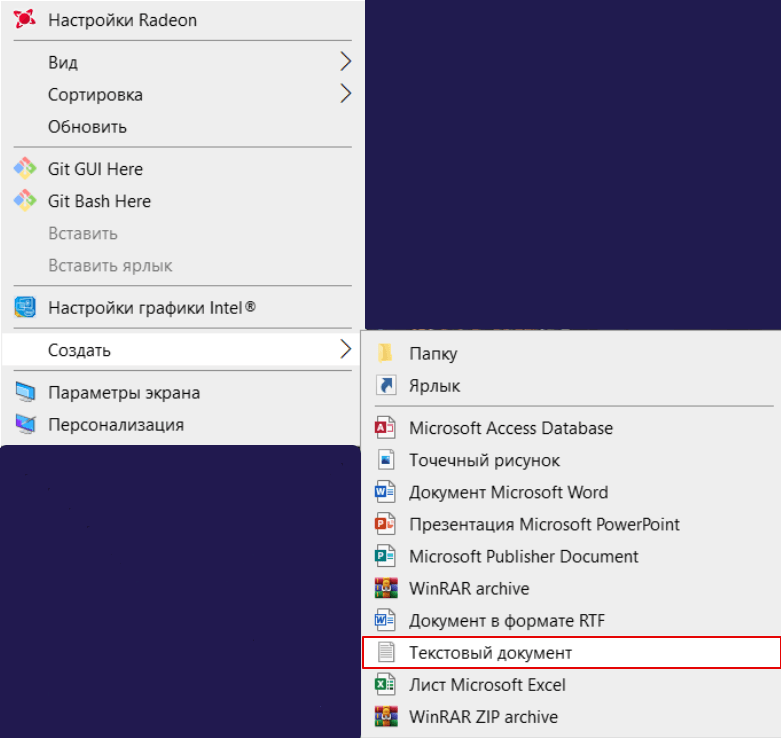
На рабочем столе создайте текстовый файл. Для этого кликните правой кнопкой мыши и нажмите Создать — Текстовый документ:
-
4.
Назовите новый документ hosts и удалите расширение .txt. Затем откройте созданный файл hosts с помощью Блокнота и вставьте оригинальный hosts Windows 10:
# Copyright (c) 1993-2006 Microsoft Corp. # # This is a sample HOSTS file used by Microsoft TCP/IP for Windows. # # This file contains the mappings of IP addresses to host names. Each # entry should be kept on an individual line. The IP address should # be placed in the first column followed by the corresponding host name. # The IP address and the host name should be separated by at least one # space. # # Additionally, comments (such as these) may be inserted on individual # lines or following the machine name denoted by a '#' symbol. # # For example: # # 102.54.94.97 rhino.acme.com # source server # 38.25.63.10 x.acme.com # x client host # localhost name resolution is handle within DNS itself. # 127.0.0.1 localhost # ::1 localhost -
5.
Сохраните изменения:
Файл hosts Windows 10: восстановить -
6.
Перенесите файл в папку etc.
-
7.
Перезапустите Windows.
Готово, файл hosts вернётся к базовым настройкам.
Что делать, если файл hosts не работает
Как правило, обновления в hosts вступают в силу сразу после сохранения. Перезагрузка компьютера и дополнительные действия не нужны. Однако случаются ситуации, когда настройки не срабатывают. В этом случае убедитесь, что в записях:
- нет пробелов перед IP-адресом (в начале строки),
- только один пробел между IP-адресом и доменом.
Если записи добавлены правильно, но настройки всё равно не работают, попробуйте очистить кэш DNS. Для этого:
-
1.
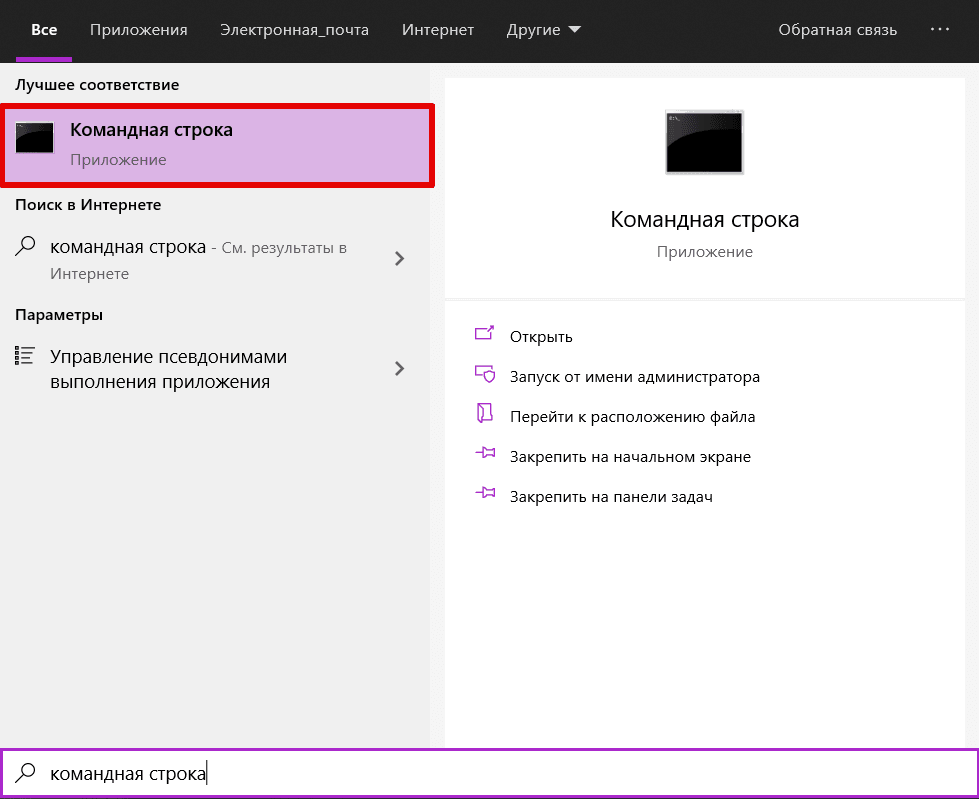
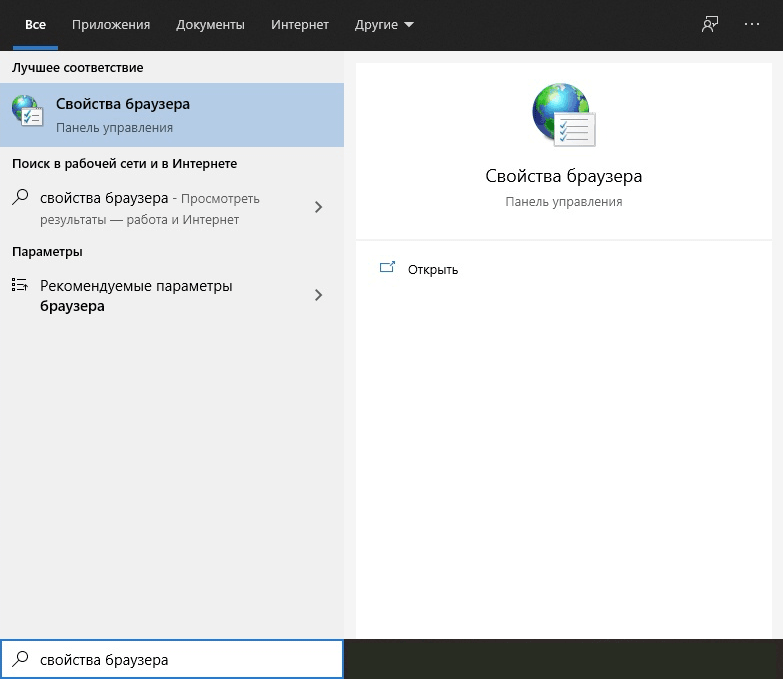
Откройте командную строку. Для этого введите в поисковую строку «Командная строка» и выберите появившееся приложение:
- 2.
Если вы используете прокси-сервер, он тоже может влиять на работу hosts. Чтобы исправить проблему:
-
1.
Зайдите в Свойства браузера:
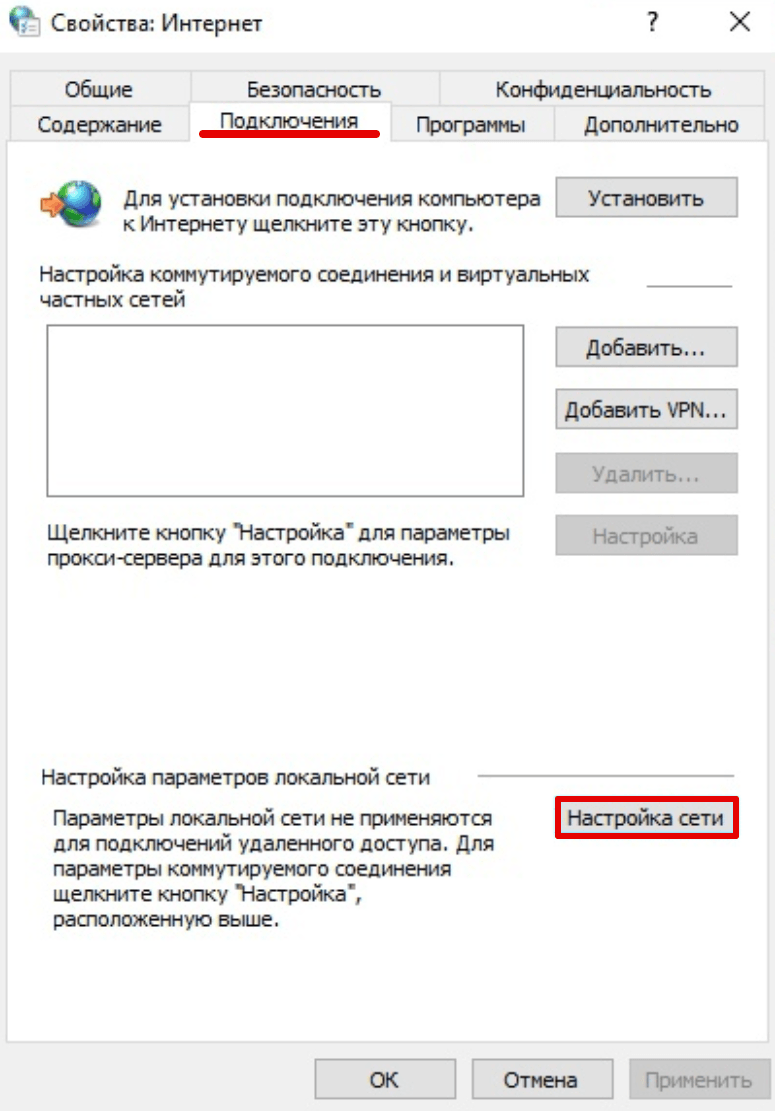
-
2.
Откройте вкладку «Подключения» и нажмите кнопку Настройка сети:
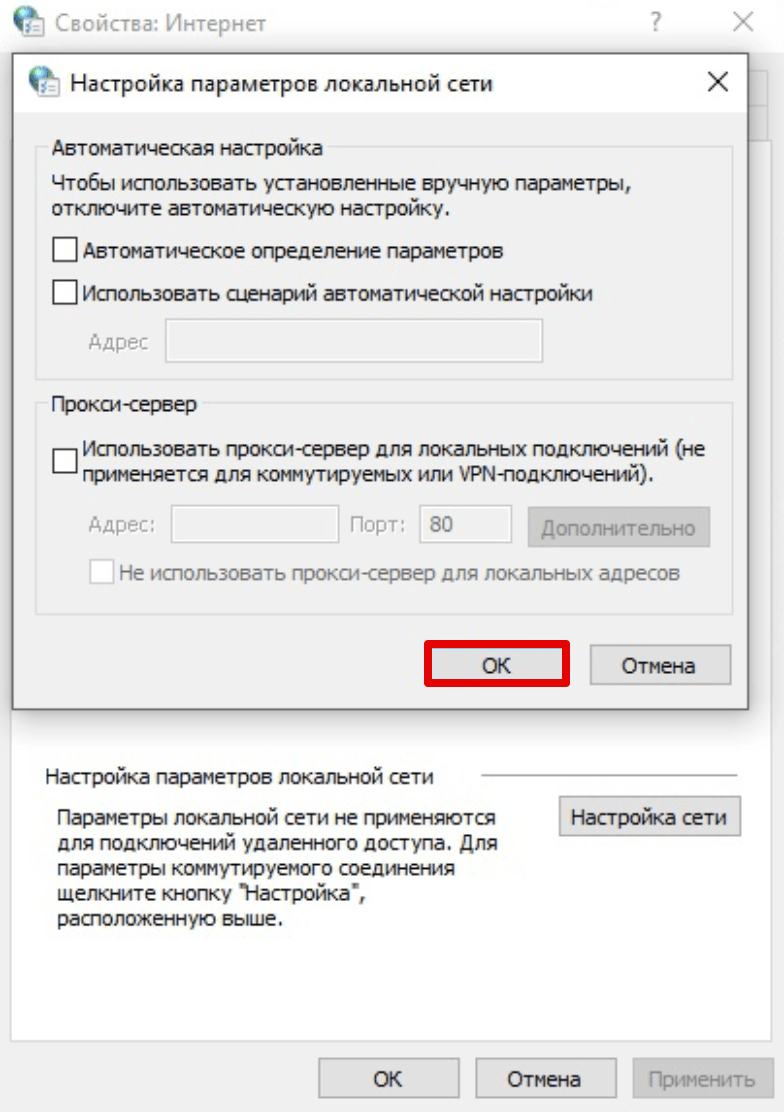
-
3.
Уберите все галочки. Нажмите ОК:
Помогла ли вам статья?
Спасибо за оценку. Рады помочь 😊
👍
by Milan Stanojevic
Milan has been enthusiastic about technology ever since his childhood days, and this led him to take interest in all PC-related technologies. He’s a PC enthusiast and he… read more
Updated on
- For any type system errors, you will definitely find a solution in our System Errors hub.
- Command Prompt is one of tools for troubleshooting Windows issues. For more details about Command Prompt check out this handy article.
- To edit files in Windows you can use the default Notepad app. If like an HTML editor better, take a look at our list with some of the best HTML editors.
- If you have issues with Windows errors check our dedicated Windows 10 errors hub.
Sometimes in order to fix a certain problem or to block a certain website on your Windows 10 PC, you have to edit the hosts file.
Editing hosts file is a relatively advanced procedure, and a number of users reported “Access denied” message while trying to edit the hosts file on Windows 10.
The hosts file is located in your Windows 10 installation directory, and it’s protected from unauthorized access, but if you need to edit the hosts file, you can avoid “Access denied” message by following one of our solutions.
Here are some more examples of this problem:
- Can’t edit hosts file Windows 10 – If you can’t edit the hosts file in Windows 10, it’s probably because you don’t have required permissions. We’ll explore that problem here
- Hosts file being used by another process – This is another common issue that prevents users from editing the host file.
- Don’t have permission to save hosts file Windows 10 – This is the same case as the first error message.
Table of contents:
- Run Notepad as administrator
- Copy the hosts file to a different location
- Make sure hosts isn’t set to Read-only
- Change the security settings for hosts
- Use the hidden administrator account
How to edit the hosts file on Windows 10 and avoid Access denied message?
1. Run Notepad as administrator
- Press Windows Key + S, enter Notepad. Right-click Notepad from the list of results and choose Run as administrator.

- Once Notepad opens, choose File > Open.
- Navigate to C:WindowsSystem32driversetc folder and make sure to change Text Documents (*.txt) to All Files. Select hosts and click Open.

- Make the changes you want and save them.
If you use Notepad as your text editor, you need to run it as administrator before you can edit the hosts file. To run Notepad as administrator and to edit the hosts file, do the following:
How we test, review and rate?
We have worked for the past 6 months on building a new review system on how we produce content. Using it, we have subsequently redone most of our articles to provide actual hands-on expertise on the guides we made.
For more details you can read how we test, review, and rate at WindowsReport.
We have to mention that this solution should work with any other text editor, so if you don’t use Notepad, just run your desired text editor as administrator and you should be able to edit hosts file without any problems.
Looking for some Notepad alternatives? Here are the 6 best text editors available right now.
Alternatively, you can start Command Prompt as administrator and use it to start Notepad and edit the hosts file. To do that, follow these instructions:
- Press Windows Key + X and choose Command Prompt (Admin) from the menu.

- Once the Command Prompt opens, enter the following lines and press Enter after each line:
- cd C:WindowsSystem32driversetc
- notepad hosts

- Notepad will now open the hosts file, and you should be able to make the necessary changes.
If you’re having trouble accessing Command Prompt as an admin, then you better take a closer look on this guide.
2. Copy the hosts file to a different location
- Go to C:WindowsSystem32driversetc and locate hosts file.
- Copy it to your Desktop, or any other folder that you can easily access.
- Open the hosts file on your Desktop with Notepad or any other text editor.
- Make the necessary changes and move the hosts file back to C:WindowsSystem32driversetc directory.
Edit your hosts file easily by following this step-by-step guide.
3. Make sure hosts isn’t set to Read-only
- Go to C:WindowsSystem32driversetc.
- Locate the hosts file, right-click it and choose Properties from the menu.
- Go to the Attributes section and make sure the Read-only option isn’t checked.

- Click Apply and OK to save changes.
Now you should be able to make the necessary changes to the hosts file. After you’re finished, it might be a good idea to set hosts file back to Read-only mode again.
Sometimes, all your documents are read-only, including your hosts file. If you want to change them properly, you can find more info about that in this quick guide.
4. Change the security settings for hosts
- Navigate to C:WindowsSystem32driversetc.
- Locate hosts file, right-click it and choose Properties.
- Navigate to the Security tab and click the Edit button.
- You should see the list of users and groups on your PC that have access to the hosts file. If your user name or group is on the list, click it and make sure that it has Permissions set to Full control. If your user name isn’t on the list, click the Add button.
- Enter the user name or the group name in the Enter the object names to select the field and click Check Names and OK.

- A new user or group will be added to the list. Now you need to select the newly added group or user and check the Full control option below.
- Click Apply and OK to save changes.
Epic guide alert! no more File Explorer issues for you. Fix them all with the help of this extensive guide!
5. Use the hidden administrator account
- Press Windows Key + X and choose Command Prompt (Admin).
- When Command Prompt opens, enter net user administrator /active:yes and press Enter. This will activate the hidden administrator account.

- After you have activated the administrator account, you can switch to it, and try editing the hosts file.
Most system files are protected, therefore you need an administrator account in order to make changes to them. Since hosts are one of the system files, it requires an administrator account in order to edit it.
If you don’t use an administrator account, you can enable a hidden administrator account and use it to make the changes to the hosts file.
Learn everything there is to know about the administrator account and how you can enable/disable it right here!
After you made the changes to the hosts file, you can come back to your original account, start Command Prompt as administrator again and enter net user administrator /active:no to disable the hidden administrator account.
The hosts file is a system file, so it’s protected, and usually, it’s not advised that you edit it, but if you decide to do so, it’s always good to know how to reset hosts file to default in Windows 10 in case anything goes wrong.
If you have any more questions, feel free to leave them in the comments section below.
![]()
What is a hosts file in Windows 10?
A ‘hosts’ file is a plain text file, which maps hostnames to IP addresses. A host file helps in addressing network nodes in a computer network. A hostname is a human-friendly name or label assigned to a device (a host) on a network and is used to distinguish one device from another on a specific network or over the internet.

If you have been a tech-savvy person, you would be able to access and modify the Windows hosts file to solve certain issues or block any websites on your device. The hosts file is located at C:\Windows\system32\drivers\etc\hosts on your computer. Since it is a plain text file, it can be opened and edited in notepad. But Sometimes you may encounter ‘Access Denied’ error while opening hosts file. How will you edit the host file? This error will not let you open or edit the hosts file on your computer. In this article, we will discuss various methods to solve Can’t edit the hosts file on Windows 10 issue.
Editing a hosts file is possible and you might need to do it for a variety of reasons.
- You can create website shortcuts by adding a required entry in the hosts file that maps the website IP address to a hostname of your own choice.
- You can block any website or ads by mapping their hostname to the IP address of your own computer which is 127.0.0.1, also called loopback IP address.
Table of Contents
Make sure to create a restore point just in case something goes wrong.
Why can’t I edit the hosts file, even as Administrator?
Even if you try to open the file as an Administrator or use the built-in Administrator account to modify or edit the hosts file, you are still unable to make any changes to the file itself. The reason being that the access or permission required to make any changes to the hosts file are controlled by TrustedInstaller or SYSTEM.
Method 1 – Open Notepad with Administrator Access
Most of the people use notepad as a text editor on Windows 10. Therefore, before you edit the host file, you need to run Notepad as Administrator on your device.
1. Press Windows Key + S to bring up the Windows Search box.
2. Type notepad and in the search results, you will see a shortcut for Notepad.
3. Right-click on Notepad and select ‘Run as administrator’ from the context menu.

4. A prompt will appear. Select Yes to continue.

5. Notepad window will appear. Select File option from the Menu and then click on ‘Open‘.

6. To open the hosts file, browse to C:\Windows\system32\drivers\etc.

7. If you can’t see the hosts file in this folder, select ‘All Files’ in the option below.

8. Select the hosts file and then click on Open.
9. You can now see the contents of the hosts file.
10. Modify or make the required changes in the hosts file.

11. From Notepad menu go to File > Save or press Ctrl+S to save the changes.
It is important to note that this method works with all text editor programs. Therefore, if you use another text editor program apart from notepad, you just need to open your program with Administrator access.
Alternative Method:
Alternatively, you can open the notepad with admin access and edit the files using the Command Prompt.
1.Open the command prompt with admin access. Type CMD in Windows search bar then right-click on Command Prompt and choose Run as administrator.

2.Once the elevated command prompt opens, you need to execute the below-given command
cd C:\Windows\System32\drivers\etc
notepad hosts
3.The command will open the editable host file. Now you can make the changes to the hosts file on Windows 10.

Method 2 – Disable Read-only for the hosts file
By default, the hosts file is set to open but you cannot make any changes i.e. it is set to read-only. In order to fix Access denied when editing hosts file error in Windows 10, you need to disable the read-only feature.
1.Navigate to C:\Windows\System32\drivers\etc.

2.Here you need to locate the hosts file, right-click on it and choose Properties.

3.In the attribute section, uncheck the Read-only box.

4.Click Apply followed by OK to save the settings
Now you can try to open and edit the hosts file. Probably, the problem of access denied will be solved.
Method 3 – Change the Security settings for the hosts file
Sometimes getting access to these files requires special privileges. It could be one reason that you may not be given full access, therefore, you are getting access denied error while opening hosts file.
1.Navigate to C:\Windows\System32\drivers\etc.
2.Here you need to locate the hosts file, right-click on the file and choose Properties.
3.Click on the Security tab and click on the Edit button.

4.Here you will find a list of users and groups. You need to ensure that your user name has full access and control. If your name is not added in the list, you can click on the Add button.

5.Select the user account via the Advanced button or just type your user account in the area which says ‘Enter the object name to select’ and click OK.

6.If in the previous step you have clicked on the Advanced button then click on “Find now” button.

7.Finally, click OK and checkmark “Full Control”.

8.Click Apply followed by OK to save changes.
Hopefully, now you will be able to access and edit the hosts file without any issues.
Method 4 – Change the hosts file location
Some users noted that changing the file location has solved their problem. You can change the location and edit the file thereafter put the file back to its original location.
1.Navigate to C:\Windows\System32\drivers\etc.
2.Locate the Hosts file and copy it.

3.Paste the copied file on your Desktop where you can easily access that file.

4.Open the hosts file on your Desktop with Notepad or another text editor with Admin access.

5.Make the necessary changes on that file and save changes.
6.Finally, copy & paste the hosts file back to its original location:
C:\Windows\System32\drivers\etc.
Recommended:
- Create Multiple Gmail Accounts Without Phone Number Verification
- Identify and Install Missing Audio & Video Codecs in Windows
- Fix The Diagnostics Policy Service Is Not Running Error
- 10 Ways To Fix Slow Page Loading In Google Chrome
That’s if you have successfully Fix Access denied when editing hosts file in Windows 10 but if you still have any queries regarding this article then please feel free to ask them in the comment’s section.