При отправке документа на печать можно столкнуться с ошибкой «Не был произведен вызов Startdocprinter». Во многих случаях проблема возникает с принтерами, подключенными к сети. Сообщение об ошибке появляется при печати с Word, Acrobat Reader и даже Блокнота в Windows 7, 8.1, 10.

Сообщение об ошибке Startdocprinter может отобразится по ряду причин:
Сбой очереди печати. Проблема возникает из-за прерывания, когда диспетчер печати подготовил к отправке файл на принтер. Есть несколько причин, которые препятствуют выводу на печать. В этом случае самый простой способ решения — запустить средство устранения неполадок.
Сбой диспетчера печати. Проблема появляется, когда служба неисправна и не может задействовать операцию вывода на печатающее устройство.
Проблема управления доступом. Эта ошибка также возникает из-за проблемы с тем, каким образом операционная система распознает список управления доступом службы. Решается запуском утилиты cacls.exe из окна командной строки.
Неправильные приглашения принтера. Вызов функции может быть не произведен из-за несогласованных портов принтера. Решить ее можно путем переустановки каждого порта.
Запуск средства устранения неполадок принтера
Прежде чем перейти к более сложным способам решения, рекомендуется начать поиск неисправностей запуском утилиты, способной автоматически решить большинство проблем.
Воспользуйтесь инструментом устранения неполадок принтера, чтобы проанализировать текущую ситуацию с драйверами и посмотреть, эффективность его предустановленных способов восстановления. Инструмент ищет несоответствия, которые приводят к ошибкам печатающего устройства. Если ему удастся найти способ восстановления, он порекомендует исправление, которое разрешит ошибку.
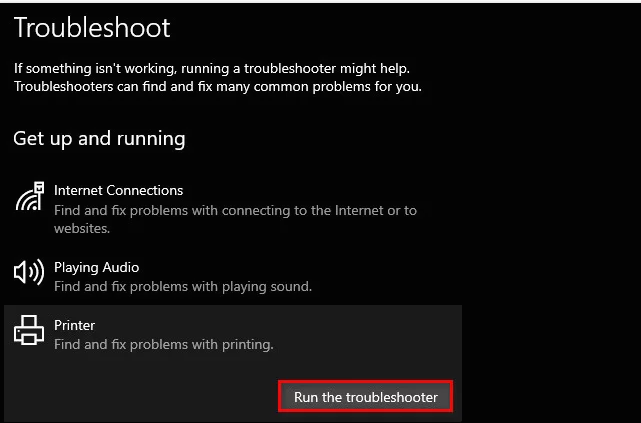
Откройте вкладку Устранения неполадок командой ms-settings:troubleshoot из окна «Выполнить» (Win + R).
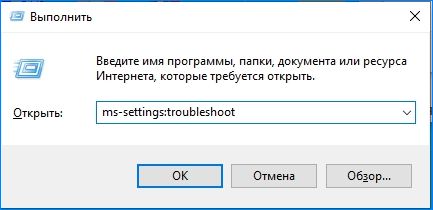
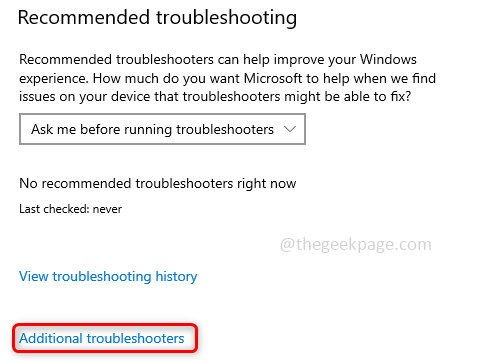
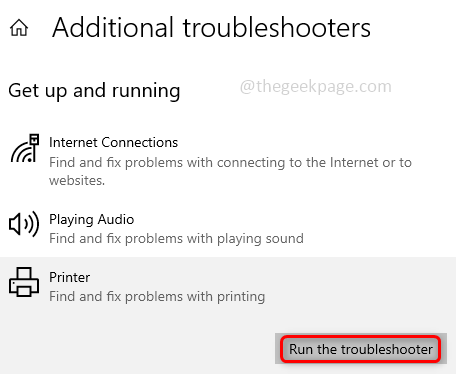
В правой части окна прокрутите вниз до раздела «Запустить диагностику и устранить неисправность». Затем выберите принтер и кликните на кнопку «Запустить средство устранения неполадок».

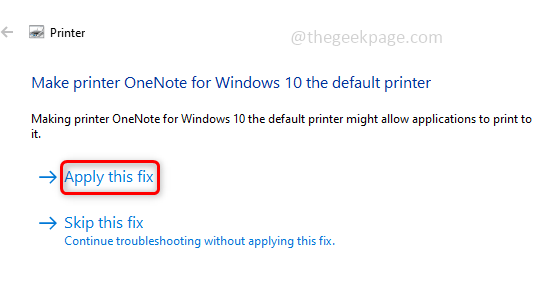
Дождитесь завершения начального сканирования, а затем нажмите «Применить это исправление», если средство определило вариант восстановления.
После успешного применения исправления перезагрузите компьютер и проверьте, возникает ли ошибка, повторив то действие, при котором она возникала. Если продолжаете сталкиваться с ошибкой, из-за которой не произведен вызов функции Startdocprinter или инструмент не нашел никаких проблем с конфигурацией принтера, перейдите к следующему методу.
Перезапуск диспетчера печати
Сообщение также может возникнуть при сбое службы, вследствие которого не может быть произведена операция отправки задания на принтер. Решается путем ее перезапуска.
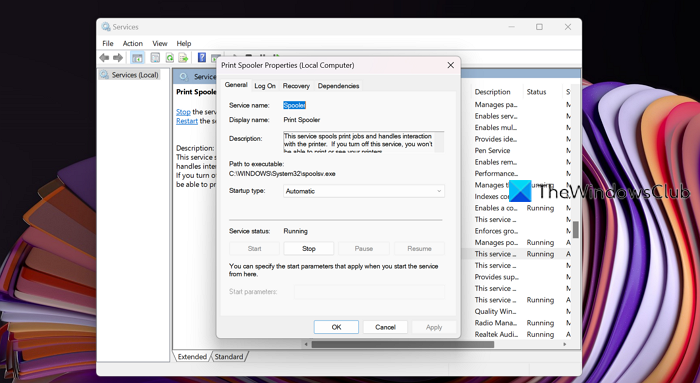
Откройте Службы командой services.msc из окна «Выполнить» (Win + R).
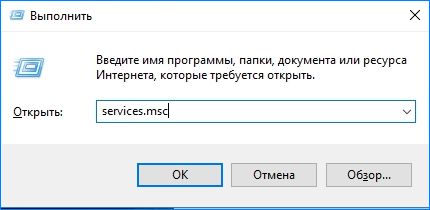
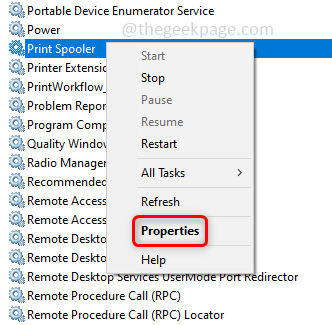
Прокрутите список вниз и найдите службу Диспетчера печати. Щелкните правой кнопкой мыши на ней и выберите «Свойства».
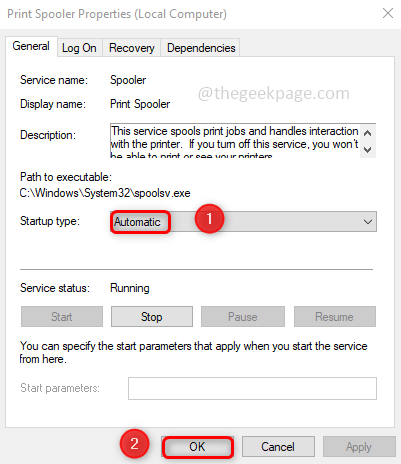
Установите тип запуска на автоматический, затем нажмите «Остановить».
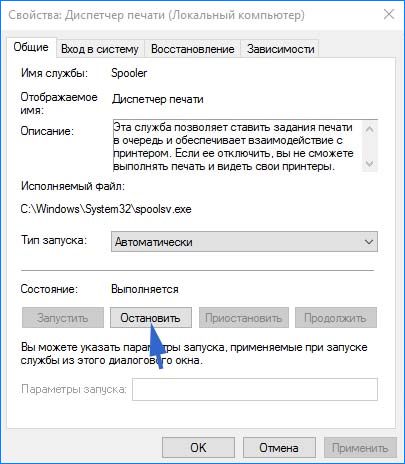
После остановки нажмите на кнопку «Запустить».
Когда успешно запустится перезагрузите компьютер и посмотрите, удалось ли исправить ошибку вызова Startdocprinter.
Исправление службы через командную строку
Вызов Startdocprinter не может быть произведен при нарушении работы диспетчера. В этом случае попробуйте устранить проблему путем изменения списка управления доступом службы.
Откройте строку системного поиска клавишами Win + S, наберите «cmd» и под найденным результатом нажмите на «Запуск от имени администратора».
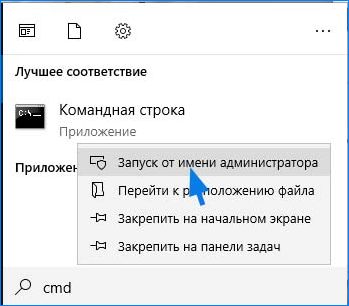
В консоли наберите команду:
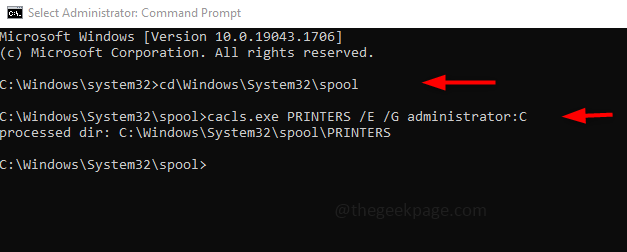
cd \Windows\System32\spool
Теперь выполните следующую команду, чтобы изменить управление доступом:
cacls.exe PRINTERS /E /G администратор:C

После успешной обработки команды перезагрузите ПК и проверьте, устранен ли сбой при вызове Startdocprinter.
Переустановка всех портов принтера
Наиболее эффективным способом является простая переустановка всех портов. Это исправление считается эффективным в версиях Windows 7, 8 и 10. Для исправления сначала удалим все порты, а затем переустановим драйвера этого печатающего устройства.
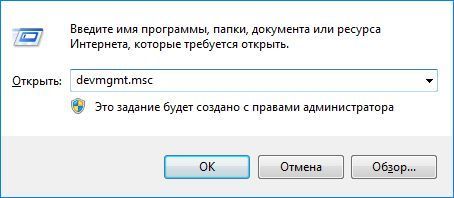
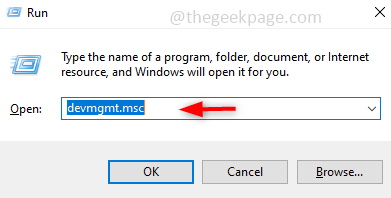
Откройте «Диспетчер устройств» командой devmgmt.msc из окна «Выполнить» (Win + R).
Прокрутите список установленных устройств и разверните вкладку «Очереди печати». Затем щелкните правой кнопкой мыши на каждом драйвере и нажмите кнопку «Удалить».

После удаления всех драйверов разверните вкладку контроллеров USB. Удалите каждый порт USB, к которому может быть подключено печатающее устройство, правым щелчком мыши.
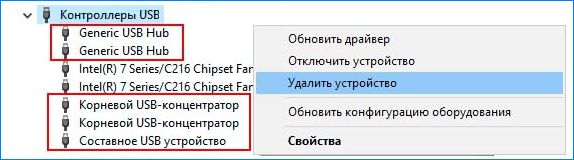
После перезагрузите ПК. При следующем запуске Windows автоматически установит набор универсальных драйверов и портов.
Примечание: Если сбой при вызове функции Startdocprinter не возникает, то можно оставить универсальные драйвера или установите оригинальные (совместимые), загруженные с сайта производителя.
Some HP Printer users are unable to print as when they try to do the same, an error message that says A StartDocPrinter call was not issued pops up. This issue is obviously annoying and requires fixing, that is what, we are going to do in this article. We will be seeing some simple solutions to get rid of the issue and make your Printer start printing again.

Win32Exception was unhandled by user code, A StartDocPrinter call was not issued
What causes the StartDocPrinter issue?
There are various reasons why you can see the error code in question. Usually, the issue is nothing but a mere glitch that can occur due to numerous reasons. This glitch, sometimes, can be resolved automatically, whereas, in some instances, it requires some tweaking. Also, misconfiguration is another reason that can create this issue. This thing can be resolved by using the built-in troubleshooter. But, we wouldn’t recommend you just by reading the causes, instead, go to the troubleshooting guide and resolve the issue.
If you are seeing A StartDocPrinter call was not issued message on Windows PC, try the following solutions.
- Run Printer Troubleshooter
- Restart Print Spooler
- Repair Printer Spooler
- Remove and Re-add Printer
- Reinstall Printer Driver
Let us talk about them in detail.
1] Run Printer Troubleshooter
Let us first see if the built-in Windows utility, the troubleshooter, can identify and resolve the issue for you. To deploy it, follow the prescribed steps.
Windows 11
- Open Settings from the Start Menu.
- Click System > Troubleshoot > Other troubleshooters.
- Look for the Printer troubleshooter, and click on the Run button.
Windows 10
- Open Settings.
- Go to Update & Security > Additional troubleshooter.
- Click Printer > Run the troubleshooter.
Then, follow the on-screen instructions to run the troubleshooter and then see if the issue persists.
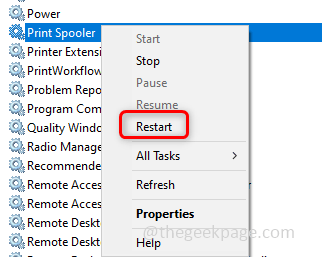
2] Restart Print Spooler
If running the troubleshooter doesn’t work for you, then we need to restart the Print Spooler Service. This is a great option if your issue is caused by a glitch. Follow the given steps to do the same.
- Open Services from the Start Menu.
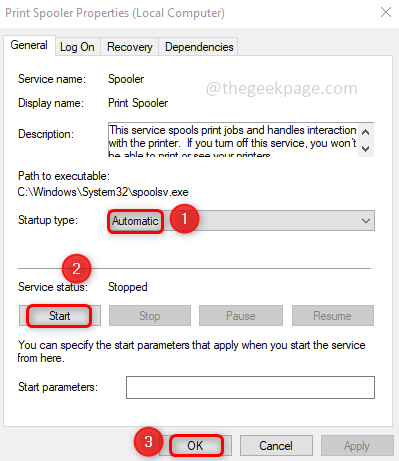
- Right-click on Print Spooler and select Properties.
- Click on Stop.
- Wait for 10 seconds, right-click on Properties, click on Start, and select Automatic from the drop-down menu.
Hopefully, this will do the job for you.
3] Repair Print Spooler
You may also see the error code in question if the Print Spooler is broken. However, the good news is, that you can easily repair the Print Spooler using Command Prompt.
To do the same, open Command Prompt as an administrator and then run the following commands.
cd\Windows\System32\spool
cacls.exe PRINTERS /E /G administrator:C
After executing these commands, restart your computer and check if the issue persists.
Also Read: How to enable or disable Print Spooler Service on Windows 11/10
4] Remove and Re-add Printer
Next up, we need to remove and then re-add your Printers and see if that works. This is meant to resolve any glitch that your printer may have. We are going to remove all the third-party printers and then add your current one, this should do the job for you.
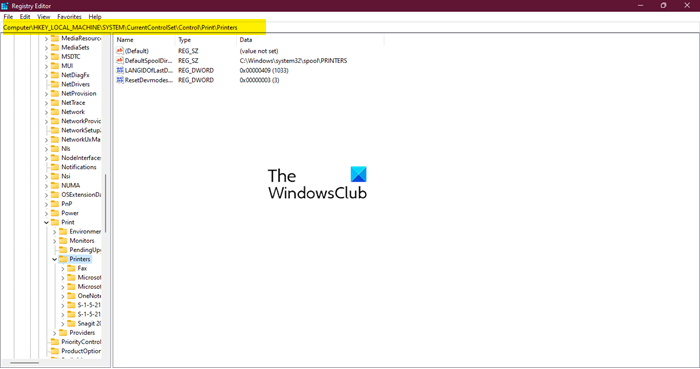
First of all, open Registry Editor and navigate to the following location.
Computer\HKEY_LOCAL_MACHINE\SYSTEM\CurrentControlSet\Control\Print\Printers
Now, delete all the third-party keys except the following keys.
- Fax
- Microsoft Print to PDF
- Microsoft XPS Documents Writer
- OneNote
- Send To OneNote2016
These are the Microsoft Printers keys that are important for your computer.
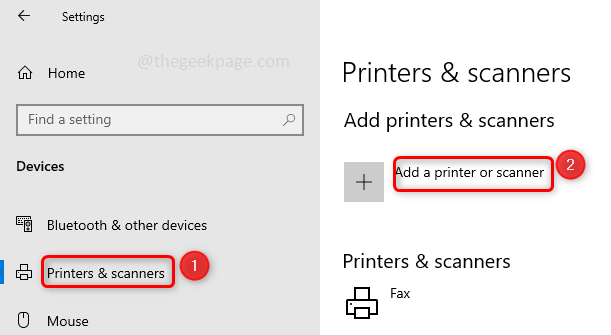
Now, go to Settings > Bluetooth & devices > Printers & scanner > Printer server properties. Now, remove all the third-party printers. Then, uninstall the program related to the Printer that you have removed.
Again open the Registry Editor and move to the following location.
Computer\HKEY_LOCAL_MACHINE\SYSTEM\CurrentControlSet\Control\Print\Monitor
Delete third-party Printer Monitor except for the following.
- AppMon (released RS1/RS2 timeframe)
- Local Port, LPR Port, Microsoft Shared Fax Monitor, Standard TCP/IP Port, USB Monitor & WSD Port
After removing everything, restart your computer, reattach the Printer and see if the issue persists.
5] Reinstall Printer Driver
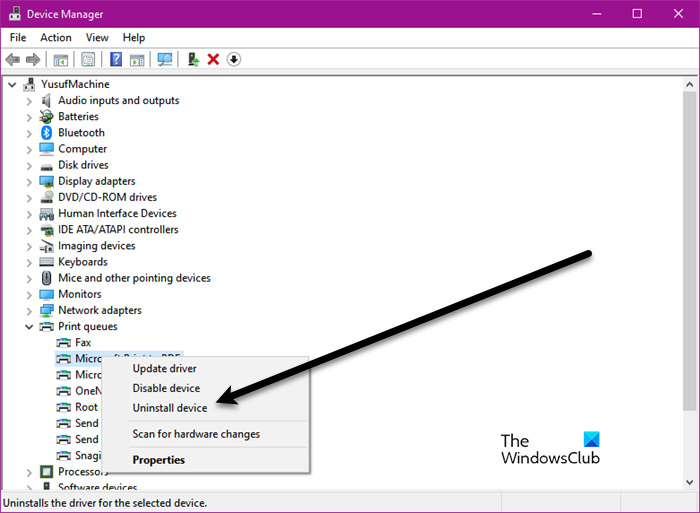
Finally, we are going to reinstall the Driver of the Printer that is giving you trouble. To do the same, first, remove the Printer from your computer, then open Device Manager, expand Printer Queues, right-click on the Printer and select Uninstall device.
Finally, reattach the Printer, its drivers will automatically get installed.
What is a StartDocPrinter?
StartDocPrinter is a function that notifies Print Spooler that there is a document that needs to be spooled for printing. So, you can clearly see that the error is caused if the Print Spooler is broken or has some issues.
Print Spooler can be resolved by restarting the service or repairing the feature. You can check the second and third solutions mentioned in this article to resolve the issue. However, it would be better if you check our guide to repairing Print Spooler.
That’s it!
Read Next: Print Spooler Service not running, Windows can’t Add or Connect to printer.
Usually error A StartDocPrinter call was not issued windows are faced by the user when trying to print anything over the network. Ther error is basically related to system issues instead of any particular applications like acrobat reader, notepad, ms word, etc. The problem has been seen in various versions of the windows. Now certainly, there are some causes why this error occurs. Reasons include stopped print spooler service, issues with the print queue, access control issue and sometimes invalid prompts can also cause this error. Fortunately, we have troubleshooting guidelines through which you can certainly remove this error from your system.

Error A StartDocPrinter Call was Not Issued Windows
Causes of A StartDocPrinter Call Was Not Issued Error Problem:
Error A StartDocPrinter call was not issued windows error occurs because of multiple issues. If the print spooler service fails to respond or is stopped, then this error occurs. Furthermore, inconsistent or invalid prompts to the print service may lead to this error. The error occurs due to miscommunication between the command and the service. Sometimes multiple or failed print requests also result in this error.
- Issues with the Printer Queue
- Stopped or some other issues with print spooler service
- Invalid Prompts
- Issues with ports
Similar Types of A StartDocPrinter Call Was Not Issued Error Issue:
- Sage 100
- Cacls.exe printers /e /g administrator:c
- Could not start print job windows 10
- Nicelabel
- A StartDocPrinter Call was Not Issued Windows 10 1903
- Remote desktop
- Epson
- Autocad
How to Fix & Solve A StartDocPrinter Call Was Not Issued Error
To fix error A StartDocPrinter Call Was Not Issued windows Error theses are the following methods that will be helpful for you. In the first method, we will try to eliminate the error using the windows troubleshooter. The second method will be all about manually starting the print spooler service. If somehow, the second method fails in the third method, we will use some useful commands to repair the print spooler service. The final resolution will be reinstalling the printer driver. Now lets got through all the steps in detail.
1. Using the Windows Troubleshooter –
In the first method, we will follow the easy way. Instead of jumping right onto other little complex methods, we request you to go through this method first. We will run the windows troubleshooter for fixing A StartDocPrinter Call was Not Issued remote desktop issue.
- STEP 1. Open up a Run window by pressing Windows key + R simultaneously
- STEP 2. Now, type ms-settings:troubleshoot in the search field and hit Enter
- STEP 3. in the Troubleshooting app on the right click on Get up and running section
- STEP 4. Now click on Printer, finally hit on Run the troubleshooter to start the troubleshooting process
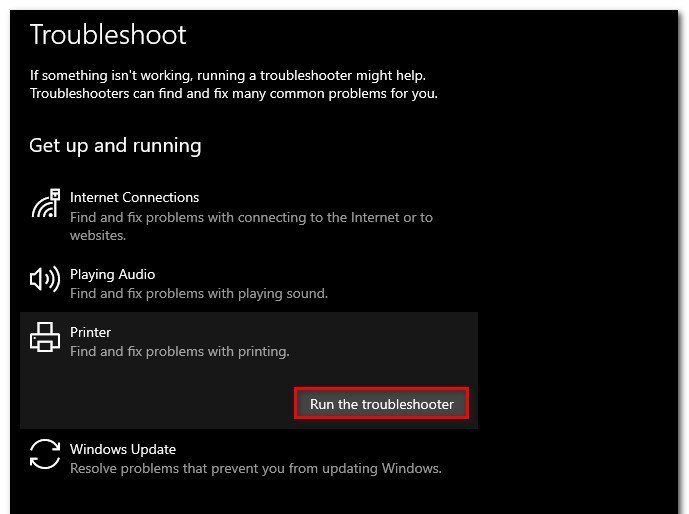
- STEP 5. After the process completes, a new window will open up and click on Apply this fix
- STEP 6. Now check if A StartDocPrinter Call was Not Issued windows 10 error still occurs
2. Starting the Print Spooler Service –
In this A StartDocPrinter Call was Not Issued windows 8 method, we will make sure that the print spooler is up and running fine. Sometimes due to some system changes, the services get stopped, or maybe it is not responding. Follow the steps to ensure the service is running fine.
- STEP 1. Simultaneously hold Windows key + R to open the Run window
- STEP 2. Now, in the search field type services.msc and hit Enter
- STEP 3. If UAC (User Account Control) admin permission click Yes
- STEP 4. In the Services screen, locate the Print Spooler Service
- STEP 5. Right-click on the Print Spooler Service, and click on Properties
- STEP 6. In the General tab, firstly put Startup type to Automatic
- STEP 7. Now If the service status is Stopped, hit the Start Button
- STEP 8. If not, Stop the service, wait for a few minutes then again hit the Start button

- STEP 9. Finally, reboot your system and see if A StartDocPrinter Call was Not Issued windows 7 error is now resolved
3. Repairing the Print Spooler Service using the Command –
If the above method fails to work, the chances are that service needs repairing. Follow this A StartDocPrinter Call was Not Issued windows method. In this method, we will repair the print spooler service using the command.
- STEP 1. In the start menu type cmd, now select run as administrator
- STEP 2. You will be asked for administrator permissions click on yes
- STEP 3. In the command prompt window, type the following command and press Enter
cd\Windows\System32\spool
- STEP 4. Now type the following command and press Enter
cacls.exe PRINTERS /E /G administrator:C
- STEP 5. After performing both the commands, restart your system
- STEP 6. Finally, check if A StartDocPrinter Call was Not Issued windows 10 error still persists
4. Reinstalling the Printer Driver –
If all of the above methods fail to work, maybe A StartDocPrinter Call was Not Issued windows 8 problem is with your printer driver. Either the driver is corrupted or outdated. Reinstalling will fix the issue.
- STEP 1. Click on Start menu, type Run and then hit enter
- STEP 2. Then, type devmgmt.msc inside the text box and press Enter
- STEP 3. Give the UAC (User Account Control) permission if asked
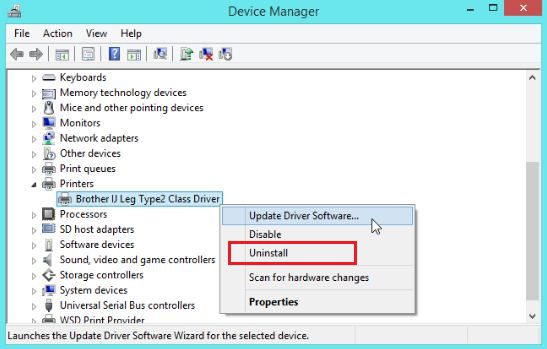
- STEP 4. In the Device Manager window, locate Printer and expand it
- STEP 5. Now right-click on installed Printer driver and click on Uninstall from the menu
- STEP 6. Uninstall the associated USB driver too
- STEP 7. Now restart your system and make sure it is connected to the internet
- STEP 8. Your system will automatically install the generic printer driver to solve this A StartDocPrinter Call was Not Issued windows 7 issue.
Conclusion:
In this troubleshooting guide, we have gone through four methods that will help you in resolving error A StartDocPrinter Call Was Not Issued windows. Furthermore, we have given a piece of brief information on the causes and effects of the error on the system. However, if you have some other methods to fix the issue, tell us in the comments.
We hope with the help of this error A StartDocPrinter Call was Not Issued windows guide you have fixed the problem. For more troubleshooting guides, follow us. Thank you!
Некоторые пользователи Windows сталкиваются с ошибкой «Вызов StartDocPrinter не был выполнен» при попытке распечатать любой документ. Это скорее системная проблема, а не какое-либо конкретное приложение, такое как Microsoft Word doc, Acrobat Reader и т. Д., В большинстве случаев связанные с этим. Причинами ошибки могут быть прерывание очереди печати, не отвечающая служба диспетчера очереди печати, проблемы с портами принтера и т. д. Да, эта ошибка определенно раздражает, но есть разные способы ее устранения. В этой статье мы подробно рассмотрим, как устранить ошибку «Вызов StartDocPrinter не был выполнен».
Оглавление
Способ 1: перезапустите службу диспетчера очереди печати
Шаг 1: Откройте Windows Услуги. Для этого откройте приглашение запуска, используя Виндовс + Р клавиши вместе и введите services.msc и нажмите Enter.

Шаг 2: В окне служб найдите Диспетчер очереди печати а также двойнойнажмите в теме. Нажмите на Останавливаться. Это остановит службу

Шаг 3: Затем в раскрывающемся меню типа запуска выберите автоматический. Теперь нажмите на Начинать а затем нажмите на ХОРОШО.
Шаг 4: Закройте окно «Службы» и проверьте, решена ли проблема.
Способ 2: используйте средство устранения неполадок Windows
Шаг 1. Откройте настройки устранения неполадок, введя «Устранение неполадок» в строке поиска Windows и щелкнув значок настройки устранения неполадок от результата.
Шаг 2: Справа нажмите на Дополнительные средства устранения неполадок.
Шаг 3: Выберите параметр «Принтер», и появится Запустите средство устранения неполадок кнопка нажмите на нее.
РЕКЛАМНОЕ ОБЪЯВЛЕНИЕ
Шаг 4: Это займет несколько минут. Если есть какие-либо предложения, проверьте, не относятся ли они к принтеру, который вы устраняете, и примените их. Нажмите на Применить это исправление.
Шаг 5: Исправление будет применено через несколько минут, после чего появится окно с сообщением о том, что устранение неполадок завершено. Нажми на Закрывать кнопка. Проверьте, исчезла ли ошибка, если нет, попробуйте следующий метод.
Способ 3: восстановить службу диспетчера очереди печати с помощью команд
Шаг 1: Откройте командная строка в администратор режим, для этого введите команда в окнах панель поиска и нажмите Ctrl + Shift клавиши вместе и нажмите войти.
Шаг 2: Выполните приведенные ниже команды одну за другой. Для этого копировать приведенные ниже команды и вставить их в командную строку один за другим. Хит войти выполнить его.
cd\виндовс\систем32\спул
cacls.exe ПРИНТЕРЫ /E /G администратор: C
Шаг 3. Перезагрузите компьютер
Способ 4: переустановите драйверы принтера
Шаг 1: Откройте Диспетчер устройств. Для этого откройте окно запуска, нажав на Виндовс + Р ключи вместе.
Шаг 2: Введите devmgmt.msc в строке запуска и нажмите войти.
Шаг 3: В окне диспетчера устройств прокрутите вниз и найдите Очереди печати.
Шаг 4: Разверните очереди печати, щелкнув раскрывающийся список слева. Появится список драйверов печати.
Шаг 5: Щелкните правой кнопкой мыши драйвер, который вы считаете проблемным, и нажмите удалить устройство.

Шаг 6: Перезагрузите компьютер, и теперь система автоматически установит общие драйверы принтера, и проблема будет решена.
Способ 5: сброс среды печати
Если ни один из вышеперечисленных методов не работает для вас, попробуйте сбросить всю среду печати. То есть удалить драйверы печати и их следы. Затем переустановите печатающее устройство.
Примечание: Перед выполнением этого метода возьмите резервная копия реестра в случае неправильного изменения реестра могут возникнуть проблемы. Поэтому внимательно следуйте инструкциям.
Шаг 1: Откройте Windows Услуги. Для этого откройте приглашение запуска, используя Виндовс + Р клавиши вместе и введите services.msc и ударил войти.

Шаг 2. Прокрутите вниз и найдите Диспетчер очереди печати щелкните по нему правой кнопкой мыши и нажмите Характеристики.
Шаг 3: Затем в типе запуска выберите автоматический и нажмите на Ok.
Шаг 4. Перезапустите службу диспетчера очереди печати, щелчок правой кнопкой мыши на РаспечататьДиспетчер очереди и нажав на Запустить снова.
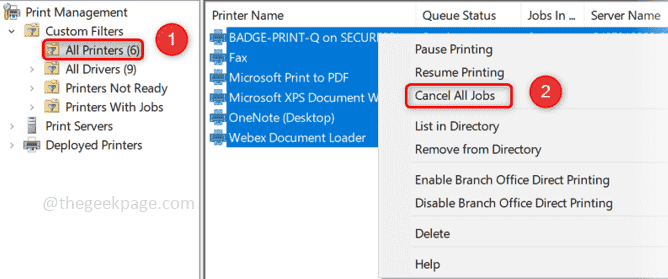
Шаг 5: В строке поиска Windows введите Управление печатью, из появившегося результата поиска нажмите на него, чтобы открыть.
Шаг 6: Слева нажмите на Все принтеры. С правой стороны выберите все драйверы печати с помощью Ctrl + А ключи вместе.
Шаг 7: Щелкните правой кнопкой мыши на выделенном и нажмите Отменить все задания который удаляет все ожидающие задания на печать.
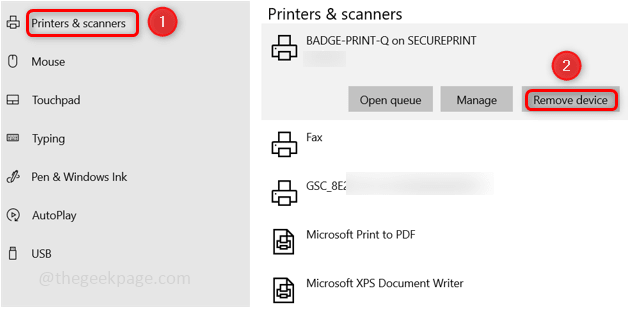
Шаг 8: Откройте Параметры Windows нажав на Окна + я ключи вместе. И нажмите на Устройства.

Шаг 9: Щелкните левой кнопкой мыши на Принтеры и сканеры. Справа, если есть сторонние сканеры, выбираем их и нажимаем Удалить устройство.
Случайно вы не можете удалить устройство, но вы можете сделать это через реестр Windows.
Откройте редактор реестра, введя реестр в строке поиска Windows и нажав Enter.

Перейдите по указанному ниже пути и щелкните правой кнопкой мыши в сторонних записях очереди печати нажмите Удалить.
Компьютер\HKEY_LOCAL_MACHINE\SYSTEM\CurrentControlSet\Control\Print\Printers
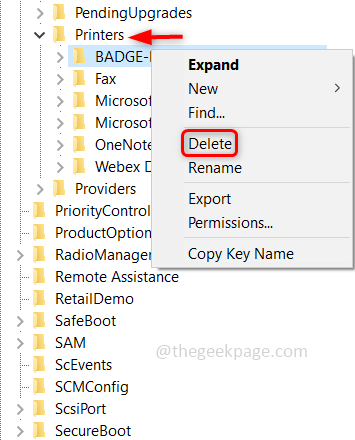
Примечание: удалять только сторонние очереди печати. Не удаляйте факс, Microsoft Print to PDF, Microsoft XPS Documents Writer, очереди печати OneNote.
Шаг 10: В строке поиска Windows введите Управление печатью и нажмите на него, чтобы открыть. И выберите Все драйверы вариант слева.
Шаг 11: Щелкните правой кнопкой мыши сторонний драйвер в списке и выберите Удалить пакет драйверов.
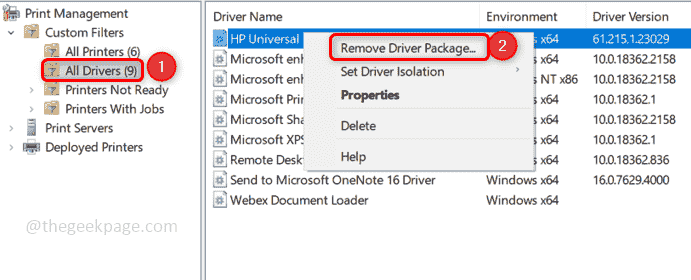
Примечание: Удалите только сторонние драйверы и не удаляйте драйверы печати, связанные с Microsoft.
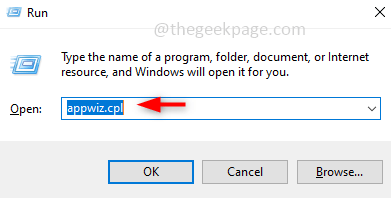
Шаг 12: Если есть сторонние драйверы печати, удалите их из Добавить или удалить программы. Для этого откройте приглашение запуска, используя Виндовс + Р клавиши вместе и введите appwiz.cpl затем нажмите Enter.
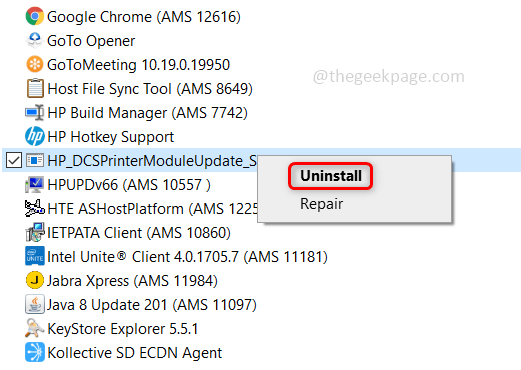
Шаг 13. Найдите все связанное с принтером OEM или стороннее программное обеспечение. щелкните правой кнопкой мыши на них и нажмите удалить.
Шаг 14. Также удалите сторонние мониторы печати, для этого откройте редактор реестра набрав реестр в строке поиска Windows и нажав Enter.

Шаг 15. Перейдите в указанное ниже расположение и удалите записи сторонних мониторов из этого расположения.
Компьютер\HKEY_LOCAL_MACHINE\SYSTEM\CurrentControlSet\Control\Print\Monitors
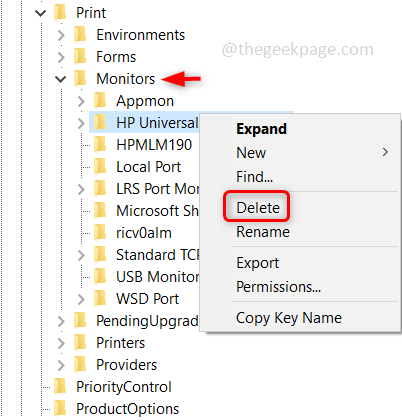
Примечание: Не удаляйте мониторы печати, такие как локальный порт, порт LPR, общий факс-монитор Microsoft, стандартный порт TCP/IP, USB-монитор и порт WSD, AppMon
Шаг 16. Убедитесь, что выбран тип запуска автоматический [Как упоминалось в шаге 2] и запустить снова ваша система.
Шаг 17: Теперь переустановите принтер. Для этого откройте настройки с помощью Окна + я ключи. Нажмите на Устройства.
Шаг 18: С левой стороны нажмите на Принтеры и сканеры затем нажмите на Добавьте принтер или сканер и следуйте инструкциям на экране, чтобы добавить устройство.
Шаг 19: Теперь, когда у нас есть чистая установка, проблема будет решена. Идите и распечатайте документ.
Вы также можете загрузить этот инструмент для ремонта ПК, чтобы найти и устранить любую проблему с ПК:
Шаг 1 — Загрузите Restoro PC Repair Tool отсюда
Шаг 2 — Нажмите «Начать сканирование», чтобы автоматически найти и устранить любую проблему с ПК.
Вот и все! Надеюсь, эта статья помогла вам решить проблему. Поделитесь своими мыслями о том, какой метод сработал для вас. Спасибо !!!
In this article, we are going to discuss on How to fix A StartdocPrinter call was not issued error in Windows 10. You are provided here with easy steps/methods to resolve the issue. Let’s starts the discussion.
‘A StartdocPrinter call was not issued’ error: It is common Windows Problem considered as printing issue. This error is usually appeared when you try to print anything/document in your Windows 10 computer. Some users reported they faced this issue with the printer that is connected to network. They explained the issue is occurred when they tried to print from other programs like MS word, Acrobat Reader and even Notepad.
There could be several reasons behind the issue including the issue with Printer queue, issue with print spooler service, required access permission is not given, improper printer prompts and other issues. It is possible to fix the issue is with our instructions. Let’s go for the solution.
How to fix A StartdocPrinter call was not issued error in Windows 10?
Method 1: Fix A StartdocPrinter call was not issued with ‘PC Repair Tool’
‘PC Repair Tool’ is easy & quick way to find and fix BSOD errors, DLL errors, EXE errors, problems with programs/applications, malware or viruses infections in computer, system files or registry issues, and other system issues with just few clicks.
Method 2: Run Printer troubleshooter
You can run Windows built-in Printer troubleshooter to fix the issue.
Step 1: Open ‘Settings’ app in Windows PC via Windows Search Box and go to ‘Update & Security > Troubleshoot > Additional Troubleshooters’
Step 2: Find and select ‘Printer’ troubleshooter, and click ‘Run the troubleshooter’ and follow on-screen instructions to finish the troubleshooting and once finished, check if the issue is resolved.
Method 3: Restart Print Spooler service

You can restart Print Spooler service in computer in order to fix the issue.
Step 1: Open ‘Services’ app via Windows Search Box in Windows PC
Step 2: Find and double-click ‘Print Spooler Service’ to open its Properties. Select ‘Automatic’ from ‘Startup Type’ dropdown, and hit ‘Start’ button under ‘Services Status’ section, and then hit ‘Apply > Ok’ button to save the changes and then restart your computer and check if the issue is resolved.
Method 4: Repair Print Spooler Service via CMD
Step 1: Type ‘cmd’ in Windows Search Box and press ‘SHIFT + ENTER’ keys on keyboard to open ‘Command Prompt as Admisntrator’
Step 2: Type the following command and hit ‘Enter’ key after each to execute.
cd\Windows\System32\spool
cacls.exe PRINTERS /E /G administrator:C
Step 3: Once executed, restart your computer and check if the issue is resolved.
Method 5: Re-install all printer ports
Another way to fix the issue is to reinstall all printer ports in Windows computer.
Step 1: Open ‘Device Manager’ in Windows PC via Windows Search Box and expand ‘Printers’ or ‘Print Queues’ category
Step 2: Right-click on each printer driver one-by-one and select ‘Uninstall’ to uninstall them.
Step 3: Once each primer driver have been uninstalled, expand ‘Universal Serial Bus Controllers’ category, right-click on each list of installed items and select ‘Uninstall’ to uninstall it.
Step 4: Once done, restart your computer and restarting computer will automatically reinstall all necessary drivers in computer.
Download or reinstall device drivers update in Windows PC [Automatically]
You can also try to update all Windows drivers including printer drivers using Automatic Driver Update Tool. You can get this tool through button/link below.
Conclusion
I hope this post helped you on How to fix A StartdocPrinter call was not issued error in Windows 10 with easy ways. You can read & follow our instructions to do so. That’s all. For any suggestions or queries, please write on comment box below.