Содержание
- Способ 1: Обновление драйвера сетевой карты
- Способ 2: Переименование файла «Ndu.sys»
- Способ 3: Изменение способа подключения к интернету
- Способ 4: Встроенное средство устранения неполадок
- Способ 5: Обновление версии ОС
- Способ 6: Откат к предыдущему состоянию системы
- Способ 7: Переустановка Windows 10
- Вопросы и ответы
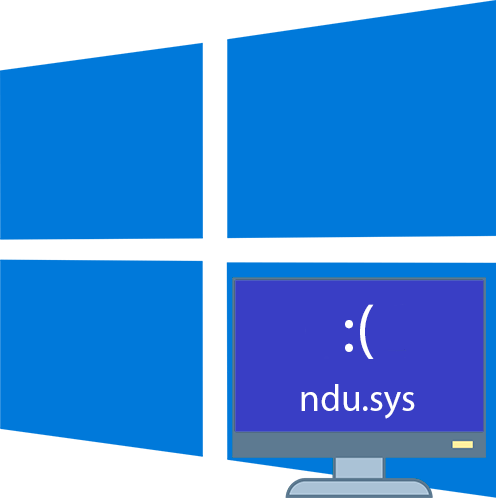
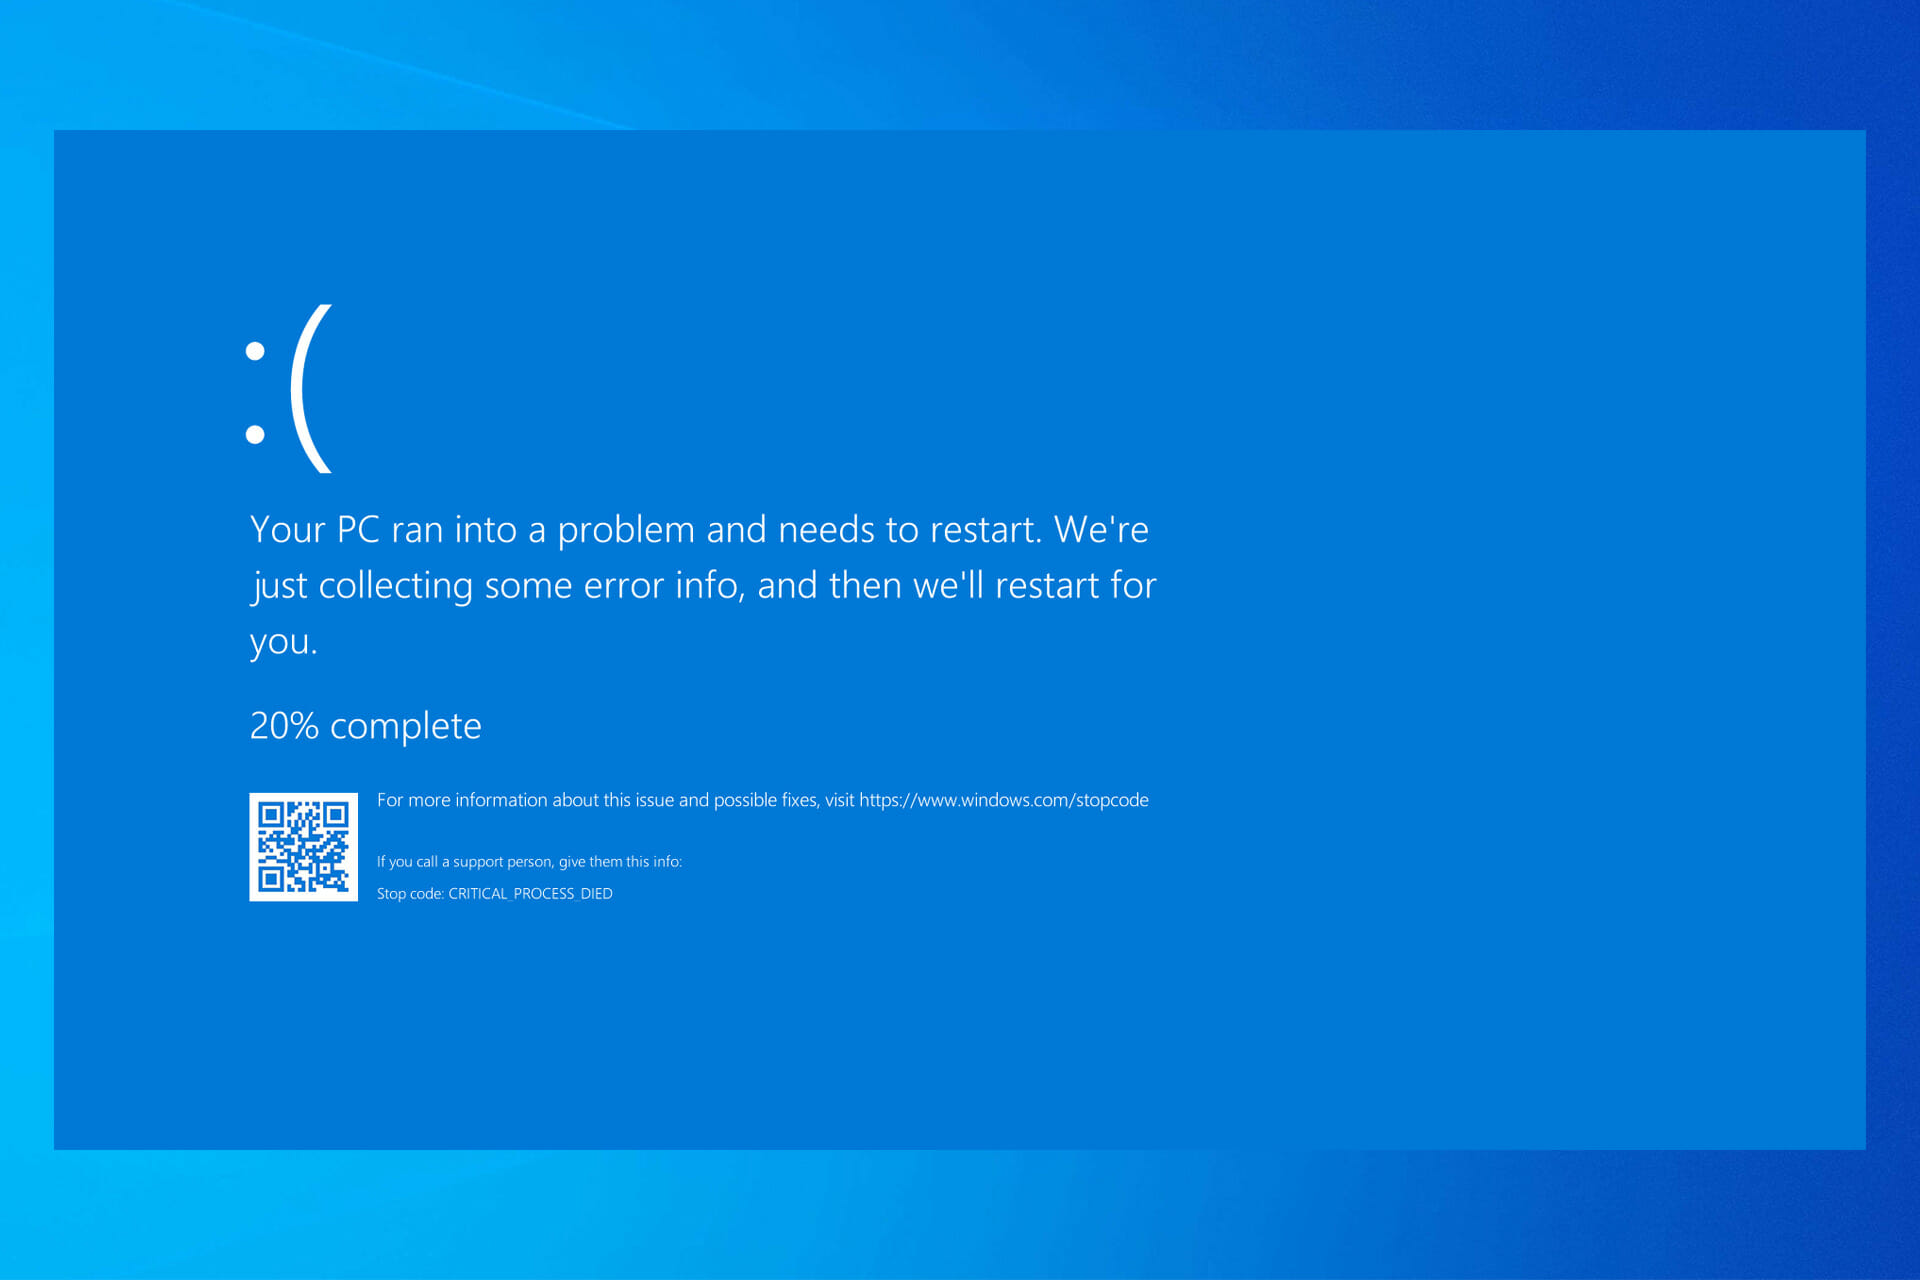
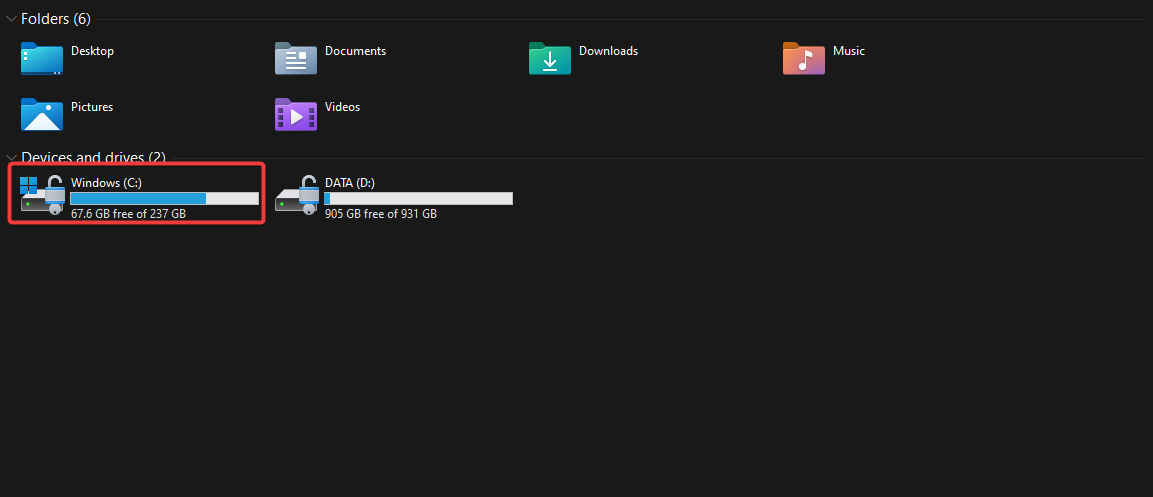
«Ndu.sys» – это драйвер системы, который мониторит сетевые данные. Ошибка в его работе сопровождается традиционным синим экраном и говорит о том, что сетевой драйвер поврежден или несовместим с используемым оборудованием.
Способ 1: Обновление драйвера сетевой карты
Обновление или переустановка драйверов сетевого адаптера может помочь решить проблему с ошибкой «Ndu.sys». Актуальную версию программного обеспечения для оборудования можно найти на официальном сайте производителя. Еще в этом помогут встроенные средства Windows 10 и специальные утилиты от производителя сетевой карты или сторонних разработчиков. Все способы скачивания и инсталляции драйвера для оборудования описаны более подробно в нашем отдельном материале.
Подробнее: Инсталляция программного обеспечения для сетевого адаптера в Windows 10
В некоторых ситуациях помогает откат версии драйвера до предыдущего состояния, если в работе ПО возникла критическая ошибка. Также сбой происходит из-за неправильной установки:
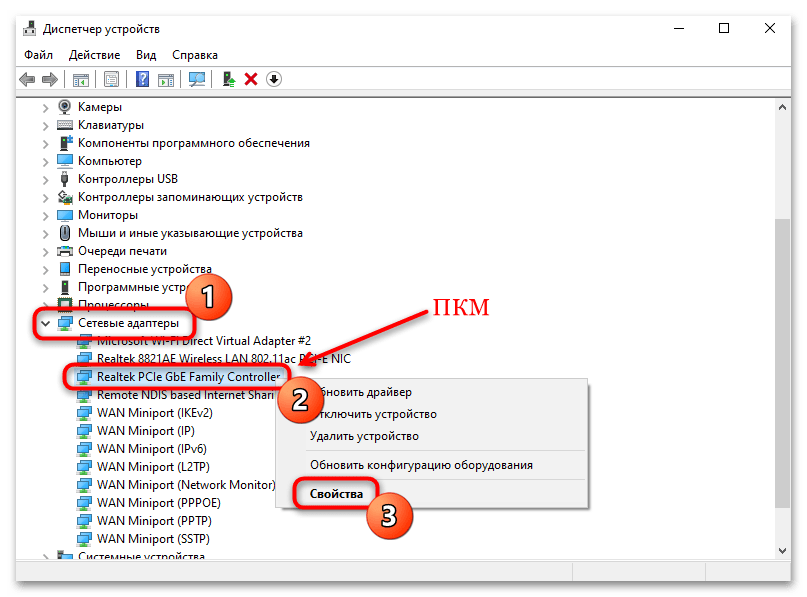
- Запустите штатное средство «Диспетчер устройств» Windows 10, щелкнув правой кнопкой мыши по значку системы на нижней рабочей панели и выбрав соответствующий пункт.
- Разверните меню «Сетевые адаптеры» и перейдите в раздел «Свойства» выбранного оборудования, щелкнув по нему правой кнопкой мыши.
- В новом окне на вкладке «Драйвер» нажмите на кнопку «Откатить», если она активна.

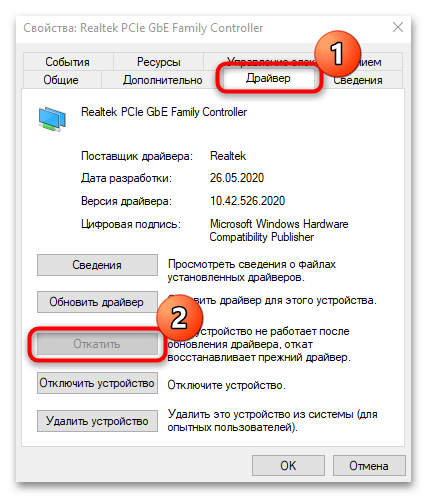
Если кнопка отката драйверов подсвечивается серым цветом и не активна, то вернуть состояние оборудования не получится. В этом случае может помочь только переустановка или обновление.
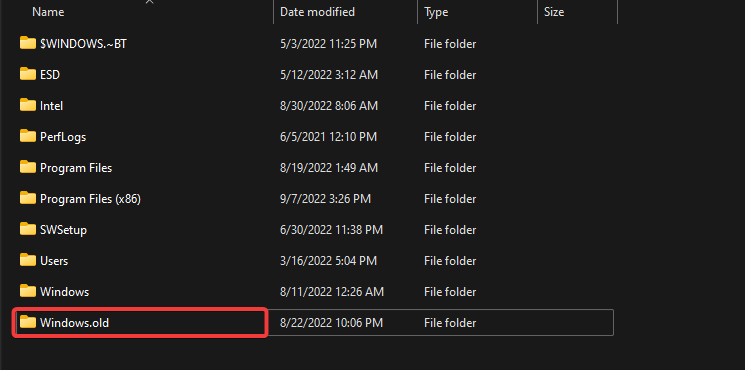
Еще один из самых простых методов устранения ошибки – это изменение имени системного файла в каталоге с драйвером на локальном диске. Он подойдет, если проблема появилась после переустановки системы, а старые данные были сохранены в специальной папке «Windows.old». Для совершения процедуры потребуется вход в систему под учетной записью администратора:
Читайте также: Методы управления учетными записями в Windows 10
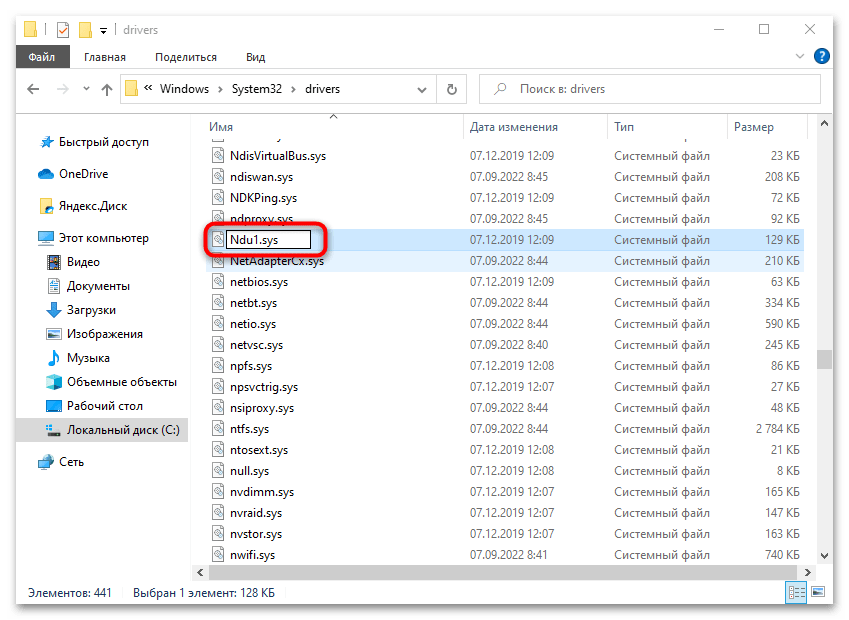
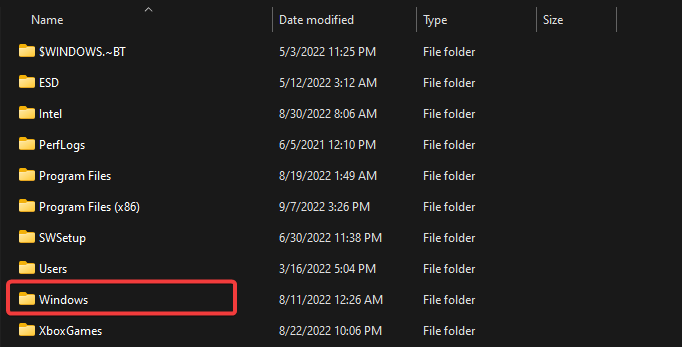
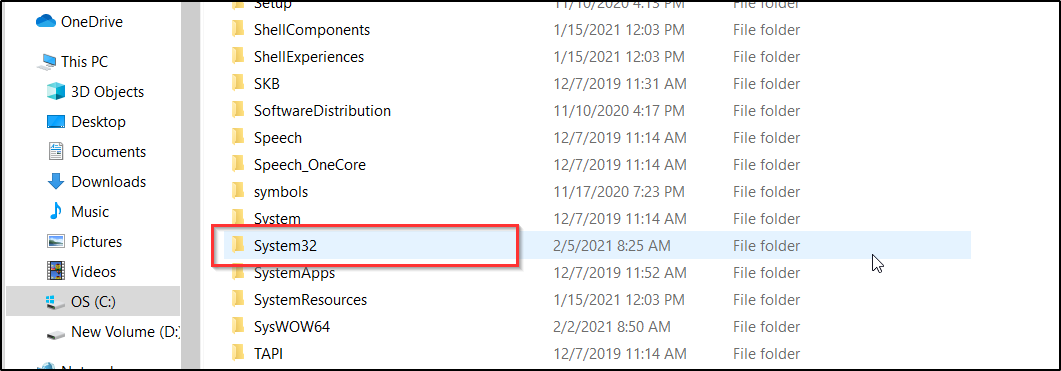
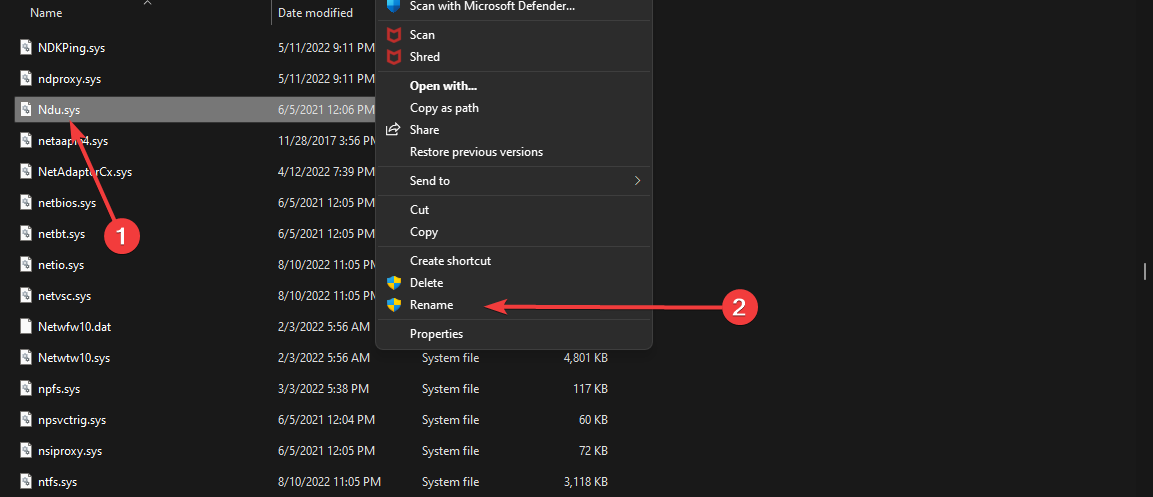
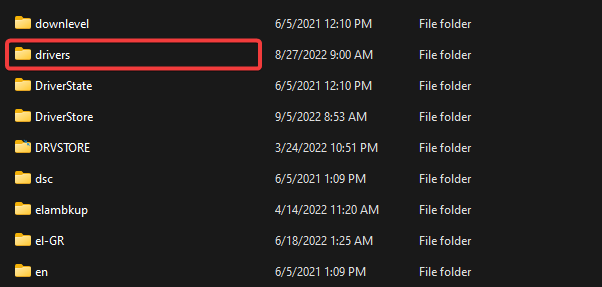
- Через встроенный «Проводник» перейдите по пути
«Локальный диск (C:) – Windows – System32 – drivers». В последней папке отыщите файл «Ndu.sys». Щелкните по нему правой кнопкой мыши и выберите пункт «Переименовать». - Задайте файлу любое имя. Чтобы не запутаться, можно добавить цифру или символ в конце, например «Ndu1.sys».

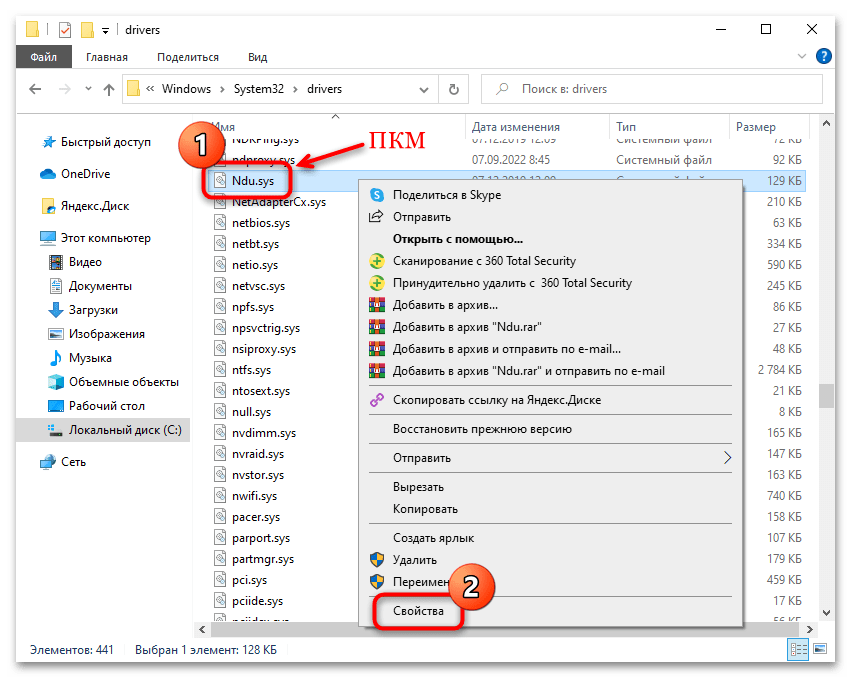
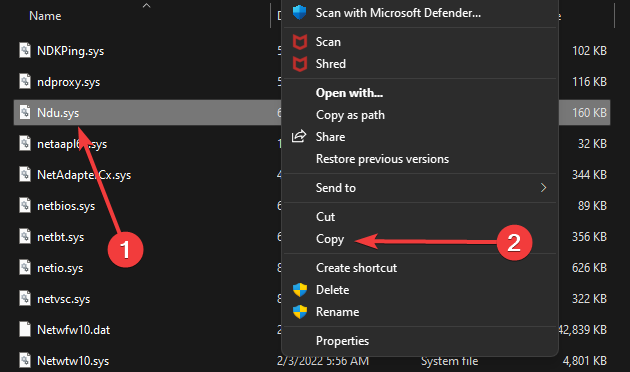
Поскольку файл системный, то его удаление или изменение его параметров не рекомендуется и, соответственно, такие действия не допускаются. Но существует способ получить права доступа на файл через его свойства:
- Щелкните правой кнопкой мыши по названию системного файла и из контекстного меню выберите пункт «Свойства».
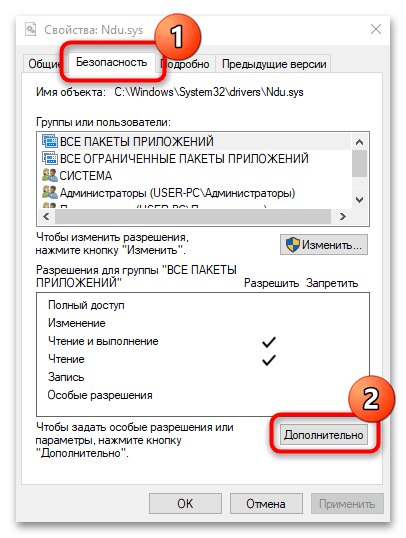
- На вкладке «Безопасность» нажмите на кнопку «Дополнительно».
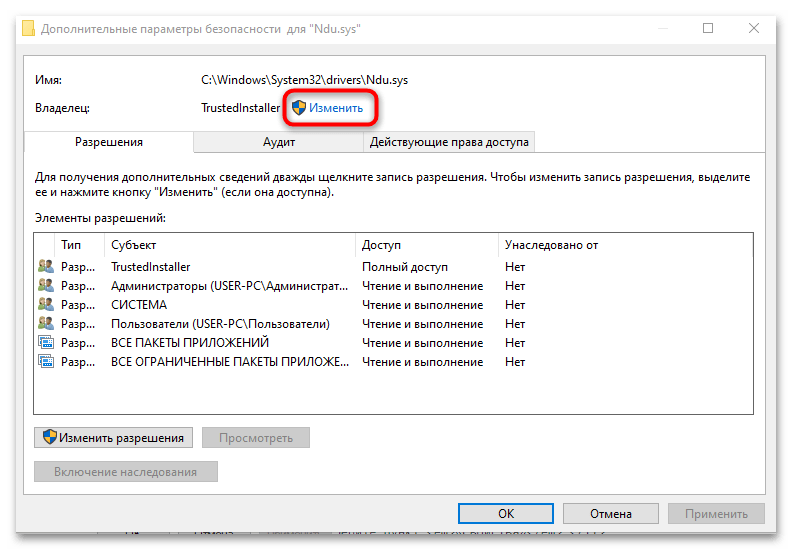
- Кликните по ссылке «Изменить» у строки «Владелец».
- В новом окне выберите «Дополнительно».
- Нажмите на кнопку «Поиск», чтобы отобразился список учетных записей на компьютере. Выделите пользователя, которого нужно сделать владельцем объекта, и нажмите на кнопку «ОК» в этом окне и в предыдущем, чтобы подтвердить действие.


Если на локальном диске сохранилась более старая версия операционной системы, с которой происходило обновление, то файл «Ndu.sys» нужно скопировать оттуда. Вернитесь в «Локальный диск (C:)» и найдите папку «Windows.old». В ней также потребуется перейти на пути, описанном в Шаге 1, а затем скопировать файл «Ndu.sys», выделив его и одновременно нажав на клавиши «Ctrl + C». Снова перейдите в папку из Шага 1 и вставьте скопированный файл, используя сочетания клавиш «Ctrl + V» или контекстное меню.
Способ 3: Изменение способа подключения к интернету
Если используется проводное подключение к интернету через порт Ethernet, то может помочь изменение способа выхода в сеть, а именно подключение к беспроводной точке доступа Wi-Fi, и наоборот.
Потестируйте компьютер при новом подключении, чтобы понять, пропала ли ошибка. Если нет, то переходите к следующим способам. Также изучите их, если новый способ подключения к сети не устраивает.
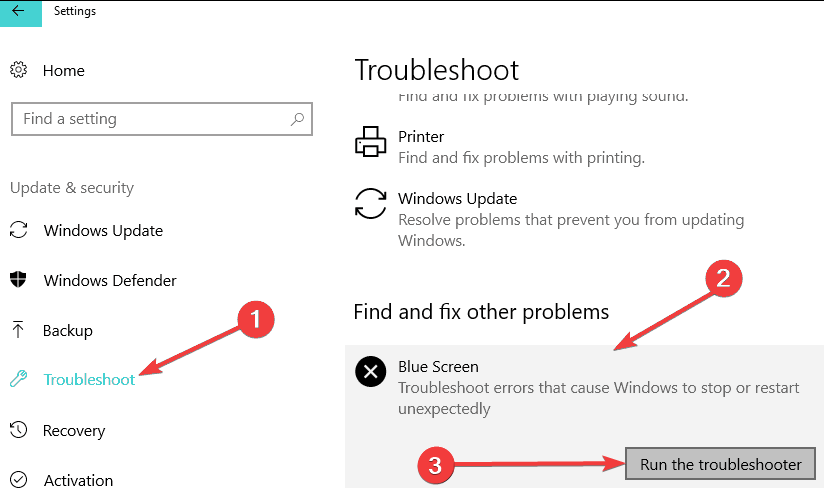
Способ 4: Встроенное средство устранения неполадок
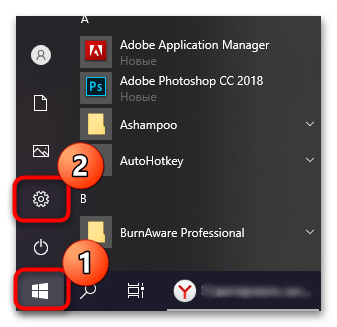
В операционной системе реализована встроенная функция поиска и устранения неполадок в работе различных аппаратных и программных компонентов:
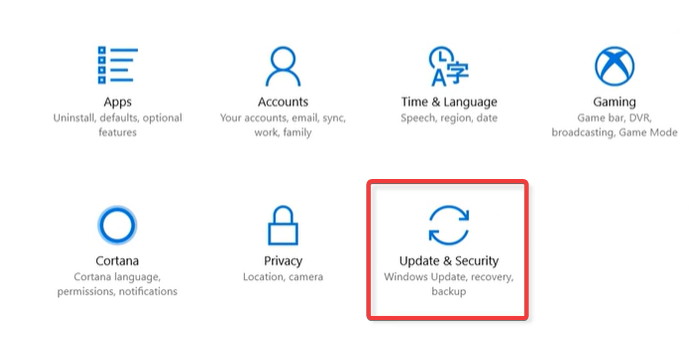
- Откройте приложение «Параметры», выбрав его из главного меню Виндовс.
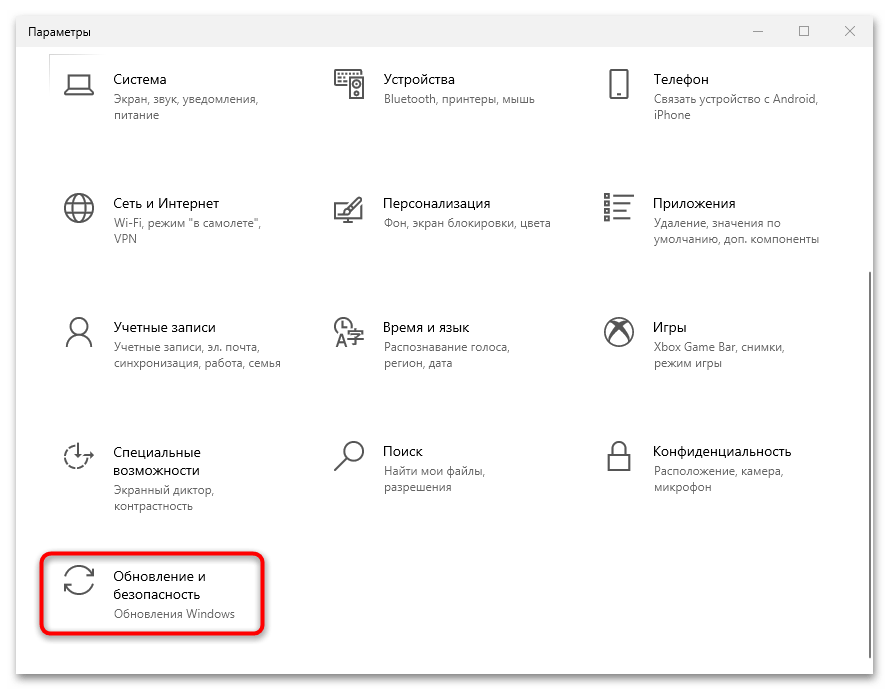
- Перейдите в раздел «Обновление и безопасность».
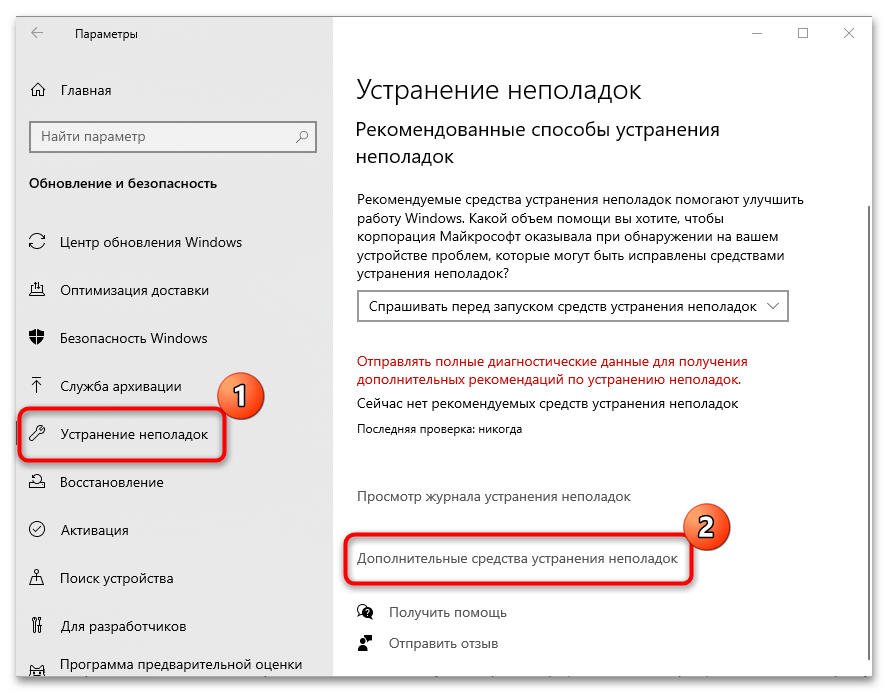
- На панели слева переключитесь в «Устранение неполадок», затем кликните по ссылке «Дополнительные средства устранения неполадок».
- Нажмите на строку «Сетевой адаптер». Появится новая кнопка – «Запустить средство устранения неполадок». Воспользуйтесь ей.
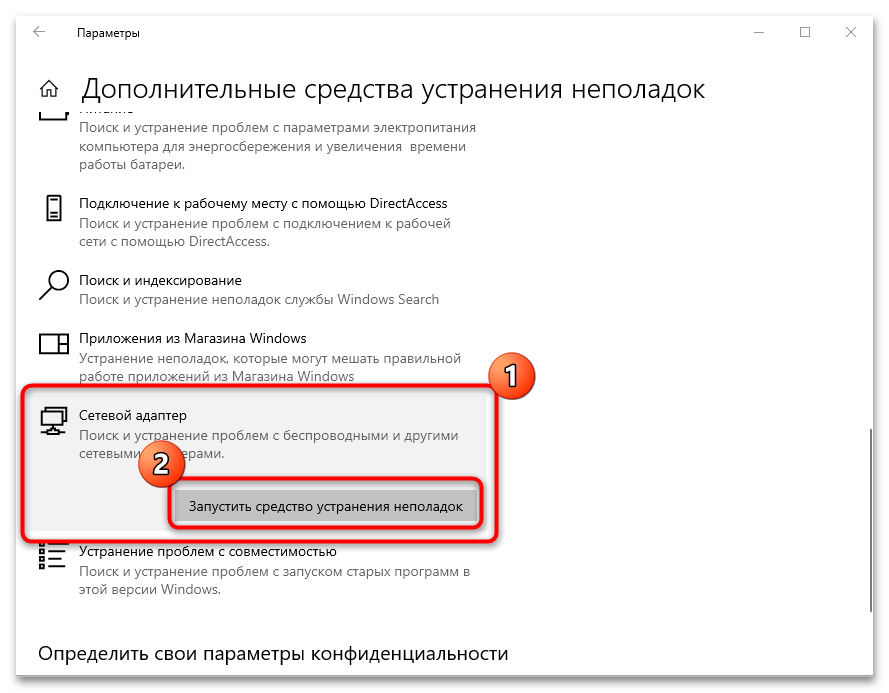
После этого инструмент самостоятельно проверит систему и сетевое оборудование на наличие ошибок. Если таковые будут найдены, то они исправятся автоматически или будут предложены варианты по исправлению ситуации пользователем.
Способ 5: Обновление версии ОС
Синий экран и ошибка «Ndu.sys» в Windows 10 могут появляться из-за того, что версия операционной системы устарела. Чтобы посмотреть, в этом ли дело, попробуйте вручную загрузить и установить апдейты. Также можно воспользоваться специальными вспомогательными утилитами от компании Microsoft. Более подробно инструкции по обновлению ОС описаны в нашей отдельной статье.
Подробнее: Обновление Windows 10 до последней версии
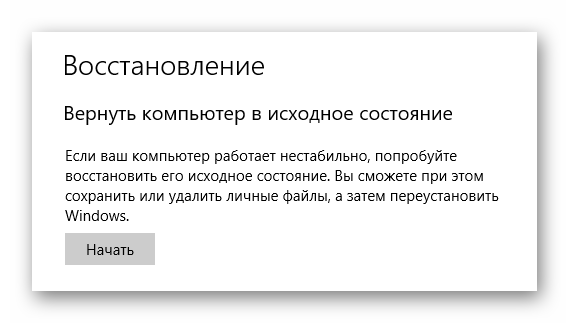
Способ 6: Откат к предыдущему состоянию системы
Операционная система Windows 10 предусматривает возможность откатить ее до предыдущего состояния, то есть воспользоваться точкой восстановления. Такой способ помогает во многих ситуациях, поэтому может устранить ошибку «Ndu.sys» с синим экраном.
Все недавние настройки и приложения, которые были установлены до создания точки восстановления, будут удалены.
Наш автор на сайте подробно разбирал, как откатить систему к предыдущему состоянию в двух вариантах: если она запускается или не запускается. В первом случае можно воспользоваться штатным инструментом и «Панелью управления», а во втором – входом в «Безопасный режим».
Подробнее: Откат к точке восстановления в Windows 10

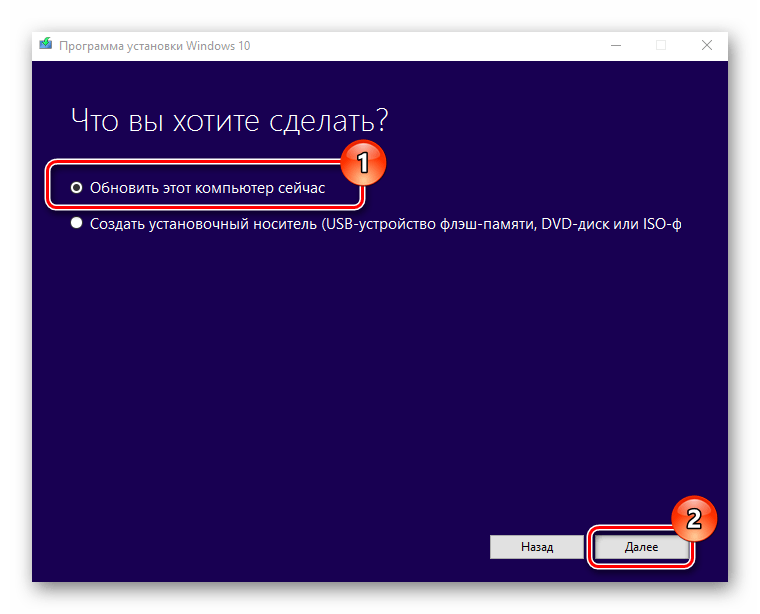
Способ 7: Переустановка Windows 10
Самый радикальный способ – это полная переустановка операционной системы, после чего Виндовс 10 станет «чистой». Существует несколько методов сделать это: можно сбросить все настройки к заводским или инсталлировать систему со съемного носителя, например с флешки. Все методы мы уже разбирали ранее. Учтите, что все пользовательские данные, настройки и приложения, хранящиеся на локальном диске, на который устанавливается система, будут безвозвратно стерты, поэтому следует позаботиться об их копиях.
Подробнее: Способы переустановки операционной системы Windows 10
You should update drivers before trying more complicated solutions
by Ivan Jenic
Passionate about all elements related to Windows and combined with his innate curiosity, Ivan has delved deep into understanding this operating system, with a specialization in drivers and… read more
Updated on
- The Ndu.sys error usually occurs when hardware or driver incompatibility occurs.
- If the error driver irql not less or equal (Ndu.sys) appears randomly after a few minutes, check for driver updates.
- Renaming the folder is the simplest solution to eliminate the Ndu.sys blue screen error.
- Ndu.sys is related to your Wi-Fi adapter driver, so check for network issues.
Have you installed the latest Windows 10 OS version to see how it goes? Unfortunately, some users have experienced some trouble with the Ndu.sys error.
This is undoubtedly one of the most common and complicated errors in Windows 10. Rest assured, after following the steps listed in this tutorial, you will fix Ndu.sys errors in Windows 10 and continue your testing of the new operating system.
The error driver irql not less or equal (Ndu.sys) comes with the traditional blue screen. In addition, you can see multiple stop code errors like KMODE EXCEPTION NOT HANDLED (Ndu.sys) or SYSTEM SERVICE EXCEPTION.
This means that if you get it during your usage, it won’t go away unless you reboot your operating system, and even then, it might appear randomly after a few minutes.
This error message is caused by incompatible hardware drivers and, to be more specific, the Wireless adapter driver.
What does NDU SYS mean?
NDU stands for Network Data Usage, and the Ndu.sys driver is a monitoring driver file located in the C:\Windows\System32\drivers path. This service offers the capability for monitoring network data utilization.
This is a BSOD error similar to Unexpected Kernel Mode Trap, and drivers can cause it, so keep them up to date.
Specific files can also cause your PC to crash, and that’s the case with Watchdog.sys system error, so you need to investigate the file that caused the crash.
These are usually driver files, and many reported Storport.sys GSOD error on their PC as well. Below are also some of the versions of this error that users are complaining about:
- Disable Ndu Windows 10
- Bddci.sys blue screen
- Kmode exception not handled
- Kmode exception not handled ndu.sys, system thread exception not handled ndu.sys
- Ndu.sys failed in Windows 11, 10
- Ndu.sys Malwarebytes
- Kmode exception not handled ndu.sys
- System thread exception not handled ndu.sys
- Driver_irql_not_less_or_equal ndu.sys
- Ndu.sys keeps crashing
However, you can fix these issues by following the solutions in this guide.
How do I fix ndu.sys blue screen error?
- What does NDU SYS mean?
- How do I fix ndu.sys blue screen error?
- 1. Rename the Ndu.sys folder
- 2. Install the latest network card drivers
- 3. Check for updates
- 4. Use a different Internet connection
- 5. Reset Windows 10
- 6. Run the BSOD troubleshooter
- 7. Clean install Windows 10
- How do I fix Ndu.sys failed on Windows 11?
- Should you disable NDU?
1. Rename the Ndu.sys folder
It’s possible to resolve this occurring BSOD error by renaming the Ndu.sys file from your PC. You should check each of the steps below to do it accordingly.
1.Open the My Computer or This PC icon by double clicking on it or going to the Start menu and left-clicking.
How we test, review and rate?
We have worked for the past 6 months on building a new review system on how we produce content. Using it, we have subsequently redone most of our articles to provide actual hands-on expertise on the guides we made.
For more details you can read how we test, review, and rate at WindowsReport.
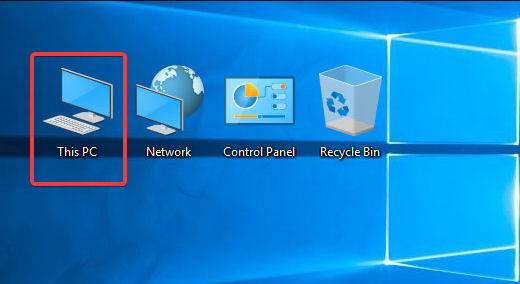
2. Double-click to enter the C:/ partition or whichever partition you have installed your Windows 10 on.
3. Double-click on the Windows folder to open it.
4. Now search for the System32 file inside the Windows folder and double-click it to open.
5. Now go to the System32 folder, look for the drivers‘ folder, and double-click on it to open.
6. After you get to the drivers folder, you will have to look for the Ndu.sys file.

7. Right-click on the Ndu.sys file and click on the Rename feature from the menu.
8. Name the Ndu.sys as Ndu.sys11 or whichever name you wish but be sure to change the name and remember it. If you cannot change the file name, you must log in with your administrator account or change your permissions on this specific file to an administrator.
9. Open again the C: partition you have Windows 10 installed.
10. Double-click the Windows.old folder this time because this should be the old Windows operating system you upgraded from.
11. Open again the System32 folder you have in the Windows.old folder.
12. Now find and double click to open the drivers folder.
13. Search in the drivers folder for the Ndu.sys file.
14. Right-click on it and select the Copy option.
15. Now paste it into the drivers folder of the Windows 10 version.
16. Restart your computer.
17. Check if you still have the same BSOD with Ndu.sys error.
2. Install the latest network card drivers
Updating drivers by yourself can be time-consuming. Therefore, we recommend using a third-party tool to update all your drivers automatically. Doing this will spare you time for manually searching drivers.
Sometimes, malfunctioning drivers can cause multiple system errors. If this happens to your PC, you may need to update or reinstall certain drivers entirely. As the process is not quite straightforward, we recommend using a reliable driver updater for the job.
Here’s how to do it:
- Download and install Outbyte Driver Updater.
- Launch the software.
- Wait for the app to detect all faulty drivers.

- Now, it will show you all the malfunctioning drivers listed to select the ones to Update or Ignore.
- Click on Update & Apply Selected to download and install the newest versions.
- Restart your PC to ensure the applied changes.


Outbyte Driver Updater
Secure your Windows PC with Outbyte from various errors caused by problematic drivers.
Disclaimer: this program needs to be upgraded from the free version in order to perform some specific actions.
3. Check for updates
- Open the Settings app.
- Select Updates & Security.

- Click the Check for updates button.

- If prompted to, restart the computer.
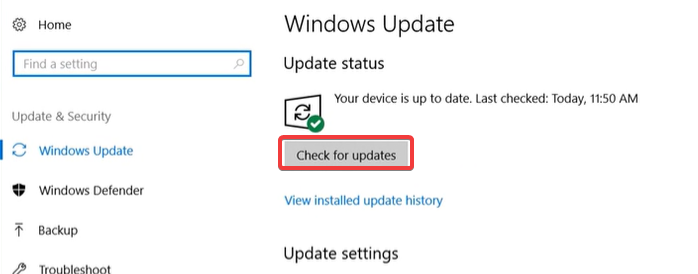
Updating your Windows 10 system is a good way of keeping your computer away from any BSoD errors.
Updates from Windows usually add new features to the current version, including new security features and repair bugs from the previous OS version.
As Ndu.sys error is a blue screen issue mostly related to your wireless adaptor or driver incompatibility, a Windows Update might address this problem.
4. Use a different Internet connection

If you are using a wired internet connection on your Windows 10 computer, try switching it to Wireless and check if you still have the same error message.
If you are using a wireless Internet connection, do the opposite and switch to a wired internet connection to see if you still get this error message.
- Fix the Kmode exception not handled error on Windows 10 & 11
- FIX: Driver irql less or not equal error on Windows 10
- Security Settings Blocked Self-signed Application [Fix]
- Bugcheck 0x0000012B: How to Fix This BSoD
5. Reset Windows 10
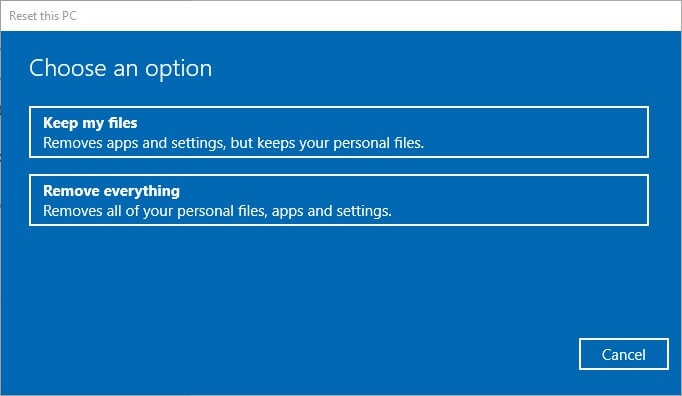
- Type reset this PC in the Windows search box and select the first app.

- Press the Get started button.

- Select the Keep my files option.

- Select the Next and Reset buttons to confirm.
- The reset process will now start. Follow the instructions on the screen to complete the reset.
- Wait for the process to complete. This may take a few minutes, depending on the number of software installed on your machine.

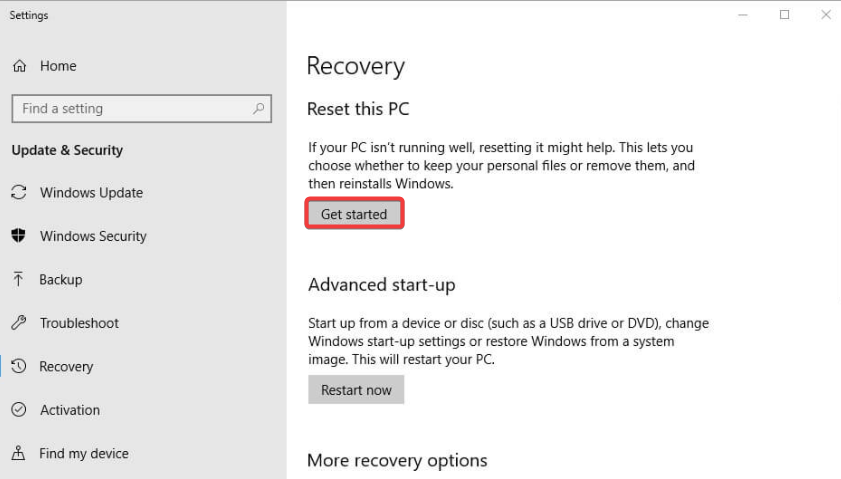
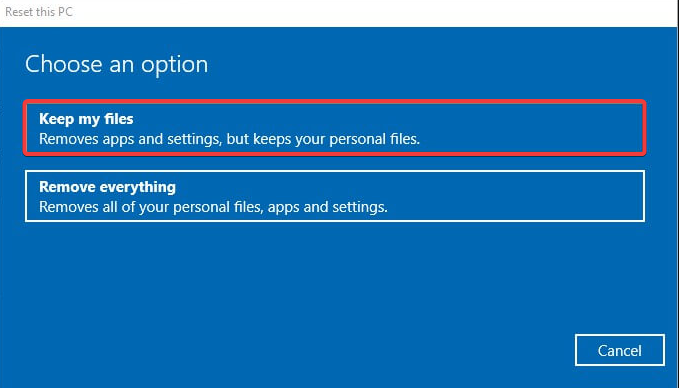
Note: Another method you can use to fix Ndu.sys errors is refreshing Windows 10. Once you’ve hit the Refresh button, the OS will remove all third-party software installed on your computer.
6. Run the BSOD troubleshooter
- Open the Settings app and go to the Update & Security section.

- Click on Troubleshoot from the menu on the left, choose Blue Screen from the right pane, and click Run the troubleshooter.

- Follow the instructions on the screen to complete the troubleshooting.
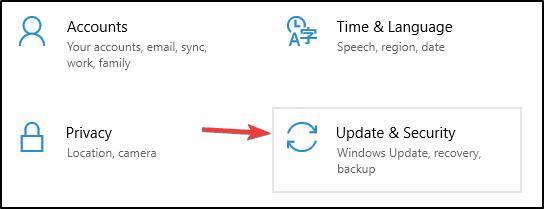
Note: BSoD errors are pretty frequent on Windows 10. For this reason, Microsoft added a built-in BSOD troubleshooter to Windows 10’s Settings page.
7. Clean install Windows 10
If nothing worked, performing a clean reinstall of Windows 10 is the last resort method.
Starting from scratch allows you to eliminate all the elements that triggered Ndu.sys errors and fix the issue for good.
So, if you want to clean install Windows 10, you need your installation drive or DVD and a lot of patience. The whole process usually takes one hour or two.
How do I fix Ndu.sys failed on Windows 11?
On Windows 11, most of the solutions that have worked on Windows 10 are still applicable. You could try any of the following:
- Renaming the Ndu.sys folder
- Installing the latest network card drivers
- Updating the OS
- Changing your internet connection
- Uninstall third-party programs (the Ndu.sys error has been connected to Malwarebytes)
The steps are similar to the solutions described above for Windows 10.
Should you disable NDU?
The NDU system finds peripheral devices; for instance, NDU enables the OS to interface with USB ports to identify any attached USB devices.
Although deactivating the NDU registry is not advised, it can be helpful as NDU will no longer constantly check for new devices. This reduces the use of available resources like memory and computing power.
We hope these solutions helped you get your network running until Microsoft releases a hotfix for this issue.
This is all you need to do to fix the Ndu.sys error message in Windows 10. Also, if you need further help with this issue, please let us know by posting a comment below.
![]()
Download Windows Speedup Tool to fix errors and make PC run faster
The original Ndu.sys is an important part of Windows and rarely causes problems. The file Ndu.sys is the Windows Network Data Usage Monitoring Driver file and is located in the C:\Windows\System32\drivers folder and the process is known as Windows Network Data Usage Monitoring Driver. If you’re encountering the Ndu.sys Blue Screen error on your Windows 11/10 device, you can try the solutions provided in this post.

You may encounter this issue after a successful upgrade to the latest version of Windows 11/10.
If you’re faced with this SYSTEM_SERVICE_EXCEPTION error, you can try our recommended solutions below in no particular order and see if that helps to resolve the issue.
- Run the Blue Screen Online Troubleshooter
- Update network card drivers
- Rename and replace Ndu.sys file
- Rollback to previous Windows 11/10 version
- Switch internet connection mode
- Reset Windows 11/10
- Clean install Windows 11/10
Let’s take a look at the description of the process involved concerning each of the listed solutions.
If you can log in normally, good; else you will have to boot into Safe Mode, enter Advanced Startup options screen, or use the Installation Media to boot to be able to carry out these instructions.
1] Run the Blue Screen Online Troubleshooter
In some cases, the Blue Screen Online Troubleshooter from Microsoft will resolve BSOD errors.
2] Update network card drivers
The Ndu.sys is known as Windows Network Data Usage Monitoring Driver. So, you might be encountering this error because of outdated or corrupted network card drivers. In this case, you can either update your drivers manually via the Device Manager, or you can get the driver updates on the Optional Updates section under Windows Update. You may also automatically update your drivers or you can download the latest version of the driver from the network card manufacturer’s website.
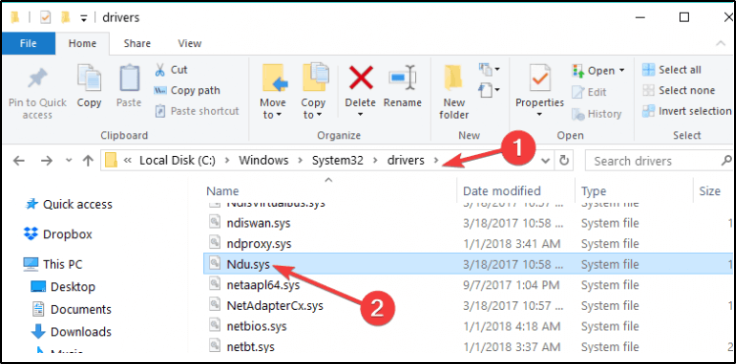
3] Rename and replace Ndu.sys file
Do the following:
- Press Windows key + E to open File Explorer.
- Navigate to the folder path below:
C:\Windows\System32\drivers
- At the location, right-click on the Ndu.sys file and then select Rename.
- Name the Ndu.sys file as Ndu.sys1.
Note: If you cannot change the name of the file, make sure you logged in with an administrator account or simply change the permissions you have on this specific file to the administrator.
- Next, open again the C: partition you have Windows 10 installed.
- Search in the C: partition for the Windows.old folder. This folder contains the old Windows 10 version you upgraded from.
- Locate and open the System32 folder you have in the Windows.old folder.
- Now find and double-click to open the driver’s folder.
- Search in the drivers’ folder for the Ndu.sys file.
- Right-click on it and select the Copy option.
- Now paste it in the drivers’ folder of the current upgraded Windows 10 install.
- Exit File Explorer.
- Reboot your Windows 10 computer.
On boot, check to see if the BSOD error persists. If so, try the next solution.
4] Rollback to previous Windows version
This solution requires you to roll back to a previous version of Windows 11/10.
5] Switch internet connection mode
This solution requires you to switch internet connection mode. So, if you are using a wired (ethernet) connection mode to access the internet on your Windows 10 computer, you can switch to wireless connection mode or vice-versa, and see if the error persists.
6] Reset Windows 11/10
This solution requires you to reset Windows and see if that helps.
7] Clean install Windows 11/10
At this point, if none of the above solutions worked to resolve the BSOD error, it’s most likely due to some kind of system corruption that cannot be resolved conventionally. In this case, you can back up your files to an external USB drive; if you can’t boot to the desktop, use a Linux Live USB and then clean install Windows.
Hope this helps!
Obinna has completed B.Tech in Information & Communication Technology. He has worked as a System Support Engineer, primarily on User Endpoint Administration, as well as a Technical Analyst, primarily on Server/System Administration. He also has experience as a Network and Communications Officer. He has been a Windows Insider MVP (2020) and currently owns and runs a Computer Clinic.
What is ‘ndu.sys BSOD’ error in Windows 10?
In this article, we are going to discuss on How to fix ndu.sys BSOD Windows 10. You will be guided with easy steps/methods to resolve the issue. Let’s starts the discussion.
‘ndu.sys BSOD error Windows 10’: It is common Windows Problem considered as Blue Screen of Death (BSOD) error. This error is appeared with message saying ‘Your PC ran into a problem and needs to restart. We’re just collecting some error info, and then we’ll restart for you’ along with some Windows Stop Codes like SYSTEM_SERVICE_EXCEPTION error and ndu.sys error. This BSOD error is usually appeared in the middle of your work on Windows computer or when you start/restart your Windows computer.
If you are not aware, ndu.sys is important part of Microsoft Windows and rarely causes the issue. The file ndu.sys is Windows Network Data Usage Monitoring Driver file and is located in ‘C:\Windows\System32\drivers’ folder and the process is known as Windows Network Data Usage Monitoring Driver. However, several users reported they faced ndu.sys BSOD error in Windows 10 computer possibly due to issue with ndu.sys file.
There could be several reasons behind the issue including outdated/corrupted network drivers, outdated Windows OS, issue with ndu.sys files, corruption in system files or registry, and other issues. It might possible you have accidently deleted the ndu.sys file from its original path or the file is moved to another path of computer. You can rename and replace ndu.sys file in order to fix. It is possible to fix the issue with our instructions. Let’s go for the solution.
How to fix ndu.sys BSOD Windows 10?
Method 1: Fix ‘ndu.sys BSOD’ error with ‘PC Repair Tool’
‘PC Repair Tool’ is easy & quick way to find and fix BSOD errors, DLL errors, EXE errors, problems with programs/applications, malware or viruses infections in computer, system files or registry issues, and other system issues with just few clicks.
Method 2: Run Blue Screen Troubleshooter
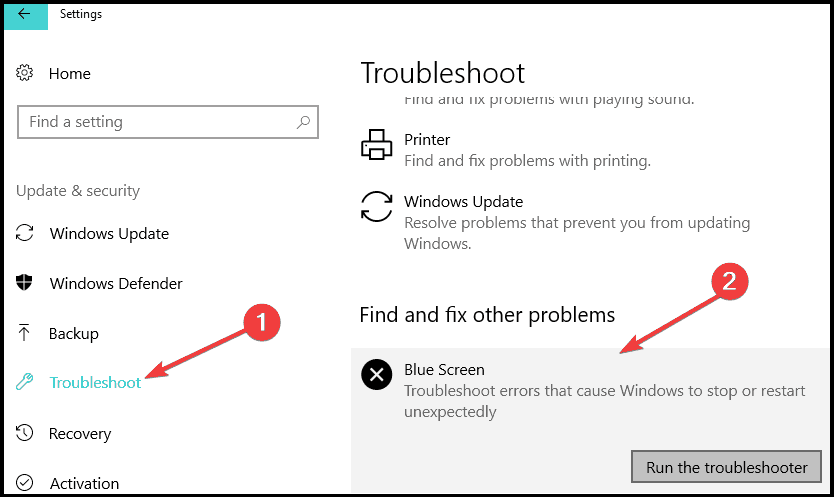
Windows built-in Blue Screen troubleshooter can resolve the issue.
Step 1: Open ‘Settings’ app in Windows PC via Windows Search Box and go to ‘Update & Security > Troubleshoot > Additional Troubleshooters’
Step 2: Find and select ‘Blue Screen’ troubleshooter, and click ‘Run the troubleshooter’ and follow on-screen instructions to finish troubleshooting and once finished, check if the issue is resolved.
Method 3: Rename ndu.sys folder
Step 1: Open ‘This PC’, ‘My Computer’ and go to ‘C: > System32’ folder
Step 2: Go to ‘Drivers’ folder and look for ndu.sys file, right-click it and select ‘Rename’ and rename it to ‘ndu.sys11’ and save the changes
Step 3: Once again the C: partition you have Windows 10 installed. Search for C: drive for Windows.old folder this time because this should be the old Windows OS you upgraded from
Step 4: Go to ‘System32’ folder and go to ‘Drivers’ folder, search for ndu.sys file, right-click on it and select ‘Copy’. Now, paste it in Drivers folder of Windows 10 version.
Step 5: Once done, restart your computer and check if the issue is resolved.
Method 4: Update Network Adapter Drivers
Updating network adapter drivers to latest version can resolve the issue. You can update all Windows drivers including network adapter drivers using Automatic Driver Update Tool. You can get this tool through button/link below.
Method 5: Update Windows OS
Updating Windows OS to latest version can resolve the issue.
Step 1: Open ‘Settings’ app and go to ‘Update & Security > Windows Update’ and click ‘Check for updates’ and click ‘Check for updates’ button
Step 2: Download and install all available updates in computer and once updated, restart your computer and check if the issue is resolved.
Method 6: Try a different internet connection
This issue can be occurred due to some issue with your internet connection. You should make sure internet connection is working fine and there is no issue with internet connection at all. You can try a different internet connection and check if the issue is resolved. Also, you can try a wired connection if you face the issue with wireless network connection, and check if it works.
Method 7: Reset Windows 10
If the issue is still persist, you can perform Windows 10 reset operation in computer in order to fix.
Step 1: Open ‘Settings’ app in Windows PC and go to ‘Update & Security > Recovery > Reset This PC’ and click ‘Get Started’
Step 2: Follow on-screen instructions to finish resetting process and once finished, restart your computer and check if the issue is resolved.
Method 8: Clean Windows 10 Install
If the issue is still persist, you can try to fix the issue by performing clean Windows 10 installation. To do s, you need to insert Bootable Windows 10 Installation Media USB into your computer and boot your computer with it, perform clean Windows installation in computer and once finished, check if it works for you.
Conclusion
I hope this post helped you on How to fix ndu.sys BSOD Windows 10 with easy steps/methods. You can read & follow our instructions to do so. That’s all. For any suggestions or queries, please write on comment box below.
На чтение 7 мин. Просмотров 22k. Опубликовано
Содержание
- Как я могу исправить ошибки Ndu.sys в Windows 10?
- Решено: Ndu.sys синий экран смерти ошибка
- 1. Переименуйте папку Ndu.sys
- 2. Установите последние драйверы сетевой карты
- 3. Откат к предыдущей версии ОС
- 4. Проверьте наличие обновлений
- 5. Используйте другое подключение к Интернету
- 6. Сбросить Windows 10
- 7. Запустите средство устранения неполадок BSOD
- 8. Чистая установка Windows 10
Как я могу исправить ошибки Ndu.sys в Windows 10?
- Переименуйте папку Ndu.sys
- Установите последние версии драйверов сетевых карт
- Откат к предыдущей версии ОС
- Проверить наличие обновлений
- Используйте другое подключение к Интернету
- Сброс Windows 10
- Запустите средство устранения неполадок BSOD
- Чистая установка Windows 10
Вы установили последнюю версию ОС Windows 10, чтобы посмотреть, как она работает? Ну, к сожалению, некоторые пользователи столкнулись с некоторыми проблемами в связи с ошибкой Ndu.sys . Это, безусловно, одна из самых распространенных и не очень простых ошибок, которые вы можете получить в Windows 10. Будьте уверены, выполнив шаги, перечисленные в этом руководстве, вы исправите ошибки Ndu.sys в Windows 10 и продолжить тестирование новой операционной системы.

Ошибка «драйвер не равен или меньше (ndu.sys)» сопровождается традиционным синим экраном. Это означает, что если вы получите его во время использования, оно действительно не исчезнет, если вы не перезагрузите операционную систему, и даже после этого оно может появиться случайно через несколько минут. Это сообщение об ошибке вызвано несовместимыми драйверами оборудования, а точнее драйвером беспроводного адаптера.
Решено: Ndu.sys синий экран смерти ошибка
- Откройте значок «Мой компьютер», дважды щелкнув по нему или перейдя в меню «Пуск» и щелкнув по нему левой кнопкой мыши.
- Дважды щелкните, чтобы войти в раздел «C: /» или любой раздел, на котором вы установили Windows 10 Technical Preview.
- Дважды щелкните папку «Windows», чтобы открыть ее.
- Теперь найдите файл «System32» в папке «Windows» и дважды щелкните его, чтобы открыть.
- Теперь перейдите в папку «System32», найдите папку «drivers» и дважды щелкните по ней, чтобы открыть.
-
После того, как вы попали в папку «Drivers», вам нужно будет найти файл «Ndu.sys».
- Щелкните правой кнопкой мыши файл «Ndu.sys» и щелкните левой кнопкой мыши или нажмите «Переименовать» в появившемся меню.
-
Назовите «Ndu.sys» как «Ndu.sys11» или как угодно, но не забудьте изменить имя и запомнить его.
Примечание. Если вы не можете изменить имя файл, вам придется войти в систему с учетной записью администратора или просто изменить разрешения, которые у вас есть для этого конкретного файла на администратора. - Снова откройте раздел «C:», на котором установлена Windows 10.
- Ищите в разделе «C:» папку «Windows.old» на этот раз, потому что это должна быть старая операционная система Windows, с которой вы обновились.
- Снова откройте папку «System32», находящуюся в папке «Windows.old».
- Теперь найдите и дважды щелкните, чтобы открыть папку «драйверы».
- Найдите в папке «drivers» файл «Ndu.sys».
- Щелкните правой кнопкой мыши и выберите «Копировать».
- Теперь вставьте его в папку «драйверы» версии Windows 10.
- Закройте окна, которые вы открыли.
- Перезагрузите компьютер с Windows 10.
- Проверьте, не появился ли у вас тот же синий экран смерти с ошибкой Ndu.sys, но я уверен, что с этого момента у вас больше не будет проблем.

- СВЯЗАННЫЕ: исправьте ошибки Blue Screen of Death с помощью этих 4 программных решений
2. Установите последние драйверы сетевой карты
- Перейдите на сайт производителя вашей сетевой карты.
- Поиск последней версии драйверов, совместимых с последней версией ОС Windows 10.
- Загрузите и установите драйверы.
- Перезагрузите систему Windows 10 и проверьте, сохраняется ли та же проблема.
Мы также рекомендуем этот сторонний инструмент (на 100% безопасный и протестированный нами) для автоматической загрузки устаревших драйверов на ваш компьютер.
3. Откат к предыдущей версии ОС
Если вышеуказанные методы не помогли решить проблему, я бы предложил вернуться к предыдущей версии ОС Windows 10 или сборке Windows 10, если вы инсайдер.
4. Проверьте наличие обновлений
- Щелкните левой кнопкой мыши или коснитесь значка «Internet Explorer», который находится у вас в нижней части экрана.
- Запишите в адресную строку Internet Explorer, расположенную в верхней части окна, следующее: « http://update.microsoft.com »
- Нажмите кнопку «Ввод» на клавиатуре.
- Он должен попросить вас проверить систему, и в этом случае вы должны щелкнуть левой кнопкой мыши или нажать кнопку «Да», чтобы продолжить.
- В следующем появившемся окне будут проверены все доступные обновления в вашей системе.
- Следуйте инструкциям на экране для установки последних обновлений Windows 10.
- Перезагрузите систему и еще раз проверьте, появляется ли синий экран Ndu.sys.
- СВЯЗАННЫЕ: Как просмотреть подробности BSOD в Windows 10, 8.1, 8
5. Используйте другое подключение к Интернету
- Если вы используете проводное подключение к Интернету на компьютере с Windows 10, попробуйте переключить его на беспроводной и проверить, не появляется ли у вас то же сообщение об ошибке.
- Если вы используете беспроводное подключение к Интернету, сделайте обратное и переключитесь на проводное подключение к Интернету, чтобы увидеть, появляется ли по-прежнему это сообщение об ошибке.
- СВЯЗАННЫЕ: Исправлено: BSOD для Windows 10, 8.1, 7, вызванный ntoskrnl.exe
6. Сбросить Windows 10
Другим методом, который можно использовать для исправления ошибок Ndu.sys, является обновление Windows 10. После нажатия кнопки «Обновить» ОС удалит все стороннее программное обеспечение, установленное на вашем компьютере. Тем не менее, он все равно сохранит все ваши личные файлы и настройки.
- Перейдите в Настройки> Обновление и безопасность> Устранение неполадок.
- Выберите Сбросить этот ПК.
-
В открывшемся окне выберите «Сохранить мои файлы».
- Выберите версию Windows, которую вы хотите обновить> нажмите кнопку «Сброс».
- Подождите, пока процесс завершится. Это может занять несколько минут, в зависимости от количества программного обеспечения, установленного на вашем компьютере.

7. Запустите средство устранения неполадок BSOD
Ошибки BSOD довольно часто встречаются в Windows 10. По этой причине Microsoft добавила встроенное средство устранения неполадок BSOD на страницу настроек Windows 10. Чтобы запустить этот инструмент, перейдите в Настройки> Обновление и безопасность> Устранение неполадок> выберите и запустите средство устранения неполадок «Синий экран».

- СВЯЗАННЫЕ: Как исправить ошибку BSOD atikmdag.sys в Windows 10
8. Чистая установка Windows 10
Если ничего не помогло, чистая переустановка – это, в конце концов, последний метод. Начать с нуля позволяет избавиться от всех элементов, которые вызвали ошибки Ndu.sys и исправить проблему навсегда.
Итак, если вы хотите очистить установку Windows 10, вам нужен установочный диск или DVD и много терпения. Весь процесс обычно занимает один час или два. Вот шаги, чтобы следовать:
- Загрузите инструмент Media Creation на альтернативный компьютер.
- Вставьте чистый DVD-диск или совместимую флэш-память USB (4 ГБ или более).
- Запустите инструмент создания медиа.
- Перейдите к разделу «Создать установочный носитель» (USB-накопитель, DVD-диск или файл ISO) для другого ПК> нажмите «Далее».
- Настройте свои параметры> выберите версию ОС, которую вы хотите установить.
- Выберите флэш-накопитель USB или ISO в зависимости от выбранного носителя> нажмите «Далее».
- Запишите файлы на DVD или создайте загрузочный USB-накопитель> Перезагрузите компьютер.
- Нажмите F10, F11, F12, чтобы открыть меню загрузки.
- Выберите USB-накопитель или DVD-ROM в качестве основного загрузочного устройства> нажмите любую клавишу для загрузки.
- Выберите Advanced и отформатируйте системный раздел.
- Выберите его и начните с установки.
Если вы не хотите выполнять все перечисленные выше шаги для чистой установки Windows 10, вы можете использовать Windows Refresh Tool для выполнения этой работы.
Мы надеемся, что эти решения помогли вам настроить вашу сеть и запустить ее, пока Microsoft не выпустит исправление для этой проблемы.
Это все, что вам нужно сделать, чтобы исправить сообщение об ошибке Ndu.sys в Windows 10. Кроме того, если вам нужна дополнительная помощь в решении этой проблемы, сообщите нам об этом, оставив комментарий в комментариях ниже.