Well it is pretty much easy in windows 2008 if you install Routing and Remote Access server role. Go to Server Manager -> Add Roles -> And select Routing and Remote Access. Then from the console you can enable and configure routing.
From what you describe on your question you will need to set up your NIC2 as the interface pointing to the internet and you may want to enable NAT for addressing private range of IP Addresses for your internal network.
Related videos on Youtube

13 : 32
Configure a server running Windows Server 2008 R2 become a Routing device

05 : 08
How To Enable LAN Routing on Windows Server 2008 R2

12 : 11
Routing and Remote Access — Windows Server 2008 SP2

08 : 23
How to setup a basic router in Server 2008R2

02 : 13
DevOps & SysAdmins: Using Windows Server 2008 R2 as a router (2 Solutions!!)
Comments
-
I have setup a new box with the following:
Hardware — Dell 990, Core i5 CPU, 4GB RAM, 500GB hard disk, 2 NICs
NIC1 — Connected with D-Link gigabit switch — 30 Users
NIC2 — Connected with ADSL Modem/Router
OS — Windows Server 2008 R2
Roles — ADDS, DNS, DHCP
Below are the requirements:
- Users will get their IP address, subnet mask, DNS server IP and
default gateway from the server. - Users will be using internet through this server.
How can this be achieved?
-
As «spirit» says, it is possible. But this box is way to overpowered for this kind of task. Any standard router could do this task at much lower cost.
- Users will get their IP address, subnet mask, DNS server IP and
-
All that is unnecessary to setup the server simply as a server. All you need is to add the route to the routine table (check out «ROUTE ADD»), add the relevant firewall rules (if applicable) and you’re done. What you’re describing is how to setup the server as a NAT device which is a rather different can of worm: the OP better understand the difference before starting in this path. (not that what you said is incorrect, mind you, it’s just answering a different question).
-
@Stephane — The question states «Users will be using internet through this server» — while I’d admit it could be a LITTLE clearer, combining that statement with the question title pretty much says that the answer is what Spirit said it is — Install RRAS and yes, you’d be using the server as a NAT device.
-
@Stephane — re: Connection issues — sorry, I don’t follow. I’ve setup RRAS for years… I think going back to 2000 for routing. Never seen connection issues and it’s proven to be one of the more reliable routers I’ve used. Indeed, SBS 2003 favored this configuration. Yes, if the router or modem supports NAT I’d go with that in MOST cases, but from the posted question, I’m not sure why you are assuming it does or even exists.
-
@MultiverseIT Simply put: there is plenty of opportunity for NAt to go bad, when you perform two NAT translations using two different systems, you’re begging for problems. Add the fact that is is simply not needed and using RRAS if the device in front of the server is already doing NAT is more than pointless. If you really want to do that (and there ARE reasons for this) then at least highlight the fact that you must bridge the modem to the server’s external NIC too (and configure the firewall).
-
@Stephane — Why are you assuming double-NAT? First, I avoid that whenever possible and have only seen it implemented in a few places. Second, I have never seen a problem with it (and I see a LOT of questions on forums and help a lot of clients). Third, in my experience of supporting various clients and helping others on forums over the last 16 years, having the MODEM doing NAT has typically only been done with select DSL systems. It really seems you are making an excessive number of assumptions that are just not likely to be the case.
-
@MultiverseIT let’s put it this way: you made an assumption when you answered the OP question: that he wanted NAT. I raised that fact and added that not only wasn’t it answering the original question, it also could produce some additional issues if you’re using it behind the «traditional» home/SOHO DSL setup and that you should include that fact in your answer. believe me: NAT in itself is (a necessary) evil (due to the obscure way most NAT system build their translation tables) so you shouldn’t push your luck by adding two translation when one would do.
Recents
Related
Lab: Using Windows Server 2008 R2 as a Simple NAT Router
We have a number of lab setups that require the VMs to be on their own Private Network in Hyper-V but still have access to the Internet.
In some cases we need to have access to that private network and the VMs just as we would a product network.
In comes Windows Server 2008 R2 SP1. We set up the VM with two vNICs. One is connected to the Private Network while the other is connected to the Internet via our internal production network (gives us quick access to the lab VMs).
- We install the OS
- Install Integration Services.
- Install the Network Policy and Access Services Role.
- Run the Configure and Enable Routing and Remote Access.
- Choose VPN and NAT

- Set the WAN connection.
- Allow DHCP to be set automatically.
- No RADIUS for authentication

- Click OK to the DHCP Relay warning.


We now have an internal router that will allow the VMs on the Private Network to reach out to the Internet.
Finally, to publish internal services via the WAN connection:
- Click on NAT under IPv4

- Right click on the WAN Interface in the centre pane and click Properties.
- Click on HTTPS (443) and a window pops up.
- Enter the IP address of the server hosting HTTPS and click OK.
- Tick the check to the left of HTTPS and then click Apply (if it did not do so).

- Repeat for the needed published services.
- Test the connections:


In the end, it should take no more than 20 minutes to have the first router configured.
Philip Elder
MPECS Inc.
Microsoft Small Business Specialists
Co-Author: SBS 2008 Blueprint Book
Windows Live Writer
I have setup a new box with the following:
Hardware — Dell 990, Core i5 CPU, 4GB RAM, 500GB hard disk, 2 NICs
NIC1 — Connected with D-Link gigabit switch — 30 Users
NIC2 — Connected with ADSL Modem/Router
OS — Windows Server 2008 R2
Roles — ADDS, DNS, DHCP
Below are the requirements:
- Users will get their IP address, subnet mask, DNS server IP and
default gateway from the server. - Users will be using internet through this server.
How can this be achieved?
- domain-name-system
- active-directory
- windows-server-2008-r2
- dhcp-server
![]()
slayernoah
1,6502 gold badges13 silver badges19 bronze badges
asked Nov 24, 2011 at 15:16
![]()
1
-
As «spirit» says, it is possible. But this box is way to overpowered for this kind of task. Any standard router could do this task at much lower cost.
Nov 24, 2011 at 15:31
2 Answers
Well it is pretty much easy in windows 2008 if you install Routing and Remote Access server role. Go to Server Manager -> Add Roles -> And select Routing and Remote Access. Then from the console you can enable and configure routing.
From what you describe on your question you will need to set up your NIC2 as the interface pointing to the internet and you may want to enable NAT for addressing private range of IP Addresses for your internal network.
answered Nov 24, 2011 at 15:26
![]()
SpiritSpirit
1,1548 gold badges25 silver badges45 bronze badges
7
-
All that is unnecessary to setup the server simply as a server. All you need is to add the route to the routine table (check out «ROUTE ADD»), add the relevant firewall rules (if applicable) and you’re done. What you’re describing is how to setup the server as a NAT device which is a rather different can of worm: the OP better understand the difference before starting in this path. (not that what you said is incorrect, mind you, it’s just answering a different question).
Nov 24, 2011 at 15:38
-
@Stephane — The question states «Users will be using internet through this server» — while I’d admit it could be a LITTLE clearer, combining that statement with the question title pretty much says that the answer is what Spirit said it is — Install RRAS and yes, you’d be using the server as a NAT device.
Nov 27, 2011 at 19:27
-
@MultiverseIT If the network access device (modem or otherwise) already performs NAT, it’s unecessary to configure it as well on the server. It can also cause real connection issues.
Nov 28, 2011 at 10:34
-
@Stephane — re: Connection issues — sorry, I don’t follow. I’ve setup RRAS for years… I think going back to 2000 for routing. Never seen connection issues and it’s proven to be one of the more reliable routers I’ve used. Indeed, SBS 2003 favored this configuration. Yes, if the router or modem supports NAT I’d go with that in MOST cases, but from the posted question, I’m not sure why you are assuming it does or even exists.
Nov 28, 2011 at 14:27
-
@MultiverseIT Simply put: there is plenty of opportunity for NAt to go bad, when you perform two NAT translations using two different systems, you’re begging for problems. Add the fact that is is simply not needed and using RRAS if the device in front of the server is already doing NAT is more than pointless. If you really want to do that (and there ARE reasons for this) then at least highlight the fact that you must bridge the modem to the server’s external NIC too (and configure the firewall).
Nov 29, 2011 at 10:21
You can set up quickly using PowerShell:
Install-WindowsFeature Routing -IncludeManagementTools

Install-RemoteAccess -VpnType Vpn

netsh routing ip nat install
netsh routing ip nat add interface WAN
netsh routing ip nat set interface WAN mode=full
netsh routing ip nat add interface LAN
Extracted from: http://www.sysadmit.com/2016/03/windows-server-como-router.html
answered Mar 11, 2016 at 10:28
![]()
You must log in to answer this question.
Сегодня мы рассмотрим вопрос организации общего доступа к интернет и автоматической настройки сети на платформе Windows. Несмотря на то, что это более дорогое решение, его применение будет оправдано когда необходима тесная интеграция с сетевой инфраструктурой развернутой на базе Windows Server.
Научиться настраивать MikroTik с нуля или систематизировать уже имеющиеся знания можно на углубленном курсе по администрированию MikroTik. Автор курса, сертифицированный тренер MikroTik Дмитрий Скоромнов, лично проверяет лабораторные работы и контролирует прогресс каждого своего студента. В три раза больше информации, чем в вендорской программе MTCNA, более 20 часов практики и доступ навсегда.
В качестве рабочей платформы мы использовали Windows Server 2008 R2, как наиболее актуальную на сегодняшний день платформу, однако все сказанное с небольшими поправками применимо и к предыдущим версиям Windows Server 2003 / 2008.
 Первоначально необходимо настроить сетевые интерфейсы. В нашем случае интерфейс смотрящий в сеть провайдера получает настройки по DHCP, мы переименовали его в EXT. Внутренний интерфейс (LAN) имеет статический IP адрес 10.0.0.1 и маску 255.255.255.0.
Настройка NAT
Простейшим способом организовать общий доступ к интернет будет включение соответствующей опции в настройках сетевого подключения. Однако при всей простоте такой способ чрезвычайно негибок и приемлем только если никаких других задач маршрутизации перед сервером ставиться не будет. Лучше пойти более сложным, на первый взгляд, путем, зато получить в свои руки весьма мощный и гибкий инструмент, позволяющий решать гораздо более сложные сетевые задачи.
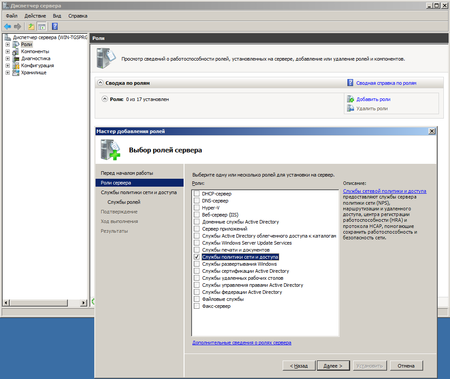 Начнем, как полагается, с добавления новой роли сервера: Служб политики сети и доступа.
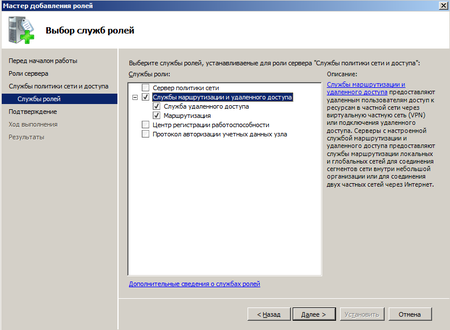 В службах ролей отмечаем Службы маршрутизации и удаленного доступа, все остальное нас сейчас не интересует. После успешной установки роли можно будет переходить к настройкам маршрутизации.
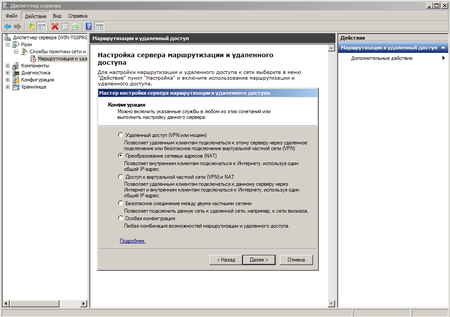 В Ролях находим службу маршрутизации и через меню Действия выбираем Настроить и включить маршрутизацию и удаленный доступ. Настройка производится с помощью мастера, который пошагово проведет нас через все этапы настройки. В качестве конфигурации выбираем Преобразование сетевых адресов (NAT), любые другие возможности можно будет настроить позже вручную.
 Здесь нужно указать интерфейс которым наш сервер подключен к интернету, при необходимости его можно создать (например при использовании PPPoE или VPN соединения).
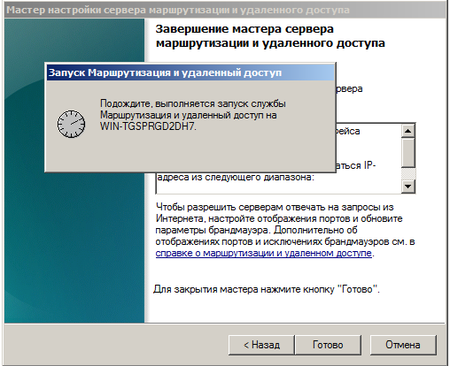 Остальные настройки оставляем по умолчанию и после нажатия на кнопку готово произойдет запуск службы Маршрутизации и удаленного доступа, наш сервер готов обслуживать клиентов из внутренней сети. Проверить работоспособность можно указав клиентской машине IP адрес из диапазона внутренней сети и указав в качестве шлюза и DNS сервера адрес нашего сервера.
Настройка DHCP
Для автоматической настройки сетевых параметров на клиентских машинах, ну не бегать же от места к месту вручную прописывая IP адреса, следует добавить роль DHCP сервера.
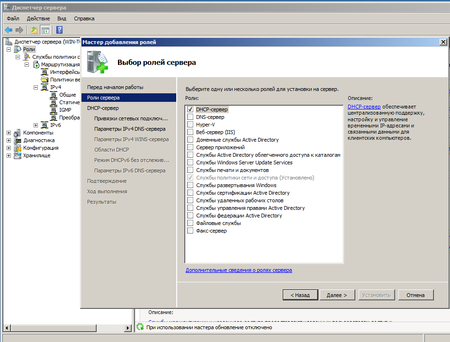 Для этого выбираем Добавить роль в Диспетчере сервера и отмечаем необходимую нам опцию.
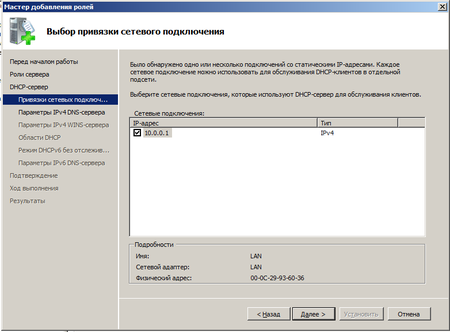 Теперь нам предстоит ответить на ряд несложных вопросов. В частности выбрать для каких внутренних сетей следует использовать DHCP, при необходимости можно настроить различные параметры для разных сетей. Потом последовательно указать параметры DNS и WINS серверов. Последний, при его отсутствии, можно не указывать. Если в вашей сети отсутствуют старые рабочие станции под управлением ОС отличных от Windows NT 5 и выше (2000 / XP / Vista / Seven), то необходимости в WINS сервере нет.
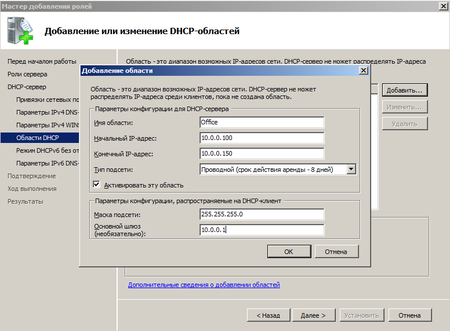 К добавлению DHCP-области нужно отнестись с повышенной внимательностью, ошибка здесь может привести к неработоспособности всей сети. Ничего сложного здесь нет, просто внимательно вводим все необходимые параметры сети, следя, чтобы выделяемый диапазон IP не перекрывал уже выделенный для других устройств и не забываем правильно указывать маску и шлюз.
Отдельно следует обратить внимание на такой параметр как срок аренды адреса. По истечении половины срока аренды клиент посылает серверу запрос на продление аренды. Если сервер недоступен, то запрос будет повторен через половину оставшегося срока. В проводных сетях, где компьютеры не перемещаются в пределах сети, можно выставлять достаточно большой срок аренды, при наличии большого количества мобильных пользователей (например публичная Wi-Fi точка в кафе) срок аренды можно ограничить несколькими часами, иначе не будет происходить своевременное освобождение арендованных адресов и в пуле может не оказаться свободных адресов.
Следующим шагом отказываемся от поддержки IPv6 и после установки роли DHCP сервер готов к работе без каких либо дополнительных настроек. Можно проверять работу клиентских машин.
 Выданные IP адреса можно посмотреть в Арендованных адресах, относящихся к интересующей нас области. Здесь же можно настроить резервирование за определенным клиентом конкретного адреса (привязав по имени или MAC-адресу), при необходимости можно добавить или изменить параметры области. Фильтры позволяют создать разрешающие или запрещающие правила основываясь на MAC-адресах клиентов. Более полное рассмотрение всех возможностей DHCP-сервера Windows Server 2008 R2 выходит за рамки данной статьи и скорее всего мы посвятим им отдельный материал.
Научиться настраивать MikroTik с нуля или систематизировать уже имеющиеся знания можно на углубленном курсе по администрированию MikroTik. Автор курса, сертифицированный тренер MikroTik Дмитрий Скоромнов, лично проверяет лабораторные работы и контролирует прогресс каждого своего студента. В три раза больше информации, чем в вендорской программе MTCNA, более 20 часов практики и доступ навсегда.
Proper inflow and outflow of network traffic requires careful setup of the device that directs the traffic — your router. Email, Internet access, remote access, and other services require ports to be opened and forwarded to function successfully. This article
covers router setup for Windows Small Business Server 2008.
Directions are provided for the following routers. If your router is not listed, use the General Directions.
- General Directions
- Linksys BEFSR41
- Netgear RP614
- Sonicwall TZ170
- Sonicwall TZ100
- D-Link DIR-825
- Linksys WRT160N
- Linksys WRT54GL
- Watchguard Firebox X20e
Note: this article was written for Windows SBS 2008. If you use Windows SBS 2003, you will need to modify the steps using different firewall ports. See the following topic for firewall ports to open for Windows SBS 2003:
http://technet.microsoft.com/en-us/library/cc747257(WS.10).aspx.
Important: Verify Your Settings!
You should verify any settings in this document to ensure your router is properly directing and filtering Internet traffic as desired.
Overview
The following is a diagram of a typical home or small business network.

A typical home or small business network consists of the following:
- An Internet connection: provided by your Internet Service Provider (ISP).
- An Internet connection device: usually a cable or DSL modem provided by your ISP. Some ISPs provide a device that combines a modem with a broadband router.
- A broadband router: a device that routes network traffic from your local network to the Internet. Small business routers usually provide firewall services requiring port configuration. Some routers support UPnP to simplify configuration.
The router may also function as a wireless access point. - Client computers: connect to each other through a switch (sometimes part of the router) and to the Internet through the broadband router. Multiple switches may be used if you connect more than a few desktop and notebook computers.
- A home or small business server: provides file sharing and remote access.
Reality Check
This article assumes you have a basic understanding of small business networking.
If the terms ping, static IP address, DHCP, firewall ports, and UPnP are a foreign language for you, consider having a friend or consultant help you set up your network.
The following links provide information on small business networking:
General Directions
UPnP Router Configuration
Many broadband routers designed for small business support UPnP – a standard that simplifies router setup. Check your product documentation for UPnP support. If UPnP is supported, Windows SBS 2008 may be able to automatically configure your broadband router.
-
If your router supports UPnP, ensure that UPnP is enabled.
-
Open your Web browser, and then connect to the configuration Web page for your router. Usually the Web page is at the IP address of your router.
-
If necessary, type your user name and password to log on to the configuration Web page. Some routers include a default user name, password, and IP address on the underside of the router. For more information, see the documentation
for your router. -
Find the UPnP setting page on your router. For more information, see the documentation for your router.
-
Save the configuration on your router, and then close the browser. If your router needs to restart, wait until it restarts completely before you proceed.
NOTE: For security reasons,you should disable UPnP after you have configured the router. Because there is no longer a need for UPnP based configuration, it is a security best practice to eliminate potential attack
vectors.
Manual Router Configuration
If your router does not support UPnP, or if UPnP is disabled, there may be a yellow warning icon and the text indicating your router could not be found or configured when Windows SBS 2008 attempts to configure your router. If your router does not support
the UPnP standard, you must manually configure your router to forward the following ports to the IP address of your Windows SBS 2008 server:
| Service or Protocol | Port |
| SMTP e-mail | TCP 25 |
| HTTP Web traffic | TCP 80 |
| HTTPS Web traffic | TCP 443 |
| HTTPS Web traffic for Windows SharePoint Services through Remote Web Workplace | TCP 987 |
| VPN (if you plan to enable VPN on your Windows SBS 2008 server) | TCP 1723 |
| Remote Desktop Protocol (RDP, optional, allows direct Remote Desktop Connection to your Windows SBS 2008 server. Best practice is to not open this port unless RDP connection is required.) | TCP 3389 |
A typical router-configuration page includes a table that looks similar to the following one. This article will use 192.168.1.3 for the IP address of your Windows SBS 2008 server.
Port forwarding rules
| IP Address | Protocol (TCP/UDP) | Schedule | Inbound Filter |
| 192.168.1.3 | TCP 25 | Always | Allow All |
| 192.168.1.3 | TCP 80 | Always | Allow All |
| 192.168.1.3 | TCP 443 | Always | Allow All |
| 192.168.1.3 | TCP 987 | Always | Allow All |
| 192.168.1.3 | TCP 1723 | Always | Allow All |
| 192.168.1.3 | TCP 3389 | Always | Allow All |
To manually configure your router
- Open your Web browser, and then connect to the configuration Web page for your router. Usually the Web page is at the IP address of your router.
- If necessary, type your user name and password to log on to the configuration Web page. Some routers include a default user name, password, and IP address on the underside of the router. For more information, see the documentation for your router.
- Disable UPnP on your router.
- Find the port forwarding configuration page on your router.
- Type the necessary information to forward TCP port 80, TCP port 443, TCP port 987, TCP port 1723 (if you plan to enable VPN), and TCP port 3389 to the IP address of your Windows SBS 2008 server.
- Save the port-forwarding configuration on your router, and then close the browser. If your router needs to restart, wait until it restarts completely before you proceed.
Configure the Linksys BEFSR41 for Remote Access

UPnP Router Configuration
The Linksys BEFSR41 broadband router supports UPnP – a standard that simplifies router setup. If you enable UPnP in the Linksys BEFSR41, Windows SBS 2008 may be able to automatically configure your remote access settings.
-
Open the Web browser on your computer and enter the address for the Linksys router in the address field. The default IP address is
192.168.1.1. -
At the login screen, leave the User Name field blank and enter the router password. The default password is
admin. -
Click the Administration tab, the
Management page should be selected. If not, click the Management tab. -
For UPnP, click Enabled, and then click
Save Settings. -
Close the Web browser.

Once the router is configured, open the Windows SBS Console, click
Network, click Connectivity, and then click
Connect to the Internet. The Windows SBS 2008 Connect to the Internet wizard will attempt to find and configure the remote access settings on your router.
Manual Router Configuration
If you prefer to not use UPnP, you must manually configure your router to forward the following ports to the IP address of your Windows SBS 2008 server:
| Service or Protocol | Port |
| SMTP e-mail | TCP 25 |
| HTTP Web traffic | TCP 80 |
| HTTPS Web traffic | TCP 443 |
| HTTPS Web traffic for Windows SharePoint Services through Remote Web Workplace | TCP 987 |
| VPN (if you plan to enable VPN on your Windows SBS 2008 server) | TCP 1723 |
| Remote Desktop Protocol (RDP) | TCP 3389 |
To manually configure your router
- Open the Web browser on your computer and enter the address for the Linksys router in the address field. The default IP address is
192.168.1.1. - At the login screen, leave the User Name field blank and enter the router password. The default password is
admin. - Find the screen with UPnP settings and disable UPnP.
- Click the Applications and Gaming tab, the Port Range Forwarding page should be selected. If not, click the
Port Range Forwarding tab. - Enter the settings as in the screenshot below. The IP address should be the IP address of your server.
- Click Save Settings, and then close the Web browser.

Once the router is configured, open the Windows SBS Console, click
Network, click Connectivity, and then click
Connect to the Internet. The Windows SBS 2008 Connect to the Internet wizard will attempt to detect your router and configure your network.
Configure the Netgear RP614 for Remote Access

UPnP Router Configuration
The Netgear RP614v4 broadband router supports UPnP – a standard that simplifies router setup. If you enable UPnP in the Netgear RP614v4, Windows SBS 2008 may be able to automatically configure your remote access settings.
-
Open the Web browser on your computer and enter the address for the Netgear router in the address field. The default IP address is
192.168.1.1. -
At the login screen, enter the user name and password. The default user name is
admin. The default password is password. -
Under Advanced, click UPnP.
-
Click Turn UPnP On, and then click
Apply. -
Close the Web browser.

Once the router is configured, open the Windows SBS Console, click
Network, click Connectivity, and then click Connect to the Internet. The Windows SBS 2008 Connect to the Internet wizard will attempt to find and configure the remote access settings on your router.
Manual Router Configuration
If you prefer to not use UPnP, you must manually configure your router to forward the following ports to the IP address of your Windows SBS 2008 server:
| Service or Protocol | Port |
| SMTP e-mail | TCP 25 |
| HTTP Web traffic | TCP 80 |
| HTTPS Web traffic | TCP 443 |
| HTTPS Web traffic for Windows SharePoint Services through Remote Web Workplace | TCP 987 |
| VPN (if you plan to enable VPN on your Windows SBS 2008 server) | TCP 1723 |
| Remote Desktop Protocol (RDP) | TCP 3389 |
To manually configure your router
- Open the Web browser on your computer and enter the address for the Netgear router in the address field. The default IP address is
192.168.1.1. - At the login screen, enter the user name and password. The default user name is
admin. The default password is password. - Find the screen with UPnP settings and disable UPnP.
- Under Advanced, click Port Forwarding / Port Triggering.
- Under Service Name, click HTTP, enter the server IP address, and then click
Add. - Click Add Custom Service, and then enter the following settings:
Service Name: SMTP
Service Type: TCP
Starting Port: 25
Ending Port: 25
Server IP Address: your server IP address
- Click Apply.
- Continue adding the custom services you see in the screenshot below.
- Close the Web browser.

Once the router is configured, open the Windows SBS Console, click
Network, click Connectivity, and then click
Connect to the Internet. The Windows SBS 2008 Connect to the Internet wizard will attempt to detect your router and configure your network.
Configure
the Sonicwall TZ170 for Remote Access

UPnP Router Configuration
The Sonicwall TZ170 broadband router does not support UPnP.
Manual Router Configuration
You must manually configure your router to forward the following ports to the IP address of your Windows SBS 2008 server:
| Service or Protocol | Port |
| SMTP e-mail | TCP 25 |
| HTTP Web traffic | TCP 80 |
| HTTPS Web traffic | TCP 443 |
| HTTPS Web traffic for Windows SharePoint Services through Remote Web Workplace | TCP 987 |
| VPN (if you plan to enable VPN on your Windows SBS 2008 server) | TCP 1723 |
| Remote Desktop Protocol (RDP) | TCP 3389 |
To manually configure your router
- Open the Web browser on your computer and enter the address for the Sonicwall router in the address field. The default IP address is
192.168.1.1. - At the login screen, enter the user name and password. The default user name is
admin. The default password is password. - Click Firewall, and then click Services.
- Under Custom Services, click Add.
- Enter the following settings:
Name: RDP
Port Range: 3389 — 3389
Protocol: TCP(6)

- Click OK.
- Repeat the above steps and create a custom service for Sharepoint. Use port
987 (TCP). - Under Firewall, click Access Rules.
- Click Add.
- Enter the following settings:
Action: Allow
Service: RDP
Source, Ethernet: WAN
Destination, Ethernet: LAN
Destination, Address Range Begin: your server’s IP address
- Click OK.
- Repeat the above steps and add the following access rules:
Service: Send E-Mail (SMTP)Service: Web (HTTP)
Service: HTTPS
Service: Sharepoint – the name of the custom service you created above
Service: PPTP
- Close the Web browser.


Once the router is configured, open the Windows SBS Console, click
Network, click Connectivity, and then click
Connect to the Internet. The Windows SBS 2008 Connect to the Internet wizard will attempt to detect your router and configure your network.
Configure
the Sonicwall TZ100 for Remote Access

UPnP Router Configuration
The Sonicwall TZ100 broadband router does not support UPnP.
Manual Router Configuration
You must manually configure your router to forward the following ports to the IP address of your Windows SBS 2008 server:
| Service or Protocol | Port |
| SMTP e-mail | TCP 25 |
| HTTP Web traffic | TCP 80 |
| HTTPS Web traffic | TCP 443 |
| HTTPS Web traffic for Windows SharePoint Services through Remote Web Workplace | TCP 987 |
| VPN (if you plan to enable VPN on your Windows SBS 2008 server) | TCP 1723 |
| Remote Desktop Protocol (RDP) | TCP 3389 |
To manually configure your router
-
Open the Web browser on your computer and enter the address for the Sonicwall router in the address field. The default IP address is
192.168.168.168. - At the login screen, enter the user name and password. The default user name is
admin. The default password is password. - Click Firewall, and then click Services.
- Under Service Groups, View Style, click Custom Services.
- Unders Services, click Add.
- Enter the following settings:
Name: SharePointProtocol: TCP(6)Port Range: 987 — 987
- Click OK.
- Under Service Groups, click Add Group.
- For Name, enter: SBSPorts
- From the list on the left, select the following Services and add them to the list on the right with the right arrow button:
HTTP
HTTPS
PPTP
SharePoint
STMP
Terminal Services TCP
- Click OK.
- On the left navigation menu, under Firewall, click Access Rules
- Under Access Rules, View Style, click
Drop-down Boxes. - For the From Zone, select: WAN
- For the To Zone, select: LAN
- Click OK.
- Click Add.
- Under Settings, enter the following:
Action: Allow
Service: SBSPorts
Source: Any
Destination: WAN Primary IP (or the port use use for broadband)
Users Allowed: All
Schedule: Always on
- Click OK.
- Close the Web browser.


Once the router is configured, open the Windows SBS Console, click
Network, click Connectivity, and then click
Connect to the Internet. The Windows SBS 2008 Connect to the Internet wizard will attempt to detect your router and configure your network.
Configure the D-Link DIR-825 for Remote Access

UPnP Router Configuration
Though the D-Link DIR-825 broadband router supports UPnP, UPnP configuration did not test successfully.
Manual Router Configuration
You must manually configure your router to forward the following ports to the IP address of your Windows SBS 2008 server:
| Service or Protocol | Port |
| SMTP e-mail | TCP 25 |
| HTTP Web traffic | TCP 80 |
| HTTPS Web traffic | TCP 443 |
| HTTPS Web traffic for Windows SharePoint Services through Remote Web Workplace | TCP 987 |
| VPN (if you plan to enable VPN on your Windows SBS 2008 server) | TCP 1723 |
| Remote Desktop Protocol (RDP) | TCP 3389 |
To manually configure your router
-
Open the Web browser on your computer and enter the address for the D-Link router in the address field. The default IP address is
192.168.0.1. - At the login screen, enter the user name and password. The default user name is
admin. The default password is blank. - Find the screen with UPnP settings and disable UPnP.
-
On the top menu, click Advanced.
-
On the left menu, click VIRTUAL SERVER.
-
Click the first Application Name list box and select
SMTP. -
Click the left double arrow to place
SMTP in the Name box. -
In the first IP Address box, enter the IP address of your server.
-
Select the check box to enable it.
-
Repeat steps 6.-9. in the available list boxes for the following
Application Names: HTTP, HTTPS,
PPTP, REMOTE DESKTOP -
In the next blank Name box, type:
SharePoint -
In the Public Port box, type:
987 -
In the Private Port box, type:
987 -
In the IP Address box, enter the IP address of your server.
-
Select the check box to enable it.
- Click Save Settings.
- Click Continue when the settings are saved and close the Web browser.

Once the router is configured, open the Windows SBS Console, click
Network, click Connectivity, and then click
Connect to the Internet. The Windows SBS 2008 Connect to the Internet wizard will attempt to detect your router and configure your network.
Configure
the Linksys WRT160N for Remote Access

UPnP Router Configuration
The Linksys WRT160N broadband router supports UPnP – a standard that simplifies router setup. If you enable UPnP in the Linksys WRT160N , Windows SBS 2008 may be able to automatically configure your remote access settings.
-
Open the Web browser on your computer and enter the address for the Linksys router in the address field. The default IP address is
192.168.1.1. -
At the login screen, enter the user name and password. The default user name is blank. The default password is
admin. -
Click the Administration tab.
-
For UPnP, click Enabled, and then click
Save Settings. -
Close the Web browser.

Once the router is configured, open the Windows SBS Console, click
Network, click Connectivity, and then click
Connect to the Internet. The Windows SBS 2008 Connect to the Internet wizard will attempt to find and configure the remote access settings on your router.
Manual Router Configuration
If you prefer to not use UPnP, you must manually configure your router to forward the following ports to the IP address of your Windows SBS 2008 server:
| Service or Protocol | Port |
| SMTP e-mail | TCP 25 |
| HTTP Web traffic | TCP 80 |
| HTTPS Web traffic | TCP 443 |
| HTTPS Web traffic for Windows SharePoint Services through Remote Web Workplace | TCP 987 |
| VPN (if you plan to enable VPN on your Windows SBS 2008 server) | TCP 1723 |
| Remote Desktop Protocol (RDP) | TCP 3389 |
To manually configure your router
- Open the Web browser on your computer and enter the address for the Linksys router in the address field. The default IP address is
192.168.1.1. - At the login screen, leave the User Name field blank and enter the router password. The default password is
admin. - Find the screen with UPnP settings and disable UPnP.
- Click the Applications and Gaming tab, the Port Range Forwarding page should be selected. If not, click the
Port Range Forwarding tab. - Enter the settings as in the screenshot below. The IP address should be the IP address of your server.
- Click Save Settings, and then close the Web browser.

Once the router is configured, open the Windows SBS Console, click
Network, click Connectivity, and then click
Connect to the Internet. The Windows SBS 2008 Connect to the Internet wizard will attempt to detect your router and configure your network.
Configure the Linksys WRT54GL for Remote Access

UPnP Router Configuration
The Linksys WRT54GL broadband router supports UPnP – a standard that simplifies router setup. If you enable UPnP in the Linksys WRT54GL, Windows SBS 2008 may be able to automatically configure your remote access settings.
-
Open the Web browser on your computer and enter the address for the Linksys router in the address field. The default IP address is
192.168.1.1. -
At the login screen, leave the User Name field blank and enter the router password. The default password is
admin. -
Click the Administration tab, the
Management page should be selected. If not, click the Management tab. -
For UPnP, click Enabled, and then click
Save Settings. -
Close the Web browser.

Once the router is configured, open the Windows SBS Console, click
Network, click Connectivity, and then click
Connect to the Internet. The Windows SBS 2008 Connect to the Internet wizard will attempt to find and configure the remote access settings on your router.
Manual Router Configuration
If you prefer to not use UPnP, you must manually configure your router to forward the following ports to the IP address of your Windows SBS 2008 server:
| Service or Protocol | Port |
| SMTP e-mail | TCP 25 |
| HTTP Web traffic | TCP 80 |
| HTTPS Web traffic | TCP 443 |
| HTTPS Web traffic for Windows SharePoint Services through Remote Web Workplace | TCP 987 |
| VPN (if you plan to enable VPN on your Windows SBS 2008 server) | TCP 1723 |
| Remote Desktop Protocol (RDP) | TCP 3389 |
To manually configure your router
- Open the Web browser on your computer and enter the address for the Linksys router in the address field. The default IP address is
192.168.1.1. - At the login screen, leave the User Name field blank and enter the router password. The default password is
admin. - Find the screen with UPnP settings and disable UPnP.
- Click the Applications and Gaming tab, the Port Range Forwarding page should be selected. If not, click the
Port Range Forwarding tab. - Enter the settings as in the screenshot below. The IP address should be the IP address of your server.
- Click Save Settings, and then close the Web browser.

Once the router is configured, open the Windows SBS Console, click
Network, click Connectivity, and then click
Connect to the Internet. The Windows SBS 2008 Connect to the Internet wizard will attempt to detect your router and configure your network.
Configure
the Watchguard Firebox X20e for Remote Access

UPnP Router Configuration
The Firebox X20e broadband router does not support UPnP.
Manual Router Configuration
You must manually configure your router to forward the following ports to the IP address of your Windows SBS 2008 server:
| Service or Protocol | Port |
| SMTP e-mail | TCP 25 |
| HTTP Web traffic | TCP 80 |
| HTTPS Web traffic | TCP 443 |
| HTTPS Web traffic for Windows SharePoint Services through Remote Web Workplace | TCP 987 |
| VPN (if you plan to enable VPN on your Windows SBS 2008 server) | TCP 1723 |
| Remote Desktop Protocol (RDP) | TCP 3389 |
To manually configure your router
-
Open the Web browser on your computer and enter the address for the Firebox router in the address field. The default IP address is
192.168.111.1. - At the login screen, enter the user name and password. The default user name is
admin. The default password is admin. - Click Firewall, and then click Configure Incoming.
- Under Common Packet Filter Policies, for the HTTP and
HTTPS, and SMTP policies, set the following:Filter: Allow
Host: IP address of your server
Port Redirect, HTTP: 80
Port Redirect, HTTPS: 443Port Redirect, SMTP: 25
- Click Submit.
- Under Custom Packet Filter Policies, click Add Packet Filter Policy.
- Enter the following:
Policy Name: SharePoint
Incoming Tab, Incoming Filter: Allow
Policy Host: type the IP address of your server
Properties Tab, Protocol Settings: 987
- Click Add, and then click Submit.
- Repeat Step 7 and 8 for the following policies and ports:
VPN, port 1723
RDP, port 3389


Once the router is configured, open the Windows SBS Console, click
Network, click Connectivity, and then click
Connect to the Internet. The Windows SBS 2008 Connect to the Internet wizard will attempt to detect your router and configure your network.