Windows Server 2019 contains a firewall program called Windows Defender Firewall with Advanced Security. The firewall filters incoming and outgoing traffic on your Windows Server 2019 instance to safeguard it from common network attacks. By default, the firewall is configured to allow access to all pre-installed system programs.
However, several programs may use multiple different ports for operation, and these will be automatically blocked because they don’t match with the rules in your firewall configuration. In this case, you need to open the specific port on Windows Server.
Prerequisites
-
Deploy a Windows Server 2019 Instance on Vultr
-
A Remote Desktop Connection App
Establish a connection to your server by logging in through any remote desktop app or click the console on your Vultr dashboard to access your server. After you connect you can start configuring your Windows server 2019 firewall rules.
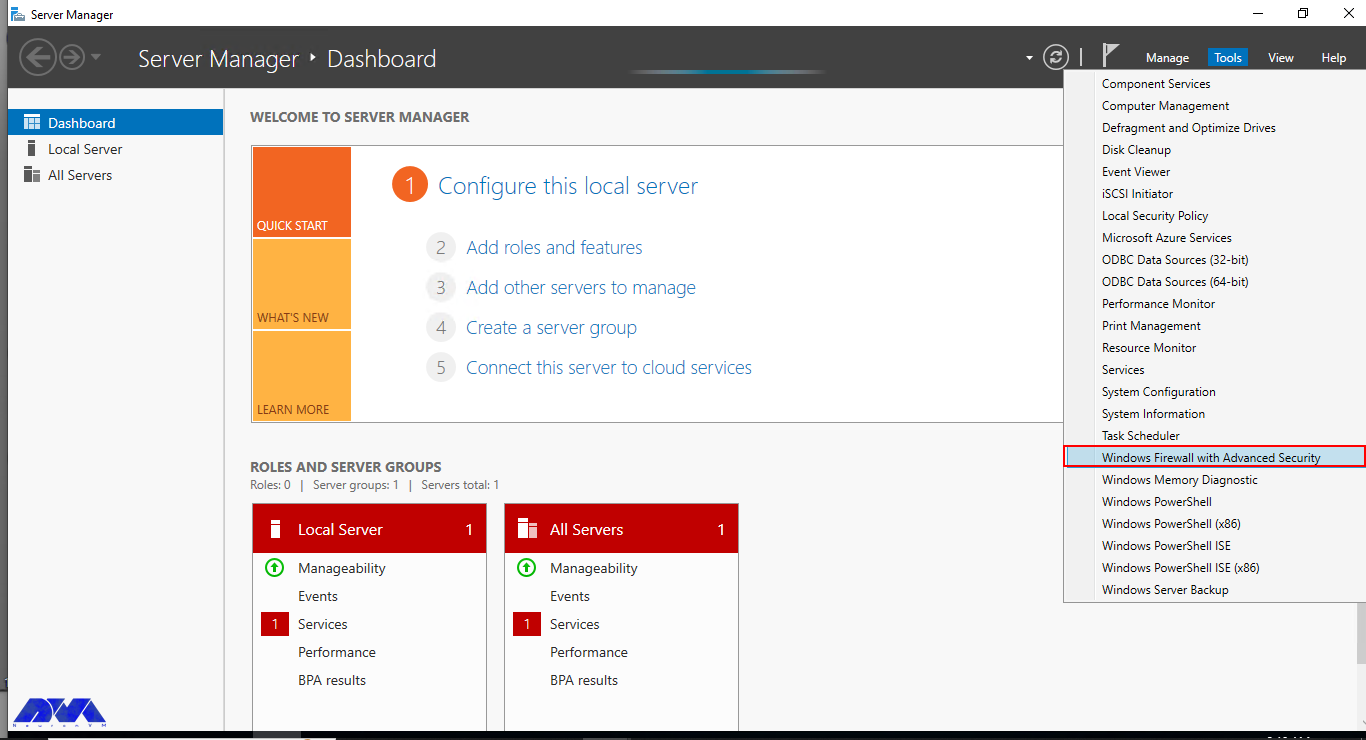
By default, Windows Defender Firewall is turned on, but in any case, you should confirm the current status and turn on firewall. To do this, click the tools node under server manager and select Windows Defender Firewall with Advanced Security from the drop down list.

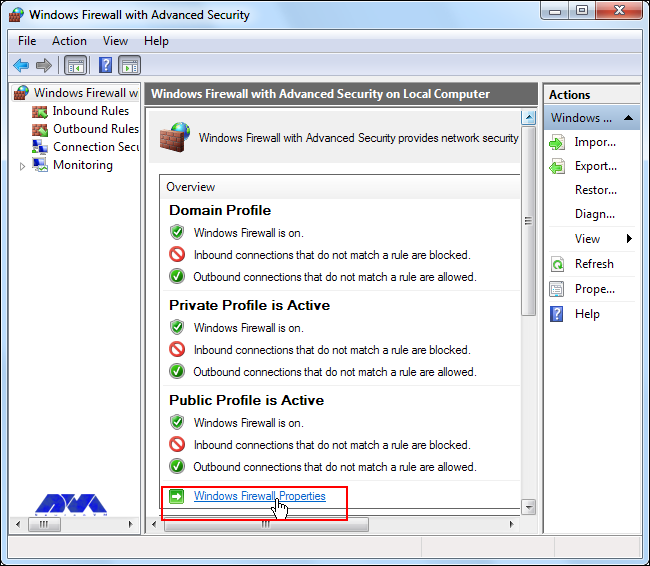
From the open group policy management window, check the current status of Windows Firewall profiles if it is set to ON; otherwise, click the Windows Defender Firewall properties option and turn the service on per profile.

Firewall Rules
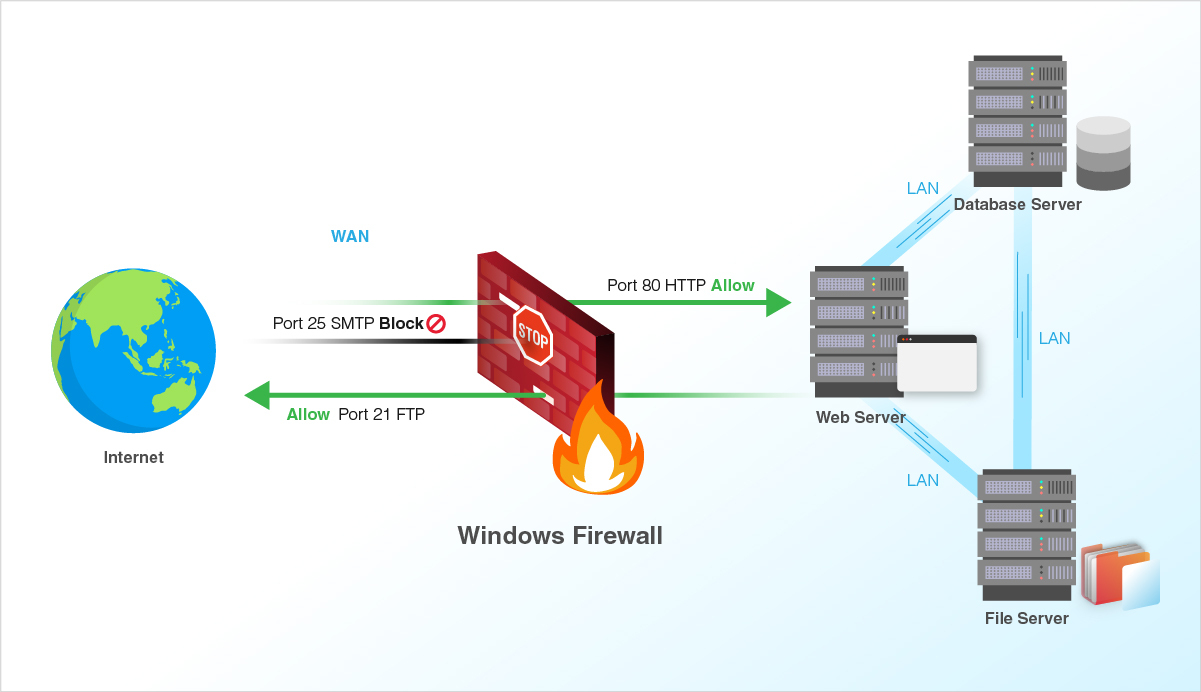
Windows Firewall rules allow you to either permit or block specific incoming and outgoing network packets on your server. You can choose multiple parameters for each inbound or outbound rule. A rule can consist of a TCP or UDP port, program name, service, or a protocol to filter for every server profile.
Windows server profiles are grouped into, Domain, Private and Public. Domain represents your server’s connection to a corporate domain network, Private applies to your home or workplace network connection, and Public represents non-secure public network locations.
Open an Inbound Port (Incoming connections)
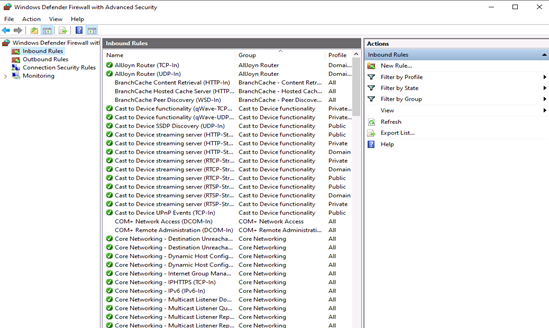
Launch windows defender firewall from the tools sub-menu under server manager. Then, select Inbound Rules on the left panel of the Firewall console.
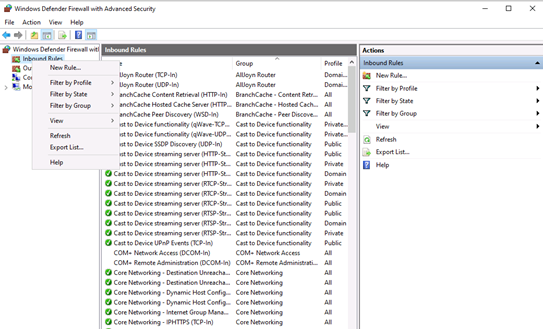
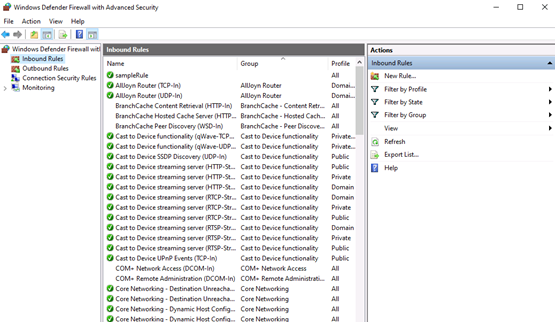
A list of current rules will be displayed. Now, on the left Inbound Rules sub-menu under actions, click New Rule.

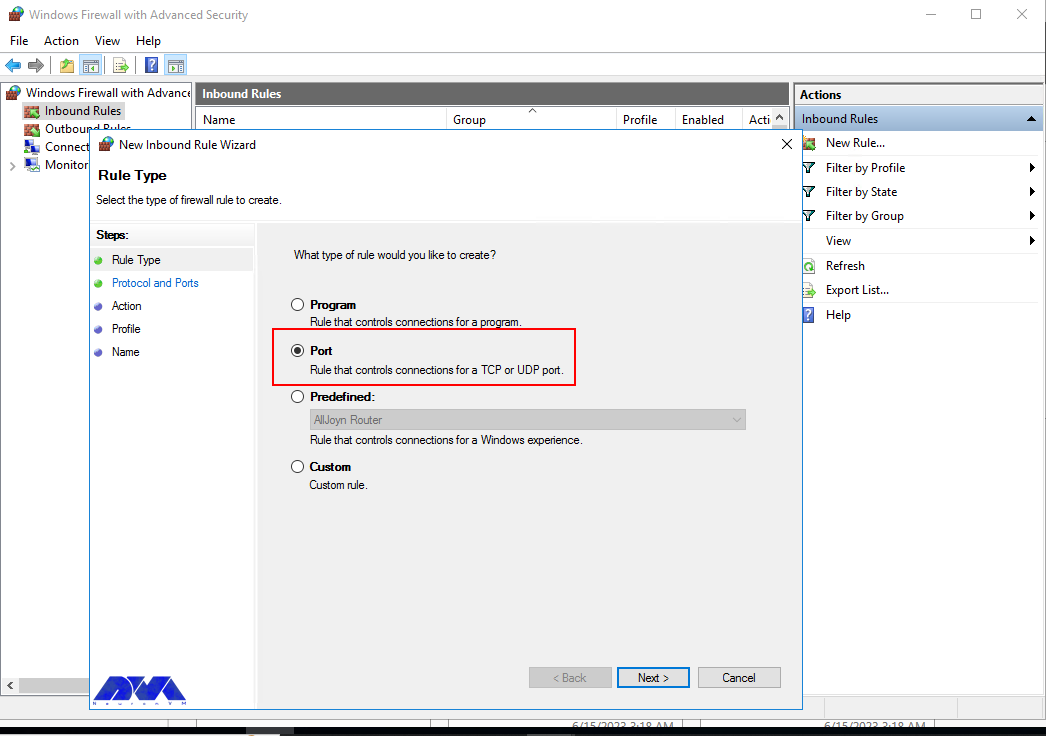
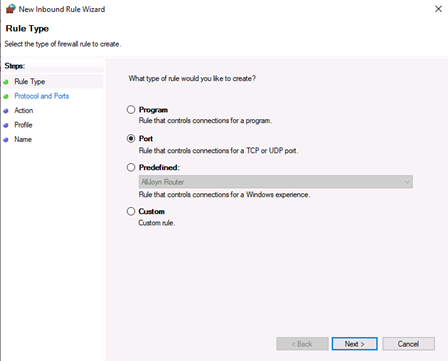
Select Port as the rule type in the rule wizard and click Next.

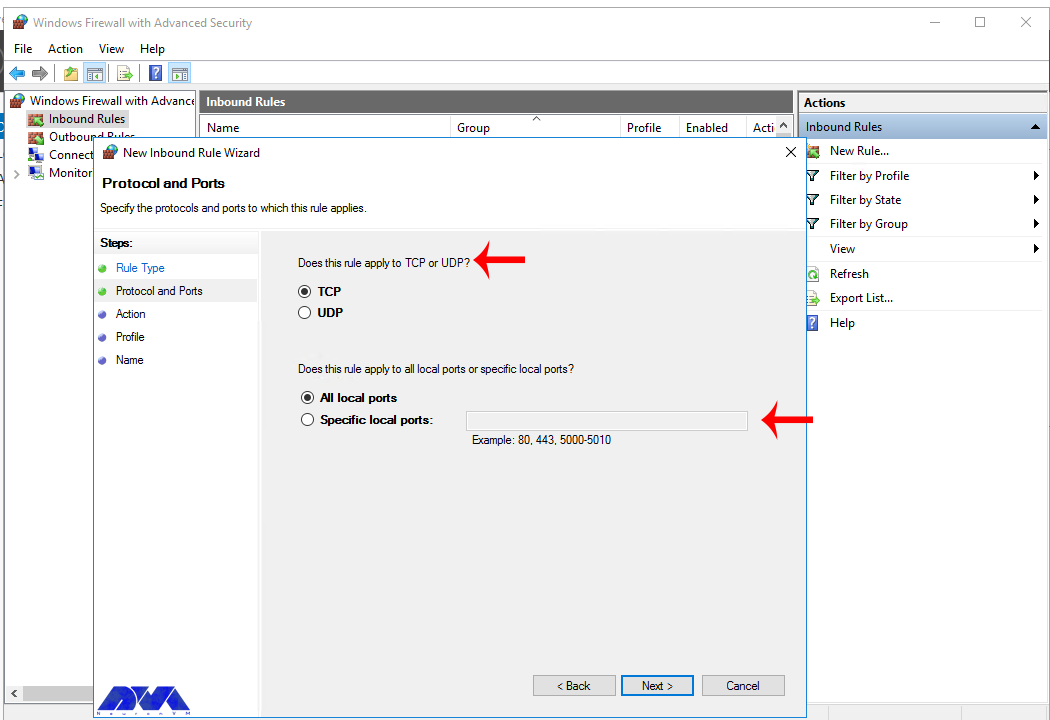
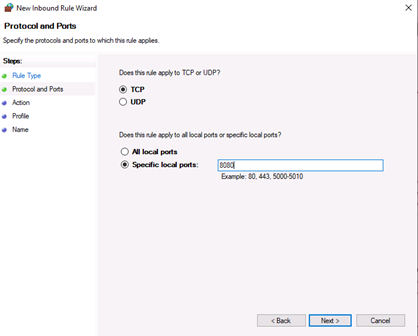
Now, choose whether the new rule applies to a TCP or UDP port on your server. Then, select specific ports and enter your target port number, you can enter a ports range, or multiple ports separated by - and , respectively, then click Next.

Define your TCP or UDP port rule.

-
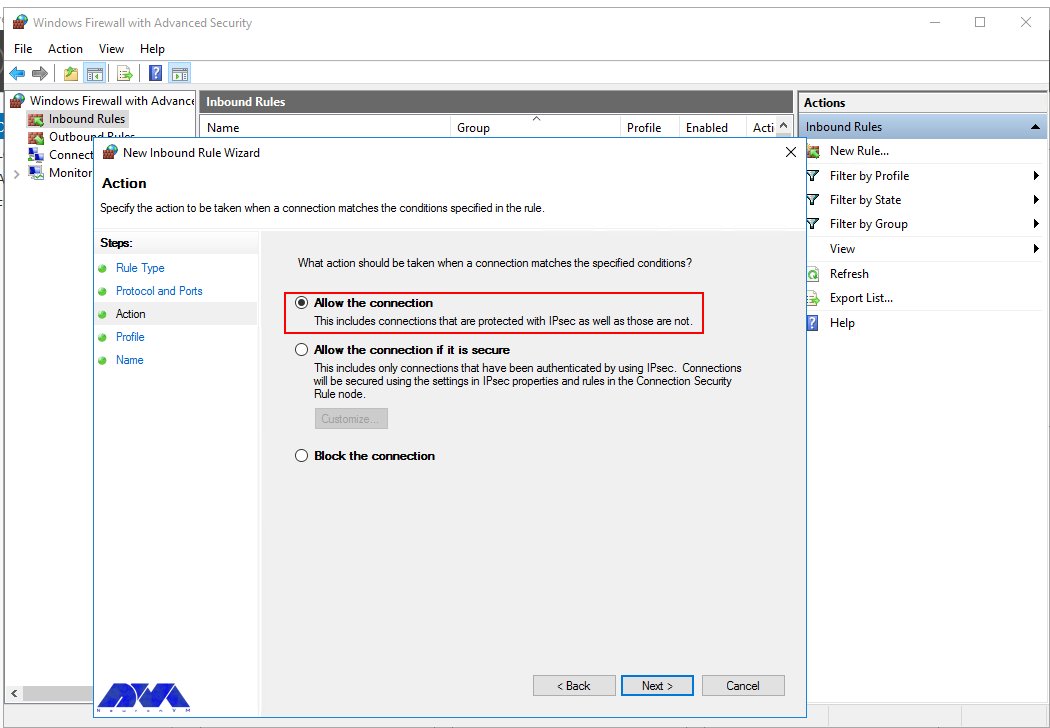
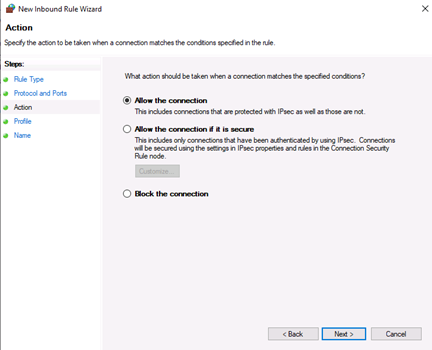
Allow the connectionwill allow incoming connections to the specified server port -
Allow the connection if it is securewill authenticate with IP security and either deny or allow the connection. For example,httpsconnections will be allowed andhttpblocked. -
Block the connectionwill block all incoming connections to your server through the specified port
In this case, choose Allow the connection to open the port.
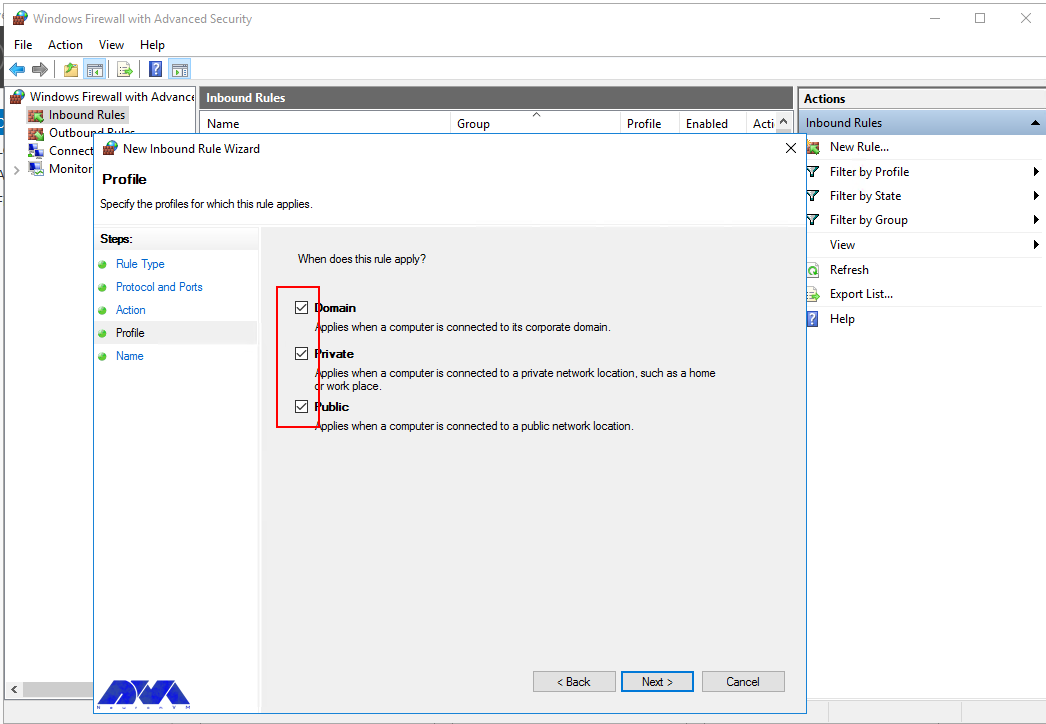
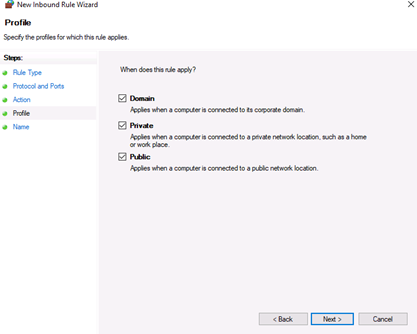
Click Next to assign the new rule to one or more profiles. You can select between Domain, Private, and Public, or choose all to apply the firewall rule on multiple profiles.
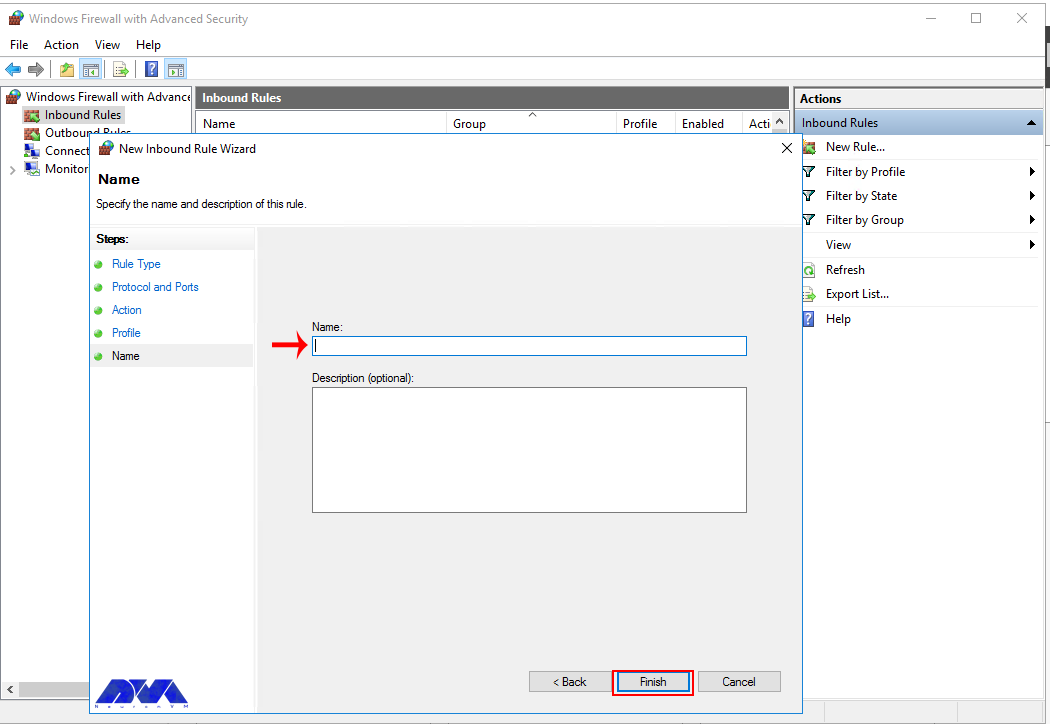
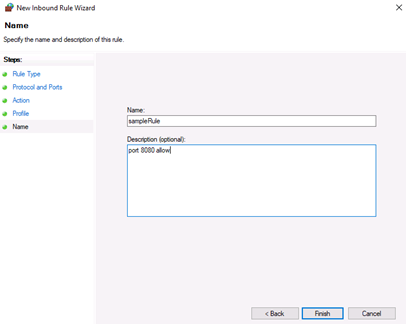
Next, give your new firewall rule a custom name and description for easy identification. Then, Click finish to enable the new rule. Your new Inbound (Incoming) port rule will be enabled, and all connections to the server that match the port will be accepted.
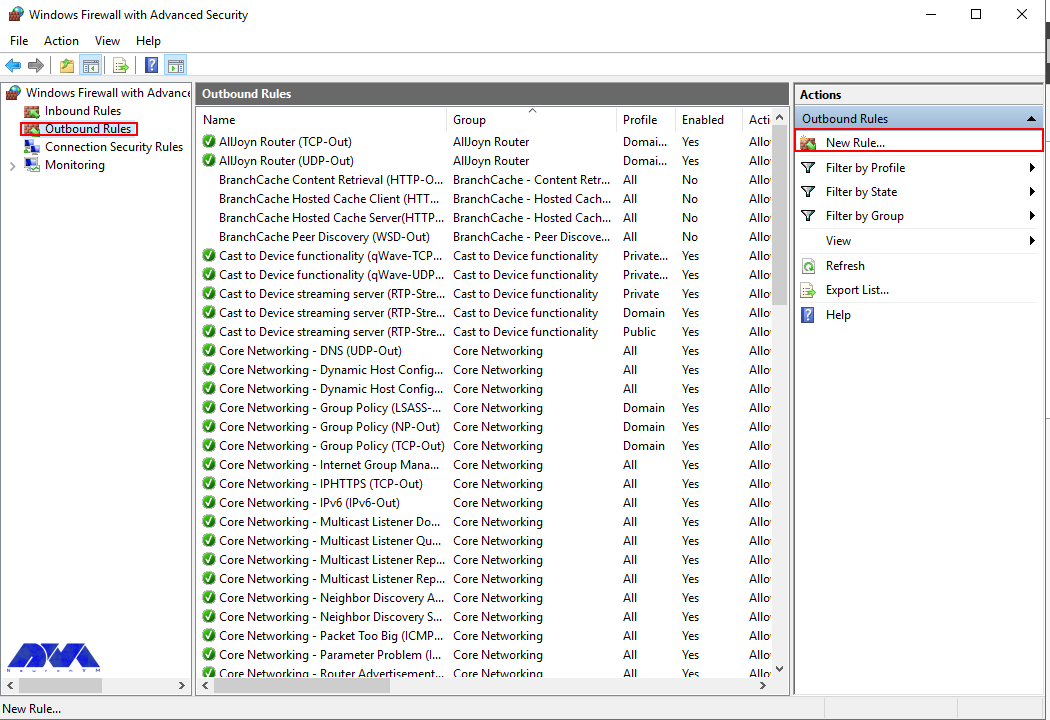
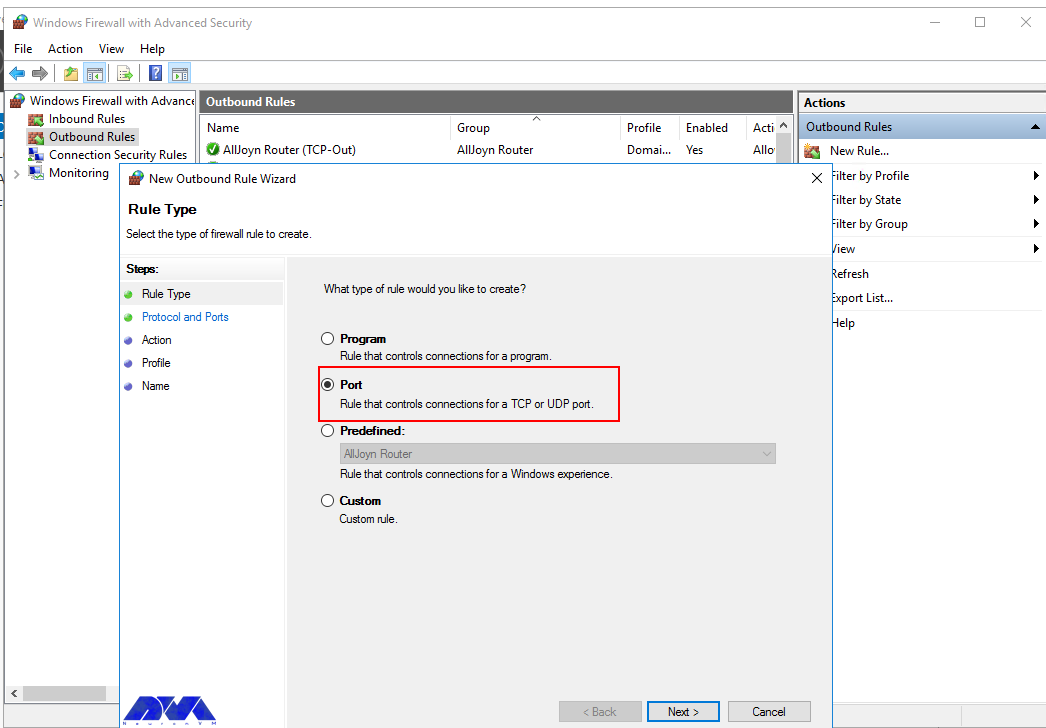
Open an Outbound Port (Outgoing connection)
From the Windows Defender Firewall console, click Outbound Rules on the left pane, and a list of available outgoing connection rules will be displayed.
Now, click New Rule on the right pane under the outbound rules node.
In the new outbound rule wizard, select Port as the rule type and click Next.

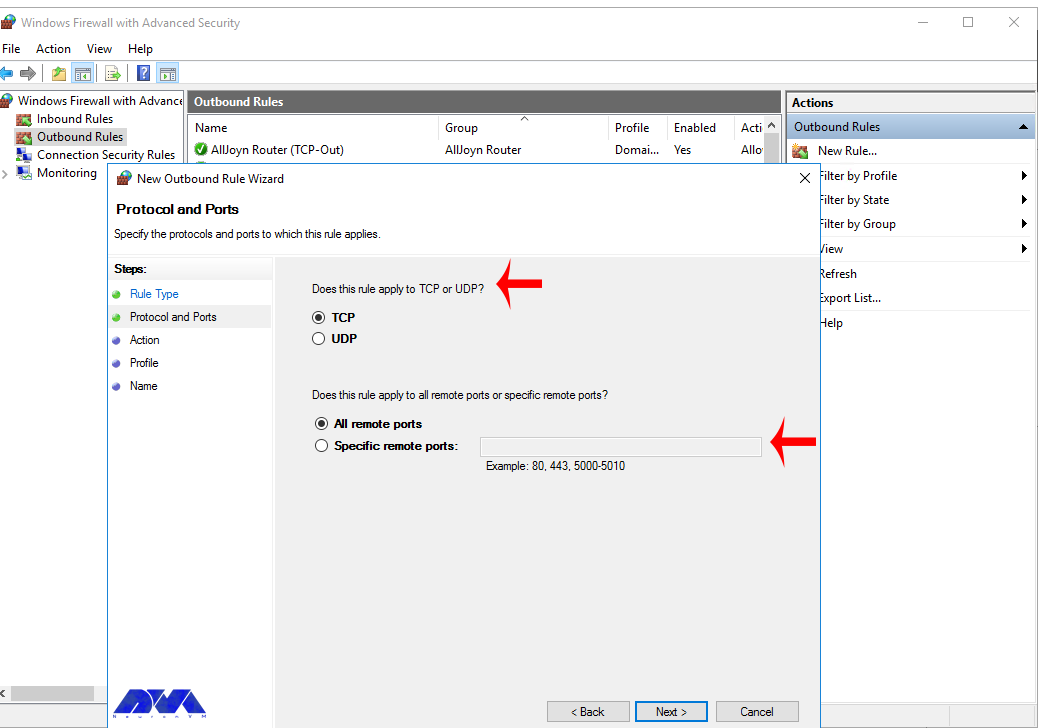
Now, let’s choose whether the new rule applies to a TCP or UDP port. Then, select specific remote ports and enter the target server port number; you can enter a range of ports, a single port, or multiple different ports you intend to open.

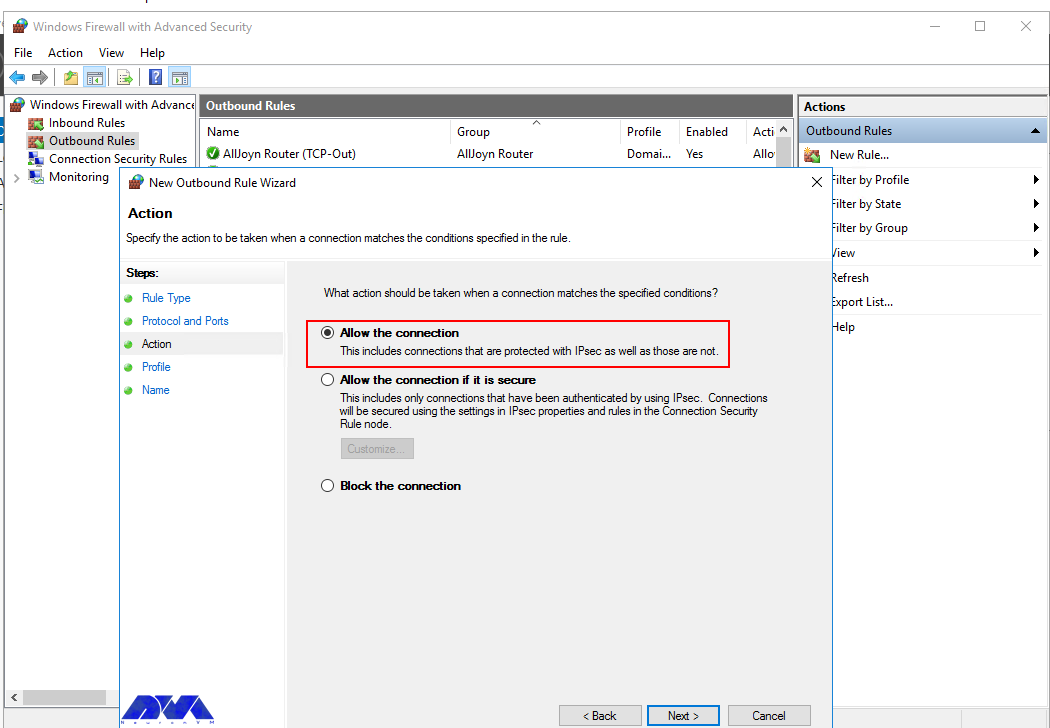
Next, on the Action page, select Allow the connection, then click next to select the server profile on which the rule should be enabled.
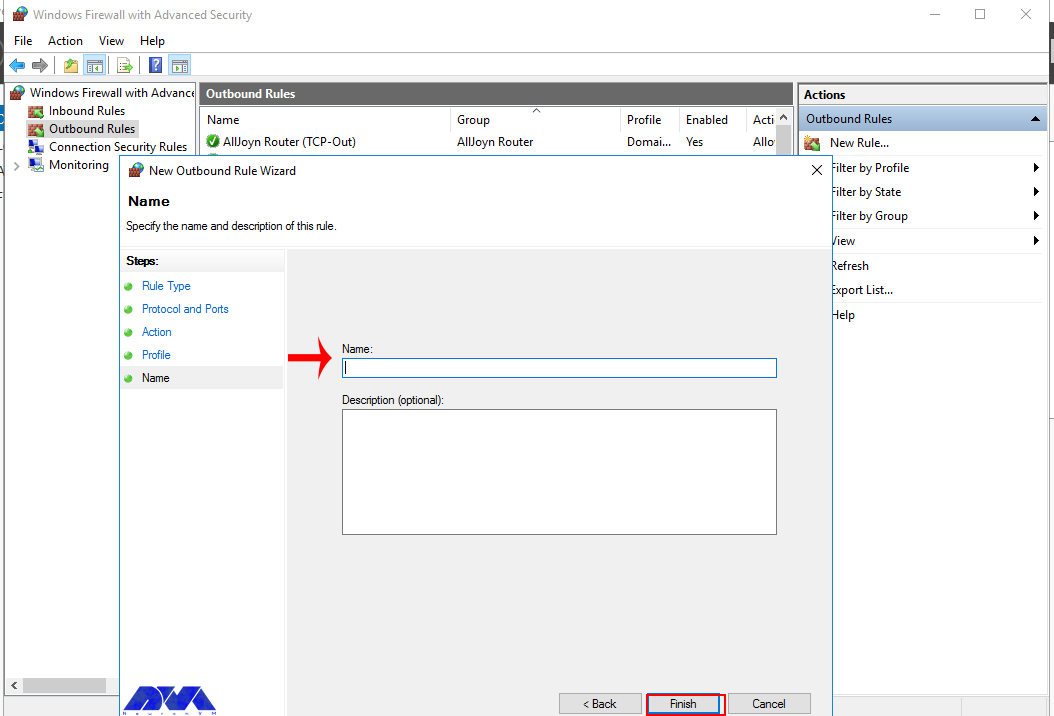
Give the new outbound rule a name and description that uniquely describes it. Then, click Finish to enable the outbound rule for the target port to be open on all selected server profiles.

Open a Port through Windows PowerShell
From the Windows start menu, open PowerShell. Then, edit the following command and replace it with your settings.
New-NetFirewallRule -Enabled:True -LocalPort 21 -Protocol TCP -Direction Inbound -Profile Domain -Action Allow -DisplayName example opening a port rule"
-
New-NetFirewallRuleCreates a new Firewall rule. -
EnabledThis enables the new rule, by default, it will be set to True. -
LocalPortYour target port number. -
ProtocolSpecifies the protocol associated with your port number. -
DirectionSets your target direction to either Inbound (Incoming) or Outbound (Outgoing). -
ProfileAssigns the new rule to a server profile; you can choose domain, private, or public. -
Actiondefines the state for the new firewall rule, enter allow. -
DisplayNamesets a custom name for the new firewall rule
Your Output should be similar to the one below.
PS C:\Users\Administrator> New-NetFirewallRule  -Enabled:True  -LocalPort 21  -Protocol TCP  -Direction Inbound  -Profile Domain  -Action Allow  -DisplayName "example opening a port rule"


Name                  : {427a1b12-ece6-4d54-847d-de482b227c6c}

DisplayName           : example opening a port rule

Description           :

DisplayGroup          :

Group                 :

Enabled               : True

Profile               : Domain

Platform              : {}

Direction             : Inbound

Action                : Allow

EdgeTraversalPolicy   : Block

LooseSourceMapping    : False

LocalOnlyMapping      : False

Owner                 :

PrimaryStatus         : OK

Status                : The rule was parsed successfully from the store. (65536)

EnforcementStatus     : NotApplicable

PolicyStoreSource     : PersistentStore

PolicyStoreSourceType : Local
Congratulations, you just opened a network port on your Windows Server 2019. The server will accept incoming and outgoing connections through the selected ports, but the firewall will block connections from a profile that doesn’t match the port rule.
Introduction
Firewalls are a critical component of securing modern networks with internet access. Without firewalls in place, malicious actors could easily access and infect devices on a network. Properly configured firewalls substantially reduce undesirable communications.
This article explains how to create firewall rules using the Windows Firewall with Advanced Security console and Windows PowerShell on Windows Server 2016 / 2019 / 2022.
What is a Firewall?
A firewall controls the flow of data packets in and out of a network. It acts like a barrier, similar to how a physical firewall prevents the spread of fire between compartments. The firewall allows or blocks connections according to configured firewall rules.
Computers behind a firewall cannot receive data until it passes the filters. This greatly enhances security and reduces unauthorized access risks. Benefits of firewalls:
- Protect devices by blocking undesired traffic
- Notify administrators of connection attempts
- Log activity for monitoring
- Prevent spread of infections
- Reduce hacking risks
How Windows Server 2016 / 2019 / 2022 Firewalls Work
The Windows firewall acts as a barrier between local network devices and external networks. When a connection is attempted to a server, the firewall intercepts the traffic and evaluates it against the defined rules.
Only network packets that match the configured rules are allowed through. For example, a rule could allow TCP traffic on port 80 while blocking other ports. Carefully configured rules optimize security while allowing desired connections.
Windows provides inbound rules to control incoming traffic and outbound rules to filter outgoing traffic. Rules can be tailored for each network profile.
Windows Firewall with Advanced Security
Windows Firewall with Advanced Security provides the management interface for configuring Windows firewall settings. It comes built-in to Windows Server without needing additional licensing or hardware.
There are three default firewall profiles:
- Domain – For corporate networks with detected domain controllers
- Private – For home or office networks behind a gateway device
- Public – For untrusted public networks with internet access
Profiles allow custom rules per network type. You can enable, disable, or configure profiles independently.
Accessing the Firewall Console
To open the Windows Firewall with Advanced Security console:
- Open Server Manager > Tools > Windows Firewall with Advanced Security
- Search for “firewall” in the Start menu and launch the Windows Firewall shortcut
- Run wf.msc in the Run command (Win + R)
The left menu allows configuring inbound rules, outbound rules, connection security, and monitoring.
Configuring Firewall Rules
Firewall rules control whether to allow or block specific network connections. Rules can filter by:
- Program path
- Port and protocol
- Predefined service
- Source/destination IP
- Network interface
- And more…
Follow these steps to create an inbound firewall rule:
1. Open the Firewall console and select Inbound Rules
2. Click New Rule to launch the rule wizard
3. Select the rule type – Program, Port, Predefined, or Custom
4. Choose All Programs or a Program path
5. Choose Action (allow or block) or allow if connection is secured
6. Choose profiles
7. Name the rule and click Finish
Repeat the wizard for outbound rules. Once created, rules can be edited or disabled from the console.
Rules can also be created from PowerShell. For example:
PS C:\Users\Administrator> New-NetFirewallRule -DisplayName "Allow SSH" -Enabled True -Direction Inbound -Action Allow -Protocol TCP -LocalPort 22Monitor active connections under the Monitoring tab.
Conclusion
The Windows Firewall provides a flexible and granular rule-based firewall solution for Windows Server 2016, 2019 and 2022. The advanced interface allows creating detailed rules to filter incoming and outgoing traffic as needed. Monitor activity to verify your rules are working correctly. Careful configuration enhances security while allowing desired connections.
A firewall generally prevents dangerous attacks on the local network and computer. In simple terms, a wall that prevents fire from moving from one part to another is called a firewall. Generally, a firewall controls the information that is transmitted between computers and the Internet. In this article, we are going to teach you How to Configure Firewall on Windows Server 2016.
What is Firewall?
A Firewall is a network security system that controls and monitors incoming and outgoing network traffic based on predefined security rules. A firewall is a network security device that monitors inbound and outbound network traffic. It protects the network against threats and creates a barrier between a trusted internal network and an unreliable external network such as the Internet. This process is governed by a set of predefined security instructions. It is interesting to know that a Firewall is designed to secure the communication process between different networks. The Firewall prevents unauthorized data from entering computers where ports called ports enter.
How to Configure Firewall on Windows Server 2016
Before starting the steps to configure the firewall, we suggest you visit the Windows VPS and Admin RDP plans provided on our website and configure the firewall after installing Windows Server 2016.
By default, the Windows Firewall with Advanced Security is turned on. Note that you should confirm the current status and turn on the firewall.
To turn on the firewall first, you need to open “Server Manager“, then click on the Tools tab, and then select Windows Firewall with Advanced Security:
Now you can check the current status of Windows Firewall profiles from open group policy management and if it was not set to On. You need to click on Windows Firewall properties and turn on the service in each profile:
You can permit or block specific input and output network packets on your server and select multiple parameters for each inbound or outbound rule with the help of a Windows Firewall. Windows server profiles include Domain, Private, and Public groups. The Domain represents your server’s connection to a corporate domain network, Private is used to connecting to your home or workplace network, and Public represents insecure public network locations.
How to Open an Inbound Port
First, you need to launch the Windows Firewall with Advanced Security from the Tools sub-menu under Server Manager. Select Inbound Rules from the left panel of the Firewall console. Then click on New Rule under the right sub-menu of Inbound Rules under Actions:

Now you should select Port in the rule wizard section and then click on Next:
In this step, you have to choose whether the new rule applies to a TCP or UDP port on the server. Then select your desired ports and enter their number. Also, you can enter ports range or multiple ports separated by – and, respectively, and finally click Next:
You can use Allow the connection to allow incoming connections to the specified server port.
Allow the connection if it is secure will authenticate with IP security and you can deny or allow the connection. For example, HTTP connections will be allowed and HTTP blocked.
Block the connection will block all incoming connections to your server through the specified port.
In this step, you should select the allow the connection to open port option and then click Next to assign a new rule to the profile:
Now select Domain, Private, and Public, or select all to apply the Firewall rule in multiple profiles:
Remember to give your new firewall rule a name and description. Finally, you should click on Finish to enable the new rule. All connections to the server that match the port are accepted:
How to Open an Outbound Port
First, you should go to the Windows Firewall with Advanced Security console and click on Outbound Rules on the left pane. Now you will see a list of available outgoing connection rules. Then, you need to click on New Rule on the right pane under the outbound rules node.
In the next step, you should select Port as the rule type in the new output rule wizard and then click Next:
Next, you have to choose whether the new rule applies to the TCP port or UDP. Select specific remote ports and then enter the port number of the server you want:
In this step, after selecting Allow the connection on the Action page, you should click Next:
Then you need to select the Server Profile on which the rule should be enabled:

Remember to name the new output rule and describe it. Finally, you should click Finish to enable the outbound rule for the target port on all selected server profiles:
How to Open a Port through Windows PowerShell
To do this first, you should go to the Windows Start menu and search for PowerShell and open it. Then you have to replace your settings in the following command:
New-NetFirewallRule -Enabled:True -LocalPort 21 -Protocol TCP -Direction Inbound -Profile Domain -Action Allow -DisplayName example opening a port rule"
The words in the above command indicate:
New-NetFirewallRule: It will create a new Firewall rule.
Enabled: It enables the new rule and by default, it will be set to True.
LocalPort: It is your target port number.
Protocol: It specifies the protocol associated with your port number.
Direction: It sets your target direction to either Inbound or Outbound.
Profile: It assigns the new rule to a server profile.
Action: It defines the state for the new firewall rule. You should enter Allow.
DisplayName: It sets a custom name for the new firewall rule.
Output:
PS C:\Users\Administrator> New-NetFirewallRule -Enabled:True -LocalPort 21 -Protocol TCP -Direction Inbound -Profile Domain -Action Allow -DisplayName "example opening a port rule"


Name : {427a1b12-ece6-4d54-847d-de482b227c6c}
DisplayName : example opening a port rule
Description :
DisplayGroup :
Group :
Enabled : True
Profile : Domain
Platform : {}
Direction : Inbound
Action : Allow
EdgeTraversalPolicy : Block
LooseSourceMapping : False
LocalOnlyMapping : False
Owner :
PrimaryStatus : OK
Status : The rule was parsed successfully from the store. (65536)
EnforcementStatus : NotApplicable
PolicyStoreSource : PersistentStore
PolicyStoreSourceType : Local
That is it!
Conclusion
This article taught you how to configure the Firewall on Windows Server 2016. You can use this article to open a network port on your Windows Server 2016. The server accepts incoming and outgoing connections through selected ports, but the Firewall blocks profile connections that don’t comply with port rules.
FAQ
Are there any other tools available for managing Windows Firewall?
Yes, you can use a command line provided by Microsoft.
Is it dangerous to turn off Windows Firewall?
It allows all the data packets to enter your network easily and makes it vulnerable to all kinds of Cyber attacks.
Firewall is an integral part of any system and can be used to protect a server against unauthenticated access from the outside world. It helps to prevent hackers from logging into servers on the network. Firewall can also be used to set up specific rules in-order to restrict access to specific ports of the system based on IP address.
The basic functionality of a firewall is to control the incoming and outgoing traffic and choose whether to block a particular connection or let it through based on the defined set of security rules.
We can use the below steps for managing Windows 2022 firewall settings.
-
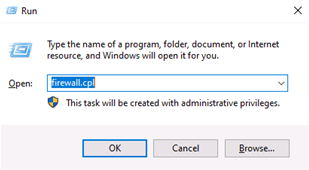
Log in to the Windows server and open Firewall using the command
firewall.cplin the run dialog box (*Windows key+R will open Run dialog box).
-
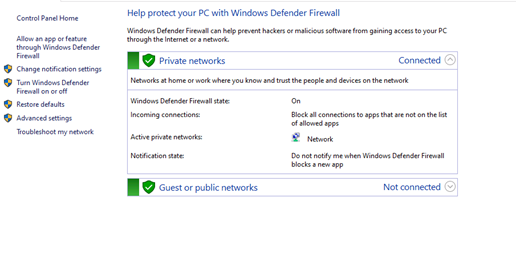
Under firewall settings, there are two sections called
Private networksandGuest or public networkswith green shields to the left of them, which says that the firewall is active. If they are on red shields, then the firewall is disabled. -
Click on either of these sections, it will prompt a
drop-down menuwith details about the current public or private networks. -
Now select the
Advanced settingsoption from the left-hand side of the page.
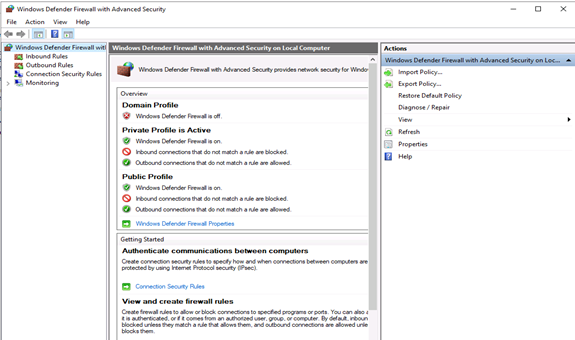
-
Inbound Rules : Which incoming connections are automatically allowed.
-
Outbound Rules : Which outgoing connections are automatically allowed.
-
Connection Security Rules : Baselines for which connections your computer will allow and which ones it will block.
-
Monitoring : This is an overview of your firewall’s basic monitoring guidelines.
Steps to open/limit a port in Windows 2022
-
Navigate to the
Firewall advanced settingspage. Now select theInbound Rulesoption from the left list options. -
Now right click on the
Inbound Rulesand selectNew Ruleoption. -
Upon selection of the new rule, the box appears and select the
Port. -
Click
Nextand choose the appropriate rule whether it is TCP or UDP and enter your requiredcustom port. -
Now, the action to be performed in the given firewall rule is defined. Choose whether
Allow the connectionorBlock the connection. -
To configure the firewall rule i.e specify the profile in which the rule is to be applied, whether it is public, or private, or a particular Domain.
-
Finally the rule is to be named and saved so as to identify with ease. Click
Finish.
Steps to open/limit a Network in Windows 2022
-
Come to
Advanced Settingsof the Windows firewall and select theInbound Rulesfrom the left pane. -
Now, right-click the rule you wish to configure and then, choose the
Properties.Here you would require to select the rule wisely as below:
-
Allow Particular Network : Create a Firewall rule to Allow a port and use that rule’s properties to edit scope.
-
Block Particular Network : Create a Firewall rule to Block a port and use that rule’s properties to edit scope.
-
Click the
Scope Taband you may be able to add an IP address or a range of IP addresses by clickingAddbutton.You may please select any of the following 2 options and then click
OK.
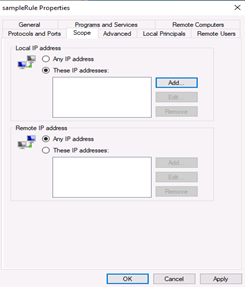
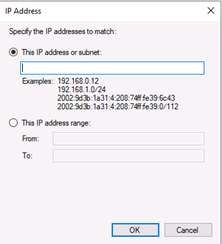
-
This IP Address or Subnet: Type an IP address (such as 192.168.0.12) or a subnet using Classless Inter Domain Routing (CIDR) notation (such as 192.168.0.0/24) that should be allowed for the firewall rule.
-
This IP Address Range: Using the From and To boxes, type the first and last IP address that should be allowed to use the firewall rule and then click OK.
Related Feature on LayerPanel
- Firewall Overview
Related Tutorials
-
Basic Firewall Information and Rule Setting
-
Setting up Windows Firewall with Advanced Security on Windows Servers 2019
-
Setting up Windows Firewall for your Windows Cloud Servers 2016
-
Installing Telnet Client on Linux and Windows Cloud Servers
-
How to check if TCP / UDP port is open on Linux & Windows Cloud Servers
-
How to Enable & Disable Ping (ICMP Echo Requests) in Windows Server 2022 Firewall
-
How to Enable & Disable Ping (ICMP Echo Requests) in Windows Server 2019 Firewall
-
How to Enable & Disable Ping (ICMP Echo Requests) from IPTables on Linux Cloud Servers
-
Firewall Configuration using Iptables on Ubuntu 14.04
-
How to set up & configure firewall using FirewallD for CentOS 8
-
How to set up & configure Ubuntu Firewall (UFW) for Ubuntu 18
-
How to test Firewall Configuration with Nmap on Linux Cloud Servers
![]() В данной статье я расскажу как добавить разрешающее правило в Брандмауэр Windows Server 2012 R2 (в Windows Server 2008 R2 действия аналогичны). Правило будем добавлять на примере работы сервера 1С:Предприятие 8.х (необходимо открыть порт 1541 для менеджера кластера, порты 1560-1591 для рабочих процессов и порт 1540 для агента сервера).
В данной статье я расскажу как добавить разрешающее правило в Брандмауэр Windows Server 2012 R2 (в Windows Server 2008 R2 действия аналогичны). Правило будем добавлять на примере работы сервера 1С:Предприятие 8.х (необходимо открыть порт 1541 для менеджера кластера, порты 1560-1591 для рабочих процессов и порт 1540 для агента сервера).
Некоторые программы и службы при работе через сетевые протоколы используют определенные порты для обмена данными. По умолчанию включенный брандмауэр Windows блокирует подобную сетевую активность. В частности, если попытаться подключиться с клиентской машины к серверу 1С:Предприятие 8.х можно натолкнуться на ошибку:
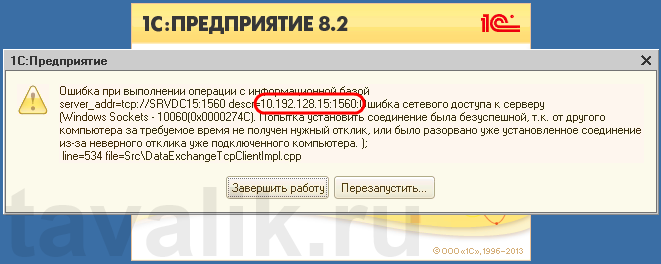
«Ошибка при выполнении операции с информационной базой (…). Ошибка сетевого доступа к серверу (…). Попытка установить соединение была безуспешной, т. к. от другого компьютера за требуемое время не получен нужный отклик, или было разорвано уже установленное соединение из-за неверного отклика уже подключенного компьютера (…) »
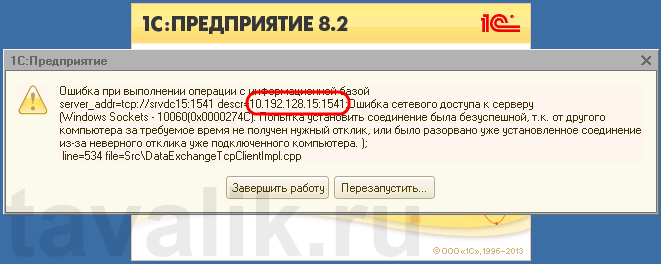
Данная ошибка означает, что по указанному адресу не найден сервер «1С:Предприятия», ну или на сервере закрыт порт (в данном случае порт 1541).
Для открытия порта, заходим на компьютер, где установлен сервер «1С:Предприятия» (в моем примере это компьютер с адресом 10.192.128.15 и установленной на нем операционной системой Windows Server 2012 R2).
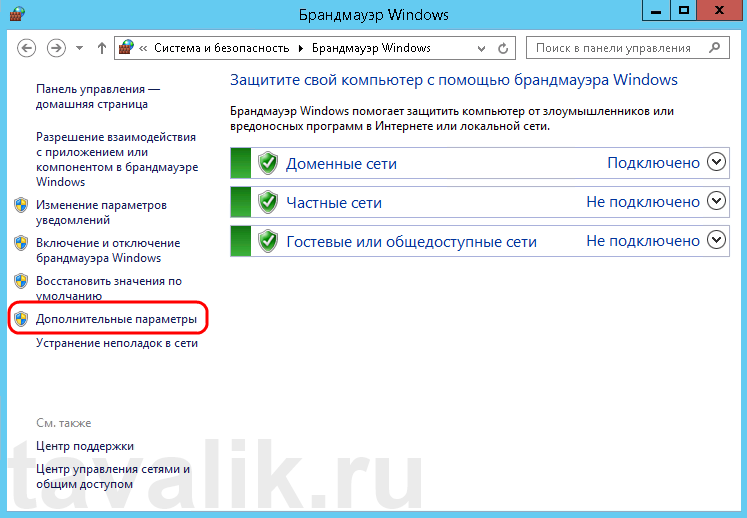
Запускаем брандмауэр Windows. Сделать это можно кликнув правой кнопкой мыши по «Пуск» (Start), затем «Панель управления» (Control Panel) — «Система и безопасность» (System and Security) — «Брандмауэр Windows» (Windows Firewall). Или же выполнив команду firewall.cpl (для этого необходимо нажать комбинацию клавиш Win + R, в окне «Отрыть» (Open) ввести имя команды и нажать «ОК» ) .

Далее нажимаем на «Дополнительные параметры» (Advanced Settings) в меню слева.
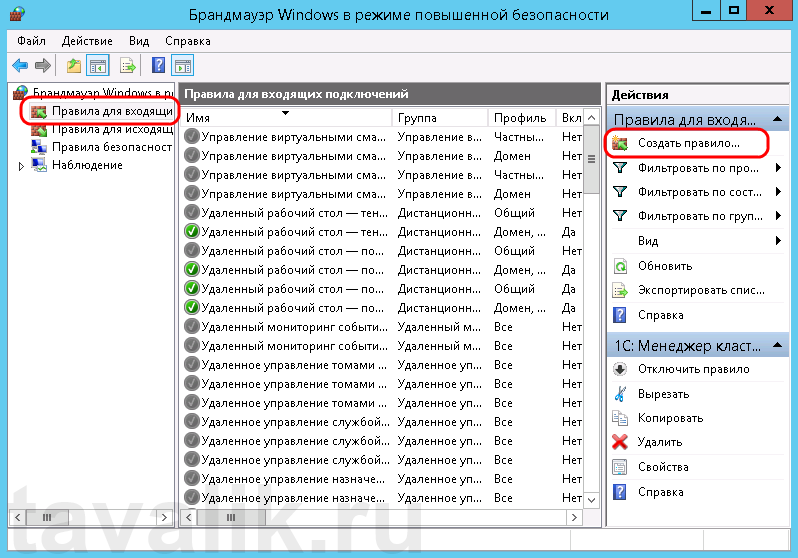
В открывшемся окне, в дереве слева откроем вкладку «Правила для входящих подключений» (Inbound Rules), а затем в меню «Действия» (Actions) выберем пункт «Создать правило…» (New Rule…).
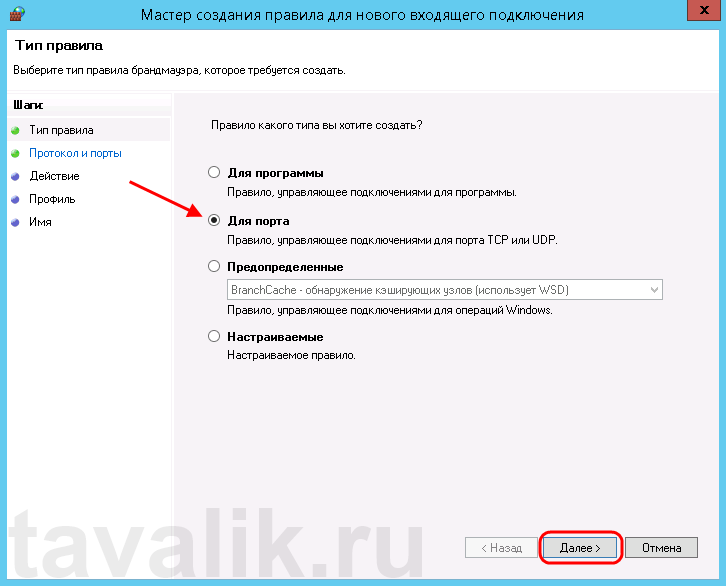
Запустится «Мастер создания правила для нового входящего подключения» (New Inbound Rule Wizard). На первой странице выберем тип правила (Rule Type) «Для порта» (Port) и нажмем «Далее» (Next).
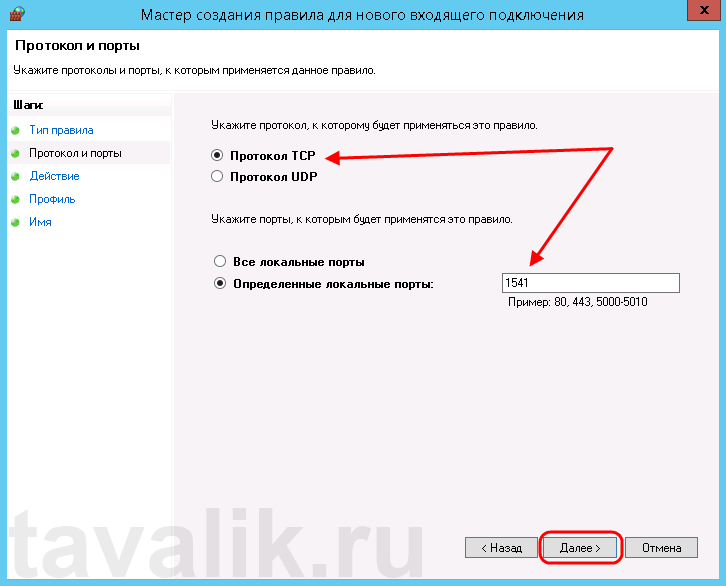
Затем необходимо указать протокол (в нашем примере это TCP) и, непосредственно, номер порта (Specific local ports), который открываем. После чего жмем «Далее» (Next).
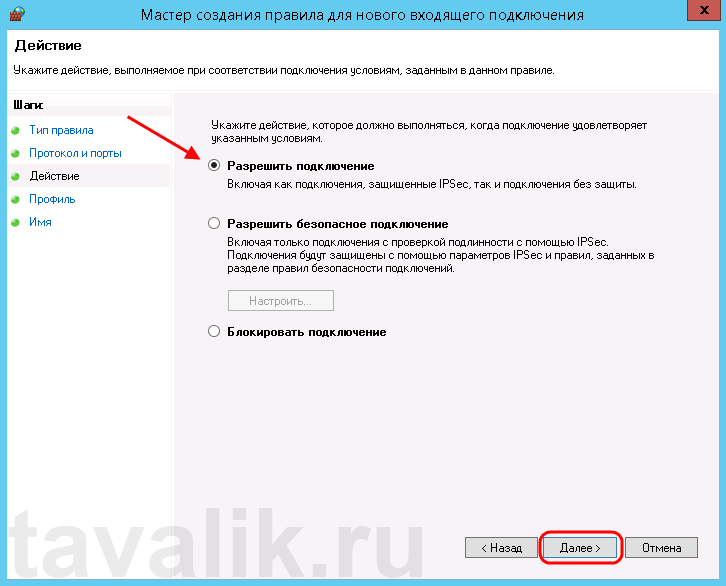
Теперь укажем действие связанное с добавляемым правилом. Выберем «Разрешить подключение» (Allow the connection) и нажмем «Далее» (Next).
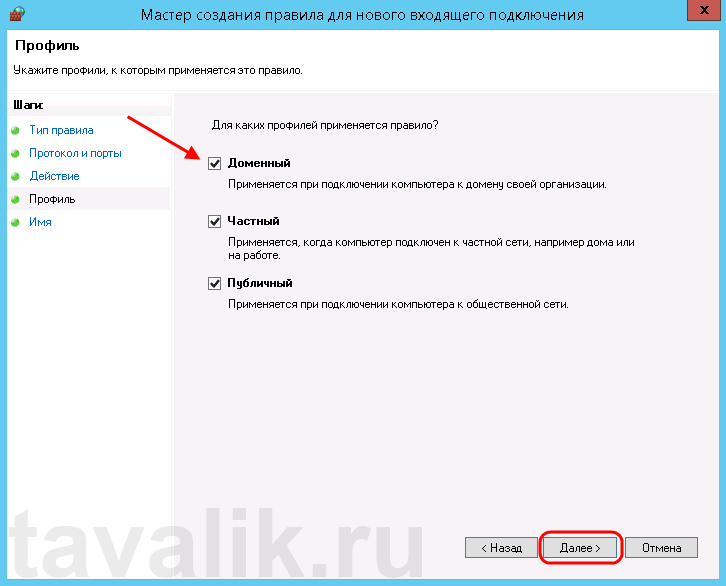
На следующей странице нужно указать, для каких профилей брандмауэра будет действовать правило. Отмечаем нужные профили галочками и жмем «Далее» (Next).
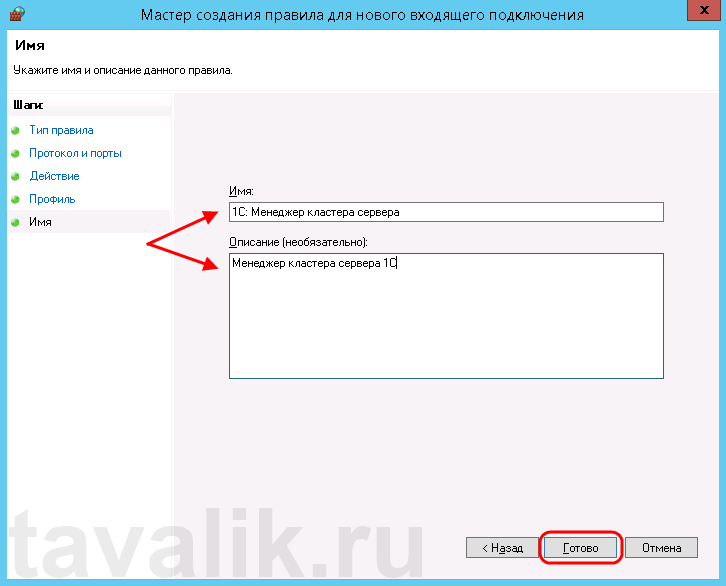
Ну и наконец, вводим имя и описание для нового правила и нажимаем «Готово» (Finish) для завершения работы мастера.
Пробуем снова подключиться к серверу «1С:Предприятия» и видим что ошибка сохранилось, но в сообщении уже другой, 1560-ый порт.
Вышеописанным способом добавим еще одно разрешающее правило, с названием «1С: Рабочие процессы» для всего диапазона портов с 1560 по 1591 (для рабочих процессов 1С), указав их через дефис на шаге «Протокол и порты» (Protocol and Ports).

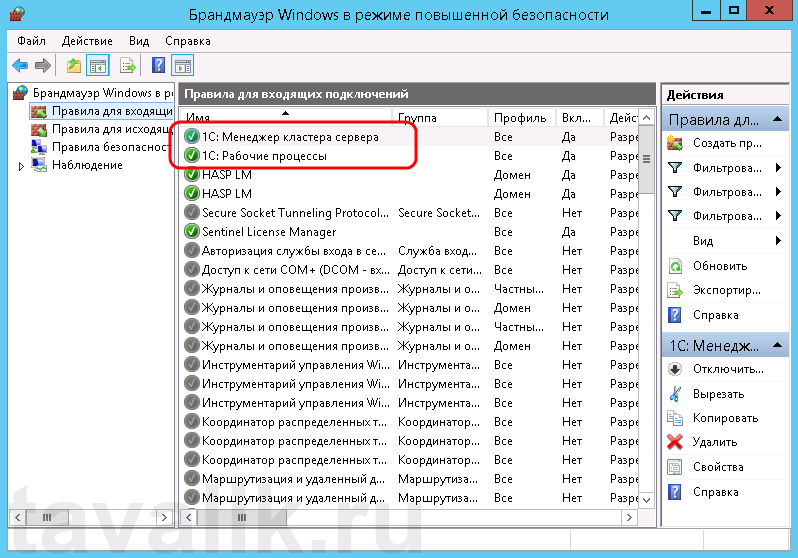
Теперь, в оснастке «Брандмауэр Windows в режиме повышенной безопасности» (Windows Firewall with Advanced Security) в таблице «Правила для входящих подключений» (Inbound Rules) мы должны увидеть 2 только что созданных правила.
Ну а клиент «1С:Предприятия» должен без ошибок подключиться к серверу. Если же потребуется подключаться к этом серверу через консоль администрирования серверов «1С:Предприятия», то необходимо также открыть порт 1540.
Аналогичным образом добавляются правила для для исходящих подключений (Outbound Rules), запрещающие правила, правила для определенных программ и протоколов. Также любое правило можно изменить, открыв его свойства из данной оснастки.