
INTRODUCTION
Windows Deployment Services (WDS)
Windows Deployment Services (WDS) allows to install Windows operating systems to a PXE-enabled clients without a physical media using network. You can automate Windows installation process including the necessary softwares and drivers to more than one computer to reduce time waste.
Preboot eXecution Environment (PXE)
In computing, the Preboot eXecution Environment (PXE), most often pronounced as pixie) specification describes a standardized client-server environment that boots a software assembly, retrieved from a network, on PXE-enabled clients. – WIKI
Image types
WDS supports four image types
- Install Image: It is the actual operating system. It is found in the operating system media\sources\install.wim.
(refer this youtube video tutorial to make install.wim https://www.youtube.com/watch?v=vyQ-b7mueLY)
- Boot Image: It is Windows PE image. You can find it the operating system media\sources\boot.wim.
- Discover Image: This image is used by WDS clients which don’t support PXE boot. You create the image using boot.wim image from media file and Windows Assessment Tool Kit (ADK) to create a discover image.
- Capture Image: This image is custom install image. You capture the image from a template computer using Sysprep, and deploy the image on client computes.
AT least two types of images are needed to be added in Windows Deployment Services in this tutorial
- install.wim (actual Windows installation files)
- boot.wim (used to boot client machines)
you can download Windows 10 installation with Windows Imaging Format (WIM) files namely install.wim and boot.wim from Microsoft website
LINK: https://www.microsoft.com/en-us/evalcenter/evaluate-windows-10-enterprise
Capture image is also created later in this tutorial to install Windows 10 with softwares
More tips
- Windows Deployment Services (WDS) can be either standalone or integrated with active directory
- DNS and DHCP servers should be configured since the client PC rely on them
- Windows firewall should be disabled in the WDS server
- To install windows, the client PC should be booted using network service boot
- WDS supports images namely Windows Vista, Windows 7, Windows 8, Windows 10, Windows Server 2008, Windows Server 2012 and Windows Server 2016
TUTORIAL
The tutorial is divided into 3 steps
- Install Windows Deployment Services
- Configure Windows Deployment Services
- Prepare and add images (install.wim and boot.wim)
login to Windows Server 2019 (in this case the Active Directory is already configured and WDS will be installed in the same server. If you need, you can install WDS as a standalone server separately which is recommended)
01 Install Windows Deployment Services

Click ‘Add roles and features’ in the ‘Server Manager’

Click ‘Next’ to proceed from ‘Before you begin’ window

Select ‘Role based or feature based’ as the installation type

Select the server from the server pool where WDS is going to be installed

Select ‘Windows Deployment Services’ as the server role

Click ‘Next’

Select both of the role services namely ‘Deployment Server’ and ‘Transport Server’ (this option is selected by default)

Confirm the installation selection and click ‘Install’

02 Configure Windows Deployment Services
Select ‘Windows Deployment Services’ from the ‘Server Manager’

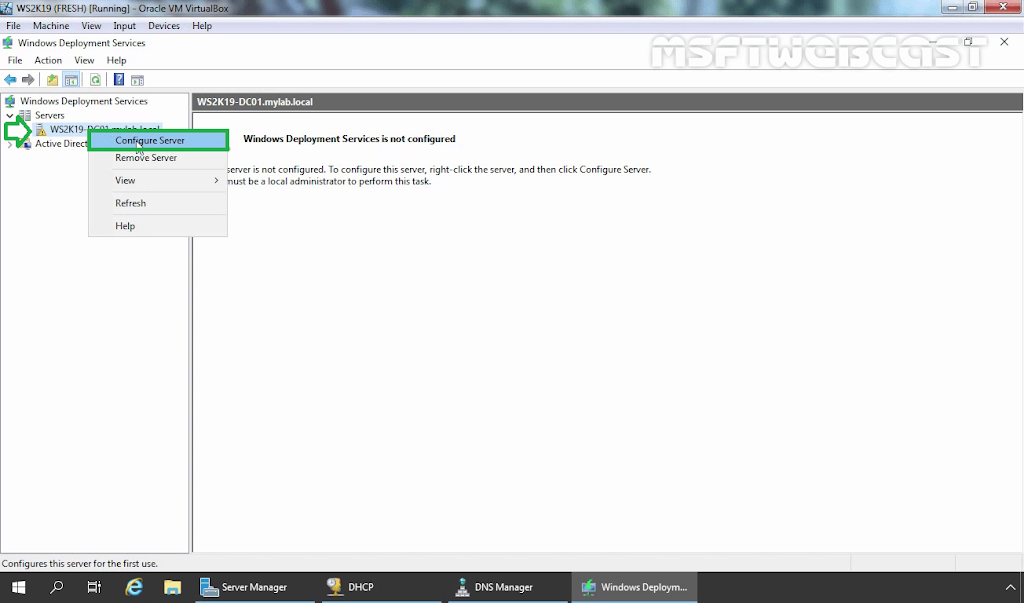
Notice that WDS is not configured yet and needs to be properly configured

Right click on the server and select ‘Configure Server’

Read the prerequisites carefully which will be needed to troubleshoot in future

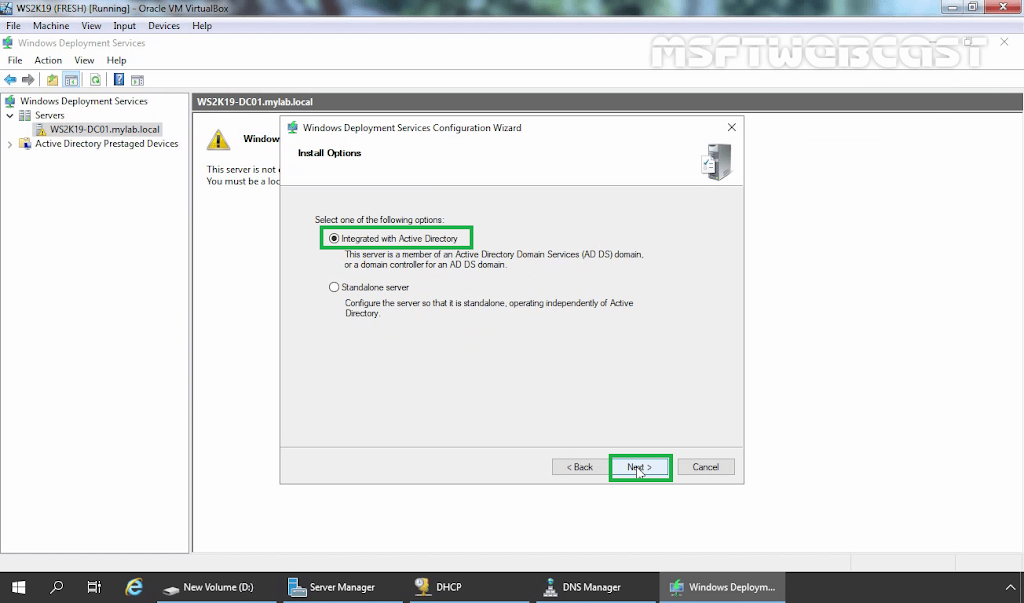
Next Window gives two options to install WDS (‘Integrated with active directory’ is chosen for this scenario. If you needed WDS can be installed as a standalone server)

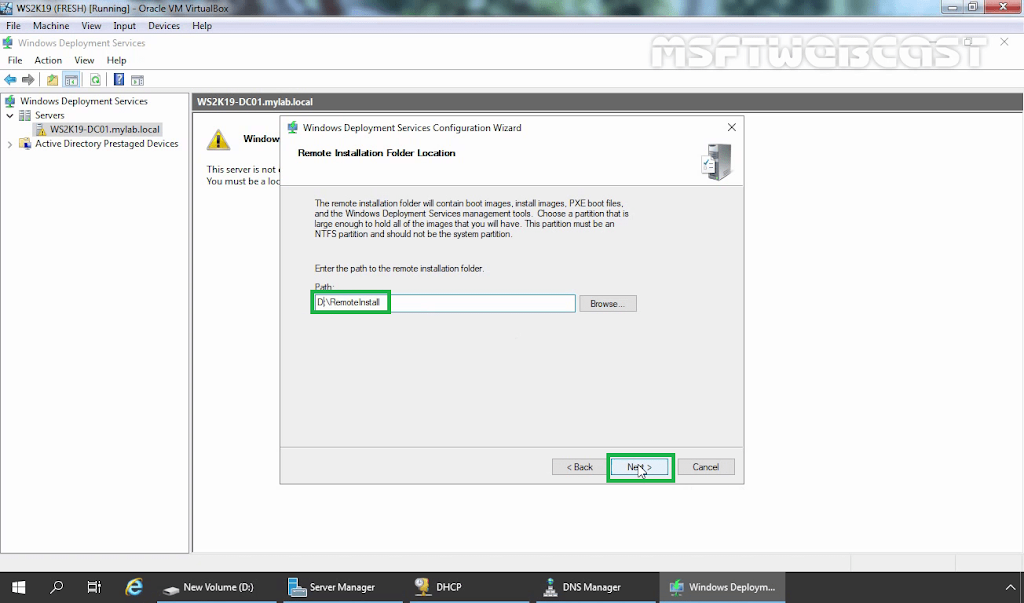
Browse to choose the remote installation folder

Local (D:) drive is chosen here and formatted and NTFS file system is chosen as it is a requirement

A meaningful name is given for the destination folder

‘Respond to all client computers (known and unknow)’ is selected out of the three options given

If you need you can add images to the server right after finishing the configuration

03 Prepare and add images (install.wim and boot.wim)
Firstly, make sure that WDS is running. If not right click on the server and select ”All tasks’ and start the service (In this case the service is already running)

Go to local Disk drive D:/techremoteinstall which was configured earlier

Right click on the folder and select properties to share the folder in network so client PCs have the access

Check the inside of the folder

Boot the Windows 10 ISO image
Download link: https://www.microsoft.com/en-us/evalcenter/evaluate-windows-10-enterprise

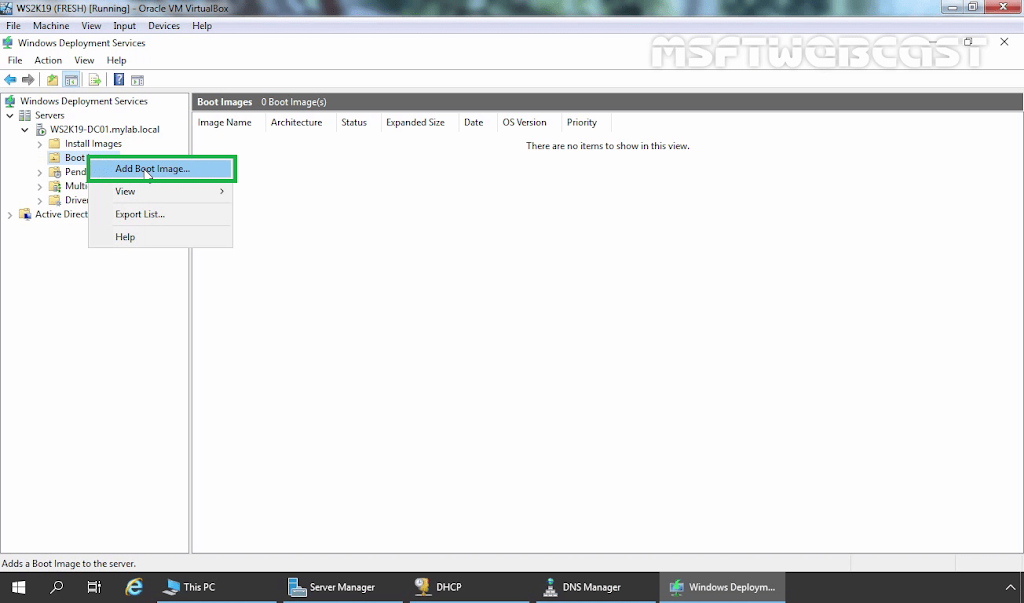
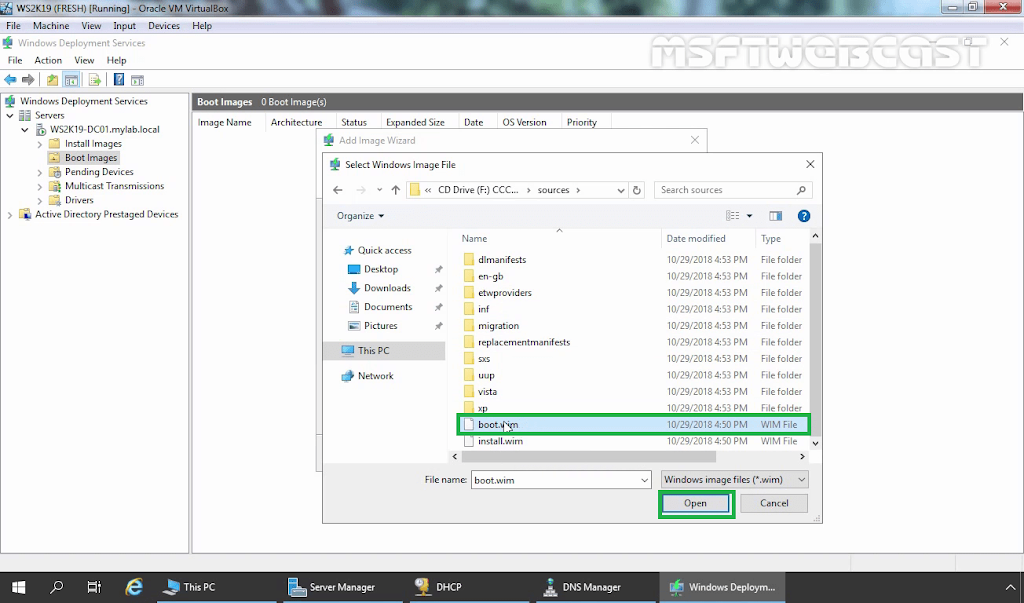
Right click on ‘Boot images’ and select ‘Add Boot Image’

Select ‘Browse’ to go to location of the image

Select Windows 10

Open ‘sources’ folder

Select ‘boot.wim’ file

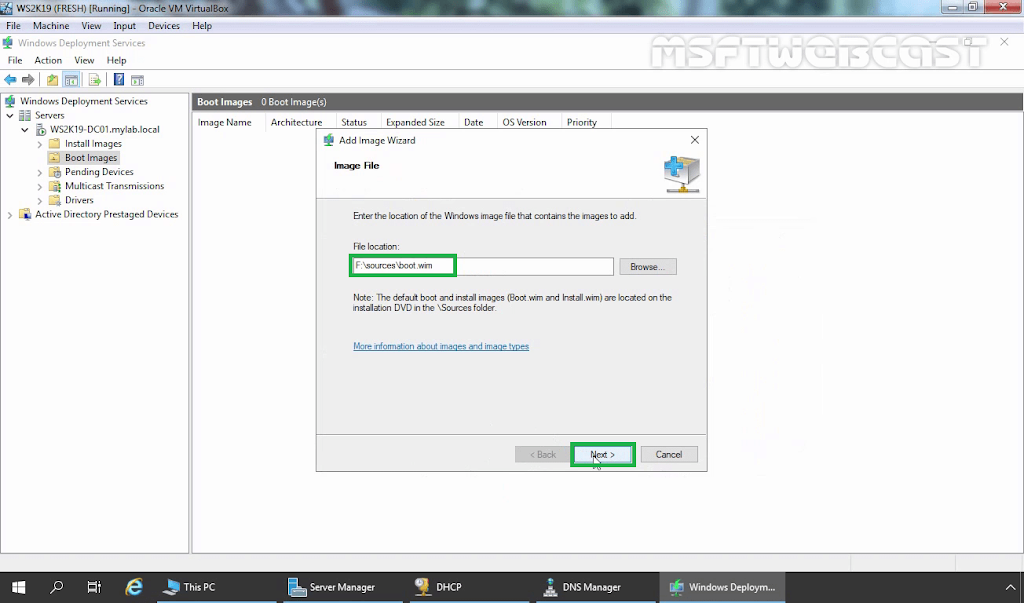
Click ‘Next’ to proceed

Provide an appropriate ‘image name’ and ‘image description’

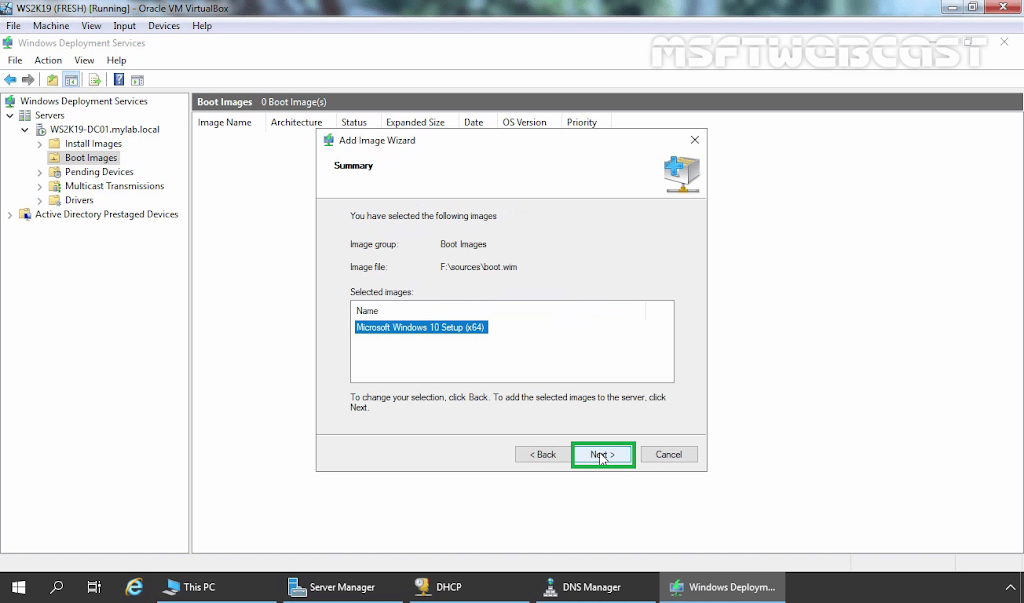
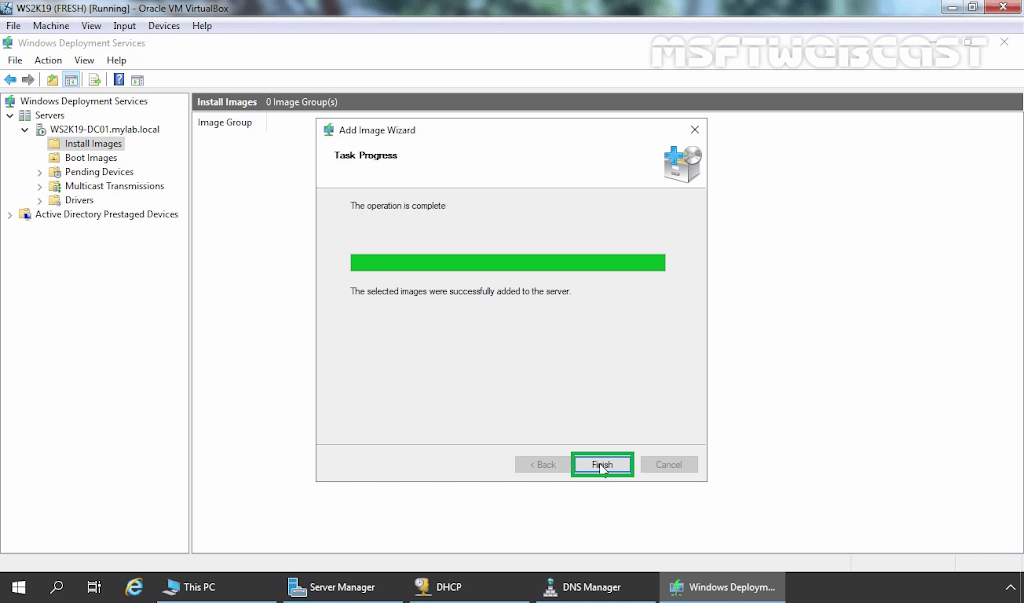
Review the ‘Summary’ and click ‘Next’

Click ‘Finish’ to exit from the ‘Add Image Wizard’

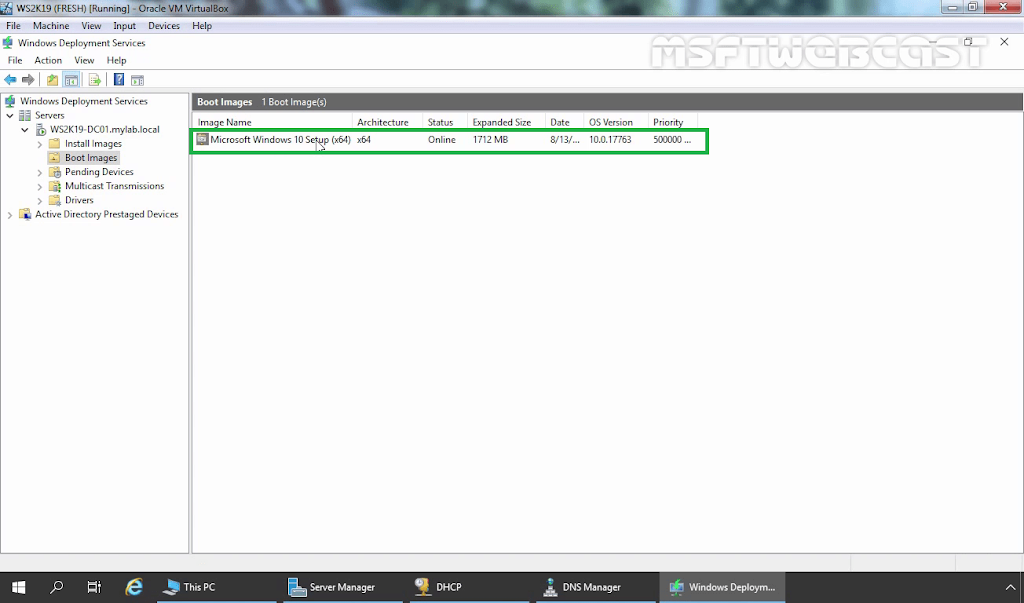
Select the Boot Images to find the added Windows 10 boot image

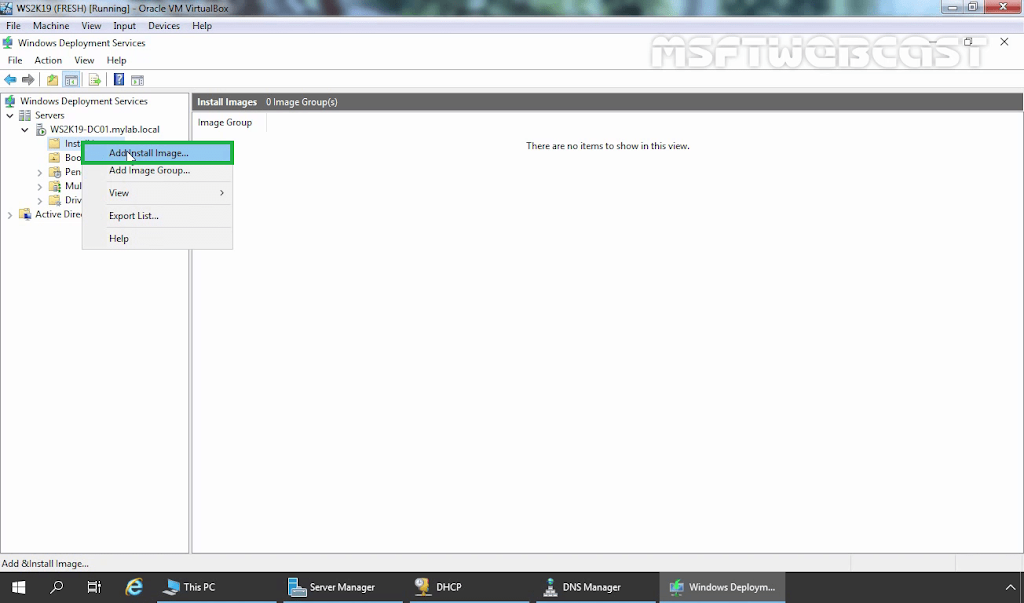
In the next step, right click on the ‘Install Images’ and select ‘Add Install Image’

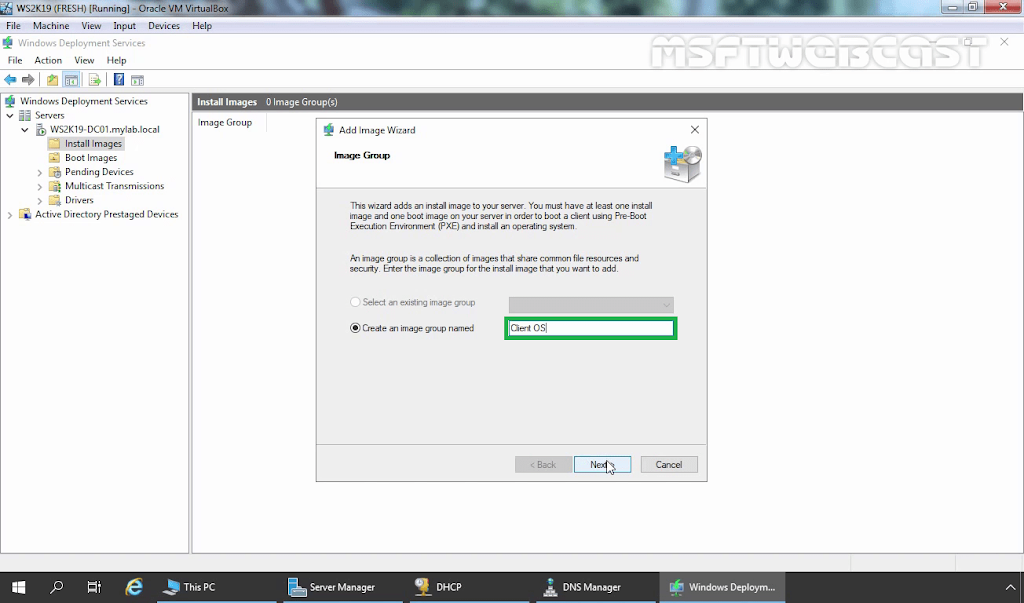
In this step an option is given to create an image group

Browse to find the install.wim

Go to Windows 10 installation files and find install.wim

After providing the file location click ‘Next’ to proceed

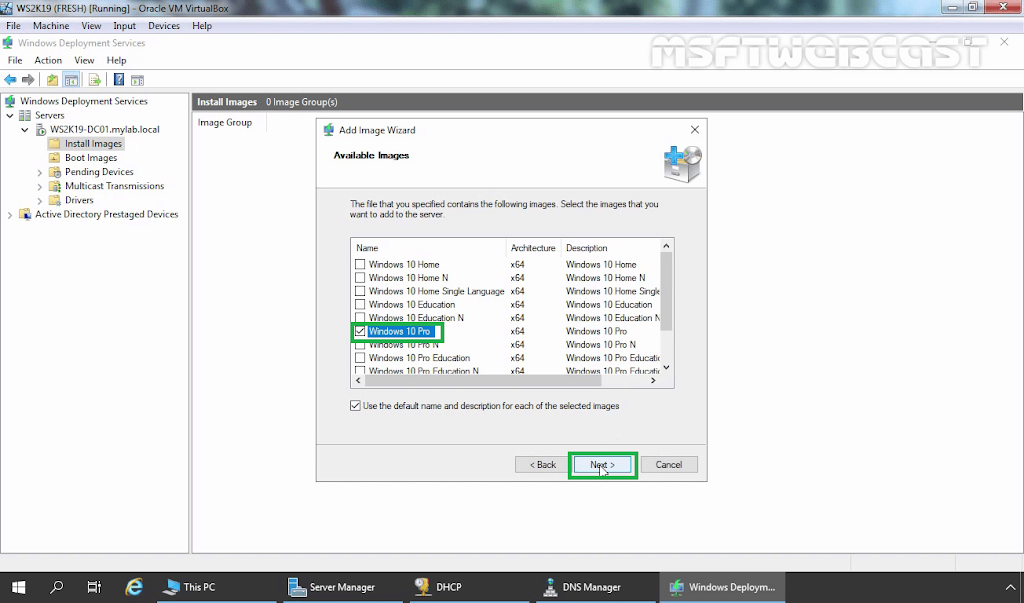
Select the version of the Windows 10 (In this downloaded ISO there is only one version. If you are given multiple options you can select the required versions)

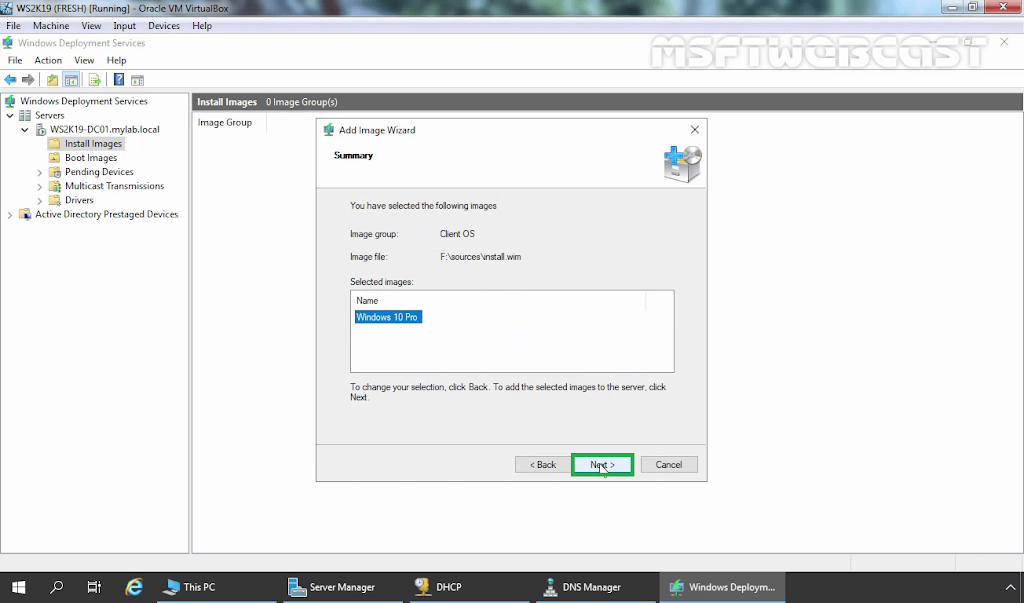
Review the summary and click ‘Next’ to proceed

Wait till the image (install.wim) is added to the server

Check ‘Install Images’ to see the added windows 10 ‘install.wim’ file

If you would like to deploy OS to the New rack Server or PC but they have no DVD (virtual DVD), WDS (Windows Deployment Services) server is your good friend, you can easy to deployment via network (PXE).
Today, I am going to show you step by step to install and configure WDS server. you don’t need a new hardware for it, you can build WDS server as a VM of exiting Windows 10 laptop or Server.
- Assumed the host machine (it can be a Windows 10 laptop) is connecting to Corporate Network, so the WDS VM and testing VM will get the IP address from DHCP server. if it’s at your lab or pilot environment, you need to build your own DHCP server.
- Login to WDS2019 Server via local Administrator (WDS server can be a domain member server or WORKGROUP server)
-
Use ping command to make sure the VM (WDS2019) can ping outside network.

-
On the Server Manager page, select Manage, click Add Roles and Features.
-
On the Before you begin page, click Next.
-
On the Select installation type page, select Role-based or feature-based installation, click Next.
-
On the Select destination server page, click Next.
-
On the Select server roles page, select Windows Deployment Services.
-
On the Add features that are required for Windows Deployment Services page, click Add Features.
-
On the Select server roles page, click Next.
-
On the Select features page, click Next.
-
On the WDS page, click Next.
-
On the Select role services page, click Next.
-
On the Confirm installation selections page, select Restart the destination server automatically if required, click Yes on the Add Roles and Feature wizard warning message, and then click Install.
-
On the Installation progress page, click Close.
-
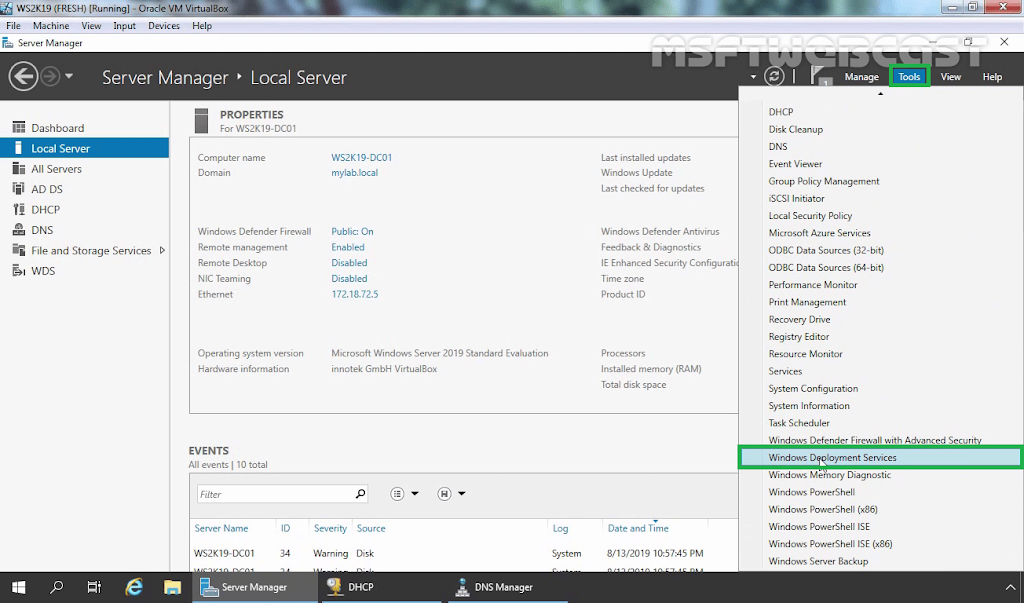
On the Server Manager, select Tools, click Windows Deployment Services.
-
On the Windows Deployment Services page, expand Servers, right-click the WDS2019 server and then select Configure Server.
-
On the Before You Begin page, click Next.
-
On the Install Options page, select Standalone server, click Next.
-
On the Remote Installation Folder Location page, click Next. (You also can select the folder is not the same as system volume).
-
On the System Volume Warning message, click Yes.
-
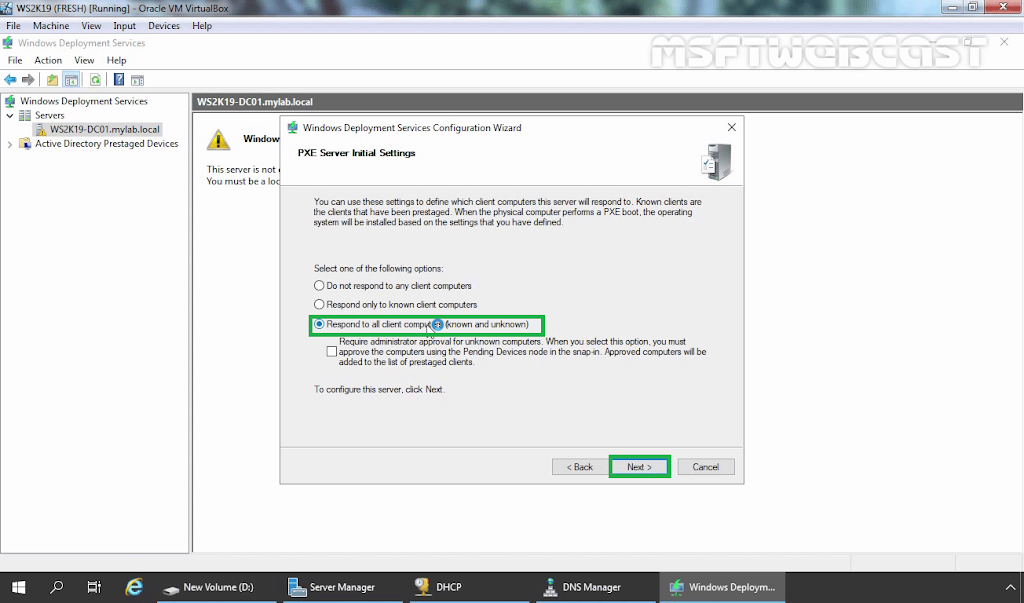
On the PXE Server Initial Settings page, select Response to all client computers (known and unknown), click Next.
-
On the Operation Complete page, unselect Add images to the server now, click Finish.
-
Creating a new folder at WDS2019 server and copy boot.wim and install.wim of D:\sources to this folder. (D drive is mounting Windows Server 2019 ISO image).
-
On the Windows Deployment Services page, expend WDS2019 and right click Boot Images, click Add Boot Image.
-
On the Image file page, click Browse at File location.
-
Select boot.wim file, click Open.
-
On Image File page, click Next.
-
On the Image Metadata page, type Image name and description for the Boot Image, click Next.
-
Click Next on the Summary page.
-
On the Task Progress page, make sure the operation is complete without issues, click Finish.
-
On the Windows Deployment Services page, expend WDS2019 server, right-click Install Images, click Add Install Image.
-
On the Image Group, type image group name, click Next.
-
On the Image File page, click Browse from File location.
-
Select install.wim file and click Open.
-
On the Image File page, click Next.
-
On the Available Images, select Windows Server 2019 SERVERSTANDARD and Windows Server 2019 SERVERDATACEBTER, click Next.
-
On the Summary page, click Next.
-
On the Task Progress page, make sure the operation is complete without issues, click Finish.
- Now, we can try to deploy windows server 2019 via PXE to another VM and test WDS functions.
-
On the Hyper-V Manager page, on the Actions pane, click New and select Virtual Machine.
-
On the Before You Begin page, click Next.
-
On the Specify Name and Location page, type Name and select location for the test Virtual Machine, click Next.
-
On the Specify Generation page, select Generation 2, click Next.
-
On the Assign Memory page, assign 4GB for Startup memory, click Next.
-
On the Configure Networking page, select External Network at Connection, click Next.
-
On the Connect Virtual Hard Disk page, click Next.
-
On the Installation Options page, select Installation an operating system from a network-based installation server, click Next.
-
On the Completing the New Virtual Machine Wizard page, click Finish.
-
On the Hyper-V Manager page, right-click Test virtual machine and select Connect.
-
On the Test Virtual Machine console, click Start.
-
Press Enter for the network boot service.
-
It will start loading boot image file from WDS Server.
-
After loading image file completed, on the Locate and Keyboard page, click Next.
-
Type local administrator and password to connect to WDS2019 server.
-
Select the Operating system you would like to install, click Next.
- You can follow previously steps to install windows server 2019 for the test virtual machine.


Hope you enjoy this post.
Cary Sun
Twitter: @SifuSun

Windows Deployment Services (WDS) is a really interesting tool from Microsoft for network-based installation (deployment) of Windows operating systems. In windows server 2003 it was called Remote Installation Services (RIS). The purpose of WDS is to remotely deploy the Windows operating systems. See this guide on how to set up and install WDS role, how to configure Windows Deployment Services on Windows Server 2019, and how to configure DHCP Server option 60, 66, and 67 for Windows Deployment Services. Also, For the complete installation steps of WinPE, please see the following guide: Install ADK, MDT, and WDS: How to deploy Windows images via Microsoft Deployment Toolkit and Windows Deployment Services.
How does WDS work?
WDS uses a PXE method for client booting. PXE enables clients to boot off the network. To find WDS services and to load boot images, the client should be able to contact the WDS server, the client network card must be PXE compliant and most devices are NICs compliant. For cards that don’t support PXE, we have another type of boot image which is referred to as a discover boot image.
Discover images can be used for computers that are not PXE compliant. That means that those computers cannot boot off the network. Note: The discover image has to be created manually in the WDS server first, after which we can transfer it to external media such as CD, DVD or USB drive. For more information on WDS images, see the following link.
Then we can use that media to boot up the computer into the discover image, which will then allow us to connect to the WDS server over the network. So, remember that clients have to have a PXE-compliant NIC in order to contact the WDS server. If the NIC is not PXE compliant, then we must use another means of network boot such as a Windows PE through the discover image of the WDS server. We can use WAIK tools to create an ISO image that contains the discovered boot image. ISO can then be burned to CD or DVD using some tool that is capable of creating a disc from IS
In environments with a large number of clients, WDS can be very useful as new devices can be formatted on the fly by simply plugging it to the Ethernet, without any physical support like Windows DVDs or USB drives.
The configuration isn’t difficult but there are some requirements:
– There must be an Active Directory Domain Services
– At least one partition on the server must be formatted as NTFS
– A DHCP server must be active to assign IP addresses to the WDS clients
See the following links for more details on what DHCP is, installation and configuration..
– What is Dynamic Host Configuration Protocol (DHCP)
– How to install Dynamic Host Configuration Protocol on Windows Server 2019
– Configuring DHCP: Post deployment of Dynamic Host Configuration Protocol
Configure Windows Deployment Services (WDS)
The following requirements are vital.
– Choose where to store your images
– DHCP Options
– PXE Server Settings.
Configure your server
Open the WDS snap-in console. In the previous article, I discussed and installed the WDS role, see the following link for more information.

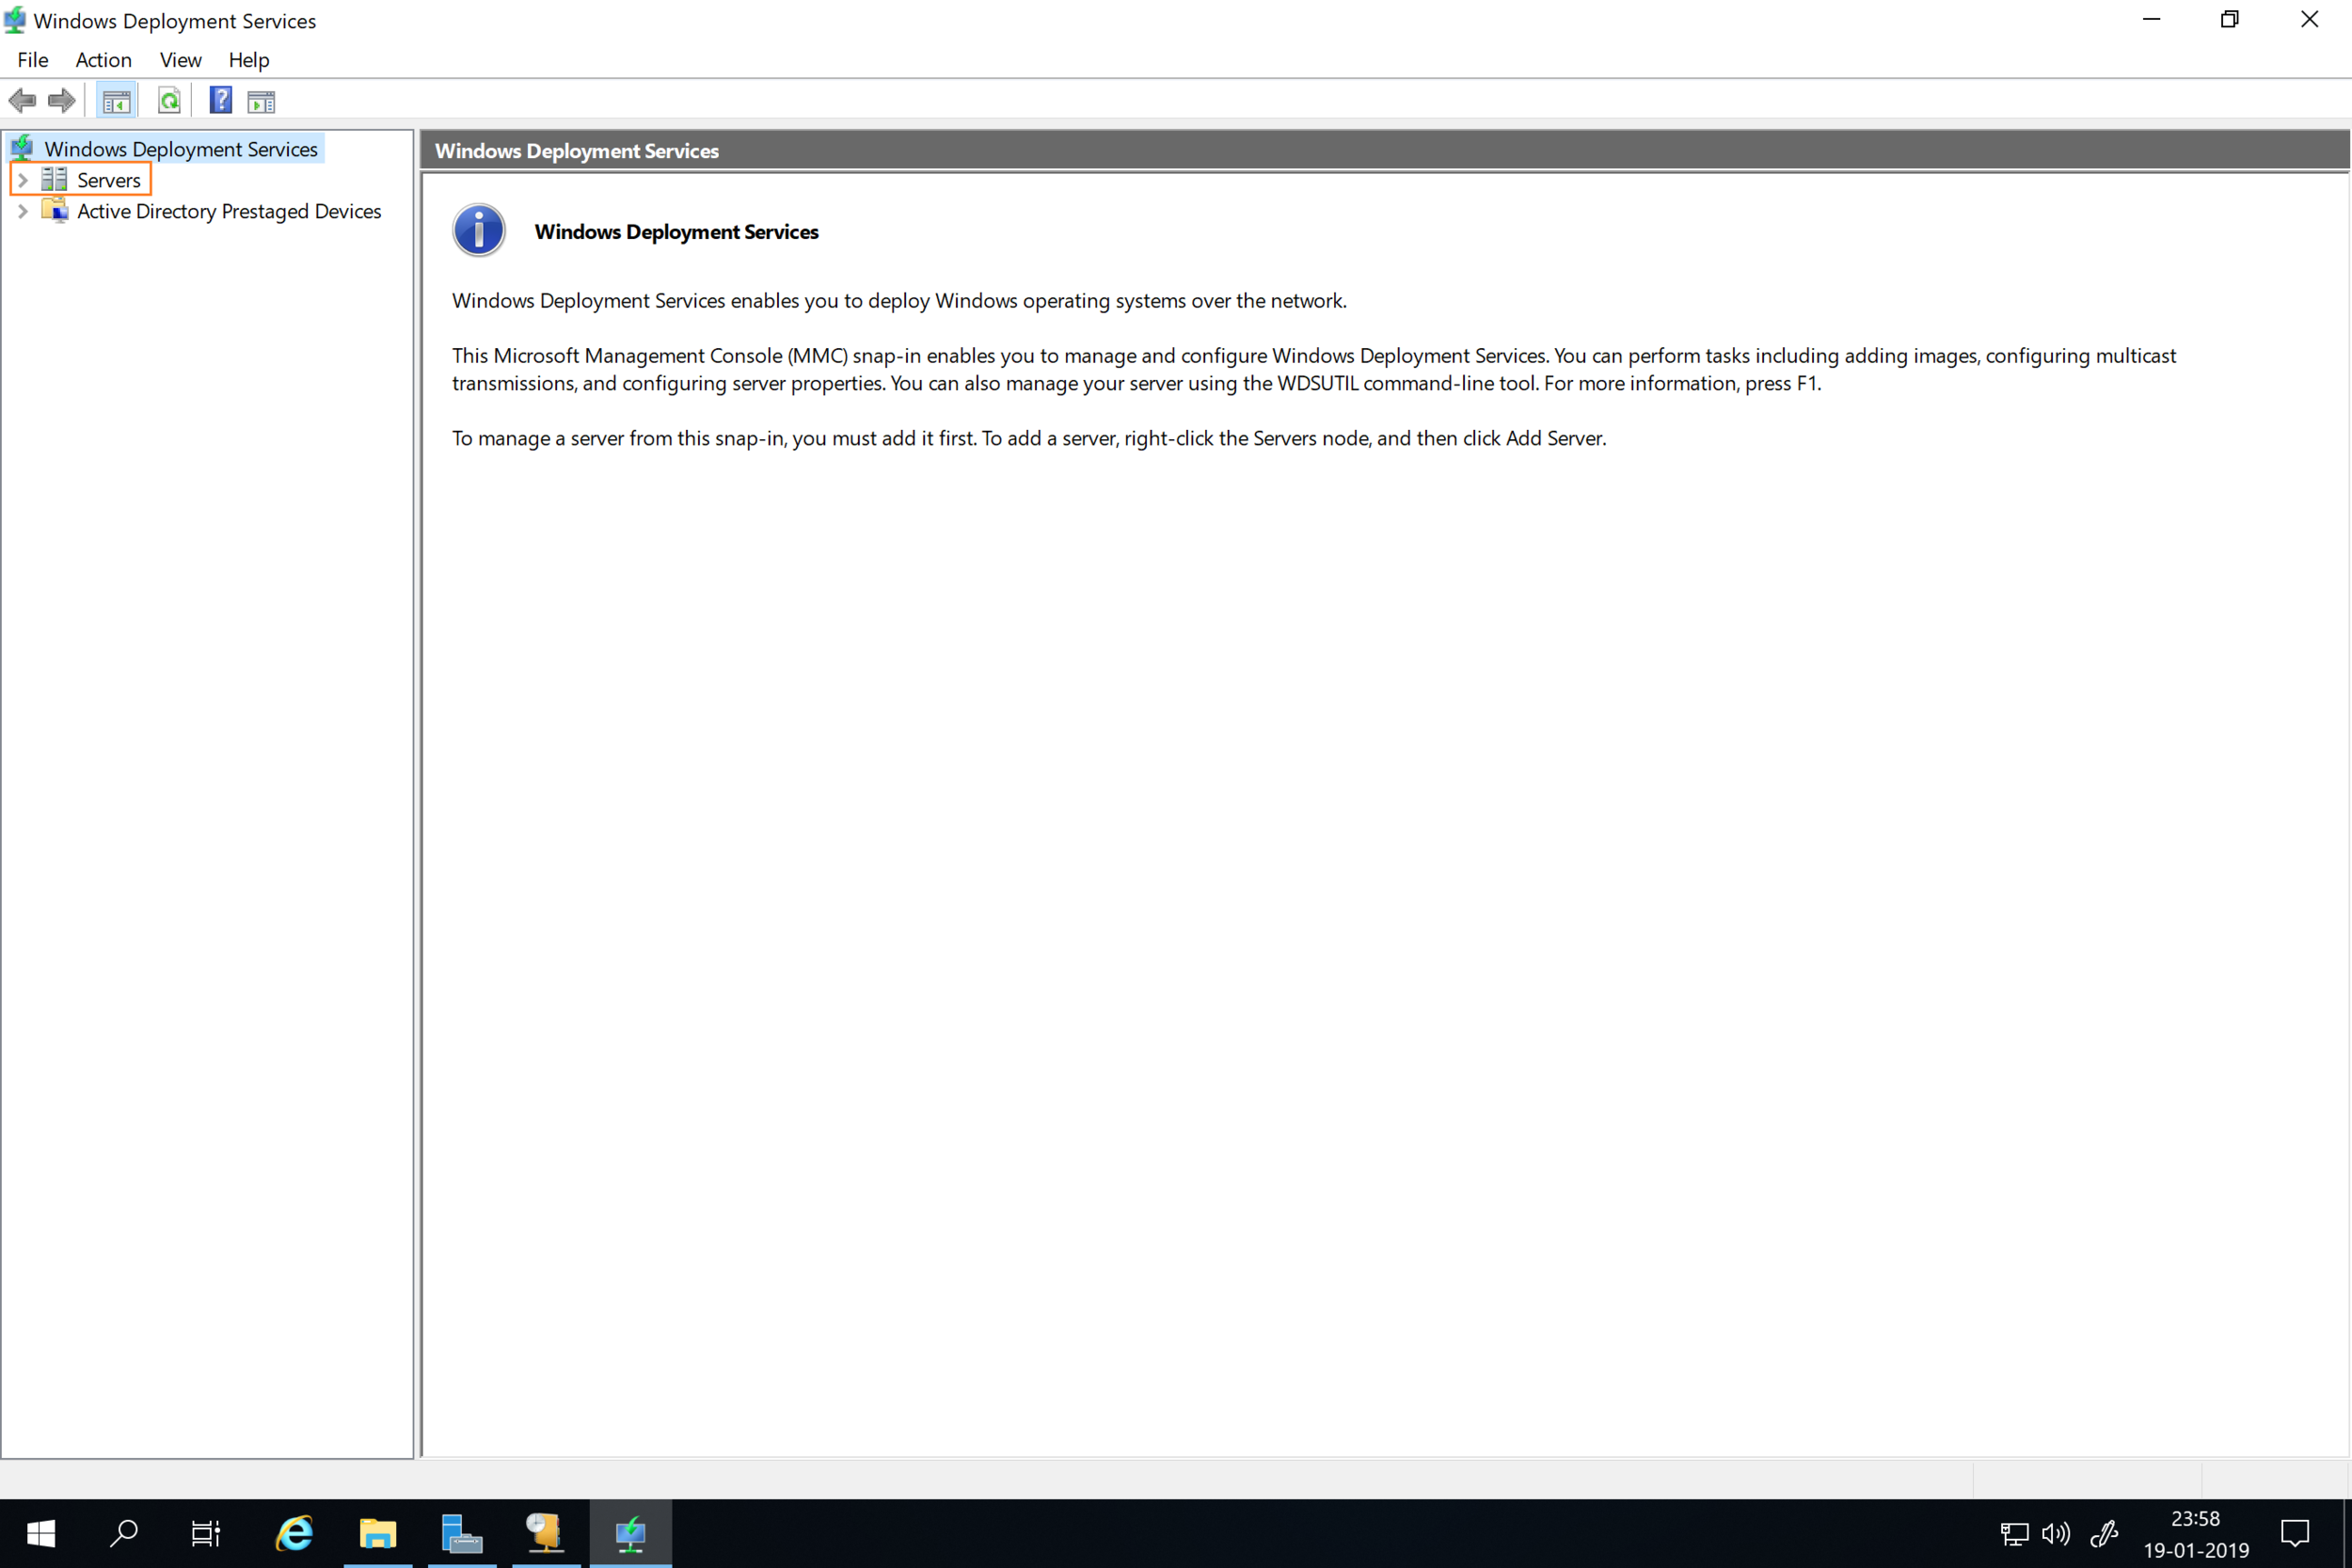
This will launch the Windows Deployment Services console as shown below
– As you can see the server is currently not configured.

To have the server configured
– Right-click on the server name (in my case, TechDarchive.techdirect.local)
– Click on configure the server

– This will open up the Windows Deployment Services Configuration Wizard as shown below. Read and ensure you are complying with the requirements to setup WDS.
– Click on Next

– Click on next to continue
– On the Install Options page, verify that you choose Integrated with Active Directory and then click Next.

– Click on Next.
– On the Remote Installation Folder Location page, you can accept the default location which is C:\RemoteInstall and then click Next

Note: If you do not want to have your boot images, install and PXE boot files etc saved to this location, click on browse and select your desired location. Since this is in a test environment, I will leave it this way. Ensure you select a different partition for a production environment.
– Click on Next,
– This will prompt the “System Volume Warning dialog window”
– Click Yes.

Configure Proxy Server
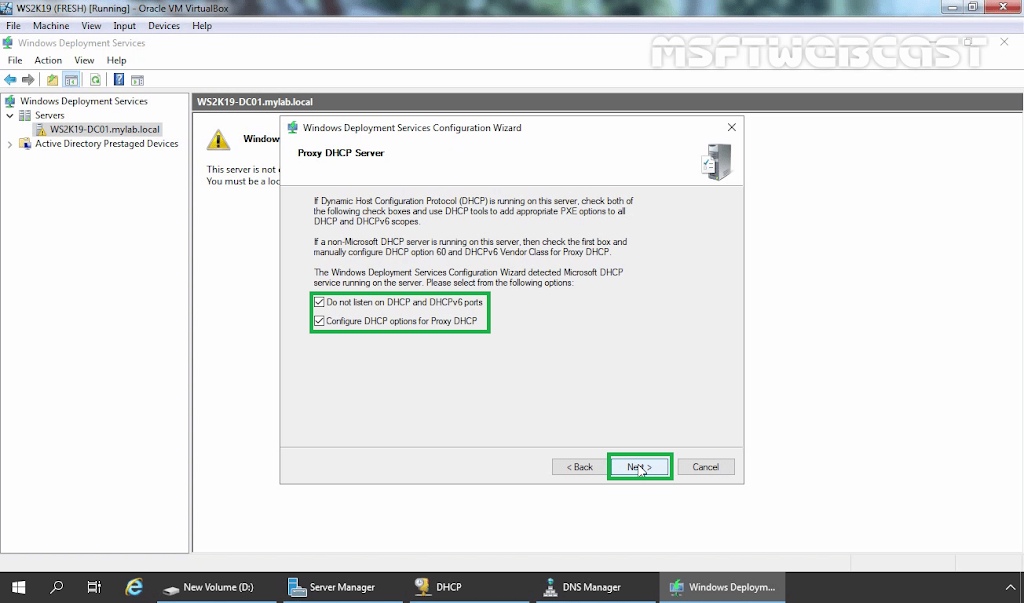
– Next, on the Proxy DHCP Server window, ensure you check the two boxes in order to use DHCP tool to add appropriate PXE options to all DHCP and DHCPv6 scopes.
– Click on Next
Note: If you are configuring WDS and there is not DHCP server running on the same hardware, you will not see this image below.

– On the PXE Server Initial Settings window, click Respond to all client computers (known and unknown), and
– Click on Next, please wait for few second for the process to complete.

– This will start the WDS configuration as shown below.
– When complete, Click on Finish.


This will display the WDS console as shown below.

You can right click


We will be adding the images in the next article. See How to add images to WDS and configure Multicast transmission via the GUI and WDSUTIL.
As you can see in the above or below diagram, the WDS has now stopped.
– To start WDS, right-click on the node as shown below
– Select All Tasks
– Click on start


Now, Windows Deployment Services has started as shown below

To stop or restart WDS, follow the same steps to perform either of the operations.
I hope you found this blog post on How to configure Windows Deployment Services on Windows Server helpful. If you have any questions, please let me know in the comment session.
In the previous article, we have learned the steps on how to install the Windows Deployment Services on Windows Server 2019. After installing the WDS server role, the next step is to configure it.
In this post, we will learn about how to configure the WDS server role in Windows Server 2019. But there are some prerequisites to fulfill.
Prerequisites to configure WDS Server:
- The server must be a member server of an active directory domain or a domain controller itself.
- There must be an active DHCP server to provide IP addresses to PXE clients.
- There must be an active DNS server for name resolution.
- The server must have at least one NTFS partition to store WDS images and support files.
Configure Windows Deployment Services:
Open server manager dashboard. Click on Tools and select Windows Deployment Services.
Expand Servers. Then right-click the WDS server and select Configure Server.
On the Before you begin page, read the requirements once before you click Next.

Select the Integrate with Active Directory option. You can also choose the standalone mode if you don’t have an active directory infrastructure. Click Next.
Provide the path on your NTFS drive where you would like to store WDS related files like boot images and install images. Click Next.
I have configured the DHCP server role on the same WDS server. So we need to check both boxes and click Next.
Next, on the PXE Server Initial Settings box, click Respond to all client computers (known and unknown), and then click Next, please wait for a few seconds for the process to complete.
Clear the Add images to the server now checkbox, and then click Finish.

Now, you have installed and configured WDS in Windows Server 2019.
How to add Boot and Install Image:
The next step is to add the WDS images that you want to deploy on your network. To add the WDS images, you need to add the Boot images and Install images files for the supported Windows operating systems.
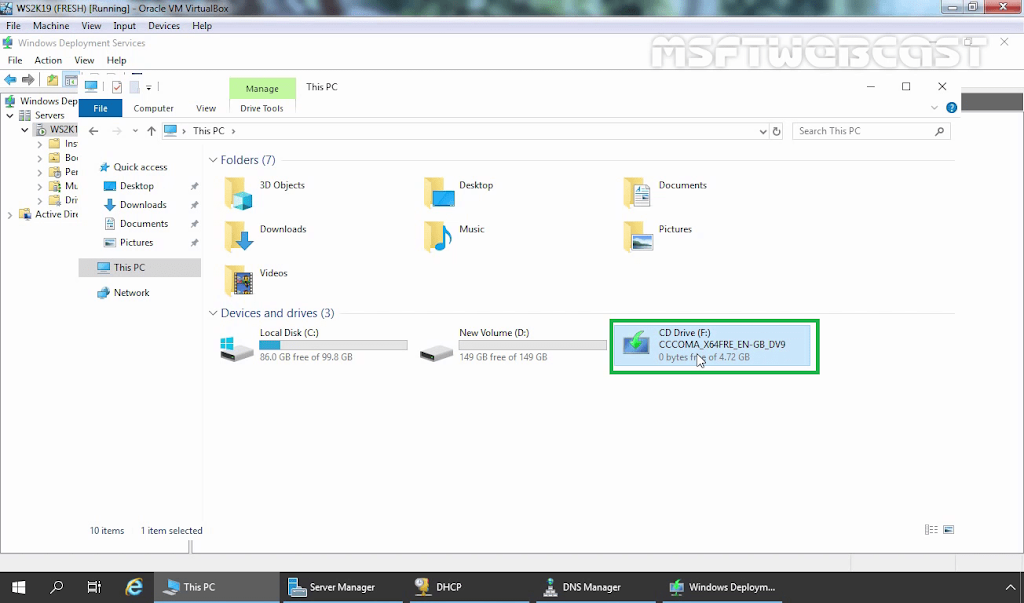
For this article, already we have mounted the ISO image of the Windows 10 operating system.
Select and right-click Boot Images and then click Add Boot Image.
On the Image File page, click Browse and navigate to the Sources directory of the installation media and select the Boot.wim file.
On the Image File box, verify the File Location then click Next.
On the Image Metadata box, specify Image name and Image description. Click Next.

On the Summary box, click Next.
Once the process complete, Click on Finish.

Verify that Windows 10 boot image is listed under the boot images
Next, you need to add an install image into WDS, so in the WDS console, right-click Install Images, and then click Add Install Image.
In the Add Image Group box, type Client OS, and then click Next.
On the Image File page, click Browse and navigate to the Sources directory of the installation media and select the Install.wim file.

On the available images page, select the editions that you intend to deploy for your network. Click Next.
On the Summary page, click Next and wait for few minutes for the process to be completed.
Once the process complete, Click on Finish.

Now, your WDS server is ready to be used. At this point, we can deploy the Windows 10 operating system over the network using our WDS server.
Post Views: 4,116

BELOW WE MAY GET STEP-BY-STEP SCREENSHOTS,
Step 1 — Click on «Start» button.
Step 2 — Click on «Server Manager«.
Step 3 — Click on «Add roles and features«.
Step 4 — Click on «Next«.
Step 5 — Keep selected «Role-based or feature-based installation» and click on «Next«.
Step 6 — Select/Verify the server name and IP address, then click on «Next«.
Step 7 — Locate «Active Directory Domain Services» and click the check box.
Step 8 — Click on «Add Features«.
Step 9 — Locate «DHCP Server» and click the check box.
Step 10 — Click on «Add Features«.
Step 11 — Locate «DNS Server» and click the check box.
Step 12 — Click on «Add Features«.
Step 13 — Locate «Windows Deployment Services» and click the check box.
Step 14 — Click on «Add Features«.
Step 15 — Confirm the Tick marks and click on «Next«.
Step 16 — Click on «Next«.
Step 17 — Click on «Next«.
Step 18 — Click on «Next«.
Step 19 — Click on «Next«.
Step 20 — Click on «Next«.
Step 21 — Click on «Next«.
Step 22 — Click on the check box «Restart the destination server automatically if required«.
Step 23 — Click on «Yes«.
Step 24 — Click on «Install«.
Step 25 — Wait for some time until installation completes.
Step 26 — Click on «Promote this server to a domain controller«.
Step 27 — Click on «Add a new forest«.
Step 28 — Type root domain name.
Step 29 — Click on «Next«.
Step 30 — Choose appropriate «Forest and Domain functional level» from drop down menu and type «Directory Services Restore Mode (DSRM) password«.
Step 31 — Click on «Next«.
Step 32 — Click on «Next«.
Step 33 — Verify the NetBIOS name assigned to the domain and click on «Next«.
Step 34 — Click on «Next«.
Step 35 — Click on «Next«.
Step 36 — Click on «Install«.
Step 37 — Wait for some time until installation completes and system restarts.
Step 38 — Click on «Notifications» flag icon.
Step 39 — Click on «Complete DHCP configuration«.
Step 40 — Click on «Next«.
Step 41 — Click on «Commit«.
Step 42 — Click on «Close”.
Step 43 — Click on «Tools» button.
Step 44 — Click on «DHCP«.

Step 45 — Click on «Server«, e.g. wds2019.dskoli.net as shown in screenshot.

Step 46 — Click on «IPv4«.
Step 47 — Click on «More Actions«.
Step 48 — Click on «New Scope…«.
Step 49 — Click on «Next«.

Step 50 — Type a name and description for the scope.
Step 51 — Click on «Next«.

Step 52 — Type the «IP Address Range» for the scope.
Step 53 — Click on «Next«.

Step 54 — Type the «IP Address Range» that you want to exclude for the scope.

Step 55 — Click on «Add«.
Step 56 — Click on «Next«.
Step 57 — Click on «Next«.
Step 58 — Click on «Next«.
Step 59 — Type an «IP Address» of same server.
Step 60 — Click on «Add«.
Step 61 — Click on «Next«.
Step 62 — Click on «Next«.
Step 63 — Click on «Next«.
Step 64 — Click on «Next«.
Step 65 — Click on «Finish«.
Step 66 — Verify Scope has been created and Active.
Step 67 — Click on «Tools» button.
Step 68 — Click on «Windows Deployment Services«.
Step 69 — Click on «Servers«.
Step 70 — Select «Server«, e.g. wds2019.dskoli.net as shown in screenshot.

Step 71 — Right-click on «Server«, e.g. wds2019.dskoli.net as shown in screenshot.
Step 72 — Click on «Configure Server«.
Step 73 — Click on «Next«.
Step 74 — Click on «Next«.
Step 75 — Change the path to the remote installation folder.
Step 76 — Click on «Next«.
Step 77 — Click on «Next«.
Step 78 — Click on «Respond to all client computers (known and unknown)«.
Step 79 — Click on «Next«.
Step 80 — Click on «Finish«.
Step 81 — Right-Click on “Boot Images”.
Step 82 — Click on «Add Boot Image…«.
Step 83 — Click on «Browse«.
Step 84 — Click on Windows Image»DVD Drive» and open “sources”.
Step 85 — Double-click on «boot.wim«.
Step 86 — Click on «Next«.
Step 87 — Click on «Next«.
Step 88 — Click on «Next«.
Step 89 — Wait for some time until adding boot image completes.
Step 90 — Click on «Finish«.
Step 91 — Right-Click on “Install Images”.
Step 92 — Click on «Add Install Image…«.
Step 93 — Click on «Next«.
Step 94 — Click on «Browse«.
Step 95 — Double-click on «install.wim«.
Step 96 — Click on «Next«.
Step 97 — Un-check all images which are not required.
Step 98 — Make sure required one is selected and then click on «Next«.
Step 99 — Click on «Next«.
Step 100 — Wait for some time until adding Windows image completes.
Step 101 — Click on «Finish«.
Step 102 — Right-click on «Server«, e.g. wds2019.dskoli.net as shown in screenshot.
Step 103 — Scroll to “All Tasks” and click on «Start«.
Step 104 — Wait for some time until services starting.
Step 105 — Click on «OK«.
Step 106 — Verify the green icon on «Server«, e.g. wds2019.dskoli.net as shown in screenshot.
Client Side
Make Client machine boot from network or create virtual machine with an option “Install an operating system from a network-based installation server“.
Step 107 — Click on «Start«.
Step 108 — Wait for some time until Virtual Machine “Start PXE over IPv4”.
Step 109 — Verify the details and press “Enter» for network boot service.
Step 110 — Wait for some time until “Loading files…”.
Step 111 — Click on «Next«.
Step 112 — Enter administrator user name in the format “domain\user or user@domain.com”.
Step 113 — Click on «Ok«.
Step 114 — Select required Operating system and Click on «Next«.
Step 115 — Click on «Drive options (advanced)«.
Step 116 — Click on «New«.
Step 117 — Click on «Apply«.
Step 118 — Click on «OK«.
Step 119 — Click on «Next«.
Step 120 — Wait for some time until server initiates session.
Step 121 — Windows Installation will start.
“Thank You for being with me.”