On Windows 11, Wake on LAN (WoL) is a networking feature available on specific hardware that enables you to turn on a computer from a low-power state using a particular packet referred to as a «magic packet» sent over the network.
Wake on LAN has been around for a long time, and even though it’s not for everyone, it can come in handy in many situations. For example, to turn on a computer you want to access remotely to retrieve a file or create a backup, but you don’t want to keep powered on all the time to prevent wasting energy.
Whatever the reason it might be, depending on the hardware, on Windows 11, you can enable Wake on LAN through the motherboard or add-in card firmware. Once the feature is enabled, you can use a third-party app or script to turn on a computer remotely.
This guide will walk you through the steps to enable WoL on your computer.
How to enable WoL on Windows 11
On Windows 11, to use Wake on LAN, you have to turn on the feature (if not already enabled) on the motherboard’s firmware (UEFI). You can turn it on directly from the Windows settings if you have an add-in card or USB adapter.
Firmware configuration
To enable Wake on LAN on the UEFI firmware, use these steps:
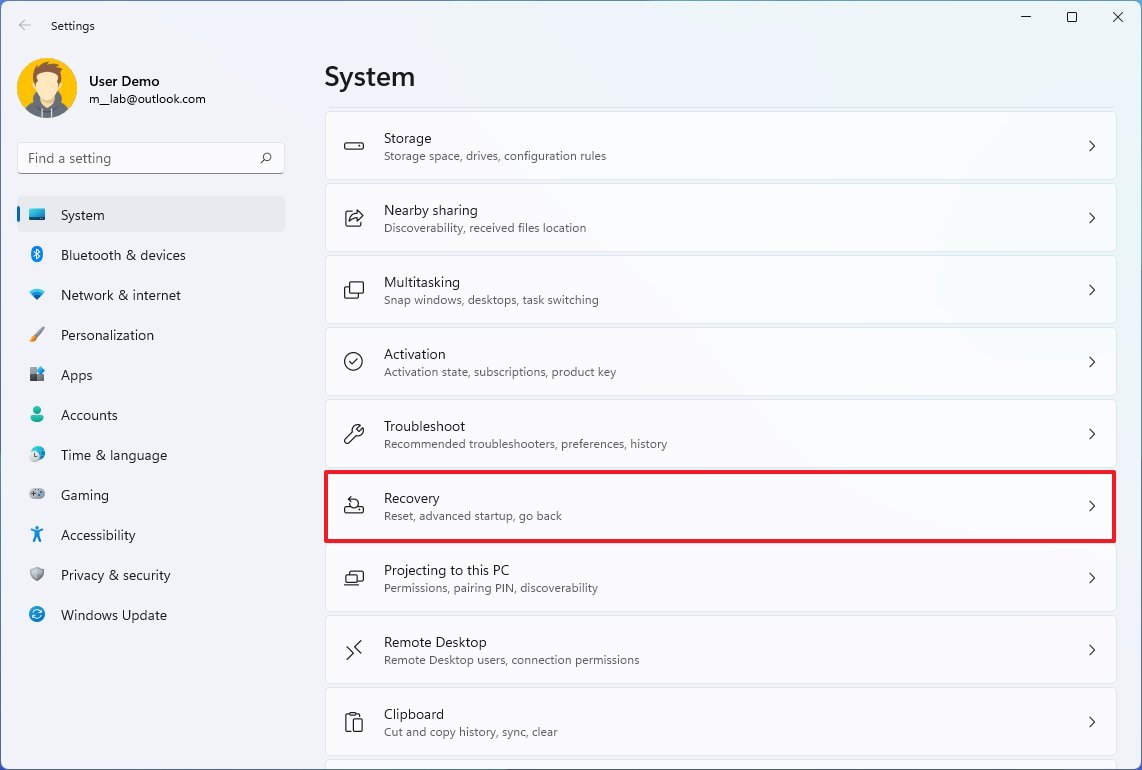
- Open Settings.
- Click on System.
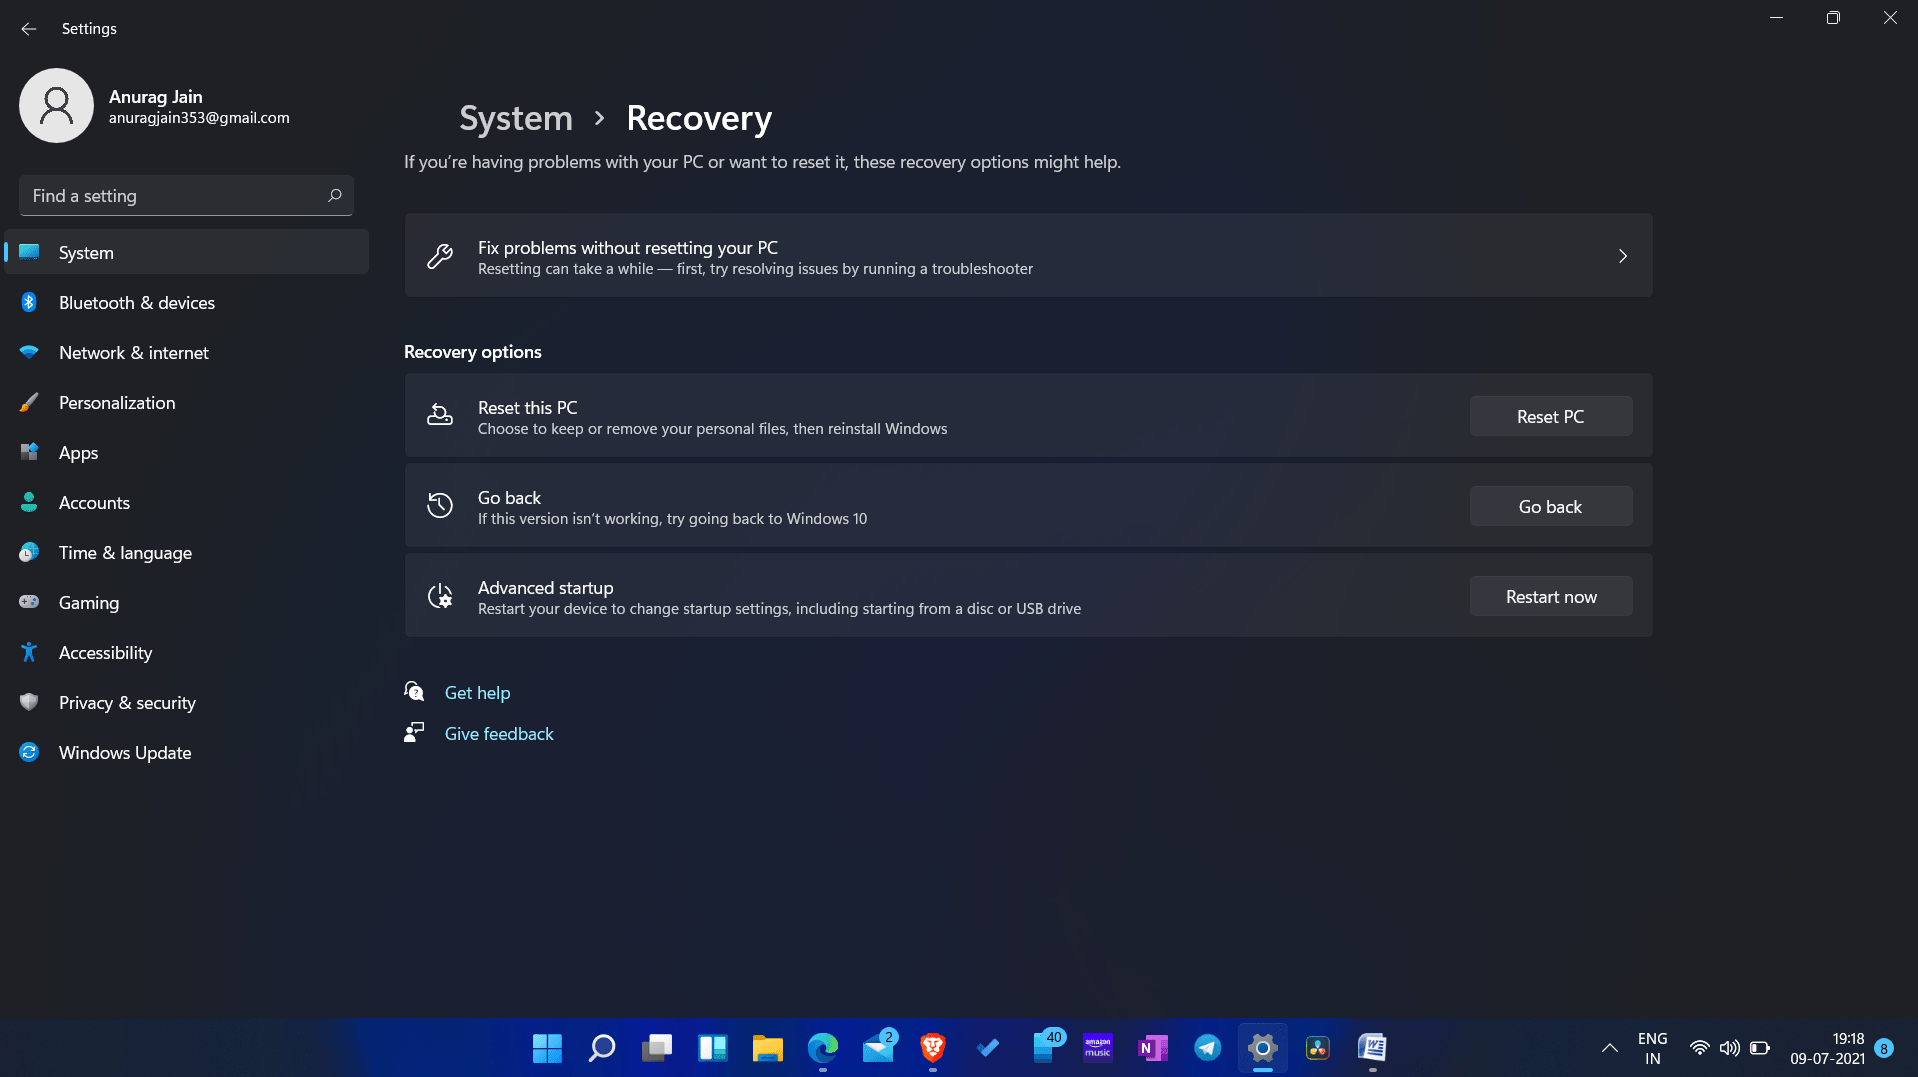
- Click the Recovery page on the right side.
- Under the «Recovery options» section, click the Restart now button for the «Advanced startup» setting.
- Under the «Recovery options» section, click the Restart now button for the «Advanced startup» setting.
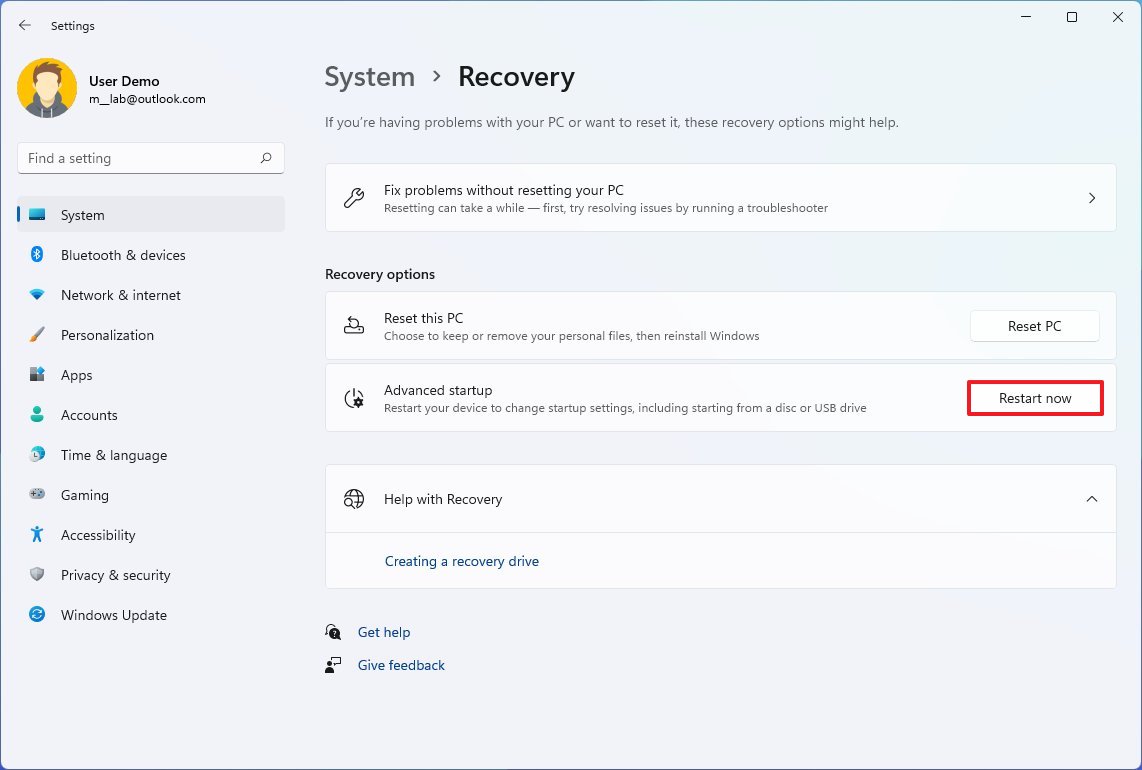
- Click the Restart now button again.
- Click on Troubleshoot.
- Click on Advanced options.
- Click the UEFI Firmware Settings option.

- Click the Restart button.
- Navigate to the power options tab.
- Turn on the Wake on LAN (WoL) feature.
- Quick note: Since the firmware settings can vary per manufacturer and computer model, it’s best to check your manufacturer support website for more specific instructions.
- Save the changes.
- Restart the computer.
Once you complete the steps, you can continue with the instructions to wake up the computer remotely.
Although it may not be necessary, you may also want to use the steps below to double-check that the feature is ready on Windows 11 to receive magic packets over the network.
Network settings configuration
To enable Wake on LAN from the Settings app for add-in cards and USB network adapters, use these steps:
- Open Settings.
- Click on Network & internet.
- Click the Advanced network settings page on the right side.
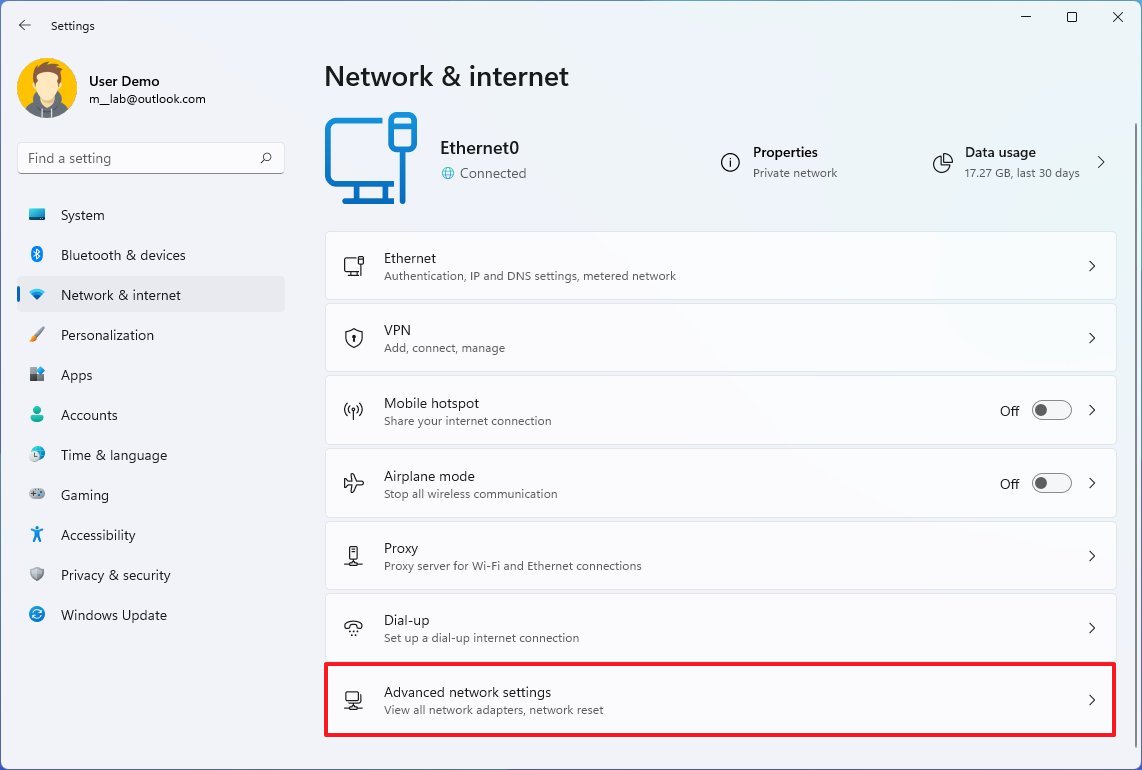
- Under the «Related settings» section, click on More network adapter options.

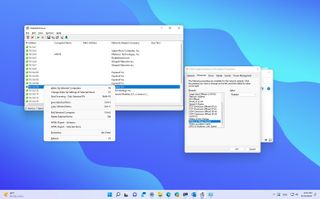
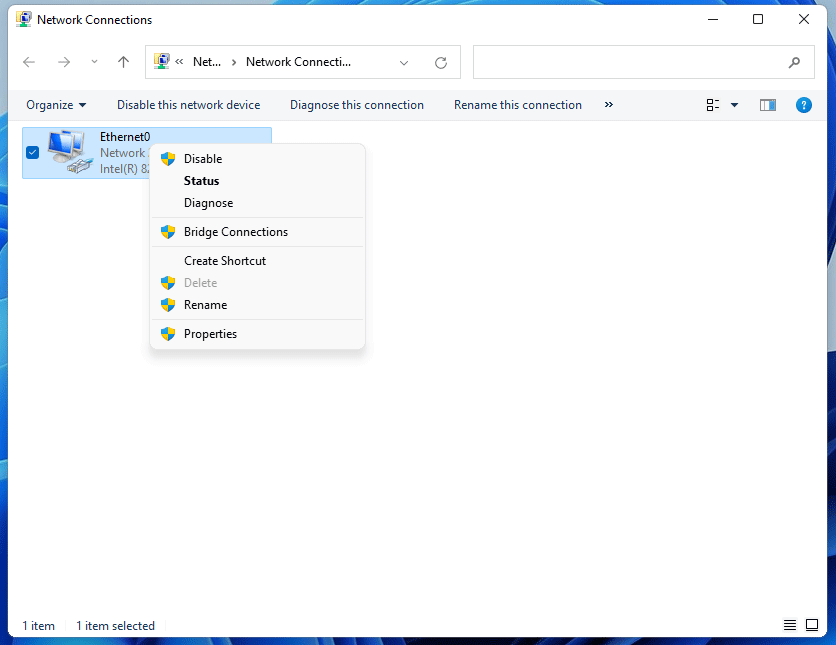
- Right-click the network adapter and select the Properties option.
- Click the Networking tab.
- Click the Configure button.
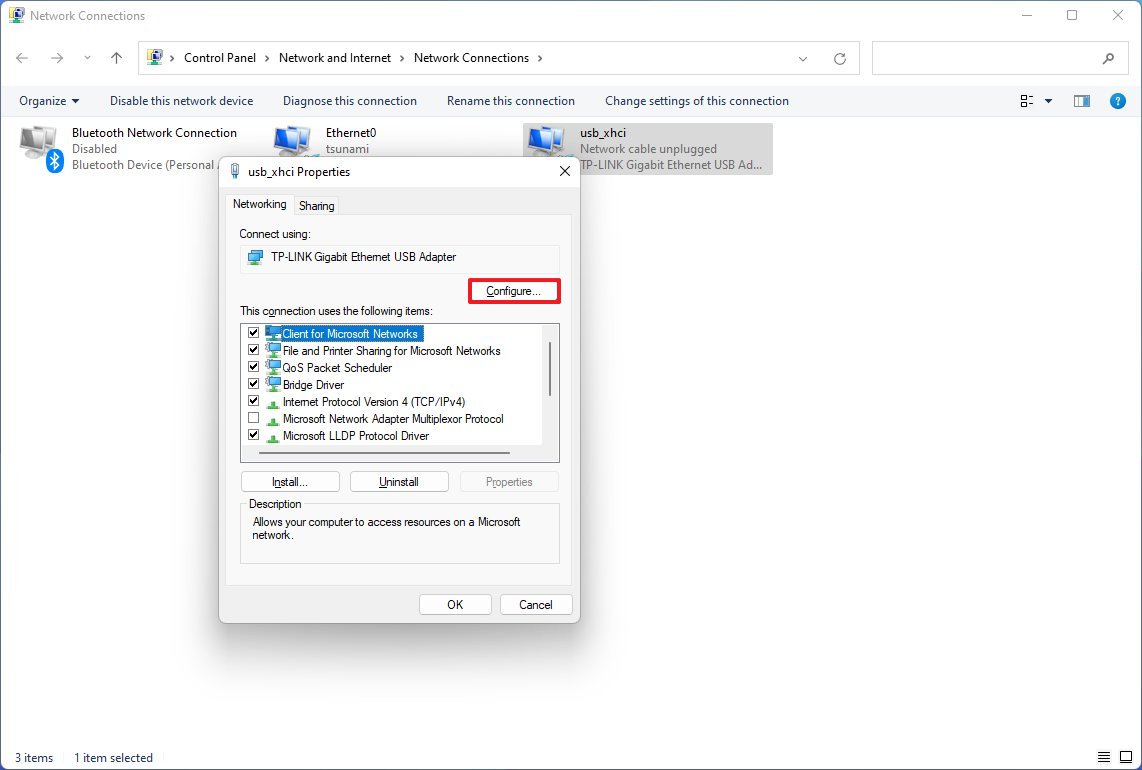
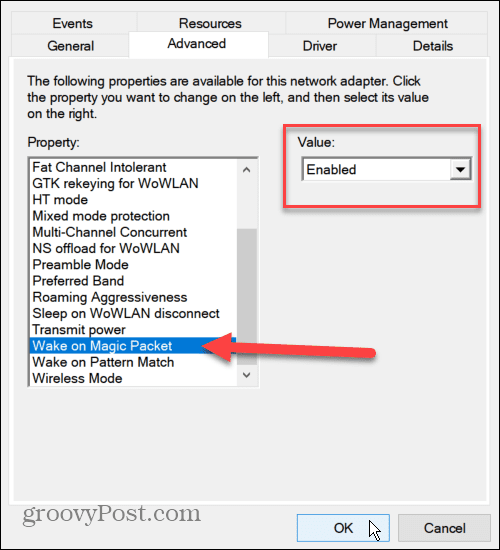
- Click the Advanced tab.
- Under the «Properties» section, select the Wake on LAN setting.
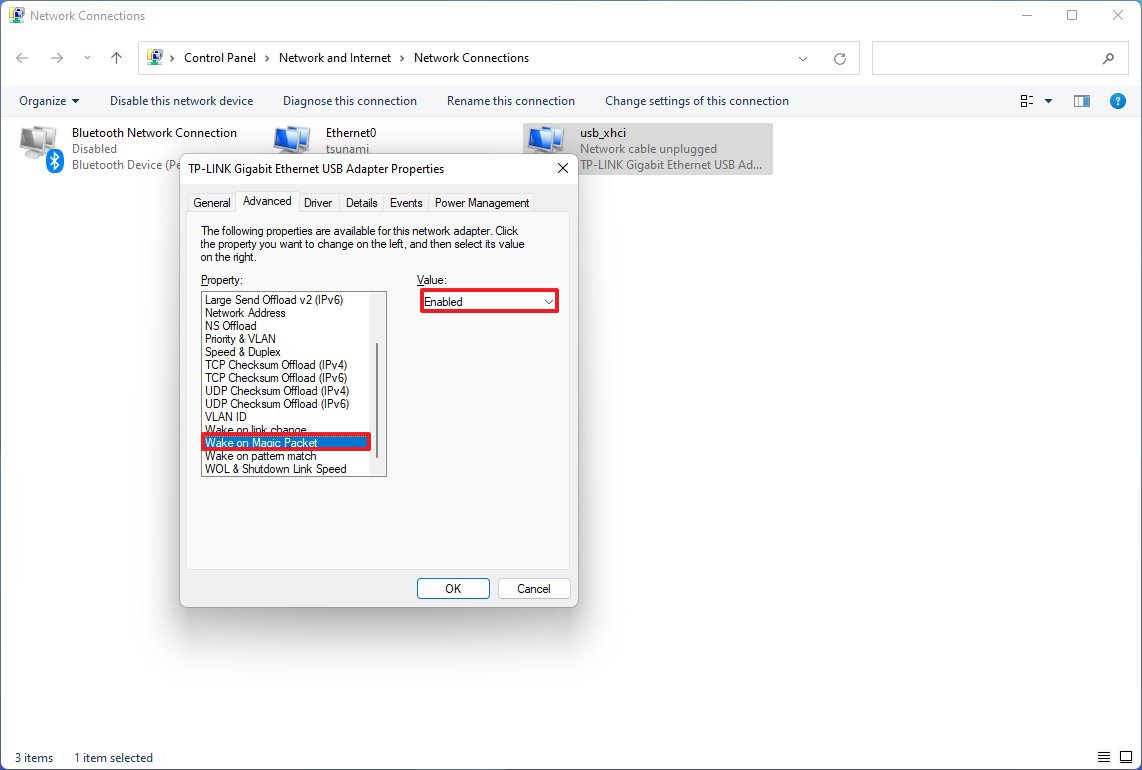
- Quick note: The optional settings may be required if you use a network adapter from Realtek.
- Select the Enabled option from the «Value» drop-down menu.
- (Optional) Select the «Wake on pattern match» option.
- Select the Enabled option from the «Value» drop-down menu.
- (Optional) Select the «WoL & Shutdown Link Speed» option.
- Select the 10Mbps option from the «Value» drop-down menu.
- Quick note: The setting could have different names depending on the manufacturer. In this case, the option is called «Wake on Magic Packet.» You may need to check your manufacturer support website for more specific details.
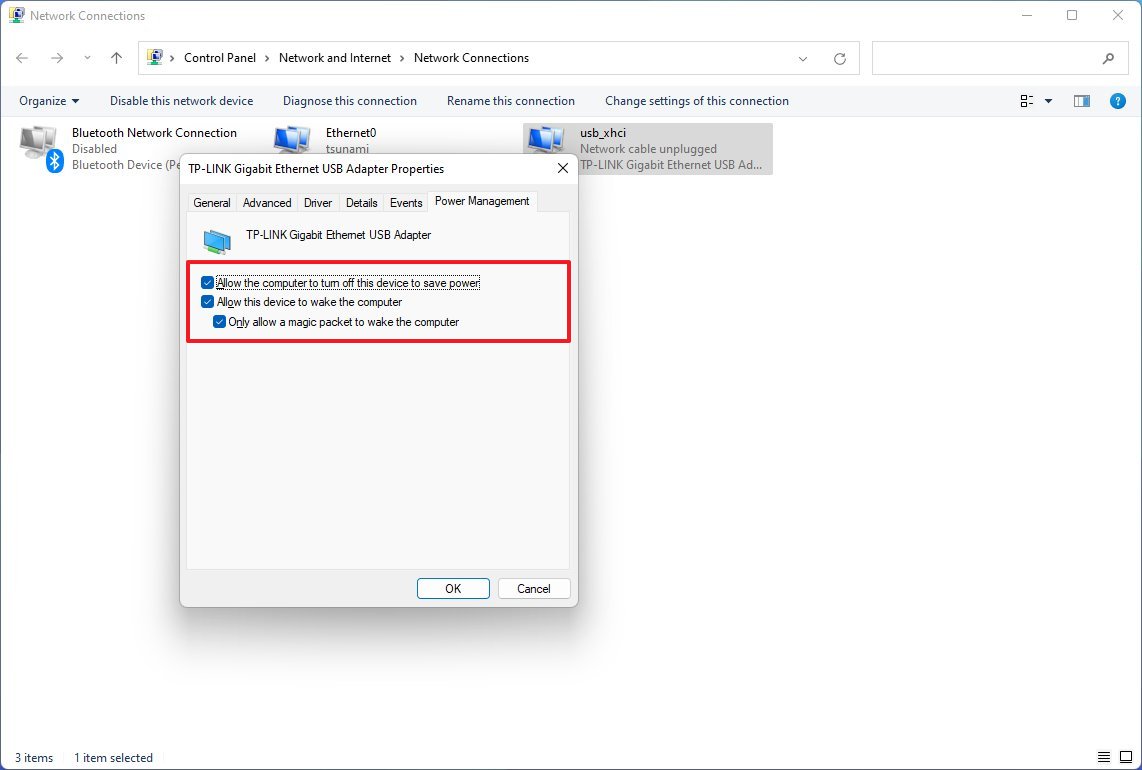
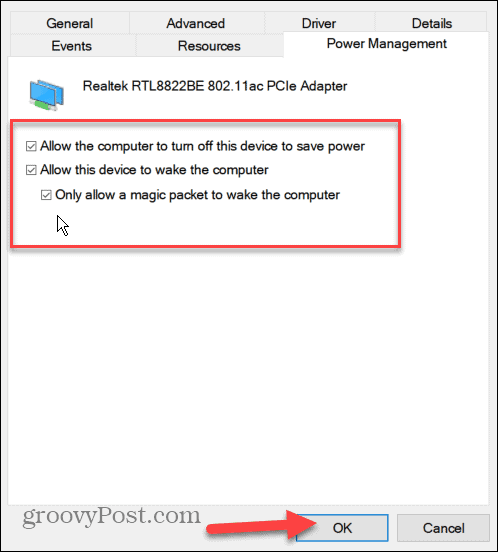
- Click the Power Management tab.
- Check the «Allow the computer to turn off this device to save power» option.
- Check the «Allow this device to wake the computer» option.
- Check the «Only allow a magic packet to wake the computer» option.
- Click the OK button.
After you complete the steps, you can proceed with the instructions to use a third-party tool or script to send a wake-up packet over the network to the device you want to start.
You can always disable the WoL feature using the same instructions mentioned above but on step 9, make sure to disable the option and other settings you may have selected. Also, you may want to disable the feature inside the firmware.
How to send WoL packet on Windows 11
You can use virtually any third-party application for Windows, Linux, Mac, mobile apps for Android and iPhone, or custom scripts to send a magic wake-up packet. You may also be able to wake a device through the WoL feature built into the router.
Warning: The app we are using works as advertised, but it’s a third-party tool, and you should use it only at your own risk. You have been warned.
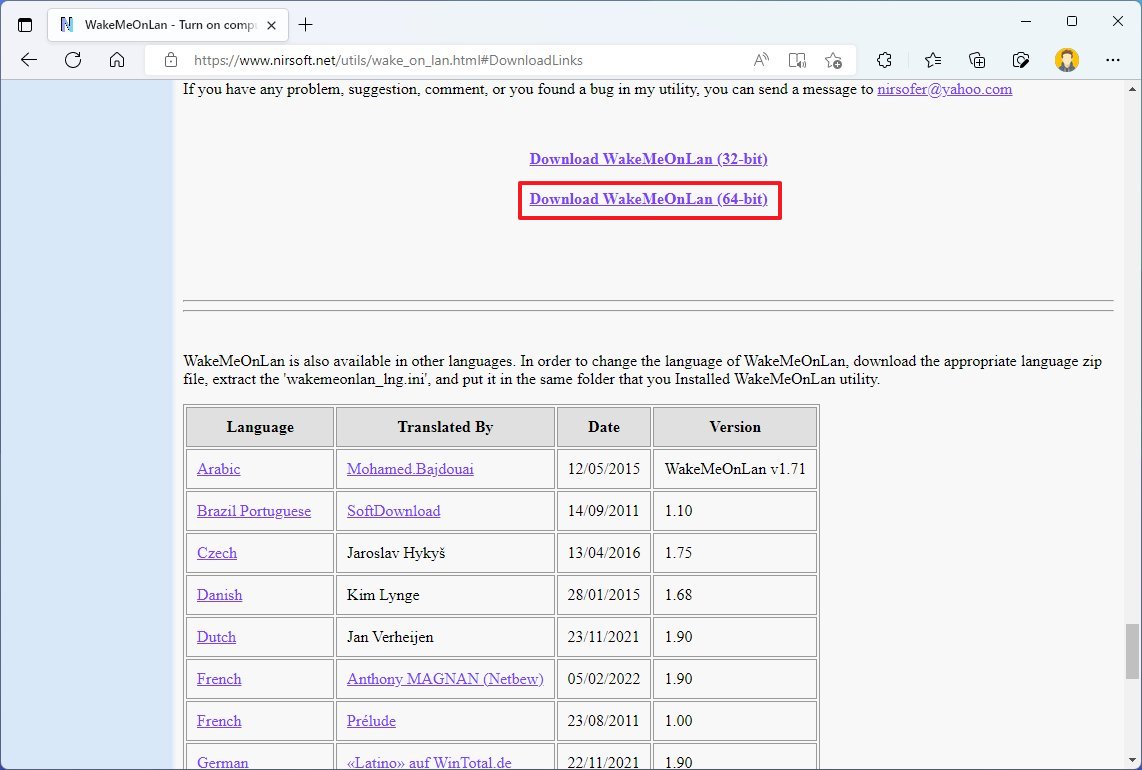
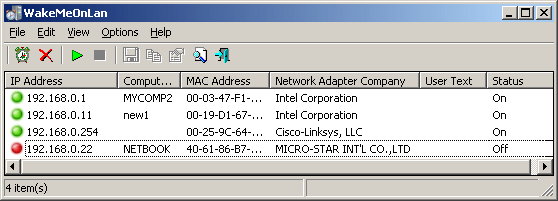
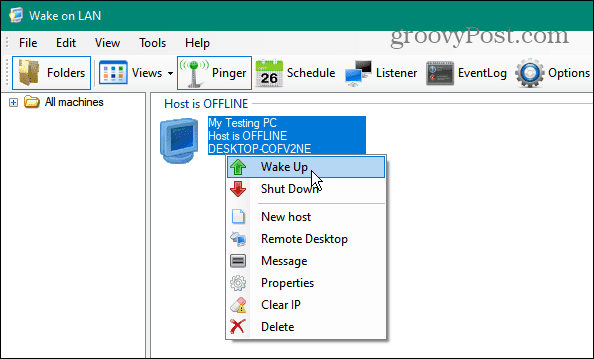
For this guide, we picked the «WakeMeOnLan» tool from NirSoft to wake a device remotely:
- Open the NirSoft download.
- Click the download link to save the app on your device.
- Right-click the zip folder and select the Extract All option.
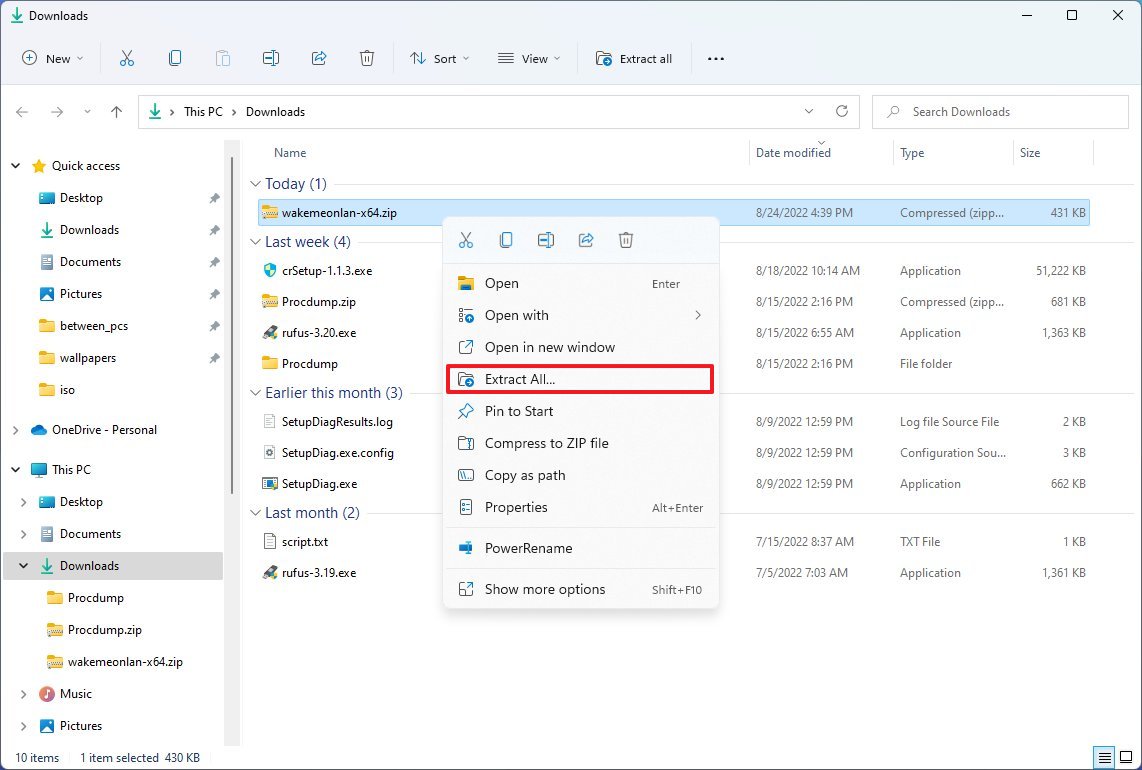
- Click the Extract button.
- Double-click the WakeMeOnLan.exe file to launch the standalone tool.
- Click the Play (Start Scanning) button to discover all the devices in the network.
- Quick note: The device to wake up remotely has to be turned on for the tool to find it. Once it is on the list, the device can be offline to use the WoL feature. You can also use the Ctrl + N keyboard shortcut to add the remote computer information (IP address, computer name, and MAC address) manually.
- Right-click the remote computer and select the Wake Up Selected Computers option.
- Click the Yes button.
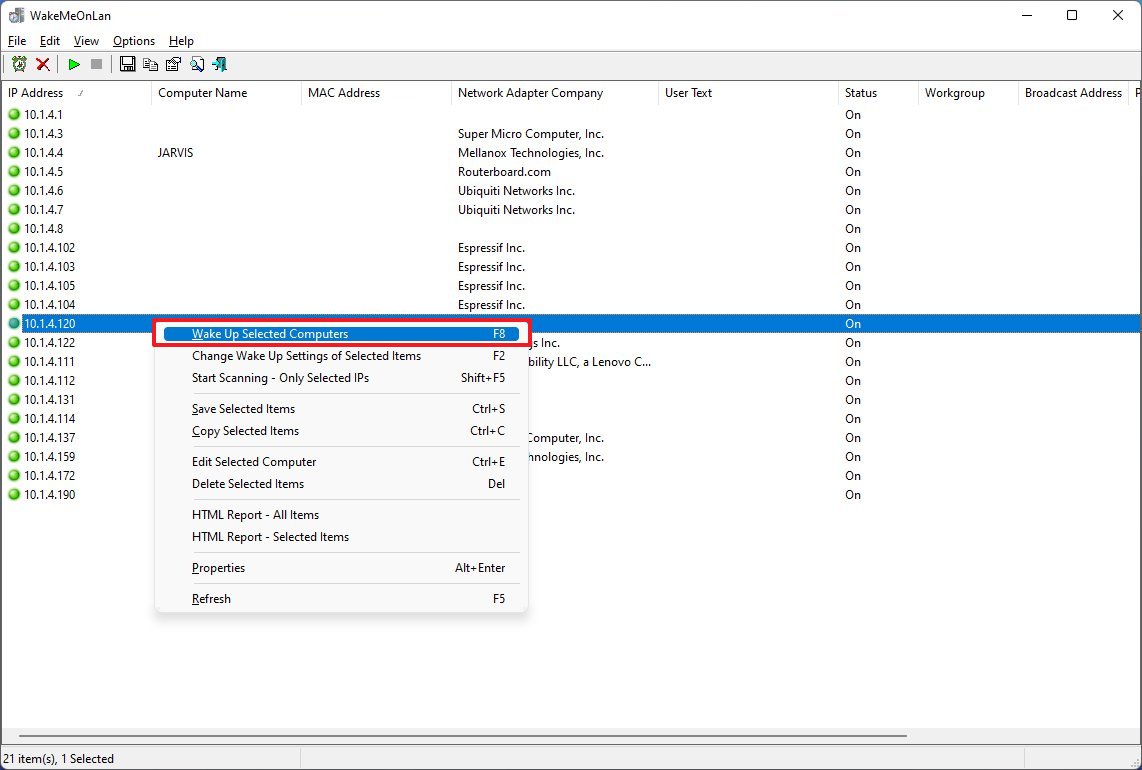
Once you complete the steps, the magic packet will be sent over the network to wake the computer.
Determine network configuration
If you use a tool that offers an interface to input the device information, you will have to manually obtain the IP and MAC address to use Wake on LAN.
To find the network configuration of your computer, use these steps:
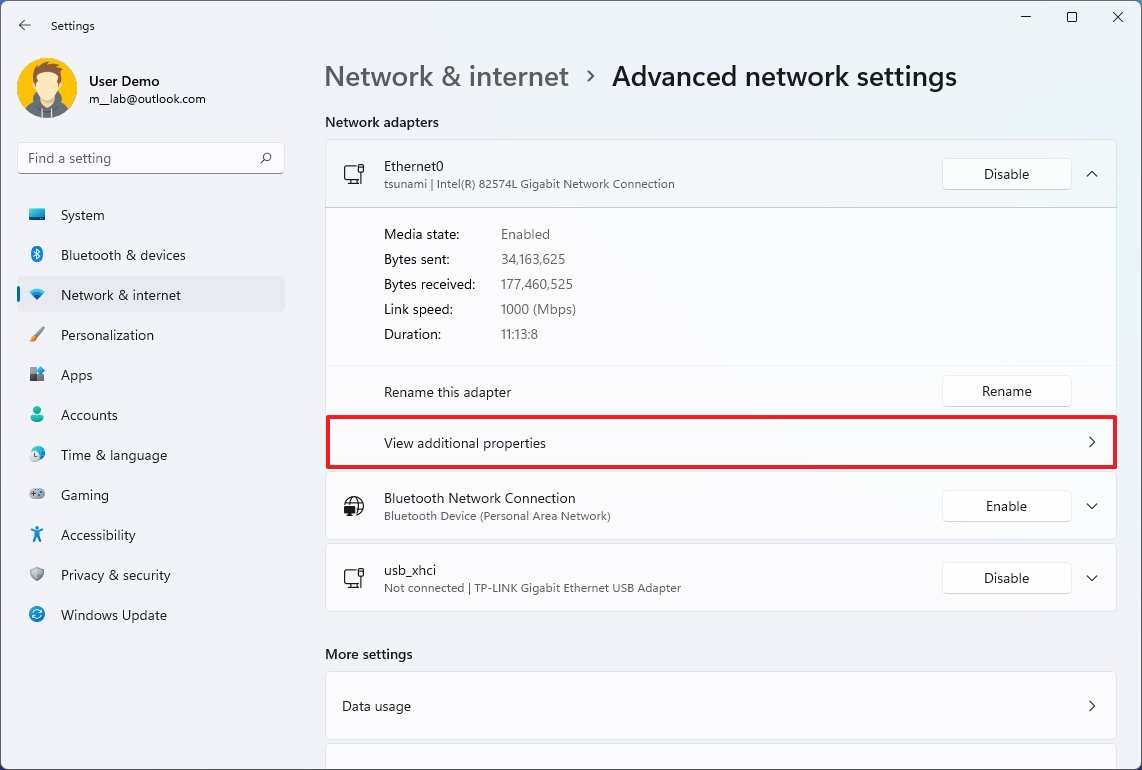
- Open Settings.
- Click on Network & internet.
- Click the Advanced network settings page on the right side.
- Under the «Network adapters» section, click on the network adapter configured for Wake on LAN.
- Click the View additional properties setting.
- Confirm the IPv4 address and Physical address (MAC) settings.
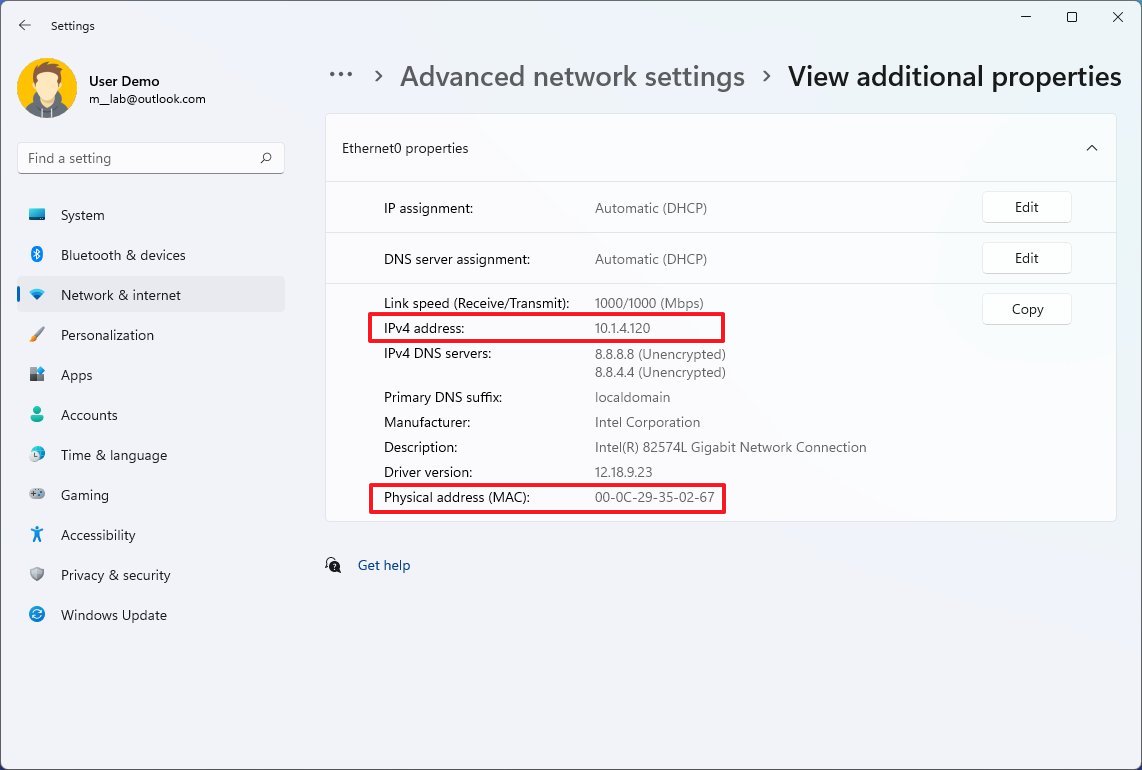
After you complete the steps, use the network addresses to send a magic packet to wake up a device remotely with your particular application.
How to troubleshoot WoL problems on Windows 11
If you sent the wake command, but the computer is not turning on, there are a few troubleshooting steps you can follow.
In case you have a USB network adapter, Wake on LAN may only work when the device is in the sleeping state mode because turning off the computer will stop providing power to the USB port.
If the option is not present in the motherboard’s firmware or the network adapter’s properties, the feature may not be available for your computer.
After enabling Wake on LAN, you may also need to disable fast startup to make the feature work.
On Windows 11, the ability to power on a computer remotely will only be available when the network adapter is active and reachable within the network. If the computer is off, you can look at the Ethernet adapter, and if you see blinking lights, it indicates that the adapter is active.
If you have a laptop, make sure it’s connected to a power source to allow the feature to work as expected.
Finally, if you suspect a networking problem that may prevent the magic package from waking up the remote computer, you can use the «ping» command to check the connectivity. In addition, you should also use the «ipconfig» command in the destination computer to make sure you have the correct IP and MAC address.
More resources
For more helpful articles, coverage, and answers to common questions about Windows 10 and Windows 11, visit the following resources:
- Windows 11 on Windows Central — All you need to know
- Windows 10 on Windows Central — All you need to know
All the latest news, reviews, and guides for Windows and Xbox diehards.
Mauro Huculak is technical writer for WindowsCentral.com. His primary focus is to write comprehensive how-tos to help users get the most out of Windows 10 and its many related technologies. He has an IT background with professional certifications from Microsoft, Cisco, and CompTIA, and he’s a recognized member of the Microsoft MVP community.
-
Home
-
News
- How to Enable/Disable Wake on Lan Windows 11
By Linda | Follow |
Last Updated
Wake on LAN is a feature that allows a computer to be turned on or awakened from sleep mode by a network message. This post from MiniTool Partition Wizard shows you how to enable or disable Wake on LAN Windows 11 in 3 ways.
What Is Wake on LAN?
According to the description of Wikipedia, Wake-on-LAN (WoL or WOL) is an Ethernet or Token Ring computer networking standard that allows a computer to be turned on or awakened from sleep mode by a network message.
In addition, according to Microsoft’s statement, when the user explicitly requests to enter hibernate state, the Wake on LAN feature is supported, too. Of course, if you shut down your computer, the Wake on LAN feature is not supported (this design is reasonable).
How to Enable or Disable Wake on LAN Windows 11?
The following ways can be used to enable Wake on LAN Windows 11, but you can also use them to disable Wake on LAN Windows 11.
Way 1. Use the Firmware
In most cases, the motherboard’s firmware allows you to enable or disable Wake on LAN. If Wake on LAN is not enabled in the firmware, you cannot enable it in Windows 11. How to enable Wake on LAN Windows 11 using the firmware? Here is the guide:
- Press Windows + I keys to open Settings.
- Go to System > Recovery.
- Find the Advanced startup section, and click the Restart now button. After the restart, you will enter WinRE.
- Click Troubleshoot > Advanced options > UEFI Firmware Settings.
- Click Restart to enter the firmware.
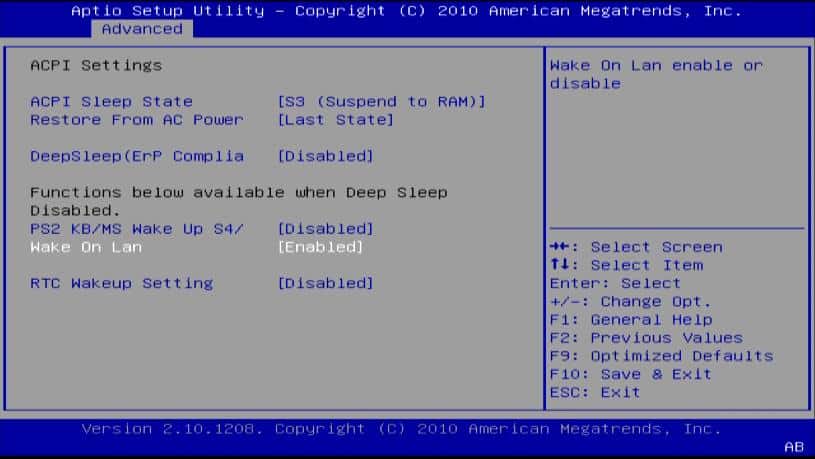
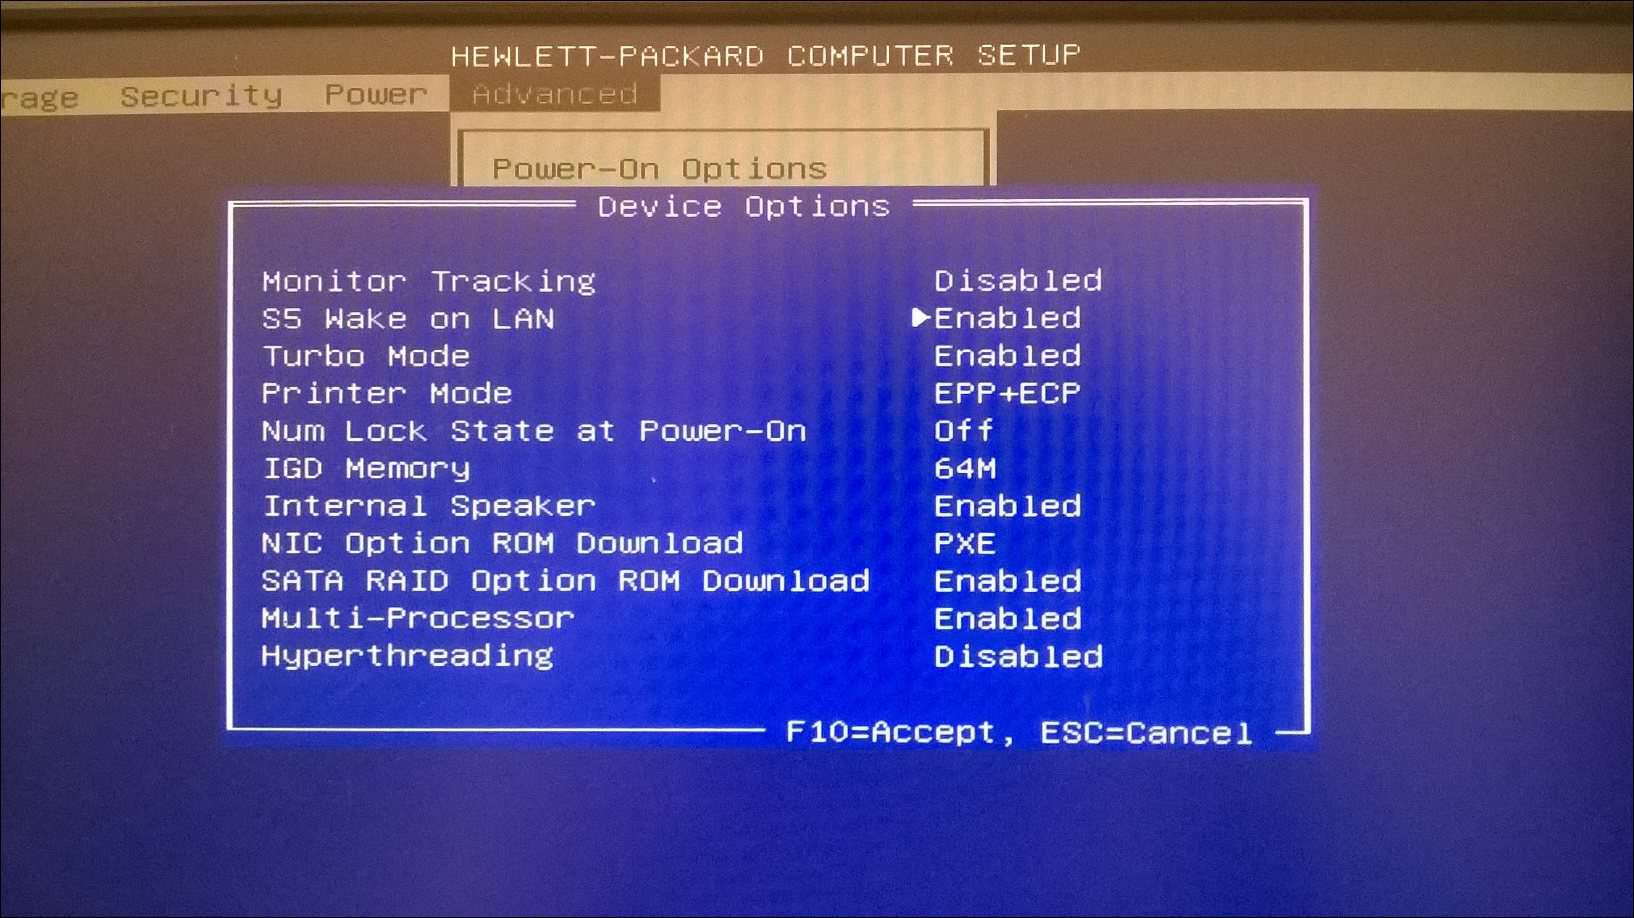
- In the firmware, go to the Advanced or Power tab to find the Wake on LAN feature and then enable or disable it according to your need.
Tips:
1. Sometimes, the Wake on LAN feature may be on other tabs like Chipset, etc. You need to open more tabs to find it.
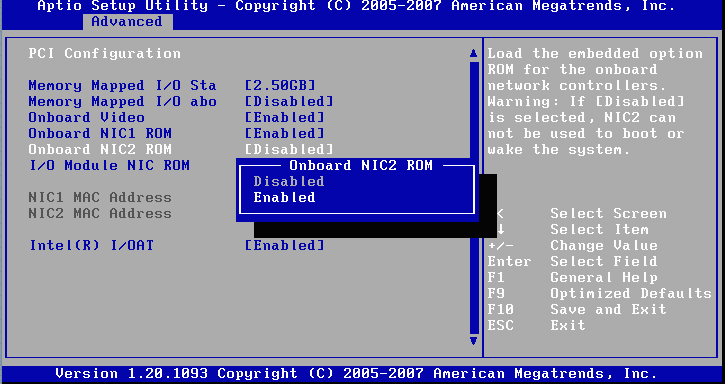
2. Sometimes, the Wake on LAN feature may be called other names in your firmware, like PME Event Wake Up, Onboard NIC ROM, Power On By PCI/PCIE Device, PCIE Devices Power On, WOL From Soft-Off, S5 Wake on LAN, Resume by PME, or other similar names.
Way 2. Use the Ethernet Connection Properties Window
This way is convenient because it offers you a GUI. How to disable Wake on LAN Windows 11 or enable it? Here is the guide:
Step 1: Open the Properties window of the Ethernet connection. Windows 11 offers many methods to access the Ethernet connection properties. You can try them.
- From Settings: Open Settings and go to Network & internet > Advanced network settings. Under Related settings, click More network adapter options. On the new window, right-click an Ethernet and choose Properties. On another new window, click Configure.
- From Device Manager: Open Device Manager, expand Network adapters, right-click the Intel Network/Ethernet Connection driver, and choose Properties.
- From Control Panel: Open Control Panel, and click Network and Internet > Network and Sharing Center. On the left navigation bar, click Change adapter settings. On the new window, right-click an Ethernet and choose Properties. On another new window, click Configure.
Step 2: Go to the Advanced tab. In the Property box, find Wake on Magic Packet (or other names like Wake on Settings) to enable it. Then, go to the Power Management tab, and check (enable) or uncheck (disable) the following 2 options: Allow this device to wake the computer and Only allow a magic packet to wake the computer.
Way 3. Use Commands
You can also use commands to enable or disable Wake on LAN Windows 11.
How to enable Wake on LAN Windows 11 using commands:
- Open PowerShell or Command Prompt.
- Execute this command to list all devices that are user-configurable to wake the computer: powercfg -devicequery wake_programmable.
- Find the Ethernet adapter you want to enable to WOL for.
- Execute the command to enable it: powercfg -deviceenablewake “Device name”.
How to disable Wake on LAN Windows 11 using commands:
- Open PowerShell or Command Prompt.
- Execute this command to list all devices that are configured to wake the computer: powercfg -devicequery wake_armed.
- Find the Ethernet adapter you want to disable WOL for.
- Execute the command to disable it: powercfg -devicedisablewake “Device name”.
Bottom Line
MiniTool Partition Wizard is a functional tool. It can recover data from hard drive, migrate OS, clone disk, recover partitions, etc. If you have this need, download it to have a try.
MiniTool Partition Wizard DemoClick to Download100%Clean & Safe
About The Author

Position: Columnist
Linda has been working as an editor at MiniTool for 5 years. She is always curious about computer knowledge and learns it crazily. Her articles are simple and easy to understand. Even people who do not understand computer can gain something. By the way, her special focuses are disk management, data recovery and PDF editing.
Wake On LAN is a feature that allows you to set your computer to boot from a low-power state. This serves as a computer’s remote power button. You can use this feature to access your computer’s files and applications while reducing power consumption when the computer is not in use. This feature (WoL) can even be used to wake up your Windows 11 PC from across the house via the Internet.
How To Configure Wake On LAN on Windows 11
If you don’t know how to remotely wake up your Windows 11 PC with the Wake On LAN feature, this article will help you. We’ll go over how to enable and turn on the Wake On LAN feature, as well as how to configure and use it to remotely wake up your Windows 11 PC.

Enable Wake On LAN in Windows 11
First, you will have to enable Wake On LAN feature. You can enable Wake On LAN from the BIOS menu. To enable Wake On LAN on your Windows 11 PC, follow the steps given below-
- Press the Windows + I to open the settings of your PC.
- In the settings, go to the Windows Update section from the left sidebar.
- Click on recovery in the Windows update section.
- Here you will find advanced startups. Click on the restart now button beside the advanced startup option.
- Your PC will restart. On the next screen that opens up, select troubleshoot. Next, select advanced options, and then select the UEFI Firmware settings option.
- Select the Restart option, and you will be headed to the BIOS.
- In the BIOS, head to the power settings section.
- Here you will find Wake On LAN option; enable it.
If your PC does not have an Ethernet port, your PC won’t support Wake On LAN. However, you can get a USB A 3.0 to RJ45 Gigabit Ethernet LAN adapter to give your PC the Wake On LAN functionality.
Configuring Wake On LAN
Next, you will have to configure the Wake On LAN feature on your PC. To configure it, follow the steps given below-
- In the start menu, search for the control panel and open it.

- In the control panel, head to the network and internet section.
- Now click on the network and sharing center and open it.
- On the left sidebar, click on change adapter settings.
- This will show you all the networks you have connected to.
- Now select the active network adapter and right-click on it. Click on the properties option.
- In the network adapter properties, click on configure button.
- Now click on the advanced tab, and then select wake on the magic packet.
- Now on the right sidebar, you will see a value drop-down menu. From here, select enabled.
- Next, select wake on magic pattern and enable it. Although this step is optional, you can do it.
- Now select WOL and Shutdown Link speed and set the value to 10 MBps.
- Next, head to the power management tab.
- Here check the allow the device to wake the computer option, and then check the Only allow a magic packet to wake the computer.
- Once done, click on the OK button.
That’s how you can configure Wake On LAN feature. However, if you don’t want to use it, you can disable the wake on the magic packet as you enabled it earlier.
Waking Up Windows 11 PC Remotely
Now that you have enabled Wake On LAN feature, and configured it, let’s discuss how you can remotely wake up Windows 10 PC. Follow the steps given below to remotely wake up Windows 10 PC.
- Download the NirSoft application and install it on your PC.
- After installing the application on your PC, open it, and click on the Play button to discover all the devices in the network.
- Now right-click on the remote computer. Select the Wake Up Selected Computers option.
- Now click on the yes button. That’s it, and you are done with the process.
Now the tool will start sending the magic packet to the wake-up device.
RELATED GUIDES:
- How To Check CPU Temperature In Windows 11
- Connect Airpods To Windows 11 PC Laptop
- How To Turn Off S Mode on Windows 11
- Change Windows 11 Virtual Memory Size
Final Words
That’s how you can remotely wake up Windows 11 PC. We hope this article helped you setup up the wake on LAN feature and remotely wake up Windows 11 PC.

Anurag Jainhttps://itechhacks.com
Anurag is a Senior content analyst with 4 years of experience in the industry. Based in India, He is extremely skilled at Windows related to How to Troubleshooting matters. His favorite topics are Windows 11, Android, and How To’s.

Wake on LAN allows you to wake up and control remote PCs on your network. If you want to enable Wake on LAN on Windows 11, here’s what you’ll need to do.
Wake on LAN (WoL) is a networking feature that IT pros have been using for years. WoL lets you remotely wake up a remote computer via a “magic” data packet sent from another PC on your network.
The remote PC “listens” while in sleep or hibernation mode for the data packet. If the packet is detected, your PC wakes up. This allows easier access to other Windows machines across a network, meaning you don’t need to physically touch the other PC to wake it up and begin using it.
If you want to enable Wake on LAN on Windows 11, here’s what you’ll need to do.
To use Wake on LAN on Windows 11, you’ll need to make sure your network is configured to allow it.
For example, you’ll need to make sure that all of your PCs are connected to your network using a wired Ethernet connection, as this feature isn’t supported on Wi-Fi networks. If you have a PC without an Ethernet port, you can’t use Wake on LAN out of the box.
You’ll need to get a USB 3.0 to RJ45 Gigabit Ethernet LAN adapter (you can also get a USB-C Ethernet adapter). A P2P network between PCs is required, and the PC being “woken up” needs to be in sleep mode or hibernation mode.
Enabling Wake on LAN in BIOS/UEFI
Before going to Windows 11, you need to make sure Wake on LAN is enabled in the PC’s BIOS or UEFI settings. Usually, you can get to the BIOS/UEFI menu by hitting Del or by pressing a function key like F2 or F12 during the boot-up process.
Next, check for settings under “Power Options” or the “Advanced” section in the BIOS/UEFI menu and enable the Wake on LAN option. These steps will vary, depending on your PC, so if you’re unsure, consult your PC manufacturer’s support documentation.
Enabling Wake on LAN on Windows 11
If your BIOS/UEFI settings are configured, you can then configure Windows 11 to support Wake on LAN functionality.
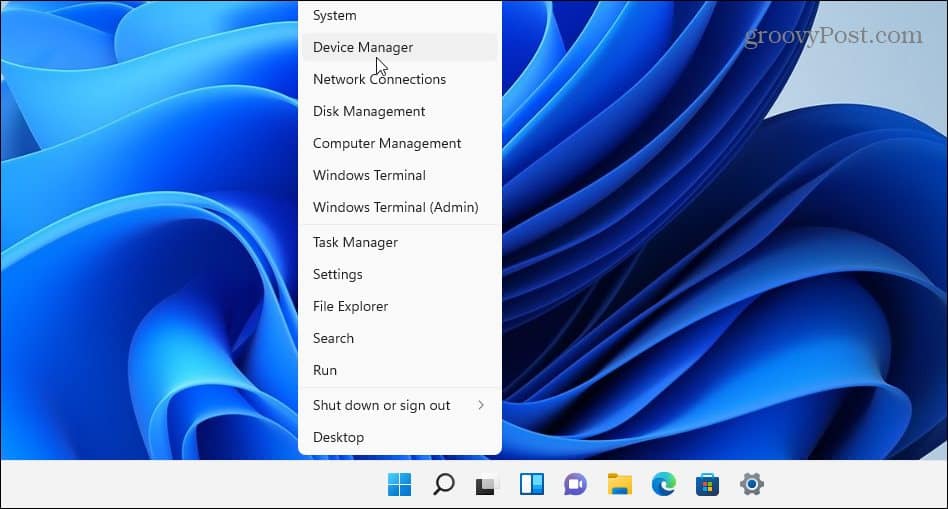
To do this, right-click the Start button and select Device Manager from the menu that appears.
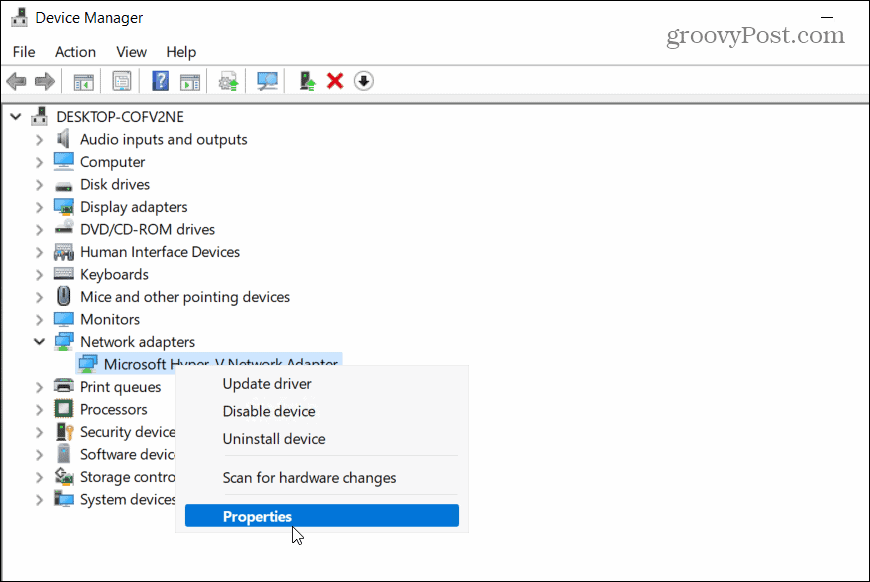
Next, scroll down and expand Network Adapters in the Device Manager window. Right-click on the Ethernet adapter and select Properties.
Click the Power Management tab and make sure to check all of the available options, including Only allow a magic packet to wake the computer.
Press OK to save your settings.
Now, select the Advanced tab in the Ethernet adapter properties window.
Scroll down and highlight the Wake on Magic Packet in the Property option, set the “Value” box to Enabled, and click OK.
Wake on LAN is now enabled on your PC and you begin using it, but if it doesn’t work, restart your PC first. You’ll need to double-check that your PC is in sleep or hibernation mode for this to work and make sure to connect your PC via Ethernet only.
How to Use Wake on LAN on Windows 11
Enabling WoL on Windows 11 is just the start. You’ll next need a special Wake on LAN tool to send the magic packet to wake up your PC.
Several free, open-source Wake on LAN tools are available, including the imaginatively named WakeOnLAN (produced by Aquila Technology. You could also try WakeMeOnLAN (created by NirSoft). For this article, we’re using WakeOnLAN, but you’re free to use another WoL tool.
Find the Remote PCs MAC Address
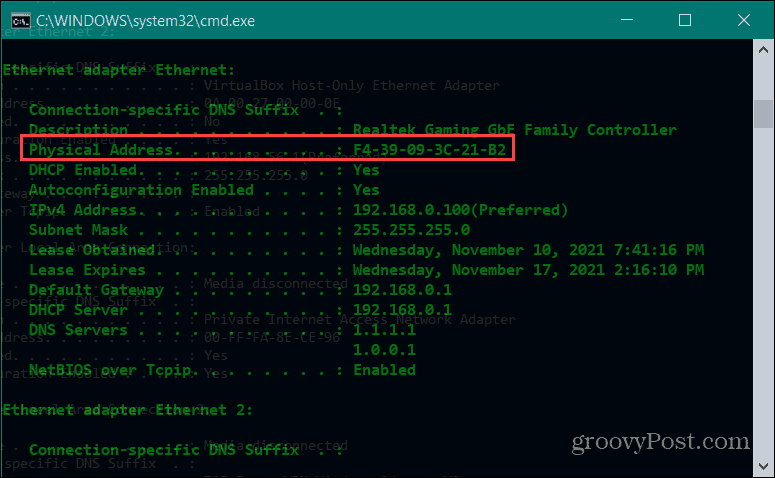
After you download and install the software, you’ll need to know the MAC address of the remote PC you want to wake up. You can find it by using the command line or PowerShell.
Launch either utility via the Start menu and type ipconfig /all. Scroll down through the list of data to find the Ethernet adapter. The MAC Address is the “Physical Address” entry you’ll see listed in the results.
You can also find the MAC Address via Settings. Open Settings via the Start menu, then select Network & Internet > Ethernet.
Scroll down to see the Physical Address (MAC) listed in the connection information.
Sending WoL Packets with WakeOnLAN
Now that you have the MAC address, you can start with the WakeOnLan app. Launch the app via Start, then press File > New Host.
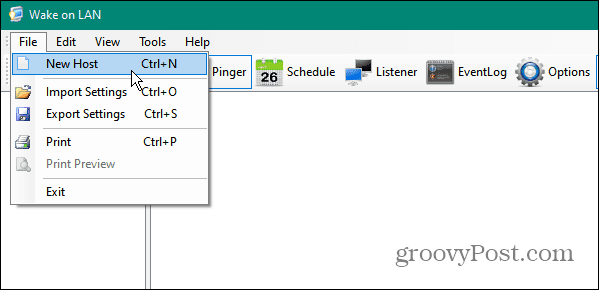
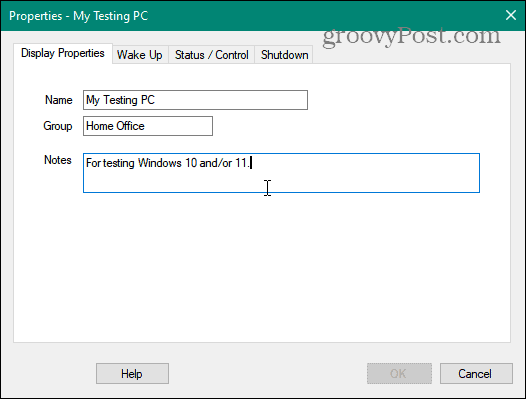
Next, type in a name for the machine. You can also provide a group name (to separate PCs into specific groups) and a descriptive note.
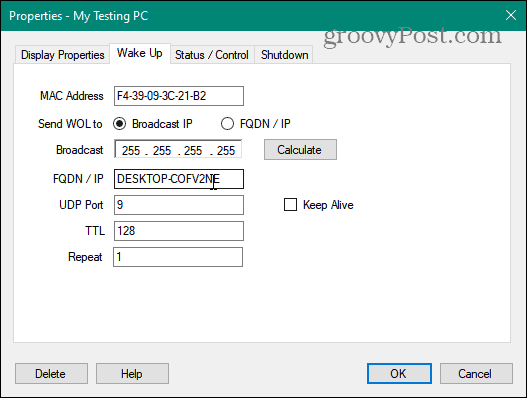
Click the Wake Up tab and type in the MAC address of the remote PC, then select the Broadcast IP button.
Leave the Broadcast field as the default entry. For the FQDN/IP field, type in the PC’s hostname.
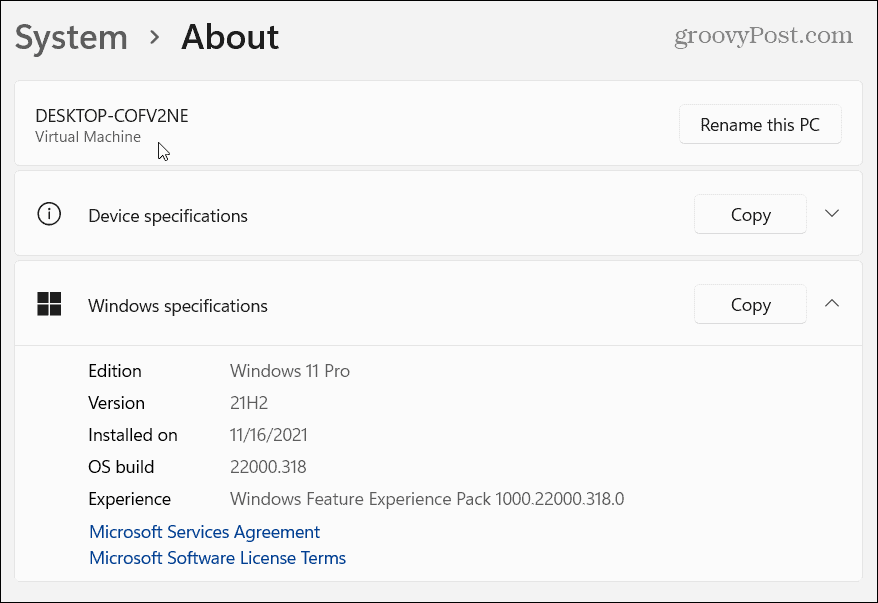
If you need to find the name of the remote PC, press Start > Settings > About. If it has an unusual hostname, you might want to rename the machine first.
Next, right-click the remote machine you want to wake and select “Wake Up” from the menu. Once a PC is running, you can use Remote Desktop (RDP) to connect to it.
Monitoring Window 11 PCs
If you enable Wake on LAN on Windows 11, you’re free to access and control your PCs remotely. The steps above should help you get started, and if you’re using WoL on Windows 10, the steps shouldn’t seem too dissimilar.
This is also a great way to keep your PCs powered down, saving you money on your energy bills in the process. For more on Windows 11 networking, take a look at how to set up a metered connection. For better security and a faster web browsing experience on your Windows 11 PC, you may want to change your DNS settings next.
![]()

Содержание
- Зачем использовать WoL и как это работает
- Предпосылки WoL
- Настройка устройства пробуждения
- Поиск неисправностей
Добро пожаловать в это руководство, где мы покажем вам, как включить функцию Wake-on-LAN в Windows 10 и 11. Wake-on-LAN позволяет удаленно включать компьютеры через Интернет, что может быть невероятно полезно как для администраторов, так и для частных пользователей. Если эта функция включена, компьютеры в вашей сети можно быстро и легко запускать из любой точки мира. Оставайтесь с нами, и мы покажем вам, как это работает.
Shutterstock.com, получено от Городенкова.
В течение многих лет сетевые администраторы использовали древнюю практику Wake-on-LAN (WoL). Этот метод позволяет удаленно включать ПК в той же сети, не приближаясь к самой машине. Имея под рукой эту мощь, ее легко использовать, не выходя из собственного дома. Узнайте, как это сделать здесь.
Зачем использовать WoL и как это работает

Wake-on-LAN (WoL) — это функция, позволяющая удаленно активировать компьютеры, обычно с другого компьютера в сети. Эта гибкость и удобство имеют небольшой недостаток — настройка может оказаться немного сложнее, чем предполагалось.
Изучая, почему кто-то решил бы использовать эту функцию, мы можем сделать вывод, что основным преимуществом является удобство. Например, если вы готовите кофе на кухне и хотите, чтобы ваш компьютер работал к тому времени, когда вы доберетесь до домашнего офиса, вы можете просто использовать приложение на своем телефоне, нажать кнопку, и ваш компьютер будет запущен, как только вы доберетесь до дома. вы достигаете пункта назначения.
Вам не нужно использовать только телефон, чтобы разбудить компьютер; этот трюк можно выполнить с любого другого компьютера, Mac или даже смарт-динамика. Однако установка может быть немного сложнее.
СВЯЗАННЫЙ Что такое MAC-адрес и как он работает?
Основная идея Wake-on-LAN (WoL) относительно проста. Компьютеры обмениваются данными небольшими сегментами, называемыми пакетами. Если WoL активирован, компьютер будет ожидать прихода «волшебного пакета», содержащего MAC-адрес ПК, и это заставит компьютер проснуться.
Без какой-либо дополнительной настройки, кроме того, что обсуждается в этой статье, Wake on LAN не может использоваться удаленно. Чтобы функция пробуждения по локальной сети работала, устройство (например, ваш телефон), которое используется для отправки сигнала пробуждения, должно быть подключено к той же сети, что и компьютер, который должен быть разбужен.
Несмотря на необходимость предварительной настройки функции, эти функции предоставляют множество уникальных преимуществ. Например, можно использовать приложение на своем телефоне для запуска ПК из любого места — в офисе, дома или где-либо еще. Кроме того, это можно сделать с другого компьютера, Mac или даже умного динамика, что делает этот процесс чрезвычайно адаптируемым и эффективным.
В заключение, Wake-on-LAN предлагает удобный и адаптируемый способ удаленного доступа к компьютерам без необходимости физического присутствия. При небольшой предварительной настройке эту функцию можно использовать в различных ситуациях и на различных устройствах, что делает ее отличной для использования.
Предпосылки WoL

Wake on Lan (WoL) — это технология, позволяющая удаленно включать компьютер через Ethernet-соединение, обеспечивая доступ к данным в любое время и в любом месте. В этом руководстве описаны шаги, необходимые для правильной настройки пробуждения по локальной сети в Windows 10 и 11.
Для успешной реализации Wake on Lan сначала убедитесь, что ваш компьютер подключен к Интернету через соединение Ethernet. Настольные компьютеры и ноутбуки, которые всегда подключены к Интернету через соединение Ethernet, лучше всего подходят для этого трюка. Кроме того, отключите Wi-Fi на устройстве, которое вы хотите разбудить по локальной сети, так как это поможет WoL работать должным образом.
Чтобы включить Wake-on-Lan, вам потребуется доступ к BIOS вашего компьютера. Наш гид» Что такое BIOS и когда его следует использовать? » может помочь вам войти в BIOS, поскольку шаги могут различаться в зависимости от производителя и модели вашей системы. Как правило, для доступа к BIOS можно использовать специальную клавишу или клавишу, например Del.
Если вы ищете функцию Wake-on-LAN в BIOS, ее расположение может отличаться на разных компьютерах. В данном конкретном случае опция WoL была найдена в разделе Power. Если вы не можете найти эту функцию, используйте торговую марку и номер модели вашей материнской платы в поиске Google, чтобы найти ее местонахождение.
Обычно рекомендуется убедиться, что WoL (Wake-on-LAN) включен в BIOS, так как он может быть настроен на автоматическое включение.
Чтобы активировать Wake-on-Lan в Windows 10 или 11, необходимо выполнить следующие шаги.
Чтобы открыть диспетчер устройств, вы можете щелкнуть правой кнопкой мыши кнопку «Пуск» и выбрать «Диспетчер устройств» или выполнить поиск, нажав кнопку «Пуск» и введя «диспетчер устройств». Другой вариант — перейдите по этой ссылке .
Когда утилита запустится, перейдите в раздел «Сетевые адаптеры» и выберите свой Ethernet-контроллер. Будет много вариантов на выбор, но вам нужно найти тот, который содержит слова «контроллер», «адаптер» или что-то подобное. Не следует выбирать все, что помечено как TAP, VPN или только для хоста.
Найдя свой контроллер Ethernet, щелкните его правой кнопкой мыши и выберите «Свойства».
Когда я нажимаю кнопку питания на моем компьютере: Когда я закрываю крышку на моем компьютере: Когда я нажимаю кнопку перехода в спящий режим на моем компьютере: При нажатии на вкладку «Управление питанием» открывается окно «Свойства». Убедитесь, что отмечены все три поля, в том числе «когда я нажимаю кнопку питания на моем компьютере», «когда я закрываю крышку на своем компьютере» и «когда я нажимаю кнопку перехода в спящий режим на моем компьютере».
- Разрешить компьютеру отключать это устройство для экономии энергии
- Включить пробуждение компьютера с этого устройства
- Настройте компьютер на пробуждение только с помощью волшебного пакета
Прежде чем закрыть это окно, давайте перейдем на вкладку «Дополнительно». Прокрутите список до «Wake On Magic Packet» и убедитесь, что в раскрывающемся списке «Значение» установлено значение «Включено».
Если это так, выберите «ОК», и вы завершили эту часть.
Чтобы открыть приложение «Настройки» в Windows 11, нажмите Windows + i на клавиатуре. Затем перейдите в раздел Сеть и Интернет > Ethernet. В нижней части экрана вы найдете еще одну вещь.
Чтобы получить доступ к Ethernet-подключению в Windows 10, перейдите в раздел Сеть и Интернет > Ethernet, а затем щелкните имя соединения Ethernet вверху. Прокрутите вниз до конца страницы, пока не найдете «Свойства».
Вы должны искать то, что помечено как «Физический адрес (MAC)» и обычно представляет собой 12-символьную комбинацию букв и цифр, разделенных тире. Обязательно скопируйте его на случай, если он понадобится вам позже.
Включение Wake-on-Lan на вашем компьютере — отличный способ обеспечить доступ к своим данным в любое время. Его относительно просто настроить, так как все, что для этого требуется, — это доступ к вашему BIOS, включение этой функции в диспетчере устройств и проверка правильности записи вашего физического адреса (MAC).
С помощью этого простого руководства настроить Wake-on-Lan можно в несколько кликов. Кроме того, легкий доступ к вашим документам и другим файлам независимо от времени и местоположения делает Wake on Lan отличным инструментом для любого пользователя.
Настройка устройства пробуждения

У многих людей есть задача запускать свои компьютеры на регулярной основе. В этом тексте мы будем обсуждать альтернативный вариант обычного «выключения» компьютера, а именно использование настроек «Сон» или «Гибернация» для экономии энергии.
Теперь, когда ПК настроен, пришло время подготовить устройство, которое будет выполнять пробуждение.
Загрузите приложение Wake On Lan, созданное разработчиком Майком Уэббом, чтобы легко использовать телефон для этого примера.
После завершения установки убедитесь, что ваше устройство подключено к той же сети Wi-Fi, что и предполагаемый целевой компьютер. Коснитесь знака плюс (+) на главном экране, а на следующем экране выберите раскрывающееся меню. Это запустит поиск любых устройств, присутствующих в сети. Определите, кто в настоящее время подключен.
Если вам не удается найти свое устройство, нажмите «Ввести вручную» и укажите псевдоним и MAC-адрес. После этого нажмите «Добавить устройство», и процесс будет завершен.
Пришло время оценить нашу установку. Подойдите к компьютеру, который хотите перевести в спящий режим, и откройте меню «Пуск». Вместо выбора опции «Завершение работы» выберите «Сон» и подождите, пока компьютер перейдет в режим пониженного энергопотребления. Помните, лучше использовать спящий режим или гибернацию чем сразу закрыть его.
Используя приложение Wake-on-LAN на своем телефоне, коснитесь своего устройства, и оно включится в течение нескольких секунд.
Не выключайте компьютер — вместо этого выберите режим сна или гибернации
С помощью приложения Wake On Lan, представленного Майком Уэббом, пользователи могут легко и быстро использовать свои телефоны, чтобы «разбудить» свое устройство. Это гораздо более эффективный способ, чем простое выключение компьютера, поскольку он обеспечивает соответствующую энергосберегающую замену.
Внедрив приложение Wake On Lan, пользователи смогут не только создать более плавный и эффективный процесс включения своих устройств, но и сэкономить энергию, выбрав режим сна или гибернации вместо простого выключения компьютера.
Поиск неисправностей
Wake-on-LAN (WoL) может быть отличной и удобной функцией. Однако иногда для расширения его функциональности требуется устранение основных неполадок.
Если функция Wake-on-LAN (WoL) не работает должным образом, выполните некоторые основные действия по устранению неполадок. Сначала убедитесь, что ваш компьютер действительно находится в спящем режиме — все ли индикаторы RGB погасли (при условии, что вы не запрограммировали их так, чтобы они оставались включенными)? Подсвечивается ли кнопка питания, как будто ПК включен? Попробуйте включить компьютер традиционным способом и посмотрите, что произойдет.
Если компьютер находится в спящем режиме, убедитесь, что ваш телефон правильно подключен к нужной сети Wi-Fi. Верните компьютер в спящий режим и повторите попытку. Кроме того, может оказаться полезным проверьте кабель Ethernet на наличие осложнений .
Включение Wake-on-LAN может быть полезной и приятной функцией, позволяющей вашему компьютеру быть готовым к использованию, как только вы это сделаете.
Узнайте, как загрузить или выключить любой компьютер по расписанию: Следуйте инструкциям здесь
Чтобы убедиться, что эта функция работает должным образом, важно убедиться, что ваш компьютер действительно находится в спящем режиме, ваш телефон правильно подключен, и проверьте, нет ли проблем в кабеле Ethernet. В результате можно правильно использовать эту функцию для загрузки или выключения компьютера по расписанию.
Устранение неполадок Wake-on-LAN может стать отличным способом раскрыть удобство использования готового к использованию компьютера, как только он вам понадобится. После тщательного изучения можно убедиться, что WoL работает правильно, и воспользоваться преимуществами запланированных загрузок и выключений.
В заключение, Wake-on-LAN — отличный и простой способ удаленного включения компьютеров в той же сети. Его легко настроить, особенно дома, и это отличный способ сэкономить время и усилия при удаленном доступе к устройству.
ЧИТАТЬ СЛЕДУЮЩИЙ
- › Узнайте, что такое Wake-on-LAN и как его включить
- › Узнайте, как отключить обучение искусственному интеллекту Adobe, используя ваши данные
- › Испытайте облачные игры с ASUS Chromebook Vibe CX34 Flip
- › TCL делает шаг на арену дополненной реальности со своими собственными умными очками
- › Ознакомьтесь с новейшей линейкой LG Gram 2023 года для ультратонкого опыта
- › TCL представляет свой телевизор QM8 с впечатляющей мини-светодиодной панелью
- › Asus разрабатывает беспроводную механическую клавиатуру с небольшим OLED-экраном