Настройка SSTP-подключения к RAS.URFU.RU на устройствах с Windows 10
Для подключения устройства к корпоративной сети УрФУ вам потребуется «Учётная запись».
Учётная запись для работы в сети УрФУ имеет следующий вид:
Если вы являетесь сотрудником университета, то ваша учетная запись может иметь вид
p.a.varankin
p.a.varankin@at.urfu.ru
p.a.varankin@urfu.ru
Допустимы все три варианта использования.
Если вы являетесь студентом университета, то ваша учетная запись может иметь вид
nprohorova@yandex.ru (учетная запись на основе личной почты, которая была сформирована в начале учебы)
natalia.prohorova@at.urfu.ru (эта учетная запись генерируется автоматически, посмотреть её можно в личном кабинете https://id.urfu.ru )
Учетную запись для работы в беспроводной сети можно получить с помощью инструмента самообслуживания пользователей корпоративной сети УрФУ: https://id.urfu.ru либо обратившись к администраторам компьютерных классов.
1. Откройте «Параметры сети и Интернет»
VPN (Virtual Private Network) technology provides a secure and encrypted tunnel across a public network. So, a private network user can send and receive data to any remote private network through VPN tunnel as if his/her network device was directly connected to that private network.
Secure Socket Tunneling Protocol (SSTP) transports PPP tunnel over TLS channel. SSTP uses TLS channel over TCP port 443. So, SSTP VPN can virtually pass through all firewalls and proxy servers. Because of using TLS channel, encrypted data passes over SSTP Tunnel. So, there is no chance to steal data by a middle man attacker and data can send and receive across public network safely. MikroTik SSTP Server can be applied in two methods.
- Connecting from remote workstation/client: In this method, SSTP VPN client software can communicate with MikroTik SSTP VPN Server over Secure VPN tunnel whenever required and can access remote private network as if it was directly connected to that remote private network.
- Site to Site SSTP VPN: This method is also known as VPN between routers. In this method, an SSTP client supported router always establishes a SSTP VPN tunnel with MikroTik SSTP VPN Server. So, private networks of these two routers can communicate with each other as if they were directly connected to the same router.
The goal of this article is to connect a remote client device over secure SSTP VPN Tunnel across public network. So, in this article I will only show how to configure MikroTik SSTP VPN Server for connecting a remote workstation/client (Windows 10 Client).
How SSTP Connection Established
To establish a SSTP VPN tunnel across public network, the following mechanisms are occurred.

- TCP connection is established from SSTP Client to SSTP Server on TCP port 443.
- SSL validates server certificate. If certificate is valid connection is established otherwise connection is denied.
- The client sends SSTP control packets within the HTTPS session which establishes the SSTP state machine on both sides.
- PPP username and password validation is checked over SSTP. Client authenticates to the server and binds IP addresses to SSTP Client interface.
- SSTP tunnel is now established and packet encapsulation can begin.
Network Diagram
To configure a Client-Server SSTP VPN Tunnel between a MikroTik Router and a Windows 10 SSTP Client, we are following the below network diagram.
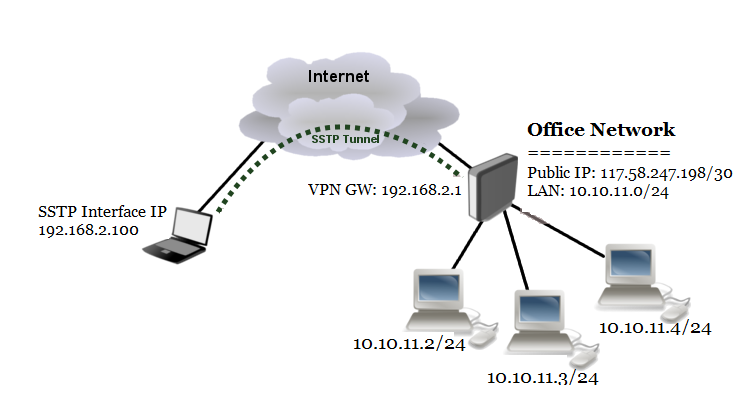
In this network diagram, a MikroTik Router’s ether1 interface is connected to public network having IP address 117.58.247.198/30 and ether2 interface is connected to LAN having IP network 10.10.11.0/24.
We will configure SSTP Server in this MikroTik Router on TCP port 443. So, Windows 10 SSTP Client can be connected to this SSTP Server and can be able to access remote network resources as if the device is connected to that remote network.
SSTP VPN Server and SSTP Client Configuration
We will now start SSTP Server and Client configuration. Complete SSTP configuration can be divided into two parts.
- Part 1: SSTP Server Configuration in MikroTik Router
- Part 2: SSTP Client Configuration in Windows 10
Part 1: SSTP Server Configuration in MikroTik Router
According to the network diagram, MikroTik Router is our SSTP VPN Server. So, we will enable and configure SSTP VPN Server in MikroTik Router. It is assumed that MikroTik WAN and LAN networks have been configured and are working without any issue.
Complete MikroTik SSTP Server configuration can be divided into the following three steps.
- Step 1: Creating TLS Certificate for SSTP Server
- Step 2: Enabling and Configuring SSTP Server
- Step 3: Creating SSTP Users
Step 1: Creating TLS Certificate for SSTP Server
SSTP Server configuration requires TLS certificate because SSTP VPN uses TLS certificate for secure communication. MikroTik RouterOS v6 gives ability to create, store and manage certificates in certificate store. So, we will create required SSTP Server certificate from MikroTik RouterOS. SSTP Server requires two types of certificates:
- CA (Certification Authority) Certificate and
- Server Certificate
Creating CA certificate
MikroTik RouterOS provides a self-signed certificate and self-signed certificate must have a CA (Certification Authority) Certificate to sign Server Certificate. This CA certificate will also be installed in SSTP Client devices otherwise Server Certificate cannot be verified. The following steps will show how to create a CA certificate in MikroTik RouterOS.
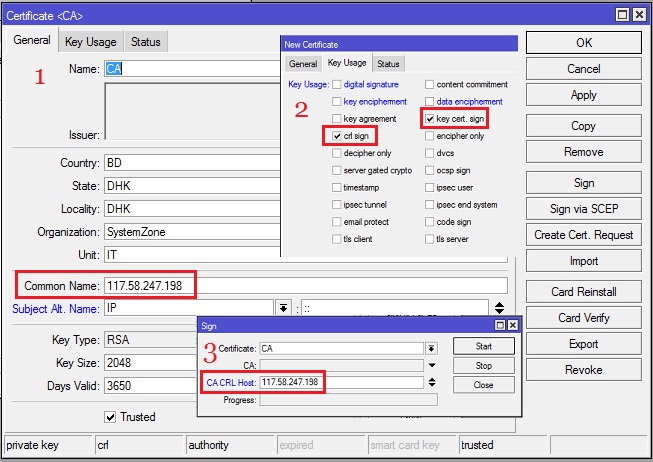
- From Winbox, go to System > Certificates menu item and click on Certificates tab and then click on PLUS SIGN (+). New Certificate window will appear.
- Put your CA certificate name (for example: CA) in Name input field.
- Put the WAN IP Address (example: 117.58.247.198) of MikroTik Router in Common Name input field.
- You will find some optional fields in General tab. You can fill those if you wish. All fields are self-defined.
- Click on Key Usage tab and uncheck all checkboxes except crl sign and key cert. sign
- Click on Apply button and then click on Sign button. Sign window will appear now.
- Your created CA certificate template will appear in Certificate dropdown menu. Select your newly created certificate template if it is not selected.
- Put MikroTik Router’s WAN IP address (example: 117.58.247.198) in CA CRL Host input field.
- Click on Sign button. Your Signed certificate will be created within few seconds.
- Click on OK button to close New Certificate window.
- If newly created CA certificate does not show T flag or Trusted property shows no, double click on your CA certificate and click on Trusted checkbox located at the bottom of General tab and then click on Apply and OK button.
Creating Server Certificate
After creating CA certificate, we will now create Server Certificate that will be signed by the created CA. The Server Certificate will be used by SSTP Server. The following steps will show how to create Server Certificate in MikroTik RouterOS.
- Click on PPP menu item from Winbox and then click on Interface tab.
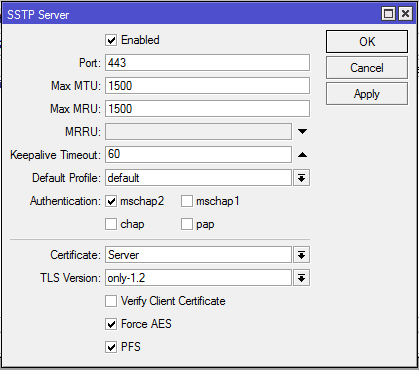
- Click on SSTP Server button. SSTP Server window will appear.
- Click on Enabled checkbox to enable SSTP Server.
- Make sure TCP Port 443 is assigned in Port input field.
- From Authentication, uncheck all checkboxes except mschap2 checkbox.
- From Certificate dropdown menu, choose server certificate (Server) that we created before.
- From TLS Version drop down menu, choose only-1.2 option. TLS Version any can also be selected.
- Now click on Force AES and PFS checkboxes.
- Now click on Apply and OK button.
SSTP Server is now running in MikroTik Router. As MikroTik SSTP VPN is limited to use username and password for successful VPN connection, we will now create PPP users who will be able to connect to MikroTik SSTP Server and get IP information.
Step 3: Creating SSTP Users
MikroTik SSTP uses username and password to validate legal connection. So, we have to create username and password to allow any user. The complete user configuration for SSTP Server can be divided into the following three parts.
- IP Pool Configuration
- User Profile Configuration and
- SSTP User Configuration
IP Pool Configuration
Usually multiple users can connect to SSTP Server. So, it is always better to create an IP Pool from where connected user will get IP address. The following steps will show how to create IP Pool in MikroTik Router.
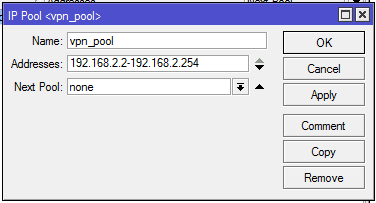
- From Winbox, go to IP > Pool menu item. IP Pool Window will appear.
- Click on PLUS SIGN (+). New IP Pool window will appear.
- Put a meaningful name (vpn_pool) in Name input field.
- Put desired IP Ranges (example: 192.168.2.2-192.168.2.254) in Addresses input filed. Make sure not to use VPN Gateway IP (192.168.2.1)in this range.
- Click Apply and OK button.
User Profile Configuration
After creating IP Pool, we will now configure user profile so that all users can have similar characteristics. The following steps will show how to configure user profile for SSTP Users.
- From Winbox, go to PPP menu item and click on Profile tab and then click on PLUS SIGN (+). New PPP Profile window will appear.
- Put a meaningful name (example: vpn_profile) in Name input field.
- Put VPN Gateway address (example: 192.168.2.1) in Local Address input field.
- Choose the created IP Pool (vpn_pool) from Remote Address dropdown menu.
- Click Apply and OK button.

SSTP User Configuration
After creating user profile, we will now create users who will be connected to SSTP Server. The following steps will show how to create SSTP users in MikroTik RouterOS.
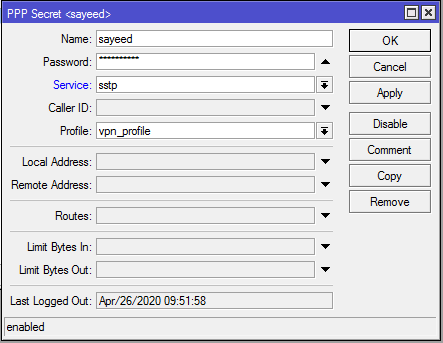
- From PPP window, click on Secrets tab and then click on PLUS SIGN (+). New PPP Secret window will appear.
- Put username (For example: sayeed) in Name input field and put password in Password input field.
- Choose sstp from Service dropdown menu.
- Choose the created profile from Profile dropdown menu.
- Click on Apply and OK button.
We have created a user for SSTP Server. Similarly, we can create more users that we require.
SSTP Server configuration in MikroTik Router has been completed. In the next part we will configure SSTP Client in Windows 10 Operating System.
Part 2: SSTP Client Configuration in Windows 10
After configuring SSTP Server in MikroTik Router, we will now configure SSTP Client in Windows 10 Operating System. SSTP Client configuration in Windows 10 can be divided into the following two steps.
- Installing CA Certificate in Windows 10
- SSTP Client Configuration in Windows 10
Installing CA Certificate in Windows 10
Exported CA Certificate must be installed in Windows Trusted Root Certification Authorities otherwise SSTP Client cannot verify SSTP Server Certificate. To install CA Certificate in Windows 10, do the following steps.
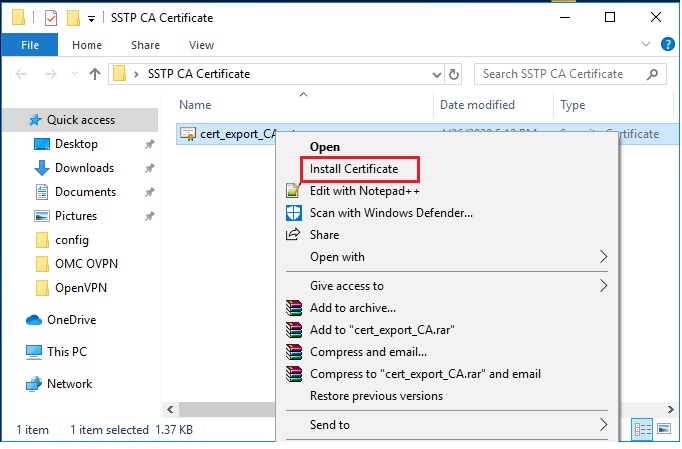
Click mouse right button on the Exported CA Certificate and choose Install Certificate option.
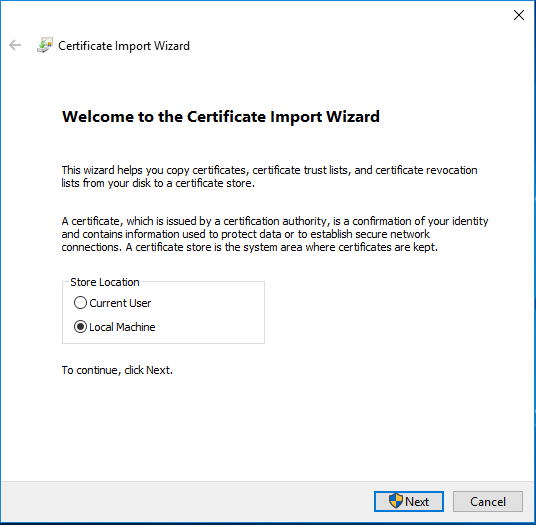
You will now find Certificate Import Wizard window and it will ask for choosing certificate Store Location. From Sore Location panel, choose Local Machine radio button and then click Next button.
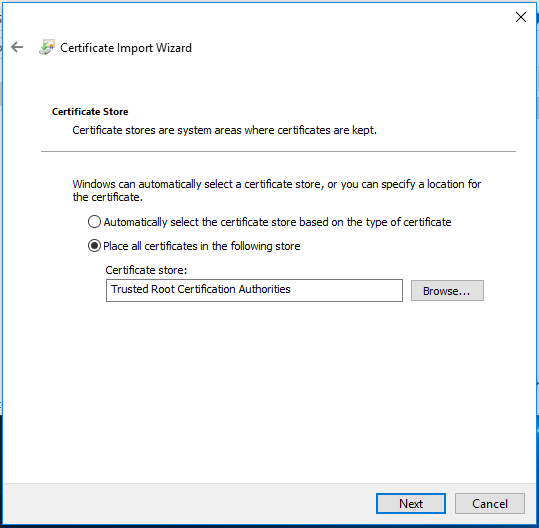
The next window will ask for choosing a specific certificate store. Exported CA must be placed in Trusted Root Certification Authorities store. So, click on Place all certificate in the following store radio button and then click on Browse button and choose Trusted Root Certificate Authorities and then click Next button.
The next Certificate Import Wizard will show a summery and ask to click Finish button. So, click Finish button and you will find a certificate importation successful message.
SSTP Client Configuration in Windows 10
After importing CA certificate in Trusted Root Certification Authorities, we will now configure SSTP Client in Windows 10 Operating System. The Following steps will show how to configure SSTP Client in Windows 10 OS.
How to Configure MikroTik SSTP VPN Server with Windows 10 Operating System has been discussed in this article. I hope you will now be able to configure SSTP Server and Client with MikroTik Router and Windows 10 Operating System. However, if you face any confusion to configure SSTP VPN Server and Client, feel free to discuss in comment or contact me from Contact page. I will try my best to stay with you.
Подключение по протоколу SSTP из Windows 10
Ниже приведем пошаговую последовательность действий для подключения к локальной сети компании iQline с удаленного компьютера под управлением ОС Windows 10.
Чтобы установить соединение с VPN-сервером компании iQline, на компьютере с Windows 10 нужно добавить VPN-подключение.
Для этого в меню «Параметры Windows» следует открыть настройки в разделе «Сеть и Интернет».

Далее перейти к параметрам VPN и нажать на «Добавить VPN-подключение».

В открывшемся окне нужно ввести следующие установки:
Поставщик услуг VPN — Windows (встроенные)
Имя подключения — любое, например iqline
Имя или адрес сервера — vpn.iqline.ru
Тип VPN — Протокол SSTP
Тип данных для входа — Имя пользователя и пароль
В полях Имя пользователя и Пароль можно сразу указать данные выданные вам сотрудником iQline, чтобы не вводить их каждый раз при подключении, и нажать кнопку «Сохранить».

Чтобы компьютер использовал туннель только для соединения с локальной сетью iQline, а не пытался получить через него доступ в интернет, потребуется дополнительно настроить параметры VPN-подключения.
Для этого в том же меню «Параметры Windows» в разделе «Сеть и Интернет», где вы добавляли VPN, нужно выбрать пункт «Состояние» и в открывшейся вкладке «Настройка параметров адаптера»

Нажав на «Настройка параметров адаптера» появится окно «Сетевые подключения». В контекстном меню сетевого адаптера (доступно по щелчку правой кнопкой мыши), соответствующего настроенному ранее VPN-подключению, следует выбрать пункт «Свойства».

Откроется диалоговое окно настройки свойств туннеля. В нем, на вкладке «Сеть» нужно выбрать компонент «IP версии 4 (TCP/IPv4)» и нажать кнопку «Свойства».

В окне настройки свойств TCP/IPv4 нужно нажать кнопку «Дополнительно…».

На вкладке «Параметры IP», в окне настройки дополнительных параметров протокола TCP/IPv4, нужно выключить настройку «Использовать основной шлюз в удаленной сети». Для применения настройки следует закрыть это окно, и приведшие к его открытию дополнительные окна, при помощи кнопки «OK».
Последним пунктом настройки нужно скачать файл https://route.iqline.ru/iqline.bat и запустить его от имени администратора (нажмите правой кнопкой мыши на файл iqline.bat и в контекстном меню выберите «Запуск от имени администратора»).

Настроенное подключение доступно в отображении «Сеть и Интернет — VPN», либо в меню «Сеть» в области системных уведомлений (в правом нижнем углу экрана).

Для L2TP/IPsec с общим ключом
Важно: L2TP IPsec клиенты, находящиеся за одним NAT’ом, могут испытывать проблемы подключения если их более одного. Решить проблему может помочь
инструкция
. Рекомендуем вместо L2TP IPsec использовать IKEv2 IPsec.
Имя подключения — название создаваемого подключения;
-
Имя или адрес сервера — адрес VPN-сервера;
-
Тип VPN — Протокол L2TP/IPsec с общим ключом;
-
Общий ключ — значение строки PSK в разделе Пользователи -> VPN-подключение -> Основное -> Подключение по L2TP/IPsec;
-
Тип данных для входа — Имя пользователя и пароль;
-
Имя пользователя — имя пользователя, которому разрешено подключение по VPN;
-
Пароль — пароль пользователя.

При настройке подключения по VPN из сети Интернет, в свойствах VPN-подключения нужно указать следующие параметры:
-
Перейдите в Настройки параметров адаптера;
-
Нажмите на созданное подключение правой кнопкой мыши и выберите Свойства;
-
Перейдите во вкладку Безопасность и установите:
-
Шифрование данных — обязательное (отключиться, если нет шифрования)
-
Протокол расширенной проверки подлинности (EAP) — Microsoft защищенный пароль (EAP MSCHAPV2)
-
Если создается VPN-подключение к UTM через проброс портов, рекомендуем выполнить следующие действия:
-
1.
Откройте Редактор реестра;
-
2.
Перейдите в
HKEY_LOCAL_MACHINE\SYSTEM\CurrentControlSet\Services\PolicyAgentи создайте DWORD-параметр с именем AssumeUDPEncapsulationContextOnSendRule и значением2;
-
1.
Неправильно указан логин или пароль пользователя. Часто при повторном соединении предлагается указать домен. Старайтесь создавать цифро-буквенные пароли, желательно на латинице для учетных записей. Если есть сомнения в этом пункте, то временно установите логин и пароль пользователю «user» и «123456».
-
2.
Для того, чтобы пакеты пошли через VPN-туннель, надо убедиться, что в настройках этого подключения стоит чекбокс Использовать основной шлюз в удалённой сети в разделе Настройка параметров адаптера -> Правой кнопкой мыши по подключению -> Свойства -> Сеть -> Свойства опции «Протокол Интернета версии 4 (TCP/IPv4)» ->Дополнительно. Если же маршрутизировать все пакеты в этот интерфейс не обязательно, то маршрут надо писать вручную.
-
3.
Подключение происходит через DNAT, т.е. внешний интерфейс Ideco UTM не имеет «белого» IP-адреса, а необходимые для работы порты (500 и 4500) «проброшены» на внешний интерфейс устройства, расположенного перед Ideco UTM и имеющего «белый» IP-адрес. В данном случае VPN-подключение либо вообще не будет устанавливаться, либо будут периодические обрывы. Решение — исключить устройство перед Ideco UTM и указать на внешнем интерфейсе Ideco UTM «белый» IP-адрес, к которому в итоге и будут осуществляться L2TP/IPsec-подключения. Либо используйте протокол SSTP, потому что его проще опубликовать с помощью проброса портов.
-
4.
Если в OC Windows 10 повторно подключиться по L2TP, но при этом использовать невалидный ключ PSK (введя его в дополнительных параметрах (скриншот ниже)), подключение все равно будет установлено успешно. Это связано с особенностями работы ОС.
Убедитесь, что локальная сеть (или адрес на сетевой карте) на удалённой машине не пересекается с локальной сетью организации. Если пересекается, то доступа к сети организации не будет (трафик по таблице маршрутизации пойдёт в физический интерфейс, а не в VPN). Адресацию необходимо менять.
In this tutorial we will show you how to set up SSTP VPN on Windows 10 but first let’s see what are our requirements and recommendations.
Requirements
In order to set up the SSTP VPN you will need:
- A CactusVPN account. If you don’t have one you can try our services for free.
- Your VPN username, password and VPN server address. You can find them in your account on our website, by going to Settings.
If you still want to set up SSTP VPN manually, go step-by-step through following instructions:
SSTP VPN Setup Instructions
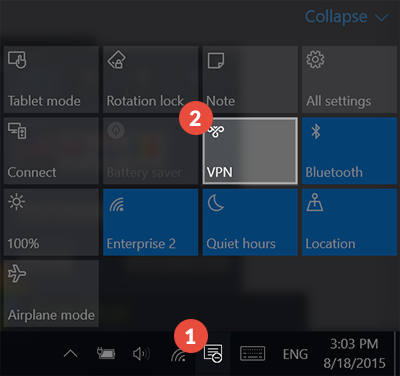
-
From the lower right corner click on Action Center icon (1).
Then press on VPN (2).

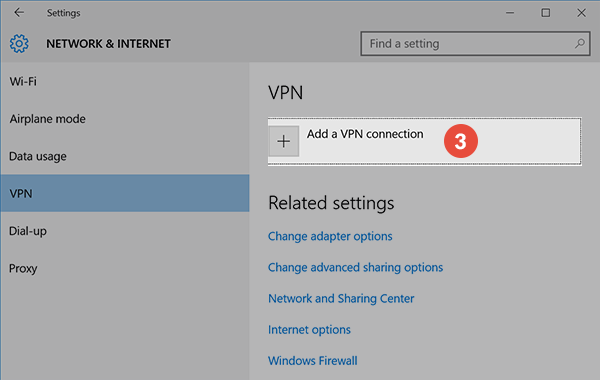
-
This will open Network & Internet settings window. Click on Add a VPN connection (3).
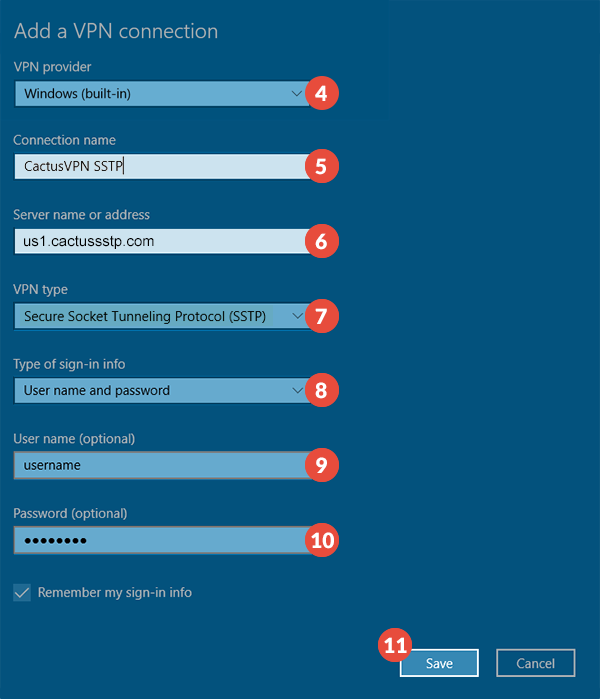
On the next page fill the fields with the following settings:
VPN provider (4) – Select Windows (built-in).
Connection name (5) – Give a memorable name to this connection. For example name it CactusVPN SSTP.
Server name or address (6) – enter the SSTP hostname of the CactusVPN server you want to connect to.
You can find IP addresses of all our servers in your account on our website, by going to Settings.
VPN type (7) – select Secure Socket Tunneling Protocol (SSTP).
Type of sign-in info (8) – select User name and password.
In the User name (9) and Password (10) fields type your VPN username and password.
You can find your VPN username and password in your account on our website, by going to Settings -> VPN Username & Password. Make sure you use your VPN username and password and NOT the website account credentials (What is the difference?).
Check all selected data once again and press Save (11).
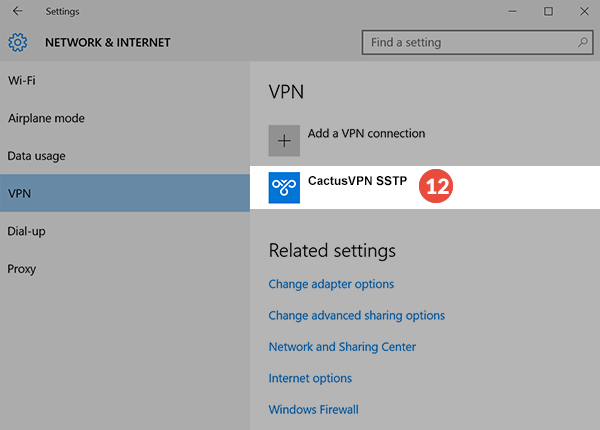
-
Now you can see your VPN connection (12) was created.
-
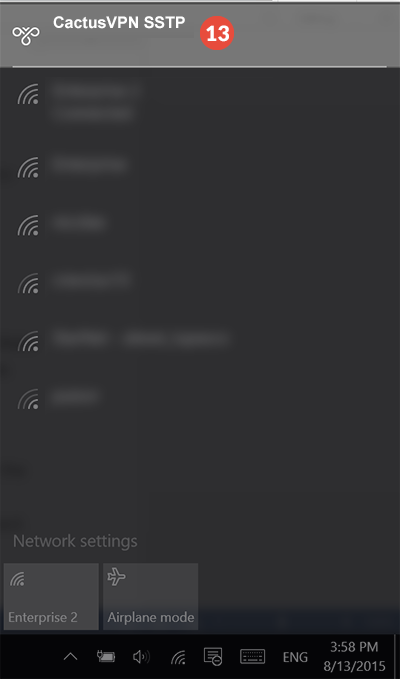
To connect to SSTP protocol click ok Network icon (Wi-Fi or wired) and click on the desired VPN connection (13).
-
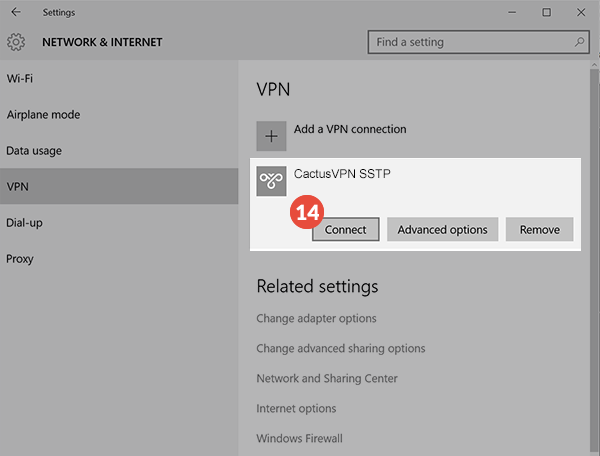
This will open your Network and Internet settings. Click on desired VPN connection and press on Connect button (14).
VPN and Smart DNS Services
Protect online privacy, secure your connection and access blocked websites
Try CactusVPN For Free