
Удаленный рабочий стол применяется для дистанционного администрирования системы. Для его настройки нужно сделать, буквально, несколько шагов.
Как включить
Настройка доступа
Ограничения
Доступ из Интернет
Включение
1. Открываем сведения о системе. В Windows Server 2012 R2 / 2016 или 10 кликаем правой кнопкой мыши по Пуск и выбираем Система.
В Windows Server 2012 / 8 и ниже открываем проводник или меню Пуск. Кликаем правой кнопкой по Компьютер и выбираем Свойства.
2. Настраиваем удаленный рабочий стол. В меню слева кликаем по Настройка удаленного доступа.
В открывшемся окне ставим переключатель в положение Разрешить удаленные подключения к этому компьютеру.
* желательно, если будет установлен флажок Разрешить подключение только с компьютеров, на которых работает удаленный рабочий стол с проверкой подлинности на уровне сети. Но если компьютер, с которого мы будем заходить с устаревшей операционной системой, это может вызвать проблемы.
Предоставление доступа
Очень важно, чтобы у пользователя был установлен пароль. Без него зайти в систему с использованием RDP будет невозможно — это программное ограничение. Поэтому всем учетным записям ставим пароли.
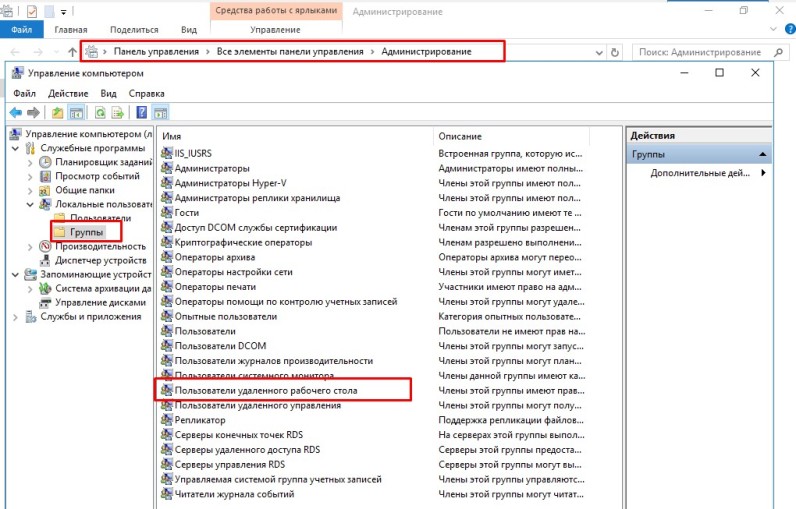
У пользователей с правами администратора права на использование удаленного стола есть по умолчанию. Чтобы обычная учетная запись могла использоваться для удаленного входа в систему, добавьте ее в группу Пользователи удаленного рабочего стола. Для этого открываем консоль управления компьютером (команда compmgmt.msc) — переходим по разделам Служебные программы — Локальные пользователи и группы — Группы и кликаем дважды по Пользователи удаленного рабочего стола:
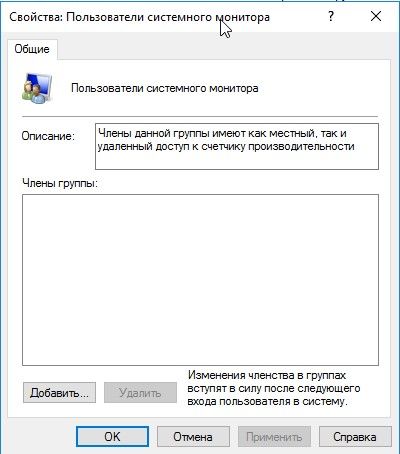
В открывшемся окне добавляем необходимых пользователей.
Для проверки правильности настроек, используйте программу Подключение к удаленному рабочему столу (находится в меню Пуск или вызывается командой mstsc) на любом другом компьютере в сети.
Ограничение по количеству пользователей
По умолчанию, в серверных операционных системах Windows разрешено подключение для одновременно двух пользователей. Чтобы несколько пользователей (больше 2-х) могли использовать удаленный стол, необходима установка роли удаленных рабочих столов (терминального сервера) и активации терминальных лицензий — подробнее, читайте в инструкции Установка и настройка терминального сервера на Windows Server.
В пользовательских системах (Windows 10 / 8 / 7) разрешено подключение только одному пользователю. Это лицензионное ограничение. В сети Интернет можно найти патчи для его снятия и предоставления возможности подключаться удаленным рабочим столом для нескольких пользователей. Однако, это нарушение лицензионного соглашения.
Доступ через глобальную сеть (Интернет)
Для возможности подключения по RDP из вне необходим статический внешний IP-адрес. Его можно заказать у Интернет провайдера, стоимость услуги, примерно, 150 рублей в месяц (некоторые поставщики могут предоставлять бесплатно). Для подключения нужно использовать полученный внешний IP.
Если компьютер подключен к Интернету напрямую, никаких дополнительных действий не потребуется. Если мы подключены через NAT (роутер), необходима настройка проброса портов. Пример того, как это можно сделать на Mikrotik.
Была ли полезна вам эта инструкция?
Да Нет
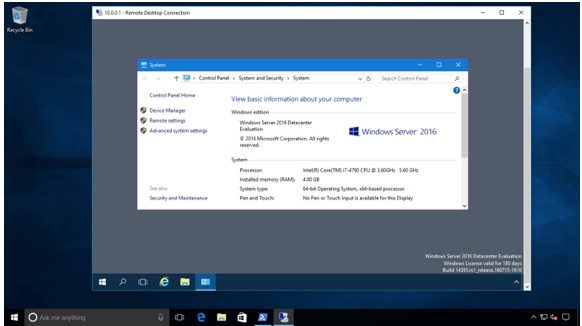
Remote Desktop Protocol (RDP) is a Microsoft-proprietary remote access protocol that is used by Windows systems administrators to manage Windows Server systems remotely. What sets RDP apart from, say, Windows PowerShell or Secure Shell (SSH) remoting is the presence of the full graphical desktop, as shown in Figure 1.
MORE: Best Remote Access Software and Solutions
By default, the RDP server component listens for incoming connections on TCP port 3389 by default, although this can be changed by the administrator for security reasons.
To be sure, Microsoft’s current push is for admins to reduce their reliance upon RDP and instead (a) deploy Windows Servers in Server Core or Nano mode; and (b) employ Windows PowerShell command-line remote administration instead of RDP.
Microsoft’s justification for this advice is two-fold:
- A GUI layer consumes unnecessary system resources
- A GUI layer broadens the attack surface of your servers
Regardless, many admins are accustomed to RDP-based remote administration, and seek to do so even in the newly released Windows Server 2016 operating system. Let’s learn how to enable RDP in Server 2016 (tl;dr: the process is identical to Windows Server 2012 R2).
Server Manager
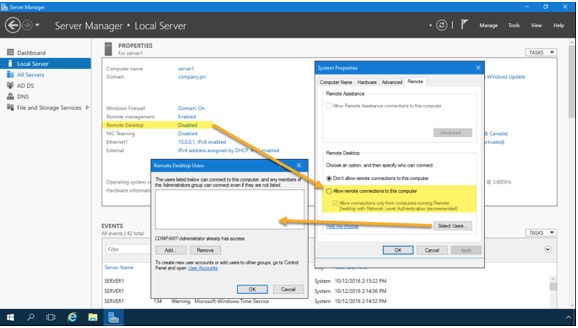
Open the Server Manager console, navigate to the Local Server node, and click the Remote Desktop hyperlink as shown in Figure 2.
The Remote Desktop hyperlink is simply a shortcut to the System Properties sheet from the System Control Panel item. Select Allow remote connections to this computer, and optionally enable Allow connections only from computers running Remote Destkop with Network Level Authentication (recommended).
Network Level Authentication (NLA) protects Windows Server against denial-of-service (DoS) attacks by requiring authentication to take place before any graphical session is established by the server. NLA also conserves server system resources.
Windows PowerShell
From a lower-level perspective, incoming RDP connections are enabled on a server through two Registry values and a Windows Firewall rule.
Open an elevated Windows PowerShell session and run the following commands. This first one creates the fDenyTSConnections value and sets it to 0 (off). This makes sense, because we don’t want to deny Terminal Services (TS) connections.
New-ItemProperty -Path ‘HKLM:SystemCurrentControlSetControlTerminal Server’ -Name ‘fDenyTSConnections’ -Value 0 -PropertyType dword -Force
The next command creates and enables the UserAuthentication (Network Layer Authentication) value; NLA is a good idea and you should consider enabling it by default on your servers.
New-ItemProperty -Path ‘HKLM:SystemCurrentControlSetControlTerminal ServerWinStationsRDP-Tcp’ -Name ‘UserAuthentication’ -Value 1 -PropertyType dword -Force
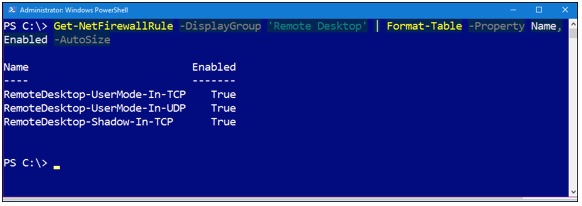
The next command enables the predefined «Remote Desktop» Windows Firewall rule. We can then invoke the Get-NetFirewallRule PowerShell cmdlet to verify as shown in Figure 3.
Enable-NetFirewallRule -DisplayGroup ‘Remote Desktop’
Group Policy
The chances are good that you want to standardize RDP behavior across all your infrastructure servers. Therefore, we turn to Group Policy to accomplish this goal.
Start by creating, linking and scoping a new Group Policy Object (GPO) that targets the servers that should share RDP server settings.
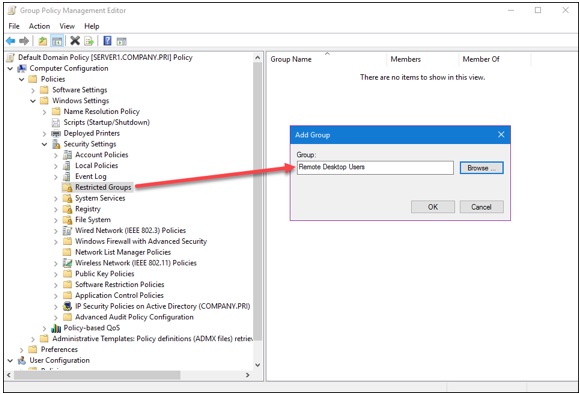
Next, navigate to the following Group Policy path and add a new Restricted Groups entry (shown in Figure 4):
Computer ConfigurationPoliciesWindows SettingsSecurity SettingsRestricted Groups
You can customize the membership in the servers’ built-in Remote Desktop Users group; members of this group can establish RDP sessions to the server. Note that the local Administrators group (and, by extension, the Domain Admins global group) is automatically granted this privilege in Active Directory.
The following three Group Policy settings govern:
- Windows Firewall incoming RDP exceptions
- User right to establish RDP sessions
- Requiring NLA
Computer ConfigurationAdministrative TemplatesNetworkNetwork ConnectionsWindows FirewallDomain ProfileWindows Firewall: Allow Inbound Remote Desktop exceptions
Computer ConfigurationAdministrative TemplatesWindows ComponentsRemote Desktop ServicesRemote Desktop Session HostConnectionsAllow user to connect remotely by using Remote Desktop Services
Computer ConfigurationAdministrative TemplatesWindows ComponentsRemote Desktop ServicesRemote Desktop Session HostSecurityRequire user authentication for remote connections by using NLA
Creating the Client Connection
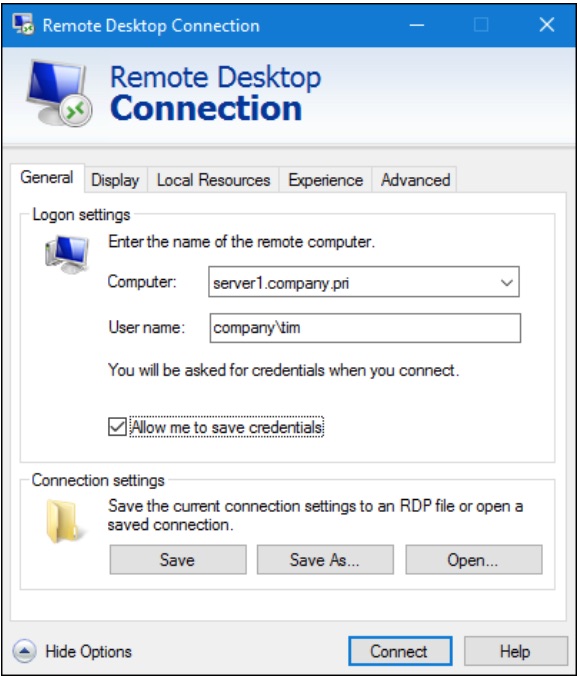
Windows Client and Windows Server both include the Microsoft RDP client, called Remote Desktop Connection. My favorite way to invoke this tool is to:
Press WINDOWS KEY+R
Type mstsc (which stands for «Microsoft Terminal Services Client»)
Press ENTER
I show you the Remote Desktop Connection user interface in Figure 5.
What’s cool about RDP clients is that they are available for just about every desktop or mobile operating system. Here is a representative list:
- Android: Microsoft Remote Desktop
- iOS: Microsoft Remote Desktop
- Linux: rdesktop
- macOS: Microsoft Remote Desktop
- Windows Phone: Microsoft Remote Desktop
Note that Windows Server supports only two simultaneous RDP sessions at once. If you need more than that, then you’ll have to install the Remote Desktop Services (RDS) Session Host server role and purchase additional RDS connection licenses from Microsoft.
Final Thoughts
If you’ve configured RDP on previous Windows Server versions, then you’ll find that Windows Server 2016 behaves the exact same way. Keep in mind, however, that Microsoft’s ever-widening embrace of «assume breach» security posture and the hybrid cloud scenario and its accompanying «manage herds, not pets» philosophy means the emphasis is on command-line automation rather than on-off RDP GUI sessions.
- 10 Best New Features in Windows Server 2016
- Windows 10 for IT Pros: Tutorials, Tips and Tricks
- Top 6 Windows 10 Apps for IT Pros
Join the experts who read Tom’s Hardware for the inside track on enthusiast PC tech news — and have for over 25 years. We’ll send breaking news and in-depth reviews of CPUs, GPUs, AI, maker hardware and more straight to your inbox.
Do you wish to enable RDP in Windows Server 2016? Need to establish remote connections but don’t know how to do so? Want to configure remote desktop using Command Prompt or PowerShell terminal? This how-to tutorial will answer your questions and help you with the configuration.
Why should you use Windows Server 2016?
In a previous article, we have explained how to enable RDP in Windows Server 2012. Now, it’s time to tell you about Windows Server 2016, and explain how you can enable Remote Desktop in Windows Server 2016. But let’s start with a brief history of Windows Server 2016.
Windows Server 2016 is the successor to Windows Server 2012 R2 released in October 2016. This is the seventh release of Windows Server families.
Need a Remote Desktop?
Reliable, high-performance RDP servers with 99.95 uptime. Take your desktop on the go to all the major cities in the US, Europe, and Asia.
Get an RDP Server
Main Features of Windows Server 2016
- Active Directory Federation Services
- Windows Defender (a pre-installed anti-malware)
- IIS 10, support for HTTP/2
- High-availability cluster (i.e. HA cluster, or Metro-clusters Active/Active, or even fail-over cluster)
- Web application proxy
- Windows PowerShell 5.1
- Windows Server Containers
- The feature of Nano-server
- Hyper-V cluster update
- Remote Desktop Services (like Support of Gen 2 VMs (virtual machines) with Remote Desktop, or Pen remoting support, or Edge support in RDSH, or even support of OpenGL applications and guest VMs in Remote Desktop)
- Windows Multipoint Services
- Personal session desktops
And client updates ( including Remote Desktop preview app for Windows 10, and Remote Desktop preview app for Mac)
As you see, Windows Server 2016 comes with brand new features that Allow Remote Desktop and better connections. Here, we will tell you how to enable RDP in Windows Server 2016.
Things to notice before configuring RDP in Windows Server 2016
- By default, Remote Desktop is disabled in all Windows Server 2016 editions (except Windows server 2016 Essential edition).
- RDP in Windows Server can be enabled through two environments including the PowerShell terminal, and logging into the GUI (Graphical User Interface).
- The main difference between these two installation options comes in the GUI shell package. Server Core 2016 does not have pre-installed GUI shell packages. In fact, the GUI is no longer an option in a default install in Windows Server 2016. If you wish to enable Remote Desktop on Windows Server 2016 using GUI, you should enable it.
Windows 10 VPS Hosting
Get yourself an efficient Windows 10 VPS for remote desktop, at the cheapest price out there. FREE Windows 10 running on NVMe SSD storage and high-speed internet.
Check Out Windows 10 VPS Plans
As you know, Graphic User Interface (GUI) allows for remote access to Windows Server 2016. So, when it comes to enabling RDP in Windows Server 2016 via Logging into the GUI, your first requirement is the installation of a Graphic User Interface. After installing the GUI, do the following steps:
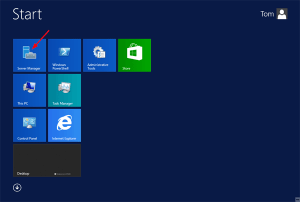
Step 1 : Find Server Manager option
Open Server Manager
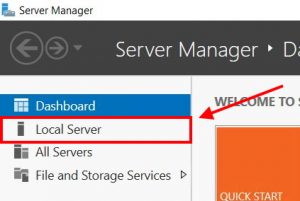
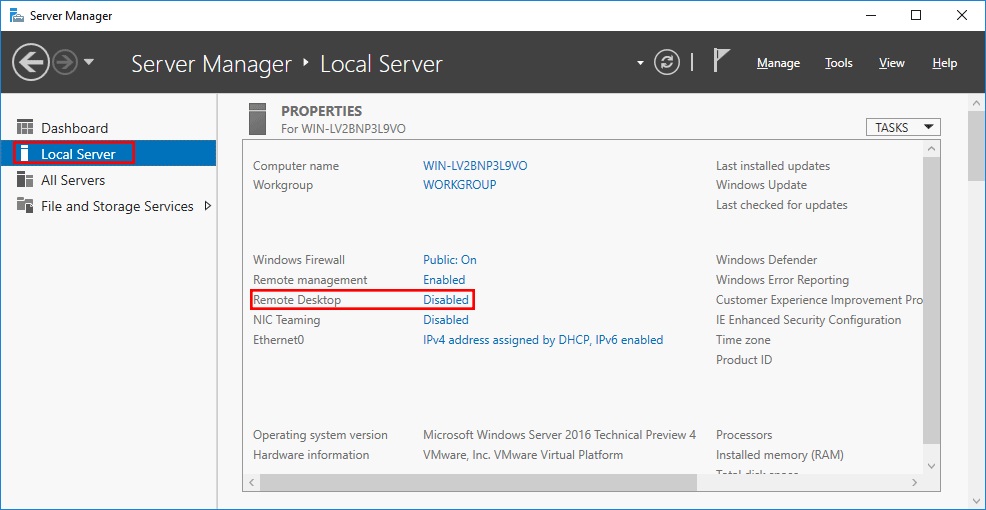
Step 2 : Select Local server
Click Local Server from the left panel
Step 3 : Disable Remote Desktop
Find the Remote Desktop option and click Disabled as shown in the following picture
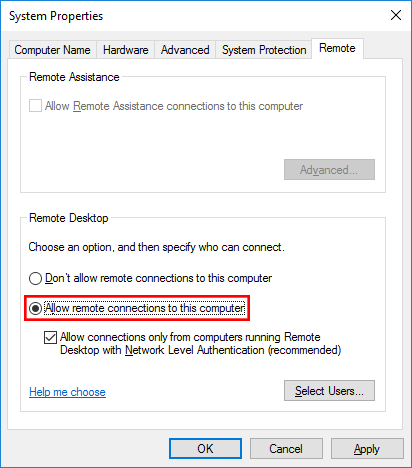
Step 4 : Enable the Allow remote connections to this computer
In this step, a new window will appear. In System Properties Window, enable the Allow remote connections to this computer In this part, you can decide whether to choose Network Level Authentication (NLA) or not. You can also, add more users here.
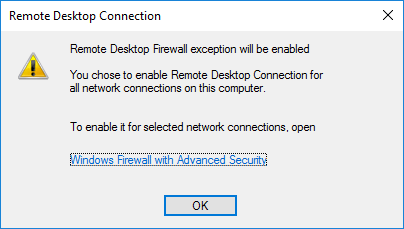
Step 5 : Confirm the configuration
Once, you configure all required settings, you will see a message to enable the corresponding Windows Firewall rule. The Remote Desktop Connection Window helps you to establish remote desktop connections, so click OK to confirm the configuration.
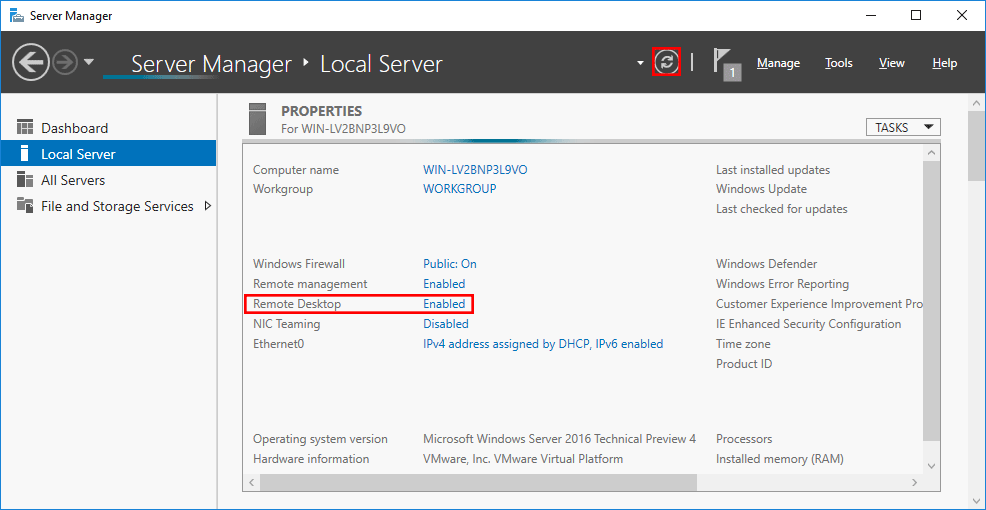
Step 6 : Select the Refresh button to set the changes
Now, move back to the Server Manager window. In this window, select the Refresh button as highlighted below to set the changes. Congratulation. You configured a remote desktop.
Enable RDP in Windows Server 2016 via Powershell
PowerShell is an object-oriented command environment that has new features in Windows Server 2016. It utilizes small programs called cmdlets to simplify the management, administration, and configuration of heterogeneous environments.
To enable Remote Desktop in Windows Server 2016 via PowerShell, we can use two cmdlets. The first will enable remote desktop and the second will open the Firewall. They are listed here:
- A code used to configure remote access:
Set-ItemProperty -Path "HKLM:SYSTEMCurrentControlSetControlTerminal Server" -Name "fdenyTSXonnections" -Value 0
- A code for opening the firewall:
Enable-NetFirewallRule -DisplayGroup "Remote Desktop"
As you see, PowerShell enables RDP with these commands. Notice that administrators can remote in by default, while to provide non-admin users permission to Remote Desktop access, you should add them to the Remote Desktop Users’ local group.
Need a Remote Desktop?
Reliable, high-performance RDP servers with 99.95 uptime. Take your desktop on the go to all the major cities in the US, Europe, and Asia.
Get an RDP Server
Enable RDP in Windows Server 2016 with command line
Well, one of the answers to the “How to Enable RDP in Windows Server 2016” question is using PowerShell Terminal. In order to do this, you should follow the instructions below.
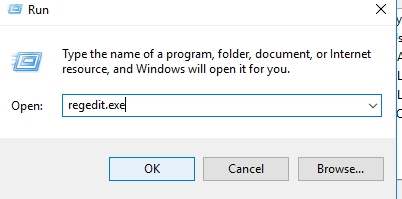
1- Click Windows + R key to open Run Window;
2- In this window, type regedit.exe and press OK;
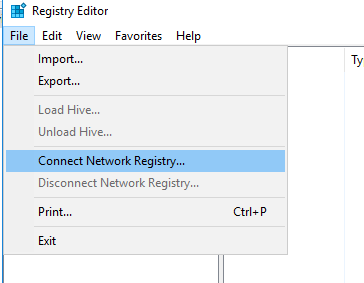
3- In Registry Editor, select File and then select Connect Network Registry;
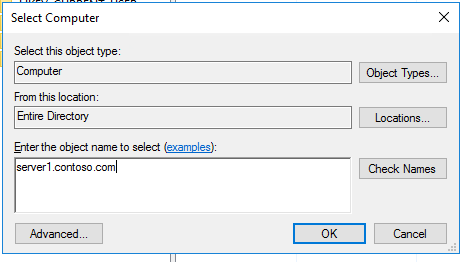
4- Specify the IP address or hostname of the remote computer and press But remember that:
If the remote computer could not authorize you as a current user, then a credential is needed.
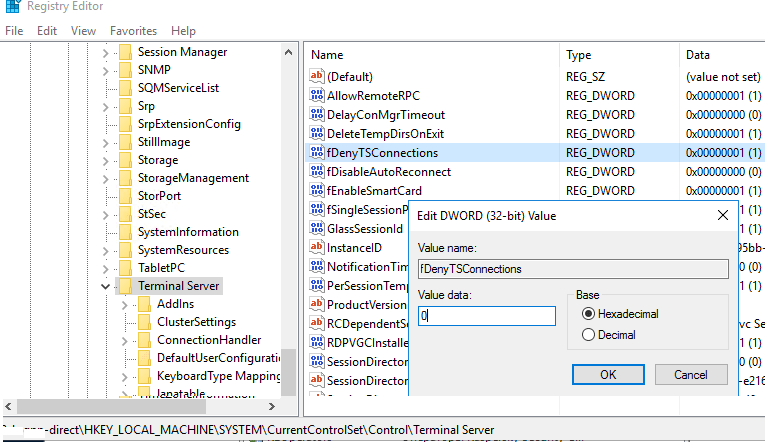
5- Now, the Registry Editor Panel appears. In this stage try to find “HKLMSYSTEMCurrentControlSetControlTerminal Server” and change the DWORD value of the fDenyTSConnections parameter from 1 to 0, and press OK;
6- Now, it’s time to add one of the firewall rules in the Windows Firewall. This rule allows remote connections. You can add it via PowerShell Remoting, using PS exec, or using a GPO (Group Policy Object). Go to the Command Prompt and type the following code:
PsExec.exe \server1 -u contosoadmin -p password cmdnetsh advfirewall firewall add rule name="allow RemoteDesktop" dir=in protocol=TCP localport=3389 action=allowshutdown –f –r –t
7- Reboot your system and try to connect to a remote computer.
Note:
8- For more information about how to set firewall rules in Windows firewall, run the following command:
netsh advfirewall firewall add rule ?
9- Make sure to run all these codes in administrator mode. To do so, do the following:
Click on Start, type CMD, then right-click on Command Prompt and choose Run as Administrator.
Windows 10 VPS Hosting
Get yourself an efficient Windows 10 VPS for remote desktop, at the cheapest price out there. FREE Windows 10 running on NVMe SSD storage and high-speed internet.
Check Out Windows 10 VPS Plans
Conclusion
In this article, we learned how to enable RDP in Windows Server 2016 using various methods. We can mention one extra method here. By default, windows server 2016 sets external Remote Desktop Access to disabled. We can easily enable it using Server Manager (as we explained in a previous article named “how to enable RDP in Windows Server 2012”). So you can also use server manager to enable remote connections via Windows Server 2016. Do you know any more methods? Please share with us.
Краткое описание: В данном руководстве рассматривается установка службы удаленных рабочих столов RDP Windows Server 2016.
 Поддержи автора статьи, просмотри рекламу ↓↓↓
Нужна консультация или помощь в решении IT вопроса?
Службы удаленных рабочих столов Windows Server является самыми востребовательными по практическому использованию. Типичная связка подключения клиентского ПК к:
- Серверу приложений;
- Виртуальному рабочему столу.
Такой функционал решает задачи не только быстродействия(это все же сервер), но и вопрос с безопасностью коммерческой информации. Стоит отметить, что структурированные данные легче администрируются во всех аспектах этого понятия: предоставление доступа, резервное копирование и репликация, управление кластерными системами.
Установка службы удаленных рабочих столов RDP
 Поддержи автора статьи, просмотри рекламу ↓↓↓
Диспетчер сервера, добавление роли
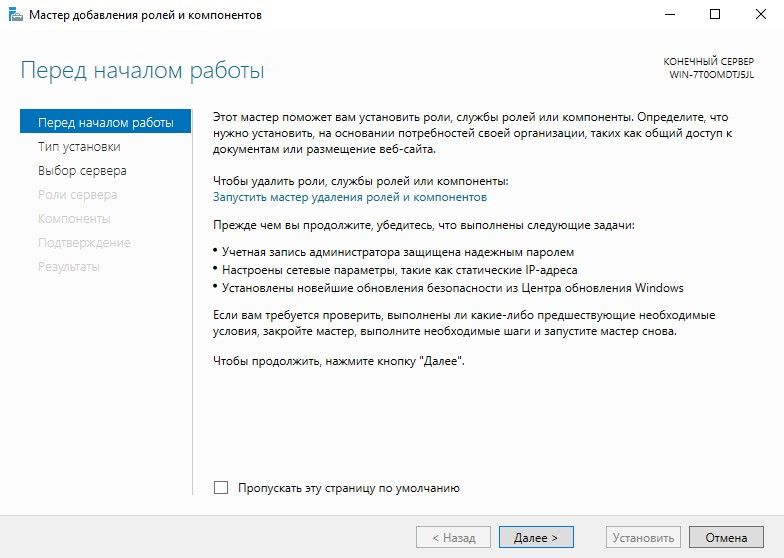
Перед началом работы
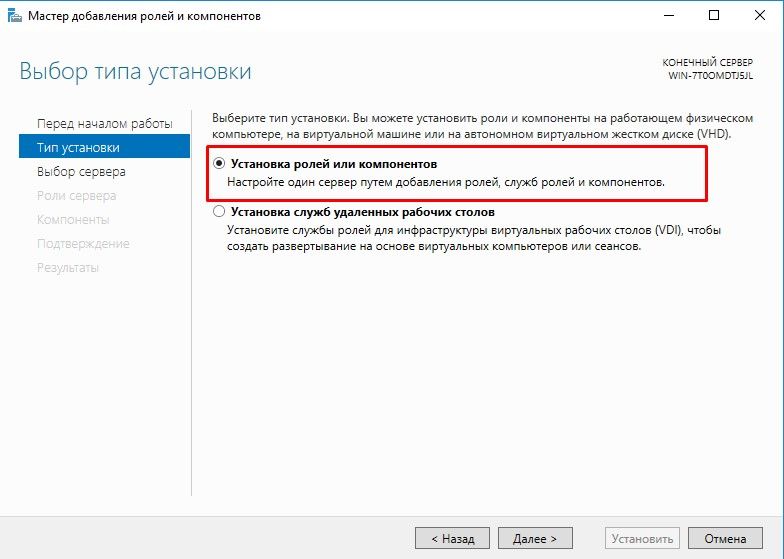
Тип установки
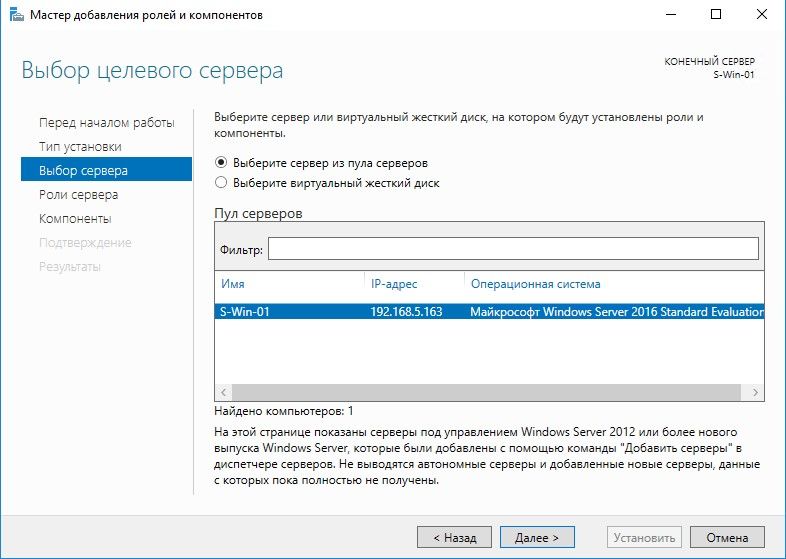
Выбор сервера для установки
 Поддержи автора статьи, просмотри рекламу ↓↓↓
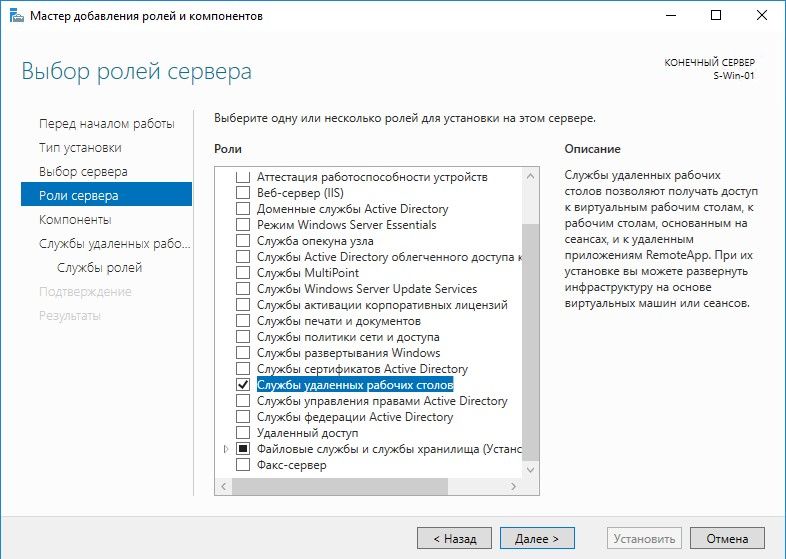
Выбор роли службы удаленных рабочих столов
Пропуск добавления компонентов
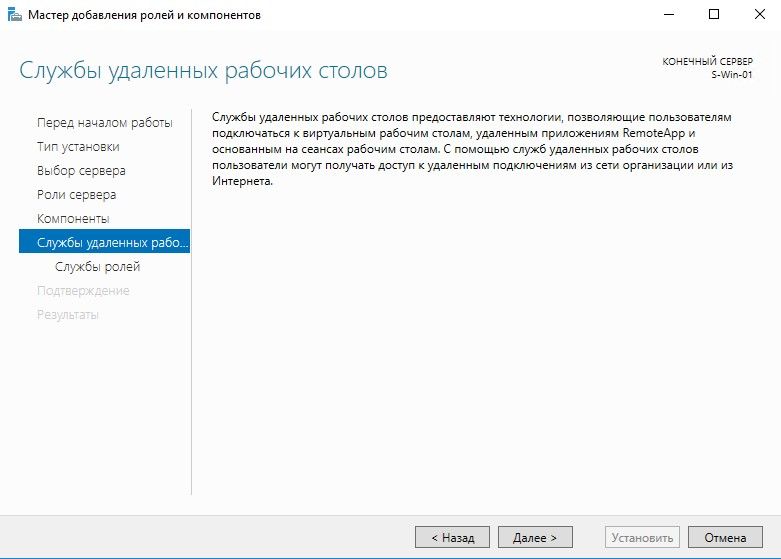
Описание службы удаленных рабочих столов
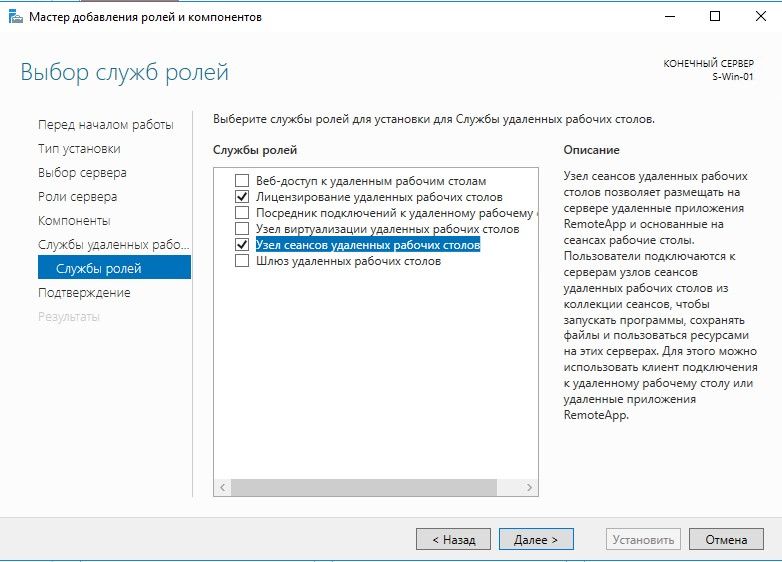
Добавление ролей для службы удаленных рабочих столов
 Поддержи автора статьи, просмотри рекламу ↓↓↓
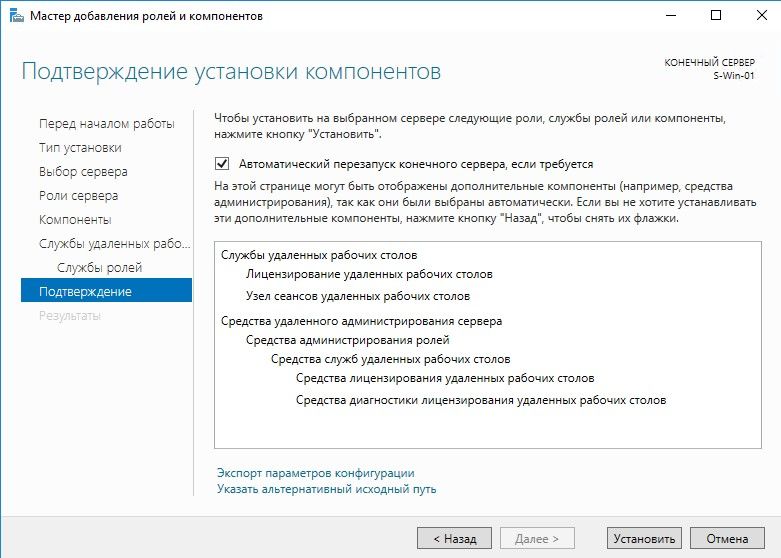
Подтверждение установки
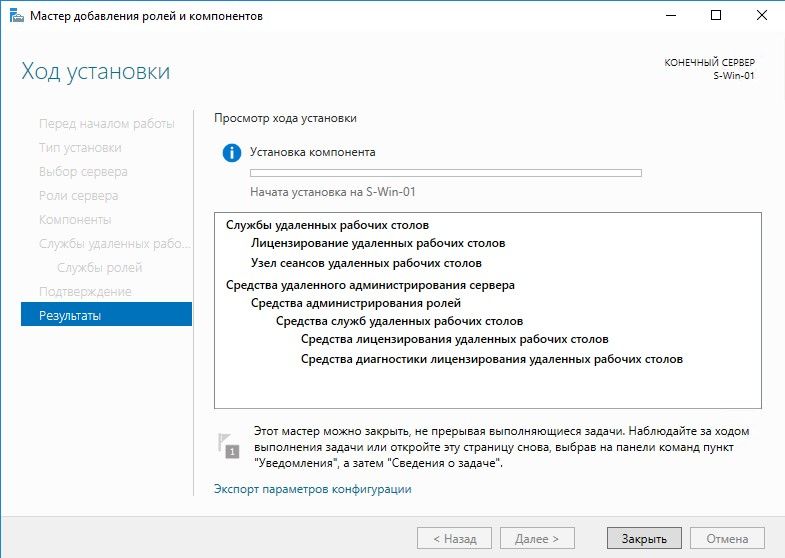
Процесс установки
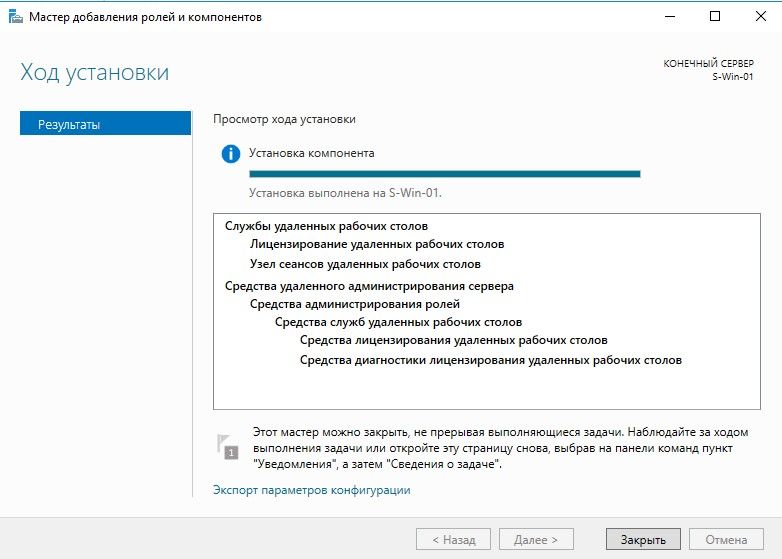
Завершение установки, после этого требуется перезагрузить систему
Активация сервера лицензирования RDP
 Поддержи автора статьи, просмотри рекламу ↓↓↓
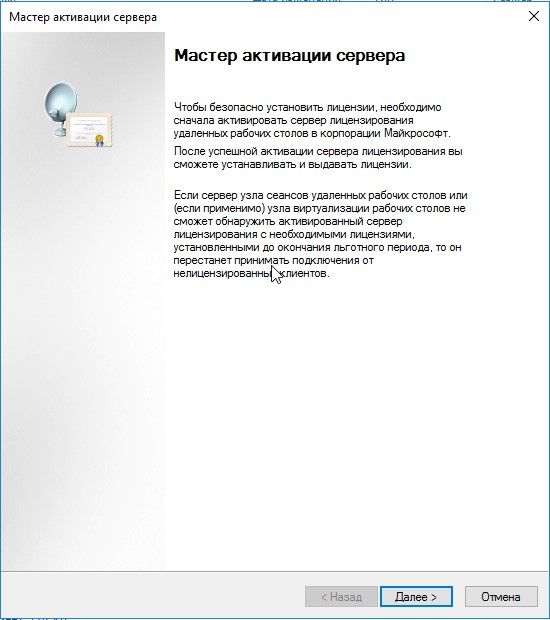
Мастер активации сервера, первый запуск
Сведения об организации
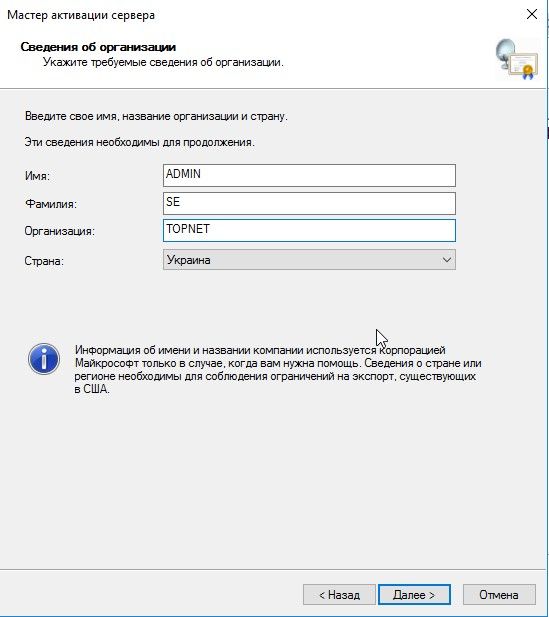
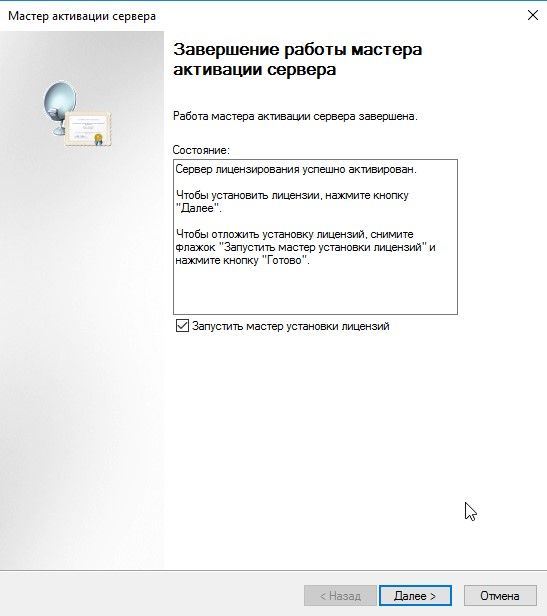
Мастер активация сервера, завершение работы
 Поддержи автора статьи, просмотри рекламу ↓↓↓
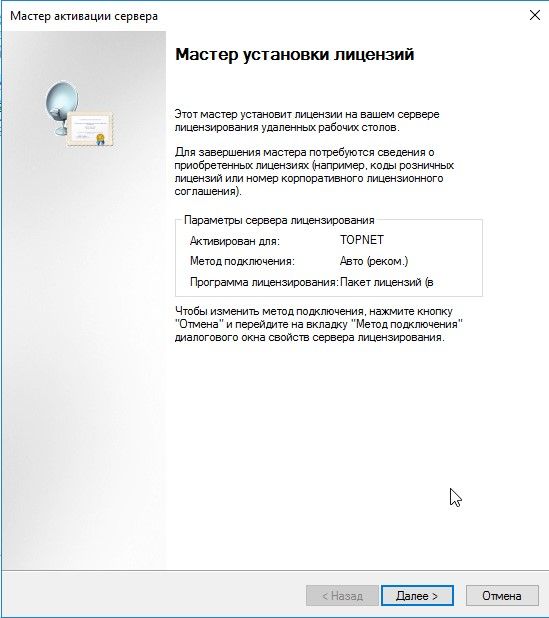
Мастер установки лицензий, запуск
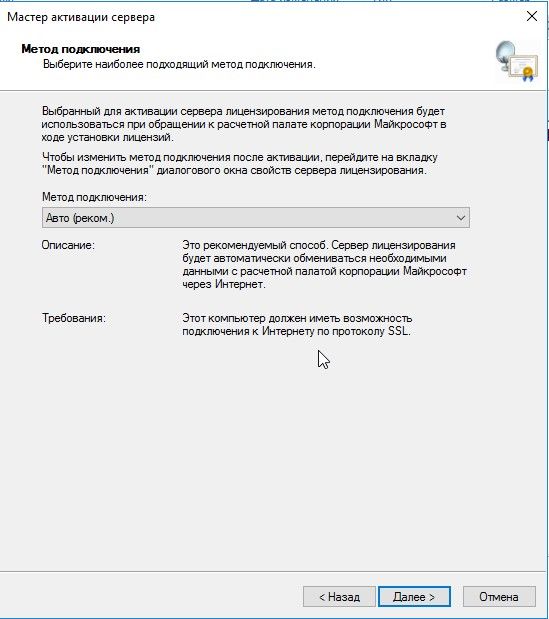
Выбор метода подключения
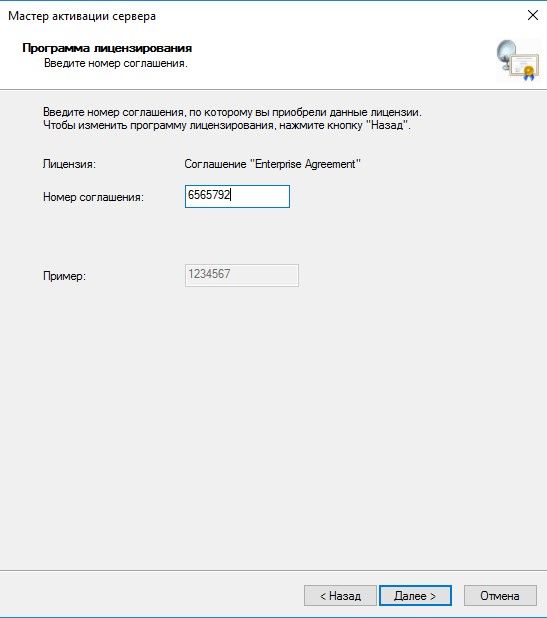
Номер соглашения
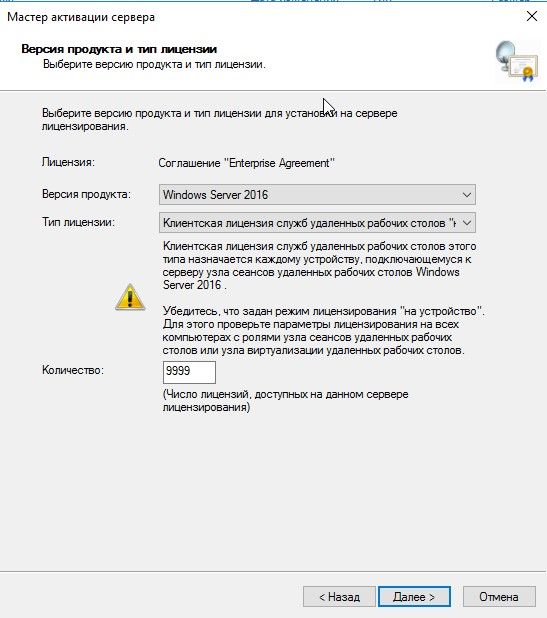
Версия продукта
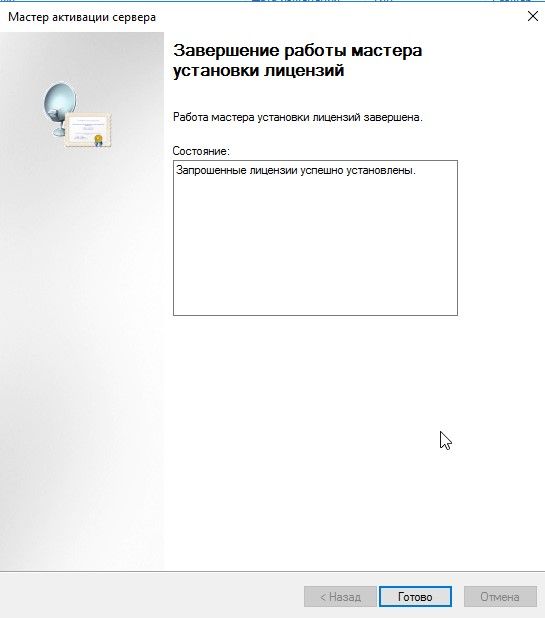
Мастер установки лицензий, завершение
 Поддержи автора статьи, просмотри рекламу ↓↓↓
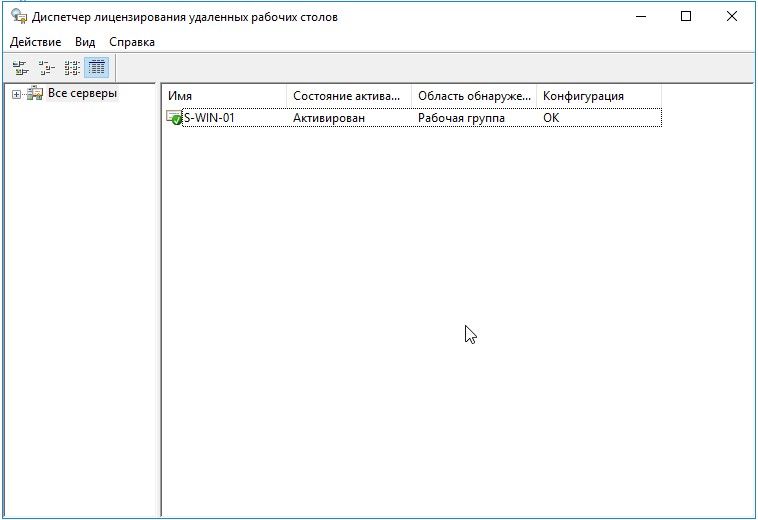
Успешное завершение активации сервера лицензирования
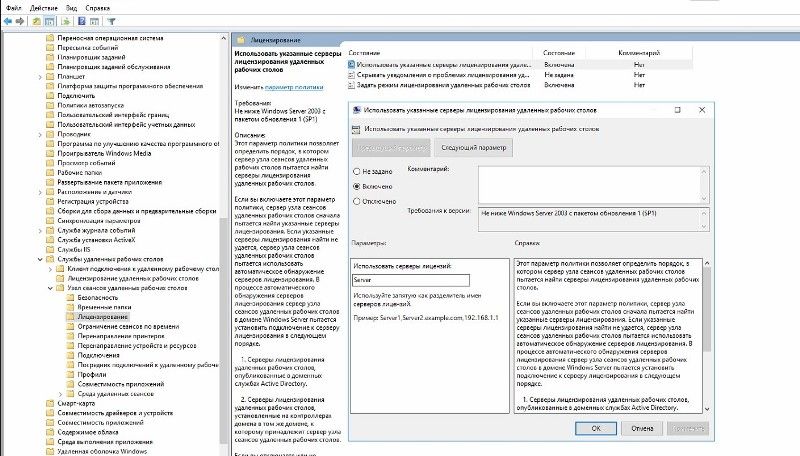
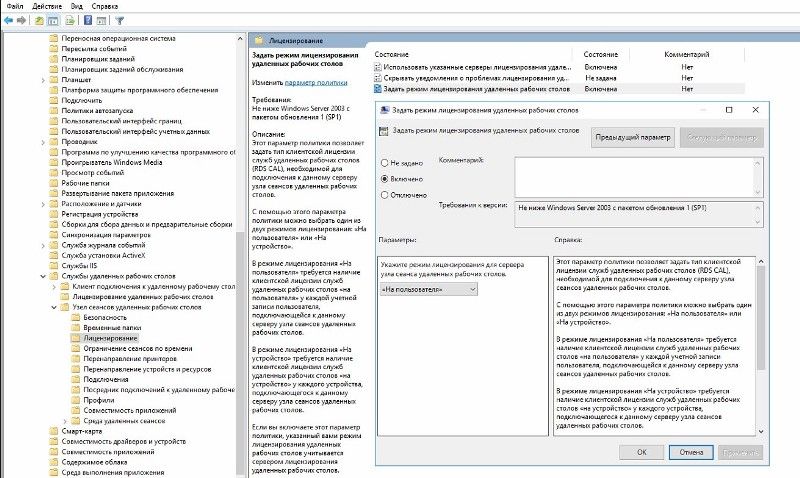
Важный этап — указание сервера лицензирования, т.к. начиная с Windows 2012R2 эту опцию перенесли в групповые политики:
Указание типа лицензирования — на пользователя
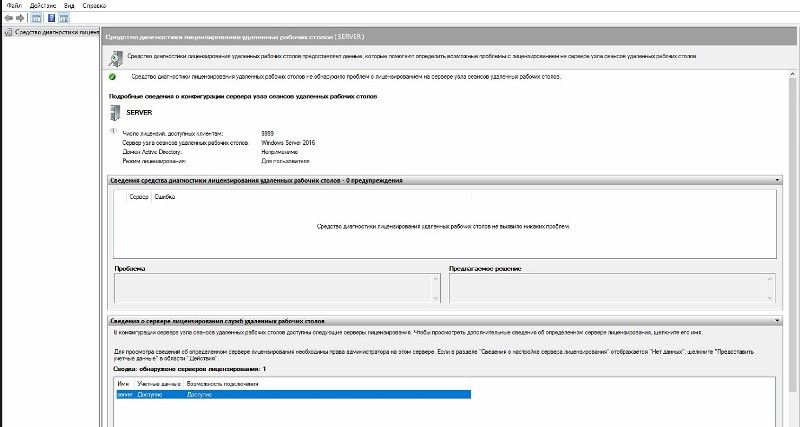
Проверка работы службы терминалов
Добавление пользователей в группу разрешения для подключения
Во всех версия Windows Server, есть группа, по которой задаются разрешения для подключения к удаленному рабочему столу.
Остается только добавить пользователя
 Поддержи автора статьи, просмотри рекламу ↓↓↓
Для настройки терминального сервера к нему распространяются ниже представленные требования исходя из ПО, которое будет запускаться пользователями и количества пользователей:
- Процессор: от 4 ядер
- Оперативная память : 1 ГБ на каждого пользователя + 4 ГБ для работы ОС + 4 ГБ запас
- Дисковая система: для большей отказоустойчивости нужно настроить RAID-массив
Для установки выделить два диска: первый логический диск от 50 ГБ. До 100 ГБ выделить для установки ОС, второй логический диск выделить под пользовательские профили с расчетом минимум 1 ГБ на пользователя - Ширина канала для терминального сервера: 250 Кбит/с на пользователя
Бесплатный сервер 1С для подписчиков нашего telegram-канала !
У нас вы можете взять терминальный сервер 1С в аренду с бесплатными индивидуальными настройками.
Первоначальные настройки Windows Server 2016:
- Настроить статический IP-адрес сервера
- Проверить правильность настройки времени и часового пояса
- Установить все обновления системы
- Задать понятное имя для сервера и, при необходимости, ввести его в домен
- Включить доступ до сервера по удаленному рабочему столу для удаленного администрирования
- Настроить запись данных профилей пользователей на второй логический диск
- Активировать лицензию Windows Server 2016
Настройка терминального сервера
Начиная с Windows 2012 терминальный сервер должен работать в среде Active Directory.
Если в вашей локальной сети есть контроллер домена, просто присоединяйте к нему сервер терминалов, иначе установите на сервер роль контроллера домена.
Установка роли и компонентов
В панели быстрого запуска открываем Диспетчер серверов:
Нажимаем Управление — Добавить роли и компоненты:
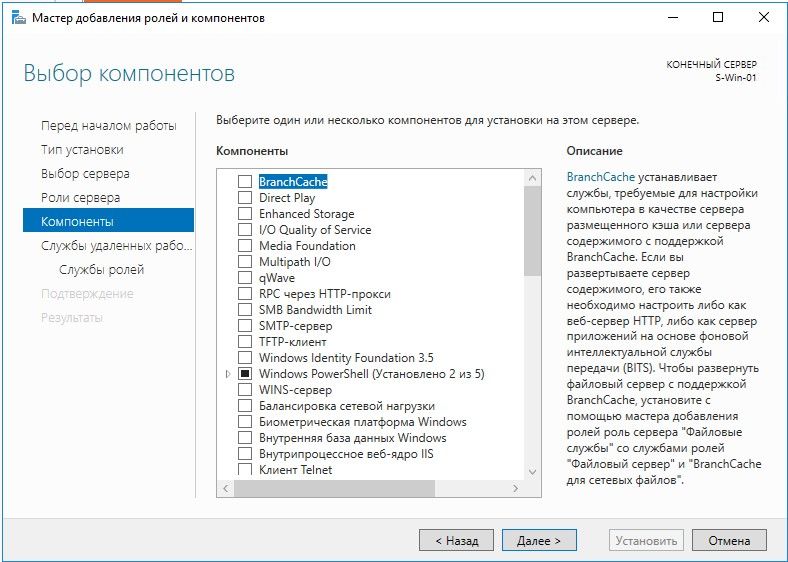
Нажимаем Далее до «Выбор типа установки». Оставляем Установка ролей и компонентов и нажимаем Далее дважды:
В окне «Выбор ролей сервера» выбираем Службы удаленных рабочих столов:
Кликаем Далее, пока не появится окно «Выбор служб ролей» и выбираем следующие:
- Лицензирование удаленных рабочих столов
- Узел сеансов удаленных рабочих столов
Нажимаем Далее, при появлении запроса на установку дополнительных компонентов соглашаемся.
При необходимости, также выставляем остальные галочки:
- Веб-доступ к удаленным рабочим столам — возможность выбора терминальных приложений в браузере.
- Посредник подключений к удаленному рабочему столу — для кластера терминальных серверов посредник контролирует нагрузку каждой ноды и распределяет ее.
- Узел виртуализации удаленных рабочих столов — для виртуализации приложений и запуска их через терминал.
- Шлюз удаленных рабочих столов — центральный сервер для проверки подлинности подключения и шифрования трафика. Позволяет настроить RDP внутри HTTPS.
Нажимаем Далее и в следующем окне Установить. Дожидаемся окончания процесса установки и перезагружаем сервер.
Установка служб удаленных рабочих столов
После перезагрузки открываем Диспетчер серверов и нажимаем Управление — Добавить роли и компоненты:
В окне «Выбор типа установки» выбираем Установка служб удаленных рабочих столов и нажимаем Далее:
В окне «Выбор типа развертывания» выбираем Быстрый запуск и нажимаем Далее:
В «Выбор сценария развертывания» — Развертывание рабочих столов на основе сеансов — Далее:
Еще раз Далее — при необходимости, ставим галочку «Автоматически перезапускать конечный сервер, если это потребуется» и кликаем по Развернуть.
Настройка лицензирования удаленных рабочих столов
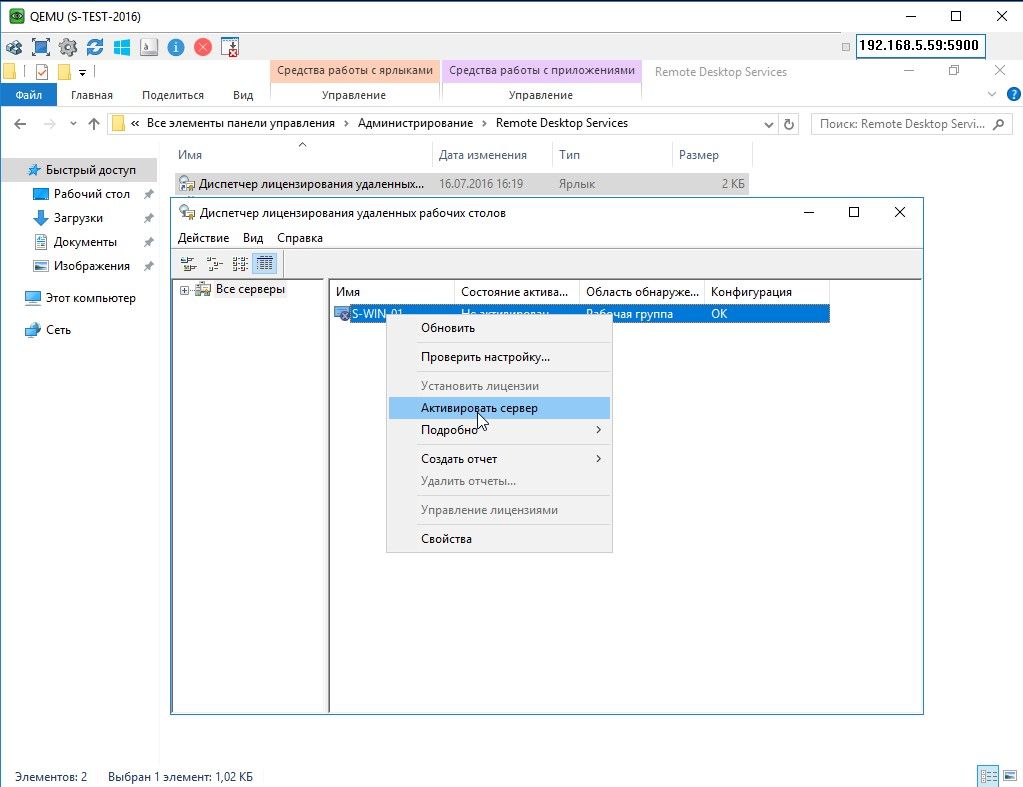
Для корректной работы сервера, необходимо настроить службу лицензирования. Для этого открываем диспетчер серверов и кликаем по Средства — Remote Desktop Services — Диспетчер лицензирования удаленных рабочих столов:
В открывшемся окне кликаем правой кнопкой мыши по нашему серверу и выбираем Активировать сервер:
В открывшемся окне дважды кликаем Далее — заполняем форму — Далее — Далее — Снимаем галочку «Запустить мастер установки лицензий» — Готово.
Снова открываем диспетчер серверов и переходим в «Службы удаленных рабочих столов»:
В «Обзоре развертывания» кликаем по Задачи — Изменить свойства развертывания:
В открывшемся окне переходим в Лицензирование — Выбираем тип лицензий — прописываем имя сервера лицензирования (в данном случае локальный сервер) и нажимаем Добавить:
Применяем настройки, нажав OK.
Добавление лицензий
Открываем диспетчер серверов и кликаем по Средства — Remote Desktop Services — Диспетчер лицензирования удаленных рабочих столов:
В открывшемся окне кликаем правой кнопкой мыши по нашему серверу и выбираем Установить лицензии:
В открывшемся окне нажимаем Далее:
Выбираем программу, по которой куплены лицензии, например, Enterprise Agreement:
Нажимаем Далее — вводим номер соглашения и данные лицензии — выбираем версию продукта, тип лицензии и их количество:
Нажимаем Далее — Готово.
Проверить статус лицензирования можно в диспетчере серверов: Средства — Remote Desktop Services — Средство диагностики лицензирования удаленных рабочих столов.
Мы также готовы оказать помощь в установке и настройке терминального сервера.
Нашим клиентам мы предлагаем реализацию данного проекта и его последующее обслуживание в рамках ИТ-аутсорсинга.




 Поддержи автора статьи, просмотри рекламу
