Posted by
on December 20, 2018
By default in Windows Server 2019 remote desktop is disabled. This post will cover how to turn on and enable Remote Desktop Protocol (RDP) in Windows Server 2019, using either PowerShell or the GUI.
Note: In Windows Server 2019 Essentials edition, remote desktop is already enabled by default so you will not need to manually do this.
Remote desktop can be enabled through the graphical user interface (GUI) with the following easy steps.
Allowing Remote Desktop With The GUI
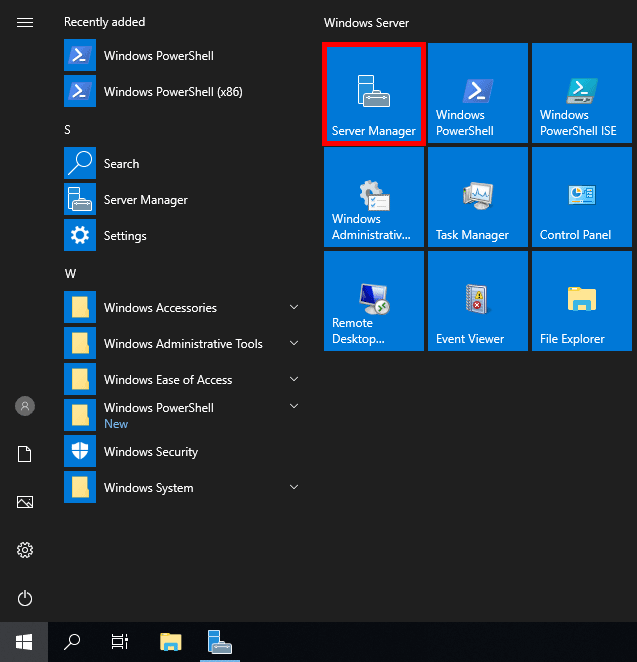
- Open Server Manager. This can be found by opening the start menu, as shown below.

If Server Manager does not show here, simply type “Server Manager” into the start menu to search for it. By default Server Manager will open when you log in to the GUI, otherwise you can select it from the task bar.
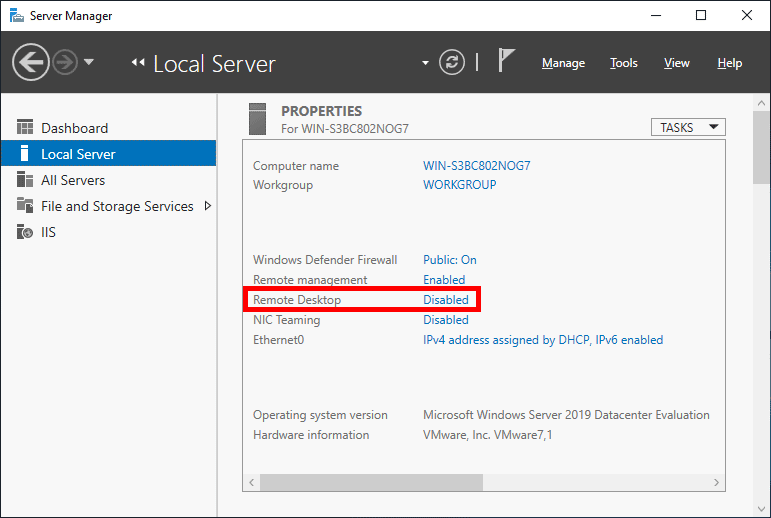
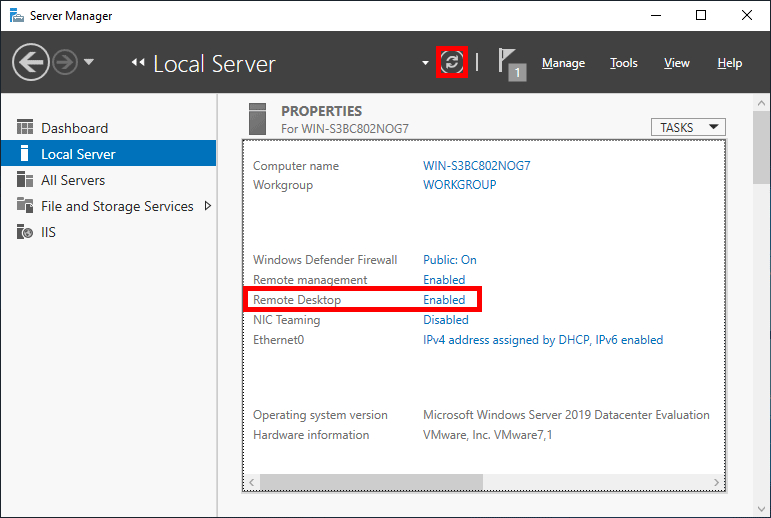
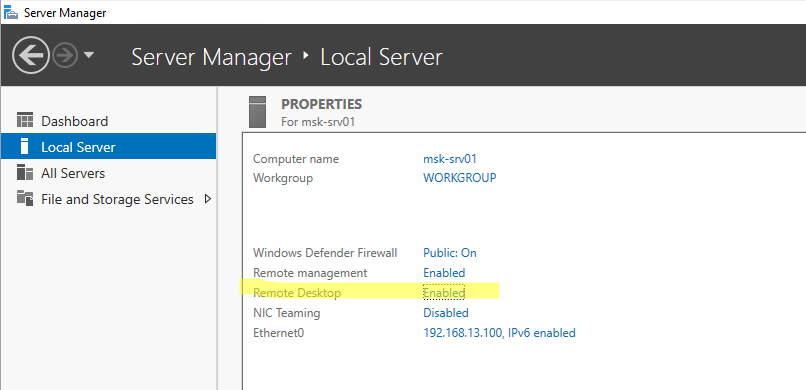
- Within the Server Manager window, select Local Server from the left hand side. You may need to wait a little for it to detect the current state of your system. You should see that Remote Desktop is listed as Disabled as shown below.

- Click on the Disabled text which will open the System Properties window in the Remote tab.
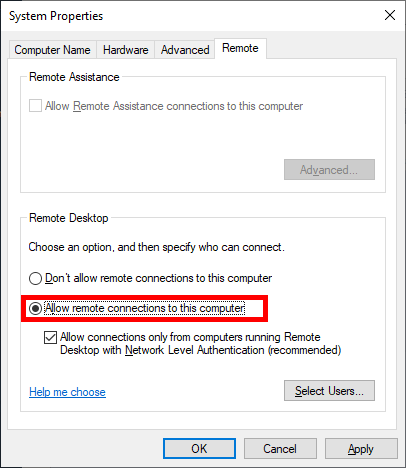
- From the System Properties window, select “Allow remote connections to this Computer” as shown below.

Tip: You can also open the System Properties window shown above by entering “SystemPropertiesRemote” into a Command Prompt or PowerShell terminal.
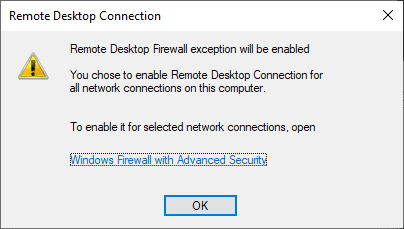
- Once you select “Allow remote connections to this computer” the below warning message will appear, advising that this will create the required firewall rules in Windows firewall to allow remote desktop traffic in from any source address, select OK to proceed.

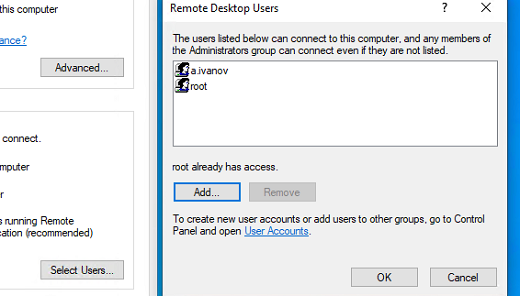
- At this point you can optionally click the “Select Users…” button to define specific users or groups that have permission to connect via remote desktop. Select the OK button to close out of the System Properties window and enable remote desktop.
- Back in Server Manager, Remote Desktop may still show as Disabled until you refresh the view. After clicking the refresh button as highlighted below (or pressing F5 on the keyboard), the status should update to Enabled.
That’s it, remote desktop should now be ready to use!
Allowing Remote Desktop With PowerShell
While there isn’t currently an explicit PowerShell cmdlet used for enabling remote desktop, we can use the Set-ItemPropery cmdlet to modify the registry value that enables or disables Remote Desktop:
Set-ItemProperty -Path 'HKLM:\System\CurrentControlSet\Control\Terminal Server' -name "fDenyTSConnections" -value 0
Once complete we can use the ‘Enable-NetFirewallRule’ to configure Windows Firewall to allow remote desktop connections in:
Enable-NetFirewallRule -DisplayGroup "Remote Desktop"
Remote Desktop should now be accessible in Windows Server 2019.
By default this will allow all connections in, the same as if we had just enabled it using the GUI steps shown above. It is highly recommended that you configure more specific firewall rules where possible to only allow inbound traffic from known hosts.
Summary
By default Windows Server 2019 sets external remote desktop access to disabled as a security measure, we can easily optionally enable it from within the server console or via PowerShell to allow everyone or a specific set of users or groups.
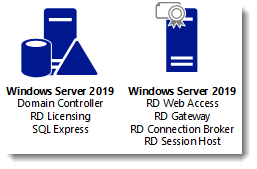
Installing Remote Desktop Services (RDS) on Windows Server 2019 appears to take many steps, but in reality is quite easy. In this article, we dive into how to install these services in a domain environment that requires two servers.
Prerequisites
There are only two necessary steps before we embark on installing RDS. Those are:
- All servers are domain joined
- There are at least two available servers
The reason that we need two servers is that the RD Licensing role will go on the second server rather than all on one, as this is considered a Microsoft best practice. In this tutorial, we use the Domain Controller as the RD License server which would not be considered best practice. The reason for doing this in this tutorial is to keep the installation simple.
Installation of Remote Desktop Services base roles
In this first installation series, we are going to add the following roles to our primary RDS server:
- RD Connection Broker
- RD Web Access
- RD Session Host
Installation steps
- Within Server Manager on the primary RDS server that we are installing, open the Add Roles and Features Wizardand select Remote Desktop Services installation.

2. For this tutorial we are going to choose Quick Start, but if you need further control over the installation process, you can use the Standard Deployment to modify more options during installation.

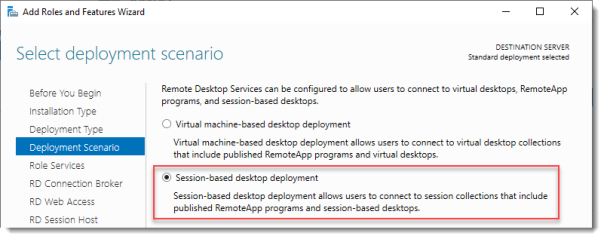
3. Next, we will choose Session-based desktop deployment, as this is a common RemoteApp and desktop session model that is commonly used in more traditional RDS deployments.

4. In the Server Selection, choose the server where we are installing RDS.

5. Choose Restart the destination server automatically if required and click on Deploy to start the installation.

6. Verify that all roles have succeeded in installation before moving on to the next steps.

Add secondary server
For this tutorial, we are going to use the Domain Server as our RD Licensing server, but to easily install that role, we can add an additional server to the Server Manager.
- Add the secondary server by right-clicking on the All Servers, choosing Add Servers, and then picking the server from Active Directory.


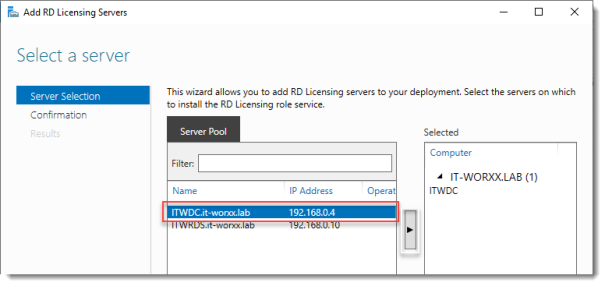
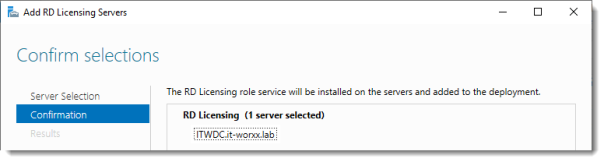
2. Navigate to Remote Desktop Services and click on the green plus for RD Licensing.

3. The Add RD Licensing Servers screen will appear and that will let you add the secondary server as a target for the RD Licensing role.

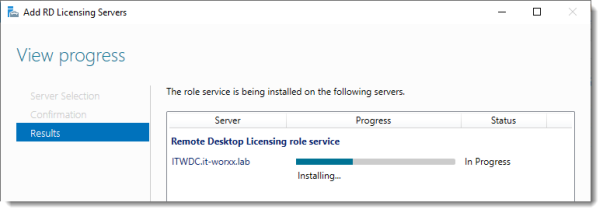
4. Click on Add to install the role on the secondary server.

5. Verify that the installation is complete by seeing the green plus replaced by the proper icon in RD Licensing.

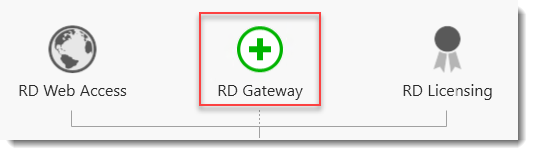
Add RD Gateway Role
Finally, we need to add the RD Gateway Role to our primary RDS server.
- Under the Remote Desktop Services screen, click on the green plus over RD Gateway.
- Select the primary RDS server to use for the installation of this role.

3. Name the self-signed SSL certificate with a Fully-Qualified Domain Name.

4. Click on Next and then Add to install the role to our primary RDS server.
Configure deployment properties
Now that all the roles have been installed, we can configure the actual deployment properties.
- Navigate to the Remote Desktop Services screen and under the Tasks dropdown, click on Edit Deployment Properties.

2. Leave the default settings on the RD Gateway screen and click on the RD Licensing menu item.

3. Choose Per User at the RD Licensing screen. You can choose either, but for the purposes of this tutorial, we want Per User.

4. Note the URL of the RD Web Access screen as this will be used later to access the applications deployed.

5. For the purposes of testing, you can leave the certificates Not Configured, and finally click on OK to save the deployment configuration.

If you do want to configure a certificate, you will have to do this for each and every role service individually
By default, a QuickSessionCollection was created upon installation that contains Calculator, WordPad, and Paint as RemoteApps. This can be used to test the RDP deployment.
- Navigate to the IIS URL originally located in RD Web Access, or you can use https://localhost/rdweb/ if you are located on the RDP server itself, to test IIS.

2. Log into the IIS RDS session using domain credentials.

3. Finally, launch a remote connection, either one you have defined or a default RemoteApp.

Remote Desktop Services may have a lot of steps to deploy, but once setup, it is easy to configure and use. RemoteApps offer a lot of flexibility as does the ability to define collections of RDP connections that can be offered to users.
Additional resources:
Windows and Physical Servers Backup Best Practices: Read this white paper to learn more about best practices when protecting Windows Server operating systems!
![]()
Adam Bertram
Adam Bertram is a 20-year veteran of IT and an experienced online business professional. He’s a consultant, Microsoft MVP, blogger, trainer, author and content marketing writer for multiple technology companies.
Catch up on Adam’s articles at adamtheautomator.com, connect on LinkedIn, or follow him on Twitter at @adbertram.
More about author
- Prerequisites
- Installation of Remote Desktop Services base roles
- Installation steps
- Add secondary server
- Add RD Gateway Role
- Configure deployment properties
- Verify Remote Desktop Services
Similar Blog Posts
Best Practices for Secure Hybrid and Multi-Cloud Backup
Read more
From Tokyo’s Tech Scene to the London Legal Sector: What I’ve Learned on My Data Protection Journey
Read more
Linux Hardened Repositories: Achievable Immutability for All
Read more
You’re all set!
Watch your inbox for our weekly blog updates.
OK
Протокол Remote Desktop Protocol (RDP) позволяет удаленно подключиться к рабочему столу компьютера с Windows и работать с ним, как будто это ваш локальный компьютер. По умолчанию RDP доступ в Windows запрещен. В этой статье, мы покажем, как включить и настроить RDP доступ в Windows 10 и Windows Server 2016/2019.
Содержание:
- Включаем удаленный рабочий стол в Windows 10
- Как включить RDP доступ с помощью PowerShell?
- RDP доступ к Windows Server 2016/2019
- Включение RDP с групповых политик в домене Active Direcrtory
- Как удаленно включить RDP на компьютере Windows?
Включаем удаленный рабочий стол в Windows 10
Самый простой способ включить RDP доступ в Windows – воспользоваться графическим интерфейсом.
Откройте свойства системы через панель управления, или выполнив команду SystemPropertiesRemote.

Перейдите на вкладку Remote Settings (Удаленный доступ), включите опцию Allow remote connection to this computer (Разрешить удалённые подключения к этому компьютеру).
В целях безопасности желательно разрешить подключение только с клиентов RDP с поддержкой протокола NLA (Allow connections only from computers running Remote Desktop with Network Level Authentication/ Разрешить подключение только с компьютеров, на которых работает удаленный рабочий стол с проверкой подлинности на уровне сети).

Сохраните изменения, нажав ОК.
По умолчанию право на подключение к компьютеру через RDP есть только у членов группы локальных администраторов. Если вам нужно разрешить RDP доступ другим пользователям, нажмите кнопку Select Users.
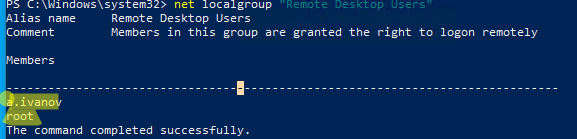
Все пользователи, которых вы укажете здесь будет добавлены в локальную группу Remote Desktop Users. Вы можете в командной строке вывести список пользователей в этой группе:
net localgroup "Remote Desktop Users"
или
net localgroup “Пользователи удаленного рабочего стола”
Чтобы добавить нового пользователя в группу доступа RDP, выполните:
net localgroup "Remote Desktop Users" /add publicuser
В русской версии Windows измените название группы на “Пользователи удаленного рабочего стола”.
В новых билдах Windows 10 классическая панель для включения RDP доступа теперь спрятана и Microsoft рекомендует пользоваться новой панелью Setting.
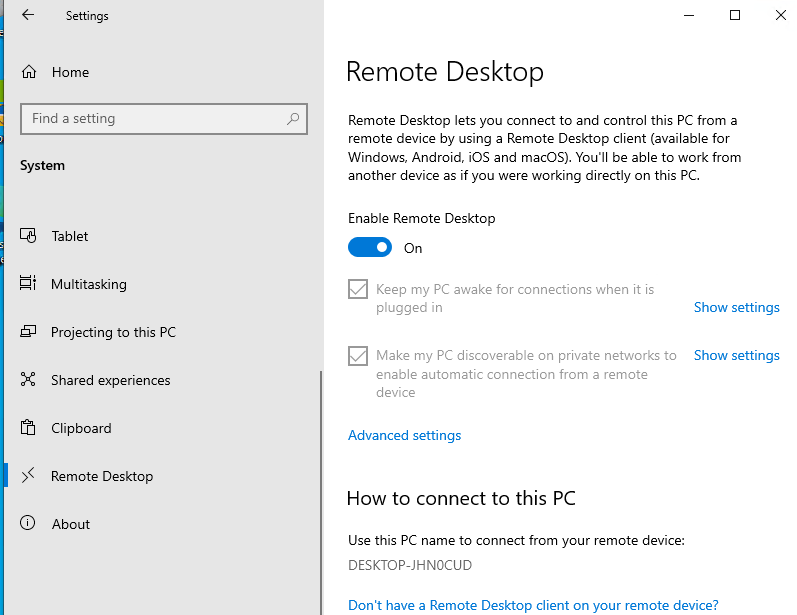
- Перейдите в Settings -> System —> Remote Desktop;
- Включите опцию Enable Remote Desktop;

- Подтвердите включение RDP на компьютере.
Обратите внимание, что вы не можете включить RDP доступ к редакции Windows 10 Home. RDP сервер работает только на Windows 10 Pro и Enterprise. Впрочем, есть обходное решение.
Обратите внимание, что по умолчанию при включении Remote Desktop, включаются две опции:
- Keep my PC awake for connection when it is plugged in ;
- Make my PC discoverable on private networks to enable automatic connection from a remote device
На жмите на ссылку “Advanced settings”. Здесь можно включить использование протокола “Network Level Authentication” для RDP подключений (рекомендуется).
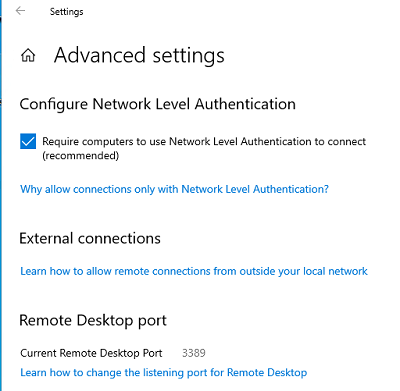
Если на компьютере включен Windows Defender Firewall (брандмауэр), то нужно проверить, что в нем разрешены входящие RDP подключения. По умолчанию для RDP подключений используется порт TCP
3389
, а в последних билдах Windows также используется
UDP 3389
( см. статью про кейс с черным экраном вместо рабочего стола при RDP доступе).
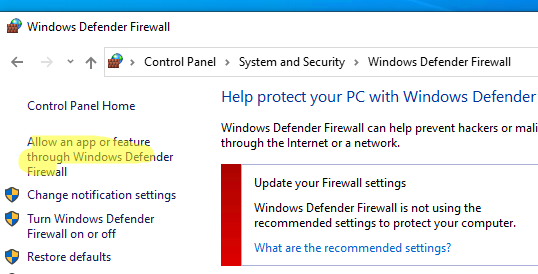
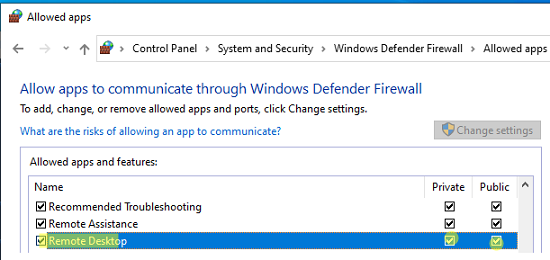
Перейдите в панель управления и выберите элемент Windows Defender Firewall. Откройте список стандартных правил брандмауэра Windows, щелкнув в левом столбце по ссылке Allow an app or feature through Windows Firewall.
Проверьте, что правило Remote Desktop включено для профиля Private (домашняя или рабочая сеть) и, если необходимо, для профиля Public (общедоступные сети).
Подробнее про типы сетей и профили брандмауэра Windows здесь.
Если нужно, вы можете дополнительно ограничить длительность RDP сессий с помощью GPO.
Теперь к данному компьютеру можно подключится с помощью RDP клиента. Встроенный RDP клиент Windows –
mstsc.exe
. Он сохраняет всю историю RDP подключений с компьютера. Поддерживается копирование файлов между локальным и удаленным компьютером прямо через буфер обмена RDP.
Также вы можете использовать менеджеры RDP подключений, такие как RDCMan или mRemoteNG, или альтернативные клиенты.
Для удобства пользователей пароль для RDP подключения можно сохранить в Windows Credential Manager.
Как включить RDP доступ с помощью PowerShell?
Вы можете включить RDP доступ в Windows с помощью пары PowerShell команд. Это гораздо быстрее:
- Запустите консоль PowerShell.exe с правами администратора;
- Включите RDP доступ в реестре с помощью командлета Set-ItemProperty:
Set-ItemProperty -Path 'HKLM:\System\CurrentControlSet\Control\Terminal Server' -name "fDenyTSConnections" -value 0Чтобы закрыть RDP доступ, измените значение fDenyTSConnections на 1.
- Разрешите RDP подключения к компьютеру в Windows Defender Firewall. Для этого включите предустановленное правило :
Enable-NetFirewallRule -DisplayGroup "Remote Desktop"
- Если нужно добавить пользователя в группу в локальную группу RDP доступа, выполните:
Add-LocalGroupMember -Group "Remote Desktop Users" -Member 'a.petrov'

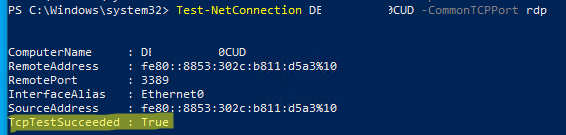
Чтобы проверить, что на компьютере открыт RDP порт, воспользуйтесь командлетом Test-NetConnection:
Test-NetConnection -ComputerName deskcomp323 -CommonTCPPort rdp
RDP доступ к Windows Server 2016/2019
В отличии от десктопной редакции Windows 10, в Windows Server по умолчанию поддерживается два одновременных RDP подключения. Эти подключения используются администраторами для управления сервером.
Включается RDP в Windows Server аналогично. Через SystemPropertiesRemote, через Server Manager или командами PowerShell, рассмотренными выше.
Вы можете использовать Windows Server в качестве терминального сервера. В этом случае множество пользователей могут одновременно подключаться к собственному рабочему столу на сервере. Для этого нужно установить и настроить на сервере роль Remote Desktop Session Host. Это требует приобретения специальных RDS лицензии (CAL). Подробнее о RDS лицензировании здесь.
Для дополнительно защиты RDP сессий можно использовать SSL/TLS сертификаты.
Включение RDP с групповых политик в домене Active Direcrtory
Если вам нужно включить RDP доступ сразу на большом количестве компьютеров, можно воспользоваться групповыми политиками (GPO). Мы подразумеваем, что все компьютеры включены в домен Windows.
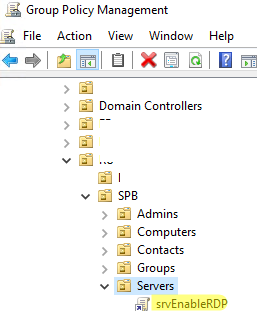
- Запустите консоль управления доменными GPO
gpmc.msc
; - Создайте новую (или отредактируйте уже существующую) групповую политику и привяжите ее к целевой OU с компьютерами или серверами;
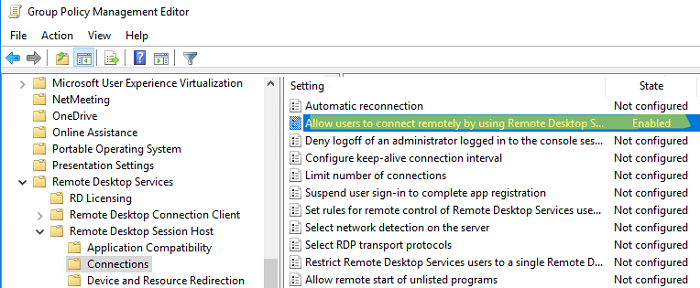
- Переключитесь в режим редактирования политики и перейдите в секцию GPO Computer Configuration -> Administrative Templates -> Windows Components -> Remote Desktop Services -> Remote Desktop Session Host -> Connections;
- Найдите и включите политику Allow Users to connect remotely by using Remote Desktop Services, установив ее в Enable;
- Обновите параметры групповых политик на клиентах;
- После применения данной политики вы сможете подключится ко всем компьютерам по RDP (политика применится как к десктопным клиентам с Windows 10, так и к Windows Server). Если нужно, вы можете более тонко нацелить политики на компьютеры с помощью WMI фильтров GPO.
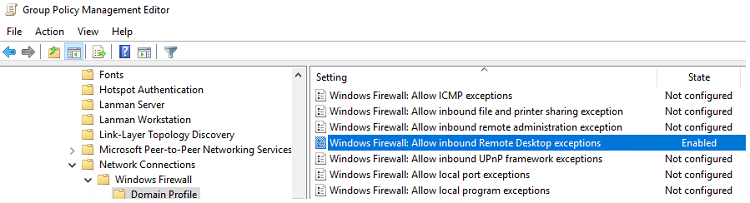
- Если на компьютерах включен Windows Defender Firewall, нужно в этой же GPO разрешить RDP-трафик для доменного профиля. Для этого нужно активировать правило Windows Firewall: Allow inbound Remote Desktop Exceptions (находится в разделе Computer Configuration -> Administrative Templates -> Network -> Network Connections -> Windows Firewall -> Domain Profile).
Подробнее о настройке правил брандмаура Windows через GPO рассказано здесь.
Как удаленно включить RDP на компьютере Windows?
Также вы можете удаленно включить RDP на любом компьютере Windows. Для этого у вас должен быть удаленный доступ к этому компьютеру (через PowerShell или WMI) и ваша учетная запись состоять в группе локальных администраторов на этом компьютере.
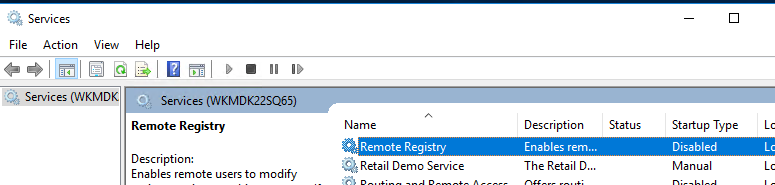
Вы можете удаленно включить RDP через реестр. Для этого на удаленном компьютере должна быть включена служба Remote Registry (по умолчанию она отключена). Чтобы запустить службу:
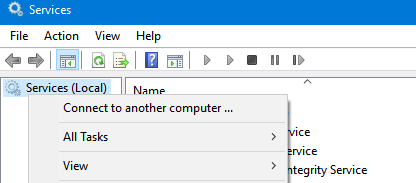
- Запустите консоль управления службами (
services.msc
); - Выберите Connect to another computer и укажите имя удаленного компьютера;
- Найдите в списке службу Remote Registry, измените тип запуска на Manual (ручной) и затем запустите службу – Start.
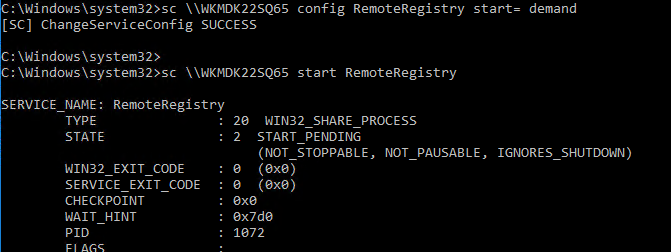
Тоже самое можно выполнить удаленно из командной строки с помощью встроенной утилиты
sc
(позволяет создавать, управлять или удалять службы Windows):
sc \\WKMDK22SQ65 config RemoteRegistry start= demand
sc \\WKMDK22SQ65 start RemoteRegistry
Затем на локальном компьютере
- Запустите редактор реестра
regedit.exe - Выберите в меню Файл пункт Connect Network Registry (Подключить сетевой реестр)
- Укажите имя или IP адрес удаленного компьютера, на котором нужно включить службу RDP;
- Перейдите в раздел
HKEY_LOCAL_MACHINE\SYSTEM\CurrentControlSet\Control\Terminal Server
; - Найдите параметр fDenyTSConnections (тип REG_DWORD). Если данный ключ отсутствует – создайте его. Измените его значение на 0, чтобы включить RDP.
Для отключения RDP доступа нужно изменить значение fDenyTSConnections на 1.
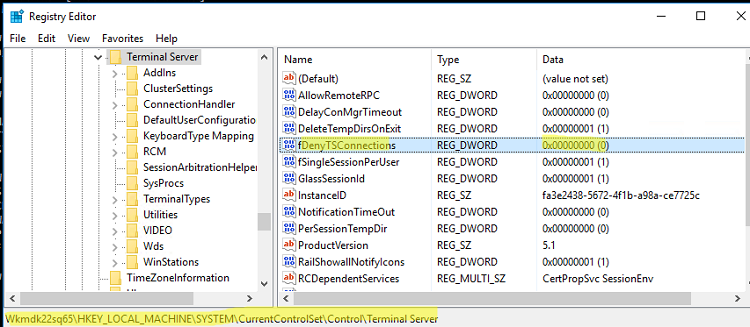
Сразу после этого без перезагрузки удаленный компьютер должен стать доступным по RDP.
Но гораздо быстрее можно включить RDP в реестре удаленого компьютера через командную строку:
REG ADD "\\WKMDK22SQ65\HKLM\SYSTEM\CurrentControlSet\Control\Terminal Server" /v fDenyTSConnections /t REG_DWORD /d 0 /f
Если на удаленном компьютере настроен PowerShell remoting, вы можете выполнить на нем удаленную команду через Invoke-Command:
Invoke-Command -Computername WKMDK22SQ65 -ScriptBlock {Set-ItemProperty -Path "HKLM:\System\CurrentControlSet\Control\Terminal Server" -Name "fDenyTSConnections" –Value 0}
Если в Windows установлен OpenSSH сервер, вы можете подключиться к нему любым ssh клиентом и внести изменения в реестр в локальной ssh сессии.
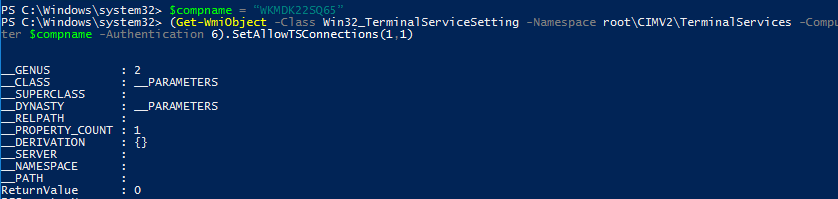
Также вы можете подключиться к удаленному компьютеру и включить RDP через WMI:
$compname = “WKMDK22SQ65”
(Get-WmiObject -Class Win32_TerminalServiceSetting -Namespace root\CIMV2\TerminalServices -Computer $compname -Authentication 6).SetAllowTSConnections(1,1)
A step by step guide to build a Windows Server 2019 Remote Desktop Services deployment.
I posted this before based on Windows Server 2012 R2 RDS and thought it was high time to update this post to a more modern OS version.
I will provide all the steps necessary for deploying a single server solution using the GUI tools.
Although it is called a single server installation, we will need 2 servers as shown below.
Software used in this guide:
Windows Server 2019 ISO (evaluation can be downloaded here: https://www.microsoft.com/en-us/evalcenter/evaluate-windows-server-2019).
SQL Server 2017 Express x64 (free version can be downloaded here: https://www.microsoft.com/en-us/download/details.aspx?id=55994).
SQL Server 2016 Native Client (free version can be downloaded here: https://www.microsoft.com/en-us/download/details.aspx?id=52676. After clicking the download button select ENU\x64\sqlncli.msi). Although I’m installing SQL Express 2017, there are no newer client tools available.
SQL Server Management Studio (free, and can be downloaded here: https://docs.microsoft.com/en-us/sql/ssms/download-sql-server-management-studio-ssms).
And a certificate. I got mine for free from https://www.sslforfree.com/. This certificate needs to contain the FQDN you will use as the RD Web Access URL (mine is rds.it-worxx.nl in this guide). It needs to be in .pfx format and you need to have the private key in it.
This guide will not focus on building a domain using a single domain controller and adding the second server as a member server to this domain.
Also some basic knowledge is assumed in this guide. I will not detail how to create a Security Group and adding a computer account to it. I will also not detail how to install SQL Express, or adding logins to a SQL Server Instance security context. If you need extra help with this, Bing it or drop me a mail with details, and I will provide steps to continue.
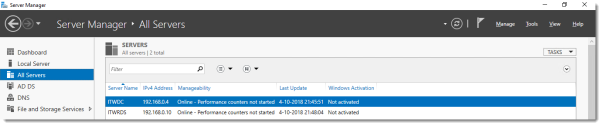
I will be using Hyper-V on my Windows 10 1809 laptop and I have prepared 2 servers:
ITWDC (1 vCPU, 1024MB memory, dynamic, 60GB Harddisk)
Installed Windows
IPv4 192.168.0.4/24
Added .NET Framework 3.5 as a feature
Added Active Directory Domain Services as a role
Configured this server as a Domain Controller in a new forest: it-worxx.lab
ITWRDS (1 vCPU, 1024MB memory, dynamic, 60GB Harddisk)
Installed Windows
Added .NET Framework 3.5 as a feature
IPv4 192.168.0.10/24, DNS server 192.168.0.4
Configured it as a member server in the it-worxx.lab domain
Installing the Remote Desktop Services Roles
Log on to the Domain Controller, and in Server Manager right-click the All Servers node and add the second server using the Add Servers command (or select the All Servers node, click Manage and click Add Servers).
Now that all servers needed in this deployment scenario are present, click Manage, and click Add Roles & Features.
Before you begin
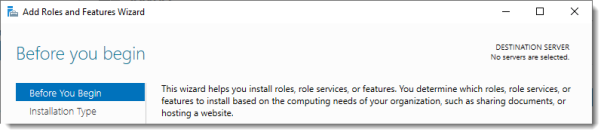
Click Next.
Select Installation Type
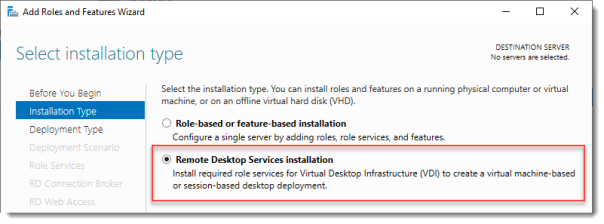
Select Remote Desktop Services installation.
Click Next.
Select Deployment Type

Although Quick Start might be a valid option for a single server deployment, leave the default selected. This will explain the steps necessary to install Remote Desktop Services in greater detail.
Click Next.
Select Deployment Scenario
Select Session-based desktop deployment.
Click Next.
Review Role Services

Review the services that will be installed.
Click Next.
Specify RD Connection Broker server
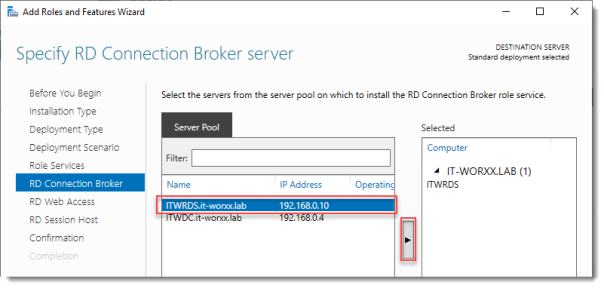
Click the member server and click the Add button.
Click Next.
Specify RD Web Access server
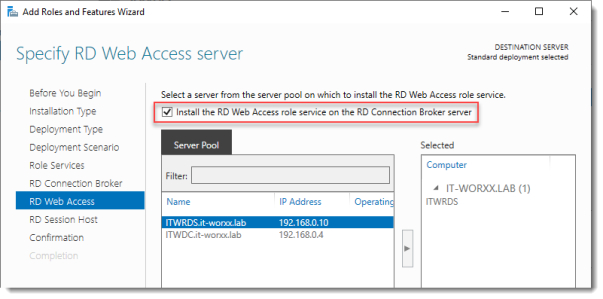
Check Install the RD Web Access role on the RD Connection Broker server.
Click Next.
Specify RD Session Host server
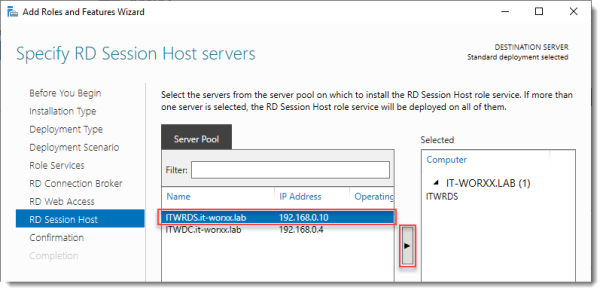
Click the member server and click the Add button.
Click Next.
Confirm selections
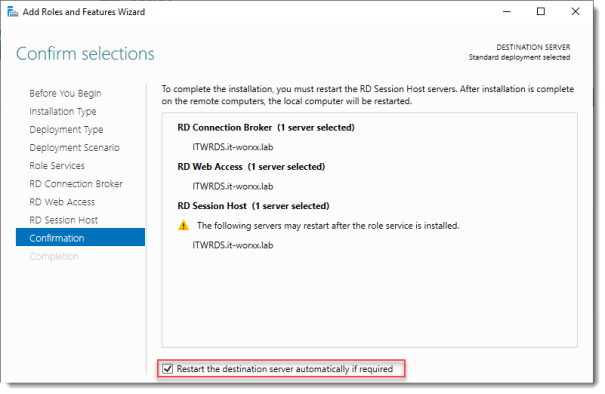
Check Restart the destination server automatically if required.
Click Deploy.
View progress
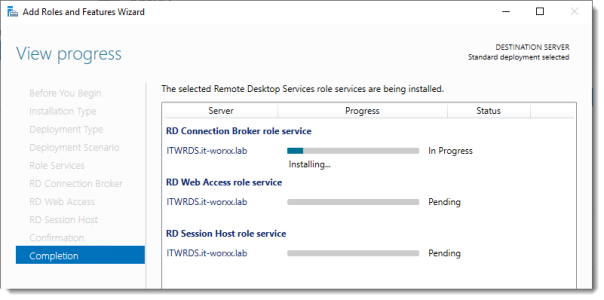
Wait until all role services are deployed and the member server has restarted.
Click Close.
In Server Manager click Remote Desktop Services and scroll down to the overview.
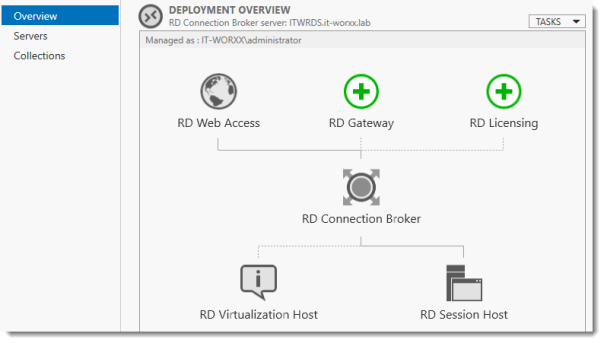
As you can see the deployment is missing a RD Gateway server and a RD Licensing server.
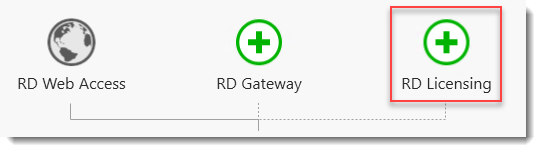
Click the Add RD Licensing server button.
Select a server
Click the domain controller and click the Add button.
Click Next.
Confirm selections
Click Add.
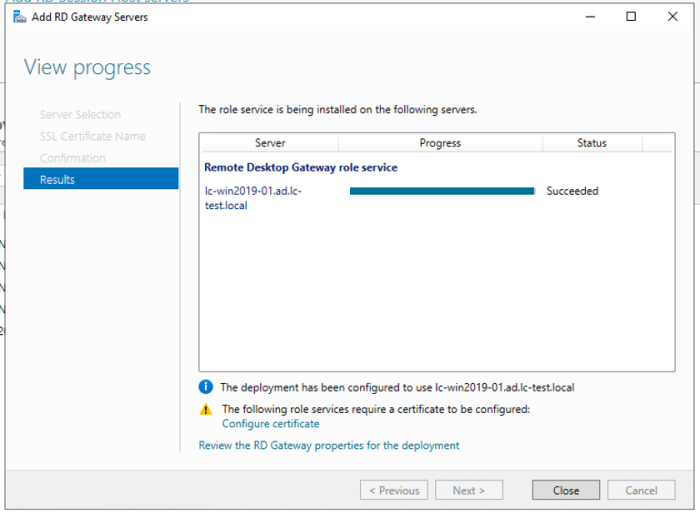
View progress
Wait until the role service is deployed. No restart is needed.
Click Close.
Click the Add RD Gateway server button.
Select a server
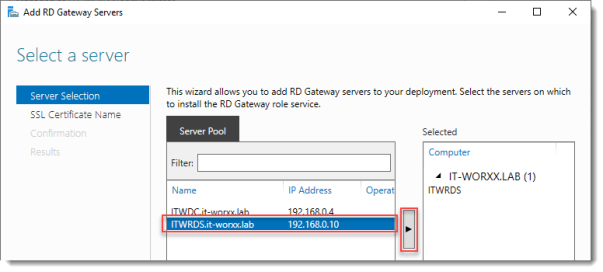
Click the member server and click the Add button.
Click Next.
Name the self-signed SSL certificate
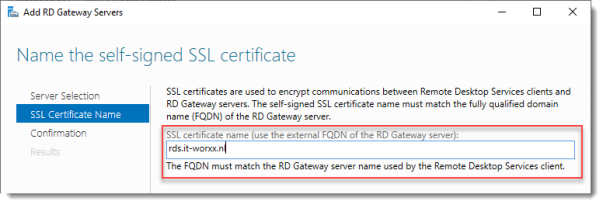
The wizard creates a self-signed certificate. We will deal with certificates in this deployment in a little bit. We will replace the self-signed certificate.
Enter the external Fully Qualified Domain Name which you will also use for the Web Access URL. In my case, for lack of a better name, I used “rds.it-worxx.nl”. I didn’t want to use “remote.it-worxx.nl” or “desktop.it-worxx.nl” or anything else.
Click Next.
Confirm selections
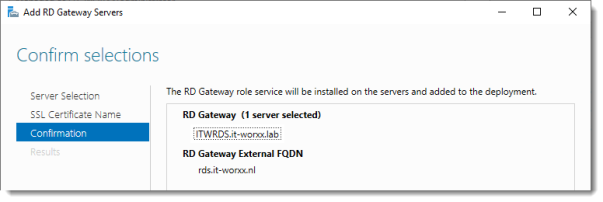
Click Add.
View progress
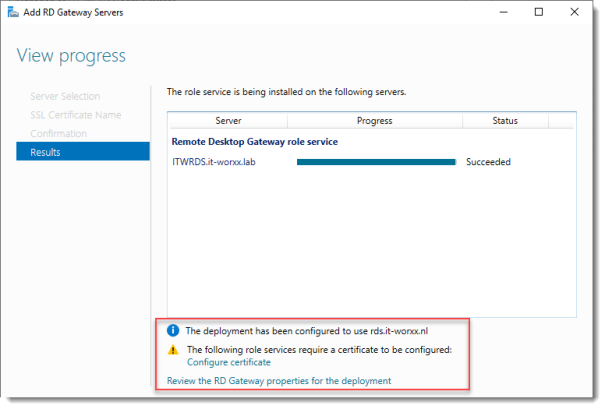
Wait until the role service is deployed. Again, no restart is needed.
Notice that “rds.it-worxx.nl” was configured for the deployment.
Also notice that even more certificate configuring is needed, but we’ll get to that later. Pay no attention to it for now. The same goes for the RD Gateway properties for the deployment. We’ll get to that later.
Click Close.
Review role installation and setting License Mode
Let’s have a quick look at the configuration we have so far.
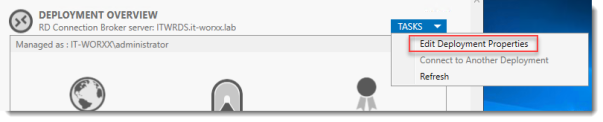
In Server Manager, Remote Desktop Services, Overview, click Tasks and click Edit Deployment Properties.
Configure the deployment
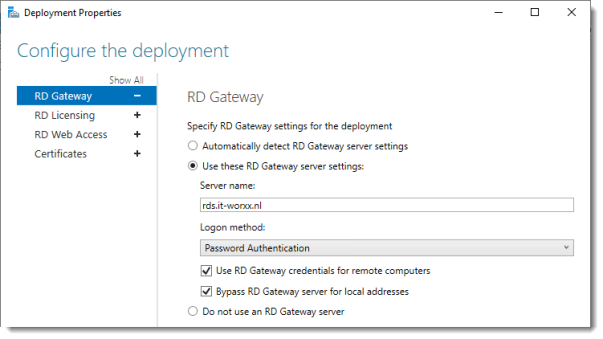
Review the RD Gateway settings and notice what settings are available.
Click RD Licensing.
Configure the deployment
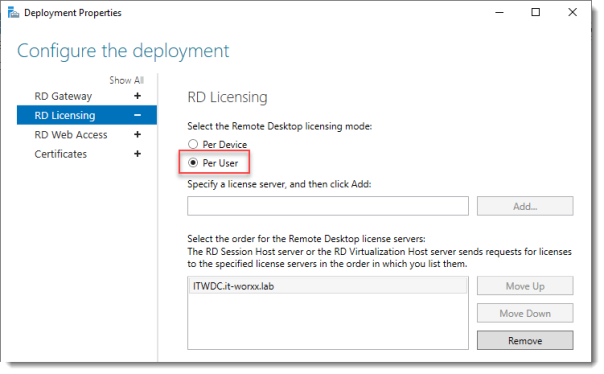
Notice that an RD License server is available, but no license type is selected yet.
I selected Per User, but since this is just a guide setup, it really doesn’t matter.
Click RD Web Access.
Configure the deployment
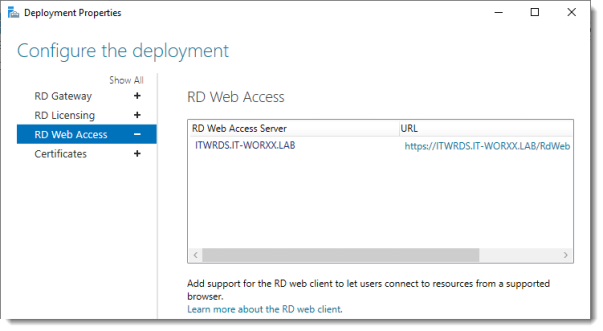
By default the RD Web Access IIS application is installed in /RdWeb.
If you want to know how to change this, check another post: https://msfreaks.wordpress.com/2013/12/07/redirect-to-the-remote-web-access-pages-rdweb/
This is for Windows Server 2012 R2 RDS, but it also works for Windows Server 2019 RDS.
Click Certificates.
Configure the deployment
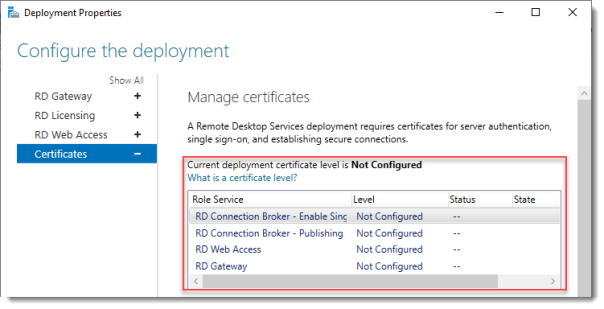
Notice that the certificate level currently has a status of Not Configured.
As you can see, certificates are used for different goals within the deployment.
The RD Gateway certificate is used for Client to gateway communication and needs to be trusted by the clients. Either install the self-signed certificate on all clients, or use a certificate for which the complete certificate chain is already trusted by all clients. As it said in the wizard, the external FQDN should be on the certificate.
The RD Web Access certificate is used by IIS to provide a server identity to the browser clients.
The RD Connection Broker actually has two goals for which it needs certificates. To enable single sign on (server to server authentication), and for publishing (signing RDP files). If you look in the deployment you’ll see that the Connection Broker is now configured to use “itwrds.it-worxx.lab”, so we have to change it to use an external FQDN as well.
If we use the same FQDN for all goals described above, we need only 1 certificate, and only 1 external IP address.
We’ll come back to this wizard later to assign the certificate. First order of business is to change the internal FQDN for the Connection Broker to an external FQDN.
Click OK (no reason why we shouldn’t commit the change we made on the licensing tab, remember?)
Changing the Connection Broker FQDN to an externally resolvable FQDN
Open DNS Manager on the domain controller and browse to Forward Lookup Zones.
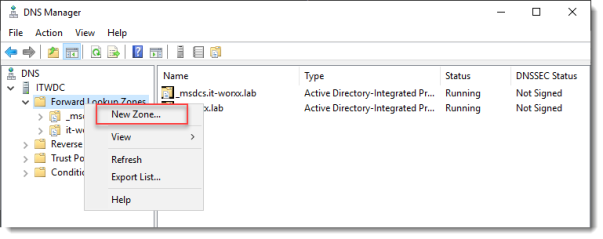
Right click Forward Lookup Zones and click New Zone… Go through this wizard accepting the defaults until you have to enter a Zone Name.
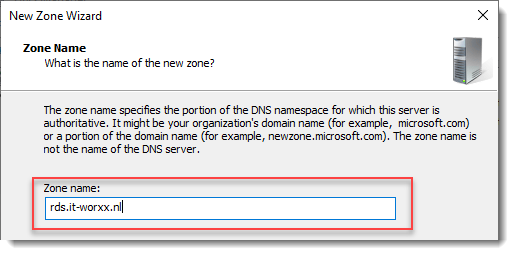
Enter the external FQDN which will also be used by the Connection Broker.
Finish the rest of the wizard accepting the defaults.
Browse to the newly created zone.
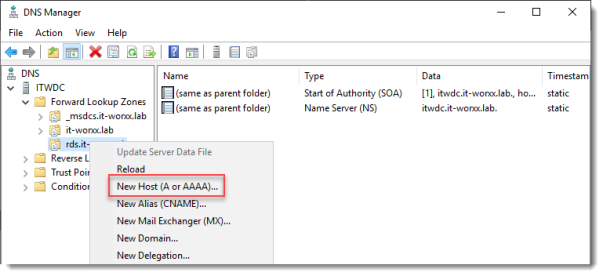
Right click the newly created zone and click New Host (A or AAAA)…
New Host
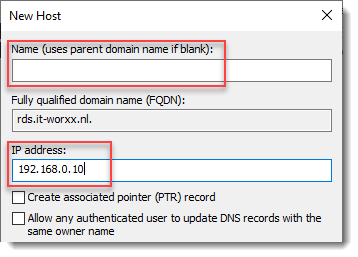
Leave the Name field blank, but enter the member server’s (holding the RD Connection Broker role) IPv4 address.
Click Add Host.
Now the configuration will be able to resolve “rds.it-worxx.nl” to the server holding the Connection Broker role, and this will work because “rds.it-worxx.nl” is also on the certificate that we will configure later.
Create a new Global Security Group called “RD Connection Brokers” and add the computer account for the member server to it as a group member.
We need this group to be able to convert the RD Connection Broker to a highly available RD Connection Broker. You’ll see why we need to do this in a few steps.
Reboot the member server to let it know it’s a member of the RDS Connection Brokers security group.
The next steps in re-configuring the RD Connection Broker depend on an SQL database shared by all Connection Brokers in the deployment. Without this configuration the RD Connection Broker will rely on the Windows Internal Database that was created during the initial deployment of the roles.
Install SQL Express on the Domain Controller (or use an existing SQL Server if you already have one).
It’s not best practice to install SQL onto a Domain Controller, but it’ll do for this guide.
Here’s a list of needed features:

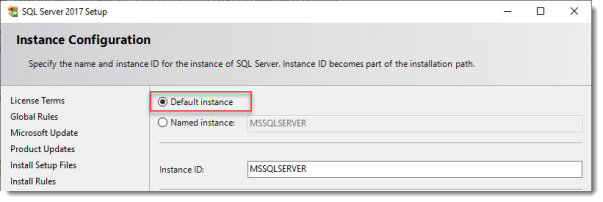
Use the Default Instance (so click Default, and do not leave the wizard’s selection on Named instance: SQLEXPRESS).
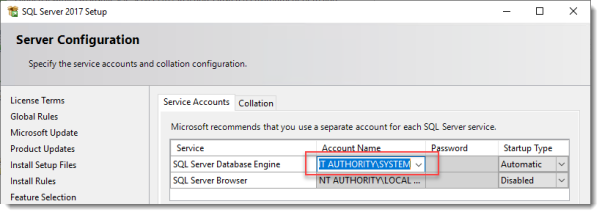
Set the SQL Service to start using SYSTEM because the default account of SQLSERVER cannot be used on a Domain Controller.
When the installation is done open SQL Configuration manager and browse to Client Protocols under SQL Native Client 11.0 Configuration.
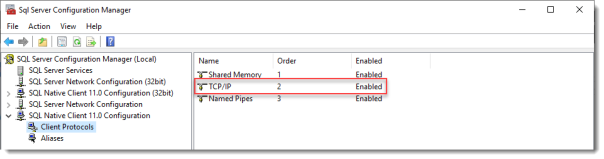
Check if TCP/IP is enabled under Client Protocols. SQL Express install enables this by default, but check it just to be sure, especially if you use an existing SQL Server.
Browse to Protocols for MSSQLSERVER under SQL Server Network Configuration.
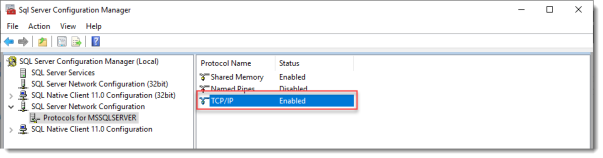
Enable TCP/IP. If this is a new SQL installation, this will be disabled by default.
Restart the SQL Server service if you changed this setting.
On the SQL Server, make sure port 1433 is not being blocked by Windows Firewall.

I added the SQL Server executable to the exception list to allow all inbound traffic, but TCP 1433 inbound should suffice.
If you installed SQL Server using the default folder locations, the sqlservr.exe executable is found in “C:\Program Files\Microsoft SQL Server\MSSQL14.MSSQLSERVER\MSSQL\Binn”.
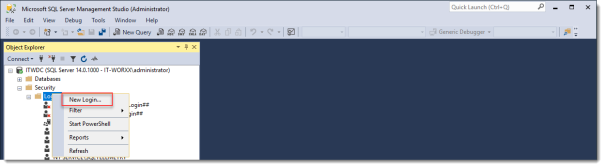
Open SQL Server Management Studio, connect to the default instance on the Domain Controller and browse to Logins under Security.
Remember the Management Studio is no longer available with the SQL Server download, but is a different download.
Right click Logins and click New Login…
Login – New
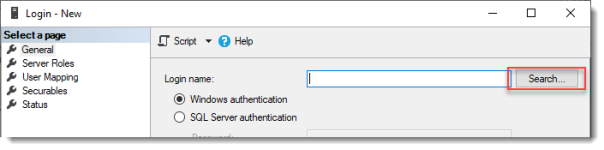
Click Search…
Select User, Service Account, or Group
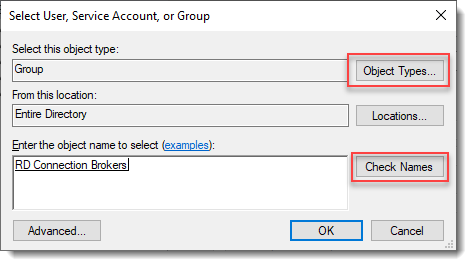
Click Object Types… and select Group.
Type the RDS Connection Brokers security group name and click Check Names.
Click OK.
Login – New
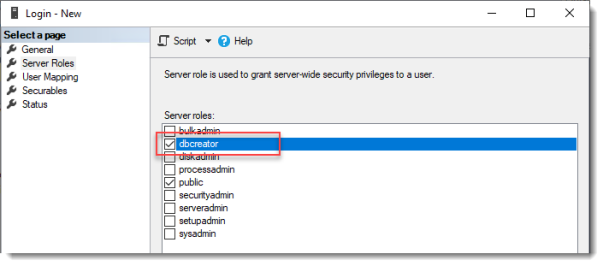
Click Server Roles and select dbcreator.
Click OK.
We have just effectively granted the RDS Connection Broker server the right to create databases.
We need this because the RDS Connection Broker service will try to migrate from WID (Windows Internal Database to a (high available) SQL Server instance when we convert the Broker to a high available broker.
Install the SQL Native Client on the member server (Client Components only). If you used the member server in this setup to install the SQL Management Studio, you can skip this step because the Native Client was installed with installing the Management Studio.
Everything we need is in place to convert the RD Connection Broker, so let’s do just that.
In Server Manager click Remote Desktop Services and scroll down to the overview.
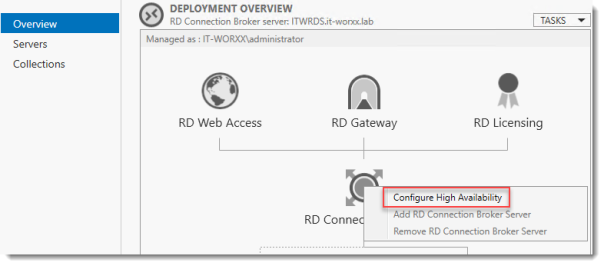
Right click RD Connection Broker and click Configure High Availability.
Before you begin
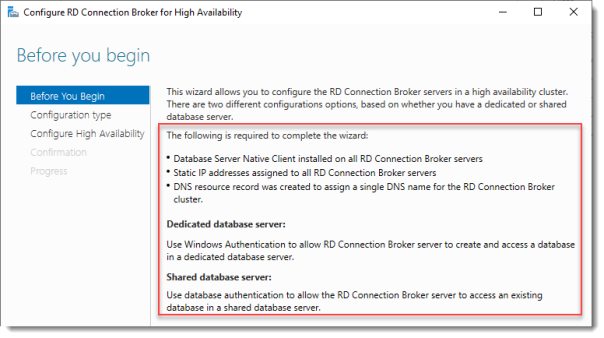
So we’re building a single node cluster here 
Look at the pre-requisites.
If you have more than one RD Connection Broker they need to be configured using DNS Round Robin.
Click Next.
Configure RD Connection Broker for High Availability
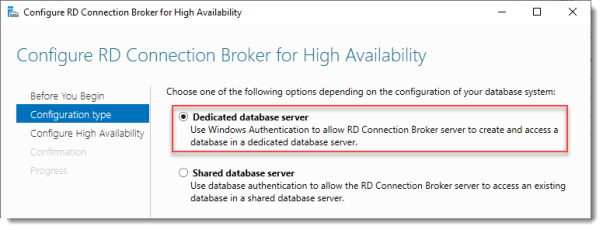
Since we just installed an SQL Server for this, leave the default selected. You’d use the other option for instance if you’d like to use Azure SQL for this deployment.
Click Next.
Configure RD Connection Broker for High Availability
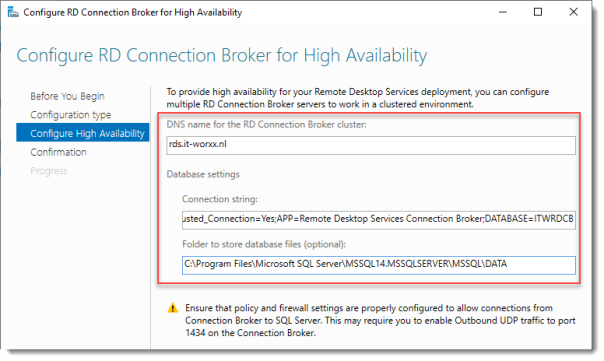
DNS name for the RD Connection Broker cluster:
The DNS Zone name we configured in DNS earlier: rds.it-worxx.nl
Connection string:
DRIVER=SQL Server Native Client 11.0;SERVER=ITWDC;Trusted_Connection=Yes;APP=Remote Desktop Services Connection Broker;DATABASE=ITWRDCB
Folder to store database files:
C:\Program Files\Microsoft SQL Server\MSSQL14.MSSQLSERVER\MSSQL\DATA
I used the instance default folder.
Click Next.
Confirmation
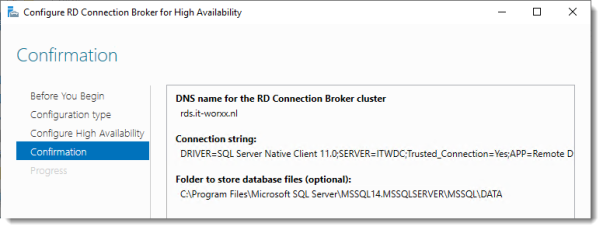
If you get an error before this page:
- Check if TCP/IP is enabled in client protocols and for your instance
- Check if you can reach port 1433 on the SQL Server from the member server
Click Configure.
Progress
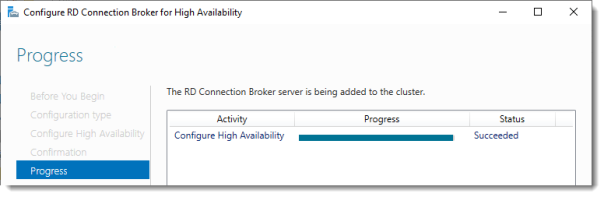
If you get an error on this page:
- Check SQL permissions for the security group
- Check if the database path you entered is correct
Click Close.
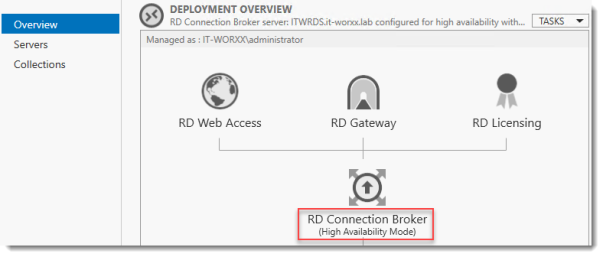
The RD Connection Broker is now in High Availability Mode, and configured as “rds.it-worxx.nl” and we are finally ready to complete the configuration.
Configuring Certificates

In Server Manager, Remote Desktop Services, Overview, click Tasks and click Edit Deployment Properties, then click Certificates.
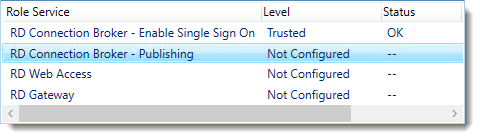
Configure the deployment

Click RD Connection Broker – Enable Single Sign On and click Select Existing certificate.
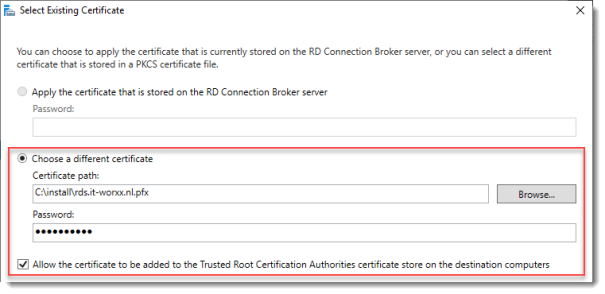
Browse to the .pfx file, enter its password, and check Allow the certificate..
Click OK.

So click Apply. This takes a little while, be patient.
Configure the deployment
Click RD Connection Broker – Publishing and click Select Existing certificate.
Browse to the .pfx file, enter its password, and check Allow the certificate..
Click OK.
Click Apply. This again takes a little while, be a little more patient.
Configure the deployment
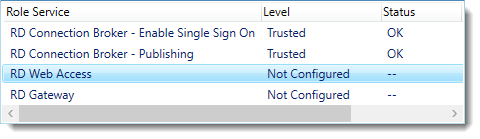
Click RD Web Access and click Select Existing certificate.

Note: Did you notice the warning when you select RD Web Access?
Browse to the .pfx file, enter its password, and check Allow the certificate..
Click OK.
Click Apply again. This takes another little while longer, be slightly more patient.
Configure the deployment
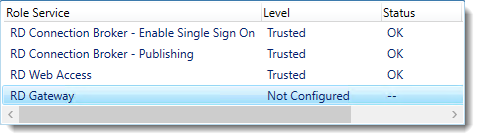
Last one. Click RD Gateway and click Select Existing certificate.
Browse to the .pfx file, enter its password, and check Allow the certificate..
Click OK.
Click OK to apply the final certificate step.
Configured all servers, configured certificates..
One thing left to do: Tell our RDS environment exactly what to publish.
Publishing resources to your users
In fact you can use this setup to either provide full desktop sessions on the Session Host, or you can choose to publish only applications on the Session Host.
Let’s publish full desktop sessions.

In Server Manager, Remote Desktop Services, Session Collections, click Tasks and click Create Session Collection.
Before you begin

Review the requirements. This won’t be an issue in this setup, but you could restrict access to this collection by selecting a select group of people.
Click Next.
Name the collection
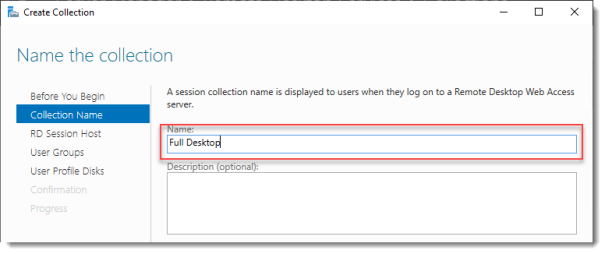
Enter a descriptive name. This name will be displayed under its icon in the Web Access interface.
Click Next.
Specify RD Session Host servers

Click the member server and click the Add button.
Click Next.
Specify user groups
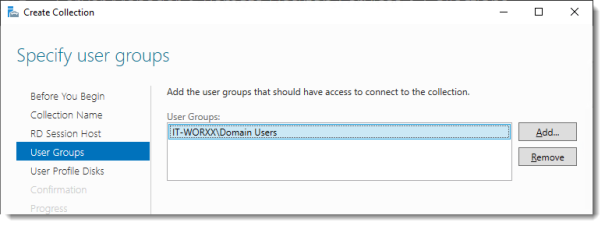
You can limit access to the resource here if you want. Add one or more groups to restrict access to these groups only. In this setup the default selection of Domain Users will do fine. Groups you specify here will be added to the list of groups of users that are allowed to connect using RDP to the Session Host server(s).
Click Next.
Specify user profile disks
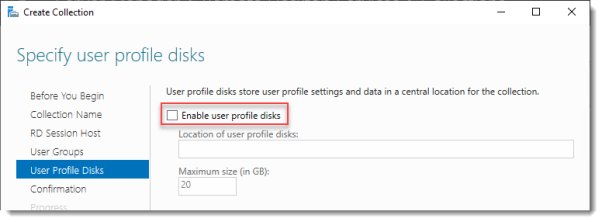
User profile disks are not in focus in this guide. Since I have no file shares configured in this setup, uncheck Enable user profile disks for now.
Click Next.
Confirm selections
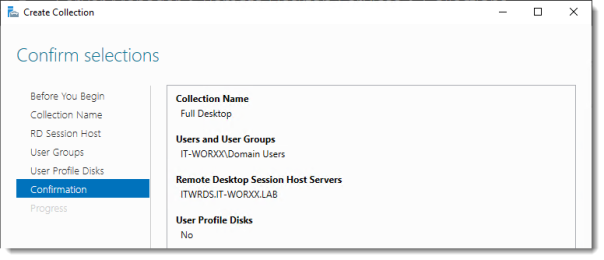
Review the information and click Create.
View Progress
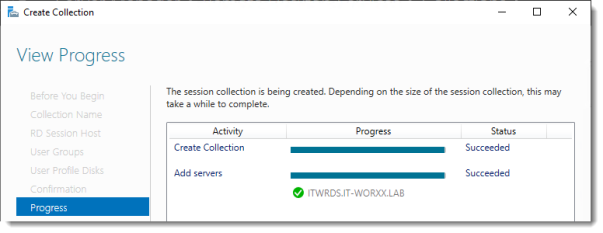
Wait until the collection is created and the server is added to the collection.
Click Close.
Time to test the setup!
Testing the setup
On a machine that has access to your test setup (you may have to add the external FQDN to your hosts file if you didn’t publish it to the internet) open https://rds.it-worxx.nl/rdweb
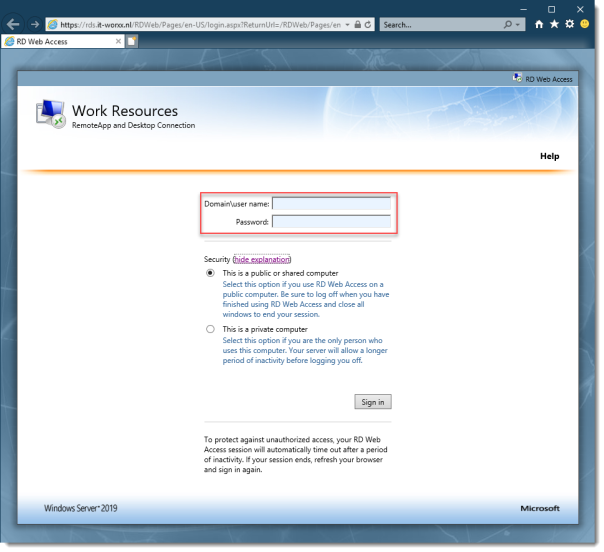
Hey! At least the RD Web Access application works 
Enter a valid username and password (IT-WORXX\username or username@it-worxx.lab).
Create a user for this, or simply use the domain admin account.
Click Sign in.
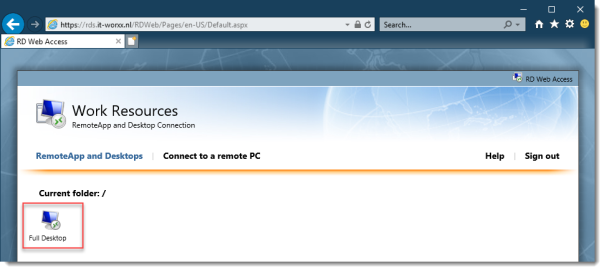
After logging in you are presented with the full desktop session collection we created.
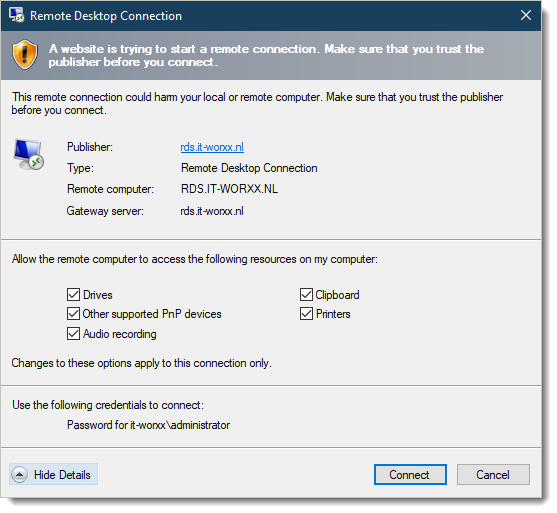
After clicking the Full Desktop icon you get the warning that devices are going to be redirected.
And when you click Connect, you connect
Enjoy.
Arjan
Установим роли терминального сервера на Windows Server 2019 и лицензируем. Маленькая тонкость — сервер не в домене.
Подготовка Windows Server 2019
Для начала установим сам сервер. Всё необходимое вынесено в отдельную статью:
Установка Windows Server 2019 на виртуальную машину VMware
Не забываем про настройку:
Первоначальная настройка Windows Server 2019
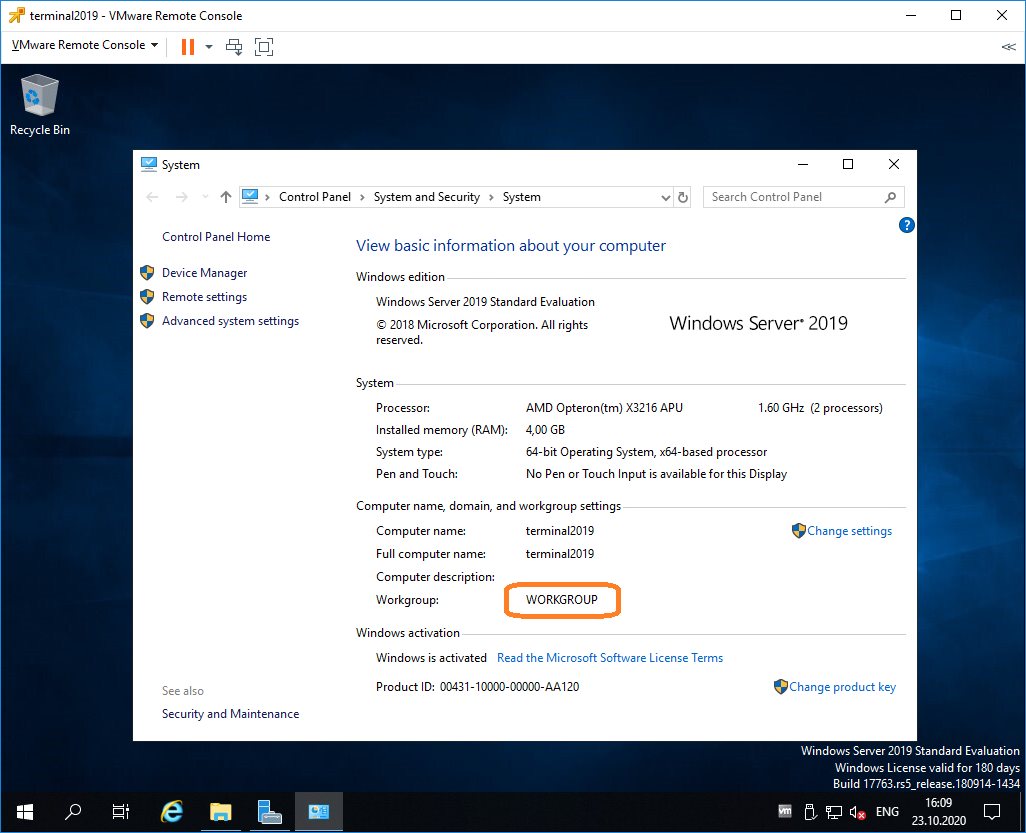
Итак, операционная система установлена и настроена. Сервер в рабочей группе WORKGROUP.
Установка роли терминального сервера
Нам понадобится установить две роли, можно выполнить установку одновременно, я предлагаю инструкцию с минимальным количеством перезагрузок.
Роль Remote Desktop Licensing
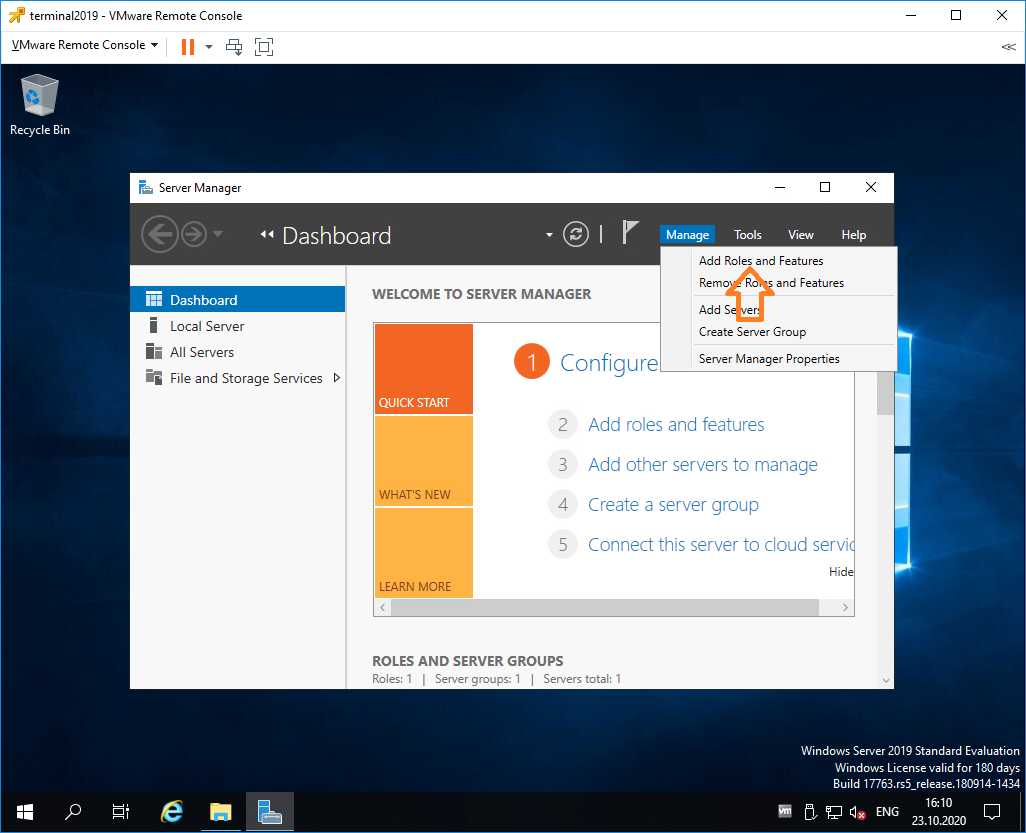
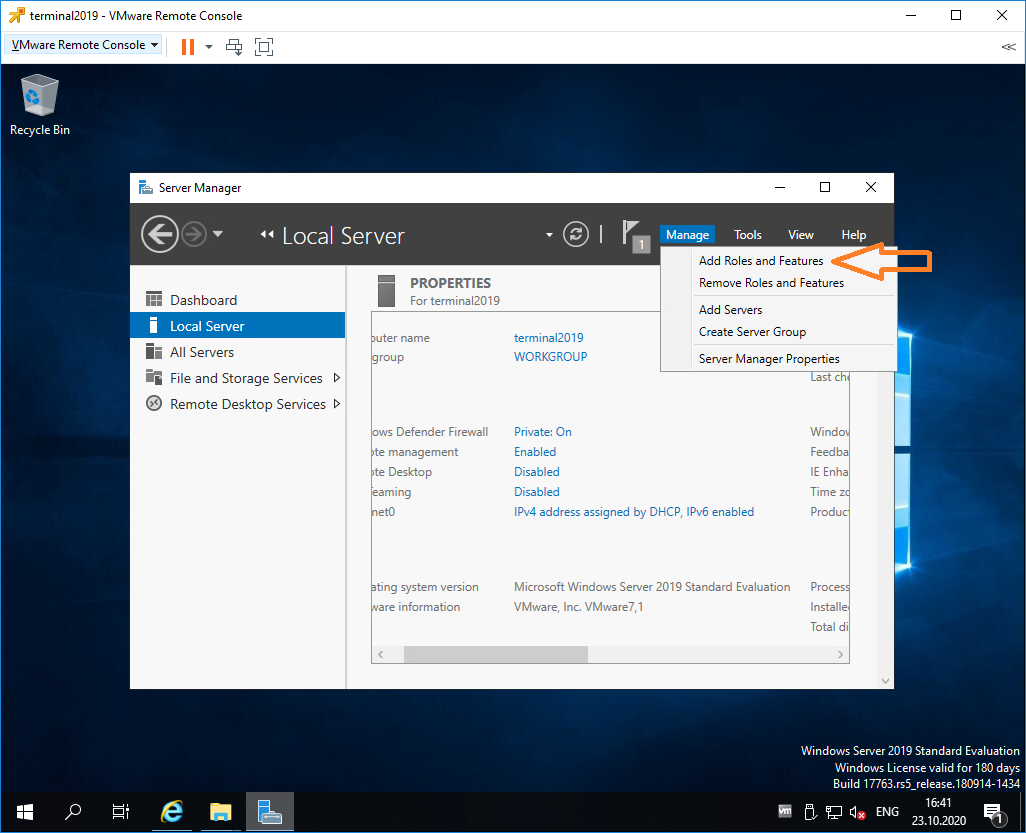
Входим в Server Manager. Справа вверху выбираем Manage > Add Roles and Features.
Попадаем в раздел Before You Begin.
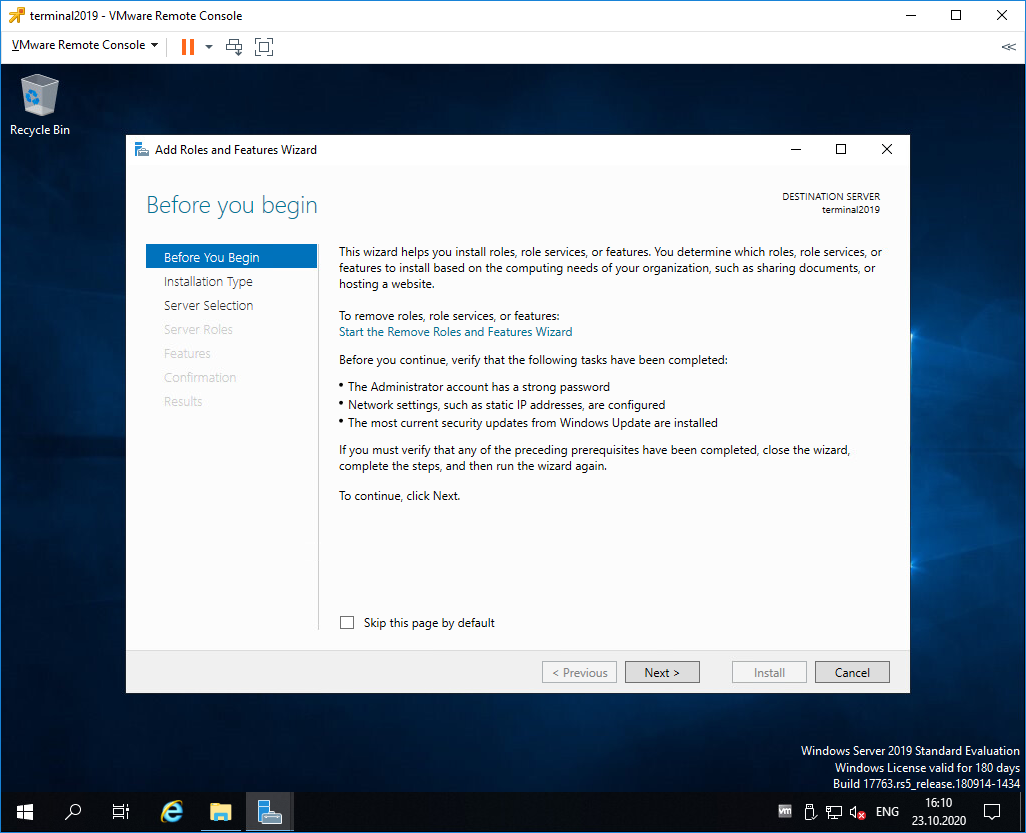
Это начальная страница, пропускаем. Next.
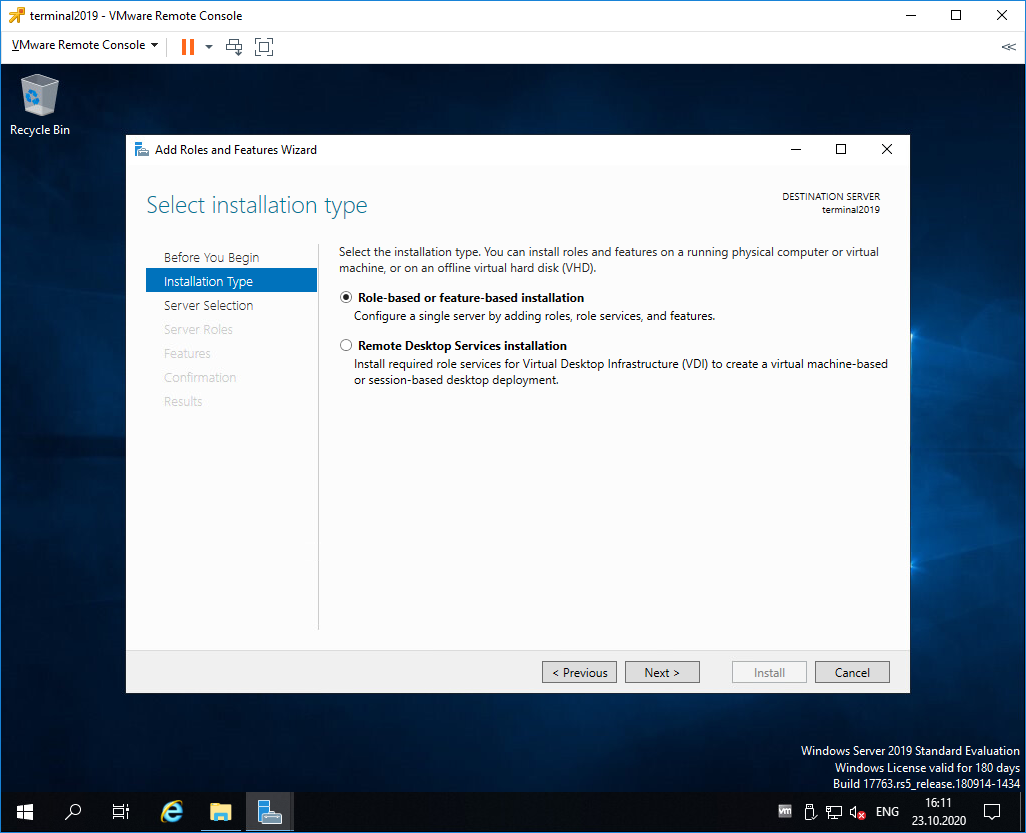
Попадаем в раздел Installation Type. Для установки сервиса удаленных рабочих столов предусмотрен специальный мастер Remote Desktop Services installation, но нам не удастся его использовать, поскольку сервер не в домене. Выбираем Role-based or feature-based installation. Next.

Попадаем в раздел Server Selection. Выбираем текущий сервер. Next.

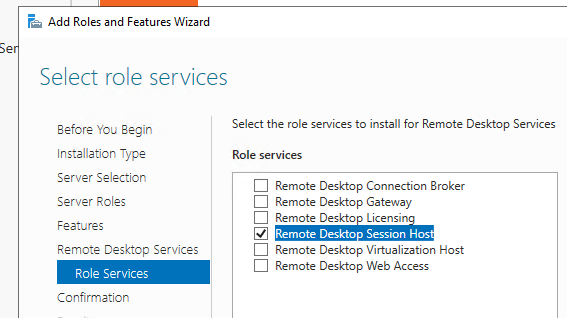
Попадаем в раздел Server Roles. Выделяем галкой роль Remote Desktop Services. Next.
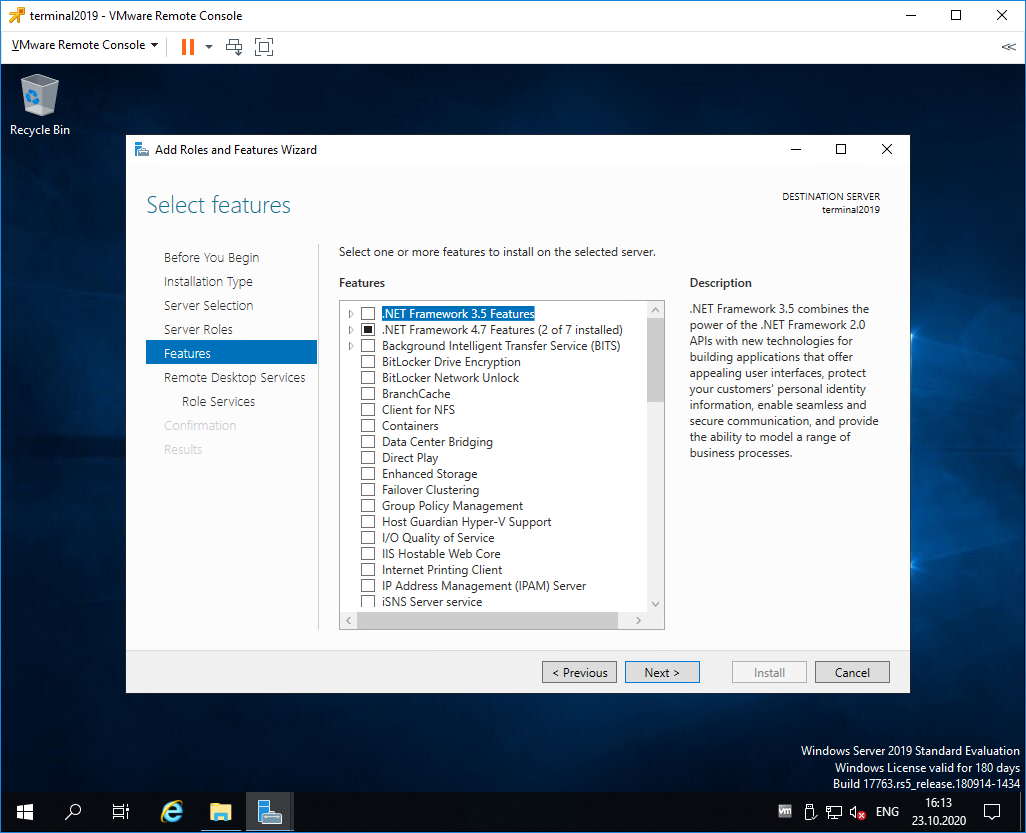
Попадаем в раздел Features. Здесь ничего дополнительно не выбираем. Next.
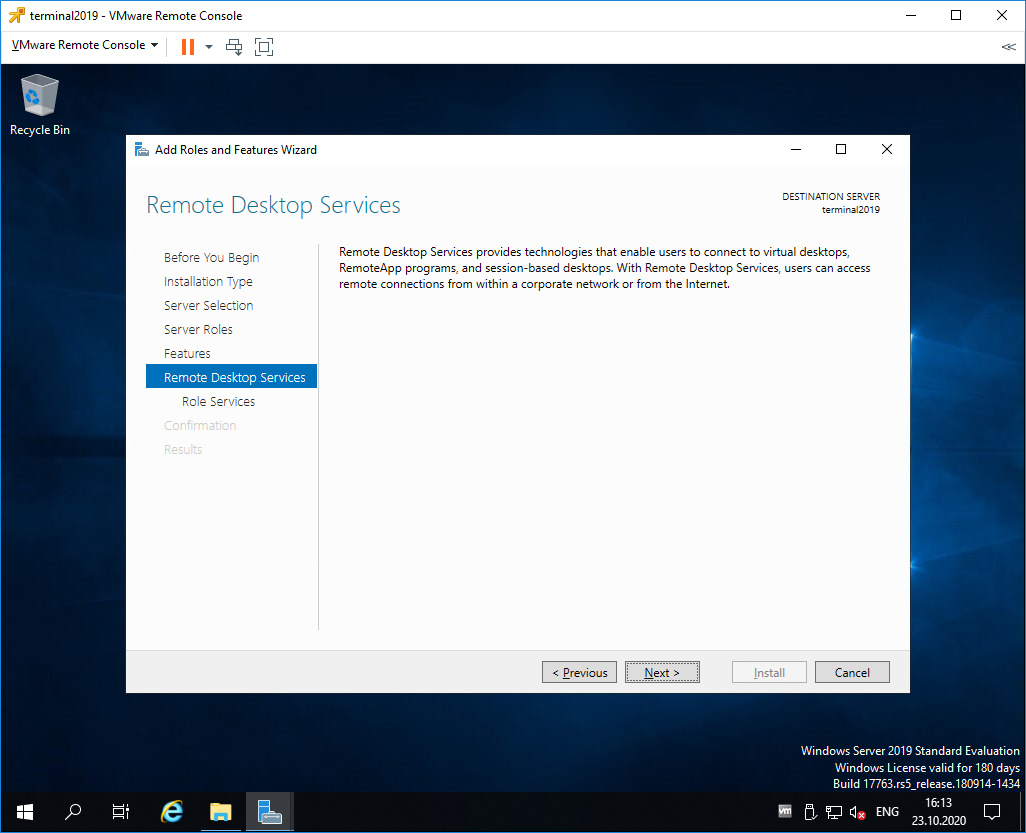
Попадаем в раздел Remote Desktop Services. Ненужное нам окошко. Next.
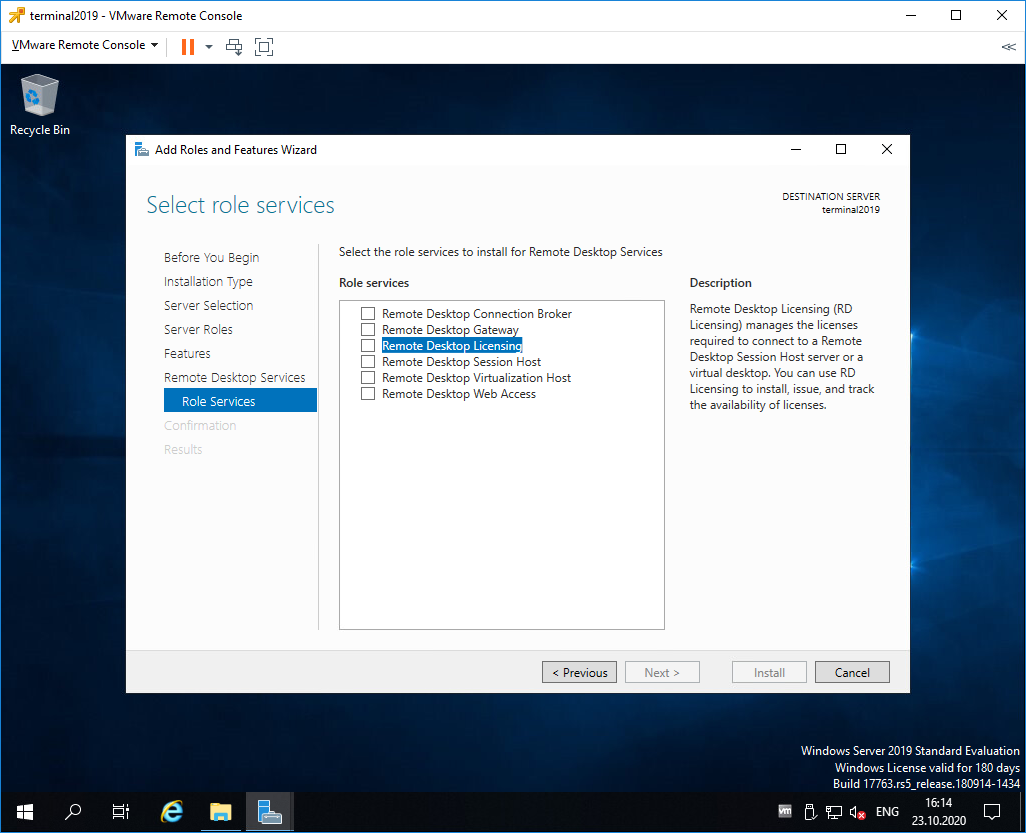
Попадаем в раздел Role Services. Первая роль, которую нам нужно установить, это Remote Desktop Licensing. Выделяем галкой.

Нам предлагают установить дополнительные фичи, которые требуются для данной роли. Соглашаемся, Add Features.

Remote Desktop Licensing выделено галкой, Next.
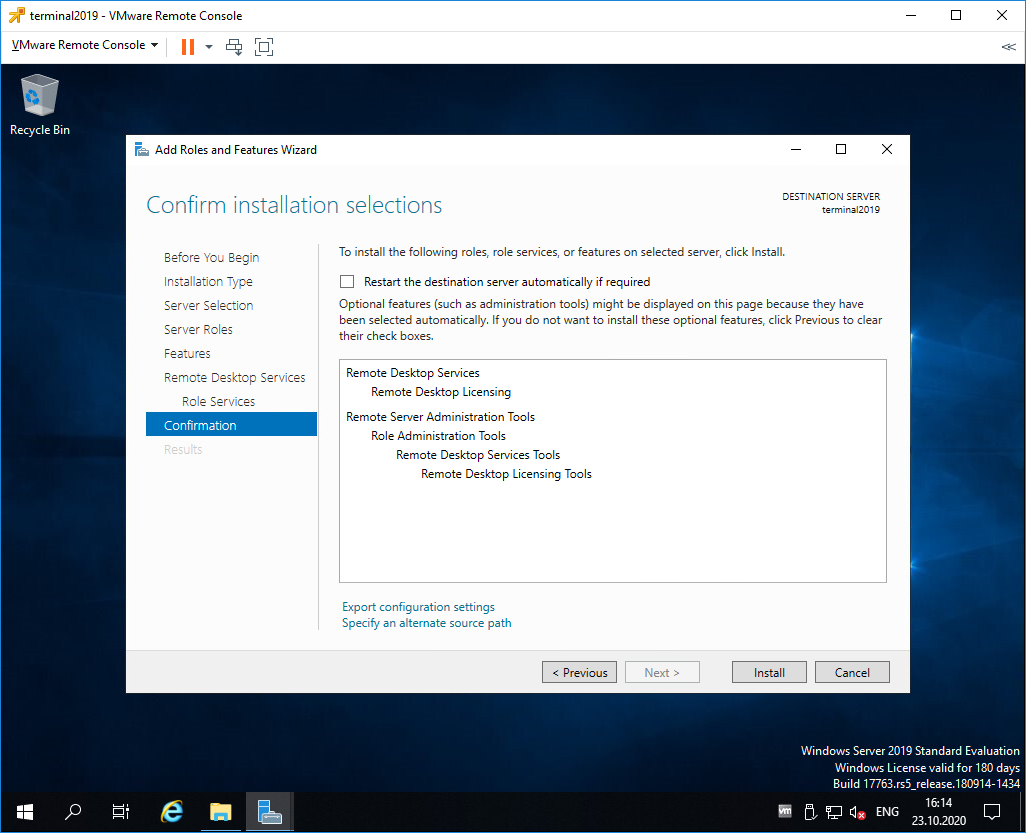
Попадаем в раздел Confirmation. Install.
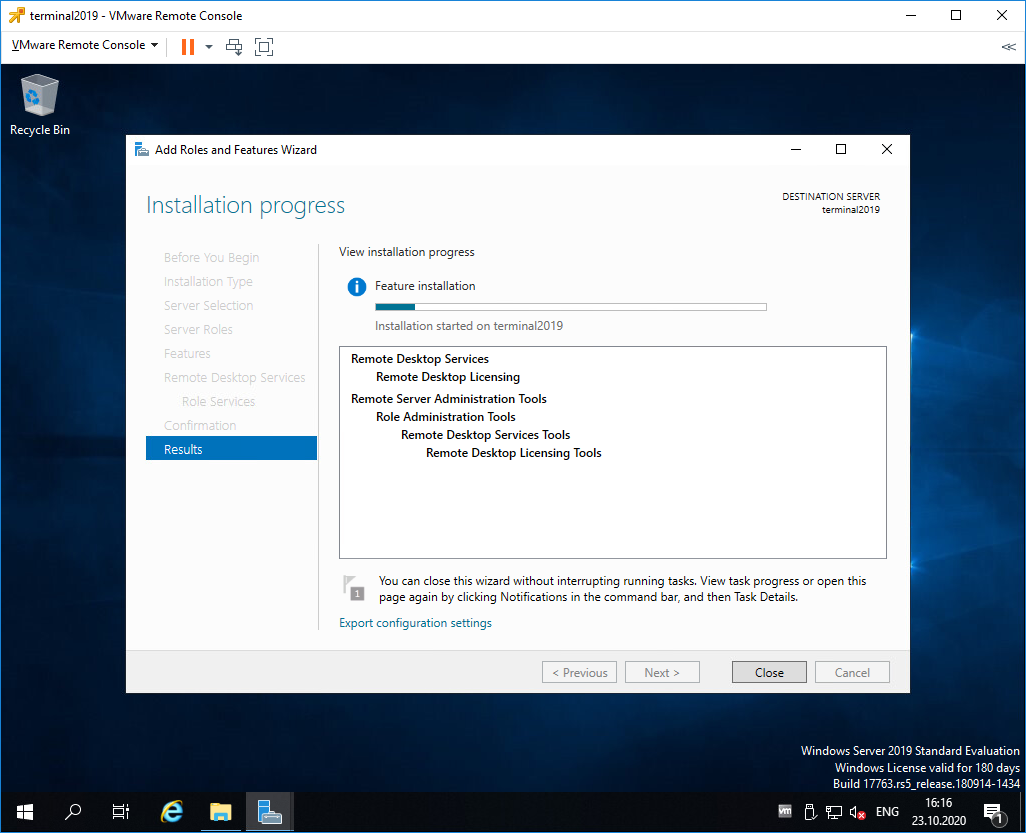
Начинается установка роли.
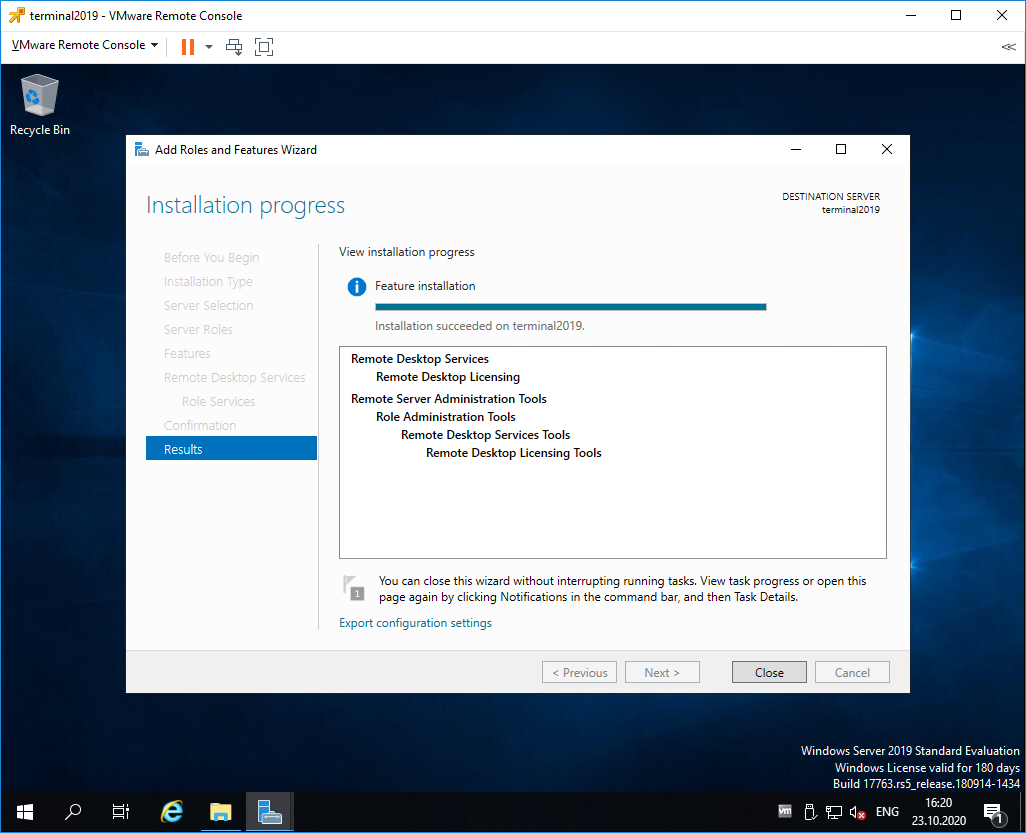
Роль Remote Desktop Licensing успешно установлена. Примечательно, что перезагрузка не требуется.

Открываем Windows Administrative Tools.
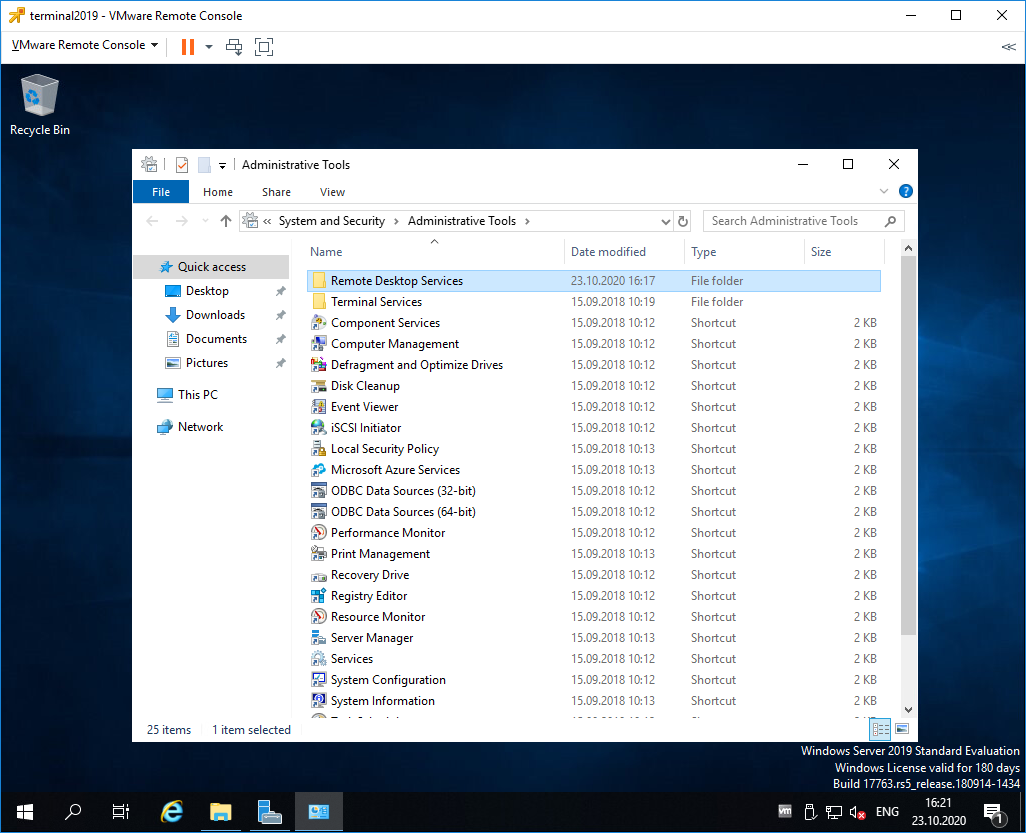
Переходим в папку Remote Desktop Services.
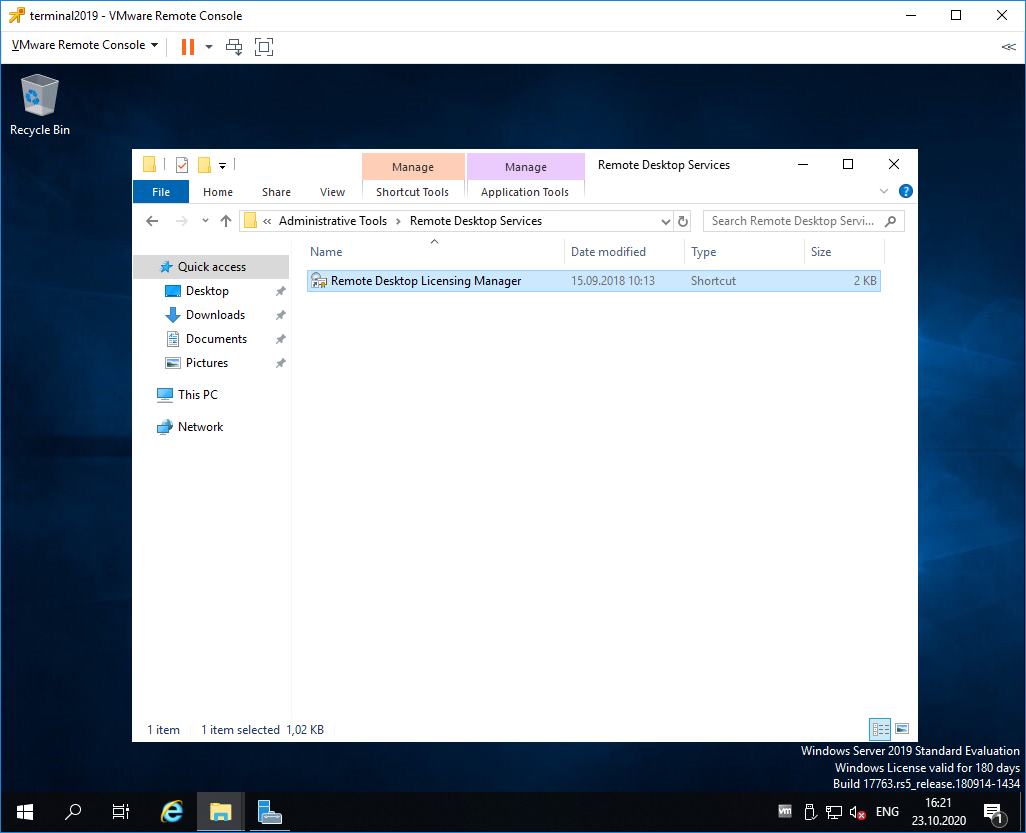
Запускаем оснастку Remote Desktop Licensing Manager.
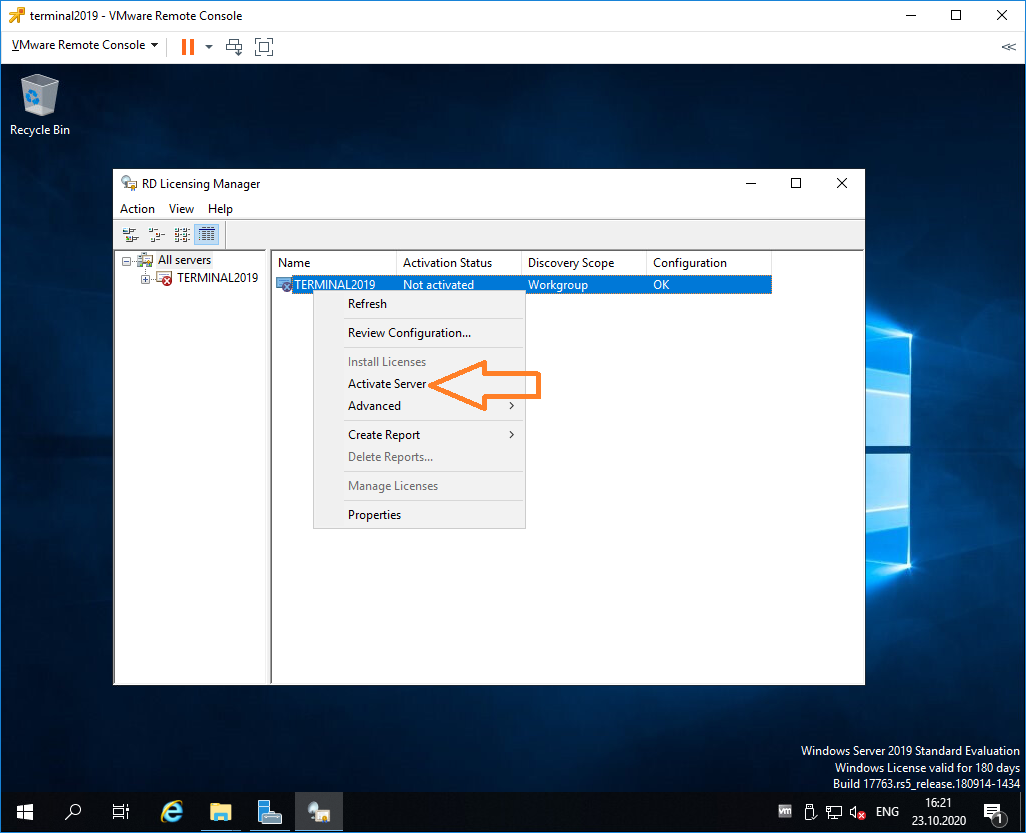
Выбираем наш сервер, правой кнопкой — активировать.
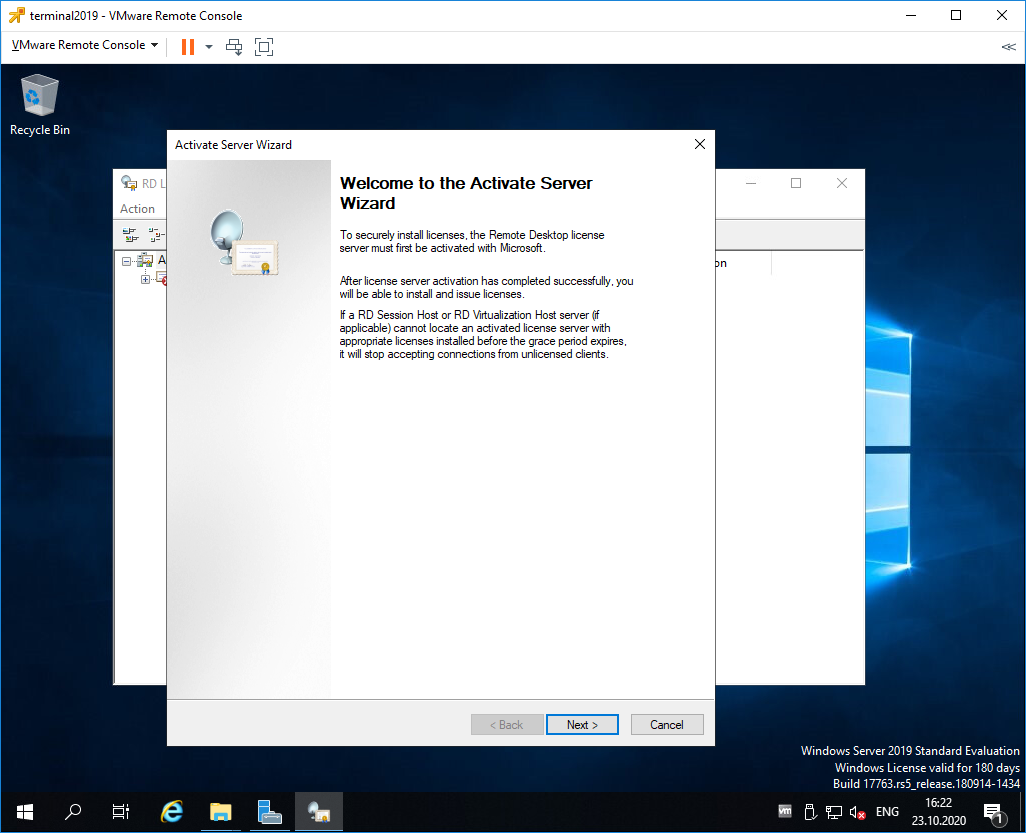
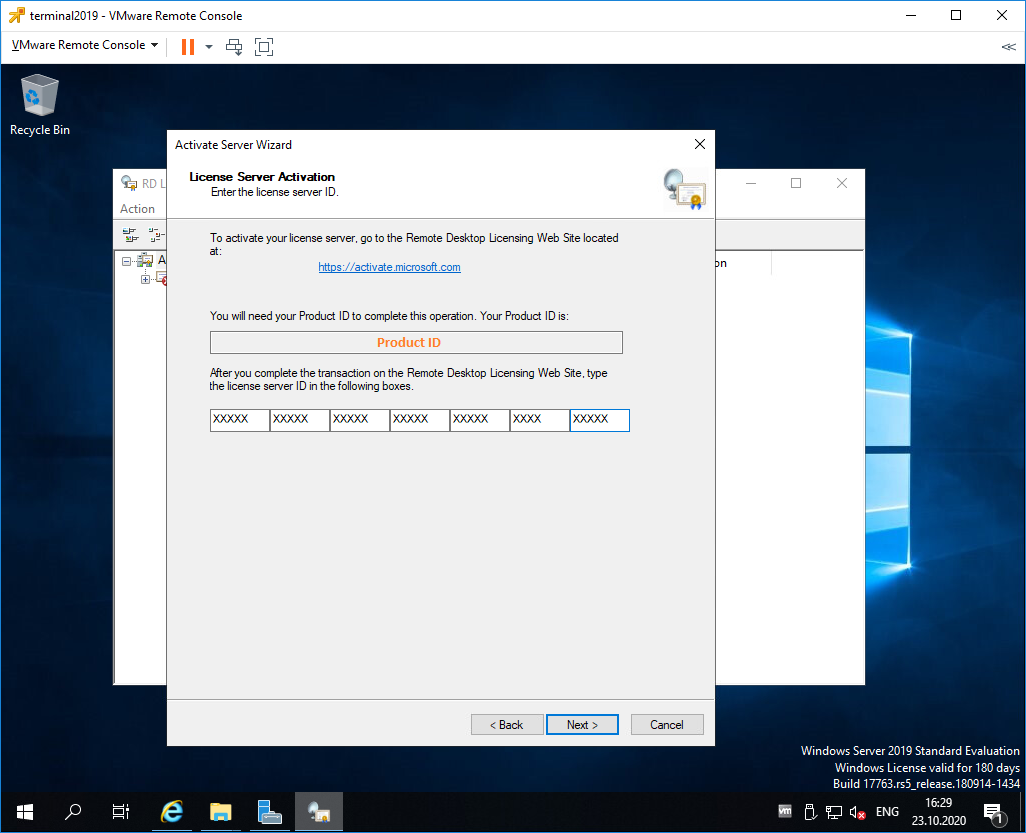
Открывается окно активации. Next.
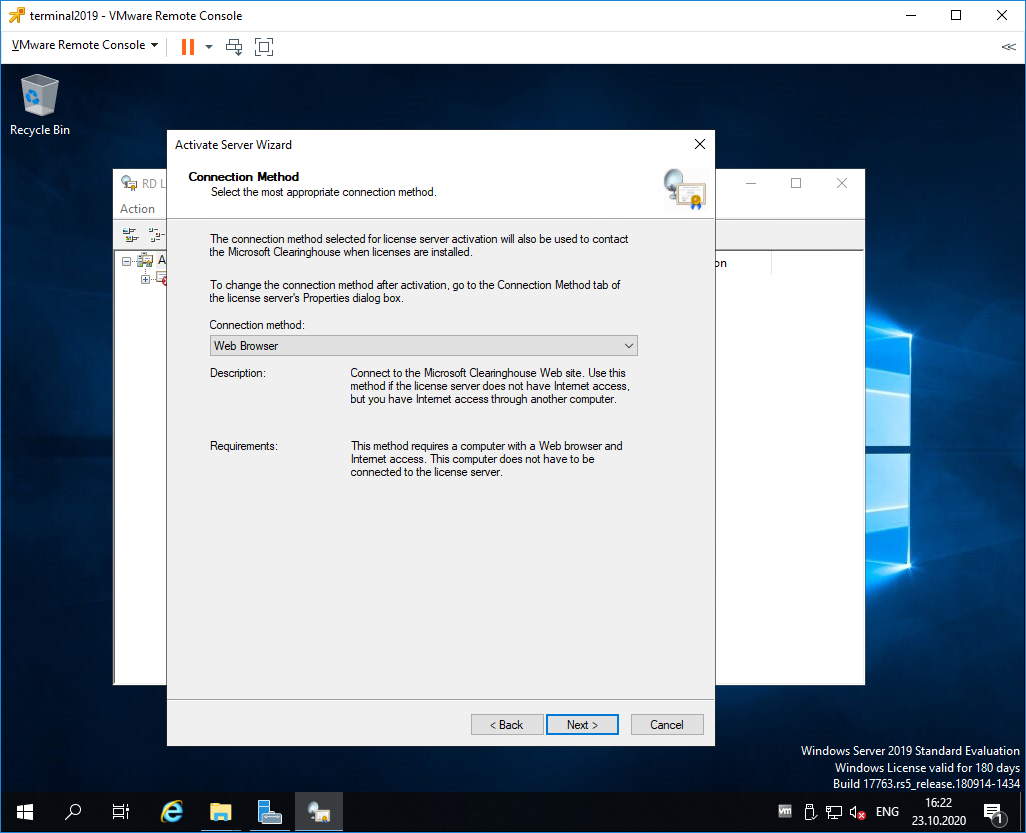
Выбираем метод соединения Web Browser. Next.
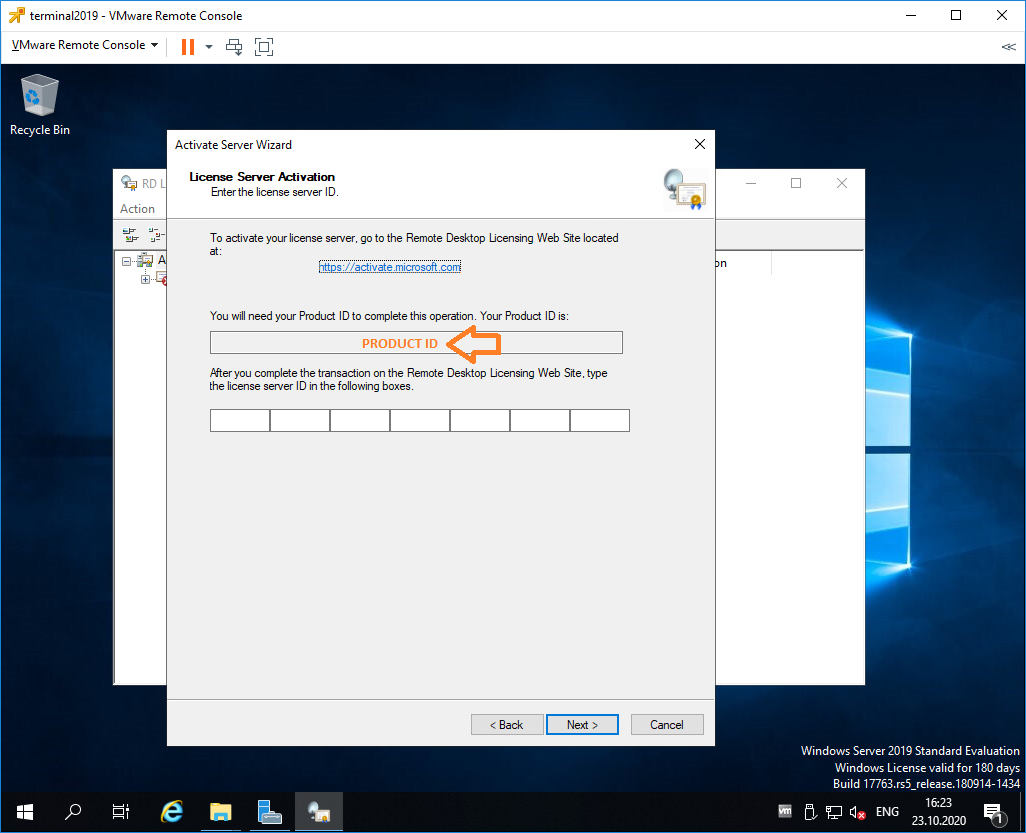
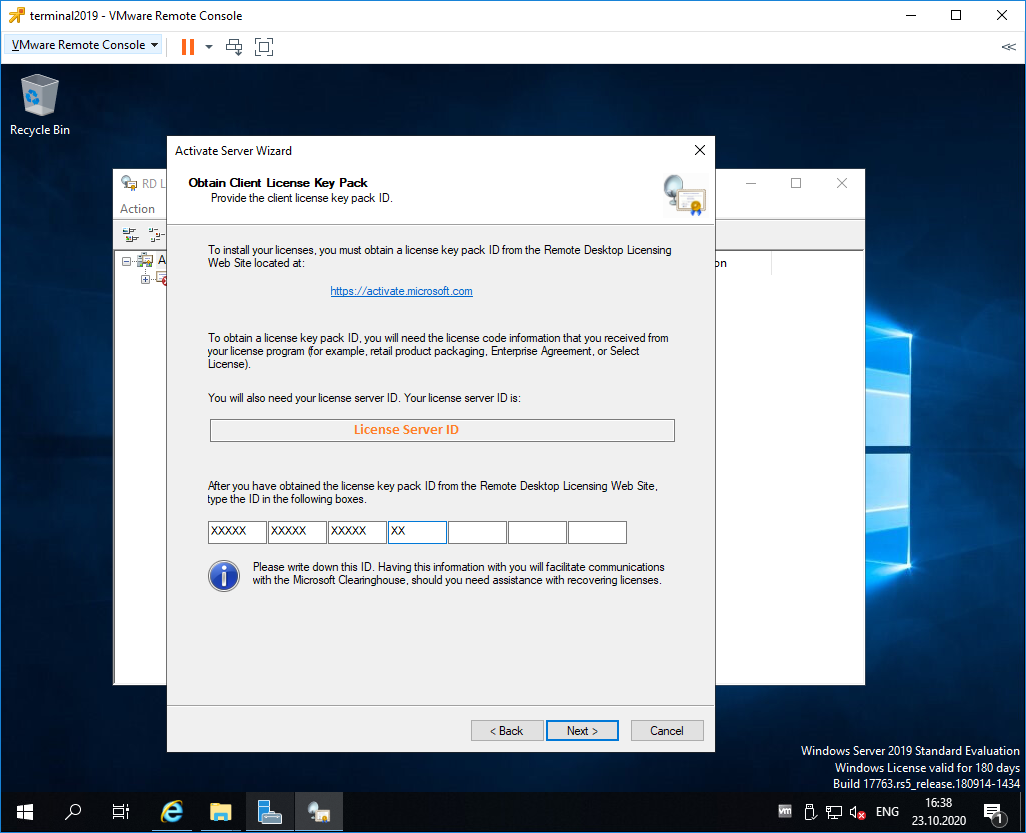
Получаем код продукта который нам понадобится для активации (Product ID). Копируем.
В браузере открываем сайт https://activate.microsoft.com/
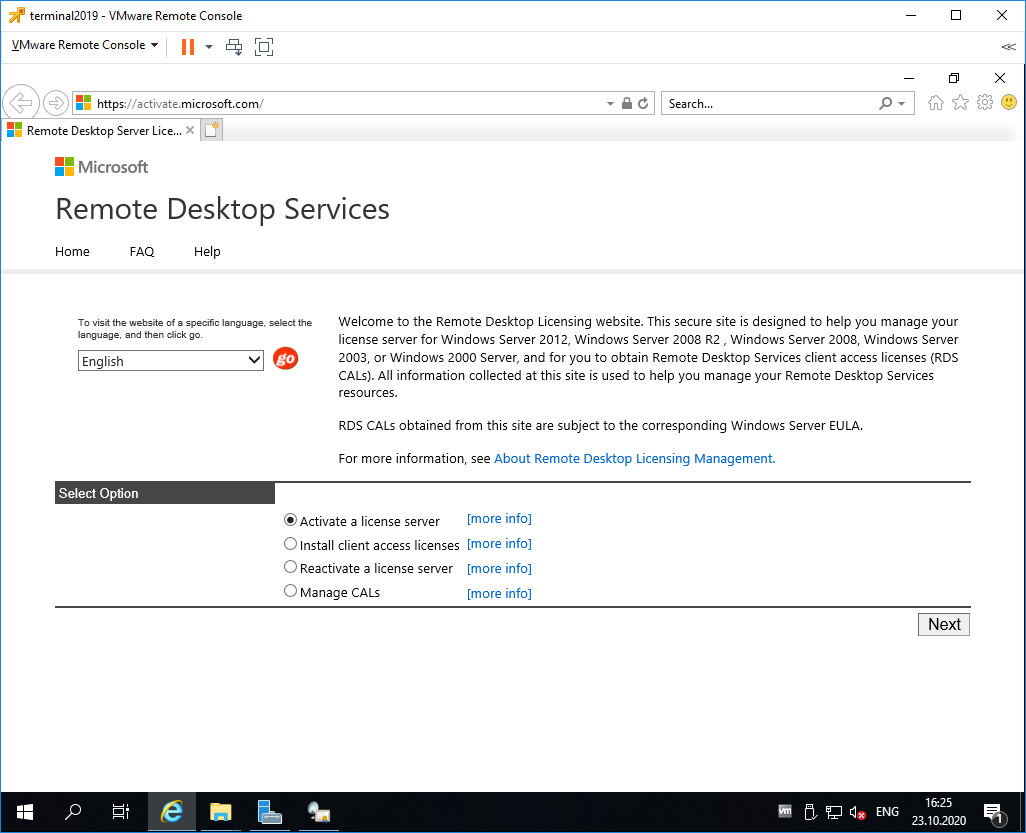
Выбираем «Activate a license server». Next.
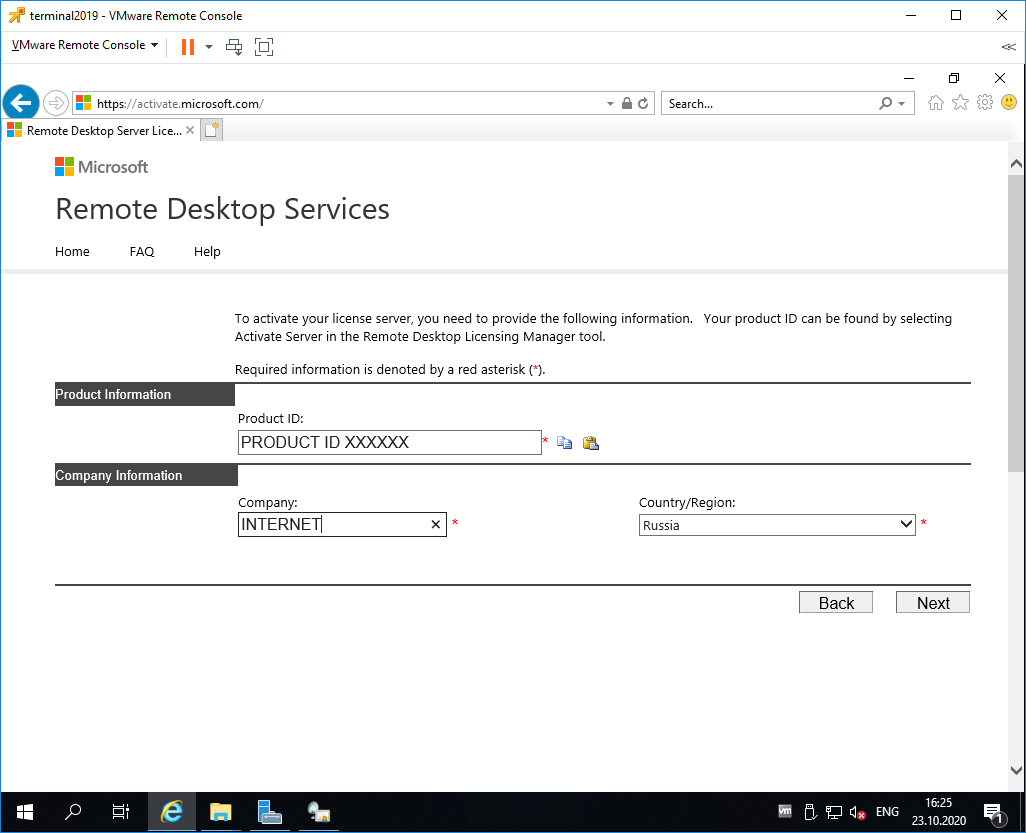
Вводим Product ID полученный ранее, организацию и любую страну или регион. Next. Next.
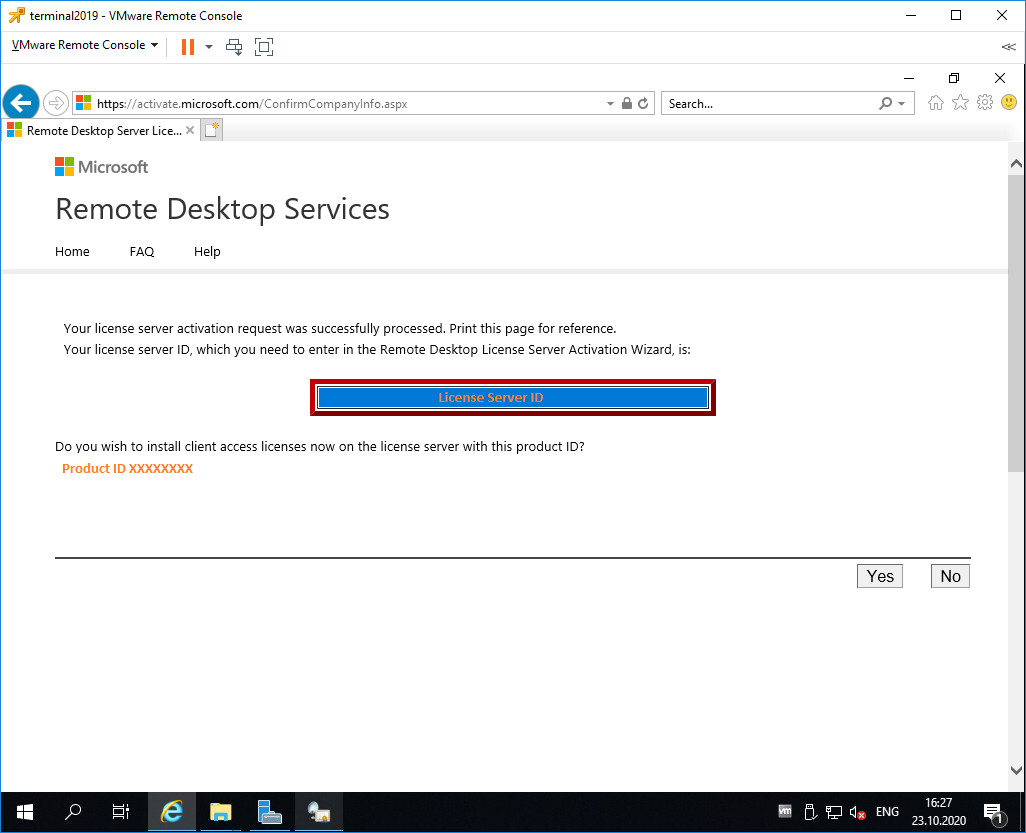
Если все сделано правильно, то мы получим необходимый код сервера лицензирования. Копируем его. На вопрос «Do you wish to install client access licenses now on the license server with this product ID?» отвечаем «Yes» и пока возвращаемся к терминальному серверу, к текущему окну ещё вернёмся.
Вводим код в открытом мастере, жмём Next.
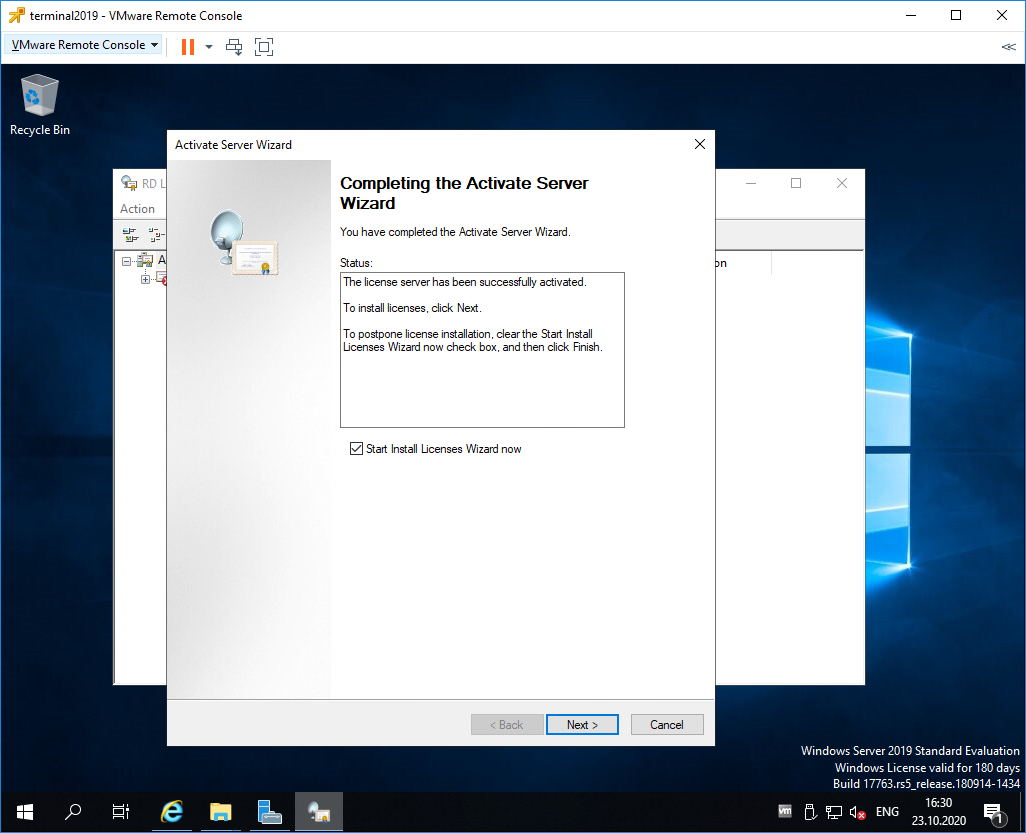
Устанавливаем галку «Start Install Licenses Wizard now». Next.
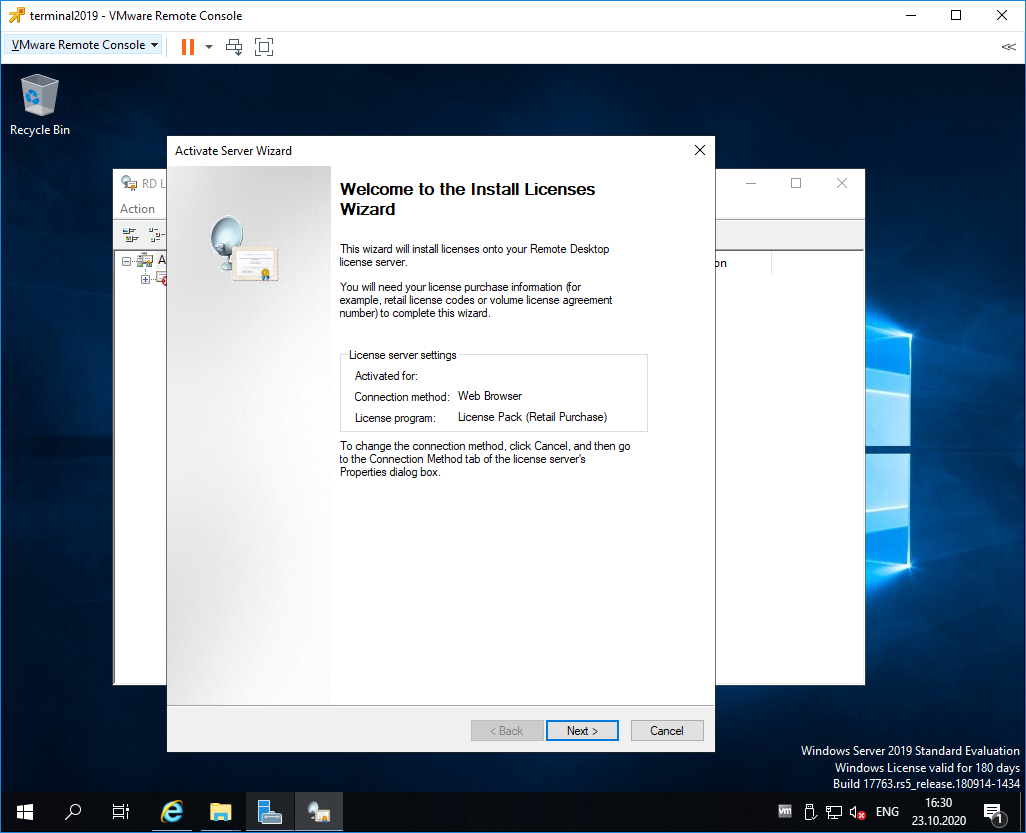
Открывается мастер установки лицензий. Next.

Нас просят ввести license key pack ID. Возвращаемся к браузеру.
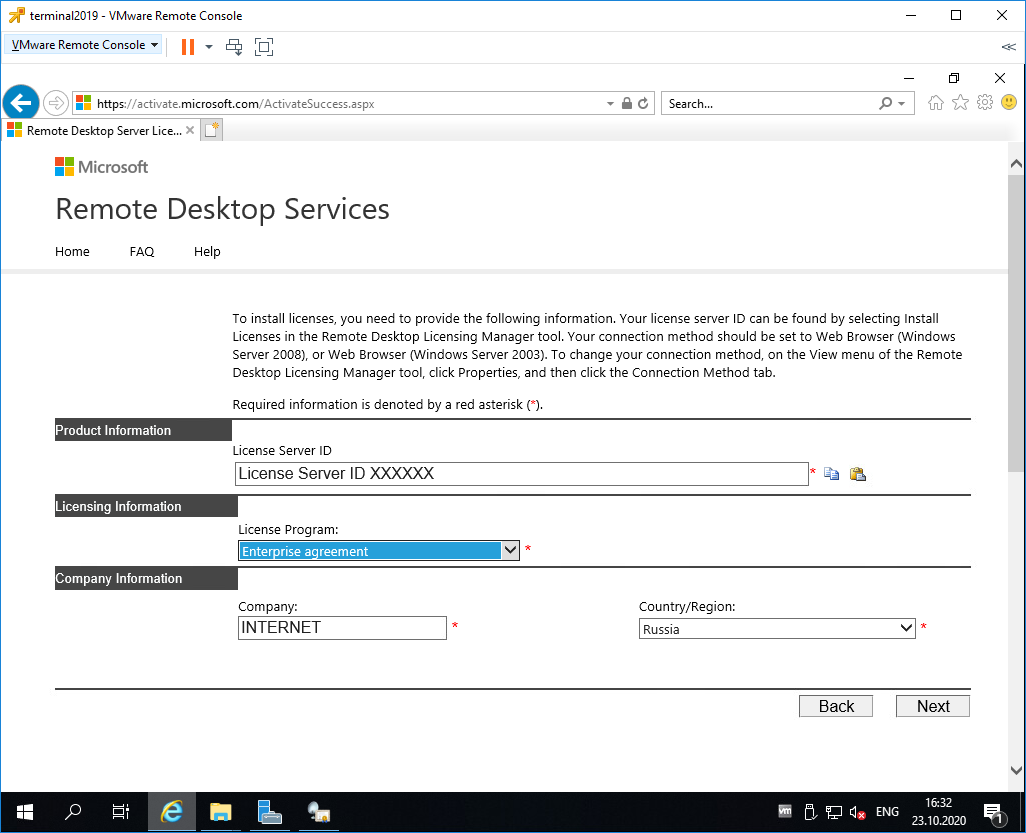
Вставляем License Server ID, в качестве программы лицензирования, по идее он уже должен сюда переместиться из предыдущего окна. License Program выбираем Enterprise agreement. Указываем компанию и страну. Next.
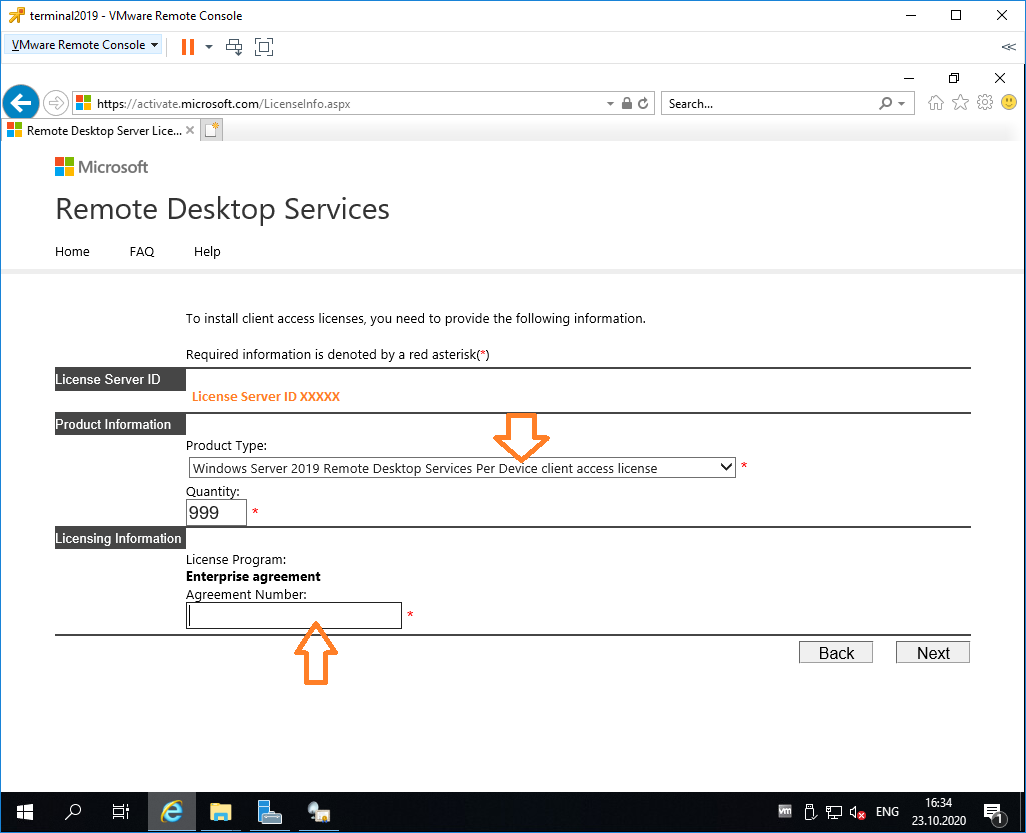
Выбираем тип продукта: Windows Server 2019 Remote Desktop Services Per Device client access license. Указываем количество лицензий. Обязательно соглашение Enterprise agreement, или ищем в интернете который подойдет…
Настройка и лицензирование терминального сервера Windows Server 2016
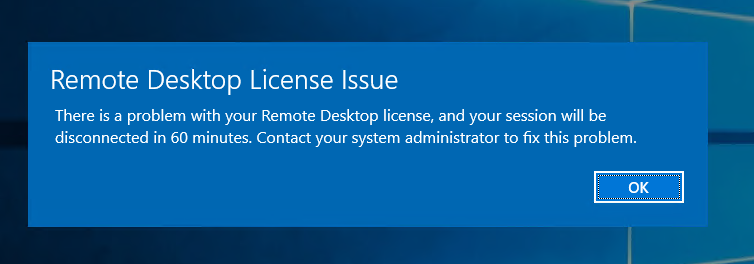
Не стоит выбирать лицензии Per User, иначе потом вы получите такую ошибку:
Next.
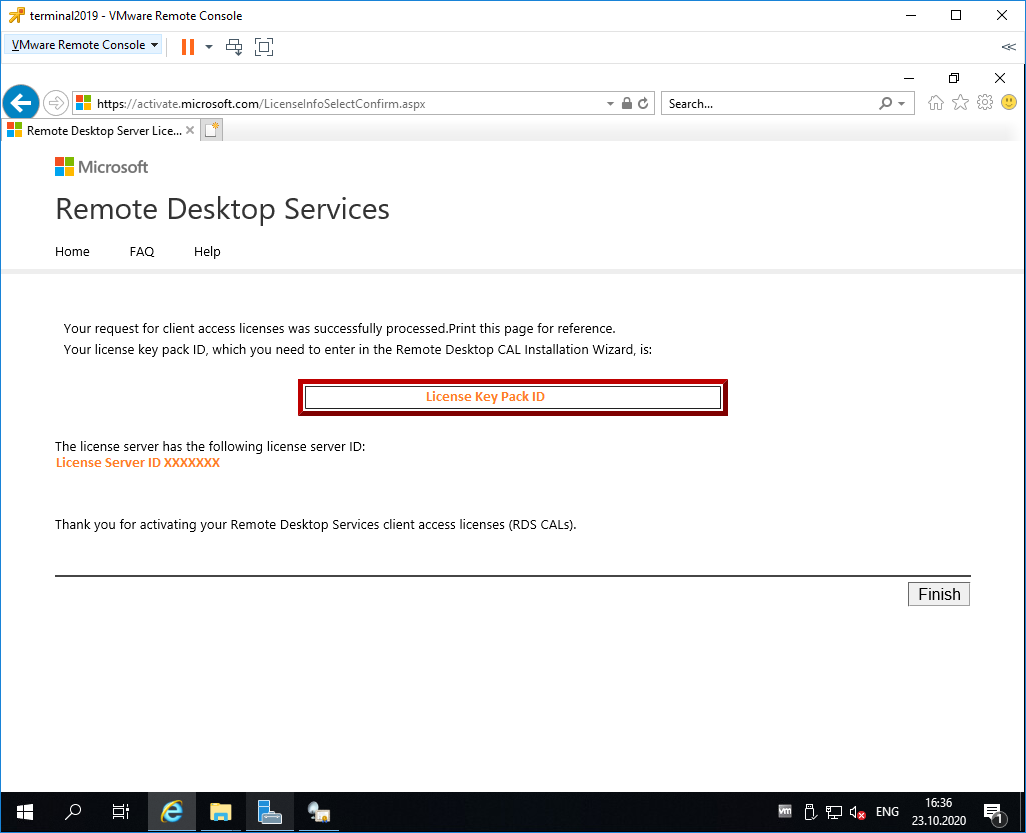
Ну вот мы и получили нужные нам клиентские лицензии. Копируем.
Вводим ключ в мастер. Next.
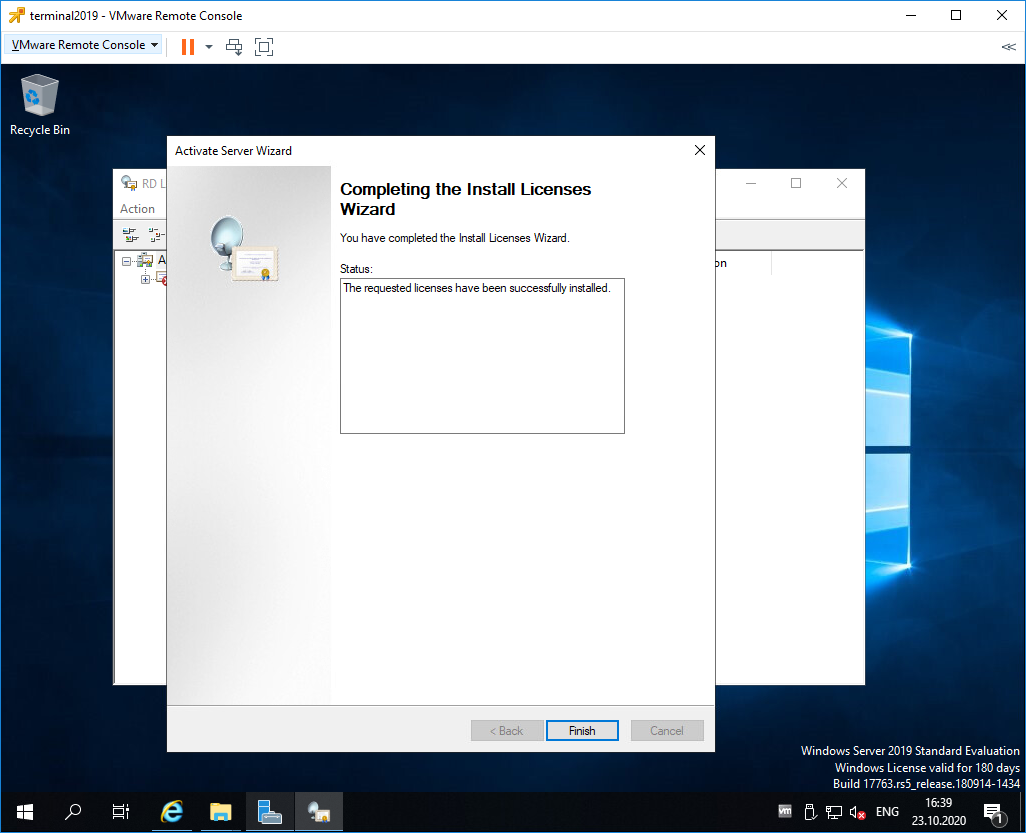
Finish.
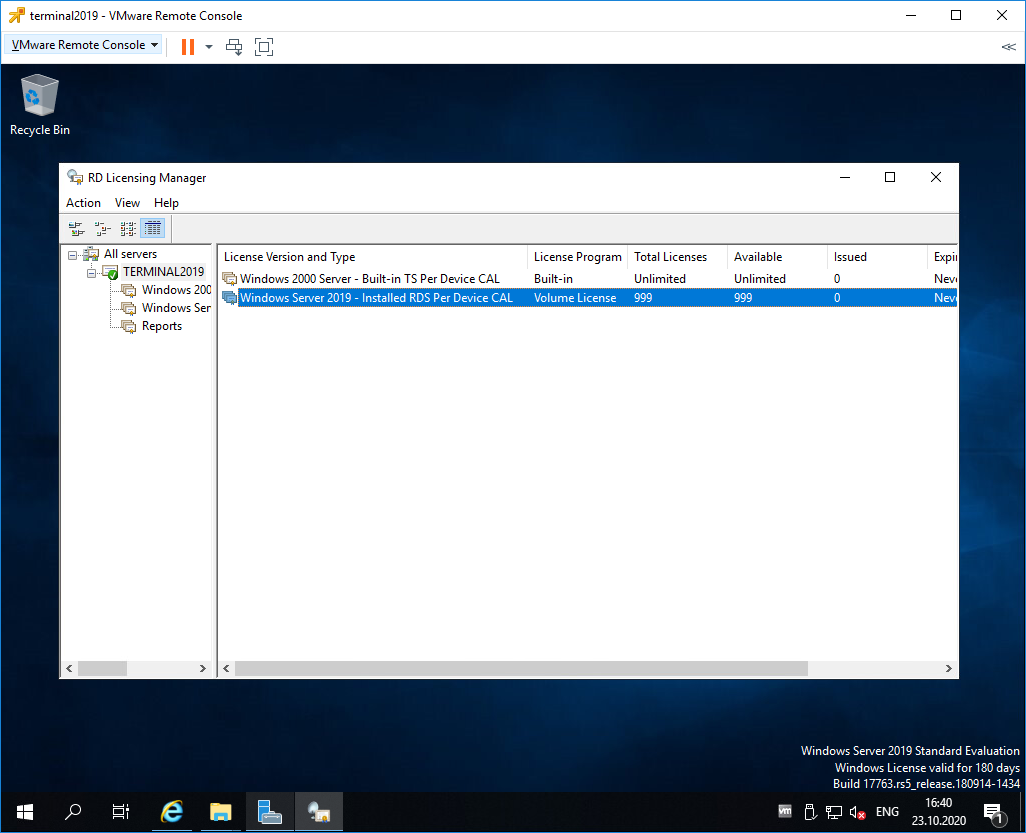
Возвращаемся к Remote Desktop Licensing Manager. Сервер активирован. Лицензии получены. Кстати, они начнут тратиться после окончания триального периода.
Роль Remote Desktop Session Host
Входим в Server Manager. Справа вверху выбираем Manage > Add Roles and Features.
Попадаем в раздел Before You Begin.

Это начальная страница, пропускаем. Next.
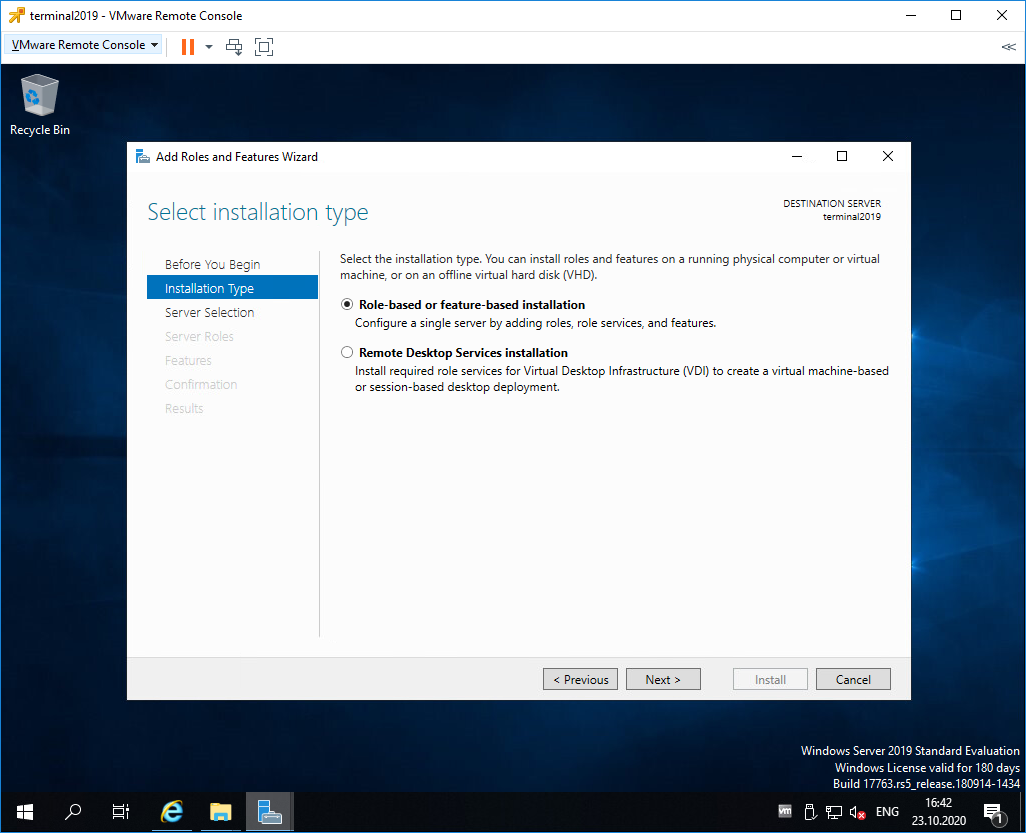
Попадаем в раздел Installation Type. Выбираем Role-based or feature-based installation. Next.
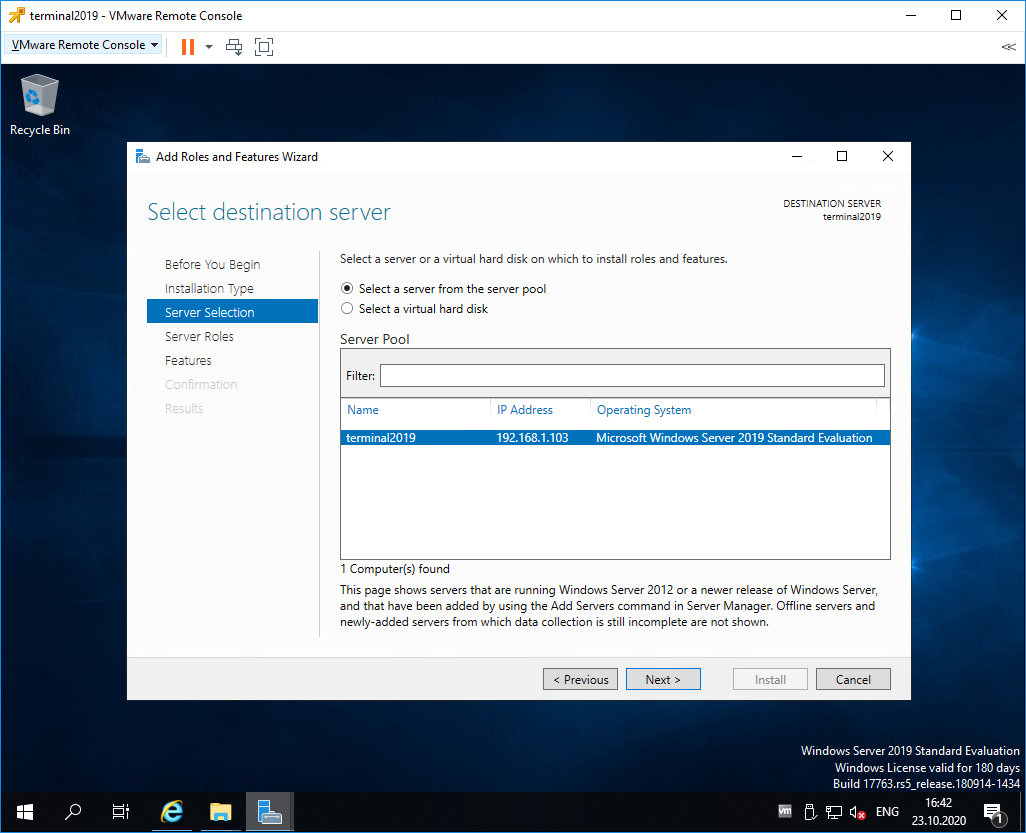
Попадаем в раздел Server Selection. Выбираем текущий сервер. Next.

Попадаем в раздел Server Roles. Выделяем галкой роль Remote Desktop Session Host.
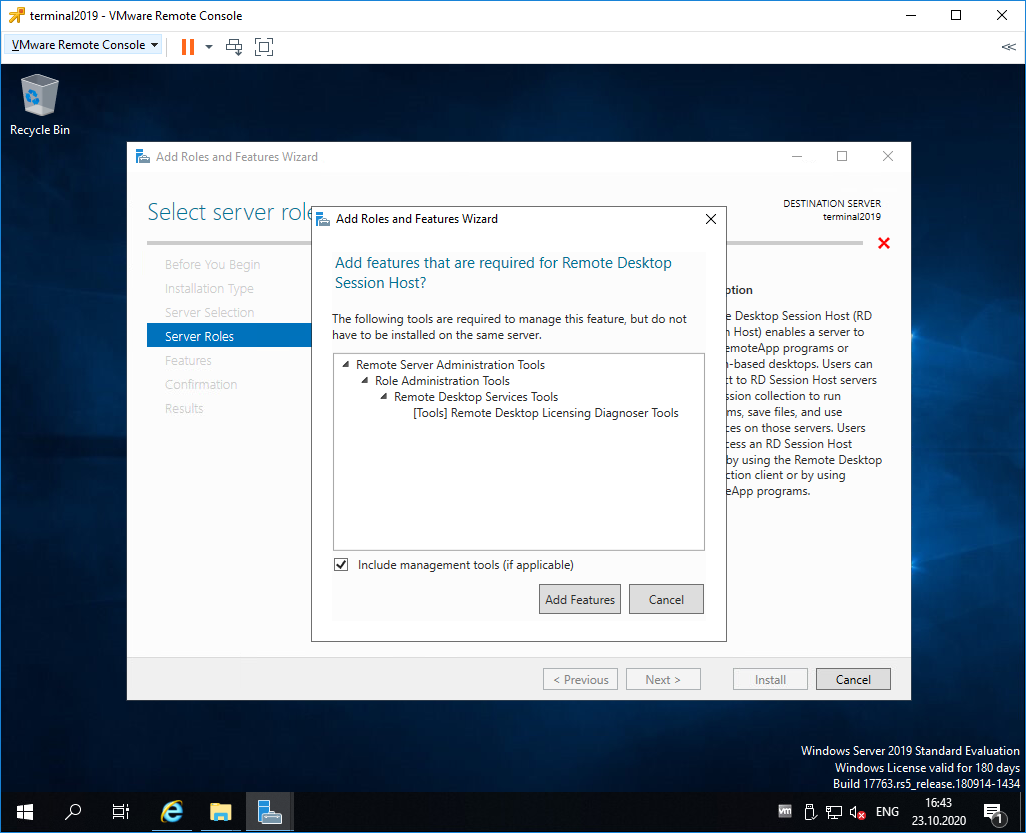
Нам предлагают установить дополнительные фичи, соглашаемся. Add Features.
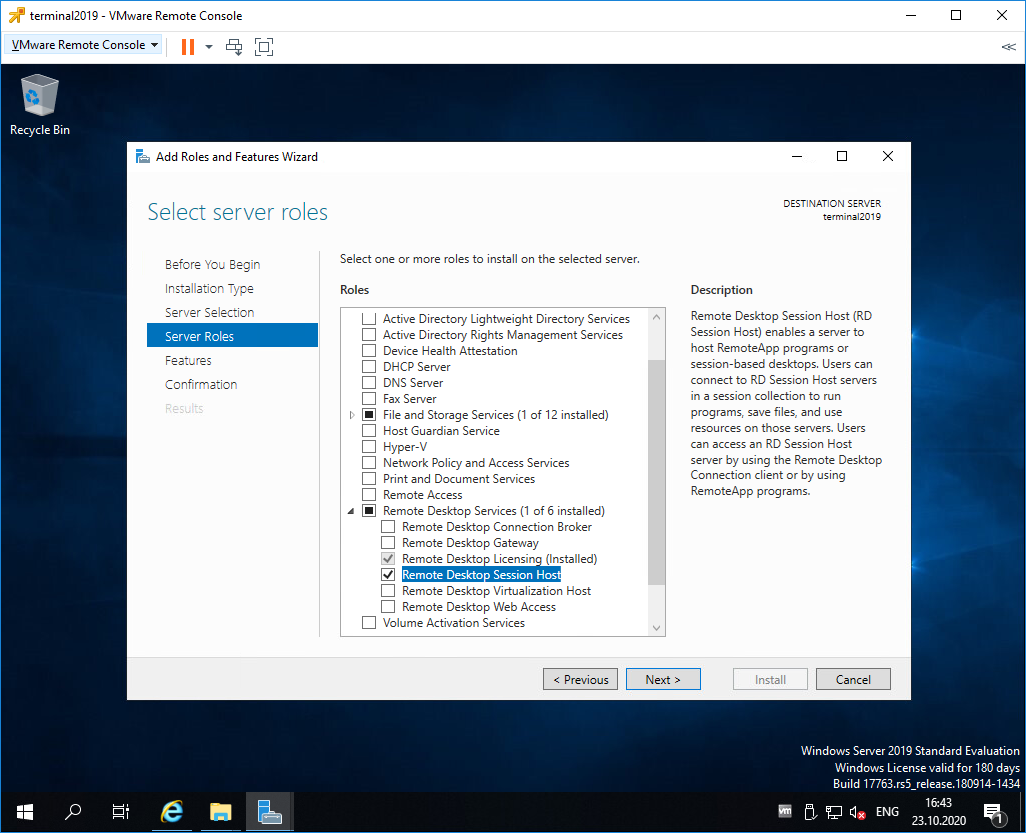
Роль Remote Desktop Session Host выделена. Next.
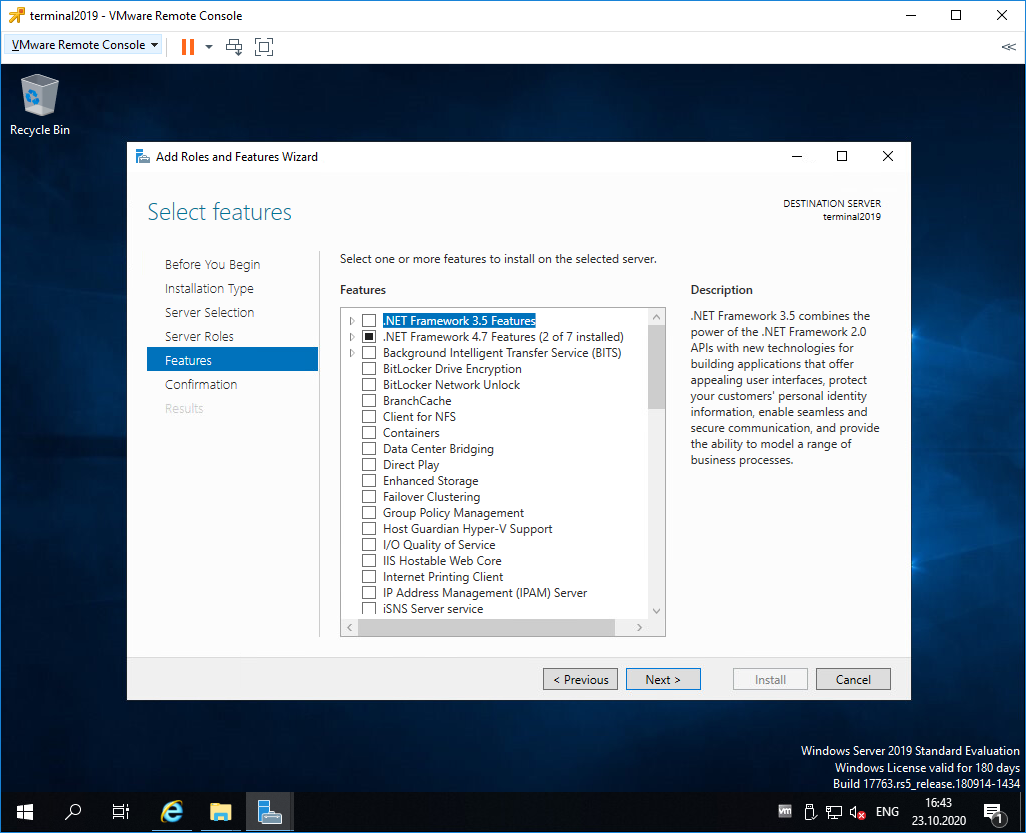
Попадаем в раздел Features, ничего не выделяем. Next.
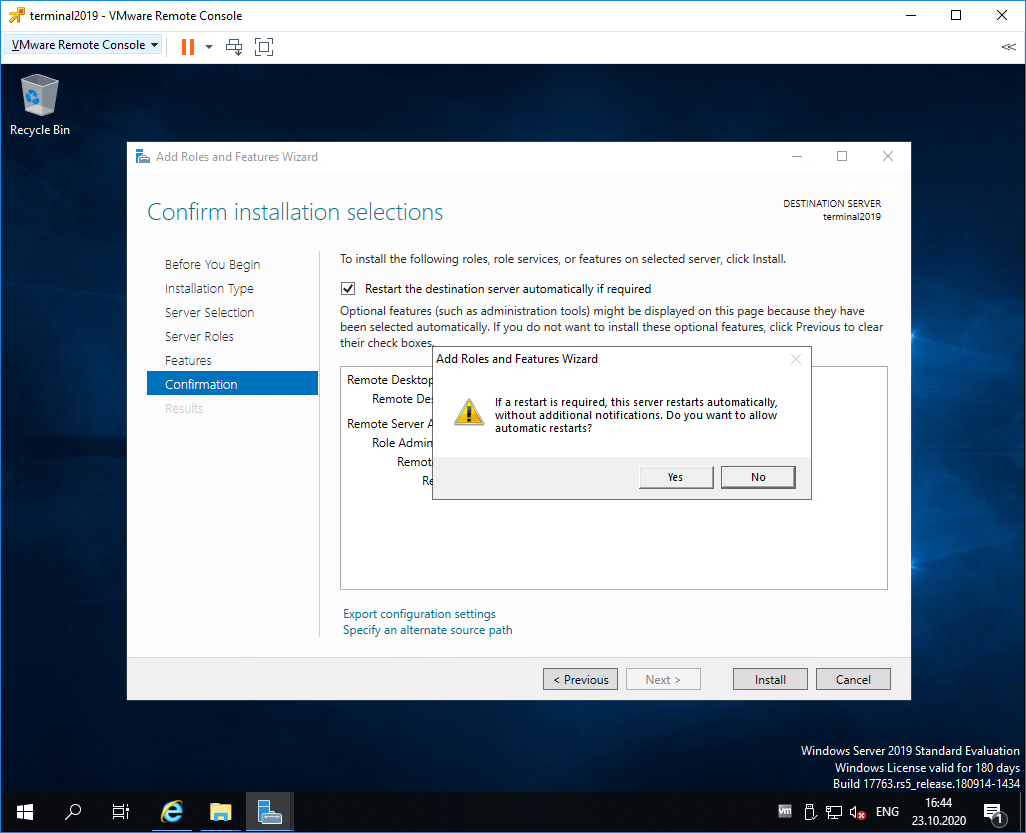
Попадаем в раздел Confirmation. Ставим галку Restart the destination server automatically if required. Отображается предупреждение, что сервер может быть перезагружен. Yes.
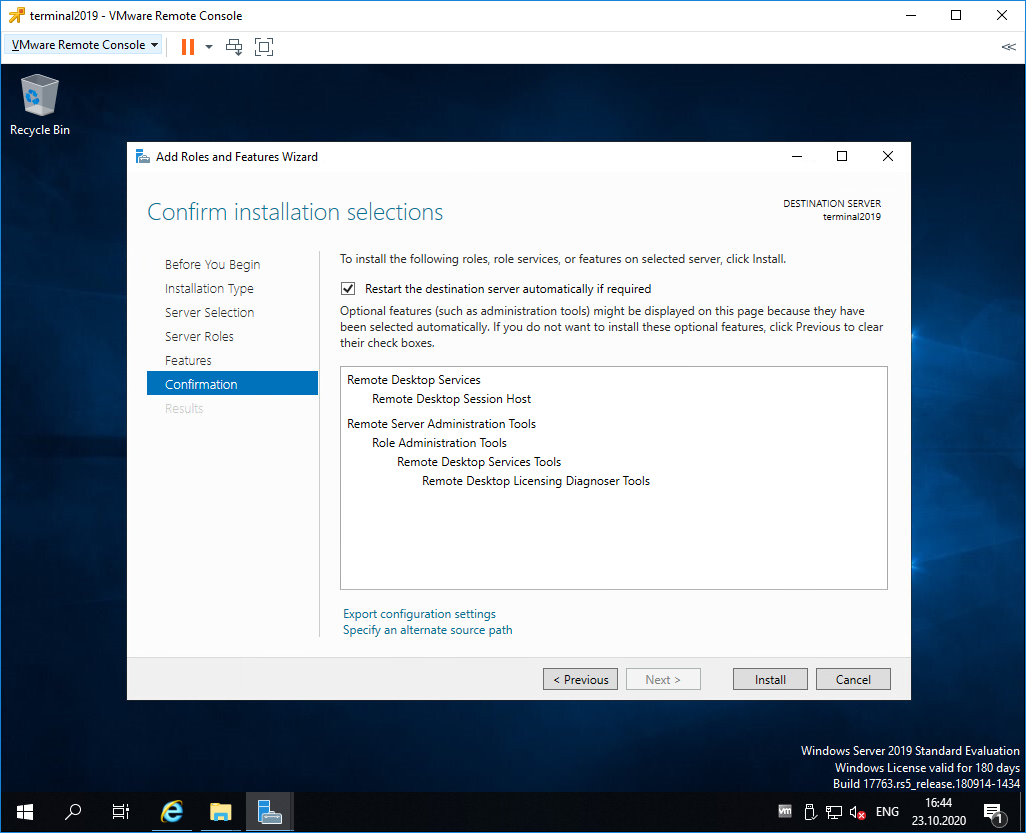
Install.
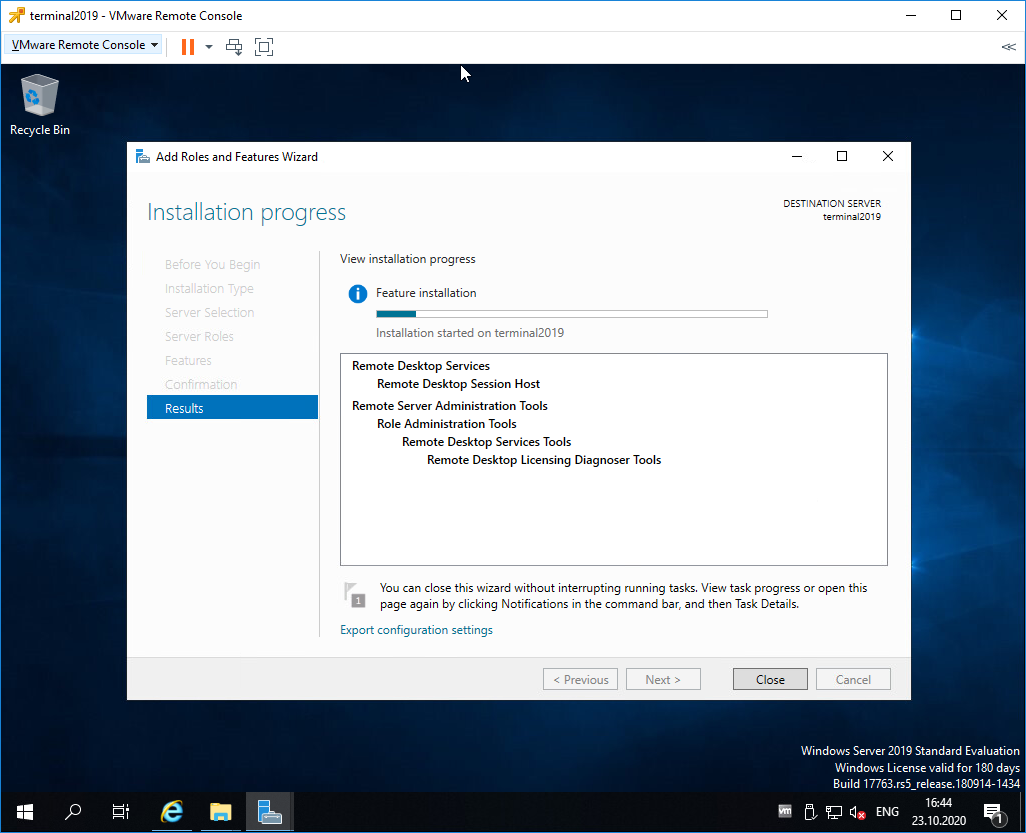
Начинается процесс установки роли.

Сервер перезагружается.
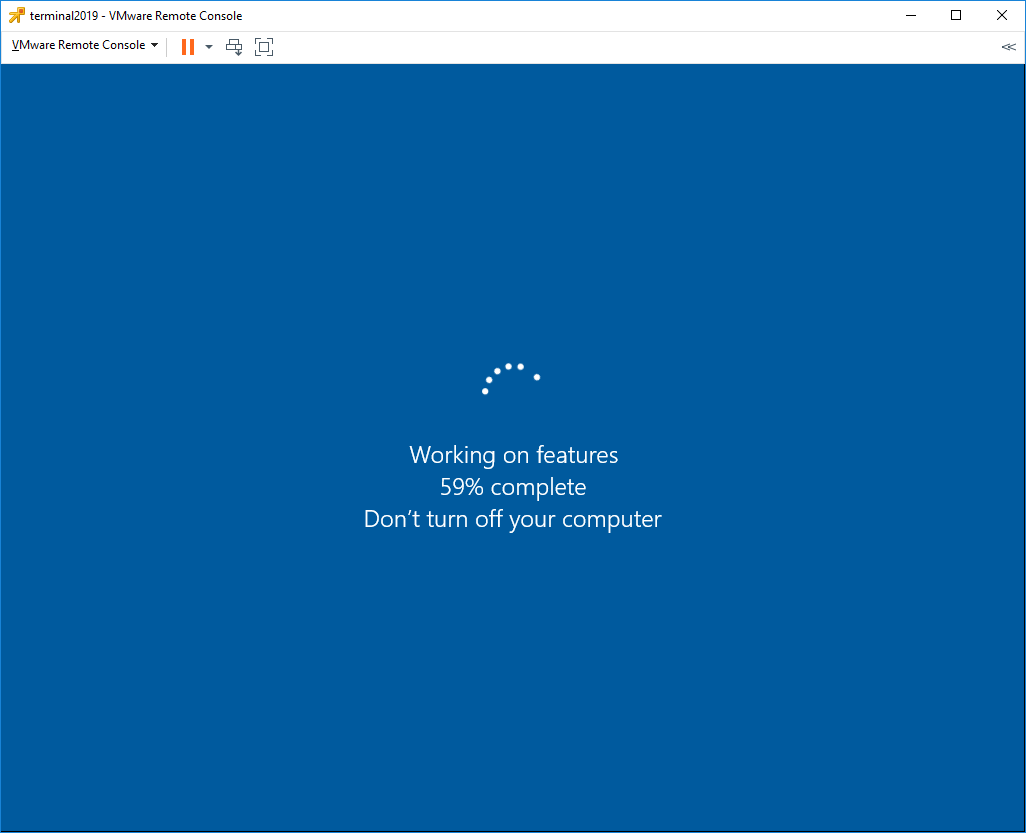
В процессе устанавливаются компоненты.
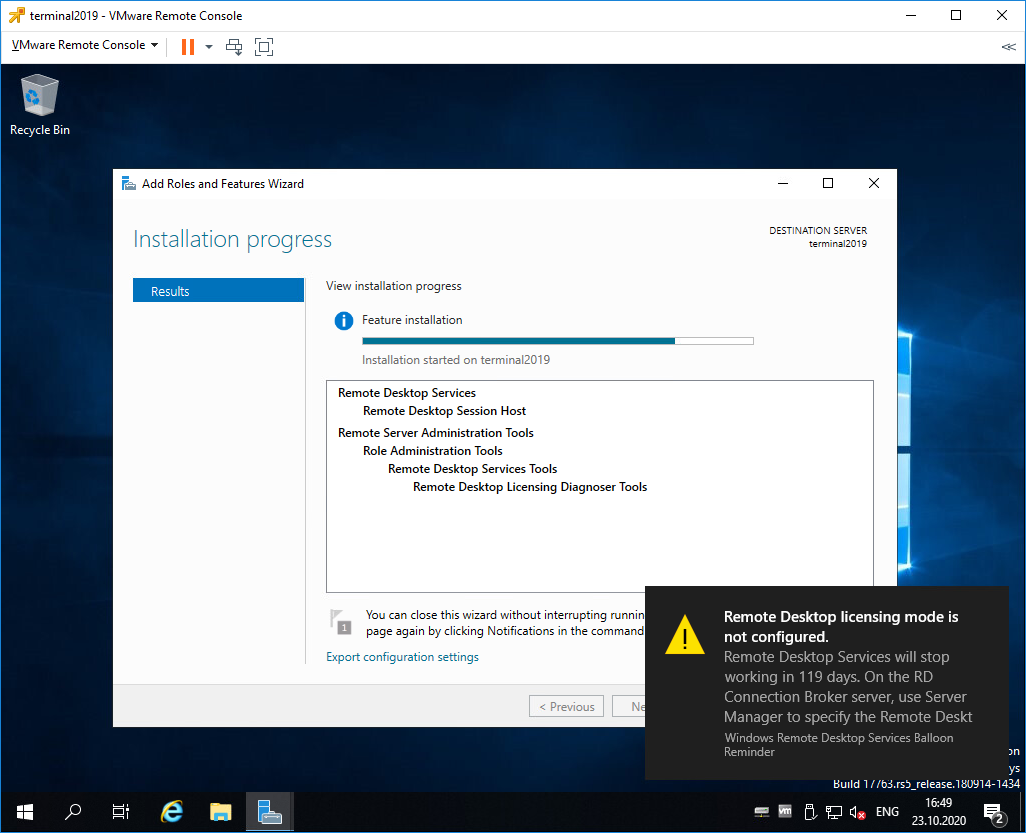
После перезагрузки автоматически продолжается установка роли. Триальный период работы терминального сервера — 119 дней.
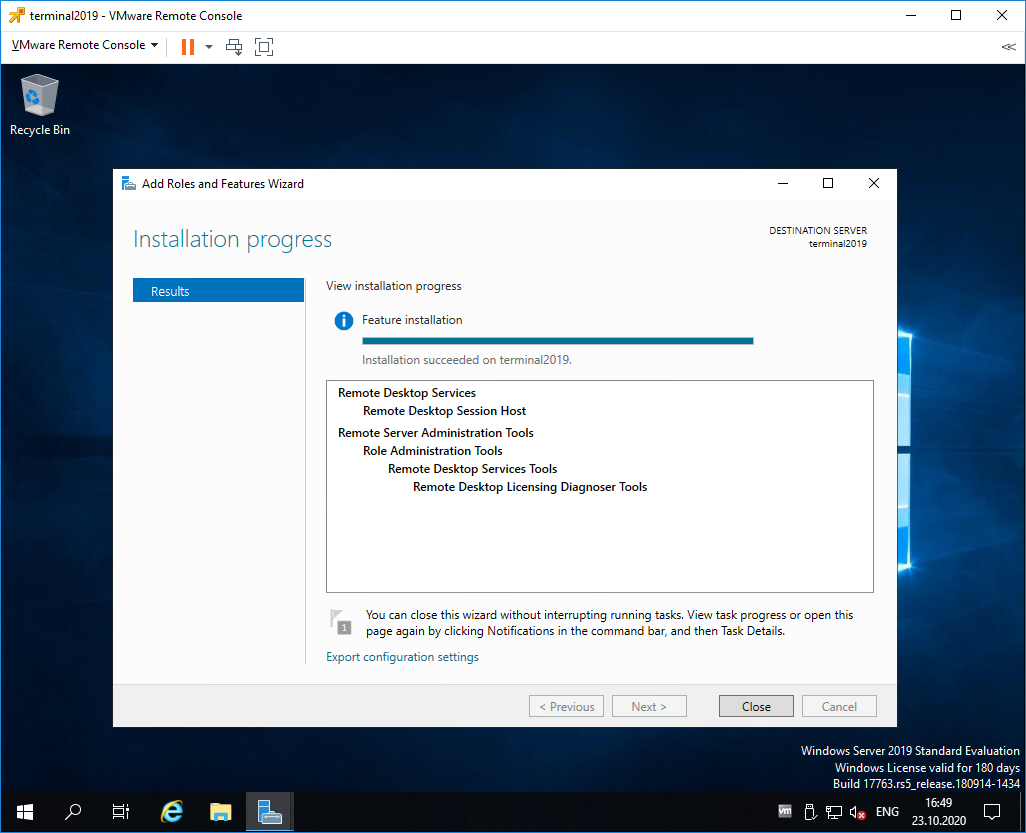
Роль Remote Desktop Session Host успешно установлена. Close.
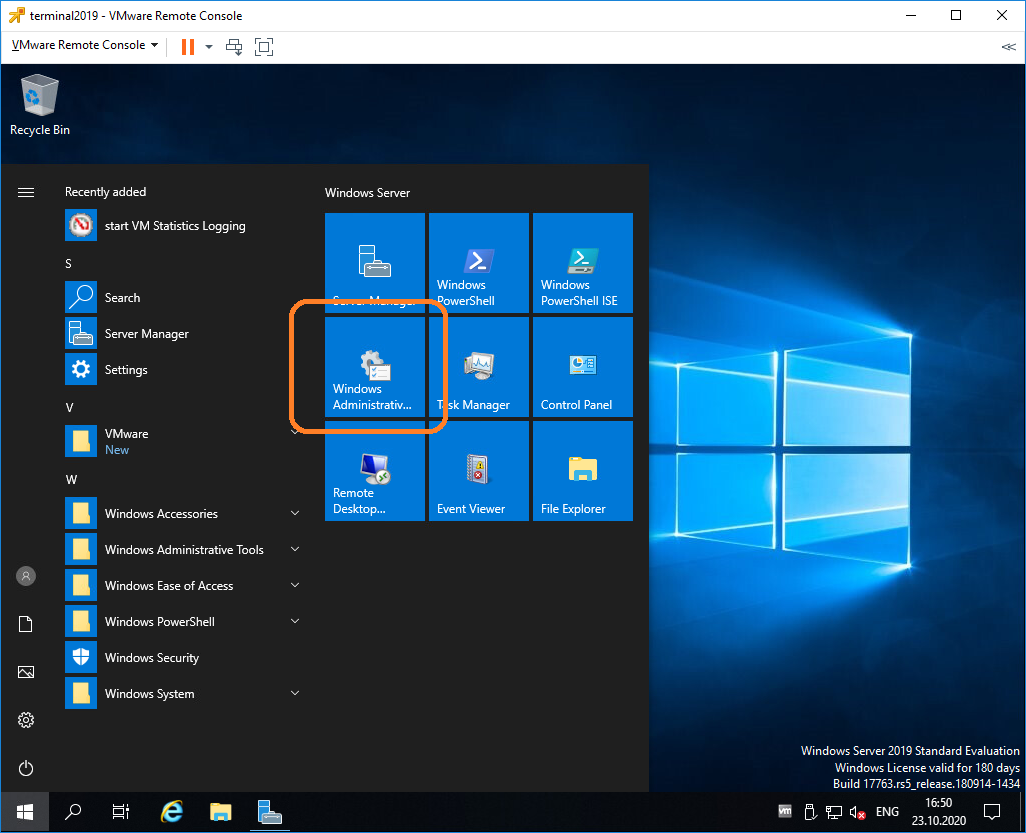
Открываем Windows Administrative Tools.
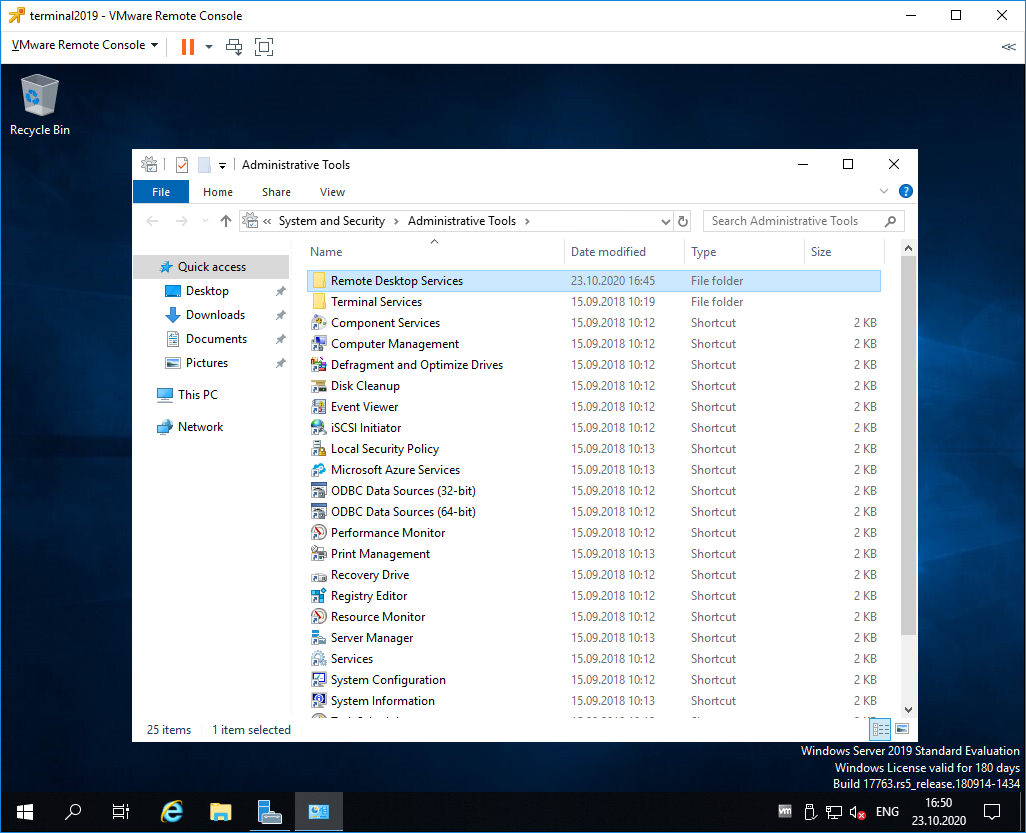
Переходим в папку Remote Desktop Services.
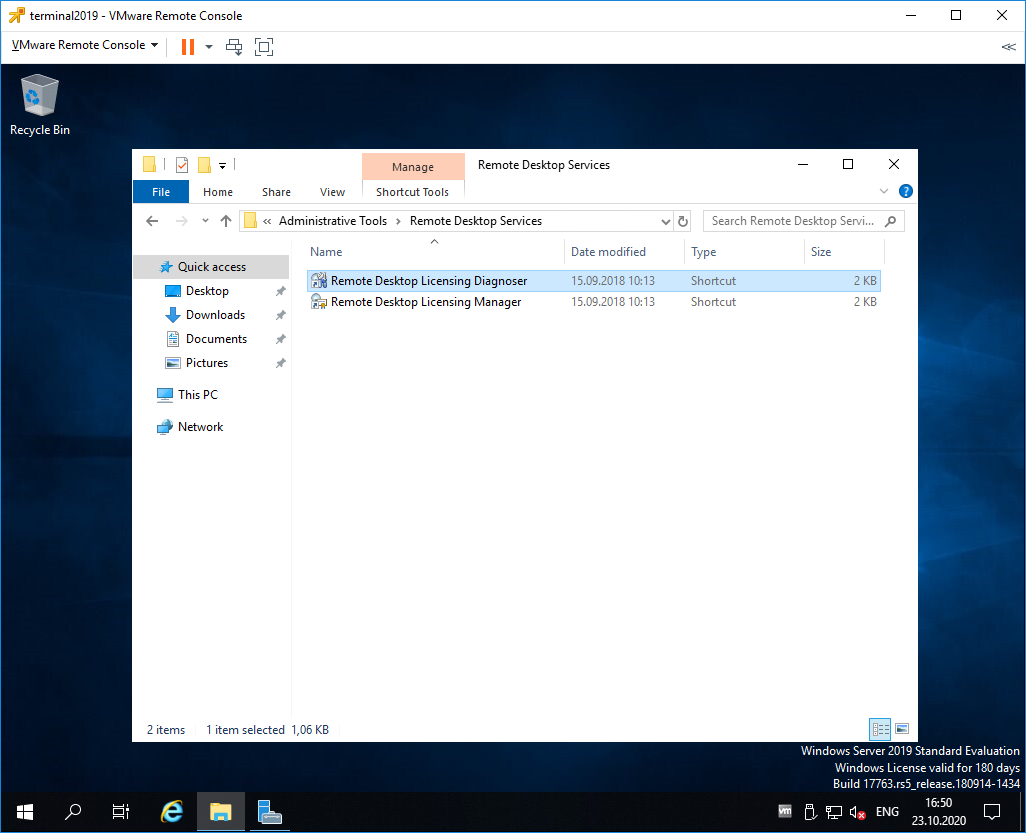
Запускаем оснастку Remote Desktop Licensing Diagnoser.
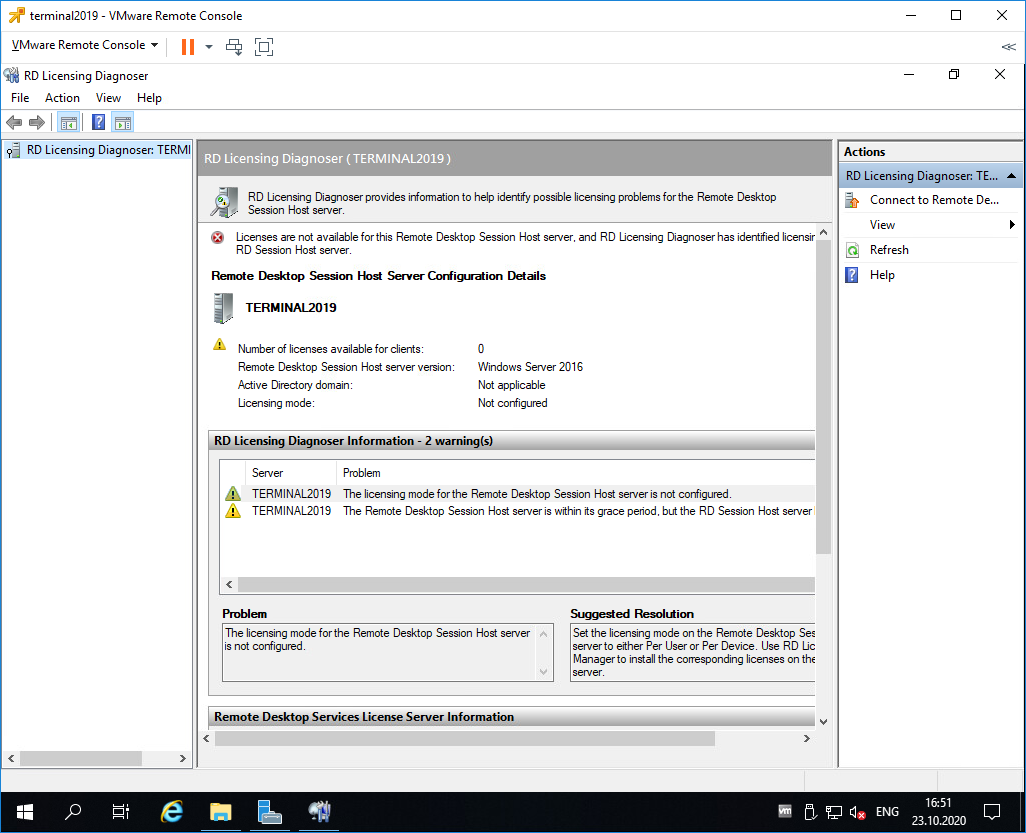
Видим ошибку.
The licensing mode for Remote Desktop Session Host server is not configured.
Выполняем gpedit.msc.
gpedit.msc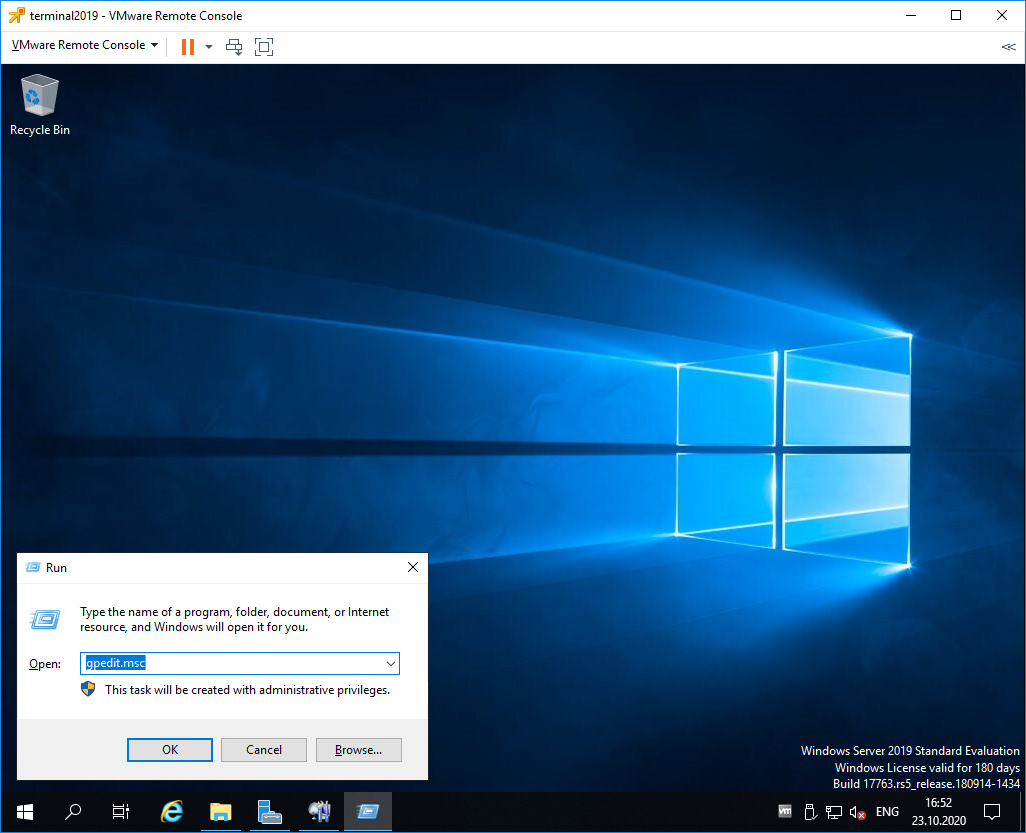
Откроется Local Group Policy Editor.
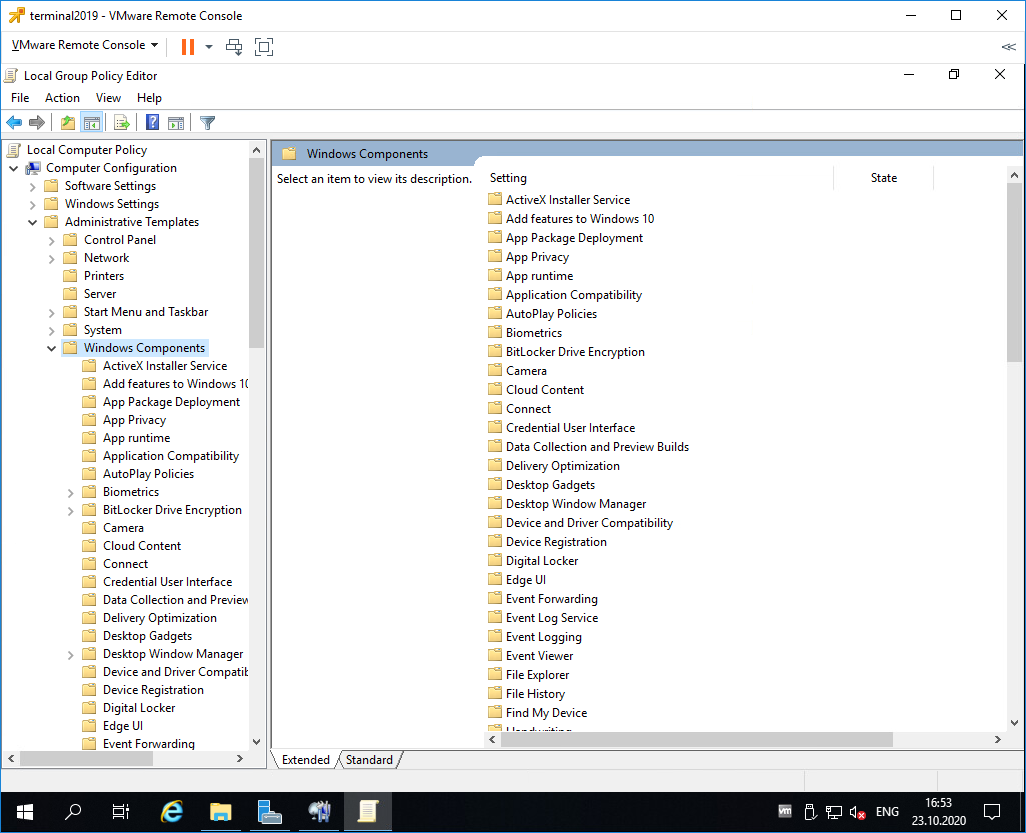
Раскрываем Computer Configuration > Administrative Templates > Windows Components > Remote Desktop Services > Remote Desktop Session Host > Licensing.
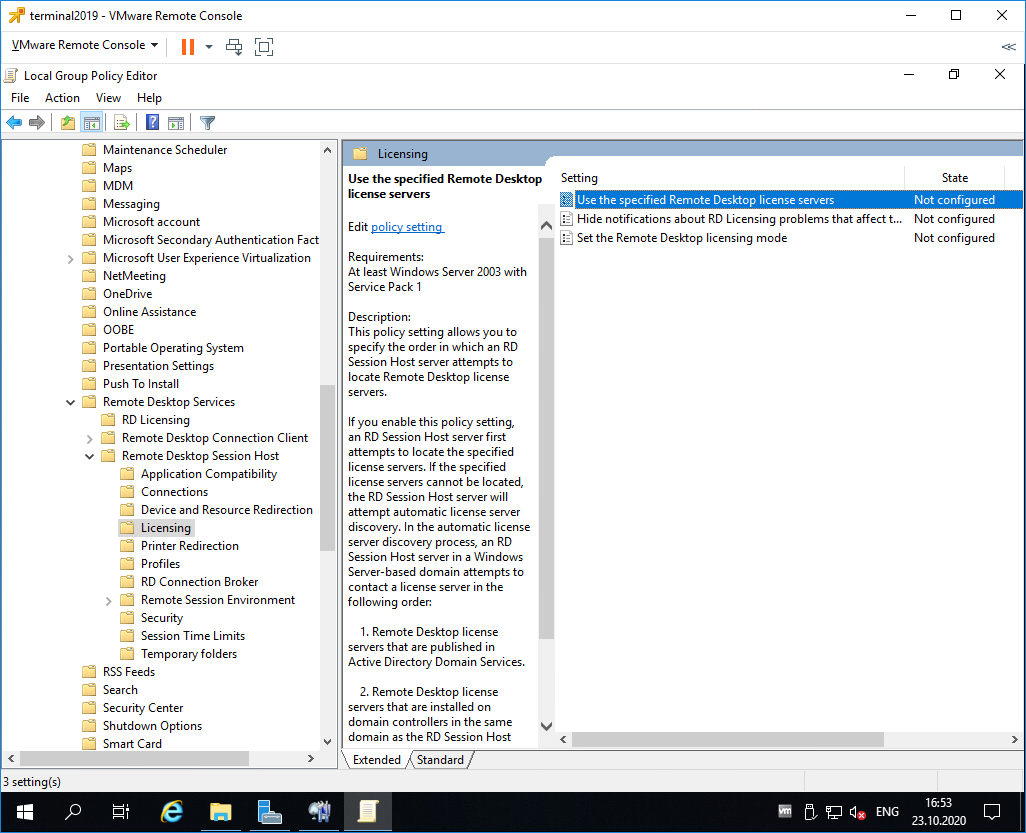
Редактируем Use the specified Remote Desktop license servers.
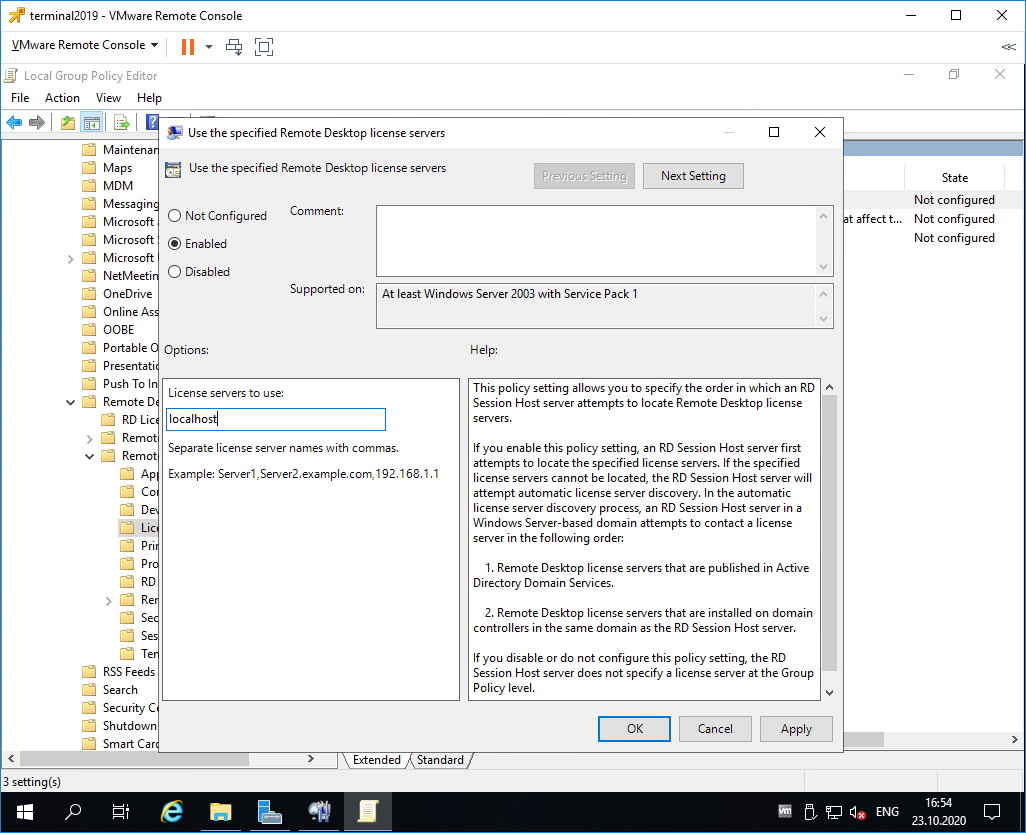
Включаем — Enabled. В поле «License server to use» прописываем сервер, с которого получать лицензии, в моём случае «localhost». OK.
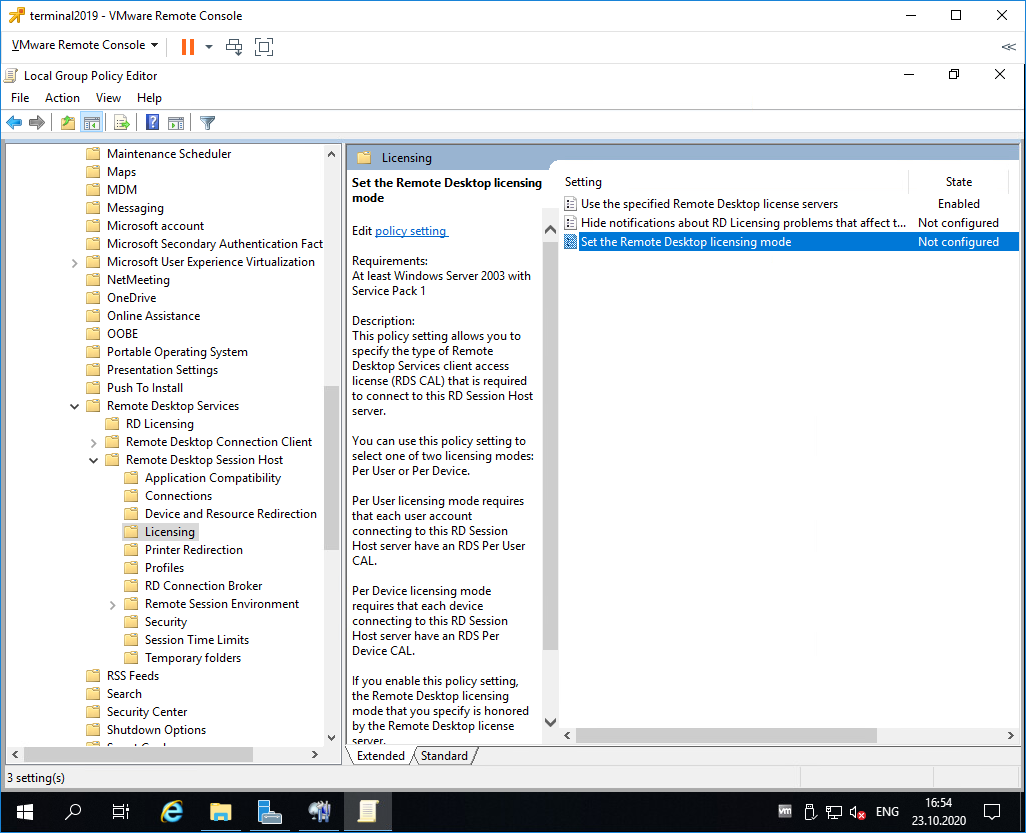
Редактируем Set the Remote Desktop licensing mode.
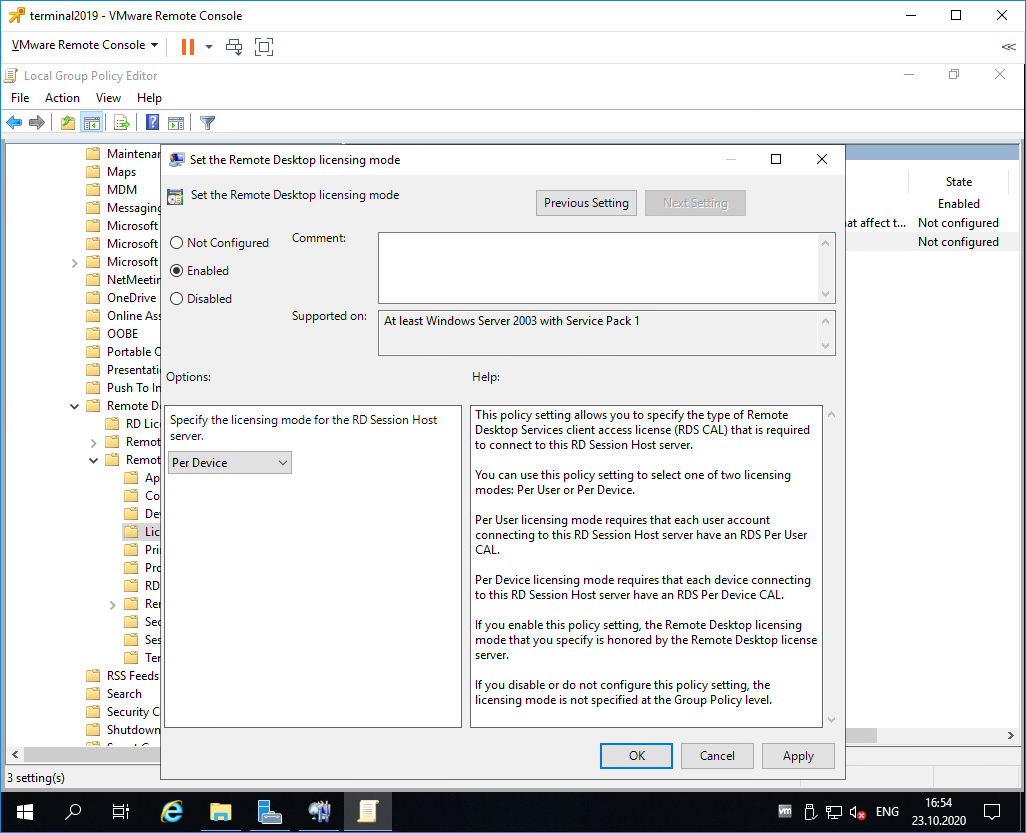
Включаем — Enabled. В поле «Specify the licensing mode for the RD Session Host server» устанавливаем значение Per Device. OK.
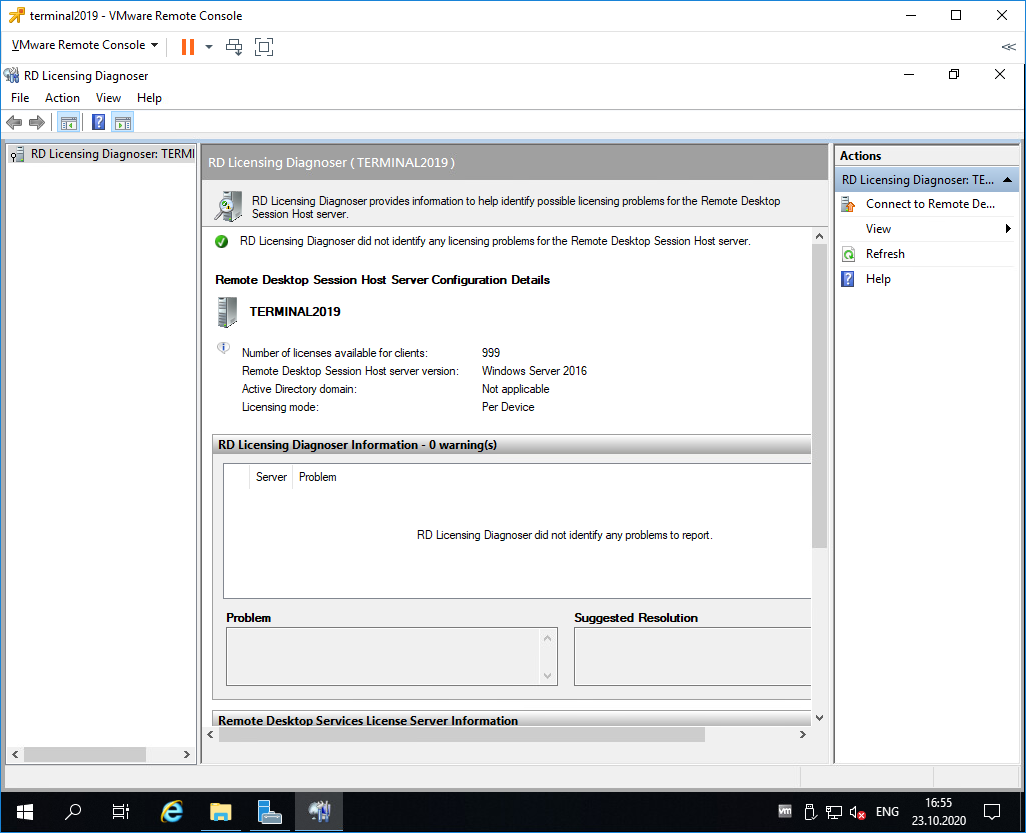
Снова запускаем оснастку Remote Desktop Licensing Diagnoser. Теперь всё зелёное, ошибок нет.
Практические испытания
Поскольку мы с вами системные администраторы 99 уровня, то нам нужно провести практические испытания терминального сервера.
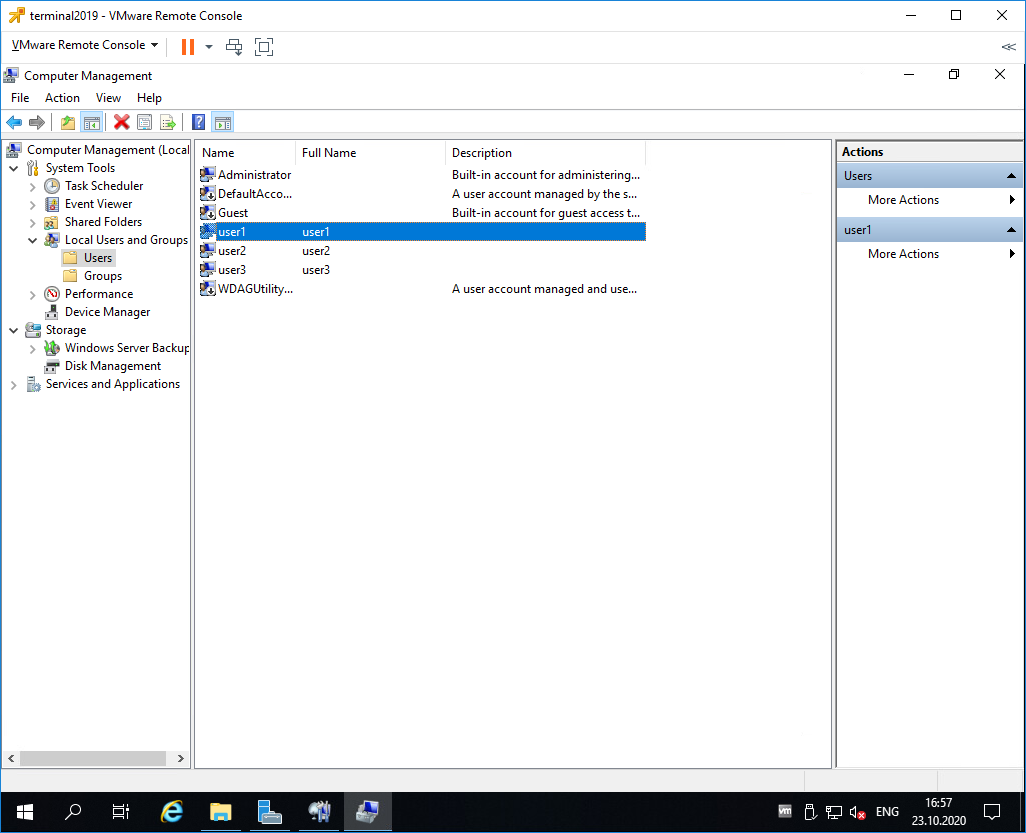
На терминальном сервере создаём трёх локальных пользователей: user1, user2, user3.
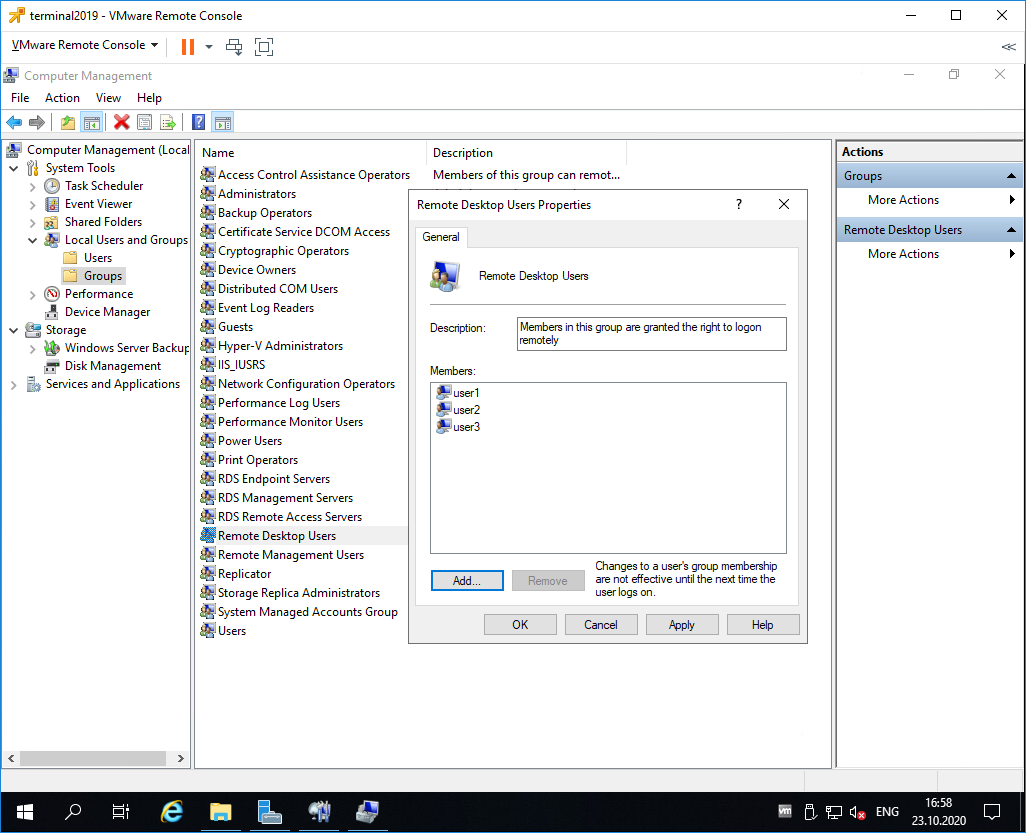
Включаем их в группу Remote Desktop Users.
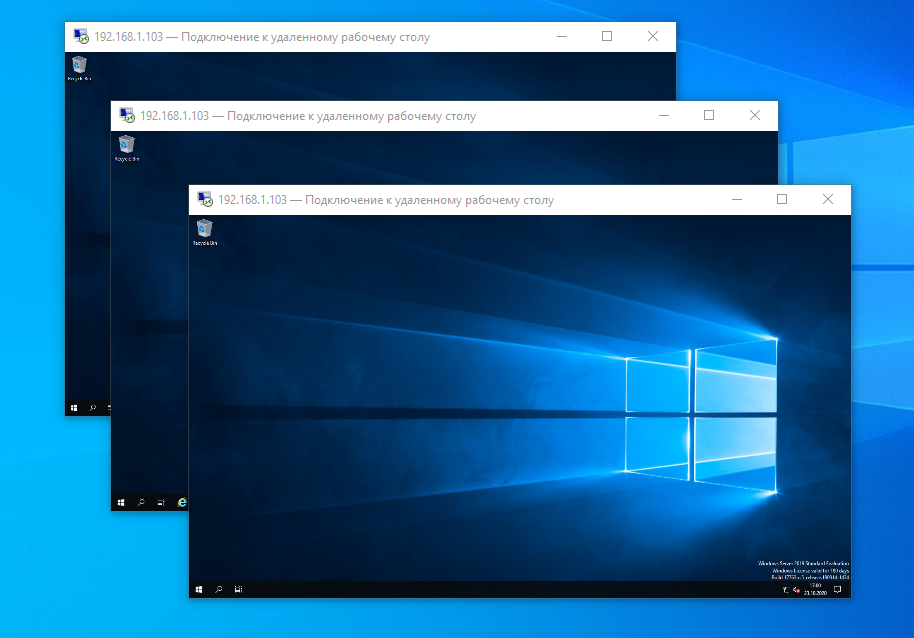
Коннектимся под этими пользователями к терминальному серверу по RDP.
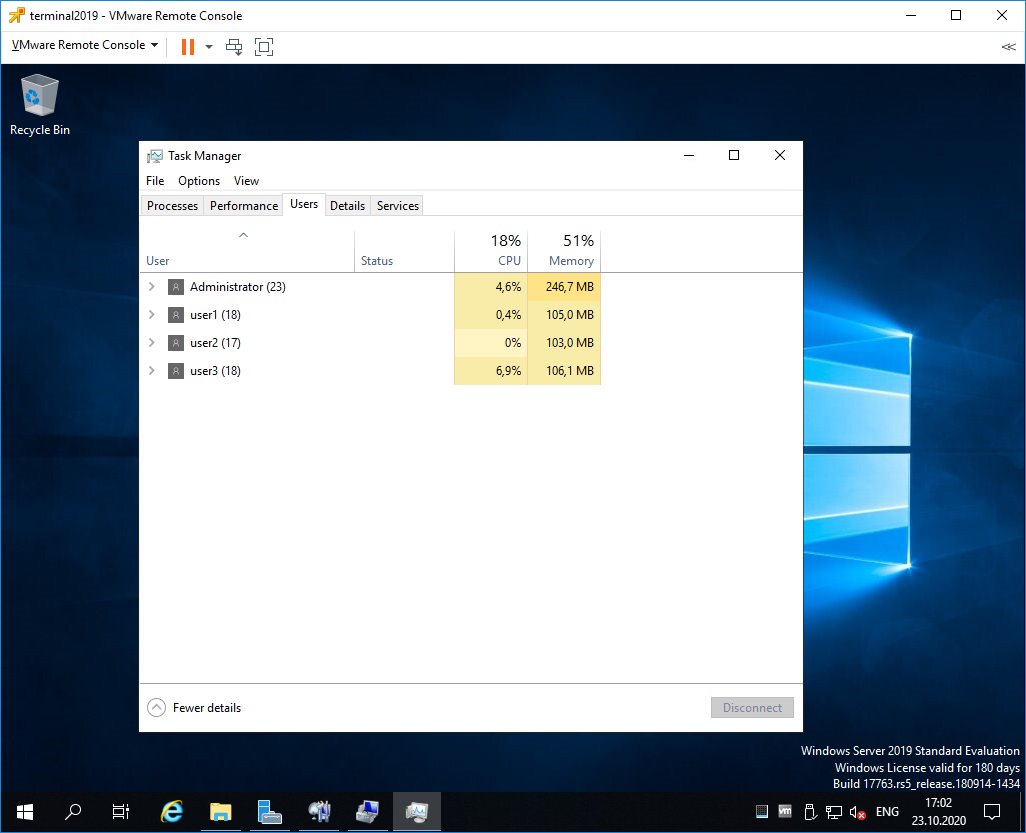
Есть три активных сеанса.
Заключение
Мы с вами успешно создали терминальный сервер Windows Server 2019 в рабочей группе WORKGROUP без домена. 120 дней терминальный сервер будет работать в триальном режиме, затем начнёт использовать лицензии Per Device. Для подключения к терминальному серверу требуется создать локальную учётную запись и включить её в группу Remote Desktop Users.