От терпения — опытность, от опытности — надежда (Сенека Старший).
Недавно нашей задачей было установить общедоступные компьютеры за отдельным маршрутизатором для контроля доступа в Интернет. Поскольку у нас полно компьютерных компонентов, мы решили построить маршрутизатор на более старом компьютере с операционной системой Ubuntu Server 18.04.1 LTS (Bionic Beaver).
Мы написали это руководство, чтобы помочь другим с подобной задачей.
ПРЕДПОСЫЛКИ
- Компьютер под управлением Ubuntu Server 18.04.1 LTS. Не будем вдаваться в подробности установки операционной системы Ubuntu. Это довольно просто.
- Как минимум два сетевых интерфейса. Один предназначен для глобальной сети, а другой — для локальной сети маршрутизатора. Вы также можете использовать некоторые коммутаторы в случае, если вы собираетесь подключить несколько устройств в локальной сети, купить коммутаторы или маршрутизаторы можно на сайте http://spw.ru/. Но это почти все, что вам нужно для работающего роутера.
Примечание
Поскольку мы будем изменять брандмауэр, мы бы не советовали настраивать его через SSH. Вы можете заблокировать себя во время процесса.
1. НАСТРОЙКА СЕТЕВЫХ ИНТЕРФЕЙСОВ
Во-первых, нам нужно настроить сетевые интерфейсы, которые мы будем использовать. В нашем случае eth0 будет WAN, а eth1 LAN.
WAN (eth0) — этот интерфейс получит IP от провайдера, поэтому мы оставляем его с помощью DHCP.
LAN (eth1) — мы настраиваем интерфейс со статическим IP внутри подсети, которую мы будем использовать для локальной сети
Небольшое замечание: Ubuntu 18.04 не использует традиционный файл конфигурации сети /etc/network/interfaces. Он использует NETPLAN. В нашем случае, есть конфигурационный файл, называется 50-cloud-init.yaml внутри папки /etc/netplan/. В вашем случае файл может иметь другое имя, просто найдите файл с расширением.yaml внутри папки netplan.
Давайте откроем это с помощью nano:
sudo nano /etc/netplan/50-cloud-init.yaml
Отредактируйте его в соответствии с потребностями вашей сети, в моем примере я настроил это так:
# Этот файл создан на основе информации, предоставленной
# источник данных. Изменения в нем не будут сохраняться во всем экземпляре.
# Чтобы отключить возможности сетевой конфигурации cloud-init, напишите файл
# /etc/cloud/cloud.cfg.d/99-disable-network-config.cfg со следующим:
# network: {config: disabled}
network:
    ethernets:
        eth0:
            dhcp4: true
        eth1:
            addresses:
            - 192.168.1.1/24
            dhcp4: false
            nameservers:
                addresses:
                - 8.8.8.8
                - 8.8.4.4
                search: []
    version: 2
Подводя итог: eth0, который является WAN, получает IP от модема интернет-провайдера. Eth1 является частью локальной сети маршрутизатора. Нам нужен статический IP и DNS-серверы (в нашем примере мы использовал Google). Также мы не настроили ни один шлюз на eth1.
Сохраните конфигурацию с помощью следующих команд:
sudo netplan generate
sudo netplan apply
2. НАСТРОЙКА СЕРВЕРА DHCP
Далее мы настроим DHCP-сервер. Мы действительно не хотим настраивать каждый клиент со статическим IP в сети LAN. Для этой задачи нам нужно установить следующий пакет.
sudo apt-get install isc-dhcp-server
Далее нам нужно отредактировать файл /etc/default/isc-dhcp-server. Это сообщает DHCP-серверу, какой сетевой интерфейс он должен прослушивать. В нашем случае это конечно eth1, интерфейс локальной сети.
Вводим команду:
sudo nano /etc/default/isc-dhcp-server
А под «INTERFACESv4» вставьте сетевой интерфейс вашей локальной сети. В нашем случае это eth1 :
INTERFACESv4 = "eth1"
Следующим шагом будет настройка DHCP-сервера. Это делается путем редактирования файла /etc/dhcp/dhcpd.conf
sudo nano /etc/dhcp/dhcpd.conf
Вот куча разных параметров, большинство из них комментируются # перед каждой строкой. Короче говоря, мы запишем только те параметры, которые мы использовал, и/или отредактируем их в соответствии со своими потребностями. Если вы хотите, вы можете удалить все содержимое этого файла и просто скопировать/вставить код ниже. Конечно, вы меняете IP-адреса, шлюзы и т. д. В соответствии с вашей собственной конфигурацией сети.
option domain-name "whatever.you.want";
option domain-name-servers 8.8.8.8, 8.8.4.4;
default-lease-time 600;
max-lease-time 7200;
ddns-update-style none;
authoritative;
log-facility local7;
subnet 192.168.1.0 netmask 255.255.255.0 {
     range 192.168.1.101 192.168.1.200;
     option subnet-mask 255.255.255.0;
     option routers 192.168.1.1;
     option broadcast-address 192.168.1.255;
}
Теперь давайте применим настройки и включим DHCP-сервер при загрузке с помощью следующих команд:
sudo systemctl restart isc-dhcp-server
sudo systemctl enable isc-dhcp-server
С помощью следующей команды мы проверяем статус.
sudo systemctl status isc-dhcp-server
Если все настроено правильно, должна быть строка «ACTIVE». В противном случае вы что-то напутали в файле /etc/dhcp/dhcpd.conf. Возможно, отсутствует точка с запятой или скобка.
3. НАСТРОЙКА ФАЙЕРВОЛА
Чтобы иметь функциональный маршрутизатор, нам нужно правильно настроить брандмауэр. Это делается путем записи некоторых правил iptables. Чтобы сохранить правила при перезапуске сервера, мы создали скрипт, который будет выполняться во время загрузки.
Сначала давайте включим UFW с…
sudo ufw enable
Далее нам нужно включить пересылку пакетов из WAN в LAN. У нас следующий параметр внутри файла /etc/ufw/sysctl.conf:
Открываем файл…
sudo nano /etc/ufw/sysctl.conf
… и мы просто удаляем # перед следующей строкой:
net/ipv4/ip_forward=1
В Ubuntu 18.04 файл /etc/rc.local больше не существует. Но мы все еще можем создать это с:
sudo nano /etc/rc.local
Затем скопируйте/вставьте следующий скрипт. Есть комментарии, объясняющие каждое правило iptables. Вы можете удалить их, если хотите, но вы НЕ должны удалять #! /bin/bash. Также измените eth0 и eth1, если ваши сетевые интерфейсы имеют несколько разных имен.
#!/bin/bash

# /etc/rc.local

# Default policy to drop all incoming packets.
iptables -P INPUT DROP
iptables -P FORWARD DROP

# Accept incoming packets from localhost and the LAN interface.
iptables -A INPUT -i lo -j ACCEPT
iptables -A INPUT -i eth1 -j ACCEPT

# Accept incoming packets from the WAN if the router initiated the connection.
iptables -A INPUT -i eth0 -m conntrack \
--ctstate ESTABLISHED,RELATED -j ACCEPT

# Forward LAN packets to the WAN.
iptables -A FORWARD -i eth1 -o eth0 -j ACCEPT

# Forward WAN packets to the LAN if the LAN initiated the connection.
iptables -A FORWARD -i eth0 -o eth1 -m conntrack \
--ctstate ESTABLISHED,RELATED -j ACCEPT

# NAT traffic going out the WAN interface.
iptables -t nat -A POSTROUTING -o eth0 -j MASQUERADE

# rc.local needs to exit with 0
exit 0
Этот сценарий должен выполняться во время загрузки, поэтому нам нужно сделать файл исполняемым с помощью следующей команды:
sudo chmod 755 /etc/rc.local
И это все. Мы перезагружаем маршрутизатор с помощью команды sudo reboot, и мы готовы к работе. 🙂
Если вы нашли ошибку, пожалуйста, выделите фрагмент текста и нажмите Ctrl+Enter.
1 812 просмотров
Contents
-
Setting up an Ubuntu Wired/Wireless Router
- Preface
- Scripted wired:wired router
-
Network Manager
-
Typical Example
- Quick and Dirty
-
Typical Example
- Technical Overview
-
Prerequisites
- Internet Connection
-
Router Hardware
- Use your desktop PC
- Dedicated Hardware
- Terminology
- Internal Network Information
-
Setting Up Your Network Interfaces
- Device Naming Overview
- Taking a Backup
-
Configuring the External Network Interface
-
Setting up External Network Interface
- For Dynamic IP Addresses (DHCP) Only
- For PPPoE connection with dynamic IP address only
- For Static IP Address Only
- Testing Connectivity
-
Setting up External Network Interface
-
Configuring the Internal Network Interfaces
- Wired Only
- Wireless Only
- Both Wired and Wireless
- Enable IP forwarding and Masquerading
- Firewall
- DHCP and DNS
1. Setting up an Ubuntu Wired/Wireless Router
1.1. Preface
This article is intended for intermediate and advanced users who would like to set up an Ubuntu installation acting as a router at home or in their office. The end result is a powerful router that can provide functionality similar to popular products (for example, the Linksys WRT54G).
1.2. Scripted wired:wired router
I (user id Snake_Byte) created a python script a while back that sets up a wired router for you given some basic info (check the readme).
Tested on Karmic and Lucid, let me know if you have any problems. I want to start a GUI project to make this simpler, and incorporate wireless features if anyone is interested, we can get a repo going.
[Note added: The script included in this page at the link below assumes different addresses than on the rest of the page and MUST BE EDITED to replace the assumed IP address and range for your private network, and to remover the examples, before use. Furthermore, for recent versions of Debian and Ubuntu, the assumed dhcp3-server must be replaced by a more modern server, such as isc-dhcp-server, and all references to dhcp3 and dhcp3 should be replaced by just dhcp once you do so. Thus you should LOOK OVER ALL OF THE CONTENTS of the directory tree after unpacking the tar file — so not just blindly execute it before doing so.]
You can get it here:
ubuntu router.tar
1.3. Network Manager
This tool is perfect for simple networking problems, especially for laptop users. It is not appropriate for setting up a router, even though it does have a very basic internet connection sharing capability.
1.3.1. Typical Example
Home Office
The basis is one PC connected to a broadband internet connection. Additional devices:
- network printer
- wifi PDA
- laptop
Some of these devices should be able to communicate with each other, some should be allowed to communicate with the internet. Some are wired, and some are wireless. With this guide, your PC can share the internet over additional network interfaces, such as wireless cards and ethernet cards.
University
Single PC on a university LAN. Additional devices:
- X-Box running mythbuntu
- Wifi mobile phone
- laptops
1.3.1.1. Quick and Dirty
If you would like to try to do the same thing the ‘quick and dirty’ way, see EasyRouter, a much quicker method with much less flexibility.
1.4. Technical Overview
The router that will be created is an Internet gateway for wired and/or wireless clients to share an internet connection with one IP address.
The essential components are:
-
routing of packets from your local networks to the internet, with IP_masquerading
- handling DNS requests
- providing IP addresses to devices on your local networks (DHCP)
This router can also provide:
- A firewall
- port forwarding
2. Prerequisites
2.1. Internet Connection
This is not strictly necessary, but is probably the reason you are following this article. You can set up a router in an isolated network using these instructions, but you will likely have specialist requirements, and need to make changes.
2.2. Router Hardware
2.2.1. Use your desktop PC
If you have a recent PC, bought in the last two years, it probably has enough horsepower to run all your normal applications and act as a router at the same time.
2.2.2. Dedicated Hardware
You’ll need a dedicated computer to act as the router. The computer can use old hardware and having the minimum requirements to install Ubuntu should suffice. The author of this article runs his router on a P3 600mhz processor with 256MB of RAM. You are encouraged use this as a server for other applications perhaps by installing postfix, apache, mysql, and/or samba. This guide recommends a server installation of Ubuntu, but there’s no reason why a desktop installation wouldn’t work. If you plan to be able to access the router remotely, install ssh before proceeding.
The following needs to be physically installed and recognized by the kernel on your router:
- A network adapter
-
For a wired network,
- Another network adapter, typically an ethernet port on a motherboard, or PCI card.
-
For a wireless network,
- A wireless network adapter
-
Ideally it should be able run in «master» mode, although «ad-hoc» mode might be good enough. Cards and chipsets which can work in master mode (otherwise known as access point or ap mode), are listed at the Linux Wireless Project.
-
sudo ip link set dev <interface name> down && sudo iwconfig <interface name> mode master should not return an error; but some cards take extra commands to set master mode. mac80211 compatible drivers can run cards in master mode. Pay careful attention to what hardware you buy.
-
If your wireless network adapter is not recognized by your server installation of Ubuntu, it may use the madwifi chipset (like the D-Link DWL-G520). Please visit Router/Madwifi for more information.
-
- A wireless network adapter
Running ip addr will show you what network interfaces are available.
2.2.3. Terminology
interface is used to mean the operating system’s name for a place which sends or receives data packets. It is often, but not necessarily, the same as a device. An interface may have several devices associated (e.g. a bridge), or a single device may have several interfaces. device will refer here to the bit of hardware dealing with your network connections.
3. Internal Network Information
Here are the values we’ll use to set up your internal network. Advanced users use caution when changing them as the changes will need to be reflected in all further router configuration.
Firstly, discover the IP address of your internet-connected interface. If you are plugged into a business or academic LAN, this is very likely to be given by:
ip addr show eth0
For a home broadband user, it may be a ppp interface; and a wireless user could have any number of interface names, such as ethX, wlanX, athX, where X is a digit.
Be aware that it is important to use different numbers below to the one given to your internet device. This is probably the case already, but if you are not directly connected to the internet, you may be on a LAN with the same address range. If you already have a broadband router, for example, it might have given you the 192.168.0.2 address, and kept 192.168.0.1 for itself. If so, change the third digit (0) to another number (and do so throughout the rest of this tutorial).
|
Router |
|
|
Address |
192.168.0.1 |
|
Network |
192.168.0.0/24 |
|
Broadcast |
192.168.0.255 |
|
Clients |
|
|
Addresses |
192.168.0.2 — 192.168.0.254 |
|
Prefix length |
/24 |
|
Broadcast |
192.168.0.255 |
|
Gateway |
192.168.0.1 |
4. Setting Up Your Network Interfaces
4.1. Device Naming Overview
|
Network Device |
Internal or External Network |
Description |
|
eth0 |
External |
Network adapter connected to an external network (your broadband connection) |
|
eth1 |
Internal |
Network adapter connected to a hub or switch |
|
wlan0 |
Internal |
Wireless network adapter |
|
br0 |
Internal |
Network bridge between eth1 and wlan0 that will treat the two like one device |
It is important to note that the names of the network interfaces above (eth0, eth1, and wlan0) are used as convention. It is very likely that your router will recognize its devices under different names (for example, madwifi calls its wireless device ath0). Please substitute the names of your device accordingly. For information about how to change the names of your network devices, try man iftab.
4.2. Taking a Backup
Issue the following command to take a backup of your current network configuration:
-
sudo cp /etc/network/interfaces /etc/network/interfaces.bak
4.3. Configuring the External Network Interface
4.3.1. Setting up External Network Interface
Here, we configure the Ubuntu networking system to bring the the local loopback and external network interfaces up by editing /etc/networking/interfaces. The primary goal here is to set up your external network interface (eth0, or whatever you’re using in place of it) to be brought up by the networking subsystem. The examples below are only for the most basic setups. If your setup requires additional configuration, for example you need to setup ADSL with PPPoE, adapt the following examples so that the end result is your external network interface connected to the Internet.
4.3.1.1. For Dynamic IP Addresses (DHCP) Only
Open /etc/network/interfaces with your favourite editor. Delete everything and paste in what is below. Follow the commented out instructions carefully.
-
# Set up the local loopback interface
auto lo
iface lo inet loopback

# Set up the external interface
#
# Don't forget to change eth0 to the proper name of the external
# interface if applicable.
#
auto eth0
iface eth0 inet dhcp
4.3.1.2. For PPPoE connection with dynamic IP address only
See forum.
4.3.1.3. For Static IP Address Only
Open /etc/network/interfaces with your favourite editor. Delete everything and paste in what is below. Follow the commented out instructions carefully.
-
# Set up the local loopback interface
auto lo
iface lo inet loopback

# Set up the External interface
#
# For every xxx.xxx.xxx.xxx, enter the numeric address given to you
# by your Internet provider. Don't forget to change eth0 to the proper
# name of the external interface if applicable.
#
auto eth0
iface eth0 inet static
    address xxx.xxx.xxx.xxx
    netmask xxx.xxx.xxx.xxx
    gateway xxx.xxx.xxx.xxx
Now, set up your DNS servers as given to you by your service provider in /etc/resolv.conf, which should look something like this
-
nameserver xxx.xxx.xxx.xxx
nameserver xxx.xxx.xxx.xxx
You can visit the Ubuntu Server Guide — Network Configuration documentation for more information
4.3.2. Testing Connectivity
Reload the network configuration and test for connectivity,
-
sudo /etc/init.d/networking restart
ping -c 3 -W 10 ubuntu.com
And if all goes well something similar should return:
-
PING ubuntu.com (82.211.81.166) 56(84) bytes of data.
64 bytes from signey.ubuntu.com (82.211.81.166): icmp_seq=1 ttl=43 time=99.9 ms
64 bytes from signey.ubuntu.com (82.211.81.166): icmp_seq=2 ttl=43 time=109 ms
64 bytes from signey.ubuntu.com (82.211.81.166): icmp_seq=3 ttl=43 time=100 ms

--- ubuntu.com ping statistics ---
3 packets transmitted, 3 received, 0% packet loss, time 2001ms
rtt min/avg/max/mdev = 99.982/103.450/109.419/4.254 ms
4.4. Configuring the Internal Network Interfaces
4.4.1. Wired Only
Append the following to /etc/network/interfaces and follow the commented out instructions carefully.
-
# Set up the internal wired network
#
# Don't forget to change eth1 to the proper name of the internal
# wired network interface if applicable.
#
auto eth1
iface eth1 inet static
    address 192.168.0.1
    network 192.168.0.0
    netmask 255.255.255.0
    broadcast 192.168.0.255
Your internal network interface is: eth1 (or whatever you’re using in place of it)
4.4.2. Wireless Only
If you plan on using WEP, generate a network key,
-
dd if=/dev/random bs=1 count=13 2>/dev/null | xxd -p
Append the following to /etc/network/interfaces and follow the commented out instructions carefully.
-
# Set up the internal wireless network
#
# Don't forget to change wlan0 to the proper name of the internal
# wireless network interface if applicable.
#
# If you would like to use WEP, uncomment the line 'wireless-key'
# and replace '<key goes here>' with a WEP key.
#
# You may also change the network essid and channel.
#
auto wlan0
iface wlan0 inet static
    wireless-mode master
    wireless-essid "UbuntuWireless"
    wireless-channel 1
    #wireless-key <key goes here>
    address 192.168.0.1
    network 192.168.0.0
    netmask 255.255.255.0
    broadcast 192.168.0.255
Your internal network interface is: wlan0 (or whatever you’re using in place of it)
4.4.3. Both Wired and Wireless
First install the necessary tools to create a network bridge,
-
sudo apt-get install bridge-utils
If you plan on using WEP, generate a network key,
-
dd if=/dev/random bs=1 count=13 2>/dev/null | xxd -p
Append the following to /etc/network/interfaces and follow the commented out instructions carefully.
-
# Set up the internal wireless network
#
# Don't forget to change wlan0 to the proper name of the internal
# wireless network interface if applicable.
#
# If you would like to use WEP, uncomment the line 'wireless-key'
# and replace '<key goes here>' with a WEP key.
#
# You may also change the network essid and channel.
#
auto wlan0
iface wlan0 inet manual
    wireless-mode master
    wireless-essid "UbuntuWireless"
    wireless-channel 1
    #wireless-key <key goes here>

# Set up the internal wired network
#
# It's not necessary to bring this interface up as the bridge
# we are about to create does this. Leave these lines commented.
#
#auto eth1
#iface eth1 inet manual


# Set up the internal wired/wireless network bridge
#
# Don't forget to change wlan0 and eth1 to the proper name of
# the internal wired and wireless interfaces if applicable.
#
auto br0
iface br0 inet static
    address 192.168.0.1
    network 192.168.0.0
    netmask 255.255.255.0
    broadcast 192.168.0.255
    bridge-ports eth1 wlan0
Your internal network interface is: br0
4.5. Enable IP forwarding and Masquerading
Doing the above might not be enough to make the Ubuntu machine a real router which does NAT (Network Address Translation) and IP Forwarding. The following script configures the Kernel IPTable and IP forwarding. You will have to configure at least the script’s 2 variables; the 1st is the external network interface; the 2nd is the internal network interface.
-
EXTIF="eth0"
INTIF="eth1"
The script was originally from a Ubuntu router guide forum article which has 2 internal network interfaces. What’s showing below uses only 1 internal network interface. You will have to modify the script manually or use the script in the Ubuntu router guide forum article if you need to configure 2 internal network interfaces.
-
echo -e "\n\nLoading simple rc.firewall-iptables version $FWVER..\n"
DEPMOD=/sbin/depmod
MODPROBE=/sbin/modprobe

EXTIF="eth0"
INTIF="eth1"
#INTIF2="eth0"
echo "   External Interface:  $EXTIF"
echo "   Internal Interface:  $INTIF"

#======================================================================
#== No editing beyond this line is required for initial MASQ testing ==
echo -en "   loading modules: "
echo "  - Verifying that all kernel modules are ok"
$DEPMOD -a
echo "----------------------------------------------------------------------"
echo -en "ip_tables, "
$MODPROBE ip_tables
echo -en "nf_conntrack, "
$MODPROBE nf_conntrack
echo -en "nf_conntrack_ftp, "
$MODPROBE nf_conntrack_ftp
echo -en "nf_conntrack_irc, "
$MODPROBE nf_conntrack_irc
echo -en "iptable_nat, "
$MODPROBE iptable_nat
echo -en "nf_nat_ftp, "
$MODPROBE nf_nat_ftp
echo "----------------------------------------------------------------------"
echo -e "   Done loading modules.\n"
echo "   Enabling forwarding.."
echo "1" > /proc/sys/net/ipv4/ip_forward
echo "   Enabling DynamicAddr.."
echo "1" > /proc/sys/net/ipv4/ip_dynaddr
echo "   Clearing any existing rules and setting default policy.."

iptables-restore <<-EOF
*nat
-A POSTROUTING -o "$EXTIF" -j MASQUERADE
COMMIT
*filter
:INPUT ACCEPT [0:0]
:FORWARD DROP [0:0]
:OUTPUT ACCEPT [0:0]
-A FORWARD -i "$EXTIF" -o "$INTIF" -m conntrack --ctstate ESTABLISHED,RELATED -j ACCEPT
-A FORWARD -i "$INTIF" -o "$EXTIF" -j ACCEPT
-A FORWARD -j LOG
COMMIT
EOF

echo -e "\nrc.firewall-iptables v$FWVER done.\n"
After configuring the 2 variables, save the script below as nat.sh and make it executable by doing
-
chmod a+x nat.sh
Now, test the script by running as root
-
sudo sh nat.sh
Investigate the messages from the console output to see if any error happened. If everything looks fine, use another host in the internal network to test if it can access the external network (presumably the Internet). A quick way to test is pinging Google public DNS from the console.
-
ping -c 3 -W 10 8.8.8.8
If ping responds, make our new script bootable so we don’t have to run the script every time we restart.
-
sudo cp nat.sh /etc/init.d/
sudo ln -s /etc/init.d/nat.sh /etc/rc2.d/S95masquradescript
As a final test, restart your computer and test to see if you still have the same functionality. If so then congratulations! If not then make sure you followed the above correctly so the script is bootable.
5. Firewall
See Router/Firewall
6. DHCP and DNS
Dynamic Host Configuration Protocol (DHCP)
CategoryNetworking
Follow through this tutorial to learn how to configure Ubuntu 20.04 as Linux router. Linux is awesome, It can function as “anything”, -:). Just like how you can use any other router to route your traffic between local networks and even to the internet.
Table of Contents
There is more to configuring a Linux system to function as a router. However, in this tutorial, we will be covering how to configure Linux router to route traffic to Internet via WAN interface as well as route traffic between LAN via LAN interfaces.
Below is our basic setup diagram;

Assign Static IP Addresses to the Linux Router
As per our setup, our Linux router has three interfaces attached:
- enp0s3: WAN Interface with IP 192.168.100.101 (bidged, static)
- enp0s8: LAN, 172.16.0.1/24, (static)
- enp0s9: LAN 172.16.1.1/24, (static)
IP Address details on the Ubuntu router
ip add
1: lo:  mtu 65536 qdisc noqueue state UNKNOWN group default qlen 1000
    link/loopback 00:00:00:00:00:00 brd 00:00:00:00:00:00
    inet 127.0.0.1/8 scope host lo
       valid_lft forever preferred_lft forever
    inet6 ::1/128 scope host
       valid_lft forever preferred_lft forever
2: enp0s3:  mtu 1500 qdisc fq_codel state UP group default qlen 1000
    link/ether 08:00:27:df:2c:b4 brd ff:ff:ff:ff:ff:ff
    inet 192.168.100.101/24 brd 192.168.100.255 scope global dynamic enp0s3
       valid_lft 86100sec preferred_lft 86100sec
    inet6 fe80::a00:27ff:fedf:2cb4/64 scope link
       valid_lft forever preferred_lft forever
3: enp0s8:  mtu 1500 qdisc fq_codel state UP group default qlen 1000
    link/ether 08:00:27:12:62:bf brd ff:ff:ff:ff:ff:ff
    inet 172.168.0.1/24 brd 172.168.0.255 scope global enp0s8
       valid_lft forever preferred_lft forever
    inet6 fe80::a00:27ff:fe12:62bf/64 scope link
       valid_lft forever preferred_lft forever
4: enp0s9:  mtu 1500 qdisc fq_codel state UP group default qlen 1000
    link/ether 08:00:27:66:4b:4f brd ff:ff:ff:ff:ff:ff
    inet 172.16.1.1/24 brd 172.16.1.255 scope global enp0s9
       valid_lft forever preferred_lft forever
    inet6 fe80::a00:27ff:fe66:4b4f/64 scope link
       valid_lft forever preferred_lft forever
IP addresses assignment;
cat /etc/netplan/00-installer-config.yamlnetwork:
version: 2
renderer: networkd
ethernets:
enp0s3:
dhcp4: no
addresses: [192.168.100.101/24]
gateway4: 192.168.100.1
nameservers:
addresses:
- 192.168.100.1
- 8.8.8.8
enp0s8:
dhcp4: no
addresses: [172.16.0.1/24]
enp0s9:
dhcp4: no
addresses: [172.16.1.1/24]
IP Address details on Other LAN Servers;
Host on 172.16.1.0/24 Network:
ip add
1: lo:  mtu 65536 qdisc noqueue state UNKNOWN group default qlen 1000
    link/loopback 00:00:00:00:00:00 brd 00:00:00:00:00:00
    inet 127.0.0.1/8 scope host lo
       valid_lft forever preferred_lft forever
    inet6 ::1/128 scope host
       valid_lft forever preferred_lft forever
2: enp0s3:  mtu 1500 qdisc fq_codel state UP group default qlen 1000
    link/ether 08:00:27:79:66:34 brd ff:ff:ff:ff:ff:ff
    inet 172.16.1.10/24 brd 172.16.1.255 scope global enp0s3
       valid_lft forever preferred_lft forever
    inet6 fe80::a00:27ff:fe79:6634/64 scope link
       valid_lft forever preferred_lft forever
cat /etc/netplan/00-installer-config.yamlnetwork:
version: 2
renderer: networkd
ethernets:
enp0s3:
dhcp4: no
addresses:
- 172.16.1.10/24
gateway4: 172.16.1.1
nameservers:
addresses:
- 172.16.1.1
- 8.8.8.8
Host on 172.16.0.0/24 Network:
ip add
1: lo:  mtu 65536 qdisc noqueue state UNKNOWN group default qlen 1000
    link/loopback 00:00:00:00:00:00 brd 00:00:00:00:00:00
    inet 127.0.0.1/8 scope host lo
       valid_lft forever preferred_lft forever
    inet6 ::1/128 scope host
       valid_lft forever preferred_lft forever
2: enp0s3:  mtu 1500 qdisc fq_codel state UP group default qlen 1000
    link/ether 08:00:27:3e:fe:0e brd ff:ff:ff:ff:ff:ff
    inet 172.16.0.10/24 brd 172.16.0.255 scope global noprefixroute enp0s3
       valid_lft forever preferred_lft forever
    inet6 fe80::eb09:7797:df2d:d54b/64 scope link noprefixroute
       valid_lft forever preferred_lft forever
cat /etc/sysconfig/network-scripts/ifcfg-enp0s3TYPE=Ethernet
PROXY_METHOD=none
BROWSER_ONLY=no
BOOTPROTO=none
IPADDR=172.16.0.10
PREFIX=24
GATEWAY=172.16.0.1
DEFROUTE=yes
IPV4_FAILURE_FATAL=no
IPV6INIT=yes
IPV6_AUTOCONF=yes
IPV6_DEFROUTE=yes
IPV6_FAILURE_FATAL=no
IPV6_ADDR_GEN_MODE=stable-privacy
NAME=enp0s3
UUID=ea93c07b-a40e-4e1f-a850-f97e2a762f9a
DEVICE=enp0s3
ONBOOT=yes
DNS1=172.16.0.1
DNS2=8.8.8.8
NM_CONTROLLED=no
At this point;
- no LAN device has Internet access
- only devices on same LAN can access each other
- No device can access devices on different LAN

Enable Kernel IP forwarding on Ubuntu Linux Router
Next, you need to enable IP forwarding in order for the Linux router box for it to function as a router, receive and forward packets.
Once this is done, devices on both 172.16.0.0/24 and 172.16.1.0/24 should be able to communicate.
To enable IP forwarding, you need to uncomment the line net.ipv4.ip_forward=1 on the /etc/sysctl.conf configuration file.
So, first check if the said line is already defined on the configuration file;
grep net.ipv4.ip_forward /etc/sysctl.confSample output;
#net.ipv4.ip_forward=1if the line is present in the config file and comment, simply uncomment by running the command below;
sed -i '/net.ipv4.ip_forward/s/^#//' /etc/sysctl.confOtherwise, just insert the line;
echo 'net.ipv4.ip_forward=1' >> /etc/sysctl.confNext, apply the changes;
sysctl -pCheck the status by running the command below;
sysctl net.ipv4.ip_forwardValue should be 1.
Verify IP forwarding between the two LANs.

Configure NATing and Forwarding on Linux Router
NATing and Forwarding can be handled using iptables or via the iptables front-end utility like UFW.
Configure Packet Forwarding
Configure the packets received from router LAN interfaces (enp0s8 and enp0s9) to be forwarded through the WAN interface, which in our case is enp0s3.
iptables -A FORWARD -i enp0s8 -o enp0s3 -j ACCEPTiptables -A FORWARD -i enp0s9 -o enp0s3 -j ACCEPTSimilarly, configure packets that are associated with existing connections received on a WAN interface to be forwarded to the LAN interfaces;
iptables -A FORWARD -i enp0s3 -o enp0s8 -m state --state RELATED,ESTABLISHED -j ACCEPTiptables -A FORWARD -i enp0s3 -o enp0s9 -m state --state RELATED,ESTABLISHED -j ACCEPTConfigure NATing
Next, configure NATing;
iptables -t nat -A POSTROUTING -o enp0s3 -j MASQUERADETo ensure that the two local networks can also communicate, run the commands below;
iptables -t nat -A POSTROUTING -o enp0s8 -j MASQUERADEiptables -t nat -A POSTROUTING -o enp0s9 -j MASQUERADEConsult man iptables for more information.
Save iptables rules Permanently in Linux
In order to permanently save iptables rules, simply install the iptables-persistent package and run the iptables-save command as follows.
apt install iptables-persistentThe current rules will be saved during package installation but can still save them thereafter by running the command;
iptables-save > /etc/iptables/rules.v4Your LAN systems should be now be able to connect to internet via the Linux router;

And there you go. You vms can now route traffic through your Linux router.
That concludes our guide on how to configure Ubuntu 20.04 as Linux Router.
Other Tutorials
Basic Operation of Firewalld in Linux
Install pfSense Firewall on KVM
Install and Configure Endian Firewall on VirtualBox
 Более четырех лет назад мы опубликовали материал посвященный настройке роутера на базе Ubuntu Server. Тема оказалась весьма востребованной и популярной, но за прошедшее время некоторые настройки успели измениться, пусть и незначительно. В связи с этим мы решили вернуться к этой теме и опубликовать современную версию популярной статьи.
Научиться настраивать MikroTik с нуля или систематизировать уже имеющиеся знания можно на углубленном курсе по администрированию MikroTik. Автор курса, сертифицированный тренер MikroTik Дмитрий Скоромнов, лично проверяет лабораторные работы и контролирует прогресс каждого своего студента. В три раза больше информации, чем в вендорской программе MTCNA, более 20 часов практики и доступ навсегда.
Мы не будем подробно останавливаться на установке системы и назначении тех или иных компонентов, об этом достаточно сказано в исходном материале, а уделим основное внимание отличиям в современных версиях Ubuntu Server и настраиваемых пакетах.
Настройка сети
В нашем примере внешний сетевой интерфейс — eth0 — имеет статические настройки, если же вы используете PPPoE или PPTP подключение, то для настройки подключения рекомендуем воспользоваться нашими материалами:
- Настройка PPPoE подключения в Ubuntu Server
- Настройка PPTP подключения в Ubuntu Server
Начиная с версии 12.04 (мы рассматриваем только LTS версии и крайне не рекомендуем использовать на серверах промежуточные релизы) все сетевые настройки, в том числе и DNS-сервера указываются в одном месте, конфигурационном файле /etc/network/interfaces. Перед тем как приступать к настройке повысим права до суперпользователя:
sudo -sзатем откроем файл в штатном редакторе nano, работа с ним далека от удобства, но для изменения нескольких строк он вполне подойдет:
nano /etc/network/interfacesПриведем его к следующему виду (настройки внешнего интерфейса приведены исключительно для примера):
auto eth0
iface eth0 inet static
address 172.18.0.106
netmask 255.255.240.0
gateway 172.18.0.1
dns-nameservers 172.18.0.1 208.67.222.222auto eth1
iface eth1 inet static
address 192.168.31.1
netmask 255.255.255.0
post-up /etc/nat
Для указания DNS-серверов теперь используется директива dns-nameservers, если серверов несколько, они указываются в одну строку, через пробел.
Если вы получаете сетевые настройки от провайдера по DHCP, то настройки будут иметь вид:
auto eth0
    iface eth0 inet dhcp
Последней строкой идет автоматическая загрузка правил iptables из файла /etc/nat, который мы создадим позже.
Перезапустим сеть:
service networking restartЕсли все сделано правильно, на сервере должен появиться интернет. После чего следует обновить пакеты на сервере и установить необходимый минимум утилит для администрирования:
apt-get update
apt-get upgrade
apt-get install mc ssh
Представлять двухпанельный менеджер с удобным редактором Midnight Commander (mc) мы думаем не нужно, как и SSH-сервер, дающий возможность удаленного администрирования.
Настройка NAT и брандмауэра
Технология сетевой трансляции адресов — NAT — позволяет организовать выход в интернет компьютеров локальной сети через один сетевой адрес. Данная технология абсолютно прозрачна для клиентских устройств и способна работать с любыми сетевыми приложениями и протоколами. За функции NAT в Ubuntu отвечает сетевой фильтр iptables, который предоставляет также функции брандмауэра.
В зависимости от политики сетевой безопасности существуют различные подходы к настройке брандмауэра. Мы предпочитаем задавать только базовые правила, исходя внутри сети из принципа: все что не запрещено — разрешено. Это позволяет свободно работать любым сетевым службам во внутренней сети и без помех выходить в интернет, обеспечивая при этом достаточный уровень безопасности. Для внешней сети запрещено все, что не разрешено и доступ к сетевым службам администратор должен разрешать явно.
Создадим файл настроек:
touch /etc/natи внесем в него следующее содержимое:
#!/bin/sh# Включаем форвардинг пакетов
echo 1 > /proc/sys/net/ipv4/ip_forward
# Сбрасываем настройки брандмауэра
iptables -F
iptables -X
iptables -t nat -F
iptables -t nat -X
# Разрешаем доступ из локальной сети
iptables -A INPUT -i eth1 -j ACCEPT
# Разрешаем инициированные нами подключения извне
iptables -A INPUT -i eth0 -m state --state ESTABLISHED,RELATED -j ACCEPT
# Разрешаем подключения по SSH
iptables -A INPUT -i eth0 -p tcp --dport 22 -j ACCEPT
#Запрещаем входящие извне
iptables -A INPUT -i eth0 -j DROP
# Разрешаем инициированные нами транзитные подключения извне
iptables -A FORWARD -i eth0 -o eth1 -m state --state ESTABLISHED,RELATED -j ACCEPT
# Запрещаем транзитный трафик извне
iptables -A FORWARD -i eth0 -o eth1 -j DROP
# Включаем NAT
iptables -t nat -A POSTROUTING -o eth0 -s 192.168.31.0/24 -j MASQUERADE
Сохраним изменения и дадим нашему файлу права на исполнение:
chmod +x /etc/natперезагрузим сервер:
rebootТеперь если вручную задать сетевые настройки для рабочей станции, указав в качестве шлюза наш роутер и любой доступный DNS-сервер, то не ней должен появиться доступ в интернет.
Настройка DHCP и кэширующего DNS
В принципе мы уже можем использовать наш роутер по назначению, однако ручное указание сетевых настроек, это даже не вчерашний, а позавчерашний день, поэтому DHCP-сервер является неотъемлемой частью сетей любого размера. Также имеет смысл настроить собственный кэширующий DNS-сервер, который не только снизит нагрузку на вышестоящие сервера и уменьшит время отклика, но также позволит создавать собственные записи для хостов внутренней сети, что может оказаться полезным при развертывании иных сетевых сервисов.
Все эти функции реализованы в одном пакете dnsmasq, который предельно прост в установке и настройке:
apt-get install dnsmasqФункции кэширующего DNS-сервера становятся доступны сразу после установки и в настройке не нуждаются, однако следует явно указать интерфейсы, которые будет обслуживать dnsmasq. Для этого откроем файл /etc/dnsmasq.conf и изменим следующую строку (не забываем раскомментировать при необходимости):
listen-address=127.0.0.1, 192.168.31.1Для настройки DHCP сервера достаточно указать диапазон пула адресов и срок аренды:
dhcp-range=192.168.31.100,192.168.31.199,255.255.255.0,12hПерезапустим сервис:
service dnsmasq restartПосле чего хосты внутренней сети будут получать все сетевые настройки автоматически.
Настройка кэширующего прокси-сервера Squid3
На заре своего развития основным назначением прокси-сервера Squid было кэширование трафика, сегодня, когда безлимитный интернет стал нормой жизни, эти возможности отходят на второй план, но остаются достаточно актуальными.
Squid поддерживает кэширование двух типов, в оперативной памяти и на диске. Сегодня можно встретить рекомендации отказаться от дискового кэша, мол проще скачать объект заново, чем искать его на диске. Однако мы считаем, что разумный размер дискового кэша при большом количестве клиентов позволяет эффективно использовать канал за счет хранения в кэше статических элементов: картинок, скриптов, CSS-файлов для часто посещаемых ресурсов.
Сразу предостережем от распространенной ошибки — использования для хранения кэша старых медленных дисков и выделения под кэш значительного пространства. В этом случае эффект будет прямо противоположен ожиданиям, время поиска объекта на диске при большой нагрузке будет занимать значительно больше времени, чем его повторное скачивание.
Но все преимущества Squid раскрываются тогда, когда появляется необходимость тонкой фильтрации трафика, здесь богатые возможности позволяют реализовывать самые разнообразные схемы, которые просто невозможно рассмотреть в рамках одного материала, получить все материалы по данной теме вы можете выполнив поиск по тегу squid.
Внимание! Начиная с Debian 9 и Ubuntu 16.04 вместо пакета squid3 снова используется squid, также аналогичным образом следует изменить все пути, т.е. вместо /etc/squid3 использовать /etc/squid.
Для установки squid выполните команду:
apt-get install squid3Перейдем к настройкам. Для новичка конфигурационный файл squid может показаться излишне сложным, на самом деле большую часть его занимают подробные комментарии и примеры. Поэтому мы пойдем по файлу от начала к концу, указывая какие строки надо добавить или изменить. Откроем файл конфигурации /etc/squid3/squid.conf и перейдем к указанию группы доступа (acl) для локальной сети. Раскомментируем и исправим или добавим ниже строку:
acl localnet src 192.168.31.0/24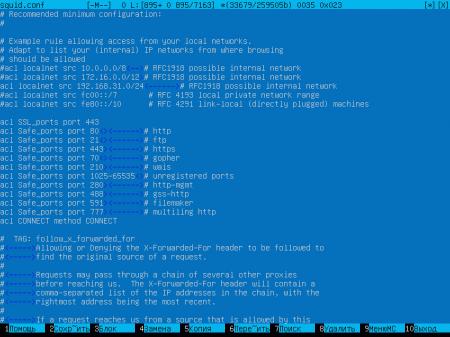 Затем, спускаясь далее по конфигурационному файлу найдем секцию отвечающую за правила доступа и убедимся, что она содержит следующие правила:
http_access allow localnet
http_access allow localhost
http_access deny all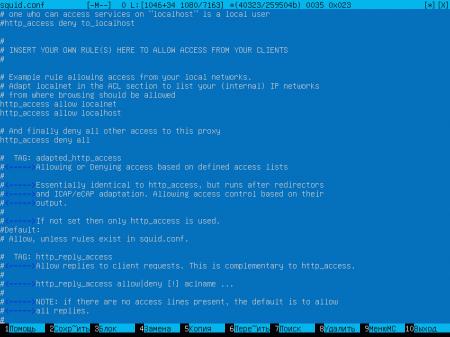 Данная секция разрешает доступ для клиентов локальной сети, собственно сервера и запрещает всем остальным.
Теперь укажем порт, интерфейс и режим работы прокси-сервера.
http_port 192.168.31.1:3128 interceptПараметр intercept указывает, что прокси работает в прозрачном режиме, т.е. не требует прямого указания прокси на клиентах.
Перейдем к указанию параметров кэша. Зададим доступный объем памяти и укажем максимальный объем кэшированного объекта в памяти:
cache_mem 1024 MB
maximum_object_size_in_memory 512 KB
При задании этих параметров исходите из доступной памяти сервера, но учтите, что кэш в памяти начинает эффективно работать только после «прогрева» и будет сброшен при перезагрузке или выключении сервера.
После чего укажем размер дискового кэша и его расположение:
cache_dir ufs /var/spool/squid3 2048 16 256Размер кэша указывается в МБ, в нашем случае 2048 МБ — 2 Гб, следующие два числа указывают количество директорий первого и второго уровня, рекомендуем оставтить эти параметры без изменения.
Следующий параметр задает максимальный размер объекта в дисковом кэше:
maximum_object_size 4 MBДалее по файлу укажем место хранения логов и количество ротаций:
access_log daemon:/var/log/squid3/access.log squid
logfile_rotate 31
В нашем случае логи хранятся 31 день, указывая это значение исходите из размеров лога и свободного места на диске, в любом случае этот параметр можно всегда изменить.
Внимание! В Ubuntu Server 12.04 (Squid 3.1) указанная выше строка должна иметь вид: access_log /var/log/squid3/access.log squid
Остальные параметры оставляем без изменений, сохраняем файл настроек.
Перед тем как перезапускать службу выполним проверку файла конфигурации:
squid3 -k checkЕсли команда отрабатывает без вывода — ошибок нет, в противном случае изучаем вывод и исправляем допущенные ошибки. После этого перезапустим службу, чтобы применить внесенные изменения.
service squid3 restartВ том случае, когда были изменены параметры кэша следует его перестроить:
service squid3 stop
squid3 -z
service squid3 start
Затем в /etc/nat добавляем правило заворачивающее http-трафик на squid:
# Заворачиваем http на прокси
iptables -t nat -A PREROUTING -i eth1 ! -d 192.168.31.0/24 -p tcp --dport 80 -j REDIRECT --to-ports 3128
Сохраняем изменения, перезагружаем сервер.
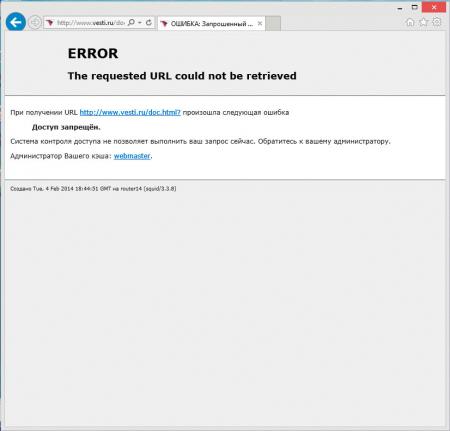
Обращаем ваше внимание, что squid3 в прозрачном режиме, в отличие от предыдущей версии, не принимает соединения, если в настройках прямо указано использование прокси.
 В этом случае вы получите сообщение, что доступ запрещен:
 Как видим, настройка роутера на современной платформе, несмотря на отличия, остается весьма простой и доступна для повторения широкому кругу читателей. В наших будущих материалах мы также будем принимать за основу роутер, настроенный именно по данному материалу, в тоже время с данным роутером будут работать все решения, опубликованные нами ранее, хотя для некоторых из них могут понадобиться незначительные корректировки.
Дополнительные материалы:
- Linux. Настройка роутера (NAT + DHCP + Squid)
- Ubuntu Server. Настраиваем роутер NAT + DHCP + Squid3
- Ubuntu Server. Настраиваем контент-фильтр роутера (DansGuardian)
- DansGuardian. Сложности фильтрации русскоязычного контента
- Ubuntu Server. Настраиваем антивирусный фильтр роутера (ClamAV)
- Ubuntu Server. Дополняем контент-фильтр роутера антивирусом (DansGuardian + ClamAV)
- Ubuntu Server. Настраиваем форвардинг портов на роутере
- Ubuntu Server. Настраиваем аутентификацию через Squid
- Ubuntu Server. Ограничиваем скорость клиентов через Squid
- SARG — анализируем логи прокси-севера Squid
- SAMS — веб-интерфейс для управления Squid и не только
- Squid — настраиваем URL-фильтрацию по спискам
- Squid — блокируем потоковое мультимедиа
- Как устроена и работает система контроля доступа в Squid
- Настраиваем Squid для работы с Active Directory. Часть 1 — базовые настройки
- Настраиваем Squid для работы с Active Directory. Часть 2 — Kerberos-аутентификация
- Настраиваем Squid для работы с Active Directory. Часть 3 — Авторизация на основе групп AD
- WPAD или автоматическая настройка параметров прокси
- Устраняем ошибки Windows Update при работе через прокси-сервер Squid
- Настраиваем ограничение скорости для пользователей в Squid
- Сборка Squid 3.5 с поддержкой SSL из исходных кодов для Debian / Ubuntu
- Настраиваем роутер NAT + DHCP + Squid3 с поддержкой фильтрации SSL-трафика
Научиться настраивать MikroTik с нуля или систематизировать уже имеющиеся знания можно на углубленном курсе по администрированию MikroTik. Автор курса, сертифицированный тренер MikroTik Дмитрий Скоромнов, лично проверяет лабораторные работы и контролирует прогресс каждого своего студента. В три раза больше информации, чем в вендорской программе MTCNA, более 20 часов практики и доступ навсегда.
Linux router configuration is simple, you just need to make sure the router have two interfaces that connected to the network that will be routed, enable packet forwarding and iptables for NAT if needed. There are more advanced configuration, but in this post we will build Linux router on Ubuntu Server 20.04 to allow LAN traffic through to internet on WAN interface with NAT.
How to build Linux Router with Ubuntu Server 20.04 LTS
 |
| Topology and IP addresses |
Find out the available network interfaces
 |
| Find out the available network interfaces |
- enp0s3 is the WAN interface, it will be configured to obtain IP address from DHCP server.
- enp0s8 is the LAN interface, it will be configured to use 10.10.10.1/24 IP address.
1. Edit network configuration
nano /etc/netplan/anything.yaml
This configuration below addedd interface enp0s3 to obtain dhcp and enp0s8 to use 10.10.10.1/24 IP address. Just add lines that red colored to your configuration file, if it is a newly installed Ubuntu Server.
network:
  version: 2
  renderer: networkd
  ethernets:
    enpos3:
      dhcp4: yes
    enp0s8
      addresses:
        - 10.10.10.1/24
— Save then exit the configuration file and apply the configuration
— Make sure all the configuration have applied
2. Enable Packet forwarding for IPv4
Find and uncomment net.ipv4.ip_forward=1 line
 |
| Enable Packet forwarding for IPv4 |
to apply sysctl configuration.
3. Enable NAT with iptables
iptables -t nat -A POSTROUTING -j MASQUERADE
This command will enable NAT on all traffic.
iptables command line will not be saved after the system reboot, there are many ways to make it persistent after reboot. This time we will use the easiest way to install iptables-persistent package to the Ubuntu server.
apt update -y && apt install iptables-persistent
It will asks you to save the current ipv4 and ipv6 iptables rules, answer yes to save it or no to save it later.
iptables-save > /etc/iptables/rules.v4
This command will save the iptables rules to /etc/iptables/rules.v4, where later it will be restored by iptables-persistent on every reboot.
4. Configure the clients
If all going well, we have finished building Linux Router with Ubuntu Server 20.04 LTS. According to the topology, the clients use 10.10.10.0/24 network address. So configure the clients accordingly.
 |
| Configure the clients |
Try to ping google or just open your browser to start browsing the internet to see if it is works.