Introduction
This document describes how to configure and debug Secure Shell (SSH) on Cisco routers or switches that run Cisco IOS® Software.
Prerequisites
Requirements
The Cisco IOS image used must be a k9(crypto) image in order to support SSH. For example, c3750e-universalk9-tar.122-35.SE5.tar is a k9 (crypto) image.
Components Used
The information in this document is based on Cisco IOS 3600 Software (C3640-IK9S-M), Release 12.2(2)T1.
SSH was introduced into these Cisco IOS platforms and images:
- SSH terminal-line access (also known as reverse-Telnet) was introduced in Cisco IOS platforms and images starting in Cisco IOS Software Release 12.2.2.T.
-
SSH Version 2.0 (SSH v2) support was introduced in Cisco IOS platforms and images starting in Cisco IOS Software Release 12.1(19)E.
The information in this document was created from the devices in a specific lab environment. All of the devices used in this document started with a cleared (default) configuration. If your network is live, ensure that you understand the potential impact of any command.
Conventions
Refer to Cisco Technical Tips Conventions for more information.
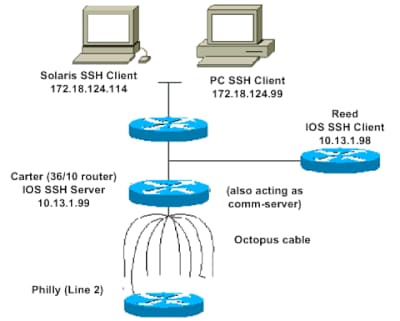
SSH v2 Network Diagram
Test Authentication
Authentication Test without SSH
First test the authentication without SSH to make sure that authentication works with the router Carter before you add SSH. Authentication can be with a local username and password or with an authentication, authorization, and accounting (AAA) server that runs TACACS+ or RADIUS. (Authentication through the line password is not possible with SSH.) This example shows local authentication, which lets you Telnet into the router with username cisco and password cisco.
Note: Throughout this document, vty is used to indicate Virtual Terminal Type.
!--- The aaa new-model command causes the local username and password on the router to be used in the absence of other AAA statements.

aaa new-model
username cisco password 0 cisco
line vty 0 4
transport input telnet

!--- Instead of aaa new-model, you can use the login local command.
Authentication Test with SSH
In order to test authentication with SSH, you have to add to the previous statements in order to enable SSH on Carter, and test SSH from the PC and UNIX stations.
ip domain-name rtp.cisco.com

!--- Generate an SSH key to be used with SSH.

crypto key generate rsa
ip ssh time-out 60
ip ssh authentication-retries 2
At this point, the show crypto key mypubkey rsa command must show the generated key. After you add the SSH configuration, test your ability to access the router from the PC and UNIX station.
Optional Configuration Sets
Prevent Non-SSH Connections
If you want to prevent non-SSH connections, add the transport input ssh command under the lines to limit the router to SSH connections only. Straight (non-ssh) Telnets are refused.
line vty 0 4

!--- Prevent non-SSH Telnets.

transport input ssh
Test to ensure that non-SSH users cannot Telnet to the router Carter.
Set Up an IOS Router or Switch as SSH Client
There are four steps required to enable SSH support on a Cisco IOS router:
1. Configure the hostname command.
2. Configure the DNS domain.
3. Generate the SSH key.
4. Enable SSH transport support for the vty.
If you want to have one device act as an SSH client to the other, you can add SSH to a second device called Reed. This puts these devices in a client-server arrangement, where Carter acts as the server, and Reed acts as the client. The Cisco IOS SSH client configuration on Reed is the same as required for the SSH server configuration on Carter.
!--- Step 1: Configure the hostname if you have not previously done so.

hostname carter

!--- The aaa new-model command causes the local username and password on the router to be used in the absence of other AAA statements.

aaa new-model
username cisco password 0 cisco

!--- Step 2: Configure the DNS domain of the router.

ip domain-name rtp.cisco.com

!--- Step 3: Generate an SSH key to be used with SSH.

crypto key generate rsa
ip ssh time-out 60
ip ssh authentication-retries 2

!--- Step 4: By default the vty transport is Telnet. In this case, Telnet is disabled and only SSH is supported.

line vty 0 4
transport input ssh

!--- Instead of aaa new-model, you can use the login local command.
Issue this command to SSH from the Cisco IOS SSH client (Reed) to the Cisco IOS SSH server (Carter) to test this:
ssh -v 2 -c aes256-cbc -m hmac-sha1-160 -l cisco 10.31.1.99Setup an IOS Router as an SSH Server that Performs RSA-based User Authentication
Complete these steps to configure the SSH server to perform RSA-based authentication.
1. Specify the Host name.
Router(config)#hostname <host name>2. Define a default domain name.
Router(config)#ip domain-name <Domain Name>3. Generate RSA key pairs.
Router(config)#crypto key generate rsa4. Configure SSH-RSA keys for user and server authentication.
Router(config)#ip ssh pubkey-chain5. Configure the SSH username.
Router(conf-ssh-pubkey)#username <user name>6. Specify the RSA public key of the remote peer.
Router(conf-ssh-pubkey-user)#key-string7. Specify the SSH key type and version. (This step is optional.)
Router(conf-ssh-pubkey-data)#key-hash ssh-rsa <key ID>8. Exit the current mode and return to privileged EXEC mode.
Router(conf-ssh-pubkey-data)#endAdd SSH Terminal-Line Access
If you need outbound SSH terminal-line authentication, you can configure and test SSH for outbound reverse Telnets through Carter, which acts as a comm server to Philly.
ip ssh port 2001 rotary 1
line 1 16
   no exec
   rotary 1
   transport input ssh
   exec-timeout 0 0
   modem InOut
   stopbits 1
If Philly is attached to the Carter Port 2, then you can configure SSH to Philly through Carter from Reed with this command:
ssh -v 2 -c aes256-cbc -m hmac-shal-160 -p 2002 10.31.1.99You can use this command from Solaris:
ssh -c 3des -p 2002 -x -v 10.13.1.99Restrict SSH Access to a Subnet
You need to limit SSH connectivity to a specific subnetwork where all other SSH attempts from IPs outside the subnetwork are dropped.
You can use these steps to do the same:
- Define an access-list that permits the traffic from that specific subnetwork.
- Restrict access to the VTY line interface with an access-class.
This is an example configuration. In this example, only SSH access to the 10.10.10.0 255.255.255.0 subnet is permitted, any other is denied access.
Router(config)#access-list 23 permit 10.10.10.0 0.0.0.255
Router(config)#line vty 5 15
Router(config-line)#transport input ssh
Router(config-line)#access-class 23 in
Router(config-line)#exitNote: The same procedure to lock down the SSH access is also used for switch platforms.
Configure the SSH Version 2
carter(config)#ip ssh version 2Variations on Banner Command Output
The banner command output varies between the Telnet and different versions of SSH connections. This table illustrates how different banner command options work with various types of connections.
Banner Command Options |
Telnet |
SSH v2 |
|
banner log |
Displays before log in to device. |
Displays before log in to device. |
|
banner motd |
Displays before log in to device. |
Displays after log in to device. |
|
banner exec |
Displays after log in to device. |
Displays after log in to device. |
Note: SSH version 1 is no longer recommended.
Unable to Display the Login Banner
SSH version 2 supports the log in banner. When it initiates the SSH session with the Cisco router, the log in banner is displayed if the SSH client sends the username. For example, when the Secure Shell ssh client is used, the log in banner is displayed. When the PuTTY ssh client is used, the log in banner is not displayed. This is because SSH sends the username by default and PuTTY does not send the username by default.
The SSH client needs the username to initiate the connection to the SSH enabled device. The Connect button is not enabled if you do not enter the host name and username. This screen image shows that the log in banner is displayed when SSH connects to the router. The banner then prompts for a password.
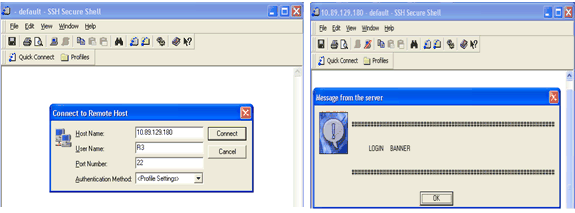 Banner Prompts for a Password
The PuTTY client does not require the username to initiate the SSH connection to the router. This screen image shows that the PuTTY client connects to the router and prompts for the username and password. It does not display the log in banner.
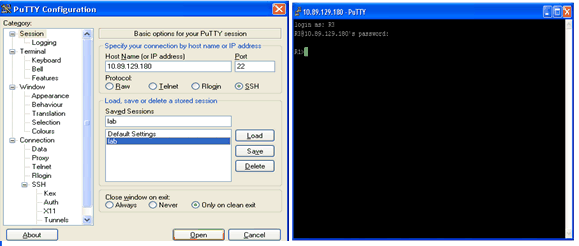 SSH Connection to Router
This screen shot shows that the log in banner is displayed when PuTTY is configured to send the username to the router.
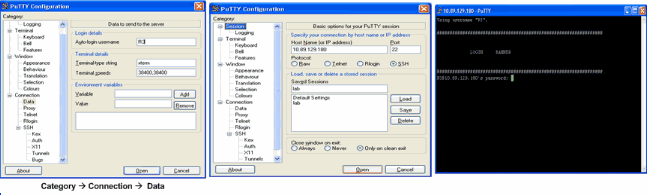 Send Username to Router
Debug and Show Commands
Before you issue the debug commands described here, refer to Important Information on Debug Commands. Certain show commands are supported by the Output Interpreter Tool (registered to customers only), which allows you to view an analysis of show command output.
-
debug ip ssh Displays debug messages for SSH.
-
show ssh Displays the status of SSH server connections.
carter#show ssh
  Connection    Version Encryption    State              Username
0 2.0 DES Session started cisco-
show ip ssh displays the version and configuration data for SSH.
carter#show ip ssh
  SSH Enabled - version 2.0
  Authentication timeout: 120 secs; Authentication retries: 3
Sample Debug Output
Router Debug
00:23:20: SSH0: starting SSH control process
00:23:20: SSH0: sent protocol version id SSH-2.0-Cisco-1.25
00:23:20: SSH0: protocol version id is - SSH-2.0-1.2.26
00:23:20: SSH0: SSH_SMSG_PUBLIC_KEY msg
00:23:21: SSH0: SSH_CMSG_SESSION_KEY msg - length 112, type 0x03
00:23:21: SSH: RSA decrypt started
00:23:21: SSH: RSA decrypt finished
00:23:21: SSH: RSA decrypt started
00:23:21: SSH: RSA decrypt finished
00:23:21: SSH0: sending encryption confirmation
00:23:21: SSH0: keys exchanged and encryption on
00:23:21: SSH0: SSH_CMSG_USER message received
00:23:21: SSH0: authentication request for userid cisco
00:23:21: SSH0: SSH_SMSG_FAILURE message sent
00:23:23: SSH0: SSH_CMSG_AUTH_PASSWORD message received
00:23:23: SSH0: authentication successful for cisco
00:23:23: SSH0: requesting TTY
00:23:23: SSH0: setting TTY - requested: length 24, width 80; set:
   length 24, width 80
00:23:23: SSH0: invalid request - 0x22
00:23:23: SSH0: SSH_CMSG_EXEC_SHELL message received
00:23:23: SSH0: starting shell for vty
Server Debug
Note: This is Solaris machine output.
rtp-evergreen.rtp.cisco.com#ssh -c 3des -l cisco -v 10.31.1.99
rtp-evergreen#/opt/CISssh/bin/ssh -c 3des -l cisco -v 10.13.1.99
SSH Version 1.2.26 [sparc-sun-solaris2.5.1], protocol version 1.5.
Compiled with RSAREF.
rtp-evergreen: Reading configuration data /opt/CISssh/etc/ssh_config
rtp-evergreen: ssh_connect: getuid 0 geteuid 0 anon 0
rtp-evergreen: Allocated local port 1023.
rtp-evergreen: Connecting to 10.13.1.99 port 22.
rtp-evergreen: Connection established.
rtp-evergreen: Remote protocol version 2.0,
   remote software version Cisco-1.25
rtp-evergreen: Waiting for server public key.
rtp-evergreen: Received server public key (768 bits)
   and host key (512 bits).
rtp-evergreen: Host '10.13.1.99' is known and matches the host key.
rtp-evergreen: Initializing random; seed file //.ssh/random_seed
rtp-evergreen: Encryption type: 3des
rtp-evergreen: Sent encrypted session key.
rtp-evergreen: Installing crc compensation attack detector.
rtp-evergreen: Received encrypted confirmation.
rtp-evergreen: Doing password authentication.
cisco@10.13.1.99's password:
rtp-evergreen: Requesting pty.
rtp-evergreen: Failed to get local xauth data.
rtp-evergreen: Requesting X11 forwarding with authentication spoofing.
Warning: Remote host denied X11 forwarding, perhaps xauth program
   could not be run on the server side.
rtp-evergreen: Requesting shell.
rtp-evergreen: Entering interactive session.
Incorrect Configurations
These sections have sample debug output from several incorrect configurations.
SSH from an SSH Client not Compiled with Data Encryption Standard (DES)
Bad Password
Router Debug
00:26:51: SSH0: starting SSH control process
00:26:51: SSH0: sent protocol version id SSH-2.0-Cisco-1.25
00:26:52: SSH0: protocol version id is - SSH-2.0-1.2.26
00:26:52: SSH0: SSH_SMSG_PUBLIC_KEY msg
00:26:52: SSH0: SSH_CMSG_SESSION_KEY msg - length 112, type 0x03
00:26:52: SSH: RSA decrypt started
00:26:52: SSH: RSA decrypt finished
00:26:52: SSH: RSA decrypt started
00:26:52: SSH: RSA decrypt finished
00:26:52: SSH0: sending encryption confirmation
00:26:52: SSH0: keys exchanged and encryption on
00:26:52: SSH0: SSH_CMSG_USER message received
00:26:52: SSH0: authentication request for userid cisco
00:26:52: SSH0: SSH_SMSG_FAILURE message sent
00:26:54: SSH0: SSH_CMSG_AUTH_PASSWORD message received
00:26:54: SSH0: password authentication failed for cisco
00:26:54: SSH0: SSH_SMSG_FAILURE message sent
00:26:54: SSH0: authentication failed for cisco (code=7)
00:26:54: SSH0: Session disconnected - error 0x07
SSH Client Sends Unsupported (Blowfish) Cipher
Router Debug
00:39:26: SSH0: starting SSH control process
00:39:26: SSH0: sent protocol version id SSH-2.0-Cisco-1.25
00:39:26: SSH0: protocol version id is - SSH-2.0-W1.0
00:39:26: SSH0: SSH_SMSG_PUBLIC_KEY msg
00:39:26: SSH0: SSH_CMSG_SESSION_KEY msg - length 112, type 0x03
00:39:26: SSH0: Session disconnected - error 0x20
Get «%SSH-3-PRIVATEKEY: Unable to Retrieve RSA Private Key for» Error
A change in the domain name or host name can trigger this error message. Use these workarounds:
-
Zeroize the RSA keys and re-generate the keys.
crypto key zeroize rsa label key_name
crypto key generate rsa label key_name modulus key_size-
If the previous workaround does not work, try these steps:
-
Zeroize all RSA keys.
-
Reload the device.
-
Create new labeled keys for SSH.
-
Tips
-
If your SSH configuration commands are rejected as illegal commands, you have not successfully generated a RSA key pair for your router. Ensure you have specified a host name and domain. Then use the crypto key generate rsa command to generate a RSA key pairs and enable the SSH server.
-
When you configure RSA key pairs, you can get these error messages:
-
No hostname specified.
You must use the hostname global configuration command to configure a host name for the router.
-
No domain specified.
You must use the ip domain-name global configuration command to configure a host domain for the router.
-
-
The number of allowable SSH connections is limited to the maximum number of
vtyconfigured for the router. Each SSH connection uses avtyresource. -
SSH uses either local security or the security protocol configured through AAA on your router for user authentication. When you configure AAA, you must ensure that the console is not run under AAA. Apply a keyword in the global configuration mode to disable AAA on the console.
-
No SSH server connections running:
carter#show ssh

%No SSHv2 server connections running.
This output suggests that the SSH server is disabled or not enabled properly. If you have already configured SSH, it is recommended that you reconfigure the SSH server in the device. Complete these steps in order to reconfigure the SSH server on the device.
- Delete the RSA key pairs. After the RSA key pairs are deleted, the SSH server is automatically disabled.
carter(config)#crypto key zeroize rsaNote: It is important to generate key pairs with at least 768 as bit size when you enable SSH v2.
Caution: This command cannot be undone after you save your configuration. Also, after RSA keys are deleted, you cannot use certificates or the CA or participate in certificate exchanges with other IP Security (IPSec) peers unless you regenerate the RSA keys to reconfigure CA interoperability, get the CA certificate, and request your own certificate again.
2. Reconfigure the hostname and domain name of the device.
carter(config)#hostname hostname

carter(config)#ip domain-name domainname
3. Generate RSA key pairs for your router. This automatically enables SSH.
carter(config)#crypto key generate rsaNote: Refer to crypto key generate rsa — Cisco IOS Security Command Reference, Release 12.3 for more information on the usage of this command.
Note: You can receive the SSH2 0: Unexpected mesg type received error message due to a packet received that is not understandable by the router. Increase the key length while you generate rsa keys for ssh in order to resolve this issue.
4. Configure the SSH server.
5. To enable and configure a Cisco router/switch for the SSH server, you must configure SSH parameters. If you do not configure SSH parameters, the default values are used.
ip ssh {[timeout seconds] | [authentication-retries integer]}
carter(config)# ip sshRelated Information
- SSH Product Support Page
Overview :
SSH is a security mechanism, which can be used to access the privilege and configuration mode of a Router and a Switch from a remote location to perform the required action. The primary aim to configure SSH is to access devices deployed in a network from a remote location so that the required configuration can be performed and resources can be provided in a seamless manner. To learn about the SSH configuration, the Cisco Packet Tracer tool is used to demonstrate the steps to be followed and associated commands to be executed for this purpose. In addition to this, syntax and explanation of each command are provided along with screen-grabs.
SSH Configuration on Cisco Router :
Below listed steps will be followed to configure the SSH as follows.
Step-1 :
Cisco Packet Tracer is opened and network topology is created between a computer system and a router.
Step-2 :
Desktop settings of the Computer System need to be accessed to assign it with IP address, associated subnet mask and gateway address of the network.

Assigning IP address, subnet mask, and default gateway address to PC.
Step-3 :
Further, the Command Line Interface of the router needs to be accessed to assign an IP address to the connected interface (Fast Ethernet 0/0 in this scenario).
Step-4 :
Configuration mode is accessed using configure terminal command through Router’s CLI. IP address 192.168.16.1 is assigned to interface with subnet mask of 255.255.255.0. In addition to this, no shutdown command is executed to change the interface state to up. With successful configuration of assigning IP addresses, a communication channel is established between the computer system and Router.
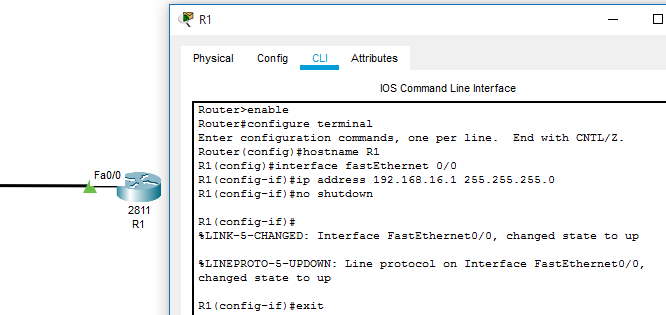
An IP address is assigned to Router’s interface
Step-5 :
SSH Command Execution –
- All the commands used to enable the SSH is highlighted in the below-provided screen-grab of the Cisco Packet Tracer.
- At first, domain name is set using ‘ip domain-name domain-name command.
- Then, to maintain a secure SSH connection, a crypto key is generated using ‘crypto key generate RSA’ command. A value of ‘1024’ is input and enter is clicked to successfully generate the key.
- ‘enable password password’ command is executed to maintain security and to allow only authorized users to access the router command-line interface.
- Further, the ‘username password’ command is used to set the username to establish an SSH connection with the network device.
- ‘IP ssh version 2’ command is used to define the version of SSH, which will be configured on this router.
- Further, ‘line vty 0 15’ is executed, so that router can be accessed from a remote system connected to the network.
- Then, ‘transport input ssh’ and ‘login local’ commands are executed for the successful configuration of SSH on the Cisco Router.
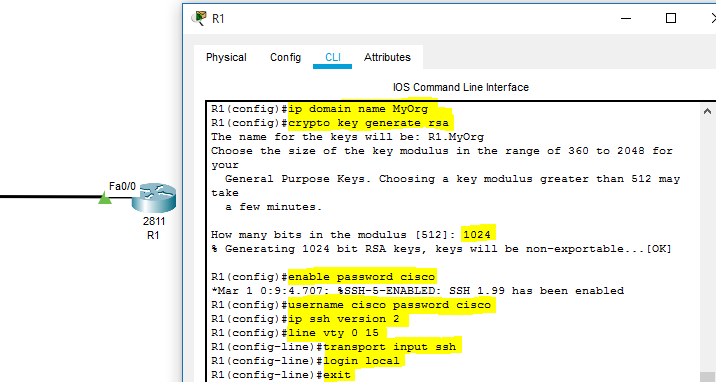
SSH configuration
Step-6 :
To test the SSH configured on Cisco Router, Command Prompt is opened on Computer System and the ‘ssh -l username IP-address’ command is executed.
Command –
ssh -l cisco 192.168.16.1

SSH Testing
Last Updated :
16 Aug, 2021
Like Article
Save Article
Поговорим о том как настроить ssh доступ на маршрутизаторы Cisco.
SSH (Secure SHell) — сетевой протокол прикладного уровня, используется для удалённого управление различным оборудованием и операционными системами, а также для туннелирование TCP-соединений для просмотра, редактирования и передачи файлов, шифрует весь передаваемый трафик.
По умолчанию для управления оборудованием cisco используется протокол telnet, который является незащищённым и передаёт данные и пароли в открытом виде. Для обеспечения безопастности сетевого оборудования Cisco рекомендуется отключать протокол telnet, а для управления использовать протокол ssh.
Заходим в привилегированный режим.
router>enable
Настраиваем параметры необходимые для генерации ключа используемого ssh.
Устанавливаем точную текущую дату и время.
router#clock set 15:00:00 15 May 2018
Входим в режим конфигурирования.
cisco#configure terminal
Задаем домен, если у вас нет домена можно указать любой домен например cisco.com.
cisco(config)#ip domain name mydomain.ru
Задаем имя роутера.
cisco(config)#hostname mycisco
Задаем версию протокола ssh. Рекомендуется версия 2.
mycisco(config)# ip ssh version 2
Задаем количество попыток подключения по ssh.
mycisco(config)# ip ssh authentication-retries 2
Задаем хранение пароли в зашифрованном виде.
mycisco(config)#service password-encryption
Включаем протокол aaa.
mycisco(config)#aaa new-model
Создаем пользователя admin с паролем qwerty и максимальными уровнем привелегий 15.
mycisco(config)#username admin privilege 15 secret qwerty
Задаем пароль qwerty для привилегированного режима.
mycisco(config)#enable secret qwerty
Генерируем rsa ключ для ssh длиной желательно не менее 1024.
mycisco(config)#crypto key generate rsa
The name for the keys will be:
Choose the size of the key modulus in the range of 360 to 4096 for your
  General Purpose Keys. Choosing a key modulus greater than 512 may take
  a few minutes.
How many bits in the modulus [512]:1024
Разрешаем доступ по ssh только из определенной сети (192.168.1.0/24).
mycisco(config)#access-list 23 permit 192.168.1.0 0.0.0.255
Входим в режим конфигурирования терминальный линий.
mycisco(config)#line vty 0 4
Разрешаем доступ только по ssh.
mycisco(config-line)# transport input ssh
По умолчанию журнальные сообщения могут выводиться в независимости от того набирает пользователь какие либо команды или нет, прерывая исполнение текущих команд. Включая logging synchronous маршрутизатор начинает дожидаться завершения текущей команды и вывода ее отчета.
mycisco(config-line)# logging synchronous
Позволяем входить сразу в привилигированный режим.
mycisco(config-line)# privilege level 15
Включаем автоматическое закрытие ssh сессии через 30 минут.
mycisco(config-line)# exec-timeout 30 0
Привязываем группу доступа, созданную на шаге 10, к терминальной линии.
mycisco(config-line)# access-class 23 in
Выходим из режима конфигурирования.
mycisco(config-line)# end
Сохраняемся.
mycisco# copy running-config startup-config
Вот и все, включение ssh на оборудование Cisco закончено.
Read the article CONFIGURING SSH ON CISCO IOS in ![]() English
English
Вопрос «как настроить подключение к Cisco по протоколу SSH?» возникает у каждого, кто сталкивается с этим оборудованием. Ответ — «Просто!»
Для примера возьмем модель маршрутизатора Cisco 881. Команды для настройки других маршрутизаторов (1841, 2800, 3825…) или коммутаторов (2900, 3500, 4800…) будут аналогичными. Различие может быть лишь в настройке интерфейсов. (Настройка доступ по протоколу SSH на межсетевые экраны Cisco ASA описана в статье «Cisco ASA. Основы. Доступ в Интернет»
Итак, в нашем распоряжении:
- маршрутизатор Cisco 881
- рабочая станция администратора
- несколько компьютеров в локальной сети офиса
- коммутатор, который используется для организации локальной сети офиса
Задача: настроить защищенное подключение к маршрутизатору Cisco с помощью протокола SSH и обеспечить безопасное удаленное управление.

Шаг 0. Настройка интерфейса
На маршрутизаторе должен быть включен интерфейс, который будет использоваться для управления. В нашем случае это будет внутренний (LAN) интерфейс Fastethernet 0.
Для справки:
На Маршрутизаторе Cisco 881 имеется один интерфейс 3го уровня Fastethernet 4 (тот, на котором сразу можно задать IP адрес) и встроенный коммутатор с четырьмя интерфейсами 2го уровня (Fastethernet 0 – Fastethernet 3). На каждый из этих 4ех интерфейсов можно привязать по одному(!) виртуальному интерфейсу 3го уровня. (Vlan).
Для интерфейса управления маршрутизатора выбираем первый доступный адрес в сети офиса — 192.168.0.1. Далее заходим в настройки виртуального интерфейса Vlan 1 и присваиваем ему этот ip адрес. После этого привязываем его к одному из физических интерфейсов маршрутизатора (Fastethernet 0) и включаем его командой no shut.
Для наглядности:
ip address => interface Vlan X => interface Fastethernet Y
Задаем ip адрес на интерфейсе Vlan 1
R-DELTACONFIG (config)#

interface Vlan 1

ip address 192.168.0.1 255.255.255.0

no shutsown
Привязываем Vlan 1 к физическому интерфейсу FastEthernet 0
 R-DELTACONFIG (config)#

interface Fa 0

 switchport access vlan 1

no shutsown
Последнее действие выполняется для того, чтобы убедиться в корректности настройки. Vlan 1 привязан по умолчанию к каждому интерфейсу 2го уровня и строчка будет отображаться в конфигурации только, если номер Vlan будет отличаться от 1.
Далее необходимо проверить доступность созданного интерфейса с самого маршрутизатора, а затем с любой рабочей станции офиса, например с рабочей станции администратора. Подойдет простая проверка командой Ping. Естественно, что интерфейс маршрутизатора Fastethernet 0 должен быть соединен с коммутатором локальной сети (или напрямую с компьютером администратора) и адрес компьютера, с которого выполняется проверка, находится в той же сети, что и адрес интерфейса маршрутизатора (например 192.168.0.10).
Шаг 1 Создание учетной записи администратора
Для удаленного управления требуется создать учетную запись, если таковая еще отсутствует.
 R-DELTACONFIG (config)#

username admin secret *****
Вместо звездочек ****** задаем пароль для учетной записи admin.
Важно!
По правилам хорошего тона пароль состоит из заглавных и прописных букв, цифр и спец. символов, при этом не короче 8 символов.
Шаг 2 задание пароля на режим конфигурирования
При открытии консоли управления маршрутизатором пользователь попадает в упрощенный режим, из которого возможно посмотреть лишь некоторые параметры устройства и техническую информацию о нем. При этом рядом с названием устройства присутствует знак стрелки «>»
R-DELTACONFIG>
Для просмотра конфигурации маршрутизатора и дальнейшей его настройки необходимо ввести команду enable
R-DELTACONFIG> enable

R-DELTACONFIG#
Изначально этот режим не защищен паролем и любой пользователь, который подключился консольным кабелем (про кабель и как подключиться описано в этой статье) сможет попасть в режим конфигурирования . С другой стороны, пользователь, который подключился удаленно (ssh/telnet),для которого не задан уровень привилегий (как раз наш случай), не сможет попасть в режим конфигурирования.
Задаем пароль на привилегированный режим (знак решетки # рядом с именем маршрутизатора), зайдя в режим конфигурирования (conf t).
R-DELTACONFIG (config)#

R-DELTACONFIG (config)# enable secret ******
Этот пароль будет единым для всех пользователей.
Подробнее про режимы конфигурирования можно прочитать здесь.

Шаг 3. Включение удаленного управления
Для удаленного управления необходимо указать способ аутентификации пользователя командой login local
R-DELTACONFIG (config)#

line vty 0 4

login local
После выполнения этого шага и при условии, что интерфейс управления маршрутизатора доступен пользователю, становится возможным подключение к маршрутизатору с помощью протокола telnet. Для этого необходимо из командной строки рабочей станции администратора выполнить команду
C:\Documents and Settings\***>telnet 192.168.0.1
Должен последовать запрос пользователя и пароля, которые были заданы в шаге 1. После успешной авторизации будет доступен упрощенный режим управления маршрутизатора (со стрелкой «>«). Для доступа к привилегированному режиму (#) необходимо ввести команду enable, а после пароль из шага 2.
Шаг 4 Настройка SSH
При использовании протокола Telnet (TCP порт 23) все команды и данные о конфигурировании устройства передаются в открытом виде, что потенциально небезопасно. Для защиты подключения используется протокол SSH (TCP порт 22).
Для настройки подключения через протокол SSH необходимо задать имя домена (любое), сгенерировать криптографический ключ доступа и включить сам протокол SSH версии 2.
R-DELTACONFIG (config)#

ip domain-name deltaconfig.ru

crypto key generate rsa

Choose the size of the key modulus in the range of 360 to 2048 for your

General Purpose Keys. Choosing a key modulus greater than 512 may take

a few minutes.

// после запроса необходимо указать 1024

How many bits in the modulus [512]: 1024

% Generating 1024 bit RSA keys, keys will be non-exportable...[OK]

 ip ssh ver 2
После выполнения этого шага появляется возможность подключаться через SSH с помощью специальной программы, поддерживающей данную функцию, например putty. Скачать можно по этой ссылке.
Шаг 5. Ограничение подключения к маршрутизатору только через SSH
Для того, чтобы исключить возможность подключения к маршрутизатору по протоколу Telnet необходимо ввести следующие команды:
R-DELTACONFIG (config)#

line vty 0 4

transport input ssh
После этого удаленный доступ к консоли устройства будет невозможен кроме как по протоколу SSH.
Дополнительно можно ограничить доступ к управлению маршрутизатором или коммутатором Cisco только с определенных ip адресов. Как это сделать описано в этой статье.
Важно!
Будьте осторожны с доступом на устройства. Не пренебрегайте защитой подключения и ограничения круга лиц, допущенных к управлению.
Важно!
Не забудьте сохранить конфигурацию всех устройств командой write или copy run start. Иначе после перезагрузки все изменения будут потеряны.
R-DELTACONFIG#write

Building configuration...

[OK]
Перейти к оглавлению
Время на прочтение
1 мин
Количество просмотров 254K

Задача:
Настроить SSH в Cisco. Сделать SSH средой по умолчанию для терминальных линий.
Решение:
1. cisco> enable

2. cisco# clock set 17:10:00 28 Aug 2009

3. cisco# configure terminal

4. cisco(config)# ip domain name test.dom

5. cisco(config)# crypto key generate rsa

6. cisco(config)# service password-encryption

7. cisco(config)# username user privilege 15 password 7 Pa$$w0rd

8. cisco(config)# aaa new-model

9. cisco(config)# line vty 0 4

10. cisco(config-line)# transport input ssh

11. cisco(config-line)# logging synchronous

12. cisco(config-line)# exec-timeout 60 0

13. cisco(config-line)# exit

14. cisco(config)# exit

15. cisco# copy running-config startup-config
Пояснение:
1. Входим в привилегированный режим
2. Устанавливаем точное время для генерации ключа
3. Входим в режим конфигурирования
4. Указываем имя домена (необходимо для генерации ключа)
5. Генерируем RSA ключ (необходимо будет выбрать размер ключа)
6. Активируем шифрование паролей в конфигурационном файле
7. Заводим пользователя с именем user, паролем Pa$$w0rd и уровнем привилегий 15
8. Активируем протокол ААА. (до активации ААА в системе обязательно должен быть заведен хотя бы один пользователь)
9. Входим в режим конфигурирования терминальных линий с 0 по 4
10. Указываем средой доступа через сеть по умолчанию SSH
11. Активируем автоматическое поднятие строки после ответа системы на проделанные изменения
12. Указываем время таймаута до автоматического закрытия SSH сессии в 60 минут
13. Выходим из режима конфигурирования терминальных линий
14. Выходим из режима конфигурирования
15. Сохраняем конфигурационный файл в энергонезависимую память