SNMP (
Simple Network Management Protocol
) — это классический протокол для мониторинга и сбора информации о сетевых устройствах (сервера, сетевое оборудование, рабочие станции, принтеры и т.д.). Протокол SNMP довольно легкий, быстрый, для передачи данных использует UDP порты 161 и 162. В этой статье мы рассмотрим, как установить и настроить службу SNMP в Windows Server 2022/2019 и Windows 10/11.
Содержание:
- Установка службы SNMP в Windows Server 2022/2019
- Установка SNMP агента в Windows Server Core
- Установка службы SNMP в Windows 10/11
- Настройка службы SNMP в Windows Server и Windows 10/11
Установка службы SNMP в Windows Server 2022/2019
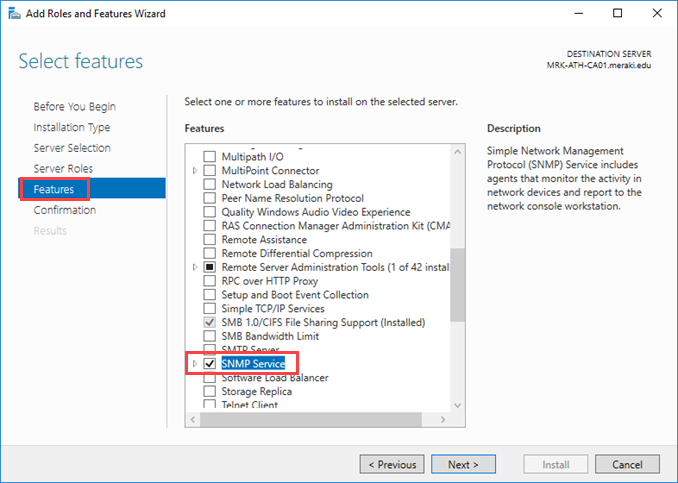
В Windows Server службу SNMP можно установить с помощью Server Manager.
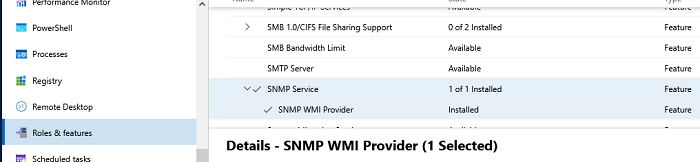
Выберите Add roles and features -> Features. Выберите SNMP Service (если нужно отметьте также SNMP WMI Providers).
Служба SNMP WMI Provider позволяет опрашивать SNMP устройство через WMI.
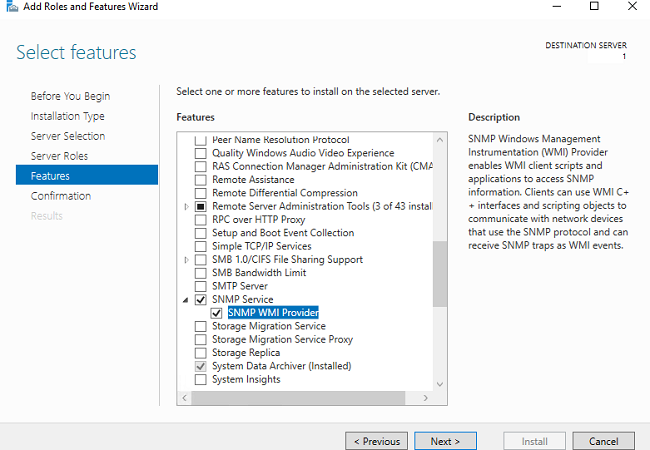
Нажмите Next -> Install и дождитесь окончания установки.
Установка SNMP агента в Windows Server Core
В Windows Server Core можно установить SNMP с помощью веб-интерфеса Windows Admin Center и PowerShell.
Если вы используете Windows Admin Center, подключитесь к хосту Windows Server, выберите Roles and Features -> SNMP Service.
Т.к. в Windows Server Core отсутствует графический интерфейс, а для его управления используется командная строка, вы можете установить службу SNMP из командной строки PowerShell.
Для установки ролей в Windows Server из PowerShell используется командлет Install-WindowsFeature.
Проверьте, что служба SNMP не установлена:
Get-WindowsFeature SNMP*

Установите роль SNMP и WMI провайдер:
Install-WindowsFeature SNMP-Service,SNMP-WMI-Provider -IncludeManagementTools
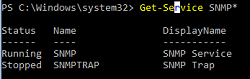
Проверьте, что службы SNMP запущены:
Get-Service SNMP*
В нашем примере SNMP служба запущена, а SNMPTRAP остановлена.
Установка службы SNMP в Windows 10/11
Вы можете использовать службу SNMP не только в Windows Server, но и в десктопных редакциях Windows 10 и 11.
В Windows 10/11 служба SNMP, вынесена в отдельный компонент Feature On Demand (как RSAT и OpenSSH).
Вы можете установить SNMP через панель Settings. Перейдите в Apps -> Optional features -> Add an optional feature -> View features.
В списке доступных компонентов выберите Simple Network Management Protocol (SNMP) и WMI SNMP Provider. Для начала установки нажмите Next (понадобится интернет подключение к серверам Microsoft).

Для установки службы SNMP через PowerShell, используйте команду:
Add-WindowsCapability -Online -Name SNMP.Client~~~~0.0.1.0
Для установки службы SNMP без подключения к интернету, вам понадобится скачать ISO образ Windows 10/11 Features on Demand из личного кабинета на сайте лицензирования Volume Licensing Service Center (VLSC).
Для офлайн установки службы SNMP с такого ISO образа используется команда:
Add-WindowsCapability -Online -Name SNMP.Client~~~~0.0.1.0 -LimitAccess -Source \\msk-fs01\Distr\Windows-FOD\Win11\
Настройка службы SNMP в Windows Server и Windows 10/11
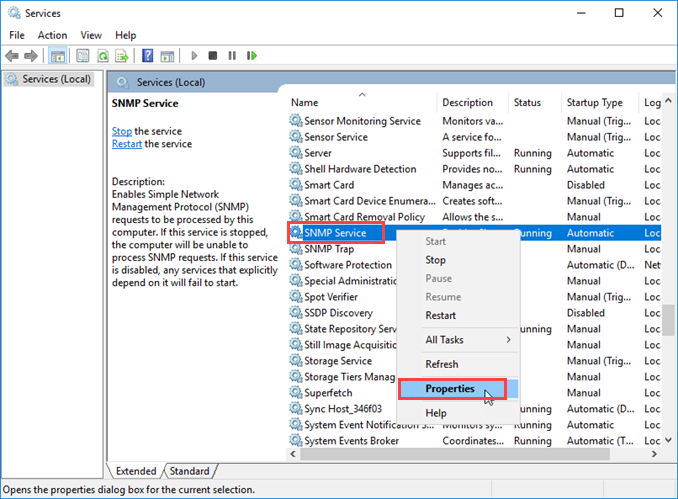
Вы можете настроить параметры службы SNMP в консоли services.msc. Найдите службу SNMP Services в списке и откройте ее свойства.
Обратите внимание, что у службы SNMP есть несколько дополнительных вкладок:
- Agent
- Traps
- Security
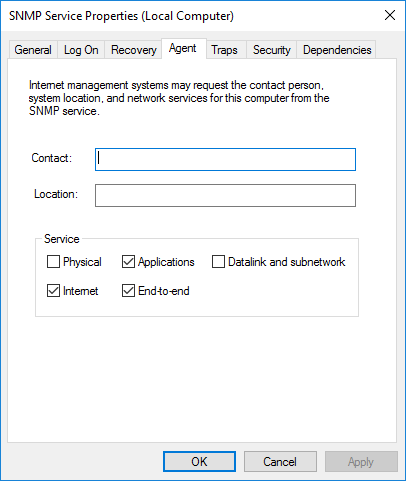
На вкладке Agent указывается базовая информация об устройстве (контакты администратора, местоположение). Здесь же можно указать тип информации, который может отправлять данное устройство при SNMP опросе.
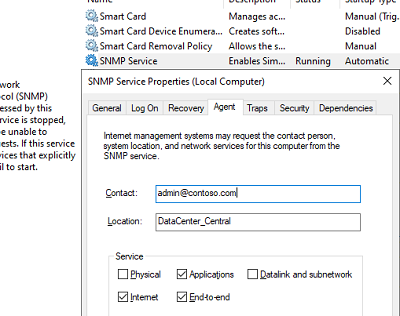
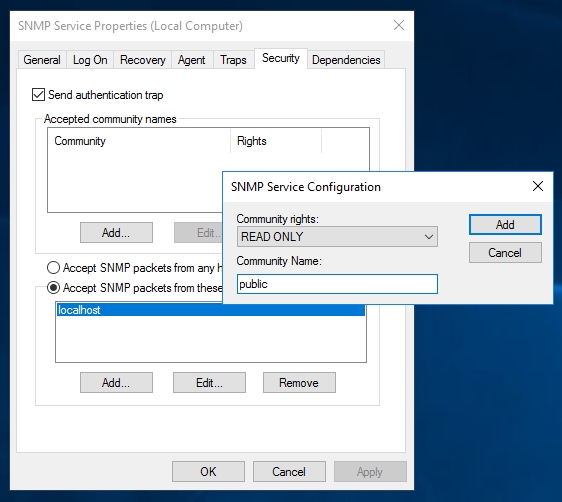
В старых версиях протокола SNMP (SNMP v.1 и SNMP v.2) для авторизации пользователя используется строка сообщества (community string). На вкладке Security можно создать несколько строк подключения.
Можно выбрать один из пяти уровней доступа для сообщества:
- READ ONLY — позволяет получать данные с устройства;
- READ WRITE — позволяет получать данные и изменять конфигурацию устройства;
- NOTIFY — позволяет получать SNMP ловушки;
- READ CREATE – позволяет читать данные, изменять и создавать объекты;
- NONE
Вы можете создать несколько community string. Для этого нужно задать имя и выбрать права/ Для мониторинга состояние сервера достаточно выбрать READ ONLY.
В списке Accept SNMP packets from these hosts можно указать имена/IP адреса серверов, которым разрешено опрашивать данное устройство. Если вы не хотите ограничивать список разрешенных устройств, оставьте здесь Accept SNMP packets from any hosts.

На вкладке Traps указываются адрес серверов, на который SNMP агент должен отправлять SNMP-ловушка (SNMP trap). SNMP Trap это широковещательный USP пакет, используемый для асинхронного уведомления менеджера (например, сообщение о критическом событии).
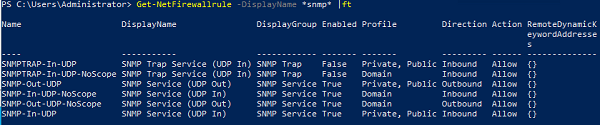
Не забудьте открыть в Windows Defender Firewall правила, разрешающие входящий и исходящий трафик для SNMP запросов и ловушек (TRAP). Нужные правила фаейрвола можно включить с помощью PowerShell.
В Windows Firewall есть несколько готовых правил для SNMP трафика:
Get-NetFirewallrule -DisplayName *snmp* |ft
- SNMPTRAP-In-UDP
- SNMPTRAP-In-UDP-NoScope
- SNMP-Out-UDP
- SNMP-In-UDP-NoScope
- SNMP-Out-UDP-NoScope
- SNMP-In-UDP
Можно включить все правила, или только определенное:
Get-NetFirewallrule -DisplayName *snmp* | Enable-NetFirewallRule
Get-NetFirewallrule SNMP-Out-UDP | Disable-NetFirewallRule
В списке служб Windows есть еще одна служба SNMP Trap. Она используется для получения сообщений от других SNMP агентов и пересылки на SNMP сервера (обычно это система мониторинга, опрашивающая устройства по SNMP, например PRTG или Zabbix).
Если вы настраиваете SNMP на Windows Server Core, вы не сможете использовать графический интерфейс службы SNMP для настройки ее параметров. Вместо этого придется вносить изменения в реестр с помощью PowerShell. Настройки службы SNMP хранятся в ветке реестра HKEY_LOCAL_MACHINE\SYSTEM\CurrentControlSet\Services\SNMP\Parameters.
Следующие команды зададут описание агента:
New-ItemProperty -Path "HKLM:\SYSTEM\CurrentControlSet\services\SNMP\Parameters\RFC1156Agent" -Name "sysContact" -Value "[email protected]" -PropertyType REG_SZ
New-ItemProperty -Path "HKLM:\SYSTEM\CurrentControlSet\services\SNMP\Parameters\RFC1156Agent" -Name "sysLocation" -Value "MSK_Datacenter1" -PropertyType REG_SZ
Для каждой ловушки SNMP придется создать отдельный ключ в HKLM\SYSTEM\CurrentControlSet\services\SNMP\Parameters\TrapConfiguration с именем community.
New-Item -Path "HKLM:\SYSTEM\CurrentControlSet\services\SNMP\Parameters\TrapConfiguration\public1"
Укажите разрешения для community:
New-ItemProperty -Path "HKLM:\SYSTEM\CurrentControlSet\Services\SNMP\Parameters\ValidCommunities" -Name "public1" -Value 4 -PropertyType DWord
Возможные значения:
- 1 — NONE
- 2 — NOTIFY
- 4 — READ ONLY
- 8 — READ WRITE
- 16 — READ CREATE
Для каждого community можно указать список серверов, с которых разрешено принимать запросы:
New-ItemProperty -Path "HKLM:\SYSTEM\CurrentControlSet\Services\SNMP\Parameters\PermittedManagers" -Name "1" -Value "server1.winitpro.ru" -PropertyType REG_SZ
Перезапустите службу SNMP для применения новых настроек из реестра:
Get-Service SNMP|Restart Service
Если нужно распространить эти SNMP настройки на множество компьютеров/серверов Windows в домене, используйте возможности внесения изменений в реестр через GPO.
Проверить работу службы SNMP можно с помощью утилиты snmpwalk (доступна в любом Linux дистрибутиве):
# snmpwalk -v 2c -c public1 -O e 192.168.13.122
В этом примере мы опросили наш Windows хост через версию протокола SNMPv2.
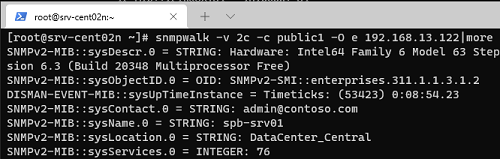
Утилита вернула базовыую информацию о хосте (syscontact, sysname, syslocation) и довольно большое количество информации о состоянии сервера Windows.
Simple Network Management Protocol (SNMP) is a UDP protocol that uses port 161 to monitor and collect detailed information on any network device supporting the SNMP protocol. All Windows servers support SNMP and we’ll show you how to easily install and configure SNMP on your Windows 2016 or 2012 server, including Read Only (RO) or Read Write (RW) SNMP community string.
In our example we will enable the SNMP agent and configure a SNMP community string to allow our Network Monitoring System (NMS) monitor our server resources.
Execution Time: 10 minutes
Step 1 – Install SNMP on Windows Server 2016
Open the Control Panel on your Windows Server and Double-click on the Program and Features icon:

This will open the Add Roles and Features Wizard. Keep clicking on the Next button until you reach the Features section. From there, select the SNMP Service option:

When prompted, click on the Add Features button to include the installation of the Administration SNMP Tools:

Optionally you can include the SNMP WMI Provider option located under the SNMP Service. When ready click on the Next button.
This is the final screen – simply click on the Install button. Ensure the “Restart the destination server automatically if required” option is not selected:

The SNMP Service will now be installed on your Windows 2016 Server. This process will require around 3 minutes to complete. When done, click on the Close button to exit the installation wizard: 
Step 2 – Configure SNMP Service & Read-Only or Read-Write Community String
Configuring the Windows 2016 Server SNMP Service is a simple task. As an administrator, run services.msc or open the Services console from the Administrative Tools. Double-click the SNMP Service and go to the Security tab:

To add a Read-Only community string, click on the Add button under the Accepted community names. Enter the desirable Community Name and set the Community rights to READ ONLY. When done, click on the Add button:

Next, in the lower section of the window, click on the Add button and insert the IP address which will be allowed to poll this server via SNMP. This would be the IP address of your Network Monitoring Service. In our environment our NMS is 192.168.5.25. When done, click on Apply then the OK button:

To confirm SNMP is working correctly, we configured our NMS to query and retrieve information from our server every 5 minutes. After a while we were able to see useful information populating our NMS:

Depending on your Network Monitoring System you’ll be able to obtain detailed information on your server’s status and state of its resources:

Summary
This article briefly explained the purpose of SNMP and how it can be used to monitor network devices and collect useful information such as CPU, RAM and Disk usage, processes running, host uptime and much more. We also showed how to install and configure the SNMP Service for Windows Server 2016. For more technical Windows articles, please visit our Windows Server section.
Simple Network Management Protocol (SNMP) is an age-old network monitoring protocol still in wide use today. In Windows Server 2016, an SNMP service is still available. You can set it up to provide a way to monitor various resources remotely on a Windows Server 2016 machine.
Contents
- Install the SNMP service
- Configure the permitted manager
- The Install-SNMP function
- Author
- Recent Posts

Adam Bertram is a 20-year IT veteran, Microsoft MVP, blogger, and trainer.
There are a couple of ways to get SNMP set up on Windows Server 2016. For this article, I’m going to focus on how to do this in PowerShell. This will allow you to replicate my work easily and set up the SNMP service on many servers at once should you choose to do so.
For the demo in this article to work, make sure you have PowerShell Remoting (PSRemoting) enabled and available on at least one Windows Server 2016 machine. I’ll be working from a computer in the same Active Directory domain. Once you’ve got this enabled and working, we can now begin to set up SNMP.
Install the SNMP service
To make things simple at first, let’s create an interactive PSRemoting session to our remote Windows Server 2016 machine.
PS> Enter-PSSession -ComputerName 'WINSRV2016'
[WINSRV2016]: PS C:\>
Once I’ve established a PSRemoting session, I can begin executing commands on the remote server. The first command I need to run is Install-WindowsFeature. I’ll use this command to install the SNMP-Service and RSAT-SNMP features. These two features will install the SNMP service itself and make the options available should we choose to configure the SNMP service via the Services GUI later.
[WINSRV2016]: PS C:\> Install-WindowsFeature -Name 'SNMP-Service','RSAT-SNMP'

Success Restart Needed Exit Code      Feature Result
------- -------------- ---------      --------------
True    No             Success        {SNMP Service}
Configure the permitted manager
After installing the SNMP service feature, we can now configure both the permitted managers and add any community strings. We can add both permitted managers and community strings via the registry. First, let’s add a few permitted managers. The permitted managers are stored in the PermittedManagers key inside the SNMP Windows service key located at HKEY_LOCAL_MACHINE.
I’d like to allow servers called foo.techsnips.local and bar.techsnips.local to query this SNMP service. I can add them both to the PermittedManagers key by using the New-ItemProperty cmdlet. You can see below that incrementing numbers starting at 1 define the permitted managers. By default, 1 is already set for localhost, so I’m starting at 2 and creating each manager entry as a value.
$managers = 'foo.techsnips.local','bar.techsnips.local'

$i = 2
foreach ($manager in $managers) {
    New-ItemProperty -Path "HKLM:\SYSTEM\CurrentControlSet\services\SNMP\Parameters\PermittedManagers"  Name $i -Value $manager
    $i++
}
After this runs, the PermittedManagers key will now look something like this:

Added permitted managers
Once you’ve added the permitted managers, it’s time to add one or more community strings. We’ll do this again via the registry, but this time the appropriate key is called ValidCommunities. Let’s add a couple here to demonstrate. We’re getting a little fancy here, but that’s what PowerShell is for! In the example below, I’m defining all the community strings and their right levels in a plain-English way. I’ve defined a read-only community string as a 4 and a read/write community string as an 8, but I don’t want to remember this!
$strings = @(
    @{
        Name = 'ro'
        Rights = 'Read Only'
    }
    @{
        Name = 'rw'
        Rights = 'Read Write'
    }
)

foreach ($string in $strings) {
    switch ($string.Rights) {
        'Read Only' {
            $val = 4
        }
        'Read Write' {
            $val = 8
        }
        default {
            throw "Unrecognized input: [$]"
        }
    }
    New-ItemProperty -Path "HKLM:\SYSTEM\CurrentControlSet\services\SNMP\Parameters\ValidCommunities"  Name $string.Name -Value $val
    $i++
}
After running this code, you can then go to the Windows Services console and view the SNMP Service Properties –> Security tab to see that the SNMP service recognizes all of the strings.

Viewing SNMP configuration
The Install-SNMP function
Now that you know the basics of setting up SNMP, we can take the code we came up with and easily adapt it to multiple servers as well. To do this, instead of creating an interactive remoting session, we will instead use Invoke-Command to send a prebuilt block of code known as a scriptblock to one or many different computers at once.
We’ll wrap this all up into an easy-to-use function called Install-SNMP we can execute on one or lots of computers.
function Install-SNMP {
    [OutputType('void')]
    [CmdletBinding()]
    param
    (
        [Parameter(Mandatory)]
        [ValidateNotNullOrEmpty()]
        [string[]]$ComputerName,

        [Parameter()]
        [ValidateNotNullOrEmpty()]
        [string[]]$PermittedManagers,

        [Parameter()]
        [ValidateNotNullOrEmpty()]
        [hashtable[]]$CommunityStrings,

        [Parameter()]
        [ValidateNotNullOrEmpty()]
        [pscredential]$Credential
    )

    $ErrorActionPreference = 'Stop'

    try {
        $scriptBlock = {
            $VerbosePreference = $using:VerbosePreference
            ## Install the service and remote GUI configuraiton ability
            $null = Install-WindowsFeature -Name 'SNMP-Service','RSAT-SNMP'

            if ($using:PermittedManagers) {
                ## Set any managers
                $i = 2
                foreach ($manager in $using:PermittedManagers) {
                    Write-Verbose -Message "Setting permitted manager [$($manager)]..."
                    $null = New-ItemProperty -Path "HKLM:\SYSTEM\CurrentControlSet\services\SNMP\Parameters\PermittedManagers" -Name $i -Value $manager
                    $i++
                }
                $strings = @(
                    @{
                        Name = 'ro'
                        Rights = 'Read Only'
                    }
                    @{
                        Name = 'rw'
                        Rights = 'Read Write'
                    }
                )
            }

            if ($using:CommunityStrings) {
                ## Set any community strings
                foreach ($string in $using:CommunityStrings) {
                    Write-Verbose -Message "Setting community string [$($string.Name)]..."
                    switch ($string.Rights) {
                        'Read Only' {
                            $val = 4
                        }
                        'Read Write' {
                            $val = 8
                        }
                        default {
                            throw "Unrecognized input: [$]"
                        }
                    }
                    $null = New-ItemProperty -Path "HKLM:\SYSTEM\CurrentControlSet\services\SNMP\Parameters\ValidCommunities" -Name $string.Name -Value $val
                    $i++
                }
            }
        }

        $icmParams = @{
            ComputerName = $ComputerName
            ScriptBlock = $scriptBlock
            Verbose = $VerbosePreference
        }
        if ($PSBoundParameters.ContainsKey('Credential')) {
            $icmParams.Credential = $Credential
        }
        Invoke-Command @icmParams
    } catch {
        Write-Error -Message $_.Exception.Message
    }
}
We can now use this function like this:
Subscribe to 4sysops newsletter!
PS> Install-SNMP -ComputerName WINSRV2016 -PermittedManagers 'foo.techsnips.local' -CommunityStrings @{'Name'='ro';'Rights'='Read Only'}  Verbose

VERBOSE: Exporting cmdlet 'Get-WindowsFeature'.
VERBOSE: Exporting cmdlet 'Install-WindowsFeature'.
VERBOSE: Exporting cmdlet 'Uninstall-WindowsFeature'.
VERBOSE: Exporting alias 'Add-WindowsFeature'.
VERBOSE: Exporting alias 'Remove-WindowsFeature'.
VERBOSE: Exporting function 'Enable-ServerManagerStandardUserRemoting'.
VERBOSE: Exporting function 'Disable-ServerManagerStandardUserRemoting'.
VERBOSE: Installation started...
VERBOSE: Installation succeeded.
VERBOSE: Setting permitted manager [foo.techsnips.local]...
VERBOSE: Setting community string [ro]...
Setting up SNMP on a Windows Server involves the following steps:
1. Install SNMP: SNMP is not enabled by default on Windows Server, so you’ll need to install it first. This can be done through the «Add Roles and Features» wizard in Server Manager.
2. Configure SNMP: Once installed, you can configure SNMP by opening the «SNMP Service» properties dialog and setting the community strings and other parameters.
3. Configure firewall: If you have a firewall enabled, you may need to configure it to allow SNMP traffic through.
4. Test SNMP: Once SNMP is configured, you can test it by using an SNMP manager tool to query the server and retrieve information.
Here is a more detailed step-by-step guide:
1. Install SNMP:
– Open Server Manager and select «Add Roles and Features«
– In the «Add Roles and Features» wizard, select «Features«
– Locate «Simple Network Management Protocol (SNMP)» and select it
– Click «Install«
2. Configure SNMP:
– Open the «SNMP Service» properties dialog from the Server Manager
– On the «Agent» tab, set the «Community» strings for read-only and read-write access. These are essentially passwords that allow SNMP managers to access the server’s information.
– Set any other relevant parameters, such as system contact and location.
3. Configure Firewall:
– If you have Windows Firewall enabled, you may need to configure it to allow SNMP traffic through.
– In the «Windows Firewall with Advanced Security» tool, create a new inbound rule for SNMP. Specify the UDP port number and allow access.
4. Test SNMP:
– Use an SNMP manager tool, such as net-snmp or SolarWinds SNMP software, to query the server and retrieve information.
– Specify the IP address of the server and the community string you set during configuration.
– You should receive data about the server’s hardware and software configuration.
Video Tutorial:How to set SNMP on Windows Server?
Does Windows Server have SNMP?
Yes, Windows Server has SNMP (Simple Network Management Protocol) and it can be enabled by following these steps:
1. Open the Control Panel and Select Programs and Features.
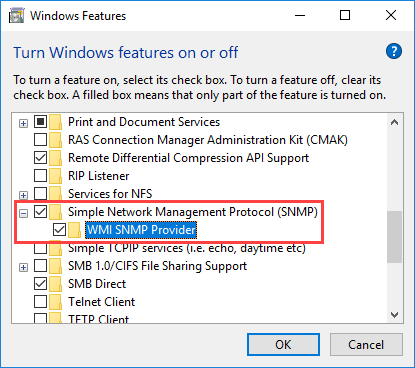
2. Click on the “Turn Windows features on or off” option.
3. Find and expand the option “Simple Network Management Protocol (SNMP)”.
4. Check the box next to SNMP, then click OK.
Once SNMP is enabled, it can be configured using the SNMP Service properties. You can also use third-party SNMP management tools to monitor and manage Windows servers through SNMP.
SNMP is an important protocol for network administrators to monitor and manage network devices, and is widely used across many different platforms including Windows Server.
Setting up SNMP on Windows Server 2016 can be done by following these steps:
1. Install SNMP Feature: Go to «Server Manager» > «Add Roles and Features» and select the «SNMP Service» checkbox under «Features«.
2. Enable SNMP: Open the «Services» app and find the «SNMP Service«. Right-click «Properties» and select the «Security» tab to configure the community string and permissions.
3. Configure SNMP: Open the «Registry Editor» and find «HKEY_LOCAL_MACHINE\SYSTEM\CurrentControlSet\Services\SNMP«. Add or modify subkeys such as «Parameters» and «CurrentVersion» to configure SNMP settings.
4. Test SNMP: Use a network monitoring tool to test the SNMP on the server. Check if the SNMP responses are being received and the data is being displayed as expected.
It’s important to note that SNMP can leave sensitive information exposed if configured incorrectly, so it’s recommended to configure SNMP securely by using strong community strings and restricting access to authorized devices only.
How to install SNMP on Windows?
Here are the steps to install SNMP on Windows:
1. Go to the Control Panel and click on «Programs and Features«.
2. Click on «Turn Windows Features on or off«.
3. Scroll down and find «Simple Network Management Protocol (SNMP)» and check the box next to it.
4. Click on «OK» and wait for the installation process to complete.
5. Once the installation is complete, go back to the Control Panel and open «Administrative Tools«.
6. Click on «Services» and scroll down to find «SNMP Service«.
7. Right-click on «SNMP Service» and click on «Properties«.
8. In the «Agent» tab, click on «Add» to add a new community name.
9. Type in a name for the community in the «Community Name» field.
10. In the «Security» tab, select the radio button for «Accept SNMP packets from any host» or «Accept SNMP packets from these hosts» based on your preference.
11. Click on «OK» to save the changes and start using SNMP on your Windows system.
How do I know if SNMP is enabled on Windows Server?
To check if Simple Network Management Protocol (SNMP) is enabled on a Windows Server, you can follow these steps:
1. Open the «Control Panel» on your Windows Server.
2. Click on «Programs.«
3. Click on «Turn Windows features on or off.«
4. Search for «Simple Network Management Protocol (SNMP)» and click on the «+» icon to expand the folder.
5. Check whether the «SNMP Service» box is checked. If it is, SNMP is enabled on your Windows Server.
Alternatively, you can also check if SNMP is enabled by following these steps:
1. Open the «Services» console on your Windows Server.
2. Search for the «SNMP Service» and check its status.
3. If the status of the SNMP Service is «Running,» it means that SNMP is enabled on your Windows Server.
In summary, you can easily check whether SNMP is enabled on your Windows Server by either looking for the SNMP Service in the «Turn Windows features on or off» menu or checking the status of the SNMP Service in the «Services» console.
Is SNMP enabled by default Windows?
No, SNMP (Simple Network Management Protocol) is not enabled by default on Windows operating systems. To enable SNMP on Windows, the following steps can be taken:
1. Open the Control Panel on your Windows machine.
2. Click on the Programs option, then click on Turn Windows features on or off.
3. Locate the SNMP option, which will be listed under Simple Network Management Protocol, and check the box next to it.
4. Click OK to save changes and wait for the SNMP feature to be installed.
5. After installation, configure SNMP by going to the Services applet in the Control Panel or by using the Local Group Policy Editor.
It’s worth noting that SNMP can be a security risk if not configured properly, so it’s important to take steps to secure the protocol if you need to use it.
How to monitor Windows server using SNMP?
Monitoring Windows servers using SNMP can be beneficial as it can help in identifying performance issues, detecting errors and failures, and improving the overall network management. Here are the steps to monitor a Windows server using SNMP:
1. Install SNMP Service on the Windows Server: Firstly, SNMP service needs to be installed on the Windows server that you wish to monitor. This can be done by going to the server manager and navigating to «Add Roles and Features» option.
2. Enable SNMP: After installing SNMP service, you need to enable it by turning on the SNMP service in the services menu. You can also define the community string and SNMP version that you want to use.
3. Configure SNMP Settings: Configure the SNMP settings by setting up the SNMP community string, SNMP version, and SNMP trap destination. SNMP community string is like a password that allows an SNMP device to communicate with another device.
4. Use SNMP Monitoring Software: There are various SNMP monitoring software available in the market that can help you monitor the Windows server. You can choose the one that fits your needs, budget, and requirements.
5. Add Device to SNMP Monitoring Software: To monitor the Windows server using SNMP, add the server to the SNMP monitoring software by entering the IP address or hostname and the SNMP community string.
6. Monitor Server Performance: Once the server is added to the SNMP monitoring software, you can start monitoring the server performance by viewing reports and alerts. SNMP monitoring can help you determine the server’s health, manage resources, and optimize performance.
In conclusion, monitoring a Windows server using SNMP is a simple and effective way to monitor the server’s performance, detect issues, and optimize the network management. By following the above steps, you can monitor your Windows server using SNMP effortlessly.
When we intend to use monitoring tools in our network, data monitoring on Windows client and Windows server environments is usually done through WMI. However, in some cases it may be necessary to use the SNMP protocol. In this article, you will learn how to install and configure this protocol on Windows operating systems.
Installing the SNMP protocol on Windows 10 and Windows Server 2016
In Windows 10, you can install the SNMP protocol through Add windows features. It is enough to enter this section in the Control Panel, and in the opened window, look for the term Simple Network Management Protocol (SNMP) and its very helpful, select it and, click OK, wait for this protocol to be installed.
In Windows Server 2016, enter Server Manager and click on Add Roles and Features. Click Next to reach the Features window. Here, as shown below, select the SNMP Service option and install it.
You can easily install SNMP in Windows Server 2016 using the following command in Powershell.
Install-WindowsFeature SNMP-Service -IncludeManagementTools
Configure SNMP on Windows 10 and Windows Server 2016
THATS protocol configuration is the same on both Windows 10 and Windows Server 2016 operating systems. Also, It is enough to enter the Windows services section by entering the services.msc command in the Run window. In this window, according to the figure below, find SNMP Service, right-click on it and select Properties.
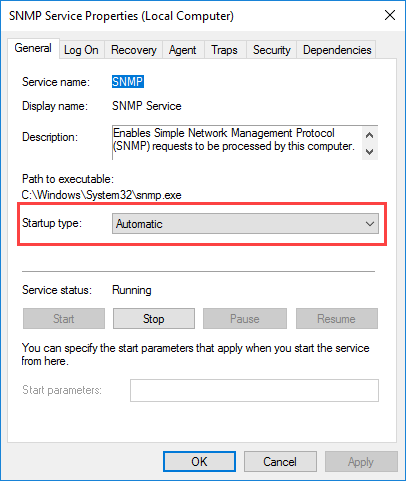
In the opened window and in the General tab, make sure that the Startup type status is Automatic.
Then enter the Agent tab, here select the services you need for monitoring.
Finally, enter the Security tab and click on Add. Create a Community String with Read Only mode. You enter the phrase you create here in the monitoring tool, and this phrase establishes the connection between your monitoring tool and its good for your Windows operating system and the other.