Huawei uses machine translation combined with human proofreading to translate this document to different languages in order to help you better understand the content of this document.
Note: Even the most advanced machine translation cannot match the quality of professional translators.
Huawei shall not bear any responsibility for translation accuracy and it is recommended that you refer to the English document (a link for which has been provided).
How to Increase WiFi Speed (WLAN AC)
- About This Document
- Applicable Scenario
- Understanding the Theoretical Wi-Fi Speed
- How to Test the Wi-Fi Speed
- Why Is My Wi-Fi So Slow
- Three Simple Moves to Quickly Improve Your Wi-Fi Speed
- Seven Easy Steps to Maximize Your Wi-Fi Speed
- Low Wi-Fi Speed Due to Poor Wi-Fi Signal Strength
- Low Wi-Fi Speed Due to a Low Negotiated Wireless Speed
- Low Wi-Fi Speed Due to Incorrect WLAN Rate Limiting Configuration
- Low Wi-Fi Speed Due to Improper VLAN Configurations
- Low Wi-Fi Speed Because STAs Are Going Offline
- Web Pages Fail to Be Opened, and the Message «DNS Server Not Responding» Is Displayed
- Web Pages Load Slowly, and Packet Loss Occurs in a Ping Test
- Collecting Information About the Slow WiFi Speed Issue
- References
About This Document
To make your Wi-Fi network faster and easier to use, this document provides a set of common troubleshooting methods for slow Internet access through a WLAN provided by AR routers. If you encounter this issue when connecting to the Internet in wired mode through an AR router, resolve the problem by referring to Slow Internet Access in the Troubleshooting Insights.
Applicable Scenario
An AR router can work in either AC or Fat AP mode to provide WLAN services. These two modes apply to different scenarios.
- The AC mode applies to large-scale venues such as waiting halls and stadiums. In this mode, an AR router functions as an AC and provides access to downstream Fit APs. The AR router and Fit APs together provide WLAN access for STAs.
- The Fat AP mode applies to small-sized enterprises, homes, cafes, SOHO offices, and enterprise branches where WLAN services are deployed independently. In this mode, an AR router functions as a Fat AP and independently provides WLAN access for STAs.
The following describes how to locate and rectify the fault of slow Wi-Fi access in large-scale venues such as waiting halls and stadiums. For details about how to locate and rectify the fault of slow Wi-Fi access in small-scale places, see How to Increase WiFi Speed (WLAN Fat AP).
Typical Networking for Large-Scale Venues
In large-scale venues where a large number of users are scattered, multiple Fit APs are generally deployed and connected to one AR router to ensure pervasive coverage of radio signals. The AR router works in AC mode to manage Fit APs that provide wireless signals for users. Figure 1-1 shows the typical networking for a waiting hall. Only Huawei Fit APs can connect to the AR router. Unless otherwise specified, APs mentioned in this document refer to Fit APs.
Figure 1-1 Typical networking for a large-scale venue (waiting hall)
How to Determine the Working Mode of an AR Router
- Check the model name of an AR router. By default, an AR router with the letter W contained in its model name works in Fat AP mode, and that without the letter W contained in its model name works in AC mode.
- If you are not sure whether the default configuration has been modified, log in to the router and run the display workmode wlan command to check its working mode.
<Huawei> display workmode wlan
 Wlan Current WorkMode = ac
 Wlan Config WorkMode  = ac  //ac indicates the AC mode, and ap indicates the Fat AP mode.
- If the AR router does not work in AC mode, run the set workmode wlan command to set the working mode to AC.
<Huawei> system-view
[Huawei] set workmode wlan ac
Warning: The WorkMode Change will be activated after board reboot. Continue? [y/n]:y
[Huawei] quit
<Huawei> reboot fast
System will reboot! Continue ? [y/n]:y
Info: system is rebooting ,please wait...
For details about how to log in to an AR router through the CLI, see How to Log In to the AR Router Through the Console Port (CLI) and How to Log In to the Router Through the Mini USB Port (CLI) in How to Log In to an AR Router Through the Web and CLI.
Understanding the Theoretical Wi-Fi Speed
In daily life, everyone may have encountered slow web page loading or video freezing when connecting to the Internet through Wi-Fi with wireless terminals (such as mobile phones, PCs, and tablets). For example, many have wondered why their mobile phones become unresponsive during Internet access even with 200 Mbit/s bandwidth. Before answering this question, let’s get familiar with some terms closely related to the Wi-Fi speed.
Figure 1-2 Wi-Fi networking
Table 1-1 List of terms related to the Wi-Fi speed
|
Term |
Description |
Example |
|---|---|---|
|
Downlink speed |
As shown in Figure 1-2, the downlink speed is the speed at which the Internet sends traffic to you for such services as browser opening or file downloading, and is expressed in Mbit/s. In this document, the downlink speed is the bandwidth that a user subscribes to from a broadband carrier. |
When a user subscribes to a 200 Mbit/s broadband package, it means that 200 Mbit/s is the downlink speed. |
|
Wireless link speed negotiated between a STA and an AC |
The speed negotiated between a STA and an AC is also called the negotiated wireless speed, which is expressed in Mbit/s, as shown in Figure 1-2. The negotiated wireless speed is the maximum transmission speed supported by both the STA and Fit AP, and is also related to the AC configuration. For details, see Low Wi-Fi Speed Due to a Low Negotiated Wireless Speed. |
If the Fit AP supports 802.11ac, but the STA supports only 802.11b/g/a, but does not support 802.11n or 802.11ac, the maximum negotiated wireless speed can reach only 54 Mbit/s. |
|
Theoretical Wi-Fi speed |
This speed refers to the maximum data transmission speed when a STA accesses the Internet through a WLAN, in Mbit/s. The theoretical Wi-Fi speed is the smaller value between the downlink speed and the wireless link speed. |
If the downlink speed is 200 Mbit/s and the wireless link speed is 150 Mbit/s, the theoretical Wi-Fi speed is 150 Mbit/s. |
|
Theoretical Wi-Fi download speed |
This speed refers to the speed for downloading a file or video using a STA, in MB/s. As 1 byte equals 8 bits, the theoretical Wi-Fi download speed and the theoretical Wi-Fi speed are in the proportion of 1:8. |
When the theoretical Wi-Fi speed is 200 Mbit/s, the theoretical Wi-Fi download speed is 25 MB/s. |
How to Test the Wi-Fi Speed
A broadband network is an extremely complex end-to-end system, which consists of the client, access network, core network, and content resources. The client refers to the network set up between STAs and wireless routers. Devices on the access and core networks between optical modems and the Internet are provided by carriers and are irrelevant to users. According to user feedback, the slow Internet access issue is mostly caused by clients. If you encounter slow Internet access using Wi-Fi, a Wi-Fi speed test is recommended at first.
Hardware Requirements for Different Wi-Fi Speeds
Slow Internet access issues caused by clients can be classified into three types: hardware, software, and configuration issues. We can rectify software and configuration issues, but not hardware issues. To resolve hardware issues, replacing the hardware is the only choice. Therefore, before a Wi-Fi network speed test, verify that the hardware configuration meets the requirements.
As broadband technologies continuously develop, 100 Mbit/s networks become widespread now. Table 1-2 describes hardware requirements for the 100 Mbit/s Wi-Fi speed.
Table 1-2 Hardware requirements for the 100 Mbit/s Wi-Fi speed
|
Hardware |
Requirements |
Description |
Remarks |
|---|---|---|---|
|
Wired interface on a wireless router |
1000 Mbit/s WAN or LAN interface |
A 100 Mbit/s interface can transmit only traffic at a speed of lower than 100 Mbit/s. To transmit traffic at a speed of higher than 100 Mbit/s, the router must have a 1000 Mbit/s interface. |
For wired interface parameters supported by AR routers, check the router product documentation or official website. Assume that an AR101W-S is used. You can check its wired interface parameters in Interface Description > GE electrical interface in the Huawei ARS Product Documentation. |
|
Fit AP |
|
The maximum transmission speed supported by a Fit AP is subject to the wireless protocol it supports. The maximum transmission speed varies depending on the AP model. For example, you can find out the rates supported by the AP6050DN, see «Radio Specifications» in Hardware Information (AP6050DN). |
For Wi-Fi protocols supported by Fit APs, check the product documentation or official website. For example, you can find out the Wi-Fi protocols supported by the AP6050DN, see AP6050DN Product Description. |
|
Wireless network adapter of a STA |
|
The maximum transmission speed supported by a STA’s wireless network adapter is subject to the wireless protocol it supports. For 802.11n/ac, the maximum speeds supported in different MIMO modes and at different frequency bandwidths are as follows:
The wireless parameters of a STA’s wireless network adapter must match those of the wireless router and Fit APs. Otherwise, the wireless link speed negotiated between the STA and router is low, and the Wi-Fi speed is affected. |
For Wi-Fi parameters supported by a STA, check its product description or official website. For example, you can find Wi-Fi parameters of Huawei’s smartphone Mate 30 Pro 5G from SPECIFICATIONS > NETWORK on Huawei Vmall. |
|
Optical modem |
Gigabit optical modem |
Generally, optical modems are provided by carriers. If optical modems are not available, you can purchase them by yourself. |
None |
|
Ethernet cable |
Category 5 enhanced (Cat 5e) cables or higher |
Category 5 (Cat 5) or higher Ethernet cables apply to 100 Mbit/s networks, but they have been mostly replaced by Cat 5e cables. Therefore, Cat 5e cables be recommended. |
None |
Figure 1-3 Wi-Fi speed chart
Wi-Fi Speed Test Method
Similar to broadband speed tests, Wi-Fi speed tests can be carried out in online (websites) or local (tools) mode. The test result varies with the speed test method. It is recommended that the Wi-Fi speed be tested using different methods for multiple times.
- For PCs, it is recommended that speed tests be carried out on websites, for example, carriers’ or dedicated speed test websites.
- For mobile phones or tablets, it is recommended speed tests be locally tested using tools. Download an app for Wi-Fi speed test from app stores (such as AppGallery or App Store) and install it to test the Wi-Fi speed.
Wi-Fi Speed Evaluation Criteria
Based on live network experiences, we summarize some recommended Wi-Fi speed evaluation criteria, as listed in Table 1-3.
Table 1-3 Wi-Fi speed evaluation criteria
|
Theoretical Wi-Fi Speed (Mbit/s) |
Theoretical Wi-Fi Download Speed (MB/s) |
Slow (< 60% of the Theoretical Wi-Fi Speed) |
Normal (60% to 80% of the Theoretical Wi-Fi Speed) |
Good (> 80% of the Theoretical Wi-Fi Speed) |
|---|---|---|---|---|
|
10 |
1.25 |
< 6 Mbit/s bandwidth |
6–8 Mbit/s bandwidth |
> 8 Mbit/s bandwidth |
|
20 |
2.5 |
< 12 Mbit/s bandwidth |
12–16 Mbit/s bandwidth |
> 16 Mbit/s bandwidth |
|
50 |
6.25 |
< 30 Mbit/s bandwidth |
30–40 Mbit/s bandwidth |
> 40 Mbit/s bandwidth |
|
100 |
12.5 |
< 60 Mbit/s bandwidth |
60–80 Mbit/s bandwidth |
> 80 Mbit/s bandwidth |
|
200 |
25 |
< 120 Mbit/s bandwidth |
120–160 Mbit/s bandwidth |
> 160 Mbit/s bandwidth |
|
300 |
37.5 |
< 180 Mbit/s bandwidth |
180–240 Mbit/s bandwidth |
> 240 Mbit/s bandwidth |
|
500 |
62.5 |
< 300 Mbit/s bandwidth |
300–400 Mbit/s bandwidth |
> 400 Mbit/s bandwidth |
- Some speed test software may measure the Wi-Fi download speed in the unit of MB/s, and will convert the unit into Mbit/s before displaying the test results. If the test results are still displayed in the unit of MB/s, multiply the value by 8 to obtain the actual Wi-Fi speed in the unit of Mbit/s.
- The theoretical Wi-Fi speed is the smaller value between the downlink speed and the wireless link speed. For example, if the downlink speed is 200 Mbit/s and the wireless link speed negotiated between the router and STA is 300 Mbit/s, the theoretical Wi-Fi speed is 200 Mbit/s.
Why Is My Wi-Fi So Slow
After analyzing numerous actual cases on live networks, we have summarized seven typical reasons for the low Wi-Fi speed issue, as shown in Figure 1-4.
Figure 1-4 Seven typical reasons for the low Wi-Fi speed issue
Three Simple Moves to Quickly Improve Your Wi-Fi Speed
Quickly improving the Wi-Fi speed can help customers restore the network services as soon as possible and rectify faults, which, however, will impose impact on running services. For example, restarting a device may interrupt current services. To minimize the impact, perform operations for speeding up your Wi-Fi during off-peak hours. For operations on the web system, see Logging In to an AR Router Through a Web System in How to Configure an AR Router.
Table 1-4 Three moves to quickly improve the Wi-Fi speed
|
No. |
Handling Measure |
Remarks |
|---|---|---|
|
1 |
Remove obstacles or interference sources around APs to keep them away from walls, microwave ovens, and metal objects. If the AP is connected to external Wi-Fi antennas, adjust the antenna angles by referring to Antenna Installation and remove obstacles around the antennas. |
None |
|
2 |
Power off and restart the router. Save the configuration before the restart to prevent configuration loss. In practice, the auto-save function is enabled to prevent configuration loss upon power-off. Web: Manually save the configuration before the restart, as shown in the following figure.
|
Restarting the router interrupts user services for 1 to 2 minutes. |
|
3 |
Reset Wi-Fi parameters of the router. Before resetting the Wi-Fi parameters, delete the existing Wi-Fi parameter settings.
|
|
|
4 |
Contact technical support engineers. For details, see Collecting Information About the Slow WiFi Speed Issue. |
None |
Seven Easy Steps to Maximize Your Wi-Fi Speed
Low Wi-Fi Speed Due to Poor Wi-Fi Signal Strength
Context
As WLANs use radio signals to transmit service data, radio waves in the air are attenuated due to the impact of the surrounding environment. If the Wi-Fi speed is low, check the Wi-Fi signal strength. The strength of Wi-Fi signals received by a STA directly affects the Wi-Fi speed.
After a STA is connected to a WLAN, the number of signal bars displayed on the STA directly shows the strength of the current Wi-Fi signal. Generally, three or four bars indicate that the Wi-Fi signal strength is normal, and zero to two bars indicate that the Wi-Fi signal strength is poor. You can also run the rf-ping command to check the strength of radio signals received by a STA. If the value of RSSI is lower than –65 dBm, the radio signals received by the STA are weak. If the strength of signals received by the STA is poor, perform the following operations for troubleshooting:
- Environment: For example, the AP or antenna is blocked by objects, causing large signal attenuation. Signals attenuate to different degrees when traveling through walls, glass, and doors. Especially, metal obstacles may completely block or reflect radio signals.
- Power: If an AP’s transmit power is low, STAs far away from the AP cannot receive radio signals. The transmit power of an AP determines its radio coverage area. That is, an AP with higher transmit power can cover a larger area.
- Interference: Improper AP channel settings may lead to severe signal interference. On a WLAN, adjacent APs must work on non-overlapping channels to avoid signal interference. The 2.4 GHz frequency band has overlapping channels. When setting channels for APs, you are advised to configure a non-overlapping channel set containing channels 1, 6, and 11 or containing channels 1, 5, 9, and 13.
Troubleshooting Procedure
- Run the rf-ping command to check the strength of radio signals received by a STA. If the value of RSSI is lower than –65 dBm, the radio signals received by the STA are weak. In this case, you need to improve the radio signal strength in terms of environment, power, and interference.
<Huawei> system-view
[Huawei] wlan ac
[Huawei-wlan-view] rf-ping xxxx-xxxx-xxxx
 Tx rate=52.0 Mbps, Reply from xxxx-xxxx-xxxx: RSSI=-58 dBm time < 1 ms
 1 packets transmitted, 1 received, 0% packet loss, time < 1 ms, RSSI -58 dBm
- Check whether the AP is blocked by obstacles. If so, remove the obstacles. If the AP is connected to external Wi-Fi antennas, adjust the antenna angles by referring to Antenna Installation and remove obstacles around the antennas.
- Run the display radio all command to check whether the AP’s transmit power is the maximum value. In the command output, CE/ME indicates the ratio of the actual AP power to the maximum power.
<Huawei> display radio all
CH/BW:Channel/Bandwidth
CE:Current EIRP (dBm)
ME:Max EIRP (dBm)
CU:Channel utilization
ST:Status
------------------------------------------------------------------------
AP ID Name    RfID  Band  Type    ST  CH/BW          CE/ME   STA    CU
------------------------------------------------------------------------
0     L1_003  0     2.4G  bgn     on  6/20M          11/24   0      71%
0     L1_003  1     5G    an      on  149/20M        28/28   0      39%
------------------------------------------------------------------------
Total:2
- If the value of CE is not equal to the value of ME, run the eirp eirp command to set the AP’s transmit power to the maximum value.
<Huawei> system-view
[Huawei] wlan ac
[Huawei-wlan-view] ap-id 0
[Huawei-wlan-ap-0] radio 0
[Huawei-wlan-radio-1/0] eirp 24
- In addition, check whether the STA is far away from the AP. Generally, when the STA is more than 50 m away from the AP, the Wi-Fi speed cannot increase even if the AP works at the maximum transmit power. In this case, deploy more APs to improve the wireless signal coverage, or move the STA to the signal coverage area.
- If the value of CE is not equal to the value of ME, run the eirp eirp command to set the AP’s transmit power to the maximum value.
- Check for interference to 2.4 GHz or 5 GHz radio signals. Run the display radio all command to check the AP’s channel utilization to determine the signal interference level. In the command output, CU indicates the channel utilization.
<Huawei> display radio all
CH/BW:Channel/Bandwidth
CE:Current EIRP (dBm)
ME:Max EIRP (dBm)
CU:Channel utilization
ST:Status
------------------------------------------------------------------------
AP ID Name    RfID  Band  Type    ST  CH/BW          CE/ME   STA    CU
------------------------------------------------------------------------
0     L1_003  0     2.4G  bgn     on  6/20M          11/24   0      71%
0     L1_003  1     5G    an      on  149/20M        28/28   0      39%
------------------------------------------------------------------------
Total:2
- If the value of CU is greater than 50%, the AP’s channel utilization is high, indicating severe radio signal interference. In this case, you are advised to switch the AP to a channel with less interference.
<Huawei> system-view
[Huawei] wlan ac
[Huawei-wlan-view] ap-id 0
[Huawei-wlan-ap-0] radio 0
[Huawei-wlan-radio-0/0] channel 20mhz 6   // Switch the AP's 2.4 GHz channel.
<Huawei> system-view
[Huawei] wlan ac
[Huawei-wlan-view] ap-id 0
[Huawei-wlan-ap-0] radio 1
[Huawei-wlan-radio-0/1] channel 80mhz 149    // Switch the AP's 5 GHz channel.
- Check whether there are interfering devices around the AP, such as microwave ovens, cordless phones, and Bluetooth devices. If so, remove the interference sources to reduce the channel utilization.
- If the value of CU is greater than 50%, the AP’s channel utilization is high, indicating severe radio signal interference. In this case, you are advised to switch the AP to a channel with less interference.
Low Wi-Fi Speed Due to a Low Negotiated Wireless Speed
Context
As described above, the negotiated wireless speed of a STA determines the upper limit of the STA’s Wi-Fi speed. A STA with a lower negotiated wireless speed has a lower link setup rate and a lower Wi-Fi speed. The negotiated wireless speed of a STA is affected by many factors, including the following:
- Radio mode: A STA’s association rate varies according to the radio mode of the associated AP. For example, 802.11g supports a maximum of 54 Mbit/s association rate, while 802.11n supports up to 600 Mbit/s association rate. If the radio mode of an 802.11n AP is set to 802.11g instead of 802.11n, the maximum association rate of STAs can only reach 54 Mbit/s.
- Frequency bandwidth (in Hz): The frequency bandwidth of a STA refers to the amount of data that the STA can transmit within a specific period. This also reflects the STA’s capability of transmitting data through a communication channel. The frequency bandwidth determines the link setup rate. A larger frequency bandwidth indicates a higher link setup rate. The frequency bandwidth is the maximum value supported by both the STAs and APs. If a STA and an AP both support 802.11ac, the 80 MHz frequency bandwidth can be configured. For 80211.b/g/a STAs, modifying the frequency bandwidth does not affect their link setup rates.
- Encryption mode: When TKIP encryption is used, an 802.11n-capable STA can associate with an AP only in 802.11g mode and the maximum link setup rate can reach only 54 Mbit/s. This is because the TKIP encryption mode is not defined in 802.11n.
- WMM function: If WMM is disabled, the STA can associate with an AP only in 802.11b/g/a mode, and the maximum link setup rate can reach only 54 Mbit/s.
- Protocol type supported by the STA’s wireless network adapter: If a STA’s wireless network adapter only supports 802.11b/g/a but does not support 802.11n or 802.11ac, the STA’s association mode can only be set to 802.11b/g/a and the maximum link setup rate of the STA can only reach 54 Mbit/s.
If the Internet access speed of a STA is low, perform the following steps to check whether the STA’s link setup rate is too low.
Troubleshooting Procedure
- Run the display radio all command to check the radio mode of an AP. In the command output, Type indicates the protocol type of an AP radio.
<Huawei> display radio all
CH/BW:Channel/Bandwidth
CE:Current EIRP (dBm)
ME:Max EIRP (dBm)
CU:Channel utilization
ST:Status
------------------------------------------------------------------------
AP ID Name    RfID  Band  Type    ST  CH/BW          CE/ME   STA    CU
------------------------------------------------------------------------
0     L1_003  0     2.4G  bgn     on  6/20M          11/24   0      71%
0     L1_003  1     5G    an      on  149/20M        28/28   0      39%
------------------------------------------------------------------------
Total:2
- If Type is not displayed bgn for the 2.4 GHz radio, run the radio-type dot11n command to set the radio type to dot11n in the 2G radio profile.
<Huawei> system-view
[Huawei] wlan ac
[Huawei-wlan-view] radio-2g-profile name default
[Huawei-wlan-radio-2g-prof-default] radio-type dot11n
- If Type is not displayed ac for the 5 GHz radio, run the radio-type dot11ac command to set the radio type to dot11ac in the 5G radio profile.
<Huawei> system-view
[Huawei] wlan ac
[Huawei-wlan-view] radio-5g-profile name default
[Huawei-wlan-radio-5g-prof-default] radio-type dot11ac
- If Type is not displayed bgn for the 2.4 GHz radio, run the radio-type dot11n command to set the radio type to dot11n in the 2G radio profile.
- For 802.11ac STAs, you are advised to run the channel command to set the channel bandwidth to 80 MHz.
<Huawei> system-view
[Huawei] wlan ac
[Huawei-wlan-view] ap-id 0
[Huawei-wlan-ap-0] radio 1
[Huawei-wlan-radio-0/1] channel 80mhz 149
- Run the display security-profile name command to check the encryption mode. In the command output, Encryption indicates the currently configured encryption mode.
<Huawei> display security-profile name default
------------------------------------------------------------
Security policy               : Open system
Encryption                    : -
------------------------------------------------------------
WEP's configuration
Key 0                         : *****
Key 1                         : *****
Key 2                         : *****
......
If Encryption is displayed TKIP, you are advised to run the following commands to change the encryption mode to AES:
<Huawei> system-view
[Huawei] wlan ac
[Huawei-wlan-view] security-profile name p1
[Huawei-wlan-sec-prof-p1] security wpa psk pass-phrase abcdfffffgF aes   // Set the WPA encryption mode to AES.
<Huawei> system-view
[Huawei] wlan ac
[Huawei-wlan-view] security-profile name p1
[Huawei-wlan-sec-prof-p1] security wpa2 psk pass-phrase abcdfffffgF aes   // Set the WPA2 encryption mode to AES.
- Run the display radio-2g-profile or display radio-5g-profile command to check whether the WMM function is enabled. In the command output, WMM switch indicates whether the WMM function is enabled.
<Huawei> display radio-2g-profile name default
------------------------------------------------------------
Radio type                             : 802.11n
Power auto adjust                      : disable
Beacon interval(ms)                    : 100
Support short preamble                 : support
Channel switch announcement            : enable
Guard interval mode                    : normal
HT A-MPDU switch                       : enable
HT A-MPDU length limit                 : 3
RTS-CTS-mode                           : cts-to-self
RTS-CTS-threshold                      : 2347
802.11bg basic rate                    : 1 2
802.11bg support rate                  : 1 2 5 6 9 11 12 18 24 36 48 54
Multicast rate 2.4G                    : 11
Interference detect switch             : disable
Co-channel frequency interference threshold(%)        : 50
Adjacent-channel frequency interference threshold(%)  : 50
Station interference threshold         : 32
WMM switch                             : enable
Mandatory switch                       : disable
......
If WMM switch is displayed disable, run the following commands to enable the WMM function in the radio profile:
<Huawei> system-view
[Huawei] wlan ac
[Huawei-wlan-view] radio-2g-profile name default
[Huawei-wlan-radio-2g-prof-default] undo wmm disable
- Check the protocol type supported by the STA’s wireless network adapter. For details, see Table 1-2. If the STA does not support 802.11n or 802.11ac, the STA’s maximum link setup rate can only reach 54 Mbit/s. You can replace the STA to increase the Wi-Fi speed.
Low Wi-Fi Speed Due to Incorrect WLAN Rate Limiting Configuration
Context
In Wi-Fi access scenarios, rate limiting may be configured to protect network bandwidth resources, which in turn affects the Wi-Fi speed of STAs. Therefore, upon slow Wi-Fi access, check whether the WLAN rate limiting function is configured on an AR router.
- When a loop occurs on the wired network, the device receives a large number of multicast or broadcast packets. As a result, the device cannot process wireless packets, affecting the Wi-Fi access speed of STAs. In this case, enable Layer 2 port isolation on the AC to isolate broadcast and multicast packets.
- When a STA that performs heavy-traffic services at a low rate is connected to an AP, other STAs connected to the AP may fail to access the Internet. In this case, you can limit the rate of the STA within the normal range, so that other STAs can access the Internet normally.
Troubleshooting Procedure
- Run the display interface brief command to check packet statistics on device interfaces. Check the incoming and outgoing traffic to determine whether an interface receives or sends a large number of packets.
<Huawei> display interface brief
PHY: Physical
*down: administratively down
(l): loopback
(s): spoofing
(b): BFD down
^down: standby
(e): ETHOAM down
(v): VirtualPort
InUti/OutUti: input utility/output utility
Interface                   PHY   Protocol InUti OutUti   inErrors  outErrors
Dialer1                     up    up(s)       0%     0%          0          0
Eth-Trunk18                 down  down        0%     0%          0          0
Ethernet1/0/0               up    up       0.01%  0.01%          0          0
Ethernet1/0/1               down  down        0%     0%          0          0
GigabitEthernet0/0/0        up    up      52.8%  49.9%          0          0
GigabitEthernet0/0/1(v)     *down down        0%     0%          0          0
GigabitEthernet0/0/1.1(v)   down  down        0%     0%          0          0
......
If the incoming and outgoing traffic is large on an interface, a loop may occur on the network. In this case, run the display interface interface-type interface-number command to check detailed packet statistics on the interface. You can run the command several times and check the increase of packet statistics.
<Huawei> display interface gigabitethernet 0/0/0
GigabitEthernet0/0/0 current state : UP
Line protocol current state : UP
Last line protocol up time : 2012-07-30 11:23:29
Description:HUAWEI, AR Series, GigabitEthernet0/0/0 Interface
Route Port,The Maximum Transmit Unit is 1500
Internet Address is 192.168.2.2/24
IP Sending Frames' Format is PKTFMT_ETHNT_2, Hardware address is 00e0-fcce-7d4d
Last physical up time   : 2012-07-30 11:23:29
Last physical down time : 2012-07-30 11:09:17
Current system time: 2012-07-30 14:58:24
Port Mode: COMMON COPPER
Speed : 1000,  Loopback: NONE
Duplex: FULL,  Negotiation: ENABLE
Mdi   : AUTO   Clock   : SLAVE
Last 300 seconds input rate 0 bits/sec, 0 packets/sec
Last 300 seconds output rate 0 bits/sec, 0 packets/sec
Input peak rate 0 bits/sec,Record time: 2012-07-30 13:46:52
Output peak rate 0 bits/sec,Record time: 2012-07-30 13:46:52

Input:  983276 packets, 132479662 bytes
  Unicast:             288163,  Multicast:               25518
  Broadcast:           669595,  Jumbo:                       0
  Discard:                  0,  Total Error:                 0

  CRC:                      0,  Giants:                      0
  Jabbers:                  0,  Throttles:                   0
  Runts:                    0,  Symbols:                     0
  Ignoreds:                 0,  Frames:                      0

Output:  465225 packets, 35625620 bytes
  Unicast:             464361,  Multicast:                   0
  Broadcast:              864,  Jumbo:                       0
  Discard:                  0,  Total Error:                 0

  Collisions:               0,  ExcessiveCollisions:         0
  Late Collisions:          0,  Deferreds:                   0

    Input bandwidth utilization threshold : 100.00%
    Output bandwidth utilization threshold: 100.00%
    Input bandwidth utilization  : 0.01%
    Output bandwidth utilization :    0%
If the increase of broadcast or multicast packets exceeds 500 pps, a loop occurs on the network. If the increase exceeds 100 pps, the interface receives a large number of broadcast or multicast packets. In this case, run the port-isolate enable command on the Layer 2 interface of the AC to configure port isolation to isolate unnecessary broadcast and multicast packets.
<Huawei> system-view
[Huawei] sysname AC
[AC] vlan batch 100 101
[AC] interface gigabitethernet 0/0/0
[AC-GigabitEthernet0/0/0] port link-type trunk
[AC-GigabitEthernet0/0/0] port trunk pvid vlan 100
[AC-GigabitEthernet0/0/0] port trunk allow-pass vlan 100 101
[AC-GigabitEthernet0/0/0] port-isolate enable
[AC-GigabitEthernet0/0/0] quit
- If the interface sends and receives traffic normally, run the display station all command to view STA access information and check for STAs with low link setup rates.
<Huawei> display station all
Rf/WLAN: Radio ID/WLAN ID
Rx/Tx: link receive rate/link transmit rate(Mbps)
-------------------------------------------------------------------------------------------------------------------
STA MAC          AP ID Ap name  Rf/WLAN  Band  Type  Rx/Tx      RSSI  VLAN  IP address                SSID
-------------------------------------------------------------------------------------------------------------------
00e0-fc68-2017   0     area_1   0/1      2.4G  11n   64/64      -50   100   192.168.20.173            wlan-net
00e0-fc02-c617   0     area_1   1/1      5G    11n   97/114     -38   100   192.168.20.31             wlan-net5g
-------------------------------------------------------------------------------------------------------------------
Total: 2 2.4G: 1 5G: 1
If the value of Rx/Tx is lower than 30 Mbit/s for a STA, the STA’s link setup rate is low. In this case, run the display station statistics sta-mac sta-mac-address command to check packet statistics about the STA.
<Huawei> display station statistics sta-mac 00e0-fc68-2017
-----------------------------------------------------------------
Packets sent to the station                            : 7
Packets received from the station                      : 40
Bytes sent to the station                              : 1170
Bytes received from the station                        : 3911
Wireless data rate sent to the station(kbps)           : 0
Wireless data rate received from the station(kbps)     : 0
STA power save percent                                 : 0%
------------------------------------------------------------------
If the traffic of a STA exceeds 10 Mbit/s, the STA is transmitting heavy-traffic services. To ensure other STAs can normally access the Internet, run the rate-limit client command to rate-limit upstream and downstream packets of each STA on the VAP.
<Huawei> system-view
[Huawei] sysname AC
[AC-wlan-view] traffic-profile name p1
[AC-wlan-traffic-prof-p1] rate-limit client up 1024
[AC-wlan-traffic-prof-p1] rate-limit client down 1024
[AC-wlan-traffic-prof-p1] quit
Low Wi-Fi Speed Due to Improper VLAN Configurations
Context
Packets transmitted on a WLAN include management packets and service data packets. Management packets must be transmitted over Control and Provisioning of Wireless Access Points (CAPWAP) tunnels, and service data packets can be transmitted over CAPWAP tunnels or directly. In practice, different VLANs must be configured for management packets and service data packets, that is, the management VLAN and service VLAN.
- Management VLAN: transmits packets that are forwarded through CAPWAP tunnels, including management packets and service data packets forwarded through CAPWAP tunnels.
- Service VLAN: transmits service data packets.
The management and service VLANs must be configured in compliance with certain rules. Otherwise, the network may be congested and the Internet access speed may be affected. Therefore, if the Internet access speed of a STA is low, check whether the service and management VLANs are configured in compliance with the following rules:
- The broadcast domain of VLAN 1 is too large and broadcast packets are flooded. Therefore, do not configure VLAN 1 as the management VLAN or service VLAN.
- To prevent data forwarding exceptions caused by MAC address flapping, do not configure the same VLAN as both the management VLAN and service VLAN.
Troubleshooting Procedure
- Check whether the correct service VLAN and management VLAN are configured on the AC’s interface connected to APs. Run the interface interface-type interface-number command to enter the interface view and check the VLANs configured on the interface.
<Huawei> system-view
[Huawei] sysname AC
[AC] interface gigabitethernet 0/0/0
[AC-GigabitEthernet0/0/0] display this
#
interface GigabitEthernet0/0/0
 port link-type trunk
 port trunk pvid vlan 100
 port trunk allow-pass vlan 100
 port-isolate enable group 1
#
[AC-GigabitEthernet0/0/0] quit
- If the interface is configured to allow packets only from VLAN 100 to pass through, the service VLAN is VLAN 1 or the same as the management VLAN. In this case, run the vap-profile name profile-name command to enter the VAP profile view and check the service VLAN ID configured in the VAP profile. If the command output does not contain the service-vlan vlan-id configuration, the service VLAN is VLAN 1.
[AC] wlan ac
[AC-wlan-view] vap-profile name vap1
[AC-wlan-vap-prof-vap1] display this
#
 service-vlan vlan-id 100
#
[AC-wlan-vap-prof-vap1] quit
- If the service VLAN is VLAN 1 or the same as the management VLAN, run the following commands to configure VLAN 101 as the service VLAN:
[AC] vlan 101
[AC] interface gigabitethernet 0/0/0
[AC-GigabitEthernet0/0/0] port trunk allow-pass vlan 101
[AC-GigabitEthernet0/0/0] quit
[AC] wlan ac
[AC-wlan-view] vap-profile name vap1
[AC-wlan-vap-prof-vap1] service-vlan vlan-id 101
[AC-wlan-vap-prof-vap1] quit
Low Wi-Fi Speed Because STAs Are Going Offline
Context
In wired scenarios, to defend against ARP address spoofing attacks, we usually configure ARP entry fixing on an AR router. Then the router can determine whether to update ARP entries based on whether the MAC addresses in the received ARP packets match those in the ARP table. However, in wireless scenarios, STAs may change flexibly, and their MAC addresses and access locations change frequently. If ARP entry fixing is configured, STAs will go offline due to ARP learning exceptions. If a STA goes offline, web pages may be opened slowly or fail to be opened on the STA.
Troubleshooting Procedure
- Check whether ARP entry fixing is configured on the router.
Run the display arp anti-attack configuration entry-check command to check the ARP entry fixing mode. disabled indicates that ARP entry fixing is disabled on the router.
<Huawei> display arp anti-attack configuration entry-check
 ARP anti-attack entry-check mode: disabled
If the ARP entry fixing mode is not disabled, run the following commands to disable ARP entry fixing:
<Huawei> system-view
[Huawei] undo arp anti-attack entry-check enable
Web Pages Fail to Be Opened, and the Message «DNS Server Not Responding» Is Displayed
Context
Control Plane Committed Access Rate (CPCAR) rate-limits protocol packets sent to the CPU, so that CPU resources are not occupied, preventing impact on other services. Different CPCAR values can be set for different protocol types. Packets whose rate exceeds the CPCAR value are discarded.
On a WLAN, the most likely protocol packets to be discarded are DNS Request and ARP Request packets. The reasons are as follows:
- When accessing the URL of a website through a WLAN, a STA sends a DNS Request packet to the DNS server. The DNS server can be a DNS server on the public network or a gateway. When the DNS server functions as a gateway, a large number of DNS Request packets are generated if a large number of STAs access the network. When the number of DNS Request packets received by an AR router serving as the DNS server and gateway exceeds the CPCAR value, the router randomly discards the DNS Request packets. If the DNS Request packet of a STA is discarded, the DNS server will not respond to the STA. As a result, the requested web page loads slowly or fails to load.
- On a WLAN, some STAs scan LAN segments and send ARP Request packets to all IP addresses on their local LANs. When the number of ARP Request packets received by the router exceeds the CPCAR value, the router randomly discards the ARP Request packets. If the ARP Request packet of a STA is discarded, the router cannot learn its ARP entry. As a result, the requested web page loads slowly. If the router keeps failing to learn ARP entries of the STA, the STA cannot access web pages.
Troubleshooting Procedure
- Check whether DNS or ARP Request packets are discarded on the router.
Run the display cpu-defend statistics command for multiple times to check whether the Drop Packets values corresponding to arp-request and dns-request change.
<Huawei> display cpu-defend statistics
------------------------------------------------------------------
Packet Type               Pass Packets        Drop Packets
-------------------------------------------------------------------
8021X                                0                   0
arp-miss                             5                   0
arp-reply                         8090                   0
arp-request                   1446576              127773
……
dns-request                     12465                1177
fib-hit                              0                   0
fr                                   0                   0
ftp-client                           0                   0
ftp-server                           0                   0
fw-dns                               0                   0
fw-ftp                               0                   0
……
-------------------------------------------------------------------
If the Drop Packets value corresponding to arp-request keeps increasing, ARP Request packets are discarded. In this case, run the following commands to change the CPCAR value to 512 for ARP Request packets.
<Huawei> system-view
[Huawei] cpu-defend policy arp
[Huawei-cpu-defend-policy-arp] packet-type arp-request rate-limit 512
[Huawei-cpu-defend-policy-arp] quit
[Huawei] cpu-defend-policy arp
If the Drop Packets value corresponding to dns-request keeps increasing, DNS Request packets are discarded. In this case, run the following commands to change the CPCAR value to 512 for DNS Request packets.
<Huawei> system-view
[Huawei] cpu-defend policy dns
[Huawei-cpu-defend-policy-dns] packet-type dns-request rate-limit 512
[Huawei-cpu-defend-policy-dns] quit
[Huawei] cpu-defend-policy dns
After the fault is rectified, you are advised to delete cpu-defend policy dns and cpu-defend policy arp commands to restore default CPCAR values for ARP and DNS Request packets in order to protect CPU resources.
By default, the CPU attack defense policy default is applied to the router. The CPCAR values of various protocols have been specified in the CPU attack defense policy default and cannot be modified.
- Check whether the DNS proxy function is configured.
If DNS Request packets are discarded on the router, check whether the DNS proxy function is configured on the router. With this function, the gateway sends DNS Request packets from STAs to the CPU for processing, which aggravates discarding of DNS Request packets. Therefore, if DNS Request packets are discarded, deleting the DNS proxy configuration is recommended. Configure the DHCP function on the router to deliver the IP address of the DNS server on the public network to STAs so that the STAs can send DNS Request packets to the DNS server on the public network.
To check the DNS configuration, run the display current-configuration | include dns command.
<Huawei> display current-configuration  | inc dns
dns resolve
dns server x.x.x.x           //x.x.x.x specifies the IP address of the DNS server on the public network.
dns proxy enable                           //The DNS proxy function is configured.
dns relay enable                           //The DNS relay function is configured.
 dhcp server dns-list y.y.y.y        //DNS server address delivered to STAs. y.y.y.y specifies the IP address of the gateway interface.
If the preceding configuration is displayed, the DNS proxy function is configured on the router. In this case, delete the DNS proxy configuration and deliver the IP address of the DNS server on the public network to STAs through the DHCP function.
<Huawei> system-view
[Huawei] undo dns proxy enable
[Huawei] undo dns resolve
[Huawei] undo dns server x.x.x.x
[Huawei] interface vlanif 100
[Huawei-Vlanif100] undo dhcp server dns-list y.y.y.y
[Huawei-Vlanif100] dhcp server dns-list x.x.x.x  //Deliver the IP address of the DNS server on the public network to STAs in a VLANIF interface address pool.
Web Pages Load Slowly, and Packet Loss Occurs in a Ping Test
Context
If a STA is online on an AR router but cannot access the Internet, ping the IP address of the STA from the AR router to check whether packet loss occurs between the STA and the AR router. If the ping operation fails or some packets are lost, perform the following operations for troubleshooting:
- Check whether strict ARP learning is configured on the router. With strict ARP learning enabled on the router, it learns ARP entries only when receiving ARP Reply packets in response to ARP Request packets sent by itself. The router will not learn the ARP entry of a STA when receiving an ARP Request packet initiated by the STA. As a result, the router cannot ping the STA, and the STA fails to access web pages.
- Check whether an IP address conflict occurs on the network. When an attack occurs on the network, an IP address conflict may occur. The IP address conflict will lead to frequent route flapping on the router and cause packets to be sent to an incorrect STA. As a result, some packets are lost during the ping operation between the STA and the router, and web pages load slowly on the STA.
Troubleshooting Procedure
- Check whether strict ARP learning is configured on the router.
Run the display arp learning strict command to check the configuration of strict ARP learning.
<Huawei> display arp learning strict
The global configuration:arp learning strict              //If no information is displayed following arp learning strict, strict ARP learning is disabled.  Interface                           LearningStrictState
------------------------------------------------------------
 Vlanif100                           force-disable      //force-disable indicates that strict ARP learning is disabled on the interface.
 Vlanif200                           force-enable       //force-enable indicates that strict ARP learning is enabled on the interface.
------------------------------------------------------------
 Total:2
 Force-enable:1
 Force-disable:1
If strict ARP learning is configured on the device, perform the following operations to disable strict ARP learning in the system view and interface view in sequence:
<Huawei> system-view
[Huawei] undo arp learning strict
[Huawei] interface vlanif 200
[Huawei-Vlanif200] undo arp learning strict
- Check whether the STA encounters an IP address conflict.
In most cases, IP addresses of STAs are automatically assigned from an address pool of the VLANIF interface. Run the display ip pool interface interface-pool-name conflict command to check information about conflicting IP addresses in the address pool.
<Huawei> display ip pool interface Vlanif100 conflict
  Pool-name        : Vlanif100
  Pool-No          : 1
  Lease            : 1 Days 0 Hours 0 Minutes
 ……
Client-ID format as follows:
   DHCP  : mac-address                 PPPoE   : mac-address
   IPSec : user-id/portnumber/vrf      PPP     : interface index
   L2TP  : cpu-slot/session-id         SSL-VPN : user-id/session-id
  ----------------------------------------------------------------
  Index              IP             Client-ID    Type       Left   Status
  ----------------------------------------------------------------
   109      192.168.10.20           -        -         -    Conflict
----------------------------------------------------------------
After finding the conflicting IP address, locate the MAC address mapping this IP address so as to locate the STA and manually change its IP address. The following methods are available for you to locate the MAC address of a STA with a conflicting IP address.
- The router records IP-MAC mappings for STAs it has learned in its ARP entries, including the STAs with conflicting IP addresses. Run the display arp command on the router to check ARP entries to find the MAC address mapping the conflicting IP address.
<Huawei> display arp IP ADDRESS MAC ADDRESS EXPIRE(M) TYPE INTERFACE VPN-INSTANCE VLAN/CEVLAN(SIP/DIP) PVC ------------------------------------------------------------------------------ 10.10.10.1 xxxx-xxxx-xxxx I - GE0/0/5 10.10.10.214 yyyy-yyyy-yyyy 4 D-0 GE0/0/5 …… 192.168.10.20 zzzz-zzzz-zzzz I - GE0/0/3 - If the corresponding ARP entry is aged and no related information can be found, check logs about IP address conflicts. Run the display logbuffer command to view log information recorded in the log buffer. Search for AM/4/IPCONFLICTDTC in the log to view the MAC address mapping the conflicting IP address.
<Huawei> display logbuffer
Logging buffer configuration and contents: enabled
Allowed max buffer size: 1024
Actual buffer size: 512
Channel number: 4, Channel name: logbuffer
Dropped messages: 0
Overwritten messages: 3315
Current messages: 512

Apr  3 2020 13:46:15+00:00 Huawei %%01DEFD/4/CPCAR_DROP_MPU(l)[0]:Some packets a
re dropped by cpcar on the MPU. (Packet-type=arp-request, Drop-Count=14428)
Apr  3 2020 13:36:15+00:00 Huawei %%01DEFD/4/CPCAR_DROP_MPU(l)[1]:Some packets a
re dropped by cpcar on the MPU. (Packet-type=arp-request, Drop-Count=16593)
Apr  3 2020 13:26:15+00:00 Huawei %%01DEFD/4/CPCAR_DROP_MPU(l)[2]:Some packets a
re dropped by cpcar on the MPU. (Packet-type=arp-request, Drop-Count=922)
......
- The router records IP-MAC mappings for STAs it has learned in its ARP entries, including the STAs with conflicting IP addresses. Run the display arp command on the router to check ARP entries to find the MAC address mapping the conflicting IP address.
Collecting Information About the Slow WiFi Speed Issue
If the issue persists after the preceding steps, collect relevant information and contact technical support personnel.
- Collect fault information.
- Collect all diagnostic information and export the information to a file.
-
Run the display diagnostic-information file-name command in the user view to collect diagnostic information and save the information to a file.
<Huawei> display diagnostic-information dia-info.txt
  This operation will take several minutes, please wait.........................
..................................................................
Info: The diagnostic information was saved to the device successfully..
- When the diagnostic file is generated, you can export the file from the device using TFTP, FTP, or SFTP. For details, see Local File Management.
-
You can run the dir command in the user view to check whether the file is generated.
-
You can also run the display diagnostic-information command and save STA logs in a diagnostic file on a disk. For details, see Diagnostic File Obtaining Guide.
-
If this command displays a long output, press Ctrl+C to abort this command.
-
The display diagnostic-information command displays diagnostic information, which helps locate faults but may affect system performance. For example, the CPU usage may become high. Therefore, do not use this command when the system is running properly.
-
Do not run the display diagnostic-information command simultaneously on multiple terminals connected to the device. This is because doing so may significantly increase the CPU usage of the device and deteriorate the device performance.
-
-
- Collect the log and trap information on the device and export the information to files.
-
Run the save logfile command in the user view to save the log and trap information in the buffer to files.
<Huawei> save logfile
Info: It may take several seconds,please wait...
Save log file successfully.
- When the diagnostic file is generated, you can export the file from the device using TFTP, FTP, or SFTP. For details, see Local File Management.
You can also run the display logbuffer and display trapbuffer commands to view the log and trap information on the device, and save STA logs in a diagnostic file on a disk. For details, see Diagnostic File Obtaining Guide.
-
- Collect all diagnostic information and export the information to a file.
- Seek technical support.
Click http://e.huawei.com/en/how-to-buy/contact-us to seek technical support.
Technical support personnel will provide instructions for you to submit all the collected information and files, so that they can locate faults.
- About This Document
- Applicable Scenario
- Understanding the Theoretical Wi-Fi Speed
- How to Test the Wi-Fi Speed
- Why Is My Wi-Fi So Slow
- Three Simple Moves to Quickly Improve Your Wi-Fi Speed
- Seven Easy Steps to Maximize Your Wi-Fi Speed
- Low Wi-Fi Speed Due to Poor Wi-Fi Signal Strength
- Low Wi-Fi Speed Due to a Low Negotiated Wireless Speed
- Low Wi-Fi Speed Due to Incorrect WLAN Rate Limiting Configuration
- Low Wi-Fi Speed Due to Improper VLAN Configurations
- Low Wi-Fi Speed Because STAs Are Going Offline
- Web Pages Fail to Be Opened, and the Message «DNS Server Not Responding» Is Displayed
- Web Pages Load Slowly, and Packet Loss Occurs in a Ping Test
- Collecting Information About the Slow WiFi Speed Issue
- References
Настройка скорости интернет-соединения на роутере Huawei — это важный шаг для обеспечения быстрой и стабильной работы вашей домашней сети. В этом подробном руководстве мы расскажем вам, как легко и просто настроить скорость на роутере Huawei, даже если вы новичок в сфере настройки сетевых устройств.
Шаг 1: Подключите ваш компьютер к роутеру Huawei с помощью Ethernet-кабеля или подключитесь к сети Wi-Fi, используя данные, указанные на задней панели роутера. Убедитесь, что компьютер подключен к роутеру надежно и стабильно.
Шаг 2: Откройте веб-браузер и введите IP-адрес роутера Huawei в адресную строку. Обычно это «192.168.1.1», но вы можете проверить эту информацию в руководстве к вашему роутеру или на задней панели.
Шаг 3: После ввода IP-адреса роутера Huawei вы должны увидеть страницу аутентификации. Введите логин и пароль, заданные по умолчанию. Если вы не знаете эти данные, проверьте их в руководстве к устройству или на задней панели роутера.
Совет: Рекомендуется изменить пароль аутентификации после первого входа в систему. Это поможет обеспечить безопасность вашей домашней сети.
Шаг 4: После успешной аутентификации вы попадете в настройки роутера. Найдите вкладку, отвечающую за настройку скорости интернет-соединения. Обычно она называется «Настройки соединения» или «Настройки WAN».
Шаг 5: Вам может потребоваться выбрать тип подключения, который вы используете для доступа в интернет. Обычно это тип соединения «PPPoE» или «Динамический IP-адрес». Если вы не знаете, какой тип соединения вам подходит, обратитесь к вашему интернет-провайдеру.
Шаг 6: Введите значения скорости загрузки и отдачи, предоставленные вашим интернет-провайдером. Обычно эти значения указаны в вашем договоре с провайдером или могут быть получены в технической поддержке.
Шаг 7: Сохраните настройки и перезапустите роутер, чтобы изменения вступили в силу. Получите удовольствие от быстрого и стабильного интернет-соединения в вашей домашней сети!
В этом руководстве мы рассмотрели основные шаги по настройке скорости на роутере Huawei. Не забывайте, что некорректная настройка может привести к проблемам с интернетом. Если у вас возникли трудности, рекомендуется обратиться к официальной документации или поддержке Huawei.
Содержание
- Как подготовиться к настройке скорости на роутере Huawei?
- Шаги настройки скорости на роутере Huawei
- Подключение к роутеру Huawei
- Вход в настройки роутера Huawei
- Настройка беспроводной сети на роутере Huawei
- Настройка скорости интернета на роутере Huawei
Как подготовиться к настройке скорости на роутере Huawei?
Настройка скорости на роутере Huawei может потребовать определенных подготовительных шагов, чтобы обеспечить успешное выполнение процесса. Вот несколько рекомендаций, которые помогут вам подготовиться к настройке скорости на вашем роутере Huawei:
- Изучите руководство пользователя: Перед началом настройки роутера Huawei полезно ознакомиться с руководством пользователя, предоставленным производителем. В этом руководстве вы найдете информацию о функциях и возможностях вашего роутера, а также инструкции по выполнению различных настроек.
- Подготовьте необходимые материалы и информацию: Прежде чем начать настройку скорости на роутере Huawei, убедитесь, что у вас есть все необходимое. Это может включать в себя компьютер или смартфон, подключенный к роутеру, а также доступ к интернету и учетную запись администратора.
- Проверьте совместимость: Убедитесь, что ваш роутер Huawei совместим с выбранным вами интернет-провайдером и его технологией подключения. Некоторые провайдеры могут предоставлять специальные настройки для роутеров определенных моделей или марок.
- Сделайте резервные копии: До начала настройки роутера Huawei рекомендуется создать резервные копии всех важных данных и настроек, находящихся на вашем роутере. Это позволит вам восстановить данные в случае нежелательной потери или сбоя.
- Проверьте обновления прошивки: Перед началом настройки роутера Huawei рекомендуется проверить наличие обновлений прошивки. Обновленная прошивка может включать в себя исправления ошибок, улучшения производительности и новые функции, которые помогут оптимизировать скорость и стабильность вашего роутера.
- Изучите ваши опции настройки: Перед настройкой скорости на роутере Huawei полезно ознакомиться с доступными опциями и настройками, которые помогут вам достичь желаемого результата. Используйте документацию или онлайн-ресурсы, чтобы понять, какие параметры можно изменить и как они влияют на скорость интернета.
Следуя этим рекомендациям, вы сможете лучше подготовиться к настройке скорости на роутере Huawei и достичь максимальной эффективности и удовлетворенности от использования вашего интернет-соединения.
Шаги настройки скорости на роутере Huawei
1. Войдите в панель управления роутера.
Для начала настройки скорости на роутере Huawei войдите в панель управления роутера через браузер. Для этого в адресной строке введите IP-адрес вашего роутера (обычно это 192.168.3.1 или 192.168.1.1) и нажмите Enter.
2. Введите логин и пароль.
Введите ваш логин и пароль для доступа к панели управления роутера Huawei. Обычно логин и пароль по умолчанию — admin.
3. Найдите раздел настройки скорости.
После успешной авторизации в панели управления, найдите раздел настройки скорости или Bandwidth Control. Обычно он расположен в разделе настроек безопасности или в разделе Advanced Settings.
4. Установите желаемую скорость.
В разделе настройки скорости вы увидите возможность установить скорость для каждого устройства, подключенного к вашему роутеру. Выберите устройство из списка и установите желаемую скорость загрузки и отдачи данных с помощью ползунков или текстовых полей.
5. Сохраните настройки.
После того как вы установили желаемую скорость для всех устройств, не забудьте нажать кнопку «Сохранить» или «Применить» в разделе настройки скорости. Это нужно, чтобы изменения вступили в силу.
6. Перезагрузите роутер (по желанию).
Если вы изменили настройки скорости на роутере Huawei, может потребоваться перезагрузка роутера, чтобы изменения вступили в силу. Для перезагрузки роутера найдите в панели управления соответствующий раздел (обычно называется Reboot, Restart или System) и нажмите на кнопку перезагрузки.
Поздравляю! Теперь вы знаете, как настроить скорость на роутере Huawei. Эти шаги помогут вам установить доступную пропускную способность для каждого устройства и оптимизировать работу вашей домашней сети.
Подключение к роутеру Huawei
Чтобы настроить скорость на роутере Huawei, необходимо сначала подключиться к нему. В этом разделе мы рассмотрим, как выполнить подключение к роутеру Huawei в нескольких простых шагах:
Шаг 1: Проверьте, что роутер Huawei подключен к электропитанию и включен. Убедитесь, что светодиодные индикаторы на роутере горят.
Шаг 2: Используйте кабель Ethernet, чтобы подключить один конец к порту WAN (обычно выделен особой маркировкой) на задней панели роутера Huawei, а другой конец — к вашему модему или кабелю Ethernet, поставляемому вашим интернет-провайдером.
Шаг 3: Подключите свой компьютер или ноутбук к роутеру Huawei с помощью еще одного кабеля Ethernet, вставив один конец в порт LAN на задней панели роутера, а другой конец — в сетевой разъем вашего компьютера.
Шаг 4: Включите компьютер или ноутбук и дождитесь его полной загрузки.
Шаг 5: Откройте веб-браузер на вашем компьютере и введите IP-адрес роутера Huawei. По умолчанию IP-адрес роутера Huawei часто является 192.168.1.1, но может отличаться в зависимости от модели роутера. Вы можете найти IP-адрес роутера Huawei в документации или на задней панели самого роутера.
Шаг 6: Нажмите клавишу Enter или нажмите на кнопку «Ввод», чтобы открыть страницу входа в роутер Huawei.
Шаг 7: Введите имя пользователя и пароль для входа в маршрутизатор Huawei. Эти данные также указаны в документации или на задней панели роутера.
Шаг 8: После успешного входа в систему вы попадете на главную страницу настроек роутера Huawei, где сможете вносить изменения в настройки скорости.
Обратите внимание, что у вас должен быть достаточный уровень доступа и знание пароля администратора для внесения изменений в настройки роутера Huawei.
Вход в настройки роутера Huawei
Для того чтобы настроить скорость на роутере Huawei, вам необходимо войти в его настройки. Для этого выполните следующие шаги:
1. Подключите ваш компьютер или устройство к роутеру Huawei через Wi-Fi или с помощью Ethernet-кабеля.
2. Откройте любой веб-браузер (например, Google Chrome, Mozilla Firefox или Internet Explorer).
3. В адресной строке введите IP-адрес вашего роутера Huawei. Обычно он имеет вид 192.168.1.1.
4. Нажмите Enter или Return на клавиатуре, чтобы перейти на страницу входа в настройки роутера.
5. Введите имя пользователя и пароль для входа в настройки роутера. Если вы не меняли эти данные ранее, используйте стандартные учетные данные, которые указаны на наклейке на задней панели роутера (обычно это «admin» в качестве имени пользователя и пароль).
6. Нажмите на кнопку «Вход» или «OK», чтобы войти в настройки роутера Huawei.
Теперь вы вошли в настройки роутера Huawei и готовы настраивать скорость подключения к интернету. Обратите внимание, что процедура входа в настройки роутера может немного отличаться в зависимости от модели и версии ПО вашего роутера Huawei.
Настройка беспроводной сети на роутере Huawei
Настройка беспроводной сети на роутере Huawei позволяет подключить к нему устройства без использования проводов. Это предоставляет удобство и гибкость в использовании сети. В этом разделе мы рассмотрим, как настроить беспроводную сеть на роутере Huawei с помощью простых шагов.
Шаг 1: Вход в интерфейс роутера
Для начала, откройте веб-браузер на вашем компьютере или устройстве, подключенном к роутеру. В адресной строке введите IP-адрес роутера (обычно это 192.168.1.1 или 192.168.0.1) и нажмите Enter. Откроется страница входа в интерфейс роутера.
Шаг 2: Вход в настройки беспроводной сети
Для входа в настройки беспроводной сети найдите в меню интерфейса роутера ссылку «Wireless» или «Беспроводная сеть». Обычно она расположена на верхней панели или в боковом меню. Нажмите на эту ссылку.
Шаг 3: Настройка имени (SSID) сети
В настройках беспроводной сети найдите поле «SSID» или «Имя сети». Введите желаемое имя беспроводной сети в это поле. Имя сети будет использоваться для идентификации вашей сети при подключении устройств к роутеру.
Шаг 4: Настройка безопасности сети
Для защиты беспроводной сети от несанкционированного доступа нам необходимо настроить безопасность. В настройках безопасности найдите поле «Security Mode» или «Режим безопасности». Выберите предпочитаемый режим безопасности (например, WPA2) и введите пароль. Пароль должен быть достаточно сложным, чтобы предотвратить его угадывание.
Примечание: Не забудьте записать пароль в безопасном месте, чтобы иметь доступ к своей сети в случае необходимости.
Шаг 5: Сохранение и применение настроек
После завершения настроек беспроводной сети, найдите кнопку «Save» или «Сохранить» в нижней части страницы. Нажмите на нее, чтобы сохранить все изменения и применить их к роутеру.
Поздравляю! Вы успешно настроили беспроводную сеть на роутере Huawei. Теперь вы можете подключать свои устройства к этой сети без использования проводов.
Настройка скорости интернета на роутере Huawei
Для начала необходимо войти в веб-интерфейс роутера, используя его IP-адрес и административные учетные данные. Обычно IP-адрес роутера Huawei указан на его корпусе или указывается в документации. После ввода IP-адреса веб-интерфейс роутера откроется в веб-браузере.
Во веб-интерфейсе роутера Huawei найдите раздел «Настройки сети» или «QoS» (Quality of Service). В этом разделе можно установить приоритеты для различных типов трафика и ограничить скорость для некоторых устройств или приложений.
Чтобы настроить скорость для конкретного устройства или приложения, необходимо указать его IP-адрес или порт и выбрать желаемую скорость загрузки и отдачи данных. Можно также установить диапазон портов или использовать идентификаторы приложений.
После настройки скорости интернета на роутере Huawei необходимо сохранить изменения и перезагрузить устройство. После перезагрузки установленные настройки вступят в силу.
Теперь вы знаете, как настроить скорость интернета на роутере Huawei. Управление скоростью загрузки и отдачи данных позволит эффективнее использовать доступное интернет-соединение и предоставит более стабильный и плавный опыт при использовании интернета.
Роутер HUAWEI TD-LTE является одним из популярных устройств, используемых для организации беспроводного доступа к интернету. Однако, чтобы получить максимальную производительность и обеспечить безопасность своей сети, важно правильно настроить роутер и оптимизировать его настройки. В этой статье мы рассмотрим несколько советов, которые помогут вам повысить скорость интернета и защитить вашу сеть.
1. Обновите прошивку роутера
Периодически HUAWEI выпускает обновления прошивки для своих роутеров, которые содержат исправления ошибок и улучшения производительности. Проверьте наличие обновлений на официальном сайте HUAWEI и, если такие имеются, следуйте инструкциям по обновлению прошивки роутера.
2. Измените канал Wi-Fi
Wi-Fi работает на различных частотах, известных как каналы. Иногда может возникнуть перегрузка на одном из каналов, что может привести к плохой производительности Wi-Fi. В настройках роутера найдите опцию для изменения канала Wi-Fi и попробуйте выбрать другой канал, который менее загружен.
3. Оптимизируйте настройки беспроводной сети
Существуют несколько настроек беспроводной сети, которые могут повлиять на скорость и производительность интернета. В настройках роутера убедитесь, что используется наилучший режим соединения (например, 802.11n) и настроены оптимальные параметры, такие как ширина канала и передача данных.
4. Включите функцию Quality of Service (QoS)
Функция Quality of Service (QoS) позволяет контролировать и оптимизировать использование вашего интернет-трафика. Включите QoS в настройках роутера и приоритезируйте важные приложения или устройства, такие как стриминговые сервисы или онлайн-игры, чтобы улучшить их производительность.
5. Улучшите безопасность своей сети
Для обеспечения безопасности вашей сети рекомендуется принять несколько мер:
- Измените пароль доступа к роутеру с сильным и уникальным паролем.
- Включите шифрование Wi-Fi и выберите наиболее безопасный режим, такой как WPA2.
- Ограничьте доступ к вашей сети путем включения списка доступа по MAC-адресам, чтобы только разрешенные устройства могли подключаться к вашему роутеру.
Заключение
Правильное настройка и оптимизация роутера HUAWEI TD-LTE сможет повысить скорость интернета и обеспечить безопасность вашей сети. Следуйте вышеуказанным советам и наслаждайтесь более быстрым и защищенным интернет-соединением.
Проблема «последней мили» потихоньку уходит в прошлое: скорость в сотни Мбит/с — не редкость у современных провайдеров. И тем большее недоумение вызывают «тормоза» видеозвонка в Whatsapp или «подвисания» видео с Youtube на подобном «стомегабитном» тарифе. Почему скорость Wi-Fi может быть в разы меньше предоставляемой провайдером и как ее увеличить — в этой статье.
Улучшаем качество связи
Скорость в беспроводной сети неразрывно связана с качеством связи. Не стоит ожидать сколь-нибудь приемлемой скорости с одной полоской на индикаторе Wi-Fi.
Если уровень сигнала вашей сети невелик, в первую очередь следует разобраться именно с этой проблемой. Вполне возможно, что вы находитесь вне зоны уверенного приема. В этом случае следует либо просто подойти поближе к роутеру, либо увеличить радиус действия сети.
Низкое качество связи также может быть связано с загруженностью диапазона. Частота 2,4 ГГц используется не только большинством сетей Wi-Fi, но и многими другими гаджетами: радионянями, пультами ДУ, беспроводными наушниками, камерами и т.п. Если у вас есть подобные устройства, попробуйте отключить их.
Установите на телефон Wi-Fi Analyzer, оцените загруженность диапазона другими сетями.
 |
| Если рабочий диапазон вашей сети выглядит так, потери скорости неизбежны. |
Правильно делим Wi-Fi с соседями
Весь диапазон «завален» соседскими сетями? Не расстраивайтесь — оптимальное расположение и правильная настройка роутера могут заметно увеличить скорость интернета даже в условиях сильной зашумленности эфира.
Сначала постарайтесь узнать, в каких точках находятся ближайшие к вам роутеры и отнести свой на максимально удаленное от них расстояние, по возможности «отгородившись» капитальными стенами. Во-первых, вы этим создадите зону, в которой ваша сеть будет доступнее просто за счет большей мощности. Во-вторых, близко расположенные роутеры «забивают» сигнал друг друга даже если используют непересекающиеся каналы — поскольку не пересекаются они только в теории, а на практике широкополосный сигнал удержать четко в рамках диапазона невозможно.

Посмотрите на экран Wi-Fi Analyzer и найдите наименее загруженный канал диапазона. Обращайте внимание не только на уровень сигнала чужих сетей, но и на их количество. Возникающее желание занять «пустое» место между сетями может привести к тому, что помех станет еще больше.
 |
| С первого взгляда может показаться, что лучшее «место» для вашей сети на этой картинке — 3, 8 или 9 каналы. Однако на них новая сеть будет пересекаться с 4-5 существующими, в то время как на 6 канале — всего с двумя. В данном случае следует выбрать именно 6 канал. |
Ширину канала в условиях высокой загруженности следует установить «Auto», «20/40 coexistance» или вообще «20». Жестко ширину «40» рекомендуется устанавливать только при отсутствии «соседних» сетей.

Почему так, ведь сужение канала снизит скорость вдвое? Потому что вдвое более широкий канал «ловит» вдвое больше помех. Лучше уверенный прием на «медленном» узком канале, чем постоянные помехи на «быстром» широком.
Обновляемся
Совет крайне актуален, если вы используете хотя бы одно сетевое устройство, произведенное более чем 5-7 лет назад. Скорости интернета тогда были на порядок ниже и производители (особенно недорогих базовых моделей) не утруждали себя «выжиманием» из роутера всей доступной производительности. Многие дешевые роутеры тех лет ограничивают скорость Wi-Fi пятидесятью, двадцатью, а то и десятком Мбит/с. И порой замена прошивки на свежескачанную с сайта производителя это ограничение убирает. Точно так же следует обновить и драйвера беспроводных адаптеров — скорость сети всегда равна скорости самого медленного клиента, поэтому старый драйвер какой-нибудь Wi-Fi-карты может «тормозить» всю сеть.

Для старых маломощных роутеров можно еще порекомендовать отключить шифрование.

А чтобы при этом не пострадала безопасность, можно переписать МАС-адреса всех клиентов и задать МАС-фильтр на их основе.


При этом снизится нагрузка на процессор роутера и — если ему не хватало производительности — возрастет скорость передачи.
Избавляемся от слабых звеньев
Какой протокол выставлен в настройках вашего роутера? Скорее всего «802.11 b/g/n» или, что то же самое, «Auto». Это означает, что пока в сети есть устройства только с поддержкой 802.11n — например, сам роутер и относительно новый планшет — то максимальная скорость передачи данных будет соответствовать этой версии протокола — 150 Мбит/с. Но стоит войти в сеть какому-нибудь древнему смартфону с 802.11b, и скорость всей сети упадет до максимальной для этой версии протокола величины в 11 Мбит/с. Более того, старому устройству даже не обязательно входить в сеть — достаточно попытаться это сделать. То есть, древний смартфон не обязательно должен быть ваш — может быть, кто-то в соседней квартире отдал свой старый телефон ребенку как игрушку, и теперь он более чем вдесятеро снижает скорость вашей сети.
Что делать? Установить поддержку только 802.11n. Если при этом у вас «отвалится» от сети какое-то устройство… решайте сами — стоит ли оно такого снижения скорости Интернета.

Если у вас двухдиапазонный роутер с возможностью одновременной работы в обоих диапазонах, обязательно включайте Wi-Fi на частоте 5 ГГц. Если такой возможности нет, попробуйте перейти на 5 ГГц, отказавшись от 2,4. Клиентов при этом «отвалится» много, далеко не все современные гаджеты имеют поддержку этого диапазона, зато с оставшимися на скорость вы не будете жаловаться еще долго.
Хотя, кто знает, какие скорости будут «в ходу» лет через пять?
Оптимизируем клиентов
Иногда причиной снижения скорости может быть слишком большое количество клиентов, одновременно нагружающих сеть. Вдруг стало «подвисать» видео на телевизоре? Вполне возможно, что торрент-клиент на ноутбуке только что нашел сервер с «толстым» каналом и начал качать файл на максимальной скорости.
Оптимизация может быть выполнена двумя путями. Во-первых, включением и настройкой QoS — технологии приоритезации трафика.

QoS (Quality of Service — Качество обслуживания) при его поддержке на роутере позволяет определить, какие сетевые активности имеют наибольший приоритет. Это позволит поддерживать скорость именно этих активностей на максимуме — за счет других.

Ну и второй способ — простое отключение от сети «лишних» клиентов. Посмотрите статистику в интерфейсе роутера, пересчитайте всех клиентов, определите «кто есть кто».

Действительно ли им всем нужен интернет?

Всем добра!
Сегодня будет заметка о настройке бюджетного Wi-Fi роутера AX3 от HUAWEI, который позволяет организовать дома сеть Wi-Fi 6 (со скоростью аж до 3000 Мбит/с! // Это если верить рекламе 🙂). Заранее отмечу, что др. похожие модельки (серия AX, WS7100/7200 и пр., B310…) будут настраиваться аналогично.
Чем примечателен этот роутер:
- высокая скорость беспроводного соединения (стандарт: ax (Wi-Fi 6));
- технология OFDMA — увеличивает произв.-сть работы сети, при подкл. нескольких устройств (+ позволяет уменьшить задержку/пинг);
- стабилен в работе (даже при подкл. 10+ устройств — нет зависаний, перегревов, перезагрузок);
- крайне простая прошивка, позволяющая за 5-10 мин. настроить «всё что нужно» (работает из коробки без танцев с бубном 🙂);
- защита безопасности Huawei HomeSec (защитит беспроводную сеть от взломщиков);
- веб-интерфейс полностью на русском языке.
*
При всем при этом, цена устройства чуть более 2000 руб. (что по совр. меркам вполне демократично // учитывая все его плюсы и текущую обстановку).
Собственно, вступление пора завершать и переходить непосредственно к подкл. и настройке аппарата. 👌
*
📌 В помощь!
Найти и приобрести такой же роутер от HUAWEI (или похожий) как в этой заметке можно в этих комп. магазинах.
*
Содержание статьи📎
- 1 Пошаговая настройка роутера (HUAWEI Wi-Fi AX)
- 1.1 ШАГ 1: распаковка, комплектация
- 1.2 ШАГ 2: уточнение IP и пароля для первого входа, подключение
- 1.3 ШАГ 3: вход в веб-интерфейс и задание первичных параметров
- 1.4 ШАГ 4: настройка Wi-Fi сети и доступа в Интернет
- 1.5 ШАГ 5: делаем постоянный IP для своего ПК, и пробрасываем порты (чтобы работали сетевые игры)
- 1.6 📌 Полный перечень настроек роутера (скрины)
- 1.6.1 Основные
- 1.6.2 Дополнительные
- 1.6.2.1 Управление обновлениями
- 1.6.2.2 Настройки сети
- 1.6.2.3 Настройки Wi-Fi
- 1.6.2.4 Безопасность
- 1.6.2.5 Система
- 1.6.2.6 Приложение (доп.)
→ Задать вопрос | дополнить
Пошаговая настройка роутера (HUAWEI Wi-Fi AX)
ШАГ 1: распаковка, комплектация
Упаковка роутера, как и комплектация, стандартны и особого интереса не вызывают (ниже сделал пару фото. В углу выделяется красный круг с громкой надписью, что фильм из сети можно загрузить за 10 сек. 🙂 По факту, конечно, это теория, на практике всё несколько дольше…).
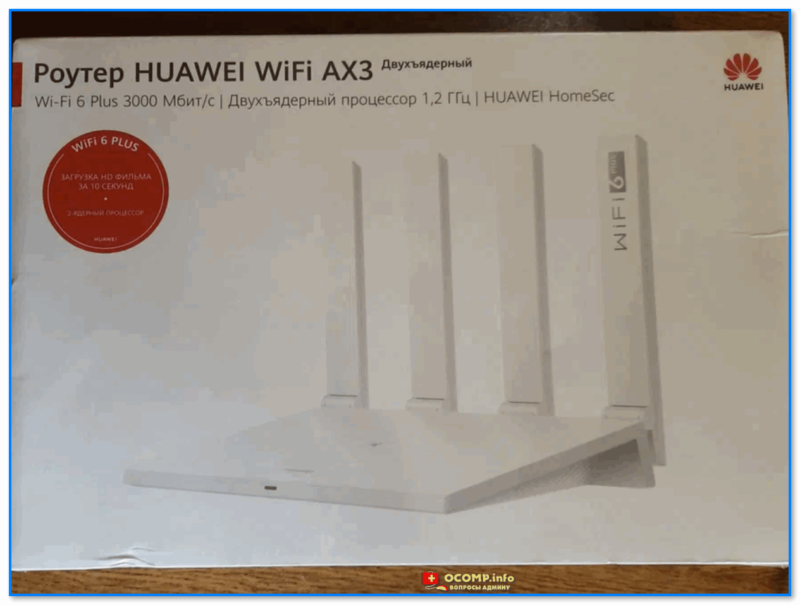
Фото коробки. HUAWEI AX3 — скорость до 3000 Мбит в сек. (фильм за 10 сек.!)

Фото коробки роутера с тыльной стороны
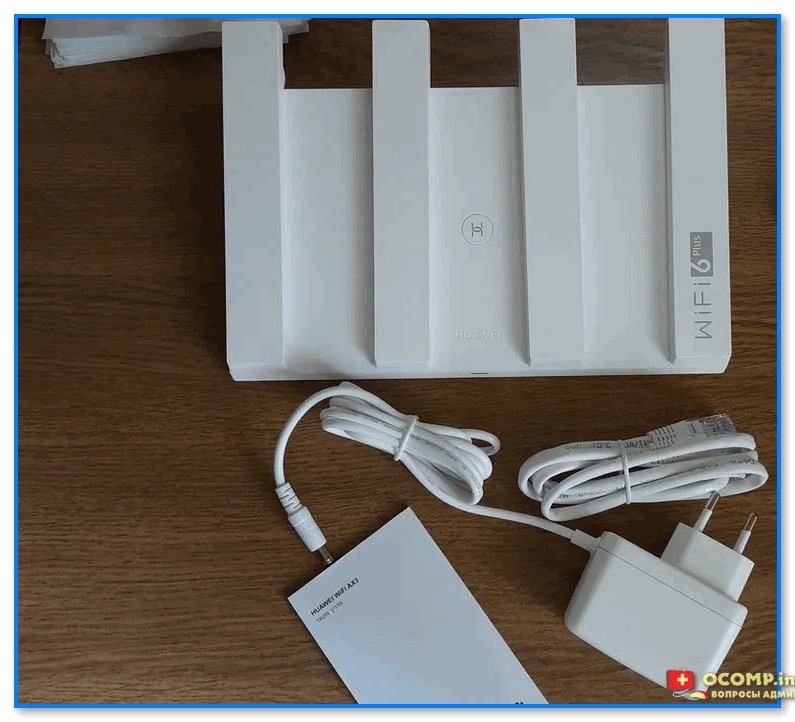
Комплектация: роутер, блок питания, сетевой кабель и инструкция
*
Краткие тех. характеристики:
- 1 порт под Ethernet RJ-45 для подкл. к Интернету;
- 3 LAN-порта (Ethernet RJ-45);
- Стандарт Wi-Fi 802.11 — ax (Wi-Fi 6);
- Частотный диапазон устройств Wi-Fi — 2.4 / 5 ГГц;
- Макс. скорость беспроводного соединения — 2976 Мбит/с;
- 4 внешн. антенны;
- UPnP AV-сервер, поддержка IPv6;
- DHCP-сервер, NAT, демилитаризованная зона (DMZ), межсетевой экран (Firewall), поддержка Dynamic DNS;
- Стандарты шифрования: WEP, WPA, WPA2, WPA3.
*
ШАГ 2: уточнение IP и пароля для первого входа, подключение
Для начала рекомендую обратить внимание на наклейку на корпусе устройства (на днище!). На ней есть крайне полезная информация:
- IP-адрес для доступа к веб-интерфейсу: http://192.168.3.1/ (это в моем случае. Этот адрес нужно записать или сфотографировать на телефон);
- имя Wi-Fi сети, которое используется по умолчанию (Wi-Fi name: HUAWEI-010AP4C8);
- пароль сети: в данном случае сеть по умолчанию идет без пароля (но на некоторых устройствах он есть!).
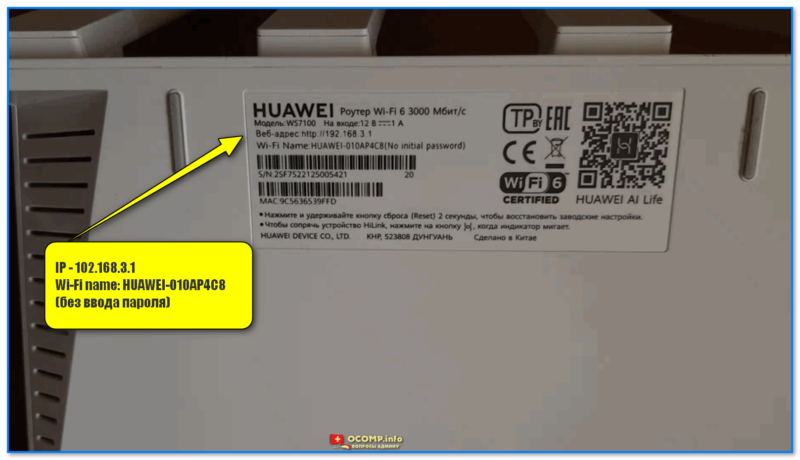
Узнаем IP и имя Wi-Fi сети по умолчанию (Wi-Fi name — HUAWEI-010AP4C8). Наклейка на корпусе роутера
Далее нужно подключить к портам:
- WAN — кабель от вашего Интернет-провайдера;
- POWER — блок питания роутера.
В общем-то, сразу после этого роутер должен начать работу (раздавать Wi-Fi сеть — ее вы сможете увидеть через телефон или ноутбук…). Кстати, совсем не обязательно подключаться к роутеру через LAN-порт для первичной настройки — всё это можно сделать по Wi-Fi.
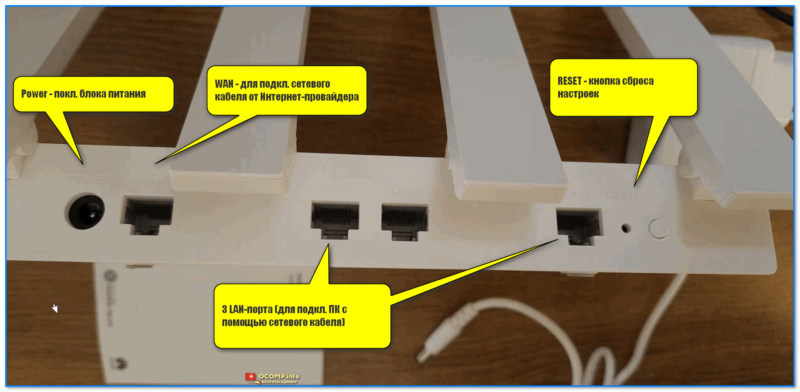
Основные порты роутера HUAWEI AX3 (Кликабельно, фото можно увеличить)
В моем случае было достаточно на ноутбуке сделать клик мышки по сетевому значку в трее (рядом с часами) и из списка выбрать Wi-Fi сеть с именем «HUAWEI…» (ее имя указывалось на наклейке на днище устройства).
📌 В помощь!
Нет значка Wi-Fi в трее Windows 11, в углу рядом с часами пусто — как тогда подключиться к беспроводной сети — https://ocomp.info/net-znachka-wi-fi-v-tree.html
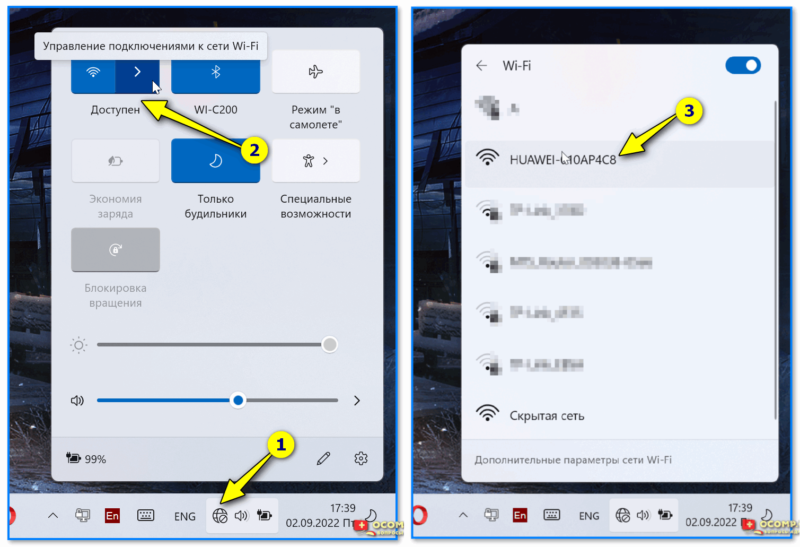
Подключаемся к Wi-Fi сети, которую роутер запускает по умолчанию
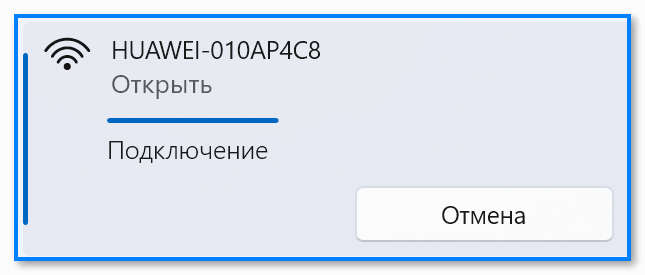
Подключение к сети
*
ШАГ 3: вход в веб-интерфейс и задание первичных параметров
Убедитесь, что вы подключены к роутеру (либо через Wi-Fi, либо напрямую LAN-кабелем к одному из сетевых портов).

Подключение к Wi-Fi есть
Далее попробуйте запустить браузер (Chrome рекомендуется) и перейти по: 📌http://192.168.3.1/ (IP указан на наклейке, на днище роутера)
Если адрес указан корректно и роутер работает — должна появиться страница приветствия. Здесь нужно согласиться с условиями и нажать кнопку «Начать».
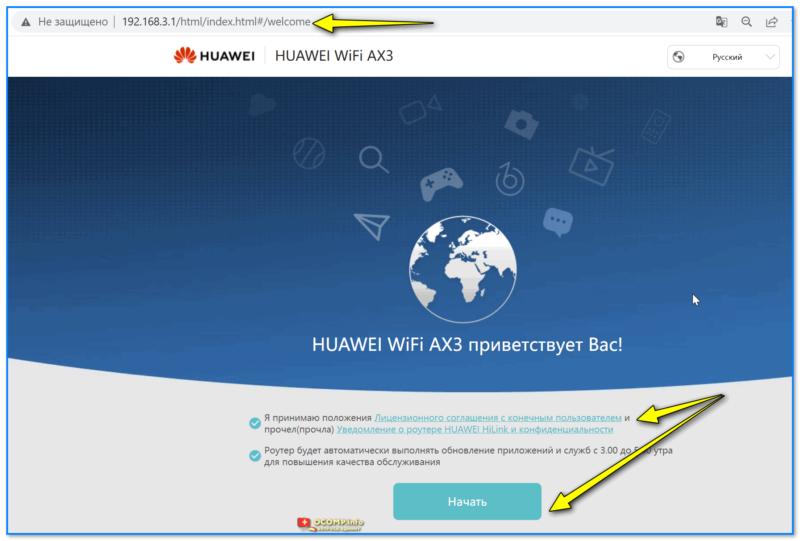
Первое окно настроек роутера HUAWEI AX3
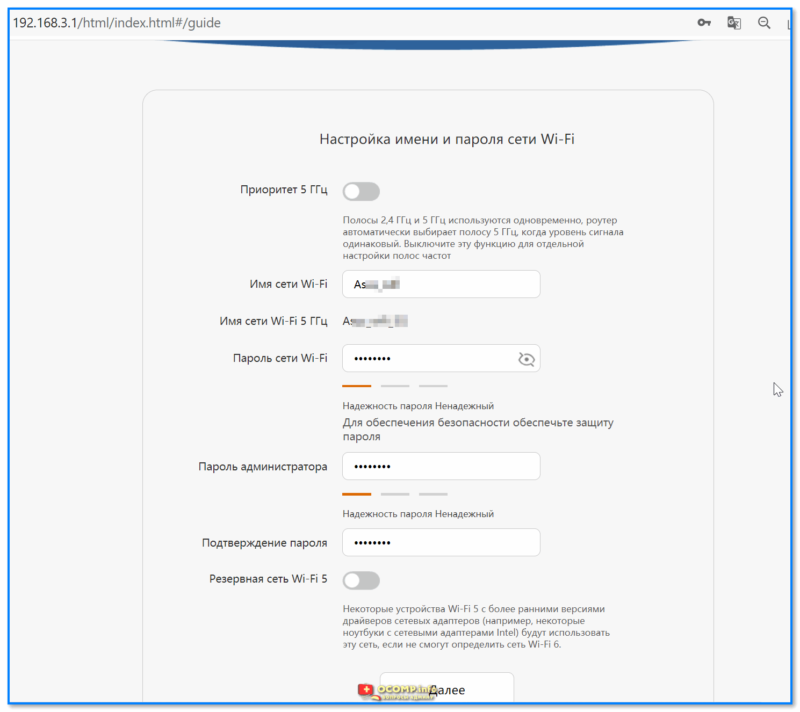
Затем можно задать новое имя для Wi-Fi сети, пароль к ней, и главный пароль администратора (он будет нужен для последующих подключений и изменения параметров! Запомните эти 2 пароля).
Настройки Wi-Fi (пока можно задать имя сети и пароль, остальное уточним после)
Остальные параметры пока можно не задавать, нажав неск. раз на кнопку «Далее». Всё это можно до-настроить в полноценном личном кабинете чуть позже…
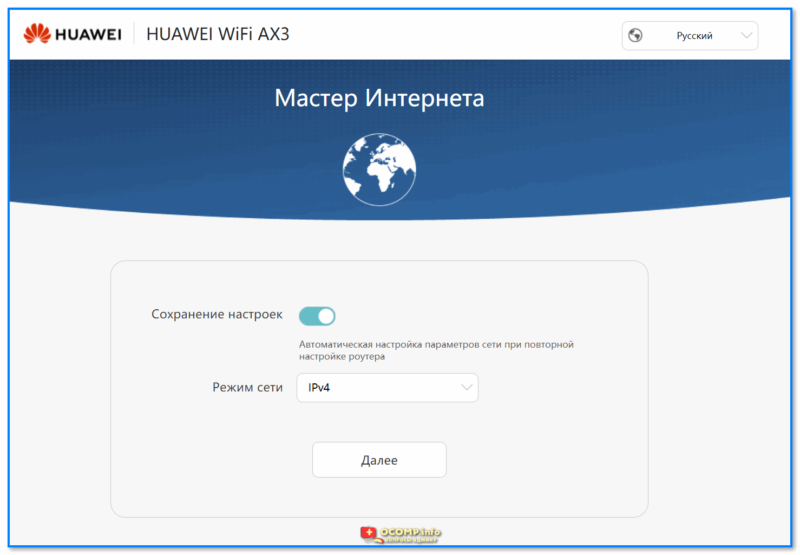
Мастер Интернета
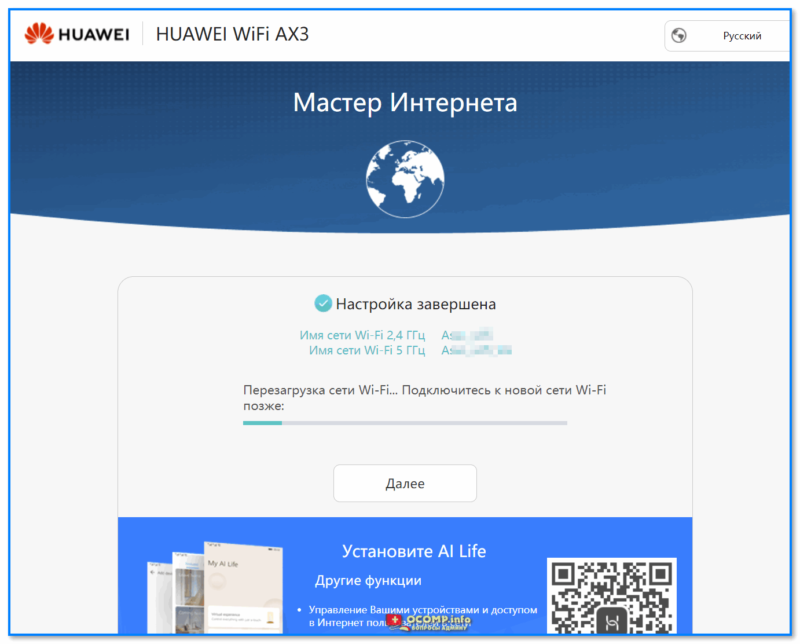
Перезагрузка роутера
*
ШАГ 4: настройка Wi-Fi сети и доступа в Интернет
После первичной настройки — очень вероятно роутер уйдет на перезагрузку и вам заново нужно будет подключиться к Wi-Fi сети, а затем в браузере открыть страничку http://192.168.3.1/
Важно: теперь потребуется для доступа указать пароль администратора, который был задан при первом подкл. (👆 чуть выше в заметке я рекомендовал вам его запомнить!).
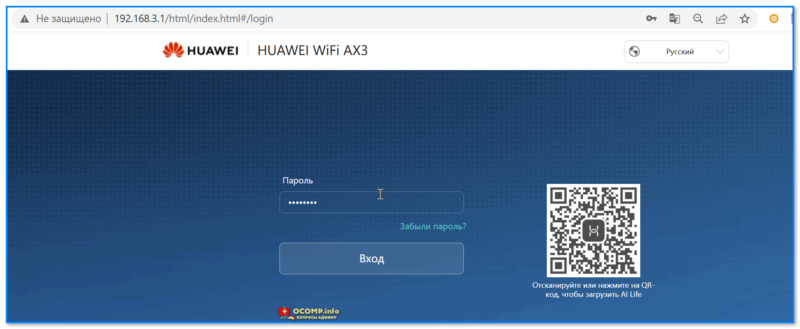
HUAWEI Wi-Fi AX3 — ввод пароля
Далее перед вами предстанет очень простой и лаконичный кабинет — сверху будут неск. разделов: «Главная», «Интернет», «Моя сеть Wi-Fi», «Устройство», «Доп. Функции».
Для уточнения настроек Wi-Fi — потребуется открыть раздел «Моя сеть Wi-Fi». Обратите внимание, что устройства от HUAWEI позволяют вручную задать уровень сигнала (их всего три: сильный, средний, слабый).
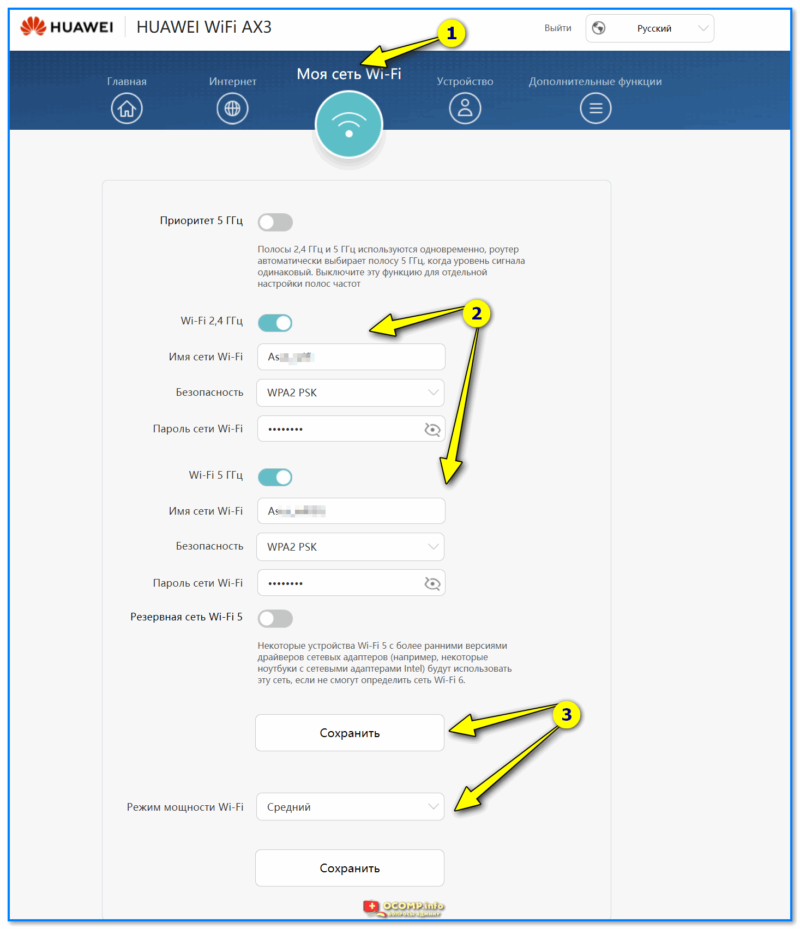
HUAWEI Wi-Fi AX3 — моя сеть Wi-Fi
Кстати, расширенные настройки Wi-Fi (для уточнения канала, полосы пропускания, вкл. невидимости и пр.) можно найти во вкладке «Доп. функции / настройки Wi-Fi».
(как правило большинству они не нужны, и роутер работает с дефолтными предустановками. Поэтому на этом разделе не останавливаюсь)
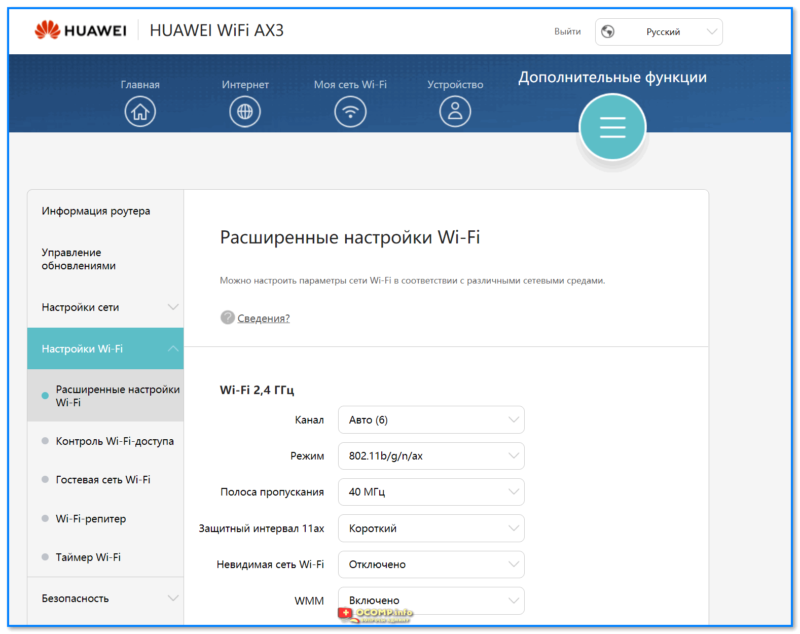
HUAWEI Wi-Fi AX3 — расширенные настройки Wi-Fi
Во вкладке «Интернет» необходимо задать следующее:
- тип подключения к Интернет: тут зависит от организации сети вашего провайдера. Как правило, тип подключения, а также пароли, логины, IP (если они нужны) указаны в договоре на оказание услуг связи с вашим провайдером. Чаще всего сегодня в России используются DHCP и PPPoE;
- MTU — максимальный размер полезного блока данных (лучше оставить как есть, по умолчанию);
- Клон MAC-адреса: у каждой сетевой карты и роутера есть свой MAC-адрес и некоторые провайдеры его запоминают (если так, то при смене роутера/сетевой карты, у которого будет новый MAC-адрес — вы не сможете подключиться к сети!). Чтобы исправить это — нужно клонировать MAC-адрес вашего старого роутера (эта информация указана на наклейке на днище роутера);
- VLAN — виртуальная лок. сеть (большинству не требуется, поэтому можно ничего не менять);
- Статический DNS — тоже пока можно не менять… (подробнее о DNS).
Если данные будут указаны верно — все устройства, подключенные к Wi-Fi роутеру, получат доступ в Интернет! 👌
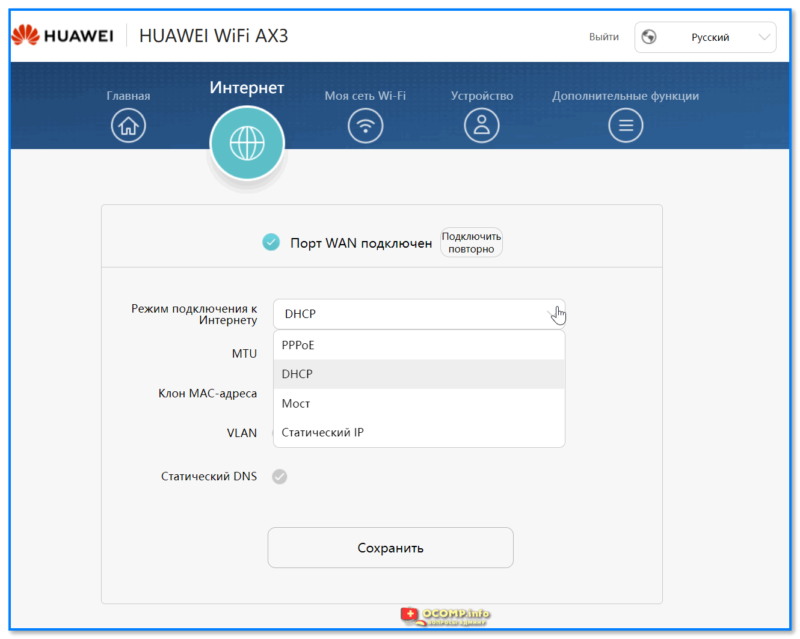
HUAWEI Wi-Fi AX3 — Интернет
👉 Кстати, рекомендую в доп. настройках (на всякий случай) отключить автоматическое обновление прошивки роутера. Не знаю как у HUAWEI — но я уже сталкивался с тем, что роутер «сам себя приводил в неработоспособность» (причем, в самое неподходящее время).
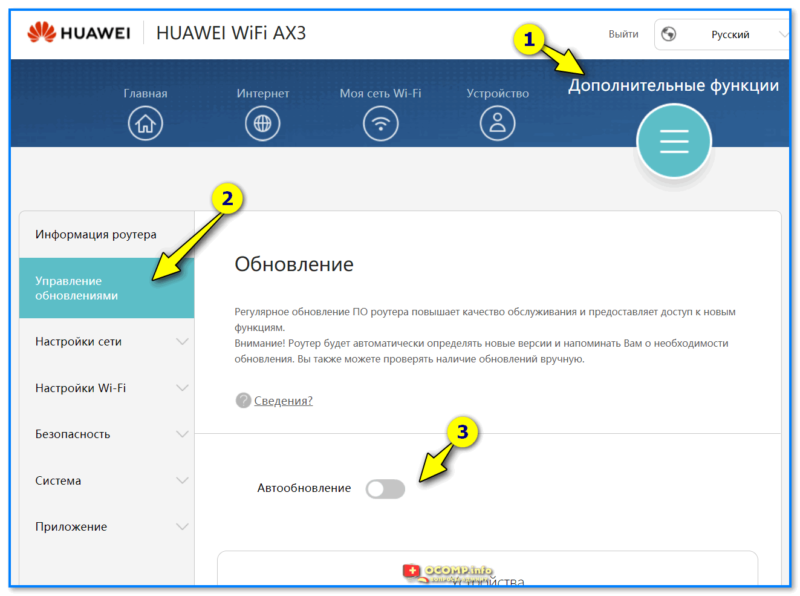
HUAWEI Wi-Fi AX3 — отключаем авто-обновление
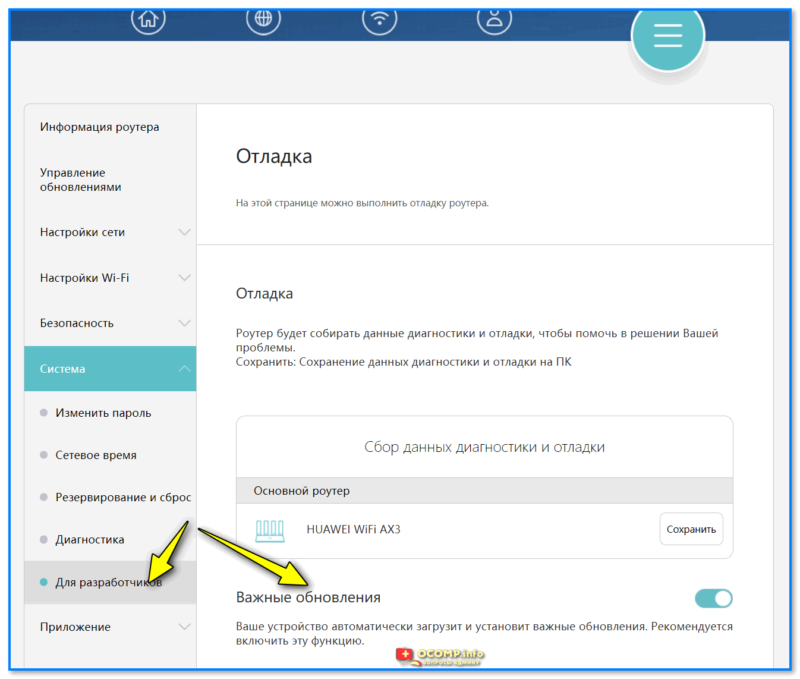
Важные обновление также откл. (на всякий случай)
*
ШАГ 5: делаем постоянный IP для своего ПК, и пробрасываем порты (чтобы работали сетевые игры)
Этот шаг не обязателен, многие его могут пропустить…
Если вы любите поиграть в сетевые игры и замечаете, что не всегда к вам могут подключиться (+ есть проблемы при работе Skype, торрентов и пр.) — вероятно, нужно пробросить порты. По умолчанию роутер блокирует все незнакомые и подозрительные на его взгляд соединения.
Чтобы не перенагружать читателя сложностями с «портами» — на мой взгляд, в развлекательных целях, гораздо проще воспользоваться опцией 📌DMZ-сервера, тем паче, что она есть у HUAWEI (сразу после вкл. DMZ — к вашему ПК смогут подключаться люди из сети Интернет).
Как это делается
Для начала нужно открыть доп. настройки роутера — вкладку «Настройка сети — LAN». Там нужно задействовать функцию привязки статического IP-адреса (что это: при подкл. к роутеру — он выдает каждый раз вашему компьютеру IP, например, 192.168.3.5. Когда вы подключитесь к нему в другой раз — он вам может выдать 192.168.3.6, т.е. новый IP. А нам нужно, чтобы IP был всегда одинаков, статичен — т.е. 192.168.3.5).
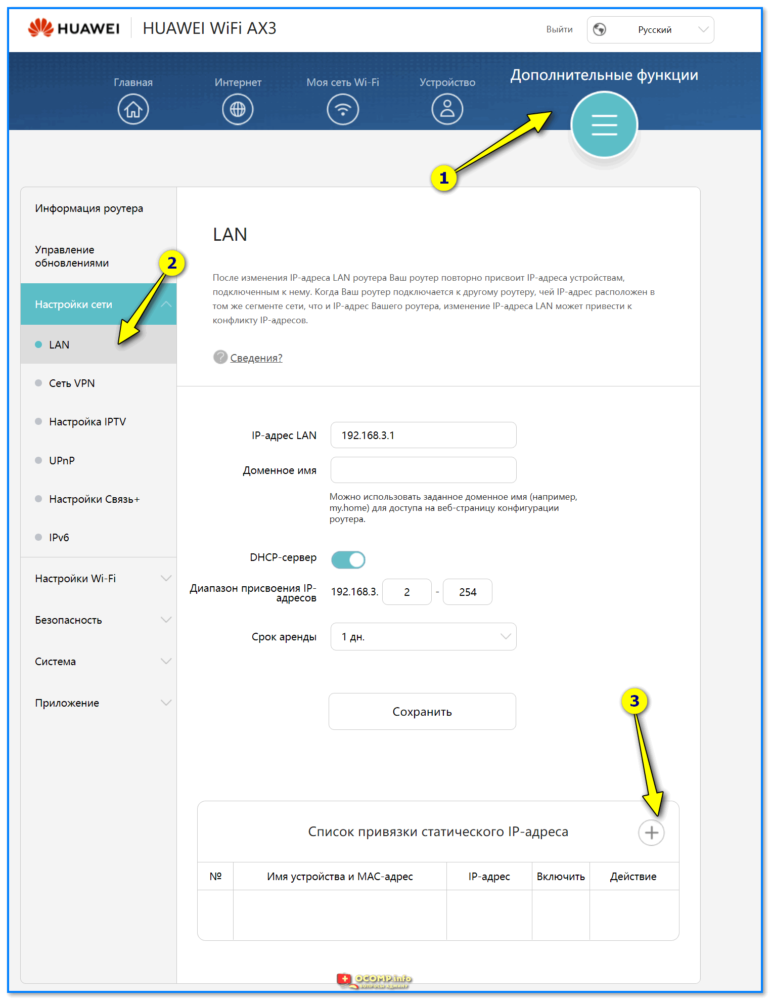
Список статический IP — HUAWEI WiFi AX3 (доп. настройки)
Затем выбираем имя своего ПК (у меня это «alex-pc») и нажимаем OK (теперь IP 192.168.3.5 будет закреплен за моим ПК, и никакие другие устройства, подключаемые к роутеру, его не займут!).
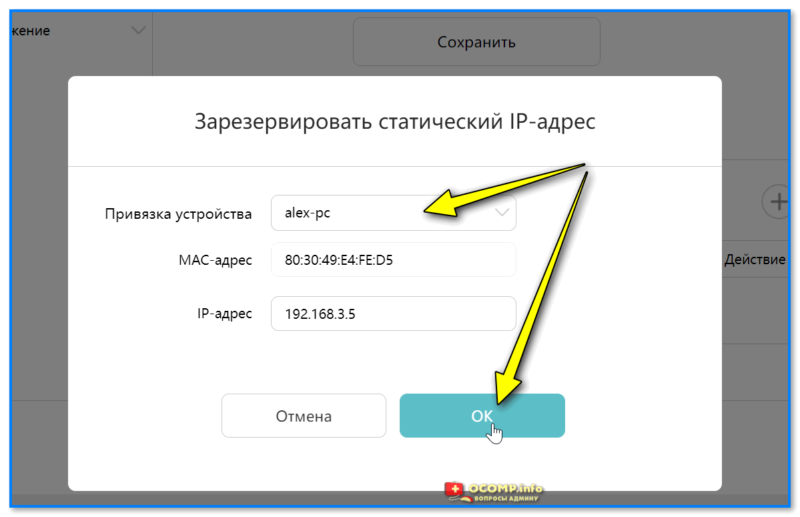
Зарезирвировать IP адрес за моим ПК (HUAWEI WiFi AX3)
Теперь в доп. функциях нужно открыть вкладку «Безопасность / DMZ-хост», вкл. работу DMZ, и указать нужный IP (имя ПК). Осталось сохранить настройки и перезагрузить роутер. Всё! 👌
(теперь DMZ-хост работает по вашему локальному IP, а он постоянен!)
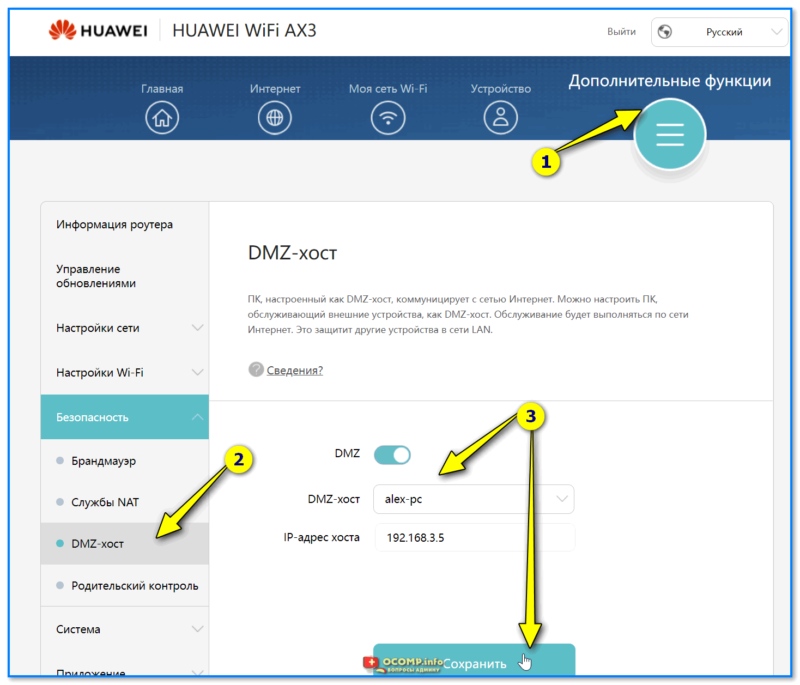
Теперь другие ПК из сети смогут подкл. к вашему ПК (HUAWEI WiFi AX3)
*
📌 Полный перечень настроек роутера (скрины)
Раз уж я привел настройку HUAWEI WiFi AX3 (WS7100) — решил также делать скрины всех его вкладок (вдруг кому-то нужно будет посмотреть перед покупкой нужную опцию или сравнить свою прошивку с этой… Мало ли?).
Т.к. прошивка роутера полностью на русском и везде приведено обилие подсказок — то скрины ниже я никак комментировать не буду (кстати, скрины все кликабельные — их удобно смотреть на большом мониторе 🙂).
Основные
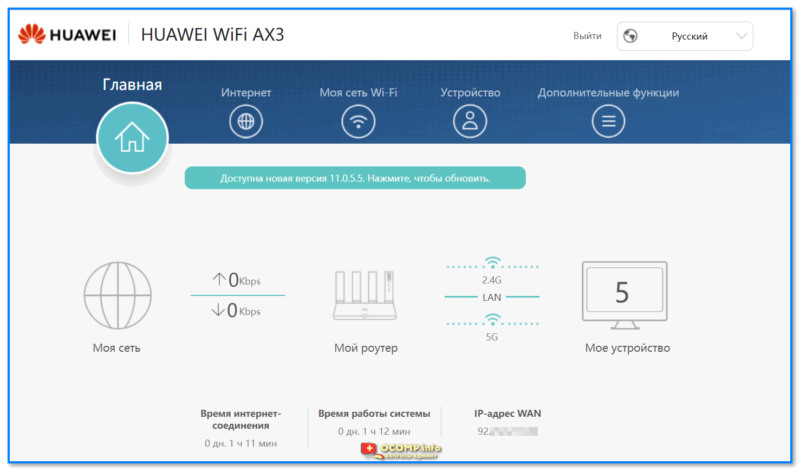
HUAWEI WiFi AX3 — вкладка главная

HUAWEI WiFi AX3 — вкладка Интернет
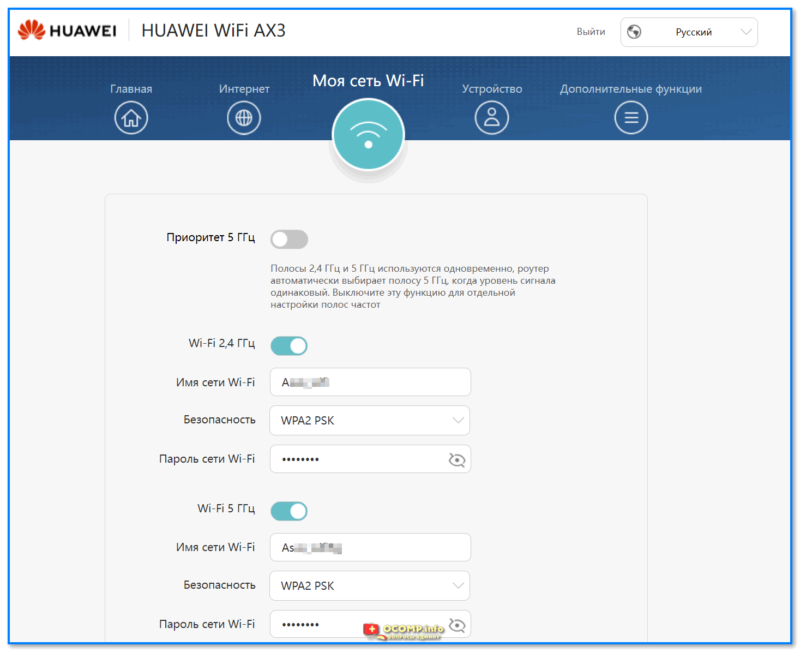
HUAWEI WiFi AX3 — вкладка моя сеть Wi-Fi
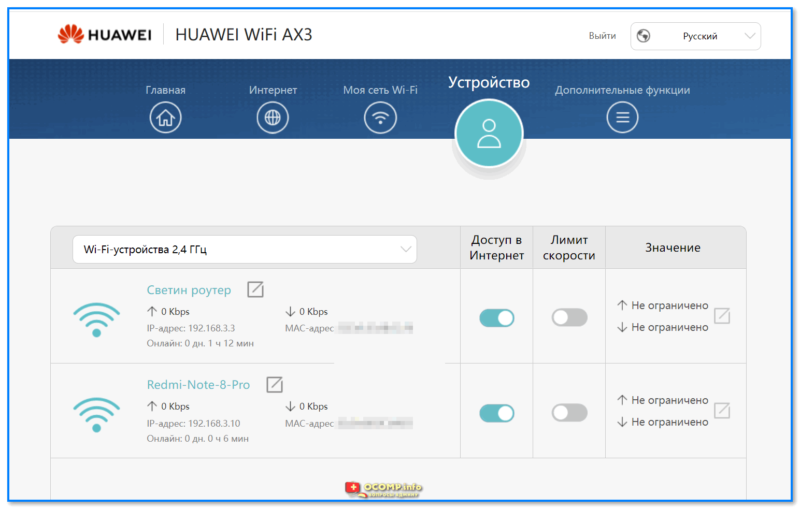
HUAWEI WiFi AX3 — вкладка с устройствами
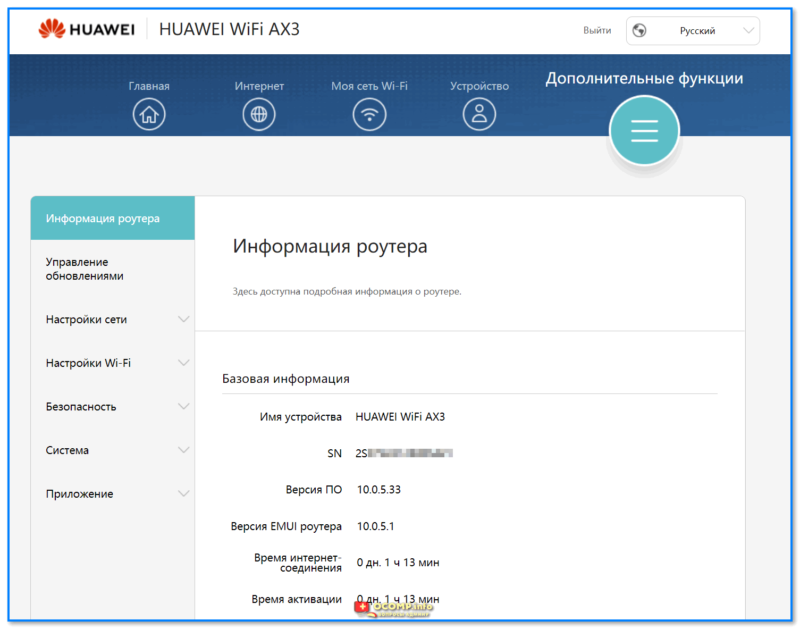
HUAWEI WiFi AX3 — вкладка доп. функции
*
Дополнительные
Управление обновлениями
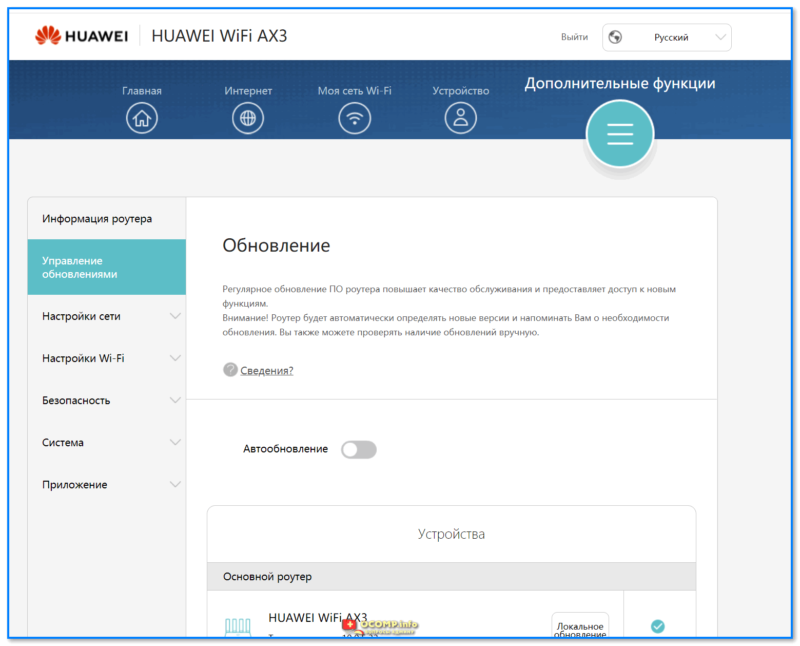
HUAWEI WiFi AX3 — обновление
*
Настройки сети
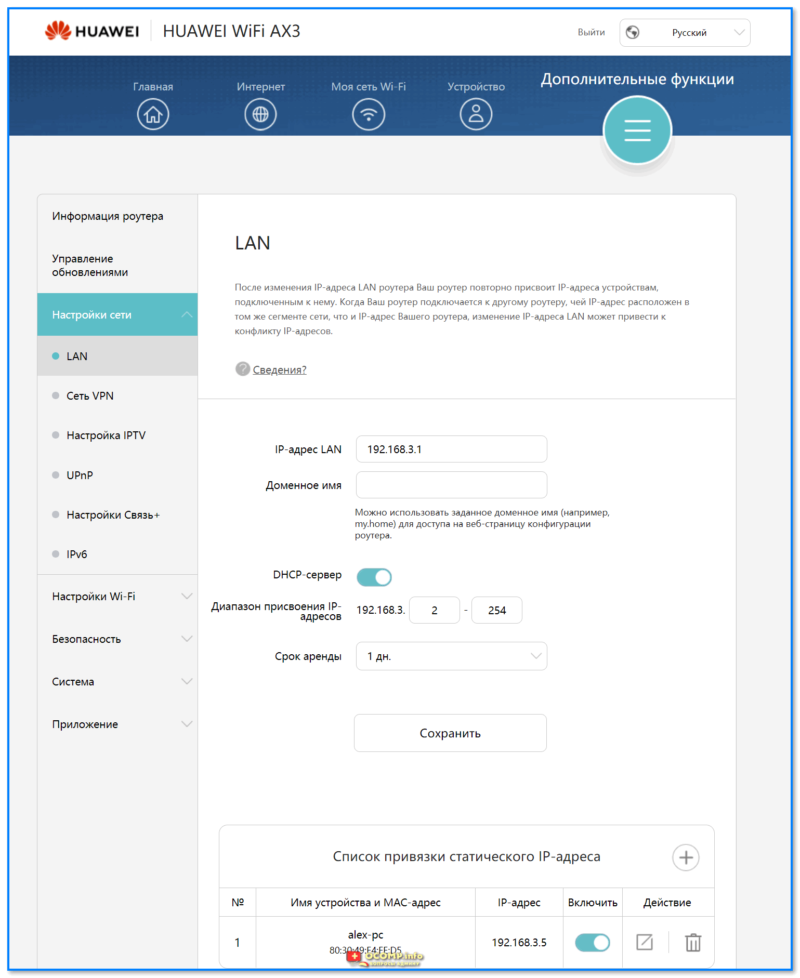
HUAWEI WiFi AX3 — настройка сети — LAN
HUAWEI WiFi AX3 — настройка сети — VPN
HUAWEI WiFi AX3 — настройка сети — IPTV
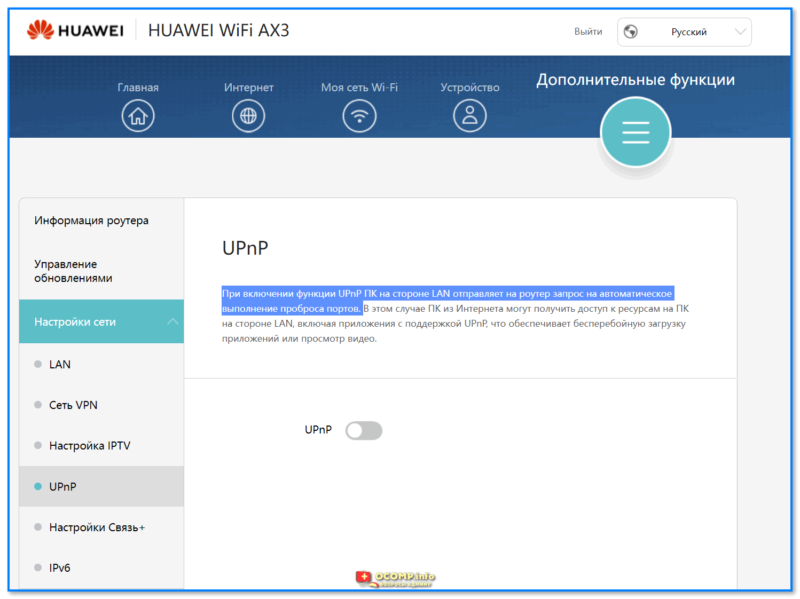
HUAWEI WiFi AX3 — настройка сети — При включении функции UPnP ПК на стороне LAN отправляет на роутер запрос на автоматическое выполнение проброса портов
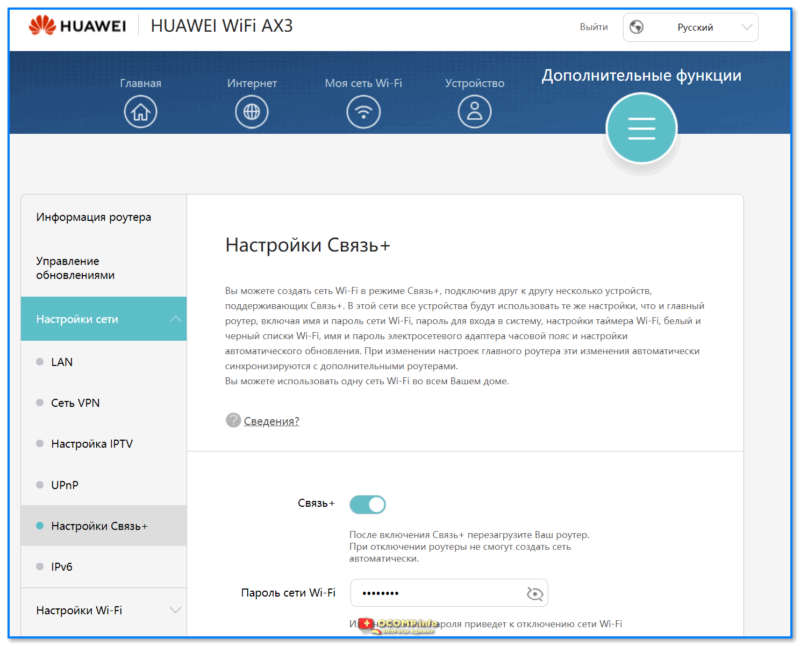
HUAWEI WiFi AX3 — настройка сети — Связь

HUAWEI WiFi AX3 — настройка сети — IPv6
*
Настройки Wi-Fi
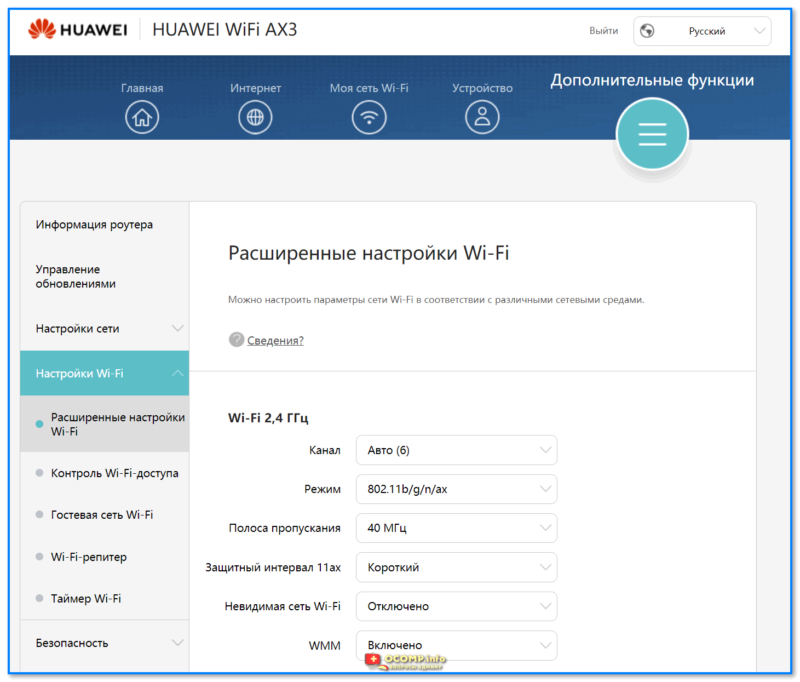
HUAWEI WiFi AX3 — настройка Wi-Fi — расширенные
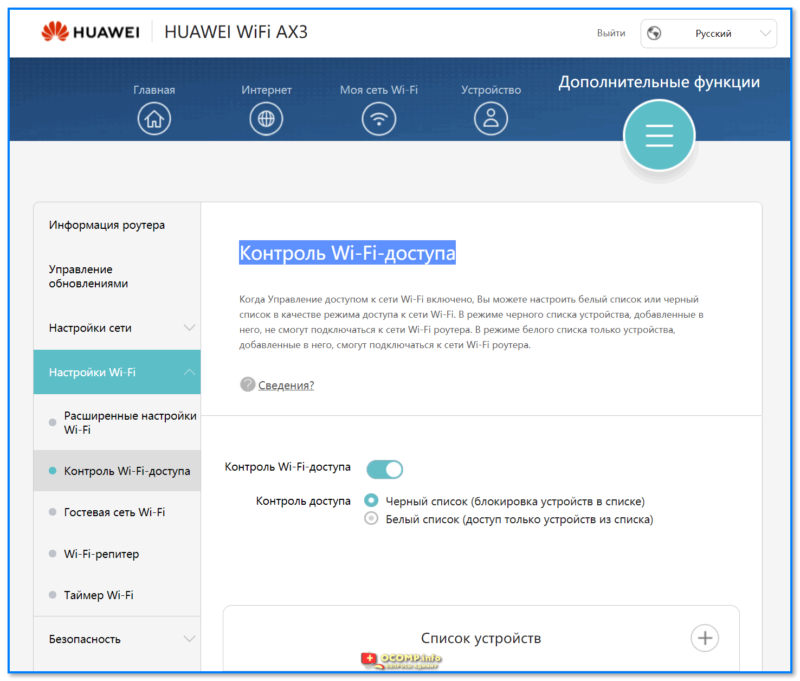
HUAWEI WiFi AX3 — настройка Wi-Fi — Контроль Wi-Fi-доступа
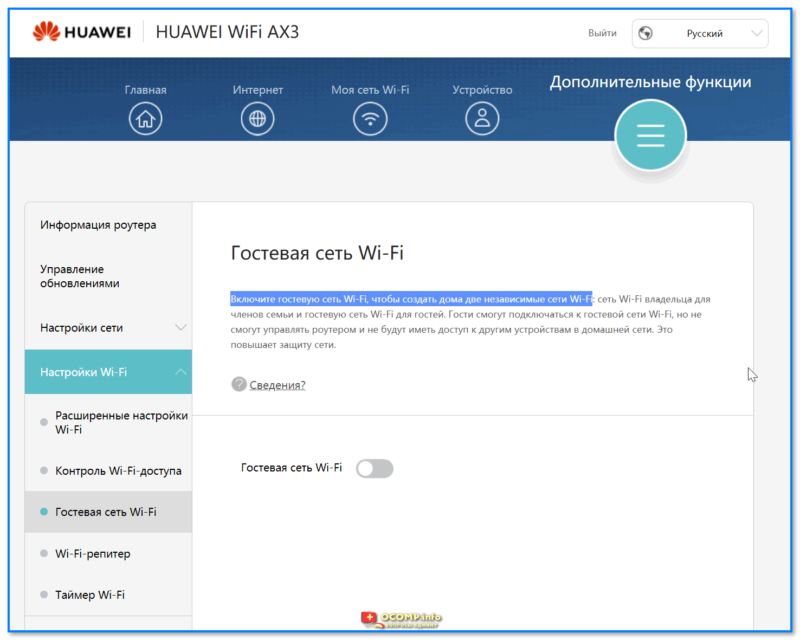
HUAWEI WiFi AX3 — настройка Wi-Fi — Включите гостевую сеть Wi-Fi, чтобы создать дома две независимые сети Wi-Fi
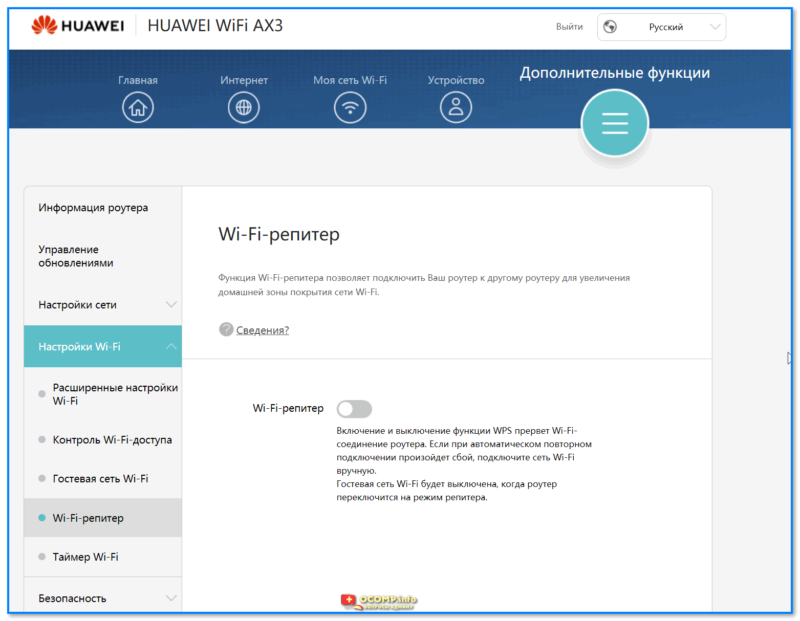
HUAWEI WiFi AX3 — настройка Wi-Fi — Функция Wi-Fi-репитера позволяет подключить Ваш роутер к другому роутеру для увеличения домашней зоны покрытия сети Wi-Fi

HUAWEI WiFi AX3 — настройка Wi-Fi — При включении функции автоматического выключения сети Wi-Fi роутер будет автоматически выключать сеть Wi-Fi в заданный период времени
*
Безопасность
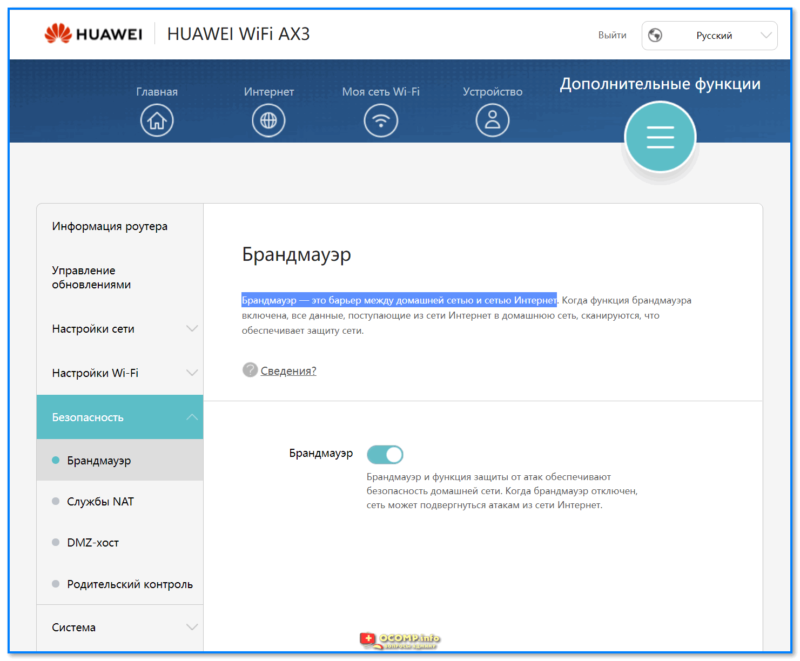
HUAWEI WiFi AX3 — Безопасность — Брандмауэр — это барьер между домашней сетью и сетью Интернет
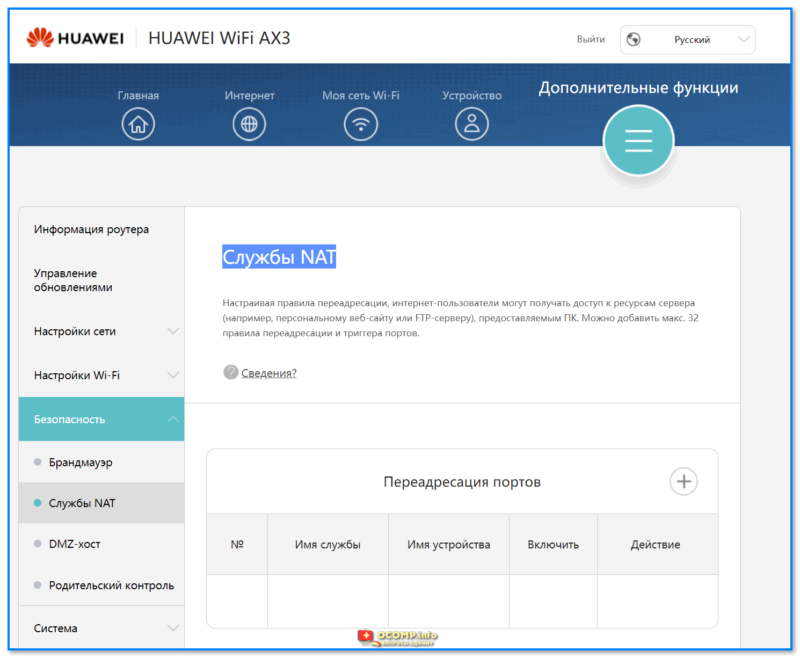
HUAWEI WiFi AX3 — Безопасность — Службы NAT
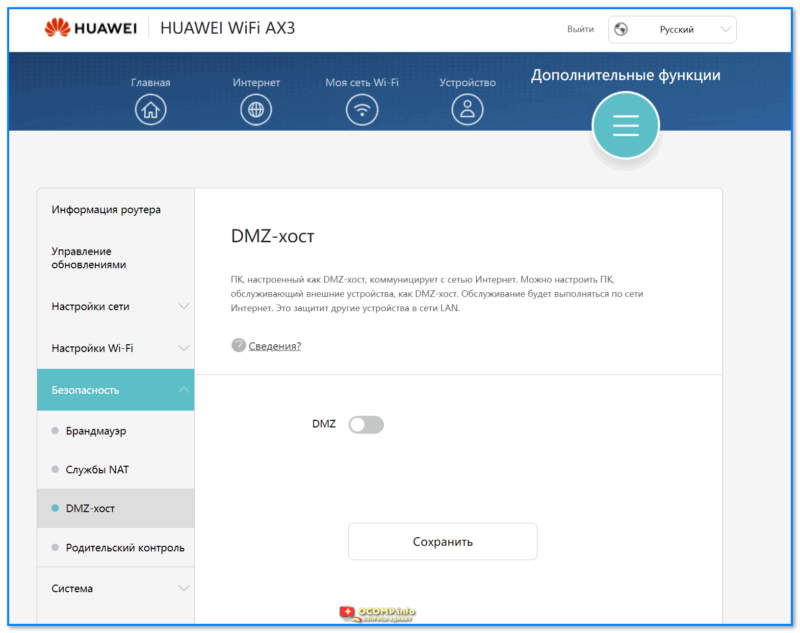
HUAWEI WiFi AX3 — Безопасность — DMZ-сервер
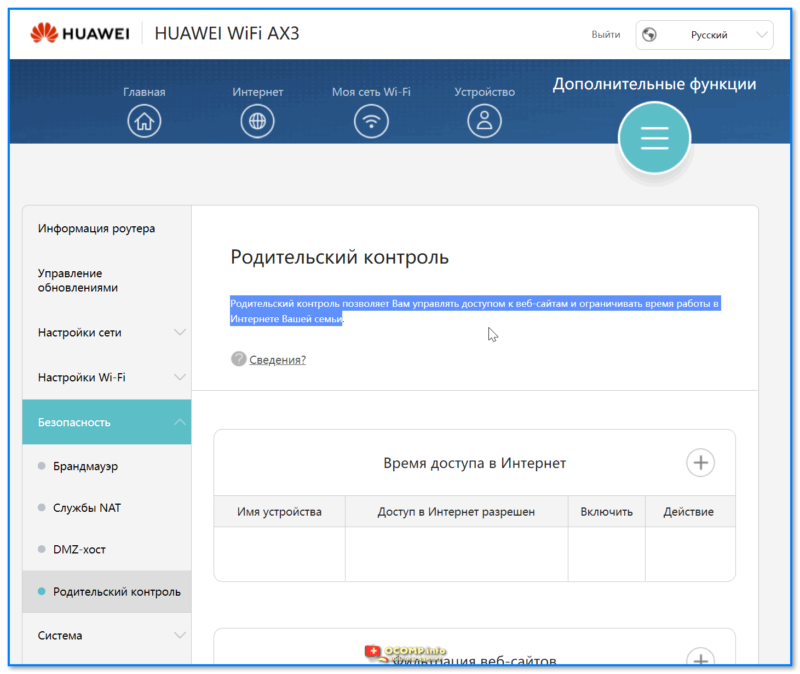
HUAWEI WiFi AX3 — Безопасность — Родительский контроль позволяет Вам управлять доступом к веб-сайтам и ограничивать время работы в Интернете Вашей семьи
*
Система

HUAWEI WiFi AX3 — Система — изменить пароль
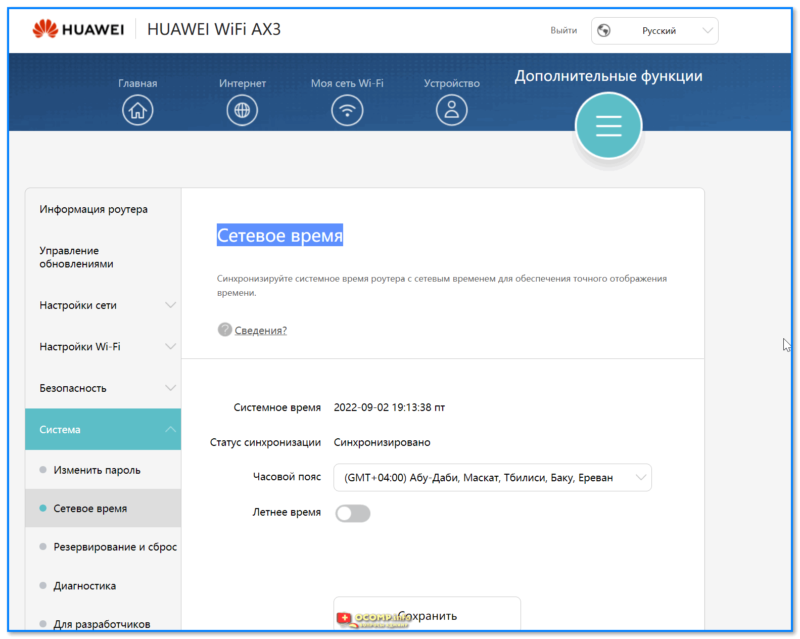
HUAWEI WiFi AX3 — Система — Сетевое время

HUAWEI WiFi AX3 — Система — Резервирование и сброс
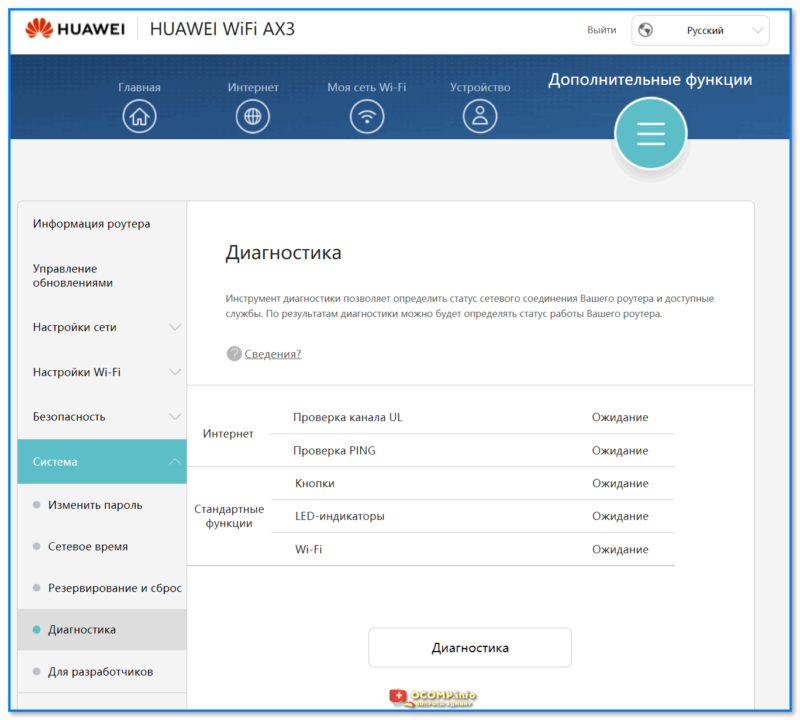
HUAWEI WiFi AX3 — Система — Диагностика
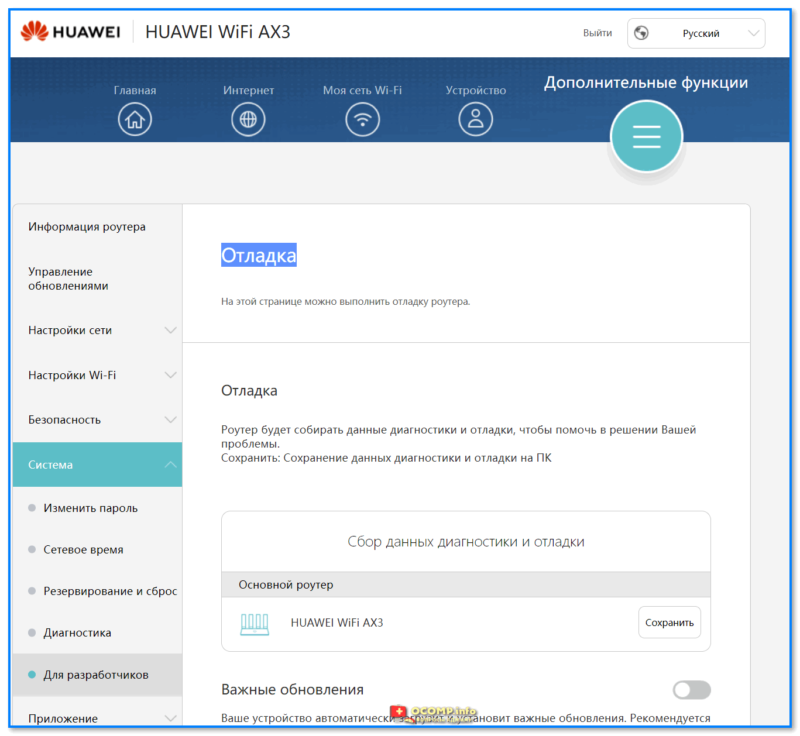
HUAWEI WiFi AX3 — Система — Отладка, для разработчиков
*
Приложение (доп.)
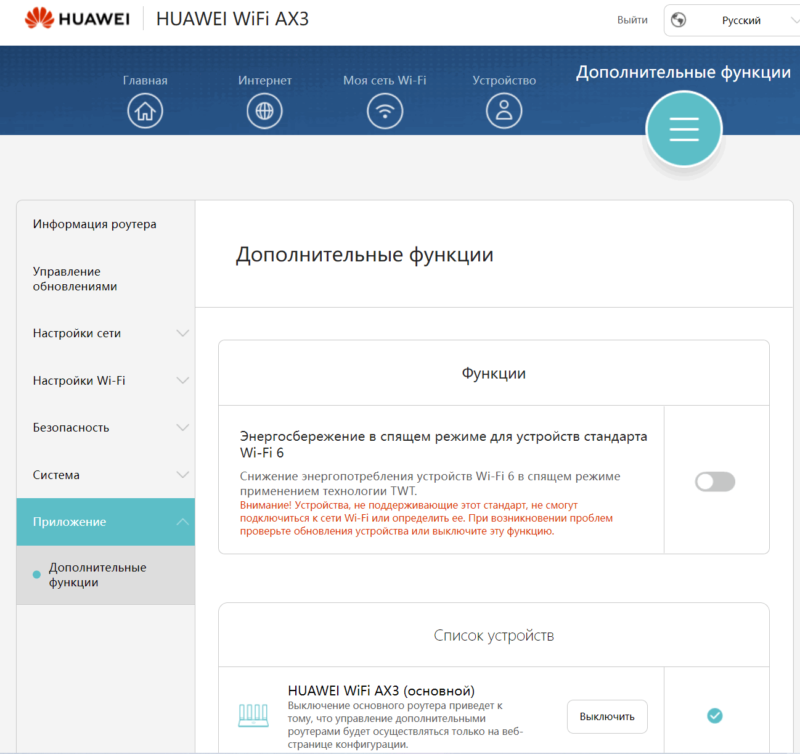
Энергосбережение в спящем режиме для устройств стандарта Wi-Fi 6
*
На этом пока вроде бы всё… (надеюсь, ничего не забыл 🙂).
Удачи!

