hEX PoE (RB960PGS)
hEX PoE is a powerful five-port Gigabit Ethernet router with an SFP port capable of powering other devices.
Safety Warnings
Before you work on any equipment, be aware of the hazards involved with electrical circuitry, and be familiar with standard practices for preventing accidents.
Ultimate disposal of this product should be handled according to all national laws and regulations.
The Installation of the equipment must comply with local and national electrical codes.
This unit is intended to be installed in the rackmount. Please read the mounting instructions carefully before beginning installation. Failure to use the correct hardware or to follow the correct procedures could result in a hazardous situation to people and damage to the system.
This product is intended to be installed indoors. Keep this product away from water, fire, humidity or hot environments.
Use only the power supply and accessories approved by the manufacturer, and which can be found in the original packaging of this product.
Read the installation instructions before connecting the system to the power source.
We cannot guarantee that no accidents or damage will occur due to the improper use of the device. Please use this product with care and operate at your own risk!
In the case of device failure, please disconnect it from power. The fastest way to do so is by unplugging the power plug from the power outlet.
It is the customer’s responsibility to follow local country regulations, including operation within legal frequency channels, output power, cabling requirements, and Dynamic Frequency Selection (DFS) requirements. All Mikrotik devices must be professionally installed.
First use
- Choose your powering solution, please see the Powering section for possibilities.
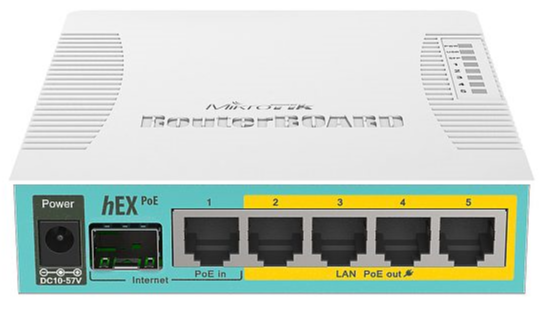
- Connect your Internet cable to port 1 (labeled «Internet»), and local network computers to ports 2-5.
- Connect your direct input power jack if not using POE, to start up the device.
- If using POE please see section POE Adapter on how to connect.
- The device will boot up and after the short beep, the network will be available for connecting.
- Set your computer IP configuration to automatic (DHCP).
- Once connected to the network, open https://192.168.88.1
 in your web browser to start configuration, since there is no password by default, you will be logged in automatically (or, for some models, check user and wireless passwords on the sticker).
 - We recommend clicking the «Check for updates» button and updating your RouterOS software to the latest version to ensure the best performance and stability.
- Set up your password on the screen that loads.
Mounting
This device is designed for use indoors by placing it on the flat surface or mounting on the wall, mounting points are shown in the picture below, screws are not included in the package. Screws with size 4×25 mm fit nicely, depending on your wall structure you can use dowels 6×30 mm and 6 mm drill bit if needed.
When mounting on the wall, please ensure that the cable feed is pointing downwards. We recommend using Cat6 cable for our devices. The IP rating scale for this device is IPX0.
Warning! This equipment should be installed and operated with a minimum distance of 20 cm between the device and your body. The operation of this equipment in the residential environment could cause radio interference.
Powering
The device accepts power from the power jack or from the first Ethernet port (Passive PoE):
- Direct input power jack (5.5mm outside and 2mm inside, female, pin positive) accepts 12 — 57 V ⎓DC.
- The first Ethernet port accepts passive Power over Ethernet 12 — 57 V ⎓DC.
- PoE out on 2 — 5 Ethernet port, It also supports passive PoE input and passive or 802.3af/at PoE output. Ethernet ports 2-5 can power other PoE capable devices with the same voltage as applied to the unit. It can power at/af mode B (4,5+)(7,8-) compatible devices, if 48-57 input voltage is used.
The power consumption of this device under maximum load with attachments is 59 W. Without attachments 6 W.
Power output
This device can supply PoE power to external devices from its Ethernet ports. This is convenient as you don’t need any additional PoE injectors to power other devices. The output voltage will be the same as the input voltage. The maximum power output of each Ethernet port in this mode is 1 A (the total maximum for all ports is 2 A). Once Power Output is enabled in RouterOS, the Ethernet LED adds red color to it (green means Ethernet link is made, red means power but no link, red and green both means there is link and power).
Booting process
RouterOS includes many configuration options in addition to what is described in this document. We suggest starting here to get yourself accustomed to the possibilities: https://mt.lv/help. In case an IP connection is not available, the Winbox tool (https://mt.lv/winbox) can be used to connect to the MAC address of the device from the LAN side (all access is blocked from the Internet port by default).
For recovery purposes, it is possible to boot the device from the network, see a section Reset button.
Extension Slots and Ports
- The device has five individual Ethernet ports, supporting automatic cross/straight cable correction (Auto MDI/X), so you can use either straight or cross-over cables for connecting to other network devices.
- 1G SFP port.
- USB type-A slot.
Please visit wiki pages for MikroTik SFP module compatibility table: https://wiki.mikrotik.com/wiki/MikroTik_SFP_module_compatibility_table
Buttons and jumpers
Reset button
The RouterBOOT reset button has the following functions. Press the button and apply the power, then:
- Release the button when green LED starts flashing, to reset RouterOS configuration to defaults.
- Release the button when the LED turns solid green to clear all configuration and bridge all interfaces.
- Release the button after LED is no longer lit (~20 seconds) to cause a device to look for Netinstall servers (required for reinstalling RouterOS over the network).
Regardless of the above option used, the system will load the backup RouterBOOT loader if the button is pressed before power is applied to the device. Useful for RouterBOOT debugging and recovery.
Connecting to a POE Adapter:
- Connect the Ethernet cable from the device to the POE port of the POE adapter.
- Connect an Ethernet cable from your LAN to the LAN port of the POE adapter, please mind arrows for data and power flow.
- Connect the power cord to the adapter, and then plug the power cord into a power outlet.
Accessories
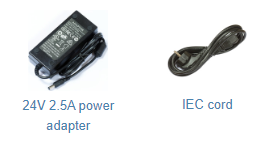
The package includes the following accessories that come with the device:
Specifications
For more information about this product, specifications, and pictures please visit our web page: https://mikrotik.com/product/RB960PGS
Operating System Support
The device supports RouterOS software version 6. The specific factory-installed version number is indicated in the RouterOS menu /system resource. Other operating systems have not been tested.
To avoid pollution of the environment, please separate the device from household waste and dispose of it in a safe manner, such as in designated waste disposal sites. Familiarize yourself with the procedures for the proper transportation of the equipment to the designated disposal sites in your area.
Federal Communication Commission Interference Statement
![]()
This equipment has been tested and found to comply with the limits for a Class B digital device, pursuant to Part 15 of the FCC Rules. These limits are designed to provide reasonable protection against harmful interference in a residential installation.
This equipment generates, uses, and can radiate radio frequency energy and, if not installed and used in accordance with the instructions, may cause harmful interference to radio communications. However, there is no guarantee that interference will not occur in a particular installation. If this equipment does cause harmful interference to radio or television reception, which can be determined by turning the equipment off and on, the user is encouraged to try to correct the interference by one or more of the following measures:
- Reorient or relocate the receiving antenna.
- Increase the separation between the equipment and receiver.
- Connect the equipment into an outlet on a circuit different from that to which the receiver is connected.
- Consult the dealer or an experienced radio/TV technician for help.
FCC Caution: Any changes or modifications not expressly approved by the party responsible for compliance could void the user’s authority to operate this equipment.
This device complies with Part 15 of the FCC Rules. Operation is subject to the following two conditions: (1) This device may not cause harmful interference, and (2) this device must accept any interference received, including interference that may cause undesired operation.
Note: This unit was tested with shielded cables on the peripheral devices. Shielded cables must be used with the unit to ensure compliance.
Innovation, Science and Economic Development Canada
This device contains license-exempt transmitter(s)/receiver(s) that comply with Innovation, Science, and Economic Development Canada’s license-exempt RSS(s). Operation is subject to the following two conditions: (1) This device may not cause interference. (2) This device must accept any interference, including interference that may cause undesired operation of the device.
L’émetteur/récepteur exempt de licence contenu dans le présent appareil est conforme aux CNR d’Innovation, Sciences et Développement économique Canada applicables aux appareils radio exempts de licence. L’exploitation est autorisée aux deux conditions suivantes : 1) L’appareil ne doit pas produire de brouillage; 2) L’appareil doit accepter tout brouillage radioélectrique subi, même si le brouillage est susceptible d’en compromettre le fonctionnement.
This Class B digital apparatus complies with Canadian ICES-003.
Cet appareil numérique de la classe [B] est conforme à la norme NMB-003 du Canada.
CAN ICES-003 (B) / NMB-003 (B)
UKCA Marking

Eurasian Conformity Mark
Информация о дате изготовления устройства указана в конце серийного номера на его наклейке через дробь. Первая цифра означает номер года (последняя цифра года), две последующие означают номер недели.
Изготовитель: Mikrotikls SIA, Aizkraukles iela 23, Riga, LV-1006, Латвия, support@mikrotik.com. Сделано в Китае, Латвии или Литве. Cм. на упаковке.
Для получения подробных сведений о гарантийном обслуживании обратитесь к продавцу. Информация об импортерах продукции MikroTik в Российскую Федерацию: https://mikrotik.com/buy/europe/russia
Продукты MikroTik, которые поставляются в Евразийский таможенный союз, оцениваются с учетом соответствующих требований и помечены знаком EAC, как показано ниже:

Norma Oficial Mexicana
EFICIENCIA ENERGETICA CUMPLE CON LA NOM-029-ENER-2017.
La operacion de este equipo esta sujeta a las siguientes dos condiciones:
- Es posible que este equipo o dispositivo no cause interferencia perjudicial y.
- Este equipo debe aceptar cualquier interferencia, incluyendo la que pueda causar su operacion no deseada.
Fabricante: Mikrotikls SIA, Brivibas gatve 214i, Riga, LV-1039, Latvia.
País De Origen: Letonia; Lituania; China (Republica Popular); Estados Unidos De America; Mexico.
Por favor contacte a su distribuidor local para preguntas regionales específicas. La lista de importadores se puede encontrar en nuestra página de inicio – https://mikrotik.com/buy/latinamerica/mexico.
CE Declaration of Conformity
Manufacturer: Mikrotikls SIA, Brivibas gatve 214i Riga, Latvia, LV1039.
The full text of the EU Declaration of Conformity is available at the following internet address: https://mikrotik.com/products![]()
Information contained here is subject to change. Please visit the product page on www.mikrotik.com for the most up to date version of this document.
")
Настройка MikroTik hEX PoE (RB960PGS)
-
Описание
-
Отзывы (1)
Описание
MikroTik hEX PoE (модель RB960PGS) — это роутер без Wi-Fi на 5 гигабитных сетевых портов, 1 SFP порт для подключения оптики и 1 USB порт для подключения 3G/4G модемов или внешних накопителей.
Сетевые порты 2-5 поддерживают подачу PoE питания на другие устройства, работающие по стандарту PoE 802.3af/at. Максимальный ток на один порт составляет 1А. Общий ток на всех портах не должен превышать 2А.

Напряжение на выходе ethernet портов 2-5 зависит от напряжения блока питания, которое подается на вход роутера. В комплект поставки входит блок питания с напряжением 24В, следовательно, на выходе будет напряжение 24В. Если на выходе ethernet портов нужно обеспечить напряжение 48В, то потребуется докупить блок питания на 48В.
Маршрутизатор MikroTik hEX PoE можно запитать по технологии PoE через первый LAN порт с напряжением 12-57 В. Для подачи питания через первый порт понадобится приобрести гигабитный PoE инжектор или POE блок питания.
Устройство предназначено для использования внутри помещения при температуре от -40°C до +70°С. Снизу корпуса есть монтажные отверстия для его установки на стену.
Операционная система RouterOS Level4, установленная в маршрутизаторе, имеет очень большой функционал. Она позволяет настроить ограничения скорости, запретить торренты и социальные сети, создать VPN сервер, поднять защищенный IPSec туннель, PPTP, PPPoE, L2TP, настроить хот-спот для кафе или гостиницы с показом рекламы, RADIUS сервер, Proxy сервер, FTP сервер и многое другое.
MikroTik hEX PoE (модель RB960PGS) подойдет тем, кому нужно запитать другие устройства по PoE. Его оптический SFP порт обеспечит высокую скорость передачи данных и защиту от грозы при прокладке оптоволоконного кабеля по улице.
Настройка роутера MikroTik hEX PoE (RB960PGS)
Для настройки роутера MikroTik hEX PoE (RB960PGS) воспользуйтесь инструкциями:
- Базовая настройка MikroTik →
- Настройка интернета →
- Настройка локальный сети LAN(+Bribge+DHCP) →
- Настройка WiFi 2.4ГГц и 5ГГц →
- Проброс портов →
- Настройка FireWall →
- Настройка VPN сервера L2TP →
- Настройка FastTrack Connection →
- Настройка CapsMan WiFi →
- Backup конфигурации →
- Настройка MikroTik IpSec VPN →
- Изменение MAC адреса →
- Сброс до заводских настроек →
- Строгий FireWall в MikroTik →
- Настройка MikroTik VPN IpSec →
- Блокировка сканера портов →
- Два провайдера, балансировка и автопереключение →
- Ограничение скорости →
- Настройка DNS сервера →
- Настройка DDNS MikroTik Cloud →
hEX PoE is a powerful five-port Gigabit Ethernet router with an SFP port capable of powering other devices.
Safety Warnings
Before you work on any equipment, be aware of the hazards involved with electrical circuitry, and be familiar with standard practices for preventing accidents.
Ultimate disposal of this product should be handled according to all national laws and regulations.
The Installation of the equipment must comply with local and national electrical codes.
This unit is intended to be installed in the rackmount. Please read the mounting instructions carefully before beginning installation. Failure to use the correct hardware or to follow the correct procedures could result in a hazardous situation to people and damage to the system.
This product is intended to be installed indoors. Keep this product away from water, fire, humidity or hot environments.
Use only the power supply and accessories approved by the manufacturer, and which can be found in the original packaging of this product.
Read the installation instructions before connecting the system to the power source.
We cannot guarantee that no accidents or damage will occur due to the improper use of the device. Please use this product with care and operate at your own risk!
In the case of device failure, please disconnect it from power. The fastest way to do so is by unplugging the power plug from the power outlet.
It is the customer’s responsibility to follow local country regulations, including operation within legal frequency channels, output power, cabling requirements, and Dynamic Frequency Selection (DFS) requirements. All Mikrotik devices must be professionally installed.
First use
- Choose your powering solution, please see the Powering section for possibilities.
- Connect your Internet cable to port 1 (labeled «Internet»), and local network computers to ports 2-5.
- Connect your direct input power jack if not using POE, to start up the device.
- If using POE please see section POE Adapter on how to connect.
- The device will boot up and after the short beep, the network will be available for connecting.
- Set your computer IP configuration to automatic (DHCP).
- Once connected to the network, open https://192.168.88.1
 in your web browser to start configuration, since there is no password by default, you will be logged in automatically (or, for some models, check user and wireless passwords on the sticker).
 - We recommend clicking the «Check for updates» button and updating your RouterOS software to the latest version to ensure the best performance and stability.
- Set up your password on the screen that loads.
Mounting
This device is designed for use indoors by placing it on the flat surface or mounting on the wall, mounting points are shown in the picture below, screws are not included in the package. Screws with size 4×25 mm fit nicely, depending on your wall structure you can use dowels 6×30 mm and 6 mm drill bit if needed.
When mounting on the wall, please ensure that the cable feed is pointing downwards. We recommend using Cat6 cable for our devices. The IP rating scale for this device is IPX0.
Warning! This equipment should be installed and operated with a minimum distance of 20 cm between the device and your body. The operation of this equipment in the residential environment could cause radio interference.
Powering
The device accepts power from the power jack or from the first Ethernet port (Passive PoE):
- Direct input power jack (5.5mm outside and 2mm inside, female, pin positive) accepts 12 — 57 V ⎓DC.
- The first Ethernet port accepts passive Power over Ethernet 12 — 57 V ⎓DC.
The power consumption of this device under maximum load with attachments is 59 W. Without attachments 6 W.
Power output
This device can supply PoE power to external devices from its Ethernet ports. This is convenient as you don’t need any additional PoE injectors to power other devices. The output voltage will be the same as the input voltage. The maximum power output of each Ethernet port in this mode is 1 A (the total maximum for all ports is 2 A). Once Power Output is enabled in RouterOS, the Ethernet LED adds red color to it (green means Ethernet link is made, red means power but no link, red and green both means there is link and power).
Booting process
RouterOS includes many configuration options in addition to what is described in this document. We suggest starting here to get yourself accustomed to the possibilities: https://mt.lv/help. In case an IP connection is not available, the Winbox tool (https://mt.lv/winbox) can be used to connect to the MAC address of the device from the LAN side (all access is blocked from the Internet port by default).
For recovery purposes, it is possible to boot the device from the network, see a section Reset button.
Extension Slots and Ports
- The device has five individual Ethernet ports, supporting automatic cross/straight cable correction (Auto MDI/X), so you can use either straight or cross-over cables for connecting to other network devices.
- 1G SFP port.
- USB type-A slot.
Please visit wiki pages for MikroTik SFP module compatibility table: https://wiki.mikrotik.com/wiki/MikroTik_SFP_module_compatibility_table
Buttons and jumpers
Reset button
The RouterBOOT reset button has the following functions. Press the button and apply the power, then:
- Release the button when green LED starts flashing, to reset RouterOS configuration to defaults.
- Release the button when the LED turns solid green to clear all configuration and bridge all interfaces.
- Release the button after LED is no longer lit (~20 seconds) to cause a device to look for Netinstall servers (required for reinstalling RouterOS over the network).
Regardless of the above option used, the system will load the backup RouterBOOT loader if the button is pressed before power is applied to the device. Useful for RouterBOOT debugging and recovery.
Connecting to a POE Adapter:
- Connect the Ethernet cable from the device to the POE port of the POE adapter.
- Connect an Ethernet cable from your LAN to the LAN port of the POE adapter, please mind arrows for data and power flow.
- Connect the power cord to the adapter, and then plug the power cord into a power outlet.
Accessories
The package includes the following accessories that come with the device:
Specifications
For more information about this product, specifications, and pictures please visit our web page: https://mikrotik.com/product/RB960PGS
Operating System Support
The device supports RouterOS software version 6. The specific factory-installed version number is indicated in the RouterOS menu /system resource. Other operating systems have not been tested.
To avoid pollution of the environment, please separate the device from household waste and dispose of it in a safe manner, such as in designated waste disposal sites. Familiarize yourself with the procedures for the proper transportation of the equipment to the designated disposal sites in your area.
Federal Communication Commission Interference Statement
![]()
This equipment has been tested and found to comply with the limits for a Class B digital device, pursuant to Part 15 of the FCC Rules. These limits are designed to provide reasonable protection against harmful interference in a residential installation.
This equipment generates, uses, and can radiate radio frequency energy and, if not installed and used in accordance with the instructions, may cause harmful interference to radio communications. However, there is no guarantee that interference will not occur in a particular installation. If this equipment does cause harmful interference to radio or television reception, which can be determined by turning the equipment off and on, the user is encouraged to try to correct the interference by one or more of the following measures:
- Reorient or relocate the receiving antenna.
- Increase the separation between the equipment and receiver.
- Connect the equipment into an outlet on a circuit different from that to which the receiver is connected.
- Consult the dealer or an experienced radio/TV technician for help.
FCC Caution: Any changes or modifications not expressly approved by the party responsible for compliance could void the user’s authority to operate this equipment.
This device complies with Part 15 of the FCC Rules. Operation is subject to the following two conditions: (1) This device may not cause harmful interference, and (2) this device must accept any interference received, including interference that may cause undesired operation.
Note: This unit was tested with shielded cables on the peripheral devices. Shielded cables must be used with the unit to ensure compliance.
Innovation, Science and Economic Development Canada
This device contains license-exempt transmitter(s)/receiver(s) that comply with Innovation, Science, and Economic Development Canada’s license-exempt RSS(s). Operation is subject to the following two conditions: (1) This device may not cause interference. (2) This device must accept any interference, including interference that may cause undesired operation of the device.
L’émetteur/récepteur exempt de licence contenu dans le présent appareil est conforme aux CNR d’Innovation, Sciences et Développement économique Canada applicables aux appareils radio exempts de licence. L’exploitation est autorisée aux deux conditions suivantes : 1) L’appareil ne doit pas produire de brouillage; 2) L’appareil doit accepter tout brouillage radioélectrique subi, même si le brouillage est susceptible d’en compromettre le fonctionnement.
This Class B digital apparatus complies with Canadian ICES-003.
Cet appareil numérique de la classe [B] est conforme à la norme NMB-003 du Canada.
CAN ICES-003 (B) / NMB-003 (B)
UKCA Marking
Eurasian Conformity Mark
Информация о дате изготовления устройства указана в конце серийного номера на его наклейке через дробь. Первая цифра означает номер года (последняя цифра года), две последующие означают номер недели.
Изготовитель: Mikrotikls SIA, Aizkraukles iela 23, Riga, LV-1006, Латвия, support@mikrotik.com. Сделано в Китае, Латвии или Литве. Cм. на упаковке.
Для получения подробных сведений о гарантийном обслуживании обратитесь к продавцу. Информация об импортерах продукции MikroTik в Российскую Федерацию: https://mikrotik.com/buy/europe/russia
Продукты MikroTik, которые поставляются в Евразийский таможенный союз, оцениваются с учетом соответствующих требований и помечены знаком EAC, как показано ниже:
Norma Oficial Mexicana
EFICIENCIA ENERGETICA CUMPLE CON LA NOM-029-ENER-2017.
La operacion de este equipo esta sujeta a las siguientes dos condiciones:
- Es posible que este equipo o dispositivo no cause interferencia perjudicial y.
- Este equipo debe aceptar cualquier interferencia, incluyendo la que pueda causar su operacion no deseada.
Fabricante: Mikrotikls SIA, Brivibas gatve 214i, Riga, LV-1039, Latvia.
País De Origen: Letonia; Lituania; China (Republica Popular); Estados Unidos De America; Mexico.
Por favor contacte a su distribuidor local para preguntas regionales específicas. La lista de importadores se puede encontrar en nuestra página de inicio – https://mikrotik.com/buy/latinamerica/mexico.
CE Declaration of Conformity
Manufacturer: Mikrotikls SIA, Brivibas gatve 214i Riga, Latvia, LV1039.
The full text of the EU Declaration of Conformity is available at the following internet address: https://mikrotik.com/products![]()
This equipment has been tested and found to comply with the limits for a Class B digital device, pursuant to Part 15 of the FCC Rules. These limits are designed to provide reasonable protection against harmful interference in a residential installation.
This equipment generates, uses, and can radiate radio frequency energy and, if not installed and used in accordance with the instructions, may cause harmful interference to radio communications. However, there is no guarantee that interference will not occur in a particular installation. If this equipment does cause harmful interference to radio or television reception, which can be determined by turning the equipment off and on, the user is encouraged to try to correct the interference by one or more of the following measures:
- Reorient or relocate the receiving antenna.
- Increase the separation between the equipment and receiver.
- Connect the equipment into an outlet on a circuit different from that to which the receiver is connected.
- Consult the dealer or an experienced radio/TV technician for help.
FCC Caution: Any changes or modifications not expressly approved by the party responsible for compliance could void the user’s authority to operate this equipment.
This device complies with Part 15 of the FCC Rules. Operation is subject to the following two conditions: (1) This device may not cause harmful interference, and (2) this device must accept any interference received, including interference that may cause undesired operation.
Note: This unit was tested with shielded cables on the peripheral devices. Shielded cables must be used with the unit to ensure compliance.
Innovation, Science and Economic Development Canada
This device contains license-exempt transmitter(s)/receiver(s) that comply with Innovation, Science, and Economic Development Canada’s license-exempt RSS(s). Operation is subject to the following two conditions: (1) This device may not cause interference. (2) This device must accept any interference, including interference that may cause undesired operation of the device.
L’émetteur/récepteur exempt de licence contenu dans le présent appareil est conforme aux CNR d’Innovation, Sciences et Développement économique Canada applicables aux appareils radio exempts de licence. L’exploitation est autorisée aux deux conditions suivantes : 1) L’appareil ne doit pas produire de brouillage; 2) L’appareil doit accepter tout brouillage radioélectrique subi, même si le brouillage est susceptible d’en compromettre le fonctionnement.
This Class B digital apparatus complies with Canadian ICES-003.
Cet appareil numérique de la classe [B] est conforme à la norme NMB-003 du Canada.
CAN ICES-003 (B) / NMB-003 (B)
UKCA Marking
Eurasian Conformity Mark
Информация о дате изготовления устройства указана в конце серийного номера на его наклейке через дробь. Первая цифра означает номер года (последняя цифра года), две последующие означают номер недели.
Изготовитель: Mikrotikls SIA, Aizkraukles iela 23, Riga, LV-1006, Латвия, support@mikrotik.com. Сделано в Китае, Латвии или Литве. Cм. на упаковке.
Для получения подробных сведений о гарантийном обслуживании обратитесь к продавцу. Информация об импортерах продукции MikroTik в Российскую Федерацию: https://mikrotik.com/buy/europe/russia
Продукты MikroTik, которые поставляются в Евразийский таможенный союз, оцениваются с учетом соответствующих требований и помечены знаком EAC, как показано ниже:
Norma Oficial Mexicana
EFICIENCIA ENERGETICA CUMPLE CON LA NOM-029-ENER-2017.
La operacion de este equipo esta sujeta a las siguientes dos condiciones:
- Es posible que este equipo o dispositivo no cause interferencia perjudicial y.
- Este equipo debe aceptar cualquier interferencia, incluyendo la que pueda causar su operacion no deseada.
Fabricante: Mikrotikls SIA, Brivibas gatve 214i, Riga, LV-1039, Latvia.
País De Origen: Letonia; Lituania; China (Republica Popular); Estados Unidos De America; Mexico.
Por favor contacte a su distribuidor local para preguntas regionales específicas. La lista de importadores se puede encontrar en nuestra página de inicio – https://mikrotik.com/buy/latinamerica/mexico.
CE Declaration of Conformity
Manufacturer: Mikrotikls SIA, Brivibas gatve 214i Riga, Latvia, LV1039.
The full text of the EU Declaration of Conformity is available at the following internet address: https://mikrotik.com/products
Information contained here is subject to change. Please visit the product page on www.mikrotik.com for the most up to date version of this document.
Количество беспроводных устройств стремительно растет, непрерывно повышая требования к пропускной способности сети и её покрытию.
На рынке сейчас присутствует достаточно решений для создания большой беспроводной сети как в небольшом частном доме, так и большом загородном коттедже, начиная с Luma, Eero, AmpliFi и заканчивая Mikrotik и Ubiquiti UniFi.
Одни решения отличаются простотой настроек и высокой ценой, другие предоставляют большие возможности, но требуют хорошей базы для настройки. В частности речь идет о продукции Mikrotik, которая отличается превосходным сочетанием высокой надежности, большого функционала и вполне демократичной стоимости. В то же время Mikrotik будет сложен в понимании настроек длvя подавляющего большинства домашних пользователей, что повышает уровень вхождения и сильно ограничивает реальное применение систем на базе Mikrotik в домашних условиях.
Несмотря на вышеописанный недостаток, однажды настроив Mikrotik, вы можете забыть о нем на месяцы, и даже годы. Оборудование Mikrotik способно работать по полгода и даже больше без перезагрузки, экономя важе время и нервы.
В рамках данной публикации мы покажем и расскажем, как создать и настроить на базе Mikrotik надежную сеть с отличным беспроводным покрытием для большой квартиры, частного дома или небольшого офиса с минимальным количеством проводов.
Выбор маршрутизатора
Для создания высокопроизводительной сети хорошо подойдёт маршрутизатор hEX PoE (модель RB960PGS). Наличие слота SFP позволяет подключиться к Интернет-провайдеру при помощи оптики, вдобавок устройство оснащено 5-ю гигабитными интерфейсами.
Если не используется SFP, подключение к Интернет можно осуществить при помощи первого сетевого интерфейса RJ-45, который также поддерживает PoE In. Оставшиеся 4 интерфейса поддерживают PoE Out, что позволяет запитать от них несколько точек доступа, но не более 4-х.
На практике практически всегда используется и проводная сеть, поэтому как минимум один порт надо будет выделить под проводную локальную сеть, итого в нашем распоряжении будет 3 порта PoE, чего достаточно для частного дома средних размеров.
Если предполагается домашнее использование — до расширения проводной сети подойдёт любой гигабитный коммутатор любого бренда. В то же время, если планируется использование VLAN и прочей экзотики, вам потребуется управляемый коммутатор, или как минимум Easy-Smart, советуем обратить внимание на управляемый коммутатор Mikrotik RB260GS.
В случае, когда требуется запитать больше 3-х точек доступа, можно докупить управляемый коммутатор с PoE — RB260GSP. Обратите внимание, покупка дополнительного PoE-коммутатора будет оправдана только в том случае, если вы будете запитывать от него 2-4 дополнительные точки доступа. В ином случае покупка коммутатора для питания всего одной точки будет лишней тратой денег.
Для сетей на 100 Мбит подойдут более доступные модели маршрутизаторов с PoE:
1. hEX PoE lite (RB750UPr2)
2. PowerBox (RB750P-PBr2)
Приобретать устройства с поддержкой PoE вовсе не обязательно, но в этом случае вам потребуется собрать небольшой коммуникационный ящик и разместить в нем все инжекторы и адаптеры.
Выбор точек доступа
В случае с точками доступа, выбор куда более широкий. Чуть ниже мы подобрали самые интересные предложения, причем отсортированы они в порядке возрастания цены.
|
Модель |
2.4 ГГц |
5 ГГц |
|
mAP lite (RBmAPL-2nD) |
MIMO 2×2 |
— |
|
wAP (RBwAP2nD) wAP (RBwAP2nD-BE) |
||
|
mAP (RBmAP2nD) |
||
|
cAP (RBcAP2nD) |
||
|
hAP ac lite (RB952Ui-5ac2nD) * |
MIMO 2×2 |
MIMO 1×1 |
|
GrooveA 52 (RBGrooveA-52HPn) |
MIMO 1×1** |
MIMO 1×1** |
|
wAP ac (RBwAPG-5HacT2HnD) wAP ac (RBwAPG-5HacT2HnD-BE) |
MIMO 2×2 |
MIMO 3×3 |
Обратите внимание, модель Groove 52 (RBGroove52HPn) не подойдёт, т.к. поставляется с 3-м уровнем лицензии, не позволяющим использовать режим AP.
Вероятно, у вас возник закономерный вопрос, что в этой таблице делает hAP ac lite? Всё просто. Во-первых у него есть поддержка PoE, что позволяет запитывать его удаленно. Во-вторых, на роутере предусмотрена возможность настенной установки. В-третьих, это, конечно же, поддержка 802.11ac и цена всего 45 у.е.
Благодаря совокупности этих параметров, RB952Ui-5ac2nD можно использовать как точку доступа Dual-Band с функционалом дополнительного коммутатора. Единственное ограничение — скорость сетевых интерфейсов в 100 Мбит.
Отдельно выделена точка GrooveA 52, т.к. она оснащена мощным радиомодулем и подойдёт для использования снаружи помещения, когда необходимо покрыть очень большую площадь. Обратите внимание, одновременно устройство может работать только в одном диапазоне — либо 2.4 ГГц, либо 5 ГГц. Выбор диапазона осуществляется в ручную в панели управления.
В таблице также отсутствуют OmniTIK и Metal, по причине соотношения цена/возможности. Эти решения больше подойдут для использования в коммерческих сетях.
Наиболее оптимальный вариант для построения сети дома — wAP, cAP и wAP ac. Причем wAP и wAP ac можно использовать снаружи помещения.
Старшая модель wAP ac оснащена гигабитным сетевым интерфейсом для обеспечения высокой пропускной способности, поддерживается одновременная работу в двух диапазонах с канальной скоростью 300 и 1300 Мбит для 2.4 и 5 ГГц соответственно.

Собственно на примере wAP и wAP ac в связке с коммутатором hEX PoE мы и будем рассматривать построение домашней беспроводной сети.
Подключение и настройка шлюза
hEX PoE будет выполнять роль главного маршрутизатора, обеспечивающего выход клиентов в интернет. Как и полагается, шлюз будет выдавать IP-адреса для остальных устройств, на самих же точках доступа DHCP-сервер будет отключен.
Подключаем устройство и логинимся в панель управления.

Процесс настройки будет рассматриваться на примере настроек по-умолчанию, чтобы максимально упростить процесс для начинающих пользователей Mikrotik.


Стандартная конфигурация нам вполне подойдёт, единственное что вам потребует так это настроит тип подключении к сети провайдера и выбрать порт ETH1 (витая пара) либо SFP (оптика)

Для удобства мы меняем IP устройства и настройки локальной сети на более привычные — 192.168.0.1/24.
Обратите внимание, пул DHCP мы намеренно подняли вверх, чего делать вовсе не обязательно. Лично мне проще в нижней части использовать статику и привязку MAC:IP, а в «верхней» части выдавать IP для остальных клиентов.
Обязательно поменяйте название устройства, в нашем случае это будет «GATEWAY» (шлюз), в дальнейшем при большом количестве устройств вам будет намного проще ориентироваться по названиям, чем по IP.

Применяем настройки. После этого Winbox станет недоступным, на некоторых ПК потребуется переподключиться к сети путем перетыкания кабеля, чтобы сетевая получила новый IP.

Правилом хорошего тона будет зайти в IP — DHCP Server — Networks и вручную добавить IP нашего маршрутизатора в качестве DNS-сервера для клиентов, получающих настройки по DHCP. Mikrotik имеет свой функционал DNS, поэтому использование провайдерского DNS на клиентах не имеет смысла.
К слову, тут же можно указать и NTP, сервер точного времени можно без труда поднять на самом Mikrotik. Если в статические записи DNS подменить time.windows.com на IP микротика, машины под управлением ОС Windows смогут брать точное время с главного шлюза без дополнительных настроек. Подробнее читайте в отдельной публикации, ссылка выше.

Не забываем обновить шлюз до последней версии RouterOS, в нашем случае это обновление с 6.36.1 до 6.38.1. Устройство перезагрузится для обновления.
Общая настройка шлюза завершена. Создание нового пользователя, смена пароля, отключение ненужных сервисов и прочие настройки защиты Mikrotik — тема для отдельной публикации, поэтому останавливаться на этом не будем.
На этом этапе можно подключать точки доступа к маршрутизатору.
Подключение точек доступа к маршрутизатору
Обе точки будут питаться посредством PoE от главного маршрутизатора. Такой подход позволит нам перегружать устройства программно на удалении, а также избавится от лишних проводов.
На практике подключение точек лучше осуществлять поэтапно, поскольку все wAP имеют открытую сеть и стандартный пароль.
Мы же подключим обе точки сразу, т.к. для опытного пользователя процесс занимает всего пару минут.

Обычная точка Доступа Mikrotik wAP без проблем получила питание по PoE, а вот для wAP ac пришлось в настройках порта выбрать режим PoE «forced on». Более подробно про приоритеты и настройку PoE Out в целом, вы можете прочесть в обзоре PowerBox.
Как видите, в режиме простоя wAP потребляет всего 1.1 Вт, а старший собрат wAP ac — 3.3 Вт.

В разделе IP — DHCP Server — Leases можно убедиться в том, что обе точки доступа получили IP-адрес.
Приступаем к следующему этапу настройки.
Подключение Mikrotik wAP
Процесс настройки обеих точек wAP осуществляется путем подключения к открытой беспроводной сети точки доступа. Для этих целей подойдет нетбук, ноутбук либо ПК с беспроводным адаптером. В нашем случае это будет нетбук.

Как видите, нетбук успешно определил все 3 сети. Почему три, а не две? Дело в том, что у wAP ac одна сеть на 2.4 ГГц, вторая на 5 ГГц.
MikroTik-5EDCC7 — наш Mikrotik wAP, сети MikroTik-7D550D и MikroTik-7D550E это Mikrotik wAP ac, что легко определить по названию сети (название отличается последним символом).
Настройку будем начинать с самой простой точки, это быстрее и позволит вам понять, как настраивать двухдиапазонную точку.

После подключения к беспроводной сети MikroTik-5EDCC7, Winbox обнаружит устройство со стандартным IP 192.168.88.1


Принимаем стандартную конфигурацию. Как видите, устройство работает в режиме маршрутизации, из-за чего, подключиться к нему через кабель не предоставляется возможным.

Переключаем точку в режим бриджа (Bridge = мост), это сделает устройство полностью прозрачным. Опцию «Adress Acquisition» выставляем в «Automatic», т.е. IP устройство будет получать от DHCP-сервера. При желании можно реализовать статик IP, но об этом чуть позже, мы реализуем его несколько иначе.
«Adress Source» следует указать «Any», иначе при выбору казалось бы логического «Ethernet», у устройства будет IP 0.0.0.0 и вы попросту не подключитесь к нему. Если всё сделано верно — устройство получит настройки сети.
Как и ранее, меняем название устройства.
Подключение Mikrotik wAP ac
Все вышеперечисленные действия повторяем для новой точки, а также каждой последующей, которая будет добавляться в сеть.


Если всё проделано правильно, в Winbox будут видные все три устройства.

И, конечно же, не забываем обновить RouterOS на всех устройствах сети.

Настройка беспроводной сети в Mikrotik wAP
Первой настроим точку доступа wAP.

В разделе Wireless — Interfaces открываем свойства беспроводного интерфейса.
Лично я сторонник «Advanced Mode» (расширенный режим), если количество опций вас пугает — можете использовать «Simple Mode». Переключение между режима осуществляется в любой момент в правой части окна с настройками.
На текущем окошке нас интересует «Freq. Usage…». После нажатия на данную кнопку у вас откроется новое окошко, в котором следует нажать «Start». Система начнет сканировать каналы и вы сможете посмотреть уровень использования каналов в режиме реального времени.
Как видите, 2442-2452 МГц используется, поэтому лучше всего работать в диапазоне 2412-2432 МГц. При этом не следует забывать, что при использовании широких каналов в 40 МГц, количество непересекающихся каналов равно 3-м.

При настройке беспроводного интерфейса я предпочитаю явно указывать 2GHz-only-N, что выставляет режим 802.11n. если же у вас есть старые устройства без поддержки нового стандарта — используйте смешанные режимы.
Ширину канала устанавливаем «20/40 Ce», можно также указывать «20/40 eC». Индекс eC и Ce указывают, куда необходимо расширять диапазон, по отношению к основному каналу. eC — расширение вниз, Ce — расширение вверх. Таким образом, если вы выбираете первый канал, расширять его можно только вверх, в случае с последним каналом ситуация обратная, его можно расширить только вниз.
SSID — название беспроводной сети. Если у вас есть точки доступа с поддержкой 5 ГГц, можно явно указать суффиксы 2G и 5G, что поможет различать диапазоны. Если этого не сделать, на клиенте вместо двух сетей в списке будет видна только одна, а подключение будет осуществляться согласно приоритетов адаптера (Prefer 2G/Prefer 5G).
WPS если не используется следует отключить.
«Frequency Mode» устанавливаем «regulatory-domain», а «Country» — «ukraine». Данная настройка позволит не нарушать региональные ограничения по использованию радиочастотного ресурса.
«WMM Support» можно выбрать «enabled». Это специальная QoS-надстройка, позволяющая повышать приоритет трафика мультимедиа.

Переходим на вкладку «Advanced». Для опции «Hw. Protection Mode» выбираем «rts cts». Если кратко, данная опция помогает избежать конфликтов, когда подключенные к точке клиенты не видят друг друга и не могут согласовать поочередность передачи данных.
Для «Adaptive Noise Immunity» устанавливаем «ap and client mode». Опять же, если кратко, данная опция позволяет активировать специальный алгоритм фильтрации шума, создаваемого точкой и/или клиентом, например, множественные переотражения сигнала от стен. Обратите внимание, опция будет работать только на адаптерах с чипами Atheros.

На вкладке HT проверьте параметры «Tx/Rx Chains», напротив которых везде должны быть установлены галочки. Если галочка не установлена на одном из каналов, адаптер не сможет использовать его во время работы.
Поскольку мы не меняли параметров мощности радиомодуля, будут действовать стандартные значения.

В данном случае нас интересуют исключительно HT20-x и HT40-x. По сути, это своего рода справочник по мощности для конкретного радиомодуля.
HT20 и HT40 указывают на ширину канала 20 и 40 МГц соответственно. Цифра в суффиксе — индекс скорости MCS для стандарта 802.11n. Чем выше цифра, тем больше скорость. Как видите, для больших скоростей используется меньшая мощность, и чем выше скорость, тем ниже мощность. Берите во внимание эти данные, если решитесь скорректировать мощность беспроводного модуля в ручном режиме.
На завершающем этапе переходим на вкладку «Security Profiles» (профили безопасности). В этом разделе требуется скорректировать профиль безопасности. Выбираем режим «dynamic keys», а также опции WPA2 и AES. Про WPA и TKIP можете забыть навсегда (не говоря уже про устаревший WEP), эти варианты защиты уже давно скомпрометировали себя и имеют «лазейки», позволяющие опытному злоумышленнику получить доступ к защищенной этим методом беспроводной сети.
Пароль сети вводится в поле «WPA2 Pre-Shared Key». На этом настройка первой точки завершена.
Настройка беспроводной сети в Mikrotik wAP ac
При настройке второй точки доступа делаем всё аналогично первой точке доступа.

Не забывайте, что необходимо проводить сканирование беспроводной сети для каждой точки, поскольку условия эфира могут меняться, в зависимости от места размещения. Если же вы хотите довериться автоматике — выбирайте канал «auto», Mikrotik вполне неплохо сам справляется с этой задачей.

Не забывайте указать для новой и каждой последующей точки точно такой же SSID, как и на первом устройстве. Делать это необходимо для автоматического роуминга клиентов между AP.
Рабочую частоту можно указывать одинаковую, но только в том случае, если точки доступа слабо пересекаются. В противном случае, точки будут делить эфир между собой, что негативно скажется на скорости при одновременной работе. Лучше всего использовать принцип «шахматной доски», т.е. чередовать каналы так, чтобы они не пересекались вообще.
В случае с точками доступа Dual-Band, в списке Wireless Interfaces будет 2 интерфейса, настраивается каждый по отдельности.

Принцип тот же, сканируем диапазон и выбираем оптимальную частоту. Если у вас диапазон 5745-5805 чист, рекомендуем использовать его. В нашем случае он уже «забит» местными провайдерами.
К слову, для опытным администраторов будет интересен speсtral-scan и spectral-history. Работают оба инструмента через терминал.


Для вызова используются команды:
/interface wireless spectral-scan
/interface wireless spectral-history
С каналами и частотами определились.

Для диапазона 5 ГГц указываем суффикс 5G, делать это вовсе не обязательно, о чем уже говорилось ранее.
Ширина канала по-умолчанию будет предлагаться 20/40 МГц, но мы то знаем, что 802.11ac может использовать каналы шириной 80 МГц и именно на них он обеспечивает высокую скорость.
Для каналов на 80 МГц используется надстройка eCee в разных комбинациях, всего их 4, т.к. канал на 80 МГц объединяет 4 канала по 20 МГц. Логика выбора та же, что и для 2.4 ГГц.

Выполняем настройки аналогично тем, что делались для предыдущей точки и диапазона 2.4 ГГц. Не забывайте проверить Chains и настроить параметры безопасности (профиль).
Нюансы роуминга на Mikrotik
В принципе, на этом можно было бы завершить краткую инструкцию, но есть еще один нюанс.

На практике довольно часто бывают случаи, когда беспроводные сети пересекаются. В таких случаях клиент может упорно висеть на точке со слабом сигналом, даже при том, что у него «под носом» находится точка с отличным уровнем сигнала.
Собственно пример такого случая на скриншоте выше. Слева мы видим, что телефон подключен к сети 5 ГГц с хорошим уровнем сигнала. После перемещения в другую зону, смартфон по прежнему остается висеть на сети 5 ГГц, при том, что канальная скорость упала до 87 Мбит, а рядом имеется сеть 2.4 ГГц с отличным сигналом.
Что делать в таком случае? Можно переключать сеть вручную, если у сетей разные названия, но можно также использовать «напильник» и «костыли».

Первым делом на всех беспроводных интерфейсах необходимо отключить опцию «Default Authenticate». Необходимо это для того, чтобы использовать функционал ACL.

Во вкладке Access List (раздел все тот же, Wireless) создаем 2 правила.
Первое правило. Задаем диапазон уровня сигнала -75…120 дБм, устанавливаем опции Authentication и Forward. Данное правило будет разрешать подключение для клиентов, у которых уровень сигнала не менее -75 дБм.
Второе правило. Задаем диапазон -120…-76 дБм, отключаем опции Authentication и Forward. Данное правило будет отключать клиентов, у которых уровень сигнала опустился ниже -76 дБм.
Опция Authentication разрешает подключение, следовательно, её отсутствие подключение запрещает. Опция Forward разрешает обмен данными между станциями/клиентами. Форвард может быть полезен в защищенной домашней сети, а вот в публичной открытой сети обмен данными между клиентами в обязательном порядке надо запрещать в целях безопасности.
При желании, здесь же можно настроить правила по дням недели и времени. Для этих целей ниже под спойлером Time есть необходимые параметры.

После того как правила ACL созданы, в таблице регистраций (Registration) вы можете увидеть список авторизованных клиентов. Причем, в комментарии к каждому клиенту будет указан комментарий из правила ACL (если он задан), что очень удобно.

Проверяем работу на смартфоне. При ухудшении уровня сигнала до -75 дБм, устройство еще держится на старой точке. Как только сигнал ухудшается до -76 дБм, точка автоматически отключает клиента, после чего клиент подключается к самой сильной точке.

Впрочем, данный метод не лишен недостатков. Всё дело в том, что точки осуществляют принудительное отключение клиента, из-за чего у конечного клиента возникает кратковременный обрыв связи. В лучшем случае это ~2 секунды. Многое зависит от клиентского оборудования.
Уровень сигнала в -75 дБм я задал исключительно для примера, это более рекомендуемый уровень, нежели универсальный параметр «на любой случай». На практике иногда приходится использовать -80 дБм и ниже. В любом случае, значение подбирается исключительно экспериментальным методом прямо на месте, исходя из конкретного покрытия и чувствительности клиентского оборудования.
В заключение
Конечно, вариантов реализации домашней беспроводной сети на Mikrotik множество, начиная с ручной настройки и заканчивая использованием CAPsMAN и даже Mesh.
Нами описан вариант полностью ручной настройки для того, чтобы конечный пользователь понимал «как это работает», к тому же такой вариант не требует глубоких познаний. В то же время, данная конфигурация позволяет создать надежную беспроводную сеть, которая сможет стабильно работать без вашего вмешательства.
Из недостатков стоит отметить необходимость раздельной настройки всех устройств, что занимает чуть больше времени, нежели при использовании CAPsMAN. При использовании нескольких точек такой вариант вполне пригоден и предоставляет хорошую гибкость.
Часть вторая: Домашняя беспроводная сеть на Mikrotik. Часть вторая: используем возможности CAPsMAN v2
Используемый материал
hEX PoE
Quick Setup Guide and Warranty Information
The hEX PoE (product code RB960PGS) is a router with five Gigabit Ethernet ports. It has one USB 2.0 port, and supports PoE power output to ports 2-5 (1A maximum per port, 2A total maximum).
First use
Connect your WAN cable to port 1, and LAN computers to ports 2-5
Set LAN computer IP configuration to automatic (DHCP)
Router default IP address from LAN is 192.168.88.1
Username is admin, there is no password
Powering
The board accepts powering from the power jack or from the first Ethernet port (Passive PoE):
direct-input power jack (5.5mm outside and 2mm inside, female, pin positive plug) accepts 11-57V DC
first Ethernet port accepts 802.3at/af/passive PoE input 11-57V DC
The power consumption of this device under maximum load is up to 8W
Power output
This device can supply PoE power to external devices from its Ethernet ports. This is convenient as you don’t need any additional PoE injectors to power other devices. The output voltage will be the same as input voltage. Maximum power output of each Ethernet port in this mode is 1A (total maximum for all ports is 2A). To reach maximum output power it is recommended to use a high voltage adapter together with the included PoE injector to power the hEX unit (48/56V), because 802.3af/at input is limited to 30W and the hEX will consume up to 8W by itself. Once Power Output is enabled in RouterOS, the Ethernet LED adds red color to it (green means Ethernet link is made, red means power but no link, red and green both means there is link and power).
Booting process
This device doesn’t come fitted with a Serial Port connector, so initial connection has to be done via the Ethernet cable, using the MikroTik Winbox utility. Winbox should be used to connect to the default IP address of 192.168.88.1 with the username admin and no password.
In case IP connection is not available, Winbox can also be used to connect to the MAC address of the device. More information here: http://wiki.mikrotik.com/wiki/First_time_startup
In case you wish to boot the device from network, for example to use MikroTik Netinstall, hold the RESET button of the device when starting it until the LED light turns off, and the device will start to look for Netinstall servers.
Extension Slots and Ports
Five individual Gigabit Ethernet ports, supporting automatic cross/straight cable correction (Auto MDI/X), so you can use either straight or cross-over cables for connecting to other network devices.