From DD-WRT Wiki
Jump to: navigation, search
Wiki Path: DD-WRT Wiki Main / Tutorials / Linking Routers / Client Mode

The secondary (client) router is unbridged in a different subnet (with NAT), while a Client Bridge is the same subnet as the host.
Contents
- 1 Introduction
- 2 Client (Station) Mode Setup
- 3 Client Restrictions
- 4 Troubleshooting
[edit] Introduction
This mode is NOT for WIRED connections between two routers, like an Access Point. It is a wireless connection between two routers only, usually to the primary gateway router. A Client Mode router connects to a Wireless Access Point (WAP) wireless connection as the WAN interface, and shares the internet connection only to the LAN ports, or a separate WAP for multi-radio routers. It is not seen as a WAP, nor accepts wireless connections by other client devices.
The primary (host) router is not required to be running DD-WRT firmware. The primary and secondary (DD-WRT Client Mode) routers must be on separate subnets, and NAT is used between them. Thus, when port forwarding is needed it must be configured at both routers — not just on the host router.
A Client Mode router uses its own DHCP server for IP Address, Gateway, and DNS server to connected devices. To have computers connected to both routers (main and secondary) and co-exist in the same subnet, set up DD-WRT as a Client Bridge, Repeater Bridge or use WDS. Further explanation of bridging modes is at Linking Routers.
- If using a multi-band router, do not set more than one band to CB. The other radio(s) would normally be set as AP. For example, the 2.4GHz radio can a CB while the 5GHz is an AP, or vice versa.
[edit] Client (Station) Mode Setup
The secondary client router will be on a different subnet than the primary host router. For example, if the host router IP address is 192.168.1.1, configure the client router to 192.168.2.1.
- These instructions assume a reset router. Broadcom routers: read the Peacock thread
- Connect a cable from your computer to the LAN port on your router.
- (Optional) Set your computer to a static IP address (e.g. 192.168.1.7, subnet 255.255.255.0)
- Connect to the DD-WRT GUI at 192.168.1.1 in a browser
- Set a username and password — if not asked for this, do a proper reset!
- Go to Wireless: these settings must match the primary host router — Check spelling and case!
- In Wireless->Basic Settings and change the Wireless Mode to «Client»
- Set the Wireless Network Name (SSID) to exactly match the primary router. Click Save (not Apply)
- If multiple routers broadcast the same SSID, to connect to a specific one (i.e. the primary router, instead of a repeater), enable MAC Filtering on the Wireless Tab, and add the specific device’s MAC Address.
- MAC Address can be found on the «Site Survey» page, linked from the Wireless tab in Status
- Wireless Security: set the Security Mode and other information same as primary router. Click Save (not Apply)
- (Optional) If available, in Wireless tab (or under Advanced), set (or disable) the Ack Timing in meters
- Go to Setup->Basic Setup: if needed, change Connection Type to Static IP from «Automatic Configuration — DHCP»
- Static IP allows easier access remote GUI, SSH, or telnet access is enabled under Administration
- If the client router requires external management, go to Setup->Basic Setup, set the WAN port protocol as needed and enter info provided by your ISP. This is the setting that is bonded to the wireless interface.
- In Network Setup set the Local IP Address to a different subnet from the primary host router (e.g. 192.168.2.1)
- Set the Gateway address to the primary host router gateway or internet will not work (e.g. 192.168.1.1)
- The device should be in GATEWAY Advanced Routing mode, not ROUTER, or Masquerade/NAT does not happen.
- (Optional) Set your local DNS to the IP address of your client router
- (Optional) Set Static DNS servers in Network Address Server Settings (DHCP) if not provided or wanted from WAN
- (Recommended) Change the Time Zone and DST settings as needed.
- (Optional) Set a «Server IP/Name» in Time Setting section for NTP (blank uses a default server)
- Click Save (not Apply)
- (Optional) In Security->Firewall, disable SPI Firewall if security between AP & Client is not needed
- Click Apply, then change the computer back to auto IP/DNS if needed (replug the LAN cable if not working)
- Let the client router reboot and connect to the host, then configure on the new Client IP address as needed
- If not working, unplug the router for 30sec and retry
[edit] Client Restrictions
To allow internet access but prevent 192.168.1.x clients from seeing each other on br0, use this firewall script (iptables):
iptables -I FORWARD -i br0 -d 192.168.1.0/24 -j DROP
[edit] Troubleshooting
If the preceding instructions do not work, it is usually an encryption or password problem. Disable encryption on the primary router and retry the setup. Using proper encryption and the correct case-sensitive password is key. Do a reset and start over. Note: WPA2-AES (aka CCMP) is required for 802.11N (and newer) devices.
by kczon.com
DD-WRT firmware supports Wireless Client Mode which enable your router into fully capableWireless Adapter. Client mode is just wireless connection between two routers. You can connect your router to the another Wireless Network or to the Hotspot. You can also share your android phone data connection to your home network on multiple devices which are not capable to connect via wi-fi.
Normally I used Client Mode on DD-WRT when my ISP shutdown for some days. I could connect my android device to my home network and share 3G connection to the multiple PC which are connected to the router via LAN port.
Here I’m going to show you today, how to set up Client Mode on DD-WRT Router in simple steps!, It is a quite simple method that by change Wireless Mode of your DD-WRT Router.
How to Use DD-WRT Router as Wireless Adapter – Client Mode
Here, Primary Router is Source Router or Main Router.
You need to go first
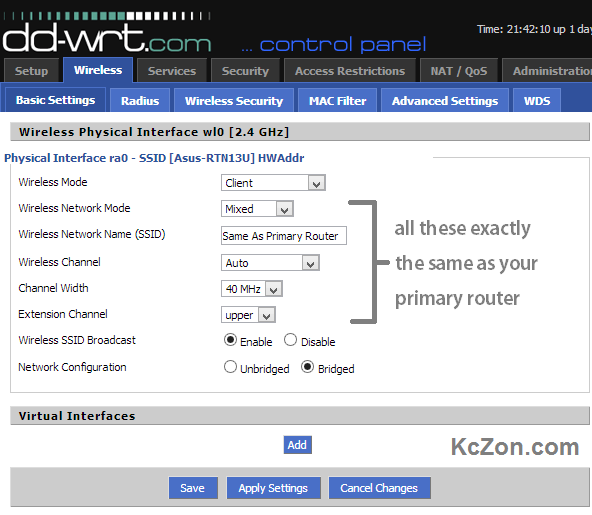
1. Wireless > Basic Settings > Wireless Physical Interface
Change Wireless Mode to the Client Mode.
2. On the Same tab > Set all these following options exactly the same as your primary router
- Wireless Network Mode
- Wireless Network Name (SSID)
- Wireless Channel
- Channel Width
- Extension Channel
3. Now navigate to the Wireless Security on the same Wireless tab.
Set all these following options exactly the same as your primary router
- Security Mode
- WPA Algorithms
- WPA Shared Key

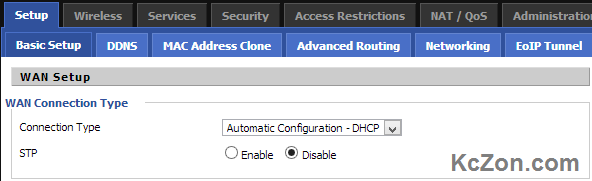
4. Now navigate to the Setup > Basic Setup > WAN Setup > WAN Connection Type
Set Connection Type to the Automatic Configuration – DHCP
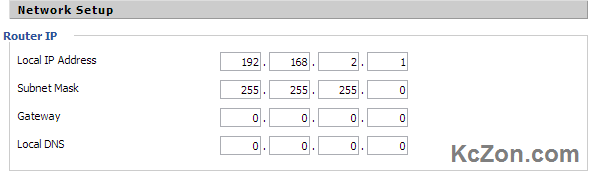
5. On the Same tab in the Network Setup > Router IP
Set the Local IP Address to 192.168.2.1 (Your Client subnet must differ from the Primary Router subnet).
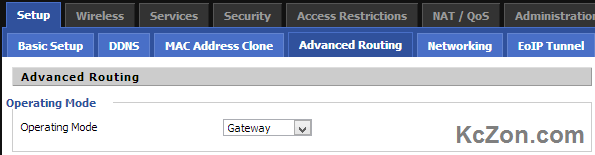
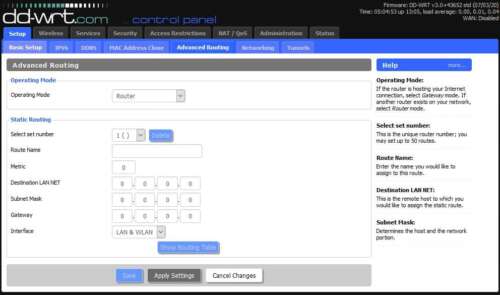
6. Now navigate to the Advanced Routing on the same Setup tab.
Change Operating Mode to the Gateway Mode instead of Router Mode.
7. Apply all Settings and Reboot the Router.
Now you can able to use DD-WRT Router as Wireless Adapter.
DD WRT — это прошивка для маршрутизаторов, созданная на основе Unix. Она используется для моделей, работающих на процессорах BroadCom, Atheros, Xscale и PowerPC, и расширяет их стандартный функционал. Опытному пользователю, которому нужно создать и настроить локальную сеть, почти всегда не хватает обычных настроек роутера для реализации всех задач, потому эта прошивка отлично подойдёт тем, кому нужная тонкая настройка функций и параметров домашней сети.

Установка прошивки позволяет расширить возможности маршрутизатора
Возможности прошивки
Помимо обычных настроек, предлагаемых официальным программным обеспечением роутера, DD WRT обеспечивает следующий функционал:
- доступ по Telnet и SSH;
- настройка планировщика задач Cron;
- удалённый запуск (Wake-on-Lan);
- настройка Samba;
- виртуальные точки Wi-Fi;
- PPTP, VPN — сервер и клиент;
- другие варианты гибкой настройки роутера.
Порядок настройки маршрутизатора с DD-WRT
Для открытия страницы настроек маршрутизатора, прошитого DD WRT, нужно настроить автоматическое назначение IP и других значений на сетевом адаптере ПК, с которого будете настраивать. Затем нужно зайти в настройку роутера по IP, изначально указанному в инструкции. Здесь система предложит вам поменять админские логин и пароль на более надёжные. Придумайте новые данные для входа, введите и запомните их — они ещё не раз пригодятся при работе с другими функциями роутера.
При желании можно поменять язык пользовательского интерфейса. Дальнейшие инструкции мы приводим на примере русского. На странице «Administration» — «Management» нужно найти пункт «Enable Info Site» и поставить метку Disabled. Здесь же в пункте Language Selection выбрать русский язык. Нажать Save.

После этого начинается непосредственно настройка.
Статический IP
- На вкладке «Установка» — «Основные установки» выбрать «Тип соединения» — «Статический IP».
- Внести IP и другие данные, предоставленные поставщиком услуг.
- Снять отметки в пунктах «Использование DNSMasq для DHCP» и «… для DNS». Сохранить параметры.
- Перейти на вкладку «Службы», отключить «DNSMasq». Сохранить параметры.

Маршрутизация
Далее — настройка маршрутизации:
- Перейти на страницу «Установка» — «Маршруты».
- Назначить название и номер маршрута (своё для каждой из созданных подсетей).
- «Сеть назначения» — 172.17.0.0 (или ваш диапазон подсети).
- «Маска подсети» — 255.255.0.0
- «Шлюз» — IP-шлюза, выданный провайдером.
- «Интерфейс» — WAN.
- Сохранить введённые значения, повторить действия для создания следующего маршрута.

Подключение по VPN (PPTP)
- Открыть вкладку «Службы» — «PPTP».
- Включить «Опции клиента PPTP».
- «IP или имя DNS-сервера» — ввести цифровой или буквенный адрес.
- «MPPE-шифрование» — пустое.
- Пользовательское имя и пароль — из договора.
- Сохранить.
")
Подключение PPPoE
В DD WRT есть некоторые сложности с реализацией протокола PPPoE, поэтому понадобится прописать некоторые параметры вручную:
- На вкладке «Службы» — «PPTP» отключить «Опции клиента PPTP».
- На вкладке «Установка» — «Основные установки» выбрать тип подключения «PPPoE».
- Логин-пароль взять из договора.
- «Имя службы» —
- «Статический DNS1» — 172.17.0.2.
- Снять отметки напротив «DNSMasq для DHCP» и «DNSMasq для DNS».
- Сохранить.

Чтобы внешняя и локальная сети роутера под DD WRT корректно работали одновременно, необходимо настроить PPPoE Dual Access. Это делается в виде текстовых команд:
- Зайти на страницу «Тех. обслуживание» — «Команды».
- В текстовое поле ввести (vlan2 — имя интерфейса, выделенного для локалки):
ifconfig vlan2 [ip-адрес] netmask [маска подсети] up
route add -net 172.17.0.0 netmask 255.255.0.0 gw [адрес шлюза]
Повторить для 172.18.0.0 и 172.24.0.0
Нажать «Сохранить параметры запуска».
- В текстовое поле «Команды» ввести:
iptables -t nat -A POSTROUTING -o vlan2 -j MASQUERADE
iptables -t nat -A POSTROUTING -o vlan2 -j SNAT —t WAN_IP
Далее — «Сохранить брандмауэр».

- После перезагрузки устройство соединится по PPPoE.
Сеть Wi-Fi
Последний штрих — настройка вай-фай-сети:
- Вкладка «Wi-Fi» — «Основные настройки».
- Тип беспроводной сети — Точка доступа.
Режим беспроводной сети — Смешанный.
Ширина канала — 20 Мгц.
SSID передаётся в эфир — Включить.
Конфигурация сети — В мосте.

- Чтобы назначить пароль на Wi-Fi-сеть, нужно перейти на вкладку «Безопасность», выбрать Режим безопасности — WPA Personal и ввести новый ключ в «Общий ключ WPA».
- Сохранить параметры и перезагрузить роутер.

Заключение
Опытному пользователю, которого не удовлетворяют стандартные функции роутера для удобной работы домашней сети, мы предлагаем попробовать поработать с роутерами, прошитыми DD WRT. Широкий функционал и правильная настройка этой прошивки позволит вам использовать функции маршрутизатора гораздо шире, чем со стандартным ПО. Попробуйте наше пошаговое руководство по настройке DD WRT и поделитесь своим результатом в комментариях. Там же можно задать нам вопросы по теме статьи.
Режим Client Bridged позволяет настроить ddwrt-роутер на приём (а не на раздачу) интернета через wifi (например, от другого роутера). Таким образом, ваш роутер можно заставить работать, будто бы он просто беспроводной адаптер.
Основные настройки:
- Wireless — Mode — Client Bridge
- WAN Connection Type — Disabled
- Указать SSID раздающего роутера, ключи безопасности и пр.
- Нажать Site_Survey, выбрать свою первую wifi сеть — нажать Join
- DHCP Server — Disabled (временно для доступа к web конфигуратору на компе выставляем ручной айпи — 192.168.1.10)
Network Setup:
- IP этого второго роутера должен быть в подсети первого роутера — 192.168.1.2
- Gateway (IP первого роутера) — 192.168.1.1
- Галочку на WAN Port — Assign WAN Port to Switch
- Advanced Routing — Operating Mode — Routing.
- Dynamic Routing— Interface — Disabled
- Security — Firewall — Сначала при включённом SPI Firewall, выключить все галочки кроме «Filter Multicast«, применить сохранить. Потом отключить и SPI Firewall. Применить , сохранить.
вернуть на компе настройки на автоматическое получение IP.
Первый роутер — раздающий инет. Второй — ddwrt-шный, получающий. Копаемся, естественно, в настройках второго.
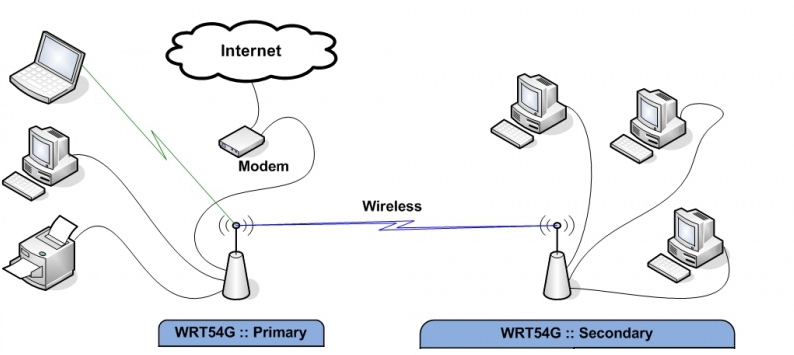
I have a main (primary) router with the Internet connection in the living room. And I have two devices in the basement. How I make them connect to the Internet is a problem.
Here I use secondary router wireless connect to the primary router. And two devices wired to connect to the secondary router.

I don’t need wireless connections to the Secondary router. I also want to make all these devices in the same sub-network. So I choose Client Bridge mode.
Based on the wiki page from DD-WRT.
Only use this or Repeater Bridge mode if all of the others are unsuitable: WDS, Client, Repeater, or AP.
Client Bridge will never be as stable as any of those modes. It is by design a hack and not a true transparent bridge like WDS. It will cause connection problems for more than a single client. See Linking Routers for a description of each of the modes.
Client Bridge (CB) extends a wired LAN using a wireless connection, as opposed to an Access Point that extends the Wireless LAN (WLAN) using a wired connection. CB is a wireless connection (NOT wired) between two routers only. All devices connections, besides the primary router, MUST be wired to the CB router.
CB is the last choice for me.
Here is my basic information.
Computer: Acer AspireOne ZG5, Windows XP, NIC set to auto retrieve the IP address.
Primary Router: D-Link DIR-880L, Hardware version A2, Firmware v1.20, Regular settings.
Router LAN IP: 192.168.1.1, DHCP range to 192.168.1.199.
Wireless: 2.4GHz SSID: dlink-2, 802.11 g/n, Channel width: Auto 20/40 MHz
Secondary Router: Buffalo WZR-HP G300NH, DD-WRT firmware v3.0-r43652 std (07/03/20)
How to config the Secondary Router?
Most important is the setup for the Secondary router. Before I start, do the HARD reset on it.
- Connect a cable from my computer to the LAN port just next to the WAN port on my router.
- Set my browser to 192.168.11.1, and open the dd-wrt GUI. (Because the dd-wrt on Buffalo use 192.168.11.1 as the router IP.)
- If asked for the password and username, just follow the guide to change it.
- Go to the Setup >> Basic Setup, change Local IP Adress to 192.168.1.1, SAVE and Apply. Restart the Router.
- Set my browser to 192.168.1.1, and open the dd-wrt GUI.
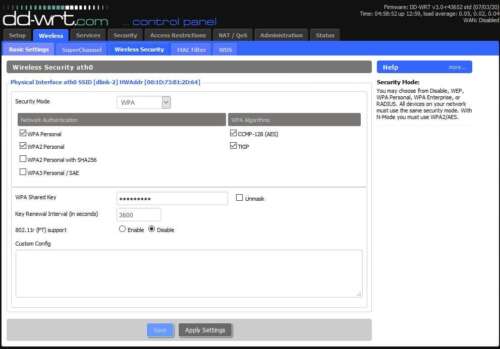
- FIRST, go to Wireless->Wireless Security and set the security type and key (dlink-2) from the primary router.
- Click SAVE, and then APPLY.
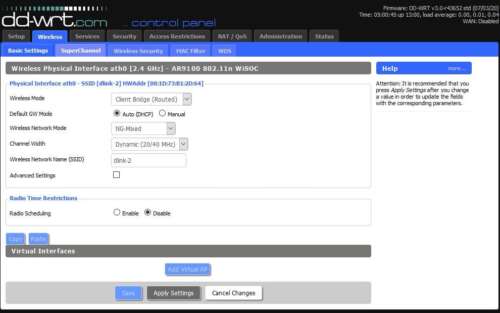
- Go to the Wireless->Basic Settings page and change the wireless mode to Client Bridge(Routed).
- The wireless network mode (NG-Mixed), channel (Dynamic(20/40 MHz), and encryption match the primary router settings.
- Set the wireless network name exactly the same as your primary router.
- Click SAVE, and then APPLY.
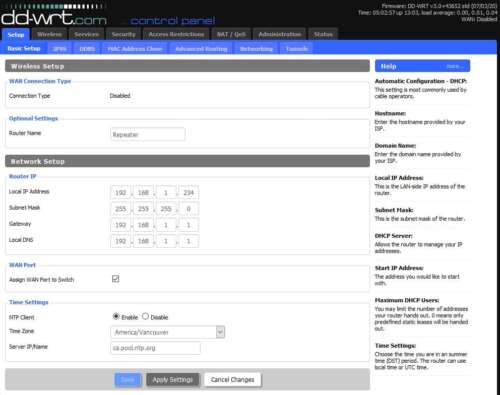
- Go to Setup->Basic Setup and enter a router Local IP address e.g. 192.168.1.234 because my primary router is on that subnet. Client Bridge subnet must match the primary router. The subnet mask is usually 255.255.255.0.
- Set the Gateway IP to your primary router, usually 192.168.1.1
- Set the Local DNS to 192.168.1.1
- Check Assign Wan port to a switch
- Set the Timezone and DST appropriately (America/Vancouver, ca.pool.ntp.org)
- Click SAVE, and then APPLY.
- Go to the new Client Bridge IP address in the browser e.g. 192.168.1.234
- Go to Security->Firewall: under Block Wan Requests uncheck all but “Filter Multicast”
- Disable SPI Firewall
- Click Save, and then Apply.
- Go to Setup->Advanced Routing: change the Operating Mode from Gateway to Router.
- Click SAVE, and then APPLY
- Reboot the router.
Here are some screenshots:
PS:
About my two devices connected to the Secondary Router. They don’t have wireless parts, and I want to use them in the basement. One is the MagicJack VOIP device. The other one is the Proxmox VE machine, which hosted five VMs.