Рано или поздно системные администраторы задаются вопросом о децентрализованном хранении информации или хотя бы об объединении нескольких существующих файловых серверов в единый. Параллельно этому поднимается вопрос о безопасности хранимой информации. Относительно простым, менее затратным и популярным среди администраторов AD (Active Directory) является использование DFS. Рассмотрим что это и как настроить.
DFS — Distributed File System — распределенная файловая система. Является продуктом компании Microsoft, предназначенный для упрощения доступа пользователей к файлам. Что примечательно, файлы могут быть разнесены территориально.
Выделяют два типа DFS:
1. Namespace DFS (Пространство имен DFS). Данный тип реализует виртуальное дерево, которое объединяет общие каталоги сети в единое пространство имен. Существует возможность настройки нескольких пространств имен.
2. Replication DFS (Репликация DFS) — репликация уже существующего каталога с отслеживанием содержимого и внесенных изменений.
Установка (DFS Installation)
Сразу заострим внимание, что установку, в рамках данного примера, будем выполнять на уже настроенный контроллер домена.
Открываем диспетчер серверов. В основной части окна кликаем по «Добавить роли и компоненты»:

В новом окне переходим к пункту «Тип установки», выбираем параметр «Установка ролей и компонентов», нажимаем кнопку «Далее»:

В обновленном окне выбираем текущий сервер и кликаем по кнопке «Далее»:

Следующим шагом, в списке доступных ролей находим «Файловые службы и службы хранилища» и раскрываем список, в котором необходимо отыскать «Файловые службы и службы iSCSI». Также раскрываем список параметров. Отмечаем галочками «Пространства имен DFS» и «Репликация DFS». В появившемся окне кликаем «Добавить компоненты». Нажимаем кнопку «Далее» несколько раз и дожидаемся окончания установки:

Создание пространства имен DFS
Перед тем, как приступить к созданию пространства имен DFS, необходимо создать хотя бы одну сетевую директорию на любом из серверов входящих в домен. В нашем случае будем использовать директорию созданную на том же контроллере домена.
Для того чтобы папка стала доступна из сети, кликаем по ней правой кнопкой мыши, в контекстном меню выбираем «Поделиться», затем «Отдельные люди»:

В поле ввода указываем «Пользователи домена», нажимаем кнопку «Добавить», затем «Поделиться»:

Общий доступ к папке готов. Кликаем по кнопке «Готово»:

Теперь сервер доступен по пути:
WINSERVER2019net_share
Создадим пространство имен DFS.
Для этого в меню «Пуск» выбираем «Средства администрирования Windows». Также можно через Панель управления ➝ Система и безопасность ➝ Администрирование.
В открывшемся окне, выбираем «Управление DFS»:

В новом окне «Управление DFS», в правой части кликаем по «Новое пространство имен …»:

В окне мастера указываем имя сервера. Его можно отыскать как в окне, которое откроется при клике по кнопке «Обзор», так и в свойствах системы на вкладке «Имя компьютера». Нажимаем «Далее»:

Следующим шагом указываем имя пространства имен. В нашем случае, пусть будет «MyDFS». Нажимаем кнопку «Изменить настройки…». В новом окне следует обратить внимание на строку «Локальный путь общей папки», при необходимости измените его. В том же окне установим переключатель на значение «Использовать пользовательские разрешения» и кликаем кнопку «Настроить»:

В открывшемся окне разрешаем полный доступ для всех и нажимаем кнопку «OK»:

Окно изменения настроек закрываем кликом по кнопке «OK», в окне мастера нажимаем кнопку «Далее»:

На новом этапе выбора типа пространства имен устанавливаем переключатель на значение «Доменное пространство имен», нажимаем кнопку «Далее».
Внимательно просматриваем настройки. Все устраивает — нажимаем «Создать»:

В случае успеха мастер покажет следующее окно:

Нажимаем кнопку «Закрыть».
Добавляем новый каталог в существующее пространство имен
Смысла в проделанном выше нет, если не добавить каталоги к уже существующему пространству имен. В примере процесс будет выполнен на том же сервере, однако, метод применим ко всем серверам в домене.
В окне управления DFS, в левой его части, разворачиваем дерево управления DFS до существующего, кликаем по необходимому. В правой части окна, в разделе действий, выбираем «Создать папку…»:

В открывшемся окне «Создание папки» указываем имя, в нашем случае «Test» и нажимаем кнопку «Добавить»:

В новом окне необходимо добавить путь к существующей сетевой папке. Список доступных каталогов можно посмотреть кликнув по кнопк «Обзор…». По окончании, нажимаем «OK»:

Результат будет таким:

Нажимаем «OK».
Доступ к DFS можно получить из любой адресной строки (Пуск->Выполнить, или из адресной строки любой папки) по шаблону:
<доменное_имя_сервера><имя_пространства_имен_DFS>
Например:
laa.testMyDFS
Результат таков:

Настройка DFS-репликации
Для выполнения репликации данных необходимо добавить второй сервер в этот же домен и установить на нем роль сервера «Репликация DFS» с помощью диспетчера серверов:

На этом же сервере создаем папку и разрешаем общий доступ к ней. В эту папку будут реплицироваться данные из директории, расположенной на сервере контроллера домена:

При открытии доступа и позже, в меню свойств папки можно увидеть сетевой путь до каталога:

Возвращаемся к контроллеру домена и развернутому на нем пространству имен DFS. Открываем уже знакомое из примеров выше окно «Управление DFS». В левой части окна, разворачиваем дерево до созданного пространства имен. В правой части окна выбираем «Добавить конечный объект папки…». В новом окне вводим адрес до общего каталога на другом сервер (который создали ранее). Нажимаем кнопку «OK»:

Система задаст вопрос желании создать группу репликации. Нажимаем кнопку «Да»:

Дожидаемся окончания хода выполнения. Итогом будет открытое окно «Мастера репликации папок». Необходимо проверить имя группы репликации, а также имя каталога, который будет реплицирован. Переходим к следующему шагу кликнув по кнопке «Далее»:

На данном этапе проверяем пути до сетевых каталогов и нажимаем «Далее»:

Следующим шагом предстоит выбрать основной узел из выпадающего списка. Это тот узел с которого данные будут реплицироваться. В случае с примером, основной член репликации сервер с именем WINSERV2016 — это сервер, на котором поднят контроллер доменов. Конкретный пример, лишний раз напоминает о необходимости определения понятных имен для серверов и прочих узлов сети. Нажимаем «Далее»:

Теперь предстоит выбрать топологию подключений между членами репликации. Выбираем доступную — «Полная сетка», однако если вы желаете создать свою топологию репликации позже, то выбирайте «Нет топологии». Нажимаем «Далее»:

Настройка подходит к концу и на этом шаге следует определиться с периодичностью репликации данных. Выбираем вариант с постоянной репликацией. Преимущества этого метода в том, что данные будут дублироваться сразу. Недостаток — нагружает локальную сеть при больших объемах информации, а также нагрузка на жесткий диск.
Второй вариант, предлагает настроить репликацию по расписанию. Минус этого способа в том, что данные будут синхронизированы «потом». Выбираем желаемый вариант и нажимаем «Далее»:

Программа предлагает просмотр выбранных параметров. Если все устраивает — нажимаем кнопку «Создать»:

В случае успеха результат будет таким:

Нажимаем кнопку «Закрыть».
Система напомнит о задержках репликации. Чтобы не получать это сообщение вновь, при желании, следует установить галочку в соответствующем месте. Нажимаем кнопку «OK»:

Настройку распределенной файловой системы, а также репликацию данных можно считать оконченной.
220140
Минск
ул. Домбровская, д. 9
+375 (173) 88-72-49
![]()
700
300
ООО «ИТГЛОБАЛКОМ БЕЛ»
220140
Минск
ул. Домбровская, д. 9
+375 (173) 88-72-49
![]()
700
300
ООО «ИТГЛОБАЛКОМ БЕЛ»
В Windows Server 2016 появилась довольно интересная возможность репликации локального хранилища (дискового тома) на удаленный сервер – Storage Replica (SR). Данные одного тома автоматически синхронизируются по сети на вторичный сервер, на котором всегда будет доступна идентичная копия тома. Репликация данных в Storage Replica выполняется на уровне блоков с помощью протокола SMB v3.1.1 и не зависит от используемой файловой системы (NTFS, CSVFS, ReFS).
Репликация хранилищ в Windows Server 2016 работает в режиме Active / Passive. Это означает, что данные доступны только на сервере источнике. Возможны два режима репликации:
- Синхронная репликация – данные пишутся одновременно на оба сервера. Перед записью данных на основной сервер он ждет подтверждения о записи данных на удаленный сервер;
- Асинхронная репликация – данные записываются на основной сервер, и затем реплицируются на вторичный.
Storage Replica поддерживает следующие сценарии:
- Репликация между томами одного сервера
- Репликация хранилища Server-to-server
- Репликация хранилища в эластичном кластере (stretch cluster)
- Репликация хранилища между двумя разными кластерами (Cluster-to-cluster)
Содержание:
- Требования к Storage Replica
- Установка Storage Replica в Windows Server 2016
- Настройка репликации томов в Windows Server 2016
Требования к Storage Replica
Для использования Storage Replica ваша инфраструктура должна соответствовать следующим требованиям:
- Windows Server 2016/2019 в редакции Datacenter;
- Оба сервера должны состоять в домене Active Directory;
- По два дополнительных диска на каждом сервере – на одном храняться данные, на втором – логи. Диск с логами должен быть быстрее диска с данными, в идеале SSD. Размеры диска с данными должны быть одинаковыми;
- Таблица разделов дисков – только GPT (MBR не поддерживается);
- Поддерживаются локальные диски (SAS/SCSI/SATA), iSCSI, SAN, общие VHDX, Storage Spaces с SAS JBOD;
- Минимум 2 Гб памяти на сервере;
- Сеть между серверами >= 1 Гбит/с с задержками не более 5 мс в обе стороны ( как правило это ограничивает расстоянием между партнерами по репликации до 30-50 км). Сетевой адаптер желательно с поддержкой RDMA;
- Наличие открытых TCP портов 445, 5985 и 5445 между серверами;
Установка Storage Replica в Windows Server 2016
Компонент Storage Replica можно установить из консоли Server Manager или с помощью PowerShell:
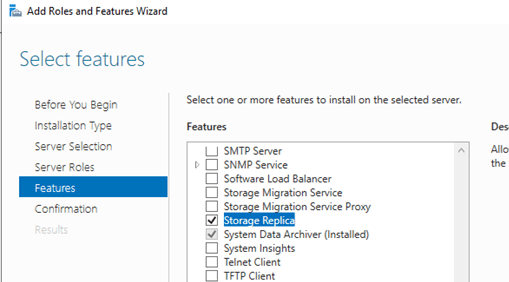
Install-WindowsFeature Storage-Replica –IncludeManagementTools -Restart

Компонент Storage-Replica нужно установить на оба сервера. После установки компонента сервера нужно перезагрузить.
Настройка репликации томов в Windows Server 2016
У Storage Replication нет встроенной графической консоли управления. Для настройки репликации хранилищ нужно использовать PowerShell, Admin Center или консоль Failover Clustering (при использовании кластера).
Список доступных командлетов в модуле StorageReplica можно вывести так:
Get-Command -Module storagereplica
С помощью команды
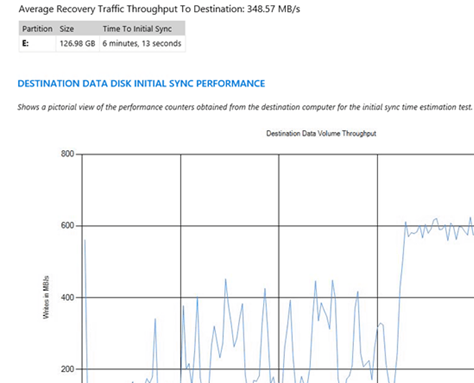
Test-SRTopology
вы можете проверить соответствует ли ваш сервер и канал связи технологии Storage Replica. Вы можете оценить текущее количество операций ввода/вывода, пропускную способность сети, размер журналов. Командлет Test-SRTopology генерирует HTML отчет с текущими нагрузками и рекомендациями.
Включим репликацию хранилища D: между двумя отдельными серверами SR1 и SR2 (для логов используется диск L:, размер журнала – 1 Гб):
New-SRPartnership -SourceComputerName SR1 -SourceRGName SR1ReplGroup01 -SourceVolumeName E: -SourceLogVolumeName L: -DestinationComputerName SR2 -DestinationRGName SR2ReplGroup01 -DestinationVolumeName D: -DestinationLogVolumeName E: -LogSizeInBytes 1GB
После включения репликации на вторичном сервере диск с данными становится недоступен для внесения изменений (формат RAW).
Информацию о репликации тома можно получить с помощью дополнительных счетчиков производительности в PerfMon или из PowerShell:
Get-Counter -Counter “\Storage Replica Statistics(*)
События репликации томов можно отслеживать в журналах Event Viewer (Applications and Services Logs -> Microsoft -> Windows -> StorageReplica) или из PowerShell:
Get-WinEvent -ProviderName Microsoft-Windows-StorageReplica -max 10
Переключить режим репликации на асинхронный можно командой:
Set-SRPartnership -ReplicationMode Asynchronous
При выходе из строя основного сервера вы можете вручную изменить направление репликации данных, переведя вторичную копию в онлайн режим:
Set-SRPartnership -NewSourceComputerName SR2 -SourceRGName SR2ReplGroup01 -DestinationComputerName SR1 -DestinationRGName SR1ReplGroup01
Для получения информации о состоянии групп и направлении репликации используйте командлеты Get-SRGroup и Get-SRPartnerShip.
Можно проверить длину очереди копирования:
(Get-SRGroup).Replicas | Select-Object numofbytesremaining
Чтобы удалить репликацию:
Get-SRPartnership | Remove-SRPartnership
(только на основном сервере)
Get-SRGroup | Remove-SRGroup
(на обоих серверах)
Вы можете использовать Admin Center для настройки Storage Replication из графического
интерфейса. 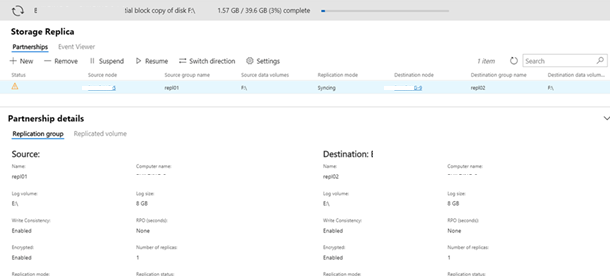
Во многих организациях в качестве решения для катастрофоустойчивого хранения данных используется DFS репликация между ЦОД. У SR есть несколько преимуществ перед DFS репликацией: данные копируются на блочном уровне (возможно репликация открытых и используемых файлов, VSS снапшотов), независимость от базы данных (нет необходимости согласования базы данных при старте), быстрая и синхронная репликация (не нужно ждать часы или дни как в DFS). Из недостатков Storage Replica: репликация только 1 к 1, высокие требования к сети и задержкам, без использования кластера используется ручное переключение направления репликации и перенастройка приложений (пользователей) на новый сервер (можно упростить за счет общего DFS namespace).
В Windows Server 2019 Build 17650 Storage Replica доступна и редакции Standard (можно реплицирвать только 1 том до 2 Тб, одному партнеру по репликации. В Datacenter партеров по репликации можен быть несколько). Кроме того, появился режим Test Failover. В этом режиме на партнере создается достпный для записи том-реплика, а репликация прекращается до момента отключения Test Failover (все изменения за время использования этого режима откатываются к снапшоту).
This handbook explains how to set up DFS data replication in an Active Directory domain on Windows Server 2016 machines.
A Distributed File System (DFS) can be one of two types:
Namespace DFS – Namespace DFS enables you to establish virtual directory trees that connect shared files across a corporate network. Multiple DFS namespaces are available to set up. It makes it easier for users to access files that are scattered around the globe;
DFS Replication – generates a duplicated shared folder and keeps track of file modifications.
Installing DFS Namespaces and DFS Replication Roles on Windows Server 2016
Let’s install the DFS Namespaces and DFS Replication roles on the two Windows Server 2016 machines that will be used for replication.
Create a new DFS namespace using the DFS Management console (dfsmgmt.msc).
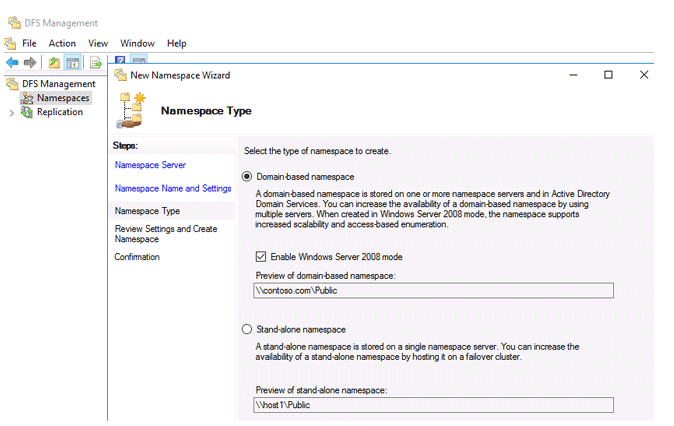
You can build a domain-based namespace or stand-alone namespace.
Domain-based namespace is a namespace that is integrated into the Active Directory. Allows you to hide the DFS namespace server name from users, as well as simplify the replacement and transfer of the namespace to another server.
Even in a workgroup, a stand-alone namespace allows you to establish DFS structures without requiring Active Directory Domain Services (AD DS). A failover cluster can be used to ensure the namespace’s high availability.
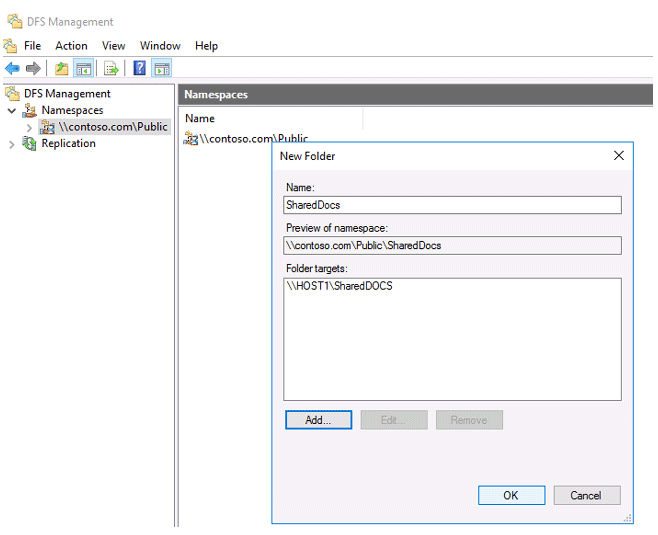
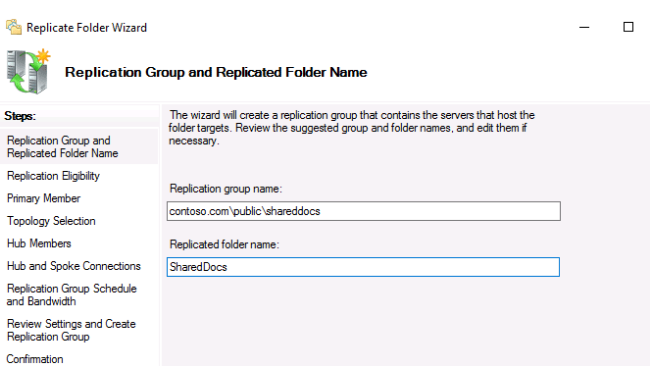
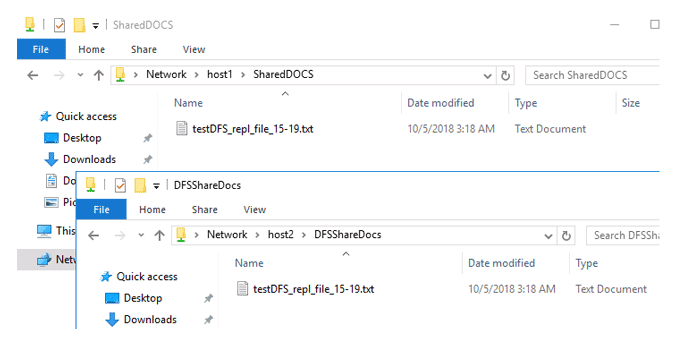
Create a new folder in the new namespace. Make sure that the new directory is accessible over the network by the UNC path dfs\namespacename\foldername (in our example it is contoso.com\public\shareddocs).
Configuring DFS Replication Between 2 Servers Running Windows Server 2016
You can now set up DFS replication. You can use DFS Replication to synchronise directories with files (replicated folders) between servers in a DFS replication group. The DFS replication group’s servers communicate with one another using DFS connections.
The Remote Differential Compression Algorithm is used to repeat changes (RDC). Only the parts of the files that have changed are reproduced. DFS replication is asynchronous, which means that sources may not be consistent at any given time.
It’s important to distinguish between FRS (File Replication Service) and DFSR (Distributed File System Replication) (Distributed File System Replication). When Windows Server 2008 introduced DFSR, it became possible to apply differential compression when only partial changes in a file were communicated over the network, rather than the complete file. The entire file is copied in FRS replication.
The use of folders between remote branches for DFS replication over slow WAN lines is advantageous.
Replication comes to a halt when communication between replication partners is lost. Replication will resume once the network has been restored.
A replication group is a collection of servers (members) that work together to replicate one or more directories.
System requirements for DFS replication:
- All servers in the replication group must have DFS Replication installed.
- The replication group’s servers must all be in the same AD forest.
- Forest schema version must be at least Windows Server 2003 R2, domain functional level must be at least Windows Server 2008;
- The NTFS file system must be used to store replicated directories. The following file systems are not supported: ReFS, FAT, and Cluster Shared Volumes.
- Antivirus on DFS servers must be compatible with DFS replication technology, or antivirus exceptions for duplicated directories must be added.
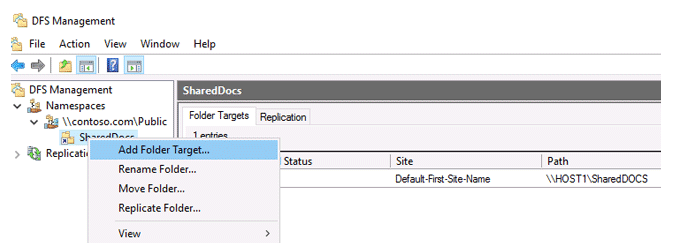
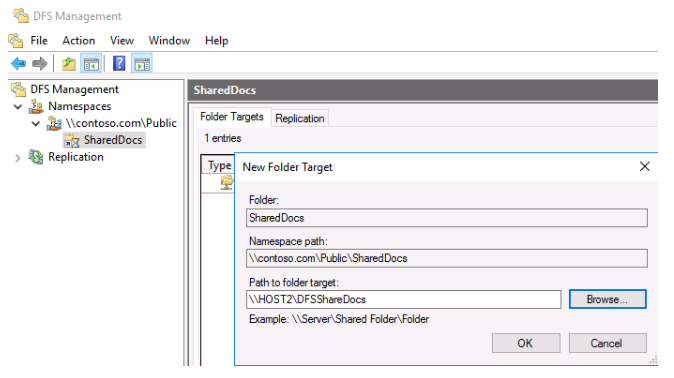
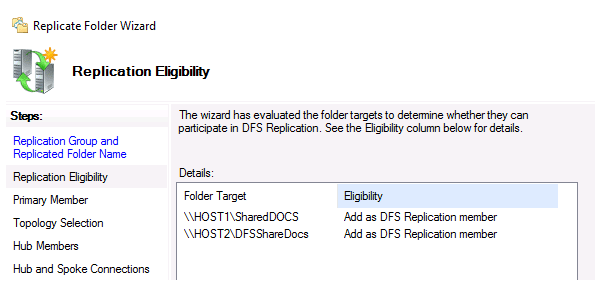
You must create a network shared folder on the second DFS server before configuring replication. Select the relevant namespace in the DFS Management interface and choose Add Folder Target from the context menu.
Enter the name of the shared folder and click OK (in our example it is \\HOST2\DFS\ShareDocs).
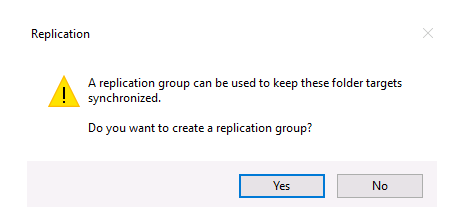
You will be prompted to create a new replication group. Click Yes.
In the DFS Replication Configuration Wizard, you need to verify the name of the replication group and the directory you want to replicate.
Check the paths to the shared folders on the servers.
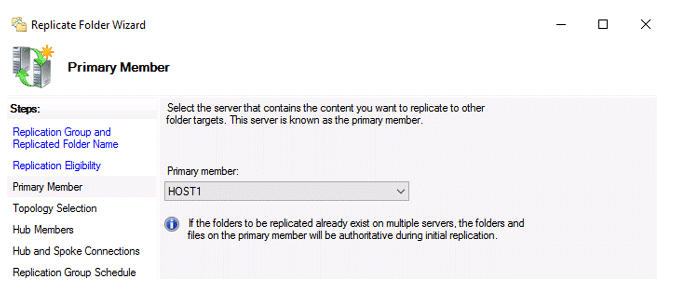
Choose the primary member node where the initial data will be stored and where initial replication will take place.
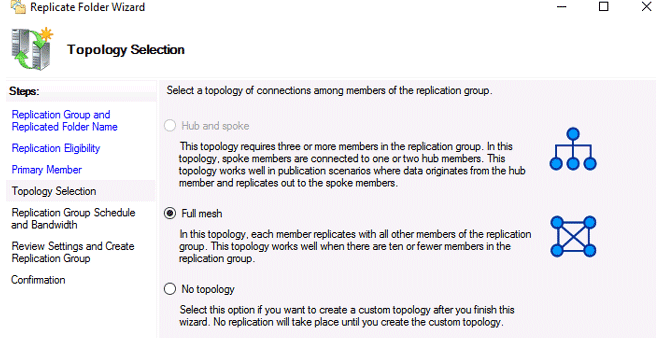
Full mesh is usually chosen as the replication topology. All modifications made on one node are promptly replicated to all others in this architecture.
The timing and bandwidth that can be used to replicate data must still be adjusted. After you’ve double-checked your settings, click Create.
Following the successful formation of a new replication group, a message should display.
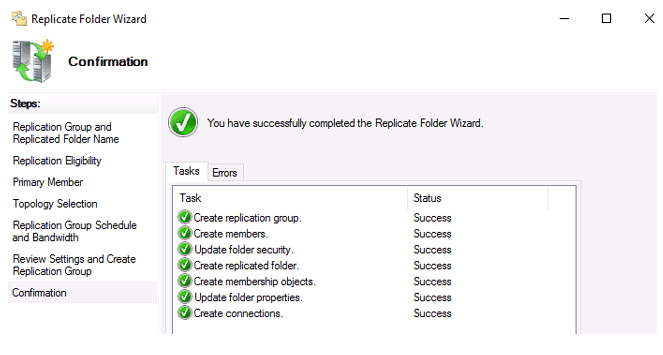
This completes the DFS distributed file system and data replication configuration.
Create a new file in one of the member servers’ shared folders. Depending on the capacity of the communication connection between DFS servers and the DFS replication parameters, huge files can take many hours or even days to replicate.
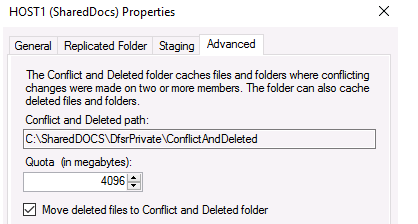
If 2 users simultaneously edit (or create) the same file, then DFS replicates the version of the file that was changed (created) last. An earlier version of the file is stored in DfsrPrivate\ConflictandDeleted directory on the server that resolves the DFS replication conflict. In this case, an entry about the conflict that has occurred appears in the ConflictandDeletedManifest.xml file.
Tweaking DFS Replication
You can tweak several variables after creating a DFS replication group to improve performance.
Expand the Replication area of the DFS Management console, which contains all the replication groups.
Choose the replication group you just made. There are four tabs on the right window:
Membership is a list of network folders that data is copied across.
Connections — specifies the structure of DFS replication partners’ relationships;
DFS folder settings for replicated folders;
Permissions for replication groups are delegated.
Note the 4 GB Staging Quota setting on the Membership tab. What exactly is it? The DFS service employs intermediate hidden folders to hold modified data that must be sent to replication partners when replicating. On each server, these files are saved in the DfsrPrivateStaging subdirectory.
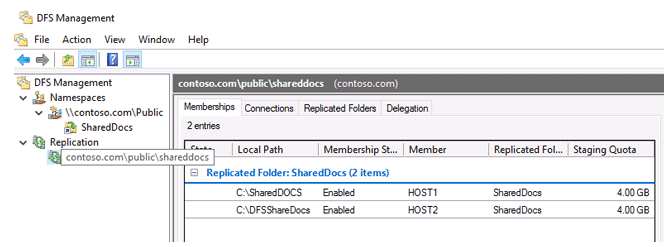
Open the attributes of any folder on the Membership tab and select the Staging tab. As you can see, you can define the Staging folder’s path and maximum size here (Quota). The default storage capacity is 4 GB. To improve the performance of the DFS file replication service in big infrastructures, the quota size should be increased.
This quota should not be less than the total size of the replication directory’s 32 biggest files, according to Microsoft. The following PowerShell command will return the total size of the directory’s 32 biggest files:
Get-ChildItem C:\SharedDOCS -recurse –force | Sort-Object length -descending | select-object -first 32 | measure-object -property length -sum).sum /1gbIf the DFS server’s staging quota is insufficient, occurrences with EventID 4208 are frequently reported in the event log. In this scenario, it is suggested that the staging quota be increased by 20%.
Some administrators assume that a file larger than the Staging folder’s quota cannot be copied through DFS. This isn’t correct. Such a file can also be reproduced normally, but the procedure will take many steps (the file will be divided into several portions and sent in pieces), slowing down the process significantly.
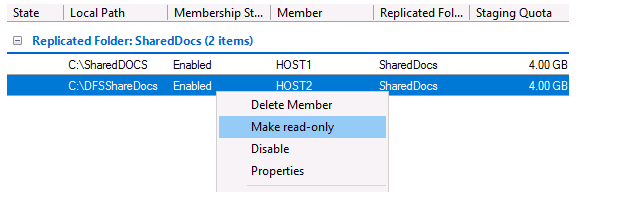
To switch the DFS directory on a specific server to read-only mode, click the directory and select Make read-only. As a result, users won’t be able to edit or create files in this directory.
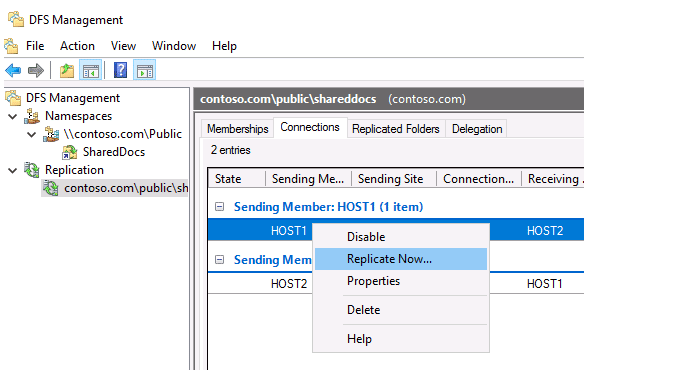
On the Connection tab, you can temporarily suspend replication to one of the servers in the DFS replication group (Disable), or start forced replication (Replication Now).
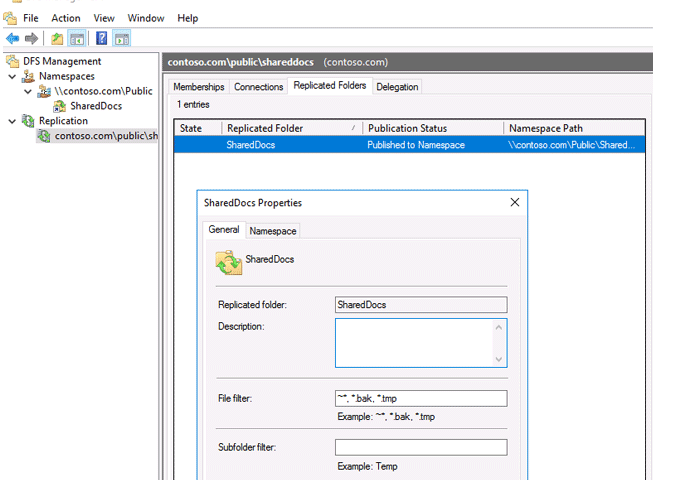
Open the properties of any folder on the Replication Folders tab. A list of file extensions that are not duplicated between DFS servers can be found in the File filter field. .bak and.tmp are the default file extensions. Other file kinds that do not need to be copied, such as video (*.avi, *.mpeg), music (*.mp3, *.wav), image files (*.iso, *.wim), or other file types, can be included.
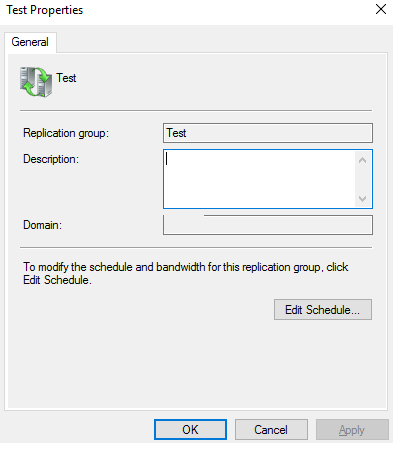
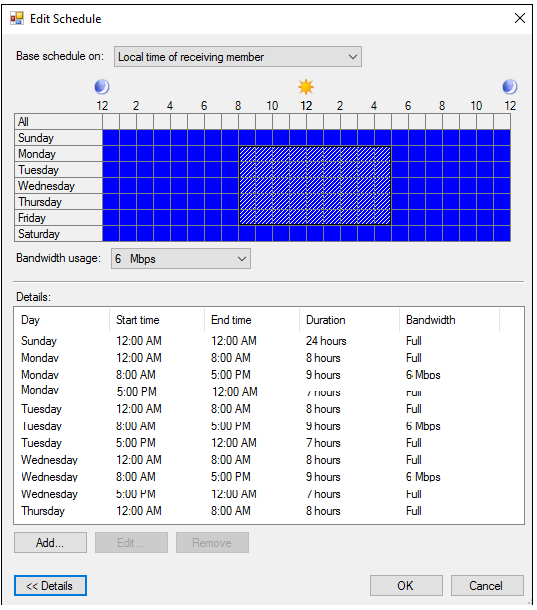
The bandwidth throttling for DFS replication between remote locations can be controlled. This is important when offices are connected by slow WAN links and you don’t want the DFS replication traffic to overload them.
A WAN connection between two sites, for example, has a bandwidth of 10 MB. During work hours, you want DFS to be limited to 6 megabits and unlimited the rest of the time.
Go to the Schedule tab > right click on the replication connection and select Properties > click on the Connections tab > go to the Connections tab > right click on the replication connection and select Properties > go to the Connections tab > right click on the replication connection Select “Custom Connection Schedule…” from the drop-down menu. Details > Edit Schedule
Here you can set a limit on the maximum channel usage by DFS replication traffic for different days of the week and daytime:
- Monday – Friday from 8:00 AM to 5:00 PM — 6 Mb;
- Sunday, Saturday, and Mo-Fri night — Full bandwidth.
You can use system event logs, as well as the current (percent windir percent debugDFSR.log) and archive DFSR replication logs (percent windir percent debugDFSR.log.gz) to diagnose DFS replication.
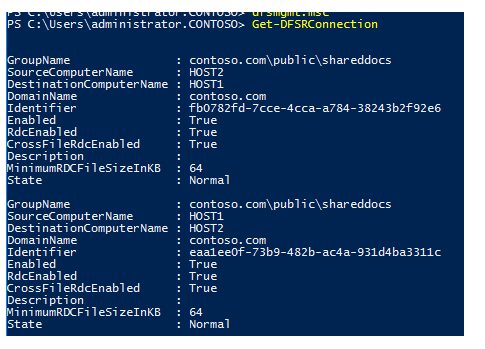
The PowerShell cmdlet Get-DFSRConnection can be used to get information about the server’s DFS replication settings.
Common DFS Replication Errors
Let’s consider the most common DFS replication errors and their solutions.
DFS Does Not Replicate Some Files
If you found that DFS Replication is not copying some files, check if they have the Temporary attribute set (0x120).
You can find such files and remove the 0x120 attribute using the following PowerShell script:
Get-ChildItem C:\DFS\DOCS -recurse | ForEach-Object -process {if (($_.attributes -band 0x100) -eq 0x100) {$_.attributes = ($_.attributes -band 0xFEFF)}}DFS Replication Error 4012
When you try to start DFS replication and get an error code 4012, it signifies the replication hasn’t been done for a long time.
The replication on the folder with the following local path: C:path was halted by the DFS Replication service. This server has been isolated from other partners for 70 days, which exceeds the MaxOfflineTimeInDays parameter’s maximum duration limit (60). The data in this folder is considered stale by DFS Replication, and this server will not replicate the folder until the problem is fixed.
You can increase this period from 60 days (default) to 120 using PowerShell:
- Check the current value of MaxOfflineTimeInDays:Get-WmiObject -Namespace root\microsoftdfs -Class DfsMachineConfig | fl MaxOfflineTimeInDays
- Increase it up to 120 days:Set-WmiInstance -Namespace root\microsoftdfs -Class DfsMachineConfig -Arguments @{MaxOfflineTimeInDays=120}
- Restart DFS Services.
DFS Replication Error 2104
In this case, you need to fix the broken DFS database. Follow these steps:
- Disable group replication (DFS Management > Replication > Replication group > Connections);
- Create and run the following .bat script with administrator permissions:
set DFS_DRIVE=E: net stop dfsr %DFS_DRIVE% icacls "%DFS_DRIVE%\System Volume Information" /grant "Domain Admins":F cd "%DFS_DRIVE%\System Volume Information" move DFSR %DFS_DRIVE%\DFSR_backup cd .. icacls "%DFS_DRIVE%\System Volume Information" /remove:g "Domain Admins" net start dfsr dfsrdiag PollAD /Member:%userdomain%\%computername%DFSR is a role service of Windows Server that enables to replicate folders between multiple file servers across limited bandwidth network connections.
DFSR (Distributed File System) Replication it’s a good solution to keep sync file servers when you have branches and must be share the same File Servers across the organization.
Another use of DFS-R is as Disaster Recovery Solution for the File Servers.
In the past i have publish the article Install and Configure DFS Replication in Windows Server 2012
Today i would like to explain how can setup DFS replication in Windows Server 2016.
Improvements in win2016
Base on Microsoft Technet DFSR in Windows Server 2016 hasn’t any improvement
DFSR Requirements before installation
Before start the installation of DFSR it’s very important to meet the requirements in your environment
- Update the Active Directory Domain Services (AD DS) schema to include Windows Server 2003 R2 or later schema additions. You cannot use read-only replicated folders with the Windows Server 2003 R2 or older schema additions.
- Ensure that all servers in a replication group are located in the same forest. You cannot enable replication across servers in different forests.
- Install DFS Replication on all servers that will act as members of a replication group.
- Contact your antivirus software vendor to check that your antivirus software is compatible with DFS Replication.
- Locate any folders that you want to replicate on volumes formatted with the NTFS file system. DFS Replication does not support the Resilient File System (ReFS) or the FAT file system. DFS Replication also does not support replicating content stored on Cluster Shared Volumes.
How to Setup DFS Replication
After verify that meet all the requirements we can start to setup DFS Replication in Windows Server 2016
- Open Server Manager
- Click Manage — — > Add Roles & Features

- Click Next

- Leave the Role-base or Feature-based installation and click Next.

-
Leave the default options and click Next.

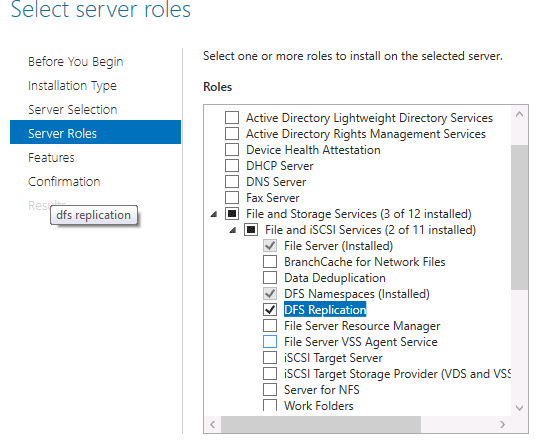
- Expand File Storage Services — — > File & iSCSI Services and check DFS Replication.

- Click Add Features to return in first screen and click Next.

- Click Next.

- Click Install and wait to finish the Installation.

How to Setup DFS Replication Group
Now we can start to configure DFS Replication across the File Servers.
- From Server Manager click Tools — DFS Management

- Right Click in Replication and select New Replication Group.
- In this scenario we have 2 File Servers so we must select Replication group for data collection.

- Type a name for the Replication Group and the Domain name of your environment.

- Select the source FileServer which contain that data that you want to replicate.

- Click Add and select the folder that you must replicate.

- After add the folder it will seems like this

- Select the destination File Server.

- Select the target folder. Don’t create the root folder in the destination because if select the target folder User as in example will be create the Path E:\Users\Users. We don’t want this. Just select the previous level before and the replication will be create the Folder. Click Next.

- Configure the Bandwidth and when you would like to Replicate. These settings depends on your requirements. In case that you want to use DFSR for Disaster Recovery it’s better to schedule the Replication after hours instead to replicate continuously.
- Select what is best for you and click Next.

- Click Create

- Check the Status all completed sucessfull and click Close
How to Configure DFS Replication
If you are setup dfs replication for the first time it’s very common to come across with specific errors because of the wrong configuration or no configuration at all.
It’s very important to know what must be change after setup of the DFS-Replication Group.
The most common errors related with the Staging folder.
Staging folder used by DFS Replication as caches for new and changed files that must be ready to replicate. By default the size of the Staging folder is 4GB.
I am sure that you will ask which is the recommended size of the staging folder?
Base on Microsoft Technet the recommended minimum size of staging folder can be calculated with the following Powershell command. The <replicatedfolderpath> is the path to replicated folder.
Get-ChildItem <replicatedfolderpath> -recurse –force | Sort-Object length -descending | select-object -first 32 | measure-object -property length -sum).sum /1gb
After calculate the staging folder size
- From the DFS Management Console in the Membership Tab right click and select Properties in the first folder.

- Click in Tab Staging
- Change the Quota (in megabytes)
- Click OK

- Another one important configuration is the File Filtering
- From the DFS Management Console select Replicated Folders Tab
- Right click and select Properties in the Replicated Folder.

- In the File Filter you can exclude extensions that you don’t want or it mustn’t replicate.
- By default has these extensions. If you have these type of files that must replicate then you must remove it from there.

- How can Force or Disable the Replication?
- From the DFS Management Console select the Tab Connections.
- Select the Server that you want to Disable or Force the Replication and with right click you can find the options.

- In the same Tab select the Server that you want. Right click and select properties
- Click in Tab Schedule.
- From here you can schedule the Replication and the Bandwidth usage
- You can click the button View Schedule to see what you have already schedule and the Bandwidth usage.

- If you want to change click Cancel.
- Select Custom connection schedule.
- Click in Edit Schedule.

Now you have Setup and Configure the DFS Replication between two FileServers.
Of course we aren’t finish here. Because now we must learn to monitoring how the replication is going.
So I will come back next week to explain DFS Replication monitoringm
Have a nice weekend !!
You can send me an email at info@askme4tech.com or do your comments in Twitter or Facebook
I invite you to follow me on Twitter or Facebook. If you have any questions, send email to me at info@askme4tech.com.
Warning: This article is written with information related to Windows Server 2016 Technical Preview 4.
Storage Replica is a new feature introduced in Windows Server 2016 that enables storage-agnostic, block-level, synchronous replication between servers for disaster recovery, as well as stretching of a failover cluster for high availability. Synchronous replication enables mirroring of data in physical sites with crash-consistent volumes ensuring zero data loss at the file system level. Asynchronous replication allows site extension beyond metropolitan ranges with the possibility of data loss.

Storage Replica is a new feature introduced in Windows Server 2016 that enables storage-agnostic, block-level, synchronous replication between servers for disaster recovery, as well as stretching of a failover cluster for high availability. Synchronous replication enables mirroring of data in physical sites with crash-consistent volumes ensuring zero data loss at the file system level. Asynchronous replication allows site extension beyond metropolitan ranges with the possibility of data loss.
Storage Replica is volume-based and uses SMB V3.1.1. It can use any fixed disk storage, as well as any storage fabric. Storage Replica does not require a cluster and can be managed using Failover Cluster Manager (FCM), PowerShell, Windows Management Instrumentation (WMI), and Azure Site Recovery (planned for the future).
This blog post is divided into two parts, in the first part, I will show you how to implement Windows Volume Replication (Server-to-server), and in the second part, I will show you how to implement Stretch Cluster with Volume Replication.
At the time of writing this article, Storage Replica support the following scenarios:
• Server-to-server storage replication using Storage Replica
• Storage replication in a stretch cluster using Storage Replica
• Cluster-to-cluster storage replication using Storage Replica
Implement Windows Volume Replication
We will configure Windows Volume Replication (Server-to-server) by implementing the following steps:
• Step 1: Create a replication partnership.
• Step 2: Monitor replication performance.
• Step 3: Reverse failover replication to a replica target.
• Step 4: Remove volume replication.
Step 1: Create a replication partnership
In this step, Windows Volume Replication has been installed on SRV01 and SRV02. It is added as a feature using Server Manager. The feature installation requires no additional input but does require a reboot of the server. Each server has been configured with a volume configured as (D:) As Windows Volume Replication operates at the volume level, the entire contents of (D:) will be subject to replication.
You can automate the feature installation by running the following command from a remote management computer in a Windows PowerShell console to install the required features and roles and restart them:
$Servers = ‘SRV01′,’SRV02’
$Servers | ForEach { Install-WindowsFeature –ComputerName $_ –Name Storage-Replica,FS-FileServer IncludeManagementTools -restart }
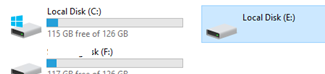
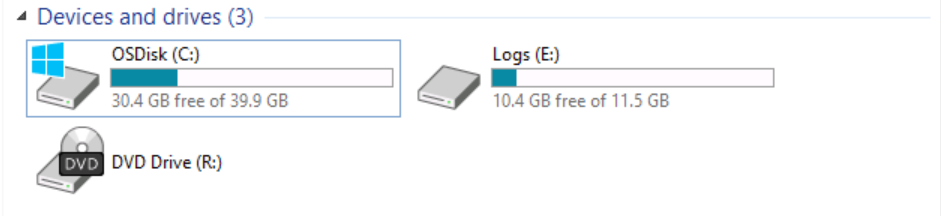
I will switch to SRV01 and explore the existing devices and drives.
As you can see, note the presence of the Volume (D:) Replica.
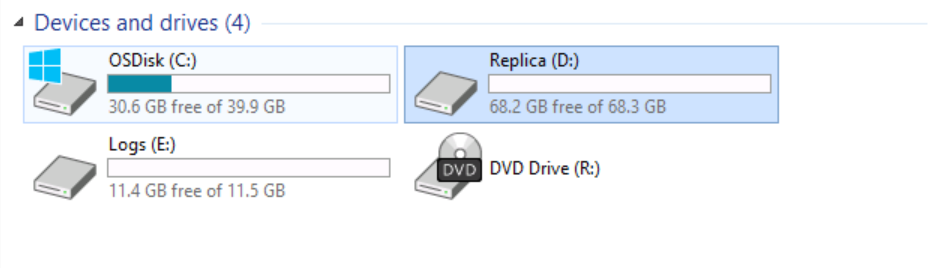
I will switch to SRV02 and explore the existing devices and drives as well.
As you can see, note the presence of the Volume (D:) Replica.

Both servers are configured with identical drives using the same capacity.
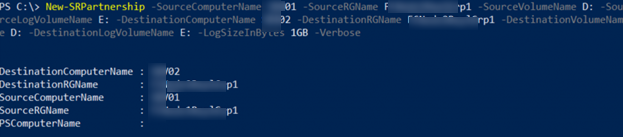
I will launch Windows PowerShell on SRV01 as Administrator and type the following command, and then press ENTER.
New-SRPartnership -SourceComputerName SRV01 -SourceRGName FCNode1ReplGrp1 -SourceVolumeName D: -SourceLogVolumeName E: -DestinationComputerName SRV02 -DestinationRGName FCNode2ReplGrp1 -DestinationVolumeName D: -DestinationLogVolumeName E: -LogSizeInBytes 1GB -Verbose
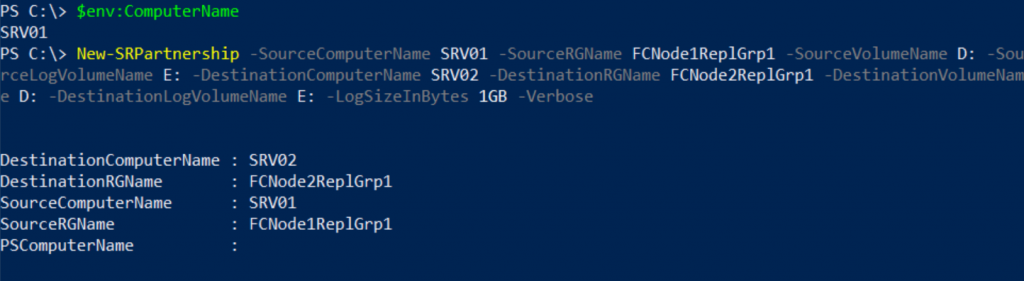
I will switch now to SRV02 and observe that volume (D:) is no longer available.
In this step we have completed the Partnership replication between SRV01 and SRV02.
Step 2: Monitor replication performance
In this step, I will use built-in performance counters to monitor the performance of volume replication. You will notice that once you establish replication, there is a period of increased CPU and replication activity while the initial sync is performed. In practice, you should allow this sync to complete before moving the replicated volume into production.
I will switch to SRV01, open Windows PowerShell, type: PerfMon.msc, and then press ENTER.
Expand Monitoring Tools, and then click Performance Monitor. In Performance Monitor, click the ADD button (green plus sign).
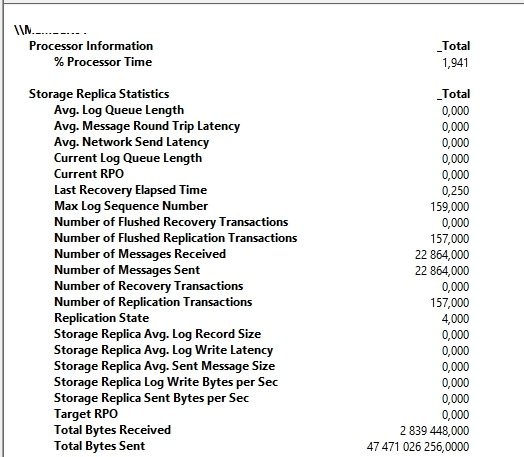
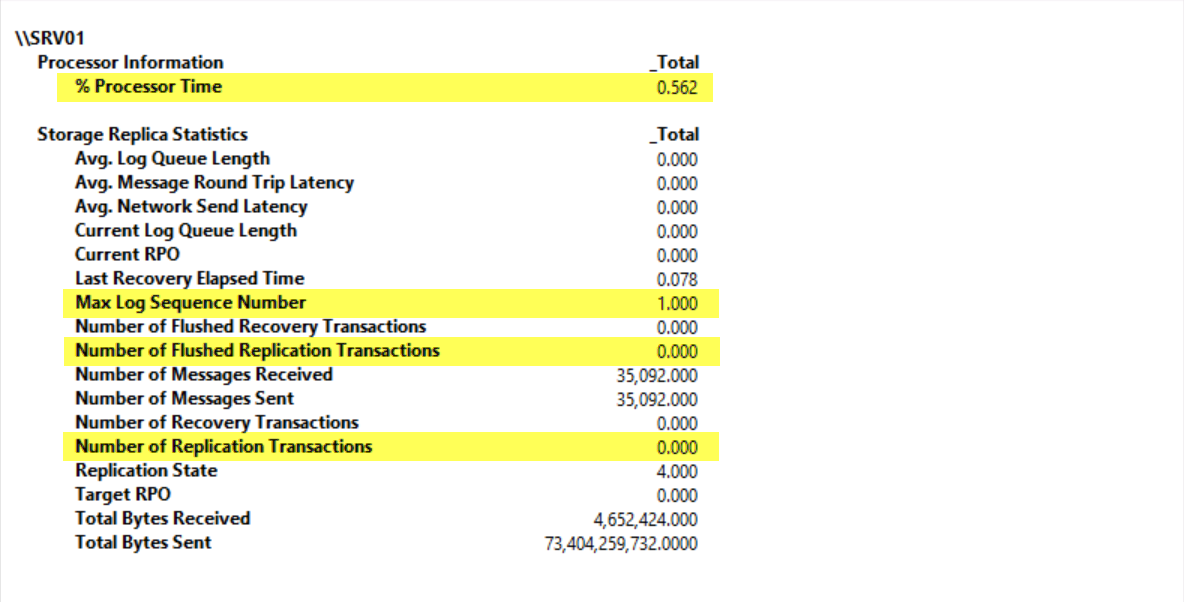
Under Available counters, click Storage Replica Statistics, and then click Add. Click OK.
Change the graph type to Report. Note that the statistics indicate the current performance and totals of volume replication.
In Windows PowerShell, type the following command, and then press ENTER:
Copy-Item c:\Windows\System32\Drivers d: -Recurse
Now switch back to Performance Monitor and notice the increase in statistics as shown in below screenshot. Wait for the statistics to settle down. This is an indication that replication is completed. This process might take a few minutes because the initial sync might still be in progress.
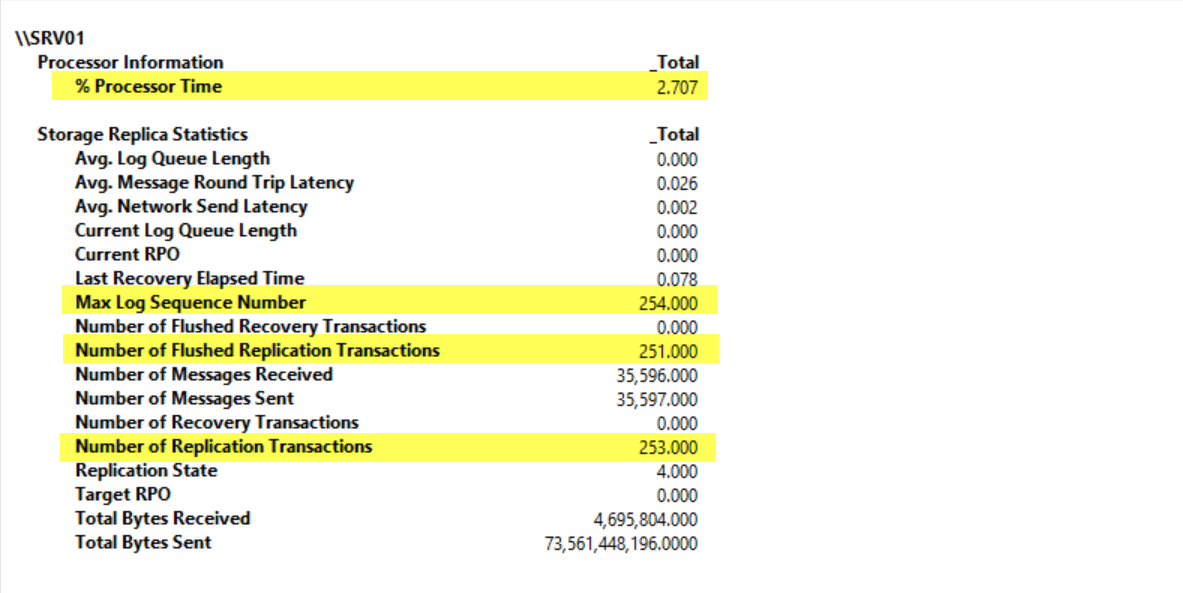
After we observed the replication is completed, we will move to Step 3 and reverse the replication from SRV02 to SRV01.
Step 3: Reverse failover replication to a replica target
In this step, I will reverse the replication and bring the target online for access to data. Changes made on the target will now replicate in reverse to the original source.
I will switch to SRV02, open Windows PowerShell as Administrator.
In Windows PowerShell, type the following command, and then press ENTER:
Set-SRPartnership –NewSourceComputerName SRV02 –SourceRGName FCNode2ReplGrp1 –DestinationComputerName SRV01 –DestinationRGName FCNode1ReplGrp1 –confirm:$false
Note: Windows Server 2016 Technical Preview does not prevent role switching when the initial sync is ongoing, which can lead to data loss if you attempt to switch before allowing initial replication to complete. Do not switch directions until the initial sync is complete.

I will switch now to SRV01 and observe that volume (D:) is no longer available.

The replication is completely reversed from SRV02 to SRV01.
Step 4: Remove volume replication
In this step, we will remove Windows Volume Replication.
Open Windows PowerShell as Administrator on SRV02.
Before we remove the replication, we will query the storage replica group and storage partnership by running the following two cmdlets:
Get-SRGroup
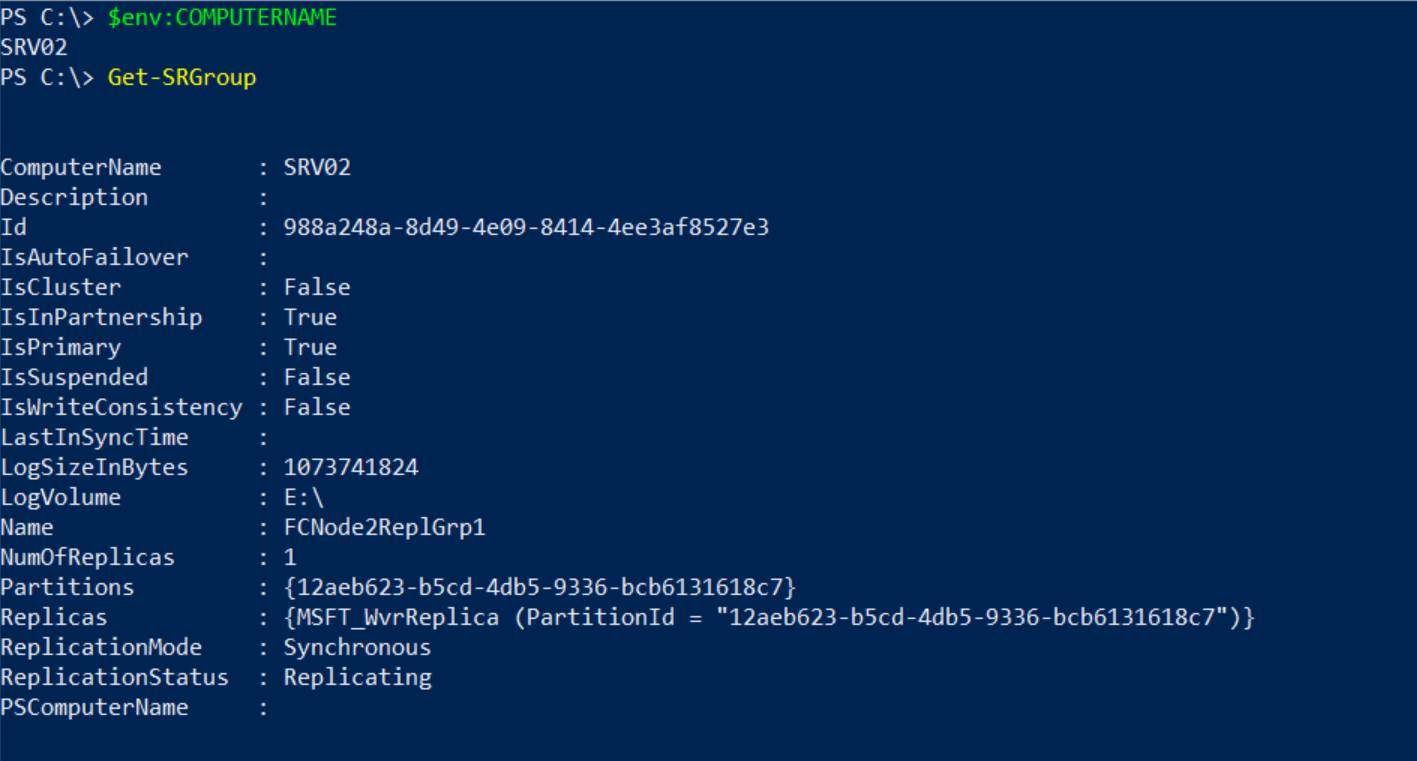
Get-SRPartnerShip
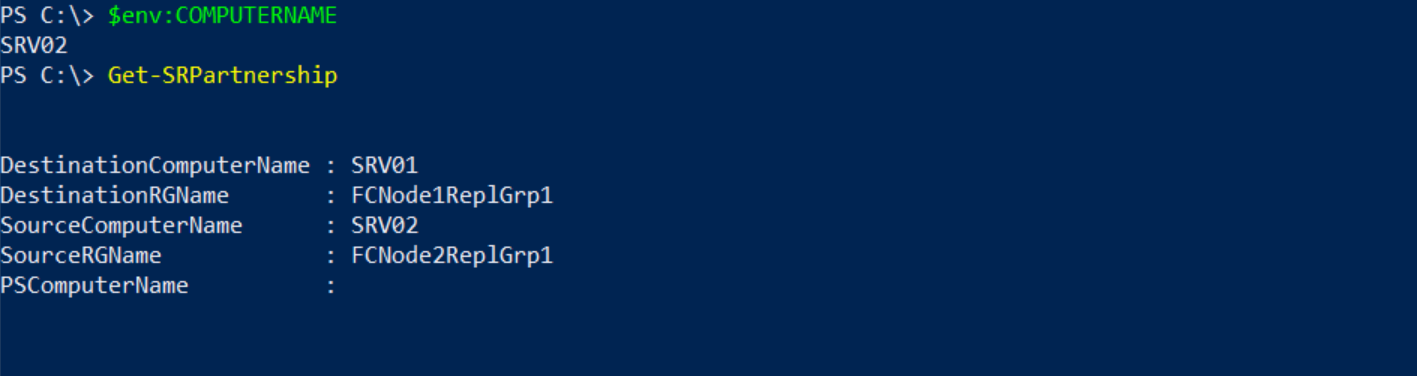
To remove the replication, type the commands listed below and press ENTER after each one.
Get-SRPartnership | Remove-SRPartnership –confirm:$false
Remove-SRGroup –Name FCNode2ReplGrp1

Switch now to SRV01 and open Windows PowerShell as Administrator.
Type the command listed below and press ENTER
Remove-SRGroup –Name FCNode1ReplGrp1

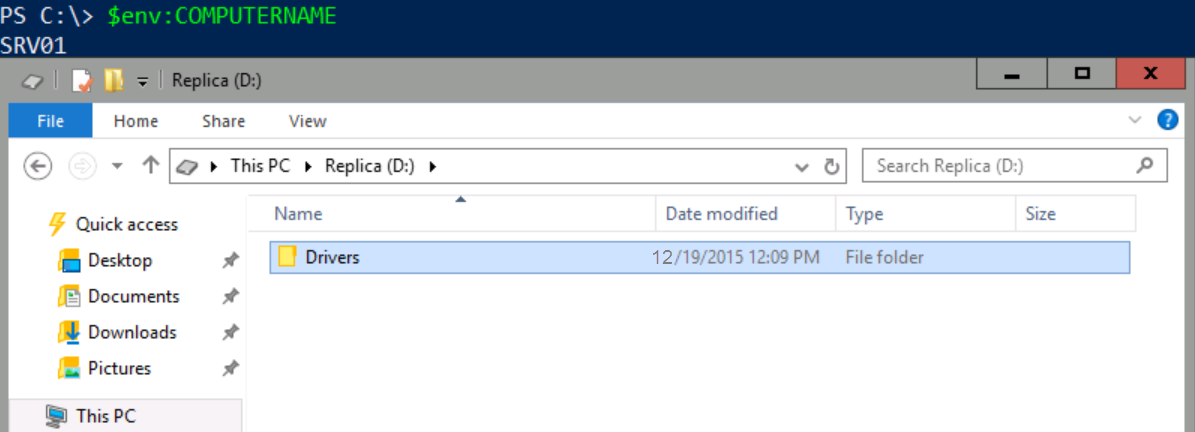
Review the D: drive on SRV01
Switch to File Explorer, and then navigate to D:

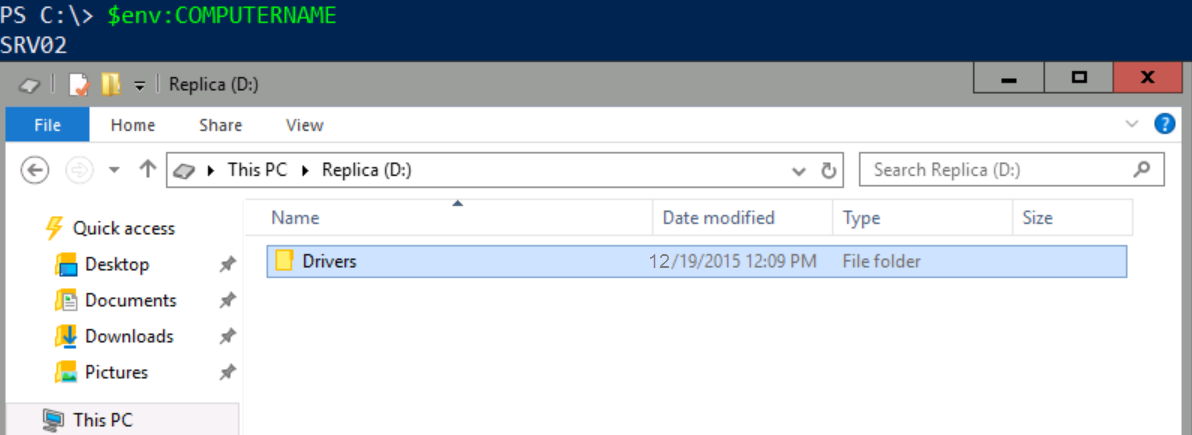
Switch to SRV02 and Review the D: drive
Switch to File Explorer, and then navigate to D:

This is to confirm that Windows Volume Replication is completely removed from SRV01 and SRV02.
To confirm the Drivers folder that we copied in Step 2 does exist on each server’s (D:) volume, please switch to File Explorer, and then navigate to D:
SRV01
SRV02
Congratulations! In Part 1 we have successfully:
- Created a replication partnership between SRV01 and SRV02.
- Monitored replication performance.
- Reversed failover replication to a replica target.
- Removed volume replication.
Until then… see you in Part 2.
Thanks for reading.
- Creating a Windows Server 2012 R2 Failover Cluster using VSAN from StarWind
- Tap Room Meeting: No Irish Handcuffs of Windows Server Solutions with VSAN from StarWind