Установим роли терминального сервера на Windows Server 2019 и лицензируем. Маленькая тонкость — сервер не в домене.
Подготовка Windows Server 2019
Для начала установим сам сервер. Всё необходимое вынесено в отдельную статью:
Установка Windows Server 2019 на виртуальную машину VMware
Не забываем про настройку:
Первоначальная настройка Windows Server 2019
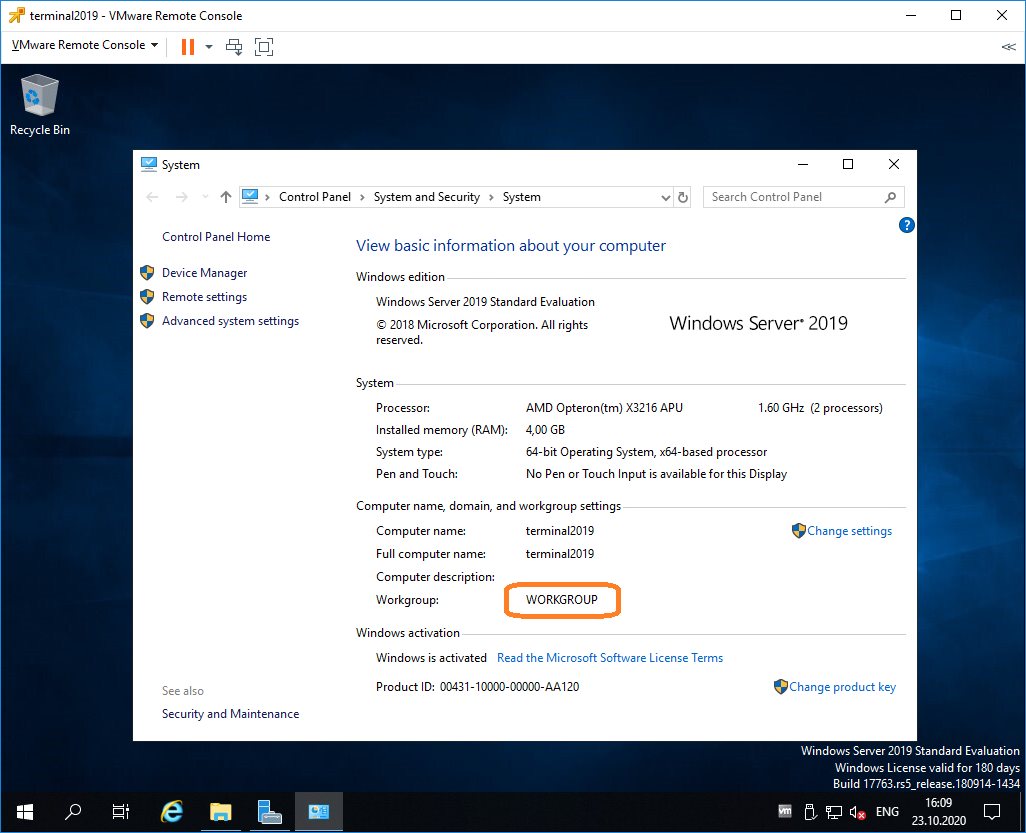
Итак, операционная система установлена и настроена. Сервер в рабочей группе WORKGROUP.
Установка роли терминального сервера
Нам понадобится установить две роли, можно выполнить установку одновременно, я предлагаю инструкцию с минимальным количеством перезагрузок.
Роль Remote Desktop Licensing
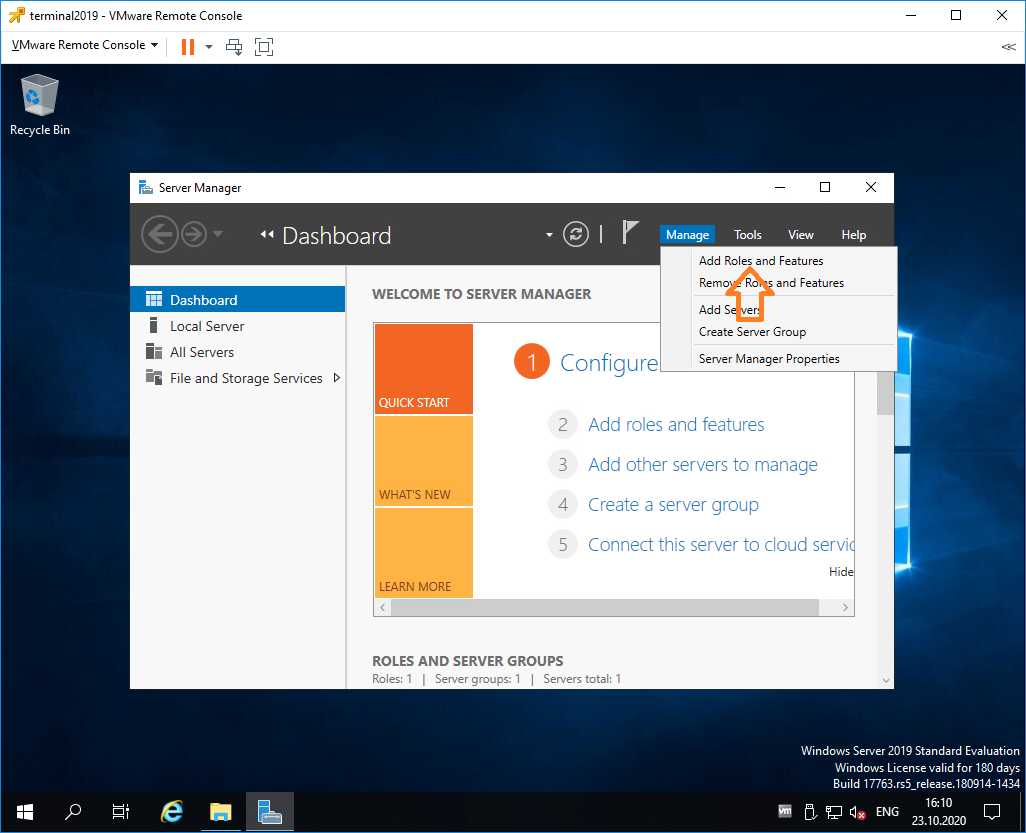
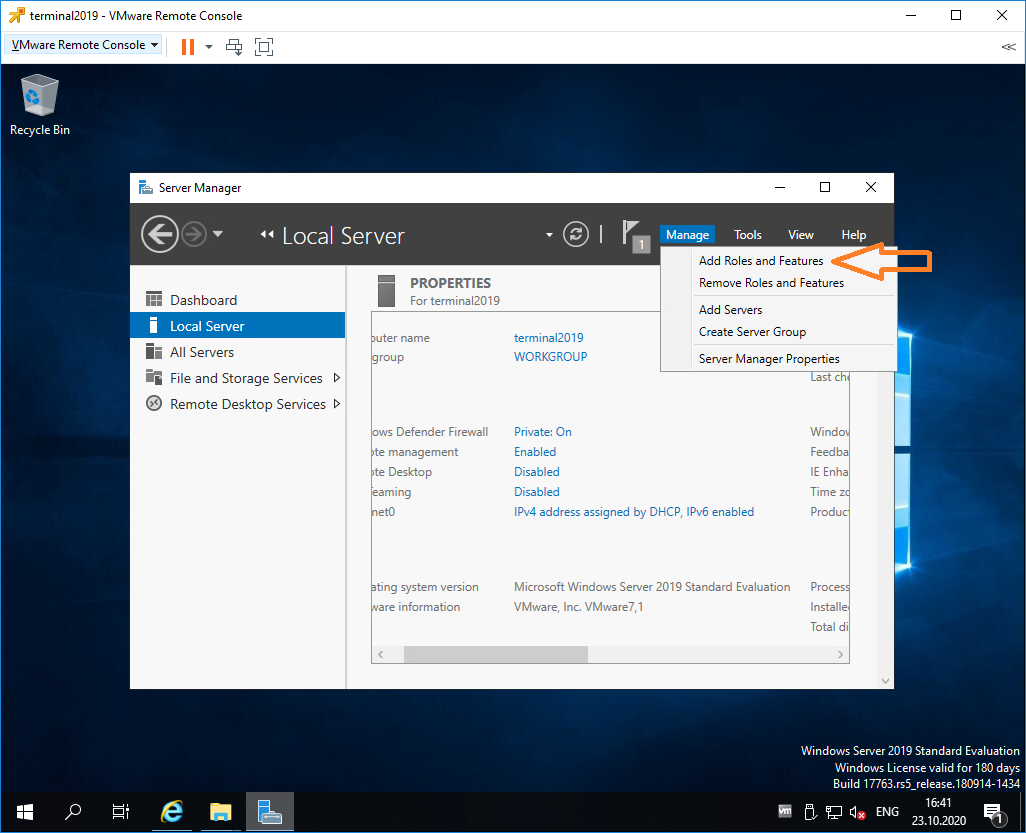
Входим в Server Manager. Справа вверху выбираем Manage > Add Roles and Features.
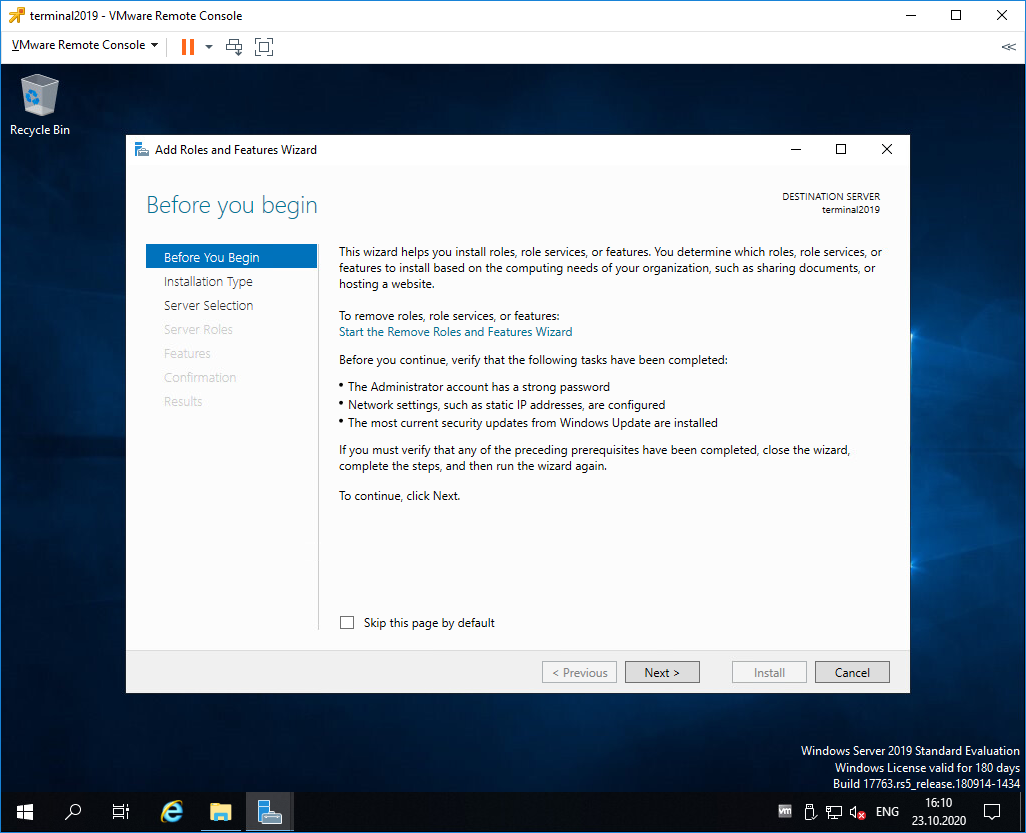
Попадаем в раздел Before You Begin.
Это начальная страница, пропускаем. Next.
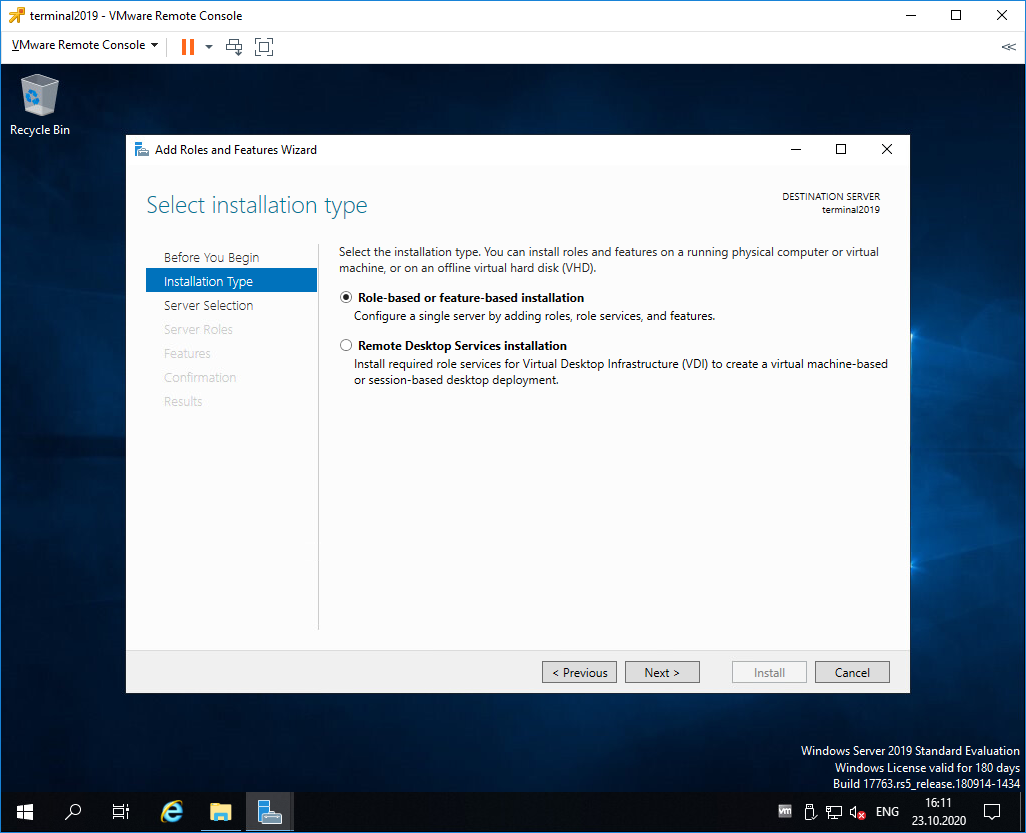
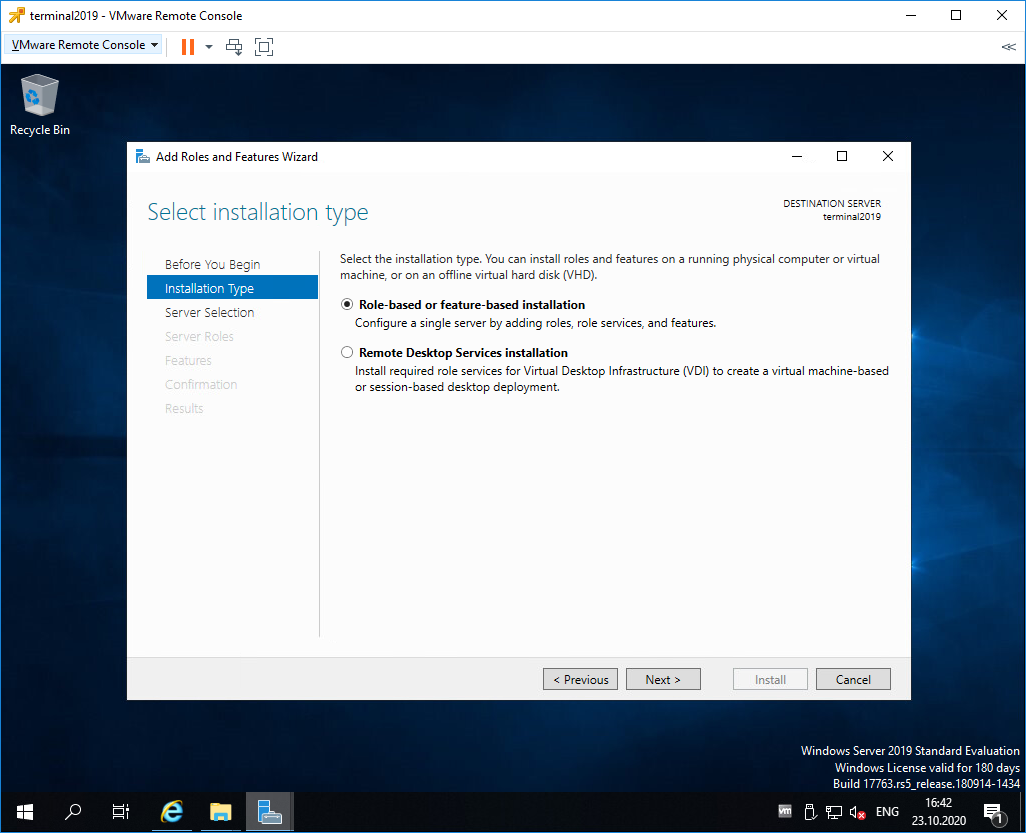
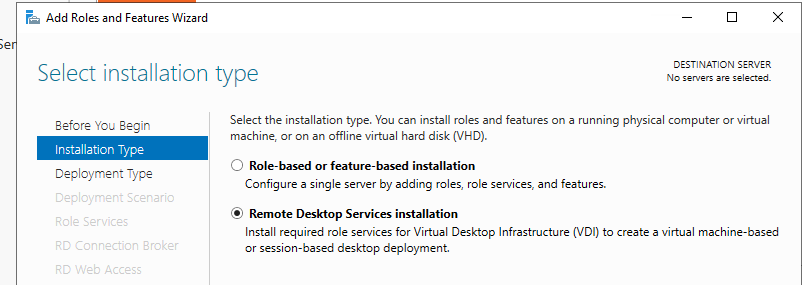
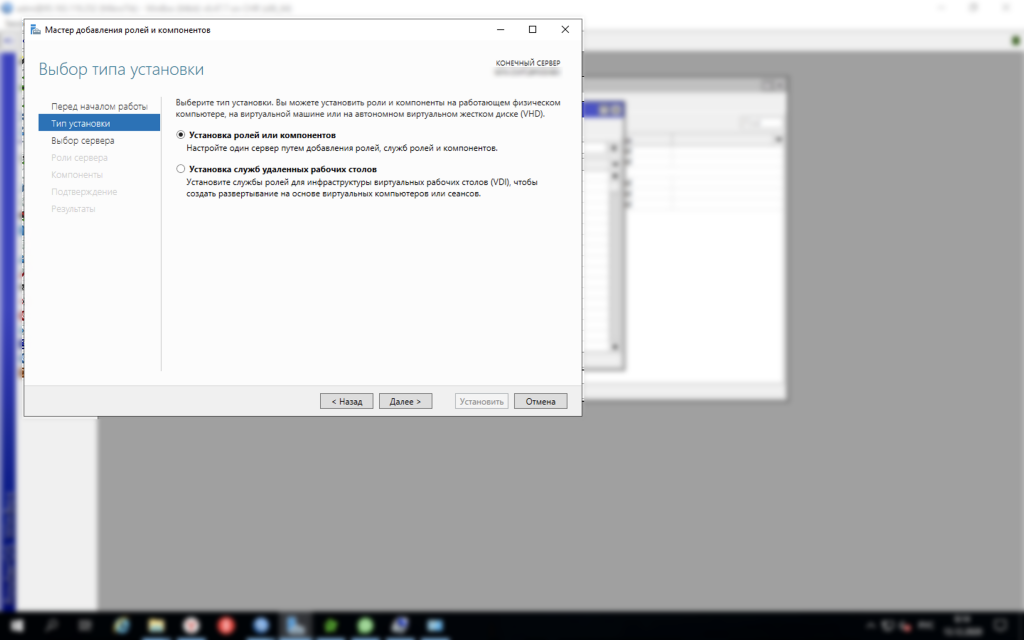
Попадаем в раздел Installation Type. Для установки сервиса удаленных рабочих столов предусмотрен специальный мастер Remote Desktop Services installation, но нам не удастся его использовать, поскольку сервер не в домене. Выбираем Role-based or feature-based installation. Next.
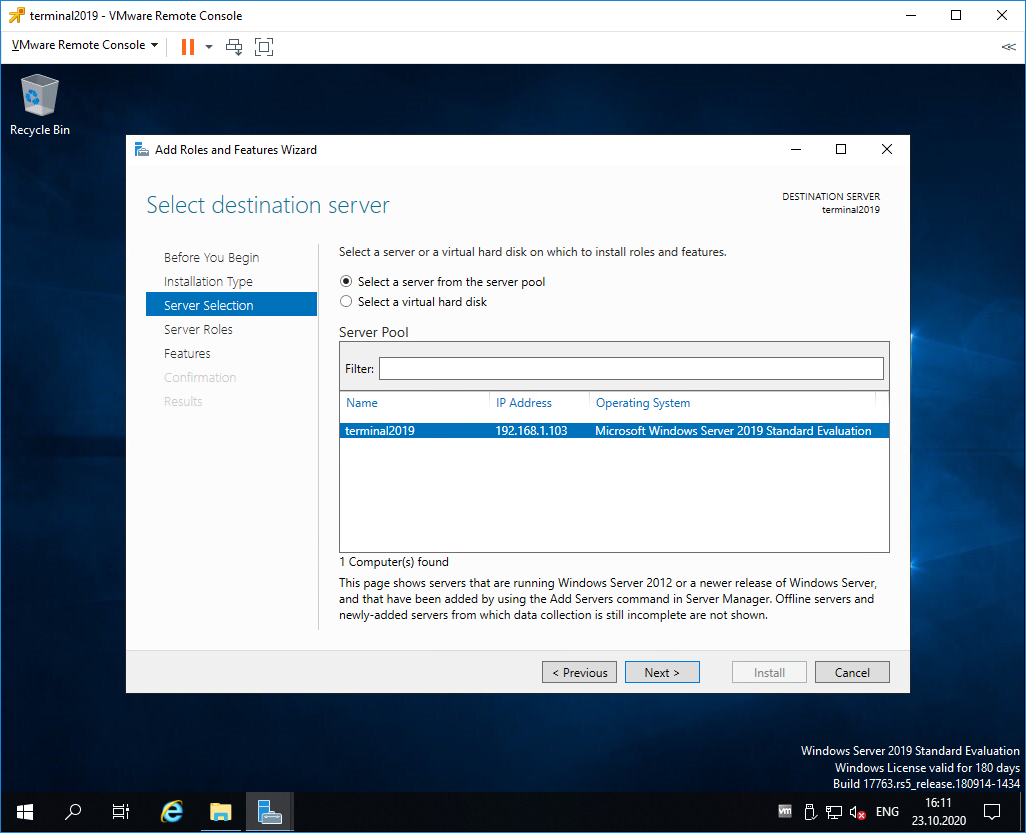
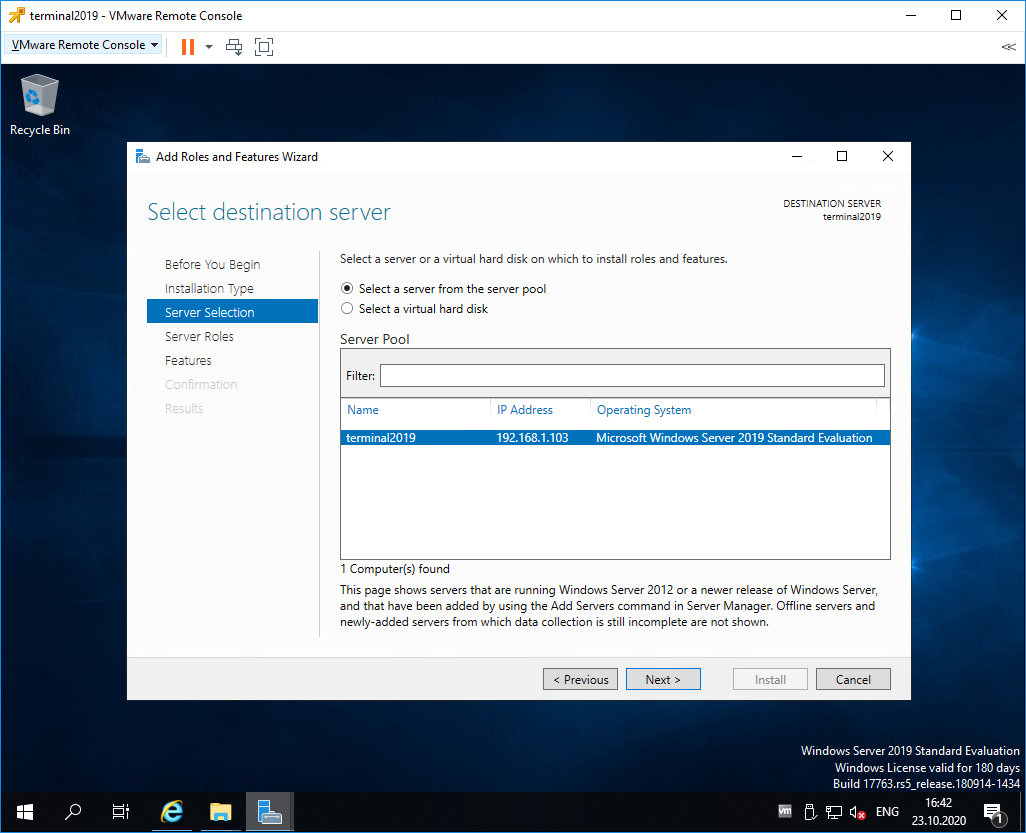
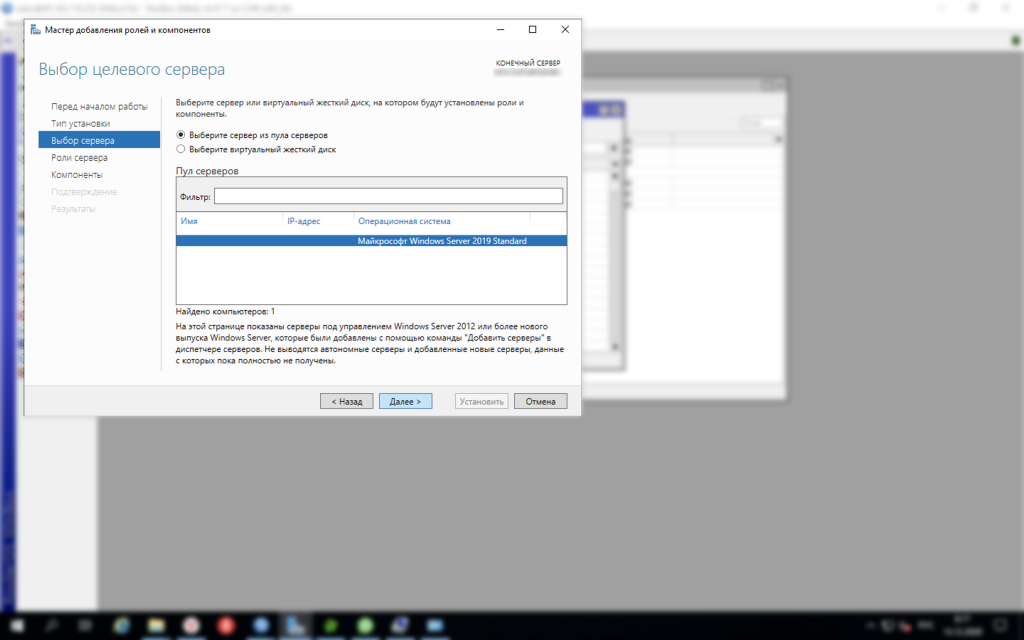
Попадаем в раздел Server Selection. Выбираем текущий сервер. Next.
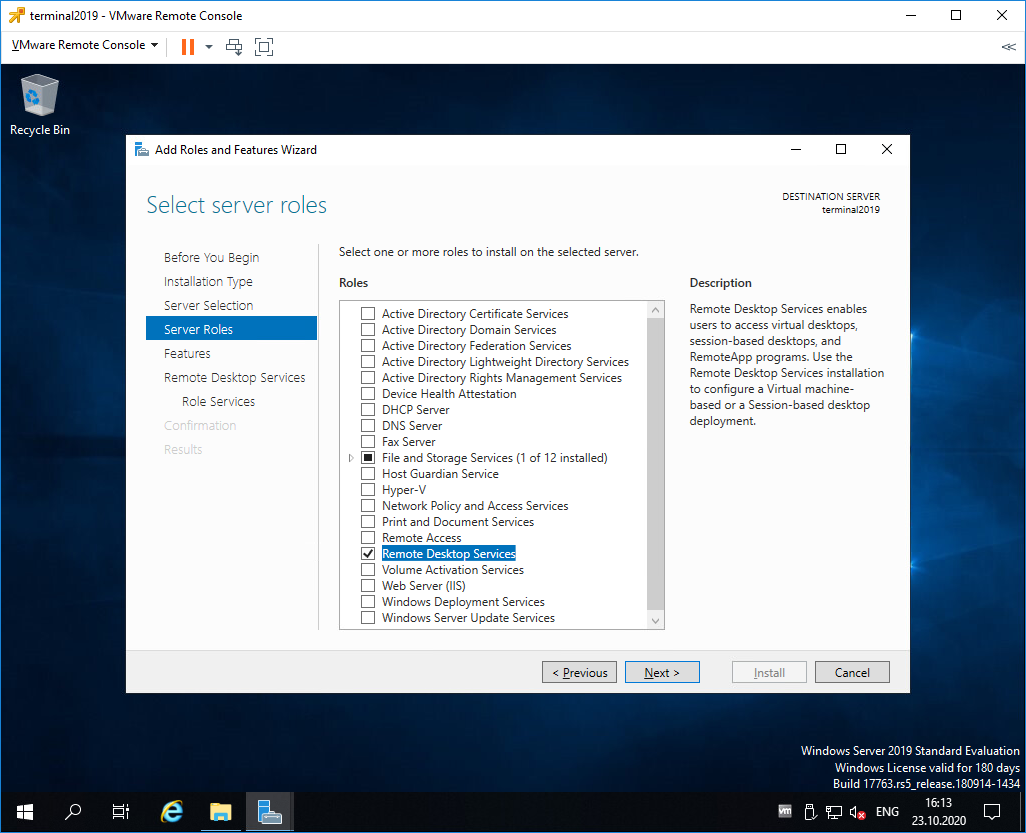
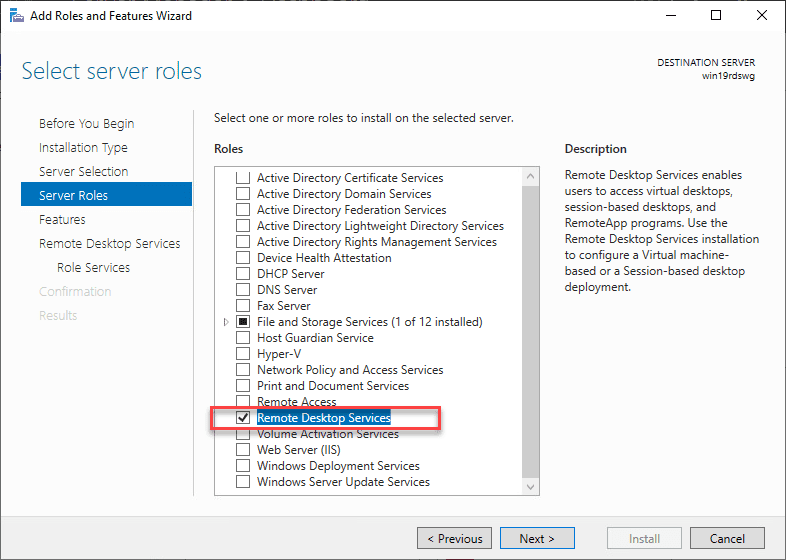
Попадаем в раздел Server Roles. Выделяем галкой роль Remote Desktop Services. Next.
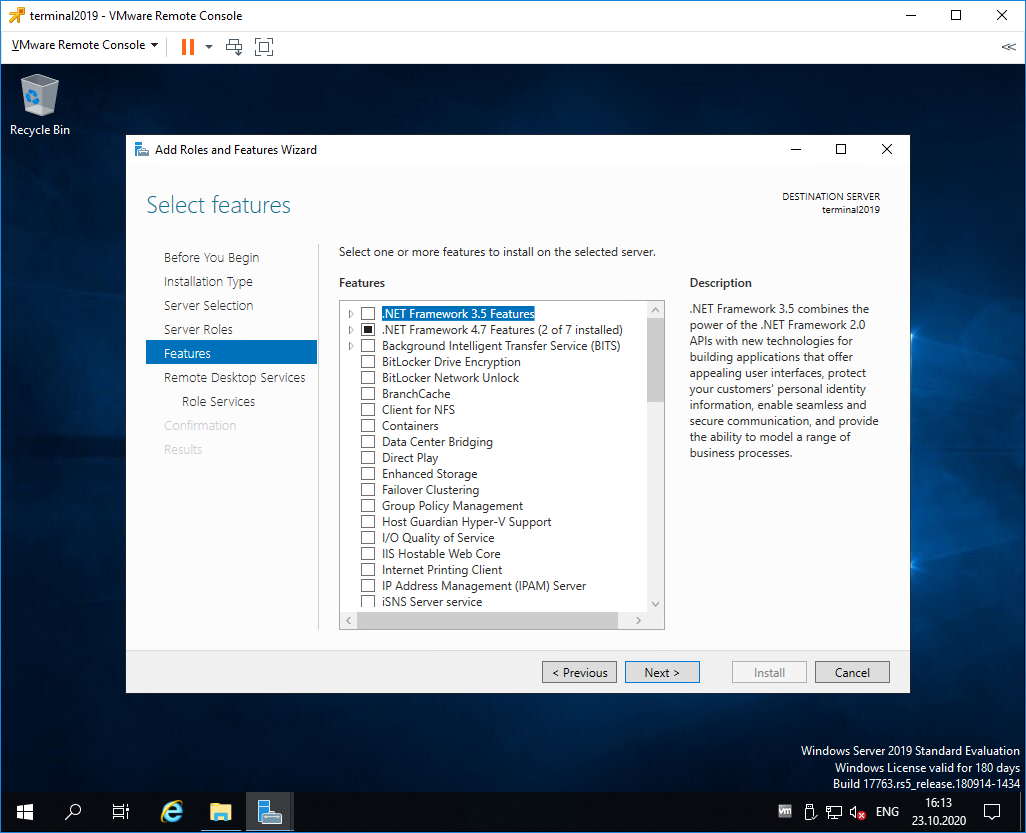
Попадаем в раздел Features. Здесь ничего дополнительно не выбираем. Next.
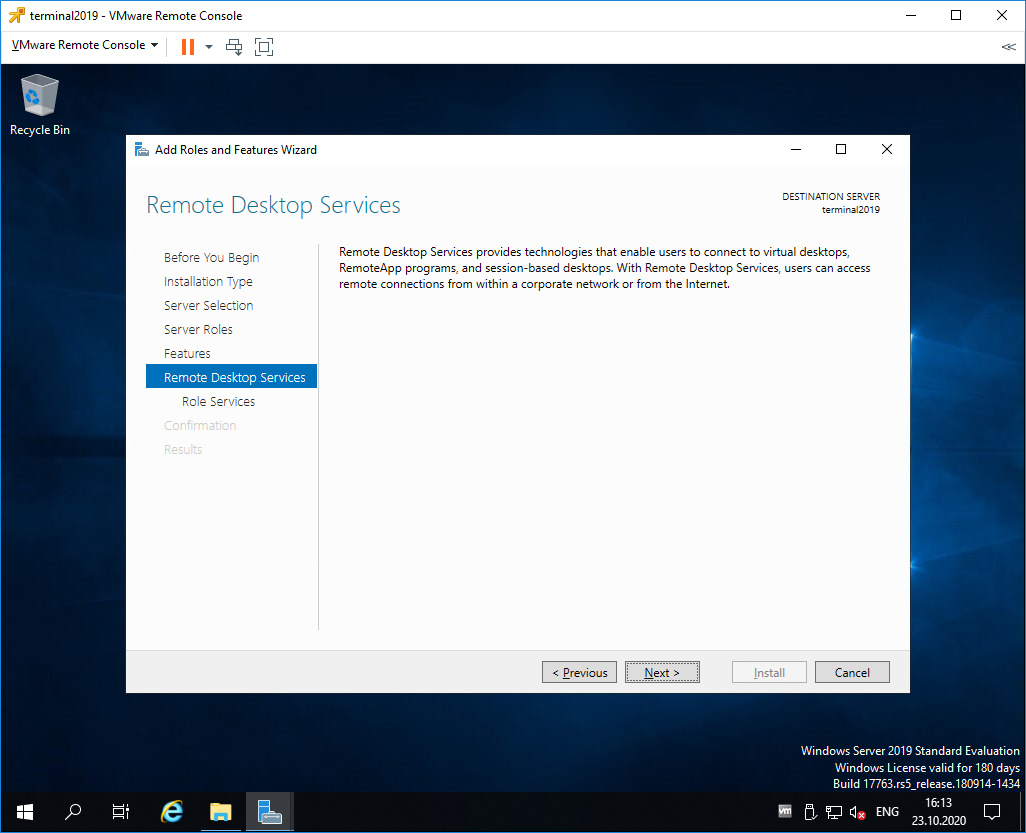
Попадаем в раздел Remote Desktop Services. Ненужное нам окошко. Next.
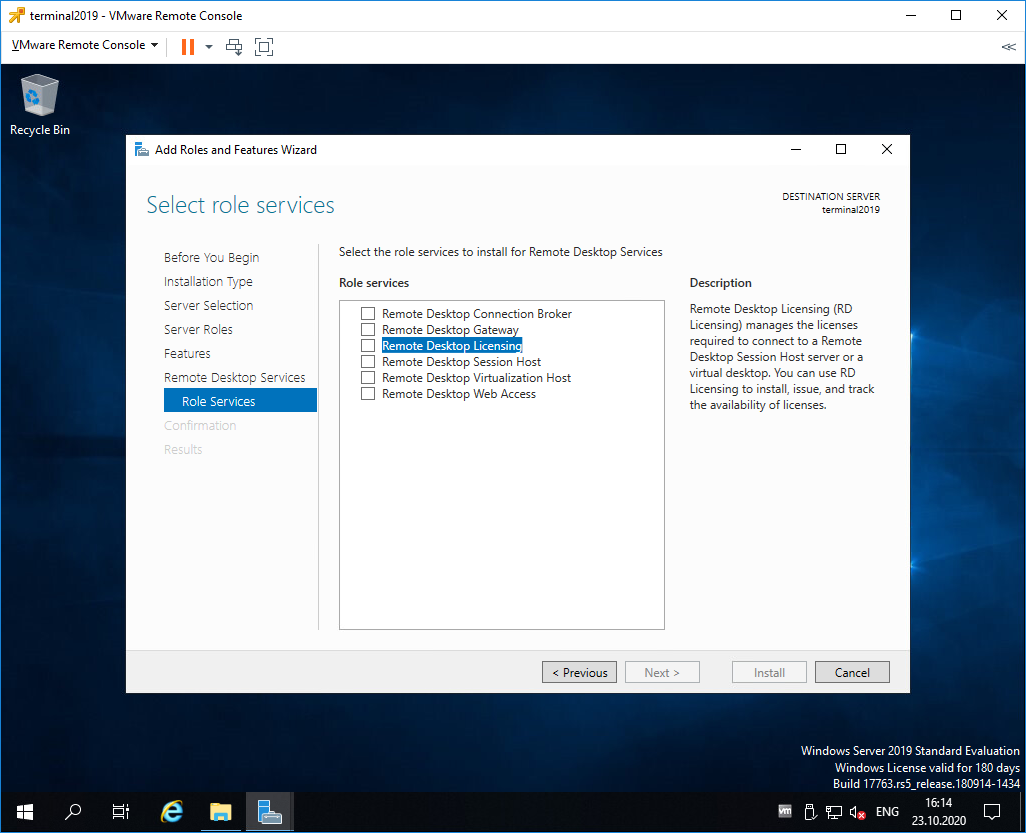
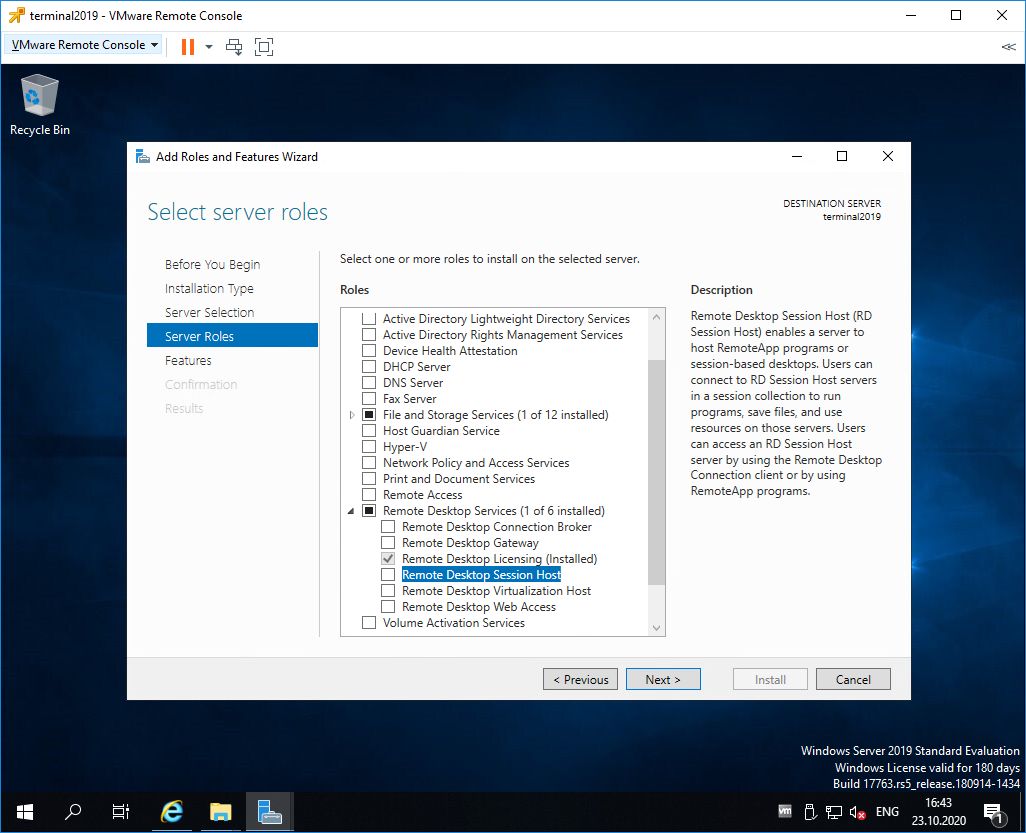
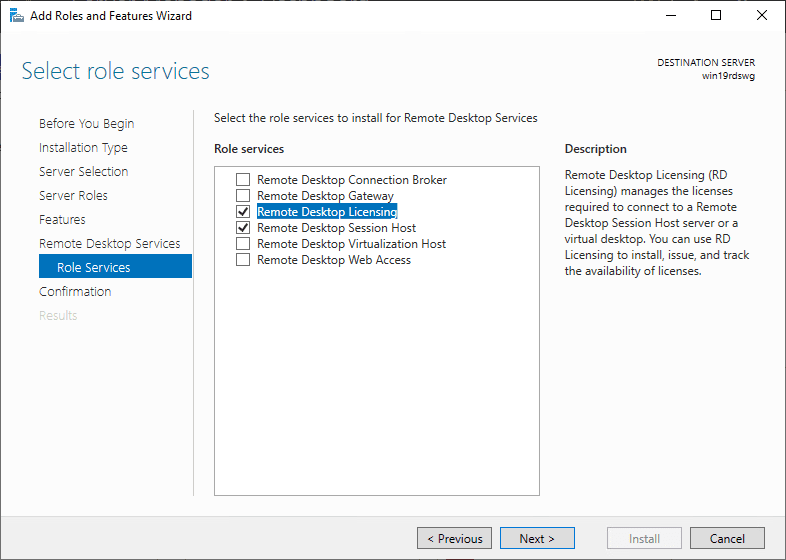
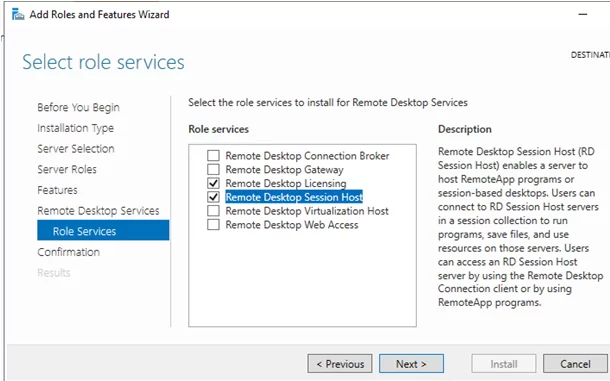
Попадаем в раздел Role Services. Первая роль, которую нам нужно установить, это Remote Desktop Licensing. Выделяем галкой.
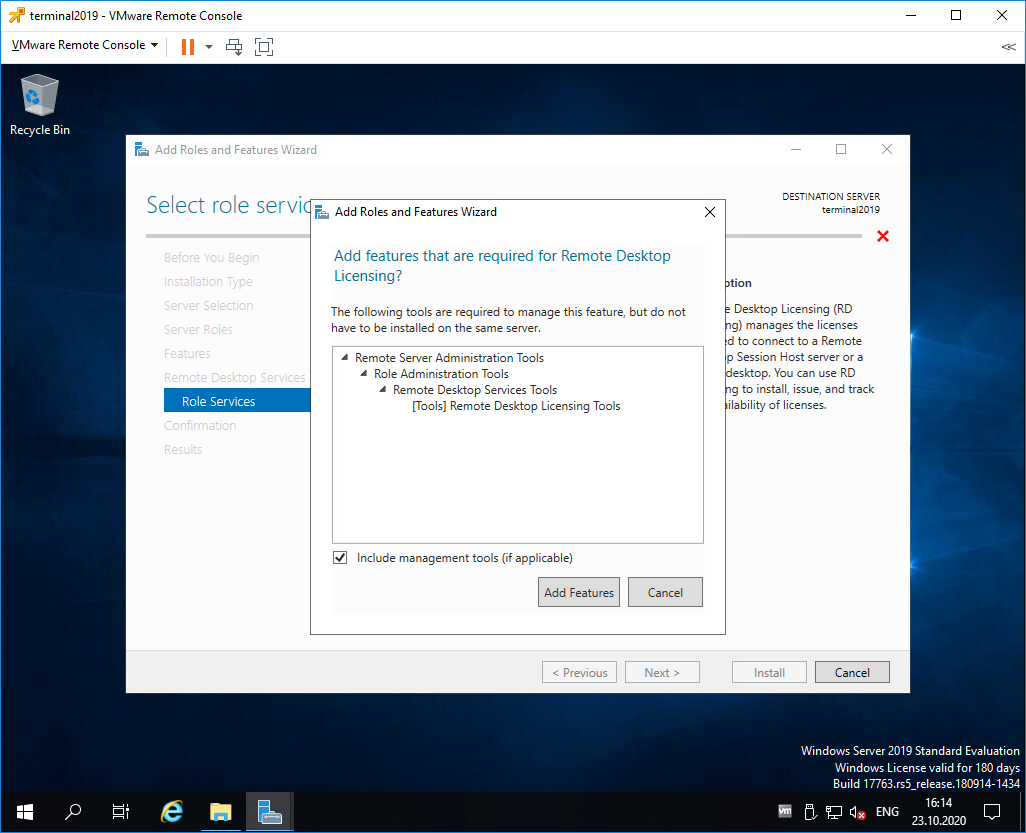
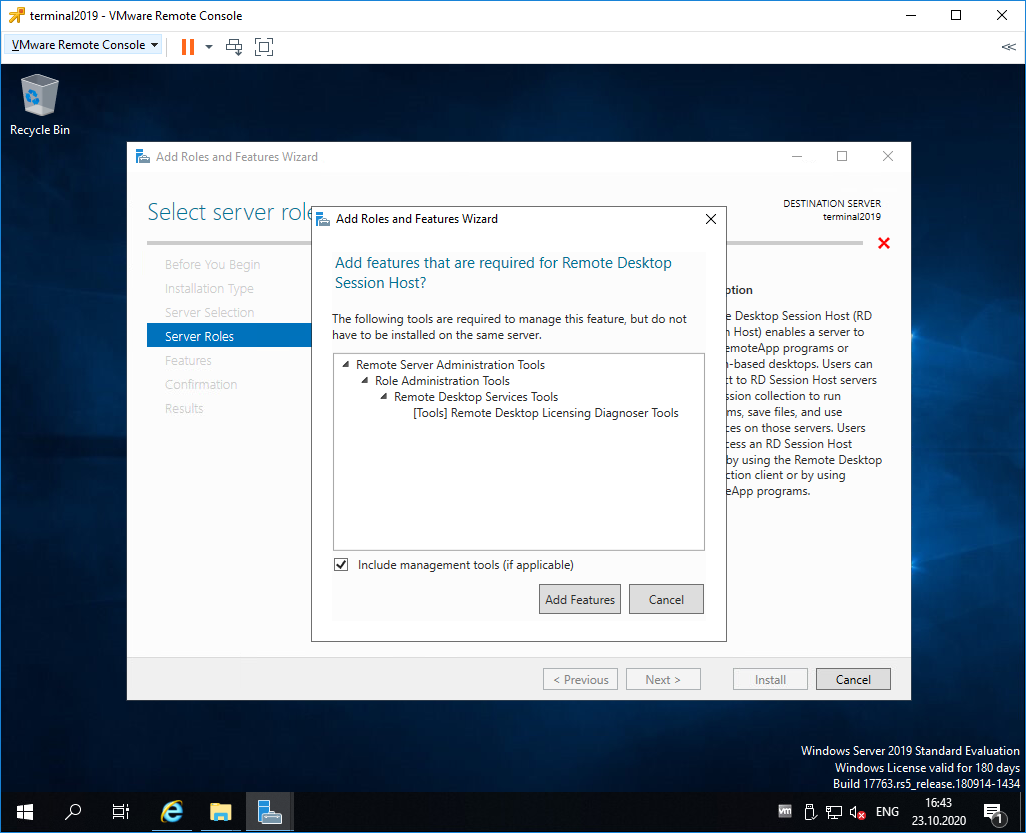
Нам предлагают установить дополнительные фичи, которые требуются для данной роли. Соглашаемся, Add Features.
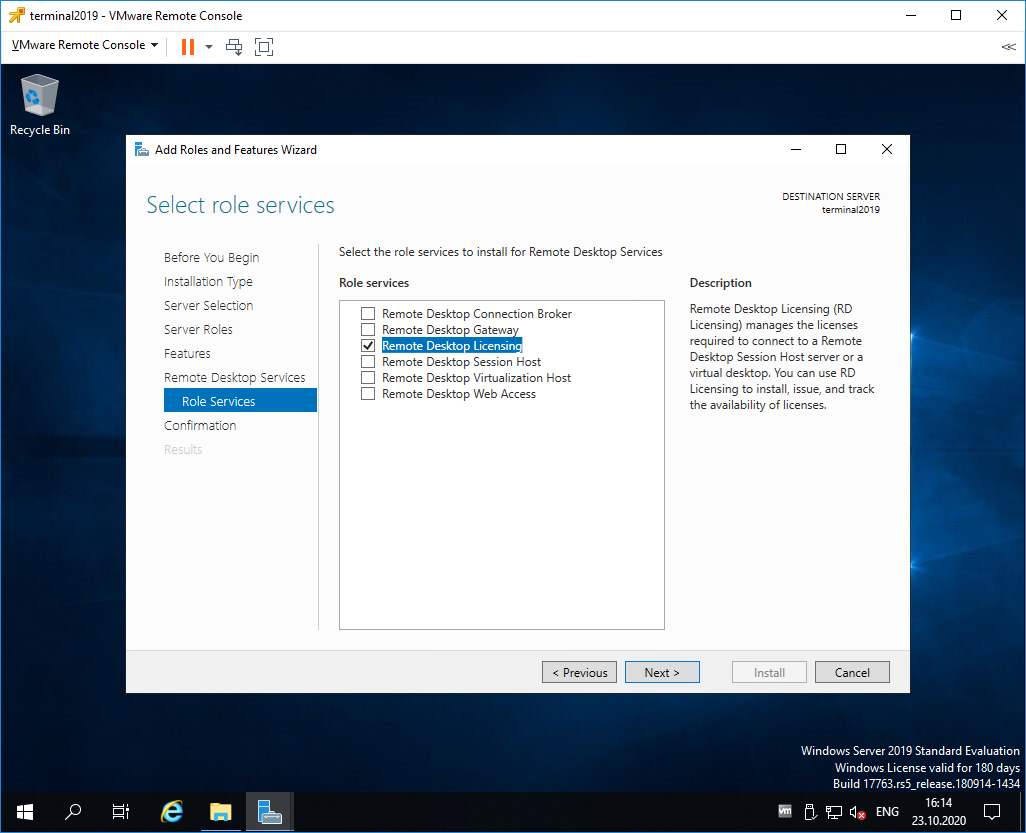
Remote Desktop Licensing выделено галкой, Next.
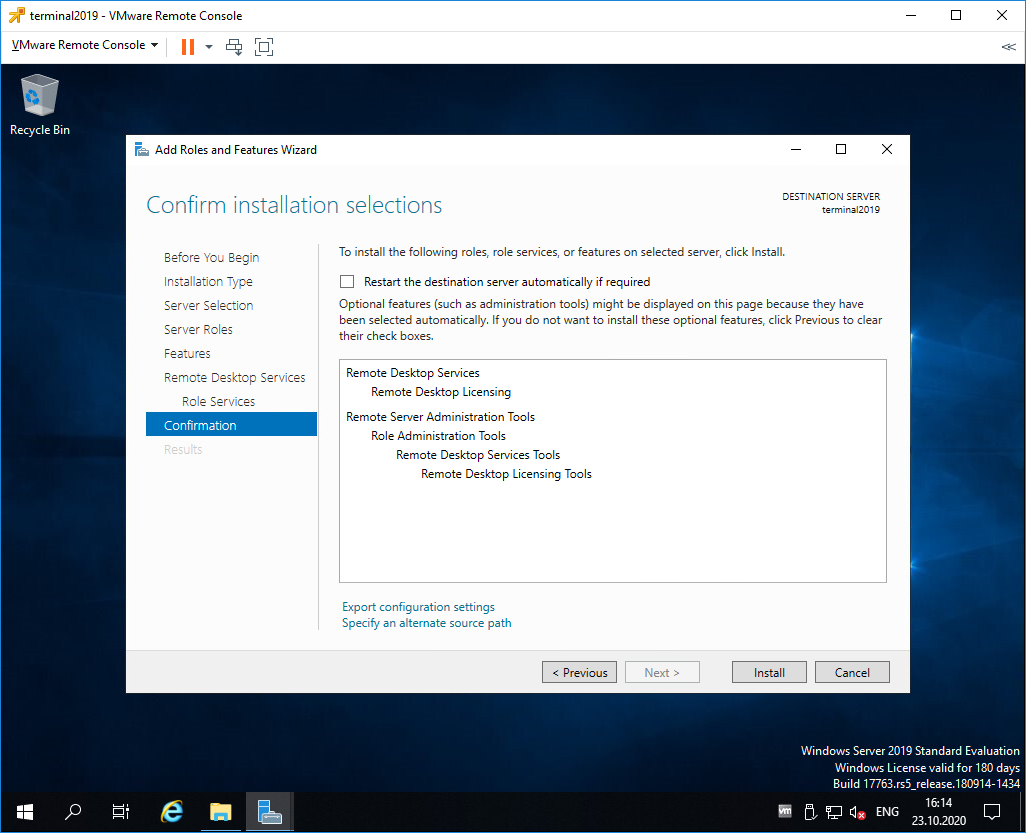
Попадаем в раздел Confirmation. Install.
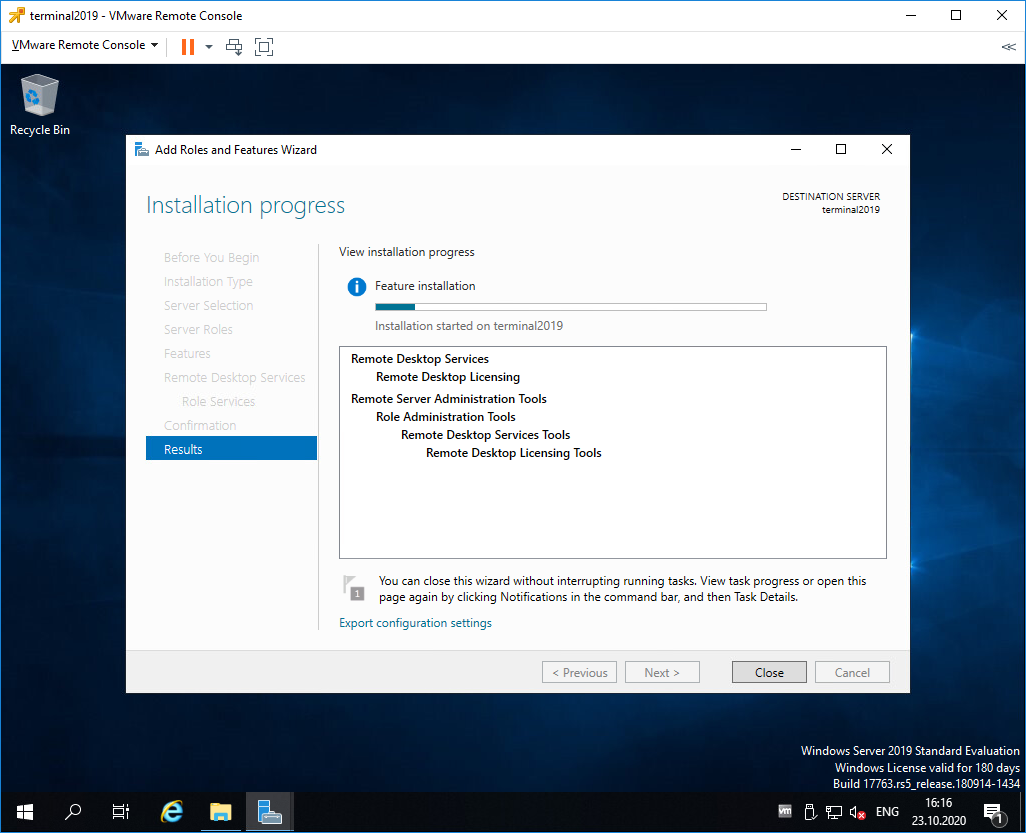
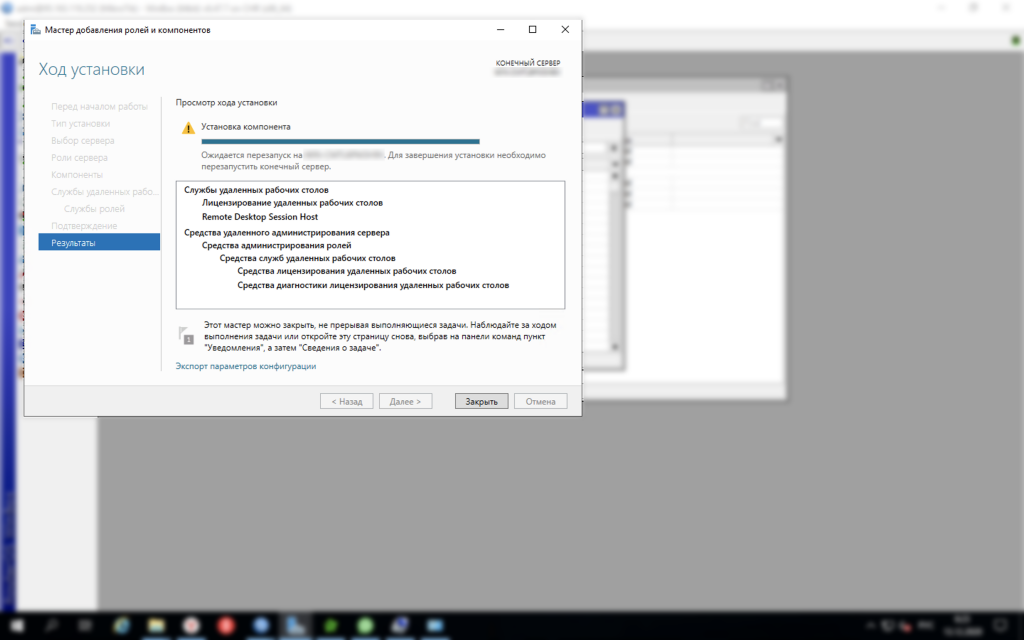
Начинается установка роли.
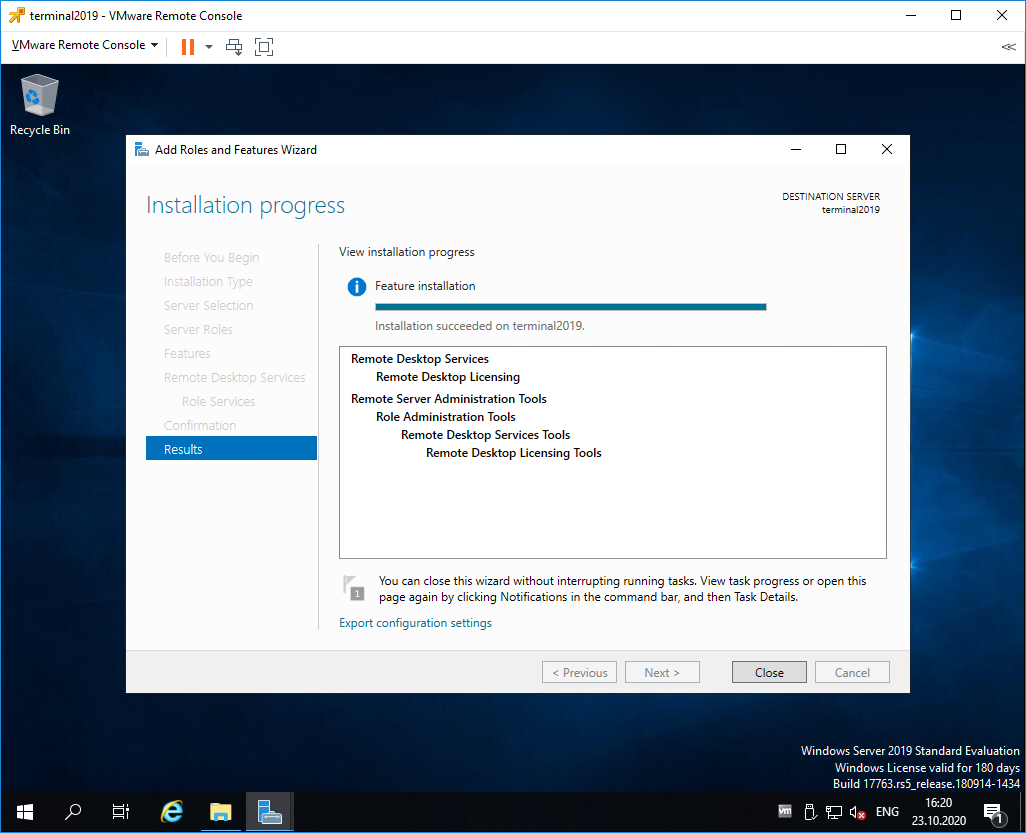
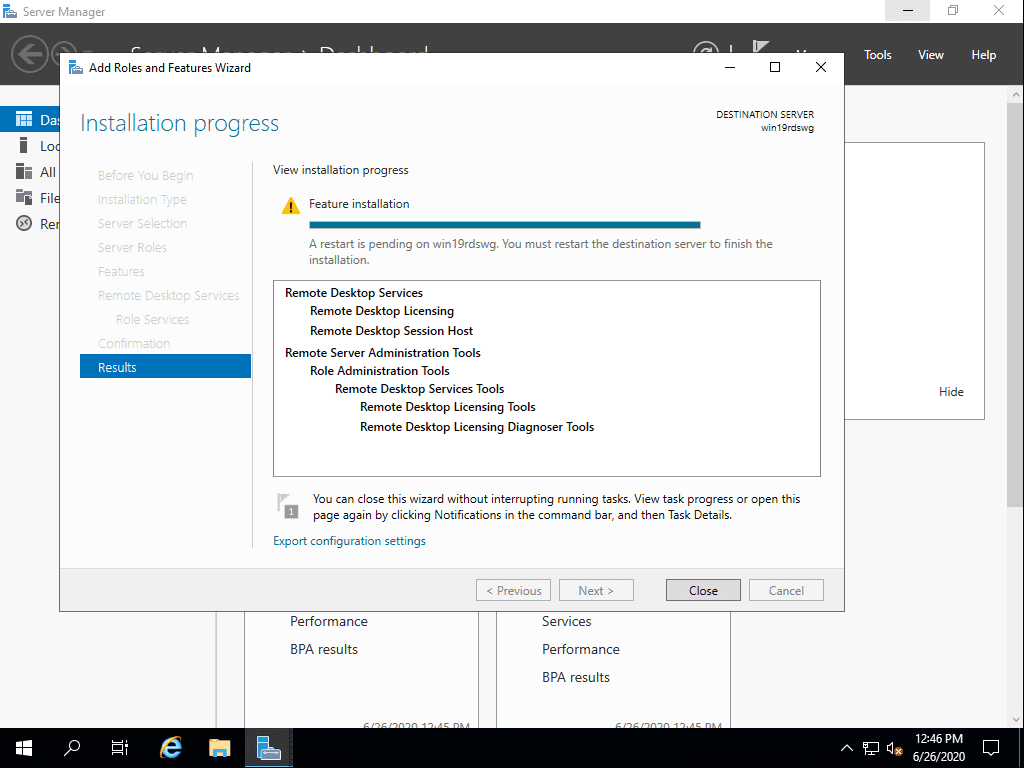
Роль Remote Desktop Licensing успешно установлена. Примечательно, что перезагрузка не требуется.
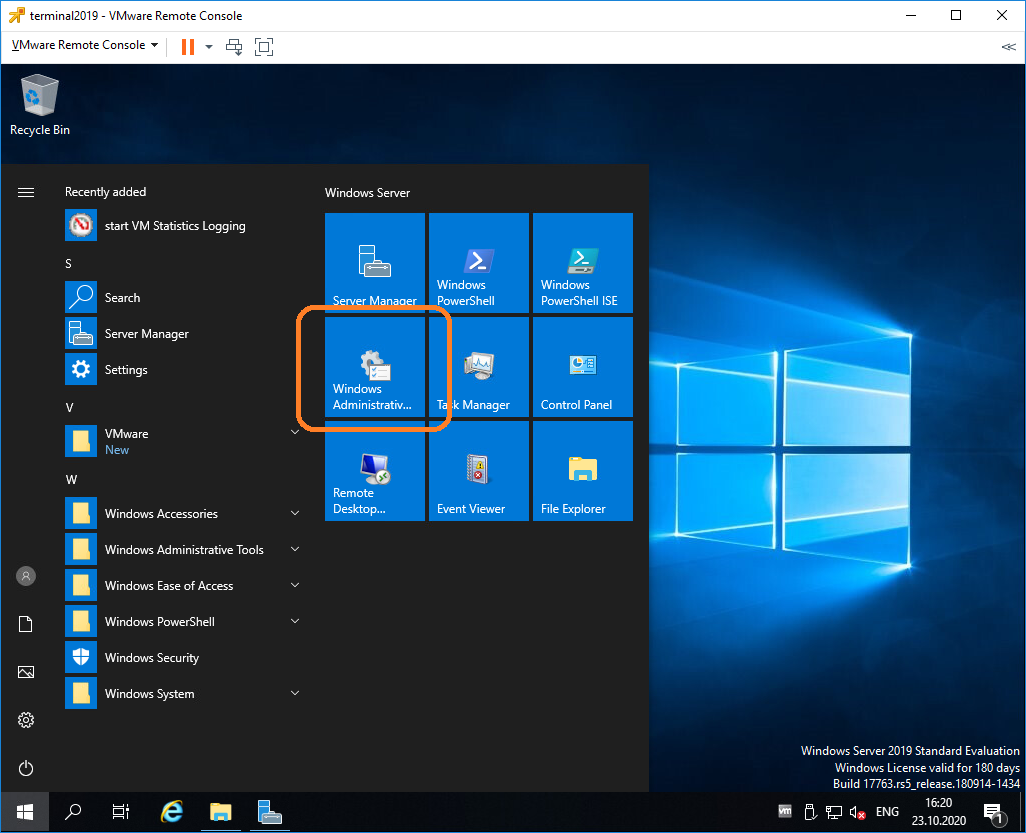
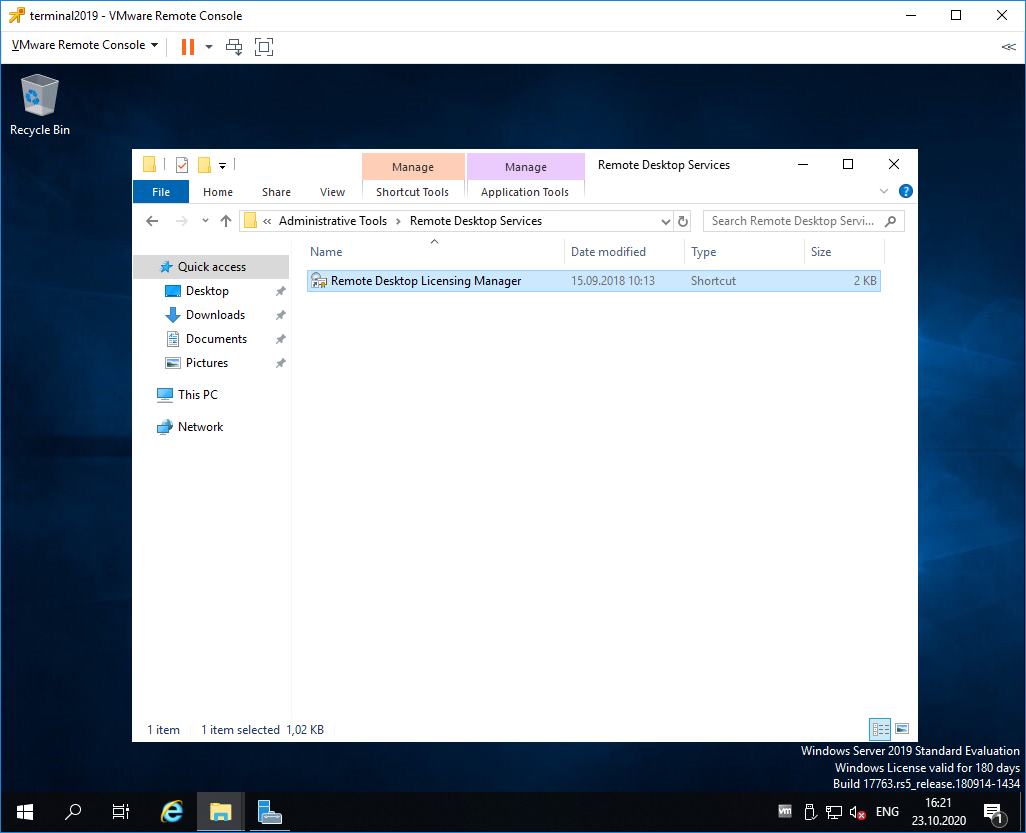
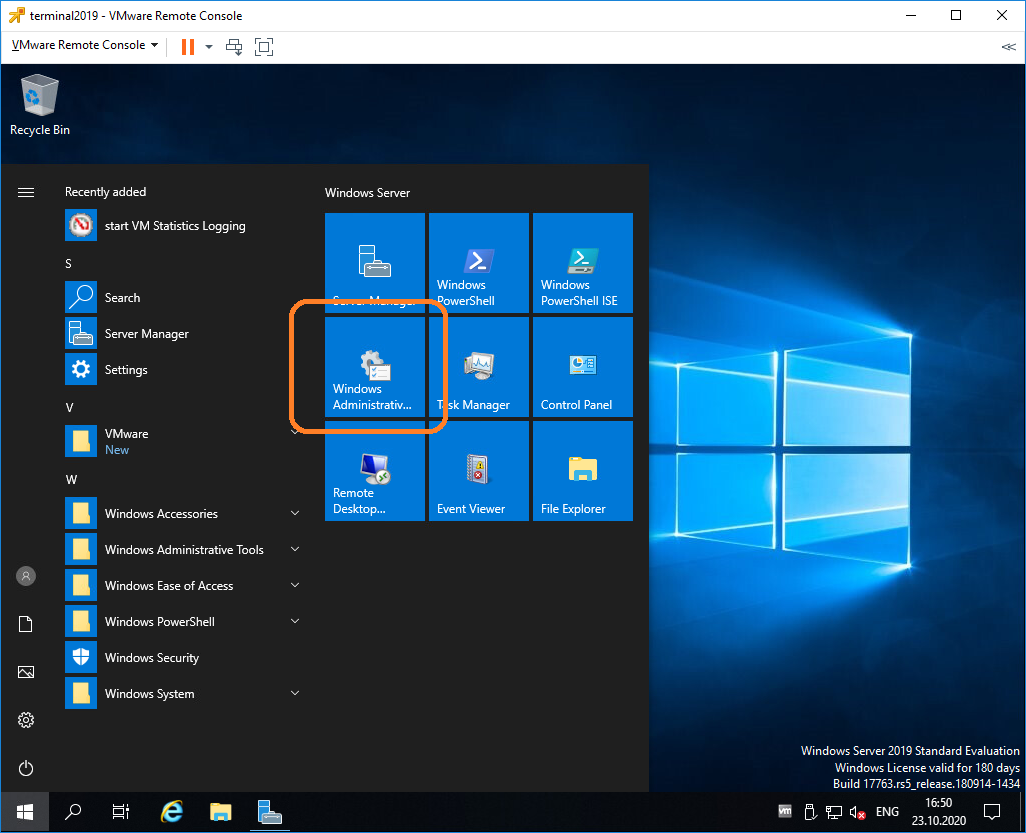
Открываем Windows Administrative Tools.
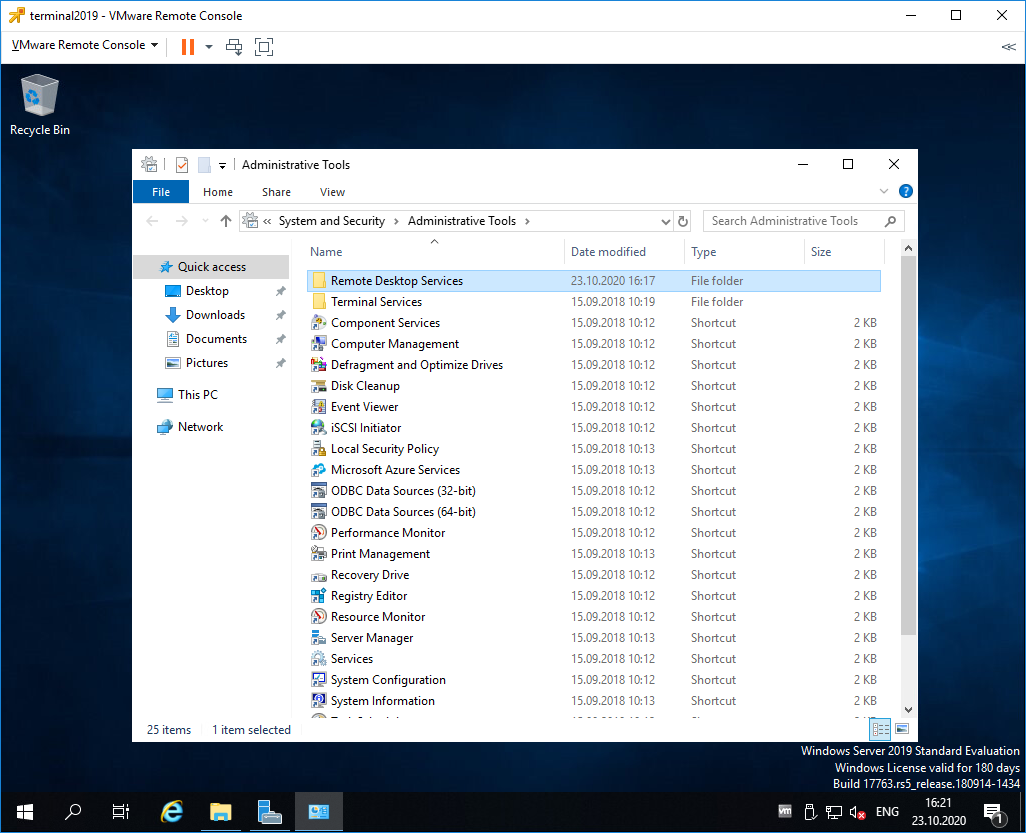
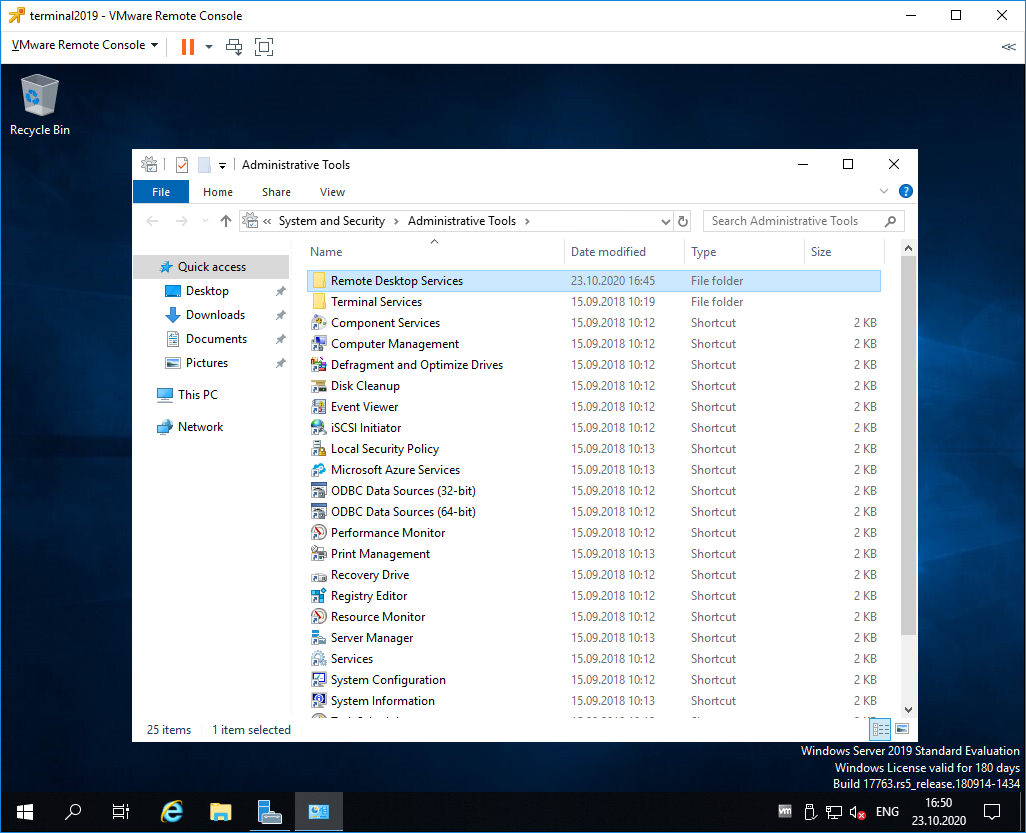
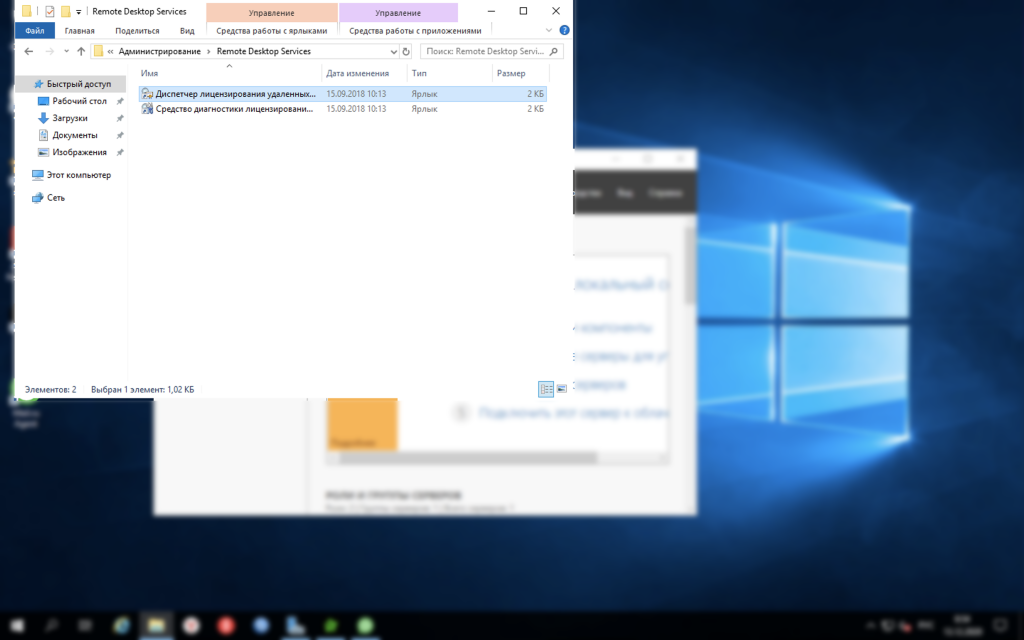
Переходим в папку Remote Desktop Services.
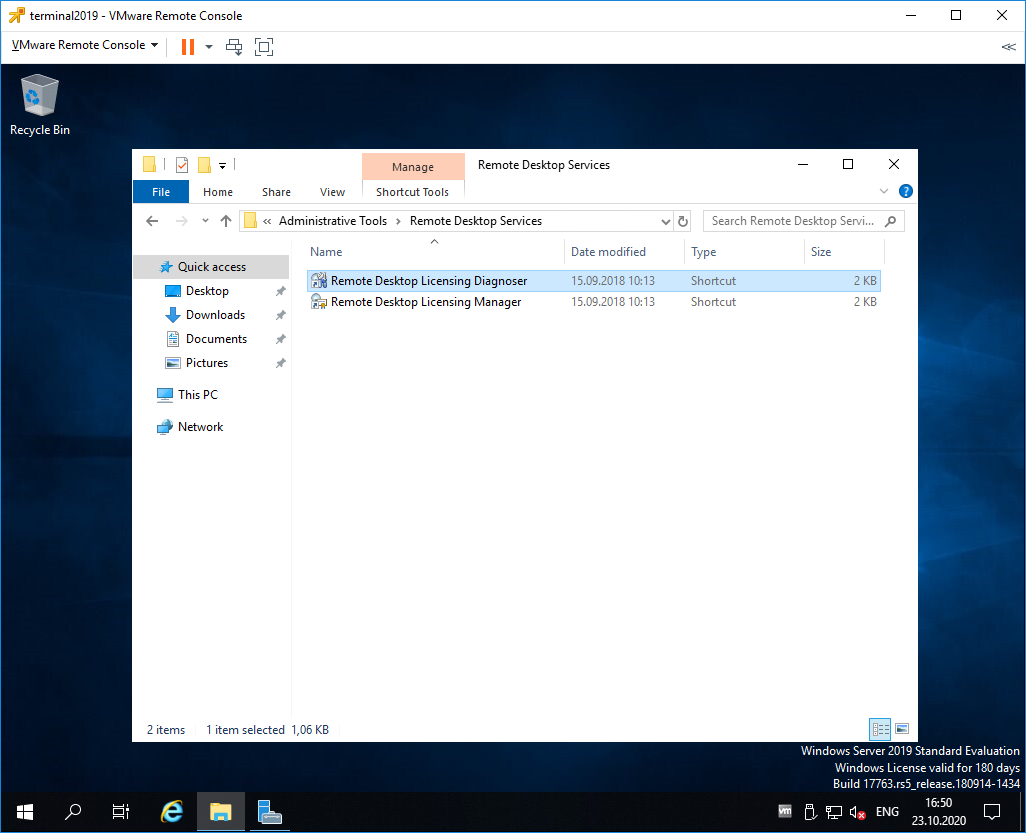
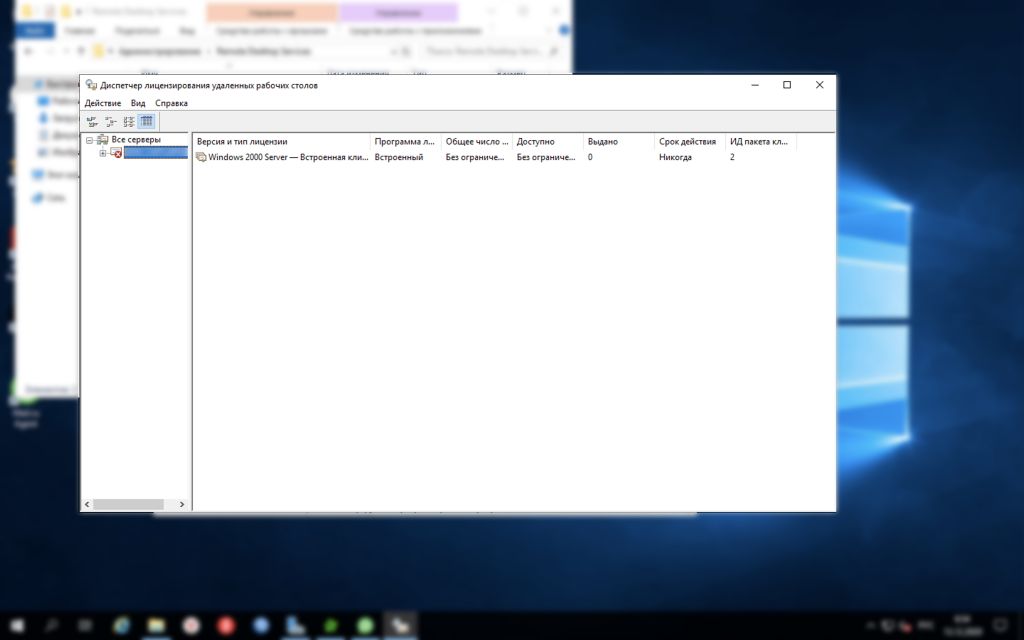
Запускаем оснастку Remote Desktop Licensing Manager.
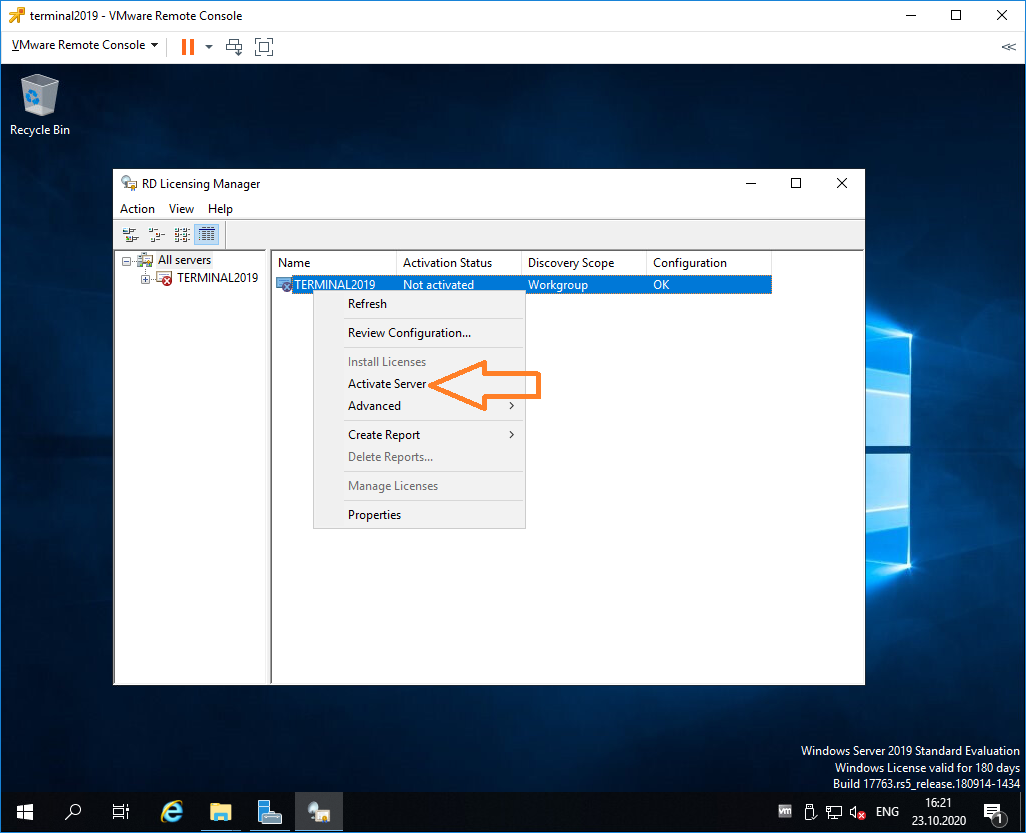
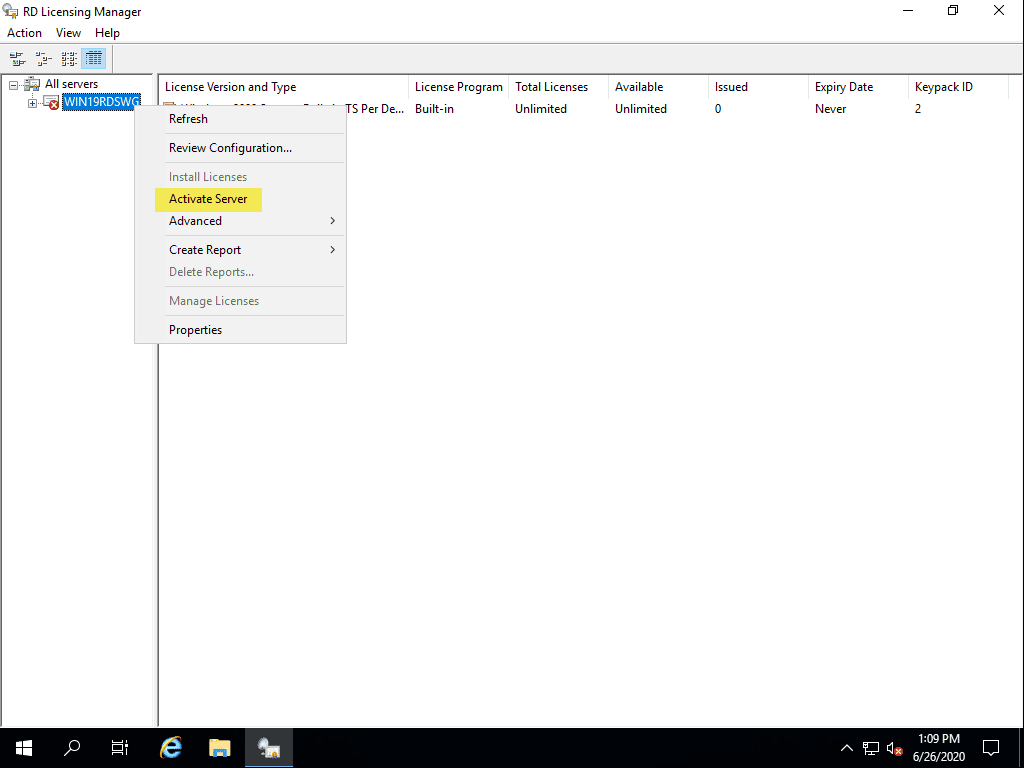
Выбираем наш сервер, правой кнопкой — активировать.
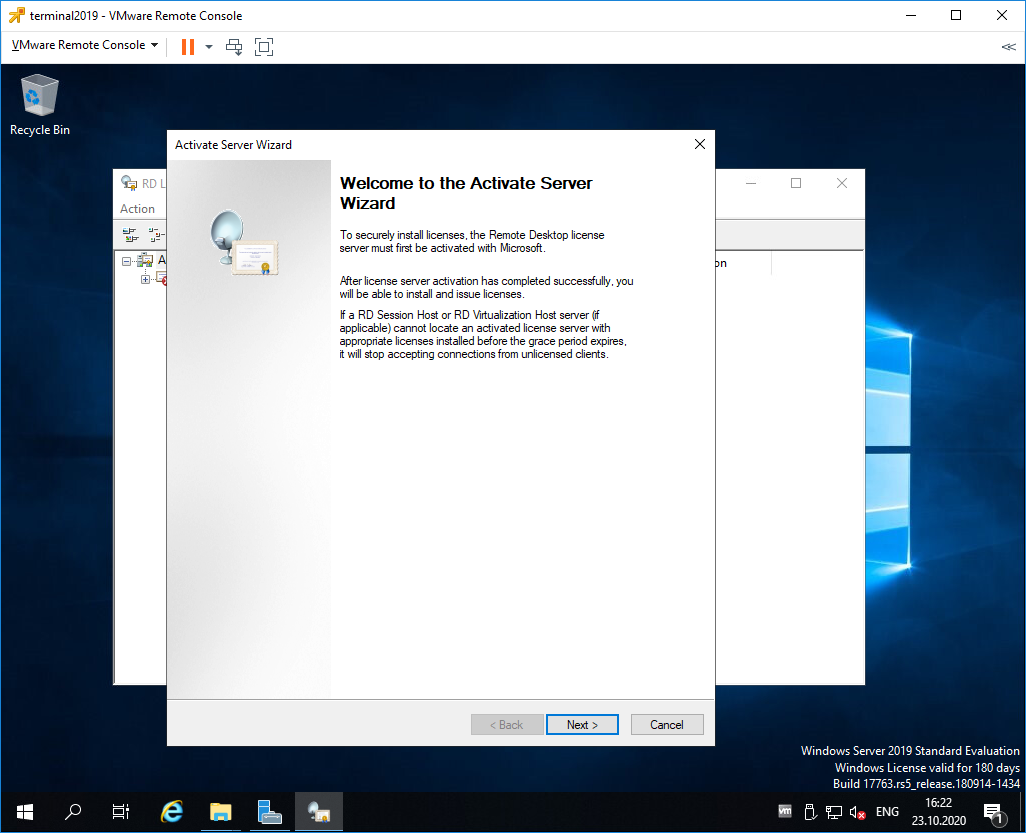
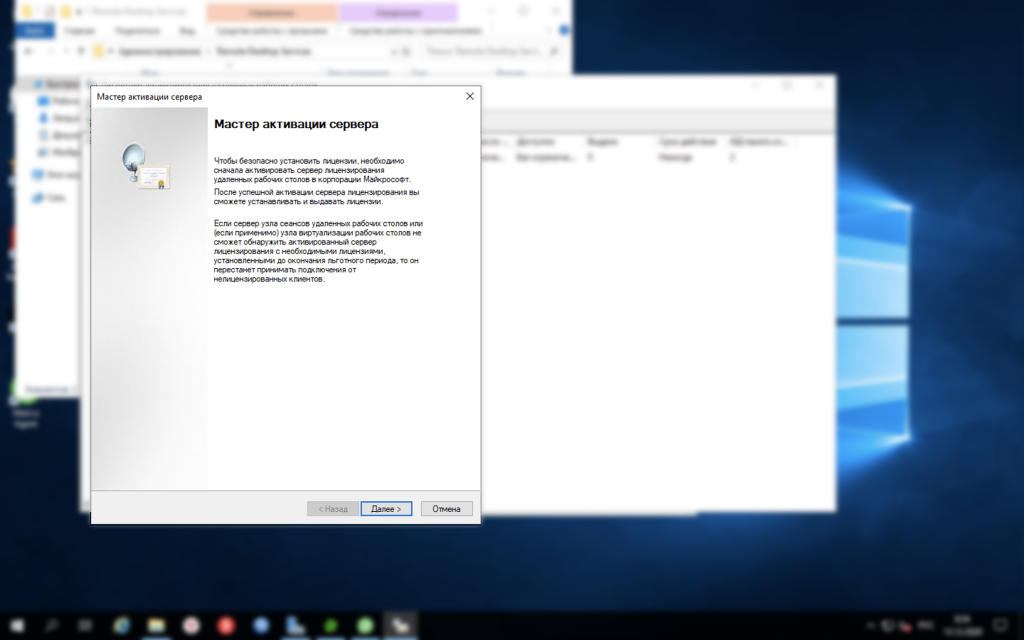
Открывается окно активации. Next.
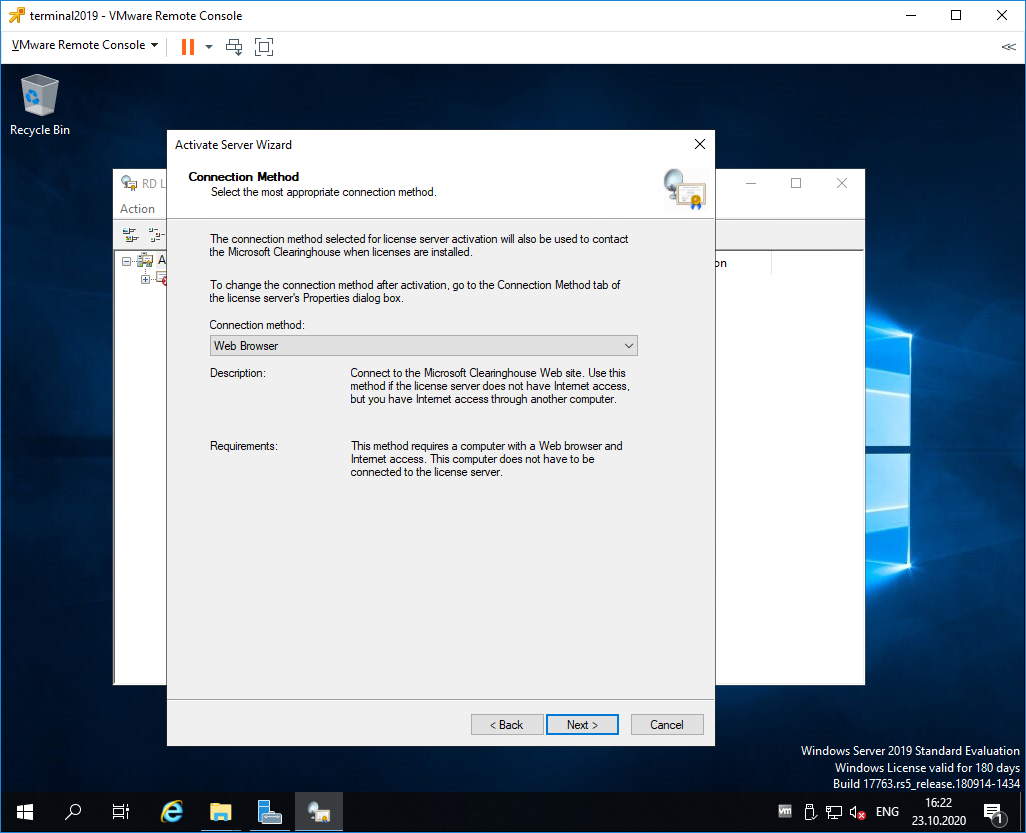
Выбираем метод соединения Web Browser. Next.
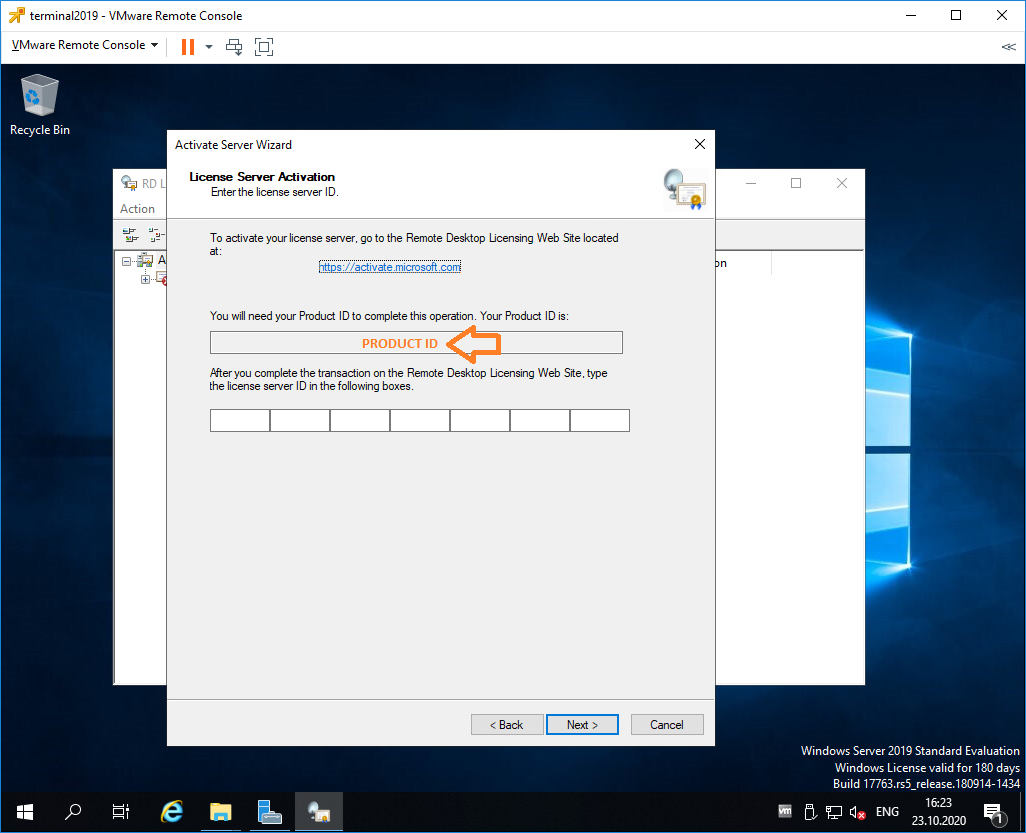
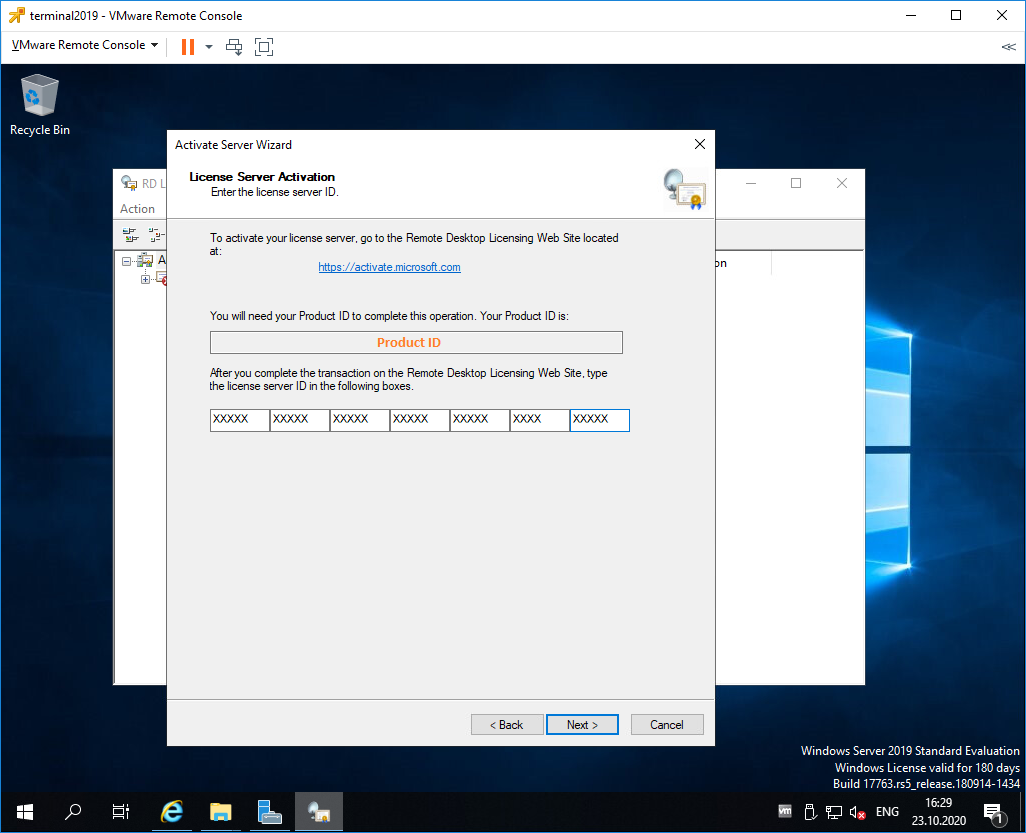
Получаем код продукта который нам понадобится для активации (Product ID). Копируем.
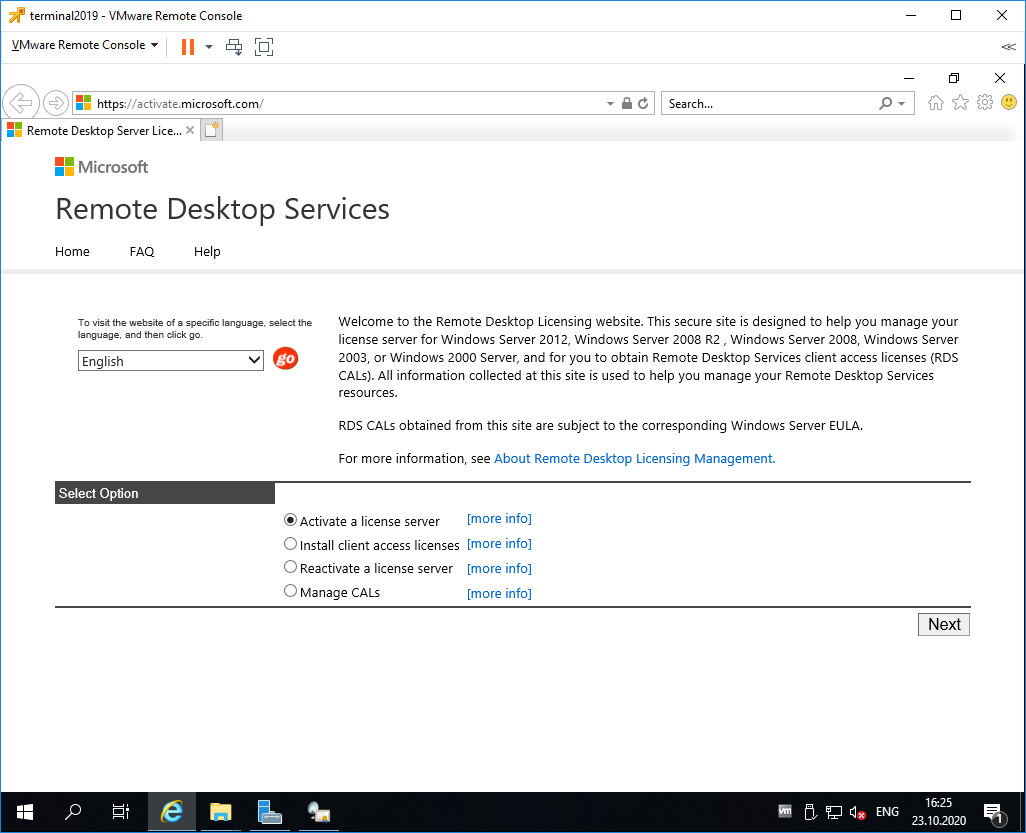
В браузере открываем сайт https://activate.microsoft.com/
Выбираем «Activate a license server». Next.
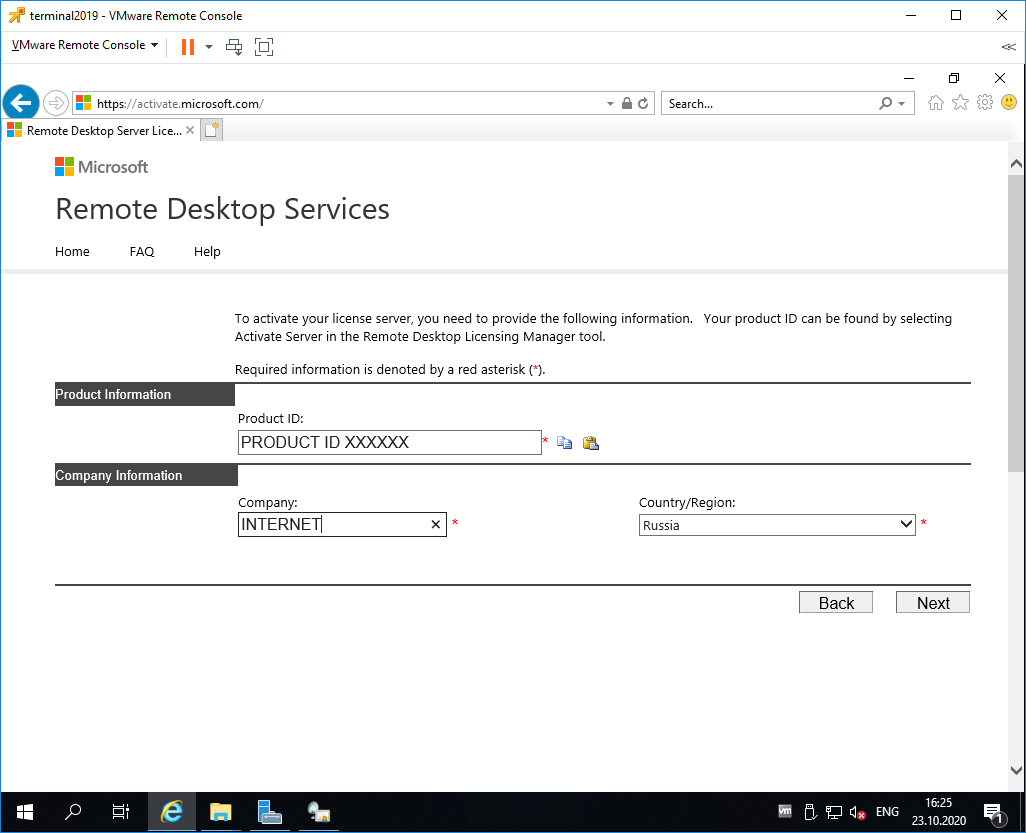
Вводим Product ID полученный ранее, организацию и любую страну или регион. Next. Next.
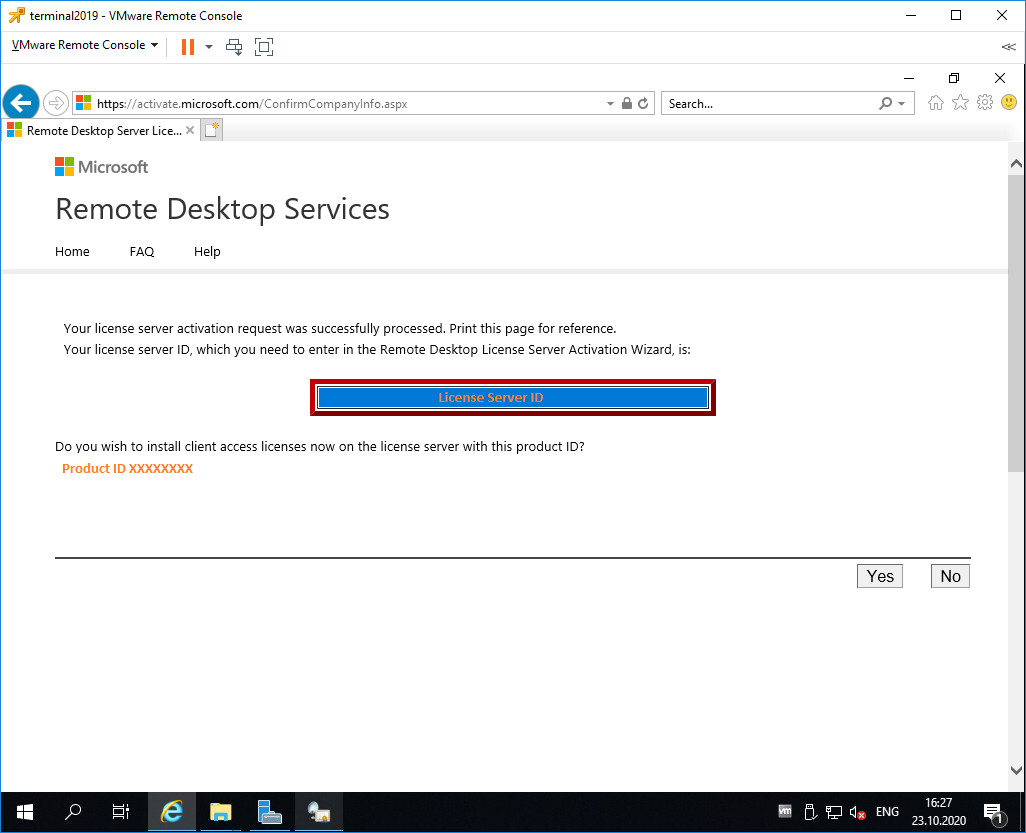
Если все сделано правильно, то мы получим необходимый код сервера лицензирования. Копируем его. На вопрос «Do you wish to install client access licenses now on the license server with this product ID?» отвечаем «Yes» и пока возвращаемся к терминальному серверу, к текущему окну ещё вернёмся.
Вводим код в открытом мастере, жмём Next.
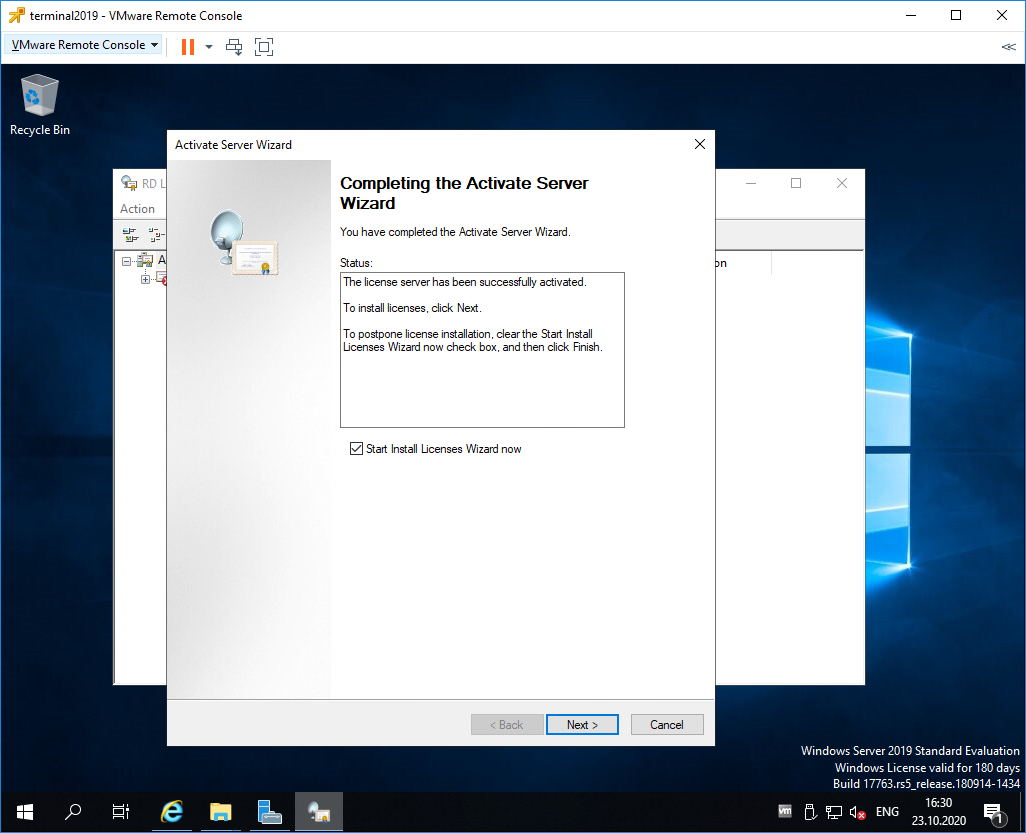
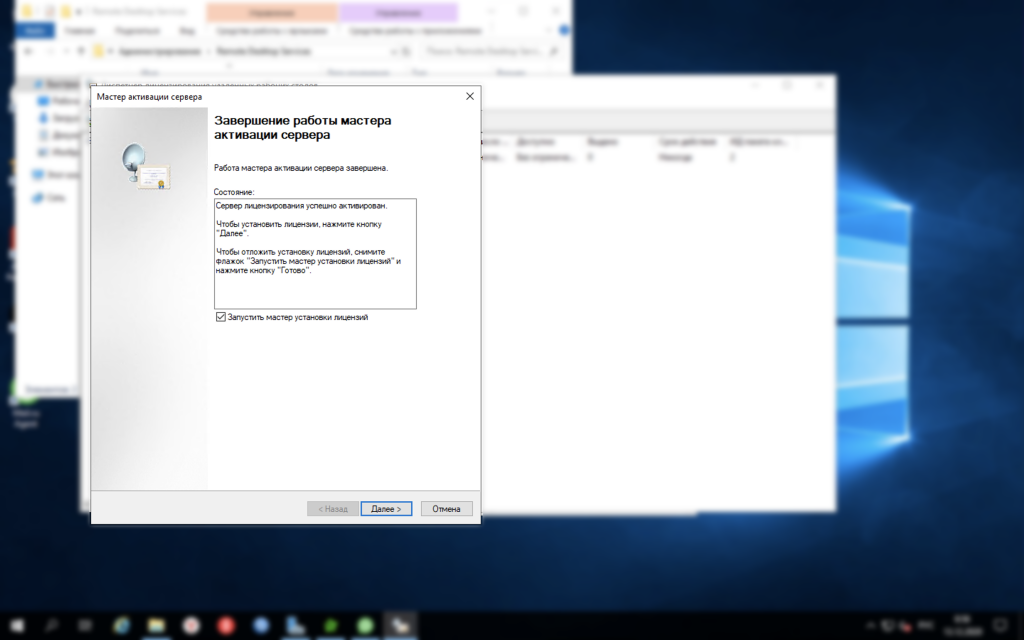
Устанавливаем галку «Start Install Licenses Wizard now». Next.
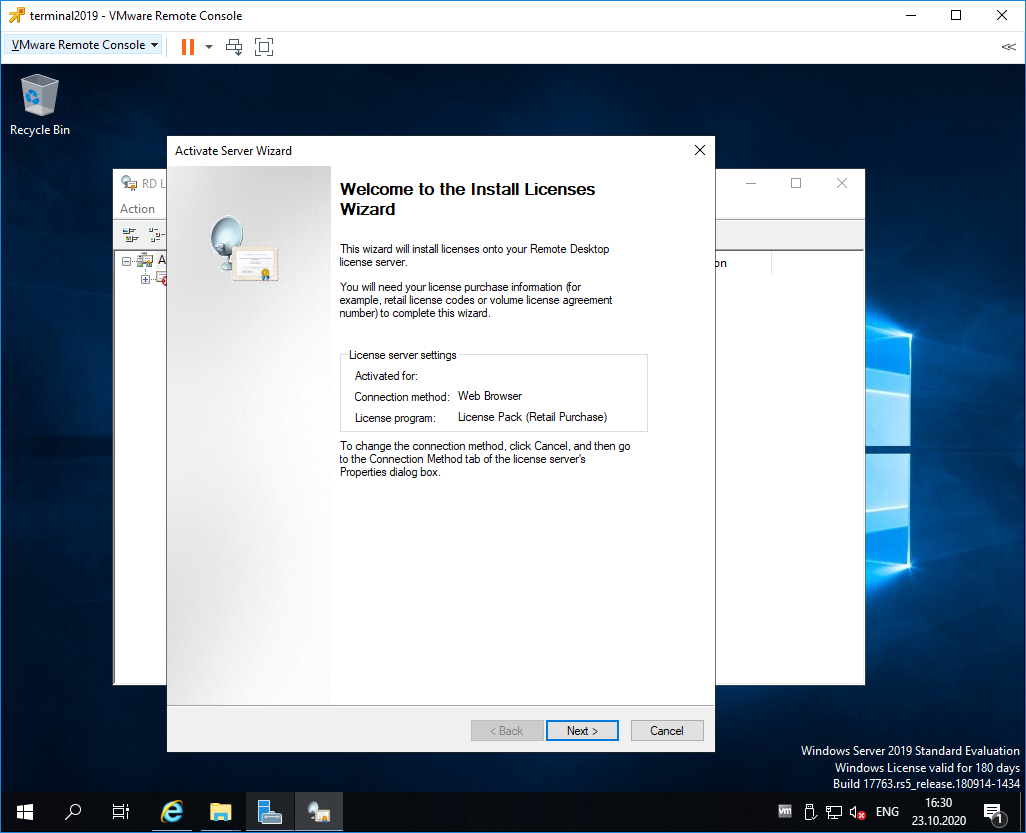
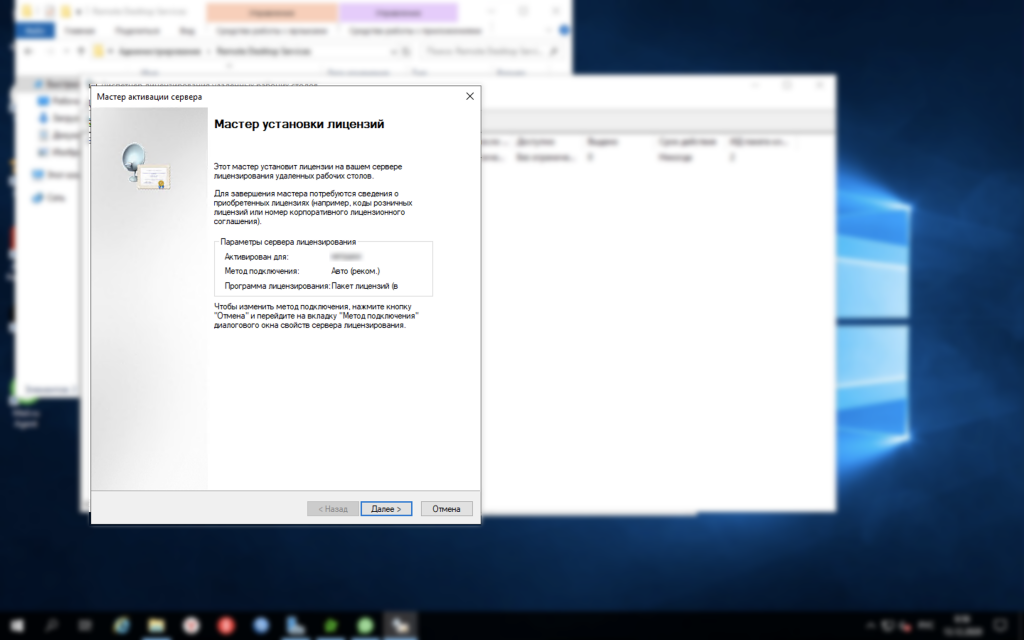
Открывается мастер установки лицензий. Next.
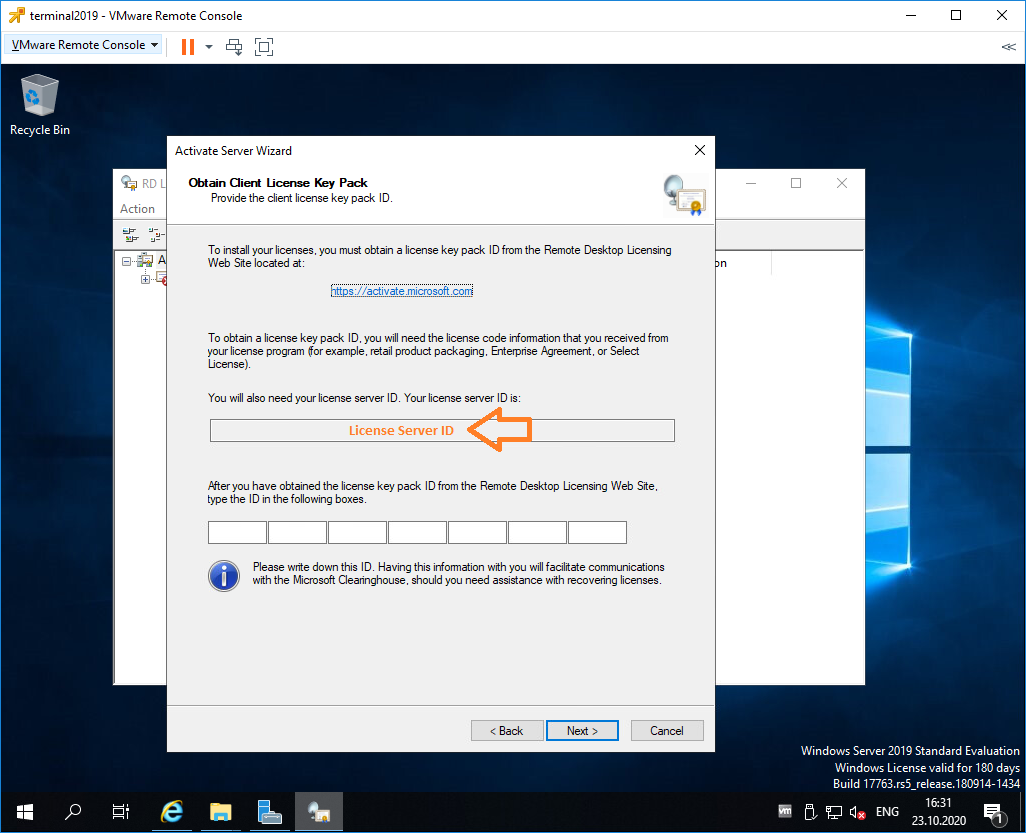
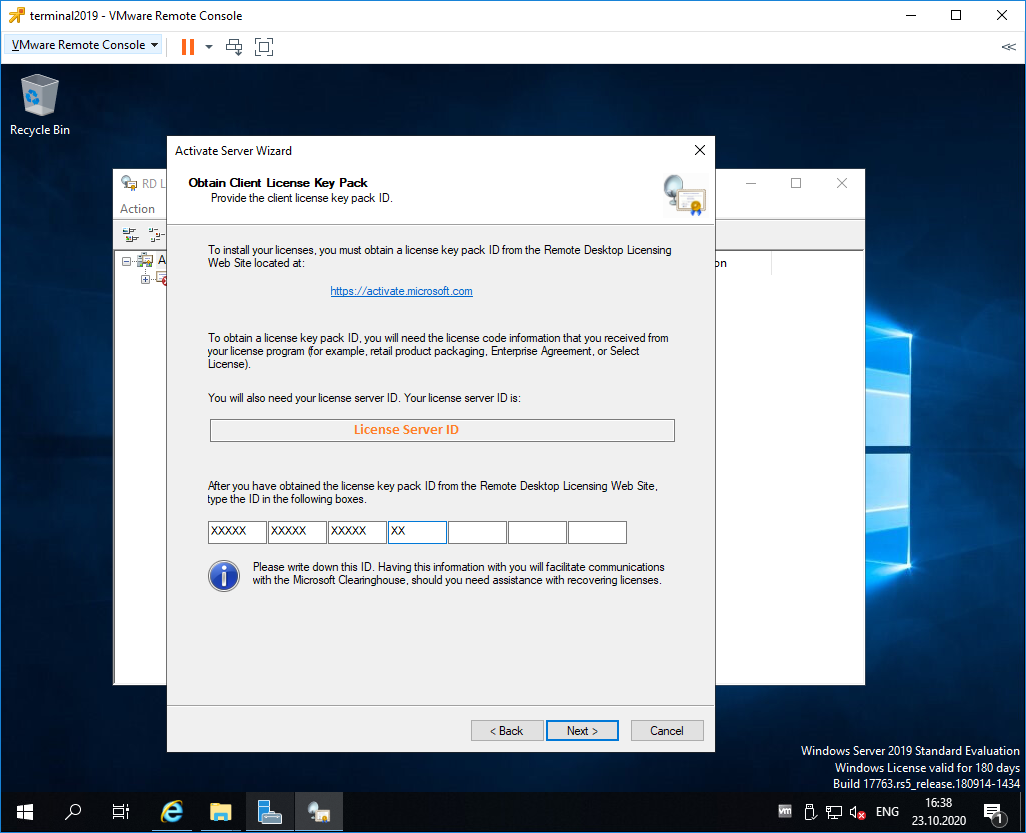
Нас просят ввести license key pack ID. Возвращаемся к браузеру.
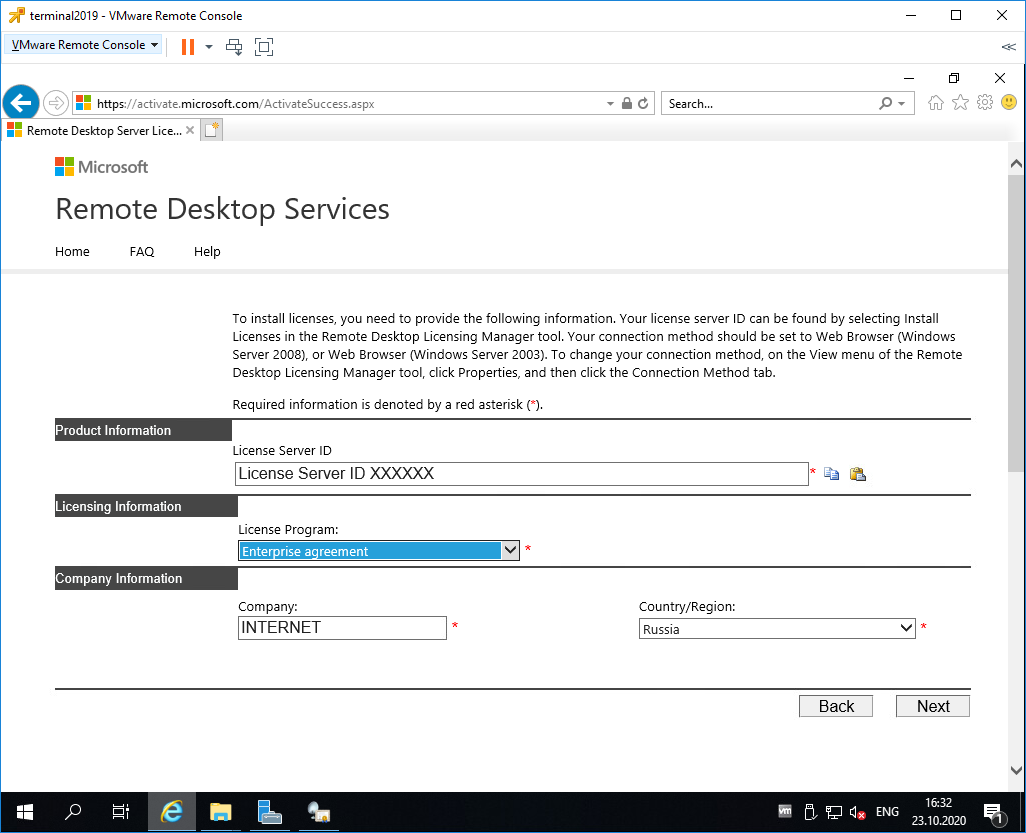
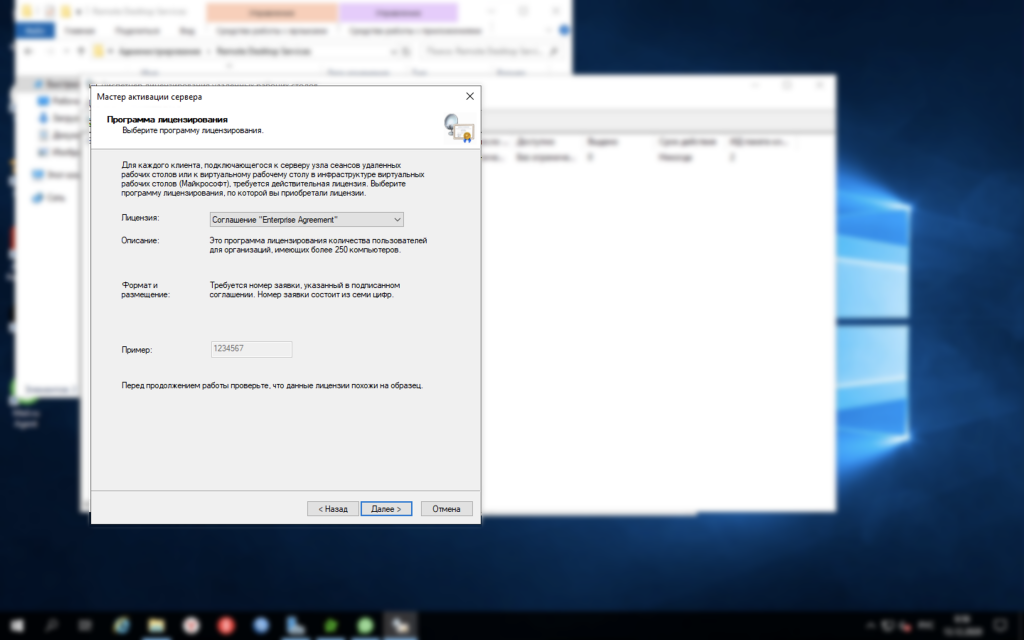
Вставляем License Server ID, в качестве программы лицензирования, по идее он уже должен сюда переместиться из предыдущего окна. License Program выбираем Enterprise agreement. Указываем компанию и страну. Next.
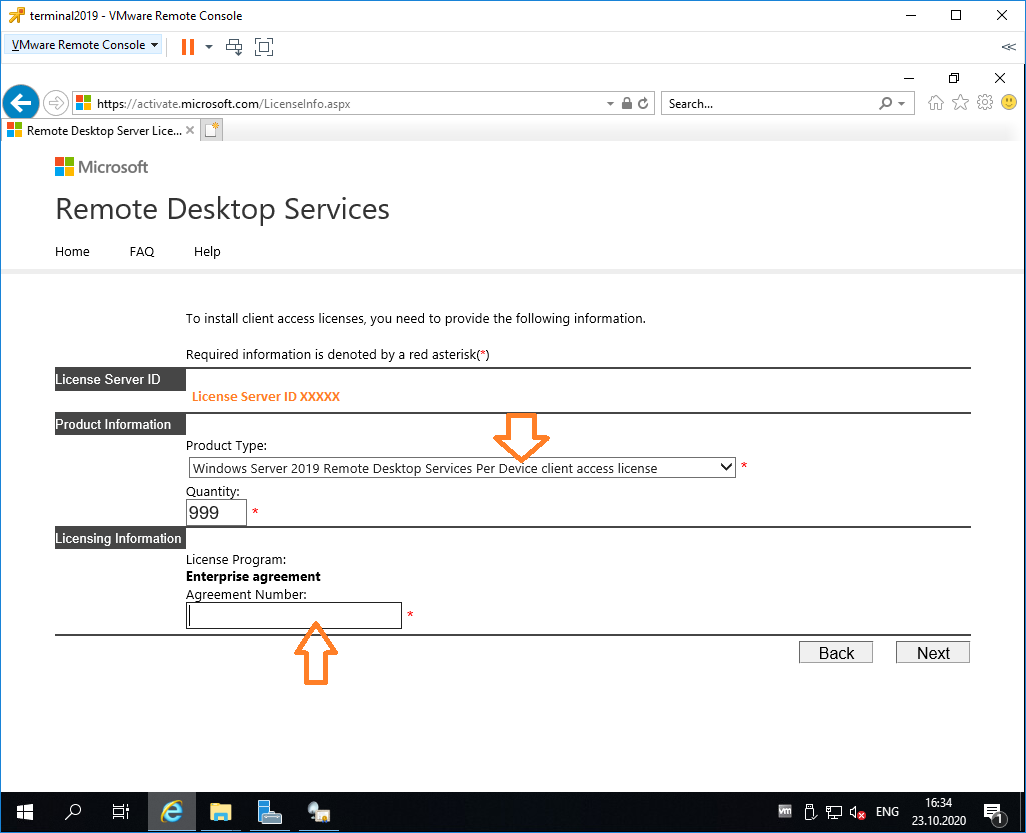
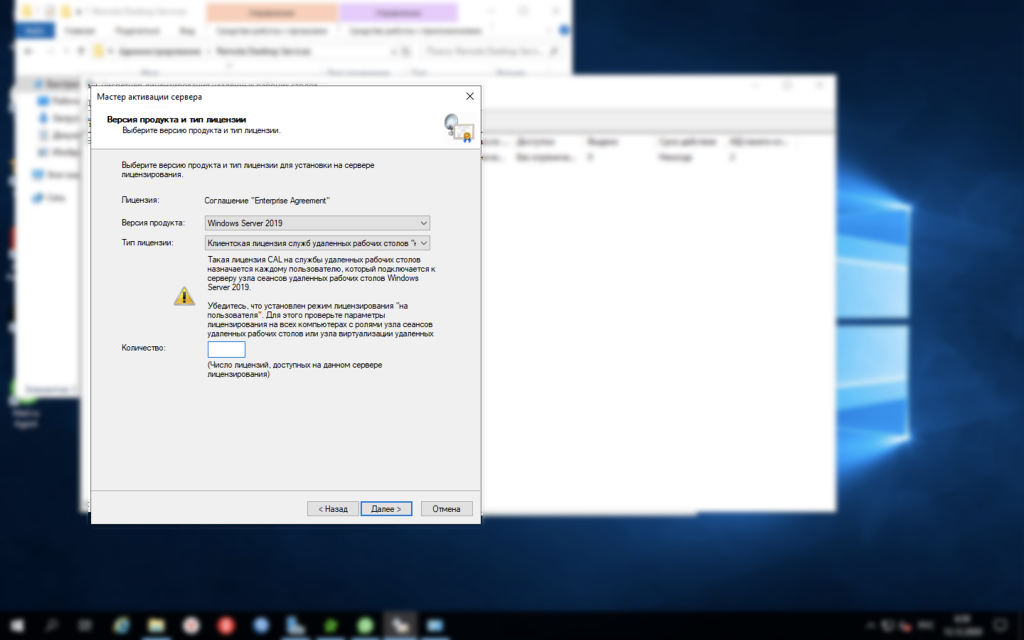
Выбираем тип продукта: Windows Server 2019 Remote Desktop Services Per Device client access license. Указываем количество лицензий. Обязательно соглашение Enterprise agreement, или ищем в интернете который подойдет…
Настройка и лицензирование терминального сервера Windows Server 2016
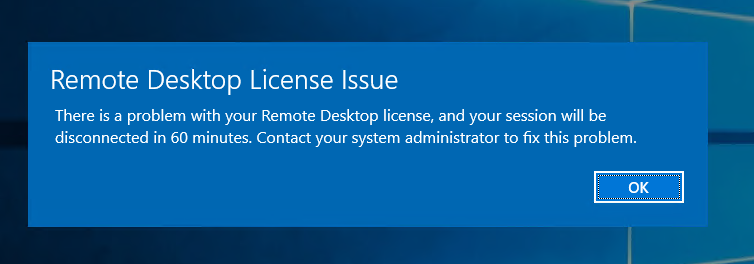
Не стоит выбирать лицензии Per User, иначе потом вы получите такую ошибку:
Next.
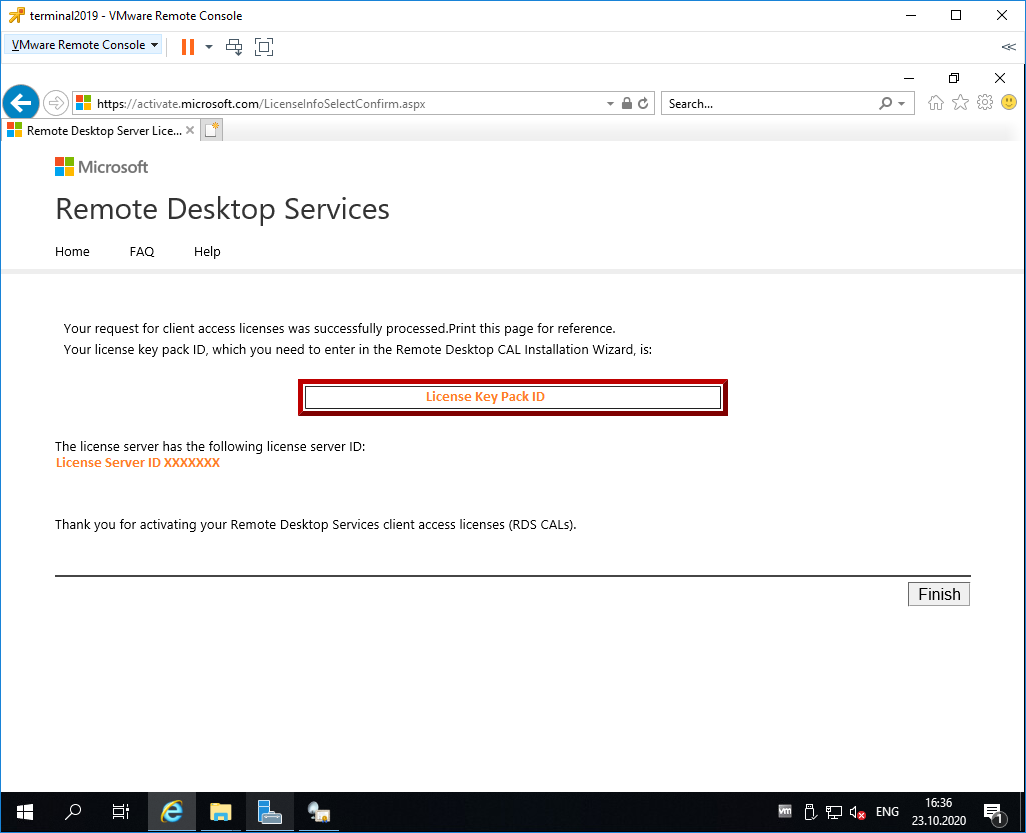
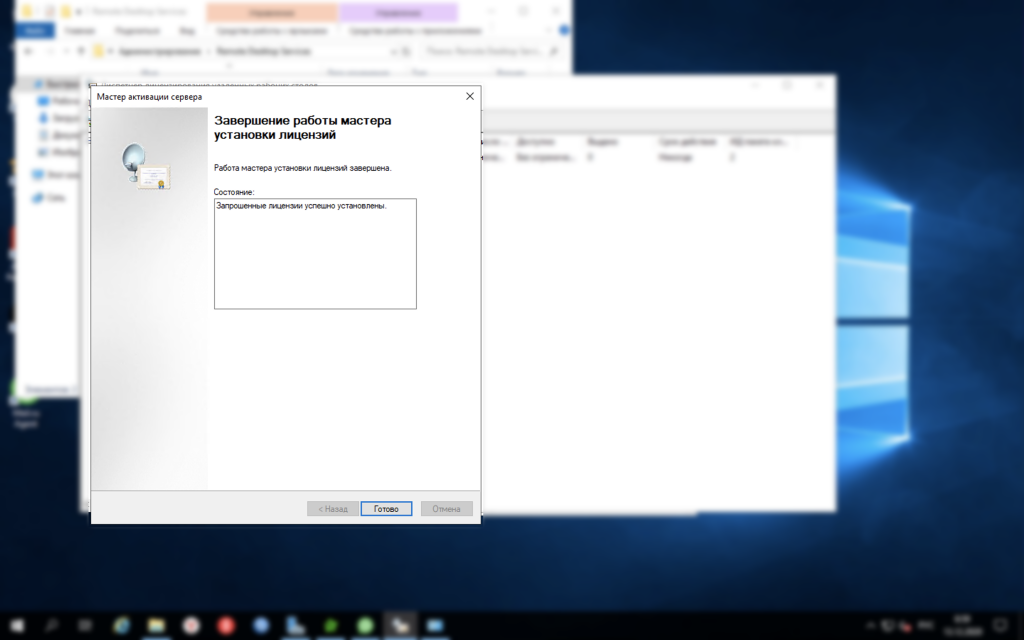
Ну вот мы и получили нужные нам клиентские лицензии. Копируем.
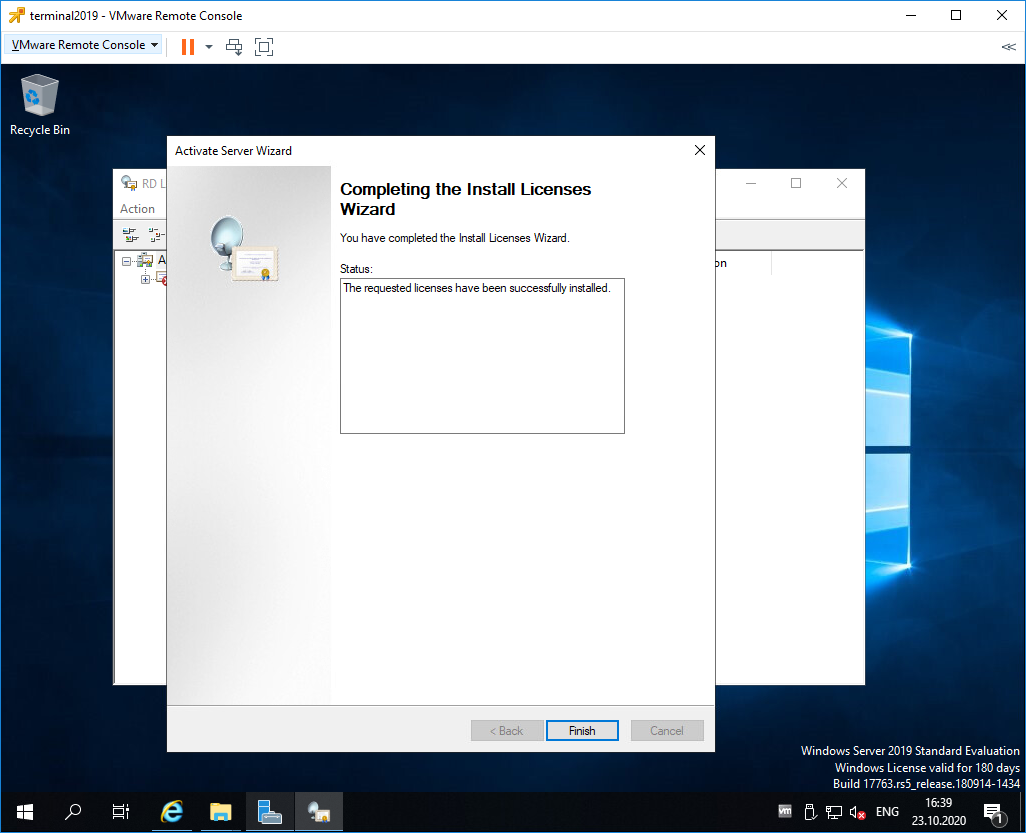
Вводим ключ в мастер. Next.
Finish.
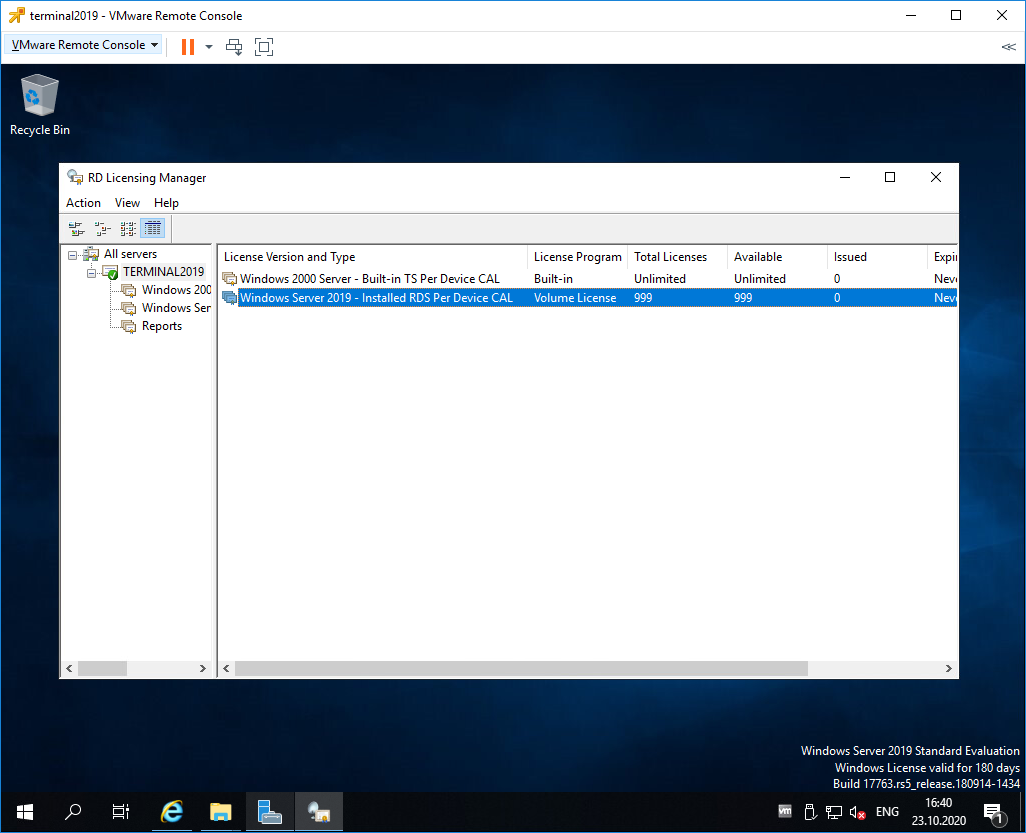
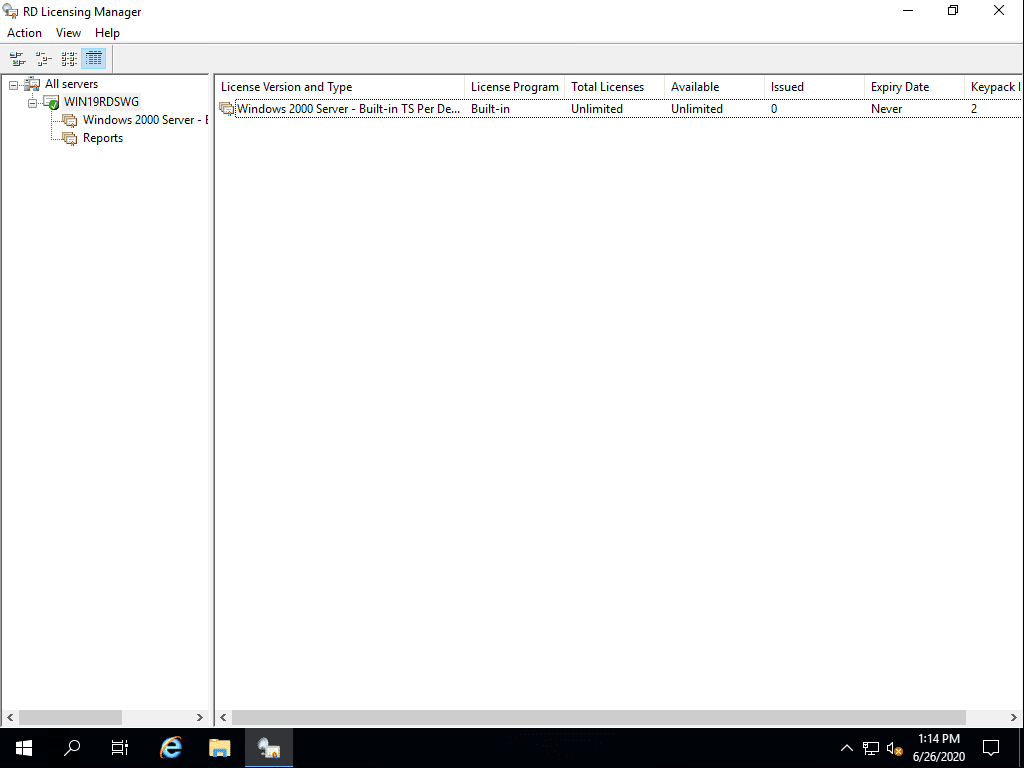
Возвращаемся к Remote Desktop Licensing Manager. Сервер активирован. Лицензии получены. Кстати, они начнут тратиться после окончания триального периода.
Роль Remote Desktop Session Host
Входим в Server Manager. Справа вверху выбираем Manage > Add Roles and Features.
Попадаем в раздел Before You Begin.
Это начальная страница, пропускаем. Next.
Попадаем в раздел Installation Type. Выбираем Role-based or feature-based installation. Next.
Попадаем в раздел Server Selection. Выбираем текущий сервер. Next.
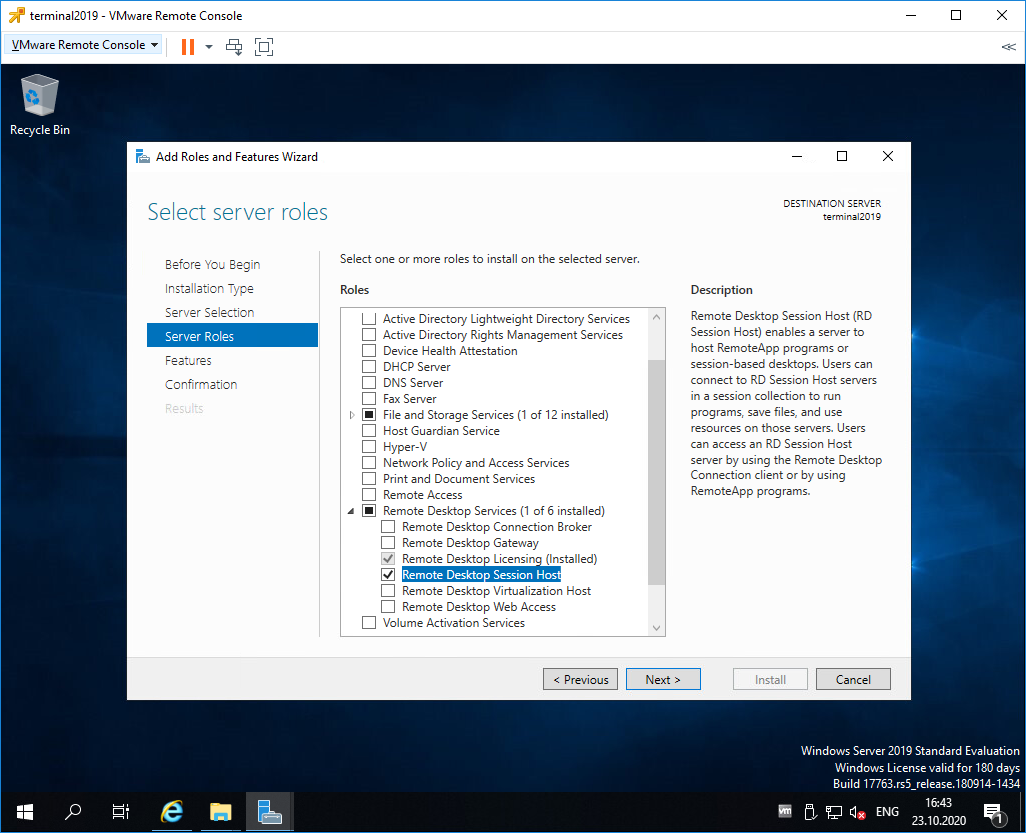
Попадаем в раздел Server Roles. Выделяем галкой роль Remote Desktop Session Host.
Нам предлагают установить дополнительные фичи, соглашаемся. Add Features.
Роль Remote Desktop Session Host выделена. Next.
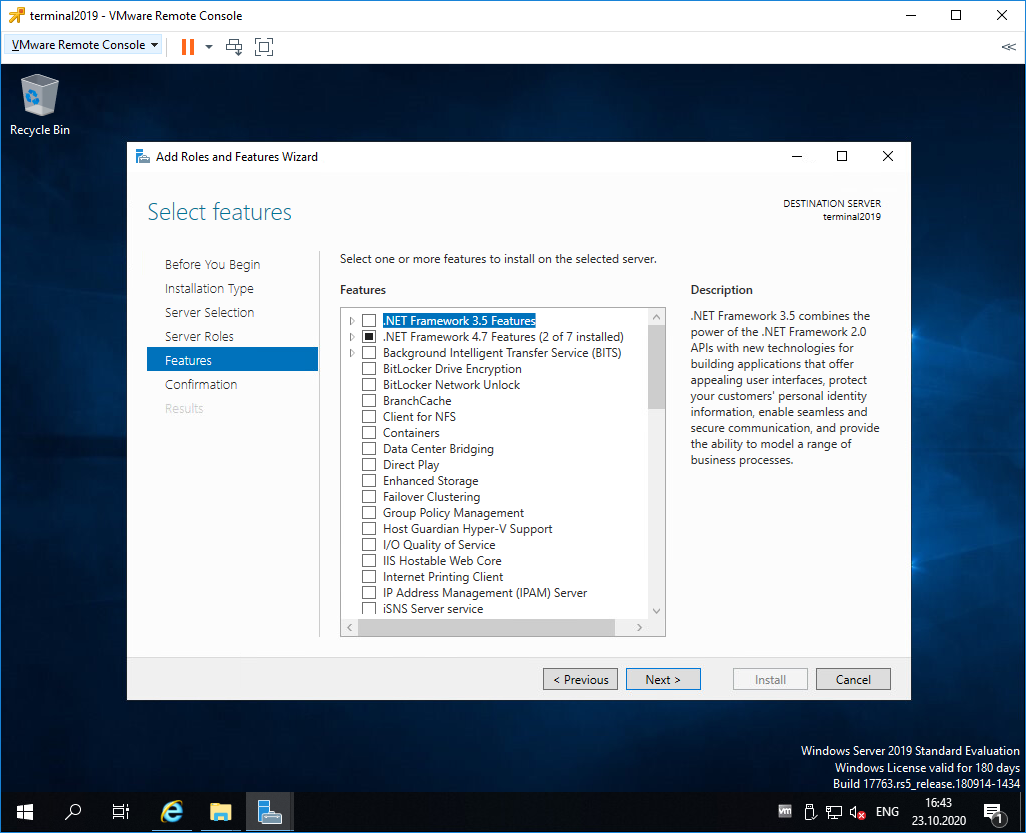
Попадаем в раздел Features, ничего не выделяем. Next.
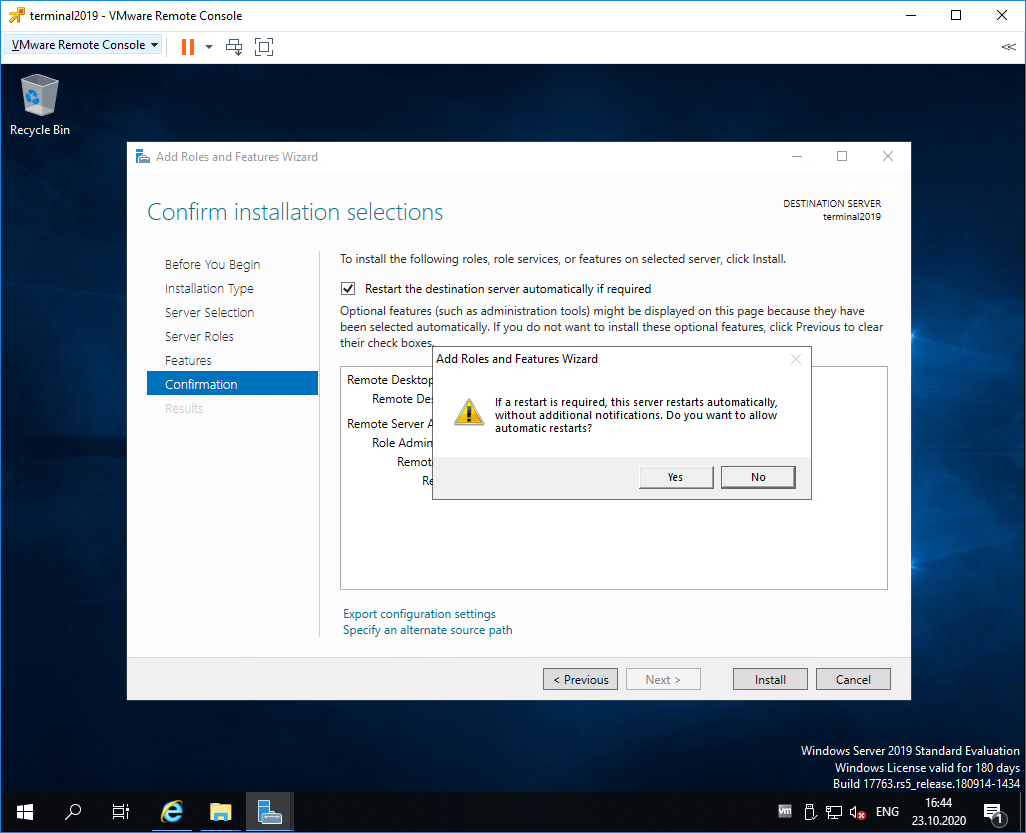
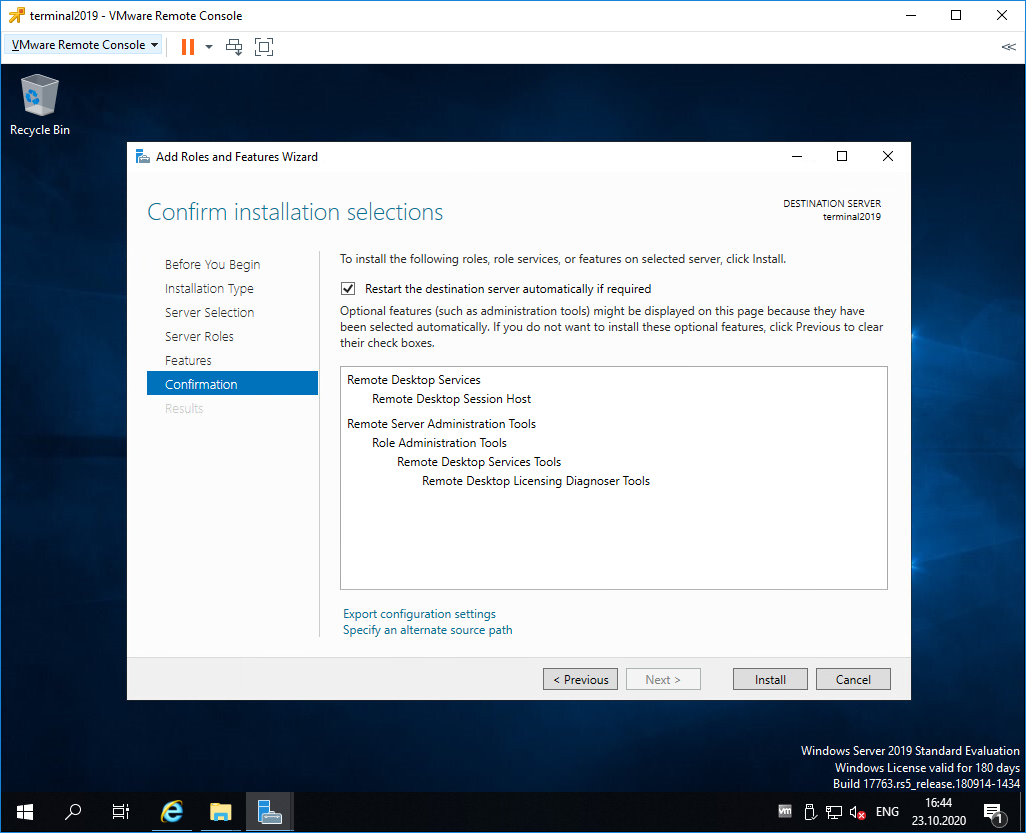
Попадаем в раздел Confirmation. Ставим галку Restart the destination server automatically if required. Отображается предупреждение, что сервер может быть перезагружен. Yes.
Install.
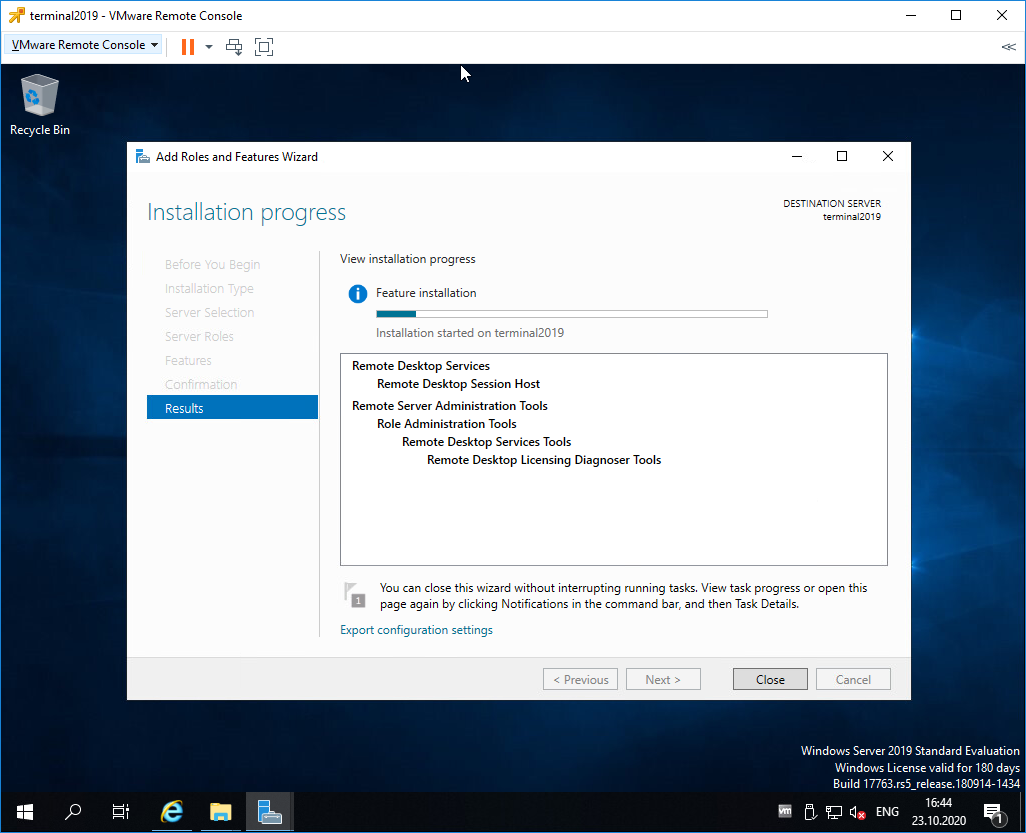
Начинается процесс установки роли.
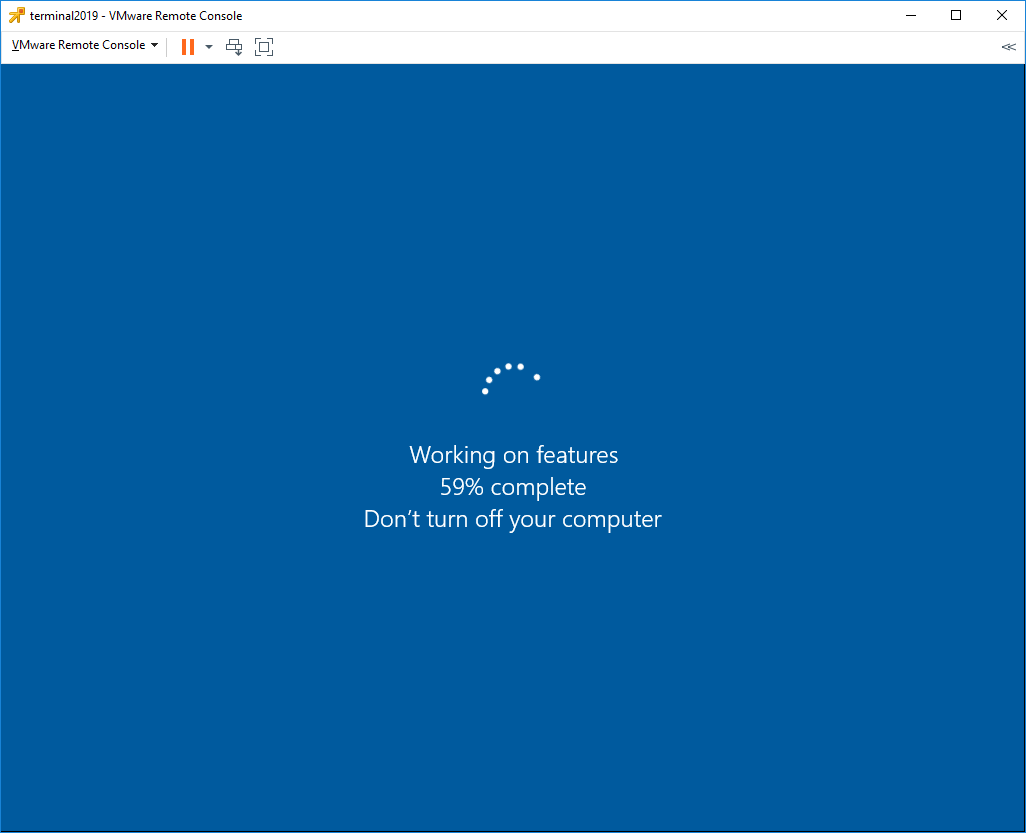
Сервер перезагружается.
В процессе устанавливаются компоненты.
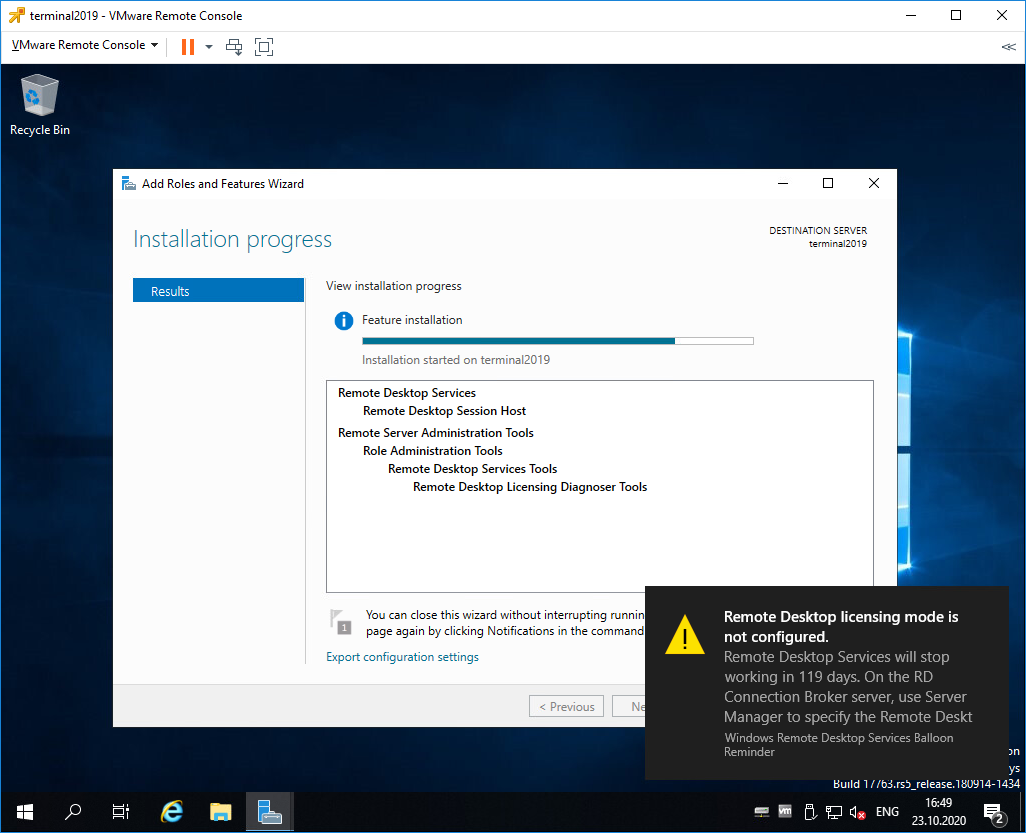
После перезагрузки автоматически продолжается установка роли. Триальный период работы терминального сервера — 119 дней.
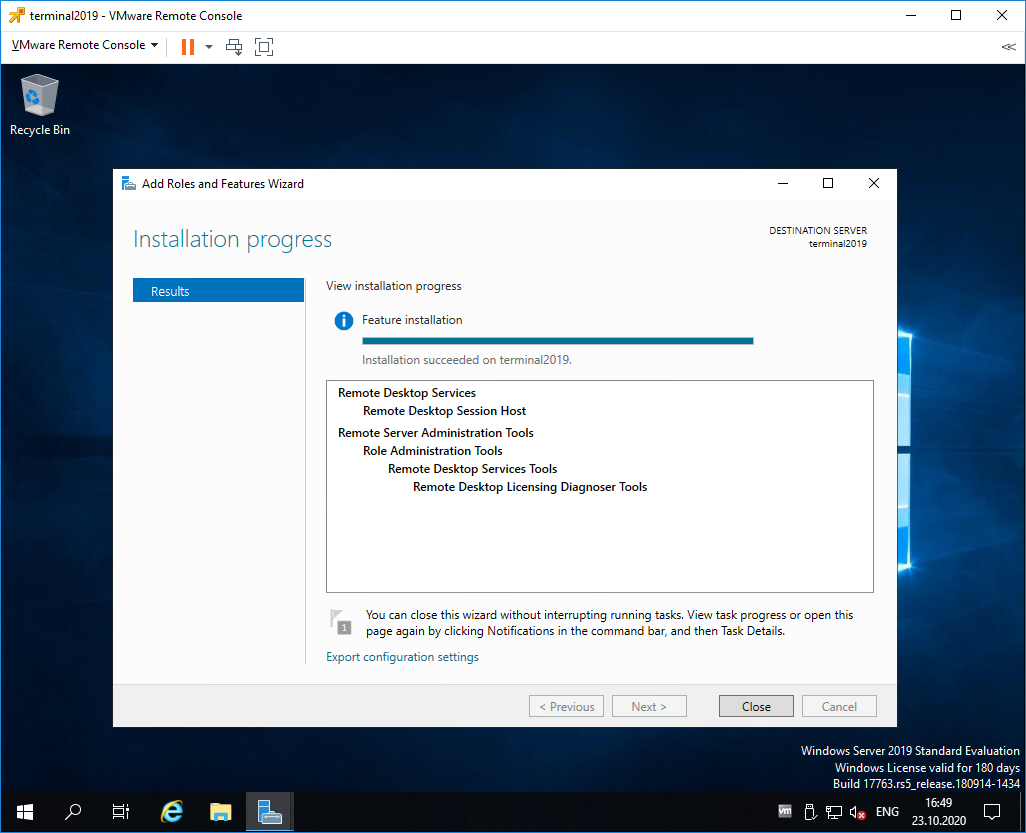
Роль Remote Desktop Session Host успешно установлена. Close.
Открываем Windows Administrative Tools.
Переходим в папку Remote Desktop Services.
Запускаем оснастку Remote Desktop Licensing Diagnoser.
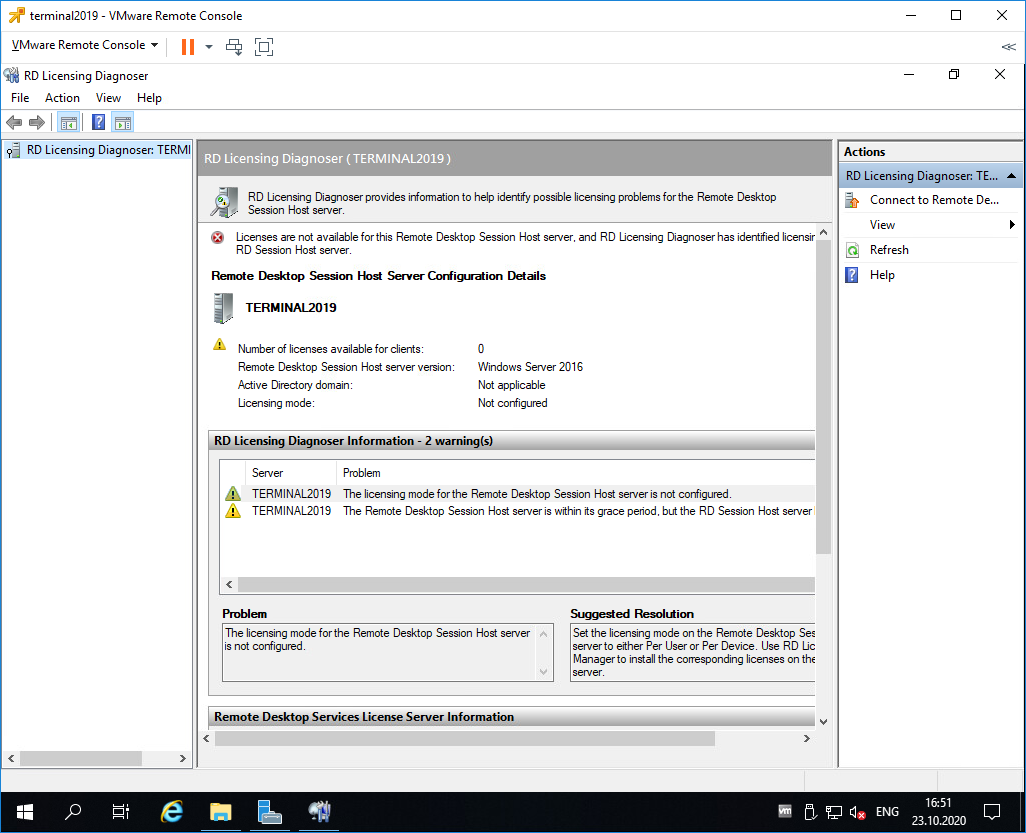
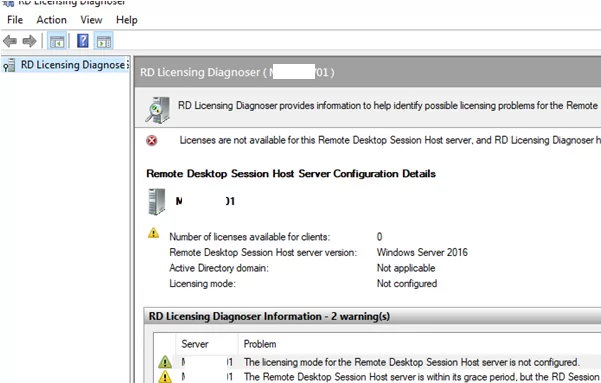
Видим ошибку.
The licensing mode for Remote Desktop Session Host server is not configured.
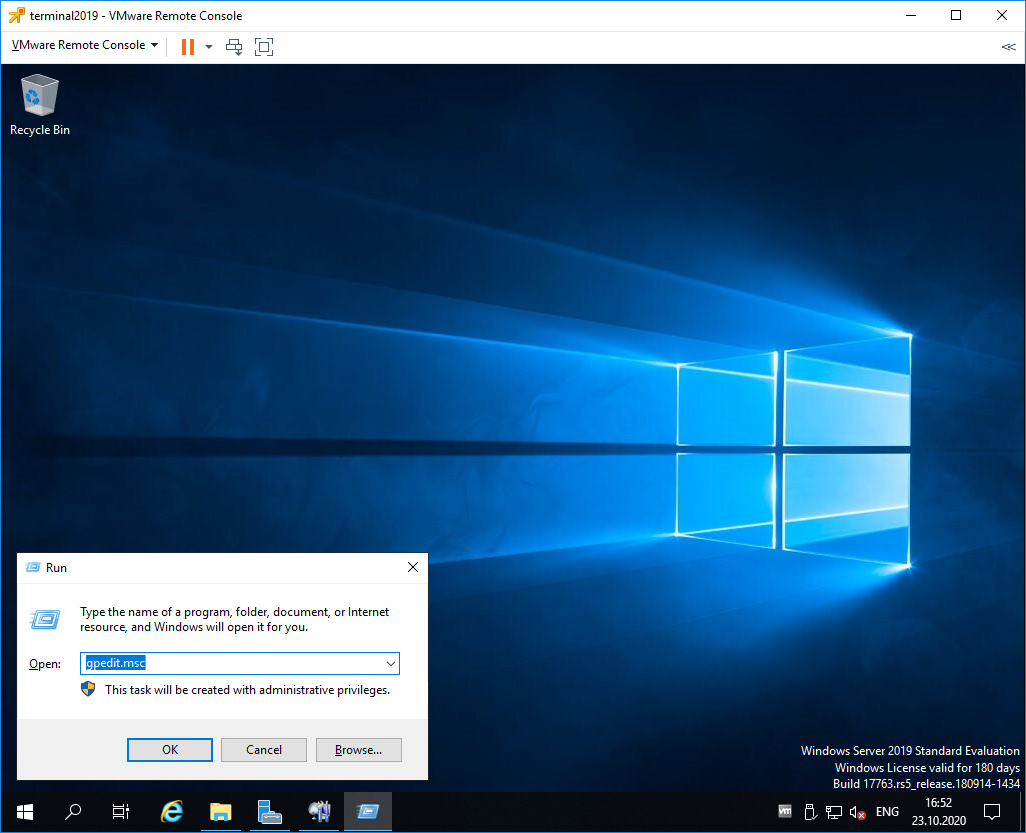
Выполняем gpedit.msc.
gpedit.mscОткроется Local Group Policy Editor.
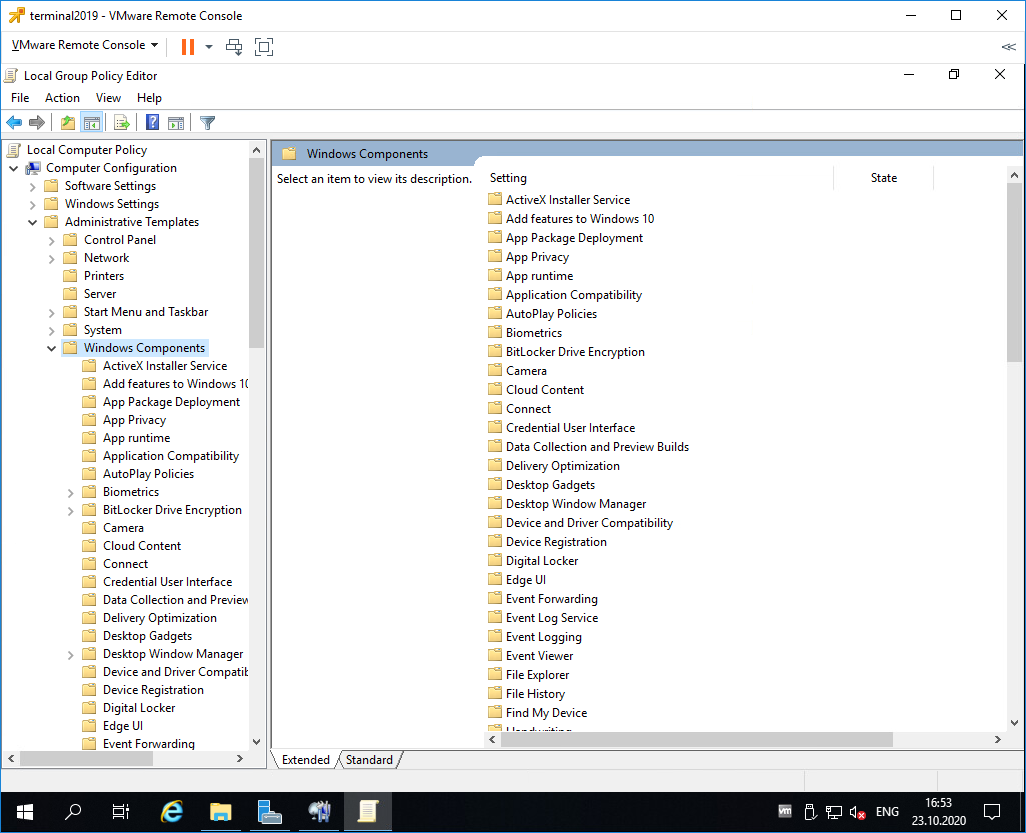
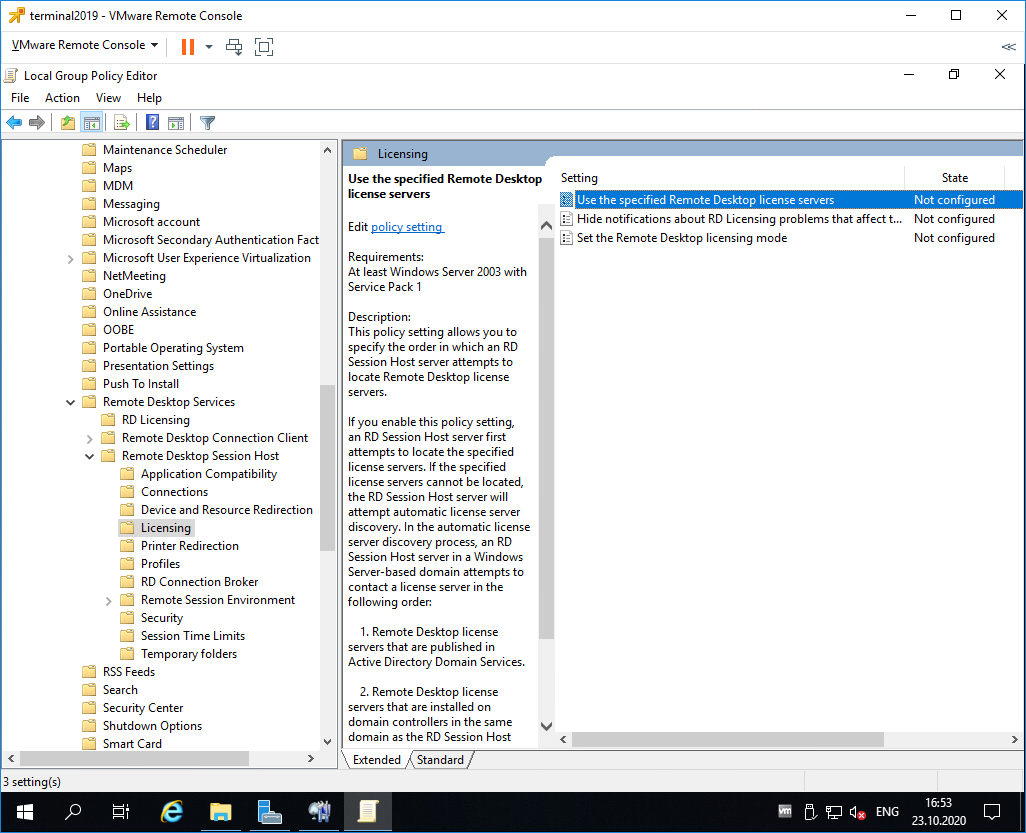
Раскрываем Computer Configuration > Administrative Templates > Windows Components > Remote Desktop Services > Remote Desktop Session Host > Licensing.
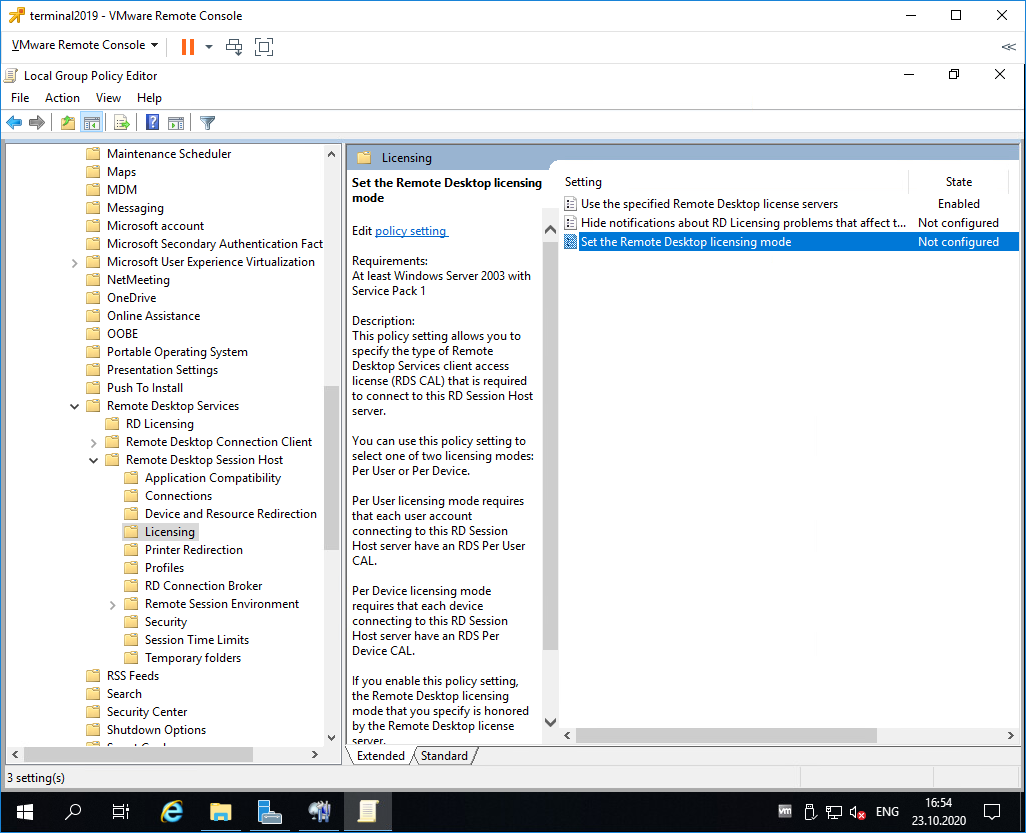
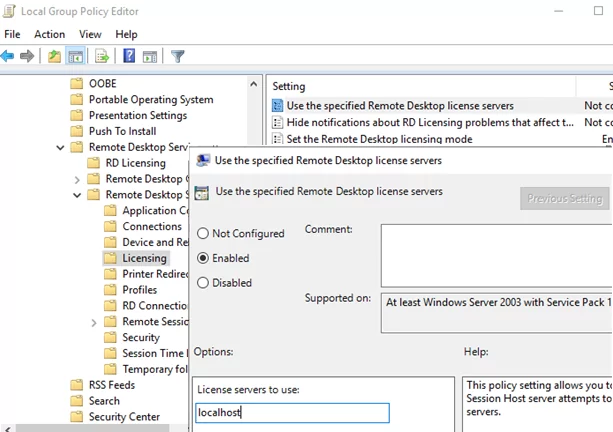
Редактируем Use the specified Remote Desktop license servers.
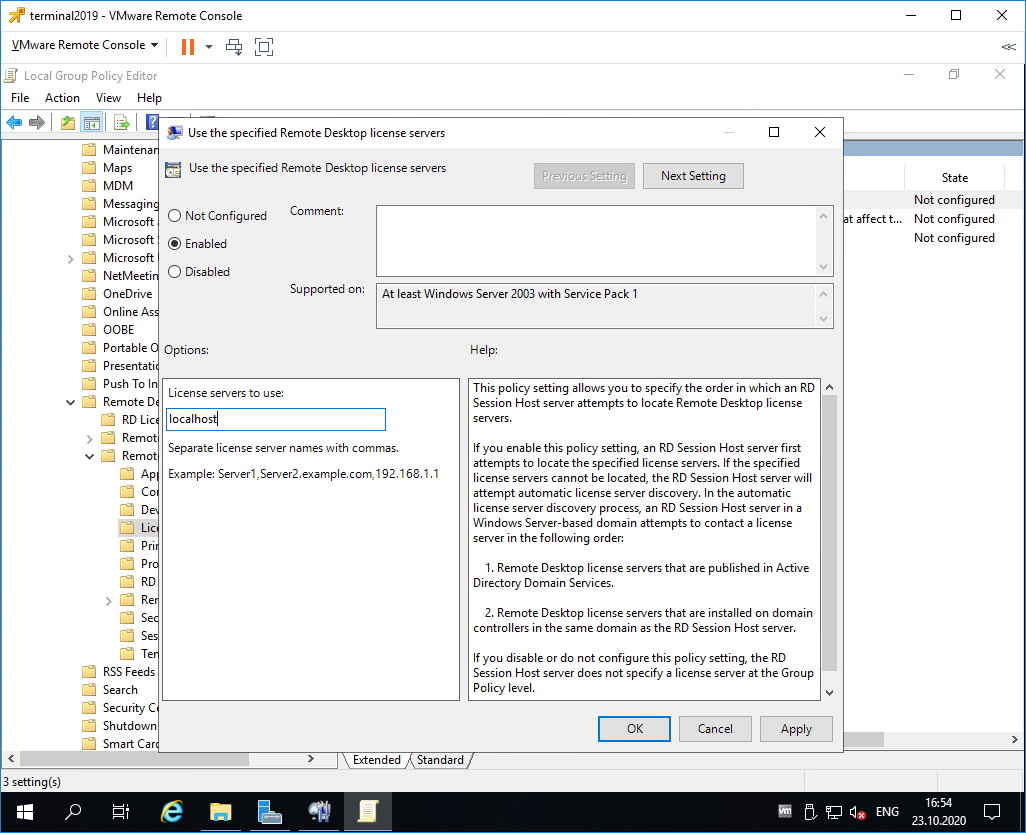
Включаем — Enabled. В поле «License server to use» прописываем сервер, с которого получать лицензии, в моём случае «localhost». OK.
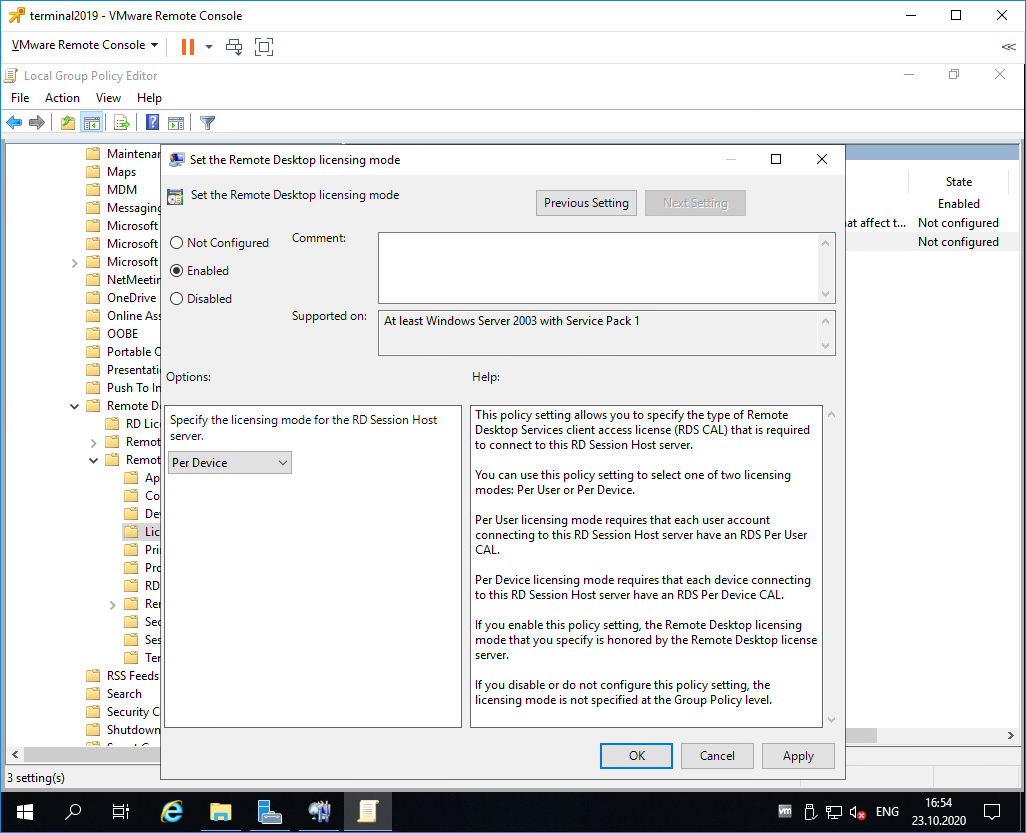
Редактируем Set the Remote Desktop licensing mode.
Включаем — Enabled. В поле «Specify the licensing mode for the RD Session Host server» устанавливаем значение Per Device. OK.
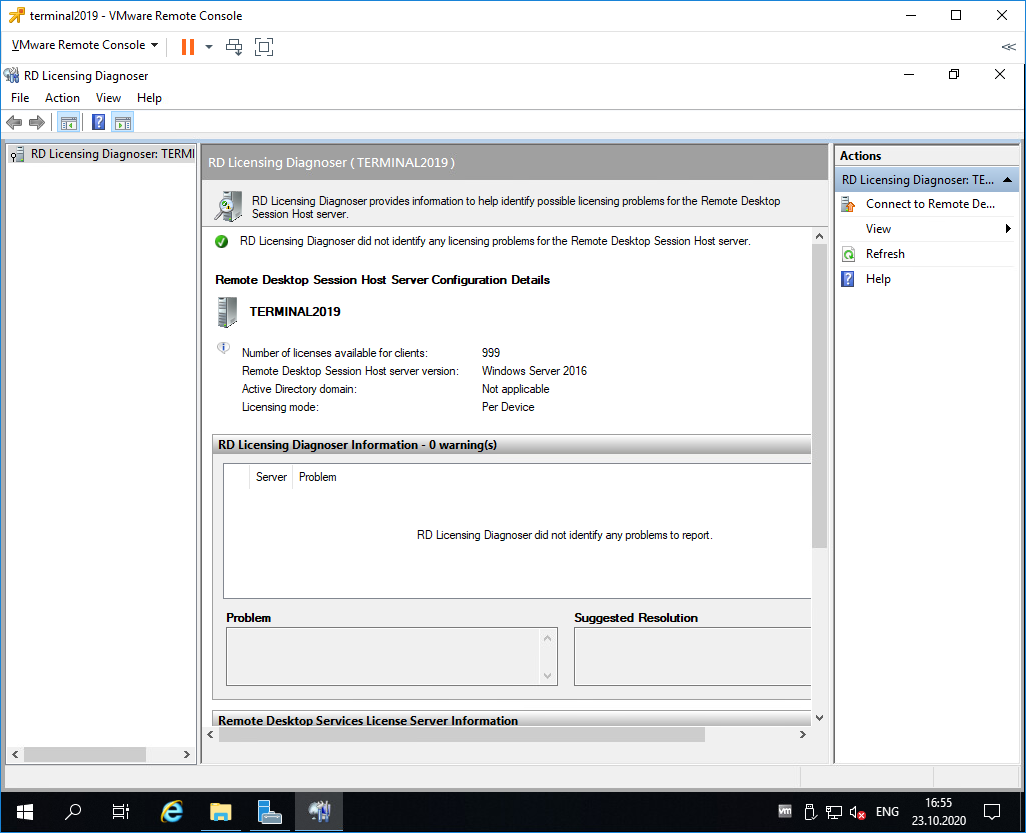
Снова запускаем оснастку Remote Desktop Licensing Diagnoser. Теперь всё зелёное, ошибок нет.
Практические испытания
Поскольку мы с вами системные администраторы 99 уровня, то нам нужно провести практические испытания терминального сервера.
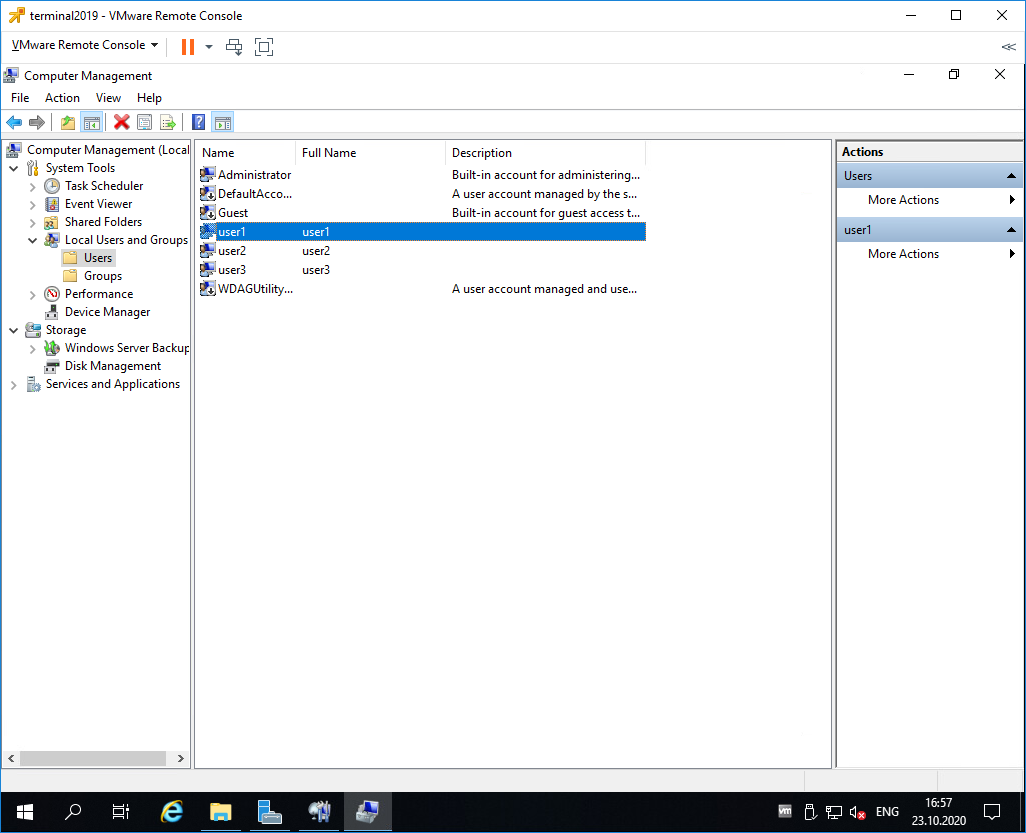
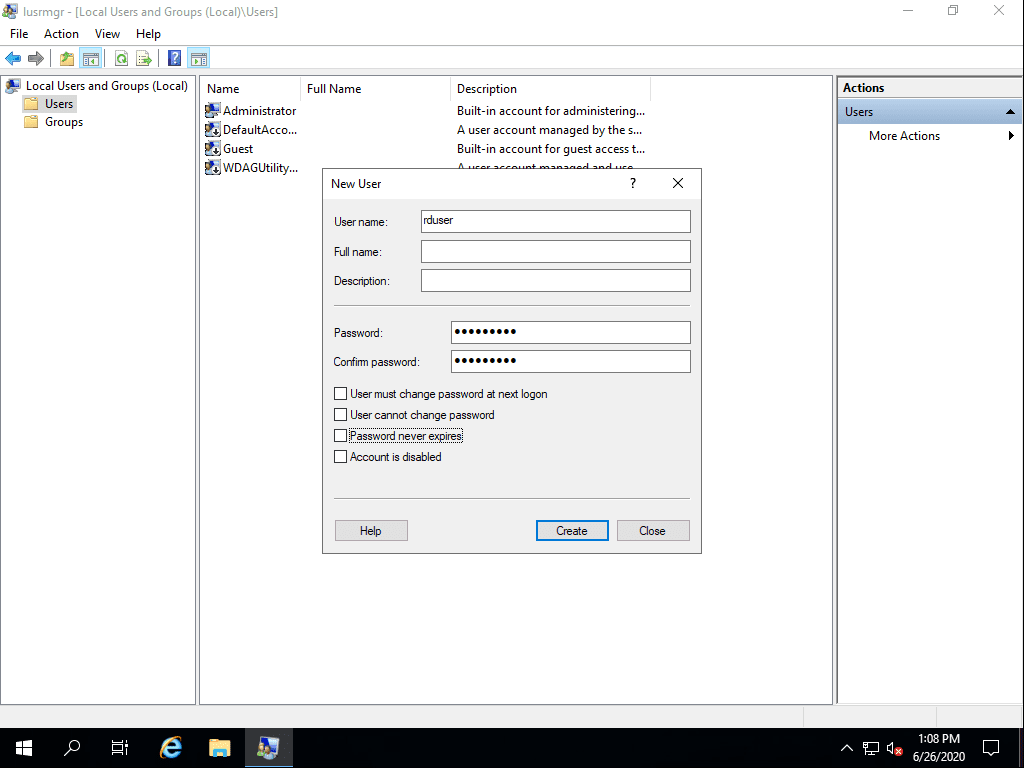
На терминальном сервере создаём трёх локальных пользователей: user1, user2, user3.
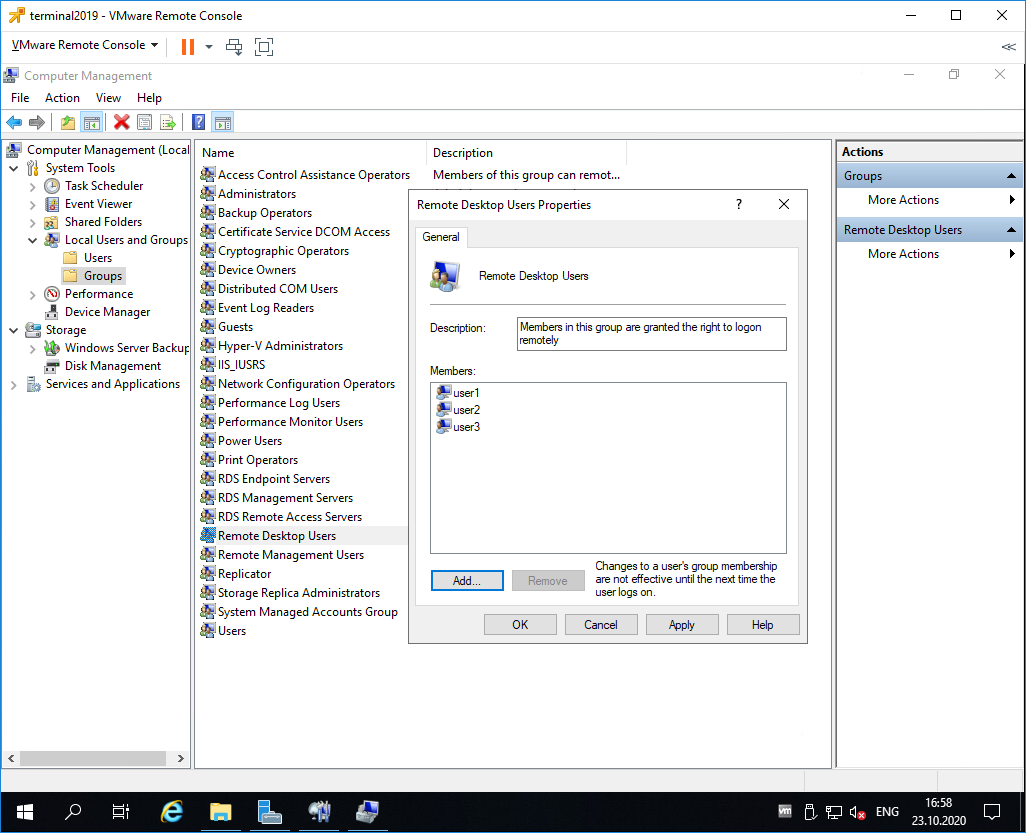
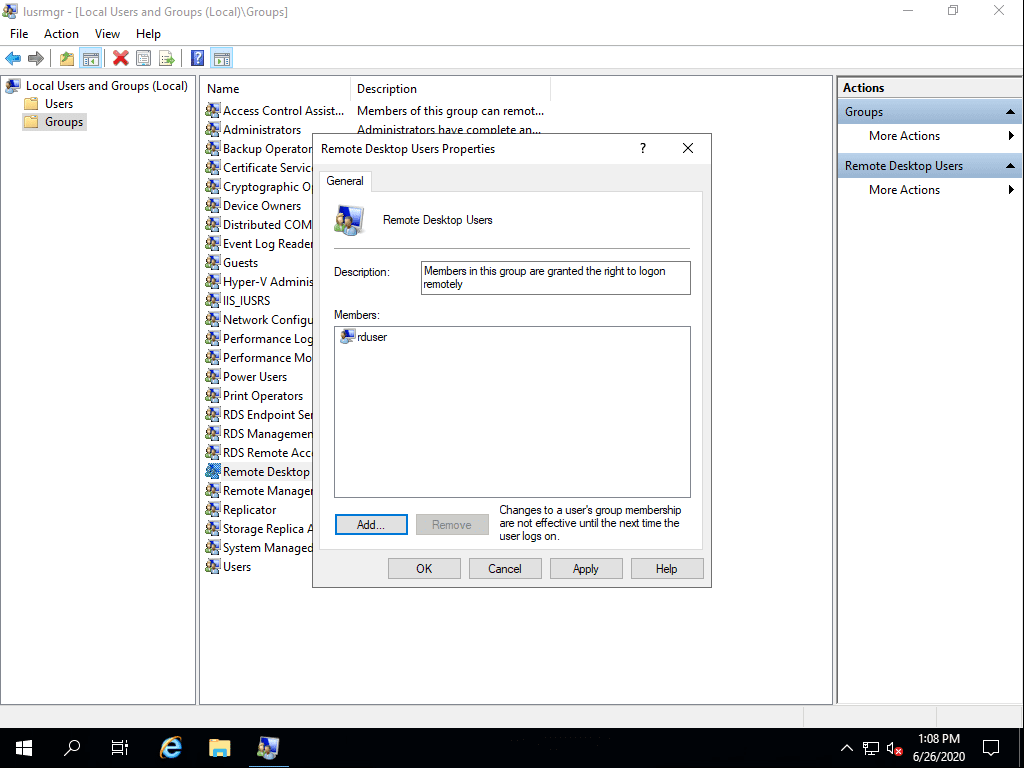
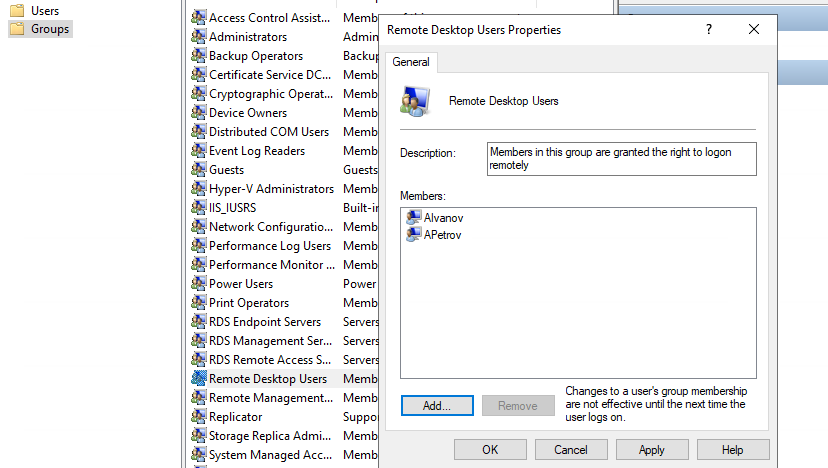
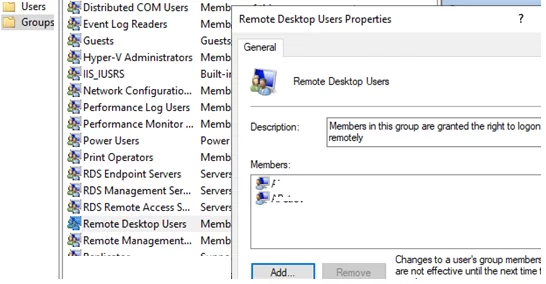
Включаем их в группу Remote Desktop Users.
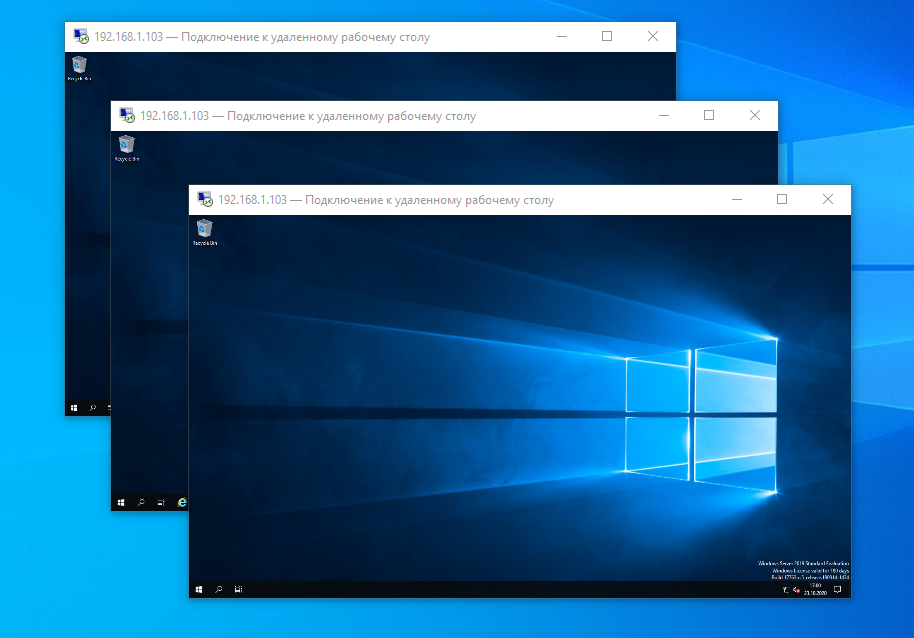
Коннектимся под этими пользователями к терминальному серверу по RDP.
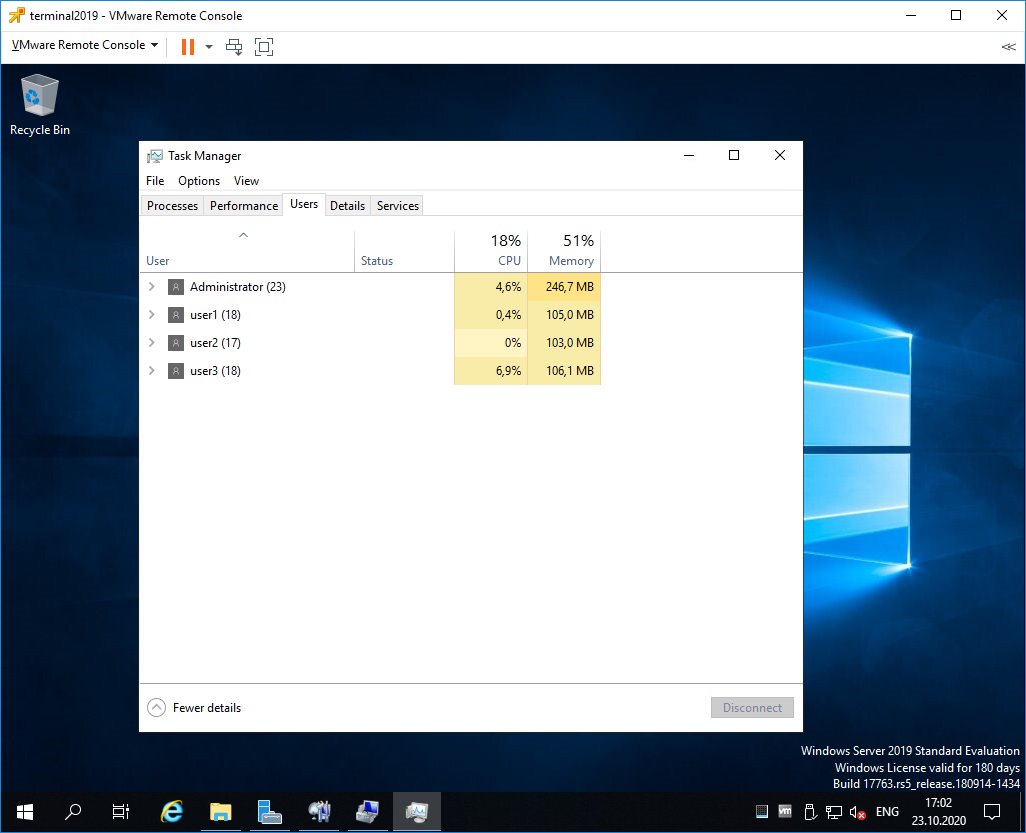
Есть три активных сеанса.
Заключение
Мы с вами успешно создали терминальный сервер Windows Server 2019 в рабочей группе WORKGROUP без домена. 120 дней терминальный сервер будет работать в триальном режиме, затем начнёт использовать лицензии Per Device. Для подключения к терминальному серверу требуется создать локальную учётную запись и включить её в группу Remote Desktop Users.
What if you have a need for running Windows Server 2019 as a remote desktop services server but you are not running a domain? If your Windows Server 2019 server is in a workgroup in an edge environment possibly and you need to run remote desktop services, is this possible? Also, what about setting up Windows Server 2019 remote desktop gateway with a workgroup? Is that possible? Can you install both on the same server in a workgroup? In this post, we will take a look at the use case of running Windows Server 2019 remote desktop services without domain services running and answer these other questions regarding the workgroup configuration with RDS and Windows Server 2019.
First of all, before you know how to do something, it is good to know why you would want to do it. Especially in production, we don’t simply want to do something just because we can without a good reason.
We all know that Windows Server in an Active Directory domain has access to many more powerful ways of doing things, centralized management, and security model.
However, there are use cases when you may want to configure Windows Server 2016 or Windows Server 2019 in a workgroup and utilize remote desktop services.

One of the strongest use cases I can think of is in an edge environment where you may not have the infrastructure setup to run a full Active Directory environment, yet still need to provide more than two connections to an application server, perhaps running a legacy application.
Another use case may be for a simple jumpbox that is used to monitor hardware or perform other low-level duties that do not require the server to be joined to an Active Directory domain.
While AD is more powerful, it is also more to maintain and takes more resources to spin up. It also requires the technical expertise to configure, manage, and troubleshoot.
Workgroup configurations by contrast, are fairly simple. Everything is contained on the same box, including the user accounts you authenticate with. So, as mentioned for certain environments, I can see this as a potential use case for this type of configuration.
Windows Remote Desktop Services and Licensing in a Workgroup
First, let’s setup the basics to connect to a single Windows Server 2019 server that is running Remote Desktop Services (RDS) for user connectivity. Launch Server Manager and install the Remote Desktop Services role.
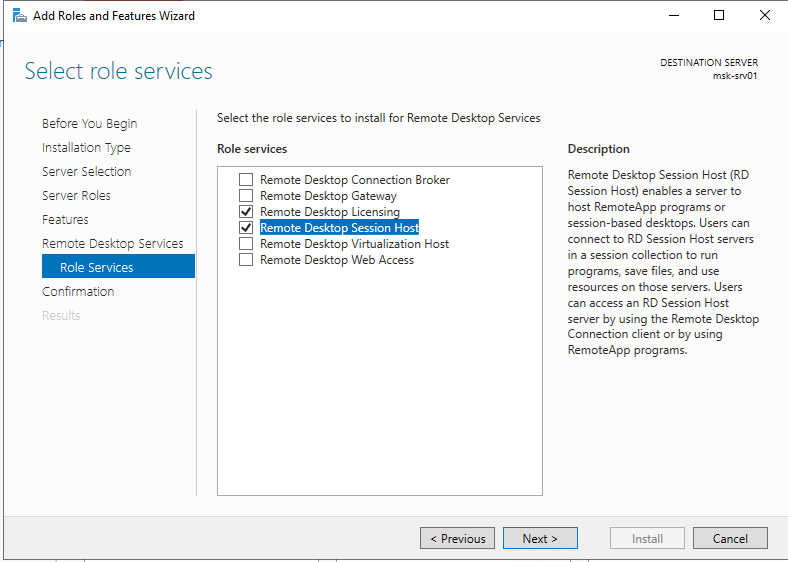
Select the Role Services that will be installed with the role installation. For a simple Windows Server 2019 remote desktop services without domain installation, you simply need to add the Remote Desktop Licensing and Remote Desktop Session Host role services.
After installation, you will need to reboot your server to finish the role installation.
After reboot, you can activate your Remote Desktop Licensing. Launch the RD Licensing Manager console and right-click on your server and select Activate Server.
After you go through the wizard to install your licensing, you should see your server activated. Note, below, I haven’t added any additional licensing for the demo.
Now, create your local user(s) that will be used to connect to the Windows Server 2019 Workgroup remote desktop services server.
Add this user or multiple users you have created into the Remote Desktop Users group which allows the local user to remote desktop into the Windows Server 2019 remote desktop services server.
At this point, you will have a functional remote desktop session host that multiple remote users will be able to remote into to run applications or use as a jump host.
Remote Desktop Services Gateway without Domain
We all know that placing an RDP server in the DMZ or forward facing to the Internet is a dangerous thing to do. Microsoft’s RDP implementation has been historically riddled with security vulnerabilities. If not properly patched it can easily lead to data breach or ransomware infection in your environment.
Using a Remote Desktop Gateway server strengthens your security since it allows a secure tunnel over SSL 443 to your RDP endpoint. This allows one of your remote workers coming across the Internet to securely tunnel to their RDP server over port 443 without exposing RDP to the outside world.
Can this be setup on a workgroup server? Yes. Also, you can do this on the same workgroup server, pretty cool! By installing on the same server as is the target of the RDP connections, you can simply open up port 443 to the outside and use the same address for the gateway as you do for the target of the RDP connection.
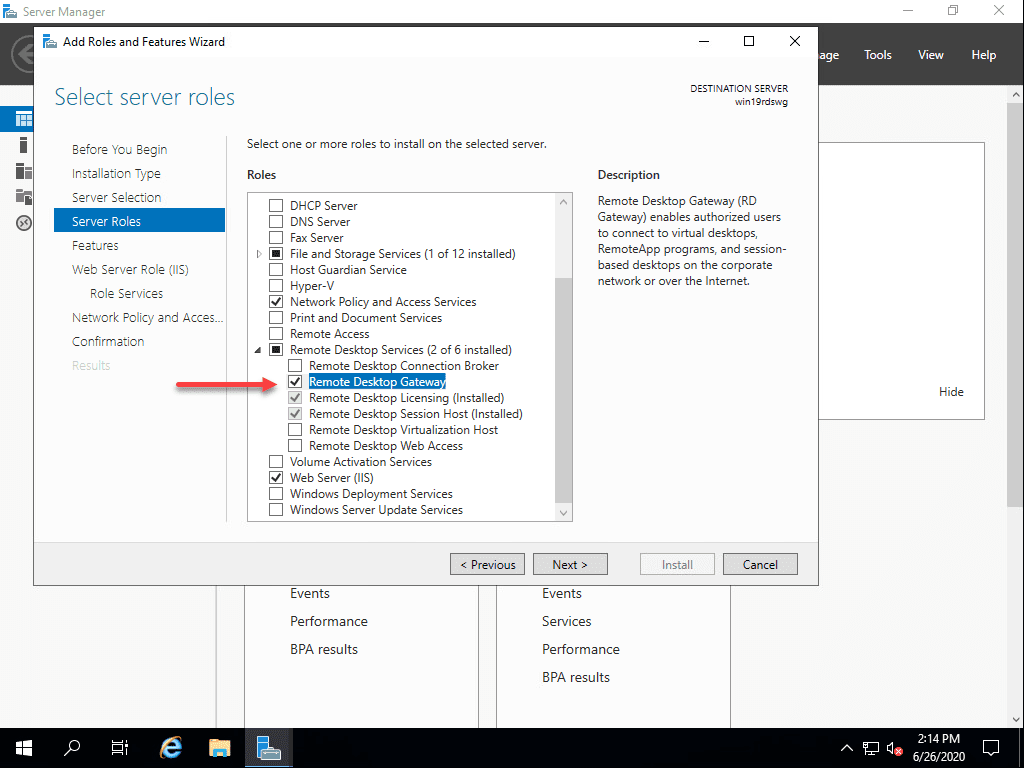
Simply go back on the same server and Add Role services. Add the Remote Desktop Gateway role service to your installation. It does not require a reboot.
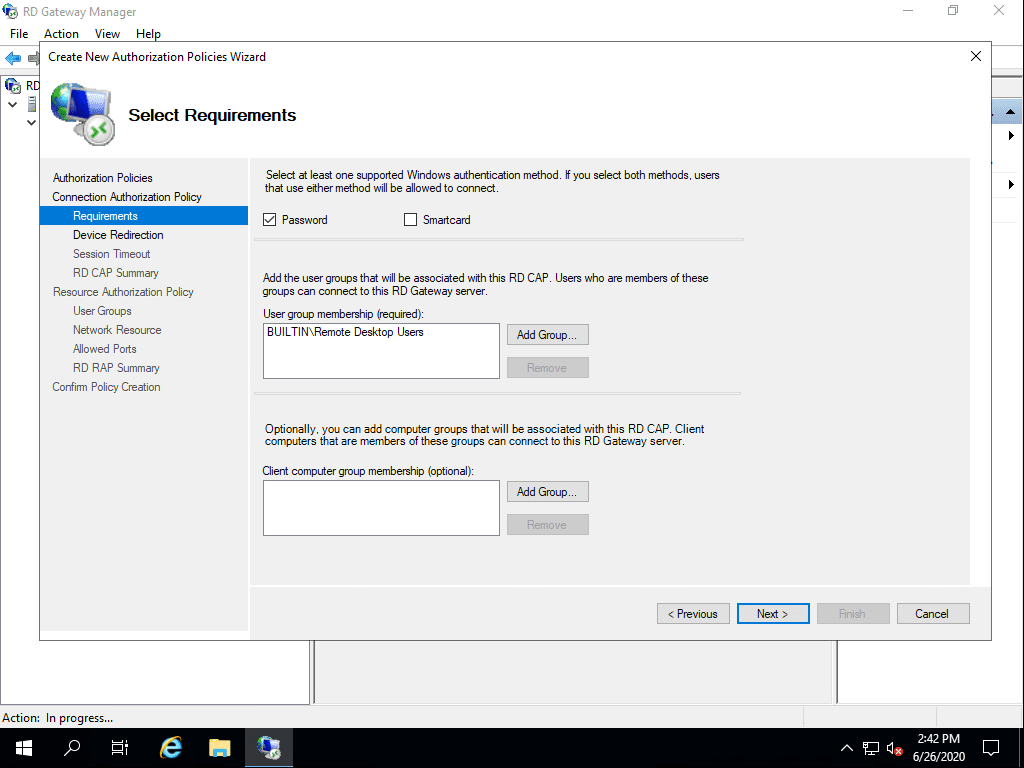
After installing the role service, launch the RD Gateway Manager console and create both the Connection Authorization Policy and the Resource Authorization Policy.
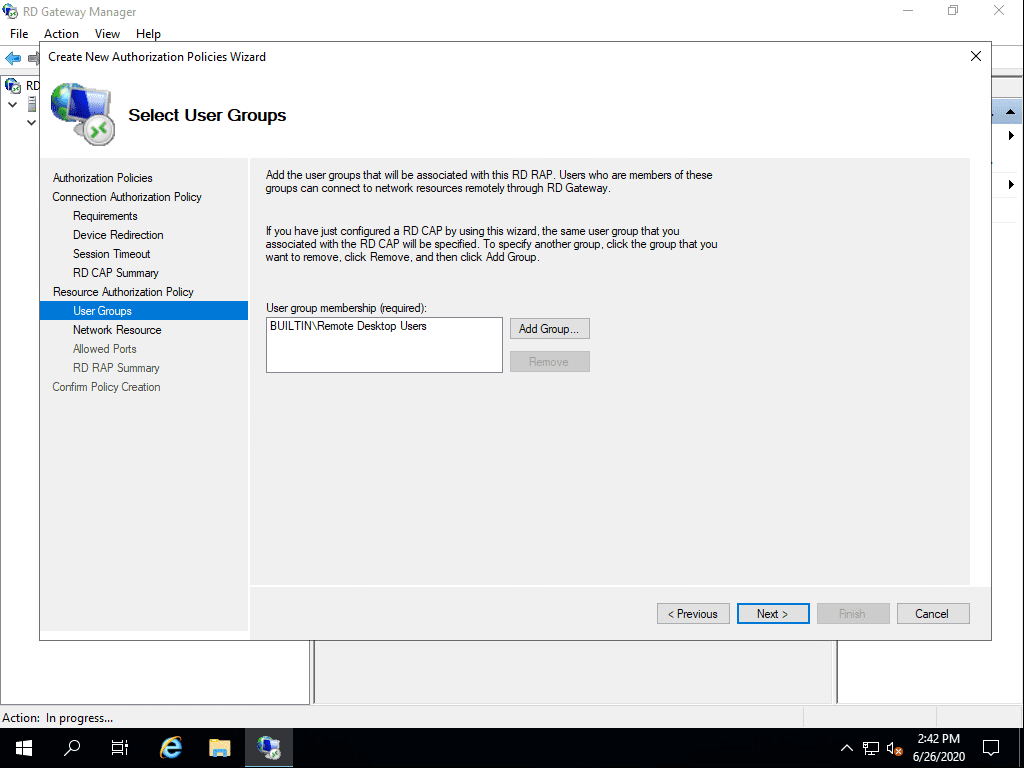
You can easily use the wizard to create both at the same time. Basically, in a workgroup configuration, you can simply add the BUILTINRemote Desktop Users group to the RD CAP and the RD RAP.
Adding the group in the RAP as well.
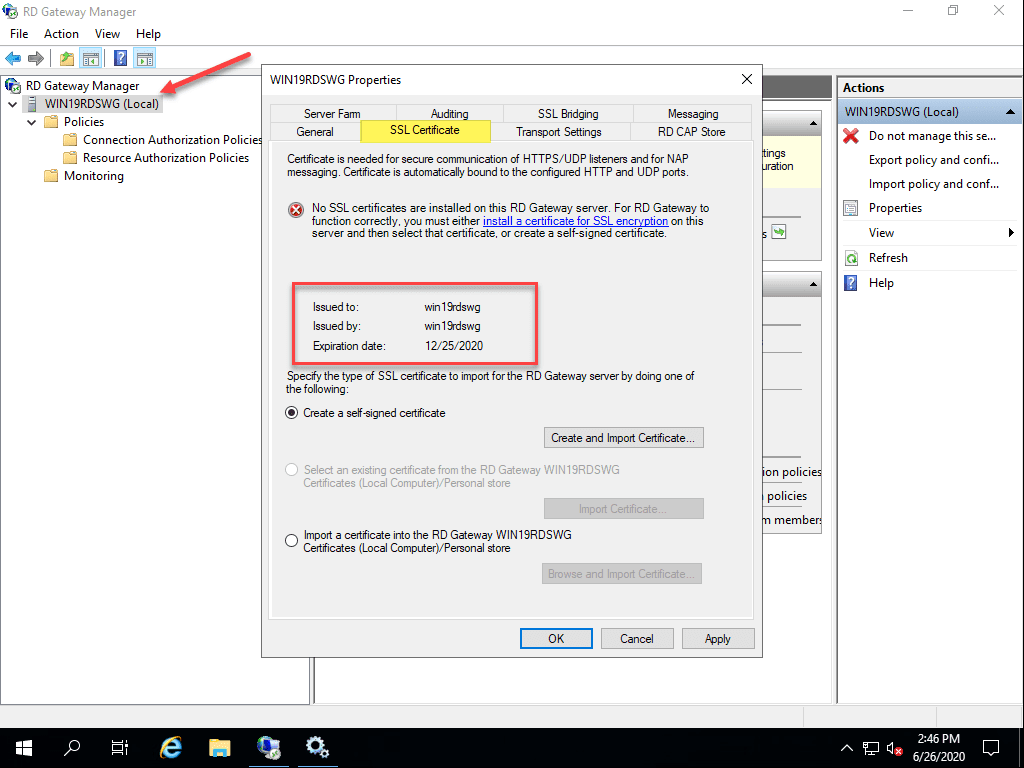
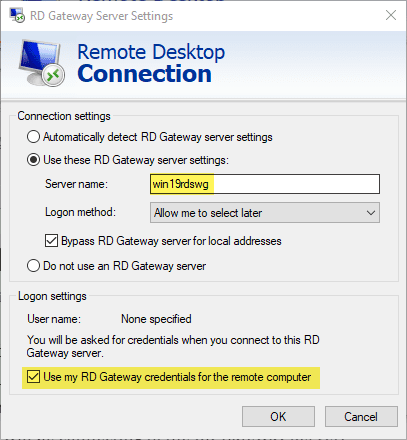
Now, configure your self-signed certificate for your Windows Server 2019 remote desktop services without domain box. Right-click on the server. Under SSL Certificate, use the Create a self-signed certificate button.
If this is just going to be a standalone server that only a couple or more users will be connecting to, you can get away with the self-signed certificate. However, keep in mind, you will have to import the certificate on the client workstations that will be connecting to the RD Gateway Server.
Thoughts
There are several use cases that may call for using a Windows Server 2019 remote desktop services no domain configuration where the server is in a workgroup and not domain joined.
This can help to simply a configuration to some degree in a remote location or edge environment that may lack a connection back to a central Active Directory database.
Using the workgroup configuration you can setup a remote desktop services box and a remote desktop gateway server all on the same server. By doing this, you will be able to expose only SSL 443 to the outside world for end users to make connections.
В этой статье описано, как установить и настроить роль терминального сервера Remote Desktop Session Host в рабочей группе (без домена Active Directory) и без всех дополнительных ролей (Connection Broker, Remote Desktop Web Access, RDS Gateway).
Windows Server с ролью RDSH (Remote Desktop Session Host) позволяет одновременно подключаться к серверу по RDP нескольким пользователям (по умолчанию в Windows Server разрешены только 2 административных RDP подключения). Для каждого пользователя создается отдельная сессия и он получает доступ к персональному рабочему столу
Если вы планируете используете отдельный RDS сервер в рабочей группе, имейте в виду, что его функциональность ограничена. Он не может масштабироваться до полноценной RDS фермы Windows Server, нельзя создавать отдельные коллекцию или RemoteApp, нет брокера, нельзя использовать User Profile Disks для профилей пользователей, отсутствуют средства централизованного управления, при проведении операций обслуживания RDP сервис будет недоступен.
Содержание:
- Установка роли Remote Desktop Services в Windows Server 2019
- Настройка роли Remote Desktop Licensing, добавление RDS лицензий (CAL)
- Настройка роли Remote Desktop Session Host в рабочей группе
Установка роли Remote Desktop Services в Windows Server 2019
Предполагаем, что вы уже установили сервер с Windows Server и выполнили базовые настройки (ip адрес, имя сервера, время/дата, установили обновления и т.д.). Теперь можно установить службу RDS.
Для этого можно использовать Server Manager или PowerShell.
Для установки службы RDS через Server Manager нужно выбрать Role-based or feature-based installation -> Server roles -> Remote Desktop Services -> в компонентах RDS выберите службы Remote Desktop Session Host и Remote Desktop Licensing (согласитесь с установкой компонентов RSAT для управления этими ролями).
Обратите внимание, что если в Server Manager вы выбрали тип установки Remote Desktop Services installation, то в режиме Standard deployment и Quick Start установщик дополнительно установит роли RD Connection Broker и Web Access. В нашем случае все эти роли излишни, т.к. мы ставим стендалон RDS сервер.
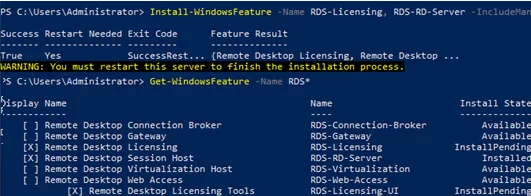
Также вы можете установить нужные роли Windows Server с помощью PowerShell:
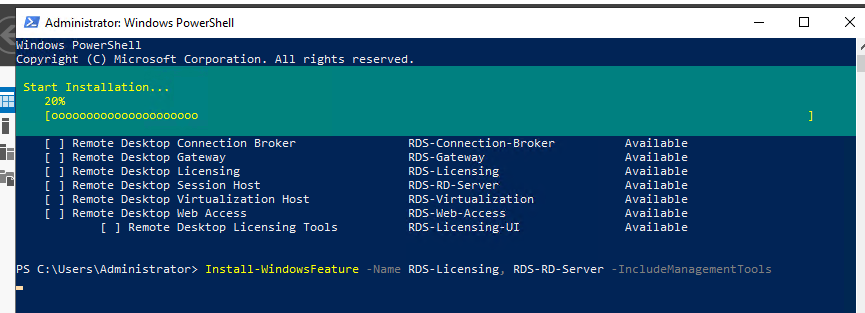
Install-WindowsFeature -Name RDS-Licensing, RDS-RD-Server –IncludeManagementTools
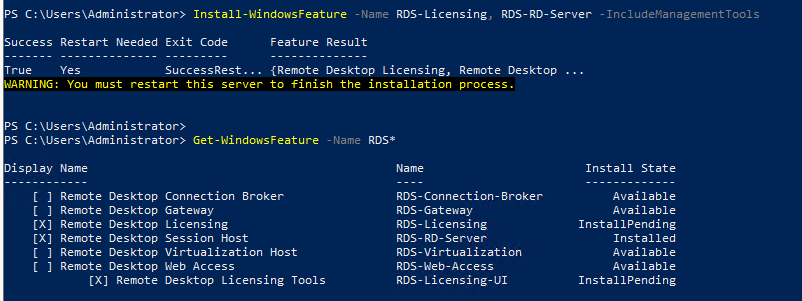
Проверьте, какие RDS роли установлены на сервере:
Get-WindowsFeature -Name RDS* | Where installed
Перезагрузите сервер:
Restart-Computer
Настройка роли Remote Desktop Licensing, добавление RDS лицензий (CAL)
Следующий этап – настройка роли Remote Desktop Licensing, которая обеспечивает лицензирование RDP подключений пользователей к вашему RDS серверу. Вы можете установить и активировать роль Remote Desktop Licensing на данном хосте (если он у вас один), либо можете разместить роль RDLicensing на другом сервере. Один сервер с ролью RDS Licensing можете выдавать лицензии неограниченному количеству RDSH хостов.
Если вы решили использовать локальный сервер RDLicensing, активируйте сервер лицензий RDS и установите клиентские лицензии (RDS CAL) согласно гайду по ссылке.
В рабочей группе нужно использовать RDS CAL типа Per Device. Если ваш сервер лицензирования выдает только Per User лицензии, то пользователи при RDP подключении к серверу будут получать ошибку:
Remote Desktop License Issue
There is a problem with your Remote Desktop license, and your session will be disconnected in 60 minutes.
Настройка роли Remote Desktop Session Host в рабочей группе
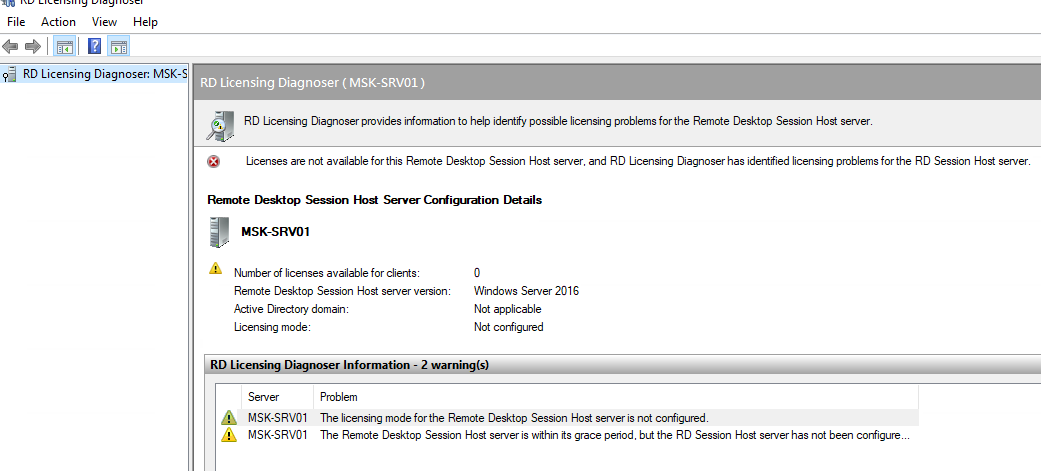
Перейдите в Control Panel -> System and Security -> Administrative Tools -> Remote Desktop Services -> Remote Desktop Licensing Diagnoser. Обратите внимание, что ваш сервер еще не настроен на получение RDS CAL лицензий с сервера лицензирования. Об этом свидетельствуют надписи:
- The licensing mode for the Remote Desktop Session Host server is not configured
- Number of licenses available for clients:
0
Если вы не нацелите ваш RDSH сервер на сервер лицензирования RDS, который может выдать пользователям лицензии, ваш сервер будет находится в триальном режиме. В этом режиме службы RDS работают в течении всего 120 дней (при каждом подключении в трее будет появляться сообщение “
Служба удаленных рабочих столов перестанет работать через xxx дней
”). После окончания grace периода ваши пользователи не смогут подключится к RDS с ошибкой:
Remote session was disconnected because there are no Remote Desktop client access licenses available for this computer.
Основной недостаток роли Remote Desktop Services в Windows Server 2019 при установке в рабочей группе – у вас по сути нет никаких удобных инструментов управления ролью RDS. Любые настройки роли RDSH придется выполнять через редактор локальных групповых политик
gpedit.msc
.
[/alert]
В локальной GPO нужно настроить параметры лицензирования RDS:
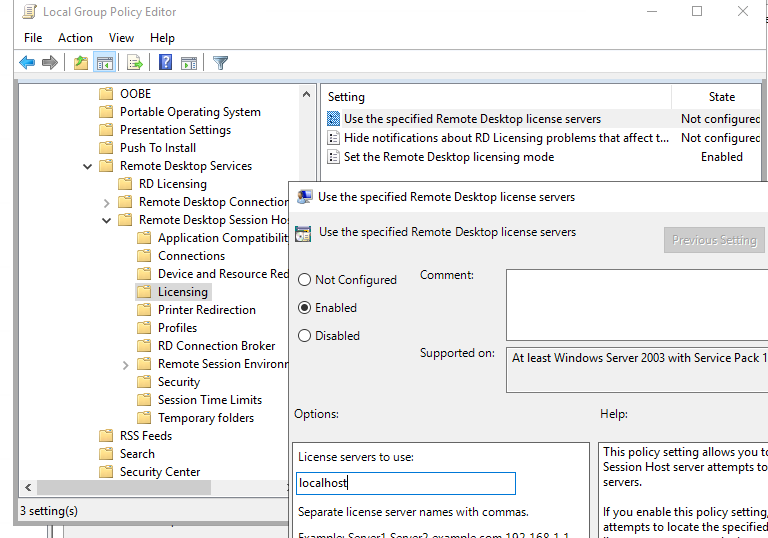
- Перейдите в раздел GPO Computer Configuration -> Administrative Templates -> Windows Components -> Remote Desktop Services -> Remote Desktop Session Host -> Licensing;
- Установите параметра Set the Remote Desktop licensing mode: Per Device;
- В Use the specified Remote Desktop license servers укажите адрес сервера, на котором установлен сервер RDLicensing. Если сервер лицензии установлен локально, укажите localhost или 127.0.0.1;
- Обновите локальные политики, и запустите Remote Desktop Licensing Diagnoser. Убедитесь, что он видит ваши RDS CAL.
Дополнительно в локальных GPO вы можете настроить лимиты (таймауты) на длительность RDP сессий и правила отключения пользователей при неактивности.
Если вы хотите настроить различные групповые политики для локальных пользователей и администраторов, воспользуйтесь функционалом множественных GPO (MLGPO).
Теперь нужно создать для пользователей локальные учетные записи на RDS сервере, под которыми они будут аутентифицироваться. Можно создать пользователей с помощью оснастки lusrmgr.msc или через PowerShell:
$UserPassword = ConvertTo-SecureString "Pa$$dr0w!!" -AsPlainText -Force
New-LocalUser "AIvanov" -Password $UserPassword -FullName "Andrey Ivanov"
Чтобы разрешить пользователю подключаться к серверу через службы Remote Desktop Services, нужно добавить аккаунт в локальную группу Remote Desktop Users. Добавьте пользователей вручную через консоль управления группами или через PowerShell:
Add-LocalGroupMember -Group "Remote Desktop Users" -Member AIvanov
Для данной группы пользователей разрешен вход в локальной политикие Allow logon through Remote Desktop Services (Computer Configuration -> Windows Settings -> Security Settings -> Local Policies -> User Rights Assignment). Эта же политика позволяет обеспечить RDP вход пользователям даже на контроллер домена.
Теперь пользователи могут попробовать со своих компьютеров подключится к вашему RDS хосту с помощью клиента mstsc.exe (или любого другого RDS клиента). Проверьте, что к серверу одновременно может подключится более двух активных RDP сессий .
При первом входе устройству пользователя выдается временная лицензия (особенности RDS Per Device лицензирования). При втором входе выдается постоянная лицензия, которая появится в консоли Remote Desktop Licensing Manager. Лицензия выдается на срок от 52 до 89 дней (случайное число).
Если у вас исчерпаны Per Device лицензии, вы можете вручную отозвать лицензии для некоторых устройств пользователей. Воспользуйтесь консоль RDSLicensing или таким PowerShell скриптом:
$licensepacks = Get-WmiObject win32_tslicensekeypack | where {($_.keypacktype -ne 0) -and ($_.keypacktype -ne 4) -and ($_.keypacktype -ne 6)}
# общее количество лицензий типа per device
$licensepacks.TotalLicenses
# количество лицензий, выданных устройствам
$TSLicensesAssigned = gwmi win32_tsissuedlicense | where {$_.licensestatus -eq 2}
# имя компьютера, для которого нужно отозвать лицензию
$compname="MSK-PC16"
$RevokePC = $TSLicensesAssigned | ? sIssuedToComputer -EQ $compname
$RevokePC.Revoke()
Если вам нужно подключиться в RDP сессию пользователя, вы можете воспользоваться режимом теневого подключения RDS (он работает на RDSH в рабочей группе).
This article describes how to install and configure a terminal server role Remote Desktop Session Host in a workgroup (without an Active Directory domain) and without any other additional roles (Connection Broker, Remote Desktop Web Access, RDS Gateway). This will be a single server RDS deployment on Windows Server 2019/2022.
Windows Server with the RDSH (Remote Desktop Session Host) role allows multiple users to connect to a server simultaneously using RDP (by default, only 2 administrative Remote Desktop connections are allowed on Windows Server). A separate session is created for each user, and they access their personal desktop environment.
If you are going to use a separate RDS host in a workgroup, note that its functionality is limited. It cannot be scaled to a full-featured RDS farm, you cannot create separate collections or a RemoteApp, there is no Connection Broker, you cannot use User Profile Disks, there are no centralized management tools, RDS service won’t be available to users during maintenance operations if the host is in the drain mode.
Contents:
- How to Install Remote Desktop Services Role on Windows Server 2019/2022?
- Configure Remote Desktop Licensing Role and Add RDS Licenses (CALs)
- Configure Remote Desktop Session Host in a Workgroup
How to Install Remote Desktop Services Role on Windows Server 2019/2022?
It is supposed that you have already installed Windows Server and configured basic settings (IP address, server name, time/date, installed updates, etc.). Then you can install the RDS role. To do it, you can use either Server Manager or PowerShell.
To install the RDS using Server Manager, select Remote Desktop Session Host and Remote Desktop Licensing in Role-based or Feature-based installation -> Server roles -> Remote Desktop Services in RDS components (agree to the installation of RSAT features to manage the roles).
Note that if you have selected Remote Desktop Services installation in Server Manager, the wizard will automatically install RD Connection Broker and Web Access in the Standard deployment or Quick Start modes. In our case, we don’t need these roles since we are installing a standalone RDS host.
You can also install Windows Server roles using PowerShell:
Install-WindowsFeature -Name RDS-Licensing, RDS-RD-Server –IncludeManagementTools
Check which RDS roles are installed on your server:
Get-WindowsFeature -Name RDS* | Where installed
Restart your server:
Restart-Computer
Configure Remote Desktop Licensing Role and Add RDS Licenses (CALs)
The next step is to configure the Remote Desktop Licensing role, which provides licensing for user RDP connections. You can install and activate Remote Desktop Licensing on this host (if you have only one host in your network) or place the RDLicensing role on another server. One server with the RDS Licensing role can issue licenses to any number of RDS hosts.
If you have decided to use a local RDLicensing server, activate the RDS Licensing host and install client licenses (RDS CALs) following this guide.
In a workgroup, you should use Per Device RDS CALs. If your licensing server issues Per User licenses only, users will see the following error when connecting to the server via RDP:
Remote Desktop License Issue
There is a problem with your Remote Desktop license, and your session will be disconnected in 60 minutes.
Configure Remote Desktop Session Host in a Workgroup
Go to Control Panel -> System and Security -> Administrative Tools -> Remote Desktop Services -> Remote Desktop Licensing Diagnoser. Note that your server is not yet configured to receive RDS CALs from the licensing server. The following messages prove it:
- The licensing mode for the Remote Desktop Session Host server is not configured
- Number of licenses available for clients: 0
If you don’t target your RDSH server to the RDS licensing server able to issue CALs to your users, your server will stay in the trial mode. In this mode, RDS services work for 120 days only (at each connection, you will see this message in the tray: “The Remote Desktop service will stop working in xxx days”). After the grace period is over, users won’t be able to connect to RDS due to the following error:
Remote session was disconnected because there are no Remote Desktop client access licenses available for this computer.
The main disadvantage of Remote Desktop Services on Windows Server 2019 in a workgroup (without a domain), is that you don’t have any convenient administrative tools to manage the RDS role. You will have to configure any RDSH role settings in the Local Group Policy Editor (gpedit.msc).
Configure RDS licensing settings with the Local Group Policy Editor (gpedit.msc):
- Go to Computer Configuration -> Administrative Templates -> Windows Components -> Remote Desktop Services -> Remote Desktop Session Host -> Licensing;
- Change Set the Remote Desktop licensing mode to Per Device;
- In Use the specified Remote Desktop license servers option, specify the IP address of the server RDLicensing server is installed on. If the licensing server is installed locally, enter
localhostor127.0.0.1; - Update local Group Policy settings and run the Remote Desktop Licensing Diagnoser. Make sure that it sees your RDS CALs.
In the local GPO, you can also set RDP session limits (timeouts) and rules of disconnecting users when they are inactive.
If you want to configure different Group Policies for local users and administrators, use the multiple GPO (MLGPO) feature.
Then create local user accounts on your RDS server. You can create users in lusrmgr.msc or with PowerShell:
$UserPassword = ConvertTo-SecureString "PaSS123!" -AsPlainText -Force
 New-LocalUser a.brown -Password $UserPassword -FullName "Andi Brown"
To allow a user to connect to a server through Remote Desktop Services, add the user account to the local Remote Desktop Users group. Add users manually using the computer management console or with PowerShell:
Add-LocalGroupMember -Group "Remote Desktop Users" -Member a.brown
This user group is allowed to logon remotely through the Allow logon through Remote Desktop Services GPO option (Computer Configuration -> Windows Settings -> Security Settings -> Local Policies -> User Rights Assignment). The same policy allows RDP access for non-admin users even to the domain controller.
Now users can try to connect to your RDS host using mstsc.exe (or any other RDS client) from their computers. Make sure that more than two active users can connect to the server simultaneously.
At the first login, a temporary license is issued for a user device (an RDS Per Device licensing feature). At the second logon, a permanent license is issued that appears in the Remote Desktop Licensing Manager. The license is issued for the period of 52-89 days (a random number).
If there are no free Per Device licenses, you can manually revoke licenses for some user devices. Use the RDSLicensing console or this PowerShell script:
$licensepacks = Get-WmiObject win32_tslicensekeypack | where {($_.keypacktype -ne 0) -and ($_.keypacktype -ne 4) -and ($_.keypacktype -ne 6)}
 # the total number of per device licenses
 $licensepacks.TotalLicenses
 # the number of licenses issued to the devices
 $TSLicensesAssigned = gwmi win32_tsissuedlicense | where {$_.licensestatus -eq 2}
 # the computer name you want to revoke a license from
 $compname="wksmun2a15"
 $RevokePC = $TSLicensesAssigned | ? sIssuedToComputer -EQ $compname
 $RevokePC.Revoke()
If you need to connect to a user RDP session, you can use the RDS shadow connection mode (it also works on an RDSH in a workgroup).
Политика компании Microsoft ведет к централизованному управлению решений на базе их продуктов и по-этому службы удаленных рабочих столов развертываются в месте с доменом Active Directory.
Но если вам нужно всего лишь базовое решение ? Выход есть)) Эта статья не претендует на звание статьи – это просто небольшая шпаргалка с небольшим описанием как установить службы удаленных рабочих столов RDS на windows 2019 server без Active Directory.
И так, как обычно идем в оснастку добавления ролей и компонентов. Подразумевается, что у вас уже машина находится в сети, видна в сетевом окружении (при необходимости) и дело осталось только за службой RDS.
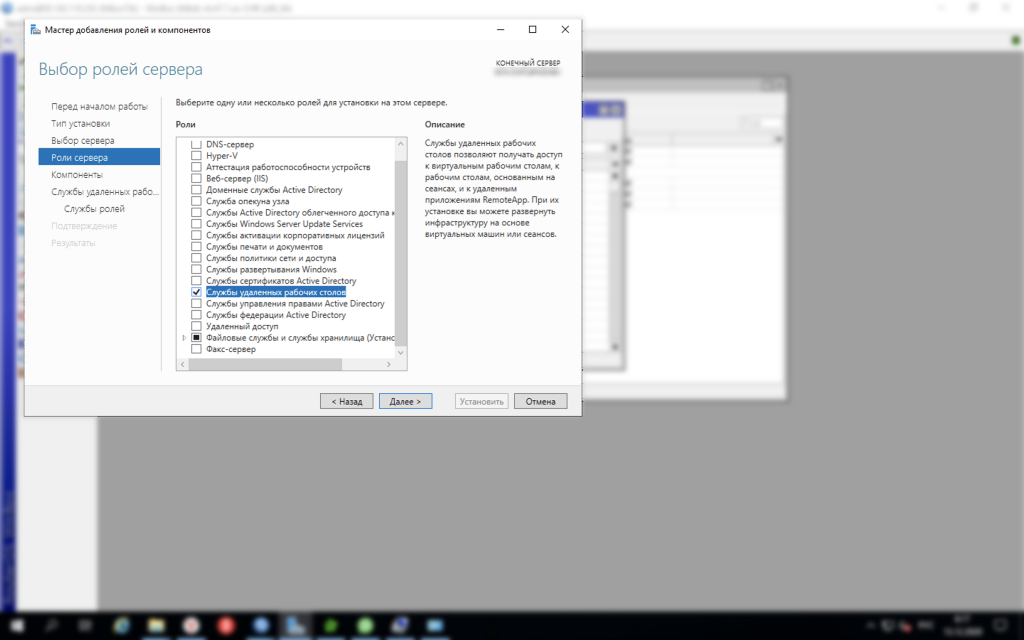
Запускаем Server Manager и установливаем роль Remote Desktop Services:
следующий шаг:
продолжаем, выбираем службы удаленных рабочих столов
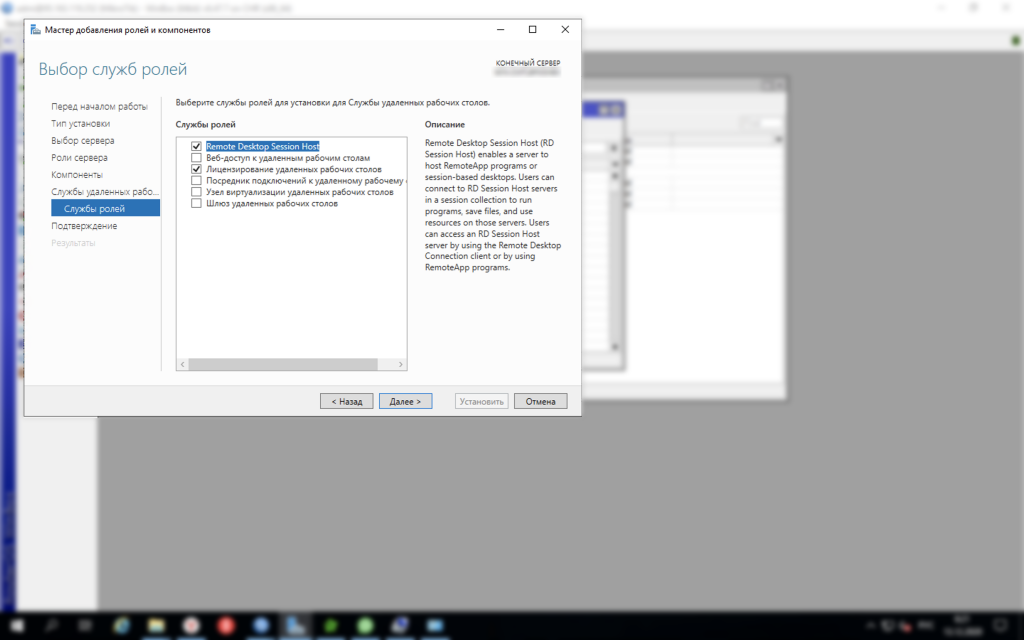
Для установки служб удаленных рабочих столов Windows Server 2019 без установки домена вам просто нужно добавить две службы ролей:
- лицензирования удаленных рабочих столов
- хоста сеансов удаленных рабочих столов.
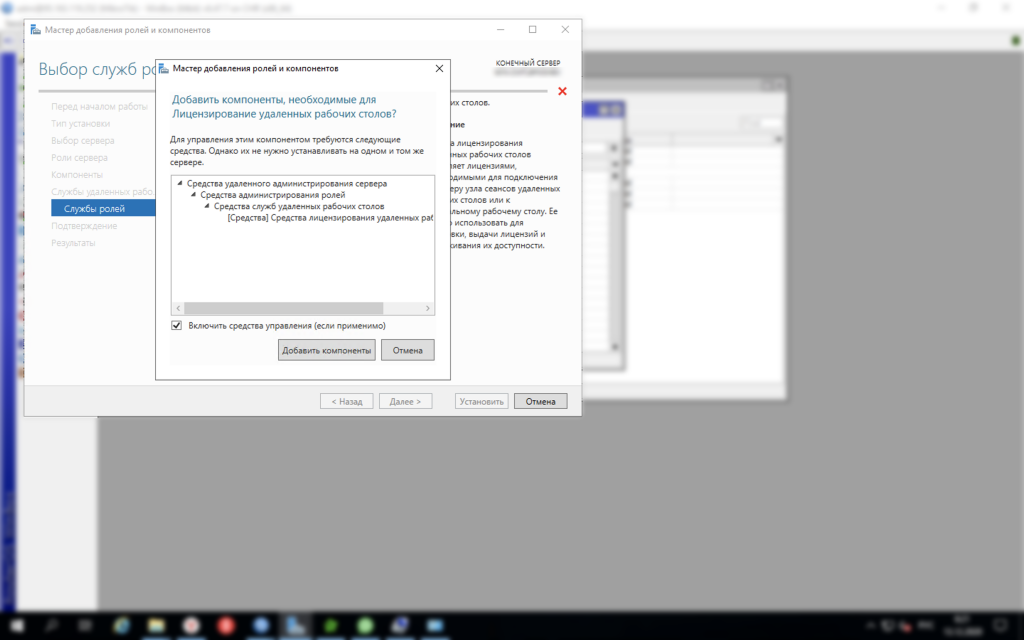
а так же сопутсвующие компоненты что предложит система:
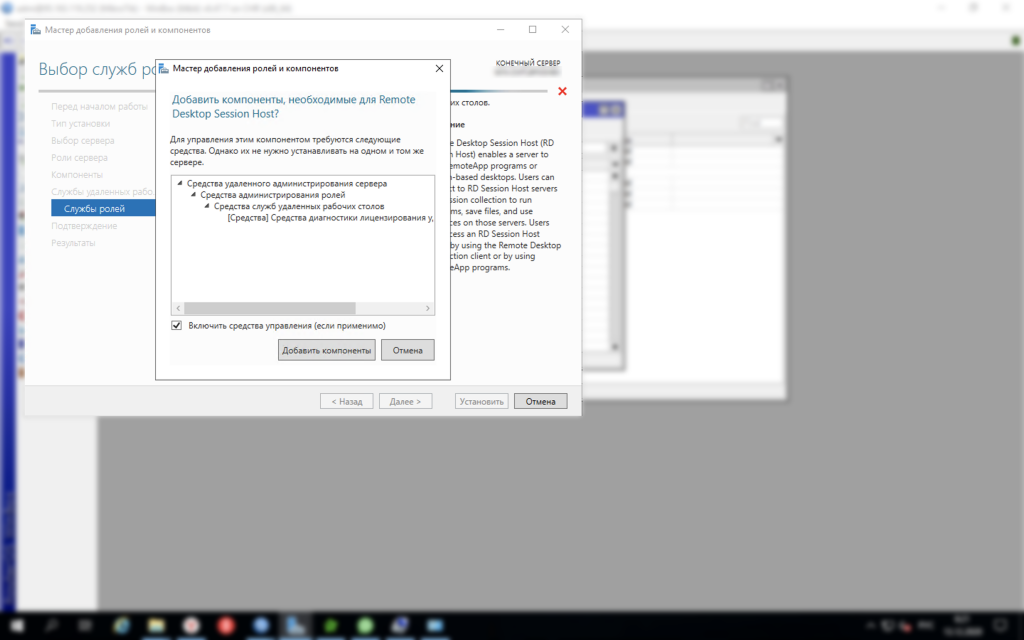
и
и
на этом первичную установку служб RDS можно считать законченной. Перезагружаем систему и приступаем к активации сервера удаленных рабочих столов windows Server 2019.
выделяем наш сервер со службами RDS
и правой кнопкой мыши в контекстном меню выбираем активацию сервера.
Мастер активации предложит вам заполнить несколько форм содержащих вашу контактную информацию о вас и вашей компании. Эти данные носят просто информационный характер для компании Microsoft.
По завершении процедуры активации, переходим к запуску мастера установки терминальных лицензий. В этом примере это установка пакета лицензий в розницу, на пользователя.
далее, в этом примере это соглашение Enterprise Agreement, вводим номер лицензионного соглашения:
указываем имеющееся количество лицензий
и всё!
Далее создаем пользователей, и не забываем их включить в группу “Пользователи удаленного рабочего стола”.
После установки и настройки севера все пользователи стали работать в новой среде не испытывая никаких проблем, кроме двух пользователей с принтером HP LaserJet P1102W:
Пользователь №1 (ОС WIndows 10): после подключения к удаленному рабочему столу он в произвольном порядке по времени, но обычно в течении 5 секунд, отключался от RDS. Лог файлы сервера говорили просто о “…terminate connection…” и ничего внятного. Поиск в сети интернет навел меня на переписку в Microsoft TechNet, где у человека была такая же проблема. Он с ней долго мучился и в итоге выяснилось, что причиной разрывов был устаревший принтер. Он заменил пользователю принтер и проблема ушла. Я пошел в экспериментах дальше, принтера у меня другого не было и я сделал просто, находящийся на локальном компьютере пользователя программный принтер PDF, по умолчанию. Пользователь подключался по RDP к “удаленке” и его канал больше не рвался. При печати ему приходилось выбирать просто 2й принтер, а не тот, что по умолчанию.
Пользователь №2 (ОС WIndows 7 (все обновления)): при печати с RDS выскакивает ошибка неверного параметра/аргумента. На данный момент проблема не решена. Будем наверно приобретать windows 10 и переустанавливать на компьютере пользователя систему. Если у кого есть другие идеи буду рад их здесь увидеть!
Просмотров: 6 303
