В этой статье мы покажем, как настроить сервер централизованной аутентификации, авторизации и аккаунтинга (RADIUS) на операционной системе Windows Server 2016, а также как настроить Radius-аутентификацию на Cisco устройствах с помощью службы Политики сети и доступа (Network Policy Server).
RADIUS (англ. Remote Authentication in Dial-In User Service) — протокол для реализации аутентификации, авторизации и сбора сведений об использованных ресурсах, разработанный для передачи сведений между центральным севером и различными сетевым оборудованием и клиентами.
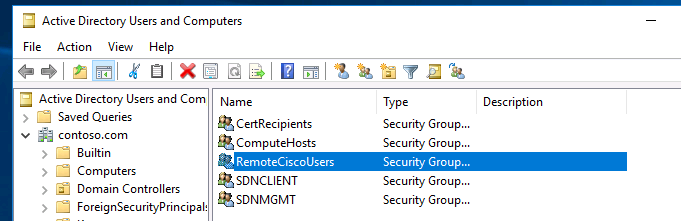
В первую очередь создайте в домене Active Directory группу безопасности AllowRemoteCiscoUsers, в которую нужно добавить пользователей, которым будет разрешена аутентификации на маршрутизаторах и коммутаторах Cisco.
Далее нужно установить на сервере, с помощью которого будет выполнятся аутентификация клиентов и назначаться права доступа, роль RADIUS сервера. Для этого на сервере Windows Server 2016 откройте оснастку Server Manager и вызовите мастер добавления ролей — Add Roles and features.
В открывшемся мастере на шаге выбора ролей отметьте роль Network Policy and Access Services. На шаге выбора служб роли в нашей ситуации достаточно будет выбрать только службу Network Policy Server.
Протокол Remote Authentication Dial In User Service (RADIUS) в Windows Server 2016 включен в состав роли Network Policy Server.
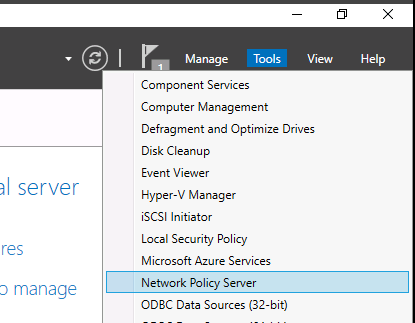
В консоли Server Manager выберите меню Tools и откройте консоль Network Policy Server (nps.msc).
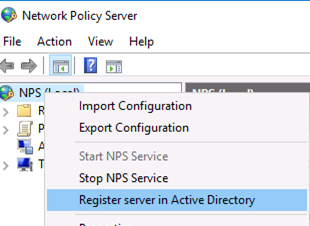
Для полноценного использования NPS-сервера в домене необходимо зарегистрировать его в домене Active Directory. В оснастке на NPS, щелкните ПКМ по вашему NPS узлу и выберите Register server in Active Directory.
Подтвердите регистрацию сервера в Active Directory:
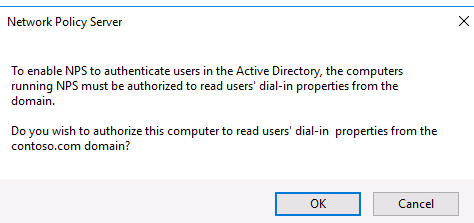
При этом мы должны предоставите серверу полномочия на чтение свойств учётных записей пользователей, касающихся удалённого доступа. Сервер при этом будет добавлен во встроенную доменную группу RAS and IAS Servers.
![]()
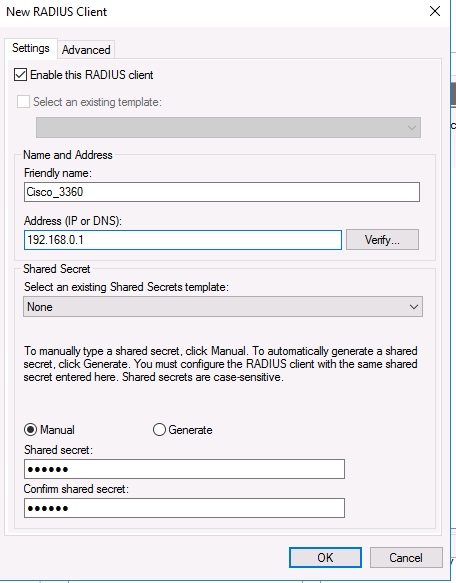
Теперь можно добавить клиента Radius. Для этого в дереве консоли NPS разверните раздел RADIUS Clients and Servers и на элементе RADIUS Clients выберите пункт New. 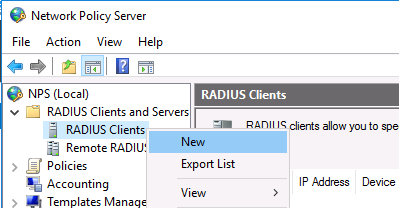
На вкладке Settings заполните поля Friendly name, Client address (можно указать IP адрес или DNS имя подключающегося сетевого устройства) и пароль — Shared Secret + Confirm shared (этот пароль вы будете использовать в настройках коммутатора или маршрутизатора Cisco для установления доверительных отношений с Radius сервером).
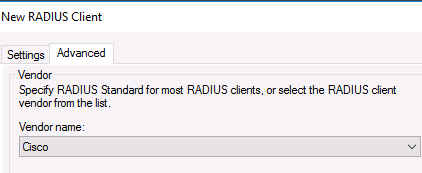
Во вкладке Advanced выберите в поле Vendor name — Cisco.
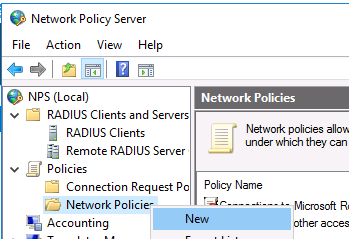
Теперь нужно создать политики доступа на сервере RADIUS. С помощью политик доступа мы свяжем клиента Radius и доменную группу пользователей.
Раскройте ветку Policies —> Network Policies, и выберите пункт меню New:
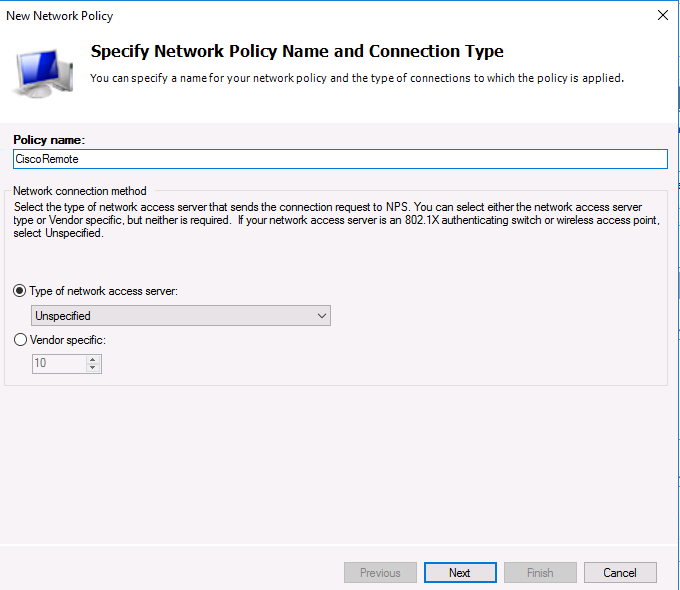
Укажите Имя политики (Policy name). Тип сервера доступа к сети (Type of network access server) оставьте без изменения (Unspecified):
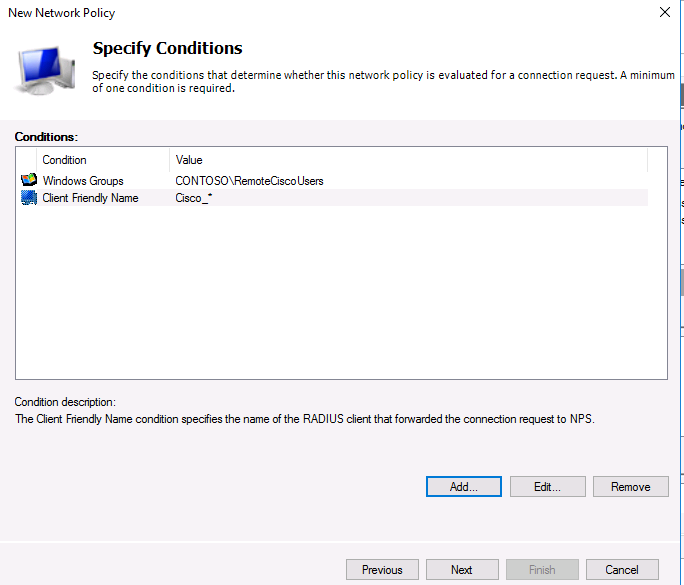
На следующем шаге Specify conditions нам нужно добавить условия, при которых будет применяться данная политика RADIUS. Добавим два условия: вы хотите, что для успешной авторизации пользователь входил в определенную доменную группу безопасности, и устройство, к которому осуществляется доступ, имело определённое имя. С помощью кнопки Add добавим сначала условие, выбрав тип Windows Group (добавьте группу RemoteCiscoUsers) и укажите Client Friendly Name (Cisco_*).
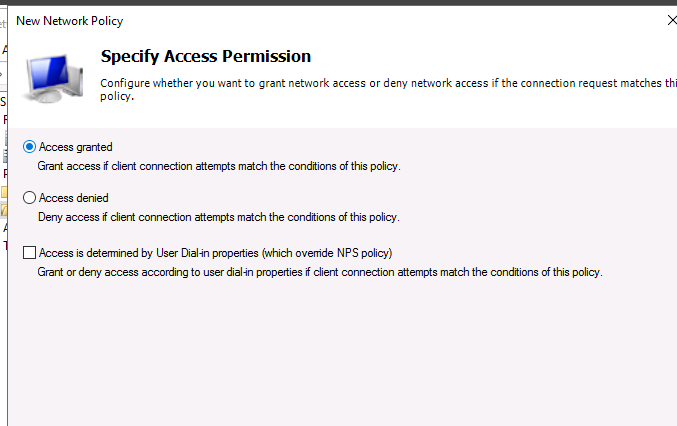
На следующем выберите значение Доступ разрешен (Access Granted).
Т.к. наш коммутатор Cisco поддерживает только метод аутентификации Unencrypted authentication (PAP, SPAP), снимите все остальные флажки. 
Следующий шаг настройки ограничений (Constraints) мы пропустим.
В разделе Configure Settings перейдите секцию RADIUS Attributes -> Standard. Удалите имеющиеся там атрибуты и нажмите кнопку Add.
Выберите Access type -> All, затем Service-Type->Add. Укажите Others=Login. 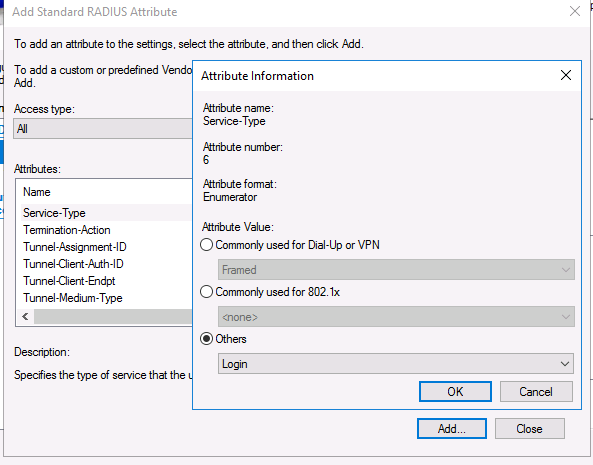
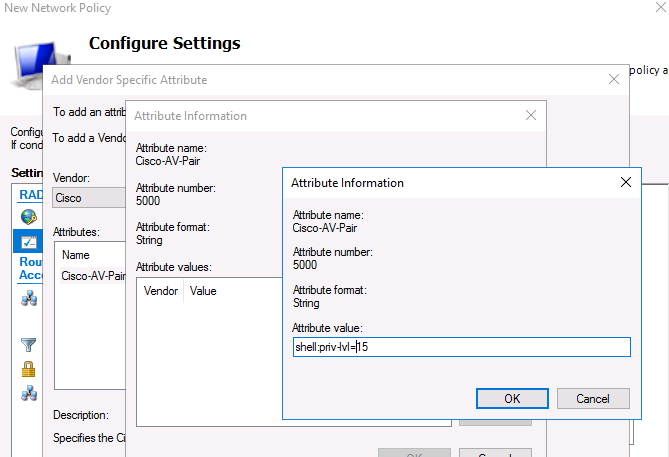
Теперь в секции RADIUS Attributes -> Vendor Specific добавьте новый атрибут. В пункте Vendor, найдите Cisco и нажмите Add. Здесь нужно добавить сведения об атрибуте. Нажмите Add и укажите следующее значение атрибута:
shell: priv-lvl = 15
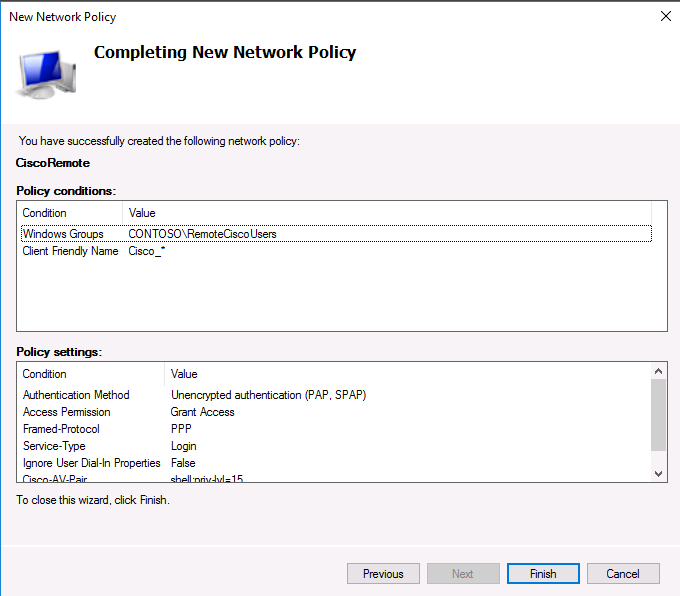
На последнем экране будут указаны все созданные вами настройки политики NPS. Нажмите Finish:
При создании и планировании политик обратите внимание на то, что имеет значение их порядок. Политики обрабатываются сверху вниз, и все условия очередной политике соблюдены, эта политика применяется к клиенту, а дальнейшая обработка других политик прекращается. То есть с точки зрения безопасности и разрешения конфликтов между политиками правильнее будет располагать политики в порядке возрастания административных полномочий.
После создания политики, можно переходить к настройке маршрутизаторов и коммутаторов Cisco для аутентификации на сервере Radius NPS.
AAA работает таким образом, что, если не получен ответ от сервера, клиент предполагает, что аутентификация не выполнена. Чтобы не потерять доступ к своим сетевым устройствам, которые вы переключаете на авторизацию на Radius сервера, обязательно создайте локальных пользователей на случай если RADIUS сервер станет недоступен по какой-либо причине.
Ниже пример конфигурации для авторизации на Radius (NPS) сервере для коммутатора Cisco Catalyst:
aaa new-model
aaa authentication login default group radius local
aaa authorization exec default group radius if-authenticated
radius-server host 192.168.1.16 key R@diu$pa$$
service password-encryption
На этом минимальная настройка коммутатора закончена и можно испытать новый механизм аутентификации и авторизации в действии.
Наконец «Долгая дорога в дюнах» закончилась, и мы пришли к корпоративному управляемому Wi-fi решению. В начале думали про решение Cisco или Aruba, но к сожалению текущий бюджет никак не располагает к решениям подобного плана. В итоге, в ходе долгих поисков истины и раздумий, решили остановиться на решении Ubnt (отдельно благодарю Александра за нужные советы). Конечно, это не одного поля ягоды с решением Cisco или Aruba, но в текущей ситуации, что есть, то есть.
Как говорил мой командир: «На пожаре и Х… водопровод» (да простят меня за мой русский).
Итак, решение выбрано, задача настроить корпоративный внутренний и гостевой сегменты Wi-fi с авторизацией на Radius сервере.
VPN сервер уже готов, осталось настроить RADIUS, сегодня как раз об этом. На первый взгляд, развернуть и настроить RADIUS сервер, не такая уж сложная задача, но немного загнались с сертификатом, пришлось «поплясать с бубном», ну об этом далее по порядку.
Для начала необходимо запросить сертификат с Центра сертификации, центр сертификации у нас уже есть, поэтому его установку в этом посте я пропущу.
MMC-Файл-Добавить или удалить оснастку-Добавляем Сертификаты-Учетной записи компьютера-Локальным компьютером.
Находим наш центр сертификации

Запрашиваем сертификат (*.p12), сохраняем его на диск, далее устанавливаем его в Личные сертификаты на будущий радиус сервер

Далее добавляем роль самого RADIUS сервера

Далее запускаем Сервер политики сети


Добавляем в раздел RADIUS-клиенты свои Wi-fi точки доступа или сервер управления точками доступа если он поддерживает эту возможность (в этом случае он будет выполнять роль RADIUS клиента)

Общий секрет, указываем тот, который в последствии укажем на Wi-fi точке (IP адрес точки в той подсети, где она находится).
Переходим к политике запросов на подключение


Вот тут, если нажать на:защищенные EAP(PEAP)-Изменить, мы должны видеть свой сертификат, если он был правильно запрошен и установлен.

Далее настраиваем Сетевые политики


На первый взгляд настройка RADIUS сервера на этом закончена, но это еще не все.
На эту тему есть четкие рекомендации, про которые я совсем забыл (спасибо Александру, что он напомнил):
https://technet.microsoft.com/en-us/library/cc754198.aspx?f=255&MSPPError=-2147217396
если сервер не включен в группу RAS and IAS, то его надо туда добавить:
https://msdn.microsoft.com/en-us/library/cc754878(v=ws.11).aspx
На всякий случай проверяем, что все так, как должно быть, открываем на сервере локальную политику (gpedit.msc)
И проверяем следующий пункт

Далее на точке или точках Wi-fi указываем авторизацию WPA Enterprise.

Здесь же хотел поблагодарить Романа, за подробные разъяснения по неясным моментам по серверу управлению Wi-fi и настройкам непосредственно Wi-fi.
И получаем далее авторизуем с доменными учетными данными, пользователей подключаемых к корпоративному Wi-fi.
Почитать по теме можно здесь:
How to Configure Windows 2012 NPS for Radius Authentication with Ubiquiti Unifi
или здесь:
https://habrahabr.ru/post/142070/
Всем хорошей работы!!!
06.12.2016 —
Posted by |
ms windows server 2016
Sorry, the comment form is closed at this time.
В этой статье мы покажем, как настроить сервер централизованной аутентификации, авторизации и аккаунтинга (RADIUS) на операционной системе Windows Server 2016, а также как настроить Radius-аутентификацию на Cisco устройствах с помощью службы Политики сети и доступа (Network Policy Server).
RADIUS (англ. Remote Authentication in Dial-In User Service) — протокол для реализации аутентификации, авторизации и сбора сведений об использованных ресурсах, разработанный для передачи сведений между центральным севером и различными сетевым оборудованием и клиентами.
В первую очередь создайте в домене Active Directory группу безопасности AllowRemoteCiscoUsers, в которую нужно добавить пользователей, которым будет разрешена аутентификации на маршрутизаторах и коммутаторах Cisco.
Далее нужно установить на сервере, с помощью которого будет выполнятся аутентификация клиентов и назначаться права доступа, роль RADIUS сервера. Для этого на сервере Windows Server 2016 откройте оснастку Server Manager и вызовите мастер добавления ролей — Add Roles and features.
В открывшемся мастере на шаге выбора ролей отметьте роль Network Policy and Access Services. На шаге выбора служб роли в нашей ситуации достаточно будет выбрать только службу Network Policy Server.
Протокол Remote Authentication Dial In User Service (RADIUS) в Windows Server 2016 включен в состав роли Network Policy Server.
В консоли Server Manager выберите меню Tools и откройте консоль Network Policy Server (nps.msc).
Для полноценного использования NPS-сервера в домене необходимо зарегистрировать его в домене Active Directory. В оснастке на NPS, щелкните ПКМ по вашему NPS узлу и выберите Register server in Active Directory.
Подтвердите регистрацию сервера в Active Directory:
При этом мы должны предоставите серверу полномочия на чтение свойств учётных записей пользователей, касающихся удалённого доступа. Сервер при этом будет добавлен во встроенную доменную группу RAS and IAS Servers.
![]()
Теперь можно добавить клиента Radius. Для этого в дереве консоли NPS разверните раздел RADIUS Clients and Servers и на элементе RADIUS Clients выберите пункт New.
На вкладке Settings заполните поля Friendly name, Client address (можно указать IP адрес или DNS имя подключающегося сетевого устройства) и пароль — Shared Secret + Confirm shared (этот пароль вы будете использовать в настройках коммутатора или маршрутизатора Cisco для установления доверительных отношений с Radius сервером).
Во вкладке Advanced выберите в поле Vendor name — Cisco.
Теперь нужно создать политики доступа на сервере RADIUS. С помощью политик доступа мы свяжем клиента Radius и доменную группу пользователей.
Раскройте ветку Policies —> Network Policies, и выберите пункт меню New:
Укажите Имя политики (Policy name). Тип сервера доступа к сети (Type of network access server) оставьте без изменения (Unspecified):
На следующем шаге Specify conditions нам нужно добавить условия, при которых будет применяться данная политика RADIUS. Добавим два условия: вы хотите, что для успешной авторизации пользователь входил в определенную доменную группу безопасности, и устройство, к которому осуществляется доступ, имело определённое имя. С помощью кнопки Add добавим сначала условие, выбрав тип Windows Group (добавьте группу RemoteCiscoUsers) и укажите Client Friendly Name (Cisco_*).
На следующем выберите значение Доступ разрешен (Access Granted).
Т.к. наш коммутатор Cisco поддерживает только метод аутентификации Unencrypted authentication (PAP, SPAP), снимите все остальные флажки.
Следующий шаг настройки ограничений (Constraints) мы пропустим.
В разделе Configure Settings перейдите секцию RADIUS Attributes -> Standard. Удалите имеющиеся там атрибуты и нажмите кнопку Add.
Выберите Access type -> All, затем Service-Type->Add. Укажите Others=Login.
Теперь в секции RADIUS Attributes -> Vendor Specific добавьте новый атрибут. В пункте Vendor, найдите Cisco и нажмите Add. Здесь нужно добавить сведения об атрибуте. Нажмите Add и укажите следующее значение атрибута:
shell: priv-lvl = 15
На последнем экране будут указаны все созданные вами настройки политики NPS. Нажмите Finish:
При создании и планировании политик обратите внимание на то, что имеет значение их порядок. Политики обрабатываются сверху вниз, и все условия очередной политике соблюдены, эта политика применяется к клиенту, а дальнейшая обработка других политик прекращается. То есть с точки зрения безопасности и разрешения конфликтов между политиками правильнее будет располагать политики в порядке возрастания административных полномочий.
После создания политики, можно переходить к настройке маршрутизаторов и коммутаторов Cisco для аутентификации на сервере Radius NPS.
AAA работает таким образом, что, если не получен ответ от сервера, клиент предполагает, что аутентификация не выполнена. Чтобы не потерять доступ к своим сетевым устройствам, которые вы переключаете на авторизацию на Radius сервера, обязательно создайте локальных пользователей на случай если RADIUS сервер станет недоступен по какой-либо причине.
Ниже пример конфигурации для авторизации на Radius (NPS) сервере для коммутатора Cisco Catalyst:
aaa new-model
aaa authentication login default group radius local
aaa authorization exec default group radius if-authenticated
radius-server host 192.168.1.16 key R@diu$pa$$
service password-encryption
На этом минимальная настройка коммутатора закончена и можно испытать новый механизм аутентификации и авторизации в действии.
Наконец «Долгая дорога в дюнах» закончилась, и мы пришли к корпоративному управляемому Wi-fi решению. В начале думали про решение Cisco или Aruba, но к сожалению текущий бюджет никак не располагает к решениям подобного плана. В итоге, в ходе долгих поисков истины и раздумий, решили остановиться на решении Ubnt (отдельно благодарю Александра за нужные советы). Конечно, это не одного поля ягоды с решением Cisco или Aruba, но в текущей ситуации, что есть, то есть.
Как говорил мой командир: «На пожаре и Х… водопровод» (да простят меня за мой русский).
Итак, решение выбрано, задача настроить корпоративный внутренний и гостевой сегменты Wi-fi с авторизацией на Radius сервере.
VPN сервер уже готов, осталось настроить RADIUS, сегодня как раз об этом. На первый взгляд, развернуть и настроить RADIUS сервер, не такая уж сложная задача, но немного загнались с сертификатом, пришлось «поплясать с бубном», ну об этом далее по порядку.
Для начала необходимо запросить сертификат с Центра сертификации, центр сертификации у нас уже есть, поэтому его установку в этом посте я пропущу.
MMC-Файл-Добавить или удалить оснастку-Добавляем Сертификаты-Учетной записи компьютера-Локальным компьютером.
Находим наш центр сертификации
Запрашиваем сертификат (*.p12), сохраняем его на диск, далее устанавливаем его в Личные сертификаты на будущий радиус сервер
Далее добавляем роль самого RADIUS сервера
Далее запускаем Сервер политики сети
Добавляем в раздел RADIUS-клиенты свои Wi-fi точки доступа или сервер управления точками доступа если он поддерживает эту возможность (в этом случае он будет выполнять роль RADIUS клиента)
Общий секрет, указываем тот, который в последствии укажем на Wi-fi точке (IP адрес точки в той подсети, где она находится).
Переходим к политике запросов на подключение
Вот тут, если нажать на:защищенные EAP(PEAP)-Изменить, мы должны видеть свой сертификат, если он был правильно запрошен и установлен.
Далее настраиваем Сетевые политики
На первый взгляд настройка RADIUS сервера на этом закончена, но это еще не все.
На эту тему есть четкие рекомендации, про которые я совсем забыл (спасибо Александру, что он напомнил):
https://technet.microsoft.com/en-us/library/cc754198.aspx?f=255&MSPPError=-2147217396
если сервер не включен в группу RAS and IAS, то его надо туда добавить:
https://msdn.microsoft.com/en-us/library/cc754878(v=ws.11).aspx
На всякий случай проверяем, что все так, как должно быть, открываем на сервере локальную политику (gpedit.msc)
И проверяем следующий пункт
Далее на точке или точках Wi-fi указываем авторизацию WPA Enterprise.
Здесь же хотел поблагодарить Романа, за подробные разъяснения по неясным моментам по серверу управлению Wi-fi и настройкам непосредственно Wi-fi.
И получаем далее авторизуем с доменными учетными данными, пользователей подключаемых к корпоративному Wi-fi.
Почитать по теме можно здесь:
How to Configure Windows 2012 NPS for Radius Authentication with Ubiquiti Unifi
или здесь:
https://habrahabr.ru/post/142070/
Всем хорошей работы!!!
06.12.2016 —
Posted by |
ms windows server 2016
Sorry, the comment form is closed at this time.
RADIUS (Remote Authentication in Dial-In User Service) is a network protocol for the implementation of authentication, authorization, and collecting information about the resources used. It is designed to transfer information between the central platform and network clients/devices. Your remote access (RADIUS) server can communicate with a central server/service (for example, Active Directory domain controller) to authenticate remote dial-in clients and authorize them to access some network services or resources. Thanks to this, you can use a single centralized authentication system in your domain.
In this article, we’ll show how to configure the centralized RADIUS server based on Windows Server 2022, 2019, or 2016 OSs, and how to configure RADIUS authentication on Cisco devices using the Network Policy Server (NPS) service. In this example, the RADIUS will use the AD to authenticate remote users and authorize them to access Cisco and Mikrotik switches/routers (act as RADIUS clients) command-line interface.
Installing Radius Server (NPS) Role on Windows Server 2022/2019/2016
At first, create a new security group in the Active Directory domain (for example, RemoteCiscoUsers) in which you will need to add all users that will be allowed to authenticate on Cisco routers and switches (How to add AD user to group with PowerShell?).

Starting with Windows Server 2008 R2, the RADIUS server functionality was implemented with the Network Policy Services (NPS) role. With the NPS role, you can authenticate remote clients against Active Directory using the Radius protocol.
So, you need to install the RADIUS server role on your Windows Server 2022/2019/2016. Open the Server Manager console and run the Add Roles and Features wizard. The Remote Authentication Dial-In User Service (RADIUS) protocol in Windows Server is a part of the Network Policy Server role. In the wizard that appears, select the Network Policy and Access Services role in the role selection step.
Note. Also, you can install NPS role and management tools from an elevated PowerShell console:
Install-WindowsFeature NPAS –IncludeManagementTools
Check if the NPAS role is installed on your Windows Server host:
Get-WindowsFeature -Name NPAS

After the role installation is completed, open the Network Policy Server (nps.msc) in the Tools menu.

To use the NPS server in the domain, you must register it in the Active Directory. In the NPS snap-in, right-click on a root and select Register server in Active Directory.

Confirm the registration of the server in Active Directory.

Also, you can register your NPS server in Active Directory with a command:
netsh ras add registeredserver
In this case, the server will be given the authority to read the properties of Active Directory user accounts to authenticate users. The server will be added to the built-in domain group RAS and IAS Servers.
![]()
Now you can add the Radius client. Radius client is the device from which your server will receive authentication requests. In this example, it could be a Cisco router, switch, Wi-Fi access point, etc.
To add the new Radius client, expand the RADIUS Clients and Servers section in the NPS console tree and select New on the RADIUS Clients item.

On the Settings tab, fill the fields Friendly name, client Address (you can specify IP address or DNS name), and Shared Secret + Confirm shared password (you will use this password in the configuration of the Cisco switch/router).
Note. The shared secret password is rarely used in huge corporate networks due to the problems with the distribution of shared keys. Instead of shared passwords, it is recommended to use certificates. If you have a corporate Certification Authority deployed to implement PKI infrastructure, you can request and import a *.p12 certificate for the Radius/NPS server. Just add the certificate to the personal certification store of the Local Machine.

In the Advanced tab, select Vendor name – Cisco.

You can use the PowerShell command instead of the NPS GUI to add a new RADIUS client. In this case, you can use the New-NpsRadiusClient PowerShell cmdlet:
New-NpsRadiusClient –Address "192.168.31.1" –Name "cisco2960" –SharedSecret "Zb+kp^JUy]vePb-h.Q*d=weya2AY?hn+npRRp[/J7d"
Configuring NPS Policies on the RADIUS Server
NPS policies allow you to authenticate remote users and grant them access permissions configured in the NPS role. Using NPS access policies, you can make a link to the RADIUS client records and the domain security group that determines the level of access to CISCO devices.
There are two types of policies on a RADIUS server:
- Connection request policies — these policies define a set of conditions that determines which RADIUS servers should authenticate and authorize connection requests received from RADIUS clients;
- Network policies — a set of conditions and settings that allow you to specify who is authorized to connect to your network and a list of assigned access permissions. These policies are processed sequentially from the top to down;
In our case, we will use only the NPS Network policies. Expand the Policies > Network Policies branch and select New:

Specify the Policy name, the type of network access server should remain unchanged (Unspecified).

In the next step Specify conditions, you need to add the conditions under which this RADIUS policy will be applied. Let’s add two conditions — the authorized user must be a member of a specific domain security group, and the device you want to access has a certain name. Use the Add option to create a new condition by selecting the Windows Group type (add the RemoteCiscoUsers group) and specifying the Client Friendly Name (Cisco_*).
Note. The Client Friendly Name field may differ from the DNS name of your device. We will need it in the further steps to identify a specific network device when creating a Remote Access Policy. Using this name, you can specify, for example, a mask by which several different RADIUS clients will be processed by a single access policy.

On the next screen, select Access Granted.

Our Cisco switch supports only the Unencrypted authentication method (PAP, SPAP), so that’s why we’ll uncheck all other options.

Skip the next configuration Constraints step.
In the Configure Settings section, go to the RADIUS Attributes > Standard section. Delete the existing attributes there and click the Add button.
Select Access type > All, then Service-Type > Add. Specify Others = Login.

Now add a new attribute in the RADIUS Attributes > Vendor Specific section. Under Vendor, select Cisco, and click Add. Here you need to add information about the attribute. Click Add and specify the following value:
shell: priv-lvl = 15
This value means that the user authorized by this policy will be granted a maximum (15) administrative access permission on the Cisco device.

The last screen displays all selected NPS policy settings. Click Finish.

Hint. You can back up the current NPS server configuration to the XML file using the command:
Export-NpsConfiguration -Path c:psbackup_nps.xml
If you need to restore the NPS configuration from a previously created backup file, run:
Import-NpsConfiguration -Path c:psbackup_nps.xml
When creating and planning RADIUS policies, pay attention to what matters in their order. Policies are processed from the top to down, and when it turns out that all the conditions in the next policy are met, their further processing is terminated. You can change the priorities of policies in the NPS console using the Processing Order value.

To enable the user account to be used for Radius authentication, open the Active Directory Users and Computers snap-in (dsa.msc), find the user, open its properties, go to the Dial-In tab and select the Control access through NPS Network Policy option in the Network Access Permission section.

Also, you can check the current option value using PowerShell:
Get-ADUser richard.doe -Properties msNPAllowDialin -Server dc1.theitbros.com
If the above command did not return any result (empty), this means that the default value “Control access through NPS Network Policy” is used.
If you want to reset this user attribute to the default state, use the command:
Set-ADUser richard.doe -Clear msNPAllowDialin -Server dc1.theitbros.com
Or you can reset this attribute for all users in the specific Active Directory OU using the LDAP filter:
Get-ADUser -SearchBase "ou=Users,ou=Paris,dc=theitbros,dc=com" -LDAPFilter "(msNPAllowDialin=*)" | % {Set-ADUser $_ -Clear msNPAllowDialin}
Configuring RADIUS Setting on Cisco Devices
After creating the policy, you can proceed to configure your Cisco routers or switches for authentication on the newly installed Radius NPS server.
Because we use domain accounts for authorization, the user credentials must be transmitted over the network in an encrypted form. To do this, disable the telnet protocol on the switch and enable SSHv2 on Cisco using the following commands in configuration mode:
configure terminal
crypto key generate rsa modulus 1024
ip ssh version 2
AAA works in such a way: if the response from the server is not received, the client assumes unsuccessful authentication. Be sure to create a local user in case the RADIUS server is unavailable for some reason.
You can create a local user with the following command:
username cisco_local password $UPerrP@ssw0rd
To make the use of SSH mandatory and disable remote access using Telnet, execute the following commands:
line vty 5 15
transport input ssh
Below is an example of the configuration for authorizing a Radius server for the Cisco Catalyst Switch:
aaa new-model

aaa authentication login default group radius local

aaa authorization exec default group radius if-authenticated

radius-server host 192.168.1.16 key Sfs34e#sf

#Specify your RADIUS server IP address and key for encryption (the shared secret that we specified on the RADIUS server)

service password-encryption

# Enable password encryption
If you have several Radius servers, add them to the group:
aaa group server radius radius_srv_group

server 192.168.1.16

server 192.168.101.16
This completes the minimum switch configuration and you can try to check Radius authentication on your Cisco device.
How to Configure RADIUS Authentication on Microtik (RouterOS) Devices?
In this part, we will show you how to configure RADIUS authentication for VPN user connections via a Mikrotik router (RouterOS based).
Open the Network Policy Server console (nps.msc) and create a new Radius client.
Select New RADIUS Client and configure the following settings:
- Enable this RADIUS Client;
- Friendly Name — enter the name of your Mikrotik router here;
- Address — specific the IP address of the Mikrotik router;
- Specify your Preshared secret key.

Create a new Network Policy with the following settings:
- User Groups — specify the name of the domain user group that is allowed to authenticate on your Mikrotik router;
- Authentication Type — MS-CHAPv2;
- Tunnel Type — Point-to-Point Tunneling Protocol (PPTP);
- Access Permissions — Access granted;
- In the Configure Authentication Methods window, leave only MS-CHAPv2 and allow users to change expired passwords (User can change password after it has expired option);
- Multilink and Bandwidth Allocation Protocol (BAP) – Do not allow Multilink connections;
- In the Standard section, remove Service-Type – Framed and leave only Framed-Protocol PPP;
- Encryptions — leave only the Strongest encryption (MPP 128-bit) method.

Once you have created a new policy, open the Network Policy Server settings.
Leave only the following UDP ports for the RADIUS server communications:
- Authentication — 1812;
- Accounting — 1813.

Check if these UDP ports are open in Microsoft Defender Firewall Rules. If not, open them manually.
Now you need to configure the connection settings for Windows Server RADIUS in the Mikrotik configuration (we assume that PPP VPN Server is already configured on RouterOS to connect users).
Check in the PPTP server settings that only mschap2 is allowed to use for authentication.

Now we need to configure the connection to Radius NPS server. Select New Radius Server and specify the following options:
- Service: ppp;
- Address: IP address of the RADIUS server;
- Secret: preshared key that you specified in the network policy settings;
- Src/ Address: Mikrotik IP address from which traffic will be sent to NPS;
- Authentication Port: 1812;
- Accounting Port: 1813.

Add appropriate access rules to Mikrotik Firewall.
Then go to Secrets > PPP Authentication and Accounting and enable the Use Radius option.

It remains to configure a PPTP VPN connection to your Mikrotik VPN on users’ computers. To authenticate to Mikrotik, users can use their Active Directory accounts (accounts must be added to the AD group that you have specified when creating the Miktotik Network Policy on NPS).
How to Check the NPS/RADIUS Logs on Windows?
To enable NPS Server Radius Authentication logging, you need to enable the Network Policy Server audit policy. You can enable this policy via the local Group Policy Editor or with the following commands:
auditpol /get /subcategory:"Network Policy Server"

auditpol /set /subcategory:"Network Policy Server" /success:enable /failure:enable

Now you can open the Event Viewer console (eventvwr.msc), go to the Windows Logs > Security, and filter the event by the Event ID 6272.
Network Policy Server granted access to a user.

If you need to find all NPS authorizations events for the specific user (Richard.Doe in this example), use the next PowerShell script:
$Query = @"
<QueryList>
<Query Id="0" Path="Security">
<Select Path="Security">
*[EventData[Data[@Name='SubjectUserName'] and (Data=theitbrosrichard.doe')]] and
*[System[(EventID='6272')]]
</Select>
</Query>
</QueryList>
"@
$events = Get-WinEvent -FilterXML $Query
$ipaddr = @{ label="IP"; Expression={$_.properties[9].value} }
$events | select $ipaddr | group "IP" | format-table Count, Name -autosize
Looking for instructions to configure Radius server on Windows server 2016? This article will guide you in detail on how to do that. Scroll down to read!
Since Radius Server was born, it has brought much more convenience to Windows users. Most of us don’t see what this tool looks like, but we use its applications almost every day.
In today’s article, we will tell you more about this tool, then walk you through the instructions on how to configure Radius server on Windows Server 2016 in detail. Let’s kick right in!
Radius Server And Its Features
In the first part, let’s get to know what this tool is and its main features!
Radius Server Windows
RADIUS is an abbreviation for Remote Authentication in Dial-In User Service. It is known as a protocol used for authenticating and collecting data from the connected resources. RADIUS works by sending information from the headquarters to network devices and vice versa. Users can therefore access the central service to authorize the dial-in devices or services remotely.
Main Features Of Radius Server
There are many positive features about the Radius server. Let’s check one by one:
- Wireless Authentication: The version IEEE 802.11 authentication offers access control to wireless routers, access points, hotspots in EAP/WPA-Enterprise/WPA2-Enterprise modes.
- Multiple authentication backends: The Radius server also supports multiple authentications. It may authenticate against local windows groups, Windows domains, LDAP directories.
- Advanced Radius proxy: The incoming and outgoing forwarded packets are applied for Radius requests.
- Built-in account management: This means using the Radius server, you can modify, add, delete users’ accounts within the database.
- Radius server provides dynamic authorization extensions
- It offers third-party billing system integration as the ClearBox Server may be integrated with SQL-based systems of billing to support the RADIUS server authentication process.
- The protocol offers multiple accounting consumer
- Users can enjoy the cloud integration service by using this protocol
In this part, we are going to focus on how to set up a RAdius server on the Windows Servers 2016 operating system. In addition, users can find here instructions for verification of this program on Cisco devices. Let’s take a closer look!
Setting Up The Radius Server (NPS) Role
To prepare for installing Radius server roles, users are suggested to make a new group of security in the AD domain named RemoteSiscoUsers. After that, add all the users who are going to be involved in Cisco router authentication.
Creating a security group
The point is that from Windows version 2008 R2, the Radius server sets up with the Network Policy Services (NPS) function. This feature helps users authorize faraway clients against AD with the help of the Radius component.
Now, we will guide you on how to setup the radius server function on the Windows Server 2016 operating system. First, open the Service Manager function before launching the Add Roles and Features wizard. You will see a screen open on your desktop; choose the Network Policy and Access Services option.
The thing is you also can use the order statement to install the NPS role by using PowerShell: Install-WindowsFeature NPAS -IncludeManagementTools
After the installation process is accomplished, log in to the Network Policy Server (nps.msc) located in the bar “Tools”.
Choosing Network Policy Server option
The next step is registering your server within the Active Directory. Under the NPS option, click on the right mouse of the root before selecting the Register server within the Active Directory option.
Selecting the Register server in the Active Directory option
Then, users should confirm this process of registration
Confirmation process
Another way of registering the NPS server inside the Active directory is using the order statement: netsh ras add registered server. Hence, the server will join in the built-in group of domains. And it will be given the authority to read the features of Active Directory user accounts.
The server is added in the domain group IAS and RAS Servers
Next, you can put in the Radius client. In this case, your client can be an address for wi-fi accessing, a router, or a switch.
Adding a new Radius client
A setting screen will appear, and it requires users to fill in the necessary information. Users should pay attention to the passwords that were applied in the configuration in the previous stage for the Cisco router.
Filling in the necessary information
Head to the Advanced menu on the right of setting one, choose the Vendor name as Cisco.
Choosing the name of the vendor
You can apply the PowerShell instead of using NPS GUI for the adding function, apply the New-NpsRadiusClient PowerShell cmdlet. New-NpsRadiusClient –Address “192.168.31.1” –Name “cisco2960” –SharedSecret “Zb+kp^JUy]vePb-h.Q*d=weya2AY?hn+npRRp[/J7d”.
Setting Up NPS Policies On The Radius Server
Using NPS policies will help users verify their faraway guests and give permission to access to utilize the NPS role. Also, by applying these policies, users can have a connection to Radius clients’ records, as well as a group of domain security. Policies on the Radius server is grouped into two categories:
- Connection request policies: These include the conditions that allow Radius servers to verify connection requests from its clients.
- Network policies: These policies include settings and conditions that accept you to authorize the network that can link to your server. These are implemented from the beginning to the bottom one by one.
In our situation, we will apply the policies of NPS Network. Here are the details on how to do it. Follow the route Policies > Network Policies option and choose New:
Choosing the new option
Next, select the name of the Policy, and make sure the sort of network server remains unchanged.
Verifying the Policy name
After that, put in the conditions of Radius that you want to apply. Here you have two conditions:
- Authorized user ought to be a part of a group of a domain security
- The wanted access device must have a name.
Here, you can use adding functions to make new conditions by choosing the type of Windows Group and authorizing the Client Friendly Name. Pay attention to the fact that this name is different from the name of the DNS of your device, as it will be used in the upcoming time to identify specific network equipment.
Specifying conditions
Another screen will pop up on your desktop; choose the option Access Granted!
Choosing the access granted option
Then, select the fourth option, let other options be not chosen.
Selecting the fourth option
Now, leave the next step and head into the configure setting board. Follow the route RADIUS Attributes > Standard section. Remove the existing attributes before choosing the adding button. Then, selecting Access type > All, then Service-Type > Add. Specify Others = Login.
Setting up the attributes information
To put in a new attribute to the Radius Attributes, users have to choose the Vendor-Specific section. Add Cisco below the Vendor. And the value, choose the following: shell: priv-lvl = 15. This value stands for your Cisco device will allow a maximum of 15 administrative accesses from authorized users.
Adding the value of attributes
A screening board will appear with all the chosen NPS policy settings.
The accomplished setting
In case users want to back up the current configuration of the NPS server to the XML file, follow the order statement: Export-NpsConfiguration -Path c:psbackup_nps.xml. If they want to restore NPS configuration from a previous backup, they can use the coding line: Import-NpsConfiguration -Path c:psbackup_nps.xml
The factors that impact the order of Radius policies are quite important.
The policies will be implemented from the beginning to the bottom. If all the conditions in the following policy are met, it will lead to the termination of the upcoming processes. To avoid this scenario, users can use the Processing Order value to make the priorities of policy changed.
The list of policy
To activate the account, you will have to open the Active Directory Users and Computers console (dsa.msc). Next, find the users before heading to its properties and choose functions like in the below photo:
Verifying Radius Setting On Cisco Devices
Following the setup Radius server, verifying the Radius setting on Cisco devices is the next step. Because the domain accounts are applied for the process of authorization, the credentials must be changed into encrypted forms. All you have to do here is disabling the telnet component on the switch before activating SSHv2 on Cisco applying the order statement:
- configure terminal
- crypto key generate rsa modulus 1024
- ip ssh version 2
– So the process will work in the way that in case the response of the server might not be received, the client device will summarize the authentication was unsuccessful. Therefore, you should make a local user: username cisco_local password [email protected]
– Next, to make SSH mandatory to use as well as disable faraway access, you should use Telnet and implement the following code lines:
line vty 5 15
transport input ssh
– You can have a look at a configuration process example of a Radius server utilized for Cisco Catalyst Switch:
aaa new-model
aaa authentication login default group radius local
aaa authorization exec default group radius if-authenticated
radius-server host 192.168.1.16 key Sfs34e#sf
#Specify your RADIUS server IP address and key for encryption (the shared secret that we specified on the RADIUS server)
service password-encryption
# Enable password encryption
If you have several Radius servers, add them to the group:
aaa group server radius radius_srv_group
server 192.168.1.16
server 192.168.101.16
The Bottom Line!
After a long time using, we prefer the Radius server because users can use a single centralized authentication system in their domain. Besides, there are many benefits that users can get.
Via this article, we hope you have known how to configure Radius server on Windows Server 2016 operating system. Although the process looks a bit complicated, it is possible to implement. If there are any related questions, don’t hesitate to send us a message. Good luck!
Post Views:
4,550
Использование для WiFi авторизации доменных учетных записей является очень удобным решением для любой организации где есть контроллер домена. Это удобно в случае если у вас несколько офисов т.к. можно подключаться под личным логином и паролем к wifi в любом офисе и безопасно в случае увольнения сотрудника т.к. его доменный профиль удаляется или блокируется.
Для настройки WiFi авторизации через доменный профиль необходимо будет выполнить следующие настройки:
- Настройка сервера политики сети NPS в Windows 2012
- Настройка RADIUS-клиента на Mikrotik.
Научиться настраивать MikroTik с нуля или систематизировать уже имеющиеся знания можно на углубленном курсе по администрированию MikroTik. Автор курса, сертифицированный тренер MikroTik Дмитрий Скоромнов, лично проверяет лабораторные работы и контролирует прогресс каждого своего студента. В три раза больше информации, чем в вендорской программе MTCNA, более 20 часов практики и доступ навсегда.
Настройка сервера политики сети NPS в Windows 2012.
Открываем «Диспетчер сервера» и приступаем к установке роли «Сервер политики сети» через «Мастер добавления ролей и компонентов». Подробно рассматривать процедуру установки не буду, здесь нет никаких сложностей. У меня на сервере эта роль уже установлена (см. скриншот).

После установки Роли потребуется перезагрузка. Перезагружаем сервер и приступаем к настройке NPS.
Настраиваем подключение RADIUS-клиента.
В Диспетчере серверов открываем /Средства/Сервер политики сети.
Переходим в /NPS/Radius-клиенты и сервер/Radius-клиенты, щелкаем пр. клавишей мыши и выбираем пункт «Новый документ»

Указываем имя (любое понятное для себя), ip-адрес роутера Mikrotik и придумываем общий секрет посложней (можно воспользоваться генератором).

Создаем политики для WiFi авторизации.
На этом шаге настройки воспользуемся мастером настройки 802.1x.
Кликаем лев. клавишей мыши по пункту «NPS(Локально)», затем в правом окне разворачиваем пункт «Стандартная конфигурация».
В пункте сценария настройки выбираем «RADIUS-сервер для беспроводных или кабельных подключений 802.1x» и переходим по ссылке «Настройка 802.1x».

Выбираем пункт «Безопасные беспроводные подключения»

На следующем шаге добавляем RADIUS-клиенты, которые были подключены к RADIUS-серверу ранее.

В качестве метода проверки подлинности выбираем «Microsoft: защищенные EAP (PEAP)».

Выбираем группы пользователей домена, которым будет доступно подключение к WiFi.

В результате получаем следующие результаты политик.
Политика запросов на подключение:

Сетевая политика:

На этом настройка NPS в качестве RADIUS-сервера для WiFi-авторизации завершена. Приступаем к настройке роутера Mikrotik.
Чтобы добавить в Mikrotik подключение к RADIUS-серверу открываем меню RADIUS и жмем плюсик.
- Отмечаем нужную службу «Services» — в случае WiFi авторизации это «wireless».
- Указываем «Adsress» Radius-сервера — это ip-адрес настроенного ранее сервера сетевой политики NPS.
- Заполняем Secret, который был указан при добавлении radius-клиента в NPS.

Все остальные настройки оставляем как есть, если только вы не решили изменить на NPS стандартные порты подключения 1812 и 1813.
Добавляем профиль авторизации: /Wireless/Security profiles. Здесь в Authentication types оставляем только WPA2 EAP.

Указываем в нашем действующем WiFi интерфейсе новый Security profile.

На этом настройка Mikrotik в качестве RADIUS-клиента закончена.
Для диагностики неисправности подключений можно включить Logging для RADIUS: /System/Logging/+. В «Topics» выбираем «radius».

Открываем Log и пробуем подключиться к точке доступа.
Количество успешных и сброшенных подключений можно посмотреть во вкладке Status созданного подключения к radius-серверу.

Научиться настраивать MikroTik с нуля или систематизировать уже имеющиеся знания можно на углубленном курсе по администрированию MikroTik. Автор курса, сертифицированный тренер MikroTik Дмитрий Скоромнов, лично проверяет лабораторные работы и контролирует прогресс каждого своего студента. В три раза больше информации, чем в вендорской программе MTCNA, более 20 часов практики и доступ навсегда.
Многофакторная аутентификация (MFA) в условиях вынужденной удалённой работы и использования VPN-сервисов приобретает особое значение для многих организаций. На примере RADIUS-сервера и Microsoft Azure, а также FreeRADIUS-сервера и службы Google Authenticator расскажем, как обезопасить учётные данные сотрудников и защитить свою сеть.
- Введение
- Аутентификация удалённого доступа с использованием сервера RADIUS и службы Microsoft Azure
- 2.1. Настройка RADIUS на Windows Server 2016
- 2.2. Настройка RADIUS-аутентификации для удалённого VPN-доступа в Check Point SmartConsole
- Аутентификация удалённого доступа с использованием сервера FreeRADIUS и службы Google Authenticator
- 3.1. Начальная настройка сервера Ubuntu
- 3.2. Настройка RADIUS-аутентификации в политике безопасности Check Point
- 3.3. Установка FreeRADIUS и Google Authenticator (генератор QR-кодов)
- 3.4. Работа мобильного приложения
- Выводы
Введение
В последнее время удалённая работа становится распространённым видом организации рабочего процесса. Всё больше компаний переводят сотрудников на работу вне офиса. Но кроме всех очевидных выгод растут и риски. По данным ESET, число ежедневных брутфорс-атак выросло до 100 000 из-за самоизоляции. Заметное количество пользователей, работающих с конфиденциальными данными, оказалось под угрозой.
Большинство компаний, перешедших на удалённый формат работы, используют VPN-сервисы для подключения к своим внутренним ресурсам. Идентификация и аутентификация пользователей при этом, как правило, осуществляются путём ввода имени пользователя и пароля.
Учитывая, что имя пользователя зачастую можно найти в открытых источниках, перед злоумышленником остаётся лишь одна преграда — пароль. Подбор, троянская программа, социальная инженерия… способов незаконного получения пароля — множество.
В этой ситуации для усиления безопасности рекомендуется задействовать дополнительные факторы аутентификации пользователей. Применение ещё одного или нескольких паролей, токенов и других методов аутентификации снижает риск компрометации учётных данных и получения несанкционированного доступа.
Сегодня мы рассмотрим примеры организации MFA для VPN-шлюза Check Point. Описание настройки дано в двух вариантах:
- Аутентификация удалённого доступа с использованием сервера RADIUS и службы Microsoft Azure.
- Аутентификация удалённого доступа с использованием сервера FreeRADIUS и службы Google Authenticator.
Аутентификация удалённого доступа с использованием сервера RADIUS и службы Microsoft Azure
Подробная инструкция по интеграции Microsoft Azure с Active Directory доступна по этой ссылке и здесь рассматриваться не будет.
Для описания процесса интеграции и настройки взаимодействия будем рассматривать схему, приведённую на рисунке ниже.
Рисунок 1. Логическая схема взаимодействия компонентов решения

Настройка RADIUS на Windows Server 2016
Шаг 1. В случае если Network Policy Server (NPS) не установлен на вашем сервере, откройте «Server Manager», далее — «Manage» → «Add roles and features», в открывшемся окне проходим первые этапы настройки без изменений, нажимая «Next» до пункта «Server roles». Находим пункт «Network Policy and Access Services», выбираем его, далее вновь нажимаем «Next» до завершения установки.
После завершения перезагрузите сервер. Далее запускаем «Server Manager» и во вкладке «Tools» открываем появившийся «Network Policy Server».
Рисунок 2. Интерфейс Network Policy Server

Шаг 2. Создайте клиент RADIUS, выбрав «RADIUS» → «New». Заполнять поля следует согласно значениям в вашей инфраструктуре.
Рисунок 3. Создание клиента RADIUS

Шаг 3. Переходим к окну NPS. Выберите «Network policy» и далее «New».
Рисунок 4. Создание политики

Шаг 4. Введите имя для своей политики и оставьте в поле с типом сервера для доступа к сети вариант «Unspecified». Затем нажмите кнопку «Next», в поле «Select condition» выберите «Add».
Рисунок 5. Окно «Specify conditions»

Шаг 5. Выберите «Windows Groups», а затем «Add group». Введите своё название группы и нажмите кнопку «Check Names».
Рисунок 6. Добавление группы

Шаг 6. Нажмите «OK» дважды в соответствующих окнах, а затем — «Next». На следующей странице выберите «Access granted».
Рисунок 7. Назначение доступа

Шаг 7. Нажмите кнопку «Next». Для указания методов проверки подлинности необходима как минимум проверка MS-CHAP-v2 или PAP (в соответствии с аналогичными параметрами протоколов в настройках RADIUS-сервера в консоли управления Check Point (шаг 16)).
Рисунок 8. Настройка метода аутентификации

Шаг 8. Нажмите кнопку «Next». Выберите необходимые дополнительные ограничения, например по времени работы.
Шаг 9. Выберите «Vendor Specific» и нажмите кнопку «Add».
Шаг 10. Нажмите кнопку «Add» в следующем окне.
Шаг 11. Измените вендора на пользовательское значение и выберите «Vendor-Specific». Нажмите кнопку «Add» ещё раз.
Рисунок 9. Добавление вендора

Шаг 12. Нажмите кнопку «Add» ещё раз. Измените значение в поле «Enter Vendor Code» на «2620» (это значение атрибута вендора используется для продуктов Check Point). Затем — «Configure Attribute».
Рисунок 10. Информация о вендоре

Шаг 13. Введите «229» для приписываемого номера, выберите строку для формата атрибута и введите имя созданной группы. Значение «229» используется для продуктов Check Point под управлением ОС Gaia.
Рисунок 11. Определение атрибута вендора

Шаг 14. Нажмите «OK» необходимое количество раз, а затем выберите «Next». Проверьте настройки и нажмите кнопку «Finish».
Рисунок 12. Завершение настройки NPS

Настройка RADIUS-аутентификации для удалённого VPN-доступа в Check Point SmartConsole
Шаг 15. Создайте хост-объект для сервера RADIUS.
Рисунок 13. Создание хост-объекта в консоли Check Point SmartConsole

Шаг 16. Создайте объект «RADIUS Server» (значение поля «Shared secret» должно быть идентично тому, что было на шаге 2).
Рисунок 14. Создание объекта сервера RADIUS

Шаг 17. Создайте пустую группу с названием «RAD-Attributevalue». Значение «Attributevalue» должно соответствовать названию атрибута, указанному в шаге 13.
Рисунок 15. Создание группы

Шаг 18. Опубликуйте свои изменения и закройте консоль.
Шаг 19. Откройте GuiDBedit (находится в директории с установленной консолью Check Point SmartConsole в папке «PROGRAM»).
Шаг 20. Измените свойство «add_radius_groups» («Global properties» → «Firewall properties») с «false» на «true».
Рисунок 16. Изменение параметров «add_radius_groups» в окне GuiDBedit

Шаг 21. Измените значение «radius_groups_attr» с 25 на 26 (атрибут 26 позволяет вендору создавать дополнительные 255 значений IETF и инкапсулировать их за значением атрибута 26). Сохраните изменения и закройте GuiDBedit.
Рисунок 17. Изменение параметров «radius_groups_attr» в окне GuiDBedit

Шаг 22. Откройте SmartConsole. Нажмите на кнопку «Manage & Settings», а затем — «Blades», выберите «Mobile Access», затем «Configure in SmartDashboard».
Рисунок 18. Настройка Mobile Access Blade

Шаг 23. Выберите значок пользователя в «Object Explorer» в левом нижнем углу. Затем выберите правой кнопкой мыши «External user profiles» и «New external user profile».
Рисунок 19. Добавление профиля пользователя

Шаг 24. Откройте раздел «Authentication» и измените схему аутентификации на «RADIUS». Затем выберите созданный на шаге 16 объект сервера RADIUS.
Рисунок 20. Выбор способа аутентификации

Шаг 25. Нажмите «OK» и сохраните изменения. Затем закройте окно SmartConsole.
Шаг 26. В SmartConsole откройте объект шлюза удалённого доступа.
Рисунок 21. Интерфейс объекта шлюза в Smart Center

Шаг 27. Выберите «VPN clients», затем — «Authentication».
Примечание: в данном примере был настроен единственный метод аутентификации с использованием RADIUS. Также можно настроить различные методы через «Multiple authentication settings», добавив необходимые варианты с помощью кнопки «Add». Эта технология поддерживается в Mobile Access Portal и в последних версиях Check Point Endpoint Client:
- Capsule VPN;
- Capsule Workspace — iOS 10.02.2 и выше;
- Capsule Workspace for Android — версия 7.1 и выше;
- Remote Access VPN Blade of the Endpoint Security Suite (Windows) — версия E80.65 и выше;
- Endpoint Security VPN (Windows) — версия E80.65 и выше;
- SecuRemote (Windows) — версия E80.65 и выше;
- Check Point Mobile for Windows — версия E80.65 и выше.
Рисунок 22. Настройка аутентификации в параметрах шлюза

Шаг 28. Измените метод проверки подлинности на «RADIUS» и выберите сервер, созданный на шаге 16. Установите флажок «Allow older clients to connect to this gateway» (это нужно для того, чтобы удалённые пользователи, подключавшиеся раньше другими методами, смогли выбрать в приложении метод аутентификации и указать «Standard», применив тем самым настройки RADIUS). Далее нажимаем «ОК».
Рисунок 23. Выбор метода аутентификации в настройках шлюза

Шаг 29. Активация мобильного приложения.
Нужно установить на мобильный телефон приложение Microsoft Authenticator. По этой ссылке необходимо зайти под учётной записью Microsoft Azure.
Рисунок 24. Активация мобильного приложения

Шаг 30. Выберите «Настроить приложение Authenticator».
Рисунок 25. Настройка мобильного приложения

Шаг 31. Выбор учётной записи — необходимо в приложении телефона отсканировать QR-код с экрана компьютера.
Рисунок 26. Выбор учётной записи

Шаг 32. В приложении утверждаем вход — Microsoft MFA с учётной записью Azure активирована.
Рисунок 27. Утверждение входа

Шаг 33. Проверка работы MFA для VPN-подключения. С рабочей станции, на которой установлен VPN-клиент, подключаемся используя учётные данные Microsoft Azure.
Рисунок 28. VPN-подключение

Шаг 34. В мобильном приложении появляется всплывающее окно об утверждении или отклонении запрашиваемого удалённого подключения. Важно иметь в виду, что новый пароль генерируется каждые 30 секунд. Если не успеть утвердить в данный отрезок времени — сессия организована не будет.
Рисунок 29. Успешное подключение

Аутентификация удалённого доступа с использованием сервера FreeRADIUS и службы Google Authenticator
Рассмотрим пример при работе под управлением сервера Ubuntu версии 16.04 (дистрибутив данной или более новой версии доступен по ссылке).
Для описания процесса интеграции и настройки взаимодействия будем рассматривать схему, приведённую на рисунке ниже.
Рисунок 30. Логическая схема взаимодействия компонентов

В качестве VPN-сервера выступает шлюз межсетевого экранирования CheckPoint R80.30.
Начальная настройка сервера Ubuntu
Шаг 1. Установите сервер с настройками по умолчанию. После установки убедитесь, что сервер имеет доступ в интернет.
Шаг 2. Выполните конфигурацию сетевого интерфейса и установите корректные настройки времени. Авторизуйтесь под учётными данными, которые были заданы при установке, и выполните конфигурацию.
Пример конфигурации. Файл /etc/network/interfaces:
# interfaces(5) file used by ifup(8) and ifdown(8)
auto ens160
#iface lo inet loopback
iface ens160 inet static
address 10.X.X.123
netmask 255.255.255.0
network 10.X.X.0
broadcast 10.X.X.255
gateway 10.X.X.1
dns-nameservers 8.8.8.8 8.8.4.4
Пример настройки часового пояса:
# timedatectl set-timezone Europe/Moscow
# service ntp restart
Выполните повторную перезагрузку:
# sudo reboot now
Шаг 3. Дополнительно необходимо установить службы:
ntp;
build-essential;
libpam0g-dev;
freeradius;
git;
libqrencode3;
libpam-google-authenticator.
Настройка RADIUS-аутентификации в политике безопасности Check Point
Шаг 4. Необходимо, чтобы на межсетевом экране были разрешены следующие взаимодействия: доступ с вашего ПК к серверу Ubuntu, доступ Ubuntu в интернет для обновления и установки приложений, доступ Ubuntu к NTP-серверу.
Шаг 5. Создайте хост-объект для сервера FreeRADIUS.
Рисунок 31. Создание хост-объекта FreeRADIUS

Шаг 6. Создайте объект RADIUS-сервера (правое меню в SmartConsole: «New» → «More» → «Server» → «More» → «RADIUS») с указанием значения «Shared secret». Такое же значение «Shared secret» необходимо задать в настройках FreeRADIUS на шаге 13.
Рисунок 32. Создание объекта RADIUS

Шаг 7. В настройках шлюза выберите «VPN clients», затем — «Authentication».
Примечание: В данном примере был настроен единственный метод аутентификации с использованием RADIUS. Также можно настроить различные методы через «Multiple authentication settings», добавив необходимые варианты с помощью кнопки «Add». Эта технология поддерживается в Mobile Access Portal и в последних версиях клиентов для конечных точек:
- Capsule VPN;
- Capsule Workspace — iOS 10.02.2 и выше;
- Capsule Workspace for Android — версия 7.1 и выше;
- Remote Access VPN Blade of the Endpoint Security Suite (Windows) — версия E80.65 и выше;
- Endpoint Security VPN (Windows) — версия E80.65 и выше;
- Check Point Mobile for Windows — версия E80.65 и выше;
- SecuRemote (Windows) — версия E80.65 и выше.
Установите флажок «Allow older clients to connect to this gateway» (необходимо для того, чтобы удалённые пользователи, подключавшиеся раньше другими методами, смогли выбрать в приложении метод аутентификации и указать «Standard», применив тем самым настройки RADIUS), а затем нажмите «Settings». После этого выберите метод аутентификации «RADIUS» согласно шагу 6.
Рисунок 33. Настройка метода аутентификации

Установка FreeRADIUS и Google Authenticator (генератор QR-кодов)
Шаг 8. Подключитесь к серверу Ubuntu по SSH. В настройках сессии необходимо указать достаточный размер окна для того, чтобы мог быть отображен QR-код.
Рисунок 34. Настройка подключения по SSH

Шаг 9. Установите FreeRADIUS и Google Authenticator:
# sudo apt-get install build-essential libpam0g-dev freeradius git libqrencode3
# sudo apt-get install libpam-google-authenticator
Шаг 10. Выполните настройку FreeRADIUS для обеспечения второго фактора с использованием Google Authenticator:
# sudo addgroup radius-disabled
# sudo nano /etc/freeradius/radiusd.conf
Найдите группы:
user = freerad
group = freerad
Закомментируйте эти записи и вставьте:
user = root
group = root
Это необходимо для того, чтобы по умолчанию FreeRADIUS использовал учётную запись с правами администратора и не было проблем с доступом.
Шаг 11. Введите команду:
# sudo nano /etc/freeradius/users
Найдите следующую запись:
#Deny access for a group of users.
#Note that there is NO 'Fall-Through' attribute, so the user will not
#be given any additional resources.
Введите под этим блоком:
DEFAULT Group == "radius-disabled", Auth-Type := Reject
Reply-Message = "Your account has been disabled."
DEFAULT Auth-Type := PAM
Шаг 12. Настройте PAM для комбинирования пользовательских паролей и PIN-кодов, генерируемых Google Authenticator:
# sudo nano /etc/freeradius/sites-enabled/default
#Pluggable Authentication Modules.
#                pam
                  pam
# sudo nano /etc/pam.d/radiusd
Приведите файл к следующему виду:
# /etc/pam.d/radiusd - PAM configuration for FreeRADIUS
#
# We fall back to the system default in /etc/pam.d/common-*
#
#@include common-auth
#@include common-account
#@include common-password
#@include common-session
auth requisite pam_google_authenticator.so forward_pass
auth required pam_unix.so use_first_pass
Шаг 13. Выполните настройку:
#sudo nano /etc/freeradius/radiusd.conf
# auth = no auth = yes
# Log passwords with the authentication requests.
# auth_badpass - logs password if it's rejected
# auth_goodpass - logs password if it's correct
#
# allowed values: {no, yes}
#
auth_badpass = no
auth_goodpass = no
Шаг 14. Настройка клиентов FreeRADIUS.
Клиенты — рабочие станции и серверы, которые проходят аутентификацию через RADIUS.
Выполните:
# sudo nano /etc/freeradius/clients.conf
В конец файла необходимо добавить информацию о клиентах аналогично примеру ниже:
client 10.X.X.5 {
secret = secret
shortname = CPSG
}
#
client 10.X.X.138 {
secret = secret
shortname= endpoint
}
«CPSG» — это VPN-шлюз Check Point, «endpoint» — рабочая станция, подключающаяся к шлюзу по VPN с использованием Check Point Mobile.
Шаг 15. Настройка пользователей FreeRADIUS.
Процесс состоит из следующих шагов:
- Добавление пользователя.
- Переход в домашнюю директорию пользователя.
- Смена владельца сессии — переход в сессию вновь созданного пользователя.
- Создание токена Google Authenticator.
- Установка параметров Google Authenticator.
- Регистрация Google Authenticator с использованием QR или секретного кода.
- Выход из пользовательской сессии.
- Рестарт процесса FreeRADIUS.
Процесс настройки приведён ниже (см. рис. 35).
Рисунок 35. Данные, выводимые программой в процессе настройки пользователей FreeRADIUS

QR-код, изображённый на иллюстрации выше, доступен лишь до конца сессии. Если есть потребность в том, чтобы воспользоваться QR-кодом позднее, то необходимо сохранить ссылку, которая находится непосредственно над ним (в нашем случае — https://www.google.com/chart?chs=200×200&chld=M|0&cht=qr&chl=otpauth://totp/cpmonitor@fru%3Fsecret%3DZLVQMR7ZTCRP24LZGRL3WQOWRQ%26issuer%3Dubuntu).
Работа мобильного приложения
Шаг 16. В мобильном приложении, которое бесплатно можно скачать на любое мобильное устройство, нужно отсканировать QR-код (иконка «+»), после чего в приложении каждые 30 секунд будет генерироваться 6-значный пароль, который нужно будет вводить после пароля пользователя при подключении с помощью Check Point Mobile.
Рисунок 36. Мобильное приложение Google Authenticator

Шаг 17. Проверить работу RADIUS непосредственно на сервере Ubuntu для данного пользователя можно следующей командой:
# radtest endpoint <passwd><g-auth-code> localhost 18120 testing123
Sending Access-Request of id 104 to 127.0.0.1 port 1812
User-Name = "cpmonitor"
User-Password =
"<unix_password>493895" NAS-IP-Address =
127.0.1.1
NAS-Port = 18120
Message-Authenticator = 0x00000000000000000000000000000000
rad_recv: Access-Accept packet from host 127.0.0.1 port 1812, id=104, length=20
Шаг 18. После выполнения всех вышеперечисленных операций можно подключаться, используя 6-значный код из приложения Google Authenticator.
Рисунок 37. Подключение VPN-клиента

Шаг 19. Убеждаемся в том, что аутентификация проходит через FreeRADIUS.
Рисунок 38. Успешное подключение

Выводы
В текущих реалиях высокого запроса на защищённые удалённые подключения вопрос обеспечения безопасности ощущается особо остро. Рассмотренные в статье методы организации мультифакторной аутентификации помогут администратору настроить инфраструктуру Check Point для использования второго фактора при удалённом подключении пользователей.
Решения от Google и Microsoft не являются единственным выбором при настройке мультифакторной аутентификации, но в силу широкого распространения могут быть востребованы во многих организациях. К тому же общий принцип настройки остаётся неизменным вне зависимости от конкретной реализации.
Авторы:
Наиль Насыбуллин, инженер отдела защиты информации, группа компаний «InnoSTage»
Марат Нурмухаметов, ведущий инженер отдела защиты информации, группа компаний «InnoSTage»
To setup and install a Cloud RADIUS Server running NPS in AWS running on Windows Server, the easiest and quickest way is to our AWS RADIUS NPS Server solution in the AWS marketplace. Launch the image direct from the marketplace. Perfect solution for providing wireless authentication for your access points (APs).
This AWS RADIUS server solution uses Network Policy Server (NPS) to perform centralized authentication, authorization, and accounting for wireless, authenticating switches, remote access dial-up or virtual private network (VPN) connections. When you use NPS as a RADIUS server, you configure network access servers, such as wireless access points or VPN servers, as RADIUS clients in NPS.
- Authenticate wireless users and control access to your wireless APs based on user, IP, device, AD groups and more
- Unlimited number of RADIUS clients (APs) and remote RADIUS server groups
- Single sign-on solution. Allow users to logon to wireless APs automatically
- Active Directory or local security accounts manager for authentication
- Allow or deny connections to specific wireless networks that you specify by network type and Service Set Identifier (SSID)
- Allow or deny connections based on AD group membership
Cloud RADIUS Server Authentication Solution

Table of Contents
Getting Started with AWS RADIUS Server
Once you have deployed our RADIUS server solution from the AWS marketplace. The first step is to RDP into your new VM:
- Guide on how to RDP into an AWS instance
Next, Once you have logged into the AWS RADIUS server, you are now ready to configure it for wireless authentication with your Active Directory.
Open ‘Network Policy Server’ from the desktop or administrative tools:

The first thing you want to do is register this NPS with your AD active directory.
We do this by right clicking the top of the tree and then clicking ‘Register server in Active Directory’: (This can be your onprem Active Directory or AWS Directory Service).
In this example it is shown as greyed out because the AD have not been added.
If you see the same add to your domain and then come back to this step.

Next we want to create a template for your shared secrets. All of the RADIUS clients that will authenticate with the server will need this shared secret so that they can authenticate.
In the long run it is easier to create a template with this in to save entering it on each RADIUS client we setup.
Expand ‘Template Management’ and right click on ‘Shared Secrets’ and click ‘New’:

Give the template a name and either enter your own shared secret or click the ‘Generate’ radial button and then click ‘Generate’ at the bottom.
Make a note of the share secret, this is needed later.
This will create you one as seen below. If you hover over the yellow warning sign you will see a message telling you that it may be too long for some clients.
If this is the case you can shorten the shared secret to a more appropriate size or create your own. Click ‘OK’ to save:

Next under ‘RADIUS Clients and Servers’ right click ‘RADIUS Clients’ and click ‘New’:

Fill this out with the relevant information, under ‘Address’ enter the IP address of your first RADIUS client.
This will be the address of your first wireless access points. Under ‘Shared Secret’ select the template we created earlier and click ‘OK’:

Repeat this process for any of your wireless access points you want to act as RADIUS clients.
Once you have done this, any you have added will be listed:

Now that all the RADIUS clients are setup we need to setup the access policy, but first you need to make sure you have a certificate in the local computer store.
Add a Trusted Certificate to Network Policy Server (NPS)
A RADIUS server must host a certificate that allows both network clients and APs to validate the server’s identity. There are three options for this certificate:
1.) Acquire a certificate from a trusted Certificate Authority. As long as the CA used is trusted by clients on the network, a certificate can be purchased and uploaded into NPS to accomplish and server identity verification (required by clients). Common examples of trusted CAs include GoDaddy and VeriSign.
2.) Implement a Public Key Infrastructure and generate a certificate (advanced)
A PKI can be used on the network to issue certificates trusted by clients on the network. A strong understanding of PKI is recommended for this option.
3.) Generate a self-signed certificate and turn off client server validation (insecure)
A self-signed certificate can be generated for testing/lab purposes, though clients will not trust a self-signed certificate and will need to have server validation disabled in order to connect.
Create a Self Signed Certificate
If you don’t have a PKI or a certificate from a third party, you can create a self signed certificate using the built-in powershell module.
Open up Powershell.exe as Administrator and run the following command
New-SelfSignedCertificate -DnsName "RADIUS FQDN" -CertStoreLocation "cert:LocalMachineMy"
New-SelfSignedCertificate -DnsName "fs.Test.local"-CertStoreLocation "cert:LocalMachineMy"

Import Self Signed Certificate
Steps below on how to generate a self signed certificate.
Once a certificate has been acquired, these are the instructions on how to import a certificate.
- Right-click the Start button and click Run.
2. Type mmc and hit Enter
3. Hit Ctrl+M (or click File -> Add/Remove Snap-in…)
4. Select Certificates from the Available snap-ins and click Add >
5. Select Computer account and click Next, then Finish.
6. Expand Certificates (Local Computer) -> Personal .
7. Right-click Personal > All Tasks > Import – Select Local Machine, click next and browse to where you’ve saved your certificate.
8. Follow the wizard to import your certificate.
This option is not recommended for production deployment, due to dramatically reduced security.
Setup RADIUS NPS Access Policy
Now lets setup the access policy. With the top of the tree selected, on the right hand side under ‘Standard Configuration’ you need to select ‘RADIUS server for 802.1X Wireless or Wired Connections‘ from the drop down list and then click ‘Configure 802.1X’ below:

Select ‘Secure Wireless Connections’ and give it a suitable name at the bottom and click ‘Next’:

On the next screen you should see a list of RADIUS clients which we setup earlier, so we don’t need to do anything here. Click ‘Next’:

From the drop down list select ‘Microsoft: Protected EAP (PEAP)’ and then click ‘Configure’:

Here you can specify the certificate you would like to use to secure the connection using the drop down menu.
I had already requested a certificate for this purpose which I selected. However you can use the default self-signed one for now. Click ‘OK’ and then click ‘Next’:

At this stage you can specify which domain groups will be given access to the wireless network. Click ‘Add‘ and search for any domain groups you would like to add and then click ‘Next‘:

The next page allows you to configure traffic controls. Here you can setup VLANS and access control lists to control traffic. You will need to refer to your AP manufacturer if they support these options, as this page is optional or you can configure later if you need these settings configured. Press Next to continue

On the last page confirm your settings and click ‘Finish’:

You will now see under the ‘Network Policies’ section that a new policy has been created:

If you double click on this policy you can see the settings that are in force:

Under the ‘Conditions’ tab you can see what conditions are required to connect to the wireless network. In this example anyone who is a member of the DOMAINStaff group will be authorized.
At this stage you can add, edit or remove groups using the buttons below. If we were to add the DOMAINDomain Computers group any machine on the network could authenticate and connect to the wireless network with its machine account:

Going a step further you can create another policy to deny access to the wireless network.
The easiest way to create another policy is to duplicate the first one. Do this by right clicking the first policy and clicking ‘Duplicate Policy’:

Under ‘Overview’ tick the ‘Policy enabled’ box and change the ‘Access Permission’ to ‘Deny access’:

Under the ‘Conditions’ tab click on the current windows group and click ‘Edit’.
Remove the DOMAINStaff group and add the group containing users you don’t want to have access to the wireless network.
Click ‘OK‘ and then click ‘OK’ again:

On the ‘Network Polices’ page right click the newly created deny policy and move it to the top if it isn’t there already so that it has the processing order of ‘1’.
Policies are processed from the top down so the deny policy will be processed first. Denying any user who meets the conditions of the policy even if they are also a member of the group that is listed in the allow policy:

You can at this stage click on the ‘Accounting‘ section and enable this RADIUS server to act as an accounting server too, keeping logs of any connection requests. This is either in the format of a log file or an SQL database.
The next step is to configure the wireless access points to pass authentication requests to our newly configured RADIUS server. The setup and process will differ depending on the brand of access point you are using.
Cisco Meraki RADIUS Authentication
We are going to use Cisco Meraki MR access points in this example.
Once a RADIUS server has been set up with the appropriate requirements to support authentication, the following instructions explain how to configure an SSID to support WPA2-Enterprise, and authenticate against the RADIUS server:
- In Dashboard, navigate to Wireless > Configure > Access control.
- Select your desired SSID from the SSID drop down (or navigate to Wireless > Configure > SSIDs to create a new SSID first).
- For Association requirements choose WPA2-Enterprise with my RADIUS server.
- Under RADIUS servers click Add a server
- Enter the Host (IP address of your RADIUS server, reachable from the access points), Port (UDP port the RADIUS server listens on for Access-requests; 1812 by default) and Secret (RADIUS client shared secret):

6. Click the Save Changes button.
Aside from the RADIUS server requirements outlined above, all authenticating APs will need to be able to contact the IP address and port specified in Dashboard.
Make sure that your APs all have network connectivity to the RADIUS server, and no firewalls are preventing access. Review the AWS firewall ports below
VLAN Tagging Options
Dashboard offers a number of options to tag client traffic from a particular SSID with a specific VLAN tag. Most commonly, the SSID will be associated with a VLAN ID, so all client traffic from that SSID will be sent on that VLAN.
With RADIUS integration, a VLAN ID can be embedded within the RADIUS server’s response. This allows for dynamic VLAN assignment based on the RADIUS server’s configuration.
Please refer to Cisco’s documentation regarding Tagging Client VLANs with RADIUS Attributes for configuration specifics.
Testing RADIUS Server from Meraki Dashboard
Dashboard has a built-in RADIUS test utility, to ensure that all access points (at least those broadcasting the SSID using RADIUS) can contact the RADIUS server:
- Navigate to Wireless > Configure >Access control.
- Ensure that WPA2-Enterprise was already configured based on the instructions in this article.
- Under RADIUS servers, click the Test button for the desired server.
- Enter the credentials of a user account in the Username and Password fields.
- Click Begin test.
- The window will show progress of testing from each access point (AP) in the network, and then present a summary of the results at the end.
APs passed: Access points that were online and able to successfully authenticate using the credentials provided.
APs failed : Access points that were online but unable to authenticate using the credentials provided. Ensure the server is reachable from the APs, the APs are added as clients on the RADIUS server.
APs unreachable: Access points that were not online and thus could not be tested with.
(Optional) Deploy a PEAP Wireless Profile using AD Group Policy
For a seamless user experience, it may be ideal to deploy a PEAP wireless profile to domain computers so users can easily associate with the SSID.
Though optional for user auth, this is strongly recommended for machine authentication.
The following instructions explain how to push a PEAP wireless profile to domain computers using a GPO, on a Domain Controller running Windows Server:
- Open the domain Group Policy Management snap-in.
- Create a new GPO or use an existing GPO.
- Edit the GPO and navigate to Computer Configuration > Policies > Windows Settings > Security Settings > Public Key Policies > Wireless Network (IEEE 801.X) Policies.
- Right Click Wireless Network (IEEE 801.X) Policies and choose Create a New Windows Vista Policy.
- Provide a Vista Policy Name.
- Click Add for Connect to available networks.
- Choose Infrastructure.
- On the Connection tab, provide a Profile Name and enter the SSID of the wireless network for Network Name(s). Click Add.
- Click the Security tab. Configure the following:
- Authentication: WPA2-Enterprise or WPA-Enterprise
- Encryption: AES or TKIP
- Network Authentication Method: Microsoft: Protected EAP (PEAP)
- Authentication mode: Computer Authentication (for machine auth).

- Click Properties.
- For Trusted Root Certification Authorities select the check box next to the appropriate Certificate Authorities and click OK.

- Click OK to close out and click Apply on wireless policy page to save the settings.
- Apply the GPO to the domain or OU containing the domain member computers (refer to Microsoft documentation for details).
Once you’ve deployed the wireless profile to users or manually setup one on a test machine, we can now test connecting.
Testing Wireless Access Profile

Now enter a username and password for a valid domain account that is a member of the group you specified earlier in the allow policy.
Depending on the model of phone you will get more of less detail at this stage. On an Android phone you need to manually specify the certification authority certificate when joining the network that will validate the server certificate we selected earlier during the setup process.
This has to be installed manually first. For testing purposes you can use the drop down list and select ‘Don’t validate’:

On an iOS device initially you will just be asked for a username and password and then asked if you trust the server certificate.
If you have preinstalled the CA certificate beforehand and enabled full trust for it you won’t be asked.
Providing all the details are valid the device will connect to the wireless network as it would with any other:

Single Sign On (SSO) For Windows Devices
For any windows domain joined devices such as tablets or laptops you will have 2 options to connect depending on your setup.
First, If you specified DOMAINDomain Computers earlier in the conditions of the allowed policy the devices will be able to authenticate using their machine accounts.
You can just click the wireless network and it will seamlessly connect authenticating in the background with its machine account. Using group policy or SCCM you can deploy the wireless profile centrally making each Windows device connect automatically without user intervention. However this does require an initial connection to the network (wired or wireless) to receive the GPO or SCCM update.
If you didn’t specify the DOMAINDomain Computers group earlier a user account is required to access the network.
The second option is when a user tries to connect to the wireless network they will be asked for a username and password. If they are already logged in as a domain user they can select the option to connect using the currently logged in user. Providing the user is a member of the correct group the device will connect to the wireless network, authenticating with that users credentials.
Eliminating the need for a pre-shared key gives you much more control over who has access to your wireless network.
Other conditions can be specified under a policy as well as windows groups such as times of the day, IP address ranges, etc. If a user leaves or is compromised there account can be disabled or their password changed to deny them further access to the wireless.
Policies can be tailored to your specific needs giving you’re a lot more flexibility.
AWS RADIUS Server Firewall Ports
The following firewall ports will need to be open for each of your wireless access points (APs) to allow them to access your RADIUS / NPS server in AWS:
RADIUS Authentication and Authorization
UDP: 1812 / 1645
RADIUS Accounting
UDP: 1813 / 1646
To setup AWS firewall rules refer to – AWS Security Groups
You also need to make sure the RADIUS server in AWS can communicate with your AD Active Directory
Radius NPS Server Support / Further Documentation
Check out the following links for further documentation and support for Radius NPS Server:
https://docs.microsoft.com/en-us/windows-server/networking/technologies/nps/nps-top
На чтение 4 мин Опубликовано Обновлено
Radius Server – это сервер аутентификации и авторизации, который позволяет контролировать доступ пользователей к WiFi-сети и обеспечивает безопасность подключений.
Настройка Radius Server на операционной системе Windows 2016 – это простой и эффективный способ защитить вашу WiFi-сеть от несанкционированного доступа и повысить безопасность передаваемых данных.
В данной статье мы рассмотрим пошаговую инструкцию по настройке Radius Server на Windows 2016 для WiFi. Вы узнаете, как установить и настроить сервер, создать пользователей и группы, настроить радиус-клиенты и протоколы аутентификации.
Необходимость в настройке Radius Server возникает в случае использования WiFi-сети с большим количеством пользователей, когда необходимо обеспечить безопасность и контроль доступа к сети. Несмотря на то, что процесс настройки требует некоторых технических навыков, благодаря данной пошаговой инструкции вы сможете успешно выполнить настройку Radius Server на Windows 2016 для WiFi.
Содержание
- Комплексная настройка Radius Server на Windows 2016 для WiFi: пошаговая инструкция
- Установка операционной системы Windows Server 2016
- Установка службы Active Directory на Windows Server 2016
Комплексная настройка Radius Server на Windows 2016 для WiFi: пошаговая инструкция
Шаг 1: Установка и настройка Windows Server 2016.
Для начала необходимо установить операционную систему Windows Server 2016 на сервер. После установки следует настроить необходимые параметры, такие как IP-адрес, DNS-серверы и прочие сетевые настройки.
Шаг 2: Установка и настройка службы Radius.
Далее следует установить службу Radius Server на сервер. Для этого находим необходимый пакет программы, скачиваем его и запускаем установку. После установки необходимо настроить параметры Radius Server, такие как порт, шифрование и прочие параметры безопасности.
Шаг 3: Настройка аутентификации пользователей.
Теперь необходимо настроить аутентификацию пользователей в Radius Server. Для этого создаем нового пользователя или используем уже существующего. Задаем имя пользователя, пароль и необходимые параметры доступа для WiFi сети.
Шаг 4: Настройка WiFi сети для работы с Radius Server.
Для того чтобы WiFi сеть работала с Radius Server, необходимо настроить параметры доступа на WiFi точке доступа или маршрутизаторе. Задаем адрес Radius Server, порт и настраиваем параметры шифрования.
Шаг 5: Проверка и тестирование работы системы.
После всех настроек необходимо проверить и протестировать работу системы. Подключите клиента к WiFi сети и попробуйте авторизоваться с использованием учетных данных, заданных в Radius Server. При успешной авторизации вы должны получить доступ к сети.
Важно: Перед настройкой Radius Server и WiFi сети рекомендуется ознакомиться с документацией и руководством по настройке данной продукции. Неправильные настройки могут привести к некорректной работе сети и нарушению безопасности.
Установка операционной системы Windows Server 2016
Установка операционной системы Windows Server 2016 производится следующим образом:
- Подготовьте загрузочный носитель с образом установки операционной системы.
- Вставьте загрузочный носитель в дисковод или подключите его к серверу через USB-порт.
- Перезагрузите сервер и выберите загрузку с установочного диска или носителя.
- Выберите язык установки и нажмите «Далее».
- Нажмите «Установка» и согласитесь с условиями лицензионного соглашения.
- Выберите тип установки, в данном случае выберите «Пользовательские: Установить только Windows (продвинутая)».
- Выберите раздел на жестком диске, на который хотите установить операционную систему, и нажмите «Далее». Если раздел необходимо создать, нажмите «Создать».
- Дождитесь завершения процесса установки операционной системы и перезагрузки сервера.
- Настройте основные параметры системы, такие как имя компьютера, пароль администратора и домен (при необходимости).
- Произведите необходимые обновления системы и установку драйверов для оборудования.
- Установка операционной системы Windows Server 2016 завершена.
Установка службы Active Directory на Windows Server 2016
- Откройте Server Manager (менеджер сервера), щелкнув правой кнопкой мыши на значок «Start» (пуск) и выбрав соответствующий пункт меню. Выберите пункт «Add Roles and Features» (добавление ролей и компонентов).
- В мастере «Add Roles and Features» нажмите «Next» (далее), чтобы продолжить.
- Выберите «Role-based or feature-based installation» (установка на основе ролей или компонентов) и нажмите «Next» (далее).
- Выберите сервер, на котором вы хотите установить службу Active Directory, и нажмите «Next» (далее).
- В списке ролей найдите «Active Directory Domain Services» (службы домена Active Directory) и отметьте флажком. Нажмите «Add Features» (добавить компоненты), чтобы установить дополнительные компоненты.
- Появится окно с предупреждением о необходимости установки дополнительных компонентов. Щелкните «Add Features» (добавить компоненты) и нажмите «Next» (далее).
- В окне «Features» (компоненты) можно оставить настройки по умолчанию. Нажмите «Next» (далее).
- В окне «Active Directory Domain Services» (службы домена Active Directory) можно оставить настройки по умолчанию. Нажмите «Next» (далее).
- В окне «Confirmation» (подтверждение) убедитесь, что выбраны правильные компоненты, и нажмите «Install» (установить) для начала установки службы Active Directory.
- Подождите, пока установка завершится, и нажмите «Close» (закрыть).
Поздравляю! Служба Active Directory успешно установлена на ваш сервер Windows Server 2016. Теперь вы можете начать настраивать и использовать AD для централизованного управления пользователями, группами и сертификатами.

Part 1 Radius Server For Wifi Authentication With Windows Server 2016
Immerse yourself in the fascinating realm of Part 1 Radius Server For Wifi Authentication With Windows Server 2016 through our captivating blog. Whether you’re an enthusiast, a professional, or simply curious, our articles cater to all levels of knowledge and provide a holistic understanding of Part 1 Radius Server For Wifi Authentication With Windows Server 2016. Join us as we dive into the intricate details, share innovative ideas, and showcase the incredible potential that lies within Part 1 Radius Server For Wifi Authentication With Windows Server 2016. 2016 deployments- authenticated and must explains running deploy this guide follow network certificates and and Network cs instructions to autoenroll companion 802-1x guide computers how wireless nps- use for the administrators certificates wireless in windows core server deploy deploying system server to to the ad wired server
How To Configure Radius Server On Windows Server 2016 Theitbros
How To Configure Radius Server On Windows Server 2016 Theitbros
Part 1: radius server for wifi authentication with windows server 2016 teknex solutions 15.9k subscribers subscribe 1.6k 190k views 5 years ago radius server authentication with windows. Network and system administrators deploying authenticated wireless must follow the instructions in the windows server 2016 core network companion guide, deploy server certificates for 802.1x wired and wireless deployments. this guide explains how to deploy and use ad cs to autoenroll server certificates to computers running nps.

Advantages Of Radius Wifi Authentication
Advantages Of Radius Wifi Authentication
So, you need to install the radius server role on your windows server 2022 2019 2016. open the server manager console and run the add roles and features wizard. the remote authentication dial in user service (radius) protocol in windows server is a part of the network policy server (nps) role. Guide to configure radius server (server 2016) for clients? posted by mhnet360 on nov 27th, 2018 at 8:43 am needs answer windows server is there a step by step guide for windows server 2016 to configure nps radius so i can configure our wireless network to use the radius server for client auth? spice (11) reply (36) flag report mhnet360 jalapeno. Configure radius on windows server 2016 a wpa 2 enterprise network is incomplete without a radius server, thanks to its triple role of authentication, accounting, and authorization (aaa). Professor robert mcmillen shows you how to setup wireless radius authentication with windows server 2016, this step by step video should help you setup wire.

Configuring Radius Authentication In Windows Server 2016
Configuring Radius Authentication In Windows Server 2016
Configure radius on windows server 2016 a wpa 2 enterprise network is incomplete without a radius server, thanks to its triple role of authentication, accounting, and authorization (aaa). Professor robert mcmillen shows you how to setup wireless radius authentication with windows server 2016, this step by step video should help you setup wire. This blog explains how to create user groups and configure user management for radius authentication in windows server 2016 ad. 320 share 27k views 5 years ago #netvn #radius #windowsserver this video explains how to configure radius server on windows 2016 for wi fi authentication. this is how you use a.
Part 1: Radius Server For Wifi Authentication With Windows Server 2016
Part 1: Radius Server For Wifi Authentication With Windows Server 2016
radius server authentication with windows server 2016 requirements: home wireless modem router with wpa wpa2 professor robert mcmillen shows you how to setup wireless radius authentication with windows server 2016, this step by step we will look at computer based wireless network settings through gpo and we will push those settings to the end devices. when you install a wifi network in your home or business you need to ensure that you configure a secure authentication method how to setup radius server (nps) authentication with wpa2 enterprise for wifi how to install radius server on windows hello everyone, this video describes how to set up radius with authentication on windows server 2012 r2 and configuring it to in this video we will learn how to configure radius server in server 2019. linkedin page: the complete guidance of network policy server installation using windows server 2022, whether you have active directory this video covers the installation of the nps, ca and remote access server roles on a microsoft windows 2019 server. we then this video explains how to configure radius server on windows 2016 for wi fi authentication. this is how you use a windows how to install radius server on windows server 2016 how to setup radius server (nps) for wifi:
Conclusion
All things considered, it is clear that post offers helpful insights about Part 1 Radius Server For Wifi Authentication With Windows Server 2016. From start to finish, the writer illustrates a deep understanding about the subject matter. Especially, the discussion of Y stands out as a key takeaway. Thank you for the post. If you need further information, feel free to contact me through social media. I am excited about your feedback. Moreover, below are some relevant posts that might be helpful: