Below we may get step-by-step screenshots,
Step 1 — Verify and ensure appropriate IP addresses are assigned to all required fields.
Step 2 — Click on «Local Server«.
Step 3 — Click on «WORKGROUP«.
Step 4 — Click on «Change…«.
Step 5 — Click on «More…«.
Step 6 — Type the domain name and click on «OK«.
Step 10 — Click on «Close«.
Step 11 — Save rest of your background work, if any and click on «Restart Now«. If planning to restart after some time then click on «Restart Later«.
Step 12 — Click on «Add roles and features«.
Step 13 — Click on «Next«.
Step 14 — Keep selected «Role-based or feature-based installation» and click on «Next«.
Step 15 — Select/Verify the server name and IP address, then click on «Next«.
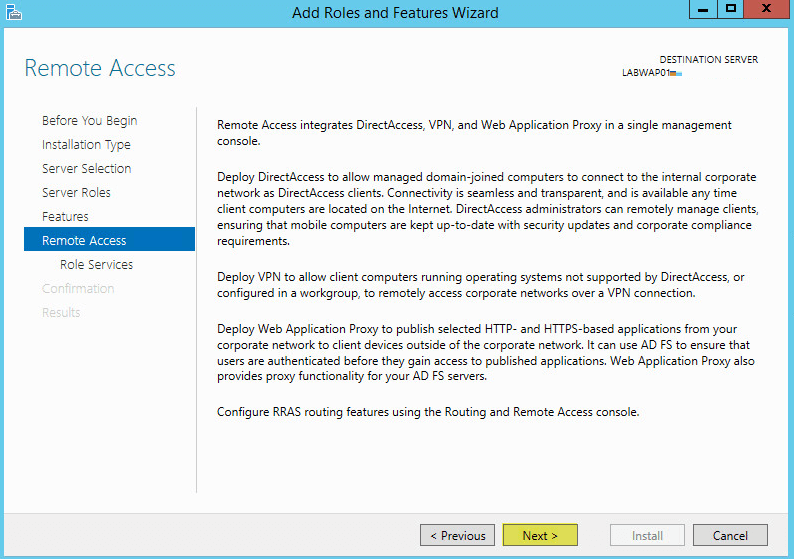
Step 16 — Locate «Remote Access» and click the check box.
Step 17 — Confirm the Tick mark and click on «Next«.
Step 18 — Click on «Next«.
Step 19 — Click on «Next«.
Step 20 — Locate «Web Application Proxy» and click the check box.
Step 21 — Click on «Add Features«.
Step 22 — Confirm the Tick mark and click on «Next«.
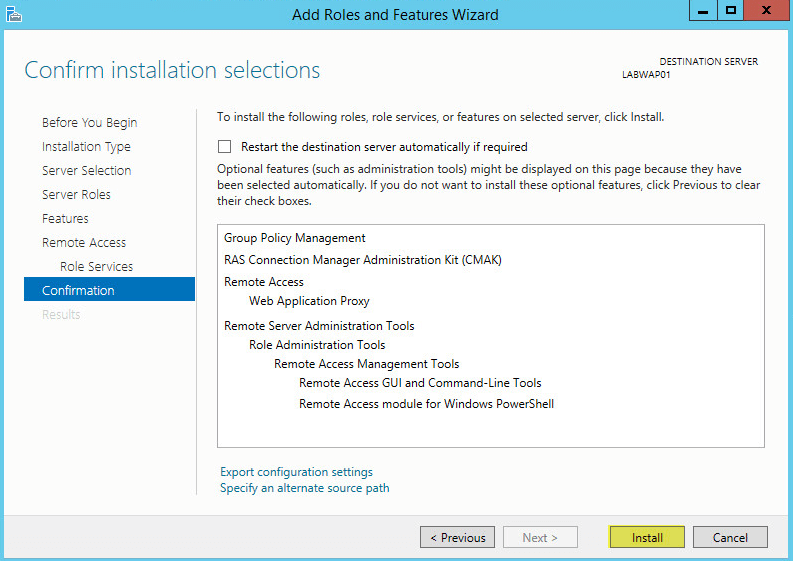
Step 23 — Click on «Install«.
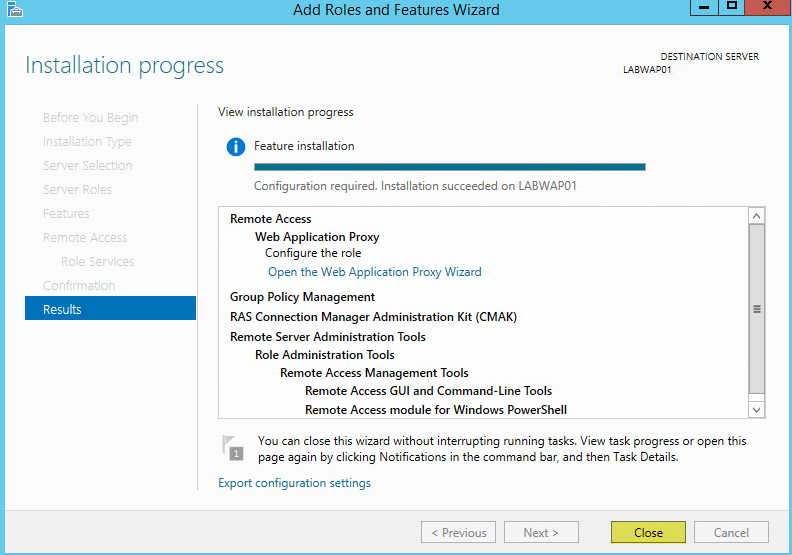
Step 24 — Wait for some time until installation completes.
Step 25 — Click on «Open the Web Application Proxy Wizard«.
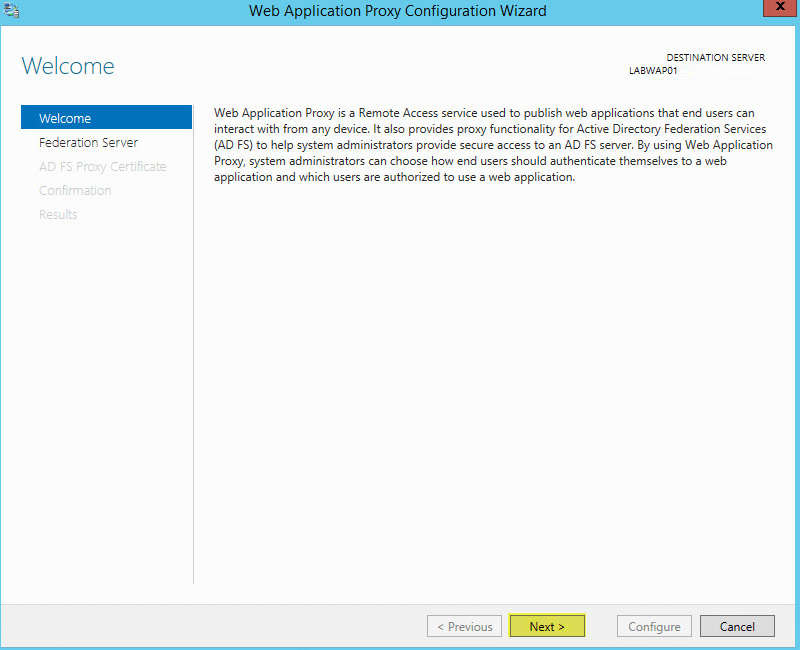
Step 26 — Click on «Next«.
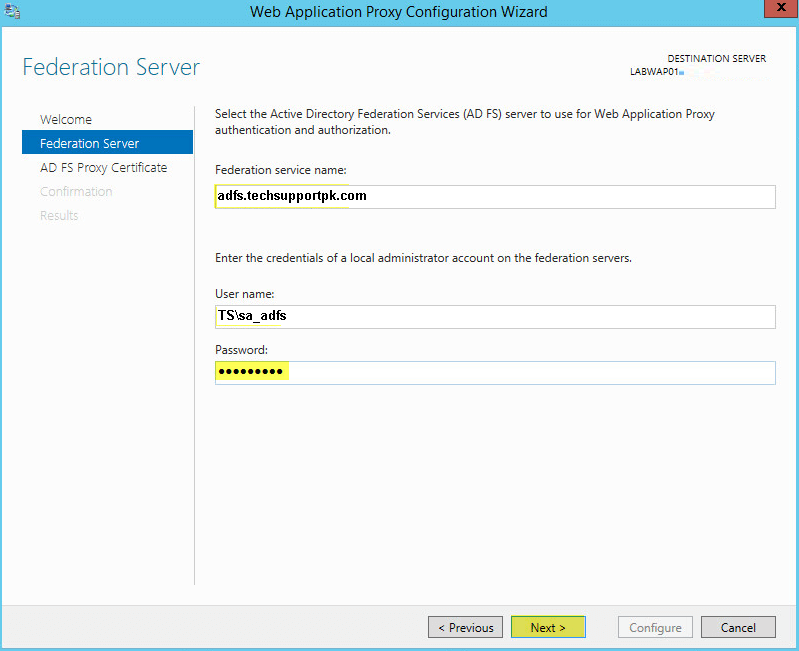
Step 27 — Type «Federation Service Name«, «User name and Password» of a local administrator account on the federation servers.
Step 28 — Click on «Next«.
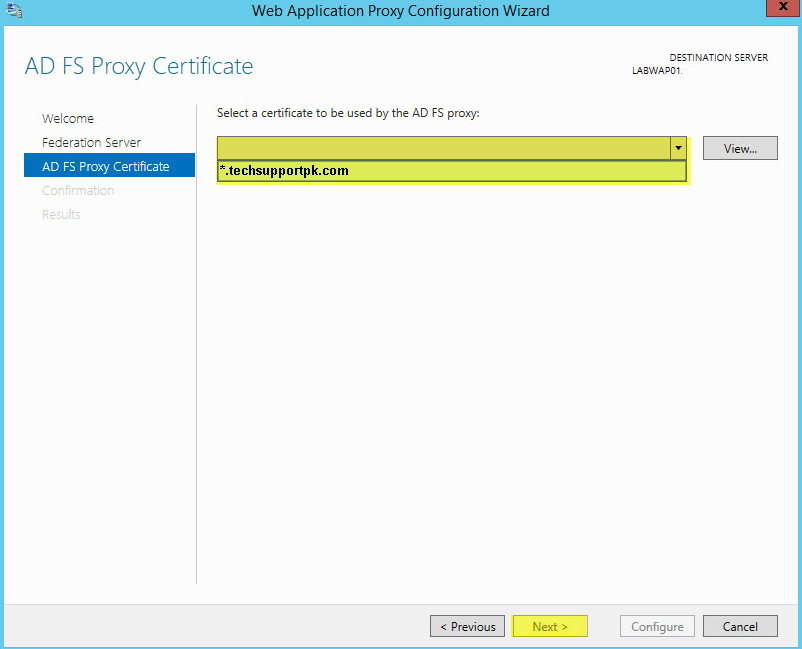
Step 29 — Select appropriate SSL Certificate from the drop down list and click on «Next«.
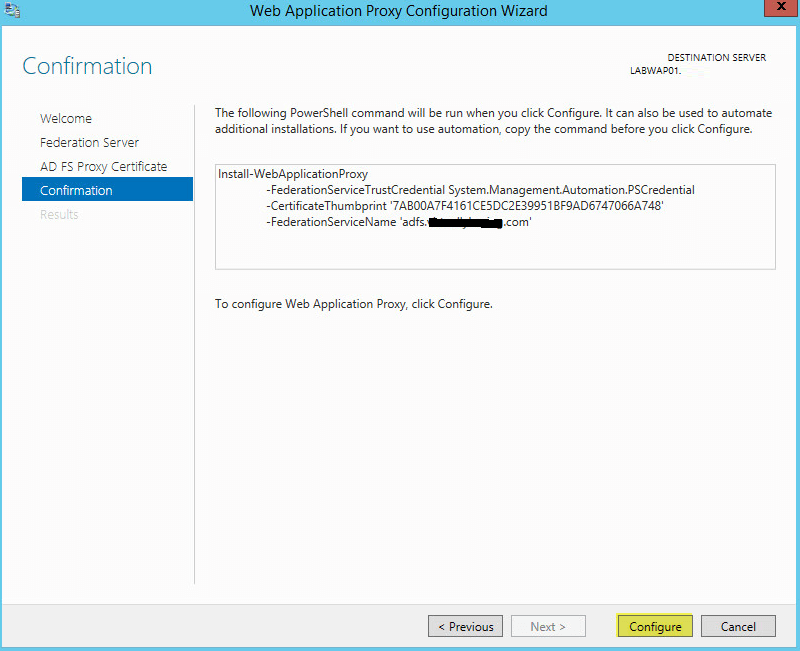
Step 30 — Review all selections and click on «Configure«.
Step 31 — Wait for some time until configuration completes.
Step 32 — Click on «Close«.
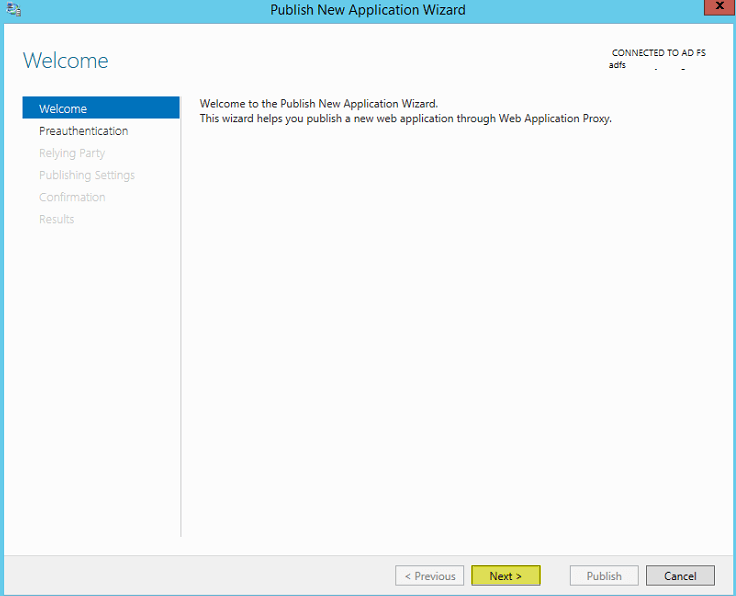
Step 33 — Click on «Publish«.
Step 34 — Click on «Next«.
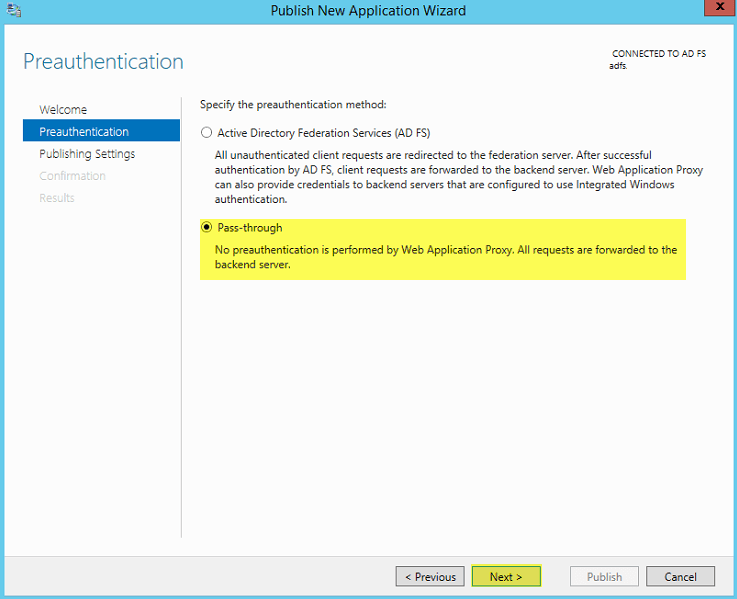
Step 35 — Click on «Pass-through«.
Step 36 — Click on «Next«.
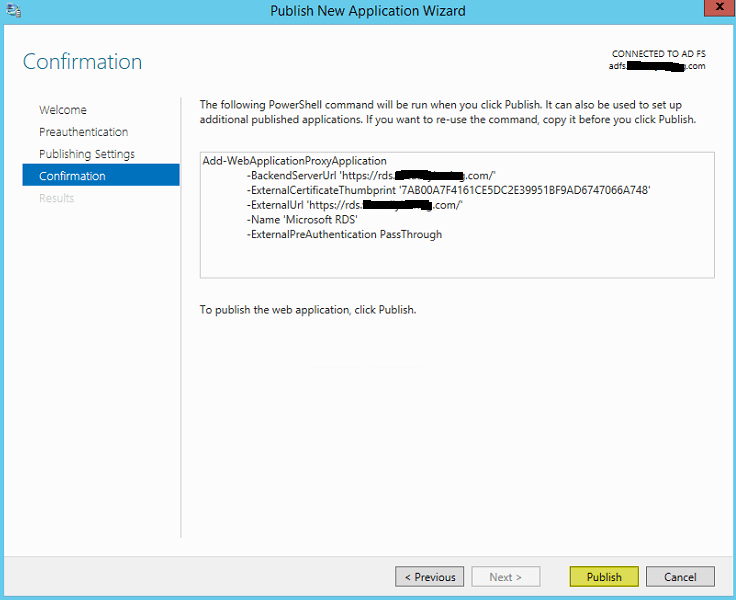
Step 37 — Type «Name«, «External URL» & «Backend server URL«, for example — «https://sso.dskoli.work/«, select appropriate «External certificate» from the drop down list.
Step 38 — Locate «Enable HTTP to HTTPS redirection«, click the check box, confirm the Tick mark and click on «Next«.
Step 39 — Review all selections and click on «Publish«.
Step 40 — Click on «Close«.
Step 41 — Published Web Application will be displayed in the list.
Step 42 — On the Public DNS Panel of domain, add «Host (A)» record for federation service name pointing to WAP server on Perimeter Network. For example, «sso.dskoli.work» pointing to Public IP.
“Thank You for being with me.”

Microsoft Web Application Proxy was introduced in Windows Server 2012 R2. It allows you to access web applications from outside your network and it acts as a reverse proxy and an Active Directory Federation Services proxy to pre-authenticate user access.
This guide walks you through the steps to install and configure web application proxy role on Windows Server 2016.
Web Application Proxy New Features
- Preauthentication for HTTP Basic application publishing
- HTTP Basic is the authorization protocol used by many protocols, including ActiveSync, to connect rich clients, including smartphones, with your Exchange mailbox. Web Application Proxy traditionally interacts with AD FS using redirections which is not supported on ActiveSync clients. This new version of Web Application Proxy provides support to publish an app using HTTP basic by enabling the HTTP app to receive a non-claims relying party trust for the application to the Federation Service.
- Wildcard domain publishing of applications
- To support scenarios such as SharePoint 2013, the external URL for the application can now include a wildcard to enable you to publish multiple applications from within a specific domain, for example, https://*.sp-apps.contoso.com. This will simplify publishing of SharePoint apps.
- HTTP to HTTPS redirection
- In order to make sure your users can access your app, even if they neglect to type HTTPS in the URL, Web Application Proxy now supports HTTP to HTTPS redirection.
- HTTP Publishing
- It is now possible to publish HTTP applications using pass-through preauthentication
- Publishing of Remote Desktop Gateway apps
- New debug log for better troubleshooting and improved service log for complete audit trail and improved error handling
- Administrator Console UI improvements
- Propagation of client IP address to backend applications
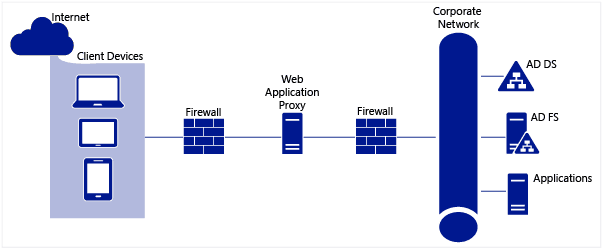
The following diagram explains the architectural layout of Web Application Proxy.
Prerequisites
Web Application Proxy and Active Directory Federation Services can not be deployed on same server. You need an additional server to set up web proxy. We assume that the following services are already installed and configured accordingly.
- Active Directory Domain Services
- Active Directory Federation Services
Installing the Web Application Proxy Server Role
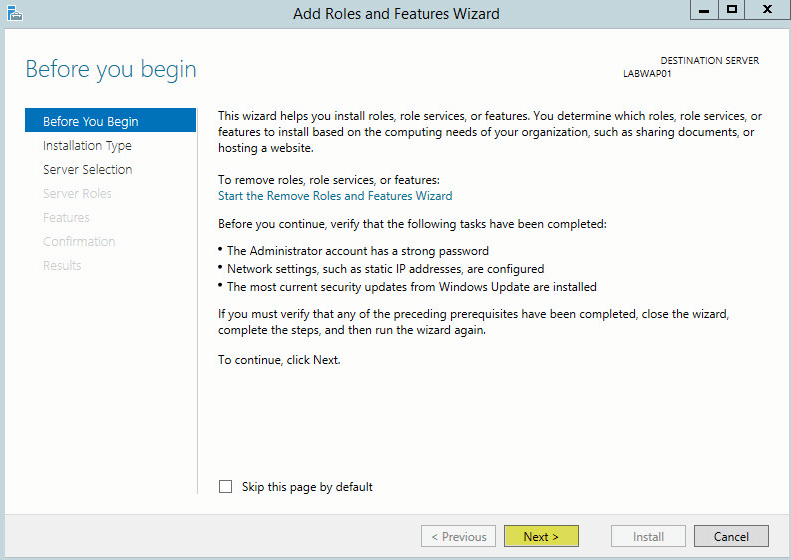
To begin, Open up Server Manager and click Manage click Add Roles and Features

Click Next:
Select Role-based or feature-based installation, click Next:

Select the server you want to install this role on to and then click Next:

Select Remote Access then click Next:

No additional Features are needed. Click Next:

Click Next:
Select Web Application Proxy:

On the pop up click Add Features

The Web Application Proxy role does not required a reboot. Click Install
Once complete click Close
Web Application Proxy is now installed but you need the AD FS certificate to continue.
You need the certificate from your AD FS server added to your Web Application Proxy server. Login to your AD FS server and open MMC.exe:

Go to File > Add/Remove Snap-ins > select Certificates then click Add:
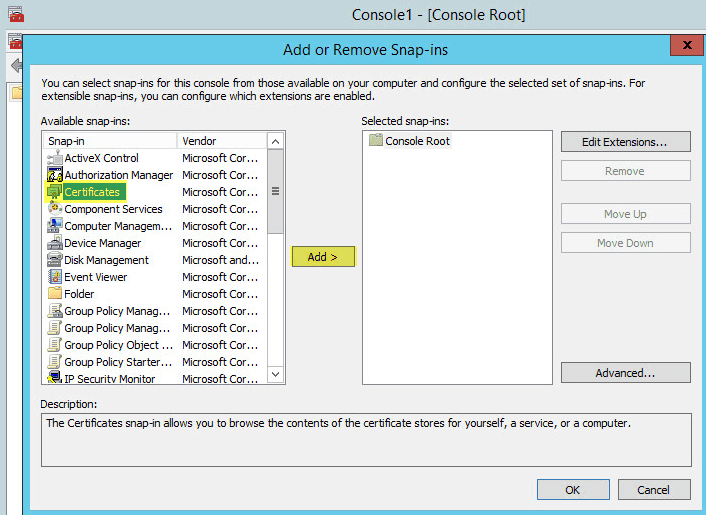
When you click OK you will get the following pop up. Select Computer account then click Next:

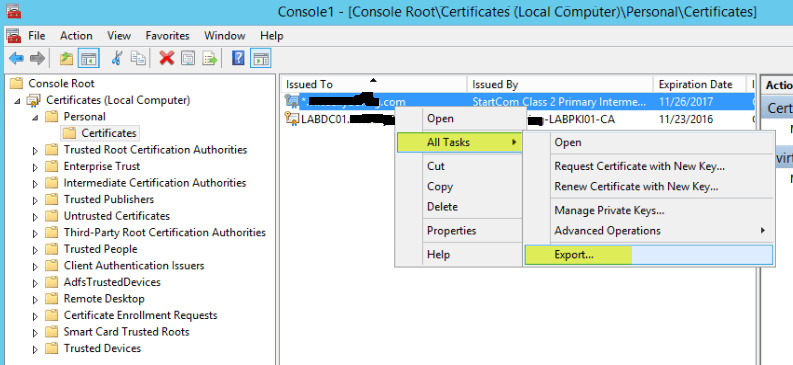
On AD FS Server: Scroll down to Personal > Certificates then right click the SSL certificate you used during setup of AD FS. Go to All Tasks > Export. Save to a location that your Web Application Proxy can access. Make sure you export the Private Key and certificate as a .pfx file format.
On Web Application Proxy: Right click on Personal > Certificates then go to All Tasks > Import:

This will bring up the Certificate Import Wizard. Click Next

Browse to the certificate that you exported from your AD FS server and select it. Click Next

Enter the password for the private key and check the box to make the key exportable. Click Next

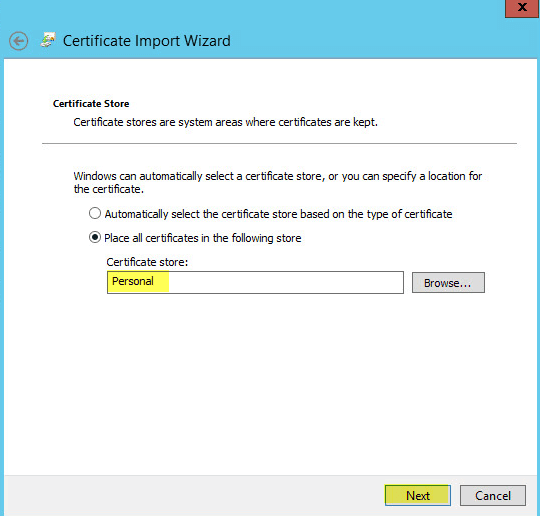
Leave the default certificate store as Personal. Click Next
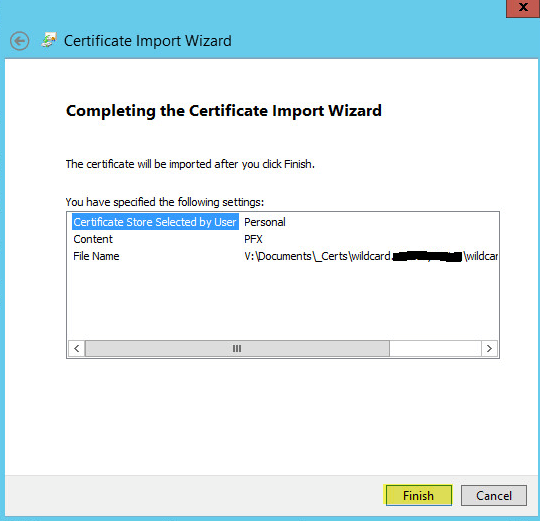
Click Finish
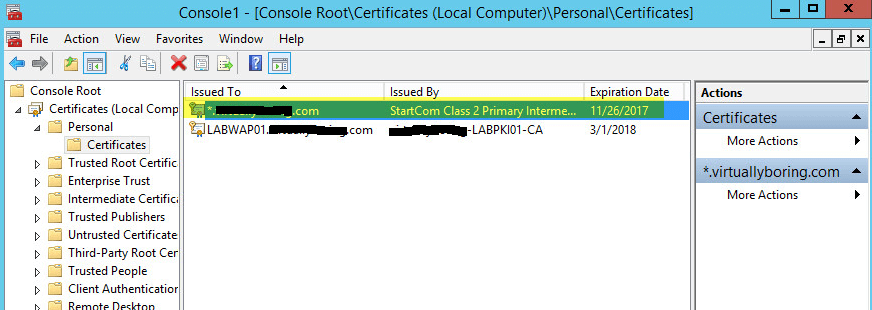
You should now see the certificate from your AD FS servers on your Web Application Proxy server
Now you are ready to start the Post Configuration settings.
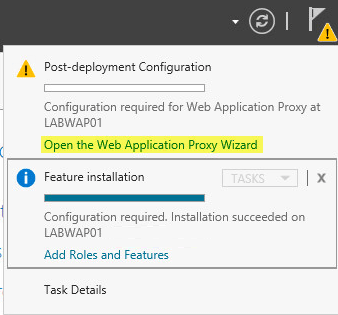
Back on your Web Application Server open Server Manager then click Notifications then the message Open the Web Application Proxy Wizard:
Click Next:
Enter the FQDN of your AD FS name and the Service Account you created during AD FS setup. Click Next:
On the drop down menu select the certificate you imported from your AD FS server. Click Next
Click Configure
Once finished click Close

Remote Access Management Console should open when you clicked Close. On Operations Status you should see all the objects as green

Finally, its time to publish apps. In the Remote Access Management Console click Web Application Proxy then Publish

Click Next:
Pass-through will let WAP act like a reverse proxy.
Here you have two options: (AD FS and Pass-through) self-explanatory. I have already set up AD FS in your environment then go with the first option otherwise 2nd is my choice since at the moment I don’t have AD FS.
Select Pass-through and click Next
Name: Enter a display name
External URL: Enter the URL that will be coming in your the WAP server externally
External Certificate: The drop down menu will show certificates that are added on the WAP server. Select the same certificate that you used while setting up your application. In my case I used my wildcard certificate.
Backend server URL: Enter the web URL of the server you want the external URL forwarded
Click Next:

Copy the PowerShell command down and with some minor edits you can easily add additional PassThrough applications with ease.
Click Publish:
Click Close to finish:

Here you can see the published web application is ready for testing.

Before you move to test your published app, ask your network guy to set up 443 port redirection to WAP server on firewall to make it possible to access web applications from the external network.
Once done.
Then from the external network (for example on your smartphone or a PC) from home, try to access your web link like https://rds.techsupportpk.com and the following page will show up.

You have successfully deployed Web Application Proxy in your environment.

- Remove From My Forums
-
Question
-
Hi,
I have a web proxy server which can reach all internet addresses:
webproxy.myorg.org
What would be the best way to configure the proxy server for my ‘Windows 2016’ server?
I’m told that this would work:
netsh winhttp set proxy «webproxy.myorg.org:8080»
The server is part of an AD domain, so will this get removed by Group Policy.
Thanks for any help.
All replies
-
Please remember to mark the replies as answers if they help.
If you have feedback for TechNet Subscriber Support, contact
tnmff@microsoft.com. -
Good day!
As we haven’t heard from you for a few days, may I confirm with you on the latest status?
Much appreciated for your response in advance.Jolin
Please remember to mark the replies as answers if they help.
If you have feedback for TechNet Subscriber Support, contact
tnmff@microsoft.com. -
Believe you are doing well.
This is a kind follow up on this case. May I know the latest status?
Thanks and looking forward to your reply
Please remember to mark the replies as answers if they help.
If you have feedback for TechNet Subscriber Support, contact
tnmff@microsoft.com.
To enable AD FS for accessibility from outside the corporate network,we can deploy one or more web application proxies for AD FS. From Windows Server 2012 the role of a federation server proxy is handled by a new Remote Access role service called Web Application Proxy
Installing wildcard certificate
Web Application Proxy requres SAN SSL certificate,in this example i used wilcard certificate
SAN certificate allows for multiple domain names to be protected with a single certificate. For example, we install certificate for test.com, and then add more SAN values to have the same certificate protect test.org, test.net
Wildcard certificate allows for unlimited subdomains to be protected with a single certificate.We can use a wildcard certificate for the domain name test.com and that cert would also work for mail.test.com, ftp.test.com and any other subdomain.
On server which will be Web Application proxy open MMC console-add Certificates snap-in-Local computer


Expand Personal folder-right click Certificates folder-All tasks-Advanced operations-create custom request

Proceed with enrollment policy
 ]
]
Choose (No Template) Legacy key

Expand Details and click Properties

On general tab set domain name

Then click Subject tab and fill the following:
CN-common name
C-Country
L-Locality
OU-Organizational Unit
O-Organization

Private Key tab:
Key options-Key Size 4096,check Make private key exportable
Key type:Exchange

Save the request file

Browse to your internal CA web enrollment pages and click Request a certificate

Click advanced certificate request

Select the Submit a certificate request link

Open the previously created request file in notepad and copy all the data in it to clipboard.
Past the clipboard into the Saved Request box
Select the web server template
Click submit

Download certificate

Go back to MMC snap-in,Right click the Certificates folder in the personal folder store and select import

Browse for location of downloaded file,select Personal as Certificate Store


Installing Web Applicaton Proxy role
In Roles check Remote Access:

Check Web Application Proxy

PowerShell:
Install-WindowsFeature Web-Application-Proxy -IncludeManagementTools
Configuring Web Application Proxy:

Enter ADFS server and local admin credentials

Select certificate

PowerShell:
Get SSL certificate thumbrint
dir Cert:\LocalMachine\My

Install-WebApplicationProxy -FederationServiceTrustCredential System.Management.Automation.PSCredential -CertificateThumbprint 'BD064CDA8DCB3FC62A907D550D0298A757760769' -FederationServiceName 'fs.test.com'

Also check Application and Services Logs-AD FS-Admin and look for EventID 396

In this article, we’ll take a look at how to centrally configure proxy settings on Windows 10 computers in a domain using Group Policy. Most popular browsers (such as Microsoft Edge, Google Chrome, Internet Explorer, Opera) and most applications automatically use the proxy settings set in Windows to access the Internet. We’ll also look at how to set up WinHTTP proxy settings on Windows.
Contents:
- How to Set Proxy Settings on Windows via GPO?
- Configure Proxy Setting via Registry and GPO
- Change WinHTTP Proxy Settings via GPO
In this article, we will look at the specifics of configuring a proxy server through Group Policy in supported versions of Windows (Windows 10, 8.1, and Windows Server 2012/2016/2019). Note that proxy settings are set differently in Windows 7/Server 2008R2, Windows XP/Windows Server 2003 with discontinued support.
How to Set Proxy Settings on Windows via GPO?
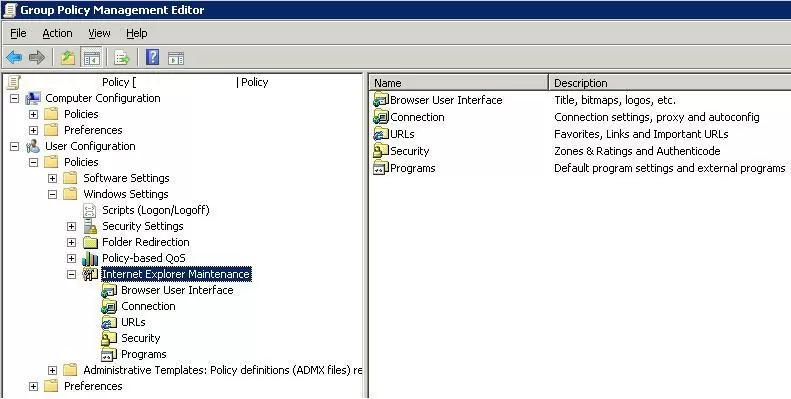
Originally, to centrally configure Internet Explorer settings (including proxy settings) using Group Policies in the Active Directory domain environment, the Internet Explorer Maintenance (IEM) policy was used. This policy option was located in the user GPO section: User configuration –> Policies –> Windows Settings –> Internet Explorer Maintenance. But since Windows Server 2012/Windows 8, the IEM policy has been deprecated. This section is missing in modern versions of Windows 10/Windows Server 2016/2019.
On the latest Windows versions, you must use Group Policy Preferences (GPP) to configure IE and proxy settings in the GPO Editor. There is also the option of using a special extension of Internet Explorer Administration Kit 11 (IEAK 11) – but it is rarely used.
Open the domain GPO Editor console (Group Policy Management Console – GPMC.msc), select the OU with the users to which you want to apply proxy settings, and create a new policy Create a GPO in this domain, and Link it here.
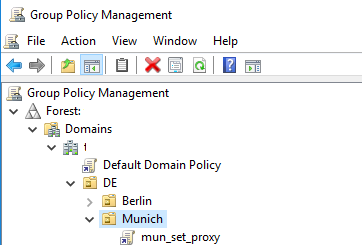
Go to User Configuration -> Preferences -> Control Panel Settings -> Internet Settings. In the context menu, select New -> Internet Explorer 10.
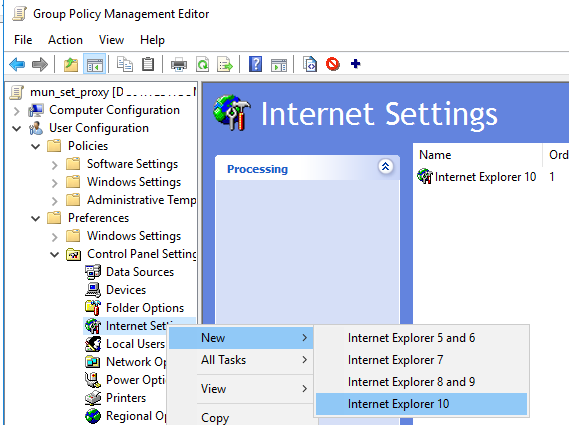
To configure proxy settings on Windows 10/Windows Server 2016, you need to use the Internet Explorer 10 item.
Tip. Although there is no separate option for Internet Explorer 11, the Internet Explorer 10 policy should apply to all versions of IE above 10 (in the InternetSettings.xml policy file, you can see that the option is valid to all IE versions from 10.0.0.0 to 99.0.0.0).
<FilterFile lte="0" max="99.0.0.0" min="10.0.0.0" gte="1" type="VERSION" path="%ProgramFilesDir%\Internet Explorer\iexplore.exe" bool="AND" not="0" hidden="1"/>
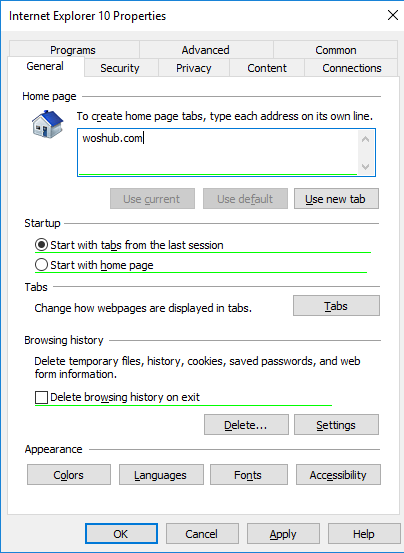
A special Group Policy Preferences IE form will appear in front of you, almost completely identical to the Internet Options settings in the Windows Control Panel. For example, you can specify a home page (General tab -> Home page field).
Important. It is not enough to simply save your changes in the Group Policy Editor. Notice the red and green underlines for the Internet Explorer 10 configurable settings. A red underline indicates that the setting won’t be applied. To save and apply a specific setting, press F5. A green underline of a parameter means that this IE parameter will be applied via GPP.
The following function keys are available:
- F5 – Enable all settings on the current tab
- F6 – Enable the selected setting
- F7 – Disable the selected setting
- F8 – Disable all settings in the current tab
To specify proxy settings, go to the Connections tab and click the Lan Settings button. The proxy server can be configured in one of the following ways:
- Automatically detect settings – automatic detection of settings using the wpad.dat file;
- Use automatic configuration script – auto-configuration script (proxy.pac);
- Proxy Server – the IP address or DNS name of the proxy server is specified directly in the policy settings. This is the easiest way, and we will use it.
Check the option Use a proxy server for your LAN, and specify the IP/FQDN name of the proxy server and the connection port in the corresponding Address and Port fields.
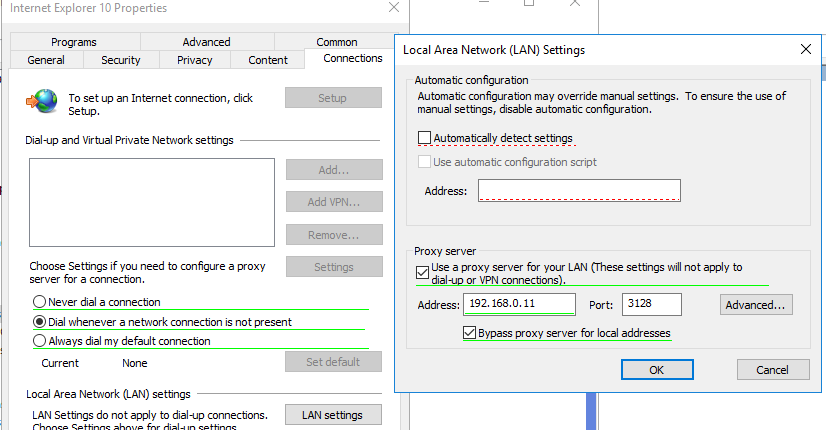
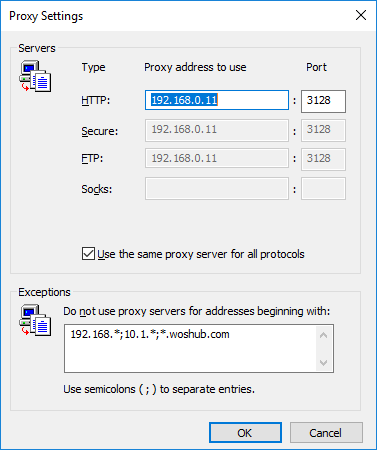
By enabling the Bypass proxy server for local addresses option, you can prevent applications (including the browsers) from using a proxy server when accessing local resources (in the format http://localnetwork). If you use resource addresses like http://web1.woshub.loc or http://192.168.1.5, then these addresses are not recognized by the Windows as local ones. These addresses and addresses of other resources, for access to which you do not need to use a proxy, must be specified manually. Press Advanced button and add this addresses to the field Do not use proxy servers for addresses beginning with in the following format: 10.1.*;192.168.*;*.woshub.loc;*.local.net.
Tip. Proxy settings in Google Chrome also can be set through the GPO using special administrative templates. Also, you can install the ADMX templates for Mozilla Firefox.
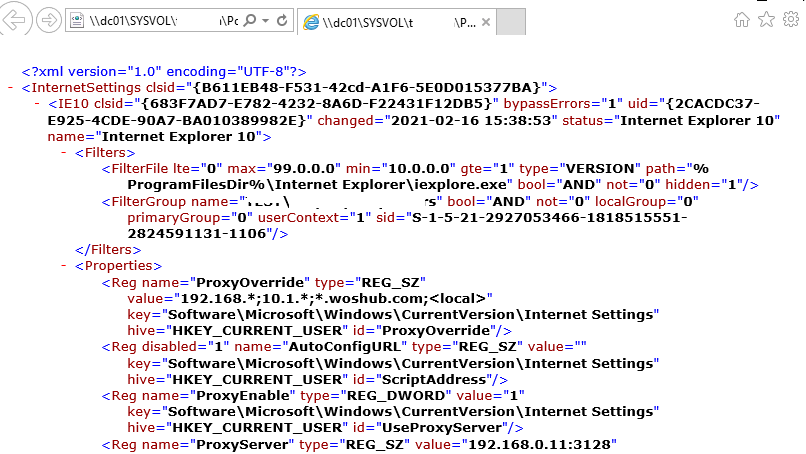
After you save the policy, you can view the InternetSettings.xml file with the specified browser settings in the policy folder on the domain controller:
\\UKDC1\SYSVOL\woshub.com\Policies\{PolicyGuiID}\User\Preferences\InternetSettings\InternetSettings.xml

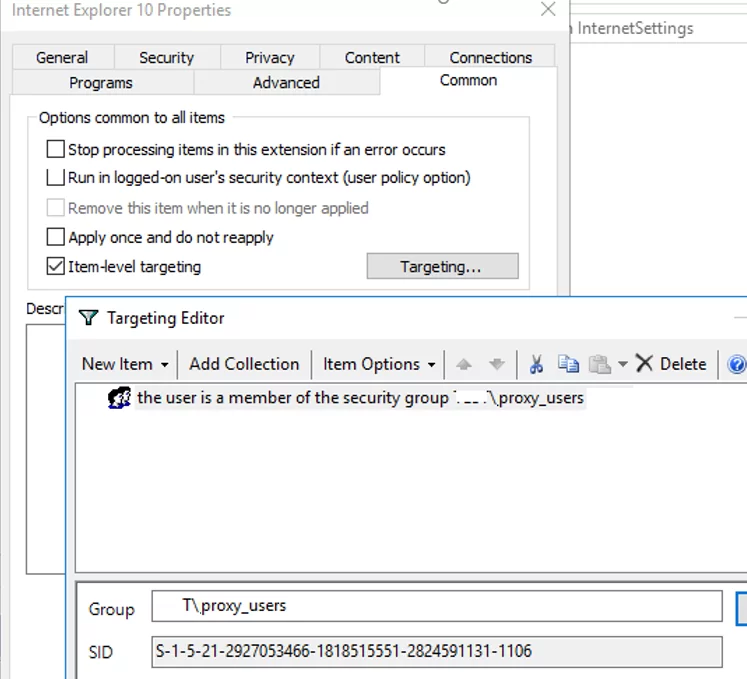
GPP allows you to more finely target policy to users/computers. For this, GPP Item Level Targeting is used. Go to the Common tab, enable the option Item-level targeting -> Targeting.
In the form that opens, specify the conditions for applying the policy. As an example, I indicated that the proxy configuration policy will be applied only to users who are members of the proxy_users domain security group. You can use your own logic for assigning proxy parameters.
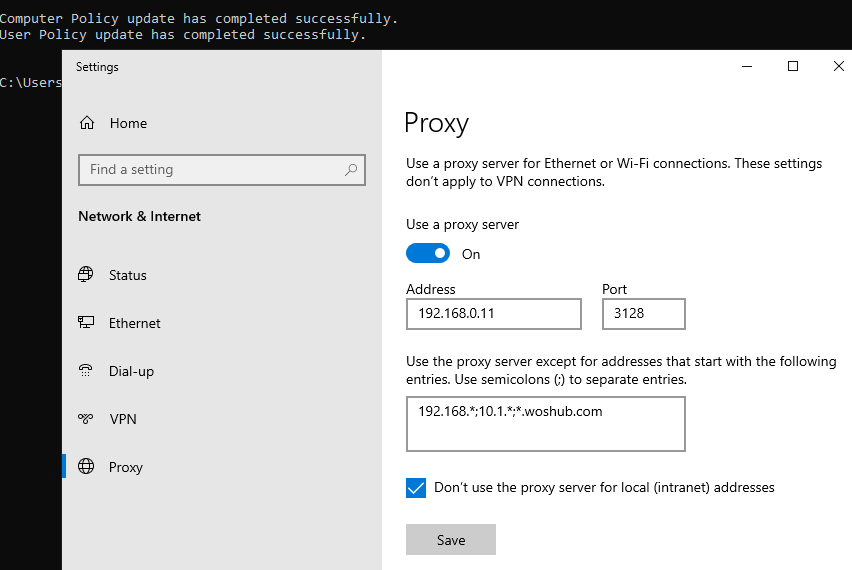
It remains to link the proxy policy to the AD container with the users and update policy settings on them. After applying policies on the users’ computers, new IE settings should be used. You can check the current proxy settings on Windows 10 in the Settings -> Network and Internet -> Proxy. As you can see, the computer now uses the proxy settings specified in the domain policy.
To prevent users from changing the proxy server settings, you can use this article.
Configure Proxy Setting via Registry and GPO
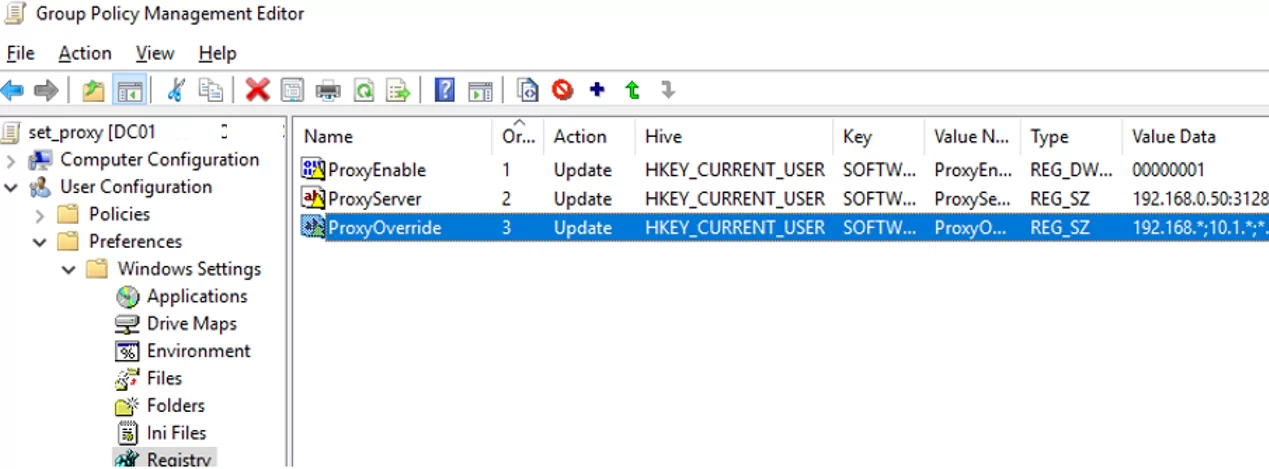
In addition, you can configure IE settings through the registry using GPP policies. For example, to enable proxy server, you need to configure the following registry parameter in the registry key HKEY_CURRENT_USER\Software\Microsoft\ Windows\CurrentVersion\Internet Settings. In the GPO editor go to the section User Configuration -> Preferences -> Windows Settings -> Registry and create three registry parameters under the specified reg key:
ProxyEnable(REG_DWORD) =00000001ProxyServer(REG_SZ) =192.168.0.11:3128ProxyOverride(REG_SZ) =https://*.woshub.com;192.168.*;10.1.*;*.contoso.com;<local>
You can also use Item-level targeting here to target your policy settings for specific users/devices.
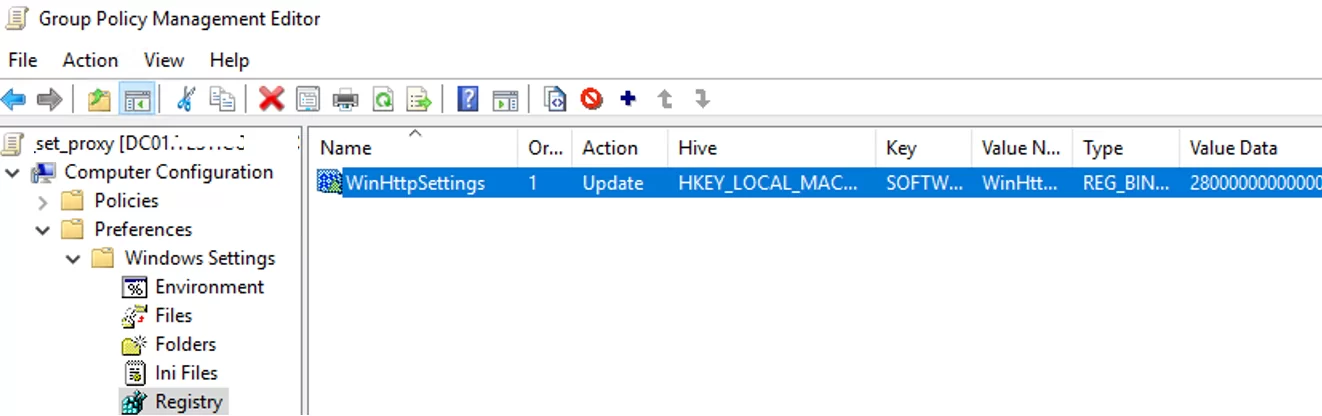
If you need to create proxy policies not per-user, but for the entire computer (per-computer), use the GPP settings from the GPO section Computer Configuration -> Preferences -> Windows Settings -> Registry. Set the same registry parameters under the registry key HKEY_LOCAL_MACHINE\Software\Policies\Microsoft\Windows\CurrentVersion\Internet Settings.
Change WinHTTP Proxy Settings via GPO
Some system services or applications (for example, the Wususerv update service or PowerShell) don’t use user’s proxy settings by default. For such applications to work correctly and access the Internet, you need to configure the WinHTTP proxy settings in Windows.
To check if WinHTTP proxy is configured on your computer, run the command:
netsh winhttp show proxy
The answer “Direct access (no proxy server)” means that no proxy is set. 
You can manually set a proxy for WinHTTP on your computer with the command:
netsh winhttp set proxy proxy.woshub.com:3128 "localhost;10.1.*;192.168.*;*.woshub.com"
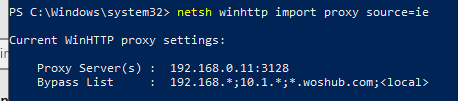
Or import proxy settings from user’s Internet Explorer settings:
netsh winhttp import proxy source=ie
However, you won’t be able to configure WinHTTP through the GPO – there is no corresponding parameter in the GPO editor, and the parameter are stored in binary registry attribute that is not suitable for direct editing.
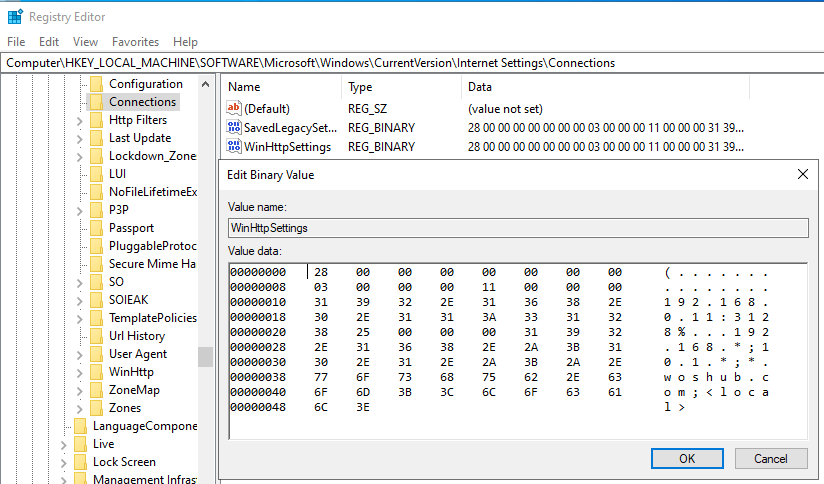
The only way to set WinHTTP proxy settings on Windows via GPO is to configure WinHTTP proxy on the reference computer, export the value of the WinHttpSettings parameter from the registry key HKLM\SOFTWARE\Microsoft\Windows\CurrentVersion\Internet Settings\Connections, and deploy this parameter to domain computers through the GPP registry extension.