Introduction
Many of our users have expressed interest in using DD-WRT or related routers to connect to VPN servers hosted behind Access Server.
While using OpenVPN in this manner may not yield the best performance, due to the limited processing power and memory of the router, it could be useful in the cases where convenience, rather than high throughput, is required.
Please note that the information provided here is for EDUCATION and INFORMATIONAL uses only. We are not responsible for any damages you incur as a result of using these instructions here. For technical support relating to the DD-WRT firmware, please visit the
DD-WRT community forums.
In order to configure DD-WRT for use in OpenVPN Access Server environments, you will first need to create and download the autologin profile from your server. Instructions for doing this is provided below.
Creating and Downloading the Autologin Profile


To create and download the autologin profile for your DD-WRT router, visit the User Permissions area, create an appropriate username for the DD-WRT OpenVPN client, and then check the Allow Auto-login checkbox. Click the Update Running Server button to make sure the changes take effect.
Now, login to the Client Web Server (CWS) and select the Login dropdown, when prompted.
Download the autologin profile that is offered to you in the CWS.
Once the profile has been downloaded, open it your favorite text editor. Please note that if you are using the Windows operating system, you will need to use a text editor that understands the Unix EOF convention. Thus, text editors such as notepad will not work. In this case, use text editors such as Notepad++, Wordpad, or Microsoft Word.
To verify that your profile is indeed an autologin profile, you should see the OVPN_ACCESS_SERVER_AUTOLOGIN=1 notation in the profile you just opened in your text editor. If this notation does not exist, it is possible that the profile you acquired was not an autologin profile, and thus will not work correctly with your DD-WRT router.
** NOTE: The instructions below will only work on more recent versions of DD-WRT. In other words, if you are running the stock version of DD-WRT provided on the main website, these instructions will probably NOT work for you. To update to the latest versions, please update to the latest versions by visiting here: ftp://ftp.dd-wrt.com/others/eko/BrainSlayer-V24-preSP2/. You should make sure that you follow all flashing instructions for your particular device, otherwise your device could be rendered inoperable. We will not be responsible for any devices that are unusable due to incompatible or bad flashes. As with any third party firmware or customizations, FLASH AT YOUR OWN RISK!
Before you begin, make sure your router is properly configured for a NTP server. This setting could be found under the Setup tab in your router configuration. Under Time settings, make sure the NTP Client is set toEnable and the Server IP / Name is populated with a proper time server. If you do not know what your time server is, please fill in time.nist.gov in the text box as indicated.
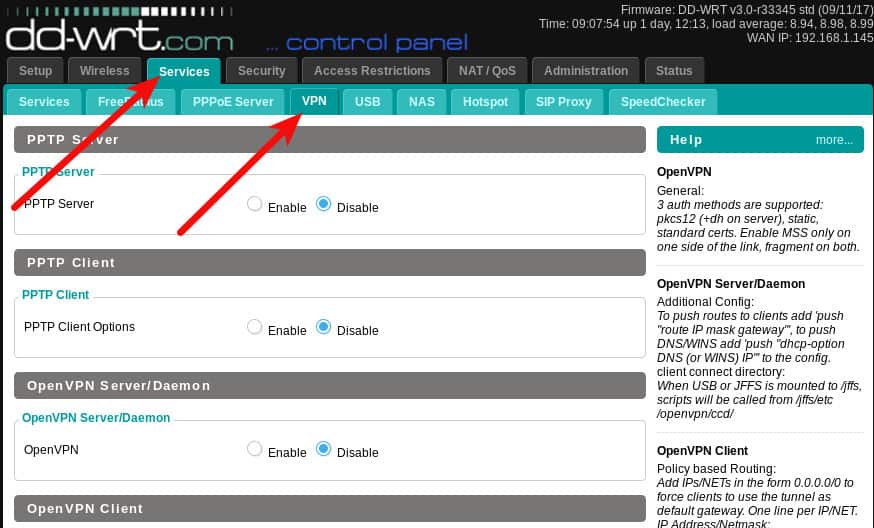
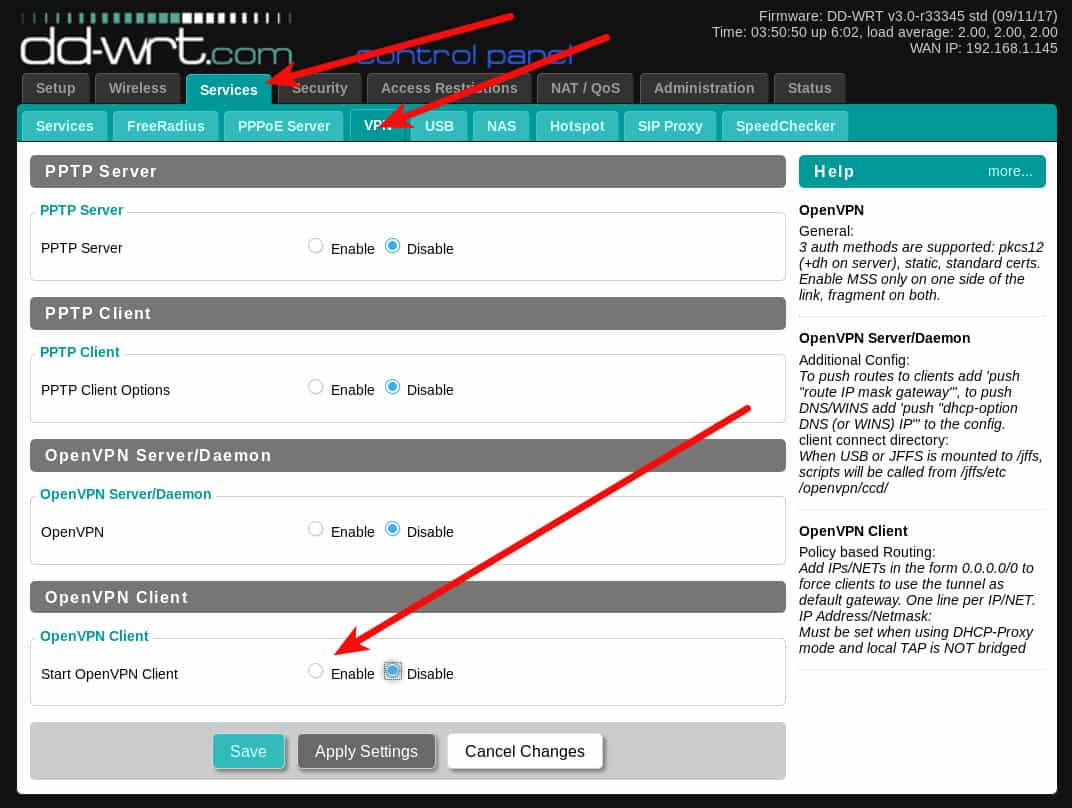
Afterwards, visit the Services tab, then the VPN tab. Under the section Start OpenVPN Client, click the Enable radio box. If you do not see this section, it is possible that your DD-WRT build is not OpenVPN enabled. Please consult the proper DD-WRT documentation for more information on the various DD-WRT builds.
Once you have selected that option, also check the Enable option under Advanced Options, this will allow you to define options required by Access Server and for the VPN connection to work.
The following screen should then be displayed, as depicted below: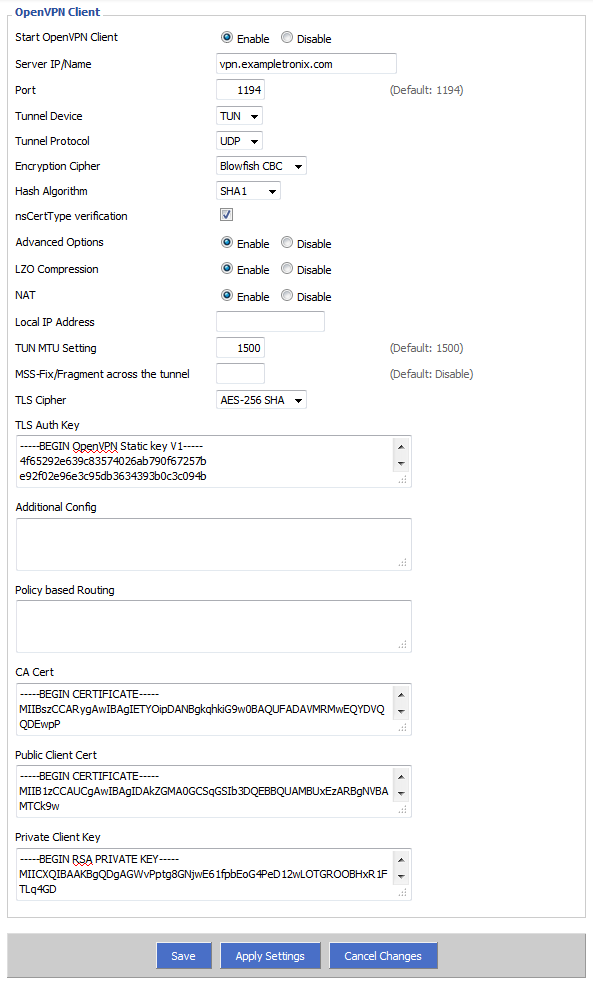
Configuration Descriptions:
Start OpenVPN Client: Enables/Disables the OpenVPN client connection.
Server IP/Name: The hostname of the VPN server you are trying to connect to. If you do not know what this is, look inside your profile for entries starting with remote. For example, the entry remote us.shieldexchange.com 1194 udp indicates that the hostname is us.shieldexchange.com.
Port: The port number the VPN server is listening on. If you do not know what this is, either look for the port number in remote entries such as the one shown in the previous example. In the previous example, the port is 1194. If your server is only using a single port, you may see the port number specified using the port directive (e.g. port 1194). It is preferable that you choose UDP ports over TCP, as UDP provides better reliability for your VPN sessions.
Tunnel Device: What operating mode your Access Server is operating on. In most cases, this will be TUN (layer 3), and this option is specified in the profile as the dev and dev-type directives (e.g. dev-type tun).
Tunnel Protocol: The tunneling protocol your VPN is specified to use. Many times Access Server is set to use a combination of both TCP and UDP ports, as conveyed by the remote entries or by the proto (e.g. proto udp) directive. If your server has both TCP and UDP entries, it is preferable that you select the UDP pair, as it will provide better reliability for your VPN sessions.
Encryption Cipher: The encryption algorithm OpenVPN will use to connect to the remote server. This must match what is currently used on the server. By default, Access Server uses the Blowfish CBC mechanism for encrypting the data channel. You cannot select other algorithms here, unless you also change what is being used on the server. For information on changing the cipher in Access Server, please visit the article here: https://openvpn.net/vpn-server-resources/change-encryption-cipher-in-access-server/.
Hash Algorithm: SHA1 is the hash algorithm used by Access Server, so you should select this here.
nsCertType verification: Checks to see if the remote server is using a valid type of certificate meant for OpenVPN connections. As this is a security feature of OpenVPN, it should be left enabled.
Advanced Options: As described previously, this option must be Enabled for you to set the required options necessary for a successful VPN connection.
LZO Compression: Enables compression over VPN. This option is turned on by default by Access Server, although support for this can be turned off on the client side.
NAT: Creates a NAT layer over the VPN tunnel. This should be Enabled if you plan to have all your client’s traffic to be sent over the VPN tunnel under the shared IP address assigned by the VPN server. If you want to send traffic from your clients directly over the tunnel without any address modification(s) (e.g. If you were using Advanced Routing), then this option should be Disabled. It is highly recommended that you turn this option on, unless you know what you are doing.
Local IP Address: Specify a IP address that your OpenVPN tunnel should use. This field is usually not applicable, since Access Server automatically assigns an address upon a successful connection.
TUN MTU Setting: The maximum transmission unit (MTU) used over the VPN tunnel. Leave this at 1500, unless otherwise directed by a support staff or a network professional.
MSS-Fix/Fragment across the tunnel: Unless directed otherwise by a support staff or a network professional, leave this field blank.
TLS Cipher: What encryption algorithm OpenVPN should use for encrypting its control channel. AES-128 SHA and AES-256 SHA are good choices here. On newer versions of DD-WRT that does not have these options, please select options that end with SHA1 or select None for this option.
TLS Auth Key: The static key OpenVPN should use for generating HMAC send/receive keys. You may find this key surrounded by the <tls-auth> brackets. Copy the contents from your profile, starting from ——BEGIN OpenVPN Static key V1—— until you reach ——END OpenVPN Static key V1——.
Additional Config: Any additional configurations you want to define for the VPN connection. If you would like to run a split tunnel over the VPN, you can use the directive syntax below:
route-nopull
route <VPN server hostname or IP here> 255.255.255.255 net_gateway
route <hostname or IP of subnet here> <subnet mask here> vpn_gateway
route <hostname 2 or IP of subnet 2 here> <subnet mask 2 here> vpn_gateway
For example, to redirect only secretnet.exampletronix.com and the 192.168.1.0/24 subnet over the vpn.exampletronix.com VPN server, use the following directives:
route-nopull
route vpn.exampletronix.com 255.255.255.255 net_gateway
route secretnet.exampletronix.com 255.255.255.255 vpn_gateway
route 192.168.1.0 255.255.255.0 vpn_gateway
Policy based Routing: This field should be left blank.
CA Cert: The CA certificate used by the VPN server, found between the <ca> brackets inside the profile. Start copying from ——BEGIN CERTIFICATE—-— until you hit ——END CERTIFICATE——.
Public Client Cert: The CA certificate used by the VPN client, found between the <cert> brackets inside the profile. Start copying from ——BEGIN CERTIFICATE—-— until you hit ——END CERTIFICATE——.
Private Client Key: The client’s private key used by the VPN client, found between the <key> brackets inside the profile. Start copying from ——BEGIN RSA PRIVATE KEY—— until you hit ——END RSA PRIVATE KEY——.
To start the VPN connection, click the Apply Settings towards the bottom of the page. You may view the status of your VPN connection by visiting the Status tab, and then the OpenVPN tab.
From DD-WRT Wiki
Jump to: navigation, search
OpenVPN is a full-featured SSL VPN solution which can accomodate a wide range of configurations, including road warrior access, home/office/campus telecommuting, WiFi security, secure branch office linking, and enterprise-scale remote access solutions with load balancing, failover, and fine-grained access-controls.
Contents
- 1 Support
- 2 Getting OpenVPN
- 3 OpenVPN authentication
- 3.1 Public Key Infrastructure (PKI) [Certificates]
- 3.2 Static Key
- 4 OpenVPN in DD-WRT
- 4.1 CLI settings
- 4.1.1 Scramble Patch by clayface
- 4.2 GUI: Client Mode
- 4.2.1 Fixed Parameters
- 4.2.2 Changeable Parameters
- 4.3 GUI: Server Configuration
- 4.3.1 Fixed Parameters
- 4.3.2 Customizable Parameters
- 4.3.3 Authentication with username and password
- 4.3.4 Client Configuration
- 4.4 Daemon Mode/Config File
- 4.1 CLI settings
- 5 Troubleshooting
- 5.1 FAQ
- 5.1.1 MTU
- 5.2 Logs
- 5.2.1 Correct time
- 5.2.2 Connecting to DD-WRT OpenVPN Server via Mac Client
- 5.2.3 Can’t Load DH Parameters
- 5.2.4 Connection reset by peer (WSAECONNRESET) (code=10054)
- 5.2.5 Incoming Packet Rejected
- 5.2.6 Authenticate/Decrypt failure
- 5.1 FAQ
[edit] Support
Refer to OpenVPN documentation for details on all OpenVPN features:
- OpenVPN FAQ
- OpenVPN Related Project Services
[edit] Getting OpenVPN
Install the OpenVPN client on the computer: Windows, Mac
Please note that it consists of one binary for both client and server connections, they are not separate packages.
[edit] OpenVPN authentication
You will have several possibilities to authenticate to an openvpn session. Some authentication methods are supported by the gui directly (should be preferred), others have to be set up in daemon mode. Which you will use depends on some things: how secure, easy to setup, easy to maintain
[edit] Public Key Infrastructure (PKI) [Certificates]
Pro-Linux article (German) about PKI security (13 Sep 2013): Current state of cryptography [English translation]
Follow these instructions to create the required certificates and keys. But there is also a Webmin module for linux servers to create your PKI infrastructure (OpenVPN CA). You begin by creating a key and certificate pair for the certificate authority (CA) you are establishing. Then for the server and each client, you create a private key and certificate pair and sign the certificates using the CA’s key. Afterwards, you should have the following files:
ca.crt
ca.key
dh{n}.pem
server.crt
server.key
and a private key and certificate pair for each client. For example, if you have two clients, you should have:
client1.crt
client1.key
client2.crt
client2.key
Note: The CA private key (ca.key) is only to sign the certificates. Keep it secure and do not copy to the server nor clients.
OpenVPN certs must be generated with SHA auth: see this thread
[edit] Static Key
This method is only usable for connecting one client to a server!
On Linux you can create a pair of keys with:
openvpn --genkey --secret /home/"user"/static.key
For Windows, ensure openvpn is installed. To create a pair of keys go to:
Programs -> OpenVPN -> Generate a static openvpn key
Finally, copy the content of the keys to the ddwrt GUI static key field.
Also see: Static Key How-To and Create Static Keypair
[edit] OpenVPN in DD-WRT
Forum thread: OpenVPN server setup guide
This assumes DD-WRT with OpenVPN is installed on the router. OpenVPN is only available on units with at least 8mb flash (except the Broadcom VPN build). Instructions may vary based on version, as the following is for builds since 2011.
The DD-WRT GUI Server and Client modes’ defaults should suffice for most users.
- Using the Web Interface, go to the «Services» tab and then the «VPN» tab (for older versions of dd-wrt go to the «Administration» tab and then the «Services» sub-tab).
- Enable OpenVPN Daemon or OpenVPN Client. If further options do not appear, click Apply Settings.
- Fill in needed parameters (see below). Everything else not mentioned here is taken care of automatically (e.g. firewall)
- Click Apply Settings.
Set up OpenVPN client where only specific traffic is routed via the VPN tunnel: Selective Routing Using DD-WRT & OpenVPN
[edit] CLI settings
[edit] Scramble Patch by clayface
These posts adds a patch to openvpn which introduces forms of scrambling to the packet payload of any OpenVPN connection.
To use it you need both sides patched, server and client, and you introduce a new scramble password phrase in server and client config files
“scramble password” – perform a simple xor operation the packet payload, using a string “password”, you choose password
“scramble reverse” – This simply reverses all the data in the packet. This is enough to get past the regular expression detection in both China and Iran.
“scramble xorptrpos” – This performs a xor operation, utilising the current position in the packet payload.
“scramble obfuscate password” – This method is more secure. It utilises the 3 types of scrambling mentioned above. “password” is a string you choose.
[edit] GUI: Client Mode
[edit] Fixed Parameters
There are default parameters that will always be written to the config file and which you cant change if you use GUI client mode:
ca /tmp/openvpncl/ca.crt
cert /tmp/openvpncl/client.crt
key /tmp/openvpncl/client.key
management 127.0.0.1 16
management-log-cache 50
verb 4
mute 5
syslog
writepid /var/run/openvpncl.pid
client
resolv-retry infinite
nobind
persist-key
persist-tun
script-security 2
tls-client
fast-io
[edit] Changeable Parameters
DD-WRT default settings in {}
OpenVPN config language in []
- Server IP/Name (e.g. 192.168.1.1)
- IP address/hostname of the OpenVPN server you want to connect to. [remote xxx]
- Port
- port which OpenVPN server is listening on. {1194} [port xxx]
- Tunnel Device (TUN/TAP)
- The mode of tunneling. TUN: routing (layer 3), TAP: bridgeing (layer 2. can be used for routing, too, but its not very common). [dev-type tun/tap]
- Tunnel Protocoll (UDP/TCP)
- The subprotocol the connection will use on the connection. {udp} [proto udp/tcp]
- Encryption Cipher (None and Blowfish to AES512)
- The encryption algorithm that will be used for the tunnel. Blowfish «fastest» to AES512 «safest». {AES128} [cipher xxx]
- Hash Algorithm (None and MD4 to SHA512)
- The hash algorithm that will be used. MD4: fastest (maybe unsafe) to SHA512. {SHA256} [auth xxx]
- Advanced options
- Leave defaults as is if you dont know what you are doing. {disabled} []
- TLS Cipher
- What encryption algorithm OpenVPN should use for encrypting its control channel. {disabled} []
- LZO Compression
- Enables compression over VPN. This might speedup the connection. Must be the same value as on server. {adaptive} [comp-lzo yes/no/adaptive/disabled]
- NAT
- Enable network address translation on the client side of the connection. Enables the NAT-firewall to protect clients. {disabled}
- Bridge TAP to br0
- Enable a transparent bridge across the tunnel to the local LAN. Works only in TAP mode with NAT disabled. {disabled}
- Local IP Address
- In cases you will not get an ip from the server. Not very common. {empty)
- Subnet Mask
- Subnet Mask for the IP Address.
- TUN MTU Setting
- set the mtu of the tunnel {1500} [tun-mtu xxx]
- UDP Fragment across the tunnel
- set mss-fix and fragmentaion accross the tunnel. {empty} [fragment xxx]
- UDP MSS-Fix
- = value of Fragment. Only usen with udp. should be set on one side only. [mssfix]
- nsCertType verification
- Checks to see if the remote server is using a valid type of certificate meant for OpenVPN connections. As this is a security feature of OpenVPN, it should be left enabled. {checked} []
- TLS Auth Key
- The static key OpenVPN should use for generating HMAC send/receive keys. {disabled} []
- Additional Config
- Any additional configurations you want to define for the VPN connection. {empty}
- Policy based Routing
- allow only special clients to use the tunnel. Add IPs in the form 0.0.0.0/0 to force clients to use the tunnel as default gateway. One line per IP. {} []
- Public Server Cert
- Certificate of OpenVPN CA (not the server’s public cert) in pem form; only part between (and including) ——BEGIN CERTIFICATE—— and ——END CERTIFICATE—— is necessary; as it is stored in nvram, everything else from that file should be removed to conserve space.
- CA Cert
- CA certificate; also only part between ‘BEGIN’ and ‘END’ is required.
- Private Client Key
- Key associated with certificate above; should be kept secret because anybody who knows this key can successfully authenticate as this client.
- DH PEM
- Diffie Hellmann parameter.
- Static Key
- used for p2p links. No pki needed.
[edit] GUI: Server Configuration
This section describes how to configure an OpenVPN server that uses SSL certificates for client authentication, which is recommended. The method offers better security than using a static key and allows multiple clients to connect at the same time.
[edit] Fixed Parameters
There are default parameters in the DD-WRT config file that cannot be changed using the GUI server mode:
dh /tmp/openvpn/dh.pem
ca /tmp/openvpn/ca.crt
cert /tmp/openvpn/cert.pem
key /tmp/openvpn/key.pem
keepalive 10 120
verb 4
mute 5
log-append /var/log/openvpn
writepid /var/run/openvpnd.pid
management 127.0.0.1 5002
management-log-cache 50
mtu-disc yes
topology subnet
client-config-dir /tmp/openvpn/ccd
script-security 2
ifconfig-pool-persist /tmp/openvpn/ip-pool 86400
fast-io
passtos
[edit] Customizable Parameters
DD-WRT default settings in {}
OpenVPN config language in []
- Start Type
- use «System». «WAN Up» doesnt work. {}
- Config via (GUI/config file)
- GUI {}
- Server Mode (TUN/TAP)
- The mode of tunneling. TUN: routing (layer 3), TAP: bridging networks (layer 2). {} [dev-type tun/tap]
- DHCP-Proxy mode
- Only in bridge mode. Let the clients use the network dhcp server not the openvpn dhcp. {} []
- Pool start Ip
- 1st ip of the ip pool used (Only in bridge mode). []
- Pool end IP
- Last ip of the ip pool used (Only in bridge mode). []
- Gateway
- Default gateway to use (Only in bridge mode). []
- Network (e.g. 10.10.10.0)
- Network to use for the tunnel (Only in routing mode). []
- Netmask (e.g. 255.255.255.0)
- Netmask of the used network. []
- Block DHCP accross the tunnel
- Dont allow DHCP requests across tunnel (Only in bridge mode).
- Port
- port which OpenVPN server listens on. {1194} [port xxx]
- Tunnel Protocoll (UDP/TCP)
- The subprotocol the connection will use on the real used tcp connection. {udp} [proto udp/tcp]
- Encryption Cipher (None and Blowfish to AES512)
- The encryption algorithm that will be used for the tunnel. Blowfish: fastest to AES512 safest. {AES128} [cipher xxx]
- Hash Algorithm (None and MD4 to SHA512)
- The hash algorithm that will be used. MD4: fastest (maybe unsafe) to SHA512. {SHA256} [auth xxx]
- Advanced options
- Leave defaults as is if you dont know what you are doing. {disabled}
- LZO Compression
- Enables compression over VPN. This might speedup the connection. Must be the same value as on server. {yes} [comp-lzo yes/no/adaptive/disabled]
- Redirect default Gateway
- Force the clients to use the tunnel as default gateway. {disabled} []
- Allow Client to Client
- Allow clients to see each other. {disabled} [client-to-client]
- Allow duplicate cn
- allow to use 1 client cert to use on multiple clients (security risc)
- TUN MTU Setting
- set the mtu of the tunnel {1500} [tun-mtu xxx]
- MSS-Fix/Fragment across the tunnel
- set mss-fix and fragmentaion accross the tunnel. {empty} [fragment xxx] [mssfix]
- TLS Cipher
- What encryption algorithm OpenVPN should use for encrypting its control channel. {disabled} []
- TLS Auth Key
- The static key OpenVPN should use for generating HMAC send/receive keys.
- Client connect script
- . {empty} []
- Additional Config
- Any additional configurations you want to define for the VPN connection. {empty}
- CA Cert
- Certificate of OpenVPN CA in pem form (usually ca.crt); only part between (and including) ——BEGIN CERTIFICATE—— and ——END CERTIFICATE—— is necessary; as it is stored in nvram, everything else from that file should be removed to conserve space.
- Public Server Cert
- Server certificate issued by CA for this particular router (usually server.crt); also only part between ‘BEGIN’ and ‘END’ is required.
- Private Server Key
- Key associated with certificate above (usually server.key); should be kept secret because anybody who knows this key can successfully authenticate client certificates.
- DH PEM
- Diffie Hellman parameters generated for the OpenVPN server (usually dh1024.pem).
[edit] Authentication with username and password
Certificates are nice, but having usernames and passwords can complement certificates. You can use the following scripts below to check for usernames/passwords.
Add this to the config on the server and set the right path for the script:
script-security 2
auth-user-pass-verify /path/to/your/script/verify.sh via-file
The script-security line is to resolve the issue where an external program may not be called due to setting of —script-security level
The auth-user-pass-verify line enables the OpenVPN server to check the passed username and password by calling the script verify.sh and passing the username and password in a tmp file.
Every client will need to have this in its config file to connect:
auth-user-pass
This tells OpenVPN client to ask the user for username and password or s/he will not be able to log in. You can also use «—auth-user-pass» (instead of the line in the config file) on the command line.
I have split up the functions into separate files compared to predecessors (See page history).
The verification done by the script may not work if OpenVPN is running in «daemon» mode (to be confirmed).
[Edit by Rocketboy235 Jan 21 2020]
The script below has been updated to make use of SHA1 checksum instead of MD5 since the last time I created it back in mid 2018. However, SHA1 has been cracked since early 2019 so hopefully dd-wrt will come packaged with a more secure/newer hash tool that can be used. Also added instructions on how to setup the scripts for OpenVPN login authentication.
Instructions on how to use the below scripts
Add both scripts to your router and make sure to do chmod +x for each file.
Then you can run Genhash.sh and pass the username and password arguments.
Example:
./genhash.sh NameOfMyUser MyLovelyPassword
This will generate a users file in /tmp and you can move it to whereever you like but you will need to update the Verify.sh script (line 14 ( begins with ‘users=’ )when you copy/paste this script) so that it points to that file when looking at the user list. For example, I place these scripts and my users file in /jffs/etc/openvpn/. Just note that if you save stuff in /tmp, you will lose them when the router reboots or loses power.
Verify.sh
#!/bin/sh
#verify.sh
#This script was made with via-file in mind

PATH=/usr/bin:/bin

#Function used for generating SHA1 hash value of password multiple times
function hashround() {
    local hash rest
    read hash rest
    printf '%s%s' "$hash" "$hash" | /usr/bin/sha1sum
}

#Location of the Approved Username/Password File
users="/location/of/the/file/for/users"

#Check to see if generated OpenVPN login file has any special characters
#Terminate script if special characters are used
if /bin/grep -q '[^-_a-zA-Z0-9]' "$1"
then
	echo "Illegal characters found in username/password." >&2
	exit 1
fi

#1st line is the username
username=`/usr/bin/awk 'NR==1' "$1"`
#2nd line is the password
password=`/usr/bin/awk 'NR==2' "$1"`

#Generate SHA1 hash of given password and loop it 10 times before comparing with hash value in users file
hashpass=$(printf '%s%s' "$username" "$password" | /usr/bin/sha1sum \
           | hashround | hashround | hashround | hashround | hashround \
           | hashround | hashround | hashround | hashround | hashround \
           | /usr/bin/cut -d' ' -f1)

if /bin/grep -Fxq "$username:$hashpass" "$users"
then
	echo "User Authenticated." >&2
	exit 0
fi

echo "Login credentials failed." >&2
exit 1
Genhash.sh
#!/bin/sh
#genhash.sh
#Generate Hash for username/password
#Case sensitive and only allows a certain set of characters to be used

function hashround() {
    local hash rest
    read hash rest
    printf '%s%s' "$hash" "$hash" | /usr/bin/sha1sum
}

case "$1" in *[!-_a-zA-Z0-9]*) exit 1 ;; esac
case "$2" in *[!-_a-zA-Z0-9]*) exit 1 ;; esac

hashpass=$(printf '%s%s' "$1" "$2" | /usr/bin/sha1sum \
           | hashround | hashround | hashround | hashround | hashround \
           | hashround | hashround | hashround | hashround | hashround \
           | /usr/bin/cut -d' ' -f1)

echo "Username: $1"
echo "Password: $2"
echo "Password (SHA1 Hashed): $hashpass"

echo "User added to approved user file which is saved in /tmp/users"
echo "$1:$hashpass" >> /tmp/users
[edit] Client Configuration
1) Copy the CA certificate and a private key and certificate pair to the client.
2) Create an OpenVPN configuration file on your client computer:
client
dev tap
proto udp
remote router-address 1194
resolv-retry infinite
nobind
persist-key
persist-tun
ca ca.crt
cert client1.crt
key client1.key
ns-cert-type server
comp-lzo
verb 3
Replace router-address in the fourth line with your router’s IP address or host name and, obviously, use the appropriate file names in the script for the client’s certificate and key. On Windows, save this script using notepad as a file with extension .ovpn and copy it into \Program Files\OpenVPN\config (along with the files ca.crt, clientX.crt and clientX.key created earlier.)
Notes:
- If you need to use TCP instead of UDP, set the protocol to tcp-client. Clients must use the same protocol that the server does.
- Client config also need match these server parameters: dev (tun/tap), cipher, auth, comp-lzo, tun-mtu.
- Mac OS X users and Linux users using TAP need to add the line
up "./vpn-up.sh"
to the configuration file and create a script file vpn-up.sh in the same directory as the configuration file with the following contents.
On Mac:
#!/bin/bash
sleep 2
ipconfig set $1 DHCP
On Linux:
#!/bin/bash
sleep 2
dhclient $1 &
This script configures the TAP interface to request an IP address using DHCP. Make sure to make the script executable with ‘chmod 755 vpn-up.sh’.
3) Use the configuration file you just created with whatever OpenVPN client software you’re using to establish a connection to your router.
If everything works, you will be connected to your internal LAN. If your router is running a DHCP server, the TAP interface will be assigned an IP address on your internal LAN. At this point, you just connect to your home PC the same way you would do it from inside your LAN.
[edit] Daemon Mode/Config File
Bridge 2 Networks
Route 2 Networks
[edit] Troubleshooting
[edit] FAQ
[edit] MTU
One verycommon problem is the wrong setting of the mtu/fragment/mss-fix values. Ethernet’s max frame size is 1500. In most cases where the Router is the gateway and the vpn connects to the outside world the values must be changed. WAN connections in general will have a lower frame size so the default setting will result in a dropping connection. mtu/fragment must be set the same on both sides!
On tcp connections only mtu can be set. Try setting the mtu to 1300 and see if it works.
On udp connections enable mss-fix on one side of the link. Lower the fragemt size to 1300 and try if its working.
In both cases when the link is working u can try to raise the values again to the maximum which will be working.
[edit] Logs
logs are written to syslog and can be seen in the GUI: Status -> OpenVPN (not in daemon and script mode)
[edit] Correct time
OpenVPN requires client and server to have more or less synchronized time. Therefore make sure that router has correct time. To check it use command date and if you get info about year 1970, you should enable NTP client. Also, ntp server has to be outside of your VPN as time should be corrected before VPN is established. If you have syslog enabled (to local server, or the server outside your VPN), errors like TLS Error: Unroutable control packet received from server_ip:1194 may indicate this problem. (This error message may appear if your certificates are not valid or have expired, too.)
If you get an error message saying that your certificate is not yet valid, set the dd-wrt clock to UTC time (in the first configuration page).
To set the time manually connect via telnet or ssh and issue the following command at the prompt:
date MMDDHHMMYYYY
[edit] Connecting to DD-WRT OpenVPN Server via Mac Client
Currently, there are two OpenVPN clients for OS X
- Tunnelblick
- Viscosity
Viscosity has a more user friendly GUI but is a commercial product. It can also import settings created for the Tunnelblick application.
PROBLEM: When I used the sample client.conf file above, nothing happened when I clicked connect on Tunnelblick.
Tunnelblick is a GUI OpenVPN application for the Mac. The last official release is 2.0.1, but I am going to explain how to connect using version 3.0rc3. This version has everything in one app and requires no extra components to be installed.
NOTE: I used certificates to connect my MacBook Pro to the OpenVPN server. You can find documentation on how to do this further up in this page. Remember to place your certificate files in the same directory as the client.conf file. Tunnelblick looks for the files in ~/Library/openvpn.
Download Tunnelblick and drag it to the Applications folder. It will say that you don’t have a client.conf file and will make one for you. You can examine the sample client.conf file that Tunnelblick makes and find that it does a few things differently than the example provided above. Set up your client.conf file using the sample I have provided below, and Tunnelblick should connect properly now.
The file I have provided is the same as the sample, except with a few things disabled and a few things added to make it do what we want. The reason I disabled a few things using the # line is that I didn’t want to delete anything, so I just disabled them.
You might notice that the command
up "./vpn-up.sh"
This is a fix that I found here.
You will need to make a script called vpn-up.sh and place it in the same directory as the client.conf file. Make the files contents:
#!/bin/bash
sleep 2
ipconfig set tap0 DHCP
client.conf:
##############################################
# Sample client-side OpenVPN 2.0 config file #
# for connecting to multi-client server.     #
#                                            #
# This configuration can be used by multiple #
# clients, however each client should have   #
# its own cert and key files.                #
#                                            #
# On Windows, you might want to rename this  #
# file so it has a .ovpn extension           #
##############################################

# Specify that we are a client and that we
# will be pulling certain config file directives
# from the server.
client

# Use the same setting as you are using on
# the server.
# On most systems, the VPN will not function
# unless you partially or fully disable
# the firewall for the TUN/TAP interface.
dev tap

# Windows needs the TAP-Win32 adapter name
# from the Network Connections panel
# if you have more than one.  On XP SP2,
# you may need to disable the firewall
# for the TAP adapter.
#dev-node MyTap

# Are we connecting to a TCP or
# UDP server?  Use the same setting as
# on the server.
proto tcp

# The hostname/IP and port of the server.
# You can have multiple remote entries
# to load balance between the servers.
remote xxxxxxxxx.dyndns.org 1194

# Choose a random host from the remote
# list for load-balancing.  Otherwise
# try hosts in the order specified.
#remote-random

# Keep trying indefinitely to resolve the
# host name of the OpenVPN server.  Very useful
# on machines which are not permanently connected
# to the internet such as laptops.
resolv-retry infinite

# Most clients don't need to bind to
# a specific local port number.
nobind

# Downgrade privileges after initialization (non-Windows only)
user nobody
group nobody

# Try to preserve some state across restarts.
persist-key
persist-tun

# If you are connecting through an
# HTTP proxy to reach the actual OpenVPN
# server, put the proxy server/IP and
# port number here.  See the man page
# if your proxy server requires
# authentication.
#http-proxy-retry # retry on connection failures
#http-proxy [proxy server] [proxy port #]

# Wireless networks often produce a lot
# of duplicate packets.  Set this flag
# to silence duplicate packet warnings.
mute-replay-warnings

# SSL/TLS parms.
# See the server config file for more
# description.  It's best to use
# a separate .crt/.key file pair
# for each client.  A single ca
# file can be used for all clients.
ca ca.crt
cert client1.crt
key client1.key

up "./vpn-up.sh"

# Verify server certificate by checking
# that the certicate has the nsCertType
# field set to "server".  This is an
# important precaution to protect against
# a potential attack discussed here:
# http://openvpn.net/howto.html#mitm

# To use this feature, you will need to generate
# your server certificates with the nsCertType
# field set to "server".  The build-key-server
# script in the easy-rsa folder will do this.
ns-cert-type server

# If a tls-auth key is used on the server
# then every client must also have the key.
#tls-auth ta.key 1

# Select a cryptographic cipher.
# If the cipher option is used on the server
# then you must also specify it here.
#cipher x

# Enable compression on the VPN link.
# Don't enable this unless it is also
# enabled in the server config file.
comp-lzo

# Set log file verbosity.
verb 3

# Silence repeating messages
;mute 20
UPDATE Sept 1, 2009
The most recent release of Tunnelblick is 3.0rc14. It seems as though the previously mention bash script does not work anymore. The following python script does work, however:
#!/usr/bin/python
import os, sys
try:
    tun_dev, tun_mtu, link_mtu = sys.argv[1:4]
except:
    sys.exit(0)
if tun_dev[0:3] == 'tap'
    os.system('/usr/sbin/ipconfig set "%s" DHCP' % os.environ['dev'])
[edit] Can’t Load DH Parameters
If you get the following:
Tue Jan 23 03:03:05 2007 OpenVPN 2.0.7 mipsel-unknown-linux [SSL] [LZO] [EPOLL] built on Jan 15 2007
Tue Jan 23 03:03:05 2007 Cannot load DH parameters from dh1024.pem: error:0906D064:lib(9):func(109):reason(100)
Tue Jan 23 03:03:05 2007 Exiting
you should check your certificates. Did you paste them correctly?
Note: you must include new lines.
[edit] Connection reset by peer (WSAECONNRESET) (code=10054)
If you received error when trying to connect to your VPN server verify the following:
- Make sure the tap-device was successfully «up’ed». It is, if you find it in the list when running «ifconfig» without further arguments. If it is not displayed in the list of available interfaces have a look at «Yet another evolution» above.
- Make sure the protocol is the same on the server and client, ie UDP/TCP
- Verify the port number is the same on the client and server; Default port is UDP 1194
- Check to see if the port is open on the server by using nMap or another utility
[edit] Incoming Packet Rejected
If you get incoming packets being rejected when trying to connect with the VPN client (OpenVPN) make sure that you are forwarding the 1194 port (if configured to use that port) to the proper server/router (usually 192.168.1.1).
Example TCP/UDP Rejection:
- [Date] TCP/UDP: Incoming packet rejected from 192.168.1.1:1194[2], expected peer address: w.x.y.z:1194 (allow this incoming source address/port by removing —remote or adding —float)
Port Forwarding is configured on v24 SP 2 under ‘NAT / Qos’.
[edit] Authenticate/Decrypt failure
Error: Authenticate/Decrypt packet error: cipher final failed
If this happens to you, you probably have a mismatch in the configuration between server and client on the «cipher»-option. (E.g.: cipher AES-128-CB / cipher AES-256-CB)
This is not a problem of DD-WRT or OpenVPN but just a config issue which can happen if you follow some of those guidelines strictly without knowing what the config options mean.
Не секрет, что большинство домашних роутеров имеет множество скрытых возможностей. Производители, по разным причинам, не захотели реализовать или просто предоставить к ним доступ в штатной прошивке. Про альтернативную прошивку DD-WRT, я уже рассказывал, хоть и довольно давно, в посте о настройке D-link DIR-300 в режиме Wi-Fi повторителя. Данная прошивка, как раз и позволяет задействовать весь скрытый потенциал роутера, выжав всё, на что способно устройство, в том числе сделать его клиентом или сервером OpenVPN.
Откуда взялась прошивка DD-WRT и где её можно скачать?
В основе DD-WRT лежит Linksys WRT, прошивка, разработанная компанией Linksys для собственных маршрутизаторов серии WRT54G. Приставка «DD» в названии DD-WRT не что иное, как автомобильный код города Дрезден в Германии, где живет главный разработчик проекта DD-WRT.
Сейчас в продаже имеются маршрутизаторы, с уже установленной DD-WRT, например от той же Linksys или других производителей. Кроме того, на большинстве роутеров, можно самостоятельно заменить проприетарную прошивку на DD-WRT. Полный список поддерживаемых устройств можно найти на официальном сайте https://www.dd-wrt.com.
Преимущества настройки маршрутизатора в качестве клиента или сервера OpenVPN
Давайте разберемся в чём заключается преимущество использования клиента OpenVPN на маршрутизаторе перед обычным клиентским приложением (например tunnelblick на macOS), которое можно установить на компьютере или смартфоне.
Итак, при поднятии VPN канала на роутере, устанавливается только одно подключение к VPN-серверу, вместо нескольких для каждого устройства, что существенно снижает нагрузку на VPN сервер. VPN канал всегда включен и доступен для устройств за ним, также не стоит забывать, что далеко не на каждом устройстве имеется возможность установить OpenVPN клиент.
Настроив маршрутизатор в качестве OpenVPN сервера мы получаем безопасный доступ к своей домашней сети или офису извне. Получается весьма бюджетный вариант начального уровня, ведь ранее я писал только о настройке OpenVPN на FreeBSD, а такое решение требовало дополнительного оборудования.
Настройка DD-WRT маршрутизатора в качестве клиента OpenVPN
Заходим в панель управления маршрутизатора (обычно адрес 192.168.0.1 или 1.1), зависит от того какую подсеть вы настроили у себя. Переходим на вкладку Services -> VPN.
Для примера, сделаем настройку подключения к абстрактному OpenVPN серверу провайдера. Существенной разницы в настройке подключения к любому другому серверу быть не должно. Для начала активируем настройку клиента OpenVPN.
Большинство поставщиков VPN, использующих OpenVPN, предоставляют конфигурационный файл для подключения. Конечно, содержимое файлов конфигурации OpenVPN клиента может отличаться, например режимом шифрования, использованием сжатия данных, авторизацией и т.д., но принцип везде остаётся одинаковым.
Пример файла настроек OpenVPN, и соответствующих ему полей на маршрутизаторе DD-WRT можно увидеть на скриншоте:
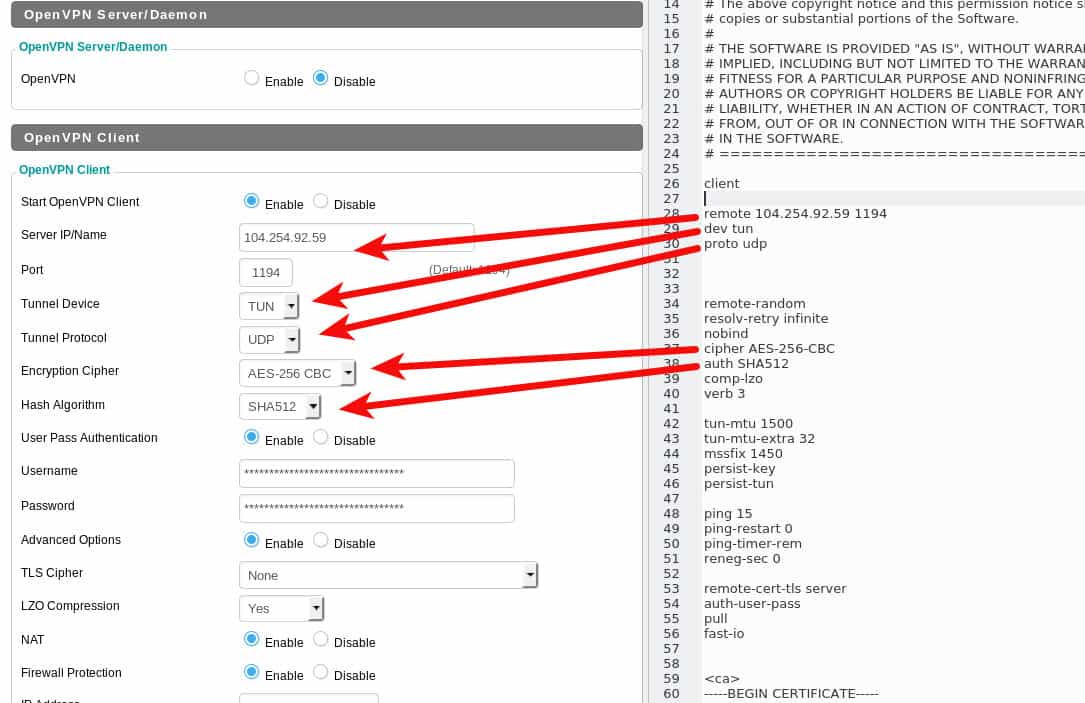
В приведенном примере нужно дополнительно ввести имя пользователя и пароль в соответствующие поля. Остальные настройки должны быть скопированы и вставлены в поле Additional Config (Дополнительные настройки) маршрутизатора DD-WRT.
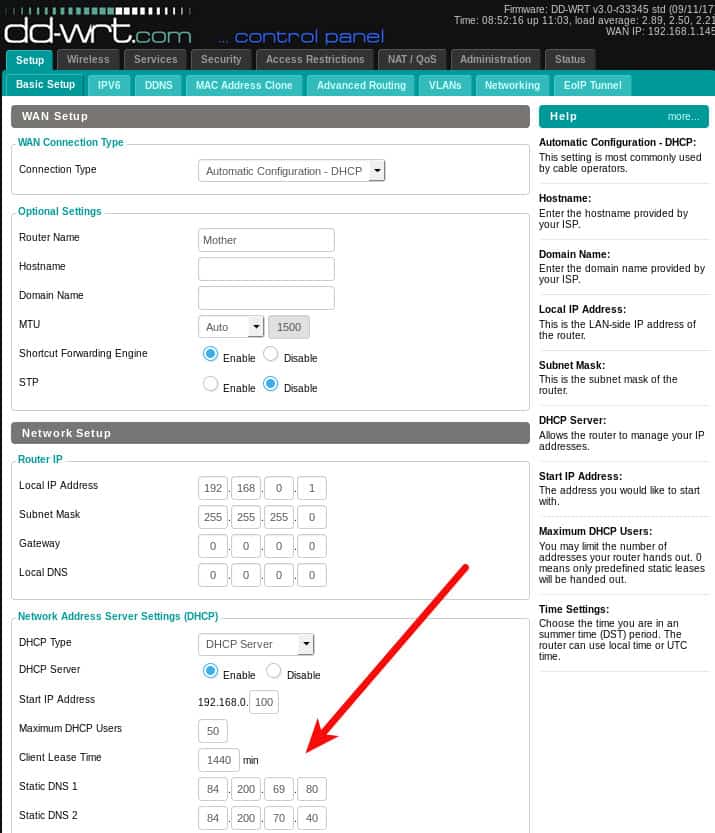
Cохраняем настройки, нажав кнопку Save. Теперь весь ваш трафик проходящий через VPN соединение будет зашифрован. Некоторые VPN сервисы дополнительно предоставляют собственные DNS, вы можете настроить маршрутизатор и на использование любых DNS-серверов, какие пожелаете Setup -> Basic Setup.
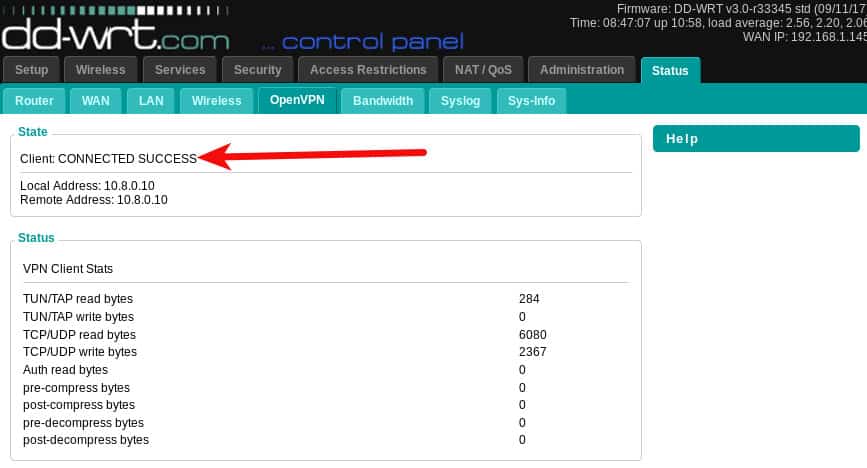
Чтобы запустить VPN, возвращаемся на вкладку Services -> VPN и нажимаем кнопку Apply Settings. На вкладке Status -> OpenVPN, должно появиться сообщение Client: CONNECTED SUCCESS. Обратите внимание, что вкладка состояния OpenVPN не появится до тех пор, пока не будет включена служба OpenVPN.
Настройка DD-WRT в качестве OpenVPN сервера
Первым делом нам понадобится создать сертификаты и ключи шифрования для использования сервером OpenVPN. Для этого установим OpenVPN на компьютер и создадим необходимые файлы. Я уже рассказывал о генерации ключей для OpenVPN сервера на FreeBSD (как это сделать в Windows, можно почитать на сайте OpenVPN или у меня в блоге). Пользователи Linux могут использовать приведенные ниже команды (взято из первоисточника, ссылка будет в конце поста).
Для Ubuntu и других пользователей на базе Debian следует установить пакеты openvpn и easy-rsa:
sudo apt-get intstall openvpn easy-rsa
Создадим рабочий каталог и назовём его openvpn:
mkdir openvpn
cd openvpn
И выполним команды генерации сертификатов:
/usr/bin/make-cadir CA
cd CA
source ./vars
./clean-all
./build-ca
./build-key-server
./build-dh
./build-key
cd keys
openvpn --genkey --secret pfs.key
При создании сертификатов будет запрашиваться информация о местоположении, которая включается в сертификат (можно писать всякую лабуду). Если желаете настроить её заранее, измените нужные поля в файле CA/vars:
export KEY_COUNTRY="US"
export KEY_PROVINCE="CA"
export KEY_CITY="SanFrancisco"
export KEY_ORG="Fort-Funston"
export KEY_EMAIL="me@myhost.mydomain"
export KEY_OU="MyOrganizationalUnit"
Также будет предложено придумать кодовую фразу (passphrase). Я не рекомендую её устанавливать, иначе вы не сможете запустить OpenVPN сервер без ввода пароля. Это касается и создания клиентских ключей, задав пароль вы будете вынуждены вводить его всякий раз при подключении к серверу. Так что при генерации ключей, на соответствующий запрос пароля просто нажимаем клавишу ввода, если вам это не нужно.
Если всё сделано правильно, то в каталоге CA/keys получили кучу файлов с ключами и сертификатами:
$ ls -1 CA/keys/
01.pem
02.pem
ca.crt
ca.key
client.crt
client.csr
client.key
dh2048.pem
index.txt
index.txt.attr
index.txt.attr.old
index.txt.old
serial
serial.old
server.crt
server.csr
server.key
pfs.key
Нам понадобятся только некоторые из них. Открываем их в текстовом редакторе и помещаем содержимое файлов в соответствующие поля на странице DD-WRT OpenVPN Server / Daemon. Переходим в раздел Services -> VPN и активируем OpenVPN Server/Daemon.
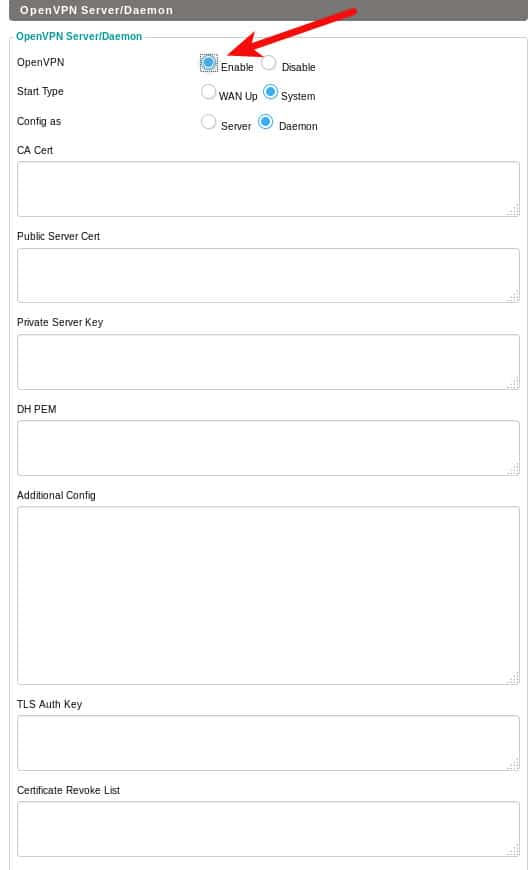
- ca.crt соответствует полю CA Cert
- server.crt соответствует полю Public Server Cert
- server.key соответствует полю Private Server Key
- dh2048.pem соответствует полю DH PEM
- pfs.key соответствует полю TLS Auth Key
Также имеется возможность указать список отозванных сертификатов (CRL).
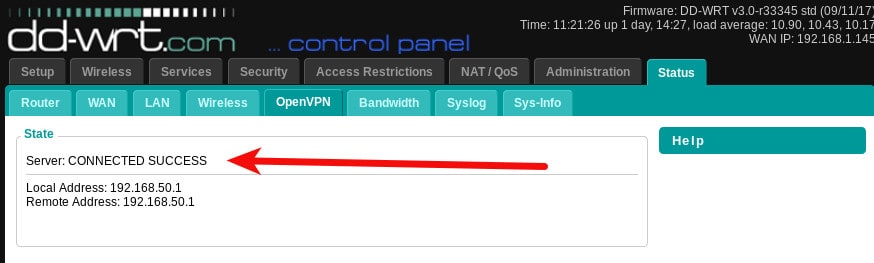
Нажав кнопку Apply settings (Применить настройки), наш VPN-сервер должен начать работу. Перейдя на страницу Status -> OpenVPN, можно проверить статус соединения. Обратите внимание, что на этот раз в сообщении говорится о сервере: CONNECTED SUCCESS.
Остаётся настроить конфигурационный файл для клиента, в данном случае выглядит примерно так:
client
dev tun
proto udp
remote YOUR_IP_ADDRESS 1194
cipher AES-256-CBC
tls-cipher TLS-DHE-RSA-WITH-AES-256-CBC-SHA
auth sha256
comp-lzo
link-mtu 1570
<key>
-----BEGIN PRIVATE KEY-----
Copy the contents of your client.key file and paste it here.
-----END PRIVATE KEY-----
</key>
<cert>
-----BEGIN CERTIFICATE-----
Copy the contents of your client.crt file and paste it here.
-----END CERTIFICATE-----
</cert>
<ca>
-----BEGIN CERTIFICATE-----
Copy the contents of your ca.crt file and paste it here.
-----END CERTIFICATE-----
</ca>
key-direction 1
<tls-auth>
Copy the contents of your pfs.ca file and paste it here
</tls-auth>
Проверяем подключение клиента к нашему openvpn серверу для командной строки Linux:
$ sudo openvpn --config client-config.ovpn
Sat Sep 23 16:05:05 2017 OpenVPN 2.3.10 x86_64-pc-linux-gnu [SSL OpenSSL)] [LZO] [EPOLL] [PKCS11] [MH] [IPv6] built on Jun 22 2017
Sat Sep 23 16:05:05 2017 library versions: OpenSSL 1.0.2g  1 Mar 2016, LZO 2.08
Sat Sep 23 16:05:05 2017 Control Channel Authentication: tls-auth using INLINE static key file
Sat Sep 23 16:05:05 2017 UDPv4 link local (bound): [undef]
Sat Sep 23 16:05:05 2017 UDPv4 link remote: [AF_INET]192.168.0.1:1194
Sat Sep 23 16:05:09 2017 [server] Peer Connection Initiated with [AF_INET]192.168.0.1:1194
Sat Sep 23 16:05:12 2017 TUN/TAP device tun0 opened
Sat Sep 23 16:05:12 2017 do_ifconfig, tt->ipv6=0, tt->did_ifconfig_ipv6_setup=0
Sat Sep 23 16:05:12 2017 /sbin/ip link set dev tun0 up mtu 1497
Sat Sep 23 16:05:12 2017 /sbin/ip addr add dev tun0 10.10.10.2/24 broadcast 10.10.10.255
Sat Sep 23 16:05:12 2017 Initialization Sequence Completed
Напоследок осталось заметить, что если провайдер не предоставляет вам статический ip-адрес, то выйти из ситуации поможет настройка динамического DNS. Настройки DDNS можно найти на соответсвующей вкладке маршрутизатора Setup -> DDNS.
Оригинал статьи Installing OpenVPN client and server on a DD-WRT router
Подписывайтесь на канал
Яндекс.Дзен
и узнавайте первыми о новых материалах, опубликованных на сайте.
для пользователей KeepSolid VPN Unlimited
DD-WRT – это проект прошивки с открытым исходным кодом, созданный, чтобы улучшить возможности маршрутизаторов. Эта альтернативная прошивка снимает ограничения стандартной прошивки маршрутизатора, предоставляя пользователям расширенные возможности по управлению сетью.
Хотите настроить первоклассную VPN-защиту на вашем роутере? В нашем руководстве вы узнаете, как настроить OpenVPN® на маршрутизаторе с прошивкой DD-WRT. Больше информации о функциях и технических характеристиках OpenVPN® вы можете найти в статье Что такое протокол OpenVPN®.
Примечание: Если на вашем маршрутизаторе нет прошивки DD-WRT, вы можете посетить страницу https://dd-wrt.com. Там вы найдете все необходимые инструкции о том, как прошить роутер, какие маршрутизаторы поддерживаются и другую информацию.
I. Сгенерируйте конфигурации для настройки OpenVPN на DD-WRT
Первым шагом в настройке KeepSolid VPN Unlimited на роутере с прошивкой DD-WRT является создание файлов конфигурации в Личном кабинете. Для этого, выполните несколько простых шагов, указанных в данной инструкции.
Поскольку вы собираетесь настраивать OpenVPN® на своем маршрутизаторе DD-WRT, в поле Protocol выберите OpenVPN®. Будет сгенерирован нужный .ovpn файл, а также доменное имя выбранного VPN-сервера.
II. Настройте OpenVPN® клиент на роутере с DD-WRT
Если на вашем роутере уже заданы сетевые настройки вашего интернет-провайдера и настроен доступ к интернету, вы можете начать настройку OpenVPN® клиента. Выполните всего несколько простых шагов ниже:
1. Войдите в панель управления вашего роутера с DD-WRT. Если вы не знаете, как это сделать, ознакомьтесь с нашей подробной инструкцией о том, как зайти в настройки роутера.
2. Перейдите в раздел Services > VPN как показано ниже:
3. Здесь вам необходимо включить опцию OpenVPN® Client и заполнить поля следующим образом:
- Server IP or DNS Name: Введите имя сервера, которое вы найдете в поле Domain name при создании конфигураций в Личном кабинете.
- Port and Protocol: Выберите 1194 udp (используется для OpenVPN® по умолчанию)
- Tunnel device: Выберите TUN
- Encryption Cipher: AES-256-CBC
- Hash Algorithm: SHA512
- Advanced Options: Enabled
- TLS Cipher: TLS-DHE-RSA-WITH-AES-128-CBC-SHA или выше
- LZO Compression: No
- NAT: Enabled
- Firewall Protection: Disable
- Tunnel UDP MSS-Fix: Disable
- Additional Config section: Введите данные ниже:
reneg-sec 0
persist-tun
persist-key
ping 5
ping-exit 30
nobind
remote-random
remote-cert-tls server
route-metric 1
4. Откройте ранее загруженный файл .ovpn в предпочитаемом текстовом редакторе и заполните поля следующим образом:
- CA cert – в файле конфигурации скопируйте раздел между <ca> и </ ca>, включая строки ——BEGIN CERTIFICATE—— и ——END CERTIFICATE——, и вставьте его в это поле.
- Public Client cert — в файле конфигурации скопируйте раздел между <cert> и </cert>, включая строки ——BEGIN CERTIFICATE—— и ——END CERTIFICATE——, и вставьте его в это поле.
- Public Client key — в файле конфигурации скопируйте раздел между <key> и </key>, включая строки ——BEGIN PRIVATE KEY—— и ——END PRIVATE KEY———, и вставьте его в это поле.
5. Затем, нажмите Apply Settings в нижней части панели управления вашего роутера с DD-WRT. Это активирует VPN-соединение на вашем роутере. В случае возникновения проблем с DNS перейдите в Setup > Basic Setup > Network Setup > Static DNS1 and 2, и установите значения 8.8.8.8 и 8.8.4.4 соответственно.
Готово! Вы завершили настройку OpenVPN® на роутере с DD-WRT и активировали VPN-соединение. Наш VPN для DD-WRT теперь шифрует трафик всех устройств, подключенных к вашему маршрутизатору, позволяя вам наслаждаться анонимностью и безопасностью в сети.
Нужно настроить VPN на других устройствах? Посетите страницу Инструкции, чтобы найти нужное руководство или обратитесь в нашу службу поддержки. Мы будем рады помочь!
«OpenVPN» является зарегистрированным товарным знаком OpenVPN Inc.
This is part five of a series of creating your own self-signed PKI and some ways to utilize the PKI to setup SSL for your web server or create your own OpenVPN server.
Disclaimer: I am not a security expert. This is just demonstrating an easy way to get OpenVPN up and running to allow access to a remote network from anywhere in the world.
For increased security, use a non-standard TCP or UDP port for your OpenVPN server, making sure to update the client «remote» line with the matching port number.
In this tutorial I am running DD-WRT in a VirtualBox VM. Learn how at https://youtu.be/BRLukj4dZxk
Prerequisites
- A XCA PKI database https://youtu.be/ezzj3x207lQ
Create Required Certificates
- Launch XCA
- Open the PKI database if it is not already (File > Open DataBase), enter password
- Click on the Certificates tab, right click on your Intermediate CA certificate
- Select New
- On the Source tab, make sure Use this Certificate for signing is selected
- Verify your Intermediate CA certificate is selected from the drop down
- Click the Subject tab
- Complete the Distinguished Name section
internalName: OpenVPN Server
countryName: US
stateOrProvinceName: Virginia
localityName: Northern
organizationName: i12bretro
organizationUnitName: i12bretro Certificate Authority
commonName: vpn.i12bretro.local - Click the Generate a New Key button
- Enter a name and set the key size to at least 2048
- Click Create
- Click on the Extensions tab
- Set the Type dropdown to End Endity
- Check the box next to Subject Key Identifier
- Update the validity dates to fit your needs
- Click the Key Usage tab
- Under Key Usage select Digital Signature and Key Encipherment
- Under Extended Key Usage select TLS Web Server Authentication
- Click the Netscape tab
- Deselect all options and clear the Netscape Comment field
- Click OK to create the certificate
- Click on the Certificates tab, right click on your Intermediate CA certificate again
- Select New
- On the Source tab, make sure Use this Certificate for signing is selected
- Verify your Intermediate CA certificate is selected from the drop down
- Click the Subject tab
- Complete the Distinguished Name section
internalName: OpenVPN Client #1
countryName: US
stateOrProvinceName: Virginia
localityName: Northern
organizationName: i12bretro
organizationUnitName: i12bretro Certificate Authority
commonName: VPN Client 1 - Click the Generate a New Key button
- Enter a name and set the key size to at least 2048
- Click Create
- Click on the Extensions tab
- Set the Type dropdown to End Endity
- Check the box next to Subject Key Identifier
- Update the validity dates to fit your needs
- Click the Key Usage tab
- Under Key Usage select Digital Signature, Key Agreement
- Under Extended Key Usage select TLS Web Client Authentication
- Click the Netscape tab
- Deselect all options and clear the Netscape Comment field
- Click OK to create the certificate
- On the Certificates tab, click the OpenVPN Server certificate
- Select Extra > Generate DH Parameter
- Type 2048 for DH parameter bits
- Click OK
- Select a location for dh2048.pem and click Save
Exporting Required Files for OpenVPN
- In XCA, click on the Certificates tab
- Right click the Intermediate CA certificate > Export > File
- Set the file name with a .pem extension and verify the export format is PEM chain (*.pem)
- Click OK
- Right click the OpenVPN Server certificate > Export > File
- Set the file name with a .crt extension and verify the export format is PEM (*.crt)
- Click OK
- Right click the OpenVPN Client #1 certificate > Export > File
- Set the file name with a .crt extension and verify the export format is PEM (*.crt)
- Click OK
- Click on the Private Keys tab
- Right click the OpenVPN Server key > Export > File
- Set the file name with a .pk8 extension and verify the export format is PKCS #8 (*.pk8)
- Click OK
- Right click the OpenVPN Client #1 key> Export > File
- Set the file name with a .pk8 extension and verify the export format is PKCS #8 (*.pk8)
- Click OK
Setting Up OpenVPN Server in DD-WRT
- Open a web browser and navigate to your DD-WRT IP address
- Login when prompted
- Select the Administration tab
- Select the Backup sub tab
- Click Backup at the very bottom
- Save the nvrambak file somewhere safe
- Select the Services tab
- Select the VPN sub tab
- Scroll down and select enable next to OpenVPN under the OpenVPN Server/Daemon header
- Set the OpenVPN Settings as the following:
- Start Type: System
- Config as: Server
- Server mode: Router (TUN)
- Network: 10.10.28.0
- Netmask: 255.255.255.0
- Port: 1194
- Tunnel Protocol: TCP
- Encyption Cipher: AES-256 GCM
- Hash Algorithm: SHA256
- Advanced Options: Enable
- TLS Cipher: TLS-ECDHE-RSA-WITH-AES-256-GCM-SHA384
- Compression: Compress lz4-v2
- Redirect default Gateway: Disable
- Allow Client to Client: Enable
- Allow duplicate CN: Disable
- Tunnel MT setting: 1500
- Tunnel UDP MSS-Fix: Disable
- Paste the contents of OpenVPN_Server.crt into the Public Server Cert field
- Paste the contents of CA_Chain.pem into the CA Cert field
- Paste the contents of OpenVPN_Server.pem into the Private Server Key field
- Paste the contents of dh2048.pem into the DH PEM field
- Paste the following into the Additional Config field:
push «route-gateway 10.10.27.27»
push «route 10.10.27.0 255.255.255.0»
push «dhcp-option DNS 10.10.27.1»
push «dhcp-option DNS 208.67.222.222» - Note in the above:
route-gateway is the IP address of the internet gateway on your local network
route is the subnet of your local network
dhcp-option DNS sets DNS servers, in my case my domain controller and an OpenDNS server - Click Save at the bottom
- Click Apply Settings
- Click the Administration tab
- Click the Command sub tab
- Paste the following into the Commands field
iptables -t nat -I PREROUTING -p udp —dport 1194 -j ACCEPT
iptables -I INPUT -p udp —dport 1194 -j ACCEPT
iptables -t nat -I PREROUTING -p tcp —dport 1194 -j ACCEPT
iptables -I INPUT -p tcp —dport 1194 -j ACCEPT
iptables -I INPUT -i tun2 -j ACCEPT
iptables -I FORWARD -i tun2 -j ACCEPT
iptables -I FORWARD -o tun2 -j ACCEPT
iptables -t nat -A POSTROUTING -s 10.10.28.0/24 -o eth0 -j MASQUERADE - Click Save Firewall at the bottom
- Click the Management sub tab
- Click Reboot Router at the very bottom
Installing OpenVPN Client Software and Testing
- Download the OpenVPN software Download
- Run the installer with all the default values
- Click the Start button and search OpenVPN GUI
- Select OpenVPN GUI from the results to start the application
Creating the OpenVPN Client Profile
- Download the OVPN template Download
- Rename the .ovpn template something meaningful
- Edit the .ovpn template replacing the following:
<#replace with dynamic dns#> with a dynamic DNS or external IP address to your server
<#replace with CA chain#> with the contents of CA_Chain.pem
<#replace with client 1 cert #> with the contents of OpenVPN_Client #1.crt
<#replace with client 1 key #> with the contents of OpenVPN_Client #1.pk8 - Save your changes
- Copy the .ovpn template to OpenVPN install directory/config
- Right click OpenVPN GUI in the system tray > Connect