Network Time Protocol (NTP) runs on the Transport Layer port 123 UDP and enables accurate time synchronization for network computers. This irons out time inconsistencies on servers and clients during file logging or replication of server databases among other resources.
In this article, we’ll outline the process of installing, configuring, and querying an NTP server on Windows Server 2019.
NTP Server
NTP servers utilize the Network Time Protocol to send time signals to servers across the globe upon request. NTP servers use the Universal Time Coordinated (UTC) time source for time signal synchronization.
The main purpose of NTP servers is to provide time synchronization for servers and computer networks with other major network servers and clients across the globe. In turn, this streamlines communications and transactions all over the world.
Installing and Configuring an NTP Server on Windows Server 2019
The process of installing, configuring, and querying an NTP Server on Windows Server 2019 is quite straightforward.
Set the NTP service to Automatic option
To start off, Hit Windows Key + R to launch the Run dialogue. Next, type services.msc and hit ENTER.
In the ‘Services’ window, locate the service ‘Windows Time’. Right-click and select the ‘Properties’ option as shown:
On the pop-up window, select the Startup type as ‘Automatic’.
Finally, click on ‘OK’ and then ‘Apply’.
Configuring NTP Server using Registry Editor
As before, launch the run dialogue by pressing Windows Key + R. Then type ‘regedit’ and hit ENTER.
The Registry editor will be launched as shown:
Navigate to the path shown below:
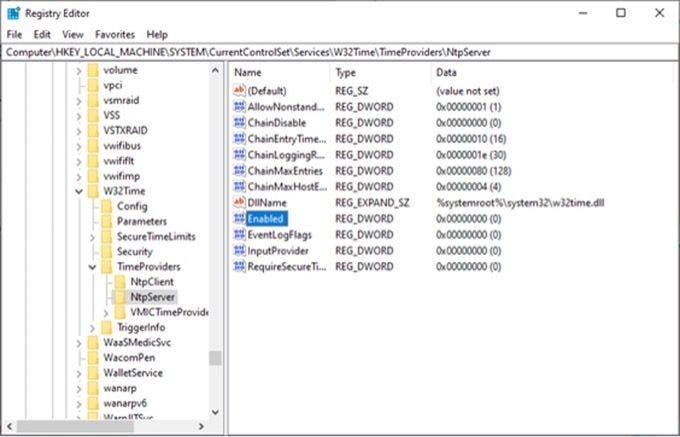
Computer\HKEY_LOCAL_MACHINE\SYSTEM\CurrentControlSet\Services\W32Time\TimeProviders\NtpServer
On the right pane, locate and double-click the ‘Enabled’ file as shown:
Set the Value data to 1 and click OK.
Next, follow this path.
Computer>HKEY_LOCAL_MACHINE>SYSTEM>CurrentControlSet>Services>W32Time>Config
At the right pane locate the ‘Announce Flags’ file.
Double click on the file and set its value to 5 in the ‘Value Data’ section.
Finally, reboot the NTP server for the changes to take place. Head back to the services Window, right-click on ‘Windows Time’ and select ‘Restart’
Configuring NTP Server on Windows 2019 using Windows PowerShell
If you love working in Powershell, launch Powershell as Administrator and enable NTP server using the command:
Set-ItemProperty -Path “HKLM:\SYSTEM\CurrentControlSet\Services\w32time\TimeProviders\NtpServer” -Name “Enabled” -Value 1
Next, configure Announce Flags value as shown:
Set-ItemProperty -Path “HKLM:\SYSTEM\CurrentControlSet\services\W32Time\Config” -Name “AnnounceFlags” -Value 5
Finally, restart the NTP server using the command:
Restart-Service w32Time
Important Note: UDP port 123 must be open for the NTP server traffic to reach your Windows Server 2019. If the NTP servers are unreachable, you can check your firewall settings to fix this.
Other useful commands
- w32tm /query /configuration to check and shows the NTP server configuration.
- w32tm /query /peers for checking the list of NTP servers configured alongside their configuration status
- w32tm /resync /nowait to force-synchronize time with your NTP server.
- w32tm /query /source to show the source of the time.
- w32tm /query /status to reveal NTP time service status.
Final take
Now your Windows Server 2019 clock is synchronized with time the NTP server’s pool.ntp.org and works as NTP client. You can achieve full network and accompanying infrastructure time synchronization by synchronizing all network workstations, servers, routers, hubs, and switches.
Since NTP servers operate over the UDP protocol using TCP/IP, these network infrastructures must be working efficiently for effective NTP server operation. In case you want to make time servers on windows server 2019 hosted on a virtual machine, you should disable the virtual machine time synchronization settings and sync their time with the domain Windows Server 2019.
Network Time Protocol (NTP) runs on the Transport Layer port 123 UDP and enables accurate time synchronization for network computers. This irons out time inconsistencies on servers and clients during file logging or replication of server databases among other resources.
In this article, we’ll outline the process of installing, configuring, and querying an NTP server on Windows Server 2019.
NTP servers utilize the Network Time Protocol to send time signals to servers across the globe upon request. NTP servers use the Universal Time Coordinated (UTC) time source for time signal synchronization.
The main purpose of NTP servers is to provide time synchronization for servers and computer networks with other major network servers and clients across the globe. In turn, this streamlines communications and transactions all over the world.
Installing and Configuring an NTP Server on Windows Server 2019
The process of installing, configuring, and querying an NTP Server on Windows Server 2019 is quite straightforward.
Set the NTP service to Automatic option
To start off, Hit Windows Key + R to launch the Run dialogue. Next, type services.msc and hit ENTER.
In the ‘Services’ window, locate the service ‘Windows Time’. Right-click and select the ‘Properties’ option as shown:
On the pop-up window, select the Startup type as ‘Automatic’.
Finally, click on ‘OK’ and then ‘Apply’.
Configuring NTP Server using Registry Editor
As before, launch the run dialogue by pressing Windows Key + R. Then type ‘regedit’ and hit ENTER.
The Registry editor will be launched as shown:
Navigate to the path shown below:
ComputerHKEY_LOCAL_MACHINESYSTEMCurrentControlSetServicesW32TimeTimeProvidersNtpServer
On the right pane, locate and double-click the ‘Enabled’ file as shown:
Set the Value data to 1 and click OK.
Next, follow this path.
Computer>HKEY_LOCAL_MACHINE>SYSTEM>CurrentControlSet>Services>W32Time>Config
At the right pane locate the ‘Announce Flags’ file.
Double click on the file and set its value to 5 in the ‘Value Data’ section.
Finally, reboot the NTP server for the changes to take place. Head back to the services Window, right-click on ‘Windows Time’ and select ‘Restart’
Configuring NTP Server on Windows 2019 using Windows PowerShell
If you love working in Powershell, launch Powershell as Administrator and enable NTP server using the command:
Set-ItemProperty -Path “HKLM:SYSTEMCurrentControlSetServicesw32timeTimeProvidersNtpServer” -Name “Enabled” -Value 1
Next, configure Announce Flags value as shown:
Set-ItemProperty -Path “HKLM:SYSTEMCurrentControlSetservicesW32TimeConfig” -Name “AnnounceFlags” -Value 5
Finally, restart the NTP server using the command:
Restart-Service w32Time
Important Note: UDP port 123 must be open for the NTP server traffic to reach your Windows Server 2019. If the NTP servers are unreachable, you can check your firewall settings to fix this.
Other useful commands
- w32tm /query /configuration to check and shows the NTP server configuration.
- w32tm /query /peers for checking the list of NTP servers configured alongside their configuration status
- w32tm /resync /nowait to force-synchronize time with your NTP server.
- w32tm /query /source to show the source of the time.
- w32tm /query /status to reveal NTP time service status.
Final take
Now your Windows Server 2019 clock is synchronized with time the NTP server’s pool.ntp.org and works as NTP client. You can achieve full network and accompanying infrastructure time synchronization by synchronizing all network workstations, servers, routers, hubs, and switches.
Since NTP servers operate over the UDP protocol using TCP/IP, these network infrastructures must be working efficiently for effective NTP server operation. In case you want to make time servers on windows server 2019 hosted on a virtual machine, you should disable the virtual machine time synchronization settings and sync their time with the domain Windows Server 2019.
Содержание
- How to Configure NTP Server on Windows Server 2019
- NTP Server
- Installing and Configuring an NTP Server on Windows Server 2019
- Configuring NTP Server using Registry Editor
- Configuring NTP Server on Windows 2019 using Windows PowerShell
- Other useful commands
- Final take
- Windows Time service tools and settings
- Network port
- Using W32tm.exe
- Run W32tm.exe
- Set client to use two time servers
- Set client to sync time automatically from a domain source
- Check client time configuration
- Configure computer clock reset
- Example: System clock rate off by four minutes
- Example: System clock rate off by three minutes
- Using Local Group Policy Editor
- Windows registry reference
- Config entries
- Parameters entries
- NtpClient entries
- NtpServer entries
- Enhanced logging
- Group Policy Object settings
- Global Configuration Settings
- Windows NTP Client settings
- Related information
How to Configure NTP Server on Windows Server 2019
Network Time Protocol (NTP) runs on the Transport Layer port 123 UDP and enables accurate time synchronization for network computers. This irons out time inconsistencies on servers and clients during file logging or replication of server databases among other resources.
In this article, we’ll outline the process of installing, configuring, and querying an NTP server on Windows Server 2019.
NTP Server
NTP servers utilize the Network Time Protocol to send time signals to servers across the globe upon request. NTP servers use the Universal Time Coordinated (UTC) time source for time signal synchronization.
The main purpose of NTP servers is to provide time synchronization for servers and computer networks with other major network servers and clients across the globe. In turn, this streamlines communications and transactions all over the world.
Installing and Configuring an NTP Server on Windows Server 2019
The process of installing, configuring, and querying an NTP Server on Windows Server 2019 is quite straightforward.
Set the NTP service to Automatic option
To start off, Hit Windows Key + R to launch the Run dialogue. Next, type services.msc and hit ENTER.
In the ‘Services’ window, locate the service ‘Windows Time’. Right-click and select the ‘Properties’ option as shown:
On the pop-up window, select the Startup type as ‘Automatic’.
Finally, click on ‘OK’ and then ‘Apply’.
Configuring NTP Server using Registry Editor
As before, launch the run dialogue by pressing Windows Key + R. Then type ‘regedit’ and hit ENTER.
The Registry editor will be launched as shown:
Navigate to the path shown below:
ComputerHKEY_LOCAL_MACHINESYSTEMCurrentControlSetServicesW32TimeTimeProvidersNtpServer
On the right pane, locate and double-click the ‘Enabled’ file as shown:
Set the Value data to 1 and click OK.
Next, follow this path.
Computer>HKEY_LOCAL_MACHINE>SYSTEM>CurrentControlSet>Services>W32Time>Config
At the right pane locate the ‘Announce Flags’ file.
Double click on the file and set its value to 5 in the ‘Value Data’ section.
Finally, reboot the NTP server for the changes to take place. Head back to the services Window, right-click on ‘Windows Time’ and select ‘Restart’
Configuring NTP Server on Windows 2019 using Windows PowerShell
If you love working in Powershell, launch Powershell as Administrator and enable NTP server using the command:
Set-ItemProperty -Path “HKLM:SYSTEMCurrentControlSetServicesw32timeTimeProvidersNtpServer” -Name “Enabled” -Value 1
Next, configure Announce Flags value as shown:
Set-ItemProperty -Path “HKLM:SYSTEMCurrentControlSetservicesW32TimeConfig” -Name “AnnounceFlags” -Value 5
Finally, restart the NTP server using the command:
Restart-Service w32Time
Important Note: UDP port 123 must be open for the NTP server traffic to reach your Windows Server 2019. If the NTP servers are unreachable, you can check your firewall settings to fix this.
Other useful commands
- w32tm /query /configuration to check and shows the NTP server configuration.
- w32tm /query /peers for checking the list of NTP servers configured alongside their configuration status
- w32tm /resync /nowait to force-synchronize time with your NTP server.
- w32tm /query /source to show the source of the time.
- w32tm /query /status to reveal NTP time service status.
Final take
Now your Windows Server 2019 clock is synchronized with time the NTP server’s pool.ntp.org and works as NTP client. You can achieve full network and accompanying infrastructure time synchronization by synchronizing all network workstations, servers, routers, hubs, and switches.
Since NTP servers operate over the UDP protocol using TCP/IP, these network infrastructures must be working efficiently for effective NTP server operation. In case you want to make time servers on windows server 2019 hosted on a virtual machine, you should disable the virtual machine time synchronization settings and sync their time with the domain Windows Server 2019.
Источник
Applies to: Windows Server 2022, Windows Server 2019, Windows Server 2016, Windows Server 2012 R2, Windows Server 2012, Windows 10, Azure Stack HCI, versions 21H2 and 20H2
The Windows Time service (W32Time) synchronizes the date and time for all computers managed by Active Directory Domain Services (AD DS). This article covers the different tools and settings used to manage the Windows Time service.
By default, a computer that is joined to a domain synchronizes time through a domain hierarchy of time sources. However, if a computer has been manually configured to synchronize from a specific time source, perhaps because it was formerly not joined to a domain, you can reconfigure the computer to begin automatically sourcing its time from the domain hierarchy.
Most domain-joined computers have a time client type of NT5DS, which means that they synchronize time from the domain hierarchy. An exception to this is the domain controller, which functions as the primary domain controller (PDC) emulator operations master for the root forest domain. The PDC emulator operations master in turn is configured to synchronize time with an external time source.
You can achieve down to one-millisecond time accuracy in your domain. For more information, see Support boundary for high-accuracy time and see Accurate Time for Windows Server 2016.
Don’t use the Net time command to configure or set a computer’s clock time when the Windows Time service is running.
Also, on older computers that run Windows XP or earlier, the Net time /querysntp command displays the name of a Network Time Protocol (NTP) server with which a computer is configured to synchronize, but that NTP server is used only when the computer’s time client is configured as NTP or AllSync. This command has since been deprecated.
Network port
The Windows Time service follows the Network Time Protocol (NTP) specification, which requires the use of UDP port 123 for all time synchronization. Whenever the computer synchronizes its clock or provides time to another computer, it happens over UDP port 123. This port is exclusively reserved by the Windows Time service.
- If you have a computer with multiple network adapters (is multi-homed), you cannot enable the Windows Time service based on a network adapter.
- The Windows Time NTP client uses UDP port 123 for both source and destination sync requests. When using network filtering, be aware of the source port being used.
Using W32tm.exe
You can use the command-line tool W32tm.exe to configure Windows Time service settings and to diagnose computer time problems. W32tm.exe is the preferred command-line tool for configuring, monitoring, and troubleshooting the Windows Time service. W32tm.exe is included with Windows XP and later and Windows Server 2003 and later.
Membership in the local Administrators group is required to run W32tm.exe locally, while membership in the Domain Admins group is required to run W32tm.exe remotely.
Run W32tm.exe
- In the Windows search bar, enter cmd.
- Right-click Command Prompt, then select Run as administrator.
- At the command prompt, enter w32tm followed by the applicable parameter, as described below:
| Parameter | Description |
|---|---|
| /? | Displays the W32tm command-line help |
| /register | Registers the Windows Time service to run as a service and adds its default configuration information to the registry. |
| /unregister | Unregisters the Windows Time service and removes all of its configuration information from the registry. |
| /monitor [/domain: ] [/computers: [, [, . ]]] [/threads: ] | Monitors the Windows Time service.
/domain: Specifies which domain to monitor. If no domain name is given, or neither the /domain nor /computers option is specified, the default domain is used. This option might be used more than once. /computers: Monitors the given list of computers. Computer names are separated by commas, with no spaces. If a name is prefixed with a *, it is treated as a PDC. This option might be used more than once. /threads: Specifies the number of computers to analyze simultaneously. The default value is 3. The allowed range is 1-50. |
| /ntte | Converts a Windows NT system time (measured in 10 -7 -second intervals starting from 0h 1-Jan 1601) into a readable format. |
| /ntpte | Converts an NTP time (measured in 2 -32 -second intervals starting from 0h 1-Jan 1900) into a readable format. |
| /resync [/computer: ] [/nowait] [/rediscover] [/soft] | Tells a computer that it should resynchronize its clock as soon as possible, throwing out all accumulated error statistics.
/computer: : Specifies the computer that should resynchronize. If not specified, the local computer will resynchronize. /nowait: do not wait for resynchronization to occur; return immediately. Otherwise, wait for resynchronization to complete before returning. /rediscover: Redetects the network configuration and rediscovers network sources, then resynchronizes. /soft: Resynchronizes by using existing error statistics. This is used for compatibility purposes. |
| /stripchart /computer: [/period: ] [/dataonly] [/samples: ] [/rdtsc] | Displays a strip chart of the offset between this computer and another computer.
/computer: : The computer to measure the offset against. /period: : The time between samples, in seconds. The default is 2 seconds. /dataonly: Displays the data only, without graphics. /samples: : Collects samples, then stops. If not specified, samples will be collected until Ctrl+C is pressed. /rdtsc: For each sample, this option prints comma-separated values along with the headers RdtscStart, RdtscEnd, FileTime, RoundtripDelay, and NtpOffset instead of the text graphic.
|
| /config [/computer: ] [/update] [/manualpeerlist: ] [/syncfromflags: ] [/LocalClockDispersion: ] [/reliable:(YES|NO)] [/largephaseoffset: ]** | /computer: : Adjusts the configuration of . If not specified, the default is the local computer.
/update: Notifies the Windows Time service that the configuration has changed, causing the changes to take effect. /manualpeerlist: : Sets the manual peer list to , which is a space-delimited list of DNS or IP addresses. When specifying multiple peers, this option must be enclosed in quotes. /syncfromflags: : Sets what sources the NTP client should synchronize from. should be a comma-separated list of these keywords (not case sensitive):
/LocalClockDispersion: : Configures the accuracy of the internal clock that W32Time will assume when it can’t acquire time from its configured sources. /reliable:(YES|NO): Set whether this computer is a reliable time source. This setting is only meaningful on domain controllers.
/largephaseoffset: : sets the time difference between local and network time that W32Time will consider a spike. |
| /tz | Displays the current time zone settings. |
| /dumpreg [/subkey: ] [/computer: ] | Displays the values associated with a given registry key.
The default key is HKLMSystemCurrentControlSetServicesW32Time (the root key for the Windows Time service). /subkey: : Displays the values associated with subkey of the default key. /computer: : Queries registry settings for computer |
| /query [/computer: ] [/verbose] | Displays the computer’s Windows Time service information. This parameter was first made available for the Windows Time client in Windows Vista and Windows Server 2008.
/computer: : Queries the information of . If not specified, the default value is the local computer. /source: Displays the time source. /configuration: Displays the configuration of run time and where the setting comes from. In verbose mode, display the undefined or unused setting too. /peers: Displays a list of peers and their status. /status: Displays Windows Time service status. /verbose: Sets the verbose mode to display more information. |
| /debug > | Enables or disables the local computer Windows Time service private log. This parameter was first made available for the Windows Time client in Windows Vista and Windows Server 2008.
/disable: Disables the private log. /enable: Enables the private log.
/truncate: Truncate the file if it exists. |
Set client to use two time servers
To set a client computer to point to two different time servers, one named ntpserver.contoso.com and another named clock.adatum.com , type the following command at the command prompt, and then press ENTER:
Set client to sync time automatically from a domain source
To configure a client computer that is currently synchronizing time using a manually-specified computer to synchronize time automatically from the AD domain hierarchy, run the following:
Check client time configuration
To check a client configuration from a Windows-based client computer that has a host name of contosoW1 , run the following command:
The output of this command displays a list of W32time configuration parameters that are set for the client.
Windows Server 2016 has improved the time synchronization algorithms to align with RFC specifications. Therefore, if you want to set the local time client to point to multiple peers, we recommended that you prepare three or more different time servers.
If you have only two time servers, you should specify the Ntpserver UseAsFallbackOnly flag (0x2) to de-prioritize one of them. For example, if you want to prioritize ntpserver.contoso.com over clock.adatum.com , run the following command:
Additionally, you can run the following command and read the value of NtpServer in the output:
Configure computer clock reset
In order for W32tm.exe to reset a computer clock, it first checks the offset ( CurrentTimeOffset , also known as Phase Offset ) between the current time and the computer clock time to determine whether the offset is less than the MaxAllowedPhaseOffset value.
- CurrentTimeOffset ≤ MaxAllowedPhaseOffset : Adjust the computer clock gradually by using the clock rate.
- CurrentTimeOffset > MaxAllowedPhaseOffset : Set the computer clock immediately.
Then, to adjust the computer clock by using the clock rate, W32tm.exe calculates a PhaseCorrection value. This algorithm varies depending on the version of Windows:
Windows Server 2016 and later versions:
PhaseCorrection_raw = | CurrentTimeOffset | Г· (16 Г— PhaseCorrectRate Г— pollIntervalInSeconds )
MaximumCorrection = | CurrentTimeOffset | Г· ( UpdateInterval Г· 100)
PhaseCorrection = min( PhaseCorrection_raw , MaximumCorrection )
Windows Server 2012 R2 and earlier versions:
To get the SystemClockRate value, you can use the following command and convert it from seconds to clock ticks by using the formula of (seconds Г— 1,000 Г— 10,000):
PhaseCorrection = | CurrentTimeOffset | Г· ( PhaseCorrectRate Г— UpdateInterval )
All versions of Windows use the same final equation to check PhaseCorrection :
PhaseCorrection ≤ SystemClockRate ÷ 2
Windows Server 2019 and Windows 10 1809 have the same formula as [Windows Server 2016 and later versions] described above by applying cumulative updates from KB5006744 onwards.
These equations use PhaseCorrectRate , UpdateInterval , MaxAllowedPhaseOffset , and SystemClockRate measured in units of clock ticks. On Windows systems, 1 ms = 10,000 clock ticks.
MaxAllowedPhaseOffset is configurable in the registry. However, the registry parameter is measured in seconds instead of clock ticks.
To see the SystemClockRate and pollIntervalInSeconds values (measured in seconds), open a Command Prompt window and then run W32tm /query /status /verbose . This command produces output that resembles the following.
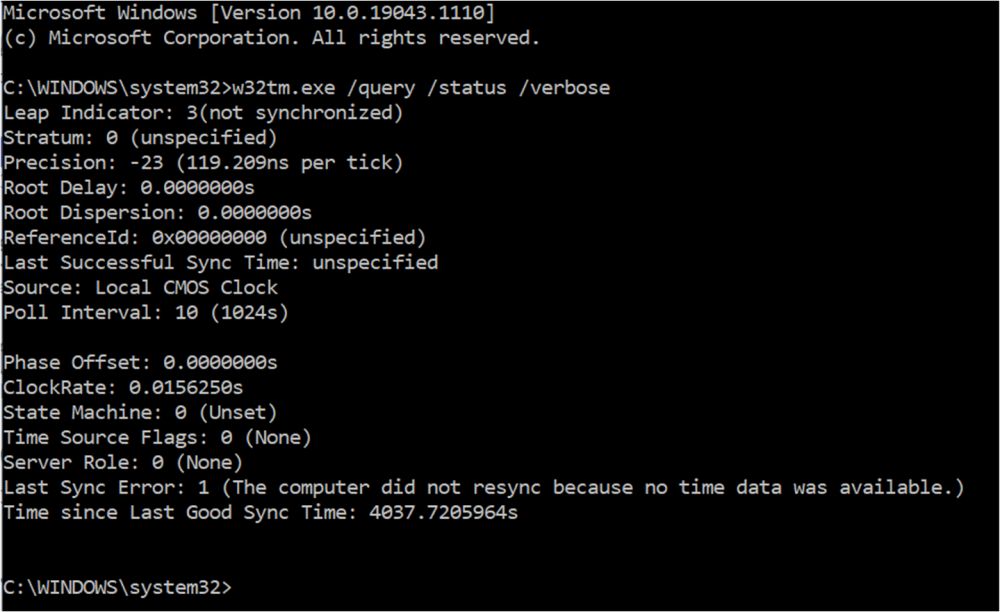
The output presents the poll interval in both clock ticks and in seconds. The equations use the value measured in seconds (the value in parentheses).
The output presents the clock rate in seconds. To see the SystemClockRate value in clock ticks, use the following formula:
( value in seconds ) Г— 1,000 Г— 10,000
For example, if SystemClockRate is 0.0156250 seconds, the value that the equation uses is 156,250 clock ticks. For full descriptions of the configurable parameters and their default values, see Config entries later in this article.
The following examples show how to apply these calculations for Windows Server 2012 R2 and earlier versions.
Example: System clock rate off by four minutes
Your computer clock time is 11:05 and the actual current time is 11:09:
UpdateInterval = 30,000 clock ticks
SystemClockRate = 156,000 clock ticks
MaxAllowedPhaseOffset = 10 min = 600 seconds = 600 Г— 1,000 Г— 10,000 = 6,000,000,000 clock ticks
| CurrentTimeOffset | = 4 min = 4 Г— 60 Г— 1,000 Г— 10,000 = 2,400,000,000 clock ticks
Is CurrentTimeOffset ≤ MaxAllowedPhaseOffset ?
AND does it satisfy the following equation?
(| CurrentTimeOffset | ÷ ( PhaseCorrectRate × UpdateInterval ) ≤ SystemClockRate ÷ 2)
Is 2,400,000,000 / (30,000 × 1) ≤ 156,000 ÷ 2
80,000 ≤ 78,000: FALSE
Therefore, W32tm.exe would set the clock back immediately.
In this case, if you want to set the clock back slowly, you would also have to adjust the values of PhaseCorrectRate or UpdateInterval in the registry to make sure that the equation result is TRUE.
Example: System clock rate off by three minutes
Your computer clock time is 11:05 and the actual current time is 11:08:
UpdateInterval = 30,000 clock ticks
SystemClockRate = 156,000 clock ticks
MaxAllowedPhaseOffset = 10 min = 600 seconds = 600 Г— 1,000 Г— 10,000 = 6,000,000,000 clock ticks
| CurrentTimeOffset | = 3 mins = 3 Г— 60 Г— 1,000 Г— 10,000 = 1,800,000,000 clock ticks
Is CurrentTimeOffset ≤ MaxAllowedPhaseOffset ?
AND does it satisfy the following equation?
(| CurrentTimeOffset | ÷ ( PhaseCorrectRate × UpdateInterval ) ≤ SystemClockRate ÷ 2)
(1,800,000,000) ÷ (1 × 30,000) ≤ 156,000 ÷ 2
In this case, the clock will be set back slowly.
Using Local Group Policy Editor
The Windows Time service stores several configuration properties as registry entries. You can use Group Policy Objects (GPOs) in Local Group Policy Editor to configure most of this information. For example, you can use GPOs to configure a computer to be an NTPServer or NTPClient, configure the time synchronization mechanism, or configure a computer to be a reliable time source.
Group Policy settings for the Windows Time service can be applied on Windows Server 2003, Windows Server 2003 R2, Windows Server 2008, and Windows Server 2008 R2 domain controllers and can be applied to computers running Windows Server 2003, Windows Server 2003 R2, Windows Server 2008, and Windows Server 2008 R2.
Windows stores the Windows Time service policy information in the Local Group Policy Editor under Computer ConfigurationAdministrative TemplatesSystemWindows Time Service . It stores configuration information that the policies define in the Windows registry, and then uses those registry entries to configure the registry entries specific to the Windows Time service. As a result, the values defined by Group Policy overwrite any pre-existing values in the Windows Time service section of the registry. Some of the preset GPO settings differ from the corresponding default Windows Time service registry entries.
For example, suppose you edit policy settings in the Time ProvidersConfigure Windows NTP Client policy. Windows loads these settings into the policy area of the registry under the following subkey:
Then Windows uses the policy settings to configure the related Windows Time service registry entries under the following subkey:
The following table lists the policies that you can configure for the Windows Time service, and the registry subkeys that those policies affect.
When you remove a Group Policy setting, Windows removes the corresponding entry from the policy area of the registry.
| Group Policy 1 | Registry locations 2, 3 |
|---|---|
| Global Configuration Settings | W32Time W32TimeConfig W32TimeParameters |
| Time ProvidersConfigure Windows NTP Client | W32TimeTimeProvidersNtpClient |
| Time ProvidersEnable Windows NTP Client | W32TimeTimeProvidersNtpClient |
| Time ProvidersEnable Windows NTP Server | W32TimeTimeProvidersNtpServer |
1 Category path: Computer ConfigurationAdministrative TemplatesSystemWindows Time Service
2 Subkey: HKLMSOFTWAREPoliciesMicrosoft
3 Subkey: HKLMSYSTEMCurrentControlSetServices
Windows registry reference
This information is provided as a reference for use in troubleshooting and validation. Windows registry keys are used by W32Time to store critical information. Don’t change these values. Modifications to the registry are not validated by the registry editor or by Windows before they are applied. If the registry contains invalid values, Windows may experience unrecoverable errors.
The Windows Time service stores information in the registry at the HKLMSYSTEMCurrentControlSetServicesW32Time path under the following subkeys:
In the following tables, «All versions» refers to Windows 7, Windows 8, Windows 10, Windows Server 2008 and Windows Server 2008 R2, Windows Server 2012 and Windows Server 2012 R2, Windows Server 2016, and Windows Server 2019.
Some of the parameters in the registry are measured in clock ticks and some are measured in seconds. To convert the time from clock ticks to seconds, use these conversion factors:
- 1 minute = 60 sec
- 1 sec = 1000 ms
- 1 ms = 10,000 clock ticks on a Windows system, as described at DateTime.Ticks Property.
For example, 5 minutes becomes 5 Г— 60 Г— 1000 Г— 10000 = 3,000,000,000 clock ticks.
Config entries
The Config subkey entries are located at HKLMSYSTEMCurrentControlSetServicesW32TimeConfig .
| Registry entry | Versions | Description |
|---|---|---|
| AnnounceFlags | All versions | Controls whether this computer is marked as a reliable time server. A computer is not marked as reliable unless it is also marked as a time server.
The default value for domain members is 10. The default value for stand-alone clients and servers is 10. |
| ChainDisable | Controls whether or not the chaining mechanism is disabled. If chaining is disabled (set to 0), a read-only domain controller (RODC) can synchronize with any domain controller, but hosts that do not have their passwords cached on the RODC will not be able to synchronize with the RODC. This is a boolean setting, and the default value is . | |
| ChainEntryTimeout | Specifies the maximum amount of time that an entry can remain in the chaining table before the entry is considered to be expired. Expired entries may be removed when the next request or response is processed. The default value is 16 (seconds). | |
| ChainLoggingRate | Controls the frequency at which an event that indicates the number of successful and unsuccessful chaining attempts is logged to the System log in Event Viewer. The default is 30 (minutes). | |
| ChainMaxEntries | Controls the maximum number of entries that are allowed in the chaining table. If the chaining table is full and no expired entries can be removed, any incoming requests are discarded. The default value is 128 (entries). | |
| ChainMaxHostEntries | Controls the maximum number of entries that are allowed in the chaining table for a particular host. The default value is 4 (entries). | |
| ClockAdjustmentAuditLimit | Windows Server 2016 Version 1709 and later versions; Windows 10 Version 1709 and later versions | Specifies the smallest local clock adjustments that may be logged to the W32time service event log on the target computer. The default value is 800 (parts per million — PPM). |
| ClockHoldoverPeriod | Windows Server 2016 Version 1709 and later versions; Windows 10 Version 1709 and later versions | Indicates the maximum number of seconds a system clock can nominally hold its accuracy without synchronizing with a time source. If this period of time passes without W32time obtaining new samples from any of its input providers, W32time initiates a rediscovery of time sources. Default: 7,800 seconds. |
| EventLogFlags | All versions | Controls which events that the time service logs.
The default value on domain members is 2. The default value on stand-alone clients and servers is 2. |
| FrequencyCorrectRate | All versions | Controls the rate at which the clock is corrected. If this value is too small, the clock is unstable and overcorrects. If the value is too large, the clock takes a long time to synchronize. The default value on domain members is 4. The default value on stand-alone clients and servers is 4.
Note |
| HoldPeriod | All versions | Controls the period of time for which spike detection is disabled in order to bring the local clock into synchronization quickly. A spike is a time sample indicating that time is off a number of seconds, and is received after good time samples have been returned consistently. The default value on domain members is 5. The default value on stand-alone clients and servers is 5. |
| LargePhaseOffset | All versions | Specifies that a time offset greater than or equal to this value in 10 -7 seconds is considered a spike. A network disruption such as a large amount of traffic might cause a spike. A spike will be ignored unless it persists for a long period of time. The default value on domain members is 50000000. The default value on stand-alone clients and servers is 50000000. |
| LastClockRate | All versions | Maintained by W32Time. It contains reserved data that is used by the Windows operating system, and any changes to this setting can cause unpredictable results. The default value on domain members is 156250. The default value on stand-alone clients and servers is 156250. |
| LocalClockDispersion | All versions | Controls the dispersion (in seconds) that you must assume when the only time source is the built-in CMOS clock. The default value on domain members is 10. The default value on stand-alone clients and servers is 10. |
| MaxAllowedPhaseOffset | All versions | Specifies the maximum offset (in seconds) for which W32Time attempts to adjust the computer clock by using the clock rate. When the offset exceeds this rate, W32Time sets the computer clock directly. The default value for domain members is 300. The default value for stand-alone clients and servers is 1. |
| MaxClockRate | All versions | Maintained by W32Time. It contains reserved data that is used by the Windows operating system, and any changes to this setting can cause unpredictable results. The default value for domain members is 155860. The default value for stand-alone clients and servers is 155860. |
| MaxNegPhaseCorrection | All versions | Specifies the largest negative time correction, in seconds, that the service makes. If the service determines that a change larger than this is required, it logs an event instead.
Note The default value for domain members is 0xFFFFFFFF (hexadecimal). The default value for domain controllers is 172,800 (48 hrs). The default value for stand-alone clients and servers is 54,000 (15 hrs). |
| MaxPollInterval | All versions | Specifies the largest interval, in log2 seconds, allowed for the system polling interval. A system must poll according to the scheduled interval, a provider can refuse to produce samples when requested to do so. The default value for domain controllers is 10. The default value for domain members is 15. The default value for stand-alone clients and servers is 15. |
| MaxPosPhaseCorrection | All versions | Specifies the largest positive time correction in seconds that the service makes. If the service determines that a change larger than this is required, it logs an event instead.
Note The default value for domain members is 0xFFFFFFFF (hexadecimal). The default value for domain controllers is 172,800 (48 hrs). The default value for stand-alone clients and servers is 54,000 (15 hrs). |
| MinClockRate | All versions | Maintained by W32Time. It contains reserved data that is used by the Windows operating system, and any changes to this setting can cause unpredictable results. The default value for domain members is 155860. The default value for stand-alone clients and servers is 155860. |
| MinPollInterval | All versions | Specifies the smallest interval, in log base 2 seconds, allowed for the system polling interval. A system does not request samples more frequently than this, a provider can produce samples at times other than the scheduled interval. The default value for domain controllers is 6. The default value for domain members is 10. The default value for stand-alone clients and servers is 10. |
| PhaseCorrectRate | All versions | Controls the rate at which the phase error is corrected. Specifying a small value corrects the phase error quickly, but might cause the clock to become unstable. If the value is too large, it takes a longer time to correct the phase error.
The default value on domain members is 1. The default value on stand-alone clients and servers is 7. Note |
| PollAdjustFactor | All versions | Controls the decision to increase or decrease the poll interval for the system. The larger the value, the smaller the amount of error that causes the poll interval to be decreased. The default value on domain members is 5. The default value on stand-alone clients and servers is 5. |
| RequireSecureTimeSyncRequests | Windows 8 and later versions | Controls whether or not the DC will respond to time sync requests that use older authentication protocols. If enabled (set to 1), the DC will not respond to requests using such protocols. This is a boolean setting, and the default value is . |
| SpikeWatchPeriod | All versions | Specifies the amount of time that a suspicious offset must persist before it is accepted as correct (in seconds). The default value on domain members is 900. The default value on stand-alone clients and workstations is 900. |
| TimeJumpAuditOffset | All versions | An unsigned integer that indicates the time jump audit threshold, in seconds. If the time service adjusts the local clock by setting the clock directly, and the time correction is more than this value, then the time service logs an audit event. |
| UpdateInterval | All versions | Specifies the number of clock ticks between phase correction adjustments. The default value for domain controllers is 100. The default value for domain members is 30,000. The default value for stand-alone clients and servers is 360,000.
Note |
| UtilizeSslTimeData | Windows versions later than Windows 10 build 1511 | Value of 1 indicates that W32Time uses multiple SSL timestamps to seed a clock that is grossly inaccurate. |
Parameters entries
The Parameters subkey entries are located at HKLMSYSTEMCurrentControlSetServicesW32TimeParameters .
| Registry entry | Versions | Description |
|---|---|---|
| AllowNonstandardModeCombinations | All versions | Indicates that non-standard mode combinations are allowed in synchronization between peers. The default value for domain members is 1. The default value for stand-alone clients and servers is 1. |
| NtpServer | All versions | Specifies a space-delimited list of peers from which a computer obtains time stamps, consisting of one or more DNS names or IP addresses per line. Each DNS name or IP address listed must be unique. Computers connected to a domain must synchronize with a more reliable time source, such as the official U.S. time clock.
There is no default value for this registry entry on domain members. The default value on stand-alone clients and servers is time.windows.com,0x1 . |
| ServiceDll | All versions | Maintained by W32Time. It contains reserved data that is used by the Windows operating system, and any changes to this setting can cause unpredictable results. The default location for this DLL on both domain members and stand-alone clients and servers is %windir%System32W32Time.dll. |
| ServiceMain | All versions | Maintained by W32Time. It contains reserved data that is used by the Windows operating system, and any changes to this setting can cause unpredictable results. The default value on domain members is SvchostEntry_W32Time. The default value on stand-alone clients and servers is SvchostEntry_W32Time. |
| Type | All versions | Indicates which peers to accept synchronization from:
The default value on domain members is NT5DS. The default value on stand-alone clients and servers is NTP. |
NtpClient entries
The NtpClient subkey entries are located at HKLMSYSTEMCurrentControlSetServicesW32TimeTimeProvidersNtpClient
| Registry entry | Version | Description |
|---|---|---|
| AllowNonstandardModeCombinations | All versions | Indicates that non-standard mode combinations are allowed in synchronization between peers. The default value for domain members is 1. The default value for stand-alone clients and servers is 1. |
| CompatibilityFlags | All versions | Specifies the following compatibility flags and values:
The default value for domain members is 0x80000000. The default value for stand-alone clients and servers is 0x80000000. |
| CrossSiteSyncFlags | All versions | Determines whether the service chooses synchronization partners outside the domain of the computer. The options and values are:
This value is ignored if the NT5DS value is not set. The default value for domain members is 2. The default value for stand-alone clients and servers is 2. |
| DllName | All versions | Specifies the location of the DLL for the time provider.
The default location for this DLL on both domain members and stand-alone clients and servers is %windir%System32W32Time.dll. |
| Enabled | All versions | Indicates if the NtpClient provider is enabled in the current Time Service.
The default value on domain members is 1. The default value on stand-alone clients and servers is 1. |
| EventLogFlags | All versions | Specifies the events logged by the Windows Time service.
The default value on domain members is 0x1. The default value on stand-alone clients and servers is 0x1. |
| InputProvider | All versions | Indicates whether to enable the NtpClient as an InputProvider, which obtains time information from the NtpServer. The NtpServer is a time server that responds to client time requests on the network by returning time samples that are useful for synchronizing the local clock.
Default value for both domain members and stand-alone clients is 1. |
| LargeSampleSkew | All versions | Specifies the large sample skew for logging, in seconds. To comply with Security and Exchange Commission (SEC) specifications, this should be set to three seconds. Events will be logged for this setting only when EventLogFlags is explicitly configured for 0x2 large sample skew. The default value on domain members is 3. The default value on stand-alone clients and servers is 3. |
| ResolvePeerBackOffMaxTimes | All versions | Specifies the maximum number of times to double the wait interval when repeated attempts to locate a peer to synchronize with fail. A value of zero means that the wait interval is always the minimum. The default value on domain members is 7. The default value on stand-alone clients and servers is 7. |
| ResolvePeerBackoffMinutes | All versions | Specifies the initial interval to wait, in minutes, before attempting to locate a peer to synchronize with. The default value on domain members is 15. The default value on stand-alone clients and servers is 15. |
| SpecialPollInterval | All versions | Specifies the special poll interval, in seconds, for manual peers. When the SpecialInterval 0x1 flag is enabled, W32Time uses this poll interval instead of a poll interval determined by the operating system. The default value on domain members is 3,600. The default value on stand-alone clients and servers is 604,800.
New for build 1703, SpecialPollInterval is contained by the MinPollInterval and MaxPollInterval Config registry values. |
| SpecialPollTimeRemaining | All versions | Maintained by W32Time. It contains reserved data that is used by the Windows operating system. It specifies the time, in seconds, before W32Time will resynchronize after the computer has restarted. Any changes to this setting can cause unpredictable results. The default value on both domain members and on stand-alone clients and servers is left blank. |
NtpServer entries
The NtpServer subkey entries are located at HKLMSYSTEMCurrentControlSetServicesW32TimeTimeProvidersNtpServer .
| Registry Entry | Versions | Description |
|---|---|---|
| AllowNonstandardModeCombinations | All versions | Indicates that non-standard mode combinations are allowed in synchronization between clients and servers. The default value for domain members is 1. The default value for stand-alone clients and servers is 1. |
| DllName | All versions | Specifies the location of the DLL for the time provider. The default location for this DLL on both domain members and stand-alone clients and servers is %windir%System32W32Time.dll . |
| Enabled | All versions | Indicates if the NtpServer provider is enabled in the current Time Service.
The default value on domain members is . The default value on stand-alone clients and servers is . |
| InputProvider | All versions | Indicates whether to enable the NtpClient as an InputProvider, which obtains time information from the NtpServer. The NtpServer is a time server that responds to client time requests on the network by returning time samples that are useful for synchronizing the local clock.
Default value for both domain members and stand-alone clients: 0 |
Enhanced logging
The following registry entries are not a part of the W32Time default configuration but can be added to the registry to obtain enhanced logging capabilities. The information logged to the System Event log can be modified by changing values for the EventLogFlags setting in the Group Policy Object Editor. By default, the Windows Time service logs an event every time that it switches to a new time source.
In order to enable W32Time logging, add the following registry entries:
| Entry | Versions | Description |
|---|---|---|
| FileLogEntries | All versions | Controls the number of entries created in the Windows Time log file. The default value is none, which does not log any Windows Time activity. Valid values are to 300. This value does not affect the event log entries normally created by Windows Time |
| FileLogName | All versions | Controls the location and file name of the Windows Time log. The default value is blank, and should not be changed unless FileLogEntries is changed. A valid value is a full path and file name that Windows Time will use to create the log file. This value does not affect the event log entries normally created by Windows Time. |
| FileLogSize | All versions | Controls the circular logging behavior of Windows Time log files. When FileLogEntries and FileLogName are defined, defines the size, in bytes, to allow the log file to reach before overwriting the oldest log entries with new entries. Please use 1000000 or larger value for this setting. This value does not affect the event log entries normally created by Windows Time. |
Group Policy Object settings
Group Policy settings are contained in the Global Configuration Settings and the Windows NTP Client Settings GPOs.
Global Configuration Settings
These are the global Group Policy settings and default values for the Windows Time service. These settings are contained in the Global Configuration Settings GPO in Local Policy Editor.
| Group Policy setting | Default value |
|---|---|
| AnnounceFlags | 10 |
| EventLogFlags | 2 |
| FrequencyCorrectRate | 4 |
| HoldPeriod | 5 |
| LargePhaseOffset | 1,280,000 |
| LocalClockDispersion | 10 |
| MaxAllowedPhaseOffset | 300 |
| MaxNegPhaseCorrection | 54,000 (15 hours) |
| MaxPollInterval | 15 |
| MaxPosPhaseCorrection | 54,000 (15 hours) |
| MinPollInterval | 10 |
| PhaseCorrectRate | 7 |
| PollAdjustFactor | 5 |
| SpikeWatchPeriod | 90 |
| UpdateInterval | 100 |
Windows NTP Client settings
These are the Windows NTP client settings and default values for the Windows Time service. These settings are contained in the Configure Windows NTP Client GPO in Local Group Policy Editor.
| Group Policy setting | Default value |
|---|---|
| NtpServer | time.windows.com , 0x1 |
| Type | NT5DS — Used for domain-joined computers NTP — Used for non-domain-joined computers |
| CrossSiteSyncFlags | 2 |
| ResolvePeerBackoffMinutes | 15 |
| ResolvePeerBackoffMaxTimes | 7 |
| SpecialPollInterval | 3,600 |
| EventLogFlags |
If you use Group Policy to set the NtpServer value as part of the Configure Windows NTP Client policy and apply it to a domain member, the Windows Time Service will not use the NtpServer Registry value. To view your NTP configuration, open a Command Prompt and run w32tm /query /configuration .
See RFC 1305 — Network Time Protocol of the Internet Engineering Task Force (IETF).
Источник
Maintaining accurate time on your server is critical largely because many services and IT applications rely on accurate time settings to function as expected. These include logging services, monitoring and auditing applications, and database replication to mention a few.
Time skew in servers, and any client systems for that matter, is undesirable and usually causes conflict in time-critical applications. To maintain accurate time settings on your server and across the network by extension, it’s preferred to install and enable a NTP server on your server.

What is an NTP server?
NTP, short for Network Time Protocol, is a protocol that synchronizes time across network devices. It listens on UDP port 123 and always ensures that time inconsistencies across the server and client systems are mitigated and that client systems are always in sync with the server.
NTP server refers to a network device or a service that fetches time from an external time source and syncs the time across the network using the NTP protocol. This guide will focus on installing NTP service on Windows server 2019.
How Does NTP Work ?
Being a protocol, NTP requires a client-server architecture. The NTP client residing on a Windows PC, for example, initiates a time request exchange with the NTP server.
A time-stamp data exchange happens between the server and client and this helps in adjusting the clock on client’s systems to the highest degree of accuracy to match the time on the NTP server. In this guide, we will walk you through the installation and configuration of NTP server on Windows Server 2019.

There are several ways of setting up NTP server and we will look at each in turn.
In Windows Server environments, there is a special Windows time service that handles time synchronization between the server and the client systems. This is known as Windows Time service. PowerShell provides a command-line tool known as w32tm.exe and comes included in all versions of Windows from Windows XP and Windows Server 2008 to the latest versions of each OS.
Using the w32tm.exe utility, you can configure your Windows system to sync with online time servers. Usually, this is the tool of choice when setting up and monitoring time on your Windows Server system.
Using the command-line utility is quite straightforward.
For example, to set the Server to point to 2 different time servers, namely 0.us.pool.ntp.org and 1.us.pool.ntp.org , launch PowerShell as the Administrator and run the command below
w32tm /config /syncfromflags:manual /manualpeerlist:”0.us.pool.ntp.org 1.us.pool.ntp.org” /update
Then restart Windows Time service using the commands:
Stop-Service w32time
Start-Service w32time
Here’s a snippet of the commands.

You can thereafter confirm the values of NTP servers configured in the registry by running this command:
w32tm /dumpreg /subkey:parameters

Configure NTP Server on Windows Server 2019 using Registry editor
The second method of installing and configuring the NTP server is using the registry editor. If you are not a fan of the Windows PowerShell, then this will truly come in handy.
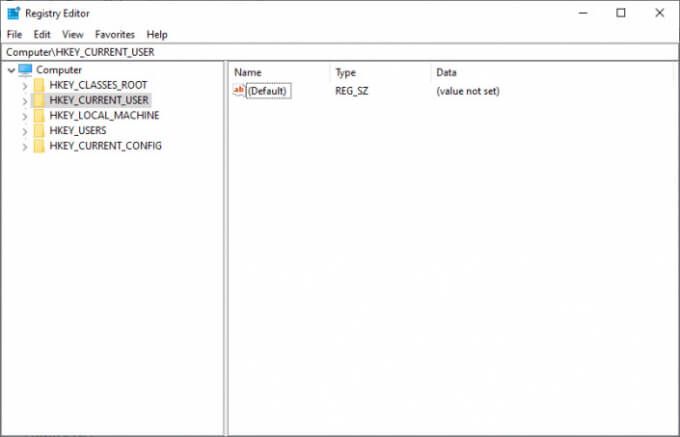
To get started, open the registry editor. Press ‘Windows key + R’ and type ‘regedit’ and hit ENTER. The windows registry will be launched as shown below.
Next, head over to the path shown below
Computer\HKEY_LOCAL_MACHINE\SYSTEM\CurrentControlSet\Services\W32Time\TimeProviders\NtpServer
On the right pane. Be sure to find & double-click the file labelled ‘Enabled’ in the diagram shown below.
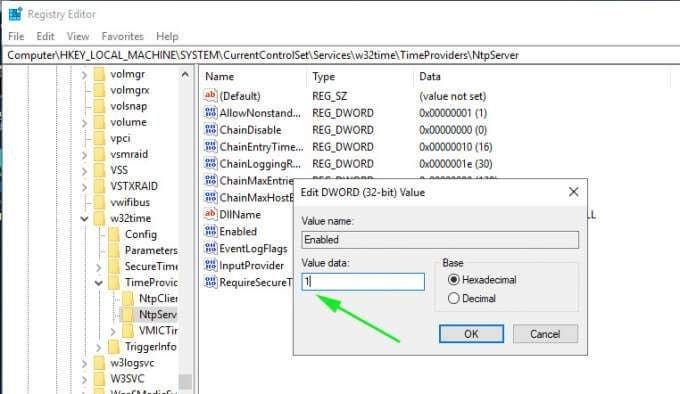
Next, In the ‘value data’ text field, set the value to ‘1’ and click the ‘Ok’ button.
Next, head over to the path:
Computer\HKEY_LOCAL_MACHINE\SYSTEM\CurrentControlSet\Services\W32Time\Config
In the right pane, double click the ‘Announce Flags’ file.
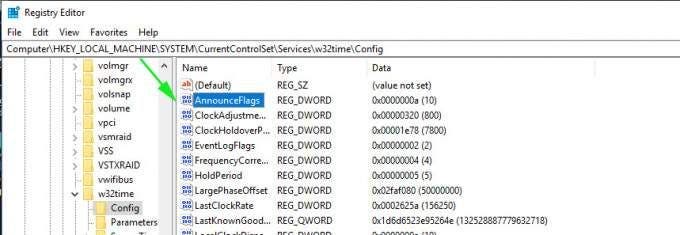
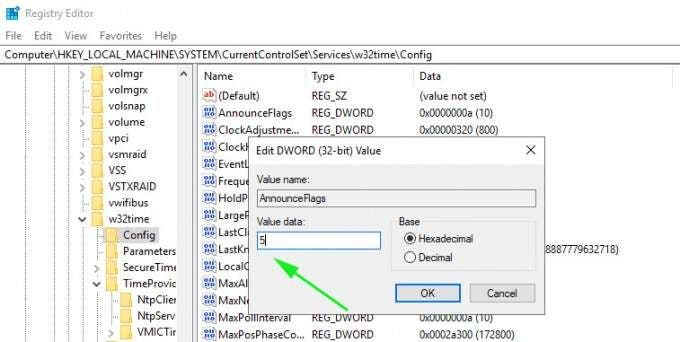
Double-click the file and in the Value data text field, type the value ‘5’ and click ‘OK’.
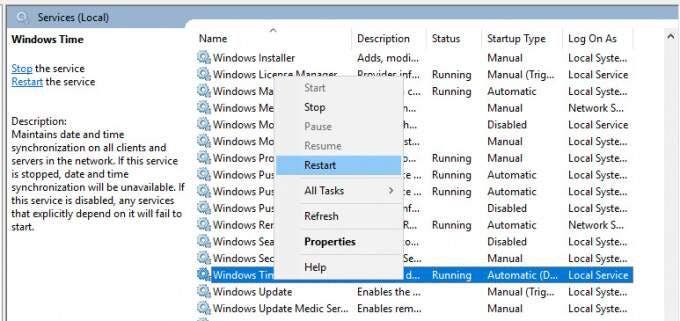
For the changes to come into effect, you need to reboot the NTP server by heading to the services Window. To achieve this, press ‘Windows key + R’ and type ‘services.msc’. Scroll and find ‘Windows Time’, right-click on it and select the ‘Restart’ option.
Useful w32tm commands
Once you have set up your NTP server, you can use the following commands to verify various aspects of the server:
To check the status of the NTP server, run the command:
w32tm /query /status
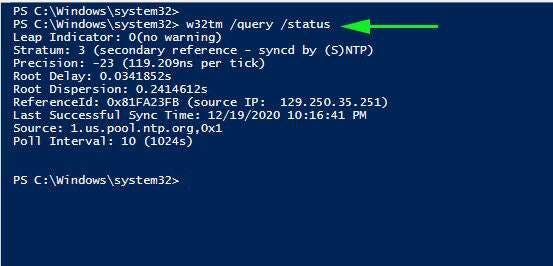
To reveal the current NTP pool being used to sync time with execute:
w32tm /query /source
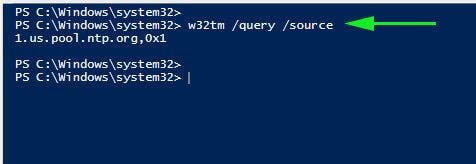
You can also display a list of NTP time servers along with their configuration status as shown.
w32tm /query /peers
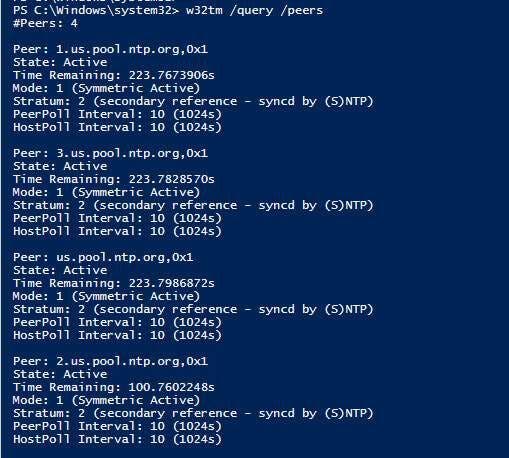
To display NTP server configuration settings, run the command:
w32tm /query /source
This shows quite a wealth of information.

Final Take
We cannot stress enough how important it is to maintain accurate time and date settings on your server. As you have seen, setting up an NTP server on your Windows server instance is quite easy and straight forward.
Once you have configured the NTP service on your server, other domain controllers in your environment will sync with this server and the Windows clients in the domain will sync with the domain controllers. Hopefully, you can now install and configure NTP on Windows Server 2019.

There is no question about it, having accurate time in your environment set in critical infrastructure systems is a must. Many business-critical applications and infrastructure systems rely on accurate time synchronized between them to ensure the system functions as expected. Time skew can cause all kinds of weirdness when it is misconfigured or out of sync between different servers/systems. This is especially true in a Windows Server Active Directory domain. Having accurate time between a client computer and domain controllers is essential. Let’s take a look at how to set ntp server Windows 2016 or Windows 2019 to see how this can be easily carried out.
What is NTP?
Wen it comes to synchronizing time in most enviornments, Network Time Protocol (NTP) is the protocol that is used to ensure accurate time across your environent. In most environments, NTP servers, special time servers, are configured that provide an external time source for which your internal servers can synchronize with.
There are several widely known NTP IP addresses on the Internet that provide reliable time sources for your network. The NTP.org servers are one such set of time servers that provide an NTP source for configuration.
There are a few NTP values to be aware of:
- NTP Server – This is a specialized server that is able to detremine the precise time from an external timing reference such as GPS and passes these precise time values on to your network
- Offset – This is the difference in time between the external time server and the time on a local client computer. The larger the offset, the more inaccurate the timing source is.
- Delay – This is the value of the round-trip time (latency) of the timing message between the client to the server and back again.
How Time is synchronized in a Windows Server domain
In a Windows domain, Microsoft has default configuration in place that takes care of a good portion of the NTP configuration. Starting with Windows 2000 Server, Windows clients are configured as NTP Clients. When configured as an NTP client, Windows computers only attempt to contact the domain controller for NTP synchronization or a manually specified NTP server.

Microsoft has made the domain controller the default in a Windows domain since it makes sense that clients already have a secure channel established with DCs for other types of communications. Additionally, accurate and synchronized time between domain controllers and clients is especially important for all kinds of things such as logins, group policy synchronization and other tasks/operations.
The order of operations or hierarchy in a Windows domain is as follows:
- Domain members attempt to synchronize time with any domain controller located in the domain
- Domain controllers synchronize with a more authoritative domain controller
- The first domain controller that is installed in the environment is automatically configured to be a reliable time source.
- Other than the first domain controller installed, the PDC emulator (if role has been moved from the first DC installed) generally holds the position of best time source.
An important point to consider and that comes into play when thinking about why we set ntp server in Windows 2016 or Windows 2019 is the authoritative domain controller must have a reliable source to synchronize with as well. This is generally an external time server outside of the domain hierarchy.
Now that we know how the domain hierarchy for time is configured, how is the external time source configured on your domain controller that is configured as the reliable source of time?
Configuring Windows Time Service with W32tm.exe
When it comes to Windows Server environments like Windows Server 2016 or Windows Server 2019, there is a special Windows service that controls the time synchronization of your Windows hosts. This is the Windows Time Service.
Microsoft provides a command line tool to interact with the Windows Time Service called W32tm.exe. This has been included in Windows operating systems since Windows XP/Windows 2003 and later. It can be used to configure Windows Time service parameters as well as diagnose time service problems. This is generally the tool of choice when it comes to configuring, monitoring, and administering Windows Time.
Using the W32tm.exe utility is fairly straightforward. It can be used from a normal command prompt as well as from a PowerShell prompt. There are several command parameters included that allow not only configuring the NTP servers you want to query, but also parameters that allow viewing the low level registry configuration as well as the synchronization status.
You can read the official Microsoft KB on the Windows Time service and the W32tm.exe utility here:
- https://docs.microsoft.com/en-us/windows-server/networking/windows-time-service/windows-time-service-tools-and-settings
However, there are a few commands I would like to show you for the purposes of configuring your Domain controller that is to be the reliable time source (PDC Emulator) for your domain.
The first command is the command line entry to specify your NTP servers, which in this case I am using the NTP.org servers to set as the source of my NTP synchronization.
w32tm /config /syncfromflags:manual /manualpeerlist:"0.us.pool.ntp.org 1.us.pool.ntp.org 2.us.pool.ntp.org 3.us.pool.ntp.org" /update

Stop-Service w32time
Start-Service w32time
If you want to view the status of the NTP synchronization on your server after you have configured the values and restarted the w32time service, you can use the following command:
w32tm /query /status
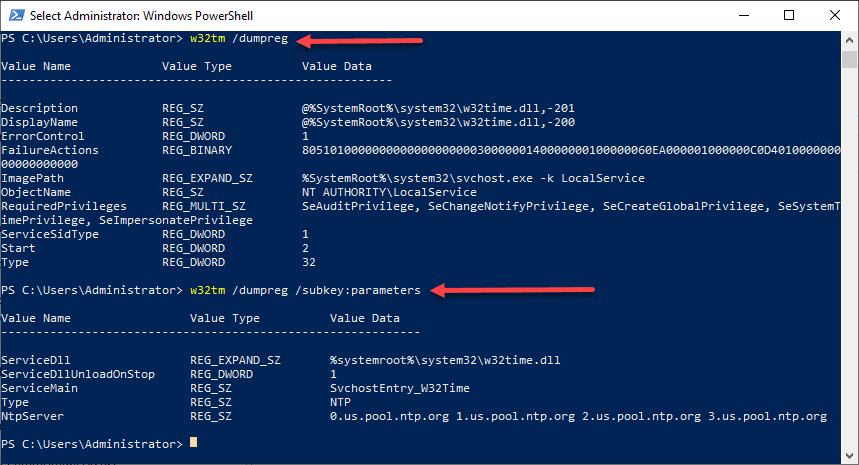
You can also check the values configured in your registry key hkey local machine system currentcontrolset services w32time config using the commands below. You can drill into the configuration parameters using the /dumpreg /subkey command.
w32tm /dumpreg

w32tm /dumpreg /subkey:parameters
Final Thoughts
As shown, you can easily set NTP Server Windows 2016 or Windows 2019 using the w32tm command utility that allows interacting with the time service in Windows Server.
In a Windows domain, you want to configure your authoritative time source domain controller, which by default is the PDC Emulator, to pull time information from an authoritative source like NTP.org or some other reliable NTP time server.
After configuring the time source, the other domain controllers will synchronize with this server and then the Windows clients joined to the domain will synchronize with the domain controllers that have the corrected time from the authoritative server.
Tutorial Configure NTP Server in Windows Server 2019. It is important to have accurate timing on all clients and servers. If time is not accurate on computers, serious network problems will occur. Fortunately, Windows has taken this into account. The service Network Time Protocol (NTP) has been around since Windows XP and Windows Server 2003. Also, most Unix and Linux versions of the NTP service supported the first version.
In this article, we will teach you how to configure the NTP server in windows server 2019.
You can Choose your perfect Windows VPS Server Packages from eldernode.
A) Open the Registry Editor
1. Click on the start menu and search for the Run.
2. Type Regedit and hit Enter. A window will open as shown below.
3. In the window that opens, select HKEY_LOCAL_MACHINE.
4. Follow the path below to reach the NtpServer option.
SYSTEM>CurrentControlSet>Services>W32Time>TimeProviders>NtpServer 5. On the right page, double-click Enabled.
In the Value data section, change the value from 0 to 1 and click ok.
6. Continue the path below until you reach the config option.
Computer>HKEY_LOCAL_MACHINE>SYSTEM>CurrentControlSet>Services>W32Time>Config. From the page on the right, double-click AnnounceFlags and change its value to 5 and click ok.
The following options explain the information about AnnounceFlags:
0x00 Not a time server
0x01 Always time server
0x02 Automatic time server
0x04 Always reliable time server
0x08 Automatic reliable time server
default value for domain members and stand-alone clients and servers is 10.
B) Restart NTPServer
1. Open the Services by searching in start menu or hitting on the windows key.
2. In the window that opens, select the windows time option. Then right-click on it and select Restart.
C) Open UDP port 123 in Firewall
You can follow the Learn how to open a port on a Windows firewall.
Note that this port is UDP and not TCP.
Dear user, we hope you would enjoy this tutorial, you can ask questions about this training in the comments section, or to solve other problems in the field of Eldernode training, refer to the Ask page section and raise your problem in it as soon as possible. Make time for other users and experts to answer your questions.
Goodluck.
You may also be interested in some related articles:


