Sometimes, you may have noticed that some websites don’t function well on your broadband connection. While most websites run fine, certain seem to have an issue. If you have encountered this situation, it is time to change the Maximum Transmission Unit (MTU) on Windows 11/10 computers.
How to check current MTU settings?
MTU, or Maximum Transmission Unit, is necessary or responsible for this case because it is the parameter that defines the maximum packet size that can be transmitted over a network. So by optimizing MTU, you can enhance your network performance. As a result, you can browse the internet more efficiently.
But not many are aware of how MTU functions. There are two quick ways to check the current MTU settings, these are:
Use Windows Terminal to check the current MTU value
Windows Terminal has to be the easiest way to learn about your current MTU value. To get started, follow the below steps:
- Press Windows Key + X to access the quick menu.
- Click Windows Terminal (Admin).
- Now run the following command and press enter.
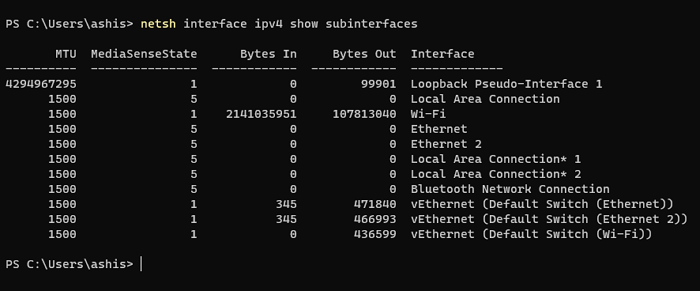
netsh interface ipv4 show subinterfaces
- Once done, you should see the MTU value of different networks under the MTU tab.
Check MTU network adapter settings
There is also an alternative option which is checking through the Network adapter settings. For this, you need to follow the below steps:
- Press the Windows key + R to launch Run.
- Type ncpa.cpl and press Enter, and you should see a list of different Network adapters.
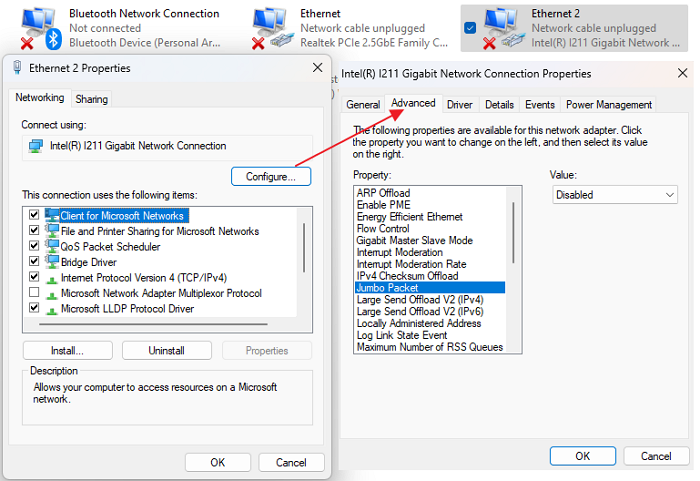
- Right-click on any of the adapters for which you want to check the MTU and then select Properties.
- Click the Configure button to open the adaptor connection properties
- Switch to the Advanced Tab and select Jumbo Frame
- Then select the higher value from the dropdown on the right.
Note: The adapter uses the default MTU value if you don’t see the Jumbo Packet option. It also means you cannot change through the control panel method.
Now that you know your MTU value, you can increase or decrease the value per your needs. To do so, there are two methods that you can follow. These are:
- Using Windows Terminal
- Changing MTU through Network Adapter settings
Let’s now look at these methods one by one below:
1] Using Windows Terminal
Changing MTU using the command prompt has to be the easiest method. All you have to do is run two commands – one to identify the interface name and the other to change the MTU value, and you are good to go. So go ahead and follow these steps:
- First, press Windows Key + X to access the quick menu and launch Windows Terminal (Admin).
- Now run the following command to list down all the network adapters:
netsh interface ipv4 show subinterfaces
- Now note down the Interface name for which you want to change the MTU.
- Next, to change the MTU value of your preferred interface, run the following command:
netsh interface ipv4 set subinterface <subinterface name> mtu=9000 store=persistent
- Over here, replace <subinterface name> with the interface name. Also, you change the mtu=9000 value to something else per your requirements.
2] Changing MTU through network adapter settings
You can do it through Network Adapter settings to change your MTU value through a visual interface. For this, follow the below steps:
- Launch Run by pressing Windows Key + X.
- Type ncpa.cpl and press Enter.
- Right-click on your preferred Network adapter and go to Properties.
- Next, click on the Configure button.
- Next, select Jumbo Packet, and from the disable dropdown menu, select any of the MTU values.
- Once done, save the changes and reboot your computer.
How to determine the optimal MTU Value?
Now you might be wondering what would be the ideal MTU value. You can quickly figure that out by running a command in Windows Terminal.
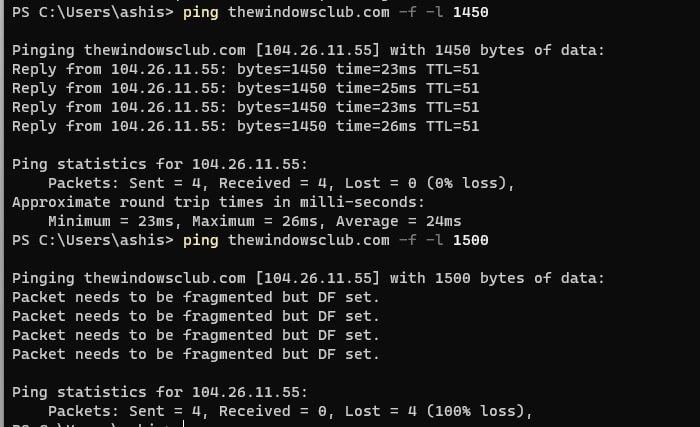
You need to run the ping command, which will send requests to the network and increase the size of the Packet till you get a message about the needed fragment of the Packet. So whichever website is not loading correctly, you can try the ping command with it by following the below steps:
Launch Windows Terminal, and run the following command:
ping [url] -f -l <packet_size>
Over here, replace [url] with your respective URL and set the <packed_size> to 1450. As you run your ping, keep increasing the size with each command until you see the Packet needs to be the fragmented message.
How to troubleshoot Common Issues around MTU?
While dealing with MTU, it is easy to mess things up. If you enter the wrong MTU value, it can impact the overall network performance.
In such a case, you can try restoring the default MTU value. The default MTU value on most computers is 1500. So you can follow the above steps to change the MTU value to 1500 and see if it helps you out.
If you still face any other internet issues, running Windows Troubleshooter might be helpful. To run it, follow the below steps:
- Press Windows Key + I to launch Settings.
- Navigate to System > Troubleshoot > Other troubleshooters.
- Over here, click on the Run button next to Internet Connections and let the troubleshooter run.
Conclusion
So that was all for how to change MTU on Windows 11/10. Changing MTU value using Windows Terminal is a much easier and straightforward process. While if you make the changes using Network adapters, you may not find the required options to make changes. So go ahead and try the above steps on your own and see if they are helpful to you.
Меняем MTU на сервере Windows с помощью командной строки. На тестовом сервере операционная система Windows Server 2016.
MTU (Maximum Transmission Unit) — максимальный размер полезного блока данных одного пакета. Если размер блока превышает MTU, то он может быть передан протоколом с использованием фрагментации.
Основные значения MTU в байтах:
- Ethernet — 1500
- 16 Mbps Token Ring — 17914
- 4 Mbps Token Ring — 4464
- FDDI — 4352
- IEEE 802.3/802.2 — 1492
- PPPoE (WAN Miniport) — 1480
- X.25 — 576
Зачем уменьшать MTU
Иногда бывает полезно уменьшить MTU на компьютере, чтобы ускорить скорость работы по сети. Классический случай, когда дома стоит роутер и на нём указан MTU 1480. Если на домашнем компьютере указано значение MTU 1500, то большие пакеты при передачи данных могут фрагментироваться. Тормозит потоковое видео или аудио, к примеру.
Уменьшаем MTU с помощью командной строки
Командная строка запущена под администратором.
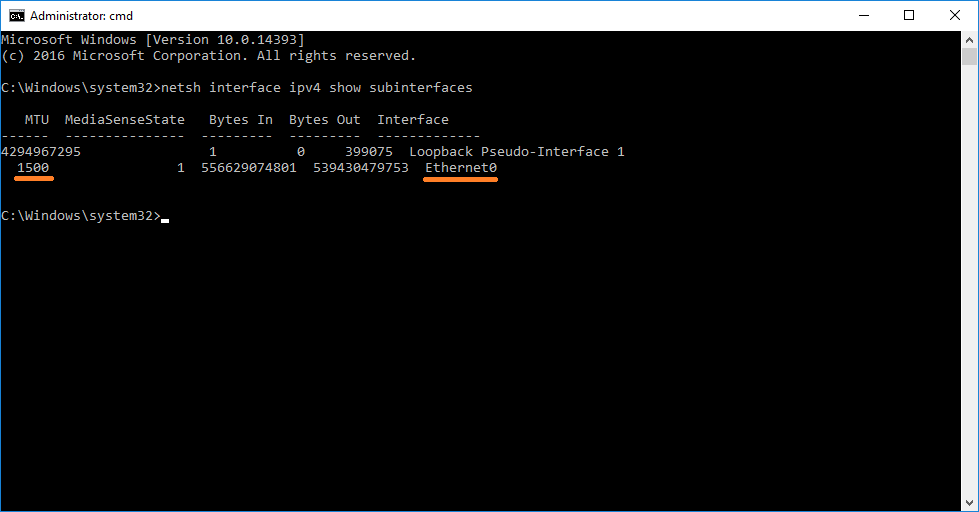
Посмотреть текущее значение MTU:
netsh interface ipv4 show subinterfacesУ меня на интерфейсе Ethernet0 указано MTU 1500.
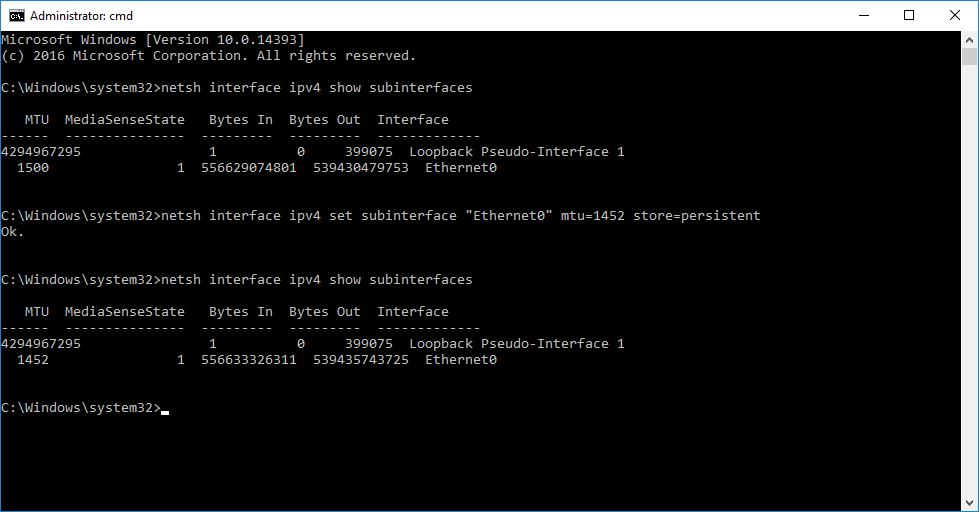
Установить значение MTU 1452 на интерфейсе Ethernet0:
netsh interface ipv4 set subinterface "Ethernet0" mtu=1452 store=persistentПерезагружаем компьютер. Всё.
Сброс MTU на значение по умолчанию:
netsh interface ipv4 resetПерезагружаем компьютер.
Определить минимальное значение MTU
Вычислить минимальное значение MTU между компьютером и узлом сети можно с помощью команды ping.
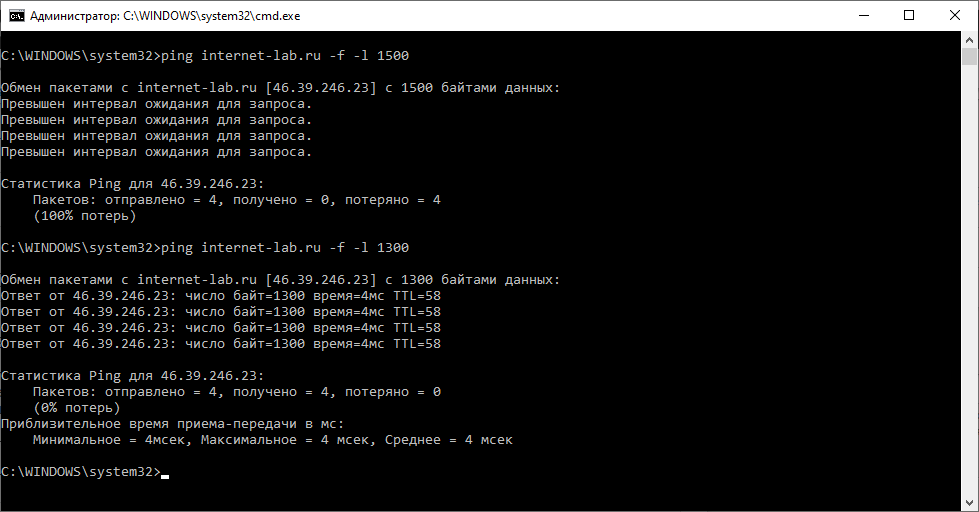
ping example.com -f -l 1500Здесь:
- -f — запрещает фрагментировать пакеты
- -l — размер пакета
Если пинг не проходит, то уменьшаем размер пакета.
У меня 1500 не проходит, а 1400 проходит. Истина где-то посередине. Методом научного пинга находим максимальный размер пакета, который проходит без фрагментации.
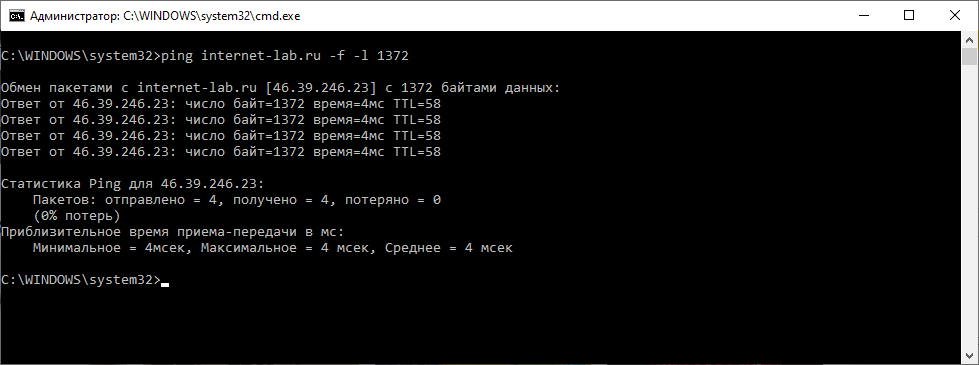
У меня получилось 1372. Прибавляем 28 байт (8 байт ICMP заголовок и 20 байт IP). 1372+28=1400.
Оптимальный размер MTU 1400.
Очень редко, но такие моменты наступают, когда необходимо изменить стандартное значение размера пакета.
Если у Вас FTP-клиент не догружает файлы или сайты в интернете открываются не всегда одинаково быстро, то, возможно, настала пора обратить внимание на установленные значения MTU.
Очень редко, но такие моменты наступают, когда необходимо изменить стандартное значение размера пакета.
Если у Вас FTP-клиент не догружает файлы или сайты в интернете открываются не всегда одинаково быстро, то, возможно, настала пора обратить внимание на установленные значения MTU.
Что такое MTU и сколько ставить?
Что такое MTU? Вот как рассказывает нам Wikipedia.
Многие задают вопрос не что это такое, а сколько устанавливать? Однозначного ответить на этот вопрос нельзя. Зависимостей очень много. Начиная от серверов, где размещены сайта, и заканчивая качеством линии связи.
У Вашего компьютера MTU должно быть равно или меньше, которое установлено на вашем роутере, маршрутизаторе провайдера или куда вы там подключаетесь. Но это не гарантирует Вам хорошую работу. На моем домашнем роутере, к примеру, а также на всех компьютерах домашней сети, установлено значение 1490. Это число я получил экспериментальным методом (если бы я тогда встретил утилиту TCP Optimizer, умеющую определять подходящий MTU, было бы в разы проще). У меня плохо отправлялись файлы на удаленный FTP-сервер, а при этом значении всё отлично работает. Хотя стоит заметить, что значение у провайдера стоит стандартное – 1500.
В Windows MTU можно поменять двумя способами: простым и сложным. Простой способ заключается в установке стороннего программного обеспечения, а сложный – в изменении MTU «родными» средствами.
Начнем с сложного, ибо он самый правильный.
Ручной метод изменения MTU в Windows
Все делается с помощью консоли. Вообще все хорошие и удобные вещи делаются только через консоль. Это стоит запомнить. 
Узнаем MTU вручную
Запускаем системную консоль Windows с правами администратора:
cmd.exeДля того, чтобы посмотреть текущие значения MTU, вводим команду:
netsh interface ipv4 show subinterfaces
MTU  Состояние определения носителя   Вх. байт  Исх. байт
------  ---------------  ---------  ---------  -------------
4294967295                1          0          0  Loopback
1500                      1   83147897    2724203  Локальное подключение к сети
В моем случае у меня только один интерфейс и это LAN со стандартным значением MTU 1500.
Меняем MTU вручную
Теперь вводим команду для того, чтобы изменить MTU для интерфейса LAN:
netsh interface ipv4 set subinterface "Локальное подключение к сети" mtu=1490 store=persistent
MTU  Состояние определения носителя   Вх. байт  Исх. байт
------  ---------------  ---------  ---------  -------------
4294967295                1          0          0  Loopback
1490                      1   83147897    2724203  Локальное подключение к сети
Этой командой я указал новое значение 1490 для MTU.
Для того, чтобы посмотреть новый результат:
netsh interface ipv4 show subinterfacesМеняем MTU в Windows с помощью TCP Optimizer
Для некоторых проще что-то делать используя графический интерфейс и в этом может помочь утилита TCP Optimizer. Вот, вроде как, ее официальный сайт. У нее достаточно много настроек и самое главное ее достоинство – она умеет определять максимальный пакет, с которым работает ваш компьютер.
Узнаем оптимальное MTU
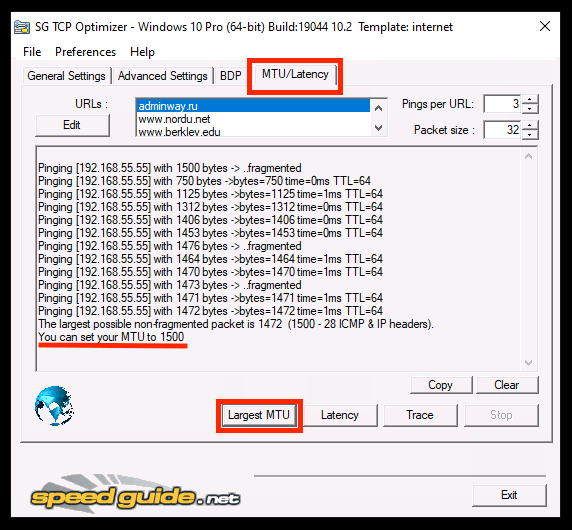
На скрине ниже показано, как можно узнать оптимальное MTU до сайтов. Сайты можно вручную задать на те, которые Вам нужны. В примере я указал этот блог:
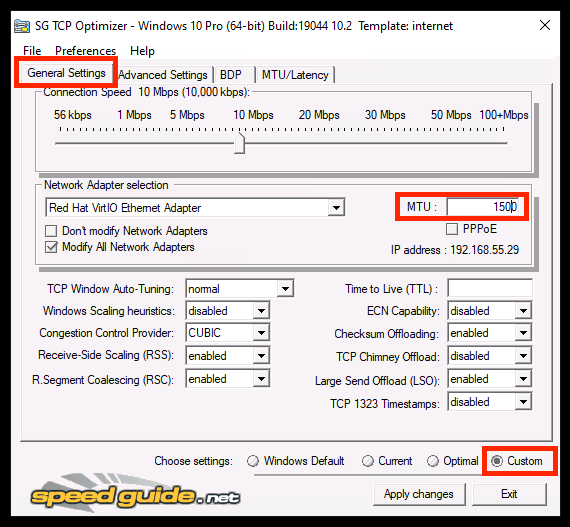
Устанавливаем MTU через TCP Optimizer
После всех изменений не забываем нажать на кнопку Apply changes.
Теги: сеть
Комментарии
Are you having trouble connecting to the internet on your Windows 10 device? Are you seeing “MTU” errors when you try to connect? If so, you aren’t alone! Many Windows 10 users experience MTU-related connection issues, but fortunately, there is a way to fix this issue. In this article, we’ll show you how to change the MTU on Windows 10 so that you can get back online.
Changing the MTU on Windows 10 is easy. Here are the steps to follow:
- Open the Settings app and go to Network & Internet > Status.
- Under the Change your network settings section, click Change adapter options.
- Right-click the active network adapter, and select Properties.
- In the Properties window, select the Configure button.
- Switch to the Advanced tab.
- Find the MTU setting, and change the value.
- Click OK to apply the changes.
Introduction to Changing MTU on Windows 10
The Maximum Transmission Unit (MTU) is an important parameter that defines the maximum size of a single data packet that can travel through a network. As such, it plays an important role in network performance and reliability. In Windows 10, changing the MTU can be done in a few steps, with the right tools and knowledge. In this article, we’ll take a look at how to change the MTU on Windows 10.
Steps to Change the MTU on Windows 10
The first step in changing the MTU on Windows 10 is to open the Network and Sharing Center. This can be accessed by typing “Network and Sharing Center” in the Windows search bar. Once in the Network and Sharing Center, click on the “Change adapter settings” option on the left side of the window.
The next step is to locate the network connection that you wish to change the MTU for. This can be done by clicking on the “Network Connections” option on the left side of the window. Once the network connection has been located, right-click it and select “Properties” from the context menu.
Setting MTU in Windows 10
In the Properties window, click on the “Configure” button and then select the “Advanced” tab. Here, you will be able to find the “MTU” setting. Change the value to the desired MTU size and then click on the “OK” button to save the changes.
Testing MTU in Windows 10
It is important to test the new MTU setting to ensure that it is working properly. To do this, open the command prompt by typing “cmd” in the Windows search bar. Once the command prompt is open, type “ping -f -l ” and hit enter. If the ping is successful, then the MTU setting is working correctly.
Things to Keep in Mind When Changing MTU
When changing the MTU on Windows 10, it is important to keep a few things in mind. Firstly, make sure that the MTU size is compatible with your network hardware. Secondly, it is important to remember that some applications may not work properly with a different MTU size. Lastly, it is important to remember that changing the MTU can have an impact on the performance of the network.
Changing MTU on Router
In some cases, it may be necessary to change the MTU on the router. This can be done by accessing the router settings and then locating the MTU setting. Once the setting has been located, change the value to the desired MTU size and then click on the “Apply” button to save the changes.
Changing MTU on Modem
In some cases, it may also be necessary to change the MTU on the modem. This can be done by accessing the modem settings and then locating the MTU setting. Once the setting has been located, change the value to the desired MTU size and then click on the “Apply” button to save the changes.
Conclusion
In this article, we have discussed how to change the MTU on Windows 10. We have outlined the steps to change the MTU and highlighted the things to keep in mind when changing the MTU. We have also discussed how to change the MTU on the router and modem.
Top 6 Frequently Asked Questions
Q1. What is MTU?
A1. MTU stands for Maximum Transmission Unit, and it is the largest packet size (in bytes) that can be sent over a network. It is determined by the physical connection of the network and affects the speed and reliability of data transfers. The default MTU size for Windows 10 is usually 1500 bytes.
Q2. What are the benefits of changing the MTU?
A2. Changing the MTU can improve the performance of your network connection. It can improve the speed of data transfers by allowing larger packets of data to be sent, and it can also help to reduce latency issues by setting a lower MTU size. It is important to note, however, that setting an MTU size that is too low can have a negative effect on your network connection.
Q3. How can I change the MTU on Windows 10?
A3. To change the MTU on Windows 10, open the Network Connections window in the Control Panel. Right-click on the network adapter that you want to change the MTU for, and select Properties. In the Properties window, select the Configure button, then select the Advanced tab. Under the Property field, select the MTU option and enter the desired MTU size. Click OK to save your changes.
Q4. What is the maximum MTU size for Windows 10?
A4. The maximum MTU size for Windows 10 is typically 1500 bytes. It is important to note, however, that different network adapters and configurations may have different maximum MTU sizes. It is important to check with the manufacturer of your network adapter to determine the maximum MTU size for your particular configuration.
Q5. Are there any risks associated with changing the MTU?
A5. Yes, there are risks associated with changing the MTU. Setting an MTU size that is too large can result in fragmentation of packets, which can reduce the performance of your network connection. Additionally, setting an MTU size that is too small can also reduce the performance of your network connection. It is important to make sure that you know the optimal MTU size for your network before changing the MTU.
Q6. How can I check the current MTU size?
A6. To check the current MTU size on Windows 10, open the Network Connections window in the Control Panel. Right-click on the network adapter that you want to check the MTU size for, and select Properties. In the Properties window, select the Configure button, then select the Advanced tab. Under the Property field, select the MTU option to view the current MTU size.
Some websites not opening | How to set MTU in windows 10 & windows 7 | Setting MTU in Windows
Changing the MTU on Windows 10 can be a simple and straightforward process. With a few simple steps, you can ensure that your computer is running optimally and at peak performance. From adjusting the settings in the command prompt to disabling the automatic MTU setting in the network adapter, the process to change MTU on Windows 10 can be done quickly and easily. With the right information and guidance, you can be sure to have your MTU settings optimized for the best performance of your Windows 10 machine.
Добрый день. Сегодня не совсем обычная статья, так как она не является повседневной и не подойдет для любого пользователя. Более того, я крайне не рекомендую лезть в данные параметры людям, которые слабо в техническом плане. Речь идет о MTU, что в википедии описано как «максимальный размер полезного блока данных одного пакета (англ. payload), который может быть передан протоколом без фрагментации.» То есть это размер полезной информации в пакете, который компьютер формирует для отправки в сеть.
Последовательность действий
Так вот, если вы попали на данную статью, я думаю вы уже решили что нужно попробовать его подкрутить. Теоретически, оптимизация данного параметра может помочь с решением проблем некорректной работы некоторых сайтов и сервисов, но опять же теоретически. Я же попробую объяснить, как это сделать средствами операционной системы.
- Итак, для начала открываем командную строку от имени администратора и вводим следующую команду: ping -f -l 1472 ххх.ххх.ххх.ххх, где, 1472=1500(стандартное значение для Ethernet) — 28 (значение заголовка, которое не учитывается) ххх.ххх.ххх.ххх — IP-адрес какого-либо сервера вашего провайдера. Я использовал основной шлюз в сети провайдера. И смотрим ответ, если ответ получен без потери пакетов, то увеличиваем значение, если выдаст «Требуется фрагментация пакета, но установлен запрещающий флаг.», значит уменьшаем и так, пока не получим крайнее верхнее значение пакета, которое проходит до нашего сервера. У меня получилось 1492 (1464+28). Значит дальше я и буду его устанавливать в качестве значения MTU.
- Далее вводим команду: netsh interface ipv4 show subinterfaces.
Она покажет значение MTU для всех сетевых подключений. Нам необходимо узнать как называется интерфейс основного сетевого подключения. У меня это Ethernet, у вас же смотрите по обстановке. Но в большинстве случаев он будет называться так же.
- Далее вводим следующую команду(для ее выполнения требуется чтобы командная строка была запущена от имени администратора): netsh interface ipv4 set subinterface «Ethernet» mtu=1492 store=persistent.
Где вместо Ethernet пишем название своего интерфейса, а в значение MTU пишем полученное на первом шаге инструкции.
- Ну и напоследок отключим автоматическую настройку значения MTU для сетевых подключений: netsh int tcp set global autotuninglevel=disabled.
- Чтобы включить автоматическую настройку обратно, нужно заменить disabled на normal.
На этом всё. Надеюсь эта статья оказалась вам полезной, нажмите одну из кнопок ниже, чтобы рассказать о ней друзьям. Также подпишитесь на обновления сайта, введя свой e-mail в поле справа или подписавшись на группу в Вконтакте.
Спасибо за внимание!
Посещаем страницу moto.skesov.ru
Материал сайта Skesov.ru
- Распечатать
Оцените статью:
- 5
- 4
- 3
- 2
- 1
(23 голоса, среднее: 4.6 из 5)
Поделитесь с друзьями!
