LDAP (Lightweight Directory Access Protocol — Протокол доступа к каталогам с небольшими затратами) — безопасный протокол, используемый для доступа и управления информацией в каталоге, а также для аутентификации и авторизации пользователей. Установка LDAP на Windows Server 2019 позволяет создать централизованную систему управления и хранения информации о пользователях, группах и ресурсах.
В данной статье будет представлена пошаговая инструкция по установке и настройке службы LDAP на Windows Server 2019. Мы рассмотрим основные этапы установки, настройку безопасности и создание базового каталога.
Шаг 1. Установка роли службы каталогов
Перед установкой LDAP необходимо установить роль службы каталогов на Windows Server 2019. Для этого выполните следующие действия:
- Откройте «Управление сервером» и выберите «Добавить роли и компоненты».
- Выберите «Служба каталогов» в списке доступных ролей и нажмите «Далее».
- Прочитайте информацию о службе каталогов и нажмите «Далее».
- Установите дополнительные компоненты, если необходимо, и нажмите «Далее».
- Подтвердите установку и нажмите «Установка».
Продолжение следует…
Содержание
- Установка LDAP на Windows Server 2019
- Шаг 1: Загрузка установочного файла
- Шаг 2: Установка LDAP-сервера
- Шаг 3: Настройка параметров подключения
- Шаг 4: Создание и настройка домена
- Шаг 5: Проверка функциональности
Установка LDAP на Windows Server 2019
Для установки LDAP на Windows Server 2019 необходимо выполнить следующие шаги:
- Открыть Server Manager (Управление сервером).
- Щелкнуть по пункту «Установка ролей и компонентов».
- Выбрать «Установка ролей и компонентов» в списке доступных действий.
- На странице «Параметры перед установкой» нажать «Далее».
- Выбрать «Установка ролей и компонентов на удаленном сервере» и нажать «Далее».
- Выбрать сервер, на который будет устанавливаться LDAP.
- На странице «Выбор ролей сервера» выбрать «Active Directory Domain Services» (Службы каталога Active Directory) и нажать «Далее».
- На странице «Функции служб каталога Active Directory» нажать «Далее».
- На странице «Подтверждение установки» нажать «Установить».
- После завершения установки, на странице «Результаты установки» нажать «Закрыть».
После завершения установки необходимо настроить LDAP на Windows Server 2019:
- Открыть Server Manager (Управление сервером).
- Щелкнуть по пункту «Active Directory Users and Computers» (Пользователи и компьютеры Active Directory).
- Выполнить вход в домен с указанием административных учетных данных.
- Щелкнуть правой кнопкой мыши на пункте «Domain Controllers» (Контроллеры домена) и выбрать «New» (Создать), а затем «OU» (Организационную единицу).
- Указать имя и описание для OU и нажать «OK» (ОК).
- Правой кнопкой мыши щелкнуть на созданной OU и выбрать «New» (Создать), а затем «User» (Пользователя).
- Указать имя и описание для пользователя, указать пароль и нажать «Next» (Далее).
- Настроить дополнительные параметры для пользователя и нажать «Next» (Далее).
- Нажать «Finish» (Готово).
Теперь у вас установлен и настроен LDAP на Windows Server 2019. Вы можете использовать его для управления пользователями и группами, а также для централизованного управления доступом к ресурсам в вашей сети.
Шаг 1: Загрузка установочного файла
- Откройте любой веб-браузер и перейдите на официальный сайт Microsoft (https://www.microsoft.com).
- На главной странице найдите раздел «Скачать» или «Загрузки» и перейдите в него.
- В поле поиска введите «Windows Server 2019» и нажмите Enter.
- В результате поиска найдите установочный файл для Windows Server 2019 и выберите его.
- Выберите желаемую версию установочного файла (32-битная или 64-битная) и нажмите кнопку «Скачать» или «Download».
После того как установочный файл будет загружен на ваш компьютер, переходите к следующему шагу установки LDAP на Windows Server 2019.
Шаг 2: Установка LDAP-сервера
После успешной установки операционной системы Windows Server 2019 перейдите к установке LDAP-сервера.
-
Откройте управляющую консоль сервера и выберите раздел «Установка ролей и функций».
-
В появившемся мастере «Добавление ролей и функций» нажмите «Далее».
-
Выберите «Установка пространства имен Active Directory» и нажмите «Далее».
-
В новом окне выберите «Установка службы каталогов Active Directory» и нажмите «Далее».
-
Нажмите «Добавить функции».
-
Продолжите нажатием «Далее» в окне «Функции служб каталогов».
-
В новом окне выберите «Служба каталогов Active Directory» и нажмите «Далее».
-
Нажмите «Установить» и дождитесь завершения процесса установки.
-
После завершения установки LDAP-сервера нажмите «Закрыть» и перезагрузите компьютер.
Поздравляем! У вас успешно установлен LDAP-сервер на Windows Server 2019. Теперь вы можете приступить к настройке и использованию LDAP для централизованного управления пользователями и ресурсами.
Шаг 3: Настройка параметров подключения
После установки службы LDAP на Windows Server 2019 необходимо настроить параметры подключения для обеспечения правильной работы сервера. В этом разделе мы рассмотрим основные параметры и узнаем, как их настроить.
| Параметр | Описание |
|---|---|
| Порт | Порт, через который будет осуществляться подключение к службе LDAP. По умолчанию используется порт 389. |
| Протокол | Протокол, который будет использоваться во время подключения к службе LDAP. Обычно используется протокол TCP/IP. |
| SSL | Настройка поддержки SSL для безопасного подключения к службе LDAP. Если требуется использовать SSL, необходимо настроить сертификаты и другие параметры безопасности. |
| База данных | Путь к базе данных, где будут храниться данные службы LDAP. Можно выбрать существующую базу данных или создать новую. |
| Аутентификация | Метод аутентификации, который будет использоваться для проверки учетных данных пользователей при подключении к службе LDAP. Обычно используется метод Simple. |
Чтобы настроить параметры подключения, откройте файл конфигурации службы LDAP (обычно называемый ldap.conf) и отредактируйте соответствующие значения. Сохраните файл после внесения изменений.
Важно убедиться, что параметры подключения настроены правильно, чтобы обеспечить безопасность и правильную работу сервера LDAP.
Шаг 4: Создание и настройка домена
После установки Active Directory Domain Services (AD DS) на сервере Windows Server 2019 можно приступить к созданию и настройке домена. Домен позволяет управлять и аутентифицировать пользователей, компьютеры и другие ресурсы в сети.
Вот как можно создать и настроить домен:
Шаг 1: Откройте «Server Manager» (Менеджер сервера), выберите «Add roles and features» (Добавление ролей и компонентов).
Шаг 2: В появившемся окне «Add roles and features wizard» (Мастер добавления ролей и компонентов) нажмите «Next» (Далее).
Шаг 3: Выберите «Role-based or feature-based installation» (Установка на основе ролей или компонентов), затем выберите сервер, на котором будет создан домен, и нажмите «Next» (Далее).
Шаг 4: В разделе «Server Roles» (Роли сервера) выберите «Active Directory Domain Services» (Службы домена Active Directory) и нажмите «Next» (Далее).
Шаг 5: В появившемся окне откройте «Features» (Компоненты), выберите «Remote server administration tools» (Средства удаленного администрирования сервера), затем «AD DS and AD LDS Tools» (Средства AD DS и AD LDS) и нажмите «Next» (Далее).
Шаг 6: В окне «Active Directory Domain Services» (Службы домена Active Directory) нажмите «Next» (Далее).
Шаг 7: В окне «Confirmation» (Подтверждение) нажмите «Install» (Установить) для начала процесса установки службы домена.
Шаг 8: По завершении установки откроется окно «Promote this server to a domain controller» (Повысить этот сервер до контроллера домена). Здесь вам нужно выбрать «Add a new forest» (Добавить новый лес) и ввести имя вашего домена. Затем введите пароль для «Directory Services Restore Mode» (Режима восстановления службы каталогов) и нажмите «Next» (Далее).
Шаг 9: Настройте параметры для дополнительных служб и нажмите «Next» (Далее).
Шаг 10: В окне «Paths» (Пути) укажите местоположение для файлов базы данных, журнала транзакций и системных файлов, затем нажмите «Next» (Далее).
Шаг 11: Установите «DNS Server» (Службу DNS) на выбранном сервере и нажмите «Next» (Далее).
Шаг 12: Проверьте настройки и нажмите «Install» (Установить) для начала процесса установки службы домена.
После завершения установки ваш сервер Windows Server 2019 будет полноценным контроллером домена, готовым к управлению пользователями, компьютерами и другими ресурсами.
Шаг 5: Проверка функциональности
После завершения установки и настройки службы LDAP на Windows Server 2019 необходимо проверить ее функциональность. Для этого можно выполнить следующие действия:
- Откройте командную строку на сервере, где была установлена служба LDAP.
- Введите команду
ldapsearch -x, чтобы выполнить простой поиск в каталоге LDAP. - Если команда успешно завершилась, это означает, что служба LDAP работает корректно и готова к использованию.
Теперь вы можете использовать свой сервер Windows Server 2019 с установленной службой LDAP для хранения и управления данными каталога LDAP.
Аутентификация и авторизация пользователей в сети – важная задача для любой организации. Для этих целей широко применяется протокол LDAP (Lightweight Directory Access Protocol). Он позволяет организовать централизованное хранение и управление информацией о пользователях и ресурсах в сети.
Windows Server 2019 предоставляет широкие возможности для настройки и использования LDAP-сервера. В этом руководстве мы рассмотрим процесс установки и настройки LDAP на Windows Server 2019, а также основные операции с директорией.
Примечание: Чтобы успешно приступить к настройке LDAP на Windows Server 2019, вам понадобятся административные права на сервере и базовые знания по сетевым протоколам и конфигурации Windows Server.
Перед установкой LDAP необходимо установить роль Active Directory Domain Services (AD DS) на сервере. Роль AD DS позволяет создавать и управлять доменами, пользователями и группами в Windows Server.
Содержание
- Установка Windows Server 2019
- Скачивание образа и создание загрузочного носителя
- Выбор версии и установка операционной системы
- Настройка сети
- Присвоение статического IP адреса
- Установка DNS-сервера
- Установка и настройка службы Active Directory
- Установка роли «Active Directory Domain Services»
Установка Windows Server 2019
- Подготовьте компьютер для установки Windows Server 2019. Убедитесь, что у вас есть достаточное количество свободного места на жестком диске, а также требуемые системные требования, указанные производителем.
- Вставьте диск установки Windows Server 2019 в дисковод или подключите загрузочный USB-накопитель к компьютеру.
- Перезагрузите компьютер и выберите загрузку с диска или USB-накопителя. Это может потребовать изменения настроек загрузки в BIOS компьютера.
- На первом экране установки выберите язык, формат времени и метод ввода, а затем нажмите кнопку «Далее».
- Нажмите «Установить сейчас» и примите лицензионное соглашение.
- Выберите «Пользовательскую установку» и выберите раздел диска, на который вы хотите установить Windows Server 2019.
- Нажмите «Далее» и следуйте инструкциям установщика для настройки имени компьютера, пароля администратора и других необходимых параметров.
- После завершения установки перезагрузите компьютер.
Теперь у вас установлена операционная система Windows Server 2019, и вы готовы приступить к настройке LDAP.
Скачивание образа и создание загрузочного носителя
Для установки Windows Server 2019 и настройки службы LDAP необходимо скачать образ операционной системы и создать загрузочный носитель. Следуйте данному руководству, чтобы успешно выполнить эту задачу:
- Перейдите на официальный сайт Microsoft и найдите раздел загрузки Windows Server 2019.
- Выберите соответствующую версию операционной системы (Standard, Datacenter и т. д.) и скачайте ISO-образ.
- Когда загрузка завершится, проверьте целостность файла, сравнив контрольную сумму ISO-образа с указанной на официальном сайте Microsoft.
- Подготовьте пустой USB-накопитель или пустой DVD-диск, который будет использоваться в качестве загрузочного носителя.
- Для создания загрузочного носителя используйте специальное программное обеспечение, такое как Rufus или Windows USB/DVD Download Tool. Следуйте инструкциям программы, чтобы записать ISO-образ на выбранный носитель.
- После записи ISO-образа на загрузочный носитель перезагрузите компьютер, выберите загрузку с этого носителя и следуйте инструкциям по установке операционной системы.
Теперь у вас есть загрузочный носитель с установочным образом Windows Server 2019. Готовьтесь продолжать настройку службы LDAP на выбранном сервере.
Выбор версии и установка операционной системы
Перед установкой и настройкой службы LDAP на Windows Server 2019 необходимо выбрать подходящую версию операционной системы.
Операционная система Windows Server 2019 предлагает два варианта установки: стандартную и Datacenter. Различия между ними заключаются в используемых лицензиях и доступных функциях.
Следует учитывать требования и потребности вашей организации при выборе версии Windows Server 2019:
1. Windows Server 2019 Standard:
Эта версия подходит для организаций с небольшим количеством серверов и не требует использования функционала гиперконвергентной инфраструктуры. Она обладает всеми необходимыми функциями для использования LDAP.
2. Windows Server 2019 Datacenter:
Эта версия рекомендуется для организаций, которым требуется гиперконвергентная инфраструктура и распределение ресурсов виртуальных машин. Она также обладает всеми необходимыми функциями для использования LDAP.
После выбора подходящей версии операционной системы, можно приступать к ее установке. Для этого необходимо создать загрузочный носитель с помощью ISO-образа операционной системы и следовать инструкциям установщика. При установке рекомендуется выбрать вариант «Установка сетевого средства обслуживания» и установить необходимые компоненты, включая службу LDAP.
После завершения установки операционной системы можно приступать к настройке службы LDAP.
Настройка сети
Перед началом установки и настройки LDAP на Windows Server 2019 необходимо убедиться, что ваш сервер находится в правильной сетевой конфигурации. В этом разделе вы узнаете, как настроить сеть на вашем сервере.
- Установите правильный IP-адрес и подсеть для вашего сервера. Убедитесь, что ваши настройки не конфликтуют с другими устройствами в сети.
- Настройте DNS-серверы. Установите IP-адреса DNS-серверов, которые вы будете использовать. Рекомендуется использовать два DNS-сервера для повышения надежности.
- Настройте шлюз по умолчанию. Установите IP-адрес шлюза по умолчанию для вашей сети. Это обычно является IP-адресом вашего маршрутизатора.
- Задайте правильные DNS-имена для вашего сервера. Установите FQDN (Fully Qualified Domain Name) для вашего сервера. Это имя будет использоваться для доступа к серверу через сеть.
После настройки сети вы будете готовы перейти к установке и настройке службы LDAP на вашем сервере Windows Server 2019.
Присвоение статического IP адреса
Чтобы присвоить статический IP адрес на Windows Server 2019, выполните следующие шаги:
- Откройте «Настройки сети и Интернет» в «Панели управления».
- Выберите «Центр управления сетями и общим доступом».
- Щелкните правой кнопкой мыши по активному сетевому подключению и выберите «Свойства».
- В списке доступных протоколов найдите «Протокол интернета версии 4 (TCP/IPv4)» и выделите его.
- Нажмите кнопку «Свойства».
- Выберите «Использовать следующий IP адрес» и введите желаемый статический IP адрес, маску подсети и шлюз по умолчанию.
- Щелкните «ОК», чтобы сохранить изменения.
После присвоения статического IP адреса, убедитесь, что другие компоненты сети имеют актуальную информацию о новом IP адресе сервера. Это может включать в себя настройку DNS-записей и обновление сетевых настроек на других устройствах.
Присвоение статического IP адреса позволит вам убедиться, что ваш LDAP-сервер всегда доступен по заданному IP адресу и обеспечит надежность и стабильность сетевого подключения.
Установка DNS-сервера
- Откройте «Server Manager» и перейдите на вкладку «Manage» (Управление).
- Выберите «Add roles and features» (Добавить роли и компоненты).
- Нажмите «Next» (Далее), чтобы продолжить.
- Выберите «Role-based or feature-based installation» (Установка на основе ролей или компонентов).
- Выберите сервер, на котором будет установлен DNS-сервер, и нажмите «Next» (Далее).
- Выберите «DNS Server» (Сервер DNS) в списке ролей и нажмите «Next» (Далее).
- Нажмите «Next» (Далее) для подтверждения установки.
- Выберите «Install» (Установить) и дождитесь завершения процесса установки.
После завершения установки DNS-сервера можно приступить к его настройке для использования в LDAP.
Установка и настройка службы Active Directory
Для установки и настройки службы Active Directory на сервере Windows Server 2019 следуйте следующим шагам:
- Откройте «Server Manager» (Управление сервером) и выберите «Add Roles and Features» (Добавить роли и функции).
- В окне «Add Roles and Features Wizard» (Мастер добавления ролей и функций) нажмите «Next» (Далее).
- Выберите «Role-based or feature-based installation» (Установка основанная на ролях или функциях) и нажмите «Next» (Далее).
- Выберите сервер, на котором вы хотите установить службу Active Directory, и нажмите «Next» (Далее).
- В списке «Select server roles» (Выберите роли сервера) найдите и выберите «Active Directory Domain Services» (Службы домена Active Directory).
- Появится окно с предупреждением о необходимости установки дополнительных «{feature_name}» (функций). Нажмите «Add Features» (Добавить функции), чтобы установить эти функции.
- После установки требуемых функций нажмите «Next» (Далее).
- В списке «Select features» (Выбор функций) нажмите «Next» (Далее).
- Чтобы принять выбранные настройки, нажмите «Next» (Далее).
- На вкладке «Install» (Установка) нажмите «Install» (Установить), чтобы начать установку службы Active Directory.
- После завершения установки, нажмите «Close» (Закрыть).
После установки и настройки службы Active Directory вы сможете приступить к созданию домена, настройке пользователей и групп, а также управлению ролевым доступом на сервере Windows Server 2019.
Установка роли «Active Directory Domain Services»
Перед началом установки Active Directory Domain Services (AD DS) убедитесь, что в Windows Server 2019 установлены все последние обновления. После этого вы можете приступить к установке AD DS, следуя инструкциям ниже:
- Откройте Server Manager (Менеджер сервера).
- В левой панели выберите пункт Manage (Управление).
- В меню выберите пункт Add Roles and Features (Добавить роли и компоненты).
- Кликните Next (Далее) до тех пор, пока не увидите список ролей.
- Выберите Active Directory Domain Services (Службы домена Active Directory) из списка ролей и нажмите кнопку Next (Далее).
- Нажмите еще раз Next (Далее) на странице с описанием роли AD DS.
- На странице «Add features that are required for Active Directory Domain Services» (Добавление компонентов, которые требуются для служб домена Active Directory) нажмите Next (Далее).
- Подтвердите выбор компонентов и нажмите Next (Далее).
- На странице «Confirm installation selections» (Подтверждение выбранных для установки пунктов) нажмите Install (Установить).
- Дождитесь завершения процесса установки и нажмите Close (Закрыть).
После установки роли AD DS на вашем сервере Windows Server 2019, вы будете готовы к настройке и использованию службы домена Active Directory.
First published on MSDN on Apr 10, 2017
Step-by-step guide for setting up
LDAPS
(LDAP over SSL)
The guide is split into 3 sections :
- Create a Windows Server VM in Azure
- Setup LDAP using AD LDS (Active Directory Lightweight Directory Services)
- Setup LDAPS (LDAP over SSL)
NOTE : The following steps are similar for Windows Server 2008, 2012, 2012 R2 , 2016. In this article, we will use Windows Server 2012 R2.
Create a Windows Server VM in Azure
Create a VM named “ldapstest” Windows Server 2012 R2 Datacenter Standard DS12 using the instructions here:
Create a Windows virtual machine with the Azure portal
Connect to the VM ldapstest using Remote Desktop Connection.
Setup LDAP using AD LDS
Now let us add AD LDS in our VM ldapstest
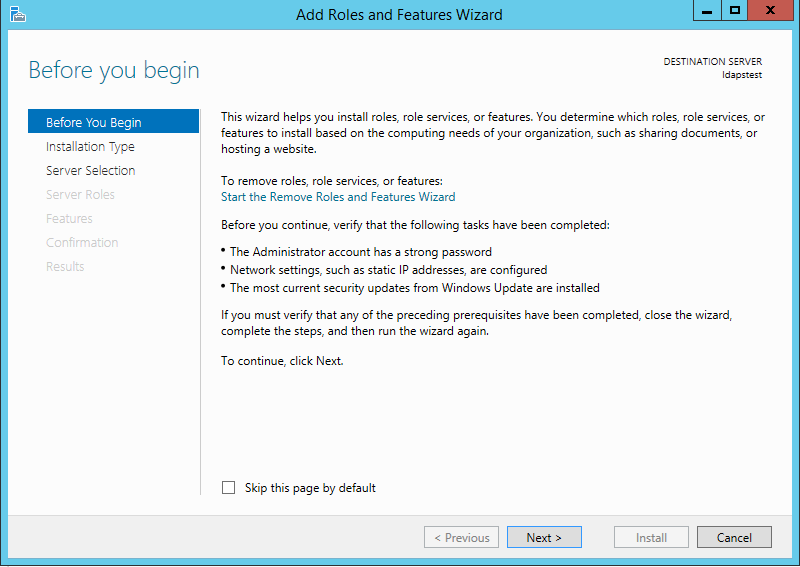
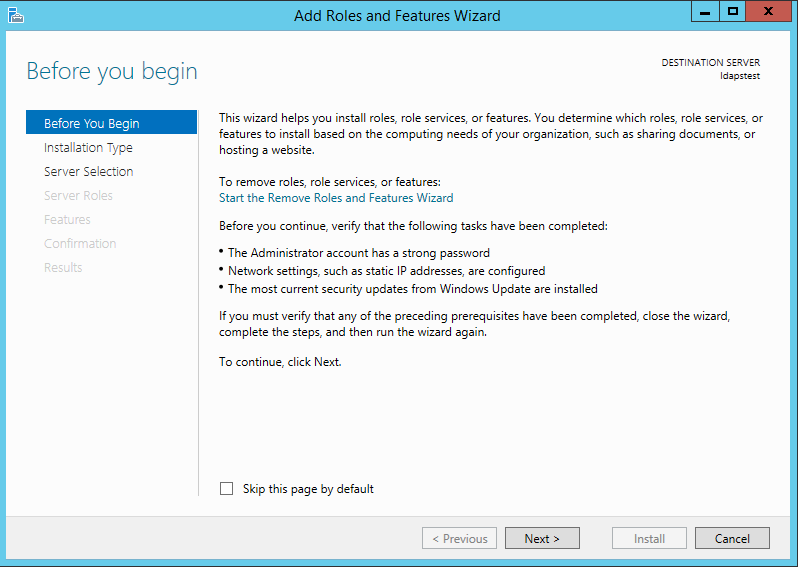
Click on Start —> Server Manager —> Add Roles and Features. Click Next.
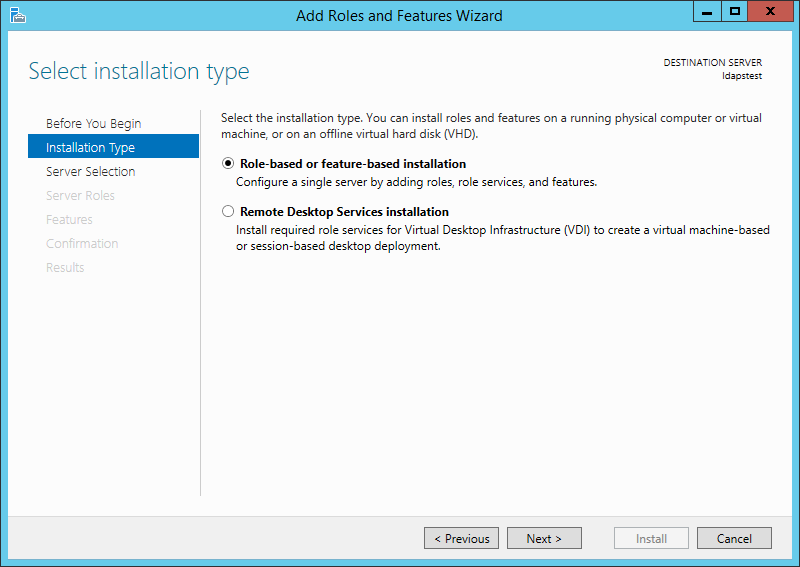
Choose Role-based or feature-based installation. Click Next.
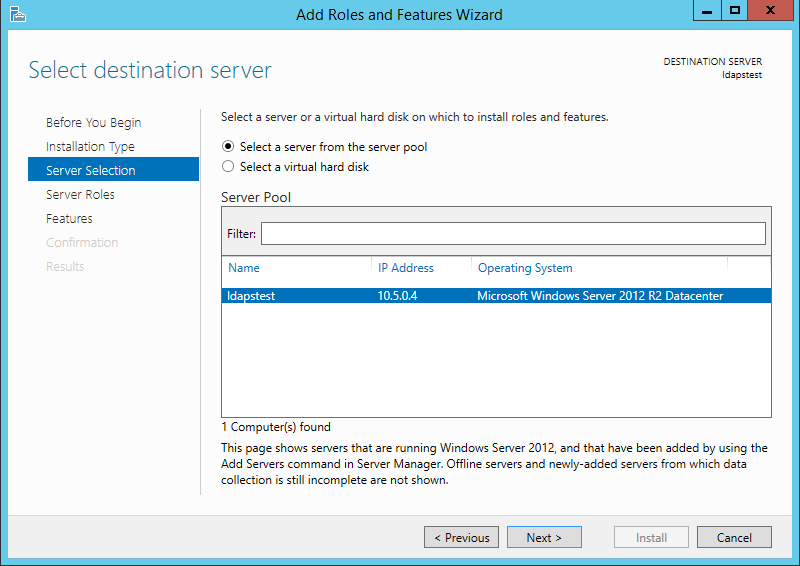
Select ldapstest server from the server pool. Click Next.
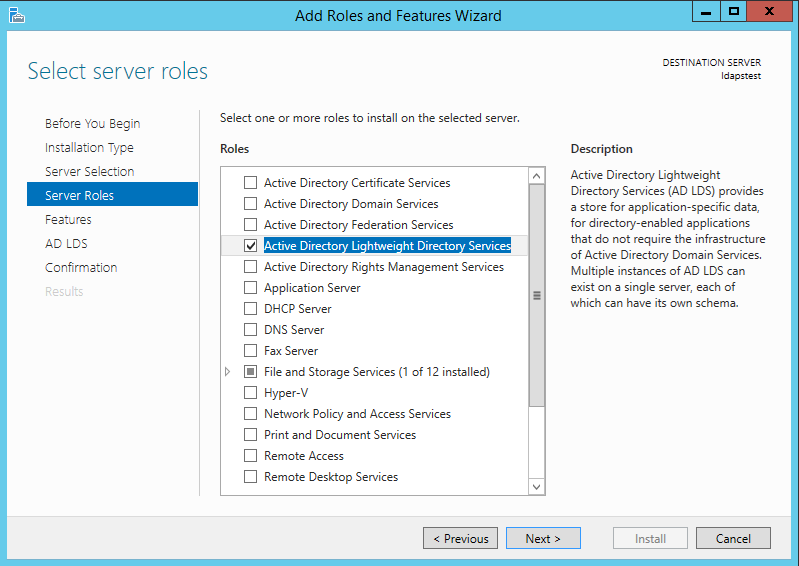
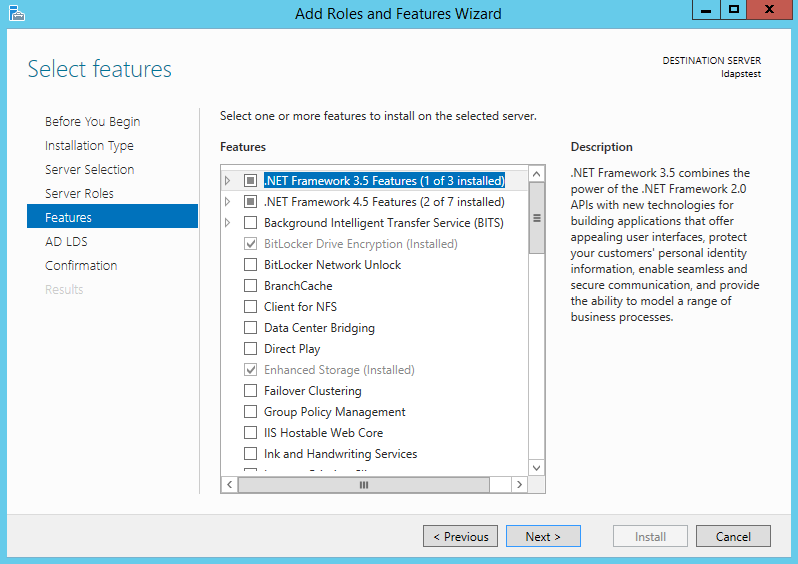
Mark Active Directory Lightweight Directory Services from the list of roles and click Next.
From the list of features, choose nothing – just click Next.
Click Next.

Click Install to start installation.

Once installation is complete, click Close.

Now we have successfully set up AD LDS Role. Let us create a new AD LDS Instance “CONTOSO” using the wizard. Click the “Run the Active Directory Lightweight Directory Services Setup Wizard” in the above screen. And then Click Close.

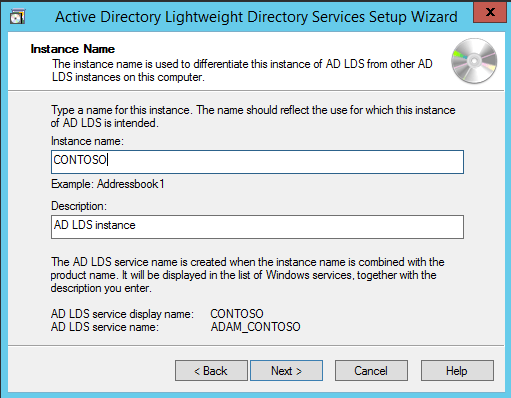
Choose Unique Instance since we are setting it up for the first time.

Type “CONTOSO” in Instance Name and click Next.
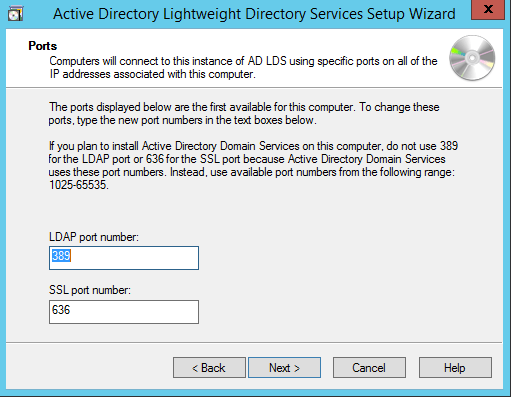
By Default, LDAP Port is 389 and LDAPS port is 636, let us choose the default values — click Next.
Create a new Application Directory Partition named “CN=MRS,DC=CONTOSO,DC=COM”. Click Next.

Using the default values for storage location of ADLDS files- Click Next.

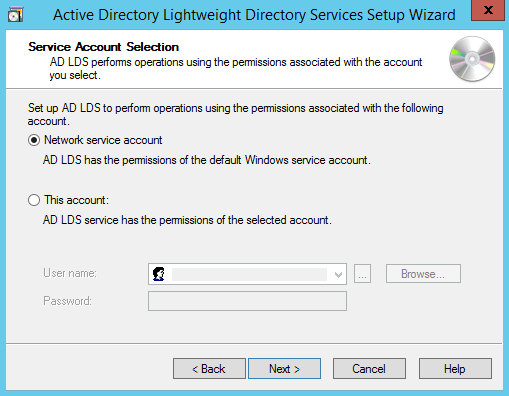
Choosing Network Service Account for running the AD LDS Service.
You will receive a prompt warning about data replication. Since we are using a single LDAP Server, we can click Yes.

Choosing the currently logged on user as an administrator for the AD LDS Instance. Click Next.

Mark all the required LDIF files to import (Here we are marking all files). Click Next.

Verify that all the selections are right and then Click Next to confirm Installation.
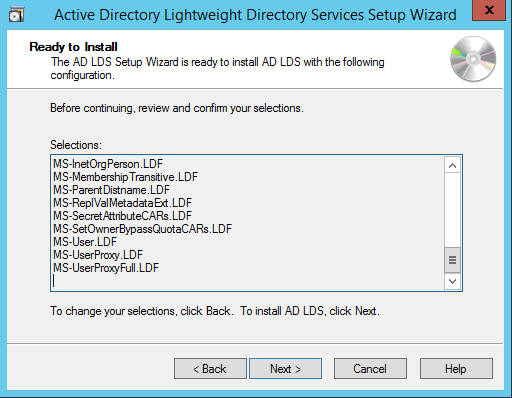
Once the instance is setup successfully, click Finish.

Now let us try to connect to the AD LDS Instance CONTOSO using ADSI Edit.
Click on Start —> Search “ADSI Edit” and open it.
Right Click on ADSI Edit Folder (on the left pane) and choose Connect To.. . Fill the following values and Click OK.
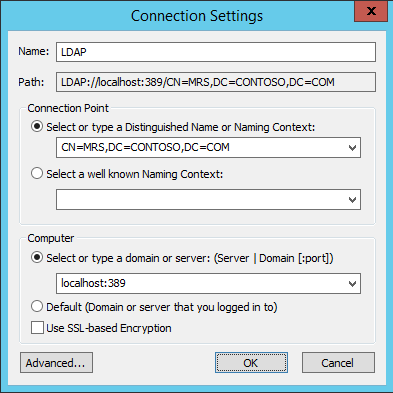
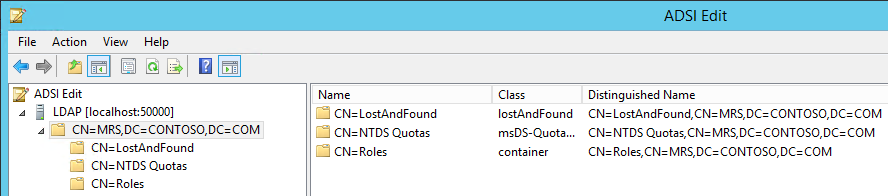
If the connection is successful, we will be able to browse the Directory CN=MRS,DC=CONTOSO,DC=COM :
Setup LDAPS (LDAP over SSL)
The Certificate to be used for LDAPS must satisfy the following 3 requirements:
• Certificate must be valid for the purpose of Server Authentication. This means that it must also contains the Server Authentication object identifier (OID): 1.3.6.1.5.5.7.3.1
• The Subject name or the first name in the Subject Alternative Name (SAN) must match the Fully Qualified Domain Name (FQDN) of the host machine, such as Subject:CN=contosoldaps. For more information, see How to add a Subject Alternative Name to a secure LDAP certificate .
• The host machine account must have access to the private key.
Now, let’s use Active Directory Certificate Services to create a certificate to be used for LDAPS. If you already have a certificate satisfying the above requirements, you can skip this step.
Click on Start —> Server Manager —> Add Roles and Features. Click Next.
Choose Role-based or feature-based installation. Click Next.

Select ldapstest server from the server pool. Click Next.

Choose Active Directory Certificate Services from the list of roles and click Next.

Choose nothing from the list of features and click Next.
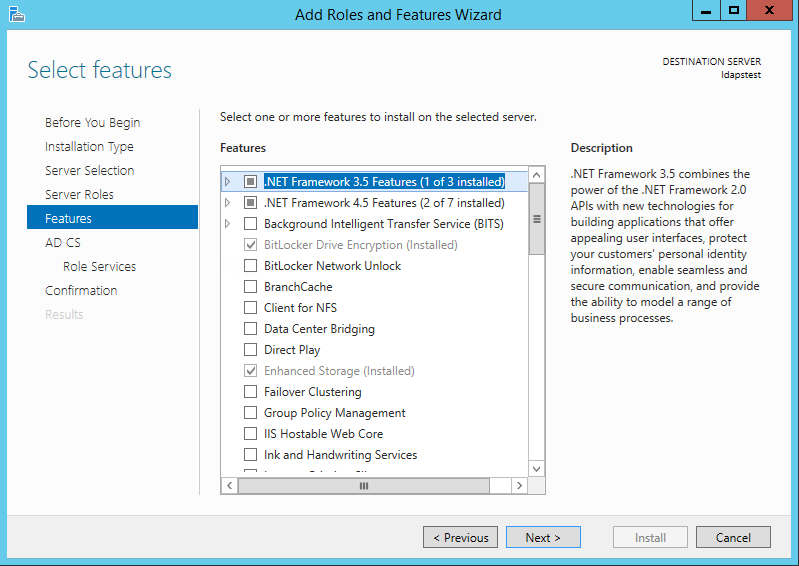
Click Next.

Mark “Certificate Authority” from the list of roles and click Next.
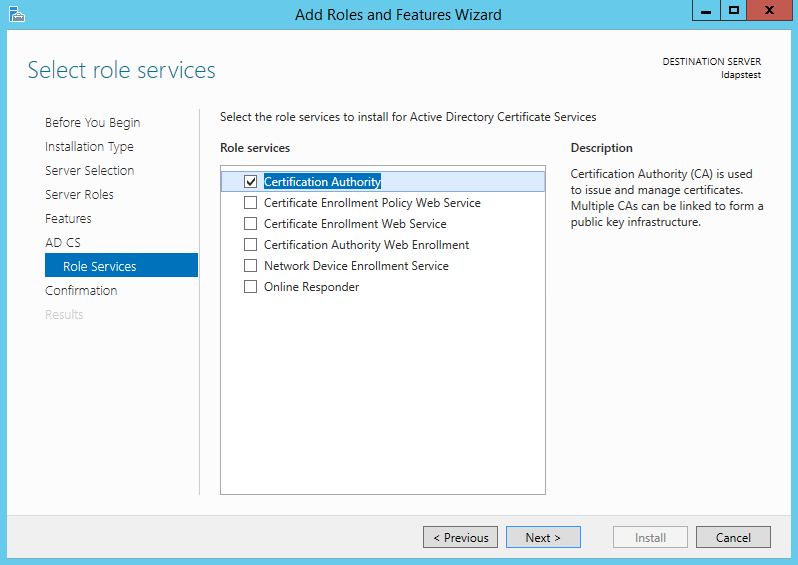
Click Install to confirm installation.

Once installation is complete, Click Close.

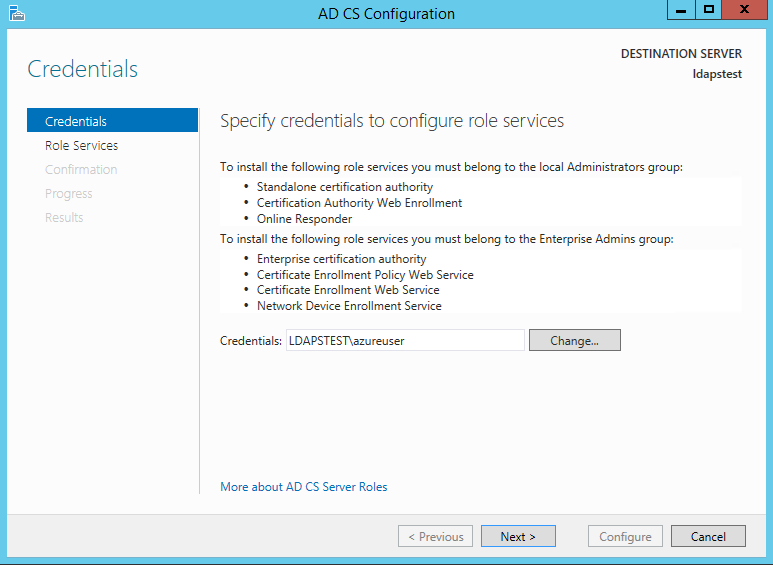
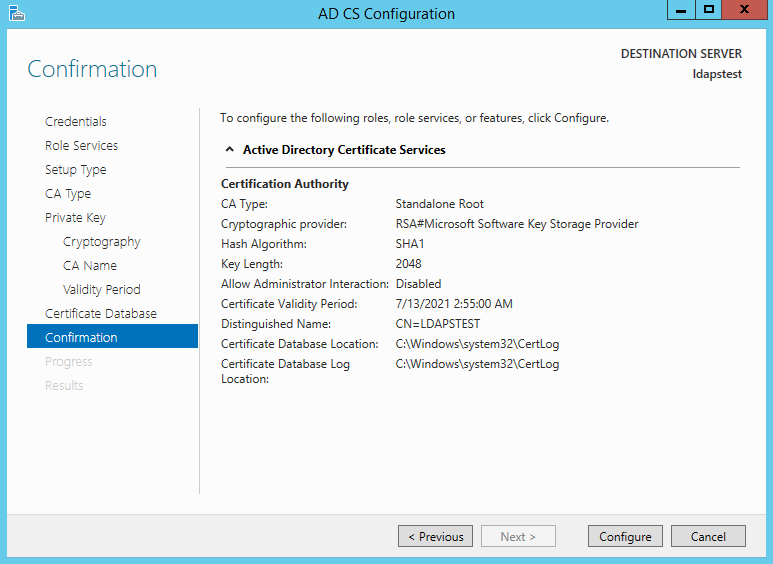
Now let’s create a certificate using AD CS Configuration Wizard. To open the wizard, click on “Configure Active Directory Certificate Services on the destination server” in the above screen. And then click Close. We can use the currently logged on user azureuser to configure role services since it belongs to the local Administrators group. Click Next.
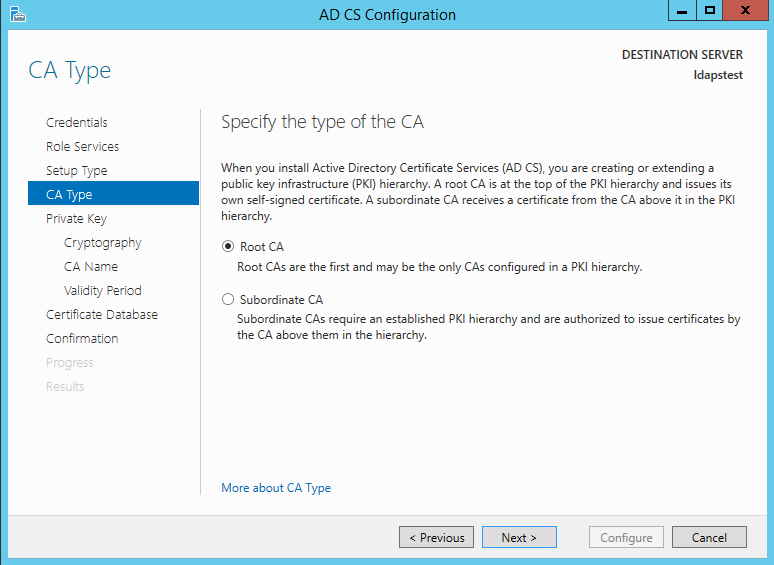
Choose Certification Authority from the list of roles. Click Next.

Since this is a local box setup without a domain, we are going to choose a Standalone CA. Click Next.

Choosing Root CA as the type of CA, click Next.
Since we do not possess a private key – let’s create a new one. Click Next.

Choosing SHA1 as the Hash algorithm. Click Next.
UPDATE : Recommended to select the most recent hashing algorithm since
SHA-1 deprecation countdown
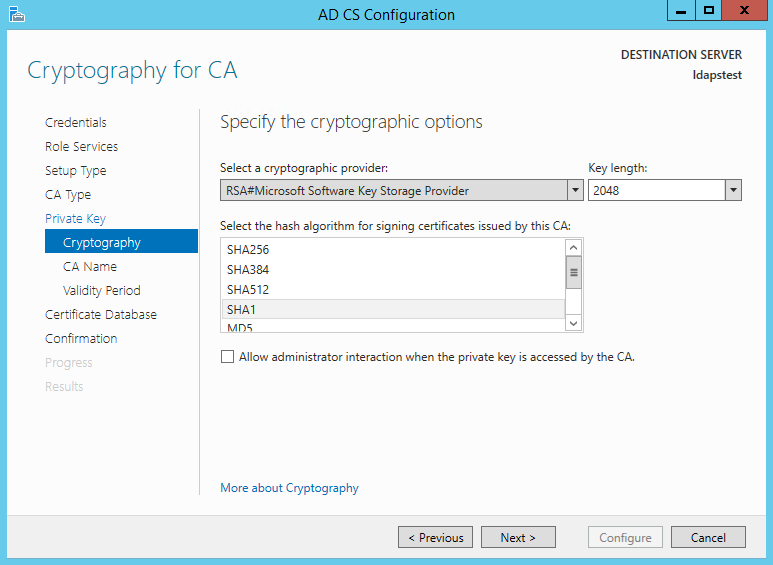
The name of the CA must match the Hostname (requirement number 2). Enter “LDAPSTEST” and Click Next.

Specifying validity period of the certificate. Choosing Default 5 years. Click Next.

Choosing default database locations, click Next.

Click Configure to confirm.
Once the configuration is successful/complete. Click Close.

Now let us view the generated certificate.
Click on Start à Search “Manage Computer Certificates” and open it.
Click on Personal Certificates and verify that the certificate “LDAPSTEST” is present:

Now to fulfill the third requirement, let us ensure host machine account has access to the private key. Using the Certutil utility, find the Unique Container Name. Open Command Prompt in Administrator mode and run the following command: certutil -verifystore MY

The private key will be present in the following location C:ProgramDataMicrosoftCryptoKeys<UniqueContainerName>
Right Click C:ProgramDataMicrosoftCryptoKeys874cb49a696726e9f435c1888b69f317_d3e61130-4cd8-4288-a344-7784647ff8c4 and click properties —> Security and add read permissions for NETWORK SERVICE.

We need to import this certificate into JRE key store since our certificate “CN=LDAPSTEST” is not signed by any by any trusted Certification Authority(CA) which is configured in you JRE keystore e.g Verisign, Thwate, goDaddy or entrust etc. In order to import this certificate using the keytool utility, let us first export this cert as a .CER from the machine certificate store:
Click Start —> Search “Manage Computer Certificates” and open it. Open personal, right click LDAPSTEST cert and click “Export”.

This opens the Certificate Export Wizard. Click Next.

Do not export the private key. Click Next.

Choose Base-64 encoded X .509 file format. Click Next.

Exporting the .CER to Desktop. Click Next.

Click Finish to complete the certificate export.

Certificate is now successfully exported to “C:UsersazureuserDesktopldapstest.cer”.
Now we shall import it to JRE Keystore using the keytool command present in this location:
C:Program FilesJavajre1.8.0_92binkeytool.exe.
Open Command Prompt in administrator mode. Navigate to “C:Program FilesJavajre1.8.0_92bin” and run the following command:
keytool -importcert -alias «ldapstest» -keystore «C:Program FilesJavajre1.8.0_92libsecuritycacerts» -storepass changeit -file «C:UsersazureuserDesktopldapstest.cer»

Type “yes” in the Trust this certificate prompt.
Once certificate is successfully added to the JRE keystore, we can connect to the LDAP server over SSL.
Now let us try to connect to LDAP Server (with and without SSL) using the ldp.exe tool.
Connection strings for
LDAP:\ldapstest:389
LDAPS:\ldapstest:636
Click on Start —> Search ldp.exe —> Connection and fill in the following parameters and click OK to connect:
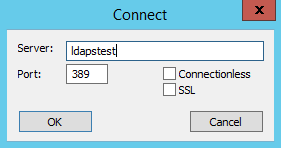
If Connection is successful, you will see the following message in the ldp.exe tool:

To Connect to LDAPS (LDAP over SSL), use port 636 and mark SSL. Click OK to connect.

If connection is successful, you will see the following message in the ldp.exe tool:

REFERENCES
https://technet.microsoft.com/en-us/library/cc770639(v=ws.10)
https://technet.microsoft.com/en-us/library/cc725767(v=ws.10).aspx
http://social.technet.microsoft.com/wiki/contents/articles/2980.ldap-over-ssl-ldaps-certificate….
https://blogs.technet.microsoft.com/askds/2008/03/13/troubleshooting-ldap-over-ssl/
http://javarevisited.blogspot.com/2011/11/ldap-authentication-active-directory.html
Содержание
- How to enable LDAP signing in Windows Server
- Summary
- How to discover clients that do not use the Require signing option
- How to configure the directory to require LDAP server signing for AD DS
- Using Group Policy
- How to set the server LDAP signing requirement
- How to set the client LDAP signing requirement by using local computer policy
- How to set the client LDAP signing requirement by using a domain Group Policy Object
- How to set the client LDAP signing requirement by using registry keys
- How to verify configuration changes
- Как включить подпись LDAP в Windows Server
- Аннотация
- Обнаружение клиентов, которые не используют параметр «Требовать подписи»
- Настройка каталога для обязательной подписи сервера LDAP для AD DS
- Использование групповой политики
- Настройка требования для подписи LDAP на сервере
- Как установить требование подписи LDAP клиента с помощью политики локального компьютера
- Как установить требование подписи LDAP клиента с помощью объекта групповой политики домена
- Как установить требование подписи LDAP клиента с помощью ключей реестра
- Проверка изменений конфигурации
How to enable LDAP signing in Windows Server
This article describes how to enable LDAP signing in Windows Server 2019, Windows Server 2016, Windows Server 2012 R2, and Windows 10.
Original product version: В Windows Server 2019, Windows Server 2016, Windows Server 2012 R2, Windows 10 — all editions
Original KB number: В 935834
Summary
You can significantly improve the security of a directory server by configuring the server to reject Simple Authentication and Security Layer (SASL) LDAP binds that do not request signing (integrity verification), or to reject LDAP simple binds that are performed on a clear text (non-SSL/TLS-encrypted) connection. SASL binds may include protocols such as Negotiate, Kerberos, NTLM, and Digest.
Unsigned network traffic is susceptible to replay attacks. In such attacks, an intruder intercepts the authentication attempt and the issuance of a ticket. The intruder can reuse the ticket to impersonate the legitimate user. Additionally, unsigned network traffic is susceptible to man-in-the-middle (MIM) attacks in which an intruder captures packets between the client and the server, changes the packets, and then forwards them to the server. If this occurs on an LDAP server, an attacker can cause a server to make decisions that are based on forged requests from the LDAP client.
How to discover clients that do not use the Require signing option
After you make this configuration change, clients that rely on unsigned SASL (Negotiate, Kerberos, NTLM, or Digest) LDAP binds or on LDAP simple binds over a non-SSL/TLS connection stop working. To help identify these clients, the directory server of Active Directory Domain Services (AD DS) or Lightweight Directory Server (LDS) logs a summary Event ID 2887 one time every 24 hours to indicate how many such binds occurred. We recommend that you configure these clients not to use such binds. After no such events are observed for an extended period, we recommend that you configure the server to reject such binds.
If you must have more information to identify such clients, you can configure the directory server to provide more detailed logs. This additional logging will log an Event ID 2889 when a client tries to make an unsigned LDAP bind. The log entry displays the IP address of the client and the identity that the client tried to use to authenticate. You can enable this additional logging by setting the 16 LDAP Interface Events diagnostic setting to 2 (Basic). For more information about how to change the diagnostic settings, see How to configure Active Directory and LDS diagnostic event logging.
If the directory server is configured to reject unsigned SASL LDAP binds or LDAP simple binds over a non-SSL/TLS connection, the directory server logs a summary Event ID 2888 one time every 24 hours when such bind attempts occur.
How to configure the directory to require LDAP server signing for AD DS
Logging anomaly of Event ID 2889
Applications that use third-party LDAP clients may cause Windows to generate incorrect Event ID 2889 entries. This occurs when you log of LDAP interface events and if LDAPServerIntegrity is equal to 2. The use of sealing (encryption) satisfies the protection against the MIM attack, but Windows logs Event ID 2889 anyway.
This happens when LDAP clients use only sealing together with SASL. We have seen this in the field in association with third-party LDAP clients.
When a connection does not use both signing and sealing, the connection security requirements check uses the flags correctly and disconnect. The check generates Error 8232 (ERROR_DS_STRONG_AUTH_REQUIRED).
Using Group Policy
How to set the server LDAP signing requirement
- Select Start >Run, type mmc.exe, and then select OK.
- Select File >Add/Remove Snap-in, select Group Policy Management Editor, and then select Add.
- Select Group Policy Object >Browse.
- In the Browse for a Group Policy Object dialog box, select Default Domain Controller Policy under the Domains, OUs, and linked Group Policy Objects area, and then select OK.
- Select Finish.
- Select OK.
- Select Default Domain Controller Policy >Computer Configuration >Policies >Windows Settings >Security Settings >Local Policies, and then select Security Options.
- Right-click Domain controller: LDAP server signing requirements, and then select Properties.
- In the Domain controller: LDAP server signing requirements Properties dialog box, enable Define this policy setting, select Require signing in the Define this policy setting list, and then select OK.
- In the Confirm Setting Change dialog box, select Yes.
How to set the client LDAP signing requirement by using local computer policy
- Select Start >Run, type mmc.exe, and then select OK.
- Select File >Add/Remove Snap-in.
- In the Add or Remove Snap-ins dialog box, select Group Policy Object Editor, and then select Add.
- Select Finish.
- Select OK.
- Select Local Computer Policy >Computer Configuration >Policies >Windows Settings >Security Settings >Local Policies, and then select Security Options.
- Right-click Network security: LDAP client signing requirements, and then select Properties.
- In the Network security: LDAP client signing requirements Properties dialog box, select Require signing in the list, and then select OK.
- In the Confirm Setting Change dialog box, select Yes.
How to set the client LDAP signing requirement by using a domain Group Policy Object
- Select Start >Run, type mmc.exe, and then select OK.
- Select File >Add/Remove Snap-in.
- In the Add or Remove Snap-ins dialog box, select Group Policy Object Editor, and then select Add.
- Select Browse, and then select Default Domain Policy (or the Group Policy Object for which you want to enable client LDAP signing).
- Select OK.
- Select Finish.
- Select Close.
- Select OK.
- Select Default Domain Policy >Computer Configuration >Windows Settings >Security Settings >Local Policies, and then select Security Options.
- In the Network security: LDAP client signing requirements Properties dialog box, select Require signing in the list, and then select OK.
- In the Confirm Setting Change dialog box, select Yes.
How to set the client LDAP signing requirement by using registry keys
Follow the steps in this section carefully. Serious problems might occur if you modify the registry incorrectly. Before you modify it, back up the registry for restoration in case problems occur.
By default, for Active Directory Lightweight Directory Services (AD LDS), the registry key is not available. Therefore, you must create a LDAPServerIntegrity registry entry of the REG_DWORD type under the following registry subkey:
The placeholder represents the name of the AD LDS instance that you want to change.
How to verify configuration changes
Sign in to a computer that has the AD DS Admin Tools installed.
Select Start > Run, type ldp.exe, and then select OK.
Select Connection > Connect.
In Server and in Port, type the server name and the non-SSL/TLS port of your directory server, and then select OK.
For an Active Directory Domain Controller, the applicable port is 389.
After a connection is established, select Connection > Bind.
Under Bind type, select Simple bind.
Type the user name and password, and then select OK.
If you receive the following error message, you have successfully configured your directory server:
Ldap_simple_bind_s() failed: Strong Authentication Required
В этой статье описывается, как включить подпись LDAP в Windows Server 2019, Windows Server 2016, Windows Server 2012 R2 и Windows 10.
Исходная версия продукта: Windows Server 2019, Windows Server 2016, Windows Server 2012 R2, Windows 10 — все выпуски
Исходный номер КБ: 935834
Аннотация
Можно значительно повысить безопасность сервера каталогов, настроив сервер на отклонение привязок LDAP saSL, которые не запрашивают подписи (проверка целостности) или отклонить простые привязки LDAP, выполняемые при соединении с незашифрованным текстом (без шифрования SSL/TLS). Привязки SASL могут включать такие протоколы, как Negotiate, Kerberos, NTLM и Digest.
Неподписаный сетевой трафик подвержен атакам с повтором. В таких атаках злоумышленник перехватывает попытку проверки подлинности и выдачу билета. Злоумышленник может повторно использовать билет, чтобы подхавлить законного пользователя. Кроме того, неподписавшийся сетевой трафик подвержен атакам «злоумышленник в середине» (MIM), в результате которых злоумышленник захватывает пакеты между клиентом и сервером, изменяет пакеты, а затем передает их на сервер. Если это происходит на сервере LDAP, злоумышленник может заставить сервер принимать решения, основанные на поддельных запросах от клиента LDAP.
Обнаружение клиентов, которые не используют параметр «Требовать подписи»
После изменения конфигурации клиенты, которые используют неподписавное подключение SASL (Negotiate, Kerberos, NTLM или Digest), привязывает LDAP или простой привязки LDAP через подключение, не относяющееся к SSL/TLS, перестают работать. Чтобы помочь определить этих клиентов, сервер каталогов доменных служб Active Directory (AD DS) или сервер облегченного доступного каталога (LDS) регистрирует сводный ИД события 2887 один раз каждые 24 часа, чтобы указать, сколько таких привязок произошло. Мы рекомендуем не использовать такие привязки для этих клиентов. После того как такие события не происходят в течение длительного периода, рекомендуется настроить сервер на отклонение таких привязок.
Если для идентификации таких клиентов необходимо получить дополнительные сведения, можно настроить сервер каталогов для предоставления более подробных журналов. В этом дополнительном окне занося в журнал событие с ид 2889, когда клиент пытается сделать неподписаную привязку LDAP. В записи журнала отображается IP-адрес клиента и удостоверение, которое клиент попытался использовать для проверки подлинности. Вы можете включить это дополнительное ведение журнала, установив для диагностического параметра «16 событий интерфейса LDAP» 2 (базовый). Дополнительные сведения об изменении параметров диагностики см. в сведениях о настройке ведения журнала событий диагностики Active Directory и LDS.
Если сервер каталогов настроен на отклонение неподписаных привязок LDAP SASL или простых привязок LDAP через подключение, не относящемся к SSL/TLS, сервер каталогов регистрирует сводный ИД события 2888 один раз каждые 24 часа при таких попытках привязки.
Настройка каталога для обязательной подписи сервера LDAP для AD DS
Сведения о возможных изменениях параметров безопасности см. в сведениях о клиентах, службах и программах, которые могут возникнуть при изменении параметров безопасности и назначений прав пользователей.
Аномалия ведения журнала события 2889
Приложения, которые используют сторонние клиенты LDAP, могут привести к тому, что Windows будет создавать неправильные записи с ИД события 2889. Это происходит при регистрации событий интерфейса LDAP и, если равно LDAPServerIntegrity 2. Использование запечатывок (шифрование) удовлетворяет защиту от атаки MIM, но Windows все равно заносим в журнал код события 2889.
Это происходит, когда клиенты LDAP используют только запечатывание вместе с SASL. Мы видели это в поле в связи со сторонними клиентами LDAP.
Если подключение не использует подписываю и запечатываю, при проверке требований безопасности подключения флаги используются правильно и отключается. При проверке создается ошибка 8232 (ERROR_DS_STRONG_AUTH_REQUIRED).
Использование групповой политики
Настройка требования для подписи LDAP на сервере
- Выберите >«Запустить»,введитеmmc.exe и выберите «ОК».
- Выберите >«Добавить или удалить оснастку»,«Редактор управления групповыми политиками» и «Добавить».
- Выберите «Обзор объекта групповой >политики».
- В диалоговом окне «Обзор объекта групповой политики» выберите политику контроллера домена по умолчанию в области «Домены», «OUS» и «Связанные объекты групповой политики», а затем выберите «ОК».
- Нажмите кнопку Готово.
- Нажмите OK.
- Выберите «Политики конфигурации компьютера контроллера домена по умолчанию» «Параметры безопасности параметров Windows» и выберите > > > > >«Параметры безопасности».
- Щелкните правой кнопкой мыши контроллер домена: требования к подписи сервера LDAP и выберите «Свойства».
- В контроллере домена: диалоговое окно «Свойства для подписи сервера LDAP» в поле «Определение этого параметра политики» выберите «Требовать подпись» в списке «Определение этого параметра политики» и затем выберите «ОК».
- В диалоговом окне «Подтверждение изменения параметра» выберите «Да».
Как установить требование подписи LDAP клиента с помощью политики локального компьютера
- Выберите >«Запустить»,введитеmmc.exe и выберите «ОК».
- Select File >Add/Remove Snap-in.
- В диалоговом окне «Добавление и удаление оснастки» выберите редактор объектов групповой политики и выберите «Добавить».
- Нажмите кнопку Готово.
- Нажмите OK.
- Выберите локальные политики >компьютерной конфигурации >конфигурации windows >Settings Security > Settings Local Policies, > а затем выберите параметры безопасности.
- Щелкните правой кнопкой мыши сетевую безопасность: требования подписи клиента LDAP и выберите «Свойства».
- В диалоговом окне «Безопасность сети: свойства для подписи клиента LDAP» выберите «Требовать подпись в списке» и затем выберите «ОК».
- В диалоговом окне «Подтверждение изменения параметра» выберите «Да».
Как установить требование подписи LDAP клиента с помощью объекта групповой политики домена
- Выберите >«Запустить»,введитеmmc.exe и выберите «ОК».
- Select File >Add/Remove Snap-in.
- В диалоговом окне «Добавление и удаление оснастки» выберите редактор объектов групповой политики и выберите «Добавить».
- Выберите «Обзор», а затем выберите политику домена по умолчанию (или объект групповой политики, для которого нужно включить подпись LDAP клиента).
- Нажмите OK.
- Нажмите кнопку Готово.
- Нажмите Закрыть.
- Нажмите OK.
- Выберите локализованные параметры безопасности параметров безопасности конфигурации компьютера с политикой домена по умолчанию, а затем > > > > выберите «Параметры безопасности».
- В диалоговом окне «Безопасность сети: требования к подписи клиента LDAP: свойства» выберите «Требовать регистрацию в списке» и затем выберите «ОК».
- В диалоговом окне «Подтверждение изменения параметра» выберите «Да».
Как установить требование подписи LDAP клиента с помощью ключей реестра
Точно следуйте всем указаниям из этого раздела. Внесение неправильных изменений в реестр может привести к возникновению серьезных проблем. Прежде чем приступить к изменениям, создайте резервную копию реестра для восстановления на случай возникновения проблем.
По умолчанию для служб Active Directory облегченного доступ к каталогам (AD LDS) этот ключ реестра недо доступен. Поэтому необходимо создать запись реестра типа REG_DWORD под следующим подмеком LDAPServerIntegrity реестра:
Замещетель представляет имя экземпляра AD LDS, который требуется изменить.
Проверка изменений конфигурации
Во sign in to a computer that has the AD DS Admin Tools installed.
Выберите > «Запустить», введитеldp.exe и выберите «ОК».
Выберите подключение. >
В «Сервер» и «Порт» введите имя сервера и порт сервера каталогов без SSL/TLS, а затем выберите «ОК».
Для контроллера домена Active Directory применимый порт — 389.
После подключения выберите привязку > подключения.
В области «Тип привязки» выберите «Простая привязка».
Введите имя пользователя и пароль, а затем выберите «ОК».
Если вы получили следующее сообщение об ошибке, сервер каталогов успешно настроен:
Ldap_simple_bind_s() failed: Strong Authentication Required
Enable LDAP over SSL (LDAPS) for Microsoft Active Directory servers.
Microsoft active directory servers will default to offer LDAP connections over unencrypted connections (boo!).
The steps below will create a new self signed certificate appropriate for use with and thus enabling LDAPS for an AD server. Of course the «self-signed» portion of this guide can be swapped out with a real vendor purchased certificate if required.
Steps have been tested successfully with Windows Server 2012R2, but should work with Windows Server 2008 without modification. Requires a working OpenSSL install (ideally Linux/OSX) and (obviously) a Windows Active Directory server.
- Create root certificate
- Import root certificate into trusted store of domain controller
- Create client certificate
- Accept and import certificate
- Reload active directory SSL certificate
- Test LDAPS using
ldp.exeutility - Reference
Create root certificate
Using OpenSSL, create new private key and root certificate. Answer country/state/org questions as suitable:
$ openssl genrsa -aes256 -out ca.key 4096
$ openssl req -new -x509 -days 3650 -key ca.key -out ca.crt
Hold onto the resulting ca.key and ca.crt.
Import root certificate into trusted store of domain controller
- From the active directory server, open
Manage computer certificates. - Add the generated
ca.crtto the certificate pathTrusted Root Certification AuthoritiesCertificates. - Done.
Create client certificate
We will now create a client certificate to be used for LDAPS, signed against our generated root certificate.
From the active directory server:
-
Create a new
request.infdefinition with the following contents — replacingACTIVE_DIRECTORY_FQDNwith the qualified domain name of your active directory server:[Version] Signature="$Windows NT$" [NewRequest] Subject = "CN=ACTIVE_DIRECTORY_FQDN" KeySpec = 1 KeyLength = 2048 Exportable = TRUE MachineKeySet = TRUE SMIME = FALSE PrivateKeyArchive = FALSE UserProtected = FALSE UseExistingKeySet = FALSE ProviderName = "Microsoft RSA SChannel Cryptographic Provider" ProviderType = 12 RequestType = PKCS10 KeyUsage = 0xa0 [EnhancedKeyUsageExtension] OID = 1.3.6.1.5.5.7.3.1 ; Server Authentication -
Run the following to create a client certificate request of
client.csr(note: it’s critical this is run from the active directory server itself to ensure correct private key -> certificate association):C:> certreq -new request.inf client.csr
Back to our OpenSSL system:
-
Create
v3ext.txtcontaining the following:keyUsage=digitalSignature,keyEncipherment extendedKeyUsage=serverAuth subjectKeyIdentifier=hash -
Create a certificate
client.crtfrom certificate requestclient.csrand root certificate (with private key):$ openssl x509 -req -days 3650 -in client.csr -CA ca.crt -CAkey ca.key -extfile v3ext.txt -set_serial 01 -out client.crt
-
Verify generated certificate:
$ openssl x509 -in client.crt -text
-
Ensure the following
X509v3 extensionsare all present:X509v3 Key Usage: Digital Signature, Key EnciphermentX509v3 Extended Key Usage: TLS Web Server AuthenticationX509v3 Subject Key Identifier
Accept and import certificate
-
From the active directory server with
client.crtpresent, run the following:C:> certreq -accept client.crt
-
Open
Manage computer certificates, the new certificate should now be present underPersonalCertificates. Ensure that:- Certificate has a private key association.
- The «Intended Purposes» is defined as «Server Authentication».
- Certificate name is the FQDN of the active directory server.
Reload active directory SSL certificate
Alternatively you can just reboot the server, but this method will instruct the active directory server to simply reload a suitable SSL certificate and if found, enable LDAPS:
-
Create
ldap-renewservercert.txtcontaining the following:dn: changetype: modify add: renewServerCertificate renewServerCertificate: 1 - -
Run the following command:
C:> ldifde -i -f ldap-renewservercert.txt
Test LDAPS using ldp.exe utility
-
From another domain controller, firstly install our generated root certificate
ca.crtto the certificate pathTrusted Root Certification AuthoritiesCertificates. -
Open utility:
-
From
Connection, selectConnect. -
Enter name of target domain controller.
-
Enter
636as port number (this is the LDAPS port). -
Click
OKto confirm the connection works. -
You’re all done!
Reference
- Enable LDAP over SSL with a third-party certification authority: https://support.microsoft.com/en-us/kb/321051
- LDAP renewServerCertificate: https://msdn.microsoft.com/en-us/library/cc223311.aspx
- How to Enable LDAPS in Active Directory (similar outcome to above): http://www.javaxt.com/tutorials/windows/how_to_enable_ldaps_in_active_directory
- DigiCert LDAPS certificate install guide: https://www.digicert.com/ssl-certificate-installation-microsoft-active-directory-ldap-2012.htm
Cookie Preferences
Cookie Consent
This privacy statement applies to miniorange websites describing how we handle the personal
information.
When you visit any website, it may store or retrieve the information on your browser, mostly in the
form of the cookies. This information might be about you, your preferences or your device and is
mostly used to make the site work as you expect it to. The information does not directly identify
you, but it can give you a more personalized web experience.
Click on the category headings to check how we handle the cookies.
For the privacy statement of our solutions you can refer to the privacy policy.
Strictly Necessary Cookies
Always Active
Necessary cookies help make a website fully usable by enabling the basic functions like site
navigation, logging in, filling forms, etc. The cookies used for the functionality do not store any
personal identifiable information. However, some parts of the website will not work properly without
the cookies.
Performance Cookies
Always Active
These cookies only collect aggregated information about the traffic of the website including —
visitors, sources, page clicks and views, etc. This allows us to know more about our most and least
popular pages along with users’ interaction on the actionable elements and hence letting us improve
the performance of our website as well as our services.
Important Info:
The scheduled update (ADV190023), regarding LDAP Signing and Channel Binding for new and existing domain controllers, scheduled for March 10, 2020, has been postponed to the second half of calendar year 2020. The March 2020 update will only provide additional auditing capabilities to identify and configure LDAP systems before they become inaccessible with the later update.
The later update results in no more connections to the domain controller, via unsigned / Clear Text LDAP on port 389. Then it is only possible to use either LDAPS via port 636 or Signed LDAP (StartTLS) on port 389.
Affected Domain Controller Versions
- Windows Server 2019
- Windows Server 2016
- Windows Server 2012 R2
- Windows Server 2012
- Windows Server 2008 R2 SP 1
- Windows Server 2008 SP 2
Affected LDAP Clients
The topic concerns not only the Microsoft environment, but all systems that serve as LDAP client and send LDAP requests. The following is a small list of systems that occurred to me.
- Citrix Gateway
- Citrix AAA
- Citrix LoadBalancer for LDAP
- Citrix Endpoint Management
- VPN (e.g. Sophos)
- Igel UMS Console
- Ticket Systems (e.g. Remedy or Helpdesk)
- ERP /CRM Systems (e.g. SAP)
- Database Systems (e.g. Oracle)
- Webserver (e.g. TomCat or Apache)
- Security Components (Firewall or Proxy)
- Backup / Storage Repository
Some manufacturers, e.g. Igel, have already reacted and it is now possible to switch the connection to LDAPS via the GUI of the UMS console.

How can I check if unsigned LDAP is used?
The first step, to determine if the environment is affected by the transition, is to scan the event logs on the Active Directory server for event IDs 2886, 2887 and 2888. After installing the March updates, the event IDs 3039, 3040 and 3041 still point to unsecured LDAP traffic. All event IDs can be found under Applications and Services Logs / Directory Service.
This is checked manually on all DCs or by the script entered below, which performs the manual steps for you.
LDAP signing events
Following are the event logs regarding LDAP signing.
| Description | Trigger | |
| 2886 | The security of these domain controllers can be significantly improved by configuring the server to enforce validation of LDAP signing. | Triggered every 24 hours, on startup or start of service if the Group Policy is set to None. Minimum Logging Level: 0 or higher |
| 2887 | The security of these domain controllers can be improved by configuring them to reject simple LDAP bind requests and other bind requests that do not include LDAP signing. | Triggered every 24 hours when Group Policy is set to None and at least one unprotected bind was completed. Minimum Logging Level: 0 or higher |
| 2888 | The security of these domain controllers can be improved by configuring them to reject simple LDAP bind requests and other bind requests that do not include LDAP signing. | Triggered every 24 hours when Group Policy is set to Require Signing and at least one unprotected bind was rejected. Minimum Logging Level: 0 or higher |
| 2889 | The security of these domain controllers can be improved by configuring them to reject simple LDAP bind requests and other bind requests that do not include LDAP signing. | Triggered when a client does not use signing for binds on sessions on port 389. Minimum Logging Level: 2 or higher |
If event 2886 is present on a domain controller, this indicates that signed LDAP is not forced by the DCs and it is possible to perform a simple (Clear Text) LDAP binding over an unencrypted connection. The security option “Domain controller: LDAP server signing requirements” is then configured to “None“.

The next checkpoint is event 2887, this event ID occurs every 24 hours and reports how many unsigned and clear text connections to the DC have occurred.

If the Active Directory servers are configured to reject unsigned or simple LDAP connections over a non-SSL/TLS connection, the Active Directory servers log these attempts and write a summary to the event log every 24 hours under event ID 2888.
Changes with March Update
Important:
The March 10, 2020 updates do not change the default policies for LDAP signing or LDAP channel binding on new or existing Active Directory domain controllers.
It only adds the following functions:
- New events are logged in the Event Log in combination with the LDAP Channel Bindings.
- A new GPO setting “Domain controller: LDAP server channel binding token requirements” to configure LDAP channel binding on supported devices. Possible settings are None, When Supported or Always. Event ID 3039 is only created if this setting is not set to None.
LDAP Channel Binding events
Following are the new events that will be released with the March update.
| Event | Description | Trigger |
| 3039 | The following client performed an LDAP bind over SSL/TLS and failed the LDAP channel binding token validation. | Triggered when a client attempts to bind without valid CBT. Minimum logging level: 2
Note Event can only be generated when Channel Binding is set to When Supported or Always |
| 3040 | During the previous 24 hour period, # of unprotected LDAPs binds were performed. | Triggered every 24 hours when CBT Group Policy is set to Never and at least one unprotected bind was completed. Minimum logging level: 0 |
| 3041 | The security of this directory server can be significantly improved by configuring the server to enforce validation of LDAP channel binding tokens. | Triggered every 24 hours, on startup or start of service if the CBT Group Policy is set to Never. Minimum logging level: 0 |
Activation LDAP Event Diagnostic Logging
With the event IDs mentioned above we only get the information that we still receive Clear Text LDAP requests to the domain controller, but not who is sending them. To change this we can increase the log level on our domain controller to see who requested the Clear Text LDAP connection (Event ID 2889).
Enable LDAP Event Diagnostic Logging
Copy the bottom line into a REG file and execute it on the DC. No restart is required.
|
# Enable Simple LDAP Bind Logging Reg Add HKLMSYSTEMCurrentControlSetServicesNTDSDiagnostics /v «16 LDAP Interface Events» /t REG_DWORD /d 2 |

Disable LDAP Event Diagnostic Logging
Copy the bottom line into a REG file and execute it on the DC to disable it again.
|
# Disable Simple LDAP Bind Logging. Reg Add HKLMSYSTEMCurrentControlSetServicesNTDSDiagnostics /v «16 LDAP Interface Events» /t REG_DWORD /d 0 |
Note:
It may be necessary to replace the double quotation marks after copying and pasting.
After activation of the extended log level, an event with the ID 2889 is created for each access via Clear Text LDAP (under Applications and Services Logs / Directory Service). These events contain which IP addresses and which user accounts have established this connection.

PowerShell script for testing the DCs
To make it easier to check the environment, I have adapted the following PowerShell scripts by Arne Tiedemann to the Microsoft March Updates.
- Connect to a domain controller
- Go to this link and download the two scripts
(Further instructions are stored in the README.md file) - Run the script ActiveDirectory-DCLDAPEvents.ps1 to search your domain controllers for event ID 2887 & 3040

- The script then create a CSV file (InsecureLDAPCount.csv) with the displayed information

Only the event entries are counted and you will not get any further information from this file!
To get more information, like user account or IP address of the LDAP client, you have to execute the script ActiveDirectory-LDAPInterfaceEventLogging.ps1
- Start the script on the domain controller

The script will detect if you have run one of the two available scripts in the last 15 minutes and would not search all DCs for the known events again.

It uses the created InsecureLDAPCount.csv file to identify the affected DCs and, based on the list, starts the increased log level for 30 minutes on the DCs. As a result, you will get a detailed list for each affected DC with the following information.
DomainController – LDAP Client IP-Address – Port – User – BindType

If the increased log level should not run for 30 minutes, the time can be adjusted with the following parameters.
|
.ActiveDirectory-LDAPInterfaceEventLogging.ps1 -Runtime «Minutes» |
Action plan for ADV190023
- Install the March Windows Updates
- Check environment automatically via script or with the following manual steps
- Configure LDAP Event Diagnostic Logging to 2 or higher
- Monitor the event log under Applications and Services Logs / Directory Service on all domain controllers
- LDAP Signing failure event 2887
- LDAP Channel Binding failure event 3040
Note:
Event 3039 can only be generated if Channel Binding is set to When Supported or Always.
- Identify the devices for each IP address named at Event 2887 (unsigned LDAP) or Event 3039 (no LDAP Channel Binding)
- Enable LDAPS on domain controller (Signed LDAP is always accepted and should not be set to Required in the phase)
- Enable LDAPS or Signed LDAP (StartTLS) on the mentioned devices

Activation LDAPS & Signed LDAP (StartTLS) on DC
Short guide to enable LDAPS & Signed LDAP (StartTLS) on your domain controllers.
Method 1
The first method is the simplest:
The DC automatically accept LDAPS & Signed LDAP (StartTLS) if a Microsoft Enterprise Root CA is installed on a domain controller. If the Active Directory Certificate Services (AD CS) role is installed and the type of CA setup on the DC is specified as “Enterprise”, all DCs in the overall structure are automatically configured to accept both.
Note:
Although it’s generally a good thing to have a CA in the organization, placement on the DC is not a good idea overall.
Method 2
In most cases a certificate is used where the root CA is not located on a DC. So the second method is to simply put a certificate (Server Authentication enabled) on each DC.
Important:
Remember that regardless of which CA is used to obtain this certificate, both the DCs and the systems running the LDAP client application must trust this certificate.
Note:
For a Windows Server 2008 / R2 / 2012 DC, the certificate must be imported into the AD DS Personal Store (NTDSPersonal).
For older servers (older than 2003 R2) the certificate must be imported into the Computer Personal Store.
For Windows Server 2016 & 2019 both methods work.
Requirements
- Installed & Activated CA
Publication of a compatible Certificate Template
We need a certificate template that supports Server Authentication and has an Exportable private key.
- Connect to your server that has the AD CA role installed
- Open the Certificate Console via Start > Run and the command certsrv.msc

- Expand the display, by double clicking on the name of your CA
- Now click with the right mouse button on Certificate Templates and then on Manage

- In the Certificate Template Console, right-click on Web Server and select Duplicate Template
It is not necessary to use the Web Server template. You can create your own template or use one of the other existing templates that have server authentication as their purpose.

- In the window that appear, the duplicated template is edited. Change the following under General
- Change the Template display name
- Change the Validity period and Renewal period to your security parameters

- Under Request Handling click on Allow private key to be exported

- Under Subject Name select DNS name and Service principal Name (SPN)

Note:
If the certificate template is to be used for wildcards, Supply in the request must be selected here

- Under Security click Add

- In the following window click on Locations…

- Select Computers and confirm with OK

- Enter your DCs and confirm this with Check Names and OK

- Under Security click on your newly added DCs and extend the Allow permissions with Read, Write & Enroll

- Under Extensions, check again that Server Authentication is also selected as the Application Policies. Confirm the entries with OK.

- Close the Certificate Template Console
- Go back to the Certificate Console and right click in the details area of Certificate Templates
- Click here on New and then on Certificate Template to be Issue

- In the window Enable Certificate Templates select the newly created template (here Server Authentication) and click on OK

Requesting a Server Authentication Certificate
For LDAPS we can use either a SAN certificate or a Wildcard certificate. Both types of certificates must be created with Server Authentication permission. Follow these instruction for either SAN certificate or Wildcard certificate.
Request SAN Certificate
- Connect to the first DC
- Open a console there via Start > Run with the command mmc

- In the MMC console click on File and on Add/Remove Snap-in…

- In the following window select Certificates on the left side and click on Add

- In the Certificate Snap-in window, select Computer account and click Next

- Under Select Computer, select Local Computer and click Finish
- Extend the console to the folder Certificates (Local Computer) > Personal > Certificates
- Right-click on the folder and click on All Tasks and Request New Certificate

- Click the first two windows with Next through
- In the window Request Certificates select your newly created certificate template (here Server Authentication)
- Click on Enroll

- If the creation was successful, this is displayed under Status. Confirm this with Finish

- Double-click the new certificate in the results area to open the Certificate Properties dialog box
![]()
- Click on the Details tab and select the Enhanced Key Usage option. Check that Server Authentication (1.3.6.1.5.5.7.3.1) has been added

Perform these steps for each domain controller.
Request Wildcard Certificate
If a load balancer (e.g. Citrix ADC) is used in front of the domain controllers, not every DC has to receive its own certificate. Only the load balancer needs a certificate (e.g. Wildcard certificate), which is then imported and accepted on all DCs.

- Connect to the first DC
- Open a console there via Start > Run with the command mmc
- In the MMC console click on File and on Add/Remove Snap-in…
- In the following window select Certificates on the left side and click on Add
- In the Certificate Snap-in window, select Computer account and click Next
- Under Select Computer, select Local Computer and click Finish
- Extend the console to the folder Certificates (Local Computer) > Personal > Certificates
- Right-click on the folder and click on All Tasks and Request New Certificate
- Click the first two windows with Next through
- In the window Request Certificates select your newly created certificate template (here Server Authentication)
- Click on the warning notice More information is required to enroll for this certificate…
Note:
If you do not see this warning, the certificate template is not defined with Supply in the request under Subject Name in the template

- In the Certificate Properties window under the Subject tab enter the following
- Type (Common name)
- Value (Your domain for the Wildcard, e.g. *.deyda.local)
- Click on Add

- In the tab General enter the display name of the certificate under Friendly name (e.g. *.deyda.local)

- Check in the tab Extensions that both Digital signature & Key encipherment is selected

- Check in the Private Key tab that Make private key exportable is selected and confirm this with OK

- When all requirements are filled out click on Enroll

- If the creation was successful, this is displayed under Status. Confirm this with Finish
- Double-click the new certificate in the results area to open the Certificate Properties dialog box

- Click on the Details tab and select the Enhanced Key Usage option. Check that Server Authentication (1.3.6.1.5.5.7.3.1) has been added

This only need to be done once for all DCs.
Export the LDAPS certificate
The following steps show how to export an LDAPS-enabled certificate from the local certificate store of a domain controller. The following steps apply to Wildcard and SAN certificates.
- Connect to the first DC
- Open a console there via Start > Run with the command mmc
- In the MMC console click on File and on Add/Remove Snap-in…
- In the following window select Certificates on the left side and click on Add
- In the Certificate Snap-in window, select Computer account and click Next
- Under Select Computer, select Local Computer and click Finish
- Extend the console to the folder Certificates (Local Computer) > Personal > Certificates
- Click with the right mouse button on the previously created certificate (here DC01.deyda.net, you can recognize it by the column Certificate Template) and click on All Tasks and Export

- Click Next on the Welcome Screen of the Certificate Export Wizard
- In the Export Private Key window, select Yes, export private key and confirm with Next
- If it is not possible to export the private key, then the wrong certificate template was selected or it was created incorrectly

- In the Export File Format window, Export all extended properties should be selected. Confirm this with Continue.
- The other selection options are optional.

- On the Security window, enter a Password to use for importing the certificate. Then click Next

- Select a path in the File to Export window via Browse and define a file name. Then click on Next

- Confirm the settings by clicking on Finish

- This is followed by a pop-up message indicating that The export was successful. Click OK.

![]()
Import for use with AD DS
The certificate must now be imported into the certificate store of the Active Directory Domain Services (NTDSPersonal). This step must be performed for each domain controller that is to provide LDAPS. These certificates must be manually renewed when they expire. The following steps apply to Wildcard and SAN certificates.
Note:
The following steps must be performed on Windows Server 2008 / R2 / 2012 DCs.
For Windows Server 2016 & 2019 the following steps are optional.
- Connect to the first DC
- Open a console there via Start > Run with the command mmc
- In the MMC console click on File and on Add/Remove Snap-in…
- In the following window select Certificates on the left side and click on Add
- In the Certificates snap-in window, select Service account and click Next

- Under Select Computer, select Local Computer and click Next
- Select Active Directory Domain Services and confirm with Finish

- Expand the console to the folder Certificates – Service (Active Directory Domain Services) > NTDSPersonal
- Right click on the NTDSPersonal folder and click on All Tasks and Import

- At the Certificate Import Wizard window click Next
- Click the Browse button in the File to Import window and then browse to the previously exported certificate file
- Ensure that Personal Information Exchange (pfx, .p12) is selected as the file type

- Confirm the selection with Next

- In the following Private key protection window, enter the Password for the certificate and click Next

- On the Certificate Store page, make sure the Place all certificates in the following store option is selected and the certificate store is NTDSPersonal.
- Confirm this with Next

- Confirm the settings with a click on Finish

- A message should then appear that The import was successful. Click on OK

- Check the successful import. Expands the navigation area under NTDSPersonal > Certificates. Here you should see the imported certificate

Checking the connections
After installing a certificate, perform the following steps to verify that LDAPS and Signed LDAP (StartTLS) are working.
- Connect to the first DC
- Open a console there via Start > Run with the command mmc
- Start the Active Directory Administration Tool (Ldp.exe)
- For non-domain controllers, the Remote server administration tools must be installed

- Click on Connection and then on Connect

- Enter the name of the LDAPS server (e.g. Domain Controller or LDAP Load Balancer) you want to test
- Change the port to 636 and check the box SSL to test LDAPS
- Start the test with OK

- Successful connection via LDAPS

- Change the port to 389 and uncheck the SSL box to test signed LDAP (StartTLS)
- Start the test with OK

- The LDAP connection is established

- Now click on Options > TLS > StartTLS to start Signed LDAP (StartTLS)

- Signed LDAP (StartTLS) could establish connection

Check without certificate
For test cases you can delete the imported certificate from the DC again or connect against a DC without certificate. There you can try to establish the same connections.

- LDAPS connection (Port 636 SSL) not successful

- LDAP connection (Port 389) still works

- But the switch to Signed LDAP (StartTLS) no longer works

Configure Citrix ADC
As mentioned above, the Citrix ADC with its DC connections may be affected by the upcoming change. Therefore here is a short instruction to change the required settings in the Citrix ADC.
Requirements
- The domain controller has bound a certificate (Server Authentication) for LDAPS or Signed LDAP (StartTLS) (e.g. Wildcard Certificate)
- If LDAPS is to be used, the affected firewalls must still be adapted (Port change from 389 to 636)
Authentication LDAPS Server
- Connect to the Management IP of the affected system

- Go in the navigantion panel to System > Authentication > Basic Policies > LDAP

- Switch to the Servers tab

- Open your existing LDAP server (here 10.0.0.4_LDAP)

- Change the Security Type to SSL, which directly change the Port to 636

- Now you can test this change directly with Test LDAP Reachability. This can be found under Connection Settings


Another advantage of switching to LDAPS is that the user can change his password independently.
- Activate the item Allow Password Change under Other Settings

CLI Command
|
set authentication ldapAction <Authentication Server Name> -serverIP <Authentication Server IP> -serverPort 636 -secType SSL |
Example:
|
set authentication ldapAction 10.0.0.4_LDAP -serverIP 10.0.0.4 -serverPort 636 -secType SSL |
Authentication Signed LDAP (StartTLS) Server
- Connect to the Management IP of the affected system
- Go to System > Authentication > Basic Policies > LDAP in the Navigation Menu
- Switch to the Servers tab
- Open your existing LDAP server (here 10.0.0.4_LDAP)
If the firewalls are not to be adjusted, Signed LDAP (StartTLS) can also be used in the Citrix ADC.
- Change the Security Type to TLS, the Port remains at 389

- Now you can test this change directly with Test LDAP Reachability. This can be found under Connection Settings

CLI Command
|
set authentication ldapAction <Authentication Server Name> -serverIP <Authentication Server IP> -serverPort 389 -secType TLS |
Example:
|
set authentication ldapAction 10.0.0.4_LDAP -serverIP 10.0.0.4 -serverPort 389 -secType TLS |
Load Balanced LDAPS Server
TCP or SSL_TCP can be selected as Load Balancing Protocol for LDAPS. SSL_TCP is recommended for higher compatibility (e.g. with Linux appliances) (SSL termination is done on the Citrix ADC).
For existing LDAP load balancing, the following must be recreated for LDAPS:
- Load Balancing Monitor
- Load Balancing Service Groups
- Load Balancing vServer
- Connect to the Management IP of the affected system
Configuration LDAPS Monitor
- Go to Traffic Management > Load Balancing > Monitors in the Navigation Menu

- Now click on Add, if you do not have an existing LDAPS monitor

- Configure the new Monitor
- Name (Name of the Monitor, e.g. LDAPS)
- Type (Type of the Monitor, LDAP)
- Password (The password of the Service Account stored under Bind DN)
- Base DN (Domain names in LDAP format, e.g. dc=deyda, dc=local)
- Bind DN (Service Account for communication with the AD, e.g. service_ldap@deyda.local)
- Filter (Restriction of search results, cn=builtin)
- Secure (Activate the Secure checkbox)
- Confirm the entry with Create

CLI Command
|
add lb monitor <Monitor Name> -scriptName nsldap.pl -dispatcherIP 127.0.0.1 -dispatcherPort 3013 -password <Password for Bind DN User> -secure YES -baseDN «<Base DN Path>« -bindDN «<Service Account for Connect>« -filter cn=builtin |
Example:
|
add lb monitor LDAPS -scriptName nsldap.pl -dispatcherIP 127.0.0.1 -dispatcherPort 3013 -password Password1 -secure YES -baseDN «dc=deyda,dc=local« -bindDN «service_ldap@deyda.local« -filter cn=builtin |
Configuration of the LDAPS Service Group
- Go to Traffic Management > Load Balancing > Service Groups in the Navigation Menu

- Now click on Add to create a new Service Group for LDAPS

- Configure the new Service Group for LDAPS
- Name (Name of the Service Group, e.g. LDAPS-svc_group)
- Protocol (Protocol, SSL_TCP)
- Confirm the entry with OK

- Click on No Service Group Member in the following window to include the existing DCs for LDAPS

- Change the server methode to Server Based and click on Click to select if existing servers are to be included. If new servers are to be included, click Add

- Select the DCs that are configured for LDAPS and add them via Select

- Configure the required port (636) and confirm the entry with Create

- In the following Load Balancing Service Group window, select Monitors on the right side

- Now click on No Service Group to Monitor Binding to bind the previously created LDAPS Monitor

- Now select the Monitor (here LDAPS) and confirm this with Select

- Confirm the integration of the Monitor by clicking on Bind

- Confirm the entries with Done. The Effective State must be displayed as Up

CLI Command
|
add serviceGroup <Service Group Name> SSL_TCP bind serviceGroup <Service Group Name> <Server Name> 636 bind serviceGroup <Service Group Name> <Server Name> 636 bind serviceGroup <Service Group Name> -monitorName <Monitor Name> |
Example:
|
add serviceGroup LDAPS-svc_group SSL_TCP bind serviceGroup LDAPS-svc_group 10.0.0.4 636 bind serviceGroup LDAPS-svc_group 10.0.0.5 636 bind serviceGroup LDAPS-svc_group -monitorName LDAPS |
Configuration of the LDAPS virtual Server
- Go to Traffic Management > Load Balancing > Virtual Servers in the Navigation Menu

- Now click on Add to create a new Virtual Server for LDAPS

- Configure the new Virtual Server for LDAPS
- Name (Name of the Virtual Servers, e.g. LDAPS-LB)
- Protocol (Protocol, SSL_TCP)
- IP Address Type (IP Address)
- IP Address (IP Address of the Virtual Server, e.g. 10.0.0.200)
- Port (LDAPS Port, 636)
- Confirm the entries with OK

- Click No Load Balancing Virtual Server ServiceGroup Binding in the following window to bind the newly created Service Group

- Click on Click to select to get to the selection list of Service Groups

- Select the previously configured Service Group (LDAPS-svc_group) and add it via Select
- Click Continue after binding

- Click under Certificate on No Server Certificate

- Now select a suitable certificate for this load balancer. Select a Wildcard certificate of the local domain (Wildcard-deyda-local) and confirm with Select

- Now click on Continue and then on Done
CLI Command
|
add lb vserver <Load Balancing Name> SSL_TCP <Load Balancing IP Address> 636 -persistenceType NONE -cltTimeout 9000 bind lb vserver <Load Balancing Name> <Service Group Name> |
Example:
|
add lb vserver LDAPS-LB SSL_TCP 10.0.0.200 636 -persistenceType NONE -cltTimeout 9000 bind lb vserver LDAPS-LB LDAPS-svc_group |
Configuration of the LDAPS Authentication Server
- Go to System > Authentication > Basic Policies > LDAP in the Navigation Menu
- Switch to the Servers tab
- Open the existing LDAP server (here 10.0.0.4_LDAP) or create a new one
- Change the following settings of the existing Authentication Server
- IP Address (IP Address of the LB Virtual Server, 10.0.0.200)
- Security Type (Type of the connection, SSL)
- Port (Port of the connection, 636)
The port is automatically changed when SSL is selected under Security Type.

- Now you can test this change directly with Test LDAP Reachability. This can be found under Connection Settings

Another advantage of switching to LDAPS is that the user can change his password independently.
- Activate the item Allow Password Change under Other Settings
CLI Command
|
set authentication ldapAction <Authentication Server Name> -serverIP <Load Balancing IP Address> -serverPort 636 -secType SSL |
Example:
|
set authentication ldapAction 10.0.0.4_LDAP -serverIP 10.0.0.200 -serverPort 636 -secType SSL |
Load Balanced Signed LDAP (StartTLS)
If the firewalls should not be changed, Signed LDAP (StartTLS) should be used in the Citrix ADC. Nothing need to be adjusted in the load balancing chain for this, because port 389 is still used.
- Connect to the Management IP of the affected system
- Go to System > Authentication > Basic Policies > LDAP in the Nagivation Menu
- Switch to the Servers tab
- Open the existing LDAP server (here 10.0.0.4_LDAP) or create a new one
- Change the Security Type to TLS, the port remain at 389

- Now you can test this change directly with Test LDAP Reachability. This can be found under Connection Settings

CLI Command
|
set authentication ldapAction <Authentication Server Name> -serverIP <Load Balancing IP Address> -serverPort 389 -secType TLS |
Example:
|
set authentication ldapAction 10.0.0.4_LDAP -serverIP 10.0.0.200 -serverPort 389 -secType TLS |
In March 2020, systems will stop working if:
-
They are integrated with Active Directory using non-secure LDAP.
-
Domain controller servers do have the latest patches installed.
-
Sysadmins don’t proactively take steps such as the ones we’ve detailed below.
There are numerous existing guides for setting up secure LDAP but none were as thorough, up to date, or user friendly as we’d like for ourselves or our clients so we decided to try to plug the gap by creating this one.
Update 2020/02/12 11:17: According to a couple of Microsoft articles (1, 2), it seems that the decision has been made to push back this default behaviour to “the second half of calendar year 2020”.
Update 2020/03/24 09:41: It seems that Microsoft have decided not to enforce these changes after all. The following is an excerpt from the same Microsoft articles:
“Note that these March 10, 2020 updates and updates in the foreseeable future will not make changes to LDAP signing or LDAP channel binding policies or their registry equivalent on new or existing domain controllers.”
Links to each section:
-
Explanation
-
Identification
-
Resolution
-
Certificate Signing Request (CSR)
-
Certificate
-
Commercial CA
-
Let’s Encrypt
-
Active Directory Certificate Services (AD CS)
-
Self-signed
-
-
Bindings
-
Testing
-
Clients
-
-
Workaround
-
Sign-off
Many systems are integrated via the Lightweight Directory Access Protocol (LDAP) because it allows systems to use a central directory of user and computer details which, in turn, allows systems to be consistent and user-aware and it allows users to access multiple services using the same set of credentials. For example:
-
Users can use their “PC” username and password with their Virtual Private Network (VPN) connections.
-
Secure Email Gateway (SEG) accounts can be automatically created.
-
Multi-Function Printer (MFP) address books can be automatically updated.
-
Firewalls can allow or reject traffic based on group membership.
etc
The problem with LDAP is that, because people tend to follow the path of least resistance, the most common method is Simple Bind which is not encrypted by default so usernames and passwords are moving around the networks just waiting to be intercepted.
On the 13th of August 2019, Microsoft published security advisory ADV190023 and support article 4520412 stating that, in order to resolve these Man-in-the-Middle (MITM) attacks / vulnerabilities such as CVE-2017-8563, they are planning to release a Windows update in March 2020 to enforce the following:
-
Simple Bind LDAP over SSL / TLS (LDAPS).
or
-
Simple Authentication and Security Layer (SASL) LDAP with digital signing requests.
Both of these options require the use of public key authentication via trusted end-entity SSL / TLS certificates.
If steps are not taken then LDAP connections will cease to work as soon as the Windows update is installed.
↑ Back to Index.
The first step is to identify what systems are integrated, if any.
Microsoft Advanced Threat Analytics (ATA) can be used for this purpose but if you don’t have that then continue reading this section.
To quickly determine if domain controller servers are being used as LDAP servers, the following PowerShell commands will retrieve the events (ID 2887) that are logged if this is the case.
$DCs = "<DC #1 hostname>", "<DC #2 hostname>";
ForEach ($DC in $DCs) {
Get-WinEvent -ComputerName $DC -ProviderName Microsoft-Windows-ActiveDirectory_DomainService | Where-Object { $_.Id -Eq 2887 } | Format-List;
}
If events are found and you require more, identifying information such as the client IP address, the username, etc, running the following PowerShell command or manually creating the registry value on each DC will cause the LDAP service to log more useful information in the events (ID 2889):
New-ItemProperty -Path "HKLM:SystemCurrentControlSetServicesNTDSDiagnostics" -Name "16 LDAP Interface Events" -PropertyType DWORD -Value 2 -Force
-
Hive and key path:
HKEY_LOCAL_MACHINESystemCurrentControlSetServicesNTDSDiagnostics
-
Value type:
DWORD (32-bit) Value/REG_DWORD -
Value name:
16 LDAP Interface Events -
Value data:
2(decimal)
Once that is in place, you can use the following PowerShell commands to extract the identifying information too:
$DCs = "<DC #1 hostname>", "<DC #2 hostname>";
ForEach ($DC in $DCs) {
Get-WinEvent -ComputerName $DC -ProviderName Microsoft-Windows-ActiveDirectory_DomainService | Where-Object { $_.Id -Eq 2887 -Or $_.Id -Eq 2889 } | Format-List;
}
Alternatively, on each DC, you can open Event Viewer and view the log Applications and Services Logs → Directory Service.
Now that you’ve identified which systems need to be reconfigured, it’s time to resolve the problem.
This section is only relevant if you’re not planning to use Let’s Encrypt or Active Directory Certificate Services (AD CS). If you’re not sure, skip ahead to the section “Certificate” then come back.
The first step is to generate the CSR.
As stated by Microsoft and confirmed by us, in this particular scenario, the Fully-Qualified Domain Name (FQDN) of the DC must be present in one of the following two places in the certificate:
-
The Common Name (CN) in the Subject field. We will be covering this option.
-
A DNS entry in the Subject Alternative Name (SAN) extension.
Customise the following content (particularly, the line starting with Subject) then save it as a text-based file named something like ldapcert.inf.
[Version] Signature="$Windows NT$ [NewRequest] Subject = "CN=DC01.example.local,O=Astrix Example,OU=IT,ST=RCT,L=Abercynon,C=GB" ; Replace the example between the quotation marks with the Fully-Qualified Domain Name (FQDN) of your domain controller computer account and, optionally, your organisation's information. KeySpec = 1 KeyLength = 2048 ; This can be 1024, 2048, 4096, 8192, or 16384. Larger key sizes are more secure, but have a greater impact on performance. Exportable = TRUE MachineKeySet = TRUE SMIME = False PrivateKeyArchive = FALSE UserProtected = FALSE UseExistingKeySet = FALSE ProviderName = "Microsoft RSA SChannel Cryptographic Provider" ProviderType = 12 RequestType = PKCS10 KeyUsage = 0xa0 [EnhancedKeyUsageExtension] OID=1.3.6.1.5.5.7.3.1 ; This denotes Server Authentication.
Once you have that file, run the following command:
certreq -new <path to input information file> <path to output CSR file>
certreq -new "C:UsersAdministratorDesktopldapcert.inf" "C:UsersAdministratorDesktopldapcert.csr"
If you’ve done this correctly, the output file will start with -----BEGIN NEW CERTIFICATE REQUEST----- and end with -----END NEW CERTIFICATE REQUEST-----.
The next step is to submit the CSR to a Certificate Authority (CA) to get an end-entity SSL / TLS certificate issued and installed. If a public CA is used, only a basic, Domain-Validated (DV) one is required.
Because of the DC FQDN requirement, your choice of CA depends entirely on whether your AD DNS domain name uses a valid Internet Top-Level Domain (TLD) or not. A full list of valid Internet TLDs is available on Wikipedia but here’s a quick summary of the common ones to give you an idea:
| Invalid TLD examples | Valid TLD examples |
| .local | .co.uk |
| .internal | .com |
| .corp | .org |
| .lan | .net |
| .localhost | .edu |
We have summarised the various pros and cons of the most common CAs below and linked each heading to the respective section:
DCs are usually the most valuable assets in the IT infrastructure so they should be hardened to reduce the attack surface by:
1. Installing as few applications as possible.
2. Not forwarding traffic to it from the Internet. This may be acceptable if Let’s Encrypt published a list of public IP addresses that they use for the DV process so that the firewall rule can be restricted but they confirmed in their FAQs that they do not.
In any case, the submission and issuance process is quite different depending on which CA you chose so we will cover each of these below.
For demonstration purposes, we will be using a Comodo PositiveSSL Certificate via CheapSSLSecurity with domain validation via DNS.
First, submit the CSR text to your chosen commercial CA and choose a domain validation option.
Second, complete the CA’s domain validation process, wait for the certificate to be issued, and download the certificate package.
Third, if required, install any intermediate or root CA certificates to the Local Machine’s store Intermediate Certification Authorities or Trusted Root Certification Authorities. This can be done by opening the missing CA certificate’s properties and selecting Install Certificate…, as demonstrated below.
Installing the certificate for the intermediate CA “Sectigo RSA Domain Validation Secure Server CA” to complete the chain of trust for the end-entity certificate.
Fourth, run the following command to install the certificate:
certreq -accept <path to CRT file>
First, install an ACME Client. For demonstration purposes, we will be using Certify SSL Manager and authorization / domain validation via DNS.
Second, open Certify SSL Manager and:
-
As prompted, register a contact email address. This will be used to notify you of upcoming certificate expiries / renewals, etc.
-
Add a new certificate and:
-
In the section
Certificate Domains, add the FQDN of the DC. For example,DC01.ad.example.astrix.co.uk. -
In the section
Authorization, set the following:-
Challenge type:
dns-01 -
DNS Update Method:
(Update DNS Manually)
-
-
Save the changes.
-
-
Select the button
Request a certificate. -
As prompted, create the DNS TXT Resource Record (RR) in the domain’s authoritative name servers.
-
Select the button
Request a certificateagain to continue.
The certificate should now be issued and installed.
First, install Active Directory Certificate Services (AD CS) by doing the following:
-
Open Server Manager.
-
Select
Dashboard→Add roles and features. -
In the section
Before You Begin, simply select the buttonNext >. -
In the section
Installation Type, keep the radio buttonRole-based or feature-based installationenabled and select the buttonNext >. -
In the section
Server Selection, choose the server that you wish to be the root CA and select the buttonNext >. -
In the section
Server Roles, tickActive Directory Certificate Services, select the buttonAdd Features, and select the buttonNext >. -
In the section
Features, simply select the buttonNext >. -
In the section
AD CS, ensure that you’re happy with the server’s hostname because it cannot be changed then select the buttonNext >. -
In the section
Role Services, simply select the buttonNext >. -
In the section
Confirmation, simply select the buttonInstall.
Second, configure AD CS by doing the following:
-
Open Server Manager.
-
Select the flag and warning symbol then the link
Configure Active Directory Certificate Services on the destination server. -
In the section
Credentials, assuming you’re signed in as an administrator, simply select the buttonNext >. -
In the section
Role Services, check the tickboxCertification Authoritythen select the buttonNext >. -
In the section
Setup Type, choose your preferred CA type then select the buttonNext >. -
In the section
CA Type, select the radio buttonRoot CAthen select the buttonNext >. -
In the section
Private Key, select the radio buttonCreate a new private keythen select the buttonNext >. -
In the section
Cryptography, select the following then select the buttonNext >:-
Cryptographic provider:
RSA#Microsoft Software Key Storage Provider -
Key length:
2048(at least) or4096(recommended) -
Hash algorithm:
SHA256(at least)
-
-
In the section
CA Name, change the defaults to the following then select the buttonNext >:-
Common name for this CA: This must be the same as the server’s FQDN.
DC01.example.local, for example. -
Distinguished name suffix: Blank.
-
Preview of distinguished name: This should automatically be
CN=<server’s FQDN>.
-
-
In the section
Validity Period, simply select the buttonNext >. -
In the section
Certificate Database, simply select the buttonNext >. -
In the section
Confirmation, simply select the buttonConfigure. -
In the section
Results, simply select the buttonClose.
Third, run the following command and make a note of the value after Unique container name for the new certificate.
Fourth, open Explorer and do the following:
-
Browse to
C:ProgramDataMicrosoftCryptoKeys. -
View the properties of the file named
<unique container name>. -
Select the tab
Securitythen select the buttonEdit…. -
Select the button
Add…, enterNetwork Service, select the buttonCheck Names, then select the buttonOK.
This should add the security principalNETWORK SERVICEwith allow permissionsRead & executeandRead. -
Close all windows applying changes.
In cases such as this (“inter-component authentication”, as McAfee describes it here), using a self-signed certificate is better than nothing but whether it can be considered as “secure” or “safe” is a debate for another time…
First, install OpenSSL.
Second, create a text-based file named something like v3ext.txt with the following content:
 keyUsage=digitalSignature,keyEncipherment
 extendedKeyUsage=serverAuth
 subjectKeyIdentifier=hash
Third, run the following PowerShell commands. Only the OpenSSL path needs to be customised. When prompted, ensure that you use a strong passphrase for the CA’s private keyfile.
& "<path>openssl.exe" genrsa -aes256 -out ca_private.key 4096; & "<path>openssl.exe" req -new -x509 -days 3650 -key ca_private.key -out ca_public.crt; Import-Certificate -FilePath ca_public.crt -CertStoreLocation Cert:LocalMachineRoot; & "<path>openssl.exe" x509 -req -days 365 -in ldapcert.csr -CA ca_public.crt -CAkey ca_private.key -extfile v3ext.txt -set_serial 01 -out ldapcert.crt; & "<path>openssl.exe" x509 -in ldapcert.crt -text; certreq -accept ldapcert.crt
Once the certificate has been installed, the DC server’s bindings need to be updated.
This can be done by simply rebooting the DC server or, alternatively, by doing the following two steps.
First, create a text-based file named something like ldap-renewservercert.txt with the following content:
 dn:
 changetype: modify
 add: renewServerCertificate
 renewServerCertificate: 1
 -
Second, run the following command:
ldifde -i -f ldap-renewservercert.txt
That’s it!
↑ Back to Index.
Once everything has been set up, it’s a good idea to test that it’s all actually working as required.
To do this, you can use tools such as ldp.exe (available on DC servers and as part of the AD DS management tools) or LDAP Admin. We will be using the latter on a PC so as to test external connections.
If the following configurations connect successfully then you should be good to go:
-
Host: FQDN of DC server. For example,
DC01.ad.example.astrix.co.uk. This is so that there are no name mismatches when validating the certificate. -
Security:
Simple authenticationwith:-
SSL( / TLS) on port636 -
TLSon port389or
-
SASLon port389
-
The final step is to actually reconfigure the clients to use one of the following connection methods:
-
Simple Bind LDAP using SSL / TLS (usually on port 636) or StartTLS (usually on port 389).
or
-
Simple Authentication and Security Layer (SASL) LDAP with digital signing requests.
Using a Sophos XG UTM / NGFW and an AD CS-issued certificate as an example, we can see that, by default, it can connect to the LDAP / DC server with SSL / TLS or StartTLS encryption enabled but not when certificate validation is enabled because it doesn’t trust the CA.
So, to install the CA certificate, do the following:
-
On the AD CS CA server:
-
Open
certmgr.msc. -
Expand the folder
Trusted Root Certification Authorities→ select the folderCertificates. -
Right-click on your CA certificate (it will be issued to and by the server’s FQDN) → hover over
All Tasks→ selectExport…. -
Select the button
Next→ ensure that the radio buttonDER encoded binary X.509 (.CER)is selected → select the buttonNext→ enter a path and file name to save the certificate as → select the buttonNext→ select the buttonFinish.
-
-
On the Sophos XG:
-
In the group
SYSTEM, select the tabCertificates→ select the tabCertificate authorities→ select the buttonAdd. -
Enter the following information:
-
Name: A descriptive name that will be displayed in the list. The subject (including the FQDN) will be automatically listed alongside it.
Astrix Example AD CS Root CAfor example. -
Certificate file format:
DER -
Certificate: The
CERfile exported as part of 1.4.
-
-
Select the button
Save.
-
Now that the chain of trust is complete, the device can validate the LDAPS certificate.
We do not recommend working around this problem but if you legitimately have a reason that you cannot use one of the above options then you can do so in one of two ways.
LDAP server Channel Binding can be disabled by running the following command or manually creating the following registry value:
New-ItemProperty -Path "HKLM:SystemCurrentControlSetServicesNTDSParameters" -Name "LdapEnforceChannelBinding" -PropertyType DWORD -Value 0 -Force
-
Hive and key path:
HKEY_LOCAL_MACHINESystemCurrentControlSetServicesNTDSParameters
-
Value type:
DWORD (32-bit) Value/REG_DWORD -
Value name:
LdapEnforceChannelBinding -
Value data:
0(decimal). This indicates «disabled” – No channel binding validation is performed. This is the behavior of all servers that have not been updated.
LDAP server signing can be disabled by setting the following policy:
-
Location:
Computer Configuration→Policies→Windows Settings→Security Settings→Local Policies→Security Options -
Policy name:
Domain controller: LDAP server signing requirements -
Policy setting:
None
We sincerely hope that this has been useful.
Feel free to subscribe to our newsletter to be automatically notified of future posts.
Until next time! 😊
I’ve got a configuration issue with my test domain controller (Server 2019) where I can’t connect via 636 using LDP. (using the full domain name)
On 2008 and 2012 I didn’t have to do any additional configuration; it just worked.
However, in 2019 is may appear that I need to manually configure an SSL cert for this to work. I found this article on MS: https://docs.microsoft.com/en-us/troubleshoot/windows-server/identity/enable-ldap-over-ssl-3rd-certification-authority and it appears that I need to get a public certificate for each domain that I will be connecting to (which will be a lot). If this is true, those certs would expire and I’m not sure what the effect will be (will it still work or fail?). If it will fail, how do I watch the certs and fix ahead of time?
But this doesn’t make sense to me since 2008 and 2012 both work «out of the box» with 636.
When I check the 2019 server with:
certutil -v -urlfetch -verify serverssl.cer > output.txt
I get:
DecodeFile returned The system cannot find the file specified 0x80070002 (Win32: 2 ERROR_FILE_NOT_FOUND)
LoadCert(Cert) returned The system cannot find the file specified 0x80070002 (Win32: 2 ERROR_FILE_NOT_FOUND)
CertUtil -verify command FAILED: 0x80070002 (WIN32: 2 ERROR_FILE_NOT_FOUND)
CertUtil: The system cannot find the file specified.
So that’s telling me the cert does not exist.
Each of the domains I will be connecting to, the computer connecting to them will not be in the same domain. In that above article it was referring to having a cert that can be trusted by both devices.
From the testdomain I can run LDP and connect back into the 2008 or 2012 domain with zero issues on 636 using the builtin configured certificate… But this is a new version and it appears to be different.
Has anyone run into this on 2019 and can share a little more information of what I’m encountering?

Contents
- 1 How To Setup Configuration Ldap On Windows Server 2019ldap Configuration On Windows Server 2019
- 2 How To Setup Configuration Ldap On Windows Server 2019,ldap Configuration On Windows Server 2019
- 2.1 Conclusion
- 2.1.1 Related image with how to setup configuration ldap on windows server 2019ldap configuration on windows server 2019
- 2.1.2 Related image with how to setup configuration ldap on windows server 2019ldap configuration on windows server 2019
- 2.1 Conclusion
Discover the Latest Technological Advancements and Trends: Join us on a thrilling journey through the fascinating world of technology. From breakthrough innovations to emerging trends, our How To Setup Configuration Ldap On Windows Server 2019ldap Configuration On Windows Server 2019 articles provide valuable insights and keep you informed about the ever-evolving tech landscape. And the windows quotfirewallquot new specific select the local that domain ensure under public once menu click select the then inbound ports- click and rule as actions then for and click private rules application select and are- port opens then security- port firewall 636 tcp and In and next- start next- advanced click with enter search
Ldap Port Step By Step Guide To Setup Ldaps On Windows Server Hari
Ldap Port Step By Step Guide To Setup Ldaps On Windows Server Hari
Click on start > server manager > add roles and features. click next. choose role based or feature based installation. click next. select ldapstest server from the server pool. click next. mark active directory lightweight directory services from the list of roles and click next. from the list of features, choose nothing – just click next. After you make this configuration change, clients that rely on unsigned sasl (negotiate, kerberos, ntlm, or digest) ldap binds or on ldap simple binds over a non ssl tls connection stop working.

Step By Step Windows Server 2019 Installation Configuration Manager
Step By Step Windows Server 2019 Installation Configuration Manager
1 i’ve got a configuration issue with my test domain controller (server 2019) where i can’t connect via 636 using ldp. (using the full domain name) on 2008 and 2012 i didn’t have to do any additional configuration; it just worked. however, in 2019 is may appear that i need to manually configure an ssl cert for this to work. #aryan computer #ubuntu 20.10 #linux #ubuntuserver 20.10 #windows server★ subscribe my channel : channel: goo.gl wwydae★join me on social net. Integrations configure ldaps on windows server step by step guide to setup ldaps on windows server connect with ldaps using miniorange guidelines to setup ldap over ssl and establish a secure connection with ldap server. secure your ldap server connection between client and server application to encrypt the communication. This video will show you how to enable or configure ldap over ssl in windows server 2019. configure ldap signing: kapilarya configure l . more more securing ldap.

Windows Server 2019 Installation And Configuration Tutorial Eldernode
Windows Server 2019 Installation And Configuration Tutorial Eldernode
Integrations configure ldaps on windows server step by step guide to setup ldaps on windows server connect with ldaps using miniorange guidelines to setup ldap over ssl and establish a secure connection with ldap server. secure your ldap server connection between client and server application to encrypt the communication. This video will show you how to enable or configure ldap over ssl in windows server 2019. configure ldap signing: kapilarya configure l . more more securing ldap. 3 contributors feedback in this article summary more information references this article discusses ldap session security settings and requirements after security advisory adv190023 is installed. applies to: windows server 2019, windows server 2016, windows server 2012 r2 original kb number: 4563239 summary. In the start menu, search for «firewall» and click windows firewall with advanced security. once the application opens, select inbound rules, and then under actions click new rule select port, and then click next. select tcp and specific local ports:. enter 636 as the port, and then click next. ensure that domain, private and public are.

How To Install And Set Up Active Directory Domain Controller On Windows
How To Install And Set Up Active Directory Domain Controller On Windows
3 contributors feedback in this article summary more information references this article discusses ldap session security settings and requirements after security advisory adv190023 is installed. applies to: windows server 2019, windows server 2016, windows server 2012 r2 original kb number: 4563239 summary. In the start menu, search for «firewall» and click windows firewall with advanced security. once the application opens, select inbound rules, and then under actions click new rule select port, and then click next. select tcp and specific local ports:. enter 636 as the port, and then click next. ensure that domain, private and public are.
How To Setup Configuration Ldap On Windows Server 2019,ldap Configuration On Windows Server 2019
How To Setup Configuration Ldap On Windows Server 2019,ldap Configuration On Windows Server 2019
aryan computer #ubuntu 20.10 #linux #ubuntuserver 20.10 #windows server ☆ subscribe my channel : channel: how to install ldap in ad in windows server 2019 in virtualbox. taking a snapshot would be neccessary before adding role as a if you need to setup secure lightweight directory access protocal aka secure ldap aka ldaps, you are in the right place. ldap configuration on windows server i suggest: ports 389 and 636 is already being used by ad; therefore, don’t use it. step by step guide to install active directory in windows server 2019 in this video tutorial i will show you the step by step guide how to enable ldap signing in windows server and client machines [tutorial] the lightweight directory access protocol this video will show you how to enable or configure ldap over ssl in windows server 2019. configure ldap signing: windows server 2019 training 36 deploying and configuring active directory lightweight directory services exercise 1: adlds #server2022 #server2019 #server2016 #ad welcome to my channel rohit tech today in this video i am in this step by step guide you’ll learn how to install & configure active directory domain services (ad ds) role in microsoft this video is show on step by step guide install & configure active directory lightweight directory services(adlds) : adlds hello world if you want to learn more about network security, it, or anything related to technology let me know and let us all learn
Conclusion
All things considered, it is evident that the post delivers helpful insights about How To Setup Configuration Ldap On Windows Server 2019ldap Configuration On Windows Server 2019. From start to finish, the author presents an impressive level of expertise about the subject matter. Especially, the section on X stands out as a highlight. Thank you for taking the time to the article. If you have any questions, please do not hesitate to reach out via the comments. I am excited about your feedback. Moreover, here are a few relevant posts that might be interesting:
In March 2020, systems will stop working if:
-
They are integrated with Active Directory using non-secure LDAP.
-
Domain controller servers do have the latest patches installed.
-
Sysadmins don’t proactively take steps such as the ones we’ve detailed below.
There are numerous existing guides for setting up secure LDAP but none were as thorough, up to date, or user friendly as we’d like for ourselves or our clients so we decided to try to plug the gap by creating this one.
Update 2020/02/12 11:17: According to a couple of Microsoft articles (1, 2), it seems that the decision has been made to push back this default behaviour to “the second half of calendar year 2020”.
Update 2020/03/24 09:41: It seems that Microsoft have decided not to enforce these changes after all. The following is an excerpt from the same Microsoft articles:
“Note that these March 10, 2020 updates and updates in the foreseeable future will not make changes to LDAP signing or LDAP channel binding policies or their registry equivalent on new or existing domain controllers.”
Links to each section:
-
Explanation
-
Identification
-
Resolution
-
Certificate Signing Request (CSR)
-
Certificate
-
Commercial CA
-
Let’s Encrypt
-
Active Directory Certificate Services (AD CS)
-
Self-signed
-
-
Bindings
-
Testing
-
Clients
-
-
Workaround
-
Sign-off
Many systems are integrated via the Lightweight Directory Access Protocol (LDAP) because it allows systems to use a central directory of user and computer details which, in turn, allows systems to be consistent and user-aware and it allows users to access multiple services using the same set of credentials. For example:
-
Users can use their “PC” username and password with their Virtual Private Network (VPN) connections.
-
Secure Email Gateway (SEG) accounts can be automatically created.
-
Multi-Function Printer (MFP) address books can be automatically updated.
-
Firewalls can allow or reject traffic based on group membership.
etc
The problem with LDAP is that, because people tend to follow the path of least resistance, the most common method is Simple Bind which is not encrypted by default so usernames and passwords are moving around the networks just waiting to be intercepted.
On the 13th of August 2019, Microsoft published security advisory ADV190023 and support article 4520412 stating that, in order to resolve these Man-in-the-Middle (MITM) attacks / vulnerabilities such as CVE-2017-8563, they are planning to release a Windows update in March 2020 to enforce the following:
-
Simple Bind LDAP over SSL / TLS (LDAPS).
or
-
Simple Authentication and Security Layer (SASL) LDAP with digital signing requests.
Both of these options require the use of public key authentication via trusted end-entity SSL / TLS certificates.
If steps are not taken then LDAP connections will cease to work as soon as the Windows update is installed.
↑ Back to Index.
The first step is to identify what systems are integrated, if any.
Microsoft Advanced Threat Analytics (ATA) can be used for this purpose but if you don’t have that then continue reading this section.
To quickly determine if domain controller servers are being used as LDAP servers, the following PowerShell commands will retrieve the events (ID 2887) that are logged if this is the case.
$DCs = "<DC #1 hostname>", "<DC #2 hostname>";
ForEach ($DC in $DCs) {
    Get-WinEvent -ComputerName $DC -ProviderName Microsoft-Windows-ActiveDirectory_DomainService | Where-Object { $_.Id -Eq 2887 } | Format-List;
}
If events are found and you require more, identifying information such as the client IP address, the username, etc, running the following PowerShell command or manually creating the registry value on each DC will cause the LDAP service to log more useful information in the events (ID 2889):
New-ItemProperty -Path "HKLM:\System\CurrentControlSet\Services\NTDS\Diagnostics" -Name "16 LDAP Interface Events" -PropertyType DWORD -Value 2 -Force
-
Hive and key path:
HKEY_LOCAL_MACHINE\System\CurrentControlSet\Services\NTDS\Diagnostics
-
Value type:
DWORD (32-bit) Value/REG_DWORD -
Value name:
16 LDAP Interface Events -
Value data:
2(decimal)
Once that is in place, you can use the following PowerShell commands to extract the identifying information too:
$DCs = "<DC #1 hostname>", "<DC #2 hostname>";
ForEach ($DC in $DCs) {
    Get-WinEvent -ComputerName $DC -ProviderName Microsoft-Windows-ActiveDirectory_DomainService | Where-Object { $_.Id -Eq 2887 -Or $_.Id -Eq 2889 } | Format-List;
}
Alternatively, on each DC, you can open Event Viewer and view the log Applications and Services Logs → Directory Service.
Now that you’ve identified which systems need to be reconfigured, it’s time to resolve the problem.
This section is only relevant if you’re not planning to use Let’s Encrypt or Active Directory Certificate Services (AD CS). If you’re not sure, skip ahead to the section “Certificate” then come back.
The first step is to generate the CSR.
As stated by Microsoft and confirmed by us, in this particular scenario, the Fully-Qualified Domain Name (FQDN) of the DC must be present in one of the following two places in the certificate:
-
The Common Name (CN) in the Subject field. We will be covering this option.
-
A DNS entry in the Subject Alternative Name (SAN) extension.
Customise the following content (particularly, the line starting with Subject) then save it as a text-based file named something like ldapcert.inf.
[Version]

Signature="$Windows NT$

[NewRequest]

Subject = "CN=DC01.example.local,O=Astrix Example,OU=IT,ST=RCT,L=Abercynon,C=GB" ; Replace the example between the quotation marks with the Fully-Qualified Domain Name (FQDN) of your domain controller computer account and, optionally, your organisation's information.
KeySpec = 1
KeyLength = 2048 ; This can be 1024, 2048, 4096, 8192, or 16384. Larger key sizes are more secure, but have a greater impact on performance.
Exportable = TRUE
MachineKeySet = TRUE
SMIME = False
PrivateKeyArchive = FALSE
UserProtected = FALSE
UseExistingKeySet = FALSE
ProviderName = "Microsoft RSA SChannel Cryptographic Provider"
ProviderType = 12
RequestType = PKCS10
KeyUsage = 0xa0

[EnhancedKeyUsageExtension]

OID=1.3.6.1.5.5.7.3.1 ; This denotes Server Authentication.
Once you have that file, run the following command:
certreq -new <path to input information file> <path to output CSR file>
certreq -new "C:\Users\Administrator\Desktop\ldapcert.inf" "C:\Users\Administrator\Desktop\ldapcert.csr"
If you’ve done this correctly, the output file will start with -----BEGIN NEW CERTIFICATE REQUEST----- and end with -----END NEW CERTIFICATE REQUEST-----.
The next step is to submit the CSR to a Certificate Authority (CA) to get an end-entity SSL / TLS certificate issued and installed. If a public CA is used, only a basic, Domain-Validated (DV) one is required.
Because of the DC FQDN requirement, your choice of CA depends entirely on whether your AD DNS domain name uses a valid Internet Top-Level Domain (TLD) or not. A full list of valid Internet TLDs is available on Wikipedia but here’s a quick summary of the common ones to give you an idea:
| Invalid TLD examples | Valid TLD examples |
| .local | .co.uk |
| .internal | .com |
| .corp | .org |
| .lan | .net |
| .localhost | .edu |
We have summarised the various pros and cons of the most common CAs below and linked each heading to the respective section:
DCs are usually the most valuable assets in the IT infrastructure so they should be hardened to reduce the attack surface by:
1. Installing as few applications as possible.
2. Not forwarding traffic to it from the Internet. This may be acceptable if Let’s Encrypt published a list of public IP addresses that they use for the DV process so that the firewall rule can be restricted but they confirmed in their FAQs that they do not.
In any case, the submission and issuance process is quite different depending on which CA you chose so we will cover each of these below.
For demonstration purposes, we will be using a Comodo PositiveSSL Certificate via CheapSSLSecurity with domain validation via DNS.
First, submit the CSR text to your chosen commercial CA and choose a domain validation option.
Second, complete the CA’s domain validation process, wait for the certificate to be issued, and download the certificate package.
Third, if required, install any intermediate or root CA certificates to the Local Machine’s store Intermediate Certification Authorities or Trusted Root Certification Authorities. This can be done by opening the missing CA certificate’s properties and selecting Install Certificate…, as demonstrated below.
Installing the certificate for the intermediate CA “Sectigo RSA Domain Validation Secure Server CA” to complete the chain of trust for the end-entity certificate.
Fourth, run the following command to install the certificate:
certreq -accept <path to CRT file>
First, install an ACME Client. For demonstration purposes, we will be using Certify SSL Manager and authorization / domain validation via DNS.
Second, open Certify SSL Manager and:
-
As prompted, register a contact email address. This will be used to notify you of upcoming certificate expiries / renewals, etc.
-
Add a new certificate and:
-
In the section
Certificate Domains, add the FQDN of the DC. For example,DC01.ad.example.astrix.co.uk. -
In the section
Authorization, set the following:-
Challenge type:
dns-01 -
DNS Update Method:
(Update DNS Manually)
-
-
Save the changes.
-
-
Select the button
Request a certificate. -
As prompted, create the DNS TXT Resource Record (RR) in the domain’s authoritative name servers.
-
Select the button
Request a certificateagain to continue.
The certificate should now be issued and installed.
First, install Active Directory Certificate Services (AD CS) by doing the following:
-
Open Server Manager.
-
Select
Dashboard→Add roles and features. -
In the section
Before You Begin, simply select the buttonNext >. -
In the section
Installation Type, keep the radio buttonRole-based or feature-based installationenabled and select the buttonNext >. -
In the section
Server Selection, choose the server that you wish to be the root CA and select the buttonNext >. -
In the section
Server Roles, tickActive Directory Certificate Services, select the buttonAdd Features, and select the buttonNext >. -
In the section
Features, simply select the buttonNext >. -
In the section
AD CS, ensure that you’re happy with the server’s hostname because it cannot be changed then select the buttonNext >. -
In the section
Role Services, simply select the buttonNext >. -
In the section
Confirmation, simply select the buttonInstall.
Second, configure AD CS by doing the following:
-
Open Server Manager.
-
Select the flag and warning symbol then the link
Configure Active Directory Certificate Services on the destination server. -
In the section
Credentials, assuming you’re signed in as an administrator, simply select the buttonNext >. -
In the section
Role Services, check the tickboxCertification Authoritythen select the buttonNext >. -
In the section
Setup Type, choose your preferred CA type then select the buttonNext >. -
In the section
CA Type, select the radio buttonRoot CAthen select the buttonNext >. -
In the section
Private Key, select the radio buttonCreate a new private keythen select the buttonNext >. -
In the section
Cryptography, select the following then select the buttonNext >:-
Cryptographic provider:
RSA#Microsoft Software Key Storage Provider -
Key length:
2048(at least) or4096(recommended) -
Hash algorithm:
SHA256(at least)
-
-
In the section
CA Name, change the defaults to the following then select the buttonNext >:-
Common name for this CA: This must be the same as the server’s FQDN.
DC01.example.local, for example. -
Distinguished name suffix: Blank.
-
Preview of distinguished name: This should automatically be
CN=<server’s FQDN>.
-
-
In the section
Validity Period, simply select the buttonNext >. -
In the section
Certificate Database, simply select the buttonNext >. -
In the section
Confirmation, simply select the buttonConfigure. -
In the section
Results, simply select the buttonClose.
Third, run the following command and make a note of the value after Unique container name for the new certificate.
Fourth, open Explorer and do the following:
-
Browse to
C:\ProgramData\Microsoft\Crypto\Keys\. -
View the properties of the file named
<unique container name>. -
Select the tab
Securitythen select the buttonEdit…. -
Select the button
Add…, enterNetwork Service, select the buttonCheck Names, then select the buttonOK.
This should add the security principalNETWORK SERVICEwith allow permissionsRead & executeandRead. -
Close all windows applying changes.
In cases such as this (“inter-component authentication”, as McAfee describes it here), using a self-signed certificate is better than nothing but whether it can be considered as “secure” or “safe” is a debate for another time…
First, install OpenSSL.
Second, create a text-based file named something like v3ext.txt with the following content:
keyUsage=digitalSignature,keyEncipherment
extendedKeyUsage=serverAuth
subjectKeyIdentifier=hash
Third, run the following PowerShell commands. Only the OpenSSL path needs to be customised. When prompted, ensure that you use a strong passphrase for the CA’s private keyfile.
& "<path>\openssl.exe" genrsa -aes256 -out ca_private.key 4096; & "<path>\openssl.exe" req -new -x509 -days 3650 -key ca_private.key -out ca_public.crt; Import-Certificate -FilePath ca_public.crt -CertStoreLocation Cert:\LocalMachine\Root; & "<path>\openssl.exe" x509 -req -days 365 -in ldapcert.csr -CA ca_public.crt -CAkey ca_private.key -extfile v3ext.txt -set_serial 01 -out ldapcert.crt; & "<path>\openssl.exe" x509 -in ldapcert.crt -text; certreq -accept ldapcert.crt
Once the certificate has been installed, the DC server’s bindings need to be updated.
This can be done by simply rebooting the DC server or, alternatively, by doing the following two steps.
First, create a text-based file named something like ldap-renewservercert.txt with the following content:
dn:
changetype: modify
add: renewServerCertificate
renewServerCertificate: 1
-
Second, run the following command:
ldifde -i -f ldap-renewservercert.txt
That’s it!
↑ Back to Index.
Once everything has been set up, it’s a good idea to test that it’s all actually working as required.
To do this, you can use tools such as ldp.exe (available on DC servers and as part of the AD DS management tools) or LDAP Admin. We will be using the latter on a PC so as to test external connections.
If the following configurations connect successfully then you should be good to go:
-
Host: FQDN of DC server. For example,
DC01.ad.example.astrix.co.uk. This is so that there are no name mismatches when validating the certificate. -
Security:
Simple authenticationwith:-
SSL( / TLS) on port636 -
TLSon port389or
-
SASLon port389
-
The final step is to actually reconfigure the clients to use one of the following connection methods:
-
Simple Bind LDAP using SSL / TLS (usually on port 636) or StartTLS (usually on port 389).
or
-
Simple Authentication and Security Layer (SASL) LDAP with digital signing requests.
Using a Sophos XG UTM / NGFW and an AD CS-issued certificate as an example, we can see that, by default, it can connect to the LDAP / DC server with SSL / TLS or StartTLS encryption enabled but not when certificate validation is enabled because it doesn’t trust the CA.
So, to install the CA certificate, do the following:
-
On the AD CS CA server:
-
Open
certmgr.msc. -
Expand the folder
Trusted Root Certification Authorities→ select the folderCertificates. -
Right-click on your CA certificate (it will be issued to and by the server’s FQDN) → hover over
All Tasks→ selectExport…. -
Select the button
Next→ ensure that the radio buttonDER encoded binary X.509 (.CER)is selected → select the buttonNext→ enter a path and file name to save the certificate as → select the buttonNext→ select the buttonFinish.
-
-
On the Sophos XG:
-
In the group
SYSTEM, select the tabCertificates→ select the tabCertificate authorities→ select the buttonAdd. -
Enter the following information:
-
Name: A descriptive name that will be displayed in the list. The subject (including the FQDN) will be automatically listed alongside it.
Astrix Example AD CS Root CAfor example. -
Certificate file format:
DER -
Certificate: The
CERfile exported as part of 1.4.
-
-
Select the button
Save.
-
Now that the chain of trust is complete, the device can validate the LDAPS certificate.
We do not recommend working around this problem but if you legitimately have a reason that you cannot use one of the above options then you can do so in one of two ways.
LDAP server Channel Binding can be disabled by running the following command or manually creating the following registry value:
New-ItemProperty -Path "HKLM:\System\CurrentControlSet\Services\NTDS\Parameters" -Name "LdapEnforceChannelBinding" -PropertyType DWORD -Value 0 -Force
-
Hive and key path:
HKEY_LOCAL_MACHINE\System\CurrentControlSet\Services\NTDS\Parameters
-
Value type:
DWORD (32-bit) Value/REG_DWORD -
Value name:
LdapEnforceChannelBinding -
Value data:
0(decimal). This indicates «disabled” – No channel binding validation is performed. This is the behavior of all servers that have not been updated.
LDAP server signing can be disabled by setting the following policy:
-
Location:
Computer Configuration→Policies→Windows Settings→Security Settings→Local Policies→Security Options -
Policy name:
Domain controller: LDAP server signing requirements -
Policy setting:
None
We sincerely hope that this has been useful.
Feel free to subscribe to our newsletter to be automatically notified of future posts.
Until next time! 😊