Групповые политики являются одним из самых эффективных способов управления компьютерной сетью, построенной на базе Windows-сетей. Групповые политики используют для упрощения администрирования, предоставляя администраторам централизованное управление привилегиями, правами и возможностями как пользователей, так и компьютеров сети.
При помощи политики возможно:
- назначать сценарии пользователя и сценарии компьютера, запускающиеся в конкретно указанное время;
- определять политики параметров пароля учетных записей, блокировку пользователей;
- распространять программное обеспечение на компьютеры сети при помощи публикации или назначения;
- выполнять набор настроек безопасности для удаленных машин;
- ввести контроль над доступом к windows-компонентам, системным ресурсам, сетевым ресурсам, утилитам панели управления, рабочему столу и экрану;
- проводить настройку по распределению прав на доступ к файлам и папкам;
- настраивать перенаправление определенных папок из профиля пользователя.
Групповые политики возможно применять сразу на нескольких доменах, на отдельных доменах, на подгруппах в домене, на отдельных системах.
Политики, применяемые к отдельным системам, называются локальными групповыми политиками. Такие политики хранятся только на локальном компьютере. Остальные групповые политики соединены в объекты и хранятся в хранилище данных Active Directory.
Управление групповых политик имеется только в профессиональных и серверных версиях Windows.
Для каждой новой версии Windows вносились новые изменения в групповую политику. В некоторых случаях старые политики не применяются на новые версии Windows.
Обычно большинство политик прямо совместимы. Это означает, что, как правило, политики, предоставленные в Windows Server 2003, могут использоваться на Windows 7 и более поздних, а также на Windows Server 2008 и более поздних. Однако, политики для Windows 8/10 и Windows Server 2012/2016 обычно не применимы к более ранним версиям Windows. Для того, чтобы узнать какие версии поддерживает политика, можно открыть окно ее свойств – там посмотреть на поле Требование к версии или поддерживается. В нем указаны версии ОС, на которых эта политика будет работать:

Редактирование групповых политик
Консоль редактирования групповой политики входит в состав сервера, ее требуется установить в диспетчере сервера как дополнительный компонент управления групповыми политиками:

После этого в составе программ меню Администрирование появляется задача Управление групповыми политиками.
В оснастке Управление групповой политикой назначаются политики к подразделениям, а благодаря иерархической структуре можно визуально понять к какой группе относятся какая-либо политика:

Групповая политика изменяется в редакторе управления групповыми политиками – для этого требуется выбрать команду Изменить в меню Действия. Так же новую групповую политику можно создать либо «с нуля», для этого выбираем Объекты групповой политики выбираем команду Создать в меню Действие. Записываем новое имя объекта групповой политики после этого нажимаем ОК. Можно скопировать в нее параметры уже существующей политики в зависимости от требуемой задачи.


Чтобы применить созданную политику, требуется установить для нее связь с соответствующим объектом службы каталогов в оснастке Управление групповой политикой:

Примененную политику можно настроить по фильтру безопасности. Таким способом параметры данного объекта групповой политики возможно разделить только для заданных групп, пользователей и компьютеров, входящих в домен:

Рекомендации по применению политик
Главное заключается в том, чтобы не изменять политику по умолчанию. Потому как если в политике возникнет какая-либо серьезная ошибка, то возврат к начальному состоянию приведет к удалению не только последних настроек, но и всех других параметров. Поэтому для административных действий по управлению системой создавайте новые политики, тогда для изменения настроек вам потребуется только отключать/включать привязку политик к организационной структуре.
Обработка одной политики с наибольшим числом назначенных параметров, не отличается по времени от обработки нескольких политик, в каждой из которых назначается только часть этих параметров. Поэтому удобнее создавать несколько политик, чем включать все изменения в одну.
Не стоит удалять ранее созданные групповые политики – желательно просто отключить привязку их от объекта службы каталогов. Они могут потребоваться в дальнейшем для анализа в случае каких-либо проблем.
В рамках нашей услуги ИТ-обслуживание мы не только настраиваем групповые политики, но и берем на себя обслуживание всей ИТ-структуры клиента, включая все настройки, обновления ПО и поддержку в режиме 24/7.
In this article, we see about How to create Group policy in windows server 2016. First open Group Policy Management console by using server manager. By using GPM we can assign various polices for Organizational units(OU). We show simple example to create GP.  Right click domain name and click to create GPO in this domain and link here.
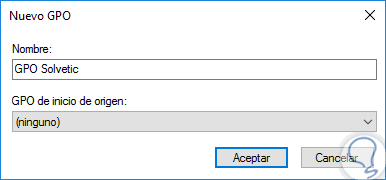
  Give a name for New GPO, we give Information Security and click OK.
Right click Group Policy Object and click Edit.
 Here we showing simple example for editing GPO, click policies-Windows settings-Security Settings-Account polices-password Policy and click Maximum password age change password expire days and click OK.
  Click GPO and click Settings to check what are the policy enabled.
  Block Inheritance Group Policy
To Block Inheritance of group policy to parent Organizational unit, it’s used to not apply any policy to blocked inheritance. For Example Right click Organizational unit and click Block Inheritance  We see now blocked Organizational units as BPO and Technical Dept.
  Enforced Group policy
Enforcing Policy will take presence and apply to all the OUs followed in the Active Directory. which means that Even you blocked any OU using the Block Inheritance, Enforce will take override of that settings and apply the policy what ever enforced. So be careful, when selecting the Enforce has it will override and apply which may cause issues if any OUs defined and required different settings..
To enable Enforce, Right click GPO and select Enforced.  Link enabled GPO
Link enabled that the group policy is linked to the OU. So the policy applies to the objects within the OU. Right click GPO and select Link enabled.  By Default Group Policy will take 90 Minutes of frequency to update to Clients which means client will contact Active Directory every 90 Minutes to check any policy changes are there and update if any changes or new Policies available and applicable for that particular client. If you want to update immediately, We can us gpupdate /force in the clients which will do check and update.
Перейти к содержимому
Некоторые, наиболее часто используемые, настройки групповых политик для домена на Windows Server 2016.
В доменном окружении по умолчанию также отключен функционал сетевого обнаружения. Для того чтобы его включить, откройте редактор управления групповыми политиками, в узле Конфигурация компьютера/Политики/Административные шаблоны/Сеть/Обнаружение топологии связи (Link Layer). Выберите политику «Включает драйвер отображения ввода/вывода (LLTDIO)», в ее свойствах установите значение «Включить» и установите флажок «Разрешить операцию для домена» в дополнительных параметрах свойств политики. Повторите аналогичные действия для параметра политики «Включить драйвер «Ответчика» (RSPNDR)», после чего обновите параметры политики на клиентской машине, используя команду gpupdate /force /boot.

Для добавления доменных пользователей/групп в локальные в GPO для группы компьютеров – Конфигурация компьютера/Настройка/Панель управления/Локальные пользователи и группы
Для подключения сетевых дисков в GPO для группы пользователей – Конфигурация пользователя/Настройки/Конфигурация Windows/Сопоставление дисков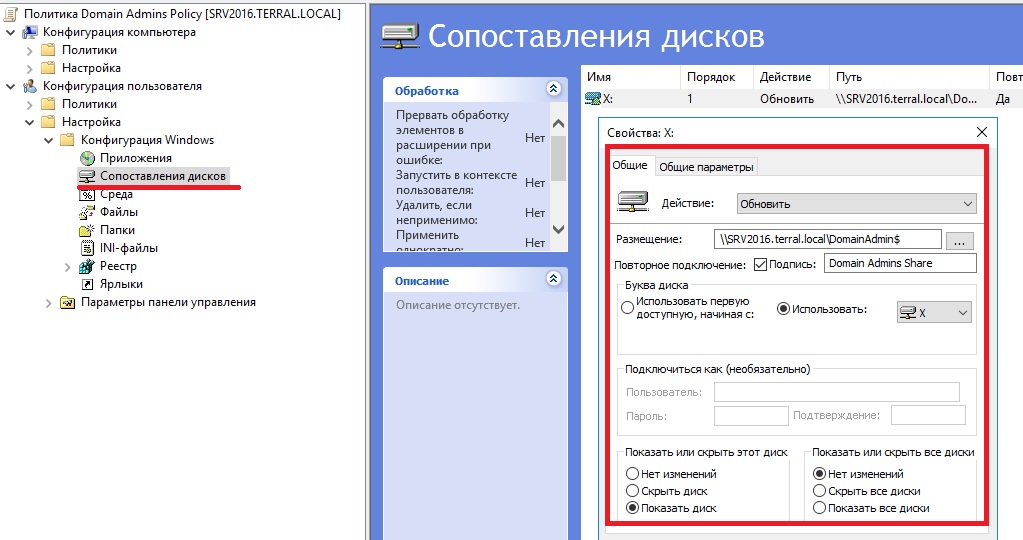
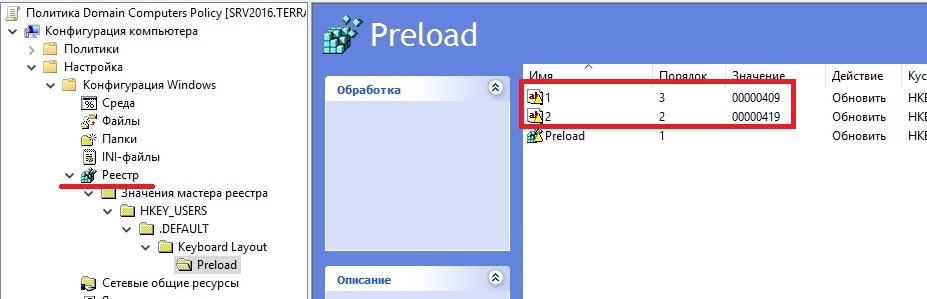
Чтобы сделать английский язык по умолчанию на экране авторизации – в GPO для группы компьютеров – Конфигурация компьютера/Настройка/Конфигурация Windows/Реестр правый клик Создать/Мастер реестра. Первый параметр меняем на 409 (Английский язык).
Однако в Windows 8/8.1/10 эти ключи не работают. Дело в том, что по-умолчанию в этих ОС выполняется применение языковых настроек пользователя к параметрам языка экрана входа в Windows. Чтобы отключить это поведение, нужно включить групповую политику Disallow copying of user input methods to the system account for sign-in в разделе Computer configuration -> Administrative Templates ->System ->Locale Services.
Включим Удаленный рабочий стол и добавим права для доменной группы. Для включения RDP-доступа:
Политика “Локальный компьютер” -> Компоненты Windows -> Службы удаленных рабочих столов -> Узел сеансов удаленных рабочих столов -> Подключения -> Разрешать удаленное подключение с использованием служб удаленных рабочих столов

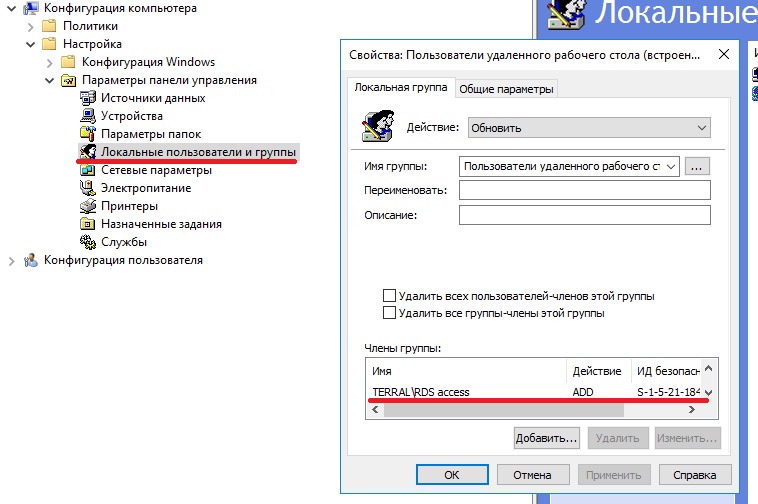
Для добавления доменной группы в локальную группу “Пользователи удаленного рабочего стола” создаем локальную группу в Конфигурации компьютера:
10 278
When managing operating systems at the organizational level, in this case Windows Server 2016, it is ideal and practical to know in depth what benefits it offers us or we can add to this system to make the administration tasks something much simpler and more centralized..
At the Windows Server 2016 level, we have a utility integrated to the system that will be very functional to control certain actions that can be applied to both users and computers and are the Group Policy Objectives or GPO (Group Policy Object).
A GPO is basically a policy that we can create and edit, obviously remove at any time, by means of which it is possible to establish the configuration on the various objects to be managed as users and equipment..
One of the advantages of GPOs is that they can be implemented in any type of scenario and we can use them for the entire domain in general or only for an organizational unit, OU, in particular.
The implementation of a GPO has been designed to be implemented in networks based on Windows Server Active Directory Domain Services (AD DS)..
Requirements to use group policies in Windows Server 2016
There are a number of basic and simple requirements to use and correctly implement group policies, these are:
- The local network must be based on AD DS, with this we indicate that at least one server must have the AD DS function installed.
- The computers we are going to manage must be attached to the domain and the users we will manage must use the domain credentials to log in to their computers directly to the domain.
- It will be necessary to have permissions to edit the Group Policy in the domain, that is, to belong to the group of Administrators or Group Policy Administrators.
Now, we may be a little confused since we well know that there are two types of GPO, domain and local, this implies:
The domain-based group policy gives us the possibility of centralizing the administration so that a single policy created can affect all the computers in the domain at the same time while the local group policy requires each machine to be configured to be done directly in which implies more administrative work.
1. Basic concepts of GPOs
Before analyzing how to create, edit or delete a policy in Windows Server 2016 it is ideal and necessary to understand the environment of the GPOs.
Step 1
The group policy environment in Windows Server 2016 is as follows: 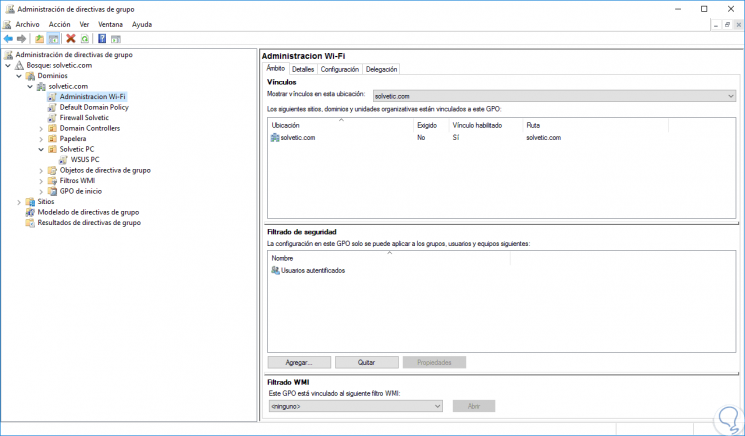
Step 2
The GPOs in Windows Server 2016 contain various group policy settings that allow us to create, move and delete GPOs within the server.
By default, group policies in Windows Server 2016 comes with two default policies:
Default Domain Controller Policy
When we install the AD DS server role, this policy is created by default, within it we find policy settings that apply specifically to the domain controllers created.
Default Domain Policy
Like the previous one, when the AD DS server role is installed, this policy is created by default and within it we find policy settings that apply to all computers and users in the domain.
On the top level of the AD DS (Active Directory Domain Server) we find sites and domains. When a simple domain is created, they will have a single site and a single domain. And within a domain it will be possible to create organizational units (OU).
2. Create a GPO in Windows Server 2016
Let’s see how to create a GPO in Windows Server 2016.
Step 1
To start this process we will use the following key combination and execute the gpmc.msc command and press Enter.
+ R
gpmc.msc
Step 2
In the displayed window we will right click on our domain and select the option “Create a GPO in this domain and link it hereâ€: 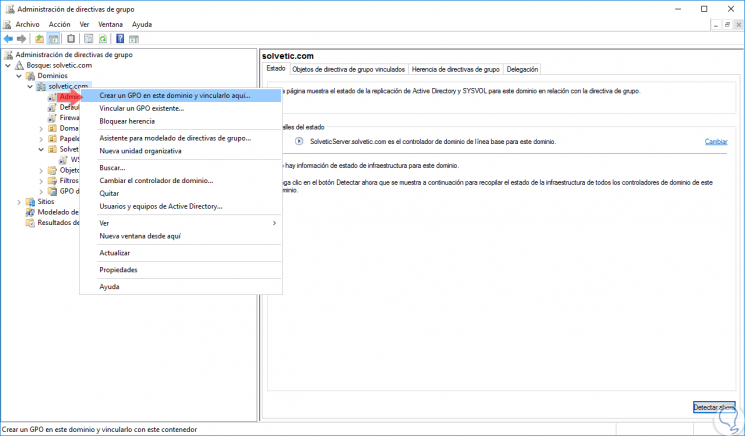
Note
It is important to remember that we can create a GPO in a specific OU, for this it is enough to right click on the created OU and select “Create a GPO in this domain and link it here, this way this GPO will only affect the equipment in said OU but not to all computers or domain users.
Step 3
When selecting this option, the following window will be displayed where we will assign a name to said GPO:
Step 4
By clicking on the «Accept» button we will see that the GPO has been created according to our criteria: 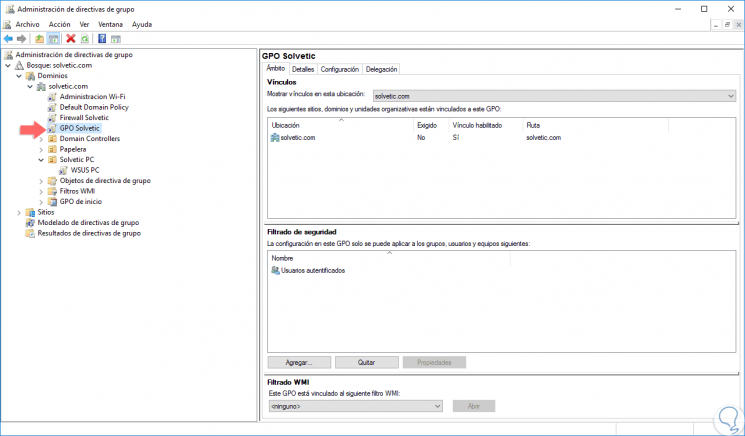
In this simple way we have created a group policy or GPO in Windows Server 2016.
3. Edit group policies in Windows Server 2016
Up to this point we have created the GPO, but this will not take any action since we have not defined the required parameters that must be applied to the users or computers of the indicated domain or OU.
Step 1
To add a task we must edit the GPO and for this we will right click on the new GPO and select the “Edit†option: 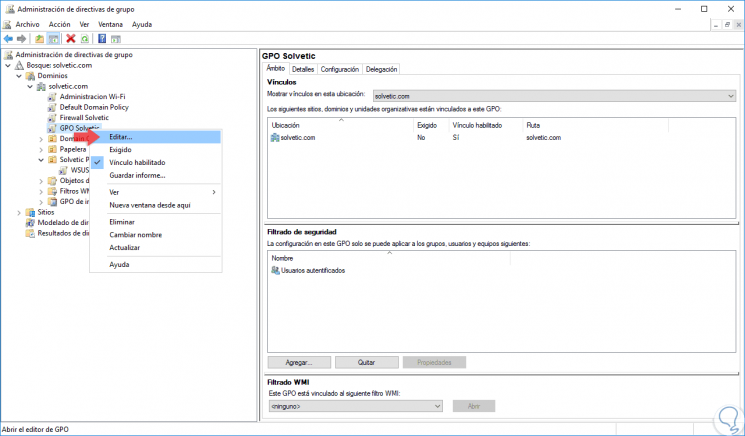
Step 2
By clicking on this option we will be redirected to the following window: 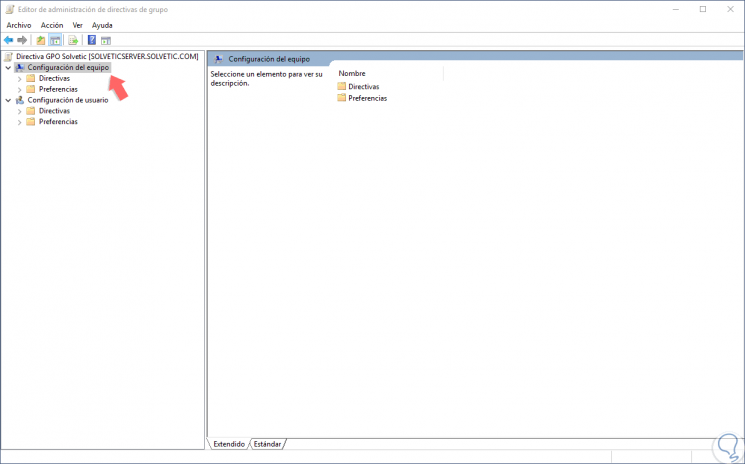
Step 3
There we find two main sections that are:
Equipment configuration
Within it, we find configurations that apply exclusively to computers, regardless of which users log in to them. These are usually system and security configurations that configure and control the equipment.
User settings
In this section we find configurations that apply to users, regardless of the equipment used. These settings have to do with the user experience.
Step 4
We also find two items in each of these folders that are:
Directives
It refers to the defined policies that must be imposed by the group.
preferences
This option includes preference settings that we can implement to change items such as registry, file, folder or other item settings. By using preference settings, it will be possible to configure Windows applications and functions that are not compatible with Group Policy.
Step 5
We can display the various options and see the following: 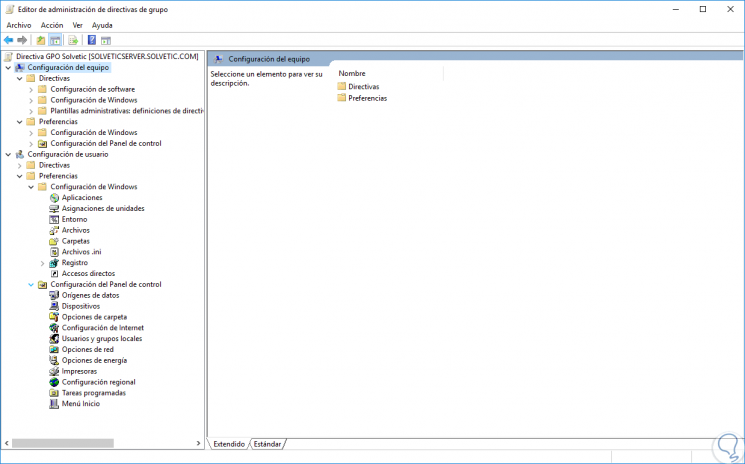
Step 6
As we can see, there we have a series of categories available to edit the action that the GPO will use on the selected object, to visualize the various policies, just click on one of the options and we will see the following: 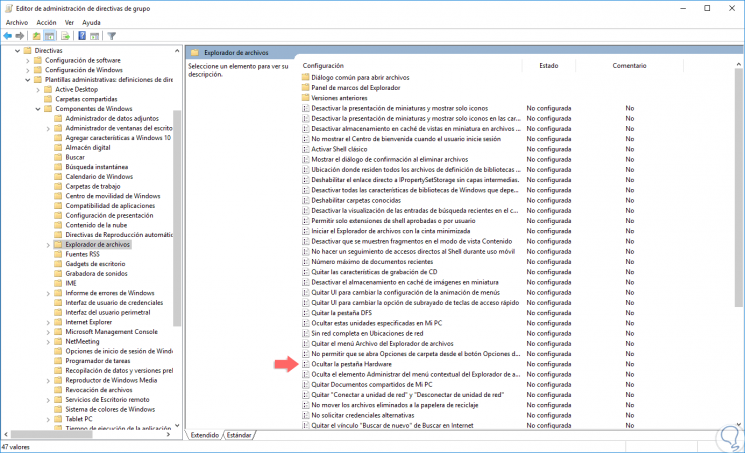
Step 7
We will have available hundreds of actions to configure and this is based on the requirements of the organization.
In this case, we will use the policy called “Hide the Hardware tabâ€, that is, when we access the control panel we see there the Hardware option: 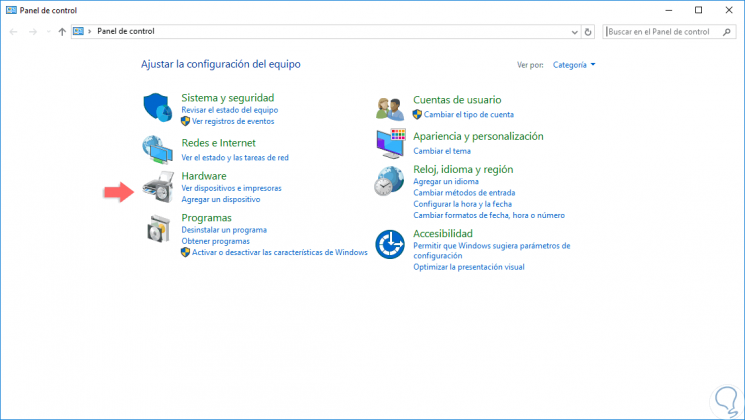
Step 8
Now, we will double click on the aforementioned policy and see the following:
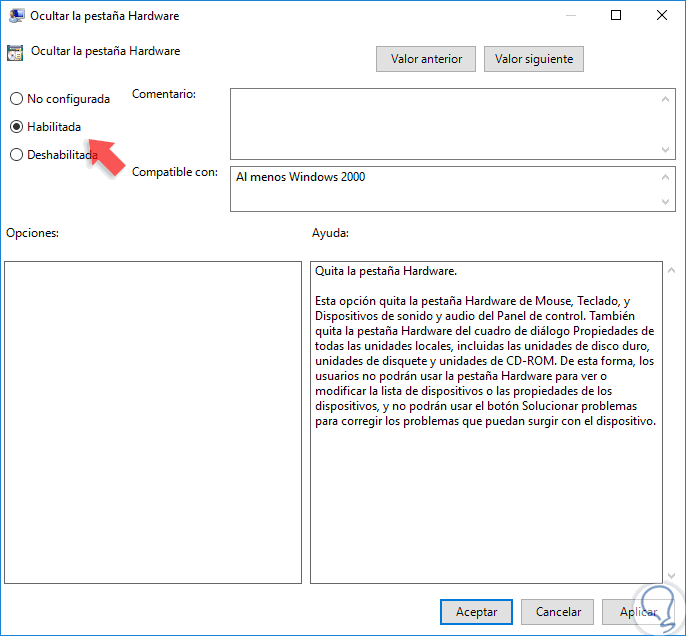
Step 9
Ali we have the following options:
Enabled
This option writes the policy settings to the registry with a value that enables it.
Disabled
This option writes the policy settings to the registry with a value that disables it.
Not configured
When this option is activated, the configuration of the undefined policy is left so that Group Policy does not write the policy configuration to the registry, so you will not have any action on the domain objects.
Step 10
In this case, we activate the “Enabled†box and click on Apply and Accept to save the changes. We can see that the policy has changed its status to Enabled: 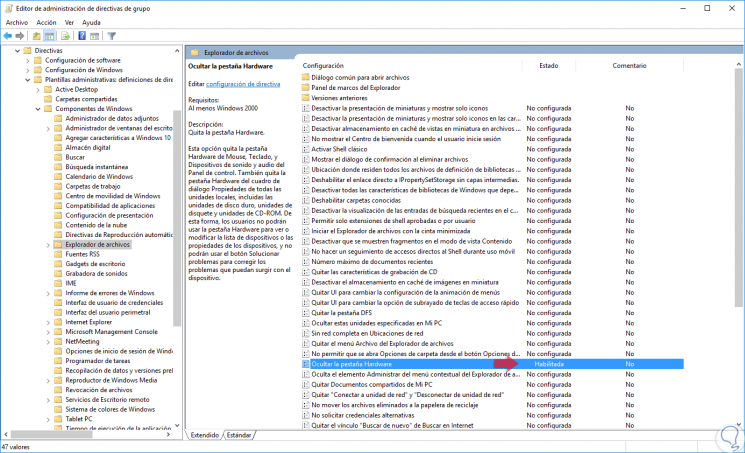
Step 11
Now, if we access the control panel again we will see that the Hardware option is no longer available: 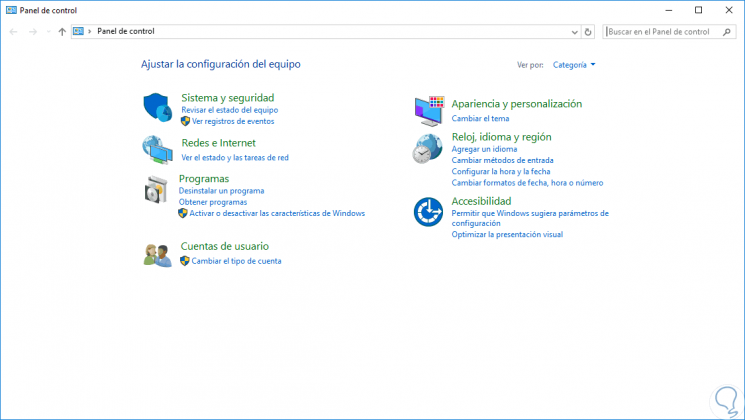
Step 12
Recall some of the types of GPO that we can implement in Windows Server 2016:
GPO at the Local Team level
These GPOs affect the device where they are applied independent of the domain to which it is linked.
GPO at Site level
This policy will directly affect the users and / or devices of a site independent of the domain to which it belongs.
Domain level GPO
With this GPO the computers and users of the current domain will be affected.
GPO at the level of OU (Organizational Unit)
This GPO applies to users and computers in a defined OU.
4. Search for a GPO in Windows Server 2016
It is possible that at some given time we have multiple GPOs created in the domain and it is difficult to locate them for editing, in this case we have the search option which helps us find the exact route of said GPO.
Step 1
To do this, we will right click on the domain and select the «Search» option: 
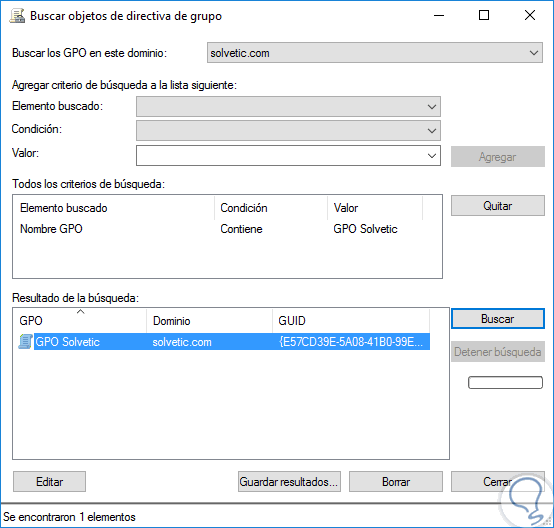
Step 2
In the displayed window we can filter the search by multiple filters such as:
- GPO Name
- GPO links
- Security groups
- GUID, etc.
Step 3
Then we add the value to search and click on the «Search» button where we will see the respective results:
Step 4
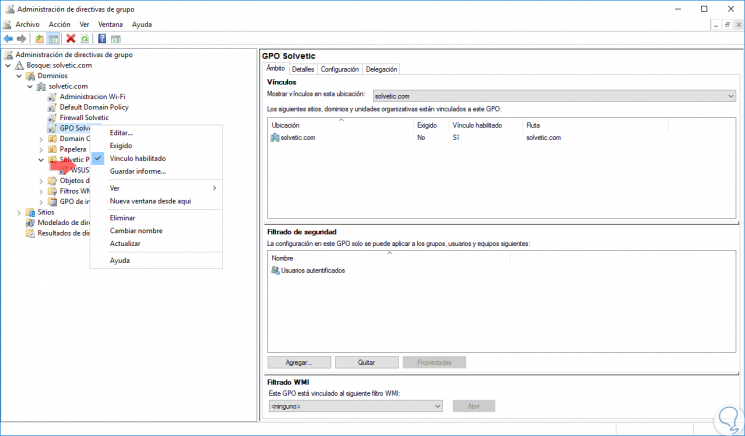
The other options available are:
- Edit: It allows us to make changes to the GPO.
- Required: Forces the value of the GPOs.
- Link enabled: This option allows us to create a link of this GPO with a domain or other GPOs.
- Save report: With this option an HTML file will be stored with details of the policy created.
- See more editing options.
- Rename the selected policy.
- Update the policy, etc.
Step 5
When we generate the report in HTML we will see the following: 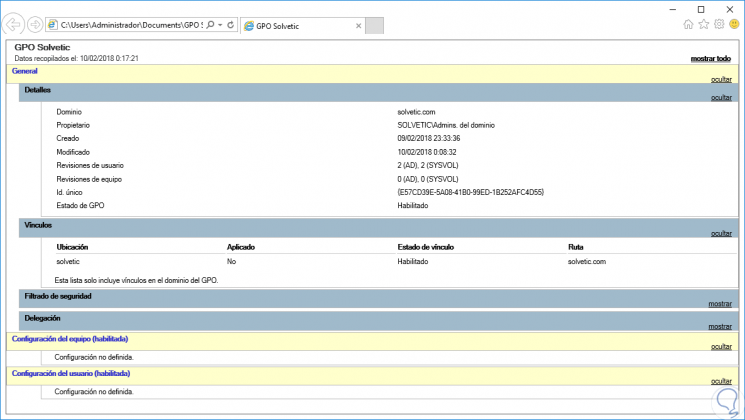
5. Remove a GPO in Windows Server 2016
Step 1
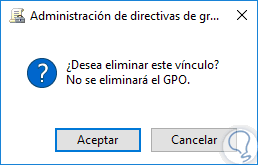
Finally, if we want to delete a GPO in Windows Server 2016, just right click on that policy and select the Delete option: 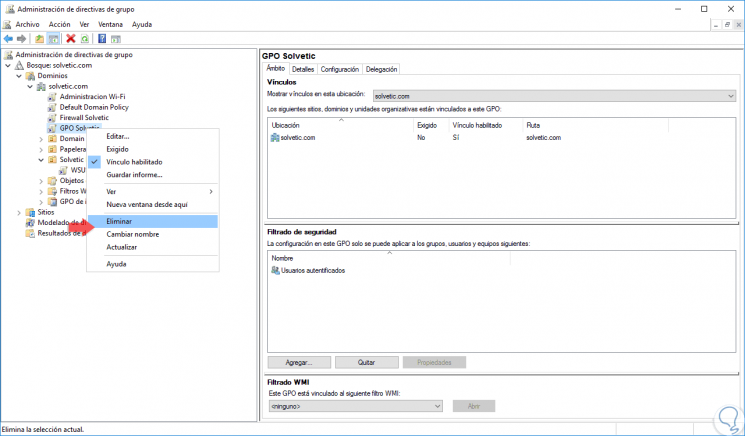
Step 2
By selecting this option we will see the following message. Click on OK and in this way this GPO will be deleted in Windows Server 2016
Thus we have seen how GPOs are one of the best tools that we have as system administrators.
Group Policy administrative templates let you configure hundreds of system settings, either computer or user based. Today I will introduce computer settings that directly affect system security and attack surface.
Contents
- Regional and Language Options
- MS Security Guide
- Lanman Workstation
- DNS Client
- Fonts
- Network Connections
- Group Policy
- Logon
- Autoplay Policies
- Microsoft account
- OneDrive
- Conclusion
- Author
- Recent Posts

Leos has started in the IT industry in 1995. For the past 15+ years he focused on Windows Server, VMware administration and security. Recently, Leos is focusing on automation via Ansible. He is also a Certified Ethical Hacker.
Over the last few months, I wrote several articles related to Windows Server security best practices. All were based on recommendations from the Center for Internet Security (CIS) organization. The latest one focused on audit policy configuration.
Administrative templates help configure system component behavior, like Internet Explorer, or end-user experience, like Start menu layout. However, some also affect system behavior, which may present security risks. In this post, I have picked important settings you should consider adding to your security baseline policy.
As usual, the format is as follows:
Name of the setting: Recommended value
Regional and Language Options
Allow input personalization: Disabled
Allow online tips: Disabled
Input personalization allows speech learning, inking, and typing. It is required for the use of Cortana. Online tips enable retrieval of tips and help for the Settings app. Both settings, when enabled, could lead to storage of sensitive data in users’ OneDrive, Microsoft, or third-party servers.
MS Security Guide
This section is not included in Group Policy by default; you have to download it from the Microsoft website. After downloading it, you can find the SecGuide.admx and SecGuide.adml files in the Templates folder. To import the files, copy the .admx file to the %SystemRoot%\PolicyDefinitions folder and the .adml file to the %SystemRoot%\PolicyDefinitions\locale (in my case en-US) folder. Reopen Group Policy Editor, and you will find the new section we just imported.
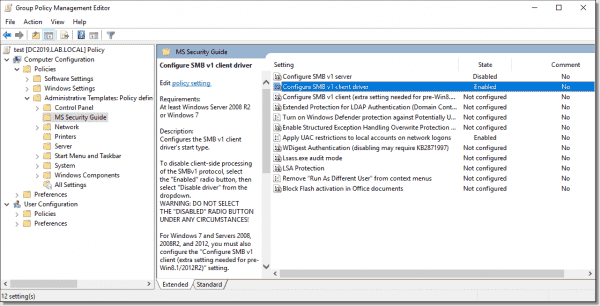
MS Security Guide settings
Configure SMB v1 server: Disabled
Configure SMB v1 client driver: Enabled: Disable driver
Both settings control the Server Message Block v1 (SMBv1) client and server behavior. SMBv1 is roughly a 30-year-old protocol and as such is much more vulnerable than SMBv2 and SMBv3. Therefore, Microsoft recommends completely disabling SMBv1 on your network. Be careful with the client driver setting—do not set it to Disabled because this will cause issues with the system. The correct setting is Enabled: Disable driver.
Note: In case you have an older device on your network, like a network printer, make sure it supports SMBv2 or higher before disabling SMBv1. Recently we had this issue where scanning to a shared folder didn’t work because the printer only supported SMBv1.
Apply UAC restrictions to local accounts on network logons: Enabled
Local accounts are a high risk, especially when configured with the same password on multiple servers. This setting controls whether you can use a local account to connect to a remote server, for example, to a C$ share. When enabled, User Account Control (UAC) removes the privileges from the resulting token, denying access. This is the default behavior.
Lanman Workstation
Enable insecure guest logons: Disabled
By default, a Windows SMB client will allow insecure guest logons, which network-attached storage (NAS) devices acting as file servers often use. Because these are unauthenticated logons, features like SMB signing and SMB encryption are disabled. This makes such communications vulnerable to man-in-the-middle attacks. Windows file servers require SMB authentication by default.
DNS Client
Turn off multicast name resolution: Enabled
Link-local multicast name resolution (LLMNR) is a secondary name resolution protocol that uses multicast over a local network. An attacker can listen to such requests (on UDP ports 5355 and 137) and respond to them, tricking the client. This is called local name resolution poisoning.
Fonts
Enable font providers: Disabled
This disables Windows from downloading fonts from online font providers. The IT department should first test and approve all system changes.
Network Connections
Prohibit installation and configuration of Network Bridge on your DNS domain network: Enabled
Network Bridge could let users connect two or more physical networks together and allow data sharing between them. This could lead to unauthorized data upload or malicious activity from the bridged network.
Prohibit use of Internet Connection Sharing on your DNS domain network: Enabled
This setting applies in Windows 10 and Windows Server 2016/2019 to the Mobile Hotspot feature. Standard users should not be able to open internet connectivity via enterprise devices.
Require domain users to elevate when setting a network’s location: Enabled
A network location setting, also known as a network profile, controls which firewall profile to apply to the system. With this setting enabled, such a change would require administrative elevation. Standard users should not change these settings.
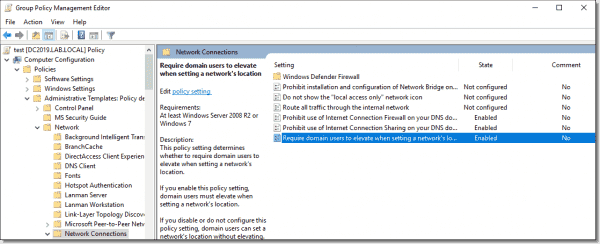
Network Connections settings
Group Policy
Configure registry policy processing: Do not apply during periodic background processing: Enabled: FALSE (unchecked)
Configure registry policy processing: Process even if the Group Policy objects have not changed: Enabled: TRUE (checked)
These two settings control how to process Group Policy. The first one should be unchecked so that the system refreshes Group Policy Objects (GPOs) in the background and does not wait for user logon or a reboot. The second should be checked to reapply each GPO setting during every refresh. This will override any unauthorized changes done locally on the system.
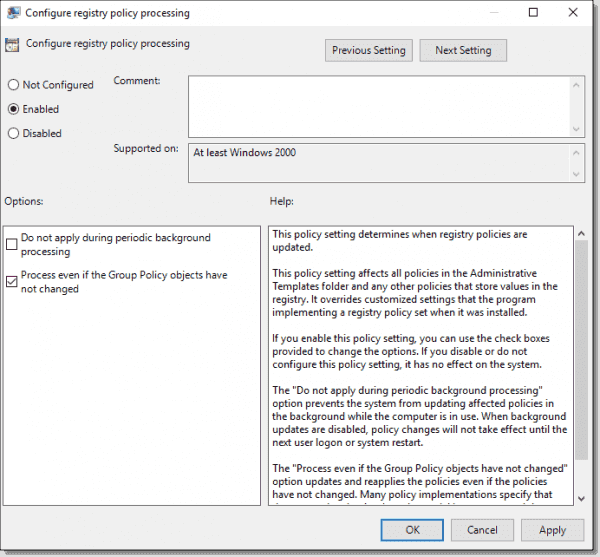
Configure registry policy processing
Logon
Turn off app notifications on the lock screen: Enabled
Application notification could expose sensitive data to unauthorized users, for example, confidential email notifications. Enable this setting to turn off such notifications.
Turn off picture password sign-in: Enabled
Turn on convenience PIN sign-in: Disabled
The Windows Hello feature allows users to sign in with a picture gesture or a PIN code similar to a credit card. Both options are relatively easy for a person standing behind a user to observe (called shoulder surfing). The recommended approach is to use complex passwords instead.
Autoplay Policies
Disallow Autoplay for non-volume devices: Enabled
This disables autoplay for external devices, like cameras or phones, which an attacker could use to launch a program or damage the system.
Set the default behavior for AutoRun: Enabled: Do not execute any autorun commands
The autorun.inf file located on a DVD or USB media stores autorun commands that often launch software installation or other commands. Even though a pop-up window displays for the user, malicious code might run unintentionally, and the recommended approach is to disable any autorun actions.
Turn off Autoplay: Enabled: All drives
Similar to autorun, autoplay starts to read data from external media, which causes setup files or audio media to start immediately. Autoplay is disabled by default, but not on DVD drives.
Microsoft account
Block all consumer Microsoft account user authentication: Enabled
In an organization, the IT department should firmly manage user authentication. Users should not be able to use their own Microsoft online IDs in any applications or services such as OneDrive.
OneDrive
Prevent the usage of OneDrive for file storage: Enabled
This policy setting lets you prevent apps and features from working with files on OneDrive, so users cannot upload any sensitive working data to OneDrive. Note that if your organization uses Office 365, this setting would prevent users from saving data to your company OneDrive.
Subscribe to 4sysops newsletter!
Conclusion
Group Policy administrative templates offer great possibilities for system and end-user experience customizations. Literally hundreds of settings are available by default, and you can add more by downloading the .admx files from Microsoft and other vendors. In this post, we have covered the important security-related settings.