Технология TS Easy Print является альтернативой стандартной службе печати, появилась впервые в Windows Server 2008R2.
Благодаря данной технологии значительно повышается быстродействие, а главное — стабильность и отказоустойчивость подсистемы печати в том числе и на терминальных серверах.
Внедрение Easy Print не требует установки ролей и компонентов, настройки сервера или рабочей станции пользователя.
Необходимо лишь наличие клиента удаленного рабочего стола версии 6.1 (или старше) и .NET Framework 3.0 SP1 (или старше).
Настройка
Чтобы включить данную технологию необходимо зайти в редактор групповых политик gpedit.msc :
Конфигурация компьютера\
Административные шаблоны\
Компоненты Windows\
Службы удаленных рабочих столов\
Узел сеансов удаленных рабочих столов\
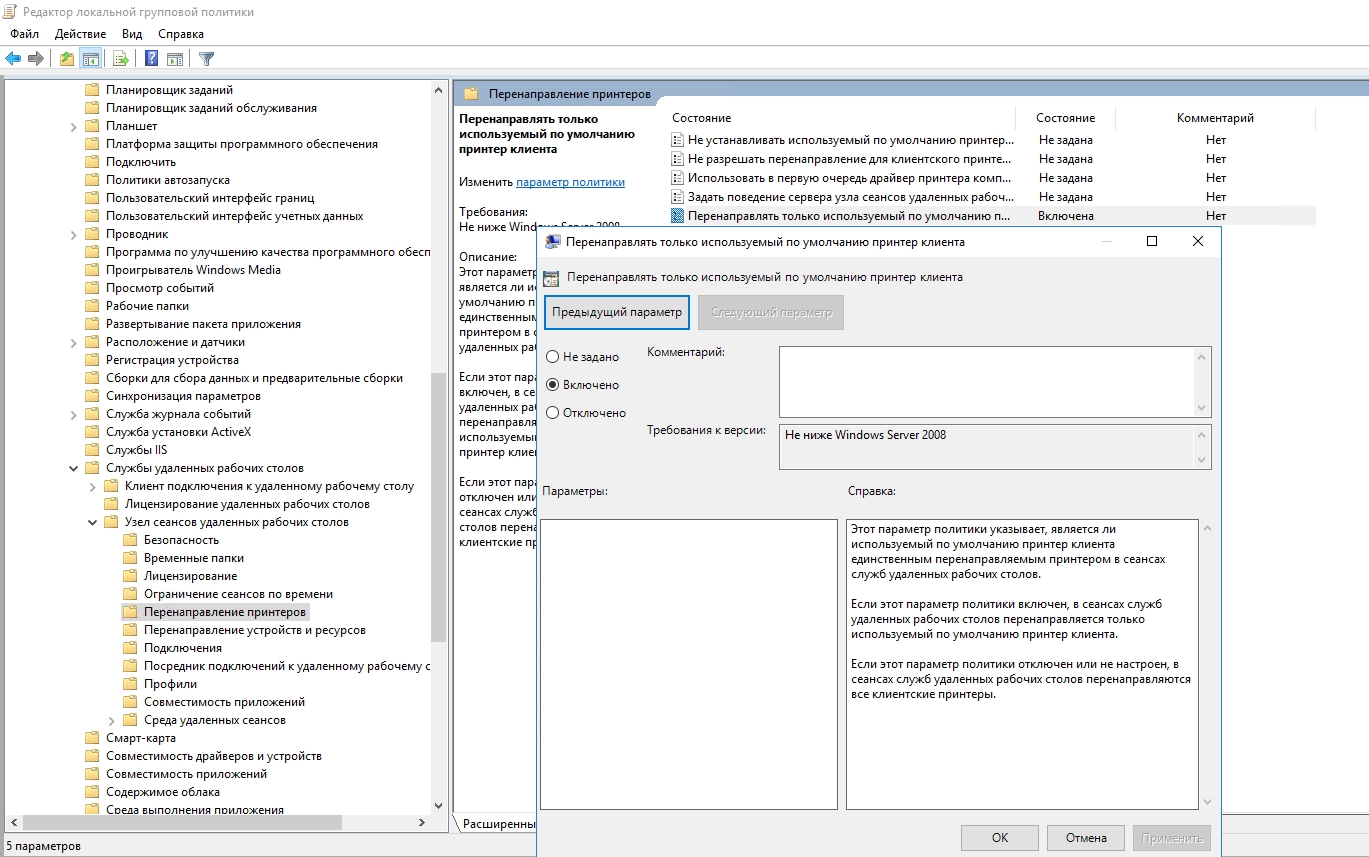
Перенаправление принтеров
перенаправлять только используемый по умолчанию принтер клиента — вкл
использовать в первую очередь драйвер принтера Easy Print — отк
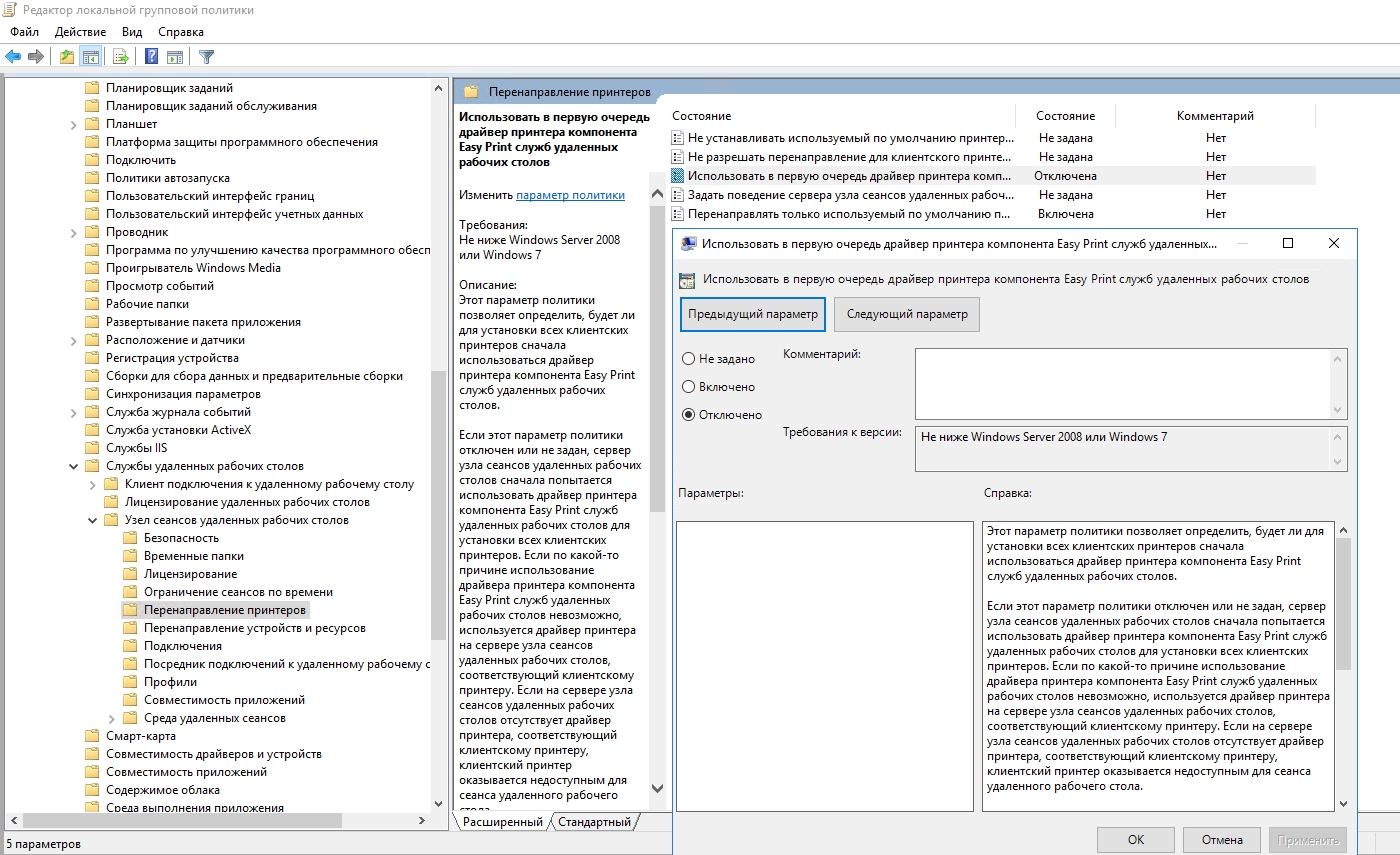
сервер сначала будет пытаться печатать с помощью драйвера принтера и только если его не найдет обратится к драйверу easy print.
Далее выполняем настройку изоляции драйверов печати.
Данная функция доступна также с Windows Server 2008.
Для этого перейдем в раздел редактора групповых политик:
Конфигурация компьютера\
Административные шаблоны\
Принтеры\
выполнять драйвера принтеров в изолированном виде — вкл
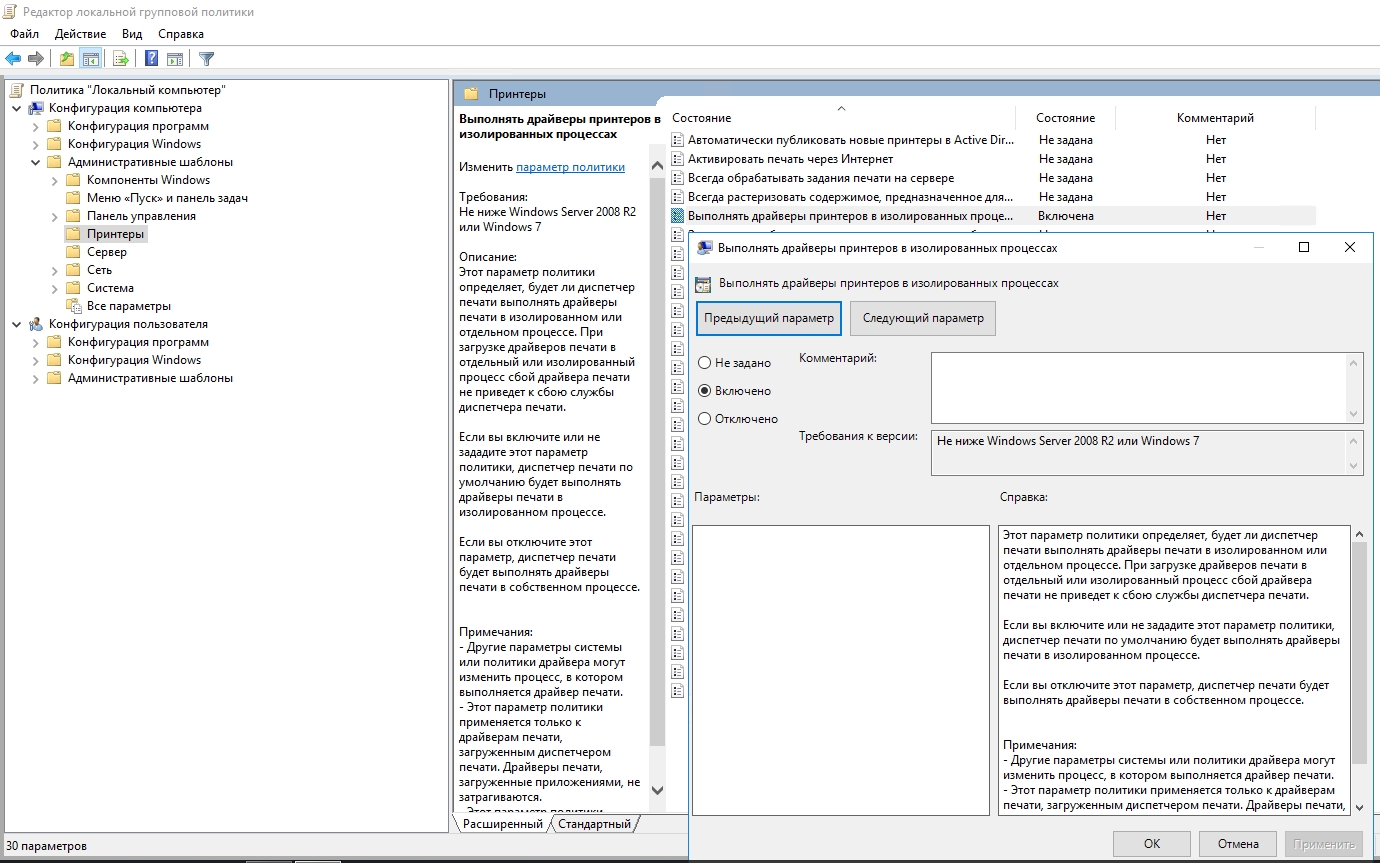
переопределить параметр совместимости выполнения драйвера печати , сообщенный драйверов печати — вкл
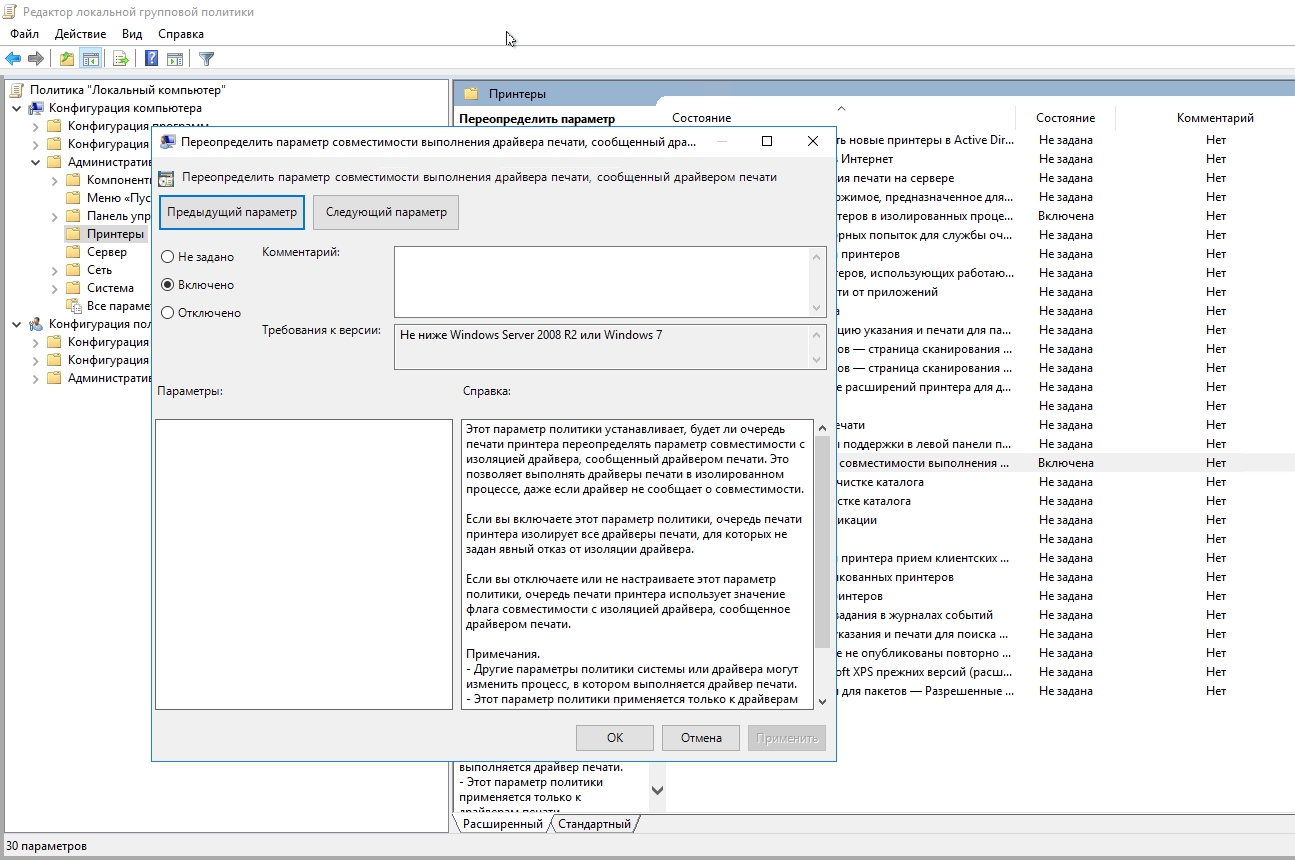
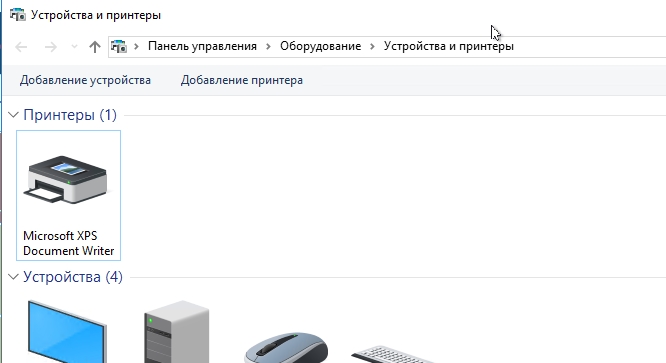
Для корректной работы данный технологии необходимо, чтобы на сервера был установлен принтер Microsoft XPS Document Writer.
Настройка Easy Print на этом окончена.
Источник
Технология TS Easy Print была впервые представлена в Windows Server 2008 в качестве альтернативы использованию традиционной подсистемы печати на терминальных серверах RDS. Easy Print позволяет избежать установки драйверов для перенаправленных принтеров на сервере терминалов и позволяет сопоставлять перенаправленный клиентский принтер с драйвером Easy Print. Это значительно повышает стабильность и производительность работы службы диспетчера очереди печати и сервера RDS в целом.
Функционал Easy Print основана на спецификациях, определенных в стандарте XPS для драйверов принтеров. Основные преимущества формата XPS: использование открытого формата документа, портативность и независимость от аппаратной платформы, низкие требования к пропускной способности канала (за счет использования более легкого стандарта XML). Задание печати XPS через сеанс RDP передается на клиентский ПК и обрабатывается локальным драйвером печати.
- Настройка Easy Print на стороне клиента
- Настройка Easy Print на стороне сервера Remote Desktop Server
Содержание:
Настройка Easy Print на стороне клиента
Для использования Easy Print на стороне клиента, он должен соответствовать следующим требованиям:
- Операционная система- Windows XP SP3 и выше
- Версия RDP клиента 6.1 (mstsc.exe — 6.0.6001) и выше
- Наличие установленного .NET Framework 3.0 SP1 или .NET 3.5
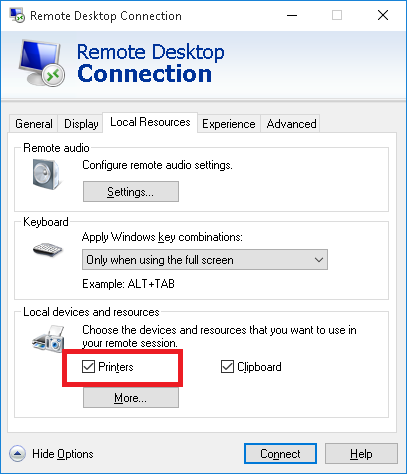
- В параметрах RDP подключения на вкладке Локальные ресурсы (Local Resources) в разделе Выберите устройства и ресурсы, которые вы хотите использовать во время удаленного сеанс должна быть отмечена опция «Принтеры»

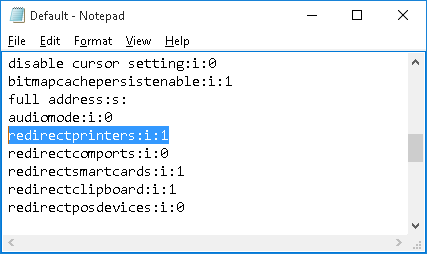
Если вместо клиент mstsc.exe, вы используете для подключения настроенный.rdp файл, в нем должна присутствовать следующая строка:
redirectprinters:i:1
Настройка Easy Print на стороне сервера Remote Desktop Server
Драйвер печати Easy Printer устанавливается на сервере при развертывании роли служб удаленных рабочих столов (RDS), а в списке принтеров появляется новый принтер с именем Microsoft XPS Document Writer. Этот драйвер печати поддерживает различные модели принтеров.
В Windows Server 2012 R2 включить обязательное использование технологии Easy Print на стороне сервера RDS можно только через групповые политики.
- Откройте редактор локальной (gpedit.msc) или доменных (GPMC.msc) GPO
- Перейдите в раздел Computer Configuration –> Administrative Templates –> Windows Components -> Remote Desktop Services –> Remote Desktop Session Host -> Printer Redirection (аналогичная политика имеется и в пользовательском разделе GPO)

- Найдите и включите политику Use Remote Desktop Easy Print driver first

Совет. В том случае, если клиент не поддерживает использование драйвера Easy Print, сервер RDS автоматически пытается использовать установленный на нем драйвер для данной модели принтера (если он, конечно, имеется).
После привязки политики к нужному контейнеру AD, можно протестировать политику.
- Обновите групповые политики на сервере Remote Desktop командой gpupdate /force
- Завершите текущую RDP сессию (logoff) и подключитесь к серверу еще раз
- Перейдите в раздел Панели управления -> Устройства и принтеры
- Найдите принтер, перенаправленный в рамках вашей RDP сессии и откройте его свойства
- Перейдите на вкладку Advanced и удостоверьтесь, что для данного принтера используется драйвер Remote Desktop Easy Print
- Send the test print job and make sure that it is properly printed on a local printer
По умолчанию количество перенаправленных принтеров в сессии ограничено числом 20. Изменить эту настройку можно через реестр. Для этого в ветке
HKEY_LOCAL_MACHINE\SOFTWARE\Policies\Microsoft\Windows NT\Terminal Services
нужно создать параметр MaxPrintersPerSession со значением, равным максимальному количеству принтеров, которые должны перенаправляться в рамках RDP сессии.
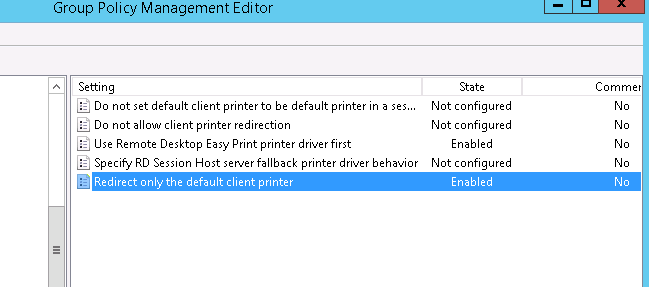
Для лучшей производительности предпочтительнее перенаправлять с клиента только один принтер, используемый по умолчанию. Для реализации этой концепции достаточно включить политику Redirect only the default client printer.
Таким образом, благодаря использованию Remote Desktop Easy Print, существенно упрощается настройка подсистемы печати на терминальных серверах, а администратору нет необходимости устанавливать на RDS серверах драйвера для различных моделей принтеров, используемых клиентами.
Как решить проблемы подсистемы печати в терминальном сервере
Время на прочтение
3 мин
Количество просмотров 285K
Приветствую, %habrausername%!
Сегодня я бы хотел поделиться своим опытом устранения проблем печати на терминальном сервере Microsoft.
Подробности под катом.
Вместо Intro
Наверняка, почти каждый системный администратор, работающий с Windows и, в частности, с терминальным сервером, сталкивался с проблемами печати.
Разрывается телефон, у всех одна и та же проблема: «Нажимаю на печать — ничего не происходит!». Идем смотреть логи и видим следующую картину:

Знакомо? Никаких подробностей, ничего — гадайте, господа администраторы! На форумах в интернете полно вопросов по этой теме и очень мало полных, структурированных ответов. Что ж, попробуем собрать в кучу все варианты решений.
Причины и решения
Итак, из-за чего может происходить подобная ситуация? Большую часть подобных ситуаций вызывают установленные на сервере драйверы.
- Необходимо помнить, что драйверы у клиентов и на сервере должны быть идентичны
- Убедитесь, что включена изоляция драйверов
- Удалите все драйвера на сервере и попробуйте использовать TS Easy Print
- Попробуйте решения сторонних компаний
А теперь пройдемся подробнее по всем пунктам. Для начала установим на наш терминальный сервер роль «Службы печати и документов».

Это позволит нам удобно управлять драйверами и принтерами, установленными в системе.
Идентичные драйвера
Думаю, тут особо не о чем рассказывать. Стоит помнить, что драйвера необходимо брать с официальных страниц изготовителя принтера. Так же еще один момент — стабильнее всего ведут себя PCL5. Если есть возможность выбора между PCL5 и PCL6 — стоит установить PCL5 (соответственно, серверу и клиенту).
Изоляция драйверов
В Windows 2008 появилась замечательная возможность изоляции драйверов принтера. Теперь драйвер принтера подгружается не Spoolsv.exe а специальным процессом PrintIsolationHost.exe. При «вылетании» драйвера принтера «слетает» только один экземпляр PrintIsolationHost.exe, а сама служба «Диспетчера печати» остается работоспособной, что, как понимаете, весьма влияет на настроение пользователей 
Чтобы включить данную возможность, нам необходимо открыть редактор локальной групповой политики (gpedit.msc) и пройти следующим путем: «Параметры компьютера -> Административные шаблоны -> Принтеры». Находим и включаем следующие пункты:
- Выполнить драйверы принтеров в изолированных процессах
- Переопределить параметр совместимости выполнения драйвера печати, назначенный драйвером печати
Будет выглядеть следующим образом:

TS Easy Print
Видимо, вняв наконец стенаниям системных администраторов, компания Microsoft решила что-то сделать с необходимостью ставить зоопарк драйверов на терминальный сервер и падающим из-за этого spoolsv.exe. В итоге, на свет родилась технология TS Easy Print. Ключевой особенностью является, то, что больше нам не нужно устанавливать на сервер драйвера для каждого принтера — вместо этого используется унифицированный драйвер Remote Desktop Easy Print, соответственно, мы уходим от проблемы падающего спулера — ведь все операции с печатью выполняются на компьютере клиента.
Для того, чтобы явно определить, что мы хотим использовать на терминальном сервере TS Easy Print, необходимо пройти опять же в редактор локальной групповой политики (gpedit.msc) по следующему пути: «Параметры компьютера -> Административные шаблоны -> Компоненты Windows -> Службы удаленных рабочих столов -> Узел сеансов удаленных рабочих столов -> Перенаправление принтеров». Нас интересуют следующие пункты, которые надо включить:
- Использовать в первую очередь драйвер принтера Easy Print удаленного рабочего стола
- Перенаправлять только используемый по умолчанию принтер клиента
Второй пункт необходим, если мы хотим, чтобы в терминале у клиента был только его принтер по умолчанию.

Далее, необходимо очистить наш сервер от лишних драйверов принтеров. Это можно сделать в менеджере роли «Службы печати и документов».
Внимательно удаляйте драйвера! Необходимо оставить в живых такие вещи, как «Remote Desktop Easy Print» и «Microsoft XPS Document Writer». Именно они и отвечают за передачу печати на клиента.
Теперь перейдем к требованием на клиенте. Их всего два — использование протокола RDP версии не ниже 6.1 и .NET Framework 3.0 с пакетом обновления 1 (SP1). Больше от них ничего не требуется.
Решения сторонних компаний
Избавиться от проблемы падающего спулера призваны такое ПО как, например, ScrewDrivers (сайт). Оно предоставляет клиент-серверную архитектуру.
Сервер ScrewDrivers — это компонент, который необходимо установить на серверы, на которых планируется использовать печать в терминальном сеансе. Клиент ScrewDrivers должен быть установлен на рабочих станциях. Именно этот компонент позволяет создать на терминальном сервере виртуальные принтеры, которые соответствуют локальным принтерам пользователя.
В целом, напоминает Easy Print, но не бесплатно (впрочем, есть лекарства ;).
Заключение
На этом хочу откланяться. Возможно информация не полная — буду рад услышать дополнения. Надеюсь, это поможет кому-то избежать часов нервотрепки
Удачи!
One challenge with Remote Desktop printing is the issue of drivers. If users want to output documents on locally attached printers, for example, in work-from-home environments, organizations might have to deal with various printer models. Remote Desktop Easy Print offers a solution with a single driver.
Contents
- How does Remote Desktop Easy Print work?
- Configuring Easy Print on the Remote Desktop Server
- Configure RDP client settings
- Testing Easy Print with an RDP connection
- Wrapping up
- Author
- Recent Posts

Brandon Lee has been in the IT industry 15+ years and focuses on networking and virtualization. He contributes to the community through various blog posts and technical documentation primarily at Virtualizationhowto.com.
In a traditional printing subsystem architecture, IT admins have to ensure that all the appropriate drivers are installed on the Remote Desktop Server so that it can render documents for printing. The Remote Desktop Easy Print architecture simplifies the challenge of installing drivers for all possible end-user printers.
How does Remote Desktop Easy Print work?
Easy Print is a proxy that redirects all printing-related work to the user’s local machine. Hence, you don’t need to install any print drivers on the session host.
Instead of creating a server-side UI that will show preferences such as number of copies, landscape v. portrait, etc., the Easy Print driver redirects all calls for UI to the actual driver on the client side. The TS client launches this UI from the local machine on top of the remote session. As a result, the user sees all printer options available to them.
When redirecting print jobs, the server creates an XPS file and sends it to the client, which will print the job on the appropriate printer. XPS has the advantage of being able to encapsulate the user’s selected printing preferences plus the document data.
Configuring Easy Print on the Remote Desktop Server
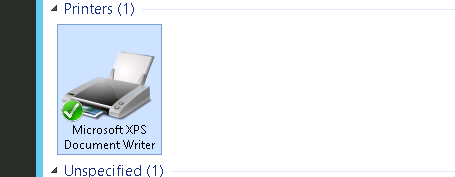
Once you have installed the Remote Desktop Services role in Windows Server, you will see a new printer called Microsoft XPS Document Writer. This is the generic Easy Print printer.

Viewing the Microsoft XPS Document Writer Easy Print Device
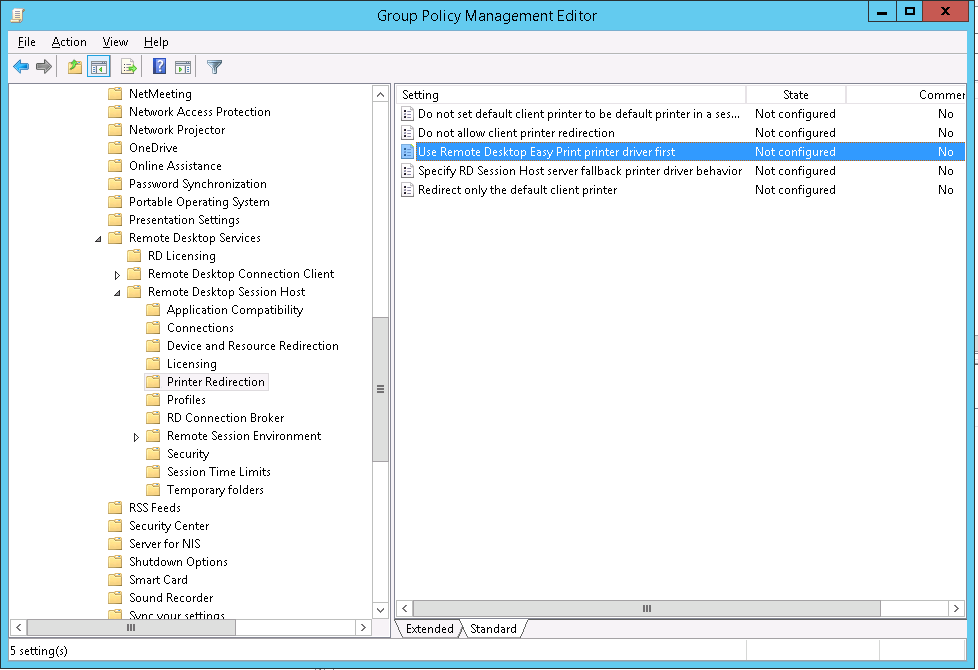
Next, we can configure Easy Print using Group Policy to ensure that the Easy Print driver is used for users connected to the session host. Open the GPO in the editor and navigate to the following setting:
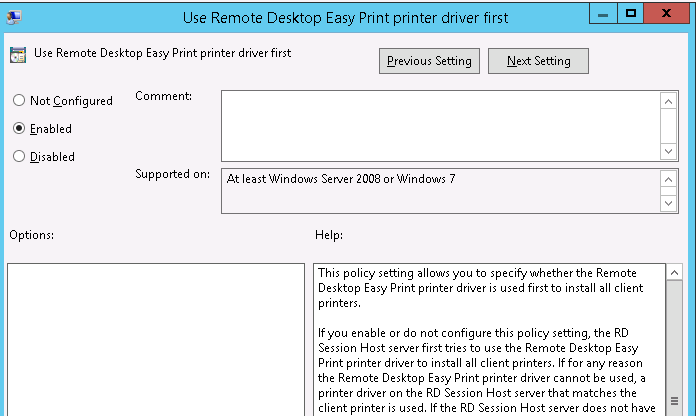
Computer Configuration > Administrative Templates > Windows Components > Remote Desktop Services > Remote Desktop Session Host > Printer Redirection. Open the Use Remote Desktop Easy Print printer driver first setting, and set it to Enabled.

Enabling the Remote Desktop Easy Print Driver First setting in Group Policy
Make sure the GPO settings are refreshed and enforced immediately by running the command at an elevated command prompt:
gpupdate /force
Configure RDP client settings
Easy Print should be available in all supported versions of Windows. There are also a few settings to be aware of.
First, make sure Printers is selected on the Local Resources tab.

MSTSC client settings with printer redirection
In Active Directory Users and Computers, you will see the following settings in the user properties:
- Connect client drives at logon
- Connect client printers at logon
- Default to main client printer
By default, these options are selected, so most will find that they can leave these settings.

Active Directory User Properties affecting client printers
You can also configure client settings related to printers in the Remote Desktop Services Session Collection. By default, the following are selected:
- Allow client printer redirection
- Use the client default printing device
- Use the Remote Desktop Easy Print print driver first
With these settings, you can configure, enable, or disable client printer redirection on the collection set directly.

Session Collection client settings for Remote Desktop Easy Print
Testing Easy Print with an RDP connection
Once you log in to the session host, navigate to your printer configuration using control printers at a run menu. Next, right-click your redirected printer, and select Printer Properties. Next, click the Advanced tab and look at the driver listed. You should see the Remote Desktop Easy Print driver selected. It is normal to see the selection grayed out, since it is a redirected printer.

Verifying that the Easy Print driver is used in a Remote Desktop connection
Be sure to test the printing functionality even if the printer is listed and displaying the Easy Print Driver.
Wrapping up
Remote Desktop Easy Print is a technology that IT admins can leverage to ease the management of printer drivers. It enables users to redirect locally attached printers to an RDS session and have the printing functionality work as expected.
Subscribe to 4sysops newsletter!
In addition, the Easy Print driver helps to ensure that even consumer-grade and non-mainstream printers have a good chance of working, even without proper enterprise-grade drivers. As with any generic solution, Easy Print might not provide the same performance or functionality you get from a native printer setup.
![]()
![]()
Remote Desktop Easy Print is a Windows Remote Desktop Services feature that allows you to easily print from a remote desktop session to a local printer.
Before the introduction of Easy Print, printing from a remote desktop session could be complex and challenging, mainly when using printers unavailable on the remote computer. With Easy Print, printing from a remote desktop session has become much easier and more streamlined.
When you connect to a remote desktop using Remote Desktop Services, the Easy Print driver is installed on the remote computer. This driver works as a bridge between the printer on the local computer and the remote desktop session, enabling you to print from the remote session to your local printer.
Remote Desktop Easy Print: How Does It Work?
Remote Desktop Easy Print creates a virtual printer on the remote computer that represents the local printer you want to use. When you print a document from the remote session, it is sent to this virtual printer, which redirects the print job to the local printer.
The process works as follows:
- When you connect to a remote desktop session, the Easy Print driver is automatically installed on the remote computer.
- When you print a document from the remote session, the print job is sent to the virtual printer created by Easy Print.
- The virtual printer converts the print job into XPS, which encapsulates the print job and settings that the local printer can understand.
- The print job is then redirected to the local printer via the Remote Desktop Connection.
- The local printer prints the document as if it were printed directly from the local computer.
Related article: How to Deploy Printers to Users or Computers via Group Policy?
Configure Remote Desktop Easy Print Settings on the Server
You can configure the Remote Desktop Easy Print settings in two ways: via Group Policy or the Server Manager. These configuration methods apply to Windows Server 2012 and later, where the Remote Desktop Services role is installed.
But note that the settings deployed via Group Policy take precedence over the setting in Server Manager.
Using Group Policy
- Open the Group Policy Management Console on your domain controller.
gpmc.msc

- Create a new GPO or edit an existing one.

- Navigate to the following policy:
Computer Configuration\Policies\Administrative Templates\Windows Components\Remote Desktop Services\Remote Desktop Session Host\Printer Redirection - Enable the policy “Use Remote Desktop Easy Print printer driver first.”
 When you enable or don’t configure this policy, the RD Session Host server will initially attempt to install all client printers using the Remote Desktop Easy Print printer driver. If the Remote Desktop Easy Print printer driver cannot be utilized, the server will look for a printer driver that matches the client printer on the RD Session Host server. If no matching printer driver is found, the client printer will not be accessible during the Remote Desktop session.
 - Close the Group Policy Management Editor and wait for the new policy to be applied.
- Optionally, you can force the group policy to apply by running the following command in an elevated command prompt on the Remote Desktop Services server.
gpupdate /force


 When you enable or don’t configure this policy, the RD Session Host server will initially attempt to install all client printers using the Remote Desktop Easy Print printer driver. If the Remote Desktop Easy Print printer driver cannot be utilized, the server will look for a printer driver that matches the client printer on the RD Session Host server. If no matching printer driver is found, the client printer will not be accessible during the Remote Desktop session.
Using Server Manager
- Login to the RDS server and open the Server Manager.
- Navigate to Remote Desktop Services > Collections and edit the Session Collection.

- Click Client Settings and check the following boxes:
- Allow client printer redirection
- Use the client default printing device
- Use the Remote Desktop Easy Print drive first

- Allow client printer redirection


If a group policy manages the printer redirection settings, you will get an error saying, “Could not set the appropriate properties on the servers. Ensure that all servers are available on the network, and the properties are not managed by Group Policy.”
When you get this error, ensure the Printer Redirection policies are not configured.
Confirm Remote Desktop Easy Print Driver is in Use
The Remote Desktop Easy Print is available in all currently supported Windows versions. Generally, the Remote Desktop Connection 6.1 and above are compatible with Easy Print.
- Open the Remote Desktop Connection app.
mstsc
- Enter the RDS server and credentials.

- Switch to the Local Resources tab, check the Printers box, and click Connect.

- Once logged in, open the Devices and Printers applet in Control Panel. Your local printers are listed on the server as redirected.

- Right-click on the printer and click Printer properties.

- Switch to the Advanced tab and confirm the driver is Remote Desktop Easy Print.


Test the Remote Desktop Easy Print
Now, try to print a test page, and it should print to your local printer.

When you check the print queue on your client, you’ll see the document name is Remote Desktop Redirected Printer Doc. This means the Remote Desktop Easy Print successfully redirected the document printing to your local printer.

Conclusion
Configuring Remote Desktop Easy Print on Windows Server 2022 can significantly improve the printing experience for remote users. Following the step-by-step instructions outlined in this blog post, you can ensure your users can easily print from their remote sessions without worrying about driver compatibility issues.
With the proper configuration and setup, you can simplify the printing process and save time and frustration for both you and your users. So why wait? Start configuring Remote Desktop Easy Print today and enjoy the benefits of a streamlined printing experience for your remote users.

Cyril Kardashevsky
I enjoy technology and developing websites. Since 2012 I’m running a few of my own websites, and share useful content on gadgets, PC administration and website promotion.