Configuring the Cisco IOS XE DHCP Relay Agent
Cisco routers running Cisco IOS XE software include Dynamic Host Configuration Protocol (DHCP) server and relay agent software. A DHCP relay agent is any host that forwards DHCP packets between clients and servers. This module describes the concepts and tasks needed to configure the Cisco IOS XE DHCP relay agent.
- Finding Feature Information
- Prerequisites for Configuring the DHCP Relay Agent
- Information About the DHCP Relay Agent
- How to Configure the DHCP Relay Agent
- Configuration Examples for the DHCP Relay Agent
- Additional References
- Technical Assistance
- Feature Information for the Cisco IOS XE DHCP Relay Agent
- Glossary
Finding Feature Information
Your software release may not support all the features documented in this module. For the latest caveats and feature information, see Bug Search Tool and the release notes for your platform and software release. To find information about the features documented in this module, and to see a list of the releases in which each feature is supported, see the feature information table.
Use Cisco Feature Navigator to find information about platform support and Cisco software image support. To access Cisco Feature Navigator, go to www.cisco.com/go/cfn. An account on Cisco.com is not required.
Prerequisites for Configuring the DHCP Relay Agent
Before you configure the DHCP relay agent, you should understand the concepts documented in the “DHCP Overview” module.
The Cisco IOS XE DHCP server and relay agent are enabled by default. You can verify if they have been disabled by checking your configuration file. If they have been disabled, the no service dhcp command will appear in the configuration file. Use the service dhcp command to reenable the functionality if necessary.
The Cisco IOS XE DHCP relay agent will be enabled on an interface only when the ip helper-address is configured. This command enables the DHCP broadcast to be forwarded to the configured DHCP server.
Information About the DHCP Relay Agent
- DHCP Relay Agent
Overview - Packet Forwarding Address
- Relay Agent Information Option
- DHCP Relay Agent Support for MPLS VPNs
- DHCP Relay Support for Option 82 Encapsulation
DHCP Relay Agent
Overview
A DHCP relay agent
is any host that forwards DHCP packets between clients and servers. Relay
agents are used to forward requests and replies between clients and servers
when they are not on the same physical subnet. Relay agent forwarding is
distinct from the normal forwarding of an IP device, where IP datagrams are
switched between networks somewhat transparently. By contrast, relay agents
receive DHCP messages and then generate a new DHCP message to send out on
another interface. The relay agent sets the gateway IP address (giaddr field of
the DHCP packet) and, if configured, adds the relay agent information option
(option82) in the packet and forwards it to the DHCP server. The reply from the
server is forwarded back to the client after removing option 82.
The DHCP relay
agent supports the use of unnumbered interfaces. An unnumbered interface can
“borrow” the IP address of another interface already configured on the device,
which conserves network and address space. For DHCP clients connected though
the unnumbered interfaces, the DHCP relay agent automatically adds a static
host route once the DHCP client obtains an address, specifying the unnumbered
interface as the outbound interface. The route is automatically removed once
the lease time expires or when the client releases the address.
Packet Forwarding Address
DHCP clients need to use User Datagram Protocol (UDP) broadcasts to send their initial DHCPDISCOVER messages because they don’t have information about the network to which they are attached. If the client is on a network segment that does not include a server, UDP broadcasts normally are not forwarded because most routers are configured to not forward broadcast traffic.
You can remedy this situation by configuring the interface of your router that is receiving the broadcasts to forward certain classes of broadcasts to a helper address. You can use more than one helper address per interface.
When a router forwards these address assignment/parameter requests, it is acting as a DHCP relay agent. The Cisco router implementation of the DHCP relay agent is provided via the
ip
helper-address interface configuration command.
In the figure below, the DHCP client broadcasts a request for an IP address and additional configuration parameters on its local LAN. Router B, acting as a DHCP relay agent, picks up the broadcast and generates a new DHCP message to send out on another interface. As part of this DHCP message, the relay agent inserts the IP address of the interface containing the
ip
helper-address command into the gateway IP address (giaddr) field of the DHCP packet. This IP address enables the DHCP server to determine which subnet should receive the offer and identify the appropriate IP address range to offer. The DHCP relay agent sends the local broadcast, via IP unicast, to the DHCP server address 172.16.1.2 specified by the
ip
helper-address interface configuration command.

Relay Agent Information Option
Automatic DHCP address allocation is typically based on an IP address, whether it be the gateway IP address (giaddr field of the DHCP packet) or the incoming interface IP address. In some networks, it is necessary to use additional information to further determine which IP addresses to allocate. By using the relay agent information option (option 82), the Cisco IOS XE relay agent can include additional information about itself when forwarding client-originated DHCP packets to a DHCP server.
Cisco IOS XE supports this functionality by using the
ip
dhcp
relay
information
option command. The relay agent will automatically add the circuit identifier suboption and the remote ID suboption to the relay agent information option and forward them to the DHCP server.
The DHCP server can use this information to assign IP addresses, perform access control, and set quality of service (QoS) and security policies (or other parameter-assignment policies) for each subscriber of a service provider network.
The figure below shows how the relay agent information option is inserted into the DHCP packet as follows:
-
The DHCP client generates a DHCP request and broadcasts it on the network.
-
The DHCP relay agent intercepts the broadcast DHCP request packet and inserts the relay agent information option (option 82) in the packet. The relay agent information option contains the related suboptions.
-
The DHCP relay agent unicasts the DHCP packet to the DHCP server.
-
The DHCP server receives the packet and uses the suboptions to assign IP addresses and other configuration parameters and forwards them back to the client.
-
The relay agent strips off the suboption fields of the packet while forwarding to the client.

- Relay Agent Information Reforwarding Policy
Relay Agent Information Reforwarding Policy
A DHCP relay agent may receive a message from another DHCP relay agent that already contains relay information. By default, the relay information from the previous relay agent is replaced. If this behavior is not suitable for your network, you can use the ip dhcp relay information policy {drop | keep | replace} global configuration command to change it.
To ensure the correct operation of the reforwarding policy, make sure to disable the relay agent information check by using the no ip dhcp relay information check global configuration command.
DHCP Relay Agent Support for MPLS VPNs
DHCP relay support for Multiprotocol Label Switching (MPLS) Virtual Private Networks (VPNs) enables a network administrator to conserve address space by allowing overlapping addresses. The relay agent can support multiple clients on different VPNs, and many of these clients from different VPNs can share the same IP address.
Configuring VPNs involves an adjustment to the usual DHCP host IP address designation. VPNs use private address spaces that might not be unique across the Internet.
In some environments, a relay agent resides in a network element that also has access to one or more MPLS VPNs. A DHCP server that provides service to DHCP clients on those different VPNs must locate the VPN in which each client resides. The network element that contains the relay agent typically captures the VPN association of the DHCP client and includes this information in the relay agent information option of the DHCP packet.
DHCP relay support for MPLS VPNs allows the relay agent to forward this necessary VPN-related information to the DHCP server using the following three suboptions of the DHCP relay agent information option:
-
VPN identifier
-
Subnet selection
-
Server identifier override
The VPN identifier suboption is used by the relay agent to tell the DHCP server the VPN for every DHCP request it passes on to the DHCP server, and it is also used to properly forward any DHCP reply that the DHCP server sends back to the relay agent. The VPN identifier suboption contains the VPN ID configured on the incoming interface to which the client is connected. If you configure the VRF name but not the VPN ID, the VRF name is used as the VPN identifier suboption. If the interface is in global routing space, the VPN suboptions are not added.
The subnet selection suboption allows the separation of the subnet where the client resides from the IP address used to communicate with the relay agent. In typical DHCP processing, the gateway address specifies both the subnet on which a DHCP client resides and the IP address that the server can use to communicate with the relay agent. Situations exist where the relay agent needs to specify the subnet on which a DHCP client resides that is different from the IP address the server can use to communicate with the relay agent. The subnet selection suboption is included in the relay agent information option and passed on to the DHCP server. The gateway address is changed to the outgoing interface of the relay agent toward the DHCP server. The DHCP server uses this gateway address to send reply packets back to the relay agent.
The server identifier override suboption value is copied in the reply packet from the DHCP server instead of the normal server ID address. The server identifier override suboption contains the incoming interface IP address, which is the IP address on the relay agent that is accessible from the client. Using this information, the DHCP client sends all renew and release packets to the relay agent. The relay agent adds all of the VPN suboptions and then forwards the renew and release packets to the original DHCP server.
After adding these suboptions to the DHCP relay agent information option, the gateway address is changed to the outgoing interface of the relay agent toward the DHCP server. When the packets are returned from the DHCP server, the relay agent removes the relay agent information options and forwards the packets to the DHCP client on the correct VPN.
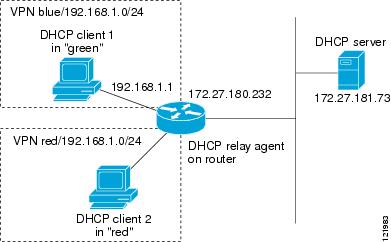
The figure below shows a VPN scenario where the DHCP relay agent and DHCP server can recognize the VPN that each client resides within. DHCP client 1 is part of VPN green and DHCP client 2 is part of VPN red and both have the same private IP address 192.168.1.0/24. Because the clients have the same IP address, the DHCP relay agent and DHCP server use the VPN identifier, subnet selection, and server identifier override suboptions of the relay agent information option to distinguish the correct VPN of the client.
DHCP Relay Support for Option 82 Encapsulation
When two relay agents are relaying messages between the DHCP client and
DHCP server, the second relay agent (closer to the server), by default,
replaces the first option 82 information with its own option 82. The remote ID
and circuit ID information from the first relay agent is lost. In some
deployment scenarios, it is necessary to maintain the initial option 82 from
the first relay agent, in addition to the option 82 from the second relay
agent. For example, an Intelligent Service Gateway (ISG) acting as a second
relay agent is connected to a Layer 2 device. The Layer 2 device connects to
the household and identifies the household with its own option 82.
The DHCP Relay Option 82 Encapsulation feature allows the second relay
agent to encapsulate option 82 information in a received message from the first
relay agent if it is also configured to add its own option 82 information. This
configuration allows the DHCP server to use option 82 information from both
relay agents. The DHCP server can use the VPN information from the second relay
agent along with the option 82 information from the first relay agent to send
correct address assignments and other configuration parameters for the client
devices based on the VRF, option 60, and encapsulated option 82. The reply
message from the DHCP server to the DHCP client traverses the same path as the
request messages through the two relay agents to the DHCP client.
Figure 4 shows the processing that occurs on the two relay agents and
the DHCP server when this feature is configured:
-
The DHCP client generates a
DHCP message (including option 60) and broadcasts it on the network. -
The first DHCP relay agent
intercepts the broadcast DHCP request packet and inserts its own option 82 in
the packet. -
The relay agent
automatically adds the circuit ID suboption and the remote ID suboption to
option 82 and forwards them to the second relay agent. -
The second relay agent
encapsulates the first relay agent’s option 82 and inserts its own option 82. -
The gateway IP address
(giaddr) is set to the incoming interface on the second relay agent and the
original giaddr from the first relay agent is encapsulated. -
The second DHCP relay agent
unicasts the DHCP packet to the DHCP server. -
The DHCP server receives
the packet and uses the VPN suboption information from the second relay, along
with the option 82 information from the first relay agent, to assign IP
addresses and other configuration parameters and forwards the packet back to
the second relay agent. -
When the second relay agent
receives the reply message from the server, it restores the encapsulated option
82 and prior giaddr from the first relay agent. The reply message is then sent
to the prior giaddr. -
The option 82 is stripped
off of the packet by the first relay agent before forwarding to the client.
Processing

How to Configure the DHCP Relay Agent
- Specifying the Packet
Forwarding Address - Configuring Relay Agent Information Option Support
- Configuring Relay Agent Information Option Support per Interface
- Configuring the Subscriber
Identifier Suboption of the Relay Agent Information Option - Configuring DHCP Relay
Agent Support for MPLS VPNs - Setting the Gateway Address
of the DHCP Broadcast to a Secondary Address Using Smart Relay Agent
Forwarding - Configuring Relay Agent Information Option Encapsulation Support
- Troubleshooting the DHCP
Relay Agent
Specifying the Packet
Forwarding Address
Perform this task
to configure the DHCP relay agent to forward packets to a DHCP server.
SUMMARY STEPS
1.
enable
2.
configure
terminal
3.
interface
type
number
4.
ip
helper-address
address
DETAILED STEPS
| Command or Action | Purpose | |
|---|---|---|
| Step 1 | enable Example: Device> enable
|
Enables
|
| Step 2 | configure terminal Example: Device# configure terminal
|
Enters global
|
| Step 3 | interface type number Example: Device(config)# interface GigabitEthernet0/0/0
|
Configures an
|
| Step 4 | ip helper-address address Example: Device(config-if)# ip helper-address 172.16.1.2
|
Forwards UPD
|
Configuring Relay Agent Information Option Support
Perform this task to enable support for the DHCP relay agent information option.
 Note |
See the «Configuring Relay Agent Information Option Support per Interface» section for more information on per-interface support for the relay agent information option. |
SUMMARY STEPS
1.
enable
2.
configure
terminal
3.
ip
dhcp
relay
information
option
4.
ip
dhcp
relay
information
check
5.
ip
dhcp
relay
information
policy
{drop
|
keep
|
replace}
6.
ip
dhcp
relay
information
trust-all
7.
end
8.
show
ip
dhcp
relay
information
trusted-sources
DETAILED STEPS
| Command or Action | Purpose | |
|---|---|---|
| Step 1 | enable Example: Router> enable
|
Enables privileged EXEC mode.
|
| Step 2 | configure terminal Example: Router# configure terminal
|
Enters global configuration mode.
|
| Step 3 | ip dhcp relay information option Example: Router(config)# ip dhcp relay information option
|
Enables the system to insert the DHCP relay agent information option (option-82 field) in forwarded BOOTREQUEST messages to a DHCP server.
|
| Step 4 | ip dhcp relay information check Example: Router(config)# ip dhcp relay information check
|
(Optional) Configures DHCP to check that the relay agent information option in forwarded BOOTREPLY messages is valid.
|
| Step 5 | ip dhcp relay information policy {drop | keep | replace} Example: Router(config)# ip dhcp relay information policy replace |
(Optional) Configures the reforwarding policy for a DHCP relay agent (what a relay agent should do if a message already contains relay information).
|
| Step 6 | ip dhcp relay information trust-all Example: Router(config)# ip dhcp relay information trust-all
|
(Optional) Configures all interfaces on a router as trusted sources of the DHCP relay information option.
|
| Step 7 | end Example: Router(config)# end
|
Returns to privileged EXEC mode.
|
| Step 8 | show ip dhcp relay information trusted-sources Example: Router# show ip dhcp relay information trusted-sources
|
(Optional) Displays all interfaces configured to be a trusted source for the DHCP relay information option.
|
Configuring Relay Agent Information Option Support per Interface
Perform this task to enable support for the DHCP relay agent information option (option 82) on a per interface basis.
The interface configuration allows the subscribers with different DHCP option 82 requirements on different interfaces to be reached from one Cisco router.
Read the “Restrictions” and «Relay Agent Information Reforwarding Policy» sections to understand how DHCP processes the relay agent information option for global configurations.
Note |
> |
SUMMARY STEPS
1.
enable
2.
configure
terminal
3.
interface
type
number
4.
ip
dhcp
relay
information
option-insert
[none]
5.
ip
dhcp
relay
information
check-reply
[none]
6.
ip
dhcp
relay
information
policy-action
{drop|
keep|
replace}
7.
exit
8.
Repeat Steps 3 through 7 to configure relay agent information settings on different interfaces.
DETAILED STEPS
| Command or Action | Purpose | |
|---|---|---|
| Step 1 | enable Example: Router> enable
|
Enables privileged EXEC mode.
|
| Step 2 | configure terminal Example: Router# configure terminal
|
Enters global configuration mode.
|
| Step 3 | interface type number Example: Router(config)# interface GigabitEthernet0/0/0
|
Configures an interface and enters interface configuration mode.
|
| Step 4 | ip dhcp relay information option-insert [none] Example: Router(config-if)# ip dhcp relay information option-insert
|
Enables the system to insert the DHCP relay agent information option (option-82 field) in forwarded BOOTREQUEST messages to a DHCP server.
|
| Step 5 | ip dhcp relay information check-reply [none] Example: Router(config-if)# ip dhcp relay information check-reply
|
Configures a DHCP server to validate the relay information option in forwarded BOOTREPLY messages.
|
| Step 6 | ip dhcp relay information policy-action {drop| keep| replace} Example: Router(config-if)# ip dhcp relay information policy-action replace |
Configures the information reforwarding policy for a DHCP relay agent (what a relay agent should do if a message already contains relay information).
|
| Step 7 | exit Example: Router(config-if)# exit
|
Exits interface configuration mode.
|
| Step 8 | Repeat Steps 3 through 7 to configure relay agent information settings on different interfaces. |
(Optional)
|
Configuring the Subscriber
Identifier Suboption of the Relay Agent Information Option
Perform this task
to enable an Internet service provider (ISP) to add a unique identifier to the
subscriber-identifier suboption of the relay agent information option.
The unique
identifier enables an ISP to identify a subscriber, to assign specific actions
to that subscriber (for example, assignment of host IP address, subnet mask,
and domain name system DNS), and to trigger accounting.
Before the
introduction of this feature, if a subscriber moved, each ISP had to be
informed of the change and all ISPs had to reconfigure the DHCP settings for
the affected customers at the same time. Even if the service was not changed,
every move involved administrative changes in the ISP environment. With the
introduction of this feature, if a subscriber moves from one Network Access
Server to another, there is no need for a change in the configuration on the
part of the DHCP server or ISP.
You should
configure the unique identifier for each subscriber.
The new
configurable subscriber-identifier option should be configured on the interface
connected to the client. When a subscriber moves from one interface to the
other, the interface configuration should also be changed.
The server should
be able to recognize the new suboption.
SUMMARY STEPS
1.
enable
2.
configure
terminal
3.
ip
dhcp
relay
information
option
4.
interface
type
number
5.
ip
dhcp
relay
information
option
subscriber-id
string
DETAILED STEPS
| Command or Action | Purpose | |||||
|---|---|---|---|---|---|---|
| Step 1 | enable Example: Device> enable
|
Enables
|
||||
| Step 2 | configure terminal Example: Device# configure terminal
|
Enters global
|
||||
| Step 3 | ip dhcp relay Example: Device(config)# ip dhcp relay information option
|
Enables the
|
||||
| Step 4 | interface type number Example: Device(config)# interface atm4/0/0
|
Configures an
|
||||
| Step 5 | ip dhcp relay string Example: Device(config-if)# ip dhcp relay information option subscriber-id newsubscriber123
|
Specifies
|
Configuring DHCP Relay
Agent Support for MPLS VPNs
Perform this task
to configure DHCP relay agent support for MPLS VPNs.
Before
configuring DHCP relay support for MPLS VPNs, you must configure standard MPLS
VPNs.
SUMMARY STEPS
1.
enable
2.
configure
terminal
3.
ip
dhcp
relay
information
option
vpn
4.
interface
type
number
5.
ip
helper-address
vrf
name
[global]
address
DETAILED STEPS
| Command or Action | Purpose | |
|---|---|---|
| Step 1 | enable Example: Device> enable
|
Enables
|
| Step 2 | configure terminal Example: Device# configure terminal
|
Enters global
|
| Step 3 | ip dhcp relay Example: Device(config)# ip dhcp relay information option vpn
|
Enables the
|
| Step 4 | interface type number Example: Device(config)# interface GigabitEthernet0/0/0
|
Configures an
|
| Step 5 | ip helper-address vrf name [global] address Example: Device(config-if)# ip helper-address vrf blue 172.27.180.232
|
Forwards UDP
|
Setting the Gateway Address
of the DHCP Broadcast to a Secondary Address Using Smart Relay Agent
Forwarding
You only need to
configure helper addresses on the interface where the UDP broadcasts that you
want to forward to the DHCP server are being received. You only need to
configure the
ip
dhcp
smart-relay command if you have secondary
addresses on that interface and you want the device to step through each IP
network when forwarding DHCP requests. If smart relay agent forwarding is not
configured, all requests are forwarded using the primary IP address on the
interface.
If the
ip
dhcp
smart-relay command is configured, the relay agent
counts the number of times that the client retries sending a request to the
DHCP server when there is no DHCPOFFER message from the DHCP server. After
three retries, the relay agent sets the gateway address to the secondary
address. If the DHCP server still does not respond after three more retries,
then the next secondary address is used as the gateway address.
This
functionality is useful when the DHCP server cannot be configured to use
secondary pools.
SUMMARY STEPS
1.
enable
2.
configure
terminal
3.
ip
dhcp
smart-relay
4.
exit
DETAILED STEPS
| Command or Action | Purpose | |
|---|---|---|
| Step 1 | enable Example: Device> enable
|
Enables
|
| Step 2 | configure terminal Example: Device# configure terminal
|
Enters global
|
| Step 3 | ip dhcp smart-relay Example: Device(config)# ip dhcp smart-relay
|
Allows the
|
| Step 4 | exit
Example: Device(config)# exit
|
Returns to
|
Configuring Relay Agent Information Option Encapsulation Support
Perform this task to enable support for the encapsulation of the DHCP relay agent information option (option 82).
SUMMARY STEPS
1.
enable
2.
configure
terminal
3.
ip
dhcp
relay
information
option
4.
ip
dhcp
relay
information
option
vpn
5.
ip
dhcp
relay
information
policy
encapsulate
6.
interface
type
number
7.
ip
dhcp
relay
information
policy-action
encapsulate
DETAILED STEPS
| Command or Action | Purpose | |
|---|---|---|
| Step 1 | enable Example: Router> enable
|
Enables privileged EXEC mode.
|
| Step 2 | configure terminal Example: Router# configure terminal
|
Enters global configuration mode.
|
| Step 3 | ip dhcp relay information option Example: Router(config)# ip dhcp relay information option
|
Enables the system to insert the DHCP relay agent information option (option-82 field) in forwarded BOOTREQUEST messages to a DHCP server.
|
| Step 4 | ip dhcp relay information option vpn Example: Router(config)# ip dhcp relay information option vpn
|
(Optional) Enables the system to insert VPN suboptions into the DHCP relay agent information option in forwarded BOOTREQUEST messages to a DHCP server and sets the gateway address to the outgoing interface toward the DHCP server.
|
| Step 5 | ip dhcp relay information policy encapsulate Example: Router(config)# ip dhcp relay information policy encapsulate
|
Enables the system to encapsulate the DHCP relay agent information option (option-82 field) received from a prior relay agent in forwarded BOOTREQUEST messages to a DHCP server.
|
| Step 6 | interface type number Example: Router(config)# interface FastEthernet0/0
|
(Optional) Configures an interface and enters interface configuration mode.
|
| Step 7 | ip dhcp relay information policy-action encapsulate Example: Router(config-if)# ip dhcp relay information policy-action encapsulate
|
(Optional) Enables the system to encapsulate the DHCP relay agent information option (option-82 field) received on an interface from a prior relay agent in forwarded BOOTREQUEST messages to a DHCP server on an interface.
|
Troubleshooting the DHCP
Relay Agent
Perform this task
to troubleshoot the DHCP relay agent.
The
show
ip
route
dhcp command is useful to help you understand any
problems with the DHCP relay agent adding routes to clients from unnumbered
interfaces. All routes added to the routing table by the DHCP server and relay
agent are displayed.
SUMMARY STEPS
1.
enable
2.
show
ip
route
dhcp
3.
show
ip
route
dhcp
ip-address
4.
show
ip
route
vrf
vrf-name
dhcp
5.
clear
ip
route
[vrf
vrf-name]
dhcp [ip-address]
DETAILED STEPS
| Command or Action | Purpose | |
|---|---|---|
| Step 1 | enable Example: Device> enable
|
Enables
|
| Step 2 | show ip
Example: Device# show ip route dhcp
|
Displays all
|
| Step 3 | show ip
ip-address Example: Device# show ip route dhcp 172.16.1.3
|
Displays all
|
| Step 4 | show ip vrf-name dhcp
Example: Device# show ip route vrf red dhcp
|
Displays all
|
| Step 5 | clear ip route [vrf vrf-name] dhcp [ip-address] Example: Device# clear ip route dhcp
|
Removes
|
Configuration Examples for the DHCP Relay Agent
- Example Configuring the DHCP Relay Agent and Relay Agent Information Option Support
- Example Configuring the DHCP Relay Agent and Relay Agent Information Option Support per Interface
- Example Configuring the Subscriber Identifier Suboption
- Example Configuring DHCP Relay Agent Support for MPLS VPNs
- Example Configuring DHCP Smart Relay Agent Forwarding
Example Configuring the DHCP Relay Agent and Relay Agent Information Option Support
The following example shows how to enable the DHCP server, the relay agent, and the insertion and removal of the DHCP relay information option (option 82). Note that the Cisco IOS XE DHCP server is enabled by default. In this example, the DHCP server was disabled:
!reenables the DHCP server
service dhcp
ip dhcp relay information option
!
interface GigabitEthernet 0/0/0
 ip address 192.168.100.1 255.255.255.0
 ip helper-address 10.55.11.3
Example Configuring the DHCP Relay Agent and Relay Agent Information Option Support per Interface
The following example shows that for subscribers being serviced by the same aggregation router, the relay agent information option needs to be processed differently for Asynchronous Transfer Mode (ATM) subscribers than for Gigabit Ethernet digital subscribers. For ATM subscribers, the relay agent information option is configured to be removed from the packet by the relay agent before forwarding to the client. For Gigabit Ethernet subscribers, the connected device provides the relay agent information option, and it is configured to remain in the packet and be forwarded to the client.
ip dhcp relay information trust-all
interface Loopback0
 ip address 10.16.0.1 255.255.255.0
!
interface ATM 3/0/0
 no ip address
!
interface ATM 3/0/0
 ip helper-address 10.16.1.2
 ip unnumbered loopback0
 ip dhcp relay information option-insert
!
interface Loopback1
 ip address 10.18.0.1 255.255.255.0
!
interface GigabitEthernet0/0/0
 no ip address
!
interface GigabitEthernet 0/0/1
 encap dot1q 123
 ip unnumbered loopback1
 ip helper-address 10.18.1.2
 ip dhcp relay information policy-action keep
Example Configuring the Subscriber Identifier Suboption
The following example shows how to add a unique identifier to the subscriber-identifier suboption of the relay agent information option.
ip dhcp relay information option
!
interface Loopback0
 ip address 10.1.1.129 255.255.255.192
!
interface ATM 4/0/0
 no ip address
!
interface ATM 4/0/1 point-to-point
 ip helper-address 10.16.1.2
 ip unnumbered Loopback0
 ip dhcp relay information option subscriber-id newperson123
 atm route-bridged ip
 pvc 88/800
 encapsulation aal5snap
Example Configuring DHCP Relay Agent Support for MPLS VPNs
In the following example, the DHCP relay agent receives a DHCP request on Gigabit Ethernet interface 0/0/0 and sends the request to the DHCP server located at IP helper address 10.44.23.7, which is associated with the VRF named red:
ip dhcp relay information option vpn
!
interface GigabitEthernet 0/0/0
 ip helper-address vrf red 10.44.23.7
!
Example Configuring DHCP Smart Relay Agent Forwarding
In the following example, the router will forward the DHCP broadcast received on Gigabit Ethernet interface 0/0 to the DHCP server (10.55.11.3), inserting 192.168.100.1 in the giaddr field of the DHCP packet. If the DHCP server has a scope or pool configured for the 192.168.100.0/24 network, it will respond; otherwise it will not respond.
Because the ip dhcp smart-relay global configuration command is configured, if the router sends three requests using 192.168.100.1 in the giaddr field, and doesn’t get a response, it will move on and start using 172.16.31.254 in the giaddr field instead. Without the smart relay functionality, the route only uses 192.168.100.1 in the giaddr field.
ip dhcp smart-relay
!
interface GigabitEthernet0/0/0
 ip address 192.168.100.1 255.255.255.0
 ip address 172.16.31.254 255.255.255.0
 ip helper-address 10.55.11.3
!
Additional References
Related Documents
|
Related Topic |
Document Title |
|---|---|
|
Cisco IOS commands |
Cisco IOS Master Commands List, All Releases |
|
DHCP commands: complete command syntax, command modes, command history, defaults, usage guidelines, and examples |
Cisco IOS IP Addressing Services Command Reference |
|
DHCP conceptual information |
“DHCP Overview” module |
|
DHCP server configuration |
“Configuring the Cisco IOS XE DHCP Server” module |
|
DHCP client configuration |
“Configuring the Cisco IOS XE DHCP Client” module |
|
DHCP server on-demand address pool manager configuration |
“Configuring the DHCP Server On-Demand Address Pool Manager” module |
|
DHCP advanced features |
“Configuring DHCP Services for Accounting and Security” module |
Standards
|
Standards |
Title |
|---|---|
|
No new or modified standards are supported by this functionality. |
— |
MIBs
|
MIBs |
MIBs Link |
|---|---|
|
No new or modified MIBs are supported, and support for existing MIBs has not been modified. |
To locate and download MIBs for selected platforms, Cisco software releases, and feature sets, use Cisco MIB Locator found at the following URL: http://www.cisco.com/go/mibs |
RFCs
|
RFCs |
Title |
|---|---|
|
RFC 951 |
Bootstrap Protocol (BOOTP) |
|
RFC 1542 |
Clarifications and Extensions for the Bootstrap Protocol |
|
RFC 2131 |
Dynamic Host Configuration Protocol |
|
RFC 2685 |
Virtual Private Networks Identifier |
|
RFC 3046 |
DHCP Relay Information Option |
Technical Assistance
|
Description |
Link |
|---|---|
|
The Cisco Support website provides extensive online resources, including documentation and tools for troubleshooting and resolving technical issues with Cisco products and technologies. To receive security and technical information about your products, you can subscribe to various services, such as the Product Alert Tool (accessed from Field Notices), the Cisco Technical Services Newsletter, and Really Simple Syndication (RSS) Feeds. Access to most tools on the Cisco Support website requires a Cisco.com user ID and password. |
http://www.cisco.com/cisco/web/support/index.html |
Feature Information for the Cisco IOS XE DHCP Relay Agent
The following table provides release information about the feature or features described in this module. This table lists only the software release that introduced support for a given feature in a given software release train. Unless noted otherwise, subsequent releases of that software release train also support that feature.
Use Cisco Feature Navigator to find information about platform support and Cisco software image support. To access Cisco Feature Navigator, go to www.cisco.com/go/cfn. An account on Cisco.com is not required.
|
Feature Name |
Releases |
Feature Configuration Information |
|---|---|---|
|
DHCP Relay Option 82 per Interface Support |
Cisco IOS XE Release 2.1 Cisco IOS XE Release 3.9S |
This feature enables support for the DHCP relay agent information option (option 82) on a per interface basis. The interface configuration allows different DHCP servers, with different DHCP option 82 requirements to be reached from one Cisco router. The following commands were introduced by this feature: |
|
DHCP Subscriber Identifier Suboption of Option 82 |
Cisco IOS XE Release 2.1 |
This feature enables an ISP to add a unique identifier to the subscriber-identifier suboption of the relay agent information option. The following command was introduced by this feature: |
|
DHCP Relay MPLS VPN Support |
Cisco IOS XE Release 2.1 Cisco IOS XE Release 3.9S |
DHCP relay support for MPLS VPNs enables a network administrator to conserve address space by allowing overlapping addresses. The relay agent can support multiple clients on different VPNs, and many of these clients from different VPNs can share the same IP address. The following commands were modified by this feature: |
|
DHCP Relay Agent Support for Unnumbered Interfaces |
Cisco IOS XE Release 2.1 Cisco IOS XE Release 3.9S |
The Cisco IOS XE DHCP relay agent supports the use of unnumbered interfaces. |
|
DHCP Relay Option 82 Encapsulation |
Cisco IOS XE Release 3.1S |
This feature allows a second DHCP relay agent to encapsulate the relay agent information option (option 82) from a prior relay agent, add its own option 82, and forward the packet to the DHCP server. The DHCP server can use the VPN information from the second relay agent along with the option 82 information from the first relay agent to send correct address assignments and other configuration parameters for the client devices based on the VRF, option 60, and encapsulated option 82. The following commands were added or modified by this feature: |
Glossary
client
—A host trying to configure its interface (obtain an IP address)
using DHCP or BOOTP protocols.
DHCP
—Dynamic Host Configuration Protocol.
giaddr
—Gateway IP address. The giaddr field of the DHCP message
provides the DHCP server with information about the IP address subnet on which
the client is to reside. It also provides the DHCP server with an IP address
where the response messages are to be sent.
MPLS
—Multiprotocol Label Switching. Emerging industry standard upon
which tag switching is based.
relay
agent
—A device that forwards DHCP and BOOTP messages between a server
and a client on different subnets.
server
—DHCP or BOOTP server.
VPN
—Virtual Private Network. Enables IP traffic to use tunneling to
travel securely over a public TCP/IP network.
VRF
—VPN routing and forwarding instance. A VRF consists of an IP
routing table, a derived forwarding table, a set of interfaces that use the
forwarding table, and a set of rules and routing protocols that determine what
goes into the forwarding table. In general, a VRF includes the routing
information that defines a customer VPN site that is attached to a PE device.
Each VPN instantiated on the PE device has its own VRF.
Время на прочтение
3 мин
Количество просмотров 184K
Статья является продолжением предыдущей статьи, посвященной базовой настройке DHCP на маршрутизаторе Cisco. В этой статье я хочу рассмотреть конфигурацию и настройку централизованного сервера DHCP и агентов DHCP-Relay
1. Конфигурация
В качестве примера возьмем следующую схему:
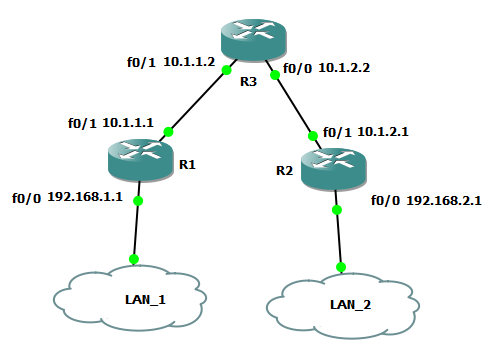
На маршрутизаторе R3 расположен DHCP-сервер, который централизованно выдает адреса в сети LAN_1 и LAN_2. Маршрутизаторы R1 и R2 в данной схеме являются DHCP-Relay агентами
Сконфигурируем на R3 два пула адресов для каждой локальной сети:
!в режиме глобальной конфигурации определим адреса, которые будут исключены из пула (это адреса интерфейсов R1 и R2

ip dhcp excluded-address 192.168.1.1

ip dhcp excluded-address 192.168.2.1

!создадим пул адресов с именем LAN_1

ip dhcp pool LAN1

network 192.168.1.0 255.255.255.0

ip default-router 192.168.1.1

!создадим пул адресов с именем LAN_2

ip dhcp pool LAN2

network 192.168.2.0 255.255.255.0

ip default-router 192.168.2.1
Естественно, при необходимости можно добавить в пул дополнительные опции.
Следующий этап — конфигурация агентов DHCP-Relay на маршрутизаторах R1 и R2. Суть DHCP-Relay заключается в пересылке широковещательного пакета от клиента одноадресатным пакетом DHCP-серверу.
Конфигурация агентов выполняется следующей командой:
!выбираем интерфейс, на который будет приходить широковещательный запрос от клиентов, в данном случае это интерфейс f0/0 маршрутизатора, который подключен к сегменту сети

interface fa0/0

ip helper-address 10.1.1.2
аналогично конфигурируется маршрутизатор R2
interface fa0/0

ip helper-address 10.1.2.2
Нужно отметить, что команда ip helper-address x.x.x.x заставляет пересылать широковещательные UDP сообщения не только протокола DHCP, по умолчанию будут пересылаться также следующие запросы:
- Time (udp 37)
- TACACS (udp 49)
- DNS (udp 53)
- TFTP (udp 69)
- NetBIOS name service (udp 137)
- NetBIOS datagram service (udp 138)
Если мы хотим исправить ситуацию, в режиме глобальной конфигурации определяем, какие запросы пересылать, а какие — нет:
no ip forward-protocol udp 37

no ip forward-protocol udp 53
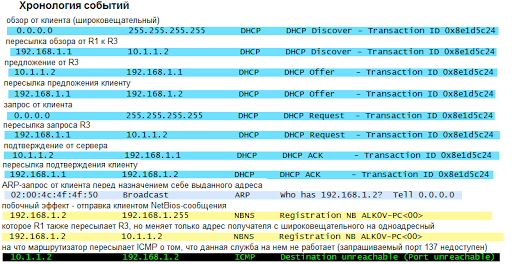
2. Как это работает?
Клиент шлет стандартный DISCOVERY:
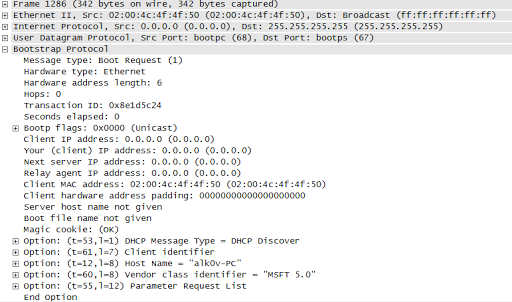
который пересылается Relay-агентом в направлении DHCP-сервера (измененные поля отмечены красным):
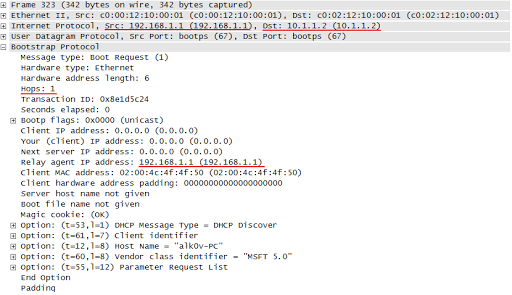
Как видно из картинки, сообщение теперь пересылается одноадресным пакетом с источником 192.168.1.1 (интерфейс маршрутизатора, на который был получен широковещательный пакет) и получателем 10.1.1.2 (адрес, который указан командой ip helper-address. Кроме того, адрес 192.168.1.1 указан в поле Relay agent IP address
На основании адреса источника сообщения DHCP-сервер определяет, из какого пула выдавать адреса. Для маршрутизатора R2 запрос пойдет с адресом источника 192.168.2.1 и сервер выдаст адрес из пула LAN_2.
Предложение OFFER от R3 к R1 выглядит следующим образом:
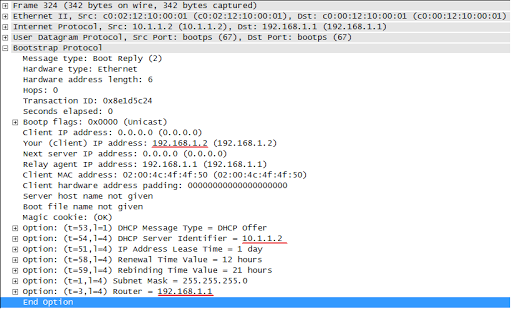
R1 пересылает его клиенту меняя только адреса источника на 192.168.1.1 и получателя на 192.168.1.2 (ссылка на скриншот)
Вот таким образом выглядит обмен сообщениями между клиентом, агентом и сервером:
3. Заключение
Для правильной работы данного примера важно учесть следующий момент: маршрутизатор R3 получает пакеты от R1 с адресом источника 192.168.1.1, поэтому на R3 сеть 192.168.1.0 должна быть в таблице маршрутизации, я настроил EIGRP между маршрутизаторами для решения этой проблемы. Смотрим таблицу:
R3#sh ip roGateway of last resort is not set
10.0.0.0/24 is subnetted, 2 subnets
C 10.1.2.0 is directly connected, FastEthernet0/0
C 10.1.1.0 is directly connected, FastEthernet0/1
D 192.168.1.0/24 [90/307200] via 10.1.1.1, 00:00:16, FastEthernet0/1
D 192.168.2.0/24 [90/307200] via 10.1.2.1, 00:02:17, FastEthernet0/0
Спасибо за внимание, обсуждение приветствуется.
DHCP позволяет устройствам в сети получать IP-адрес автоматически. В такой сети есть два участника: DHCP-клиент и DHCP-сервер. При получении IP-адреса, клиент посылает широковещательный запрос DISCOVER на поиск DHCP-сервера. Если сервер находится в одной подсети с компьютером, которому необходимо получить сетевые настройки, то проблем в данной ситуации не возникает. В противном случае, когда DHCP-сервер и DHCP-клиент находятся в разных подсетях, широковещательный запрос DISCOVER отброситься на ближайшем маршрутизаторе, так как маршрутизаторы не пропускают широковещательные запросы. Таким образом, необходим механизм, который бы пропускал определенные широковещательные запросы (в данном случае, протокола DHCP, 67/68 порты UDP) на нужный нам сервер.
Более подробно про работу протокола DHCP можно почитать в моей статье, а также здесь. Для примера рассмотри две схемы: в первой схеме — DHCP сервер находится за маршрутизатором в другой подсети, во второй схеме — DHCP-сервер и локальная сеть разнесены в разных VLAN.
Первая схема:

Конфигурация Router:
Router>enable - переходим в расширенный режим
Router(config)conf t - переходим в режим конфигурации
Router(config)#interface fa0/0 - настраиваем интерфейс в сторону LAN
Router(config-if)#description LAN - описание интерфейса
Router(config-if)#ip address 172.16.1.1 255.255.255.0 - задаем шлюз по-умолчанию
Router(config-if)#no shutdown - включаем интерфейс
Router(config-if)#ip helper-address 172.16.2.2 - перенаправляем широковещательные запросы
Router(config-if)#exit
Router(config)#interface fa0/1 - настраиваем интерфейс в сторону DHCP-server
Router(config-if)#description DHCP-server
Router(config-if)#ip address 172.16.2.1 255.255.255.0
Router(config-if)#no shutdown
По сути главная строчка в этой конфигурации ip-helper-address 172.16.2.2. Это команда означает, что все широковещательные запросы протокола UDP (в том числе и DHCP Discover), попадающие на порт fa0/0 (в сторону локальной подсети) будут пересылаться на хост 172.16.2.2 (адрес DHCP-server). Пересылаться будут следующие запросы:
- Time (udp 37)
- TACACS (udp 49)
- DNS (udp 53)
- TFTP (udp 69)
- NetBIOS name service (udp 137)
- NetBIOS datagram service (udp 138)
Если вы хотите запретить пересылать некоторые запросы, то воспользуйтесь командой no ip forward-protocol udp номер_порта. Например — запрет на пересылку DNS-запросов:
Router(config)#no ip forward-protocol udp 53
Рассмотрим как пакет DHCP-Discover находит нужный сервер. Компьютер PC0 подготавливает DHCP-запрос на автоматическое выделение IP-адреса.


Видим, что MAC-адрес назначения широковещательный FFFF.FFFF.FFFF — такой пакет отбросится на маршрутизаторе, если на нем не настроена ретрансляция.
Коммутатор перешлет широковещательный пакет на все порты, кроме того с которого был получен пакет. Компьютеры дропнут пакет, так как не выполняют функции DHCP-сервера. Маршрутизатор определит, что Ip-адрес назначения является широковещательным, а также, что пакет относится к DHCP-протоколу. Маршрутизатор видит, что пакет совпадает с helper-критерием и пересылает пакет на helper-адрес. Он смотрит в свою таблицу маршрутизации и видит что подсеть 172.16.2.1/24 находится на порту fa0/1. Маршрутизаор посылает пакет на указанный порт. В качестве Source Ip — маршрутизатор указывает свой адрес 172.16.1.1, в качестве Destination IP указывает IP-адрес DHCP-сервера 172.16.2.2.

Таблица маршрутизации Router:

DHCP-сервер в свою очередь посылает ответ DHCP-Request с предложенным Ip-адресом.

Конфигурация для Switch:
Switch(config)#interface range fa0/1 - fa0/4 - настраиваем порты в сторону PC
Switch(config-if-range)#description PC
Switch(config-if-range)#switchport mode access - переводим порты в режим доступа
Switch(config-if-range)#switchport access vlan 10 - тегируем кадры 10 VLAN'ом
Switch(config-if-range)#exit
Switch(config)#interface fa0/5 - настраиваем порт в сторону DHCP-server
Switch(config-if)#description DHCP-server
Switch(config-if)#switchport mode access - переводим порты в режим доступа
Switch(config-if)#switchport access vlan 20 - тегируем кадры 20 VLAN'ом
Switch(config-if)#exit
Switch(config)#interface fa0/24 - настраиваем порт в сторону Router
Switch(config-if)#description Router
Switch(config-if)#switchport mode trunk - настраиваем порт в режиме транка
Switch(config-if)#switchport trunk allowed vlan 10,20 - пропускаем VLAN 10,20
Switch(config-if)#exit
Конфигурация для Router
Router(config)#interface fa0/0
Router(config-if)#no shutdown - включаем интерфейс
Router(config-if)#exit
Router(config)#interface fa0/0.10 - настраиваем сабинтерфейс для пользователей
Router(config-subif)#description User-PC
Router(config-subif)#encapsulation dot1q 10 - тегируем кадры 10 VLAN'ом
Router(config-subif)#ip address 172.16.1.1 255.255.255.0 - задаем шлюз по-умолчанию
Router(config-subif)#ip helper-address 172.16.2.2 - пересылаем широковещательные пакеты на сервер
Router(config-subif)#exit
Router(config)#interface fa0/0.20 - настраиваем сабинтерфейс для сервера
Router(config-subif)#description DHCP-server
Router(config-subif)#encapsulation dot1q 20 - тегируем кадры 20 VLAN'ом
Router(config-subif)#ip address 172.16.2.1 255.255.255.0 - задаем шлюз по-умолчанию
Router(config-subif)#exit
Настройки для второй схеме полностью аналогичны первой, разница лишь в том, что мы указываем команду ip helper-address 172.16.2.2 на сабинтерфейсе.
Помогла ли вам статья?
Спасибо! Ваш голос учтен.
Dynamic Host Configuration Protocol helps us to address dynamically our hosts on the network. In fact, when a Host is configured to get its IP address dynamically, it will broadcast a DHCP REQUEST on the network searching for a DHCP SERVER.
The problem here is that our DHCP SERVER has to be on the same broadcast domain as the CLIENTS since routers do not forward broadcast packets. I suggest to start with the following architecture:
 On the left side, we have our DHCP CLIENT. In the middle, our Router and on the right side the DHCP SERVER.
As our DHCP Client wants to get an IP address, it will send a DHCP Discover message which is a broadcast message. As the Router do not forward broadcast packets, this message will never reach the DHCP Server, and as a result: No IP address for our friend DHCP Client. This is not good. 🙁
To solve this problem, the DHCP Relay Agent feature is used on routers to forward DHCP messages to the DHCP Server, and when the DHCP Server respond, the Router will forward the replies to the Client.
Let’s see how it works:

The DHCP Client broadcasts a DHCP Discover message looking for a DHCP Server. When the Router Receives this message, and with the DHCP Relay Agent feature enabled, it will forward the message to the DHCP Server as a Unicast Packet.
The router will also add to this Unicast Packet a field called giaddr (Gateway IP address) in the DHCP Packet, this field will contains in our case the IP address 192.168.1.1 since the router receives the DHCP Discover message on the Fa0/0, and the source IP address of this Unicast packet will be also 192.168.1.1.
This field is required by the DHCP Server so it can know from which pool it has to select an IP address.
One the DHCP Server receives the DHCP Discover message, it will respond by the DHCP OFFER Message; this message will be sent as a Unicast parcket to the router.
The router will forward the DHCP OFFER Message as a broadcast message.
 The DHCP Client has verified the information in the DHCP Offer message, and sends a DHCP REQUEST as a broadcast message. The router will forward this message as Unicast packet to the DHCP SERVER. Note that once again, the giaddr field is added add contains the IP address 192.168.1.1.

As a response to the DHCP REQUEST message, the DHCP SERVER will send a DHCP ACK message to the router, and in turn, the router will broadcast this message on the Fa0/0. Finally, our DHCP Client has its IP address.
Let’s see how we can configure this, are you ready?
Configuration

We will use 3 routers to see the configuration.
Here is the basic configuration:
ROUTER(config)#int f0/0
ROUTER(config-if)#ip address 192.168.1.1 255.255.255.0
ROUTER(config-if)#no shutdown
ROUTER(config)#int f0/1
ROUTER(config-if)#ip address 192.168.2.1 255.255.255.0
ROUTER(config-if)#no shutdown
DHCP_CLIENT(config)#int f0/0
DHCP_CLIENT(config-if)#no shutdown
DHCP_SERVER(config)#int f0/0
DHCP_SERVER(config-if)#ip address 192.168.2.2 255.255.255.0
DHCP_SERVER(config-if)#no shutdown
DHCP_SERVER(config)#ip dhcp pool NET1
DHCP_SERVER(dhcp-config)#network 192.168.1.0 255.255.255.0
DHCP_SERVER(dhcp-config)#default-router 192.168.1.1
DHCP_SERVER(dhcp-config)#exit
As you can see, this is the basic configuration of every router. We have also configured the DHCP SERVER service. Now we have to configure the DHCP RELAY AGENT on the router:
ROUTER(config)#int f0/0
ROUTER(config-if)#ip helper-address 192.168.2.2
ROUTER(config-if)#exit
As you can see, the DHCP RELAY AGENT feature is enabled using the IP helper-address command. 192.168.2.2 is the IP address of the DHCP SERVER. And we enable the feature on the interface connected to the DHCP CLIENT. You can see the feature enabled on the interface fa0/0:
ROUTER#show ip int fa0/0
FastEthernet0/0 is up, line protocol is up (connected)
Internet address is 192.168.1.1/24
Broadcast address is 255.255.255.255
Address determined by setup command
MTU is 1500 bytes
Helper address is 192.168.2.2
Directed broadcast forwarding is disabled
Outgoing access list is not set
Inbound access list is not set
Proxy ARP is enabled
Before configuring the interface of the DHCP CLIENT to get a dynamic IP address, we have to configure the Server to reach the network 192.168.1.0/24, because the source IP address of the DHCP messages will be 192.168.1.1/24. For this we’ll configure a static router:
DHCP_SERVER(config)#ip route 192.168.1.0 255.255.255.0 192.168.2.1
Last step is to configure the interface of the DHCP CLIENT for DHCP:
DHCP_CLIENT(config)#int f0/0
DHCP_CLIENT(config-if)#ip address dhcp
DHCP_CLIENT(config-if)#exit
Now, let’s see if the interface has an IP address:
DHCP_CLIENT#show ip int br
Interface IP-Address OK? Method Status Protocol
FastEthernet0/0 192.168.1.8 YES DHCP up up
FastEthernet0/1 unassigned YES unset administratively down down
As you can see, our router has successfully received an IP address. This means that the Relay feature is working fine.
This is all that I have for you on DHCP RELAY AGENT feature. If you have any question, just leave a comment.
Configuring DHCP Relay Server on Cisco L3 Switch
June 8, 2017
1. Overview
The DHCP server can only dynamically distributing network configuration parameters to the client computers within the same network with DHCP server. For client computers that reside a separated networks to get the network configuration parameters from DHCP server, we need a DHCP relay server.
In this article you will see how to install and configure DHCP relay server on Cisco L3 switch.
2. Prerequisites
In this tutorial, it is supposed that:
a. You have already installed DHCP server up and running. In case that you don’t, you would probably like to read this link Configuring DHCP Server on RHEL/CentOS 7.
b. You have the SSH remote access to Cisco L3 switch.
3. System Architecture Diagram
There are three VLANs on Huawei L3 switch. The DHCP server locates in VLAN 10. For DHCP server to dynamically distributing network configuration parameters to clients computers locate in another separated VLANs which are VLAN20 and VLAN30, we need to configure DHCP relay on Cisco L3 switch.

The DHCP relay need to apply on the interface or VLAN that connect the clients. It is no need to apply DHCP relay on the interface or VLAN that connect to DHCP server. So, in our case just need to apply DHCP relay configuration on interface VLAN 20 and interface VLAN 30 only.
4. Configure VLAN Interface
Let configure the VLAN interfaces for VLAN 10, VLAN 20, and VLAN 30
# vlan 10
    name VLAN-Servers
# vlan 20
    name VLAN-Client01
# vlan 30
    name VLAN-Client02
# int vlan 10
    ip address 10.0.10.1 255.255.255.0
# int vlan 20
    ip address 10.0.20.1 255.255.255.0
# int vlan 30
    ip address 10.0.30.1 255.255.255.0
Now we need to assign the switch ports to the associated VLANs.
# int G0/1
    no sh
    des DHCP-Server_NIC01
    switchport mode access
    switchport access vlan 10
# int G0/2
    no sh
    des Client-PC01
    switchport mode access
    switchport access vlan 20
# int G0/3
    no sh
    des Client-PC02
    switchport mode access
    switchport access vlan 30
To configure DHCP relay on Cisco L3 switch , execute the following commands on VLANs that connect the client, which are interface VLAN 20 and VLAN30.
# int vlan 20
    ip helper-address 10.0.10.1
# int vlan 30
    ip helper-address 10.0.10.1
6. Test DHCP Relay
To verify if the DHCP relay is working on VLAN 20, we can plug the client computer to port G0/2 which was configured for VLAN 20. The client computer should be able get the IP as the the following.

Also, to verify if the DHCP relay is working on VLAN 30, we can plug the client computer to port G0/3 which was configured for VLAN 30. The client computer should be able get the IP as the the following.

7. Conclusion
Now you just have done the configuration of DHCP relay server on Cisco L3 switch. I hope that you can find this instruction informative. If you have any questions or suggestions you can always leave your comments below. I will try all of my best to review and reply them.
Comments
comments