DHCP Client
Summary
The DHCP (Dynamic Host Configuration Protocol) is used for the easy distribution of IP addresses in a network. The MikroTik RouterOS implementation includes both server and client parts and is compliant with RFC 2131.
The MikroTik RouterOS DHCP client may be enabled on any Ethernet-like interface at a time. The client will accept an address, netmask, default gateway, and two DNS server addresses. The received IP address will be added to the interface with the respective netmask. The default gateway will be added to the routing table as a dynamic entry. Should the DHCP client be disabled or not renew an address, the dynamic default route will be removed. If there is already a default route installed prior to the DHCP client obtaining one, the route obtained by the DHCP client would be shown as invalid.
RouterOS DHCP client asks for the following options:
- option 1 — SUBNET_MASK,
- option 3 — GATEWAY_LIST,
- option 6 — TAG_DNS_LIST,
- option 33 — STATIC_ROUTE,
- option 42 — NTP_LIST,
- option 121 — CLASSLESS_ROUTE,
DHCP Options
DHCP client has the possibility to set up options that are sent to the DHCP server. For example, hostname and MAC address. The syntax is the same as for DHCP server options.
Currently, there are three variables that can be used in options:
- HOSTNAME;
- CLIENT_MAC — client interface MAC address;
- CLIENT_DUID — client DIUD of the router, same as used for the DHCPv6 client. In conformance with RFC4361
DHCP client default options include these default Options:
| Name | code | value |
|---|---|---|
| clientid_duid | 61 | 0xff$(CLIENT_DUID) |
| clientid | 61 | 0x01$(CLIENT_MAC) |
| hostname | 12 | $(HOSTNAME) |
Properties
| Property | Description |
|---|---|
| add-default-route (yes | no | special-classless; Default: yes) | Whether to install default route in routing table received from DHCP server. By default, the RouterOS client complies with RFC and ignores option 3 if classless option 121 is received. To force the client not to ignore option 3 set special-classless. This parameter is available in v6rc12+
|
| client-id (string; Default: ) | Corresponds to the settings suggested by the network administrator or ISP. If not specified, the client’s MAC address will be sent |
| comment (string; Default: ) | Short description of the client |
| default-route-distance (integer:0..255; Default: ) | Distance of default route. Applicable if add-default-route is set to yes. |
| disabled (yes | no; Default: yes) | |
| host-name (string; Default: ) | The hostname of the client is sent to a DHCP server. If not specified, the client’s system identity will be used. |
| interface (string; Default: ) | The interface on which the DHCP client will be running. |
| script (script; Default: ) | Execute script when DHCP client obtains a new lease or loses an existing one. This parameter is available in v6.39rc33+ These are available variables that are accessible for the event script:
|
| use-peer-dns (yes | no; Default: yes) | Whether to accept the DNS settings advertised by DHCP Server. (Will override the settings put in the /ip dns submenu. |
| use-peer-ntp (yes | no; Default: yes) | Whether to accept the NTP settings advertised by DHCP Server. (Will override the settings put in the /system ntp client submenu) |
Read-only properties
| Property | Description |
|---|---|
| address (IP/Netmask) | IP address and netmask, which is assigned to DHCP Client from the Server |
| dhcp-server (IP) | The IP address of the DHCP server. |
| expires-after (time) | A time when the lease expires (specified by the DHCP server). |
| gateway (IP) | The IP address of the gateway which is assigned by the DHCP server |
| invalid (yes | no) | Shows whether a configuration is invalid. |
| netmask (IP) | |
| primary-dns (IP) | The IP address of the first DNS resolver, which was assigned by the DHCP server |
| primary-ntp (IP) | The IP address of the primary NTP server, assigned by the DHCP server |
| secondary-dns (IP) | The IP address of the second DNS resolver, assigned by the DHCP server |
| secondary-ntp (IP) | The IP address of the secondary NTP server, assigned by the DHCP server |
| status (bound | error | rebinding… | requesting… | searching… | stopped) | Shows the status of the DHCP Client |
Menu specific commands
| Property | Description |
|---|---|
| release (numbers) | Release current binding and restart the DHCP client |
| renew (numbers) | Renew current leases. If the renewal operation was not successful, the client tries to reinitialize the lease (i.e. it starts the lease request procedure (rebind) as if it had not received an IP address yet) |
Configuration Examples
Simple DHCP client
Add a DHCP client on the ether1 interface:
/ip dhcp-client add interface=ether1 disabled=no
After the interface is added, you can use the «print» or «print detail» command to see what parameters the DHCP client acquired:
[admin@MikroTik] ip dhcp-client> print detail
Flags: X - disabled, I - invalid
 0   interface=ether1 add-default-route=yes use-peer-dns=yes use-peer-ntp=yes
     status=bound address=192.168.0.65/24 gateway=192.168.0.1
     dhcp-server=192.168.0.1 primary-dns=192.168.0.1 primary-ntp=192.168.0.1
     expires-after=9m44s
[admin@MikroTik] ip dhcp-client>
If the interface used by the DHCP client is part of the VRF configuration, then the default route and other received routes from the DHCP server will be added to the VRF routing table.
DHCP client status can be checked with:
/ip dhcp-client print detail
Lease script example
It is possible to execute a script when a DHCP client obtains a new lease or loses an existing one. This is an example script that automatically adds a default route with routing-mark=WAN1 and removes it when the lease expires or is removed.
/ip dhcp-client
add add-default-route=no dhcp-options=hostname,clientid disabled=no interface=ether2 script="{\r\
    \n    :local rmark \"WAN1\"\r\
    \n    :local count [/ip route print count-only where comment=\"WAN1\"]\r\
    \n    :if (\$bound=1) do={\r\
    \n        :if (\$count = 0) do={\r\
    \n            /ip route add gateway=\$\"gateway-address\" comment=\"WAN1\" routing-mark=\$rmark\r\
    \n        } else={\r\
    \n            :if (\$count = 1) do={\r\
    \n                :local test [/ip route find where comment=\"WAN1\"]\r\
    \n                :if ([/ip route get \$test gateway] != \$\"gateway-address\") do={\r\
    \n                    /ip route set \$test gateway=\$\"gateway-address\"\r\
    \n                }\r\
    \n            } else={\r\
    \n                :error \"Multiple routes found\"\r\
    \n            }\r\
    \n        }\r\
    \n    } else={\r\
    \n        /ip route remove [find comment=\"WAN1\"]\r\
    \n    }\r\
    \n}\r\
    \n"
Resolve default gateway when ‘router’ (option3) is from a different subnet
In some cases, administrators tend to set the ‘router’ option which cannot be resolved with offered IP’s subnet. For example, the DHCP server offers 192.168.88.100/24 to the client, and option 3 is set to 172.16.1.1. This will result in an unresolved default route:
 #      DST-ADDRESS        PREF-SRC        GATEWAY            DISTANCE
 0  DS  0.0.0.0/0                          172.16.1.1              1
 1 ADC  192.168.88.0/24    192.168.88.100  ether1
To fix this we need to add /32 route to resolve the gateway over ether1, which can be done by the running script below each time the DHCP client gets an address
/system script add name="dhcpL" source={ /ip address add address=($"lease-address" . "/32") network=$"gateway-address" interface=$interface }
Now we can further extend the script, to check if the address already exists, and remove the old one if changes are needed
/system script add name="dhcpL" source={
  /ip address {
    :local ipId [find where comment="dhcpL address"]
    :if ($ipId != "") do={
      :if (!([get $ipId address] = ($"lease-address" . "/32") && [get $ipId network]=$"gateway-address" )) do={
        remove $ipId;
        add address=($"lease-address" . "/32") network=$"gateway-address" \
          interface=$interface comment="dhcpL address"
      }
    } else={
      add address=($"lease-address" . "/32") network=$"gateway-address" \
        interface=$interface comment="dhcpL address"
    }
  }
}
DHCPv6 Client
Summary
Sub-menu: /ipv6 dhcp-client
DHCP-client in RouterOS is capable of being a DHCPv6-client and DHCP-PD client. So it is able to get a prefix from the DHCP-PD server as well as the DHCPv6 stateful address from the DHCPv6 server.
Properties
| Property | Description |
|---|---|
| add-default-route (yes | no; Default: no) | Whether to add default IPv6 route after a client connects. |
| comment (string; Default: ) | Short description of the client |
| disabled (yes | no; Default: no) | |
| interface (string; Default: ) | The interface on which the DHCPv6 client will be running. |
| pool-name (string; Default: ) | Name of the IPv6 pool in which received IPv6 prefix will be added |
| pool-prefix-length (string; Default: ) | Prefix length parameter that will be set for IPv6 pool in which received IPv6 prefix is added. Prefix length must be greater than the length of the received prefix, otherwise, prefix-length will be set to received prefix length + 8 bits. |
| prefix-hint (string; Default: ) | Include a preferred prefix length. |
| request (prefix, address; Default: ) | to choose if the DHCPv6 request will ask for the address or the IPv6 prefix, or both. |
| script (string; Default: ) | Run this script on the DHCP-client status change. Available variables:
|
| use-peer-dns (yes | no; Default: yes) | Whether to accept the DNS settings advertised by the IPv6 DHCP Server. |
Read-only properties
| Property | Description |
|---|---|
| duid (string) | Auto-generated DUID that is sent to the server. DUID is generated using one of the MAC addresses available on the router. |
| request (list) | specifies what was requested — prefix, address, or both. |
| dynamic (yes | no) | |
| expires-after (time) | A time when the IPv6 prefix expires (specified by the DHCPv6 server). |
| invalid (yes | no) | Shows whether a configuration is invalid. |
| prefix (IPv6 prefix) | Shows received IPv6 prefix from DHCPv6-PD server |
| status (stopped | searching | requesting… | bound | renewing | rebinding | error | stopping) | Shows the status of DHCPv6 Client:
|
Menu specific commands
| Property | Description |
|---|---|
| release (numbers) | Release current binding and restart DHCPv6 client |
| renew (numbers) | Renew current leases. If the renewal operation was not successful, the client tries to reinitialize the lease (i.e. it starts the lease request procedure (rebind) as if it had not received an IP address yet) |
Script
It is possible to add a script that will be executed when a prefix or an address is acquired and applied or expires and is removed using the DHCP client. There are separated sets of variables that will have the value set by the client depending on prefix or address status change as the client can acquire both and each of them can have a different effect on the router configuration.
Available variables for dhcp-client
- pd-valid — value — 1 or 0 — if prefix is acquired and it is applied or not
- pd-prefix — value ipv6/num (ipv6 prefix with mask) — the prefix inself
- na-valid — value — 1 or 0 — if address is acquired and it is applied or not
- na-address — value — ipv6 address — the address
IAID
To determine what IAID will be used, convert the internal ID of an interface on which the DHCP client is running from hex to decimal.
For example, the DHCP client is running on interface PPPoE-out1. To get internal ID use the following command:
[admin@t36] /interface> :put [find name="pppoe-out1"]
*15
Now convert hex value 15 to decimal and you get IAID=21
Configuration Examples
Simple DHCPv6 client
This simple example demonstrates how to enable dhcp client to receive IPv6 prefix and add it to the pool.
/ipv6 dhcp-client add request=prefix pool-name=test-ipv6 pool-prefix-length=64 interface=ether13
Detailed print should show status of the client and we can verify if prefix is received
[admin@x86-test] /ipv6 dhcp-client> print detail
Flags: D - dynamic, X - disabled, I - invalid
 0 interface=bypass pool-name="test-ipv6" pool-prefix-length=64 status=bound
prefix=2001:db8:7501:ff04::/62 expires-after=2d23h11m53s request=prefix
Notice that server gave us prefix 2a02:610:7501:ff04::/62 . And it should be also added to ipv6 pools
[admin@MikroTik] /ipv6 pool> print
Flags: D - dynamic
# NAME PREFIX REQUEST PREFIX-LENGTH
0 D test-ipv6 2001:db8:7501:ff04::/62 prefix 64
It works! Now you can use this pool, for example, for pppoe clients.
Use received prefix for local RA
Consider following setup:
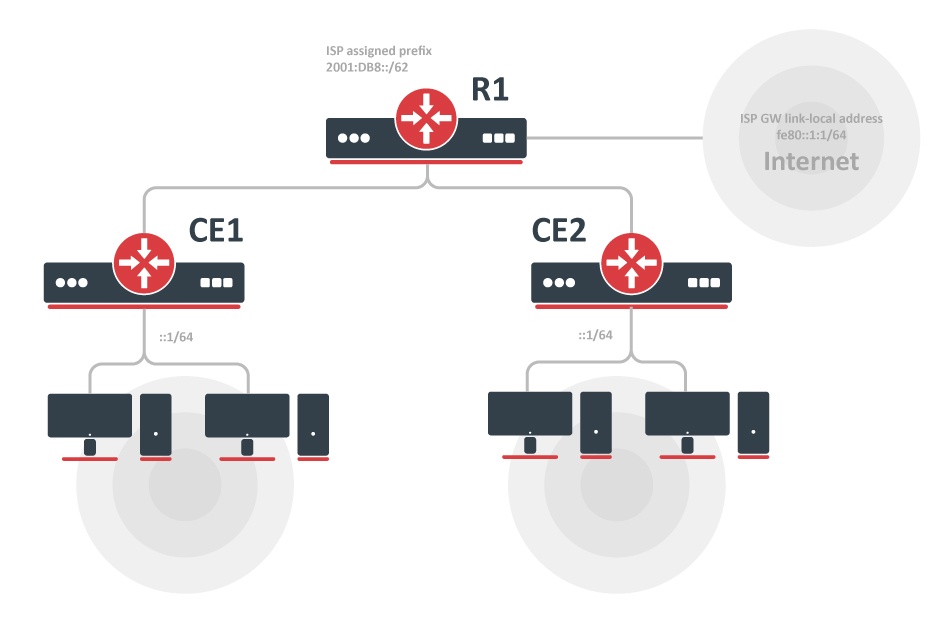
- ISP is routing prefix 2001:DB8::/62 to the router R1
- Router R1 runs DHCPv6 server to delegate /64 prefixes to the customer routers CE1 CE2
- DHCP client on routers CE1 and CE2 receives delegated /64 prefix from the DHCP server (R1).
- Client routers uses received prefix to set up RA on the local interface
Configuration
R1
/ipv6 route
add gateway=fe80::1:1%to-ISP

/ipv6 pool
add name=myPool prefix=2001:db8::/62 prefix-length=64

/ipv6 dhcp-server
 add address-pool=myPool disabled=no interface=to-CE-routers lease-time=3m name=server1
CE1
/ipv6 dhcp-client
add interface=to-R1 request=prefix pool-name=my-ipv6

/ipv6 address
add address=::1/64 from-pool=my-ipv6 interface=to-clients advertise=yes
CE2
/ipv6 dhcp-client
 add interface=to-R1 request=prefix pool-name=my-ipv6
/ipv6 address add address=::1/64 from-pool=my-ipv6 interface=to-clients advertise=yes
Check the status
After configuration is complete we can verify that each CE router received its own prefix
On server:
[admin@R1] /ipv6 dhcp-server binding> print
 Flags: X - disabled, D - dynamic
# ADDRESS DUID IAID SERVER STATUS
 1 D 2001:db8:1::/64 0019d1393536 566 server1 bound
2 D 2001:db8:2::/64 0019d1393535 565 server1 bound
On client:
[admin@CE1] /ipv6 dhcp-client> print
Flags: D - dynamic, X - disabled, I - invalid
# INTERFACE STATUS REQUEST PREFIX
0 to-R1 bound prefix 2001:db8:1::/64

[admin@CE1] /ipv6 dhcp-client> /ipv6 pool print
Flags: D - dynamic
# NAME PREFIX PREFIX-LENGTH
0 D my-ipv6 2001:db8:1::/64 64
We can also see that IPv6 address was automatically added from the prefix pool:
[admin@CE1] /ipv6 address> print
Flags: X - disabled, I - invalid, D - dynamic, G - global, L - link-local
# ADDRESS FROM-POOL INTERFACE ADVERTISE 0 G 2001:db8:1::1/64 to-clients yes
..
And pool usage shows that ‘Address’ is allocating the pool
[admin@CE1] /ipv6 pool used> print
 POOL PREFIX OWNER INFO
my-ipv6 2001:db8:1::/64 Address to-clients
DHCP Server
Summary
The DHCP (Dynamic Host Configuration Protocol) is used for the easy distribution of IP addresses in a network. The MikroTik RouterOS implementation includes both server and client parts and is compliant with RFC 2131.
The router supports an individual server for each Ethernet-like interface. The MikroTik RouterOS DHCP server supports the basic functions of giving each requesting client an IP address/netmask lease, default gateway, domain name, DNS-server(s) and WINS-server(s) (for Windows clients) information (set up in the DHCP networks submenu)
In order for the DHCP server to work, IP pools must also be configured (do not include the DHCP server’s own IP address into the pool range) and the DHCP networks.
It is also possible to hand out leases for DHCP clients using the RADIUS server; the supported parameters for a RADIUS server are as follows:
Access-Request:
- NAS-Identifier — router identity
- NAS-IP-Address — IP address of the router itself
- NAS-Port — unique session ID
- NAS-Port-Type — Ethernet
- Calling-Station-Id — client identifier (active-client-id)
- Framed-IP-Address — IP address of the client (active-address)
- Called-Station-Id — the name of DHCP server
- User-Name — MAC address of the client (active-mac-address)
- Password — » «
Access-Accept:
- Framed-IP-Address — IP address that will be assigned to a client
- Framed-Pool — IP pool from which to assign an IP address to a client
- Rate-Limit — Datarate limitation for DHCP clients. Format is: rx-rate[/tx-rate] [rx-burst-rate[/tx-burst-rate] [rx-burst-threshold[/tx-burst-threshold] [rx-burst-time[/tx-burst-time][priority] [rx-rate-min[/tx-rate-min]]]]. All rates should be numbers with optional ‘k’ (1,000s) or ‘M’ (1,000,000s). If tx-rate is not specified, rx-rate is as tx-rate too. Same goes for tx-burst-rate and tx-burst-threshold and tx-burst-time. If both rx-burst-threshold and tx-burst-threshold are not specified (but burst-rate is specified), rx-rate and tx-rate are used as burst thresholds. If both rx-burst-time and tx-burst-time are not specified, 1s is used as default. Priority takes values 1..8, where 1 implies the highest priority, but 8 — the lowest. If rx-rate-min and tx-rate-min are not specified rx-rate and tx-rate values are used. The rx-rate-min and tx-rate-min values can not exceed rx-rate and tx-rate values.
- Ascend-Data-Rate — TX/RX data rate limitation if multiple attributes are provided, first limits tx data rate, second — RX data rate. If used together with Ascend-Xmit-Rate, specifies RX rate. 0 if unlimited
- Ascend-Xmit-Rate — tx data rate limitation. It may be used to specify the TX limit only instead of sending two sequential Ascend-Data-Rate attributes (in that case Ascend-Data-Rate will specify the receive rate). 0 if unlimited
- Session-Timeout — max lease time (lease-time)
DHCP server requires a real interface to receive raw ethernet packets. If the interface is a Bridge interface, then the Bridge must have a real interface attached as a port to that bridge which will receive the raw ethernet packets. It cannot function correctly on a dummy (empty bridge) interface.
DHCP Server Properties
| Property | Description |
|---|---|
| add-arp (yes | no; Default: no) | Whether to add dynamic ARP entry. If set to no either ARP mode should be enabled on that interface or static ARP entries should be administratively defined in /ip arp submenu. |
| address-pool (string | static-only; Default: static-only) | IP pool, from which to take IP addresses for the clients. If set to static-only, then only the clients that have a static lease (added in the lease submenu) will be allowed. |
| allow-dual-stack-queue (yes | no; Default: yes) | Creates a single simple queue entry for both IPv4 and IPv6 addresses, and uses the MAC address and DUID for identification. Requires IPv6 DHCP Server to have this option enabled as well to work properly. |
| always-broadcast (yes | no; Default: no) | Always send replies as broadcasts even if the destination IP is known. Will add additional load on L2 network. |
| authoritative (after-10sec-delay | after-2sec-delay | yes | no; Default: yes) | Option changes the way how a server responds to DHCP requests:
If all requests with «secs < x» should be ignored, then delay-threshold=x setting should be used. |
| bootp-lease-time (forever | lease-time | time; Default: forever) | Accepts two predefined options or time value:
|
| bootp-support (none | static | dynamic; Default: static) | Support for BOOTP clients:
|
| client-mac-limit (integer | unlimited; Default: unlimited) | Specifies whether to limit a specific number of clients per single MAC address or leave unlimited. Note that this setting should not be used in relay setups. |
| conflict-detection (yes | no; Default: yes) | Allows disabling/enabling conflict detection. If the option is enabled, then whenever the server tries to assign a lease it will send ICMP and ARP messages to detect whether such an address in the network already exists. If any of the above get a reply address is considered already used. |
| delay-threshold (time | none; Default: none) | If the sec’s field in the DHCP packet is smaller than the delay threshold, then this packet is ignored. If set to none — there is no threshold (all DHCP packets are processed) |
| dhcp-option-set (name | none; Default: none) | Use a custom set of DHCP options defined in the option sets menu. |
| insert-queue-before (bottom | first | name; Default: first) | Specify where to place dynamic simple queue entries for static DCHP leases with a rate-limit parameter set. |
| interface (string; Default: ) | The interface on which the DHCP server will be running. |
| lease-script (string; Default: «») | A script that will be executed after a lease is assigned or de-assigned. Internal «global» variables that can be used in the script:
|
| lease-time (time; Default: 30m) | The time that a client may use the assigned address. The client will try to renew this address after half of this time and will request a new address after the time limit expires. |
| name (string; Default: ) | Reference name |
| parent-queue (string | none; Default: none) | A dynamically created queue for this lease will be configured as a child queue of the specified parent queue. |
| relay (IP; Default: 0.0.0.0) | The IP address of the relay this DHCP server should process requests from:
|
| server-address (IP; Default: 0.0.0.0) | The IP address of the server to use in the next step of the client’s bootstrap process (For example, to assign a specific server address in case several addresses are assigned to the interface) |
| use-framed-as-classless (yes | no; Default: yes) | Forward RADIUS Framed-Route as a DHCP Classless-Static-Route to DHCP-client. Whenever both Framed-Route and Classless-Static-Route are received Classless-Static-Route is preferred. |
| use-radius (yes | no | accounting; Default: no) | Whether to use RADIUS server:
|
Leases
Sub-menu: /ip dhcp-server lease
DHCP server lease submenu is used to monitor and manage server leases. The issued leases are shown here as dynamic entries. You can also add static leases to issue a specific IP address to a particular client (identified by MAC address).
Generally, the DHCP lease is allocated as follows:
- an unused lease is in the «waiting» state
- if a client asks for an IP address, the server chooses one
- if the client receives a statically assigned address, the lease becomes offered, and then bound with the respective lease time
- if the client receives a dynamic address (taken from an IP address pool), the router sends a ping packet and waits for an answer for 0.5 seconds. During this time, the lease is marked testing
- in the case where the address does not respond, the lease becomes offered and then bound with the respective lease time
- in other cases, the lease becomes busy for the lease time (there is a command to retest all busy addresses), and the client’s request remains unanswered (the client will try again shortly)
A client may free the leased address. The dynamic lease is removed, and the allocated address is returned to the address pool. But the static lease becomes busy until the client reacquires the address.
IP addresses assigned statically are not probed!
| Property | Description |
|---|---|
| address (IP; Default: 0.0.0.0) | Specify IP address (or ip pool) for static lease. If set to 0.0.0.0 — a pool from the DHCP server will be used |
| address-list (string; Default: none) | Address list to which address will be added if the lease is bound. |
| allow-dual-stack-queue (yes | no; Default: yes) | Creates a single simple queue entry for both IPv4 and IPv6 addresses, and uses the MAC address and DUID for identification. Requires IPv6 DHCP Server to have this option enabled as well to work properly. |
| always-broadcast (yes | no; Default: no) | Send all replies as broadcasts |
| block-access (yes | no; Default: no) | Block access for this client |
| client-id (string; Default: none) | If specified, must match the DHCP ‘client identifier’ option of the request |
| dhcp-option (string; Default: none) | Add additional DHCP options from option list. |
| dhcp-option-set (string; Default: none) | Add an additional set of DHCP options. |
| insert-queue-before (bottom | first | name; Default: first) | Specify where to place dynamic simple queue entries for static DCHP leases with rate-limit parameter set. |
| lease-time (time; Default: 0s) | Time that the client may use the address. If set to 0s lease will never expire. |
| mac-address (MAC; Default: 00:00:00:00:00:00) | If specified, must match the MAC address of the client |
| parent-queue (string | none; Default: none) | A dynamically created queue for this lease will be configured as a child queue of the specified parent queue. |
| queue-type (default, ethernet-default, multi-queue-ethernet-default, pcq-download-default, synchronous-default, default-small, hotspot-default, only-hardware-queue, pcq-upload-default, wireless-default) | Queue type that can be assigned to the specific lease |
| rate-limit (integer[/integer] [integer[/integer] [integer[/integer] [integer[/integer]]]];; Default: ) | Adds a dynamic simple queue to limit IP’s bandwidth to a specified rate. Requires the lease to be static. Format is: rx-rate[/tx-rate] [rx-burst-rate[/tx-burst-rate] [rx-burst-threshold[/tx-burst-threshold] [rx-burst-time[/tx-burst-time]]]]. All rates should be numbers with optional ‘k’ (1,000s) or ‘M’ (1,000,000s). If tx-rate is not specified, rx-rate is as tx-rate too. Same goes for tx-burst-rate and tx-burst-threshold and tx-burst-time. If both rx-burst-threshold and tx-burst-threshold are not specified (but burst-rate is specified), rx-rate and tx-rate is used as burst thresholds. If both rx-burst-time and tx-burst-time are not specified, 1s is used as default. |
| routes ([dst-address/mask] [gateway] [distance]; Default: none) |
Routes that appear on the server when the client is connected. It is possible to specify multiple routes separated by commas. This setting will be ignored for OpenVPN. |
| server (string) | Server name which serves this client |
| use-src-mac (yes | no; Default: no) | When this option is set server uses the source MAC address instead of the received CHADDR to assign the address. |
Menu specific commands
| check-status (id) | Check the status of a given busy (status is conflict or declined) dynamic lease, and free it in case of no response |
| make-static (id) | Convert a dynamic lease to a static one |
Store Configuration
Sub-menu: /ip dhcp-server config
Store Leases On Disk: The configuration of how often the DHCP leases will be stored on disk. If they would be saved on a disk on every lease change, a lot of disk writes would happen which is very bad for Compact Flash (especially, if lease times are very short). To minimize writes on disk, all changes are saved on disk every store-leases-disk seconds. Additionally, leases are always stored on disk on graceful shutdown and reboot.
Manual changes to leases — addition/removal of a static lease, removal of a dynamic lease will cause changes to be pushed for this lease to storage.
Accounting: The accounting parameter in the DHCP server configuration enables or disables accounting for DHCP leases. When accounting is enabled, the DHCP server logs information about IP address assignments and lease renewals. This information can be useful for tracking and monitoring network usage, analyzing traffic patterns, or generating reports on IP address allocations.
Interim-update: The interim-update parameter determines whether the DHCP server sends periodic updates to the accounting server during a lease. These updates provide information about the lease duration, usage, and other relevant details. Enabling interim updates allows for more accurate tracking of lease activity.
Radius-password: The radius-password parameter is used to set the password for the RADIUS (Remote Authentication Dial-In User Service) server. RADIUS is a networking protocol commonly used for providing centralized authentication, authorization, and accounting for network access. When configuring the DHCP server to communicate with a RADIUS server for authentication or accounting purposes, you need to specify the correct password to establish a secure connection. This parameter ensures that the DHCP server can authenticate with the RADIUS server using the specified password.
Rate limiting
It is possible to set the bandwidth to a specific IPv4 address by using DHCPv4 leases. This can be done by setting a rate limit on the DHCPv4 lease itself, by doing this a dynamic simple queue rule will be added for the IPv4 address that corresponds to the DHCPv4 lease. By using the rate-limit parameter you can conveniently limit a user’s bandwidth.
For any queues to work properly, the traffic must not be FastTracked, make sure your Firewall does not FastTrack traffic that you want to limit.
First, make the DHCPv4 lease static, otherwise, it will not be possible to set a rate limit to a DHCPv4 lease:
[admin@MikroTik] > /ip dhcp-server lease print
Flags: X - disabled, R - radius, D - dynamic, B - blocked
 #   ADDRESS               MAC-ADDRESS       HOST-NAME               SERVER               RATE-LIMIT               STATUS
 0 D 192.168.88.254        6C:3B:6B:7C:41:3E MikroTik                DHCPv4_Server                                 bound

[admin@MikroTik] > /ip dhcp-server lease make-static 0

[admin@MikroTik] > /ip dhcp-server lease print
Flags: X - disabled, R - radius, D - dynamic, B - blocked
 #   ADDRESS               MAC-ADDRESS       HOST-NAME               SERVER               RATE-LIMIT               STATUS
 0   192.168.88.254        6C:3B:6B:7C:41:3E MikroTik                DHCPv4_Server                                 bound
Then you can set a rate to a DHCPv4 lease that will create a new dynamic simple queue entry:
[admin@MikroTik] > /ip dhcp-server lease set 0 rate-limit=10M/10M

[admin@MikroTik] > /queue simple print
Flags: X - disabled, I - invalid, D - dynamic
 0  D name="dhcp-ds<6C:3B:6B:7C:41:3E>" target=192.168.88.254/32 parent=none packet-marks="" priority=8/8 queue=default-small/default-small limit-at=10M/10M max-limit=10M/10M burst-limit=0/0 burst-threshold=0/0 burst-time=0s/0s
      bucket-size=0.1/0.1
By default allow-dual-stack-queue is enabled, this will add a single dynamic simple queue entry for both DCHPv6 binding and DHCPv4 lease, without this option enabled separate dynamic simple queue entries will be added for IPv6 and IPv4.
If allow-dual-stack-queue is enabled, then a single dynamic simple queue entry will be created containing both IPv4 and IPv6 addresses:
[admin@MikroTik] > /queue simple print
Flags: X - disabled, I - invalid, D - dynamic
 0  D name="dhcp-ds<6C:3B:6B:7C:41:3E>" target=192.168.88.254/32,fdb4:4de7:a3f8:418c::/66 parent=none packet-marks="" priority=8/8 queue=default-small/default-small limit-at=10M/10M max-limit=10M/10M burst-limit=0/0 burst-threshold=0/0
      burst-time=0s/0s bucket-size=0.1/0.1
Network
Sub-menu: /ip dhcp-server network
Properties
| Property | Description |
|---|---|
| address (IP/netmask; Default: ) | the network DHCP server(s) will lease addresses from |
| boot-file-name (string; Default: ) | Boot filename |
| caps-manager (string; Default: ) | A comma-separated list of IP addresses for one or more CAPsMAN system managers. DHCP Option 138 (capwap) will be used. |
| dhcp-option (string; Default: ) | Add additional DHCP options from the option list. |
| dhcp-option-set (string; Default: ) | Add an additional set of DHCP options. |
| dns-none (yes | no; Default: no) | If set, then DHCP Server will not pass dynamic DNS servers configured on the router to the DHCP clients if no DNS Server in DNS-server is set. By default, if there are no DNS servers configured, then the dynamic DNS Servers will be passed to DHCP clients. |
| dns-server (string; Default: ) | the DHCP client will use these as the default DNS servers. Two comma-separated DNS servers can be specified to be used by the DHCP client as primary and secondary DNS servers |
| domain (string; Default: ) | The DHCP client will use this as the ‘DNS domain’ setting for the network adapter. |
| gateway (IP; Default: 0.0.0.0) | The default gateway to be used by DHCP Client. |
| netmask (integer: 0..32; Default: 0) | The actual network mask is to be used by the DHCP client. If set to ‘0’ — netmask from network address will be used. |
| next-server (IP; Default: ) | The IP address of the next server to use in bootstrap. |
| ntp-server (IP; Default: ) | the DHCP client will use these as the default NTP servers. Two comma-separated NTP servers can be specified to be used by the DHCP client as primary and secondary NTP servers |
| wins-server (IP; Default: ) | The Windows DHCP client will use these as the default WINS servers. Two comma-separated WINS servers can be specified to be used by the DHCP client as primary and secondary WINS servers |
RADIUS Support
Since RouterOS v6.43 it is possible to use RADIUS to assign a rate limit per lease, to do so you need to pass the Mikrotik-Rate-Limit attribute from your RADIUS Server for your lease. To achieve this you first need to set your DHCPv4 Server to use RADIUS for assigning leases. Below is an example of how to set it up:
/radius
add address=10.0.0.1 secret=VERYsecret123 service=dhcp
/ip dhcp-server
set dhcp1 use-radius=yes
After that, you need to tell your RADIUS Server to pass the Mikrotik-Rate-Limit attribute. In case you are using FreeRADIUS with MySQL, then you need to add appropriate entries into radcheck and radreply tables for a MAC address, that is being used for your DHCPv4 Client. Below is an example for table entries:
Error rendering macro ‘code’: Invalid value specified for parameter ‘com.atlassian.confluence.ext.code.render.InvalidValueException’
INSERT INTO `radcheck` (`username`, `attribute`, `op`, `value`) VALUES
('00:0C:42:00:D4:64', 'Auth-Type', ':=', 'Accept'),

INSERT INTO `radreply` (`username`, `attribute`, `op`, `value`) VALUES
('00:0C:42:00:D4:64', 'Framed-IP-Address', '=', '192.168.88.254'),
('00:0C:42:00:D4:64', 'Mikrotik-Rate-Limit', '=', '10M'),
Alerts
To find any rogue DHCP servers as soon as they appear in your network, the DHCP Alert tool can be used. It will monitor the interface for all DHCP replies and check if this reply comes from a valid DHCP server. If a reply from an unknown DHCP server is detected, an alert gets triggered:
[admin@MikroTik] ip dhcp-server alert>/log print
00:34:23 dhcp,critical,error,warning,info,debug dhcp alert on Public:
    discovered unknown dhcp server, mac 00:02:29:60:36:E7, ip 10.5.8.236
[admin@MikroTik] ip dhcp-server alert>
When the system alerts about a rogue DHCP server, it can execute a custom script.
As DHCP replies can be unicast, the rogue DHCP detector may not receive any offer to other DHCP clients at all. To deal with this, the rogue DHCP detector acts as a DHCP client as well — it sends out DHCP discover requests once a minute.
The DHCP alert is not recommended on devices that are configured as DHCP clients. Since the alert itself generates DHCP discovery packets, it can affect the operation of the DHCP client itself. Use this feature only on devices that are DHCP servers or using a static IP address.
Sub-menu: /ip dhcp-server alert
Properties
| Property | Description |
|---|---|
| alert-timeout (none | time; Default: 1h) | Time after which the alert will be forgotten. If after that time the same server is detected, a new alert will be generated. If set to none timeout will never expire. |
| interface (string; Default: ) | Interface, on which to run rogue DHCP server finder. |
| on-alert (string; Default: ) | Script to run, when an unknown DHCP server is detected. |
| valid-server (string; Default: ) | List of MAC addresses of valid DHCP servers. |
Read-only properties
| Property | Description |
|---|---|
| unknown-server (string) | List of MAC addresses of detected unknown DHCP servers. The server is removed from this list after alert-timeout |
Menu specific commands
| Property | Description |
|---|---|
| reset-alert (id) | Clear all alerts on an interface |
DHCP Options
Sub-menu: /ip dhcp-server option
With the help of the DHCP Option list, it is possible to define additional custom options for DHCP Server to advertise. Option precedence is as follows:
- radius,
- lease,
- server,
- network.
This is the order in which the client option request will be filled in.
According to the DHCP protocol, a parameter is returned to the DHCP client only if it requests this parameter, specifying the respective code in the DHCP request Parameter-List (code 55) attribute. If the code is not included in the Parameter-List attribute, the DHCP server will not send it to the DHCP client, but since RouterOS v7.1rc5 it is possible to force the DHCP option from the server-side even if the DHCP-client does not request such parameter:
ip/dhcp-server/option/set force=yes
Properties
| Property | Description |
|---|---|
| code (integer:1..254; Default: ) | dhcp option code. All codes are available at http://www.iana.org/assignments/bootp-dhcp-parameters |
| name (string; Default: ) | Descriptive name of the option |
| value (string; Default: ) | Parameter’s value. Available data types for options are:
RouterOS has predefined variables that can be used:
Now it is also possible to combine data types into one, for example: «0x01’vards’$(HOSTNAME)» For example if HOSTNAME is ‘kvm’, then raw value will be 0x0176617264736b766d. |
| raw-value (HEX string ) | Read-only field which shows raw DHCP option value (the format actually sent out) |
DHCP Option Sets
Sub-menu: /ip dhcp-server option sets
This menu allows combining multiple options in option sets, which later can be used to override the default DHCP server option set.
Example
Classless Route
A classless route adds a specified route in the clients routing table. In our example, it will add
- dst-address=160.0.0.0/24 gateway=10.1.101.1
- dst-address=0.0.0.0/0 gateway=10.1.101.1
According to RFC 3442: The first part is the netmask («18» = netmask /24). Second part is significant part of destination network («A00000» = 160.0.0). Third part is IP address of gateway («0A016501» = 10.1.101.1). Then There are parts of the default route, destination netmask (0x00 = 0.0.0.0/0) followed by default route (0x0A016501 = 10.1.101.1)
/ip dhcp-server option
add code=121 name=classless value=0x18A000000A016501000A016501
/ip dhcp-server network
set 0 dhcp-option=classless
Result:
[admin@MikroTik] /ip route> print
Flags: X - disabled, A - active, D - dynamic, C - connect, S - static, r - rip, b - bgp, o - ospf,
m - mme, B - blackhole, U - unreachable, P - prohibit
 #      DST-ADDRESS        PREF-SRC        GATEWAY            DISTANCE
 0 ADS  0.0.0.0/0                          10.1.101.1         0
 1 ADS  160.0.0.0/24                       10.1.101.1         0
A much more robust way would be to use built-in variables, the previous example can be rewritten as:
/ip dhcp-server option
add name=classless code=121 value="0x18A00000\$(NETWORK_GATEWAY)0x00\$(NETWORK_GATEWAY)"
Auto proxy config
/ip dhcp-server option
  add code=252 name=auto-proxy-config value="'https://autoconfig.something.lv/wpad.dat'"
Vendor Classes
Since the 6.45beta6 version RouterOS support vendor class, ID matcher. The vendor class is used by DHCP clients to optionally identify the vendor and configuration.
Vendor-class-id matcher changes to generic matcher since RouterOS v7.4beta4.
Example
In the following configuration example, we will give an IP address from a particular pool for an Android-based mobile phone. We will use the RouterBOARD with a default configuration
/ip pool
add name=default-dhcp ranges=192.168.88.10-192.168.88.254
add name=pool-for-VID ranges=172.16.16.10-172.16.16.120
Configure vendor-class-id matcher. DHCP servers configuration remains the default
/ip dhcp-server
add address-pool=default-dhcp disabled=no interface=bridge name=defconf
/ip dhcp-server network
add address=192.168.88.0/24 comment=defconf gateway=192.168.88.1
/ip dhcp-server vendor-class-id
add address-pool=pool-for-VID name=samsung server=defconf vid=android-dhcp-9
Connect your mobile phone to the device to receive an IP address from the 172.16.16.0 network
[admin@mikrotik] > /ip dhcp-server lease print detail
Flags: X - disabled, R - radius, D - dynamic, B - blocked
 0 D address=172.16.16.120 mac-address=30:07:4D:F5:07:49 client-id="1:30:7:4d:f5:7:49" address-lists="" server=defconf dhcp-option=""
     status=bound expires-after=8m55s last-seen=1m5s active-address=172.16.16.120 active-mac-address=30:07:4D:F5:07:49
     active-client-id="1:30:7:4d:f5:7:49" active-server=defconf host-name="Galaxy-S8"
If you do not know your devices Vendor Class ID, you can turn on DHCP debug logs with /system logging add topics=dhcp. Then in the logging entries, you will see Class-ID
10:30:31 dhcp,debug,packet defconf received request with id 4238230732 from 0.0.0.0
10:30:31 dhcp,debug,packet     secs = 3
10:30:31 dhcp,debug,packet     ciaddr = 0.0.0.0
10:30:31 dhcp,debug,packet     chaddr = 30:07:4D:F5:07:49
10:30:31 dhcp,debug,packet     Msg-Type = request
10:30:31 dhcp,debug,packet     Client-Id = 01-30-07-4D-F5-07-49
10:30:31 dhcp,debug,packet     Address-Request = 172.16.16.120
10:30:31 dhcp,debug,packet     Server-Id = 192.168.88.1
10:30:31 dhcp,debug,packet     Max-DHCP-Message-Size = 1500
10:30:31 dhcp,debug,packet     Class-Id = "android-dhcp-9"
10:30:31 dhcp,debug,packet     Host-Name = "Galaxy-S8"
10:30:31 dhcp,debug,packet     Parameter-List = Subnet-Mask,Router,Domain-Server,Domain-Name,Interface-MTU,Broadcast-Address,Address-Time,Ren
ewal-Time,Rebinding-Time,Vendor-Specific
10:30:31 dhcp,info defconf assigned 172.16.16.120 to 30:07:4D:F5:07:49
10:30:31 dhcp,debug,packet defconf sending ack with id 4238230732 to 172.16.16.120
10:30:31 dhcp,debug,packet     ciaddr = 0.0.0.0
10:30:31 dhcp,debug,packet     yiaddr = 172.16.16.120
10:30:31 dhcp,debug,packet     siaddr = 192.168.88.1
10:30:31 dhcp,debug,packet     chaddr = 30:07:4D:F5:07:49
10:30:31 dhcp,debug,packet     Msg-Type = ack
10:30:31 dhcp,debug,packet     Server-Id = 192.168.88.1
10:30:31 dhcp,debug,packet     Address-Time = 600
10:30:31 dhcp,debug,packet     Domain-Server = 192.168.88.1,10.155.0.1,10.155.0.126
Generic matcher
Since RouterOS 7.4beta4 (2022-Jun-15 14:04) the vendor-id matcher is converted to a generic matcher. The genric matcher allows matching any of the DHCP options.
And an example to match DHCP option 60 similar to vendor-id-class matcher:
/ip dhcp-server matcher
add address-pool=pool1 code=60 name=test value=android-dhcp-11
Match the client-id with option 61 configured as hex value:
/ip dhcp-server matcher
add address-pool=pool1 code=61 name=test value=0x016c3b6bed8364
Match the code 12 using the string:
/ip dhcp-server matcher
add address-pool=testpool code=12 name=test server=dhcp1 value="MikroTik"
Configuration Examples
Setup
To simply configure DHCP server you can use a setup command.
First, you configure an IP address on the interface:
[admin@MikroTik] > /ip address add address=192.168.88.1/24 interface=ether3 disabled=no
Then you use setup a command which will automatically ask necessary parameters:
[admin@MikroTik] > /ip dhcp-server setup
Select interface to run DHCP server on

dhcp server interface: ether3
Select network for DHCP addresses

dhcp address space: 192.168.88.0/24
Select gateway for given network

gateway for dhcp network: 192.168.88.1
Select pool of ip addresses given out by DHCP server

addresses to give out: 192.168.88.2-192.168.88.254
Select DNS servers

dns servers: 10.155.126.1,10.155.0.1,
Select lease time

lease time: 10m
That is all. You have configured an active DHCP server.
Manual configuration
To configure the DHCP server manually to respond to local requests you have to configure the following:
- An IP pool for addresses to be given out, make sure that your gateway/DHCP server address is not part of the pool.
/ip pool add name=dhcp_pool0 ranges=192.168.88.2-192.168.88.254
- A network indicating subnets that DHCP-server will lease addresses from, among other information, like a gateway, DNS-server, NTP-server, DHCP options, etc.
/ip dhcp-server network add address=192.168.88.0/24 dns-server=192.168.88.1 gateway=192.168.88.1
- In our case, the device itself is serving as the gateway, so we’ll add the address to the bridge interface:
/ip address add address=192.168.88.1/24 interface=bridge1 network=192.168.88.0
- And finally, add DHCP Server, here we will add the previously created address pool, and specify on which interface the DHCP server should work on
/ip dhcp-server add address-pool=dhcp_pool0 disabled=no interface=bridge1 name=dhcp1
DHCPv6 Server
Summary
Standards: RFC 3315, RFC 3633
Single DUID is used for client and server identification, only IAID will vary between clients corresponding to their assigned interface.
Client binding creates a dynamic pool with a timeout set to binding’s expiration time (note that now dynamic pools can have a timeout), which will be updated every time binding gets renewed.
When a client is bound to a prefix, the DHCP server adds routing information to know how to reach the assigned prefix.
Client bindings in the server do not show MAC address anymore (as it was in v5.8), DUID (hex) and IAID are used instead. After upgrade, MAC addresses will be converted to DUIDs automatically, but due to unknown DUID type and unknown IAID, they should be further updated by the user;
RouterOS DHCPv6 server can only delegate IPv6 prefixes, not addresses.
General
Sub-menu: /ipv6 dhcp-server
This sub-menu lists and allows to configure DHCP-PD servers.
DHCPv6 Server Properties
| Property | Description |
|---|---|
| address-pool (enum | static-only; Default: static-only) | IPv6 pool, from which to take IPv6 prefix for the clients. |
| allow-dual-stack-queue (yes | no; Default: yes) | Creates a single simple queue entry for both IPv4 and IPv6 addresses, and uses the MAC address and DUID for identification. Requires IPv6 DHCP Server to have this option enabled as well to work properly. |
| binding-script (string; Default: ) | A script that will be executed after binding is assigned or de-assigned. Internal «global» variables that can be used in the script:
|
| dhcp-option (string; Default: none) | Add additional DHCP options from option list. |
| disabled (yes | no; Default: no) | Whether DHCP-PD server participates in the prefix assignment process. |
| interface (string; Default: ) | The interface on which server will be running. |
| lease-time (time; Default: 3d) | The time that a client may use the assigned address. The client will try to renew this address after half of this time and will request a new address after the time limit expires. |
| name (string; Default: ) | Reference name |
Read-only Properties
| Property | Description |
|---|---|
| dynamic (yes | no) | |
| invalid (yes | no) |
Bindings
Sub-menu: /ipv6 dhcp-server binding
DUID is used only for dynamic bindings, so if it changes then the client will receive a different prefix than previously.
| Property | Description |
|---|---|
| address (IPv6 prefix; Default: ) | IPv6 prefix that will be assigned to the client |
| allow-dual-stack-queue (yes | no; Default: yes) | Creates a single simple queue entry for both IPv4 and IPv6 addresses, uses the MAC address and DUID for identification. Requires IPv4 DHCP Server to have this option enabled as well to work properly. |
| comment (string; Default: ) | Short description of an item. |
| disabled (yes | no; Default: no) | Whether an item is disabled |
| dhcp-option (string; Default: ) | Add additional DHCP options from the option list. |
| dhcp-option-set (string; Default: ) | Add an additional set of DHCP options. |
| life-time (time; Default: 3d) | The time period after which binding expires. |
| duid (hex string; Default: ) | DUID value. Should be specified only in hexadecimal format. |
| iaid (integer [0..4294967295]; Default: ) | Identity Association Identifier, part of the Client ID. |
| prefix-pool (string; Default: ) | Prefix pool that is being advertised to the DHCPv6 Client. |
| rate-limit (integer[/integer] [integer[/integer] [integer[/integer] [integer[/integer]]]]; Default: ) | Adds a dynamic simple queue to limit IP’s bandwidth to a specified rate. Requires the lease to be static. Format is: rx-rate[/tx-rate] [rx-burst-rate[/tx-burst-rate] [rx-burst-threshold[/tx-burst-threshold] [rx-burst-time[/tx-burst-time]]]]. All rates should be numbers with optional ‘k’ (1,000s) or ‘M’ (1,000,000s). If tx-rate is not specified, rx-rate is as tx-rate too. Same goes for tx-burst-rate and tx-burst-threshold and tx-burst-time. If both rx-burst-threshold and tx-burst-threshold are not specified (but burst-rate is specified), rx-rate and tx-rate is used as burst thresholds. If both rx-burst-time and tx-burst-time are not specified, 1s is used as default. |
| server (string | all; Default: all) | Name of the server. If set to all, then binding applies to all created DHCP-PD servers. |
Read-only properties
| Property | Description |
|---|---|
| dynamic (yes | no) | Whether an item is dynamically created. |
| expires-after (time) | The time period after which binding expires. |
| last-seen (time) | Time period since the client was last seen. |
| status (waiting | offered | bound) | Three status values are possible:
|
For example, dynamically assigned /62 prefix
[admin@RB493G] /ipv6 dhcp-server binding> print detail
 Flags: X - disabled, D - dynamic
0 D address=2a02:610:7501:ff00::/62 duid="1605fcb400241d1781f7" iaid=0
 server=local-dhcp life-time=3d status=bound expires-after=2d23h40m10s
last-seen=19m50s
1 D address=2a02:610:7501:ff04::/62 duid="0019d1393535" iaid=2
server=local-dhcp life-time=3d status=bound expires-after=2d23h43m47s
last-seen=16m13s
Menu specific commands
| Property | Description |
|---|---|
| make-static () | Set dynamic binding as static. |
Rate limiting
It is possible to set the bandwidth to a specific IPv6 address by using DHCPv6 bindings. This can be done by setting a rate limit on the DHCPv6 binding itself, by doing this a dynamic simple queue rule will be added for the IPv6 address that corresponds to the DHCPv6 binding. By using the rate-limit the parameter you can conveniently limit a user’s bandwidth.
For any queues to work properly, the traffic must not be FastTracked, make sure your Firewall does not FastTrack traffic that you want to limit.
First, make the DHCPv6 binding static, otherwise, it will not be possible to set a rate limit to a DHCPv6 binding:
[admin@MikroTik] > /ipv6 dhcp-server binding print
Flags: X - disabled, D - dynamic
# ADDRESS DUID SERVER STATUS
0 D fdb4:4de7:a3f8:418c::/66 0x6c3b6b7c413e DHCPv6_Server bound

[admin@MikroTik] > /ipv6 dhcp-server binding make-static 0

[admin@MikroTik] > /ipv6 dhcp-server binding print
Flags: X - disabled, D - dynamic
# ADDRESS DUID SERVER STATUS
0 fdb4:4de7:a3f8:418c::/66 0x6c3b6b7c413e DHCPv6_Server bound
Then you need can set a rate to a DHCPv6 binding that will create a new dynamic simple queue entry:
[admin@MikroTik] > /ipv6 dhcp-server binding set 0 rate-limit=10M/10
[admin@MikroTik] > /queue simple print
Flags: X - disabled, I - invalid, D - dynamic
0 D name="dhcp<6c3b6b7c413e fdb4:4de7:a3f8:418c::/66>" target=fdb4:4de7:a3f8:418c::/66 parent=none packet-marks="" priority=8/8 queue=default
-small/default-small limit-at=10M/10M max-limit=10M/10M burst-limit=0/0
burst-threshold=0/0 burst-time=0s/0s bucket-size=0.1/0.1
By default allow-dual-stack-queue is enabled, this will add a single dynamic simple queue entry for both DCHPv6 binding and DHCPv4 lease, without this option enabled separate dynamic simple queue entries will be added for IPv6 and IPv4.
If allow-dual-stack-queue is enabled, then a single dynamic simple queue entry will be created containing both IPv4 and IPv6 addresses:
[admin@MikroTik] > /queue simple print
Flags: X - disabled, I - invalid, D - dynamic
 0 D name="dhcp-ds<6C:3B:6B:7C:41:3E>" target=192.168.1.200/32,fdb4:4de7:a3f8:418c::/66 parent=none packet-marks="" priority=8/8 queue=default
-small/default-small limit-at=10M/10M max-limit=10M/10M
burst-limit=0/0 burst-threshold=0/0 burst-time=0s/0s bucket-size=0.1/0.1
RADIUS Support
Since RouterOS v6.43 it is possible to use RADIUS to assign a rate-limit per DHCPv6 binding, to do so you need to pass the Mikrotik-Rate-Limit attribute from your RADIUS Server for your DHCPv6 binding. To achieve this you first need to set your DHCPv6 Server to use RADIUS for assigning bindings. Below is an example of how to set it up:
/radius
add address=10.0.0.1 secret=VERYsecret123 service=dhcp
/ipv6 dhcp-server
set dhcp1 use-radius=yes
After that, you need to tell your RADIUS Server to pass the Mikrotik-Rate-Limit attribute. In case you are using FreeRADIUS with MySQL, then you need to add appropriate entries into radcheck and radreply tables for a MAC address, that is being used for your DHCPv6 Client. Below is an example for table entries:
INSERT INTO `radcheck` (`username`, `attribute`, `op`, `value`) VALUES
('000c4200d464', 'Auth-Type', ':=', 'Accept'),
 INSERT INTO `radreply` (`username`, `attribute`, `op`, `value`) VALUES
('000c4200d464', 'Delegated-IPv6-Prefix', '=', 'fdb4:4de7:a3f8:418c::/66'),
('000c4200d464', 'Mikrotik-Rate-Limit', '=', '10M');
By default allow-dual-stack-queue is enabled and will add a single dynamic queue entry if the MAC address from the IPv4 lease (or DUID, if the DHCPv4 Client supports Node-specific Client Identifiers from RFC4361), but DUID from DHCPv6 Client is not always based on the MAC address from the interface on which the DHCPv6 client is running on, DUID is generated on a per-device basis. For this reason, a single dynamic queue entry might not be created, separate dynamic queue entries might be created instead.
Configuration Example
Enabling IPv6 Prefix delegation
Let’s consider that we already have a running DHCP server.
To enable IPv6 prefix delegation, first, we need to create an address pool:
/ipv6 pool add name=myPool prefix=2001:db8:7501::/60 prefix-length=62
Notice that prefix-length is 62 bits, which means that clients will receive /62 prefixes from the /60 pool.
The next step is to enable DHCP-PD:
/ipv6 dhcp-server add name=myServer address-pool=myPool interface=local
To test our server we will set up wide-dhcpv6 on an ubuntu machine:
- install wide-dhcpv6-client
- edit «/etc/wide-dhcpv6/dhcp6c.conf» as above
You can use also RouterOS as a DHCP-PD client.
interface eth2{
send ia-pd 0;
};

id-assoc pd {
prefix-interface eth3{
sla-id 1;
sla-len 2;
};
};
- Run DHCP-PD client:
sudo dhcp6c -d -D -f eth2
- Verify that prefix was added to the:
mrz@bumba:/media/aaa$ ip -6 addr
 ..
2: eth3: <BROADCAST,MULTICAST,UP,LOWER_UP> mtu 1500 qlen 1000
 inet6 2001:db8:7501:1:200:ff:fe00:0/64 scope global
 valid_lft forever preferred_lft forever
 inet6 fe80::224:1dff:fe17:81f7/64 scope link
 valid_lft forever preferred_lft forever
- You can make binding to specific client static so that it always receives the same prefix:
[admin@RB493G] /ipv6 dhcp-server binding> print
Flags: X - disabled, D - dynamic
# ADDRESS DU IAID SER.. STATUS 0 D 2001:db8:7501:1::/62 16 0 loc.. bound
[admin@RB493G] /ipv6 dhcp-server binding> make-static 0
- DHCP-PD also installs a route to assigned prefix into IPv6 routing table:
[admin@RB493G] /ipv6 route> print
 Flags: X - disabled, A - active, D - dynamic, C - connect, S - static, r - rip, o - ospf, b - bgp, U - unreachable
 # DST-ADDRESS GATEWAY DISTANCE
...
2 ADS 2001:db8:7501:1::/62 fe80::224:1dff:fe17:8... 1
DHCP Relay
Summary
Sub-menu: /ip dhcp-relay
The purpose of the DHCP relay is to act as a proxy between DHCP clients and the DHCP server. It is useful in networks where the DHCP server is not on the same broadcast domain as the DHCP client.
DHCP relay does not choose the particular DHCP server in the DHCP-server list, it just sends the incoming request to all the listed servers.
Properties
| Property | Description |
|---|---|
| add-relay-info (yes | no; Default: no) | Adds DHCP relay agent information if enabled according to RFC 3046. Agent Circuit ID Sub-option contains mac address of an interface, Agent Remote ID Sub-option contains MAC address of the client from which request was received. |
| delay-threshold (time | none; Default: none) | If secs field in DHCP packet is smaller than delay-threshold, then this packet is ignored |
| dhcp-server (string; Default: ) | List of DHCP servers’ IP addresses which should the DHCP requests be forwarded to |
| interface (string; Default: ) | Interface name the DHCP relay will be working on. |
| local-address (IP; Default: 0.0.0.0) | The unique IP address of this DHCP relay needed for DHCP server to distinguish relays. If set to 0.0.0.0 — the IP address will be chosen automatically |
| relay-info-remote-id (string; Default: ) | specified string will be used to construct Option 82 instead of client’s MAC address. Option 82 consist of: interface from which packets was received + client mac address or relay-info-remote-id |
| name (string; Default: ) | Descriptive name for the relay |
Configuration Example
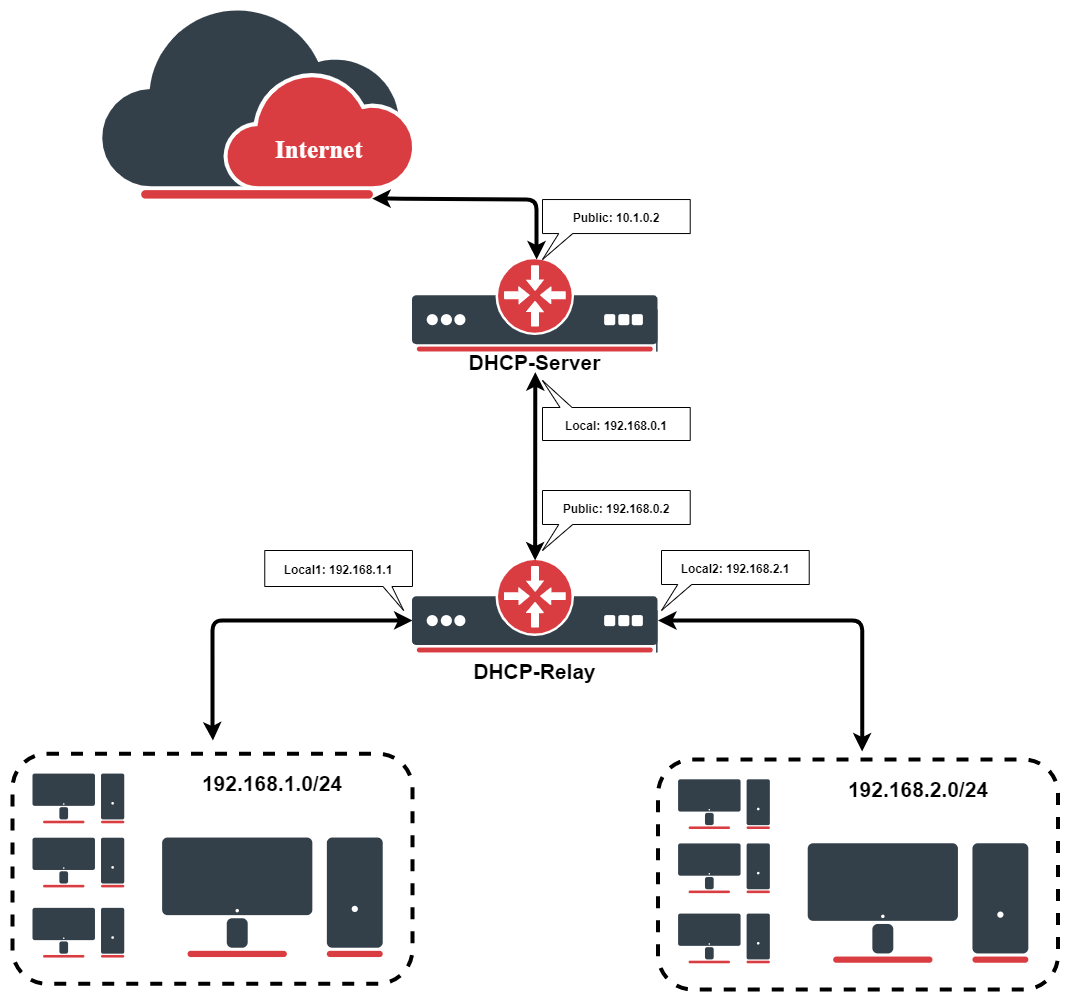
Let us consider that you have several IP networks ‘behind’ other routers, but you want to keep all DHCP servers on a single router. To do this, you need a DHCP relay on your network which will relay DHCP requests from clients to the DHCP server.
This example will show you how to configure a DHCP server and a DHCP relay that serves 2 IP networks — 192.168.1.0/24 and 192.168.2.0/24 that are behind a router DHCP-Relay.
IP Address Configuration
IP addresses of DHCP-Server:
[admin@DHCP-Server] ip address> print
Flags: X - disabled, I - invalid, D - dynamic
 #   ADDRESS            NETWORK         BROADCAST       INTERFACE
 0   192.168.0.1/24     192.168.0.0     192.168.0.255   To-DHCP-Relay
 1   10.1.0.2/24	10.1.0.0	10.1.0.255	Public
[admin@DHCP-Server] ip address>
IP addresses of DHCP-Relay:
[admin@DHCP-Relay] ip address> print
Flags: X - disabled, I - invalid, D - dynamic
 #   ADDRESS            NETWORK         BROADCAST       INTERFACE
 0   192.168.0.2/24     192.168.0.0     192.168.0.255   To-DHCP-Server
 1   192.168.1.1/24     192.168.1.0     192.168.1.255   Local1
 2   192.168.2.1/24     192.168.2.0     192.168.2.255   Local2
[admin@DHCP-Relay] ip address>
DHCP Server Setup
To setup 2 DHCP Servers on the DHCP-Server router add 2 pools. For networks 192.168.1.0/24 and 192.168.2.0:
/ip pool add name=Local1-Pool ranges=192.168.1.11-192.168.1.100
/ip pool add name=Local2-Pool ranges=192.168.2.11-192.168.2.100
[admin@DHCP-Server] ip pool> print
 # NAME                                         RANGES
 0 Local1-Pool                                  192.168.1.11-192.168.1.100
 1 Local2-Pool                                  192.168.2.11-192.168.2.100
[admin@DHCP-Server] ip pool>
Create DHCP Servers:
/ip dhcp-server add interface=To-DHCP-Relay relay=192.168.1.1 \
   address-pool=Local1-Pool name=DHCP-1 disabled=no
/ip dhcp-server add interface=To-DHCP-Relay relay=192.168.2.1 \
   address-pool=Local2-Pool name=DHCP-2 disabled=no
[admin@DHCP-Server] ip dhcp-server> print
Flags: X - disabled, I - invalid
 #   NAME         INTERFACE     RELAY           ADDRESS-POOL LEASE-TIME ADD-ARP
 0   DHCP-1       To-DHCP-Relay 192.168.1.1     Local1-Pool  3d00:00:00
 1   DHCP-2       To-DHCP-Relay 192.168.2.1     Local2-Pool  3d00:00:00
[admin@DHCP-Server] ip dhcp-server>
Configure respective networks:
/ip dhcp-server network add address=192.168.1.0/24 gateway=192.168.1.1 \
   dns-server=159.148.60.20
/ip dhcp-server network add address=192.168.2.0/24 gateway=192.168.2.1 \
   dns-server 159.148.60.20
[admin@DHCP-Server] ip dhcp-server network> print
 # ADDRESS            GATEWAY         DNS-SERVER      WINS-SERVER     DOMAIN
 0 192.168.1.0/24     192.168.1.1     159.148.60.20
 1 192.168.2.0/24     192.168.2.1     159.148.60.20
[admin@DHCP-Server] ip dhcp-server network>
DHCP Relay Config
Configuration of DHCP-Server is done. Now let’s configure DHCP-Relay:
/ip dhcp-relay add name=Local1-Relay interface=Local1 \
   dhcp-server=192.168.0.1 local-address=192.168.1.1 disabled=no
/ip dhcp-relay add name=Local2-Relay interface=Local2 \
   dhcp-server=192.168.0.1 local-address=192.168.2.1 disabled=no
[admin@DHCP-Relay] ip dhcp-relay> print
Flags: X - disabled, I - invalid
 #   NAME                        INTERFACE      DHCP-SERVER     LOCAL-ADDRESS
 0   Local1-Relay                Local1         192.168.0.1     192.168.1.1
 1   Local2-Relay                Local2         192.168.0.1     192.168.2.1
[admin@DHCP-Relay] ip dhcp-relay>
Для того что бы устройства подключенные в локальную сеть могли получать ip адреса автоматически, необходимо настроить DHCP сервер.
Содержание
- Быстрая настройка
- Дополнительные настройкиDHCP сервера.
- Привязка клиентов поMAC адресу
- Настройкаoptions
Быстрая настройка
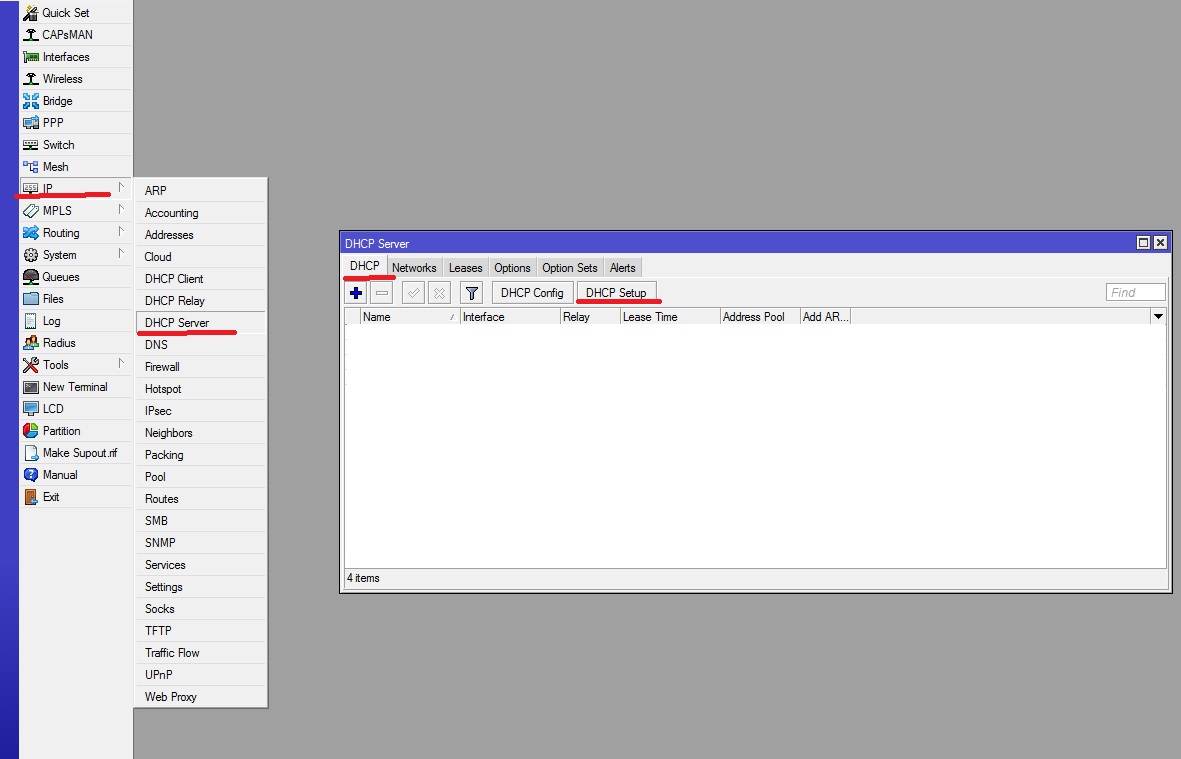
Подключаемся к маршрутизатору через winbox. Открываем вкладку IP->DHCP Server. В появившемся окне, во вкладке DHCP нажимаем кнопку DHCP Setup.
Нужно разобраться с MikroTik, но не определились с чего начать? В курсе «Настройка оборудования MikroTik» все по порядку. Подойдет и для начала работы с этим оборудованием, и для того, чтобы систематизировать знания. Это видеокурс из 162 уроков и 45 лабораторных работ, построен на официальной программе MTCNA. Проходить можно, когда удобно и пересматривать по необходимости – материалы курса выдаются бессрочно. Также есть 30 дней на личные консультации с автором. На пробу выдают 25 уроков бесплатно, заказать их можно на странице курса.
Откроется следующее окошко
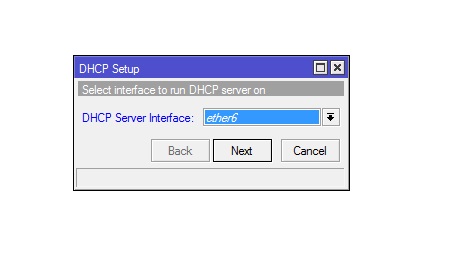
Здесь мы выбираем локальный интерфейс, на котором будет работать ЛВС, если интерфейсы объединены в bridg то выбираем этот бридж.
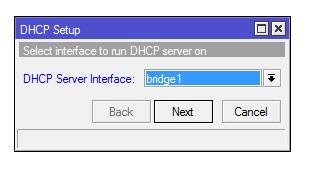
Также если необходимо настроить сервер на vlan, то выбираем нужный vlan. После выбора интерфейса нажимаем Next. В следующем окне вводим нашу локальную сеть.

Жмем Next.
Прописываем шлюз по умолчанию который будет выдаваться клиентам.

На следующей странице прописываем DHCP Relay. Relay-это ip DHCP сервера, если бы у нас в качестве сервера выступал бы другой Микротик или отдельный компьютер, то здесь нужно было бы прописать его ip. У нас маршрутизатор Mikrotik является server, поэтому Relay нам не нужен и мы просто нажимаем стрелку вверх справа от окошка ввода.
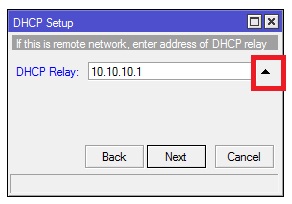
Нажимаем Next.
Выбираем пул диапазона range ip адресов, которые будут выдаваться клиентам.
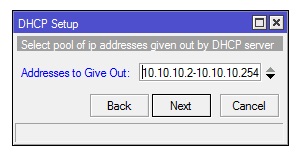
Здесь будут выдаваться ip с 10.10.10.2 по 10.10.10.254
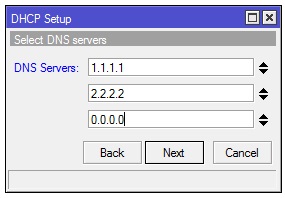
В следующем окне вводим DNS сервера, если в Микротике настроено кэширование ДНС, то вводим ip роутера.
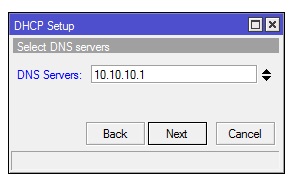
Или другие ДНС, для добавления ДНС нажмите стрелку вниз с левой стороны от окна ввода.
Нажимаем Next. Осталось указать время аренды ip адресов Lease Time.

В примере ip будут выдаваться на один день, т.е. 24 часа. Можно сделать аренду 72 часа, для этого введите строку 3d 00:00:00.
Нажимаем Next. Если все сделали правильно, то появится окошко.
После нажатия кнопки в списке DHCP появится созданный сервер, Если что, то настроено не правильно, строка будет гореть красным цветом.
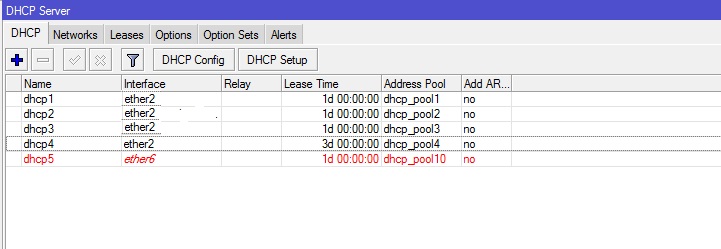
Например, если на порту не настроен ip адрес.
На этом быстрая настройка сервера Микротик закончена. Таким образом, можно настроить несколько серверов для разных пулов. Например, настроить два DHCP, один будет выдавать адреса для пользователей, а другой для локальных ресурсов внутри сети.
Для дополнительных настроек кликните два раза по созданному серверу, в результате откроется окно где можно изменить или добавить дополнительные настройки.
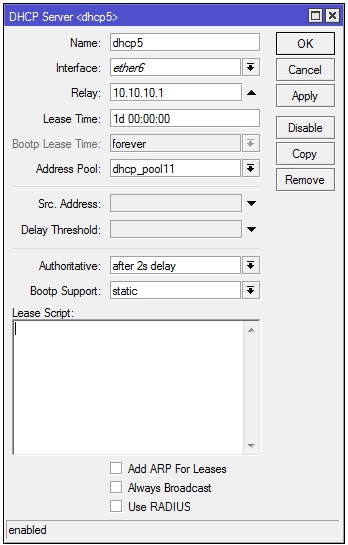
Рассмотрим настраиваемые здесь опции.
Name-Любое имя
Interface – сетевой интерфейс на котором настроен сервер, может быть как физическим так и vlan или bridge.
Lease Time – Время аренды ip, по истечении которого сетевому устройству будет выдан новый.
Address Pool — диапазон из которого будут выдаваться ip для сетевых устройств, настраивается в IP->Pool.
Src.Address – используется если на интерфейсе настроено несколько ip, здесь прописываем рабочий DHCP.
authoritative принимает следующие параметры
yes — если клиент запросит IP, Микротик ему сразу же ответит. Причём если устройство ранее получало IP другого DHCP в сети, то Микротик пошлёт ему пакет DHCPNAK заставляющий обновить ему свой IP
No — если клиент ранее получавший IP с другого DHCP запросит адрес у Микротика то он его проигнорирует
After 2s delay — если клиент запросит IP недоступный на Mikrotik он будет его игнорировать 2 секунды, а далее пошлёт DHCPNAK и присвоит IP из своего диапазона. Своим клиентам Микротик отвечает мгновенно.
After 10s delay — если клиент запросит IP адрес недоступный на Mikrotik он будет его игнорировать 10 секунд, а далее пошлёт DHCPNAK и присвоит IP адрес из своего диапазона. Своим клиентам Микротик отвечает мгновенно.
Bootp Support – принимает значения
none — не реагировать на запросы BOOTP
static — предлагать только статические лизинг для BOOTP
dynamic — предлагать статическую и динамическую аренду для BOOTP
lease—script – в этом окне можно добавить исполняемый скрипт, например при подключении компьютера заносить всю информацию в лог.
Флаги:
add arp for leases — автоматически заполняет ARP таблицу, соответствием MAC — IP.
always broadcast — Всегда отправляйте широковещательные пакеты, даже если IP-адрес назначения известен. При включении этой опции возможна дополнительная нагрузка на сеть L2.
Use Radius — Указывает использовать ли RADIUS server для аккаунтинга и аренды адресов.
На Вкладке Networks, кликаем два раза по созданному серверу и рассмотрим опции.
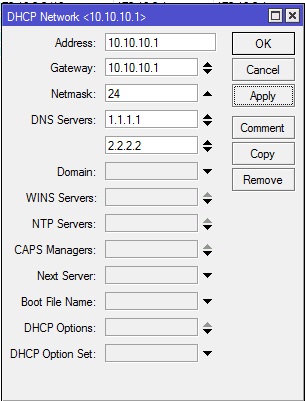
Address – здесь все понятно, ip Микротика
Gateway – шлюз выдаваемый сетевым устройствам
Netmask – маска сети
DNS Servers – ДНС выдаваемые сетевым устройствам
Domain – Имя домена сети
Boot File Name – имя загрузочного файла, используется если включена загрузка по сети через tftp.
Options – дополнительные опции, как настроить рассмотрим ниже.
Привязка клиентов по MAC адресу
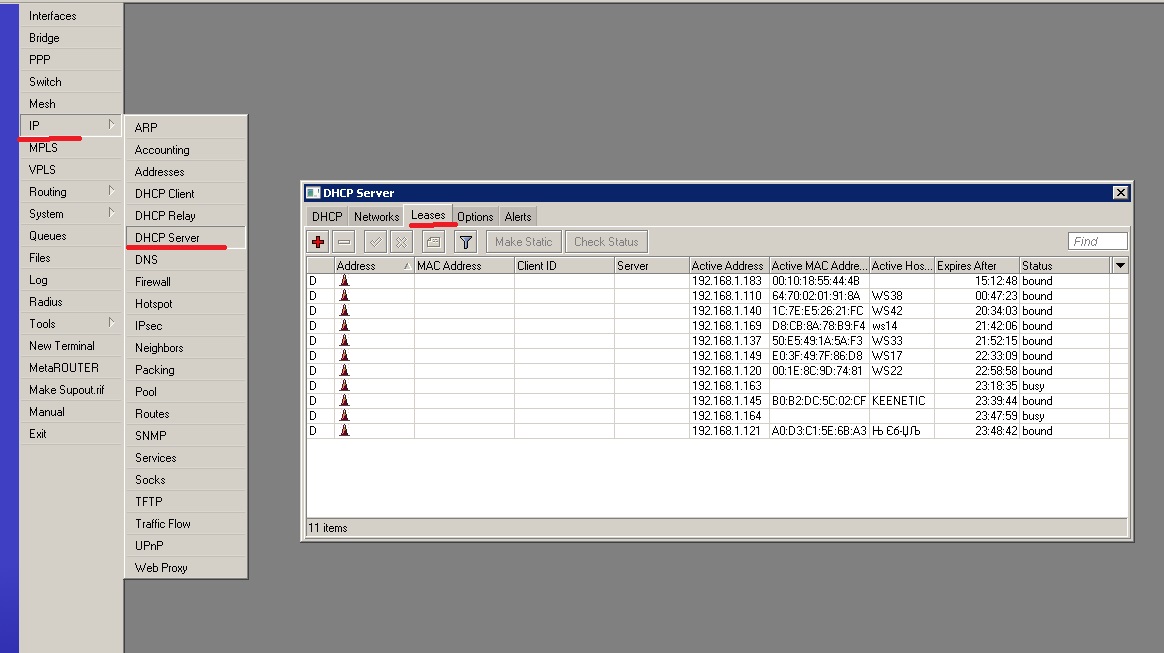
Если необходимо что бы клиент получал всегда один и тот же ip, то можно зарезервировать ip адрес за MAC адресом, для этого переходим во вкладку IP->DHCP Server, в открывшемся окне выбираем вкладку Leases, у нас откроется список клиентов.
Кликаем левой кнопкой мыши по нужной записи и нажимаем кнопку Make Static.
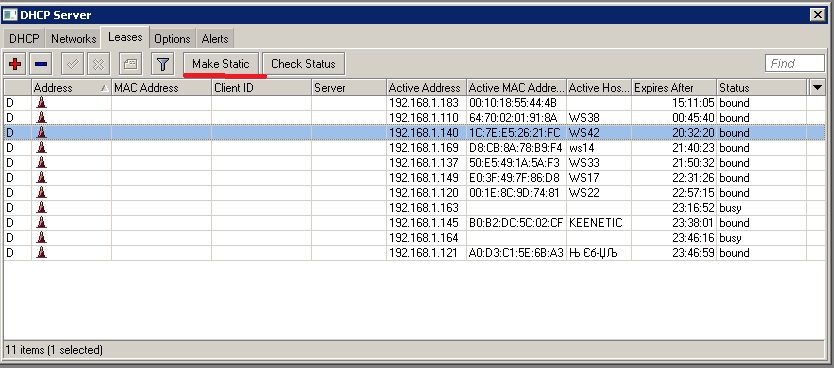
После этого буква D напротив этого клиента должна исчезнуть.
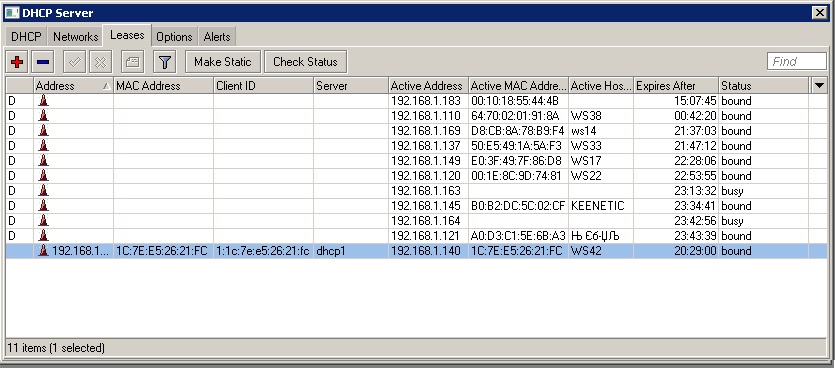
Теперь MAC клиента будет привязан к постоянному ip.
На этой вкладке также можно узнать и о статусе подключенных пользователей
waiting — пользователь не в сети, ожидается подключение.
testing — проверка использования этого адреса или нет (только для динамической аренды) путем опроса его с тайм-аутом 0,5 с
authorizing — ожидание ответа от сервера радиуса
busy — этот адрес назначается статически клиенту или уже существует в сети, поэтому он не может быть арендован, например если на компьютере настроить ip вручную.
offered — сервер предложил адрес пользователю, но не получил подтверждение от пользователя.
bound — адрес назначен пользователю и используется, будет освобожден по истечении времени аренды.
Настройка options
Если необходимо настроить опции, например option 82 использующаяся для привязки IP к порту, или option 66 указывающая ip tftp сервера.
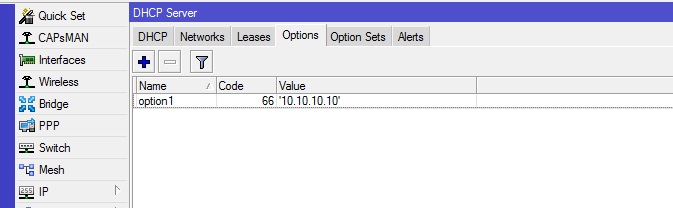
Для настройки переходим на вкладку «Options» и жмем кнопку добавить (красный крест)
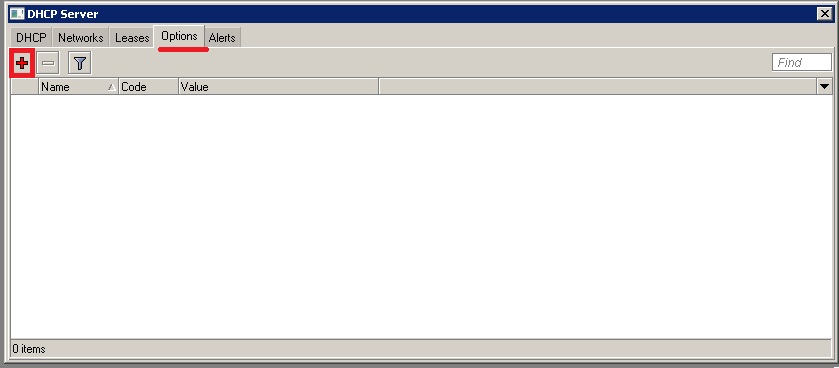
Заполняем поля открывшегося окошка.

Name-название, вводим любое имя
Code – код опции, 66, 82 и т.д.
Value – адрес ресурса, например tftp сервера
Важно: проверьте версию RouterOS, от этого будет зависеть синтаксис данной настройки.
Для версий с 6.0 -6.7, значение IP нужно вводить, используя одинарные ковычки — ’10.10.10.10’
Для версий от 6.8, значение IP нужно вводить, используя следующий синтаксис — s’10.10.10.10’
После нажатия кнопки Apply поле Raw Value заполнится автоматически, жмем OK, должна появится строчка нашей опции
Теперь переходим вкладку «Networks» и два раза кликаем по нужному серверу.
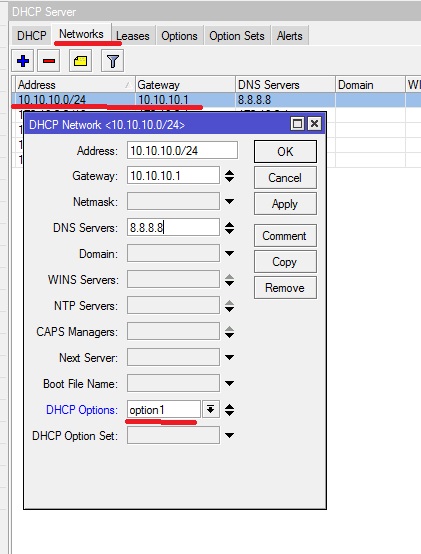
В открывшемся окне, в пункте Options, выбираем нужную нам опцию, созданную на первом шаге. После чего нажимаем кнопку ОК и настройка опции на этом закончена.
Обучающий курс по настройке MikroTik
Нужно разобраться с MikroTik, но не определились с чего начать? В курсе «Настройка оборудования MikroTik» все по порядку. Подойдет и для начала работы с этим оборудованием, и для того, чтобы систематизировать знания. Это видеокурс из 162 уроков и 45 лабораторных работ, построен на официальной программе MTCNA. Проходить можно, когда удобно и пересматривать по необходимости – материалы курса выдаются бессрочно. Также есть 30 дней на личные консультации с автором. На пробу выдают 25 уроков бесплатно, заказать их можно на странице курса.
Если вы нашли ошибку, пожалуйста, выделите фрагмент текста и нажмите Ctrl+Enter.
Материал из MikroTik Wiki
Полезные материалы по MikroTik
Введение
Есть два способа создания DHCP-сервера на маршрутизаторах MikroTik:
- экспресс-настройка с помощью мастера создания DHCP-сервера;
- пошаговая настройка каждого элемента.
Второй способ является предпочтительным, т. к. он позволяет настроить большее количество параметров.
Через графический интерфейс
Создание пула адресов. Первым делом надо создать пул адресов из которого будут раздаваться адреса в аренду. Выберем диапазон: 192.168.15.101 — 192.168.15.200

Создание DHCP-сервера. Далее создадим сам DHCP-сервер, укажем для него созданный на предыдущем шаге пул, укажем срок аренды три дня и выберем интерфейс с которого будут раздаваться адреса.
Обратите внимание, что в вашей сети может использоваться другой интерфейс.

Задание настроек. И в конце зададим настройки, которые должен раздавать наш DHCP-сервер: шлюз, DNS и WINS-серверы.

Через консоль
/ip pool
add name=dhcp-pool1 ranges=192.168.15.101-192.168.15.200
/ip dhcp-server
add address-pool=dhcp-pool1 disabled=no interface=ether1-LAN1 lease-time=3d name=dhcp-server1
/ip dhcp-server network
add address=192.168.15.0/24 dns-server=192.168.15.10 gateway=192.168.15.1 netmask=24 wins-server=192.168.15.10
Проверка
Проверка работоспособности DHCP-сервера простая. Достаточно подключиться компьютером к заданному интерфейсу. Выставить в его настройках получение IP-адреса с помощью DHCP-сервера. И проверить получены ли заданные нами настройки.
Полезные материалы по MikroTik
Для того, чтобы устройства в сети могли автоматически получать настройки, настроим DHCP сервер на микротике.
Для начала создадим новый бридж. Все порты, добавленные в этот бридж, будут раздавать ip адреса из назначенного пула.
В разделе Bridge создайте новый бридж, в поле name укажите удобное вам имя.

Назначим адресацию данному бриджу. В разделе IP – Addresses создайте новый адрес и пропишите сеть (в примере 192.168.1.1/24, network 192.168.1.0), в поле interface выберите созданный ранее бридж.

Укажите пул адресов, которые будут назначаться устройствам, подключающимся к вашей сети. Для этого откройте раздел IP – Pool и создайте новый пул: укажите его имя, а в строке addresses укажите диапазон выдаваемых адресов (192.168.1.2-192.168.1.253 в примере).

Создайте DHCP сервер. Откройте раздел IP – DHCP Server – DHCP и добавьте новый сервер. В поле Name задайте любое имя, в поле Interface выберите ваш бридж, в address pool – созданный пул адресов. В поле lease time пропишите время, на которое устройствам выдается ip адрес (по умолчанию 10 минут).

Перейдите на вторую вкладку Networks (IP – DHCP Server – Networks). Нажмите на плюс и укажите адрес вашей сети, шлюз, маску и при необходимости DNS-адреса.

Настройте NAT для созданного сервера. Откройте IP – Firewall – NAT, создайте новое правило. Во вкладке General в поле chain выберите srcnat, в Src.address пропишите адресацию вашей сети. Перейдите на вкладку Action и укажите в поле Action – masquerade.

Также вы можете быстро применить конфиг для настройки dhcp через New Terminal микротика (измените в конфиге адреса и названия интерфейсов на нужные вам):
/interface bridge add name=inet-bridge
/ip address add address=192.168.1.1/24 interface=inet-bridge network=192.168.1.0
/ip pool add name=inet-pool ranges=192.168.1.2-192.168.1.253
/ip dhcp-server add address-pool=inet-pool disabled=no interface=inet-bridge lease-time=10m name=inet-dhcp
/ip dhcp-server network add address=192.168.1.0/24 dns-server=8.8.8.8 gateway=192.168.1.1 netmask=24
/ip firewall nat add action=masquerade chain=srcnat src-address=192.168.1.0/24
 Со службами DHCP и DNS знакомы, пожалуй все, ведь это базовые службы для сетей любого размера. Но их настройка обычно сводится к установке базовых параметров и затем о них забывают. Действительно, ну что может быть в них интересного, особенно если это неполноценные сервера, а службы роутера. Это так, если говорить о бытовых роутерах, где пользователю стараются не давать в руки лишних инструментов, но RouterOS рассчитана на иную аудиторию и предоставляет широкий спектр возможностей, которыми глупо не воспользоваться.
Научиться настраивать MikroTik с нуля или систематизировать уже имеющиеся знания можно на углубленном курсе по администрированию MikroTik. Автор курса, сертифицированный тренер MikroTik Дмитрий Скоромнов, лично проверяет лабораторные работы и контролирует прогресс каждого своего студента. В три раза больше информации, чем в вендорской программе MTCNA, более 20 часов практики и доступ навсегда.
DNS (Domain Name System)
В отличие от DHCP считается, что свой DNS — это удел крупных сетей, а небольшие организации вполне могут жить и без нее, используя сервера провайдера или публичные сервера. Отчасти это так, но упуская из своих рук одну из ключевых сетевых служб администратор теряет многие инструменты контроля и управления в собственной сети.
Как работает система DNS мы рассказывали в одной из наших статей, рекомендуем ее к прочтению, особенно если вы не до конца разбираетесь в вопросе. Основное, на что нужно обратить внимание — это иерархичность системы. Данные зон хранятся на собственных серверах и для получения информации из них следует прибегать к рекурсии. Это достаточно затратный процесс, поэтому многие сервера кешируют запросы и отвечают на повторные обращения самостоятельно.
Скорость ответа на DNS-запрос очень важна для комфортного использования интернета. Внешне это может проявляться как «задумчивость» браузера, который некоторое время «думает», а только потом начинает грузить страницу. При этом сама скорость канала может быть высокой, а пинг к требуемому серверу небольшим. Неопытного админа такая ситуация может сильно озадачить, но все просто — это долго отвечает используемый DNS-сервер. Ведь прежде, чем начать взаимодействие с сервером, браузер должен получить от DNS-клиента его адрес, передав последнему доменное имя.
Mikrotik дает нам возможность использовать кеширующий DNS-сервер прямо на роутере и если вы настроили использование роутера в качестве DNS — то вы его уже используете. Еще раз перейдем в IP — DNS и внимательно посмотрим на настройки:
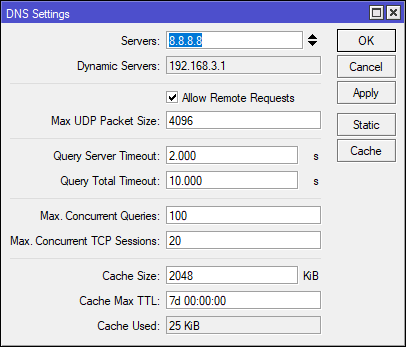 В самом низу расположены настройки кеша: его размер (Cache Size) и максимальное время хранения записей (Cache Max TTL). Еще ниже располагается показатель использования кеша — Cache Used — который показывает его текущий размер. Если он начинает приближаться к размеру кеша, то последний следует увеличить. Просмотреть кеш можно нажав на кнопку Cache.
Глядя на значение TTL, можно подумать, что это очень много, целая неделя. Но это — максимальное время хранения записи, реальное время хранения определяется временем TTL в SOA-записи домена, причем Mikrotik использует минимальное значение — Minimum TTL. В этом несложно убедиться, мы очистили кеш и посетили один из своих сайтов, минимальный TTL которого равен 4 часам:
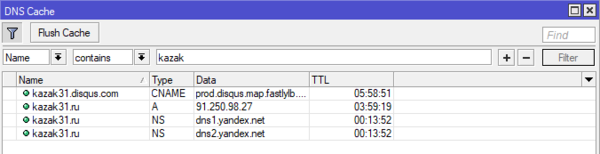 Как видим, Mikrotik использовал значение TTL из SOA-записей, ни о каких 7 днях речи не идет. Тогда для чего нужна эта настройка? Вы можете обновлять кеш чаще, чем это указано в TTL-домена. Если значение максимального TTL Mikrotik будет меньше, чем указанное в SOA-домена, то будет использоваться именно оно.
Это может быть полезным, если вы внесли какие-либо изменения во внешнюю зону и желаете быстрее обновить кеш. Как показывает практика, публичные сервера, такие как Google, OpenDNS или Яндекс тоже часто игнорируют TTL из SOA и обновляют свой кеш чаще.
Очистить кеш можно кнопкой Flush Cache в окне Cache или командой в терминале:
ip dns cache flushНо это еще не всё, изучение кеша может быть полезным для изучения сетевой активности пользователей, если они используют в качестве DNS ваш роутер — то вся их сетевая активность отразится в кеше. Говорите, никто не сидит в соцсетях?
 Поэтому, если у вас нет иных инструментов логирования и статистики, то изучение записей кеша вполне позволит получить картину сетевой активности ваших пользователей.
На этом закончим с кешем и перейдем к другому разделу — Static. Он позволяет создавать нам собственные записи типа A (и больше ничего кроме них). Не густо, но основную часть потребностей это перекрывает. Перенесли сайт на новый сервер? Не нужно ждать пока обновятся DNS-записи, заходим в раздел Static и создаем собственную запись:
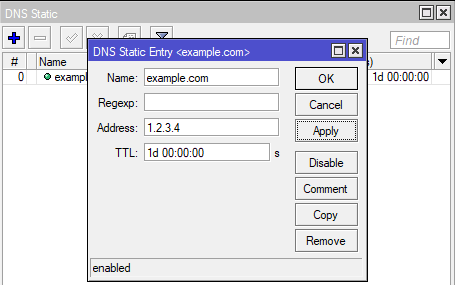 Проверим, как это работает. Выполним разрешение имени на клиенте:
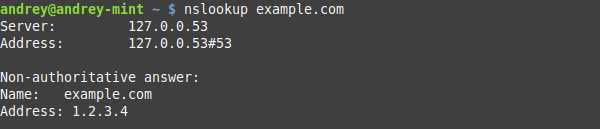 Как видим — все работает отлично.
Отдельный разговор — плоские имена. В одноранговой сети часто бывает нужно указать имя узла, который не поддерживает NetBIOS, скажем ноду Hyper-V Server или машину с Linuх. Аналогично создаем запись:
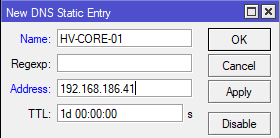 Но имейте ввиду, работать такое разрешение имен будет только на Windows машинах, на Linux вы получите ошибку:
 Но так как большинство сетей имеет преимущественно Windows ПК, то особых проблем плоские имена не доставят, и вы можете смело добавлять их записи на DNS Mikrotik вместо того, чтобы прописывать в hosts на каждой машине.
Так так, скажет внимательный читатель, это же можно использовать для блокировки нежелательных ресурсов и будет прав. Если мы не хотим, чтобы пользователи сидели в соцсетях, то добавим на сервер записи, который будут разрешать такие запросы в 127.0.0.1:
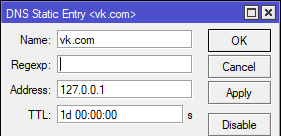 Проверим?
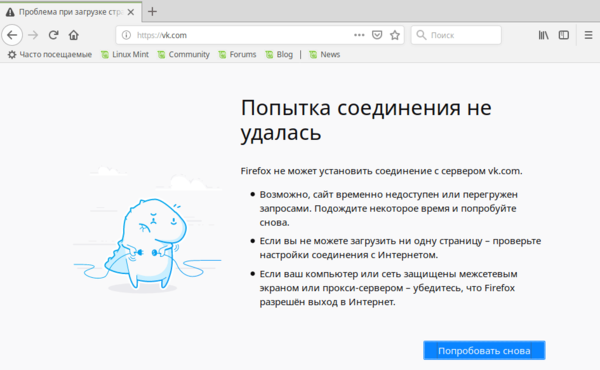 Вроде бы работает, но недостаток такого метода, что мы заблокировали только основной домен и пользователь легко сможет зайти через мобильный поддомен:
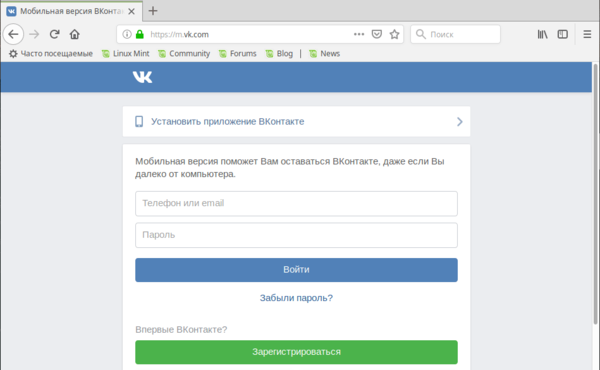 Чтобы этого избежать следует использовать регулярные выражения. К сожалению, в большинстве инструкций в интернете приводятся неправильные выражения, с которыми фильтр работать не будет, поэтому мы советуем использовать для создания и проверки регулярных выражений ресурс regex101.com. Это избавит вас от ошибок и вопросов в стиле «я сделал все как написано в статье, но ничего не работает».
Скажем, чтобы заблокировать домен vk.com со всеми поддоменами нам потребуется выражение:
\.?vk\.comВнесем его в соответствующее поле Mikrotik:
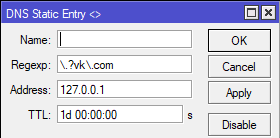 И проверим, теперь любое, даже заведомо не существующее имя в домене vk.com будет разрешаться в 127.0.0.1, что нам и требовалось.
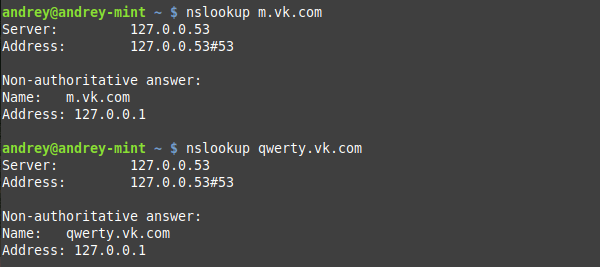
Но это правило заблокирует также любые ресурсы, которые заканчиваются на vk.com, для того, чтобы этого избежать, нам потребуется более сложное выражение:
^([A-Za-z0-9.-]*\.)?vk\.comВ небольших сетях, где пользователи имеют достаточно прав, всю эту идиллию можно быстро перечеркнуть, вручную прописав собственные DNS. Как с этим бороться? Решение в лоб — заблокировать прохождение DNS-запросов в цепочке FORWARD, но тогда у «продвинутого» пользователя вообще перестанет работать интернет, поэтому мы поступим по-другому.
Откроем IP — Firewall — NAT и добавим правило: Chain: dstnat, protocol: udp, Dst. Port: 53 и на закладке Action выберем действие redirect.
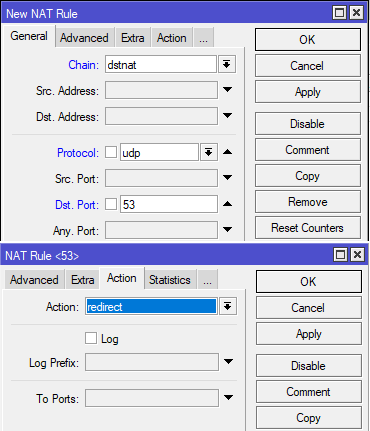 Потом создаем точно такое же правило для протокола tcp. Эти же самые действия можно быстро выполнить в терминале:
ip firewall nat
add chain=dstnat protocol=udp dst-port=53 action=redirect
add chain=dstnat protocol=tcp dst-port=53 action=redirect
Теперь любые DNS-запросы от пользователей сети будут перенаправляться на наш DNS-сервер на роутере, что сделает любые попытки обойти локальный DNS бессмысленными.
Как видим, DNS-сервер роутера Mikrotik, несмотря на кажущуюся простоту, в общем не так уж и прост и дает в руки администратора достаточно широкие возможности.
DHCP (Dynamic Host Configuration Protocol)
Когда речь заходит о DHCP, то обычно имеют ввиду автоматическое присвоение сетевых параметров, таких как IP-адрес, маска, шлюз и DNS-сервера. Но на самом деле возможности протокола намного шире и позволяют настроить очень многие сетевые параметры. Все возможности протокола описаны в RFC 2132, но мы не будем забираться столь глубоко, а рассмотрим в качестве примера только несколько наиболее популярных опций.
Прежде всего это Option 15 (DNS Domain Name) — которая позволяет автоматически настроить DNS-суффикс подключения, что позволяет снять определенный ряд проблем, связанный с использованием плоских имен.
Чтобы создать любую DHCP опцию потребуется перейти в IP — DHCP Server — Options и добавить там новую запись:
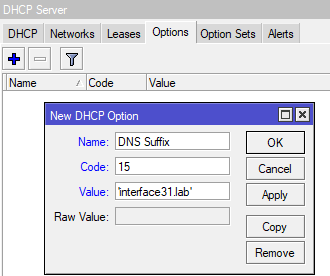 Поле Name содержит имя опции, можем задать его произвольно, так чтобы нам потом было понятно, что это такое и для чего нужно. Code — код опции, в нашем случае 15, Value — значение, в нашем случае это строка, поэтому обрамляем ее одиночной кавычкой. Тоже самое можно быстро сделать в терминале:
ip dhcp-server option
add name="DNS Suffix" code=15 value="'interface31.lab'"
Обратите внимание, что значение value берется в кавычки два раза, в двойные и одинарные.
Опции можно (и нужно) объединять в наборы — Option Set, даже несмотря на то, что во многих сценариях их можно указывать непосредственно. Если в будущем вы надумаете что-то поменять, то достаточно будет просто изменить состав набора, в противном случае вам нужно будет вспомнить все места, где вы использовали некую опцию и заменить ее на новую (или удалить / добавить). Перейдем на одноименную закладку и создадим новый набор. Пока в него будет входить только одна опция:
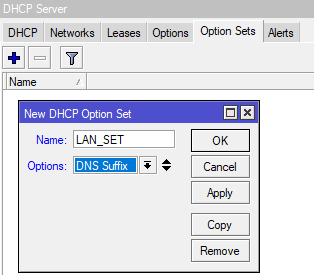
Наборам желательно давать осмысленные названия, чтобы впоследствии вы легко могли понять для чего он предназначен. Теперь назначим его для применения на всю область DHCP-сервера. Перейдем на закладку DHCP и откроем запись нашего сервера, в поле DHCP Option Set укажем имя созданного нами набора.
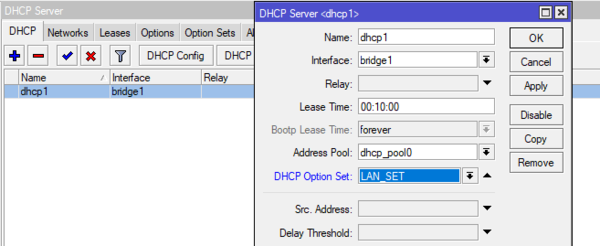
Теперь обновим параметры DHCP и сразу увидим полученный DNS-суффикс:
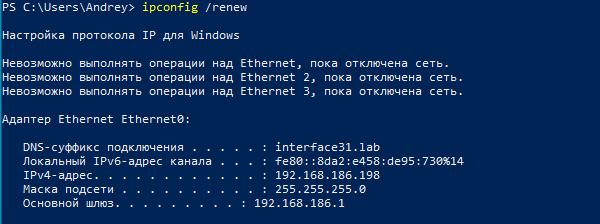 После этого все плоские имена, которые вы добавили на DNS-сервер следует дополнить до FQDN, т.е. вместо HV-CORE-01 написать hv-core-01.interface31.lab (регистр записи значение не имеет).
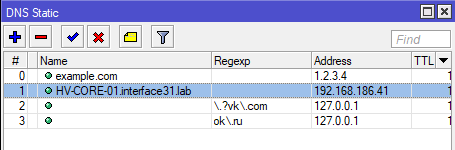 Проверим:
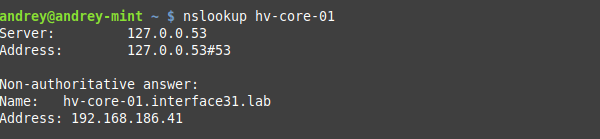 Как видим, одной проблемой стало меньше, плоские имена нормально дополняются до FQDN и нормально разрешаются на нашем DNS вне зависимости от используемой ОС.
Также довольно часто используются опции: 42 (NTP Servers), 60, 66 (TFTP Server Name), 67 (Bootfile-Name). Имейте ввиду, что ОС Windows не запрашивает у DHCP-сервера опцию 42 и для нее установить таким образом сервер времени не удастся.
Отдельно коснемся того, как указывать IP-адреса. Протокол предусматривает передачу значений в шестнадцатеричном (Hex) формате, но RouterOS позволяет использовать и строковые значение, для этого значение Value должно содержать привычное написание адреса, взятое в одинарные кавычки:
'192.168.186.1'или его шестнадцатеричное значение, которое должно начинаться с префикса 0х:
0xc0a8ba01Если адресов несколько, то указываем каждый, взяв в одинарные кавычки, без пробелов между ними:
'192.168.186.1''192.168.186.2'В шестнадцатеричном виде мы добавляем второе значение в конец строки, также без пробелов:
0xc0a8ba01c0a8ba02В терминале это будет выглядеть так:
ip dhcp-server option
add name="NTP1" code=42 value="'192.168.186.1'"
или
add name="NTP1" code=42 value="0xc0a8ba01"Для перевода значений IP-адреса в шестнадцатеричное значение, можно использовать любой онлайн-калькулятор, мы при подготовке данного материала использовали этот.
Еще одна интересная возможность открывается в выдаче отдельным узлам своего набора опций. Следующий сценарий подойдет домашним пользователям, как достаточно простой и эффективный способ обеспечить безопасность ребенка в интернет.
Суть ее состоит в следующем: мы выборочно изменяем DNS-сервера детских сетевых устройств на безопасные DNS, например, Яндекс Семейный, SkyDNS, AdGuard и т.д. Тем, кто захочет реализовать этот сценарий в сети предприятия следует иметь ввиду, что в этом случае таким клиентам будут недоступны возможности собственного DNS-сервера, т.е. все то, о чем мы говорили в первой части статьи.
Итак, сначала создадим новую DHCP опцию с кодом 6 и укажем в значении сервера Яндекс Семейного:
ip dhcp-server option
add name="YandexDNS" code=6 value="'77.88.8.7''77.88.8.3'"
или
add name="YandexDNS" code=6 value="0x4d5808034d580807"Теперь создадим новый набор опций и добавим туда опцию YandexDNS.
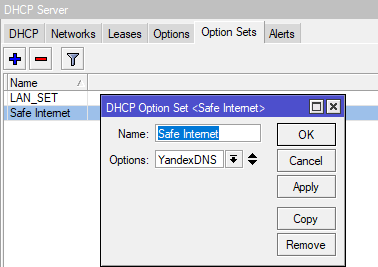 Теперь перейдем на закладку Leases, где находится список выданных в аренду адресов и найдем там детское устройство, после чего откроем запись и выполним резервирование адреса, нажав Make Static:
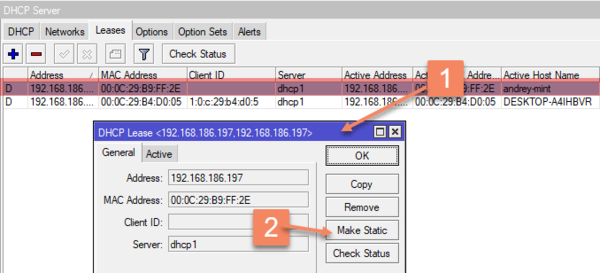 Закроем и заново откроем эту запись и в поле DHCP Option Set укажем созданный нами набор с безопасными серверами:
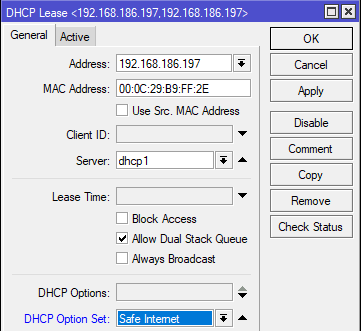 Теперь проверим на клиенте, какие DNS-сервера он получил:
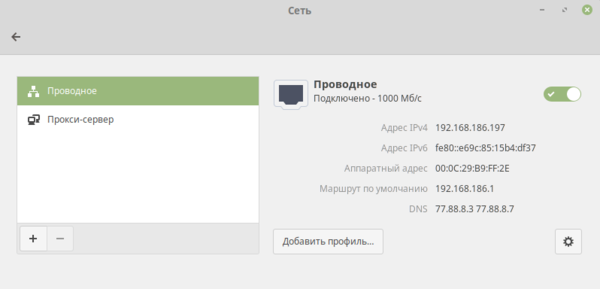 Все верно, это семейные сервера Яндекса. Попробуем посетить какой-нибудь сайт «для взрослых»:
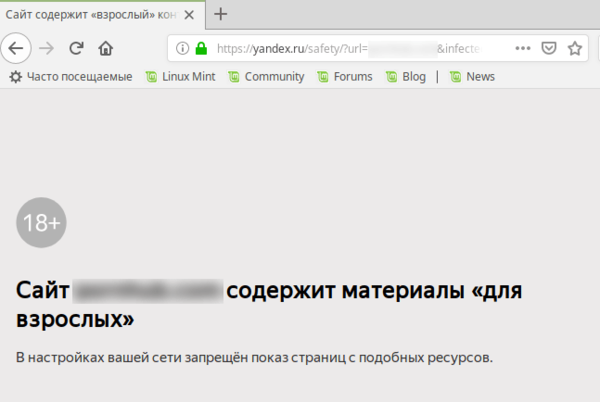 Отлично, фильтрация работает, теперь можно гораздо меньше переживать, что ребенок увидит неподобающий контент, в тоже время взрослые члены семьи могут использовать интернет без ограничений.
В прошлой части статьи мы рассказывали, как предотвратить подмену DNS на клиентском ПК, данное решение совместно с этими правилами работать не будет. Можно, конечно, добавить исключение, но мы подойдем с другой стороны. Наша основная цель в этом сценарии — это оградить ребенка от посещения ненадлежащих ресурсов, поэтому при попытке подмены DNS мы должны направлять все запросы не на роутер, а на безопасные DNS, в противном случае попытка обхода фильтрации достигнет своей цели.
Поэтому заменим в правилах действие redirect на действие dst-nat, в поле To Addresses указываем один из серверов семейного Яндекса, а в поле To Ports — порт 53.
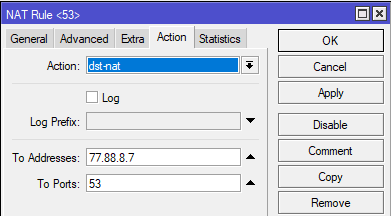 Также можно быстро добавить нужные правила командой:
ip firewall nat
add chain=dstnat protocol=udp dst-port=53 action=dst-nat to-addresses=77.88.8.7 to-ports=53
add chain=dstnat protocol=tcp dst-port=53 action=dst-nat to-addresses=77.88.8.7 to-ports=53
Напоследок рассмотрим опции 121 (Classless Static Routes) и 249 (MS Routes), которые предназначены для передачи статических маршрутов. Первая опция предусмотрена RFC 2132, вторая является «художественной самодеятельностью» Microsoft, поэтому следует указывать обе из них с одинаковым содержимым.
Во избежание ошибок мы советуем задавать маршруты в HEX-формате, синтаксис предусмотрен следующий:
[маска сети назначения][сеть назначения][шлюз]Если маршрутов несколько — добавляем значения к конец строки, без пробелов. Допустим, мы хотим добавить маршрут в сеть 192.168.4.0/22 через 192.168.186.92 и в сеть 10.8.0.0/24 через 192.168.186.94. Чтобы правильно получить шестнадцатеричное значение маски следует использовать такое представление: 0.0.0.22 или 0.0.0.24, забьем все значения в онлайн калькулятор и получим:
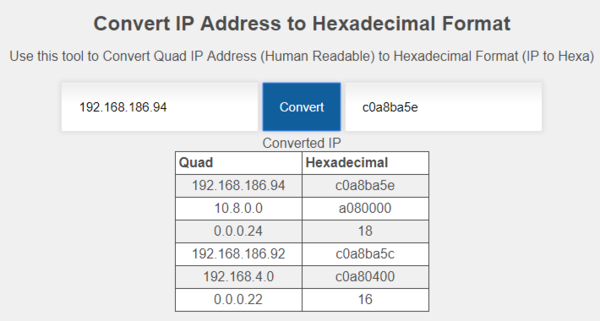
А вот теперь начнется небольшая магия, прежде всего обратим внимание на то, что количество символов в шестнадцатеричном числе всегда должно быть четным, но в строке, соответствующей 10.8.0.0 — нечетное количество символов, так как калькулятор отбросил ведущий ноль, поэтому вместо a080000 мы должны использовать 0a08000. Имеем это ввиду, так как разные калькуляторы могут по-разному обрабатывать ведущий ноль.
Затем от адреса сети, мы должны отбросить столько нулевых октетов, сколько нулей содержится в маске, в HEX-значении это по два нуля. Проще говоря для сетей /24 — /17 мы должны убрать в HEX-значении сзади два нуля, для сетей /16 — /9 — четыре нуля, для сетей /8 — /1 — шесть нулей. Таким образом 0a08000 должно превратиться в 0a0800, а c0a80400 в c0a804.
Таким образом первый маршрут должен выглядеть так:
16c0a804c0a8ba5cа второй так:
180a0800c0a8ba5eИтоговое значение будет (не забываем про 0x вначале):
0x16c0a804c0a8ba5c180a0800c0a8ba5eДобавим опции командами:
ip dhcp-server option
add name="my route" code=121 value="0x16c0a804c0a8ba5c180a0800c0a8ba5e"
add name="my win route" code=249 value="0x16c0a804c0a8ba5c180a0800c0a8ba5e"
или через графический интерфейс:
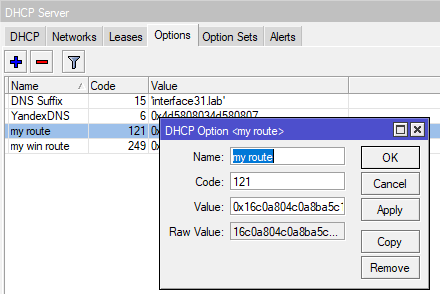 Обновим параметры DHCP и проверим таблицы маршрутизации на клиентах. Windows-клиент:
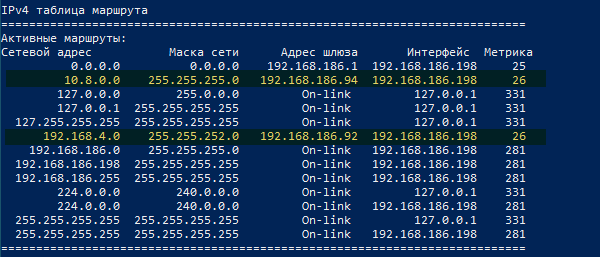 Linux-клиент:
 Как видим — все работает, маршруты добавились и еще одной заботой у администратора стало меньше.
В заключение хочется добавить, что данная статья не должна рассматриваться вами как догма, все пункты которой требуется обязательно применить. Данный материал имеет цель показать те скрытые возможности привычных сервисов, которые обычно не затрагиваются в руководствах по базовой настройке. После чего уже сам администратор должен решать, что он будет применять в своей сети и зачем. К сожалению, объем статьи не позволяет нам охватить все возможности DHCP, что-то из них мы отразим в будущих статьях, а что-то вам придется изучать самостоятельно. Но надеемся, что данный материал окажется вам полезен и даст дополнительный стимул к изучению всех возможностей используемых протоколов.
Научиться настраивать MikroTik с нуля или систематизировать уже имеющиеся знания можно на углубленном курсе по администрированию MikroTik. Автор курса, сертифицированный тренер MikroTik Дмитрий Скоромнов, лично проверяет лабораторные работы и контролирует прогресс каждого своего студента. В три раза больше информации, чем в вендорской программе MTCNA, более 20 часов практики и доступ навсегда.