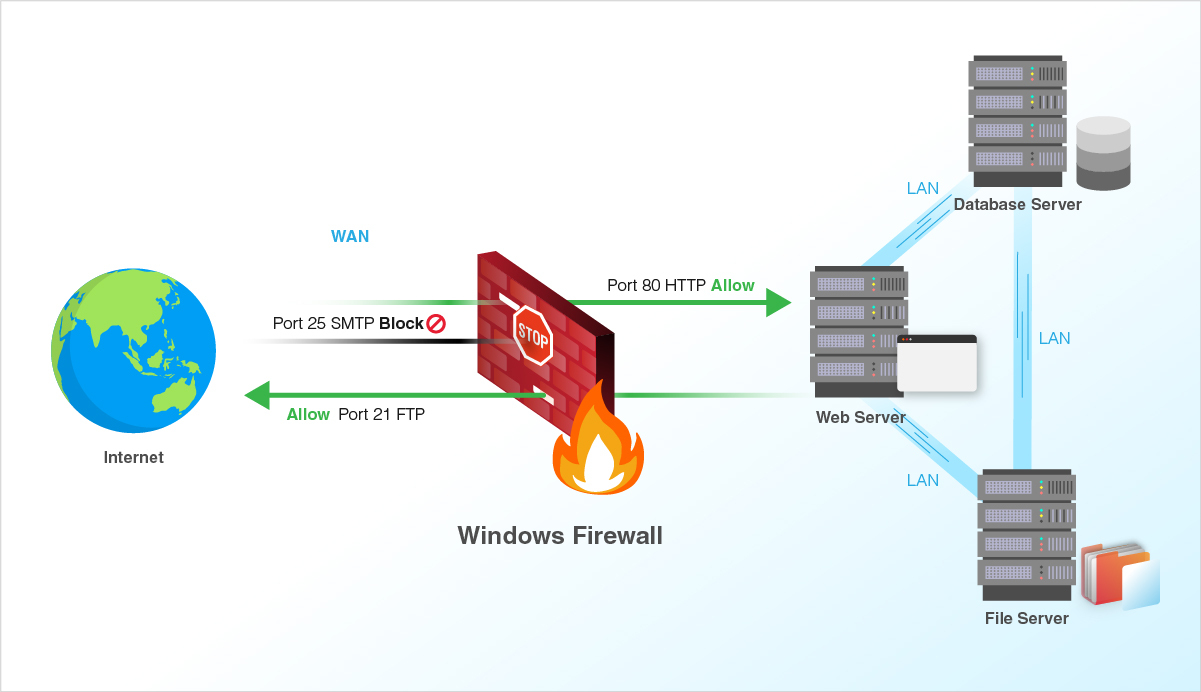
Windows Server 2019 contains a firewall program called Windows Defender Firewall with Advanced Security. The firewall filters incoming and outgoing traffic on your Windows Server 2019 instance to safeguard it from common network attacks. By default, the firewall is configured to allow access to all pre-installed system programs.
However, several programs may use multiple different ports for operation, and these will be automatically blocked because they don’t match with the rules in your firewall configuration. In this case, you need to open the specific port on Windows Server.
Prerequisites
-
Deploy a Windows Server 2019 Instance on Vultr
-
A Remote Desktop Connection App
Establish a connection to your server by logging in through any remote desktop app or click the console on your Vultr dashboard to access your server. After you connect you can start configuring your Windows server 2019 firewall rules.
By default, Windows Defender Firewall is turned on, but in any case, you should confirm the current status and turn on firewall. To do this, click the tools node under server manager and select Windows Defender Firewall with Advanced Security from the drop down list.

From the open group policy management window, check the current status of Windows Firewall profiles if it is set to ON; otherwise, click the Windows Defender Firewall properties option and turn the service on per profile.

Firewall Rules
Windows Firewall rules allow you to either permit or block specific incoming and outgoing network packets on your server. You can choose multiple parameters for each inbound or outbound rule. A rule can consist of a TCP or UDP port, program name, service, or a protocol to filter for every server profile.
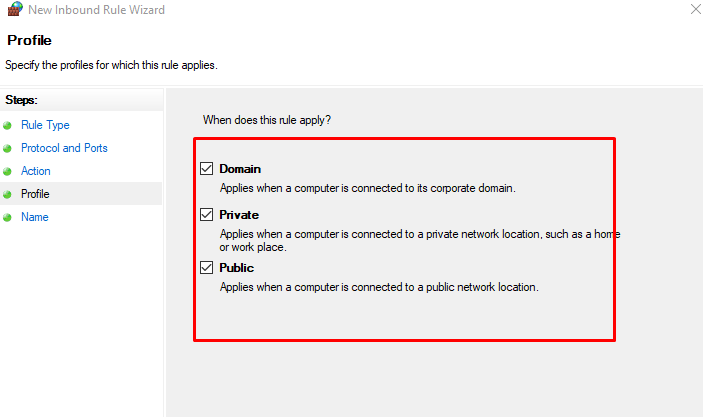
Windows server profiles are grouped into, Domain, Private and Public. Domain represents your server’s connection to a corporate domain network, Private applies to your home or workplace network connection, and Public represents non-secure public network locations.
Open an Inbound Port (Incoming connections)
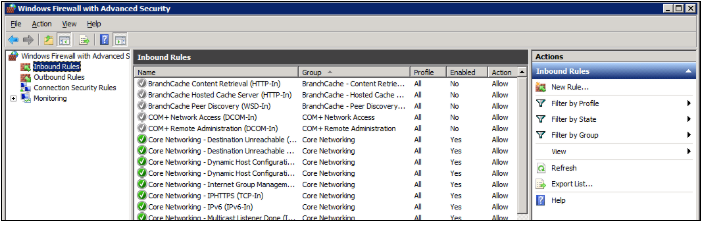
Launch windows defender firewall from the tools sub-menu under server manager. Then, select Inbound Rules on the left panel of the Firewall console.
A list of current rules will be displayed. Now, on the left Inbound Rules sub-menu under actions, click New Rule.

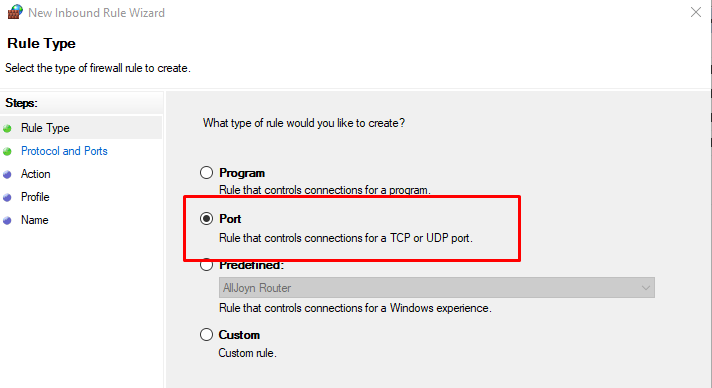
Select Port as the rule type in the rule wizard and click Next.

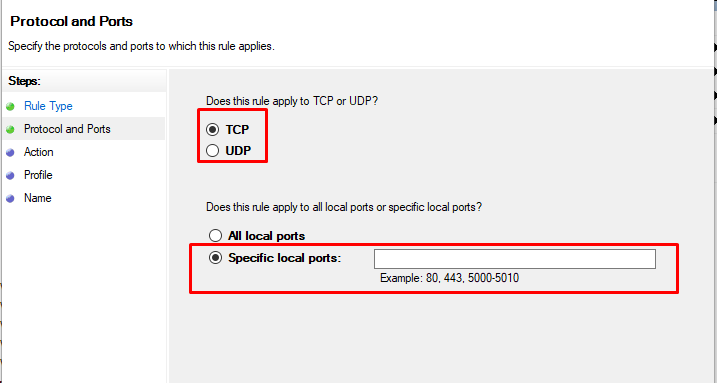
Now, choose whether the new rule applies to a TCP or UDP port on your server. Then, select specific ports and enter your target port number, you can enter a ports range, or multiple ports separated by - and , respectively, then click Next.

Define your TCP or UDP port rule.

-
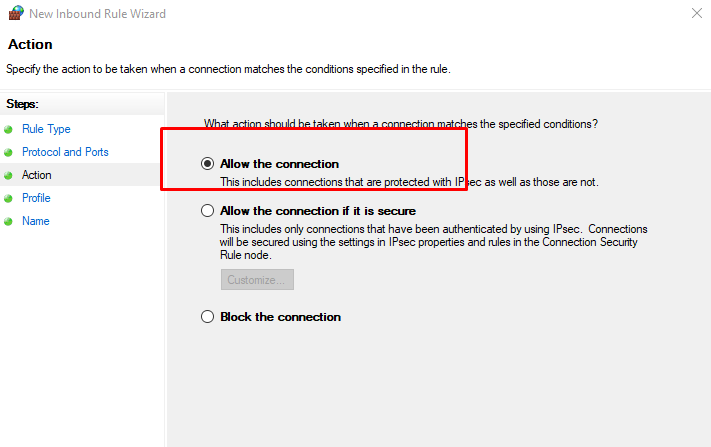
Allow the connectionwill allow incoming connections to the specified server port -
Allow the connection if it is securewill authenticate with IP security and either deny or allow the connection. For example,httpsconnections will be allowed andhttpblocked. -
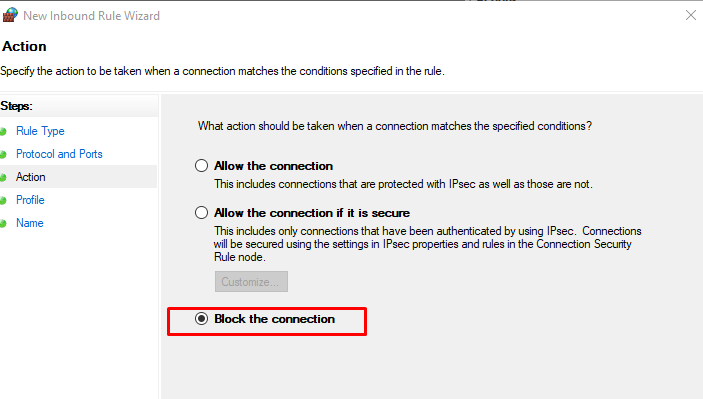
Block the connectionwill block all incoming connections to your server through the specified port
In this case, choose Allow the connection to open the port.
Click Next to assign the new rule to one or more profiles. You can select between Domain, Private, and Public, or choose all to apply the firewall rule on multiple profiles.
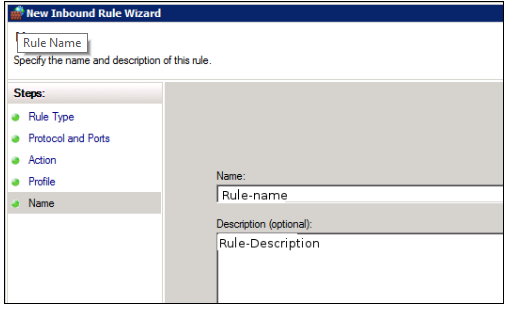
Next, give your new firewall rule a custom name and description for easy identification. Then, Click finish to enable the new rule. Your new Inbound (Incoming) port rule will be enabled, and all connections to the server that match the port will be accepted.
Open an Outbound Port (Outgoing connection)
From the Windows Defender Firewall console, click Outbound Rules on the left pane, and a list of available outgoing connection rules will be displayed.
Now, click New Rule on the right pane under the outbound rules node.
In the new outbound rule wizard, select Port as the rule type and click Next.

Now, let’s choose whether the new rule applies to a TCP or UDP port. Then, select specific remote ports and enter the target server port number; you can enter a range of ports, a single port, or multiple different ports you intend to open.

Next, on the Action page, select Allow the connection, then click next to select the server profile on which the rule should be enabled.
Give the new outbound rule a name and description that uniquely describes it. Then, click Finish to enable the outbound rule for the target port to be open on all selected server profiles.

Open a Port through Windows PowerShell
From the Windows start menu, open PowerShell. Then, edit the following command and replace it with your settings.
New-NetFirewallRule -Enabled:True -LocalPort 21 -Protocol TCP -Direction Inbound -Profile Domain -Action Allow -DisplayName example opening a port rule"
-
New-NetFirewallRuleCreates a new Firewall rule. -
EnabledThis enables the new rule, by default, it will be set to True. -
LocalPortYour target port number. -
ProtocolSpecifies the protocol associated with your port number. -
DirectionSets your target direction to either Inbound (Incoming) or Outbound (Outgoing). -
ProfileAssigns the new rule to a server profile; you can choose domain, private, or public. -
Actiondefines the state for the new firewall rule, enter allow. -
DisplayNamesets a custom name for the new firewall rule
Your Output should be similar to the one below.
PS C:\Users\Administrator> New-NetFirewallRule  -Enabled:True  -LocalPort 21  -Protocol TCP  -Direction Inbound  -Profile Domain  -Action Allow  -DisplayName "example opening a port rule"


Name                  : {427a1b12-ece6-4d54-847d-de482b227c6c}

DisplayName           : example opening a port rule

Description           :

DisplayGroup          :

Group                 :

Enabled               : True

Profile               : Domain

Platform              : {}

Direction             : Inbound

Action                : Allow

EdgeTraversalPolicy   : Block

LooseSourceMapping    : False

LocalOnlyMapping      : False

Owner                 :

PrimaryStatus         : OK

Status                : The rule was parsed successfully from the store. (65536)

EnforcementStatus     : NotApplicable

PolicyStoreSource     : PersistentStore

PolicyStoreSourceType : Local
Congratulations, you just opened a network port on your Windows Server 2019. The server will accept incoming and outgoing connections through the selected ports, but the firewall will block connections from a profile that doesn’t match the port rule.
Firewall is an integral part of any system and can be used to protect a server against unauthenticated access from the outside world. It helps to prevent hackers from logging into servers on the network. Firewall can also be used to set up specific rules in-order to restrict access to specific ports of the system based on IP address.
The basic functionality of a firewall is to control the incoming and outgoing traffic and choose whether to block a particular connection or let it through based on the defined set of security rules.
We can use the below steps for managing Windows firewall settings.
-
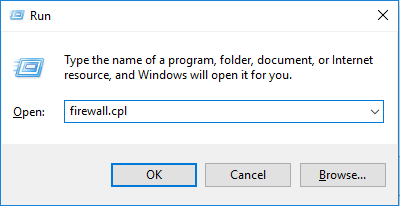
Log in to the Windows server and open Firewall using any of the command
firewall.cplorWindows Firewallusing Search bar.
-
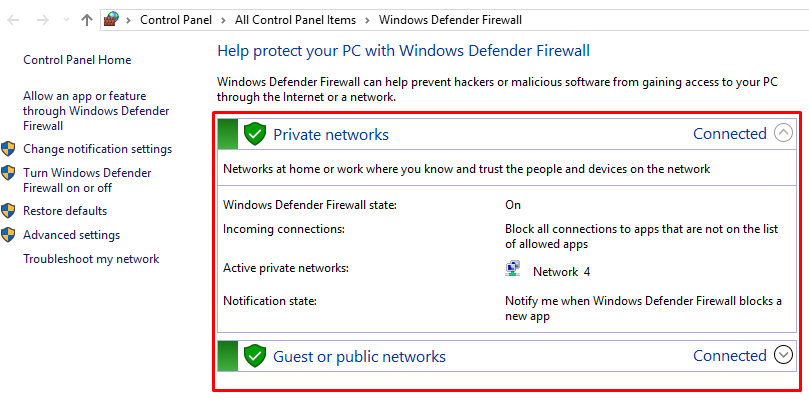
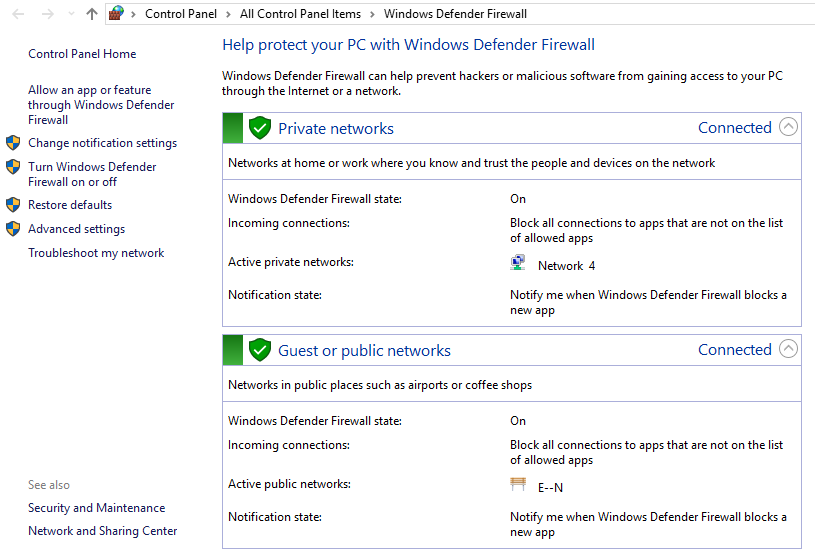
Under firewall settings, there are two sections called «Private networks» and «Guest or public networks» with green shields to the left of them, which say that the firewall is
active. If they are on red shields, then the firewall isdisabled. -
Click on either of these sections, it will prompt a drop-down menu with details about the current public or private networks.
-
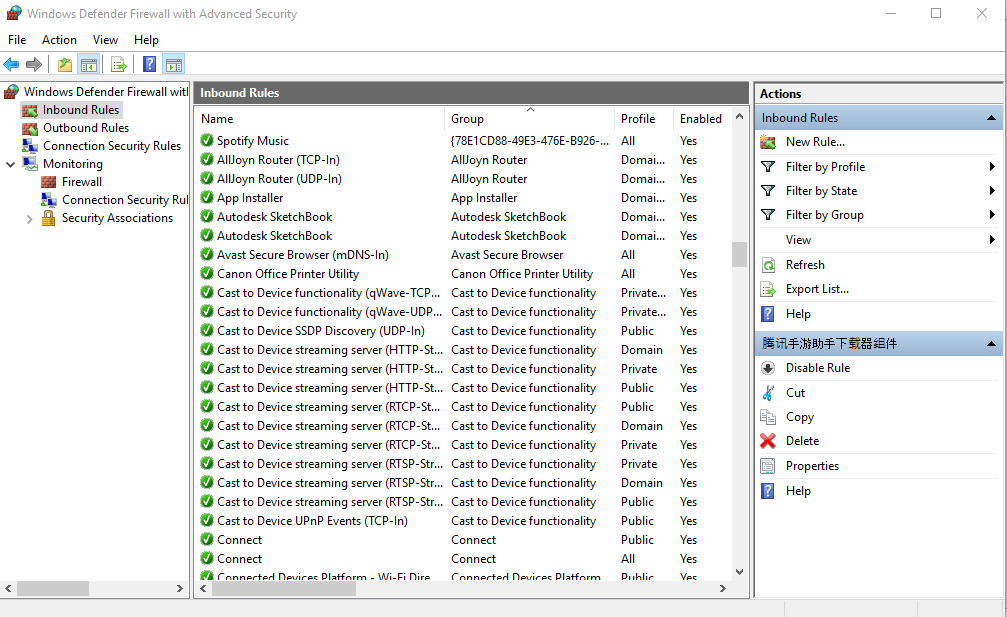
Select the
Advanced Settingsoption from the left of the main menu, then you can manage and change the firewall’s advanced settings menu.
-
Inbound Rules : Which incoming connections are automatically allowed.
-
Outbound Rules : Which outgoing connections are automatically allowed.
-
Connection Security Rules : Baselines for which connections your computer will allow and which ones it will block.
-
Monitoring : This is an overview of your firewall’s basic monitoring guidelines.
-
Go to Control Panel, System and Security and Windows Firewall.
-
Select
Advanced settingsand highlightInbound Rulesin the left pane. -
Right-click
Inbound Rulesand selectNew Rule. -
Add the
portyou need to open and clickNext. -
Select the
protocol (TCP or UDP)and add theport numberand clickNext. -
Select
Type of connectionas per your need in the next window and clickNext.
-
Open Port: Select
Allow the connectionto open a Port. -
Block Port: Select
Block the connectionto block a Port.
-
Select the
network typeand clickNext. -
Name the rulesomething relates to the setting and clickFinish.
-
Go to Control Panel, System and Security and Windows Firewall.
-
Select
Advanced settingsand highlightInbound Rulesin the left pane. -
Right-click the rule you want to configure, and then choose
Properties.Here you may need to select the Rule wisely as below:


-
Allow Particular Network : Create a Firewall rule to Allow a port and use that rule’s properties to edit scope.
-
Block Particular Network : Create a Firewall rule to Block a port and use that rule’s properties to edit scope.
-
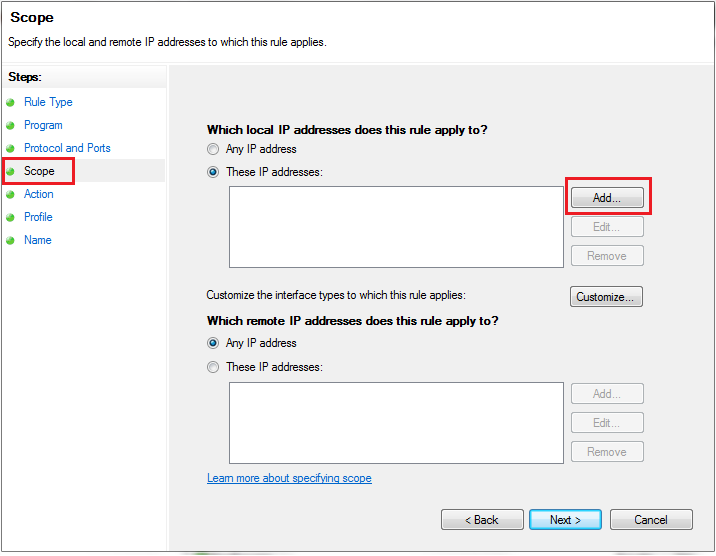
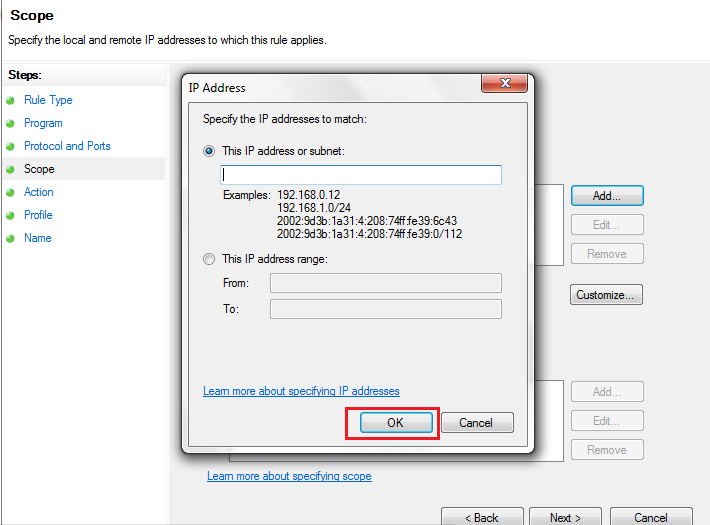
Click the
Scopetab. In the Remote IP Address group, selectThese IP Addresses. -
Select one of the following two options, and then click
OK.a. This IP Address or Subnet Type an IP address (such as 192.168.0.12) or a subnet using Classless Inter-Domain Routing (CIDR) notation (such as 192.168.0.0/24) that should be allowed for the firewall rule.
b. This IP Address Range Using the From and To boxes, type the first and last IP address that should be allowed to use the firewall rule and then click OK.
Related Feature on LayerPanel
- Firewall Overview
Related Tutorials
-
Basic Firewall Information and Rule Setting
-
Setting up Windows Firewall with Advanced Security on Windows Servers 2022
-
Setting up Windows Firewall for your Windows Cloud Servers 2016
-
Installing Telnet Client on Linux and Windows Cloud Servers
-
How to check if TCP / UDP port is open on Linux & Windows Cloud Servers
-
How to Enable & Disable Ping (ICMP Echo Requests) in Windows Server 2022 Firewall
-
How to Enable & Disable Ping (ICMP Echo Requests) in Windows Server 2019 Firewall
-
How to Enable & Disable Ping (ICMP Echo Requests) from IPTables on Linux Cloud Servers
-
Firewall Configuration using Iptables on Ubuntu 14.04
-
How to set up & configure firewall using FirewallD for CentOS 8
-
How to set up & configure Ubuntu Firewall (UFW) for Ubuntu 18
-
How to test Firewall Configuration with Nmap on Linux Cloud Servers
— Advertisement —
Hello! One of the protection mechanisms of the server is the implementation of the Firewall. Although there are third party options, Microsoft offers a Firewall integrated into the operating system. It is very efficient and highly configurable. Additionally, it can allow or block connections or redirect connection requests. Also, by customizing the rules it is possible to allow only authorized communications. On the other hand, port management is vital within the Firewall. Since they allow communication between the server and the external network. In fact, the vast majority of attacks are carried out through these ports. For this reason, the Firewall blocks most of the ports. However, it is occasionally necessary for an app to have access to one. In this case, the administrator must authorize the program’s access to the required port. So let’s see how to open a firewall port in Windows Server 2019/2016.
How to open the firewall port using the advanced settings.
In the first place it is necessary to enter the Control Panel and follow the next path:
- System and security
- Windows Defender Firewall
- Advanced Settings

The advanced settings of the Windows Firewall are immediately displayed. There are the entry and exit rules plus the security rules for connections. Finally, there are the firewall supervision options.

Clicking on the input rules will display the pre-configured Windows Server rules. As the name implies, they are related to incoming network connections and packets. Also, some rules are not activated by default. Therefore, you just need to double-click on them and then enable them.

Creating a new rule in the Windows Server Firewall.
By right-clicking on inboud rules, you can create a new rule.

There are several options for the creation of the rule. However, you should only select Port. Press Next to continue

Now it’s time to set your connection preferences:
- TCP: It is a connection-oriented protocol. In other words, its function is to create connections with the aim of sending data flow.
- UDP: It is a non connection-oriented protocol. Consequently, its development is based on the exchange of data grams.
On the other hand, it is possible to enable all ports for connection. This is obviously an unsecured option. Or you can configure specific ports.

Now it is time to determine what action the new rule will take:
- Allow connection through the port.
- Allow connection if secure. That is, allow data to be transmitted only if the connection is authenticated through Ipsec.
- Block connection through the port.

Please select the option corresponding to Allow connection and press Next. Now it is time to determine which profiles the new rule will be applied to.

Finally, you can assign a name and description to the new rule. This way it is easier to locate it later.

Back to the previous screen, you can see the new rule created.

Ultimately we have seen how to open a firewall port in Windows Server 2019/2016. In addition, the tutorial also serves to block a specific port. This way, the administrator can increase the functionality of the Firewall. All right, that’s it for now. Greetings!
Introduction
Firewalls are a critical component of securing modern networks with internet access. Without firewalls in place, malicious actors could easily access and infect devices on a network. Properly configured firewalls substantially reduce undesirable communications.
This article explains how to create firewall rules using the Windows Firewall with Advanced Security console and Windows PowerShell on Windows Server 2016 / 2019 / 2022.
What is a Firewall?
A firewall controls the flow of data packets in and out of a network. It acts like a barrier, similar to how a physical firewall prevents the spread of fire between compartments. The firewall allows or blocks connections according to configured firewall rules.
Computers behind a firewall cannot receive data until it passes the filters. This greatly enhances security and reduces unauthorized access risks. Benefits of firewalls:
- Protect devices by blocking undesired traffic
- Notify administrators of connection attempts
- Log activity for monitoring
- Prevent spread of infections
- Reduce hacking risks
How Windows Server 2016 / 2019 / 2022 Firewalls Work
The Windows firewall acts as a barrier between local network devices and external networks. When a connection is attempted to a server, the firewall intercepts the traffic and evaluates it against the defined rules.
Only network packets that match the configured rules are allowed through. For example, a rule could allow TCP traffic on port 80 while blocking other ports. Carefully configured rules optimize security while allowing desired connections.
Windows provides inbound rules to control incoming traffic and outbound rules to filter outgoing traffic. Rules can be tailored for each network profile.
Windows Firewall with Advanced Security
Windows Firewall with Advanced Security provides the management interface for configuring Windows firewall settings. It comes built-in to Windows Server without needing additional licensing or hardware.
There are three default firewall profiles:
- Domain – For corporate networks with detected domain controllers
- Private – For home or office networks behind a gateway device
- Public – For untrusted public networks with internet access
Profiles allow custom rules per network type. You can enable, disable, or configure profiles independently.
Accessing the Firewall Console
To open the Windows Firewall with Advanced Security console:
- Open Server Manager > Tools > Windows Firewall with Advanced Security
- Search for “firewall” in the Start menu and launch the Windows Firewall shortcut
- Run wf.msc in the Run command (Win + R)
The left menu allows configuring inbound rules, outbound rules, connection security, and monitoring.
Configuring Firewall Rules
Firewall rules control whether to allow or block specific network connections. Rules can filter by:
- Program path
- Port and protocol
- Predefined service
- Source/destination IP
- Network interface
- And more…
Follow these steps to create an inbound firewall rule:
1. Open the Firewall console and select Inbound Rules
2. Click New Rule to launch the rule wizard
3. Select the rule type – Program, Port, Predefined, or Custom
4. Choose All Programs or a Program path
5. Choose Action (allow or block) or allow if connection is secured
6. Choose profiles
7. Name the rule and click Finish
Repeat the wizard for outbound rules. Once created, rules can be edited or disabled from the console.
Rules can also be created from PowerShell. For example:
PS C:\Users\Administrator> New-NetFirewallRule -DisplayName "Allow SSH" -Enabled True -Direction Inbound -Action Allow -Protocol TCP -LocalPort 22Monitor active connections under the Monitoring tab.
Conclusion
The Windows Firewall provides a flexible and granular rule-based firewall solution for Windows Server 2016, 2019 and 2022. The advanced interface allows creating detailed rules to filter incoming and outgoing traffic as needed. Monitor activity to verify your rules are working correctly. Careful configuration enhances security while allowing desired connections.
In this article, we want to teach you How To Open a Firewall Port on Windows Server 2019.
A firewall is a network security device that monitors incoming and outgoing network traffic and permits or blocks data packets based on a set of security rules.
Its purpose is to establish a barrier between your internal network and incoming traffic from external sources (such as the internet) in order to block malicious traffic like viruses and hackers.
Firewalls carefully analyze incoming traffic based on pre-established rules and filter traffic coming from unsecured or suspicious sources to prevent attacks.
Most Internet applications and services have well-known ports on which machines ‘listen’ for communications.
- How To Open a Firewall Port on Windows Server 2019
How To Open a Firewall Port on Windows Server 2019
You can follow the steps below to open a Firewall port on your Windows server.
Note: This guide applies to Windows Server 2016 too.
First, you need to open your control panel. Then, follow the path below to open the Advanced settings:
System and security > Windows Defender Firewall > Advanced Settings
At the Windows Defender Advanced settings window, click on the inbound rules. And, on the top right of the window click on the New Rule to open a firewall port.
Here a New Inbound Rule Wizard will open. You need to check the box next to the port and click on the Next button.
At this point, you need to check the box next to the TCP. And in the specific local ports, enter the desired port that you want to open on your Windows server.
Next, you need to allow connections for the firewall port on the Windows server and click on the Next button.
Now depending on what you desire, you need to apply the new rule.
You can either choose “Domain, Private, or Public“. Press Next after that.
In the next window, enter the name of the rule and a description if you want. Then, press the Finish.
You can back to the Windows Defender Firewall Advanced settings window and you will see the new rule is created.
Conclusion
At this point, you learn to Open a Firewall Port on Windows Server 2019.
Hope you enjoy it.